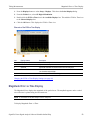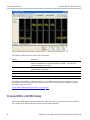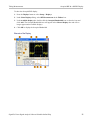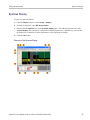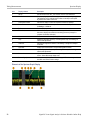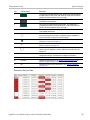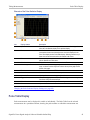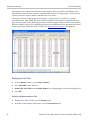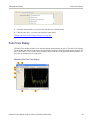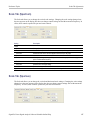
1
xx
ZZZ
SignalVu
Vector Signal Analysis Software
Printable Online Help
*P077022500*
077-0225-00
ZZZ
SignalVu
Vector Signal Analysis Software
Printable Online Help
www.tektronix.com
077-0225-00
Copyright © Tektronix. All rights reserved. Licensed software products are owned by Tektronix or its
subsidiaries or suppliers, and are protected by national copyright laws and international treaty provisions.
Tektronix products are covered by U.S. and foreign patents, issued and pending. Information in this
publication supersedes that in all previously published material. Specifications and price change privileges
reserved.
TEKTRONIX and TEK are registered trademarks of Tektronix, Inc.
Compiled Help part number 076-0177-00
Help version: 1.01
Contacting Tektronix
Tektronix, Inc.
14200 SW Karl Braun Drive
P.O. Box 500
Beaverton, OR 97077
USA
For product information, sales, service, and technical support:
In North America, call 1-800-833-9200.
Worldwide, visit www.tektronix.com to find contacts in your area.
Table of Contents
Table of Contents
Welcome
Welcome .............................................................................................................
1
About Your Instrument
Product Description ................................................................................................
Product Software ...................................................................................................
Options
Options..........................................................................................................
Documentation and Support
Documentation .................................................................................................
3
3
4
4
Connecting Signals
Connecting Signals and Selecting the Analysis Channel.......................................................
5
Taking Measurements
Measurements.......................................................................................................
Saving and Recalling Data ........................................................................................
General Signal Viewing
Amplitude vs. Time Display ................................................................................
Frequency vs. Time Display.................................................................................
Phase vs. Time Display ......................................................................................
RF I & Q vs. Time Display ..................................................................................
Spectrogram Display .........................................................................................
Spectrum Display .............................................................................................
Time Overview................................................................................................
GP Digital Modulation
Constellation Display.........................................................................................
EVM vs.Time Display........................................................................................
Magnitude Error vs.Time Display ..........................................................................
Phase Error vs.Time Display ................................................................................
Signal Quality Display .......................................................................................
Symbol Table Display ........................................................................................
RF Measurements
CCDF Display.................................................................................................
Channel Power and ACPR (Adjacent Channel Power Ratio) Display..................................
MCPR (Multiple Carrier Power Ratio) Display ...........................................................
Occupied BW & x dB BW Display.........................................................................
Spurious Display..............................................................................................
SignalVu Vector Signal Analysis Software Printable Online Help
7
9
11
12
13
15
16
18
19
21
22
23
25
26
27
28
29
32
34
37
i
Table of Contents
Pulsed RF
Pulse Statistics Display.......................................................................................
Pulse Table Display...........................................................................................
Pulse Trace Display...........................................................................................
Using Markers
Define Markers Control Panel...............................................................................
Using Markers.................................................................................................
Using Markers in Noise Mode ..............................................................................
40
41
43
44
46
48
Reference
Operating Your Instrument
Touch-screen Actions ........................................................................................
Elements of the Display......................................................................................
Data File Formats .............................................................................................
Error and Information Messages ............................................................................
Menus
Menu Overview ...............................................................................................
File Menu
File Menu .................................................................................................
Recall......................................................................................................
Save / Save As... .........................................................................................
Print........................................................................................................
Print Preview .............................................................................................
Application Presets ......................................................................................
Preset ......................................................................................................
View Menu
View Menu ...............................................................................................
Full Screen................................................................................................
Marker Toolbar...........................................................................................
Status Bar .................................................................................................
Run Menu
Run Menu.................................................................................................
Run ........................................................................................................
Resume....................................................................................................
Abort ......................................................................................................
Replay .....................................................................................................
Menu Bar: Run > Replay... ........................................................................
Single Sequence..........................................................................................
Continuous Acquisition Mode..........................................................................
Markers Menu
Markers Menu ............................................................................................
Setup Menu
ii
51
53
56
59
66
67
67
68
69
69
70
72
73
73
73
74
75
75
76
76
76
76
76
77
77
SignalVu Vector Signal Analysis Software Printable Online Help
Table of Contents
Setup Menu ...............................................................................................
Displays ...................................................................................................
Preset ......................................................................................................
Tools Menu
Tools Menu ...............................................................................................
Options Settings..........................................................................................
Window Menu
Window Menu............................................................................................
Help Menu
Help Menu ................................................................................................
Changing Settings
Settings.........................................................................................................
Acquire Control Panel........................................................................................
Amplitude vs. Time Display Settings ......................................................................
Analysis Settings..............................................................................................
CCDF Display Settings ......................................................................................
Channel Power and ACPR Settings ........................................................................
Constellation Display Settings ..............................................................................
EVM vs.Time Display Settings .............................................................................
Frequency vs.Time Settings .................................................................................
Magnitude Error vs.Time Settings ..........................................................................
MCPR Display Settings ......................................................................................
Occupied Bandwidth Display Settings .....................................................................
Phase Error vs.Time Settings ................................................................................
Phase vs.Time Display Settings .............................................................................
Pulse Statistics Display Settings ............................................................................
Pulse Table Display Settings ................................................................................
Pulse Trace Display Settings ................................................................................
Restoring Default Settings ...................................................................................
RF I & Q vs. Time Settings..................................................................................
Search (Limits Testing) Settings ............................................................................
Signal Quality Settings .......................................................................................
Spectrum Display Settings...................................................................................
Spectrogram Display Settings ...............................................................................
Spurious Display Settings....................................................................................
Symbol Table Display Settings..............................................................................
Time Overview Display Settings............................................................................
77
77
78
78
78
79
79
80
81
82
82
83
83
84
84
85
85
86
86
87
87
88
88
88
89
89
89
90
90
91
91
92
92
Reference Topics
About the Vector Signal Analysis Software ....................................................................
Actions Tab.........................................................................................................
Adjacent Channel Leakage Power Ratio........................................................................
SignalVu Vector Signal Analysis Software Printable Online Help
93
94
95
iii
Table of Contents
Adjacent Channel Power..........................................................................................
Advanced Params Tab.............................................................................................
Analysis Time Tab (Analysis Control Panel)...................................................................
Analysis Time Tab (GP Digital Modulation) ...................................................................
Average Channel Power (Pulsed RF Displays).................................................................
Average ON Power (Pulsed RF Displays) ......................................................................
BW Tab .............................................................................................................
BW Tab (Amplitude vs.Time Display)........................................................................
Carrier Feedthrough Measurement ............................................................................
CCDF - Complimentary Cumulative Distribution Function ................................................
Channels Tab (ACPR)...........................................................................................
Channels Tab (MCPR) ..........................................................................................
Channel Power ...................................................................................................
Common Information Messages ...............................................................................
Data Properties...................................................................................................
Define Tab (Search) .............................................................................................
Define Tab (Pulsed RF) .........................................................................................
Displaying the Windows Event Viewer .......................................................................
Droop Measurement (Pulsed RF Display) ....................................................................
Duty Factor (%) Measurement (Pulsed RF) ..................................................................
Duty Factor (Ratio) Measurement (Pulsed RF) ..............................................................
EVM (Error Vector Magnitude) Measurement ...............................................................
Fall Time Measurement (Pulsed RF Display) ................................................................
Find Tab (GP Digital Modulation).............................................................................
Freq & RBW Tab (RF Measurements) ........................................................................
Freq & Span Tab.................................................................................................
Freq Estimation Tab .............................................................................................
Frequency Deviation Measurement ...........................................................................
Frequency Error Measurement .................................................................................
Frequency Tab ...................................................................................................
Gain Imbalance Measurement..................................................................................
IQ Origin Offset Measurement.................................................................................
IQ Sampling Parameters ........................................................................................
Levels Tab ........................................................................................................
Limits Tab (Spurious Display) .................................................................................
Magnitude Error Measurement.................................................................................
Marker to Center Frequency....................................................................................
Maximum Frequency Error Measurement ....................................................................
Maximum Phase Error Measurement .........................................................................
Measurements Tab...............................................................................................
Measurement Params............................................................................................
Modulation Tab ..................................................................................................
iv
95
95
96
97
98
98
98
100
100
100
101
102
104
105
106
106
110
110
112
112
112
113
113
113
114
115
115
117
117
117
117
117
118
118
119
121
121
121
122
122
122
123
SignalVu Vector Signal Analysis Software Printable Online Help
Table of Contents
Multiple Carrier Power Ratio ..................................................................................
Next Peak (Markers menu) .....................................................................................
Online Help ......................................................................................................
Parameters Tab (CCDF Display)...............................................................................
Parameters Tab (Occupied BW) ...............................................................................
Parameters Tab (Spurious)......................................................................................
Params Tab (Pulsed RF) ........................................................................................
Peak (Markers Menu) ...........................................................................................
Peak/Average Ratio (Pk/Avg) Measurement (CCDF Display) .............................................
Peak Power Measurement (Pulsed RF Display)..............................................................
Phase Deviation Measurement .................................................................................
Phase Error Measurement ......................................................................................
Prefs Tab..........................................................................................................
Prefs Tab (Spectrum) ............................................................................................
Prefs Tab (Spurious).............................................................................................
Pulse-to-Pulse Frequency Difference..........................................................................
Pulse-to-Pulse Carrier Phase Measurement...................................................................
Pulse Width Measurement ......................................................................................
Quadrature Error Measurement ................................................................................
Ranges Tab (Spurious) ..........................................................................................
Reference Tab (Spurious).......................................................................................
Repeat.............................................................................................................
Repetition Interval Measurement ..............................................................................
Repetition Rate Measurement ..................................................................................
RF Channel Power Measurement ..............................................................................
Rho Measurement ...............................................................................................
Ripple .............................................................................................................
Ripple Measurement (Pulsed RF Displays)...................................................................
Rise Time Measurement (Pulsed RF Displays) ..............................................................
RMS Frequency Error Measurement ..........................................................................
RMS Phase Error Measurement ...............................................................................
Scale Tab (Amplitude vs.Time) ................................................................................
Scale Tab (EVM / Magnitude Error vs.Time) ................................................................
Scale Tab (Frequency vs.Time) ................................................................................
Scale Tab (Phase Error vs.Time)...............................................................................
Scale Tab (Phase vs.Time)......................................................................................
Scale Tab (Pulse Statistics) .....................................................................................
Scale Tab (Pulse Trace) .........................................................................................
Scale Tab (RF I & Q vs.Time) .................................................................................
Scale Tab (RF Measurements) .................................................................................
Scale Tab (Spectrogram Display) ..............................................................................
Scale Tab (Spectrum) ...........................................................................................
SignalVu Vector Signal Analysis Software Printable Online Help
125
125
126
126
127
127
128
129
129
129
130
130
130
130
131
131
132
132
132
132
134
137
137
137
137
138
138
138
138
139
139
139
140
140
141
142
143
143
144
145
146
147
v
Table of Contents
Scale Tab (Spurious) ............................................................................................
Scale Tab (Time Overview) ....................................................................................
Scope Data .......................................................................................................
Scope Settings....................................................................................................
Show Pulse Definition ..........................................................................................
Spectrum Time Tab..............................................................................................
Time Measurement ..............................................................................................
Trace Tab (Constellation Display) .............................................................................
Trace Tab (Frequency vs.Time) ................................................................................
Trace Tab (Spectrogram Display)..............................................................................
Trace Tab (Spurious) ............................................................................................
Trace Tab (RF I & Q vs.Time) .................................................................................
Traces Tab (CCDF)..............................................................................................
Traces Tab (Amplitude vs.Time Display).....................................................................
Traces Tab (Error vs.Time Display) ...........................................................................
Traces Tab (Math Trace) ........................................................................................
Traces Tab (Spectrum Display) ................................................................................
Units Tab .........................................................................................................
Vertical............................................................................................................
147
148
149
149
150
150
150
151
151
153
155
156
158
159
161
162
162
165
165
Glossary
Accuracy..........................................................................................................
ACLR .............................................................................................................
ACPR Measurement.............................................................................................
Acquisition .......................................................................................................
Analysis Length..................................................................................................
Analysis Time....................................................................................................
ASK ...............................................................................................................
Block ..............................................................................................................
Calibrator .........................................................................................................
Carrier.............................................................................................................
Carrier Frequency ...............................................................................................
Carrier Signal ....................................................................................................
Carrier-to-Noise Ratio (C/N) ...................................................................................
CDMA ............................................................................................................
Center Frequency ................................................................................................
Check Mark Indicator ...........................................................................................
CISPR.............................................................................................................
CW ................................................................................................................
CW Signal ........................................................................................................
DANL.............................................................................................................
dBfs ...............................................................................................................
vi
167
167
167
167
167
167
168
168
168
168
168
168
168
169
169
169
169
169
169
169
170
SignalVu Vector Signal Analysis Software Printable Online Help
Table of Contents
dBm ...............................................................................................................
dBmV .............................................................................................................
dBuV ..............................................................................................................
Decibel............................................................................................................
Display Reference Level........................................................................................
Distortion .........................................................................................................
Dynamic Range ..................................................................................................
EVM ..............................................................................................................
Export .............................................................................................................
FastFrame ........................................................................................................
FFT ................................................................................................................
Filter...............................................................................................................
FM.................................................................................................................
Frame .............................................................................................................
Frequency ........................................................................................................
Frequency Band..................................................................................................
Frequency Domain View .......................................................................................
Frequency Drift ..................................................................................................
Frequency Mask Trigger ........................................................................................
Frequency Range ................................................................................................
Frequency Span ..................................................................................................
GPIB ..............................................................................................................
Graticule ..........................................................................................................
Grayed Out .......................................................................................................
I/Q .................................................................................................................
IF ..................................................................................................................
Import .............................................................................................................
Input Impedance .................................................................................................
LISN ..............................................................................................................
Local Oscillator (LO) ...........................................................................................
Marker ............................................................................................................
Max Hold .........................................................................................................
MCPR (Multiple Carrier Power Ratio)........................................................................
Min Hold .........................................................................................................
Modulate..........................................................................................................
Modulating Signal ...............................................................................................
Modulation .......................................................................................................
Noise ..............................................................................................................
Noise Bandwidth (NBW) .......................................................................................
Noise Floor .......................................................................................................
Occupied Bandwidth ............................................................................................
Open (Recall) ....................................................................................................
SignalVu Vector Signal Analysis Software Printable Online Help
170
170
170
170
170
170
171
171
171
171
171
171
171
172
172
172
172
172
172
172
173
173
173
173
173
173
173
174
174
174
174
174
174
175
175
175
175
175
175
175
176
176
vii
Table of Contents
OQPSK ...........................................................................................................
PM.................................................................................................................
Primary Marker ..................................................................................................
PSK ...............................................................................................................
QAM ..............................................................................................................
Real-Time Analysis .............................................................................................
Real-Time Bandwidth ...........................................................................................
Real-Time Seamless Capture...................................................................................
Reference Level..................................................................................................
Residual FM (Incidental FM) ..................................................................................
Residual Response...............................................................................................
RBW ..............................................................................................................
Secondary Marker ...............................................................................................
Sensitivity ........................................................................................................
Shape Factor (Skirt Selectivity)................................................................................
Signal .............................................................................................................
Span ...............................................................................................................
Span per Division (Span/Div) ..................................................................................
Spectrogram ......................................................................................................
Spectrum..........................................................................................................
Spectrum Analysis...............................................................................................
Spectrum Analyzer ..............................................................................................
Spectrum Time...................................................................................................
Spur ...............................................................................................................
Spurious Response ..............................................................................................
Time Reference ..................................................................................................
Trace ..............................................................................................................
Vector Signal Analyzer .........................................................................................
Vertical Scale Factor, Vertical Display Factor ................................................................
Violation ..........................................................................................................
176
176
176
176
176
177
177
177
177
177
177
177
178
178
178
178
178
178
179
179
179
179
179
179
180
180
180
180
180
180
Index
viii
SignalVu Vector Signal Analysis Software Printable Online Help
Welcome
Welcome
Welcome
This help provides in-depth information on how to use the SignalVu Vector Signal Analysis Software.
This online help is also available in a PDF format for printing.
NOTE. Most of the screen illustrations in this document are taken from the vector signal analysis software
version that runs on the RSA6100A Real-time Spectrum Analyzers. These instruments support additional
hardware-based functionality and buttons, such as Trig and Ampl, that are not present in the SignalVu
application.
SignalVu Vector Signal Analysis Software Printable Online Help
1
Welcome
2
Welcome
SignalVu Vector Signal Analysis Software Printable Online Help
About Your Instrument
Product Description
Product Description
SignalVu vector signal analysis software helps you easily validate wideband designs and characterize
wideband spectral events. By combining the signal analysis engine of the RSA6100A real-time spectrum
analyzer with that of the industry’s widest bandwidth digital oscilloscopes, designers can now evaluate
complex signals up to 20 GHz without the need of an external down converter. You get the functionality of
a vector signal analyzer, a spectrum analyzer and the powerful trigger capabilities of a digital oscilloscope,
all in a single package. Whether your design validation needs include wideband radar, high data rate
satellite links or frequency hopping communications, SignalVu vector signal analysis software can speed
your time-to-insight by showing you time variant behavior of these wideband signals.
Key Features
Tightly integrated software and hardware control allows you to easily switch between SignalVu and
oscilloscope user interfaces to optimize triggers and other acquisition parameters. Key features of
SignalVu include:
Direct observation of microwave signals to 20 GHz without an external down converter
All signals up to the analog bandwidth of oscilloscope are captured in memory
Customizable oscilloscope acquisition parameters for effective use of capture memory
Four channel acquisitions help you correlate independent RF events
Apply custom math and filtering to acquisition channels
Extensive time-correlated, multi-domain displays connect problems in time, frequency, phase and
amplitude for quicker understanding of cause and effect when troubleshooting
Power measurements and signal statistics help you characterize components and systems: ACLR,
Multi-Carrier ACLR, Power vs. Time, CCDF, OBW/EBW, and Spur Search
Advanced Signal Analysis Suite (Opt. SVP) provides automated pulse measurements including rise
time, pulse width and pulse-to-pulse phase provide deep insight into pulse train behavior
General Purpose Digital Modulation Analysis (Opt. SVM) provides vector signal analyzer
functionality
Tektronix OpenChoice® enables easy transfer to a variety of analysis programs such as Excel and
Matlab
Product Software
Occasionally new versions of software for your instrument may become available at our Web site. Visit
www.tektronix.com/software for information.
SignalVu Vector Signal Analysis Software Printable Online Help
3
About Your Instrument
Options
Options
To view a listing of the software options installed in your software, select Help > About Your Tektronix
Vector Signal Analysis Software.
Options can be added to your instrument. For the latest information on available option upgrades, see
the Tektronix Web site .
Documentation
In addition to the online help, the following documents are available:
SignalVu Reference (Tektronix part number 077-0224-XX). This document provides a brief overview
of the SignalVu software. It identifies elements of the SignalVu screen, elements of different displays
and includes a menu tree. The Reference Manual is provided as a printable PDF file.
SignalVu Programmer Manual (077-0223-XX). This document provides supplementary information
about the remote commands for the SignalVu software. The Programmer Manual is provided as a
printable PDF file. For detailed descriptions of the remote commands, see the RSA6100A Series
Real-Time Spectrum Analyzers Programmer Manual (071-1913-XX) and the DPO7000, DPO70000
and DSA70000 Series Digital Oscilloscopes Programmer Manual (077-0010-XX).
SignalVu Printable Help Document (PDF) (077-0225-XX). A PDF file version of the online help
that can easily be printed.
The SignalVu documentation PDFs are located on the Optional Applications Software for Windows-Based
Oscilloscopes DVD.
The most recent versions of the product documentation, in PDF format, can be downloaded from
www.tektronix.com/manuals. You can find the manuals by searching on the product name.
4
SignalVu Vector Signal Analysis Software Printable Online Help
Connecting Signals
Connecting Signals and Selecting the Analysis Channel
Connecting Signals and Selecting the Analysis Channel
SignalVu analyzes signals acquired by the oscilloscope. For information on the oscilloscope input signal
capabilities and how to trigger on a signal, see the oscilloscope online help. Note that SignalVu does
not control triggering on the oscilloscope; you will need to use the oscilloscope triggering functions to
achieve a stable, triggered signal on the oscilloscope.
The SignalVu software analyzes one channel at a time, so you need to specify which oscilloscope input
channel will be analyzed.
To specify which oscilloscope channel is analyzed:
1. Select Settings > Acquire to display the Acquire control panel.
2. Select the channel you want to analyze using the Channel drop-down list.
3. Use the oscilloscope functions to achieve a stable, triggered signal.
SignalVu Vector Signal Analysis Software Printable Online Help
5
Connecting Signals
6
Connecting Signals and Selecting the Analysis Channel
SignalVu Vector Signal Analysis Software Printable Online Help
Taking Measurements
Measurements
Measurements
The automatic measurements available include RF power measurements, digital modulation measurements,
and pulse measurements.
Power measurements
Measurement
Description
Channel Power
The total RF power in the selected channel (located in the ACPR display).
Adjacent Channel Power Ratio
Measure of the signal power leaking from the main channel into adjacent channels.
Multi-Carrier Power Ratio
The ratio of the signal power in the reference channel or group of channels to the power
in adjacent channels.
Peak/Avg Ratio
Ratio of the peak power in the transmitted signal to the average power in the transmitted
signal (located in the CCDF display).
CCDF
The Complementary Cumulative Distribution Function (CCDF). CCDF shows how much
time a signal spends at or above a given power level relative to the average power of
a measured signal.
xxx
Modulation measurements
Measurement
Description
EVM
The normalized RMS value of the error vector between the measured signal and the ideal
reference signal over the analysis length. The EVM is generally measured on symbol or
chip instants and can be reported in units of percent or dB. EVM is usually measured after
best-fit estimates of the frequency error and a fixed phase offset have been removed.
Phase Error
The RMS phase difference between the measured signal and the ideal reference signal.
Magnitude Error
The RMS magnitude difference between the measured signal and the ideal reference
signal.
IQ Origin Offset
The magnitude of the DC offset of the signal measured at the symbol times. It indicates
the magnitude of the carrier feed-through signal.
Gain Imbalance
The gain difference between the I and Q channels in the signal generation path.
Constellations with gain imbalance show a pattern with a width that is different from
height.
Rho ρ
The normalized correlated power of the measured signal and the ideal reference signal.
Like EVM, Rho is a measure of modulation quality. The value of Rho is less than 1 in all
practical cases and is equal to 1 for a perfect signal measured in a perfect receiver.
Frequency Error
The frequency difference between the measured carrier frequency of the signal and the
user-selected center frequency of the analyzer.
Quadrature Error
The orthogonal error between the I and Q channels. The error shows the phase
difference between I and Q channels away from the ideal 90 degrees expected from the
perfect I/Q modulation. Constellations with quadrature error will show some leakage of
I into Q and vice versa.
xxx
SignalVu Vector Signal Analysis Software Printable Online Help
7
Taking Measurements
Measurements
Pulse measurements
Measurement
8
Description
Average ON Power
The average power transmitted during pulse on.
Peak Power
Maximum power during pulse on.
Average Transmitted Power
The average power transmitted, including both the time the pulse is on and the time
it is off, and all transition times.
Pulse Width
The time from rising edge to falling edge at the 50% level. Level is user selectable
for Volts or Watts.
Rise Time
The time required for a signal to rise from 10% to 90% (or 20% to 80%) of its ON voltage
amplitude.
Fall Time
The time required for a signal to fall from 90% to 10% (or 80% to 20%) of its ON amplitude.
Repetition Interval
The time from a pulse rising edge to the next pulse rising edge.
Repetition Rate
The inverse of repetition interval.
Duty Factor (%)
The ratio of the width to the pulse period, expressed as a percentage.
Duty Factor (Ratio)
The ratio of the pulse width to the pulse period.
Ripple
The sum of the absolute positive maximum difference and the absolute negative
difference. See also Ripple (see page 138).
Droop
The slope of the straight-line best-fit representing the top of the pulse.
Pulse-Pulse Phase Difference
The phase difference between the selected pulse and the first pulse in the analysis
window.
Pulse-Pulse Freq Difference
The difference between the frequency of the current pulse and frequency of the previous
pulse. The instantaneous frequency is measured at a user-adjustable time following the
rising edge of each pulse.
RMS Freq Error
The RMS Frequency Error measurement is the RMS average of the Freq Error vs. Time
trace, computed over the Measurement Time.
Max Freq Error
The maximum frequency error is the difference between the measured carrier frequency
of the signal and the user-selected center frequency of the analyzer.
RMS Phase Error
The RMS Phase Error measurement is the RMS average of the Phase vs Time trace,
computed over the Measurement Time.
Max Phase Error
The phase is measured at each point during the pulse’s ON time. The phase error for
each point is the difference between the measured phase value and the calculated ideal
phase value. After the phase error is calculated for all points in the acquisition record,
the largest error in the positive direction and the largest in the negative direction are
determined. Whichever of these two values has the greater absolute value is designated
the Max Phase Error.
Freq Deviation
The Frequency Deviation measurement is the difference between the maximum and
minimum measured values of the signal frequency during the Measurement Time.
Phase Deviation
The Phase Deviation is the difference between the maximum and minimum Phase values
measured during the ON time of a pulse.
Time
This is the time in seconds relative to the time reference point in the first acquisition
record in the data set.
SignalVu Vector Signal Analysis Software Printable Online Help
Taking Measurements
Saving and Recalling Data
xxx
Saving and Recalling Data
You can save different types of data for later recall and analysis.
Data type
Description
Save as type
Setup files
Saves all of the setup information for
all displays, except those settings that
are not part of Preset.
Setup
Picture of Selected Display
(PNG/JPG/BMP)
Saves a capture of the screen in the
specified format. This option is useful
for including the graphic in reports or
other applications. Marker readouts
and other information are included.
Picture
Results Export files
Saves the trace and numeric data for
the selected display. The trace and
numeric data is saved as CSV files.
Results export
Measurement Settings
Saves a list of settings relevant to the
selected measurement to a text file.
This option is useful for including the
measurement settings in reports.
Measurement settings export (TXT)
Trace
Saves a trace for later recall back into
the display from which it was saved.
Selected trace
Data
Saves data for reanalysis later or as
data to use with external software
(either CSV (comma-separated value)
or MAT (MATLAB format).
Acquisition data with setup; or
Acquisition data export (CSV or MAT)
xxx
Saving Files
Saving files follows the same procedure regardless of the type of data being saved. To save setups
(including application presets), pictures, results, or acquisition data:
1. Select Save As. . . from the File menu to open the Save As dialog box.
2. Navigate to the folder where you want to save the setups, or use the default location.
To save setups so that they appear in the Application Presets window, save your setup in the
folder C:\SignalVu\Application Presets. The saved setup will appear in the Application Presets
window with the name you give the file.
3. Enter a file name.
4. Select the type of file to save from the Save as type drop-down list.
5. Click Save.
SignalVu Vector Signal Analysis Software Printable Online Help
9
Taking Measurements
Saving and Recalling Data
Recalling Files
You can recall three types of files: Setup files, Selected Trace, and Acquisition data with setup. Recalling
data follows the same procedure regardless of the type of data being recalled.
1. Select Recall. . . from the File menu to open the Open dialog box.
2. Navigate to the folder containing the file you want to recall.
3. Select the type of file to recall from the Files of type drop-down list. This selection determines the
files that appear in the Open dialog box.
4. Select the file to recall.
5. Click Open.
Setup Files
You can set up the instrument as desired and then save the settings in a setup file. This enables you to
quickly setup the instrument by recalling previously saved setups.
Exporting Results
Save for further analysis of results in other programs, such as MATLAB or Excel.
Pictures of the Selected Display
You can save pictures of the instrument display for documentation purposes. When saving pictures of
the display, you can select from three file types: BMP, JPG, or PNG.
Measurement Settings
You can save a list of settings relevant to the selected display to a file for documentation purposes. The
exported file uses tab characters to separate values. The settings included in the file depend on the selected
display. The contents of the file are the same as a Results export except it does not include the results.
Saving Acquisition Data with Setup
Save for later analysis with the analyzer. Saving the data with setup ensures the analysis parameters
are the same when the data is recalled.
Saving Acquisition Data Export in CSV Format
Save for examining results in other programs, such as MATLAB or Excel.
10
SignalVu Vector Signal Analysis Software Printable Online Help
Taking Measurements
Amplitude vs. Time Display
Amplitude vs. Time Display
The Amplitude vs. Time display plots the signal amplitude against time. The amplitude appears on the
vertical axis while time is plotted along the horizontal axis.
Note that the trace(s) in the Amplitude vs. Time display can be set to a maximum of 100,000 points
(however, the actual number of trace points can extend up to 1,000,000 points if Max trace points is set
to Never Decimate). If the Analysis Length includes more than the selected Max trace points value, the
trace is decimated (using the method specified with the Detection control) to be equal to or less than the
Max trace points setting (except when Max trace points is set to Never Decimate). This decimated (or
undecimated) trace is what is used for marker measurements and for results export. You can set the Max
trace points on the Settings > Prefs tab.
To show Amplitude vs.Time display:
1. Press the Displays button or select Setup > Displays.
2. In the Select Displays dialog, select General Signal Viewing in the Folders box.
3. In the Available displays box, double-click the Amplitude vs.Time icon or select the icon and
click Add. The Amplitude vs.Time icon will appear in the Selected displays box and will no longer
appear under Available displays.
4. Click OK.
Elements of the Display
SignalVu Vector Signal Analysis Software Printable Online Help
11
Taking Measurements
Frequency vs. Time Display
Item
Display element
Description
1
Vert Offset
Adjusts the vertical display offset.
2
Vertical scale adjustment
Adjusts the vertical scaling.
3
Span
Adjust the bandwidth of the data to be analyzed. (Not the period of time
shown in the display.)
4
Autoscale
Adjusts the vertical and horizontal settings to provide the best display.
5
Offset
Adjust the horizontal offset.
6
Max and Min readouts
Displays the maximum and minimum amplitudes, as well as when those
values occur.
7
Scale
Sets the time spanned by the graph.
8
Clear button
Restarts multi-trace functions (Avg, Hold).
9
Trace function
Displays the current trace function setting (Settings > Trace tab > Function).
xxx
Reference. Changing Amplitude vs Time Display Settings (see page 82)
Frequency vs. Time Display
The Frequency vs. Time Display shows how the signal frequency varies with time.
Note that the trace(s) in the Frequency vs. Time display can be set to a maximum of 100,000 points
(however, the actual number of trace points can extend up to 1,000,000 points if Max trace points is set
to Never Decimate). If the Analysis Length includes more than the selected Max trace points value, the
trace is decimated (using the method specified with the Detection control) to be equal to or less than the
Max trace points setting (except when Max trace points is set to Never Decimate). This decimated (or
undecimated) trace is what is used for marker measurements and for results export. You can set the Max
trace points on the Settings > Prefs tab.
To display the Frequency vs.Time Display:
1. Select the Displays button or Setup > Displays.
2. In the Select Displays dialog, select General Signal Viewing in the Folders box.
3. In the Available displays box, double-click the Frequency vs.Time icon or select the icon and click
Add. The Frequency vs.Time icon will appear in the Selected displays box and will no longer appear
under Available displays.
4. Click OK to display the Freq vs.Time display.
12
SignalVu Vector Signal Analysis Software Printable Online Help
Taking Measurements
Phase vs. Time Display
Elements of the Display
Item
Display element
Description
1
Top of graph adjustment
Use the knob to adjust the frequency range displayed on the vertical axis.
2
Offset adjustment
Adjusts the frequency shown at the center of the display.
3
Autoscale button
Adjusts the offset and range for both vertical and horizontal to provide the
best display.
4
Maximum and Minimum
frequency readouts
Displays the maximum and minimum values, as well as when those values
occur.
5
Horizontal Scale
Sets the time spanned by the graph.
6
Clear button
Restarts Average trace.
7
Trace function
Displays the current trace function setting (Settings > Trace > Function).
xxx
Changing Frequency vs Time Display Settings (see page 85)
Phase vs. Time Display
The Phase vs. Time display plots the signal phase against time. The phase appears on the vertical axis
while time is plotted along the horizontal axis.
Note that the trace(s) in the Phase vs. Time display can be set to a maximum of 100,000 points (however,
the actual number of trace points can extend up to 1,000,000 points if Max trace points is set to Never
Decimate). If the Analysis Length includes more than the selected Max trace points value, the trace is
decimated (using the method specified with the Detection control) to be equal to or less than the Max trace
points setting (except when Max trace points is set to Never Decimate). This decimated (or undecimated)
trace is what is used for marker measurements and for results export. You can set the Max trace points
on the Settings > Prefs tab.
SignalVu Vector Signal Analysis Software Printable Online Help
13
Taking Measurements
Phase vs. Time Display
To display Phase vs.Time:
1. Press the Displays button or select Setup > Displays.
2. In the Select Displays dialog, select General Signal Viewing in the Folders box.
3. In the Available displays box, double-click the Phase vs.Time icon or select the icon and click Add.
The Phase vs.Time icon will appear in the Selected displays box and will no longer appear under
Available displays.
4. Click OK to show the Phase vs.Time display.
Elements of the Display
Item
Display element
Description
1
Top of graph adjustment
Adjusts the vertical scale. Use the knob to adjust the value of the top of the
graph.
2
Vertical offset adjustment
Adjusts the phase error shown at the vertical center of the display.
3
Autoscale button
Adjusts the vertical and horizontal settings so that the entire trace fits in the
view.
4
Horizontal Offset
Adjusts the horizontal position of the trace.
5
Max and Min readouts
Displays the maximum and minimum value of the phase error within the
analysis times and the times at which they occurred.
6
Horizontal Scale
Sets the time spanned by the graph.
7
Clear button
Restarts multi-trace functions (Avg, Hold).
8
Trace function
Shows the trace function as set on the Settings > Trace tab.
xxx
Changing the Phase vs Time Display Settings (see page 87)
14
SignalVu Vector Signal Analysis Software Printable Online Help
Taking Measurements
RF I & Q vs. Time Display
RF I & Q vs. Time Display
This is a plot of the baseband In-Phase (I) and Quadrature (Q) components of a modulated carrier. The plot
is in the time domain, with I and/or Q values the Y-axis.
Note that the trace(s) in the RF I & Q vs. Time display can be set to a maximum of 100,000 points
(however, the actual number of trace points can extend up to 1,000,000 points if Max trace points is set
to Never Decimate). If the Analysis Length includes more than the selected Max trace points value, the
trace is decimated (using the method specified with the Detection control) to be equal to or less than the
Max trace points setting (except when Max trace points is set to Never Decimate). This decimated (or
undecimated) trace is what is used for marker measurements and for results export. You can set the Max
trace points on the Settings > Prefs tab.
To display an RF I & Q vs. Time display:
1. Select the Displays button or select Setup > Displays. This shows the Select Displays dialog.
2. From the Folders box, select General Signal Viewing.
3. Double-click the RF I&Q vs.Time icon in the Available Displays box. This adds the RF I & Q vs.
Time icon to the Selected displays box.
4. Click the OK button.
Elements of the Display
SignalVu Vector Signal Analysis Software Printable Online Help
15
Taking Measurements
Spectrogram Display
Item
Display element
Description
1
Top of Graph adjustment
Use the knob to adjust the vertical scaling.
2
Vertical offset adjustment
Adjusts the level shown at the center of the display.
3
Autoscale button
Adjusts the offset and scale for both vertical and horizontal to provide the
best display.
4
Maximum and Minimum level
readouts
Displays the maximum and minimum values, within the Analysis Time, as well
as the times at which they occurred.
5
Scale
Sets the time spanned by the graph.
6
Clear button
Restarts multi-trace functions ( Avg , Hold).
7
Trace function
Displays the current trace function setting (Settings > Trace > Function). If the
traces are averaged, the number of averages is displayed.
8
Trace Control
Selects which trace is displayed (using the drop-down list) and which trace is
active (click on the trace name to display a menu).
xxx
Changing the RF I & Q vs Time Display Settings (see page 89)
Spectrogram Display
The Spectrogram is a display with the vertical axis (time) composed of successive spectral displays, each
having the amplitude represented by color or intensity. The horizontal axis represents frequency. The most
recently acquired spectrum results are added to the bottom of the spectrogram. The addition of a new
spectrum can occur at the fastest rate that new spectra can be plotted, or, if you choose, new spectra can be
added at a timed rate. The spectrogram view is well-suited to displaying long-term trends of spectral data.
The maximum number of lines that can be displayed in a spectrogram is 125,000.
NOTE. Spectrogram data is shared with the Spectrum display.
To display a Spectrogram:
1. Select the Displays button or select Setup > Displays. This displays the Select Displays dialog.
2. From the Folders box, select General Signal Viewing.
3. Double-click the Spectrogram icon in the Available Displays box. This adds the Spectrogram icon
to the Selected displays box.
4. Click the OK button. This displays the spectrogram view.
16
SignalVu Vector Signal Analysis Software Printable Online Help
Taking Measurements
Spectrogram Display
Elements of the Spectrogram Display
Item
Display element
Description
1
Scale
Sets the vertical scale factor, increasing or decreasing the amount of time
in each line.
2
Total time
This value represents the total time displayed in the Spectrogram.
3
RBW
Sets the resolution bandwidth. Note that when the RBW is set to Auto, its
value is italicized.
4
VBW
Enables the VBW (Video Bandwidth) filter. See Setup > Settings > BW tab
(see page 98).
5
Pos
Position indicates the bottom line visible in graph.
6
Autoscale
Resets Vertical and Horizontal scale and Pos to default values.
7
T
Trigger indicator. This icon indicates the trigger point within the current
acquisition.
8
CF
Sets the Center Frequency.
9
Span
Sets the span of the spectrogram display.
10
Current data record indicator
This blue line indicates the current data record. When the analysis length is
short, the blue line appears as a thin line much like the selected indicator
line. When the analysis length is relatively long, the blue line is much taller
than shown in the illustration.
11
Selected indicator
This line indicates the line that will appear in the Spectrum display (if the
Spectrogram trace is enabled in the Spectrum display). This line is attached
to the selected marker.
12
Overlap
Shows what portions of its time period a given line shares with previous or
later lines.
xxx
The Spectrogram can show results from one or multiple acquisitions and it can show one or multiple
lines for each acquisition.
Changing the Spectrogram Display Settings (see page 91)
SignalVu Vector Signal Analysis Software Printable Online Help
17
Taking Measurements
Spectrum Display
Spectrum Display
To display a spectrum:
1. Click the Displays button or select Setup > Displays.
2. From the Folders box, select General Signal Viewing.
3. Double-click the Spectrum icon in the Available displays box. This adds the Spectrum icon to the
Selected displays box (and removes it from the Available displays box). Alternately, you can click the
Spectrum icon and then click the Add button to select Spectrum for display.
4. Click the OK button.
Elements of the Spectrum Display
18
SignalVu Vector Signal Analysis Software Printable Online Help
Taking Measurements
Time Overview
Item
Display element
Description
1
Vert Offset
Sets the top of graph value. This is only a visual control for panning the
graph. The Reference Level is adjusted in the Toolbar. By default, Vert Offset
= Ref Level.
2
dB/div
Sets the vertical scale value. The maximum value is 20.00 dB/division.
3
RBW
Sets the resolution bandwidth. Note that when the RBW is set to Auto, its
value is italicized.
4
VBW
Enables the VBW (Video Bandwidth) filter. See Setup > Settings > BW tab
(see page 98).
5
Autoscale
Adjusts the Vertical and Horizontal scaling to display the entire trace on
screen.
6
Position
Default function is CF - center frequency (equivalent to the Freq setting).
If Horizontal scaling has been manually adjusted in Settings > Scale, then
Offset will replace CF as the setting at the bottom-left corner of the screen.
7
Span / Scale
Default function is Span - frequency difference between the left edge of
the display and the right edge. If Horizontal scaling has been manually
adjusted in Settings > Scale, then Scale will replace Span as the setting at
the bottom-right corner of the screen.
8
Clear
Restarts multi-trace functions (Avg, Hold).
9
Function
Readout of the Detection and Function selections for the selected trace.
10
Show
Controls whether the selected Trace is visible or not. When trace is Off, the
box is not checked.
11
Trace
Selects a trace. Touching here pops up a context menu listing the available
traces, whether they are enabled or not. If user selects a trace that is not
currently enabled, it will be made enabled.
xxx
Touchscreen Actions On Markers in the Graph Area
Action
Description
Mouse click within 1/2 div. of
a marker
Selects the marker and updates the marker display to show the selected markers values.
Touch marker to select and
then use knob, or arrow keys
Adjust the setting associated with the Marker.
Touch and drag a marker
Changes marker position to the "drop point".
xxx
Changing the Spectrum Display Settings (see page 90)
Time Overview
The Time Overview is a display that shows the entire acquisition record and shows you how the spectrum
time and analysis time fit within the acquisition record. This enables you to see how you can adjust the
spectrum time and analysis time to measure portions of the data.
SignalVu Vector Signal Analysis Software Printable Online Help
19
Taking Measurements
Time Overview
Note that the trace(s) in the Time Overview display is limited to 10,000 points. If the Analysis Length
includes more than 10,000 sample points, the trace is decimated (using the +Peak method, similar
to +Peak detection in a Spectrum display) to 10,000 points. This decimated trace is what is used for
marker measurements.
The Time Overview window displays the Spectrum Length and Analysis Length. The Spectrum Length is
the period of time within the acquisition record over which the spectrum is calculated. The Analysis Time
is the period of time within the acquisition record over which most measurements (such as Amplitude
vs. Time) are made. The Spectrum Length and Analysis Length can be locked together so that the data
used to produce the Spectrum display is also used for measurement displays; however, they do not
have to be tied together. They are by default specified separately and used to analyze different parts of
the acquisition record.
Elements of the Display
20
SignalVu Vector Signal Analysis Software Printable Online Help
Taking Measurements
Constellation Display
Item
Element
Description
1
Analysis Time Control
Click a button to select the value to be adjusted. In order, the buttons
represent Analysis Offset, Analysis Length, Spectrum Offset, and Spectrum
Length.
2
Offset and Scale
Adjusts the vertical scale and offset.
3
Amplitude vs. Time graph
The trace represents the entire acquisition record (at full horizontal scale).
The graph indicates the Analysis Length or Spectrum Length on the graph
with a darker background.
4
Autoscale button
Resets the horizontal scale to display the entire acquisition record and the
vertical scale to show all trace points.
5
Horizontal Offset
Adjusts the horizontal offset.
6
Results Timeline
This fuchsia line indicates the portion of the record actually used for
calculating the selected result. For example: if a pulse measurement is
selected, it shows the period of the specific pulse. For a constellation display,
it shows the points included in the demodulation.
7
Horizontal Scale
Adjusts the span of the graph. By decreasing the scale, the graph essentially
becomes a window that you can move over the acquisition record by adjusting
the offset.
8
Spectrum Length and Offset
Indicator
This red line indicates the Spectrum Length and Offset. The longer the time,
the longer the bar. Adjusting the offset shifts the bar left or right.
9
Actual length display
Displays the actual time for the selected value. If the user-adjusted length
extends past the end of the acquisition record, the realizable analysis length
is less than requested.
10
Analysis Length and Offset
Indicator
This blue line indicates the Analysis Length and Offset. The longer the time,
the longer the bar. Adjusting the offset shifts the bar left or right.
11
Setting Adjustment box
Click in this box to adjust the value selected by the Analysis Time Control
buttons.
xxx
NOTE. The area with black background (not gray) in the Amplitude vs.Time Graph highlights the control
selected in the Analysis Time Control drop-down list.
Changing the Time Overview Display Settings (see page 92)
Constellation Display
The Constellation Display shows a digitally-modulated signal in constellation form.
NOTE. A maximum of 80,000 samples can be analyzed.
To show the Constellation Display:
1. Select the Displays button or select Setup > Displays. This shows the Select Displays dialog.
SignalVu Vector Signal Analysis Software Printable Online Help
21
Taking Measurements
EVM vs.Time Display
2. From the Folders box, select GP Digital Modulation.
3. Double-click the Constellation icon in the Available Displays box. This adds the Constellation icon
to the Selected displays box.
4. Click the OK button. This shows the Constellation display.
Elements of the Constellation Display
Item
Display element
Description
1
Check mark indicator
The check mark indicator in the upper, left-hand corner of the display shows
when the Constellation display is the optimized display.
2
Marker Readout
Located to the left of the constellation plot or below it, depending on the size of
the window. If markers are enabled, the marker readout shows the time, mag,
phase, symbol marker and symbol value of the point with the selected marker.
3
EVM Readouts
The EVM readouts are located below the Constellation plot. The readout
shows EVM Peak (%) and location, RMS (%).
4
Plot
Constellation graph.
xxx
Changing Constellation Display Settings (see page 84)
EVM vs.Time Display
The EVM vs.Time Display shows the Error Vector Magnitude plotted over Time.
NOTE. A maximum of 80,000 samples can be analyzed.
To show an EVM vs.Time display:
22
SignalVu Vector Signal Analysis Software Printable Online Help
Taking Measurements
Magnitude Error vs.Time Display
1. Press the Displays button or select Setup > Displays. This shows the Select Displays dialog.
2. From the Folders box, select GP Digital Modulation.
3. Double-click the EVM vs.Time icon in the Available Displays box. This adds the EVM vs.Time icon
to the Selected displays box.
4. Click the OK button. This displays the EVM vs.Time view.
Elements of the EVM vs.Time Display
Item
Display element
Description
1
Top of graph adjustment
Use the knob to adjust the vertical scale.
2
Offset
Adjusts the vertical position.
3
Autoscale
Adjusts the Horizontal and Vertical scale to show the entire trace.
4
Peak and RMS value readout
Shows the maximum result, the time it occurred, and the RMS of the result
over the entire analysis length.
5
Scale
Sets the length of time shown in the graph.
xxx
Changing the EVM vs Time Display Settings (see page 84)
Magnitude Error vs.Time Display
The Magnitude Error displays the magnitude of the symbol error. The amplitude appears on the vertical
axis while time is plotted along the horizontal axis.
NOTE. A maximum of 80,000 samples can be analyzed.
To display Magnitude Error vs.Time:
SignalVu Vector Signal Analysis Software Printable Online Help
23
Taking Measurements
Magnitude Error vs.Time Display
1. Select the Displays button or Setup > Displays. This displays the Select Displays dialog.
2. Select GP Digital Modulation in the Folders box.
3. Double-click the Mag Error vs.Time icon or select the icon and click Add. The icon will appear in
the Selected displays box and will no longer appear under Available displays.
4. Click OK.
Elements of the Display
Item
Display element
Description
1
Top of graph adjustment
Use the knob to adjust the value of the vertical scale.
2
Offset adjustment
Adjusts the level shown at the bottom of the display.
3
Autoscale button
Adjusts the vertical and horizontal settings to provide the best display.
4
Horizontal Offset
Adjusts the horizontal position of the signal. Units can be either Symbols or
Seconds (Settings > Analysis Time tab > Units).
5
Peak and RMS value readout
Displays the Peak value of the magnitude error, the RMS value of the
magnitude error, and the time at which it occurs within the acquisition. Units
can be either Symbols or Seconds (Settings > Analysis Time tab > Units).
6
Horizontal Scale
Sets the time spanned by the graph. Units can be either Symbols or Seconds
(Settings > Analysis Time tab > Units).
7
Freq Error
Freq Error is the difference between the Center Frequency and the measured
frequency of the signal being tested. This readout will be Freq Offset if the
Freq Offset parameter on the Settings > Advanced Params (see page 95)
tab is set to Manual.
xxx
Changing Magnitude Error vs Time Display Settings (see page 85)
24
SignalVu Vector Signal Analysis Software Printable Online Help
Taking Measurements
Phase Error vs.Time Display
Phase Error vs.Time Display
The Phase Error vs.Time display shows the phase angle of the symbol error over time. The phase is plotted
along the vertical axis while time is plotted along the horizontal axis.
NOTE. A maximum of 80,000 samples can be analyzed.
To show the Phase Error display:
1. Press the Displays button or select Setup > Displays.
2. In the Select Displays dialog, select GP Digital Modulation in the Folders box.
3. In the Available displays box, double-click the Phase Error icon or select the icon and click Add.
The Phase Error icon will appear in the Selected displays box and will no longer appear under
Available displays.
4. Click OK to display the Phase Error.
Elements of the Display
SignalVu Vector Signal Analysis Software Printable Online Help
25
Taking Measurements
Signal Quality Display
Item
Display element
Description
1
Freq Error
Freq Error is the difference between the Center Frequency and the measured
frequency of the signal being tested. This readout will be Freq Offset if the
Freq Offset parameter on the Settings > Advanced Params (see page 95)
tab is set to Manual.
2
Top of graph adjustment
Adjusts the phase angle shown at the top of the graph.
3
Offset
Adjusts the vertical offset.
4
Autoscale
Adjusts the vertical and horizontal settings so that the entire trace fits in the
graph.
5
Offset
Adjusts the horizontal offset.
6
Peak and RMS readouts
Displays the Peak value of the phase error and the time at which it occurred.
Also displays the RMS value over the analysis length.
7
Scale
Sets the time spanned by the graph.
xxx
Changing the Phase Error vs Time Display Settings (see page 87)
Signal Quality Display
The Signal Quality display shows several measurements of signal quality.
26
SignalVu Vector Signal Analysis Software Printable Online Help
Taking Measurements
Symbol Table Display
Elements of the Display
Measurement
Description
EVM
The normalized RMS value of the error vector between the measured signal and the ideal
reference signal over the analysis length. The EVM is generally measured on symbol or
chip instants and is reported in units of percent and dB. EVM is usually measured after
best-fit estimates of the frequency error and a fixed phase offset have been removed.
These estimates are made over the analysis length. Displays RMS and Peak values with
location of Peak value.
Phase Error
The RMS phase difference between the measured signal and the ideal reference signal.
Displays RMS and Peak values with location of Peak value.
Mag Error
The RMS magnitude difference between the measured signal and the reference signal
magnitude. Displays RMS and Peak values with location of Peak value.
MER (RMS)
The MER is defined as the ratio of I/Q signal power to I/Q noise power; the result is
indicated in dB.
IQ Origin Offset
The magnitude of the DC offset of the signal measured at the symbol times. It indicates
the magnitude of the carrier feed-through signal.
Frequency Error
The frequency difference between the measured carrier frequency of the signal and the
user-selected center frequency of the instrument.
Gain Imbalance
The gain difference between the I and Q channels in the signal generation path.
Constellations with gain imbalance show a pattern with a width that is different form
height.
Quadrature Error
The orthogonal error between the I and Q channels. The error shows the phase
difference between I and Q channels away from the ideal 90 degrees expected from the
perfect I/Q modulation. Not valid for BPSK modulation type.
Rho
The normalized correlated power of the measured signal and the ideal reference signal.
Like EVM, Rho is a measure of modulation quality. The value of Rho is less than 1 in all
practical cases and is equal to 1 for a perfect signal measured in a perfect receiver.
xxx
Changing the Signal Quality Display Settings (see page 90)
Symbol Table Display
The Symbol Table Display is like the Constellation Display except that a text table is used to display data
bits at a symbol rather than a graph. The Synch Word characters, if used, are in bold font.
To display the Symbol Table:
1. Select the Displays button or select Setup > Displays. This displays the Select Displays dialog.
2. From the Folders box, select GP Digital Modulation.
3. Double-click the Symbol Table icon in the Available Displays box. This adds the Symbol Table icon
to the Selected displays box.
4. Click the OK button. This displays the Symbol Table view.
SignalVu Vector Signal Analysis Software Printable Online Help
27
Taking Measurements
CCDF Display
Using Markers
Markers are indicators in the display that you can position on a trace to measure values such as frequency,
power, and time. A Marker always displays its position and, if the Delta readout is enabled, will display
the difference between its position and that of the Marker Reference. Within the Symbol Table, colored
cells indicate the location of markers. The selected Marker is highlighted with a light green background.
All other markers are highlighted with a light gray background. In the Symbol Table, the marker readout
below the table shows the marker location in time, symbol numbers and symbol value.
Changing the Symbol Table Display Settings (see page 92)
CCDF Display
The CCDF (Complementary Cumulative Distribution Function) is a statistical characterization that plots
power level on the x-axis and probability on the y-axis of a graph. Each point on the CCDF curve shows
what percentage of time a signal spends at or above a given power level. The power level is expressed in
dB relative to the average signal power level. The CCDF Display also shows the Average power level
and the Peak/Average ratio.
To show the CCDF display:
1. Press the Displays button or select Setup > Displays. This shows the Select Displays dialog.
28
SignalVu Vector Signal Analysis Software Printable Online Help
Taking Measurements
Channel Power and ACPR (Adjacent Channel Power Ratio) Display
2. From the Folders box, select RF Measurements.
3. Double-click the CCDF icon in the Available Displays box. This adds the CCDF icon to the Selected
displays box.
4. Click the OK button.
Elements of the CCDF Display
Item
Display element
Description
1
100%
The top of the graph represents the 100% probability that the signal will be at
or above the average signal level.
2
Power level select
Adjust to display the value of the CCDF curve at a specific power level. The
selected power level is indicated by a small triangle on the CCDF curve.
3
CCDF value
Readout of the value of the CCDF curve at the selected power level.
4
Avg
Readout of the Average power level and the CCDF value at the Average
power level.
5
Readout Table
Readout of the CCDF curve at six points.
6
Pk / Avg
Readout of the Peak to Average power ratio.
7
Measurement time
Readout of the length of time used for the measurement. Displays --- s when
the Measurement time is set to continuous.
xxx
Changing the CCDF Display Settings (see page 83)
Channel Power and ACPR (Adjacent Channel Power Ratio) Display
Use the Channel Power and ACPR measurement to measure channel power by itself, or adjacent channel
leakage ratio with one main channel.
SignalVu Vector Signal Analysis Software Printable Online Help
29
Taking Measurements
Channel Power and ACPR (Adjacent Channel Power Ratio) Display
Measuring Adjacent Channel Power Ratio
1. Select the Displays button.
2. Select RF Measurements from the Folders box.
3. Double-click Chan Power and ACPR in the Available displays box. Click OK to complete your
selection.
4. Press the front-panel Freq button and use the front panel keypad or knob to adjust the frequency to
that of your main channel.
5. Press the Settings button. This displays the control panel for Chan Power and ACPR (the tab displayed
will be the tab displayed the last time the Settings panel was opened).
6. To set the number of adjacent channels, select the Channels tab. Enter the number of channels in
the Number of adjacent pairs value box. If zero is entered for the number of adjacent pairs, the
resultant measurement will be channel power only.
30
SignalVu Vector Signal Analysis Software Printable Online Help
Taking Measurements
Channel Power and ACPR (Adjacent Channel Power Ratio) Display
NOTE. As you add adjacent channels, the span of the display is adjusted so that all the channels can be
seen. Use the horizontal scale and offset to zoom the display in on any portion of the trace.
7. To set the spacing between channel centers, enter the required value in the Channel Spacing value box.
8. To set the channel bandwidth, enter the required value in the Channel Bandwidth value box.
9. After you have configured the channel settings, click the close button ( ) in the Settings panel or press
the Settings button again to remove the settings panel.
10. Press the Run button to take the measurements.
Viewing results
Measurement results are displayed in a table below the graph and within the graph itself (which can be
enabled/disabled in the Settings > Prefs tab). To see all measurements, you might need to scroll the
table. The size of the results table can be changed by dragging the horizontal divider bar between the
graph and table areas.
Heading
Description
Channel
Identifies the displayed channels. A1 means the first adjacent channel. A2 means
second adjacent channel. Adjacent channels are numbered according to their offset from
the Main channel. The closest channel is numbered 1. The next closest channel is
numbered 2; and so forth.
Lower
The power measured for the lower adjacent channel. Adjacent channel power
measurements are displayed in dB relative to the Main channel.
Upper
The power measured for the upper adjacent channel. Adjacent channels power
measurements are displayed in dB relative to the Main channel.
Avg Channel Power (Main)
The power measured for the Main channel. The detection type used for measuring
channel power and adjacent channel powers is Average. This means that the average of
the linear (pre-log) samples is used to determine the power. The Main channel power is
displayed in dBm.
xxx
Setting ACPR Measurement Parameters (see page 122)
SignalVu Vector Signal Analysis Software Printable Online Help
31
Taking Measurements
MCPR (Multiple Carrier Power Ratio) Display
MCPR (Multiple Carrier Power Ratio) Display
Use the MCPR measurement to measure adjacent channel power ratio for multiple main channels or when
adjacent channels have different offsets and/or bandwidths. The MCPR display show the Reference Power
and the ratio of each adjacent channel to the Reference Power. You can select whether the Reference
Power is the total of all active channels or a single channel.
Measuring Multiple Carrier Power Ratio
1. Press the front-panel Displays button.
2. From the Select Displays window, select RF Measurements from the Folders box.
3. Double-click the MCPR icon in the Available displays box. Click OK to complete your selection.
4. Press the front-panel Freq button and use the front panel keypad or knob to adjust the frequency to
that of the main channel. Select Meas. Freq to set the measurement frequency. Use the front panel
knob to adjust the frequency.
5. Press the Settings button. This displays the control panel for MCPR (the tab displayed will be the tab
displayed the last time the Settings panel was opened).
6. Click on the Channels tab. To set the number of Main channels, enter the number of Main channels in
the Number text entry box under Main Channels.
NOTE. As you add channels, the span of the display will be adjusted so that all the channels can be seen.
7. To set the bandwidth of all main channels, enter a value in the BW value box.
8. To set the spacing between the main channels, enter a value in the Spacing value box.
9. To prevent a main channel power level from being included in the Power Reference (Total) calculation,
select the channel to be excluded in the Inactive box.
10. To add adjacent channels, click the Add... button under Adj Chans.
32
SignalVu Vector Signal Analysis Software Printable Online Help
Taking Measurements
MCPR (Multiple Carrier Power Ratio) Display
11. To edit Frequency Offset or Bandwidth, click within the value box and use the front-panel knob or
your keyboard to set the value. Click Close to save your changes.
NOTE. Frequency Offset is the difference between the center frequency of the selected channel and
the Measurement Frequency. All channels (Main or Adjacent) are specified by their offset from the
Measurement Frequency.
12. After you have configured the Main and Adjacent channels, click the close button (
Settings panel or the Settings button to remove the settings panel.
13. Click the Run button (
) in the
) to take the measurements.
Viewing results
MCPR measurement results are displayed both in the main display and in a table below the spectrum
display. Individual Main channel power measurements appear in the Main display under the channel
identifier. Individual adjacent channel power ratios also appear in the main display under the adjacent
channel identifier.
SignalVu Vector Signal Analysis Software Printable Online Help
33
Taking Measurements
Occupied BW & x dB BW Display
The following table details the entries in the results table.
Heading
Description
Ch
Identifies the adjacent channels. Adjacent channels are numbered according to their
offset from the Main channel. The closest channel is numbered 1. The next closet
channel is numbered 2; and so forth.
Offset
The offset is the difference in frequency between the Measurement Frequency and the
center frequency of the channel.
Lower
Displays the ratio of the lower adjacent channel power to the Power Reference.
Upper
Displays the ratio of the upper adjacent channel power to the Power Reference.
Power Reference
The result of averaging the Main Channels together (excluding inactive channels).
xxx
Depending on the number of adjacent channels, to see all the measurements, you might need to drag
the divider bar between the main display and the results table at the bottom of the window to change
the height of the results table.
Setting MCPR Measurement Parameters (see page 122)
Occupied BW & x dB BW Display
The Occupied BW display shows the bandwidth within which 99% (a user-defined value, the default is
99%) of the power transmitted falls within the measurement bandwidth.
34
SignalVu Vector Signal Analysis Software Printable Online Help
Taking Measurements
Occupied BW & x dB BW Display
To show the Occupied BW display:
1. Press the Displays button or select Setup > Displays.
2. In the Select Displays dialog, select RF Measurements in the Folders box.
3. In the Available displays box, double-click the Occupied Bandwidth icon or select the icon and
click Add. The Occupied Bandwidth icon will appear in the Selected displays box and will no
longer appear under Available displays.
4. Click OK to display the Occupied Bandwidth.
Elements of the Display
SignalVu Vector Signal Analysis Software Printable Online Help
35
Taking Measurements
Occupied BW & x dB BW Display
Item
Display element
Description
1
Check mark indicator
The check mark indicator denotes the display for which the acquisition
hardware is optimized. This indictor appears only when the display is the
selected display.
2
Averaging readout
Appears when averaging is enabled (Settings > Parameters tab > Average
results). Displays "Avg: n of m" while averaging the results and "Avg: m"
once the requested number of results have been averaged.
3
Autoscale
Adjusts the vertical and horizontal settings so that the entire trace fits in the
graph.
4
Trace function readout
Displays either Normal or MaxHold to indicate trace function.
5
Clear
Resets count for Average and MaxHold functions. Enabled only when
Averaging or MaxHold is enabled. Pressing Clear will clear the trace and, if
acquisition is running, restart the averaging or hold process.
6
Graph
Displays the input signal. Shaded areas indicate the measurement bandwidth
(Settings > Parameters tab > Measurement BW).
7
Blue lines
The blue lines indicate where the selected results (selected in the Main
results area) are being measured on the trace.
8
Grid divider
Determines the portion of the display allocated to the graph and detailed
results area. You can move the grid divider all the way to the top or bottom
and any position in between.
9
Detailed results area
Displays additional measurements results.
10
Position and dB/div
Position sets the top of graph value. The dB/div setting is the vertical scale
value.
11
Main results area
Displays results for Occupied Bandwidth (OBW) and x dB bandwidth. Use the
two radio buttons to select which of the two results are illustrated in the graph
with the blue lines and arrows. There are also controls for adjusting OBW %
Power, x dB BW Level, and RBW.
12
VBW
Enables the VBW (Video Bandwidth) filter. Displays current VBW filter setting.
See Setup > Settings > Freq & RBW tab (see page 114).
xxx
Detailed Results Readouts
Measurement
Description
Freq Error
The frequency difference between the measured carrier frequency of the signal and the
user-selected center frequency of the analyzer.
OBW Level left
The signal level at the left edge of the occupied bandwidth.
OBW Level right
The signal level at the right edge of the occupied bandwidth.
OBW Ref Power
The total power measured within the measurement bandwidth.
x dB BW Ref Power
The peak power measured within the measurement bandwidth.
xxx
Changing the Occupied Bandwidth Settings (see page 86)
36
SignalVu Vector Signal Analysis Software Printable Online Help
Taking Measurements
Spurious Display
Spurious Display
To show the Spurious display:
1. Click the Displays button or select Setup > Displays.
2. From the Folders box, select RF Measurements.
3. Double-click the Spurious icon in the Available displays box. This adds the Spurious icon to the
Selected displays box (and removes it from the Available displays box). Alternatively, you can click
the Spurious icon and then click the Add button to select Spectrum for display.
4. Click the OK button.
Elements of the Spurious Display
SignalVu Vector Signal Analysis Software Printable Online Help
37
Taking Measurements
Spurious Display
Item
Display element
Description
1
dB/ div
Sets the vertical scale value. The maximum value is 20.00 dB/division.
2
Vert Position
Sets the top of graph value. This is only a visual control for panning the graph.
The Reference Level is adjusted in the Toolbar and the Ampl control panel.
By default, Vert Position = Ref Level.
3
Check Mark Indicator
Indicates the display for which the acquisition hardware is optimized.
4
Pass / Fail readout
Indicates whether one or more spurs have exceeded a limit specified on
the Settings > Limits tab.
5
Ref:
If enabled, displays the power reference level.
6
Trace function
Indicates the trace processing method. If Average or Max Hold is selected,
this readout displays the number of traces being processed (averaged or
compared for the Max Hold value).
7
Clear
Restarts multi-trace functions (Average, Max Hold).
8
Stop
Adjusts the graph stop frequency. This setting affects only visual scaling, not
measurement parameters.
9
Green bar
Indicates the range that is selected on the Settings > Ranges and Settings >
Limits tabs.
10
Spur table
Displays spur measurements. See the following table for details.
11
Start
Adjusts the graph start frequency. This setting affects only visual scaling, not
measurement parameters.
12
Autoscale
Adjusts the Vertical and Horizontal scaling to display the entire trace on
screen. Selects Multi-range display mode.
13
Bottom-of-graph readout
Indicates the amplitude at the bottom of the graph. This value changes with
the dB/div and Vertical Position settings.
xxx
Elements of the Spurious Graph Display
38
SignalVu Vector Signal Analysis Software Printable Online Help
Taking Measurements
Item
Display element
Spurious Display
Description
1
The green line or shading indicates an Abs (absolute) limit. The absolute limit
is enabled when the mask is set to Abs, Abs & Rel, or Abs OR Rel. Note that
absolute and relative amplitude masks can overlap.
2
The gray-shaded area indicates a portion of the spectrum where no
measurements are being taken.
3
The cyan line or shading indicates a Relative limit. The relative limit is
enabled when the mask is set to Rel, Abs & Rel, or Abs OR Rel. Note that
absolute and relative amplitude masks can overlap.
4
abs rel
Reminder that green-shaded areas highlight absolute limits and cyan-shaded
areas highlight relative limits.
5
This indicates the selected spur, when it is in violation of the limits. In Run
mode, this is the peak spur violation. The selected marker is highlighted in
the Spur table below the graph with a blue background.
6
A spur marker. Indicates a spur that does not exceed the mask settings. See
the Settings > Limits tab (see page 119).
7
A violation marker. Indicates a spur that exceeds the mask settings. See the
Settings > Limits tab (see page 119).
---
Indicates the selected spur when it is not in violation of the limits. The
selected marker is highlighted in the Spur table below the graph with a blue
background.
8
1, 2, 3...
A Spur number. The number indicates the row in the spur table that
corresponds to the spur. The instrument can display up to 999 spurs.
9
A, B, C, D...
Identifies the enabled ranges.
10
Green bar
Indicates the range selected on the Settings > Limits (see page 119) and
Settings > Ranges (see page 132) tabs.
11
Ref
Indicates the location of the power reference. See Settings > Reference
(see page 134).
xxx
Elements of the Spur Table
SignalVu Vector Signal Analysis Software Printable Online Help
39
Taking Measurements
Pulse Statistics Display
Column
Description
Spur
A number that identifies a spur in the graph area. The instrument can display a maximum
of 999 spurs.
Range
The letter representing the frequency range where the spur is located.
Freq Abs
The absolute frequency at which the spur occurs.
Freq Rel
The relative frequency at which the spur occurs. The relative frequency is the difference
between the absolute frequency (absolute) and the carrier frequency.
Ampl Abs
The absolute amplitude of the spur.
Ampl Rel
The relative amplitude at which the spur occurs. The relative amplitude is the difference
between the absolute amplitude and the carrier amplitude. See the Settings > Limits tab.
Lim Abs
The value of the absolute amplitude limit at the spur frequency. This value can vary even
with small spur frequency changes if the start and stop limit values are different. See
the Settings > Limits tab (see page 119).
Lim Rel
The relative amplitude limit at which the spur occurs. This value can vary even with small
spur frequency changes if the start and stop relative amplitude limit values are different.
See the Settings > Limits tab (see page 119).
Blue background
The cell in the Spur column with a blue background identifies the selected spur.
Red background
Cells in the Spur column with a red background identify violations.
Cells in the results area with a red background identify the measurement that exceeded a
limit.
xxx
Rearranging the Columns in the Spur Table
You can rearrange the order of the columns in the Spur Table. To move a column, click on the column
heading and drag it to the desired position.
Sorting the Rows in the Spur Table
You can sort the rows in the Spur table by clicking on the column heading. For example, if you click on
the Freq Abs heading, the results in the Spur table will be sorted by frequency. If you click on Range, the
rows will be sorted by range. Clicking a second time on the same heading reverses the order.
Changing the Spurious Display Settings (see page 91)
Pulse Statistics Display
The Pulse Statistics display shows measurement statistics for RF pulses. The Pulse Statistics view displays
a plot of a pulse measurement’s values for every pulse in the analysis period. For example, the Pulse
Statistics display will show the rise time measurement for each of 30 pulses, with rise time on the Y axis
and pulse number on the X axis. Alternately, the Statistics Display can show an FFT trace for the values
of a measurement over all the pulses analyzed.
40
SignalVu Vector Signal Analysis Software Printable Online Help
Taking Measurements
Pulse Table Display
Elements of the Pulse Statistics Display
Item
Display element
Description
1
Optimized indicator
The check mark indicator in the upper, left-hand corner of the display shows
when the Pulse Statistics display is the optimized display.
2
Result
Use this list to select which measurement statistics to display. The
measurement chosen here selects the same result to be displayed in the
Pulse Trace display and the Pulse Table display. Selecting a result in any of
these views causes the same result to be selected in all of them.
3
Pulse
Selects which pulse result is shown. Like the Result, this selection is shared
with the Statistics and Table views.
4
Statistics summary
Display of measurement statistics for the selected Result.
5
Vertical range
Located at the top of the left graph edge and at the bottom of the left graph
edge, use these controls to adjust the values at the top of the graph and the
bottom of the graph.
6
Plot
Selects between Trend and FFT for the trace.
7
Autoscale
Set the axes to values that show all trace points.
8
Horizontal offset
Adjusting this value moves the graph right or left.
9
Trigger indicator
Indicates the trigger point on the pulse train if the trigger occurred during the
time frame of the pulse measurements.
10
Pulse indicator
Indicates the pulse selected by the Pulse setting.
11
Pulses
Adjusts the horizontal scale.
xxx
Changing the Pulse Statistics Display Settings (see page 88)
Pulse Table Display
Pulse measurements can be displayed in a table or individually. The Pulse Table lists the selected
measurements in a spreadsheet format, showing the pulse number on which the measurement was
SignalVu Vector Signal Analysis Software Printable Online Help
41
Taking Measurements
Pulse Table Display
taken and the value of the measurement for the pulse number. Pulses are numbered according to their
relationship to a time reference (either the Acquisition Start point or the Trigger point). Those before the
reference point have negative numbers and those after it are positive.
The analyzer takes the following pulse measurements: Average ON Power, Peak Power, Average
Transmitted Power, Pulse Width, Rise Time, Fall Time, Repetition Interval (Sec), Repetition Rate (Hz),
Duty Factor (%), Duty Factor (Ratio), Ripple, Droop, Pulse-Pulse Phase Difference, Pulse-Pulse Frequency
Difference, RMS Frequency Error, Maximum Frequency Error, RMS Phase Error, Maximum Phase Error,
Frequency Deviation, Phase Deviation, and Time. See Measurements (see page 7) for definitions.
Displaying the Pulse Table
1. Press the Displays button or select Setup > Displays.
2. Select PulsedRF in the Folders box.
3. Double-click Pulse Table in the Available displays box to add the display to the Selected displays box.
4. Click OK.
Selecting the Measurements to Take
1. With the Pulse Table selected, press the Settings button.
2. In the Pulse Table Settings control panel, select the Measurements tab.
42
SignalVu Vector Signal Analysis Software Printable Online Help
Taking Measurements
Pulse Trace Display
3. Select the measurements you wish to take from the list of measurements.
4. Click the close box ( ) to remove the Settings control panel.
Changing the Pulse Table Display Settings (see page 88)
Pulse Trace Display
The Pulse Trace display enables you to take and display measurements on pulses. The Pulse Trace display
shows the RF pulse that is being measured in the display and shows the measurement results along the left
side of the window. You can also choose to display arrows and lines in the graph that illustrate where on
the pulse the measurement is being taken.
Elements of the Pulse Trace Display
SignalVu Vector Signal Analysis Software Printable Online Help
43
Taking Measurements
Define Markers Control Panel
Item
Display element
Description
1
Optimized indicator
The check mark indicator in the upper, left-hand corner of the display shows
when the Pulse Trace display is the optimized display.
2
Result
Use this list to select the measurement to show. The measurement chosen
here selects the same result to be displayed in the Statistics view and
highlighted in the Table view. Selecting a result in any of these views causes
the same result to be selected in all of them.
3
Pulse
Selects which pulse result is shown. Like the Result, this selection is shared
with the Statistics and Table views. The maximum number of pulses that
can be measured is limited to 1000.
4
Pulse threshold indicator
This green triangle indicates the power threshold used to detect pulses. See
Settings > Params > Power threshold to detect pulses.
5
Autoscale
Set the axes to values that show all trace points.
6
Horizontal offset and scale
Located along the bottom edge of the trace display, these controls specify the
offset and scale on the horizontal axis.
7
Top of graph adjustment
Sets the power level shown at the top of the graph. If the number is greater
than the Ref Level, a white line will appear in the graph to indicate the Ref
Level.
8
Vertical scale
Sets the vertical scale value.
xxx
Changing the Pulse Trace Display Settings (see page 88)
Define Markers Control Panel
The Define Markers Control Panel is used to enable markers and set their properties. You can set up to five
markers including the marker reference. Markers are shown in most displays.
Markers have two types of on-screen readouts: Absolute and Delta. When Readouts is set to Absolute,
each readout displays only the marker’s position on the trace. In Frequency displays, this means the
marker readout shows the frequency and power of the trace at the marker position. When Readouts is set
to Delta, each delta marker (M1-M4) readout displays both the marker’s position on the trace and the
difference between its position and the position of the Reference Marker (MR).
Defining Markers
1. Select Markers > Define Markers to display the Define Markers control panel.
44
SignalVu Vector Signal Analysis Software Printable Online Help
Taking Measurements
Define Markers Control Panel
2. Select Add to turn on the next marker. A drop-down list under the marker label allows you to assign
the marker to a trace.
NOTE. The first marker defined will always be MR. The MR marker is the reference for delta marker
readouts.
3. Select the trace to which the marker should be attached from the drop-down list.
4. Click Add to add additional markers.
5. Click the close button to remove the Define Markers control panel.
Defining Peaks
You can specify two amplitude values that define peaks.
NOTE. The settings shown in the DPX Signal Density section of the Define Peaks tab are not used by
SignalVu.
Amplitude
Peak Threshold
Peak Threshold specifies the level that the signal must exceed to be considered a peak.
Minimum Excursion
Minimum Excursion specifies how much the signal must decrease and then increase
before another peak can be declared.
xxx
1. Select Markers > Define Markers to display the Define Markers control panel.
2. Select the Define Peaks tab.
3. To define the level for Peak Threshold, enter a value in the Peak Threshold number entry box.
SignalVu Vector Signal Analysis Software Printable Online Help
45
Taking Measurements
Using Markers
4. To define the amount the trace must dip, enter a value in the Peak Excursion number entry box.
5. Click the close button to remove the Define Markers control panel.
Using Markers
Markers are indicators in the display that you can position on a trace to measure values for the X and Y
axes, such as frequency, power, and time. A Marker always displays its position and, if enabled, will
display the difference between its position and that of the Marker Reference (MR).
You can display up to five markers including the marker reference. Markers can all be placed on the
same trace or they can be placed on different traces. There are two types of Markers: Reference and
Delta Markers. The Marker Reference (labeled MR in the graph) makes absolute measurements and is
also used for calculating differences when Delta readouts are enabled. The Delta Markers (labeled M1
to M4 in the graph) are used to measure other points on the trace or the difference between the Marker
Reference and the Delta marker.
Measuring Frequency and Power
To measure the frequency and power at a point on a Spectrum trace:
1. Select Markers > Define Markers.
2. Select the Marker Properties tab.
3. Click Add. This displays a drop-down list under MR (Marker Reference), found inside the Reference
box. The first marker defined is always designated the Marker Reference. Subsequently defined
markers are designated as Delta Markers (you can also select and adjust markers by clicking on an
existing marker on a trace).
4. From the drop-down list, select the trace to which you want to assign the marker.
46
SignalVu Vector Signal Analysis Software Printable Online Help
Taking Measurements
Using Markers
5. Click the close control panel button to remove the Define Markers control panel.
6. Click on the marker on the trace to activate that marker.
7. Drag the marker in the graph using the touchscreen or a mouse to move the marker to the desired
location on the trace. You can also click on the marker location textbox in the Markers toolbar at the
bottom of the screen and adjust it with your mouse wheel. The Peak button in the Markers toolbar and
the arrow buttons to the right of it control marker peak searching on the trace.
8. Read the frequency and power level of the marker position on the display.
9. Read the signal density, frequency and power level of the marker position on the display.
The following table shows the appearance of the three types of marker readouts.
Marker Reference Readout
Absolute Marker Readout
Delta Marker Readout
xxx
The following table shows the appearance of the marker indicators as they appear on the trace.
SignalVu Vector Signal Analysis Software Printable Online Help
47
Taking Measurements
Marker Reference
Using Markers in Noise Mode
Absolute Marker
Delta Marker
xxx
Controlling Markers with the Touchscreen Actions Menu
In addition to controlling the marker actions from the front panel or screen menu items, you can use the
touch screen actions menu to move markers or add and delete markers.
To use the Touchscreen Actions menu, touch the display and hold for one second, then remove your finger.
You can also use a mouse to display the Touchscreen Action menu by clicking the right mouse button.
Menu item
Description
Marker to peak
Moves the selected marker to the highest peak. If no marker is turned on, this control
automatically adds a marker.
Next Peak
Moves the selected marker to the next peak. Choices are Next left, Next right, Next
lower (absolute), and Next higher (absolute).
Add marker
Defines a new marker located at the horizontal center of the graph.
Delete marker
Removes the last added marker.
All markers off
Removes all markers.
xxx
Using Markers in Noise Mode
In the Spectrum display, you can set Markers to Noise Mode to measure noise on the trace. Markers in
Noise Mode operate just as they do in normal mode, but the readouts for the markers are in dBm/Hz
and dBc/Hz.
dBm/Hz is the power in milliwatts referenced to a 1 Hz bandwidth. To make this measurement, the
analyzer assumes that the measured signal is random noise. It then converts the measured power (made at
any RBW) to the power that would be measured had a 1 Hz filter been applied for the measurement.
48
SignalVu Vector Signal Analysis Software Printable Online Help
Taking Measurements
Using Markers in Noise Mode
dBc/Hz represents dBm/Hz referenced to a carrier. Here, it is assumed that the carrier is a CW signal,
and its signal level does not change when the RBW is changed, so the Reference Marker measurement
on the carrier is unchanged from any other marker measurement. However, the delta marker values
are converted to dBm/Hz, and then a difference value, in dBc/Hz, is calculated between each delta
measurement and the reference.
Measuring Noise
To measure noise on a Spectrum trace:
1. Select Markers > Define to display the Markers control panel.
2. Click Add. The first marker defined is always designated the Marker Reference. Subsequently defined
markers are designated as Delta Markers (you can also select and adjust markers by clicking on an
existing marker in the display).
3. Click Add again so that there are at least two markers defined.
4. Check that Readouts is set to Delta.
5. If you have more than one trace defined, use the drop-down list for each marker to set it to the trace
on which you want to measure noise.
6. Select the Settings button to display the Spectrum settings control panel.
7. Click the Prefs tab.
8. Click the Marker Noise Mode check box so it is checked.
9. Click the Traces tab.
10. Verify that Detection is set to Average for the trace you are using for this measurement.
11. Click the Ana (Analysis) button.
12. Select the Units tab.
13. Select dBm for the Amplitude units.
14. Click the Close button to remove the control panel.
15. Move the markers to the desired locations on the trace.
16. Read the frequency and power level for the selected marker in the upper corners of the display. To
display the delta measurement in dBc/Hz, select the delta marker (M1, M2, M3 or M4) by clicking on
it or by selecting it in the drop-down marker list in the Markers toolbar.
SignalVu Vector Signal Analysis Software Printable Online Help
49
Taking Measurements
50
Using Markers in Noise Mode
SignalVu Vector Signal Analysis Software Printable Online Help
Reference
Touch-screen Actions
Touch-screen Actions
You can use the touch screen to change marker settings and how waveforms are displayed by using the
Touch-screen Actions menu.
To use the Touch-screen Actions menu, touch the display in a graph area and hold for one second, then
remove your finger. You can also use a mouse to display the Touch-screen Action menu by clicking
the right mouse button.
SignalVu Vector Signal Analysis Software Printable Online Help
51
Reference
Icon
Touch-screen Actions
Menu
Description
Select
Selects markers and adjusts their position.
Span Zoom
Zooms the graph area about the selected point. Touch the graph
display at a point of interest and drag to increase or decrease the
span about the point of interest. Span Zoom adjusts the span
control and can affect the acquisition bandwidth.
CF Pan
Adjusts the Center Frequency according to horizontal movement.
Zoom
Adjusts horizontal and vertical scale of the graph. The first
direction with enough movement becomes the primary scale of
adjustment. Adjustment in the secondary direction does not occur
until a threshold of 30 pixels of movement is crossed.
Dragging to the left or down zooms out and displays a smaller
waveform (increases the scale value). Dragging to the right or up
zooms in and displays a larger waveform (decreases the scale
value).
Pan
Adjusts horizontal and vertical position of the waveform. The first
direction with enough movement becomes the primary direction of
movement. Movement in the secondary direction does not occur
until a threshold of 30 pixels of movement is crossed.
-
Reset Scale
Returns the horizontal and vertical scale and position settings
to their default values.
-
Marker to peak
Moves the selected marker to the highest peak. If no marker is
turned on, this control automatically adds a marker.
-
Next Peak
Moves the selected marker to the next peak. Choices are Next
left, Next right, Next lower (absolute), and Next higher (absolute).
-
Add marker
Defines a new marker located at the horizontal center of the graph.
-
Delete marker
Removes the last added marker.
-
All markers off
Removes all markers.
xxx
Touch-screen Menu for Spurious Display
The Touch-screen actions menu in the Spurious display has some minor changes compared to the standard
version used in other displays.
52
SignalVu Vector Signal Analysis Software Printable Online Help
Reference
Elements of the Display
Icon
-
Menu
Description
Single-range
Changes the current multi-range display to a single range display.
The displayed range is the range in which you display the
touchscreen-actions menu. Selecting Single-range from the menu
is equivalent to selecting Single on the Settings > Parameters tab.
-
Multi-range
Changes the current single-range display to a multi-range display.
Selecting Multi-range from the menu is equivalent to selecting
Multi on the Settings > Parameters tab.
-
Marker -> Sel Spur
Moves the selected marker to the selected spur.
xxx
Elements of the Display
The main areas of the application window are shown in the following figure.
SignalVu Vector Signal Analysis Software Printable Online Help
53
Reference
Elements of the Display
Specific elements of the display are shown in the following figure.
54
SignalVu Vector Signal Analysis Software Printable Online Help
Reference
SignalVu Vector Signal Analysis Software Printable Online Help
Elements of the Display
55
Reference
Data File Formats
Ref
number
Setting
Description
1
Displays
Opens the Select Displays dialog box so that you can select measurement
displays.
2
Markers
Opens or closes the Marker toolbar at the bottom of the window.
3
Settings
Opens the Settings control panel for the selected display. Each display has
its own control panel.
4
Acquire
Opens the Acquire control panel so that you can define the acquisition settings.
5
Analysis
Opens the Analysis control panel so that you can define the analysis settings
such as frequency, analysis time, and units.
6
Center Frequency
Displays the Center Frequency. To change the value, click the text and enter the
frequency with a keyboard. For fine adjustments, you can use the mouse wheel.
7
Reference Level
Displays the reference level. To change the value, click the text and enter a
number using a keyboard, or use a mouse scroll wheel.
8
Replay
Runs a new measurement cycle on the existing acquisition data record using
any new settings.
9
Run
Starts and stops data acquisitions. When the instrument is acquiring data, the
button label has green lettering. When stopped, the label has black lettering.
You can specify the run conditions in the Run menu. For example, if you
select Single Sequence in the Run menu, when you click the Run button,
the instrument will run a single measurement cycle and stop. If you select
Continuous, the instrument will run continuously until you stop the acquisitions.
10
Check mark indicator
The check mark indicator in the upper, left-hand corner of the display indicates
the display for which the acquisition hardware is optimized.
xxx
Data File Formats
You can save different types of data for later recall and analysis.
56
SignalVu Vector Signal Analysis Software Printable Online Help
Reference
Data File Formats
Saved File Types
File Type
File Extension
Description
Setup files
.setup
Setup files enable you to save instrument settings for later recall. Using
these files saves setup time and ensures consistent measurements.
Picture
.png/.jpg/.bmp
Screen capture of SignalVu application window. They are useful for
documenting results in test reports.
Results Export
.csv
Results files contain the trace points and numeric values that were
produced by the selected measurement. The header of a Results file
includes key acquisition and analysis settings to aid in the interpretation
of the data. The file is saved as a plain text file, but the contents are
formatted as CSV (comma-separated values). Results files can be
opened from applications such as Microsoft Excel and MATLAB.
Measurement
Settings
.txt
Measurement settings files contain a list of settings that describe how
the instrument is set up for the selected measurement. The list contains
measurement settings (for example, Span), trace settings (for example,
whether or not a trace is selected) and global settings (for example,
Frequency and Reference Level). The list of settings contained in the
file varies depending on which display is selected.
Selected Trace
varies with display
Trace files contain the trace results data in binary format. These
files are only readable by the SignalVu application. Several of the
instrument’s measurements allow you to recall a Trace file for visually
comparing a saved trace to a live trace.
Acquisition Data
with Setup
.tiq
These files contain the acquisition data record and complete instrument
setup (in binary format). Use these files to save data for later recall and
analysis. When you save an Acquisition Data file, the current Setup
is always saved with the file. At the time of recall, you will be asked
whether you want to restore only the acquisition data or both data and
setup. If the instrument is already set up for a specific measurement,
you will probably want to recall only the acquisition data. Recalling
both data and setup returns the instrument to the same state it was
in at the time you saved the file.
Acquisition Data
.csv
These files contain IQ sample data before it has been processed by
a measurement. The acquisition data points are saved as IQ pairs.
Use this format to import the acquisition data into Microsoft Excel for
further analysis.
Acquisition Data
.mat
These files contain IQ sample data before it has been processed by
a measurement. The acquisition data points are saved as IQ pairs.
Use this format to import the acquisition data into MATLAB for further
analysis.
Range file
.csv
These files contain a list of settings that describe how the instrument is
set up for the Spurious measurement. The file contains the number of
ranges enabled, the start and stop frequencies for each enabled range,
the limits for each enabled range, the mask type and more.
xxx
SignalVu Vector Signal Analysis Software Printable Online Help
57
Reference
Data File Formats
Results Export File Format
The Results Export format contains trace points and/or scalar results produced by the measurement. The
file contains general information about the measurement settings at the top of the file and the results data in
the second part of the file. Groupings of settings or results are headed with [text], as described below.
At the top of the file is the measurement name and the date and time data was acquired.
The first grouping of settings are the [Global Parameters]. These settings include the Measurement
Frequency, Acquisition Data, Reference Level and others.
The second grouping of settings is [Parameters]. These settings are specific parameters which vary
depending on the measurement.
The next group is [Trace Parameters], which may not be present, depending on the measurement. Within
this group, there are parameters specific to a trace. There will be a Trace Parameters group for each
trace shown on the display.
The next group is [Results]. These are scalar results for the measurement.
Next is [Traces]. The Traces group consists of one or more [Trace] groups. There is one Trace group for
each trace. Each [Trace] group contains background information about the trace (units, number of points, x
scaling, and others depending on the measurement) at the top of the group, followed by the trace points.
Acquisition Data with Setup File (.tiq) Format
The file consists of two parts - the header that is in XML and the data that is in binary format.
Header. The header consists entirely of the DataFile element. This element is broken down into
sub-elements.
1. DataSetsCollection
2. Setup
DataSetsCollection. The DataSetsCollection contains a DataDescription element, a DataSet element,
and a ProductSpecific element.
Binary Data. Binary data is a sequence of Int32 values, which are IQ pairs (I,Q,I,Q, ...) in binary Little
Endian format.
To convert these values to volts, multiply the individual values by the Scaling value in the DataDescription.
The binary data starts at an offset into the file == the "offset" attribute in the DataFile element. This
offset number will always start at the 19th character into the file (starting with 1), and will always be 9
characters long.
NOTE. You should not casually modify the XML header, because this will change the offset to the start of
the binary data.
58
SignalVu Vector Signal Analysis Software Printable Online Help
Reference
Error and Information Messages
Acquisition Data Files (.csv)
The acquisition data files have two sections. At the top of the file is the following information:
SamplingFrequency - The sampling frequency in Hertz.
NumberSamples - The number of IQ samples in the file.
DateTime - When the data was acquired.
Frequency - The center frequency in Hertz.
AcquisitionBandwidth - The acquisition bandwidth Hz.
Following the AcquisitionBandwidth are the data. The data are IQ pairs, in volts.
Groupings of settings or results are headed with [some text].
The first thing in the file is the measurement name and the date/time when the acquisition was taken.
The first grouping [Parameters] are global parameters. Measurement Bandwidth in this group is the
measurement bandwidth used by the General Signal Viewing measurements (Spectrum, Amplitude
vs.Time, etc). It also includes some source settings, like Acq BW, Dither, Preamp, and RF Attenuation.
The second grouping [Parameters] are measurement-specific parameters.
Another grouping which may occur is [Trace Parameters]. Within this group, there will be a set of
parameters, one for each trace that is currently shown.
Another grouping is [Results]. These are scalar results for the measurement.
Another grouping is [Traces]. It has [Trace] groups under it, one for each trace. Each [Trace] group has
some background information about the trace (units, number of points, x scaling, etc), and the trace
points themselves.
Acquisition Data Files (.mat)
The acquisition data files saved in MatLab format contain the following MatLab variables:
InputCenter - The center frequency in Hertz.
XDelta - The sample period in seconds.
Y - A complex array containing IQ pairs.
InputZoom - Always 1, and indicates complex data.
Error and Information Messages
Error and Information Messages
The following list describes some of the common error and information messages that might appear
during instrument operation. Messages that apply specifically to one or more measurements appear in the
SignalVu Vector Signal Analysis Software Printable Online Help
59
Reference
Error and Information Messages
displays. Messages that pertain globally, such as those about hardware status, are shown in the Status Bar
at the bottom of the analyzer application window.
Acq BW too small for current setup
The display needs a wider acquisition bandwidth than what the current data record contains. This can be
due to any of the following reasons:
The sampling parameters are being manually controlled.
In the Acquire control panel > Sampling Parameters tab, set the Adjust control to All Auto to allow the
software to pick the sample rate and record length that it needs.
A display other than the one you intended has been selected. The selected display has requested
a smaller acquisition bandwidth to achieve a better accuracy or dynamic range for its particular
measurement.
Select the display that contains the message. Click Run if the instrument is not already acquiring data.
Acquisitions are not running and the measurement now requests a wider bandwidth than the last
acquisition.
Click Run to perform a new acquisition with a wider bandwidth.
The data is from a recalled TIQ file.
There is no way to increase the acquisition bandwidth for saved IQ data. You must adjust the measurement
settings so that less bandwidth is required.
The data is from a recalled oscilloscope waveform file.
In the Acquire control panel, compare the Samples/s readout on the IQ Sampling Parameters tab to the
Sample Rate readout on the Scope Data tab. If the sample rate for the oscilloscope data is more than
twice the value of the IQ sample rate, it means that the recalled waveform data was decimated for a
previous analysis that didn’t need the full bandwidth of the oscilloscope waveform. Recall the oscilloscope
waveform file again to force the software to perform a new conversion based on your new measurement
settings. Each time you change measurement settings in a way that increases the required acquisition
bandwidth, you will need to recall the oscilloscope waveform file.
The current Frequency setting is different than that of the data record, causing the measurement
bandwidth to fall at least partly outside the bandwidth of the data.
If you are using a recalled oscilloscope waveform file, try recalling it again with the new Frequency
setting. This will force a new conversion from oscilloscope samples to IQ samples.
Analysis failure: <description of error>
The instrument is unable to complete a measurement due to difficulty in characterizing the signal. For
example, due to either the signal or settings, the instrument may not be able to recognize a pulse so it
can compute the pulse measurements.
Try changing settings to improve analysis. For example, when Pulse Trace is displayed, try changing
the settings on the Settings > Params.
Analysis failure: Carrier detection failed
60
SignalVu Vector Signal Analysis Software Printable Online Help
Reference
Error and Information Messages
The instrument was unable to locate a carrier signal. Try adjusting the Carrier Threshold or Integration
BW values, if the measurement has these controls.
Analysis Length was limited
This message appears if the "Results Length", the time over which the measurement computed its results,
is less than the Actual Analysis Length reported in the Analysis Time control panel tab and the Time
Overview display. The Results Length is indicated by the magenta line below the Time Overview graph.
This can occur because the acquisition contained more data samples than a measurement can process (for
example, digital demodulation is limited to 80,000 samples) or the measurement had to use some of the
first and last samples for pre-measurement processes.
Analysis length too small for current setup
Increase the Analysis Length or decrease the RBW (Spectrum, ACPR, MCPR).
Avg Tx not available in Volts units
The Average Transmitted Power measurement is not defined for Volts.
Can’t get acquisition data record
No acquisition record currently exists in memory (run an acquisition or recall a file), or an error has
occurred. Repeat the acquisition.
Can’t replay data from swept acq
The measurement could not produce results because it is a real-time only measurement but was asked to
reanalyze (Replay) an acquisition taken in swept mode.
Can’t replay. Live data needed for swept settings
The measurement could not produce results because it was asked to reanalyze (Replay) the acquisition but
it is in Swept acquisition mode. Swept-mode measurements cannot analyze recalled data.
CISPR accuracy limited by acq memory. Adjust RBW or freq range
The CISPR function was applied, but the available data did not represent a long enough time to satisfy
CISPR requirements. Increasing RBW reduces the amount of time needed for analysis. Reducing
frequency range (for example, by reducing Span), decreases sample rate, allowing the available memory
to cover a longer time period.
An acquisition was completed even though a hardware failure was detected. This message refers to the
acquisition data currently being analyzed, but not necessarily to the current status of the instrument.
If this data is from a saved file, the error cannot be cleared.
Data acquired during RF ADC overrange
An acquisition was completed but the signal was outside the range of the analog-to-digital converter at the
time this data was acquired. This message refers to the acquisition data currently being analyzed, but not
necessarily to the current status of the instrument.
If this data is from a saved file, this error cannot be cleared.
Data acquired during RF digital gain overflow
SignalVu Vector Signal Analysis Software Printable Online Help
61
Reference
Error and Information Messages
This data was acquired when the input signal contained peaks greater than 6 dB above the Reference
Level setting.
If the data is from a file, this error cannot be cleared.
Data from unaligned instrument
The acquisition data was captured when the instrument was not aligned. This message refers to the
acquisition data currently being analyzed, but not necessarily to the current status of the instrument.
Measurements made on this data might not be accurate.
Data from uncalibrated instrument
The acquisition data was captured when the instrument was not calibrated. This message refers to the
acquisition data currently being analyzed, but not necessarily to the current status of the instrument.
If this data is from a file, the error cannot be cleared.
Data acquired with 3 GHz preamp
This is a warning that signals above 3 GHz are likely to be severely attenuated because the Preamp was on
when the data was acquired. The (optional) Preamp is not specified for operation above 3 GHz.
Disabled: data is from swept acquisition
The display needs to run in real-time mode. The display associated with this message cannot run now
because it is not the selected display, and the selected display is performing multiple acquisitions (it is
in swept mode).
Change the settings of the selected display so it is performing real-time acquisitions.
Select the associated display to make it the selected display. When it is selected, it will force the
acquisition parameters to change to meet its own needs.
Needs swept acq or larger AcqBW - Acquire data while display is selected
The display is not running because it needs to perform multiple acquisitions (it must be in swept mode) but
it is not the selected display. Only the selected display can perform multiple acquisitions.
Select the display showing this message to give it control of acquisitions parameters.
Sometimes, only one display can work and the others will be blank and show errors. This happens when
different displays have conflicting demands on the acquisition data record.
Export failure: file not saved
An error occurred while exporting Results. The file was not created.
Export the results again.
Export failure: unable to open results file for export. File not saved.
The Export Results file could not be opened for writing, so the export of results was not completed.
Verify that there is sufficient free space on hard disk.
Insufficient data for CISPR. Acquire while display is selected
62
SignalVu Vector Signal Analysis Software Printable Online Help
Reference
Error and Information Messages
This message appears when a measurement is not the selected measurement and CISPR filters are selected.
Set the measurement to be the selected measurement and reacquire the signal.
IQ Processing Error: 8012
This message occurs in GP Digital Modulation displays. The most likely cause for this message is that
there are not enough symbols to analyze. This can happen if
The Analysis Length is set too short. Increase the Analysis Length (see page 97).
The Analysis Offset has pushed the Analysis Time so far out that the actual Analysis Length is too
short, even though the user-requested Analysis Length would have been long enough without the
excessive offset. Decrease the Analysis Offset (see page 97).
The input signal is bursted, and the burst does not contain enough symbols.
Needs swept acq or larger Acq BW - Acquire data while display is selected
The display has one of two problems: It is not the selected display, which prevents it from controlling
the hardware acquisition parameters, and setting the acquisition mode to Swept; or its settings require a
wider data bandwidth.
Select the display that you are interested in and it will change the acquisition to meet its own needs.
Increase the acquisition bandwidth manually or by changing the selected display’s settings to cause
the wider bandwidth.
No Math trace: unmatched trace lengths
A math trace could not produced because the traces selected to generate the math trace do not have
the same number of points. This can easily happen if both traces are recalled, but were saved under
different “Points” settings. This can also occur if one of the selected traces is a live trace and the other
trace is a recalled trace.
In a Spectrum display, as long as one trace is live, you can change the “Points” setting (Setup >
Settings > Freq & Span tab) to match the recalled trace.
If you are using two recalled traces to generate the Math trace. You must recreate at least one of
the traces.
No burst detected
The Burst Detection Mode (see page 113) is On, but no burst was detected in the signal.
Check that the Threshold setting is properly set.
Not enough samples for current setup
The measurement was not able to run because the combination of analysis length, offset, and measurement
bandwidth relative to acquisition bandwidth, were such that not enough samples were available for the
measurement to analyze. This can occur when two or more displays are shown and one display requires
a wide acquisition bandwidth and another display requires a much narrower bandwidth. The display
requiring the much narrower bandwidth must decimate and filter the acquisition record which can result in
too few samples left for the measurement.
Increase the Analysis Length to provide more samples.
SignalVu Vector Signal Analysis Software Printable Online Help
63
Reference
Error and Information Messages
Close any displays you don’t currently need.
No FFT (not all pulses have results)
If a pulse cannot be measured (because its shape is too indistinct or it does not meet the parameters that
define a pulse (see page 128)), its results will be “- -" for every measurement on that pulse. The instrument
cannot compute an FFT.
No pulses found
The instrument was unable to find any complete pulses in the signal.
Make sure the analysis length (see page 96) includes at least one complete pulse cycle, from before
one rising edge until after the next rising edge.
Pulse Detection Error
The instrument was unable to detect a pulse.
The pulse Measurement Filter (see page 128) needs to be smaller. Try reducing the bandwidth and/or
selecting the Gaussian filter.
Detection threshold is not set to the proper level for the signal. Adjust the Power threshold to detect
pulses (see page 128).
The pulse interval is too long for the current settings. Try decreasing the filter bandwidth (see
page 128), as this may reduce the number of data points to a manageable quantity.
RBW conflict. Increase Span or Analysis Length
The measurement is not running because the actual RBW used by the measurement is too large for the
current acquisition span. Typically, the analysis length is too short as well.
Either increase the span or increase the Analysis Length.
RBW decreased
The current span or acquisition bandwidth is too small to allow a wider RBW filter.
Increase the span or acquisition bandwidth if the decreased RBW is not acceptable.
RBW increased
The current Spectrum Length (or Analysis Length if Spectrum Length is not Independent) is too small
to allow the requested RBW.
Increase the Spectrum Length (or Analysis Length) if the increased RBW is not acceptable.
RBW limited by AcqBW to: XX Hz
The requested RBW is too close to the acquisition BW. Increase the frequency range of the measurement
(for example, Span)
RBW too small/large for current Acq BW
If the RBW is set manually, it is possible for the acquisition bandwidth to be incompatible with the
RBW setting.
Change the RBW setting.
64
SignalVu Vector Signal Analysis Software Printable Online Help
Reference
Error and Information Messages
Adjust the Acq BW setting, either directly (Setup > Acquire > Sampling Params: select on of the
manual modes) or by adjusting the measurement bandwidth of the selected display (Setup > Acquire >
Sampling Params: All Auto).
Recall error: Setup not completely restored
An error occurred while recalling a Setup file. Thus, the current setup may be a combination of settings
from the Setup file and the previous Setup.
Recall the setup again.
Recall failure: problem with file or file contents
An error occurred while recalling a Setup, Trace or Data file. This can occur because of a problem opening
the file (operating system error) or because of a problem with the contents of the file.
Recall the file again.
Restoring acquisition data...
This is a status message displayed while data is being restored from a file.
Save failure: file not saved
An error occurred while saving a Setup or Data file.
Save the file again.
Saving acquisition data...
This is a status message displayed while data is being saved to a file.
Selected VBW does not use full Spectrum Length
This message can occur when the Spectrum Length is greater than required for the VBW filter. If you
look at the Time Overview display, the Magenta line for Results Length indicates the part of the Spectrum
Length that was actually used. The measurement results are correct, but don’t include some of the data in
the selected Spectrum Length. To clear this message, you can set the Spectrum Length to Auto.
Setup error: <description of error>
When this message appears, it includes text that explains the problem. For example, the ACPR display
might show: “Setup error: channels can’t overlap”. Setup errors are the result of conflicts in instrument
settings. These types of errors occur when a user makes manual changes to settings. In the example
above, the channel settings in the Channel Power and ACPR display have been set so that the channels
overlap in frequency.
Adjust the instrument settings, or change a setting back to Auto, to eliminate the error.
Setup error: Integration BW exceeds MeasurementBW
When this message appears, it includes text that explains the problem. Setup errors are the result of
conflicts in instrument settings. These types of errors occur when a user makes manual changes to settings.
Adjust the instrument settings, or change a setting back to Auto, to eliminate the error.
Setup error: Measurement time for Freq & Phase results
SignalVu Vector Signal Analysis Software Printable Online Help
65
Reference
Menu Overview
The Measurement time for Freq & Phase results (see page 110) specifies how far across the pulse top the
instrument should wait before measuring the Phase Difference and Frequency Difference for each pulse.
If this value is set too large for any of the pulses in the signal, the measurement point ends up on the
falling edge or during the pulse off time.
Decrease the Measurement time for Freq & Phase results setting (Settings > Define tab).
Unexpected software error. Please cycle power and try again. If the problem persists, contact your
Tektronix Service Center.
An unrecoverable error has occurred, and the instrument application software will shut down.
Switch the instrument off and restart it or relaunch the TekScope and SignalVu applications.
Unable to lock to External Frequency Reference.
VBW not applied - Acq BW too small
Increase VBW or measurement bandwidth. Make sure Sampling Parameters are set to Auto.
VBW not applied - Spectrum Length too short
This message occurs when the requested VBW can’t be produced because the Spectrum Length is too short.
To clear this problem, set the Spectrum Length to Auto or manually increase the Spectrum Length (see
Setup > Analysis > Spectrum Time tab). If Spectrum Length is coupled to Analysis Length, set Analysis
Length to Auto or manually increase it (see Setup > Analysis > Analysis Time tab).
Menu Overview
The main menus are:
66
SignalVu Vector Signal Analysis Software Printable Online Help
Reference
File Menu
Menu
Description
File (see page 67)
Select measurements, open and save files, print documents, and preset.
View (see page 73)
Change display size, display the Marker toolbar and Status bar.
Run (see page 75)
Start, stop and abort acquisitions, replay measurements, select single or continuous
acquisition mode.
Markers (see page 77)
Define markers and search for signal peaks.
Setup (see page 77)
Change settings for acquisition, analysis, and measurements.
Tools (see page 78)
Perform searches and configure user preferences.
Window (see page 79)
Controls the size and layout of displays within the SignalVu application.
Help (see page 79)
Access the online help, display information about the instrument hardware and software.
xxx
File Menu
Command
Description
Recall (see page 67)...
The Recall dialog enables you to recall saved data, setups and traces.
Save (see page 68)
Saves a file without asking for a file parameters (based on most recent settings).
Save As... (see page 68)
Displays the Save dialog enabling you to specify the parameters of the save operation.
Data Properties (see
page 106)
Displays characteristics of the most recently analyzed record in the display.
Print (see page 69)...
Prints the selected display.
Print Preview (see page 69)
Displays a preview of the print output.
Preset (see page 72)
Preset resets the instrument to factory defaults. Acquisition data and settings that have
not been saved will be lost.
Exit
Closes the SignalVu application. Exit does not shut down the instrument.
xxx
Recall
Menu Bar: File > Recall
Use the Recall command to load previously saved acquisition data, setups or trace data.
To recall data or setups
1. Select File > Recall. This displays the Open dialog.
SignalVu Vector Signal Analysis Software Printable Online Help
67
Reference
Save / Save As...
2. Select the file type to be recalled and click Open.
Save / Save As...
Menu Bar: File > Save / Save As...
Use Save / Save As... to store acquisition data, setups, and traces. Save is also used to export traces, results
and pictures of the display for use in other programs.
Difference Between Save and Save As
Use Save As to specify what kind of data you want to save and where the data should be saved. Use Save
to quickly save the same data as you saved the last time you executed a Save, without having to specify the
data type and location.
For example, suppose you want to save a picture of a spectrum trace each time you adjust a circuit to
document how the adjustments affect the output of the circuit. The first time you want to save a picture of
the display, you will need to select Save As. From the Save As dialog box, you specify the type of data
you want to save (Picture of Selected Display) and specify the location of the saved file. As long as the
Save and Export option (see page 78) is set to automatically name saved files, the next time you want to
save a picture of the display, you can just press Save on the front panel and a picture of the selected display
will be saved without requiring you to type a file name or the location of the file to be saved.
68
SignalVu Vector Signal Analysis Software Printable Online Help
Reference
Print
What Data Types Can Be Saved
Data type
Description
Acquisition Data
Data collected during acquisition that can be recalled for later analysis. Data is saved
in a format readable only by RSA6100A Series instruments or oscilloscopes running
SignalVu software.
Setup
Configuration information detailing instrument settings. Data can be saved in a format
readable only by RSA6100A Series instruments or oscilloscopes running SignalVu
software or in a text file.
Selected Trace
Saves the selected trace for later analysis by the analyzer. Data is saved in a format
readable only by RSA6100A Series instruments or oscilloscopes running SignalVu
software.
Exported Traces and Numeric
Results
Save traces and results in a file format that can be used by other programs.
Pictures of the Display
Save screen images in graphic image file formats that can be used in other programs.
Exported Acquisition Data
Save acquisition data records in a file format that can be used by other programs.
Acquisition data can be saved in either comma-separated-variable format or MATLAB
format.
xxx
Data File Formats (see page 56).
Options for Saving Pictures of the Display
Option
Setting
Description
Image
Format
PNG
Saves exported screen captures in Portable Network Graphics format.
JPG
Saves exported screen captures in Joint Photographic Experts Group (JPEG)
format.
BMP
Saves exported screen captures in Windows bitmap format.
xxx
Print
Menu Bar: File > Print
Print displays the Windows Print dialog box for printing a screen capture of the display. To save ink when
printing, use the Colors tab to set the color scheme. See Options Settings (see page 78)
Print Preview
Menu Bar: File > Print Preview
Print Preview shows how a print out will appear when it is printed.
SignalVu Vector Signal Analysis Software Printable Online Help
69
Reference
Application Presets
Application Presets
Menu Bar: File > Application Presets
SignalVu includes a set of configuration files that are tailored to specific applications. These configuration
files, referred to as Application Presets, open selected displays and load settings that are optimized to
address specific application requirements. You can add to the default application presets by creating your
own application presets. See Creating Application Presets (see page 72). You access the application
presets through the Application Presets menu item.
To load an application preset:
1. Select File > Application Presets. This opens the Applications Presets dialog window.
2. Select the application preset that suits your needs.
3. Click OK to recall the application preset.
Application Preset
Description
Modulation Analysis
The Modulation Analysis setup application preset provides you with the most common
displays used during modulation analysis.
Pulse Analysis
The Pulse Analysis application preset provides you with the most common displays
used during pulse analysis, and makes changes to the default parameters to settings
better optimized for pulsed signal analysis. Option SVP is required to use the pulse
measurements applications preset.
Time-Frequency Analysis
The Time-Frequency preset configures the instrument with settings suited to analyzing
signal behavior over time.
xxx
Modulation Analysis
The Modulation Analysis application preset opens the following displays:
Signal Quality: Shows a summary of modulation quality measurements (EVM, rho, Magnitude
Error, Phase Error, and others).
Constellation: Shows the I and Q information of the signal analyzed in an I vs. Q format.
Symbol Table: Shows the demodulated symbols of the signal.
To use the Modulation Analysis preset:
1. Select File > Application Presets > Modulation Analysis. Click OK.
2. Set the measurement frequency.
3. Set the reference level so that the peak of your signal is about 10 dB below the top of the spectrum
display.
4. Set the modulation parameters for your signal. This includes the Modulation Type, Symbol Rate,
Measurement Filter, Reference Filter and Filter Parameter. All of these settings are accessed by
pressing the Settings button.
70
SignalVu Vector Signal Analysis Software Printable Online Help
Reference
Application Presets
For most modulated signals, the Modulation Analysis application preset should present a stable display of
modulation quality. Additional displays can be added by using the Displays button, and other settings can
be modified to better align with your signal requirements.
Pulse Analysis
The Pulse Analysis application preset opens the following displays:
Time Overview: Shows amplitude vs. time over the analysis period.
Pulse Trace: Shows the trace of the selected pulse and a readout of the selected measurement from
the pulse table.
Pulse Measurement Table: This shows a full report for the user-selected pulse measurements.
You can make a selected pulse and measurement appear in the Pulse Trace display by highlighting it in the
Pulse Measurement Table. Key pulse-related parameters that are set by the Pulse Analysis application
preset are:
Measurement Filter: No Filter.
Measurement Bandwidth: This is set to the maximum real-time bandwidth of the instrument. Note:
The label on the “Measurement Bandwidth” setting is just “Bandwidth”. Like the main instrument
Preset command and the other application presets, the Pulse Analysis application preset also sets
most other instrument controls to default values.
Analysis Period: This set to 2 ms to ensure a good probability of catching several pulses for typical
signals.
To use the Pulse Analysis preset:
1. Select File > Application Presets > Pulse Analysis. Click OK.
2. Set the Center Frequency control to the carrier frequency of your pulsed signal.
3. Set the Reference Level to place the peak of the pulse signal approximately 0-10 dB down from
the top of the Time Overview display.
You may need to trigger on the signal to get a more stable display. This is set up with the oscilloscope’s
controls. A rising-edge trigger works well for many pulsed signals.
4. Set the Analysis Period to cover the number of pulses in your signal that you want to analyze. To do
this, click in the data entry field of the Time Overview window and set the analysis length as needed.
Time-Frequency Analysis
The Time-Frequency Analysis application preset opens the following displays:
Time Overview: Shows a time-domain view of the analysis time ‘window’.
Spectrogram: Shows a three-dimensional view of the signal where the X-axis represents frequency,
the Y-axis represents time, and color represents amplitude.
SignalVu Vector Signal Analysis Software Printable Online Help
71
Reference
Preset
Frequency vs. Time: This display’s graph plots changes in frequency over time and allows you to
make marker measurements of settling times, frequency hops, and other frequency transients.
Spectrum: Shows a spectrum view of the signal. The only trace showing in the Spectrum graph
after selecting the Time-Frequency Analysis preset is the Spectrogram trace. This is the trace from
the Spectrogram display that is selected by the active marker. Stop acquisitions with the Run button
because its easier to work with stable results. In the Spectrogram display, move a marker up or down
to see the spectrum trace at various points in time.
The analysis period is set to 5 ms.
To use the Time-Frequency application preset:
1. Select File > Application Presets > Time-Frequency Analysis. Click OK.
2. When the preset’s displays and settings have all been recalled and acquisitions are running, adjust the
center frequency and span to capture the signal of interest.
3. Set the Reference Level to place the peak of the signal approximately 0-10 dB down from the top of
the Spectrum graph.
4. If the signal is transient in nature, you might need to set a trigger to capture it. You will need to use the
oscilloscope triggering functions to capture the signal.
When the signal has been captured, the spectrogram shows an overview of frequency and amplitude
changes over time. To see frequency transients in greater detail, use the Frequency vs. Time display.
The Time-Frequency Analysis preset sets the analysis period to 5 ms. The Spectrum Span is 40 MHz. The
RBW automatically selected for this Span is 300 kHz. For a 300 kHz RBW, the amount of data needed
for a single spectrum transform is 7.46 μs. A 5 ms Analysis Length yields 671 individual spectrum
transforms, each one forming one trace for the Spectrogram to display as horizontal colored lines. This
preset scales the Spectrogram time axis (vertical axis) to -2, which means that the Spectrogram has done
two levels of time compression, resulting in one visible line for each four transforms. This results in 167
lines in the Spectrogram for each acquisition, each covering 29.84 μs.
Creating Application Presets
You can add your own application presets to the list that appears in the Application Presets dialog. Create a
Setup file and save a copy of it to C:\SignalVu Files\Application Presets. The name you give the file will
be shown in the Application Presets list along with the sets provided by Tektronix. For instructions on how
to save a Setup file, see Saving Data (see page 9).
If the Tektronix application presets files are accidentally deleted, you can restore them by reinstalling the
SignalVu software. The software installation process will not remove user files you have placed in the
Application Presets directory.
Preset
Menu Bar: File > Preset
72
SignalVu Vector Signal Analysis Software Printable Online Help
Reference
View Menu
Preset resets settings and clears all acquisition data. Settings and acquisition data that have not been
saved will be lost.
After Preset resets the analyzer settings, it displays the Spectrum view.
Preset does not affect time or date settings; the Windows XP operating system settings, or Tools Menu
items.
View Menu
The View menu enables you to control the display of items in the application window.
Command
Description
Full Screen (see page 73)
Toggles all views between full-screen size and user-selected size.
Marker Toolbar (see page 73)
Shows or hides the Marker toolbar. Enables you to define Markers and perform Peak
searches.
Status Bar (see page 74)
Shows or hides the Status bar.
xxx
Full Screen
Menu Bar: View > Full Screen
When unchecked, clicking Full Screen resizes the application window to fill the screen. Full Screen mode
maximizes the application window, and turns off the application title bar.
When checked, clicking Full Screen restores the application window to its previous size. The application
title bar is restored.
Marker Toolbar
Application toolbar: Markers
Menu bar: View > Marker Toolbar
Select Marker Toolbar to display or hide the Marker Toolbar in the application window. The Marker
Toolbar enables you to operate existing markers or define new markers.
SignalVu Vector Signal Analysis Software Printable Online Help
73
Reference
Icon / Readout
Status Bar
Description
Opens the Define Markers control panel.
Selected marker readout. This readout shows which marker is selected. The pop-up
menu allows you to choose the selected marker, add markers, and turn all markers off.
Marker position controls. For frequency displays, this readout shows the marker position
in Hertz. For time displays, this readout shows the marker position in seconds. The
position of the selected marker can be changed by selecting the numeric readout and
using the knob to adjust the value.
Changes the analyzer’s Center Frequency to the frequency of the selected marker.
Not selectable for time markers.
Moves the marker to the highest peak on the signal. On displays that scale about zero
on the vertical axis (for example, Magnitude Error, EVM, and Frequency vs.Time), the
highest peak selected by the Peak button is an "absolute value", therefore, negative
peaks are included in the search for the highest peak.
Moves the selected marker to the next peak to the left of the current position.
Moves the selected marker to the next peak to the right of the current position.
Moves the selected marker to the next lower peak value. The peak value here refers to
the numeric value of the peak amplitude. Thus, when repeatedly moving the marker, it
can move to the right or left depending on the location of the next lower value.
Moves the selected marker to the next higher peak value. The peak value here refers to
the numeric value of the peak amplitude. Thus, when repeatedly moving the marker, it
can move to the right or left depending on the location of the next higher value.
Displays/hides the marker table from the display.
Removes the Marker Toolbar from the display.
xxx
Status Bar
The Status Bar displays information on specific instrument settings. It contains only status information; it
does not display any error information. The Status bar has no controls. It can be hidden.
Elements of the Status Bar
Area within Bar
Description
Run Status
Displays the running state. For example, some run states are Acquiring, Analyzing,
Ready, or Stopped.
Status message area
Displays status messages (for example, Data from ADC Overrange). When there no
status messages to report, displays current acquisition parameters (for example, Acq
Length: 22.320 us).
Acquisition parameters
Displays parameters of the acquisition, such as acquisition bandwidth and acquisition
length.
Scope Sample Rate
Displays the oscilloscope sample rate, for example, 25.00 GS/s.
xxx
74
SignalVu Vector Signal Analysis Software Printable Online Help
Reference
Run Menu
Run Status Indicators
Indicator
Description
Acquiring
The analyzer is capturing the signal.
Analyzing
The analyzer has captured the signal and is processing the signal record.
Replaying
The analyzer is analyzing recalled waveform or acquisition records.
Stopped
If Stopped is displayed, Signal acquisition has been halted. This can occur because the
Run button has been pressed or because a trigger event has occurred, signal acquisition
has occurred and Run mode was set to Single.
xxx
Showing or Hiding the Status Bar
Select View > Status to toggle the display of the Status bar.
Run Menu
The Run menu provides access to commands that control the signal acquisition.
Command
Description
Run (see page 75)
If acquisition mode is Stopped, selecting Run begins a new measurement/acquisition
cycle. If acquisition mode is Run, pressing Run halts the current measurement/acquisition
cycle after it completes.
Resume
Restarts data acquisition, but does not reset accumulated results, such as Average
or MaxHold. This allows you to stop acquisitions temporarily, then continue. If the
accumulation is already complete, for example, 10 acquisitions or 10 averages have
already been completed, each subsequent Resume command will cause one more
acquisition to be taken, and its results added to the accumulation. Resume is not
available if instrument settings have been changed.
Abort (see page 76)
Immediately halts the current measurement/acquisition cycle.
Replay (see page 76)
Reruns measurements using the current acquisition data or a saved file. Use this to
compute new results for old data after you change settings. If you are working with a
recalled oscilloscope waveform file, you should recall the file again rather than using
Replay.
Single Sequence (see
page 76)
Selects the single-sequence acquisition mode. This is only a mode selector; it does
not initiate an acquisition.
Continuous (see page 77)
Selects the continuous acquisition mode. Selecting Continuous does initiate acquisitions.
xxx
Run
Menu Bar: Run > Run
Application Bar: Run
Selecting Run begins a new acquisition/measurement cycle.
SignalVu Vector Signal Analysis Software Printable Online Help
75
Reference
Resume
Resume
Menu Bar: Run > Resume
Restarts data acquisition, but does not reset accumulated results, such as Average or MaxHold. This
allows you to stop acquisitions temporarily, then continue. If the accumulation is already complete, for
example, 10 acquisitions or 10 averages have already been completed, each subsequent Resume command
will cause one more acquisition to be taken, and its results added to the accumulation. Not available if
instrument settings have been changed.
Abort
Menu Bar: Run > Abort
Selecting Abort immediately halts the current acquisition/measurement cycle. In-process measurements
and acquisitions are not allowed to complete.
Replay
Menu Bar: Run > Replay...
Selecting Replay causes the current measurement to be rerun using the existing acquisition data.
Single Sequence
Menu Bar: Run > Single
Selecting Single sets the Run mode to Single. In Single mode, as soon as one acquisition sequence
completes, acquisition stops.
Note that a single acquisition sequence can require more than one acquisition. For example, in a spectrum
view, the trace function might be set to Average 100 acquisitions. Thus, a complete acquisition sequence
would consist of 100 acquisitions to produce 100 intermediate traces that are averaged together to create
the final trace that is displayed. Once the 100 acquisitions have been completed, acquisition stops.
This is only a mode selector, it does not initiate an acquisition.
76
SignalVu Vector Signal Analysis Software Printable Online Help
Reference
Continuous Acquisition Mode
Continuous Acquisition Mode
Menu bar: Run > Continuous
Selecting Continuous places the analyzer in the Continuous acquisition mode. In Continuous mode, the
analyzer acquires and displays acquisitions repeatedly. The Continuous and Single Sequence acquisition
modes are mutually exclusive.
Selecting Continuous restarts acquisitions.
Markers Menu
The Markers menu provides to settings that define and control the location of markers.
Setting
Description
Peak (see page 129)
Moves the selected marker to the highest peak on the trace.
Next Peak >
Moves the selected marker to next peak depending on the setting chosen.
Marker to Center Frequency
Sets center frequency to the frequency of the selected marker.
Define Markers (see page 44)
Displays the Define Marker control panel.
xxx
Setup Menu
The Setup menu provides access to control panels that specify parameters for numerous vector signal
analyzer functions.
Command
Description
Displays (see page 77)
Displays the Displays control panel.
Settings (see page 80)
Displays the Settings control panel for the selected display.
Acquire (see page 81)
Displays the Acquire control panel.
Analysis (see page 82)
Displays the Analysis control panel.
Preset (see page 78)
Initiates the Preset.
Application Presets (see
page 70)
Displays the Application Presets window.
xxx
Displays
Menu Bar: Setup > Displays
Application Toolbar: Displays
Use the Select Displays dialog to choose the displays that appear on the screen.
SignalVu Vector Signal Analysis Software Printable Online Help
77
Reference
Preset
To select displays:
1. Press the Displays button or select Setup > Displays.
2. Select one of the choices under Folders. The folder chosen determines the choices available in
Available displays.
3. Double-click the desired display in the Available displays box or select the desired display and
click Add.
4. Click OK.
Preset
Menu Bar: Setup > Preset
Preset resets settings and clears all acquisition data. Settings and acquisition data that have not been
saved will be lost.
After Preset resets the analyzer settings, it displays the Spectrum view.
Preset does not affect time or date settings, the Windows XP operating system settings, or Tools Menu
items.
Tools Menu
Provides access to several utilities for controlling instrument functions.
Command
Description
Search... (see page 89)
Enables you to locate and highlight specified signal levels in Spectrum displays.
Options (see page 78)
Displays the Options control panel.
xxx
Options Settings
Menu Bar: Tools > Options
The Option settings control panel allows you to set some global parameters.
78
SignalVu Vector Signal Analysis Software Printable Online Help
Reference
Window Menu
Settings tab
Description
Save and Export
The instrument can automatically name saved files by appending a number to a base
file name. Use this tab to enable/disable automatic naming of files. For example, if
Automatically Increment Filename Number is disabled, when you select Save from
the File menu, you will have to enter a name for the file.
GPIB
Do not use this tab to set the GPIB address for the instrument. Use the Utilities > GPIB
Configuration control window in the TekScope application to set the instrument GPIB
address.
Security
Selecting the Hide Sensitive readouts checkbox causes the instrument to replace
measurement readouts with a string of asterisks.
Colors
Use this tab to select different color schemes for the measurement graphs.
xxx
Colors
The Color scheme setting provides three color schemes for the measurement graphs. The color scheme
setting does not change the overall instrument application or Windows color scheme.
Thunderstorm — This scheme displays graphs in shades of blue. This provides a less vibrant color
scheme than the default setting.
Blizzard — This scheme displays graphs with a white background to save ink when printing.
Classic — The default setting. This scheme displays the graph area with a black background.
Window Menu
The Window menu provides control of how windows are displayed.
Command
Description
Close View
Closes the selected view.
Cascade
Positions windows in a cascade view (not available when Lock Windows is selected).
Tile Horizontally
Positions widows in a horizontal orientation (top to bottom).
Tile Vertically
Positions widows in a vertical orientation (side by side).
Lock Windows
Locks the windows into their current position, preventing them from being moved.
(List of windows)
A numbered list of open windows.
xxx
Help Menu
The Help menu provides access to the online help and version information about the vector signal
analyzer software.
SignalVu Vector Signal Analysis Software Printable Online Help
79
Reference
Settings
Command
Description
User manual
Displays the online help.
About Tektronix Vector Signal
Analysis Software
Displays information about the vector signal analyzer software and installed options.
xxx
Settings
Menu Bar: Setup > Settings
The Settings menu item enables access to control panels that allow you to change settings for the selected
display. The control panel that appears when you select Settings depends on the selected display. The
Settings control panel for the Spectrum display is shown in the following figure.
The control panel for the CCDF display is shown in the following figure.
Settings Control Panels
ACPR Settings (see page 83)
Acquire (see page 81)
Amplitude vs Time Display Settings (see page 82)
Analysis Settings (see page 82)
CCDF Display Settings (see page 83)
Channel Power and ACPR Settings (see page 83)
Constellation Settings (see page 84)
EVM vs Time Settings (see page 84)
80
SignalVu Vector Signal Analysis Software Printable Online Help
Reference
Acquire Control Panel
Frequency vs Time Settings (see page 85)
Magnitude Error Settings (see page 85)
MCPR Settings (see page 83)
Occupied Bandwidth Settings (see page 86)
Phase Error vs Time Settings (see page 87)
Phase vs Time Settings (see page 87)
Pulse Statistics Settings (see page 88)
Pulse Table Display Settings (see page 88)
Pulse Trace Settings (see page 88)
RF I Q vs Time Settings (see page 89)
Search (Limits Testing) Settings (see page 89)
Signal Quality Settings (see page 90)
Spectrogram Settings (see page 91)
Spectrum Settings (see page 90)
Spurious Settings (see page 91)
Symbol Table Display Settings (see page 92)
Time Overview Settings (see page 92)
Acquire Control Panel
Menu Bar: Setup > Acquire
Application Toolbar: Acq
Selecting Acquire displays the Acquire control panel. These settings control the hardware acquisition
parameters for the oscilloscope. Normally, sampling parameters are automatically adjusted for selected
measurements. You can use Acquire to change these parameters if necessary.
Setting
Description
Vertical (see page 165)
Sets the channel used and reference level.
SignalVu Vector Signal Analysis Software Printable Online Help
81
Reference
Amplitude vs. Time Display Settings
Setting
Description
IQ Sampling Parameters (see
page 118)
Set Sampling parameters.
Scope Settings (see page 149)
Sets the SignalVu software to control oscilloscope acquisition parameters or use the
current oscilloscope settings.
Scope Data
Displays the sample rate and record length reported by the oscilloscope.
xxx
Run
Run mode specifies whether the analyzer will stop acquiring data after it completes a measurement
sequence.
Continuous - In Continuous mode, once the analyzer completes a measurement sequence, it begins
another.
Single - In Single mode, once the analyzer completes a measurement sequence, it stops.
NOTE. A measurement sequence can require more than one acquisition. If the analyzer is configured to
average 100 traces together, the measurement sequence will not be completed until 100 traces have
been acquired and averaged.
Amplitude vs. Time Display Settings
Menu Bar: Setup > Settings
Application Toolbar: Settings
The settings for the Amplitude vs.Time display are shown in the following table.
Settings tab
Description
BW (see page 100)
Sets the Bandwidth Method used for setting the measurement bandwidth.
Traces (see page 159)
Allows you to select the type of trace to display and their functions.
Scale (see page 139)
Sets the vertical and horizontal scale parameters.
Prefs (see page 130)
Specifies whether certain display elements are visible.
xxx
Analysis Settings
Menu Bar: Setup > Analysis
Application Toolbar: Ana
The Analysis control panel provides access to settings that are used by all displays within the application.
These settings affect only post processing and they do not control hardware settings.
82
SignalVu Vector Signal Analysis Software Printable Online Help
Reference
CCDF Display Settings
Setting
Description
Analysis Time (see page 96)
Specifies the length of time to use in measurements.
Spectrum Time (see page 150)
Specifies whether the Spectrum Analysis display uses the same Analysis Time
parameters as all the other displays or if it uses a different Offset and Length.
Frequency (see page 117)
Specifies the measurement frequency (center frequency).
Units (see page 165)
Specifies the global Power units for all displays.
xxx
CCDF Display Settings
Menu Bar: Setup > Settings
The settings for the CCDF Display are shown in the following table.
Settings tab
Description
Parameters (see page 126)
Specifies the time to be measured.
Traces (see page 158)
Select the trace to be measured and select reference trace for display.
xxx
Channel Power and ACPR Settings
Menu Bar: Setup > Settings
The settings for the Channel Power and ACPR display are shown in the following table.
SignalVu Vector Signal Analysis Software Printable Online Help
83
Reference
Constellation Display Settings
Settings tab
Description
Freq & RBW (see page 114)
Specify the frequency and resolution bandwidth used for the ACPR measurement.
Measurement Params (see
page 122)
Specify several parameters that control the measurement, such as channel filter, chip
rate, averaging, and correcting for noise floor.
Channels (ACPR) (see
page 101)
This tab specifies the BW and offset parameters of the Channels for the selected ACPR
measurement.
Scale (see page 145)
Specifies the vertical and horizontal scale settings.
Prefs (see page 130)
Specifies whether certain display elements are visible.
Restore Defaults (button)
Sets parameters for a 1-channel WCDMA measurement.
xxx
Constellation Display Settings
Menu Bar: Setup > Settings
Application Toolbar: Settings.
The settings for the Constellation view are shown in the following table.
Settings tab
Description
Modulation (see page 123)
Specifies the type of modulation used for the input signal and other parameters.
Advanced Params (see
page 95)
Specifies additional parameters.
Find (see page 113)
Used to set parameters for finding a burst within the data record and for entering a
Synch word.
Analysis Time (see page 97)
Contains parameters that define the portion of the acquisition record that is used for
analysis. Also allows you to specify the Units (Seconds or Symbols) for the GP Digital
Modulation displays.
Trace (see page 151)
Allows you to set the trace display characteristics.
Prefs (see page 130)
Enables you to set characteristics of the measurement display.
xxx
EVM vs.Time Display Settings
Menu Bar: Setup > Settings
The settings for the EVM vs.Time display are shown in the following table.
84
SignalVu Vector Signal Analysis Software Printable Online Help
Reference
Frequency vs.Time Settings
Settings tab
Description
Modulation (see page 123)
Specifies the type of modulation used in the input signal and other parameters that
controls the demodulation of the input signal.
Advanced Params (see
page 95)
Specifies Freq Offset, Magnitude normalization parameters, and enables swapping
I and Q.
Find (see page 113)
The Find tab is used to set parameters for finding bursts within the data record.
Analysis Time (see page 96)
The Analysis Time tab contains parameters that define how the signal is analyzed in the
general purpose digital modulation displays.
Trace (see page 161)
Specifies the display characteristics of the displayed trace.
Scale (see page 140)
Specifies the horizontal and vertical scale settings.
Prefs (see page 130)
Specifies whether certain display elements are visible.
xxx
Frequency vs.Time Settings
Menu Bar: Setup > Settings
Application Toolbar: Settings
The Setup settings for Frequency vs.Time are shown in the following table.
Settings tab
Description
Freq & Span (see page 115)
Sets the frequency and span parameters.
Trace (see page 151)
Sets the trace display parameters.
Scale (see page 140)
Sets the Vertical and Horizontal scale and offset parameters.
Prefs (see page 130)
Specifies whether certain display elements are visible.
xxx
Magnitude Error vs.Time Settings
Menu Bar: Setup > Settings
Application Toolbar: Settings
The Setup settings for Magnitude Errors vs.Time are shown in the following table.
SignalVu Vector Signal Analysis Software Printable Online Help
85
Reference
MCPR Display Settings
Settings tab
Description
Modulation (see page 123)
Sets parameters defining signal modulation characteristics.
Advanced Params (see
page 95)
Sets additional parameters defining signal modulation characteristics.
Find (see page 113)
The Find tab is used to set parameters for finding bursts within the data record.
Analysis Time (see page 96)
Sets parameters defining analysis time.
Trace (see page 161)
Sets traces parameters.
Scale (see page 140)
Sets vertical and horizontal scale parameters.
Prefs (see page 130)
Sets the whether or not different display elements are shown.
xxx
MCPR Display Settings
Menu Bar: Setup > Settings
Application Toolbar: Settings
The Setup settings for MCPR (Multiple Carrier Power Ratio) are:
Settings tab
Description
Freq & RBW (see page 114)
Specify the frequency and resolution bandwidth used for the MCPR measurements.
Measurement Params (see
page 122)
Specifies parameters controlling how the MCPR measurement is made.
Channels (see page 102)
Specifies the parameters of the channels to be measured.
Scale (see page 145)
Specifies the vertical and horizontal scale and offset values.
Prefs (see page 130)
Specifies whether or not certain display elements are shown.
Restore Defaults (button)
Sets parameters for a 4-carrier WCDMA measurement.
xxx
Occupied Bandwidth Display Settings
Menu Bar: Setup > Settings
Application Toolbar: Settings
The settings for the Occupied Bandwidth display are shown in the following table.
86
SignalVu Vector Signal Analysis Software Printable Online Help
Reference
Phase Error vs.Time Settings
Settings tab
Description
Freq & RBW (see page 114)
Allows you to specify the Center Frequency, Step size and RBW.
Params (see page 127)
Allows you to specify the Occupied BW % Power, x dB level, Measurement BW, enable
averaging and the Max Hold function.
Scale (see page 141)
Allows you to set the vertical and horizontal scale parameters.
Prefs (see page 130)
The Prefs tab enables you to set characteristics of the measurement display.
xxx
Phase Error vs.Time Settings
Menu Bar: Setup > Settings
Application Toolbar: Settings
The settings for the Phase Error vs.Time display are shown in the following table.
Settings tab
Description
Modulation (see page 123)
Allows you to specify the type of modulation used for the input signal and other
parameters.
Advanced Params (see
page 95)
Allows you to specify the frequency offset, magnitude normalization method and allows
for swapping the I and Q signals.
Find (see page 113)
Find tab is used to set parameters for finding bursts within the data record.
Analysis Time (see page 97)
The Analysis Time tab contains parameters that define the portion of the acquisition
record that is used for analysis.
Traces (see page 161)
Allows you to set the points/symbol and enable trace averaging.
Scale (see page 141)
Allows you to set the vertical and horizontal scale parameters.
Prefs (see page 130)
The Prefs tab enables you to set characteristics of the measurement display.
xxx
Phase vs.Time Display Settings
Menu Bar: Setup > Settings
Application Toolbar: Settings
The settings for the Phase vs.Time display are shown in the following table.
Settings tab
Description
Freq & Span (see page 115)
Sets the frequency and span parameters.
Trace (see page 151)
Sets the trace display parameters.
Scale (see page 142)
Sets the Vertical and Horizontal scale and offset parameters.
Prefs (see page 130)
Specifies whether certain display elements are visible.
xxx
SignalVu Vector Signal Analysis Software Printable Online Help
87
Reference
Pulse Statistics Display Settings
Pulse Statistics Display Settings
Menu Bar: Setup > Settings
Application Toolbar: Settings
The settings for the Pulse Statistics Display are shown in the following table.
Settings tab
Description
Params (see page 128)
Specifies several parameters that control how pulses are counted and defined.
Define (see page 110)
Specifies parameters that control where measurements are taken on a pulse.
Levels (see page 118)
Specifies parameters that control the method and levels used to calculate some pulse
values.
Freq Estimation (see page 115)
Specifies the reference used for computing frequency errors.
Scale (see page 143)
Specifies the vertical and horizontal scale settings.
Prefs (see page 130)
Specifies whether or not certain elements of the display are shown.
xxx
Pulse Table Display Settings
Menu Bar: Setup > Settings
Application Toolbar: Settings
The Setup settings for the Pulse Table Display are shown in the following table.
Settings tab
Description
Measurements (see page 122)
Selects the measurements to be show in the Pulse Table.
Params (see page 128)
Specifies several parameters that control how pulses are counted and defined.
Define (see page 110)
Specifies parameters that control where measurements are taken on a pulse.
Levels (see page 118)
Specifies parameters that control the method and levels used to calculate some pulse
values.
Freq Estimation (see page 115)
Specifies the reference used for computing frequency errors.
xxx
Pulse Trace Display Settings
Menu Bar: Setup > Settings
Application Toolbar: Settings
The Setup settings for the Pulse Trace display are shown in the following table.
88
SignalVu Vector Signal Analysis Software Printable Online Help
Reference
Restoring Default Settings
Settings tab
Description
Params (see page 128)
Specifies several parameters that control how pulses are counted and defined.
Define (see page 110)
Specifies parameters that control where measurements are taken on a pulse.
Levels (see page 118)
Specifies parameters that control the method and levels used to calculate some pulse
values.
Freq Estimation (see page 115)
Specifies the reference used for computing frequency error.
Scale (see page 143)
Specifies the vertical and horizontal scale settings.
Prefs (see page 130)
Specifies whether on not certain display elements are shown.
xxx
Restoring Default Settings
To restore the instrument to its factory default settings:
Select File > Preset to return the analyzer to its default settings.
Preset resets all settings and clears all acquisition data. Settings and acquisition data that have not been
saved will be lost.
RF I & Q vs. Time Settings
Menu Bar: Setup > Settings
Application Toolbar: Settings
The Setup settings for RF I & Q vs. Time are shown in the following table.
Settings tab
Description
Freq & Span (see page 115)
Sets the frequency and span parameters.
Trace (see page 156)
Sets the trace display parameters.
Scale (see page 140)
Sets the Vertical and Horizontal scale and offset parameters.
Prefs (see page 130)
Specifies whether certain display elements are visible.
xxx
Search (Limits Testing) Settings
Menu Bar: Tools > Search...
Selecting Search displays the Search control panel. These settings define search parameters and specify
actions to be performed when the search condition is met.
SignalVu Vector Signal Analysis Software Printable Online Help
89
Reference
Signal Quality Settings
Setting
Description
Enable Search
Select to perform a search.
Define (see page 106)
Specifies which trace to search and what to search for.
Actions (see page 94)
Specifies the action to take when the search condition is met.
xxx
Signal Quality Settings
Menu Bar: Setup > Settings
Application Toolbar: Settings
The Setup settings for Signal Quality are accessible only when the Signal Quality display is selected.
Settings tab
Description
Modulation (see page 123)
The Modulation tab specifies the type of modulation used for the input signal and other
parameters.
Advanced Params (see
page 95)
The Advanced Params tab specifies frequency offset, magnitude normalization method
and allows you to swap the I and Q signals.
Find (see page 113)
Find tab is used to set parameters for finding bursts within the data record.
Analysis Time (see page 97)
The Analysis Time tab contains parameters that define the portion of the acquisition
record that is used for analysis.
Prefs (see page 130)
The Prefs tab enables you to set characteristics of the measurement display.
xxx
Spectrum Display Settings
Menu Bar: Setup > Settings
Application Toolbar: Settings
The Setup settings for the Spectrum display are visible when Spectrum is the selected display.
90
SignalVu Vector Signal Analysis Software Printable Online Help
Reference
Spectrogram Display Settings
Settings tab
Description
Freq & Span (see page 115)
Sets frequency and span parameters for the Spectrum Analysis display.
BW (see page 98)
Sets Resolution Bandwidth and windowing parameters.
Traces (see page 162)
Sets Trace display parameters.
Scale (see page 147)
Sets vertical scale parameters.
Prefs (see page 130)
Specifies whether or not certain display elements are shown.
xxx
Spectrogram Display Settings
Menu Bar: Setup > Settings
Application Toolbar: Settings
The Setup settings for the Spectrogram display are visible when Spectrogram is the selected display.
Settings tab
Description
Freq & Span (see page 115)
Sets frequency and span parameters for the Spectrogram display.
BW (see page 98)
Sets Resolution Bandwidth and windowing parameters.
Trace (see page 153)
Sets Trace display parameters.
Scale (see page 146)
Sets vertical scale parameters.
Prefs (see page 130)
Specifies whether or not certain display elements are shown.
xxx
Spurious Display Settings
Menu Bar: Setup > Settings
Application Toolbar: Settings
The measurement settings for the Spurious display are shown in the following table.
Settings tab
Description
Parameters (see page 127)
Specifies whether the graph displays one range or multiple ranges. Specifies whether all
spurs are shown or only spurs over specified limits. Enables the use of CISPR filters
and detectors.
Reference (see page 134)
Specifies the Power Reference level.
Ranges (see page 132)
Specifies start and stop frequencies of ranges and which ranges to take measurements in.
Sets parameters that define a spur. Review, save and load the Range table from this tab.
Limits (see page 119)
Specifies Pass/Fail limit parameters.
Trace (see page 155)
Specifies the trace Function.
Scale (see page 147)
Specifies the vertical and horizontal scale settings.
Prefs (see page 131)
Specifies the appearance features of the graph area.
xxx
SignalVu Vector Signal Analysis Software Printable Online Help
91
Reference
Symbol Table Display Settings
Symbol Table Display Settings
Menu Bar: Setup > Settings
Application Toolbar: Settings
The Setup settings for the Symbol Table view are shown in the following table.
Settings tab
Description
Modulation (see page 123)
The Modulation tab specifies the type of modulation used for the input signal and other
parameters.
Advanced Params (see
page 95)
The Advanced Params tab specifies additional parameters.
Find (see page 113)
Find tab is used to set parameters for finding bursts within the data record.
Analysis Time (see page 97)
The Analysis Time tab contains parameters that define the portion of the acquisition
record that is used for analysis.
Prefs (see page 130)
The Prefs tab enables you to set characteristics of the measurement display.
xxx
Time Overview Display Settings
Menu Bar: Setup > Settings
Application Toolbar: Settings
The Setup settings for Time Overview are shown in the following table.
Settings tab
Description
Scale (see page 148)
Adjusts the vertical and horizontal scale and offset of the display.
Prefs (see page 130)
Specifies whether or not certain display elements are shown.
xxx
92
SignalVu Vector Signal Analysis Software Printable Online Help
Reference Topics
About the Vector Signal Analysis Software
About the Vector Signal Analysis Software
This window displays information about the SignalVu software and oscilloscope hardware it is running on.
Version
At the top of the window is a line that displays the version of the vector signal analysis application software.
Installed Options
This text box lists the software options installed. This window does not list the options installed on the
oscilloscope, just those that are installed with the vector signal analysis software.
Hardware Information
This text box lists the serial number of the oscilloscope on which the software is running.
Copy Info
The Copy Info button copies information about the instrument to the Windows clipboard. This information
may be useful if you need to have your instrument serviced. The following text is an example of the
information copied when you click Copy Info:
Tektronix Vector Signal Analysis Software
V1.3.560
Installed Options:
SignalVu Vector Signal Analysis Software Printable Online Help
93
Reference Topics
Actions Tab
Essentials (Opt SVE)
Pulse Measurements (Opt SVP)
General Puspose Modulation Analysis (Opt SVM)
Hardware Information:
Serial Number: B000001
Actions Tab
The Actions tab is used to specify an to action to be taken when the search condition is met.
Setting
Description
During Run or Replay
Actions specified here will occur in either Run mode or Replay mode.
Beep
The analyzer beeps when the search condition is met. There will be no sound if the
instrument hardware does not support audible output.
Stop
The analyzer stops when the search condition is met.
During Run Only
Actions specified here are taken only during Run mode (while acquiring live data).
AutoSave acquisition data
Saves acquisition data to a file when the search condition is met.
AutoSave trace
Saves Trace data to a file when the search condition is met.
AutoSave picture
Saves a screen capture to a file when the search condition is met.
xxx
AutoSave File Naming
When one of the AutoSave actions is enabled, the name of the saved file is automatically incremented
even if the Automatically generate filenames option (Tools > Options > Save and Export) is not enabled.
When the file is saved, it will be saved to the last location a file was saved. You can check this location
by selecting File > Save As. The Save dialog will show you the current save location. If you want to
save the file in a different location, save a file (any type) in the desired location. This resets the save
destination to the new location.
94
SignalVu Vector Signal Analysis Software Printable Online Help
Reference Topics
Adjacent Channel Leakage Power Ratio
Adjacent Channel Leakage Power Ratio
Adjacent Channel Leakage power Ratio (ACLR) is the ratio of the mean power centered on the
assigned channel frequency to the mean power centered on an adjacent channel frequency. In the 3GPP
specification, both the main channel and adjacent channels are required to be filtered with RRC (Root
Raised Cosine) filters.
Adjacent Channel Power
Measure of the signal power leaking into nearby channels.
Advanced Params Tab
The Advanced Params tab specifies additional parameters that control the demodulation of the signal.
Parameter
Description
Freq Offset
Specifies the kind of offset used in some graphs. Choices are Auto or Manual. When
Manual is selected, a number entry box is enabled for entering the frequency offset value.
Frequency Offset Value
Use to enter an offset frequency value. This box is enabled only when Manual is selected
for Freq Offset.
Mag Normalize
Select RMS Symbol Magnitude or Max Symbol Magnitude. This setting applies to Mag
Error and EVM.
Swap I and Q
When enabled, the I and Q data are exchanged before demodulating.
xxx
Freq Offset
The Frequency Offset setting is used when the center frequency setting does not match the signal
frequency. When Auto is selected, the analyzer measures the offset. When Manual is selected, a number
entry box is available that enables you to set the needed frequency offset.
SignalVu Vector Signal Analysis Software Printable Online Help
95
Reference Topics
Analysis Time Tab (Analysis Control Panel)
Mag Normalize
Specifies whether Magnitude Normalization uses the RMS Symbol Magnitude or the Maximum Symbol
Magnitude as the basis for normalization.
Swap I and Q
Use this check box to swap the positions of the I and Q signals in the graph.
Analysis Time Tab (Analysis Control Panel)
The Analysis Time tab contains parameters that define the portion of the acquisition record that is used
for analysis.
Setting
Description
Analysis Offset
Specifies the location of the first time sample to use in measurements.
Auto
When enabled, causes the instrument to set the Analysis Offset value based on the
requirements of the selected display.
Analysis Length
Specifies the length of time to use in measurements.
Auto
When enabled, causes the instrument to set the Analysis Length value based on the
requirements of the selected display.
Time Zero Reference
Specifies the zero point for the analysis time.
Actual
This is a displayed value, not a setting. It is the Analysis Length (time) being used by the
analyzer; this value may not match the Analysis Length requested (in manual mode).
xxx
Analysis Offset
Use analysis offset to specify where measurements begin. Range: 0 to [(end of acquisition) - Analysis
Length)]. Resolution: 1 effective sample (or symbol).
Analysis Length
Use the analysis length to specify how long a period of time is analyzed by a measurement. After you
enter a value, this box changes to show the actual value in use, which is constrained by Acquisition Time.
This setting is not available when Auto is checked. Range: minimum value depends on modulation type
to Acquisition Length. Resolution: 1 effective sample (or symbol).
96
SignalVu Vector Signal Analysis Software Printable Online Help
Reference Topics
Analysis Time Tab (GP Digital Modulation)
Time Zero Reference
The analysis offset is measured from this point. Choices are: Acquisition Start or Trigger Point.
Parameter
Description
Acquisition Start
Offset is measured from the point at which acquisition begins.
Trigger Point
Offset is measured from the trigger point.
xxx
Analysis Time Tab (GP Digital Modulation)
The Analysis Time tab contains parameters that define how the signal is analyzed in the general purpose
digital modulation displays.
Setting
Description
Analysis Offset
Specifies the location of the first time sample to use in measurements.
Auto
When enabled, causes the instrument to set the Analysis Offset value based on the
requirements of the selected display.
Analysis Length
Specifies the length of time to use in measurements.
Auto
When enabled, causes the instrument to set the Analysis Length value based on the
requirements of the selected display.
Time Zero Reference
Specifies the zero point for the analysis time.
Actual
This is a displayed value, not a setting. It is the Analysis Length (time or symbols)
being used by the analyzer; this value may not match the Analysis Length requested
(in manual mode).
Units
Sets the units of the Analysis Length to either Symbols or Seconds.
xxx
Analysis Offset
Use analysis offset to specify where measurements begin. Range: 0 to [(end of acquisition) - Analysis
Length)]. Resolution: 1 effective sample (or symbol).
Analysis Length
Use the analysis length to specify how long a period of time is analyzed by a measurement. After you
enter a value, this box changes to show the actual value in use, which is constrained by Acquisition Time.
SignalVu Vector Signal Analysis Software Printable Online Help
97
Reference Topics
Average Channel Power (Pulsed RF Displays)
This setting is not available when Auto is checked. Range: minimum value depends on modulation type.
Resolution: 1 symbol. The maximum number of samples that can be analyzed is 80,000.
Time Zero Reference
The analysis offset is measured from this point. Choices are: Acquisition Start or Trigger.
Parameter
Description
Acquisition Start
Offset is measured from the point at which acquisition begins.
Trigger
Offset is measured from the trigger point.
xxx
Average Channel Power (Pulsed RF Displays)
The total RF power in the selected channel (located in the ACPR display).
Average ON Power (Pulsed RF Displays)
The average power transmitted during pulse on.
BW Tab
The BW (bandwidth) tab allows you to change Resolution Bandwidth and Video Bandwidth settings, set
the windowing method used by the transform process by selecting a filter shape, and specify how gain
and bandwidth are optimized.
98
SignalVu Vector Signal Analysis Software Printable Online Help
Reference Topics
BW Tab
Setting
Description
RBW
Sets the Resolution Bandwidth value to be used in the spectrum analysis view. The
value is italicized when Auto is selected.
Auto
When Auto is checked, the RBW is calculated as a percentage of the Span. Kaiser is
selected as the windowing method. When Auto is unchecked, the RBW is set by the user.
Selecting any Window other than Kaiser changes the RBW setting to manual.
Span/RBW ratio
If Auto is checked, this value is used to calculate the RBW. If Auto is unchecked, this
setting is not selectable.
Filter Shape
Specifies the windowing method used for the transform (when Auto is unchecked).
VBW
Adjusts the VBW (Video Bandwidth) value.
RF & IF Optimization
This setting is not used by the SignalVu application.
xxx
Filter Shape Settings
In the analyzer, computationally efficient discrete Fourier transform algorithms such as FFT (Fast Fourier
Transform) or CZT (Chirp-Z Transform) are generally employed to transform time-domain signals into
frequency-domain spectra. There is an assumption inherent in the mathematics of Discrete Fourier
Transforms that the data to be processed is a single period of a periodically repeating signal. The
discontinuities between successive frames will generally occur when the periodic extension is made to the
signal. These artificial discontinuities generate spurious responses not present in the original signal, which
can make it impossible to detect small signals in the presence of nearby large ones. This phenomenon is
called spectral leakage.
Applying a filter, such as Kaiser, to the signal to be transformed is an effective method to combat the
spectral leakage problem. Generally the filter has a bell shape. Multiplying the transform frame by the
filter function eliminates or reduces the discontinuities at the ends of the frame, however, at the expense of
increased RBW.
Filter Shape Characteristics
The choice of filter shape depends on its frequency response characteristics such as side-lobe level,
equivalent noise bandwidth and maximum amplitude error. Use the following guidelines to select the
best filter shape.
Filter Shape
Characteristics
Kaiser (RBW)
Best side-lobe level, shape factor closest to the traditional Gaussian RBW.
-6dB RBW (MIL)
These filters are specified for bandwidth at their -6 dB point, as required by military
EMI regulations.
CISPR
These filters comply with the requirements specified in the P-CISPR 16 -1-1 document
for EMI measurements.
Blackman-Harris 4B
Good side-lobe level.
Uniform (None)
Best frequency resolution, poor side-lobe level and amplitude accuracy.
FlatTop
Best amplitude accuracy, best representation of brief events captured near the beginning
or end of the time-domain data frame, poor frequency resolution.
Hanning
Good frequency resolution, high side-lobe roll-off rate.
xxx
SignalVu Vector Signal Analysis Software Printable Online Help
99
Reference Topics
BW Tab (Amplitude vs.Time Display)
VBW
The VBW setting enables/disables the Video Bandwidth filter. VBW is used in traditional swept analyzers
to reduce the effect of noise on the displayed signal. The VBW algorithm in the analyzer emulates the
VBW filters of traditional swept analyzers.
The maximum VBW value is the current RBW setting. The minimum VBW value is 1/10,000 of the RBW
setting. VBW is disabled when the Filter shape is set to CISPR.
NOTE. If you are following a procedure that says to "set VBW to three times the RBW value or greater", it
means that the test should be conducted with no VBW effects. In the SignalVu software, this condition is
met by disabling the VBW function.
BW Tab (Amplitude vs.Time Display)
The BW (Bandwidth) tab allows you to specify the Bandwidth Method used for setting measurement
bandwidth. This determines what Acq BW the measurement will request.
Settings
Description
Span
The frequency span used for analysis in the Amplitude vs.Time display.
Time-domain Bandwidth
Time-domain Bandwidth is a filter used to process the input signal before the acquisition
system analyzes the signal.
xxx
Carrier Feedthrough Measurement
The carrier feedthrough is the offset of the constellation from zero power. The feedthrough is measured in
dB relative to either the RMS symbol magnitude or the Peak Symbol magnitude as selected by the user.
CCDF - Complimentary Cumulative Distribution Function
The Complementary Cumulative Distribution Function (CCDF) represents the probability that the peak
power above average power of a measured signal exceeds a threshold.
100
SignalVu Vector Signal Analysis Software Printable Online Help
Reference Topics
Channels Tab (ACPR)
CCDF is a plot of the percent of time that a signal’s power value exceeds it average value versus the
amount by which it exceeds the average. The CCDF plot has a log of probability on the Y-axis (100% at
the top) and dB above average amplitude on the X-axis (0 at the left).
Channels Tab (ACPR)
The Channels tab is where you specify parameters for the channels measured in the ACPR display.
Setting
Description
Number of adjacent pairs
Specifies the number of adjacent channel pairs. Range: 1 - 50; Resolution 1.
Channel Bandwidth
Specifies the frequency width of each channel (all channels share the same value).
Channel Spacing
Specifies the difference in frequency between the centers of each channel.
xxx
The following figure illustrates the settings controlled from the Channels tab.
Changing the Number of Adjacent Pairs
1. Select Number of adjacent pairs number entry box.
2. Enter a value for the number of adjacent pairs using the knob or the keypad.
SignalVu Vector Signal Analysis Software Printable Online Help
101
Reference Topics
Channels Tab (MCPR)
NOTE. As you change the value for the number of adjacent pairs, the analyzer will update the spectrum
display to identify the adjacent channels.
3. Select the Close box when you have finished making changes.
Changing the Channel Bandwidth
1. Select the Channel Bandwidth number entry box.
2. Enter a value for the number of adjacent pairs using the knob or the keypad.
NOTE. As you change the value for the number of adjacent pairs, the analyzer will update the display to
indicate the channel bandwidth
3. Select the Close box when you have finished making changes.
Channel Spacing
1. Select Channel Spacing number entry box.
2. Enter a value for the difference in center frequency between channels using the knob or the keypad.
NOTE. As you change the value for the number of adjacent pairs, the analyzer will update the display to
indicate the channel bandwidth
3. Select Close when you have finished making changes.
Channels Tab (MCPR)
Path: Setup > Settings > Channels
Application Toolbar / Front Panel: Settings
The Channels tab is where you specify the parameters for the channels measured in the MCPR display.
102
SignalVu Vector Signal Analysis Software Printable Online Help
Reference Topics
Setting
Channels Tab (MCPR)
Description
Main Channels
Number
Sets the number of Main channels.
BW
Sets the bandwidth of the Main channels.
Spacing
Sets the frequency difference between the centers of the Main channels.
Inactive
Selected channels are ignored by the measurement routine.
Adj Chans
Add...
Opens the Edit Channel Parameters dialog, which you use to specify the parameters of a
new pair of adjacent channels. You can add up to 50 adjacent channel pairs.
Edit...
Opens the Edit Channel Parameters dialog. (You must first select a channel to enable
the Edit button.)
Delete
Deletes the selected main channel or adjacent channel pair.
Add Adj.
Add a new pair of adjacent channels at the bottom. Their parameters are copied from
the channels just above them.
Channel Definition table
A table of the parameters for every channel. Offset is the frequency difference between
the Center Frequency and center of the selected channel. Nothing in the table is editable
directly.
xxx
The following figure illustrates the settings controlled from the Channels tab.
Editing Channel Parameters
To edit the offset or bandwidth of a Main channel:
1. Select the value in the BW or Spacing number entry boxes.
2. Adjust the value as required. All the Main channels share the same BW and Spacing.
3. Select the appropriate checkbox to make a channel Inactive, as appropriate.
4. Select the Close box when you have finished making changes.
SignalVu Vector Signal Analysis Software Printable Online Help
103
Reference Topics
Channel Power
To edit the offset or bandwidth of an Adjacent channel:
1. Select the channel to be edited in the channel definition table.
2. Select Edit. This displays the Edit Channel Parameters dialog.
3. Adjust the values for the Frequency Offset or Bandwidth as required.
4. Select the Close box when you have finished making changes.
Adding Channels
To add a main channel:
1. Select the Number entry box.
2. Use the knob to enter a value for the desired number of Main channels.
3. Select the Close box when you have finished making changes.
To add an adjacent channel pair:
1. Select Add.... This displays the Edit Channel Parameters dialog.
2. Use the knob to enter values for the Frequency Offset and Bandwidth as required. The Frequency
Offset is measured from the Center frequency of the Main channels.
3. Select the Close box when you have finished making changes.
Deleting Channels
To delete a main channel:
1. Select the Number entry box.
2. Use the knob to reduce the number of channels or enter a new value using the front-panel keypad.
3. Select the Close box when you have finished making changes.
To delete an adjacent channel:
1. Select the channel to be deleted in the channel definition table.
2. Select Delete. This removes the selected channel from the channel table.
3. Select the Close box when you have finished making changes.
Channel Power
The total RF power in the selected frequency band. The detection type used for measuring channel power
is Average. This means that the average of the linear (pre-log) samples is used to determine the channel
power. To measure channel power, use the ACLR measurement, and set the number of adjacent channels
to zero. This results in only the channel power being measured.
104
SignalVu Vector Signal Analysis Software Printable Online Help
Reference Topics
Common Information Messages
Common Information Messages
The following table lists some of the common information messages that might appear during normal
operation.
Message
Explanation and recommended action
Acq BW too small
The display needs a wider acquisition bandwidth than what the current data
record contains. This can be due to several reasons:
The sampling parameters are being manually controlled. In the Acquire control panel >
Sampling Parameters tab, set the Adjust control to All Auto to allow the software to pick
the sample rate and record length that it needs.
The impacted measurement is not the selected display. The selected display has
requested a smaller acquisition bandwidth to possibly achieve a better dynamic range.
Select the display that contains the message and click Run, if the instrument is not
already acquiring data.
Acquisitions are not running and the measurement now requests a wider bandwidth
than the last acquisition.
Click Run to perform a new acquisition at a wider bandwidth.
The data is from a recalled TIQ file.
There is no way to increase the acquisition bandwidth for saved IQ data. You must adjust
the measurement settings so that less bandwidth is required.
The data is from a recalled oscilloscope waveform file.
Set all measurement parameters as required and then repeat the oscilloscope waveform
file recall.
The oscilloscope acquisition parameters aren’t under the control of the SignalVu software.
Display the Acquire > Scope Settings control panel. Check the boxes for Sample Rate
and Other acquisition/hardware settings. Also verify that the IQ Sampling Params
Adjust control is set to All Auto.
Selected display is swept
When any display requires a swept acquisition, the other displays are unable to process
the swept data. This is because the swept data is customized for the selected display.
Select the display that you are interested in and it will change the acquisition to meet
its own needs.
RBW min : nnnkHz
The current Spectrum Length or Analysis Length is not long enough to allow a narrower
RBW filter. RBW Min. is the narrowest allowable RBW for the current analysis length of
the spectrum.
If the Length control is set to Manual, try setting it to Auto so that the Analysis Length will
increase to the required value.
xxx
SignalVu Vector Signal Analysis Software Printable Online Help
105
Reference Topics
Data Properties
Data Properties
The Data Properties command in the File menu displays a listing of acquisition-related information
about the last data analyzed. The last data can be from the current acquisition or it could be from a
recalled data file.
Define Tab (Search)
The Define tab sets the parameters for a search. From this tab, you specify which trace to search and what
kind of violation to search for.
106
SignalVu Vector Signal Analysis Software Printable Online Help
Reference Topics
Define Tab (Search)
Setting
Description
Search in
Specifies which trace to search.
Search for
Specifies what to search for. You can specify a search based on a signal level or a mask.
xxx
Search In
The choices for Search in are: Spectrum Trace 1, Spectrum Trace 2, Spectrum Trace 3, Spectrum Math
Trace, and Spectrogram Trace.
NOTE. If you select a trace in the display that is not the selected trace, you will not see the results of the
Search until you select the trace in the spectrum display that is the "Search in" trace.
Search For
The Search for setting has four selections. The first two selections are simple "less than" and "greater
than" searches. The second two selections are for mask searches. If you select a greater than/less than
search, you also specify the level that defines a violation. If you specify a mask-based search, then you
need to edit the mask to specify the levels that define a violation.
Greater Than/Less Than Searches
When you select either is greater than or is less than, a text entry box appears to the right of the
drop-down list. Use the text entry box to specify the signal level you wish to search for.
Mask-based Searches
When you select is outside mask or is inside mask, an Edit limits button is displayed. Select the Edit
limits button to display the Mask Editor.
SignalVu Vector Signal Analysis Software Printable Online Help
107
Reference Topics
Define Tab (Search)
To edit a search mask:
1. Click Edit limits... to display the Mask Editor.
2. Click New Table to create a table. This clears the existing points and loads the default table.
3. Select the X axis values setting:
a. Select Absolute to specify mask point locations based on signal frequency.
b. Select Relative to specify mask point locations as offsets from the center frequency.
4. To edit values in the table:
a. To edit an existing value, double-click on the cell you want to edit.
b. To add a new point to the table, click on Add Point. Edit the values as required and click Apply
when you are finished with your changes.
To specify a frequency multiplier, you can type K, M, or G. For the power level, you only need to specify a
numeric value. The unit is set to the current Units setting (Setup > Analysis > Units).
1. To delete a point from the table, select the point to be removed, and click Delete.
2. To close the Mask Editor without saving your changes, click Cancel (if you have already clicked
Apply, this only cancels changes since the last time Apply was clicked).
3. If Search mode is already enabled and the instrument is in Run mode, you can run a Search using your
changed points without closing the Mask Editor, by clicking Apply.
4. To save changes and close the Mask Editor, click OK.
5. To save the mask to a file for later recall, click Save As....
6. From the Save As dialog, name the file and save it in the desired location.
108
SignalVu Vector Signal Analysis Software Printable Online Help
Reference Topics
Define Tab (Search)
Masks are saved only in CSV (Comma Separated Value) format.
Performing a Mask-based Search
To perform a Search using a mask:
1. Select Tools > Search.
2. Click the Enable Search checkbox.
3. Select the trace that you wish to search from the Search in drop-down list.
4. Verify that the trace you selected to search is the selected trace in the display.
5. Select either is outside mask or is inside mask from the Search for drop-down list.
6. Click the Edit limits button.
7. Edit the table as necessary or click Load to use a previously saved mask.
8. If you load a saved a mask, use the Open dialog to locate and open the mask file.
9. Click OK.
The following figure shows the results of an is outside mask Search. The vertical red bar highlights
results that match the Search definition.
SignalVu Vector Signal Analysis Software Printable Online Help
109
Reference Topics
Define Tab (Pulsed RF)
Define Tab (Pulsed RF)
The Define tab enables you to specify parameters that control where measurements are made on a pulse.
Setting
Description
Measurement point for
pulse-pulse results
Specifies the position along the pulse tops where the phase is measured. This is a time
delay from the rising edge 50% point of each pulse. Range: 5 ns - 100 ms; Resolution:
0.1 ns for keyboard entry; proportional increment/decrement: between 1 - 10% of current
value
Portion of pulse top for Ripple
Adjust how much of the ON time to use in computing the measurement. Range: 10
- 100%; Resolution: 1%; Default: 50%.
Measurement time for Freq &
Phase results
Specifies the location on a pulse where the in-pulse frequency and phase measurements
are taken.
Auto
When checked, measurements are taken from the 90% point on the rising edge to
the 90% point on the falling edge. Start and Stop controls are disabled when Auto is
selected, but they display the values in use.
Start
Specifies where the starting point is located for frequency and phase measurements.
Range: ±100 ms; Resolution: 3 digits; Default: 0
Stop
Specifies where the stopping point is located for frequency and phase measurements.
Range: ±100 ms; Resolution: 3 digits; Default: 0
xxx
Start / Stop
Start and Stop times should not overlap. If the start and stop times do overlap, the affected measurements
display " - - " as a result and an error message is displayed: FreqPhase meas start is later than stop.
Displaying the Windows Event Viewer
When the analyzer generates an error message, information about the error is logged to the Windows
Event Viewer.
To display the Windows Event Viewer:
1. Select Start > Control Panels.
110
SignalVu Vector Signal Analysis Software Printable Online Help
Reference Topics
Displaying the Windows Event Viewer
2. Select Administrative Tools. (If your instrument displays control panels in Category View, select
Performance and Maintenance and then select Administrative Tools.)
3. Double-click Event Viewer.
4. From the Event Viewer window, select Application. this displays a list of all errors that have been
reported to the operating system from applications.
Errors reported to the Event Viewer from the analyzer application appear under Source as TekRSA.
5. Double-click the last error reported for TekRSA to see details on the most recently reported error.
Please note that many items reported as “errors” are simply informational and do not mean that your
instrument is impaired. Contact the Tektronix Customer Support Center or Service Center if you
are concerned about an error shown in the Event Viewer. Do not send an instrument out for repair
based solely on these event reports.
SignalVu Vector Signal Analysis Software Printable Online Help
111
Reference Topics
Droop Measurement (Pulsed RF Display)
Droop Measurement (Pulsed RF Display)
Droop is the power difference between the beginning and the end of the pulse On time. A straight-line best
fit is used to represent the top of the pulse. The result is a percentage referenced to the Average ON Power.
Duty Factor (%) Measurement (Pulsed RF)
The ratio of the width to the pulse period, expressed as a percentage.
Duty Factor (Ratio) Measurement (Pulsed RF)
The ratio of a pulse width to the pulse period.
112
SignalVu Vector Signal Analysis Software Printable Online Help
Reference Topics
EVM (Error Vector Magnitude) Measurement
EVM (Error Vector Magnitude) Measurement
The normalized RMS value of the error vector between the measured signal and the ideal reference signal
over the analysis length. The EVM is generally measured on symbol or chip instants and can be reported
in units of percent or dB. EVM is usually measured after best-fit estimates of the frequency error and a
fixed phase offset have been removed. These estimates are made over the analysis length.
Fall Time Measurement (Pulsed RF Display)
The time required for a signal to fall from 90% to 10% of its maximum steady-state amplitude.
Find Tab (GP Digital Modulation)
The Find tab is used to set parameters for finding bursts within the data record. This is a post-acquisition
operation.
Setting
Description
Burst Detection: Mode
Select whether to analyze bursts
- Auto: If a burst is found, analyze just that burst period. If a burst is not found, analyze
the whole analysis length.
- On: If a burst is found, analyze just that burst period. If a burst is not found, display
an error message.
If the signal isn’t adequate for demodulation, an error message is shown.
Burst Detection: Threshold
Sets the level required for the signal to qualify as a burst. Enter a value in dBc down
from top of the signal.
Use Synch Word
When enabled, specifies the string of symbols to look for. Enter the search string with
external keyboard or the on-screen keyboard.
Clear
Blanks the search string field.
xxx
SignalVu Vector Signal Analysis Software Printable Online Help
113
Reference Topics
Freq & RBW Tab (RF Measurements)
Freq & RBW Tab (RF Measurements)
The Freq & RBW tab specifies frequency parameters for the Channel Power & ACPR, MCPR, and
Occupied Bandwidth measurements.
Setting
Description
Center Freq
Specifies the center/measurement frequency.
Step
The Step control sets the increment/decrement size for the adjustment of the center
frequency. If Auto is enabled, the analyzer will adjust the Step size as required.
RBW
Select Auto or Manual. Adjusts the RBW for the entire measurement. This setting is
Independent of the Spectrum view’s RBW setting.
VBW
Adjusts the VBW (Video Bandwidth) value. VBW Maximum = current RBW value. VBW
Minimum = 1/10,000 RBW setting.
xxx
NOTE. While the center frequency and step settings on this control tab are shared between ACPR,
MCPR and Occupied Bandwidth, the RBW setting is not shared. The RBW setting is unique for each
measurement.
VBW
The VBW setting enables/disables the Video Bandwidth filter. VBW is used in traditional swept analyzers
to reduce the effect of noise on the displayed signal. The VBW algorithm in the analyzer emulates the
VBW filters of traditional swept analyzers.
The maximum VBW value is the current RBW setting. The minimum VBW value is 1/10,000 of the
RBW setting.
NOTE. If you are following a procedure that says to "set VBW to three times the RBW value or greater", it
means that the test should be conducted with no VBW effects. In the SignalVu software, this condition is
met by disabling the VBW function.
114
SignalVu Vector Signal Analysis Software Printable Online Help
Reference Topics
Freq & Span Tab
Freq & Span Tab
The Freq & Span tab provides access to settings that control frequency settings for the trace display.
Setting
Description
Center
The frequency at the center of the trace display.
Start
The frequency at the left edge of the trace display.
Stop
The frequency at the right edge of the trace display.
Step Size
Sets the increment/decrement size for Center, Start and Stop values.
Span
The difference between the start and stop frequencies.
Max Span
Sets the Span to the maximum value.
xxx
Center, Start, Stop, and Span Frequencies are Correlated
Changing the values for Center frequency, Start frequency, Stop frequency or Span will change the values
for the other settings, depending on which setting you change. For example, if you change the Center
frequency, the Start and Stop frequencies will be adjusted automatically to maintain the same Span.
Note however that if the Start and Stop frequencies are changed so that they are closer than the minimum
span setting, the Start and Stop frequencies will be adjusted to maintain the minimum Span setting.
Setting Changed Manually
Settings Changed Automatically As
a Result
Setting Not Automatically Changed
Start
Center, Span
Stop
Stop
Center, Span
Start
Center
Start, Stop
Span
Span
Start, Stop
Center
xxx
Freq Estimation Tab
Use the Freq Estimation tab to specify parameters used for determining frequency error.
SignalVu Vector Signal Analysis Software Printable Online Help
115
Reference Topics
Freq Estimation Tab
Setting
Description
Modulation type
Specifies which algorithm to use for estimating frequency error.
Pulse Frequency Reference
Specifies the method used to determine the pulse frequency reference.
Auto
Selecting Auto causes the instrument to calculate the values necessary to determine
the pulse frequency reference.
Freq Offset
If Auto is not enabled, specify the value for frequency offset here. If Auto is enabled, this
readout displays the calculated frequency offset.
Chirp BW
If Auto is not enabled, specify the value for Chirp BW here. If Auto is enabled, this
readout displays the calculated Chirp BW. This setting is used only when the modulation
type is set to Linear Chirp.
xxx
Modulation Type
Frequency estimation is performed by the instrument using selectable methods, depending on signal type.
The selections for modulation type are CW (constant phase), CW (changing phase), Linear Chirp and
Other. Select the method of frequency method based upon a best match to your signal based on the
following descriptions:
CW (constant phase): The signal is not designed to change in either frequency or phase during the
measured pulse train.
CW (changing phase): The signal does not change the carrier phase within each pulse, although it
could change the phase from one pulse to another pulse. The signal is not designed to make frequency
changes.
Linear Chirp: The signal changes frequency in a linear manner during each pulse. The signal has the
same carrier phase at the same time offset from the rising edge of the pulse.
Other: The signal is not one of the listed types. You must manually enter the Frequency Offset value.
The following table maps the appropriate signal type selection with the signal characteristics.
Signature
Phase offset from one pulse to another
Zero
Any (unknown)
CW
CW Constant Phase
CW Changing Phase
LFM
Linear Chirp
N/A
xxx
116
SignalVu Vector Signal Analysis Software Printable Online Help
Reference Topics
Frequency Deviation Measurement
Frequency Deviation Measurement
The Frequency Deviation measurement is the difference between the maximum and minimum measured
values of the signal frequency during the Measurement Time.
Frequency Error Measurement
The frequency difference between the measured carrier frequency of the signal and the user-selected
center frequency of the analyzer.
Frequency Tab
The Frequency tab specifies the center frequency parameters used by all views within the application
window.
Settings tab
Description
Frequency
Specifies the center or measurement frequency.
xxx
Gain Imbalance Measurement
The gain difference between the I and Q channels in the signal generation path. Constellations with gain
imbalance show a pattern with a width that is different from height.
IQ Origin Offset Measurement
The magnitude of the DC offset of the signal measured at the symbol times. It indicates the magnitude of
the carrier feed-through signal.
SignalVu Vector Signal Analysis Software Printable Online Help
117
Reference Topics
IQ Sampling Parameters
IQ Sampling Parameters
The IQ Sampling Parameters tab enables you to set the controls for real-time acquisition. Depending on
the setting chosen for Adjust, two additional parameters can be set. Normally, the best results are achieved
by leaving the Adjust control set to All Auto.
Sampling Control
There are three acquisition parameters that interact with each other: acquisition bandwidth, oscilloscope
acquisition sampling rate, and memory usage. The oscilloscope’s sampling rate is displayed in the status
bar at the bottom of the SignalVu window. This sample rate is decimated by the SignalVu software
to meet the requirements of the current measurement settings (such as the selected span, acquisition
bandwidth or resolution bandwidth of a measurement). The resulting decimated sample rate is shown in
the figure above (24.4 MSamples/sec). This is the sample rate of the IQ data analyzed and acquisition
data file stored by SignalVu.
Adjust
User Sets
All Auto
N /A
N /A
All values based on the
selected measurement
Acq BW / Acq Samples
Acq BW
Acq Samples
Acq Length
Acq BW / Acq Length
Acq BW
Acquisition Length
Acq Samples
Analyzer Calculates
xxx
Acquisition Memory Usage
The center portion of the tab shows how the acquisition memory is used.
Readout
Description
Samples/s, sec/Sample
Readout of the acquisition sample rate and sample period.
Capacity
The maximum period of time and number of samples that can be acquired with the
current sampling parameters.
Using
The total amount of acquisition memory that will be used based on the current settings.
xxx
Levels Tab
Use the Levels tab to set parameters that control the method and levels used to calculate some pulse values.
118
SignalVu Vector Signal Analysis Software Printable Online Help
Reference Topics
Limits Tab (Spurious Display)
Setting
Description
100% Level
Specifies the method used to determine the 100% level(s).
50% Level
Specifies the method used to determine the 50% level on the pulse.
Rise/Fall Levels
Select whether to use the 10% to 90% or 20% to 80% points (based on voltage level)
to define the rise and fall times.
xxx
100% Level
Use the 100% Level settings to select the method used to determine the 100% level(s) used for calculating
pulse parameters, for example, Rise, Fall, and Width.
The Pulse Average Amplitude defines the pulse top as the average of the values of all the points along
the pulse top. This average is used as the 100% level, from which the 10, 20, 50, 80 and 90% levels are
calculated. Pulse measurements are referenced against these various levels. For example, Rise is the time
between the 10 and 90% (or 20 and 80%) levels on the rising edge of the pulse. When the Pulse Average
Amplitude method is selected, the same 100% level is used for both rising and falling edges.
Because some RF pulse types have droop (a height difference between the beginning and ending points of
the pulse top), the 100% percent level on the rising edge may not be equal to the 100% level on the falling
edge. The Independent method of pulse point location is designed for pulses with different 100% levels
at their rising and falling edges. The Independent method calculates the 100% level for the rising edge
separately from the 100% level of the falling edge. As a result, the 10, 20, 50, 80 and 90% levels are also
different for the rising and falling edges, allowing for more accurate measurements on pulses with droop.
50% level
Select Voltage to use -6 dB as the 50% point. Select Power to use -3 dB as the 50% level.
Limits Tab (Spurious Display)
Use the Limits tab to specify the pass/fail parameters for the Spurious measurement. When the Mask
setting is set to any value except off, the instrument identifies any signal peak that exceeds the specified
limits as a violation and displays Fail on the screen. If no signal peak exceeds the limits, the instrument
displays Pass on the screen.
SignalVu Vector Signal Analysis Software Printable Online Help
119
Reference Topics
Limits Tab (Spurious Display)
Setting
Description
Range
Selects the frequency range to which the settings on this tab are applied.
Start
Readout of the start frequency for the selected range.
Stop
Readout of the stop frequency for the selected range.
Edit
Click this button to edit the Spurious Frequency Plan, which defines the range frequency
and whether or not measurements are taken in a range (enabled/disabled).
Enabled
Specifies whether or not measurements are taken in the specified range.
Mask
Selects the type of limits used for Pass/Fail testing. Spurs that exceed the mask settings
are considered violations.
Abs
Spurs that exceed the Absolute limits settings are identified as violations.
Rel
Spurs that exceed the Relative limits settings are identified as violations.
Abs & Rel
Spurs that exceed both the Absolute and Relative limits settings are identified as
violations.
Abs OR Rel
Spurs that exceed either the Absolute or Relative limits settings are identified as
violations.
Off
Turns off limit testing for the selecting range. Measurements are still taken in the range,
but violations are not flagged. Signal peaks that exceed the Threshold and Excursions
values will still be identified as spurs.
Absolute ampl
Absolute amplitude limits are not based on the measured carrier amplitude or manual
reference. Start and stop values can be different.
Start
Specifies the limit at the start frequency of the range.
Stop
Specifies the limit at the stop frequency of the range.
Same
Sets the limit at the start and stop frequencies to the value set for the start frequency.
Relative ampl
Relative amplitude limits are calculated from the Power Reference. If the Power
Reference is set to the Carrier level, the relative amplitude limits will change with the
carrier level. Start and stop values can be different.
Start
Specifies the limit at the start frequency of the range.
Stop
Specifies the limit at the stop frequency of the range.
Same
Sets the limit at the stop frequency to the value set for the start frequency.
Review table
Click to display the Ranges table. The Ranges Table shows the enabled ranges, and all
the settings specified on the Ranges and Limits tabs associated with the enabled ranges.
Save table
Click to save the current Range table to a file.
Load table
Click to load a saved Range table from a file.
xxx
120
SignalVu Vector Signal Analysis Software Printable Online Help
Reference Topics
Magnitude Error Measurement
Performing Pass/Fail Limit Testing
To set limits:
1. Press Settings to display the Spurious Settings panel.
2. Press Limits to display the Limits tab.
3. Press Edit to display the Range and Carrier Frequencies dialog box.
4. Adjust the start and stop frequencies as required for each range you want to test.
5. For ranges that you wish to test, verify that the Enabled box is checked. Click OK.
6. Select a range you want to test from the Range drop-down list.
7. Select the desired Mask type from the drop-down list.
8. Set the limits as desired in the Absolute ampl and Relative ampl boxes. The values you can edit
depend on the mask type you select.
9. Repeat steps 5, 6 and 7 for each range you want to test.
10. Verify that the Threshold and Excursion values on the Ranges (see page 132) tab are set as required.
These are the values that define a spur.
11. Press the close box to remove the Settings panel.
12. Click Run to begin testing.
Magnitude Error Measurement
The RMS magnitude difference between the measured signal and the reference signal magnitude.
Marker to Center Frequency
Changes the center frequency to match the frequency of the selected marker.
Maximum Frequency Error Measurement
The maximum frequency error is the difference between the measured carrier frequency of the signal and
the user-selected center frequency of the analyzer.
SignalVu Vector Signal Analysis Software Printable Online Help
121
Reference Topics
Maximum Phase Error Measurement
Maximum Phase Error Measurement
The phase is measured at each point during the pulse’s ON time. The phase error for each point is the
difference between the measured phase value and the calculated ideal phase value. After the phase error
is calculated for all points in the acquisition record, the largest error in the positive direction and the
largest in the negative direction are determined. Whichever of these two values has the greater absolute
value is designated the Max Phase Error.
Measurements Tab
The Measurements tab is used to specify the measurements that appear in the Pulse Table.
Show in Pulse Table
Checked measurements appear in the Pulse Table.
Measurement Params
The Measurement Params tab is where you set parameters that control the ACPR and MCPR measurements.
122
SignalVu Vector Signal Analysis Software Printable Online Help
Reference Topics
Modulation Tab
Measurement
Description
Average
Enables/disables measurement averaging. Averaging can be enabled in either the
Frequency Domain or Time Domain.
Number
When Averaging is set to Frequency Domain, this value specifies the number of
acquisitions to be averaged. When Averaging is set to Time Domain, this value is the
number of successive capture records that are averaged.
Correct for Noise Floor
Enables/disables the Noise Floor Correction function.
Optimization
This parameter is not used by the SignalVu application.
Power Reference
Specifies power against which the results are compared. Choices available are each of
the existing main channels and “Total power in main channels”.
Only present when MCPR is the selected display.
Channel Filter
Specify the channel filter used. Select between None (default) and Root-raised Cosine.
Filter Parameter
Value entry box for the Root-raised Cosine filter Adjacent Channel Filter.
Present only when the Channel Filter is set to RRC.
Chip Rate
Value entry box for the RRC chip rate.
Present only when the Channel Filter is set to RRC.
xxx
Correct for Noise Floor
When this setting is enabled, the instrument applies a correction to the ACPR or MCPR measurement to
reduce the effect of instrument noise on the results. It generates this correction by taking a preliminary
acquisition to measure the instrument noise floor. Once this is done, the measurement proceeds, applying
the correction to each result. When any relevant settings (reference level, attenuator, frequency, or span)
are changed, the instrument performs a new noise measurement and correction.
Modulation Tab
Menu bar: Setup > Settings > Modulation
The Modulation tab specifies the type of modulation used in the input signal and other parameters that
control the demodulation of the input signal.
SignalVu Vector Signal Analysis Software Printable Online Help
123
Reference Topics
Modulation Tab
Parameter
Description
Modulation type
Specifies the type of modulation used in the input signal.
Symbol Rate
Specifies the symbol rate in Hertz.
Measurement Filter
Specifies the filter used for measurements.
Reference Filter
Specifies the filter used as a reference.
Filter Parameter
Enter a value used for the Measurement Filter and Reference Filter.
xxx
Modulation Type
The modulation types that can be demodulated are:
Modulation type
Description
QPSK
Quadrature Phase Shift Keying
8PSK
8-Phase Shift Keying
D8PSK
Differential Eight Phase Shift Keying
DQPSK
Differential Quadrature Phase Shift Keying
PI/4DQPSK
Pi/4 Differential Quadrature Phase Shift Keying
BPSK
Binary Shift Keying
16QAM
16-state Quadrature Amplitude Modulation
32QAM
32-state Quadrature Amplitude Modulation
64QAM
64-state Quadrature Amplitude Modulation
128QAM
128-state Quadrature Amplitude Modulation
256QAM
256-state Quadrature Amplitude Modulation
MSK
Minimum Shift Keying
xxx
Symbol Rate
Enter the appropriate value for the Symbol Rate in this entry box.
Measurement Filter
The available measurement filters are:
None
Root Raised Cosine
Raised Cosine
Gaussian
Rectangular
IS95TX-MEA
IS95TXEQ-MEA
IS95Ref
124
SignalVu Vector Signal Analysis Software Printable Online Help
Reference Topics
Multiple Carrier Power Ratio
The measurement filter is applied before the demodulation bit is detected and the ideal reference is
calculated.
Reference Filter
The available reference filters are:
Raised Cosine
Gaussian
Rectangular
IS95TX-MEA
IS95TXEQ-MEA
IS95Ref
The reference filter is applied to the internally generated ideal reference signal before the EVM is
calculated.
Filter Parameter
The filter parameter specifies the alpha for the Root Raised Cosine or Raised Cosine filter, or the BT
for the Gaussian filter.
Multiple Carrier Power Ratio
The ratio of the signal power in the reference channel or group of channels to the power in adjacent
channels.
Next Peak (Markers menu)
Selecting Next Peak displays a submenu that enables you to move the selected marker to the next peak.
Setting
Description
Next Left
Moves the selected marker to the next peak to the left of the current marker position.
Next Right
Moves the selected marker to the next peak to the right of the current marker position.
Next Lower (absolute)
Moves the selected marker to the lower level peak (in absolute terms) on the trace.
Next Higher (absolute)
Moves the selected marker to the higher level peak (in absolute terms) on the trace.
xxx
SignalVu Vector Signal Analysis Software Printable Online Help
125
Reference Topics
Online Help
Online Help
Menu Bar: Help > User Manual
This menu item displays this online help. The online help is a standard Windows help system. The
Online Help menu item is the only method available to display the online help; there are no other links
to the online help within the software.
Parameters Tab (CCDF Display)
The Parameters tab enables you to specify several parameters that control signal acquisition for the
CCDF Display.
Setting
Description
Single
When this Single is selected, the CCDF measurement is based on the Analysis Time
parameters set on Analysis control panel (Setup > Analysis > Analysis Time).
Total Time
When Total Time is selected, you can adjust its value. The value set here does not affect
Analysis Length value set in the Analysis control panel.
Continuous
When Continuous is selected, the CCDF measurement combines each new record
(Actual Analysis Length) into the existing result. It does not erase and start over until
user presses STOP or CLEAR.
Span
Specifies the range of frequencies used for analysis.
xxx
Single
Depending on the Analysis Time setting, the CCDF display may present error messages:
If the Actual Analysis Time is greater than 1 ms, the CCDF Display will calculate the trace without
any problems.
If the Actual Analysis time is less than 1 ms, the CCDF Display will measure the data as best if
can, but if it receives fewer than 20 samples, the CCDF display will clear the trace and report "Not
enough samples".
126
SignalVu Vector Signal Analysis Software Printable Online Help
Reference Topics
Parameters Tab (Occupied BW)
Parameters Tab (Occupied BW)
The Parameters tab enables you to specify parameters that control the Occupied BW measurement.
Setting
Description
Occupied BW % Power
Specifies the proportion of power within the occupied bandwidth (referenced against the
total power in the measurement bandwidth).
x dB level
x dB level defines the x dB BW level search threshold.
Measurement BW
Specifies the frequency range used by the measurement.
Max Hold spectral data
Enables the Max Hold function.
Average results
Enables/disables results averaging. Note that this is not an averaging of the trace, but an
averaging of the results.
Count
Specifies the number of results averaged to calculate the Occupied BW. Range: 2 to
10,000.
xxx
x dB Level
The x dB level determines the x dB BW. The instrument analyzes the spectrum trace to locate the
frequencies at which the level is x dB down from the peak level calculated over the measurement
bandwidth. The frequency difference between the upper and lower crossing thresholds is the x dB BW.
Range: -80.0 to -1.0 dB; Resolution: 0.1%; Inc/dec small: 0.1%, large: 1%; Default: -26 dB
Max Hold Spectral Data
Max Hold displays the maximum value in the acquisition record for each display point. Each new trace
display point is compared to the previous maximum value and the greater value is retained for display
and subsequent comparisons.
Parameters Tab (Spurious)
The Parameters tab enables you to specify settings that control the Spurious measurement.
SignalVu Vector Signal Analysis Software Printable Online Help
127
Reference Topics
Setting
Params Tab (Pulsed RF)
Description
Frequency Ranges
Multi
Enables the instrument to display all enabled ranges in the graph.
Single
Limits the graph to the display of only one range. The displayed range is set to the range
that contains the selected spur.
List Spurs
All spurs
Displays any spur that exceeds the Threshold and Excursion values set on the Ranges
tab.
Over Limit
Displays only spurs that exceed both the Threshold and Excursion values set on the
Ranges tab and the limits specified on the Limits tab.
RF & IF Optimization
This parameter is not used by the SignalVu application.
xxx
Params Tab (Pulsed RF)
The Params tab enables you to adjust several measurement parameters for Pulsed RF displays.
Setting
Description
Measurement Filter
Specify whether a filter is used to limit the bandwidth of the input signal.
Bandwidth
Sets the bandwidth of the measurement filter.
Power threshold to detect
pulses
Specifies the level used for locating pulses in the data.
Minimum OFF time between
pulses
Specifies the time the signal must fall below the power threshold for two pulses to be
considered separate pulses.
Max number of pulses
Specifies the number of pulses to measure within the analysis time.
xxx
128
SignalVu Vector Signal Analysis Software Printable Online Help
Reference Topics
Peak (Markers Menu)
Measurement Filter
Three choices are available for the measurement filter:
No Filter - Max BW: The widest acquisition bandwidth available is used. The Bandwidth setting is
disabled, but shows the value in use.
No Filter: - This is the default. The Bandwidth control is enabled for you to specify an acquisition
bandwidth.
Gaussian - The Bandwidth control is enabled for you to specify a value. The instrument uses an
acquisition bandwidth two times wider than the entered value.
Power threshold to detect pulses
Specifies the minimum power level the trace must exceed to be detected as a pulse. The range for this
setting is: 0 to -70 dBc. The setting resolution is 1 dB. The default value is -10 dB.
Max number of pulses
If the Analysis Time contains fewer pulses than specified, the analyzer will measure all the pulse within
the analysis time. If there are more pulses in the Analysis Time, than the specified number, the analyzer
measures the specified number of pulses and ignores the rest. The range for this setting is: 1 - 1000. The
setting resolution is: 1. If this setting is not checked, the analyzer will measure all pulses within the
Analysis Time, up to a maximum of 1000 pulses.
Peak (Markers Menu)
Selecting Peak from the Markers menu moves the selected marker to the highest level peak within the
acquisition record.
Peak/Average Ratio (Pk/Avg) Measurement (CCDF Display)
Ratio of the peak power in the transmitted signal to the average power in the transmitted signal (located
in the CCDF display).
Peak Power Measurement (Pulsed RF Display)
The Peak Power measurement shows the maximum power during pulse on.
SignalVu Vector Signal Analysis Software Printable Online Help
129
Reference Topics
Phase Deviation Measurement
Phase Deviation Measurement
The phase deviation is the difference between the maximum and minimum Phase values measured during
the ON time of a pulse.
Phase Error Measurement
The RMS phase difference between the measured signal and the ideal reference signal.
Prefs Tab
The Prefs tab enables you to change parameters of the measurement display. The parameters available on
the Prefs tab vary depending on the selected display, but include such items as enabling/disabling Marker
Readout, switching the Graticule display on/off, and Marker Noise mode. Some parameters appear with
most displays while others appear with only one display.
Prefs Tab (Spectrum)
The Prefs tab enables you to change appearance characteristics of the Spectrum display.
130
SignalVu Vector Signal Analysis Software Printable Online Help
Reference Topics
Prefs Tab (Spurious)
Setting
Description
Show trace legend
Enables display of a legend in the measurements area that shows the Detection method
and Function setting for displayed traces. The color of the legend text matches the color
of the associated trace.
Show graticule
Select to display or hide the graticule.
Show Marker readout in graph
(selected marker)
Shows or hides the readout for the selected marker in the graph area.
Marker Noise mode
Select to enable or disable the Marker Noise mode. Use this mode to measure noise on
the trace. See Using Markers in Noise Mode (see page 48)
xxx
Prefs Tab (Spurious)
The Prefs tab enables you to change appearance characteristics of the Spurious display.
Setting
Description
Graticule
Select On or Off to display or hide the graticule.
Trace Points
Select the desired number of points per range.
Show limits
Specifies how limits are shown in the graph.
Shaded
The region above the Limit (see page 119) is indicated by a shaded area.
Line Only
The limit values are indicated by a green line.
Off
The limit values are not indicated in the graph.
Show Marker readout in graph
(selected marker)
Shows or hides the readout for the selected marker in the graph area.
xxx
Pulse-to-Pulse Frequency Difference
The Pulse-to-Pulse Frequency Difference measurement is the difference between the frequency of this
pulse and frequency of the first pulse. The instantaneous frequency is measured at a user-adjustable time
following the rising edge of each pulse.
SignalVu Vector Signal Analysis Software Printable Online Help
131
Reference Topics
Pulse-to-Pulse Carrier Phase Measurement
Pulse-to-Pulse Carrier Phase Measurement
The phase difference between the first pulse and the selected pulse in the analysis window.
Pulse Width Measurement
The time from the rising edge to the falling edge at the -3dB level (50%) of the mean power for the pulse-on.
Quadrature Error Measurement
The orthogonal error between the I and Q channels. The error shows the phase difference between I and Q
channels away from the ideal 90 degrees expected from the perfect I/Q modulation. Constellations with
quadrature error will show some leakage of I into Q and vice versa.
Ranges Tab (Spurious)
Use the Ranges tab to specify the parameters that control the Spurious measurement. From the Ranges tab,
you specify the start and stop frequencies for ranges, whether or not a range is enabled, the parameters
that specify what constitutes a spur, measurement filter shape and bandwidth, and the detection method
used for processing signals.
132
SignalVu Vector Signal Analysis Software Printable Online Help
Reference Topics
Ranges Tab (Spurious)
Setting
Description
Range
Selects the frequency range to which the settings on this tab are applied.
Start
Readout of the start frequency for the selected range.
Stop
Readout of the stop frequency for the selected range.
Edit
Click this button to edit the Spurious Frequency Plan, which defines the range frequency
values and whether or not a signal is measured in a range (enabled/disabled).
Enabled
Specifies whether or not measurements are taken in the specified range.
Filter shape
Specifies the filter shape used for the Spurious measurement.
BW
Specifies the bandwidth used for the selected filter shape.
Auto
Sets the BW automatically. If CISPR is selected for Filter shape, this control is disabled.
Detection
Sets the processing method used for compressing excess intermediate data into the
desired number of trace points.
Threshold
Specifies the level that must be exceeded for a signal peak to be recognized as a spur. A
signal peak must also exceed the Excursion setting to be considered a spur.
Excursion
Specifies the peak to peak magnitude that must be exceeded for a signal peak to be
recognized as a spur. A signal transition must also exceed the Threshold setting to be
considered a spur.
VBW
Adjusts the VBW (Video Bandwidth) value. VBW Maximum: RBW current value; VBW
Minimum: 1/10,000 RBW setting. Disabled when Filter shape is set to CISPR.
Review table
Click to display the Ranges table. The Ranges Table shows the enabled ranges, and all
the settings specified on the Ranges and Limits tabs associated with the enabled ranges.
Save table
Click to save the current Range table to a file.
Load table
Click to load a saved Range table from a file.
xxx
Changing the Range Start and Stop Frequencies
To change the range start and stop frequencies, edit the Spurious Frequency Plan:
1. Click the Edit button on the Settings > Range tab.
2. Click the Enabled box for a range to take measurements in the range.
SignalVu Vector Signal Analysis Software Printable Online Help
133
Reference Topics
Reference Tab (Spurious)
3. Click on the frequency setting to change it. Type in a number for the frequency and a letter as a
multiplier, then press Enter on the front panel. You can use k, m, or g to set the frequency multiplier.
4. Click OK to save your changes.
You can enable a range on the Ranges control panel tab by selecting the range from the Range drop-down
list and clicking the Enabled check box. If you need to change the frequency of a range, you must edit
the spurious frequency plan using the Edit button.
Specifying Spur Requirements
A spur is a signal peak that exceeds both the Threshold and Excursion settings on the Ranges tab. The
Threshold and Excursion settings are absolute values; they are not calculated relative to a reference. The
Threshold and Excursion settings are specific to the selected range. If you want to use different settings for
spurs in different ranges, you have to set the values separately for each range. The Excursion control is
used to avoid interpreting a single spur as multiple narrower spurs by requiring the amplitude to drop by
the Excursion amount between spurs. Raising the Threshold value means that fewer, larger signals will
be identified as spurs.
To specify the spur requirements for a range:
1. Select the Range for which you want to specify the spur requirements.
2. Set the Threshold value.
3. Set the Excursion value.
Reference Tab (Spurious)
The Reference tab enables you to specify the Power Reference parameter. The Power reference parameter
is used to calculate relative values in the Spur table and to calculate relative amplitude limits.
134
SignalVu Vector Signal Analysis Software Printable Online Help
Reference Topics
Reference Tab (Spurious)
Setting
Description
Power Reference
Specifies the power reference level used for relative values and limits.
No reference
Power level readings are calculated only for absolute values, no relative values are
calculated.
Manual level
The reference level for relative measurements is specified by the Reference power
level setting.
Carrier
The reference level for relative measurements is based on the power level calculated at
the specified carrier frequency.
xxx
Setting the Power Reference Level to No Reference
To set the power reference to No Reference:
Select No reference from the Power reference drop-down list.
Setting the Power Reference Level to Manual Level
To set the power reference to manual level:
1. Select Manual level from the Power reference drop-down list. This displays the Reference power
level entry box.
2. Specify the desired power level in the Reference power level entry box.
SignalVu Vector Signal Analysis Software Printable Online Help
135
Reference Topics
Reference Tab (Spurious)
Setting the Power Reference Level to Carrier
To set the power reference to Carrier:
1. Select Carrier from the Power reference drop-down list. This displays several parameters.
2. To set the Carrier frequency, click Edit. This displays the Edit Range and Carrier frequencies
dialog box.
3. Specify the necessary values in the Frequency and Channel width entry boxes under Carrier.
Click OK.
4. Specify the Threshold level.
5. Specify the Integration BW. The Integration BW is the bandwidth over which the carrier is measured.
6. Although Auto is the recommended setting, you can specify the Resolution Bandwidth by changing
the value in the Res BW entry box.
7. Set the Detection method. Select either +Peak or Average.
NOTE. If the power level measured over the Integration BW about the carrier frequency is below the
threshold level, the instrument concludes that no carrier is present and no relative measurements will be
taken. Absolute measurements will still be taken.
136
SignalVu Vector Signal Analysis Software Printable Online Help
Reference Topics
Repeat
Repeat
Menu Bar: Run > Repeat
Selecting Repeat sets the Run mode to Repeat. In Repeat mode, as soon as one acquisition sequence
completes, another begins.
Note that an acquisition sequence can require more than one acquisition. For example, in a spectrum view,
the trace function might be set to Average 100 acquisitions Thus, a complete acquisition sequence would
consist of 100 acquisitions that are averaged together to create the trace that is displayed.
Repetition Interval Measurement
The time from a pulse rising edge to the next pulse rising edge.
Repetition Rate Measurement
The inverse of repetition interval. Repetition Interval is the time from a pulse rising edge to the next
pulse rising edge.
RF Channel Power Measurement
The RF channel power gives an indication of the total average (and other measures ) RF power in
a given channel.
For some communications systems, there is an “out-of-service” total power measurement defined in the
specifications that calls for a specified constant modulation. In this case, the output power should be
relatively constant. For many measurements, this may not be the case, and the Power Measurement
results will vary as the signal varies.
Average power is the square root of the sum of the squares of the voltage samples over the measurement
time.
The defined “channel” width for the Power Measurement defines the bandwidth and shape of the filter
used to remove any RF power on frequencies outside of the channel bandwidth.
SignalVu Vector Signal Analysis Software Printable Online Help
137
Reference Topics
Rho Measurement
Rho Measurement
The normalized correlated power of the measured signal and the ideal reference signal. Like EVM, Rho is
a measure of modulation quality. The value of Rho is less than 1 in all practical cases and is equal to 1 for
a perfect signal measured in a perfect receiver.
Ripple
The Ripple measurement is calculated as follows:
Ripple = | Positive Maximum Difference | + | Negative Maximum Difference |
where the maximum differences are calculated as shown in the following illustration.
Ripple Measurement (Pulsed RF Displays)
Ripple is the peak-to-peak ripple on the pulse top. It does not include any preshoot, overshoot, or
undershoot. By default, the first 25% and the last 25% of the pulse top is excluded from this measurement
to eliminate distortions caused by these portions of the pulse.
The units for this measurement can be set to either Watts (default) or Volts.
Rise Time Measurement (Pulsed RF Displays)
This measurement determines the time required for a signal to rise from 10% to 90% (or 20% to 80%)
of its maximum steady-state voltage amplitude.
138
SignalVu Vector Signal Analysis Software Printable Online Help
Reference Topics
RMS Frequency Error Measurement
RMS Frequency Error Measurement
The RMS Frequency Error measurement is the RMS average of the Freq Error vs.Time trace, computed
over the Measurement Time.
RMS Phase Error Measurement
The RMS Phase Error measurement is the RMS average of the Phase vs.Time trace, computed over
the Measurement Time.
Scale Tab (Amplitude vs.Time)
The Scale tab allows you to change the vertical and horizontal scale settings. Changing the scale settings
changes how the trace appears on the display but does not change control settings such as Measurement
Frequency. In effect, these controls operate like pan and zoom controls.
Setting
Vertical
Description
Controls the vertical position and scale of the trace display.
Scale
Changes the vertical scale.
Offset
Vertical Offset adjusts the reference level away from top of the graph.
Autoscale
Resets the scale of the vertical axis to contain the complete trace.
Horizontal
Controls the span of the trace display and position of the trace.
Scale
Sets the period of time shown in the graph.
Offset
Allows you to pan a zoomed trace.
Autoscale
Resets the scale of the horizontal axis to contain the complete trace.
Reset Scale
Resets all settings to their default values.
xxx
SignalVu Vector Signal Analysis Software Printable Online Help
139
Reference Topics
Scale Tab (EVM / Magnitude Error vs.Time)
Scale Tab (EVM / Magnitude Error vs.Time)
The Scale tab allows you to change the vertical and horizontal scale settings. Changing the scale settings
changes how the trace appears on the display but does not change control settings such as Measurement
Frequency.
Setting
Description
Vertical
Controls the vertical position and scale of the trace display.
Scale
Changes the vertical scale units.
Offset
Vertical Offset adjusts the reference level away from top of the graph.
Autoscale
Resets the scale of the vertical axis to contain the complete trace.
Horizontal
Controls the span of the trace display and position of the trace.
Scale
Allows you to, in effect, change the span.
Offset
Allows you to pan a zoomed trace without changing the Measurement Frequency. Offset
is only enabled when the span, as specified by Freq/div, is less than the acquisition
bandwidth.
Autoscale
Resets the scale of the horizontal axis to contain the complete trace.
xxx
A Note About Units
The Units used for the horizontal scale can be either Seconds or Symbols. To set the units for the horizontal
scale, display the Analysis Time tab. On the tab, select the appropriate units from the Units drop-down list.
Scale Tab (Frequency vs.Time)
The Scale tab allows you to change the vertical and horizontal scale settings. Changing the scale settings
changes how the trace appears on the display but does not change control settings such as Measurement
Frequency.
140
SignalVu Vector Signal Analysis Software Printable Online Help
Reference Topics
Scale Tab (Phase Error vs.Time)
Setting
Description
Vertical
Controls the vertical position and scale of the trace display.
Scale
Sets the scale of the vertical axis.
Offset
Vertical Offset adjusts the reference level away from top of the graph.
Autoscale
Resets the scale of the vertical axis to contain the complete trace.
Horizontal
Controls the span of the trace display and position of the trace.
Scale
Allows you to, in effect, change the span.
Offset
Allows you to pan a zoomed trace without changing the Measurement Frequency. Offset
is only enabled when the span, as specified by Freq/div, is less than the acquisition
bandwidth.
Autoscale
Resets the scale of the horizontal axis to contain the complete trace.
xxx
Scale Tab (Phase Error vs.Time)
The Scale tab view allows you to change the vertical and horizontal scale settings. For the Phase vs.Time
view, the vertical axis represents the phase and the horizontal axis represents time.
SignalVu Vector Signal Analysis Software Printable Online Help
141
Reference Topics
Scale Tab (Phase vs.Time)
Setting
Description
Vertical
Controls the vertical position and scale of the trace display.
Scale
Sets the scale of the vertical axis. Units are in degrees.
Offset
Sets the start value for the vertical axis. Units are in degrees.
Autoscale
Resets the scale of the vertical axis to contain the complete trace.
Horizontal
Controls the span of the trace display and position of the trace.
Scale
Sets the horizontal scaling in symbols or second (units are set on the Analysis Time tab).
Offset
Sets the start value for the time axis.
Autoscale
Resets the scale of the horizontal axis to contain the complete trace.
xxx
Scale Tab (Phase vs.Time)
The Scale tab for the Phase vs.Time view allows you to change the vertical and horizontal scale settings.
For the Phase vs.Time view, the vertical axis represents the phase and the horizontal axis represents time.
Setting
Vertical
Description
Controls the vertical position and scale of the trace display.
Scale
Sets the range of the vertical axis. Units are in degrees.
Offset
Sets the start value for the vertical axis. Units are in degrees.
Y Axis
Sets the Y-axis scale to either Continuous or Modulo +/-pi. Continuous mode unwraps
the phase. Modulo +/-pi mode maps the phase to values between pi and -pi.
Reference
Sets which time point in the analysis period is used as the zero-phase-value reference.
Autoscale
Resets the scale of the vertical axis to contain the complete trace.
Horizontal
Controls the span of the trace display and position of the trace.
Scale
Sets the horizontal scaling in second/division.
Offset
Sets the start value for the time axis.
Autoscale
Resets the scale of the horizontal axis to contain the complete trace.
xxx
142
SignalVu Vector Signal Analysis Software Printable Online Help
Reference Topics
Scale Tab (Pulse Statistics)
Scale Tab (Pulse Statistics)
The Scale tab allows you to change the vertical and horizontal scale settings. Changing the scale settings
changes how the trace appears on the display but does not change control settings such as Measurement
Frequency. In effect, these controls operate like pan and zoom controls.
Setting
Description
Vertical
Controls the vertical position and scale of the trace display.
Scale
Changes the vertical scale. The units for this setting depend on the statistic selected
from the Result drop-down list in the Pulse Statistics display.
Offset
Adjusts the Reference Level away from the top of the trace display. The units for this
setting depend on the statistic selected from the Result drop-down list in the Pulse
Statistics display.
Rescale
Horizontal
Resets the scale of the vertical axis to contain the complete trace.
Controls the span of the trace display and position of the trace.
Number of pulses
Specifies the number of pulses to use to calculate statistical values.
First pulse to show
Sets the first pulse to display. (The first pulse after the start of acquisition (whether free
run or triggered) is considered Pulse0. It is the first pulse after the global time reference.
Rescale
Resets the scale of the horizontal axis to contain the complete trace.
Plot
Specifies either the FFT or Trend plot.
Reset Scale
Restores all settings to their default values.
xxx
Scale Tab (Pulse Trace)
The Scale tab allows you to change the vertical and horizontal scale settings. Changing the scale settings
changes how the trace appears on the display but does not change control settings such as Measurement
Frequency.
SignalVu Vector Signal Analysis Software Printable Online Help
143
Reference Topics
Scale Tab (RF I & Q vs.Time)
Setting
Description
Vertical
Controls the vertical position and scale of the trace display.
Scale
Changes the vertical scale units. This is only accessible when the vertical units are
set to dBm.
Offset
Adjusts the Reference Level away from the top of the trace display.
Autoscale
Resets the scale of the vertical axis to contain the complete trace.
Horizontal
Controls the span of the trace display and position of the trace.
Scale
Allows you to change the span.
Offset
Allows you to pan a zoomed trace without changing the Measurement Frequency.
Autoscale
Resets the scale of the horizontal axis to contain the complete trace.
Full Scale
Specifies the Horizontal scale default.
Selected Pulse
Sets the horizontal scale default to be based on the result value for the currently-select
pulse.
Max Pulse
Sets the horizontal scale default to be based on the largest value for the selected pulse
measurement.
Reset Scale
Resets all values to their default values.
xxx
Scale Tab (RF I & Q vs.Time)
The Scale tab allows you to change the vertical and horizontal scale settings. Changing the scale settings
changes how the trace appears on the display but does not change control settings such as Measurement
Frequency.
144
SignalVu Vector Signal Analysis Software Printable Online Help
Reference Topics
Scale Tab (RF Measurements)
Setting
Description
Vertical
Controls the vertical position and scale of the trace display.
Scale
Sets the scale of the vertical axis.
Offset
Vertical Offset adjusts the reference level away from top of the graph.
Autoscale
Resets the scale of the vertical axis to contain the complete trace.
Horizontal
Controls the span of the trace display and position of the trace.
Scale
Allows you to change the time displayed in the graph, in effect, zooming in on the trace.
Offset
Allows you to pan a zoomed trace.
Autoscale
Resets the scale of the horizontal axis to contain the complete trace.
xxx
Scale Tab (RF Measurements)
The Scale tab allows you to change the vertical and horizontal scale settings. Changing the scale settings
changes how the trace appears on the display but does not change control settings such as Center Frequency.
Setting
Description
Vertical
Controls the vertical position and scale of the trace display.
Scale
Changes the vertical scale units. This is only accessible when the vertical units are
set to dBm.
Offset
Adjusts the Reference Level away from the top of the trace display.
Autoscale
Resets the scale of the vertical axis to contain the complete trace.
Horizontal
Controls the span of the trace display and position of the trace.
Scale
Allows you to, in effect, change the span.
Offset
Allows you to pan a zoomed trace without changing the Measurement Frequency. Offset
is only enabled when the span, as specified by Freq / div , is less than the acquisition
bandwidth.
Autoscale
Resets the scale of the horizontal axis to contain the complete trace.
xxx
SignalVu Vector Signal Analysis Software Printable Online Help
145
Reference Topics
Scale Tab (Spectrogram Display)
Scale Tab (Spectrogram Display)
The Scale tab allows you to change the vertical and horizontal scale settings and set the color scheme
used for the spectrogram trace.
Setting
Description
Vertical (Time)
Scale
Changes the vertical scale or the length of time shown in the graph. The most recent
acquisition appears at the bottom of the graph.
Offset
Offset adjusts which of the lines is placed at the bottom position in the graph.
Autoscale
Resets the scale of the vertical axis to contain the complete trace for one acquisition.
Allow Overlap
Allows the use of overlapped frequency transforms.
Horizontal (Frequency)
Scale
Allows you to change the range of frequencies shown in the graph without changing the
span or measurement frequency.
Offset
Allows you pan the graph.
Autoscale
Resets Scale to the Span setting.
Color (Power)
Color
Displays a drop-down list that allows you to set the color scheme used for the
spectrogram trace.
Max
Sets the maximum power level represented by the top of the color scale.
Min
Sets the minimum power level represented by the bottom of the color scale.
xxx
Vertical Scale
The Spectrogram display allows you to zoom in and out in the time scale. Positive values zoom in (expand
the scale) and negative values zoom out (compress the scale). If the Scale control does not allow positive
values, either the Analysis Length (Setup > Analysis > Analysis Time) provides only enough time for a
single spectrogram line (manually increase the Analysis Length as needed) or Allow Overlap is disabled.
146
SignalVu Vector Signal Analysis Software Printable Online Help
Reference Topics
Scale Tab (Spectrum)
Scale Tab (Spectrum)
The Scale tab allows you to change the vertical scale settings. Changing the scale settings changes how
the trace appears on the display but does not change control settings such as Measurement Frequency. In
effect, these controls operate like pan and zoom controls.
Setting
Description
Vertical
Scale
Changes the vertical scale.
Position
Vertical Offset adjusts the reference level away from top of the graph.
Autoscale
Resets the Offset so that the trace appears below the top of the graph.
Horizontal
Scale
Allows you to change the range of frequencies shown in the graph without changing the
span or measurement frequency.
Position
Allows you pan the graph.
Autoscale
Resets Scale to the Span setting.
Reset Scale
Resets all settings to their default values.
Log scale
Resets the display to show the frequency axis in a logarithmic scale.
xxx
Scale Tab (Spurious)
The Scale tab allows you to change the vertical and horizontal scale settings. Changing the scale settings
changes how the trace appears on the display but does not change control settings such as Measurement
Frequency. In effect, these controls operate like pan and zoom controls.
SignalVu Vector Signal Analysis Software Printable Online Help
147
Reference Topics
Setting
Scale Tab (Time Overview)
Description
Vertical
Scale
Changes the range of the amplitude shown between the top and bottom of the graph.
Position
Adjusts the level shown at the top of the graph.
Autoscale
Resets the Position so that the highest level on the trace appears below the top of the
graph.
Horizontal
Start
Adjusts the frequency shown at the left edge of the graph. This value does not change
the frequencies of the ranges.
Stop
Adjusts the frequency shown at the right edge of the graph. This value does not change
the frequencies of the ranges.
Autoscale
Resets the Start and Stop frequencies to the lowest and highest values of the enabled
ranges.
Reset Scale
Resets all settings to their default values.
xxx
Scale Tab (Time Overview)
The Scale tab allows you to change the vertical scale settings. Changing the scale settings changes how
the trace appears on the display but does not change control settings such as Measurement Frequency. In
effect, these controls operate like pan and zoom controls.
Setting
Description
Vertical
Controls the vertical position and scale of the trace display.
Scale
Changes the vertical scale.
Offset
Vertical Offset adjusts the reference level away from top of the graph.
Autoscale
Resets the scale of the vertical axis to contain the complete trace.
Horizontal
Controls the scale of the trace display and position of the trace.
Scale
Allows you to change length of time shown within the graph.
Offset
Allows you to pan the graph.
Autoscale
Resets the scale of the horizontal axis to contain the analysis length.
Reset Scale
Resets all settings to their default values.
xxx
148
SignalVu Vector Signal Analysis Software Printable Online Help
Reference Topics
Scope Data
Scope Data
The Scope Data tab displays the sample rate and record length of the data received from the oscilloscope
or from a recalled oscilloscope waveform file.
Scope Settings
The Scope Settings tab is where you specify which oscilloscope settings are controlled by the SignalVu
software.
Setting
Sample Rate
When enabled, SignalVu adjusts the sample rate as required based on
measurement settings in the analysis software. Sample rate determines the
maximum available measurement bandwidth.
Other acquisition/horizontal settings
When enabled, SignalVu adjusts the oscilloscope horizontal and acquisition
settings fo the oscilloscope as needed to provide the best results. For example,
SignalVu sets Sampling Mode to Real Time Only and Horizontal Mode to Manual
when it is allowed to control these parameters. Checking these boxes helps
reduce variability in the SignalVu results.
Vertical settings
When enabled, SignalVu adjusts the oscilloscope’s vertical settings. Vertical
settings include Coupling, Bandwidth, Scale and Termination. SignalVu sets these
to values appropriate for RF signals. The Scale value sent to the oscilloscope is
calculated from SignalVu’s Reference Level control value.
Reset all scope settings to default
values
Press this button to change all oscilloscope settings to the oscilloscope’s default
values.
xxx
SignalVu Vector Signal Analysis Software Printable Online Help
149
Reference Topics
Show Pulse Definition
Show Pulse Definition
The Show Pulse Definition check box enables the display of colored lines that overlay the measurement
pulse and show the points on the waveform where the measurement is being taken. A green arrow along
the left edge shows where the Pulse Detection threshold is set vertically.
Spectrum Time Tab
This tab controls whether the Spectrum display uses the same Analysis Time parameters as all the other
views or uses a different Offset and Length.
Settings
Description
Spectrum Time Mode
Independent
Causes the spectrum analysis views to use the settings unique to those displays.
Use Analysis Time settings
Causes the spectrum analysis views to use the settings on the Analysis Time tab.
Spectrum Time (only available when Independent is selected)
Spectrum Offset
Sets the beginning of Spectrum Time with respect to the selected time reference point
(selectable in the Analysis Time tab as either Acquisition Start or Trigger).
Spectrum Length
The amount of data, in terms of time, from which spectrum traces are computed.
Auto
When enabled, causes the instrument to set the Spectrum Length value based on the
RBW setting.
Actual
This is a displayed value, not a setting. It is the Spectrum Length (time) being used
by the analyzer; this value may not match the Spectrum Length requested (in manual
mode). The actual spectrum length is always an integer multiple of the time needed to
support the RBW value.
xxx
Time Measurement
This is the time in seconds relative to the time reference point in the first acquisition record in the data set.
150
SignalVu Vector Signal Analysis Software Printable Online Help
Reference Topics
Trace Tab (Constellation Display)
Trace Tab (Constellation Display)
Menu Bar: Setup > Settings > Trace
Application Toolbar/Front Panel: Settings
The Trace tab allows you to set the trace display characteristics of the Constellation display.
Setting
Description
Points per Symbol
Select how many points to use between symbols when connecting the dots. Values:
1, 2, 4, 8.
Vectors / Constellation Points
Selects whether to draw lines (vectors) between constellation points in the display.
xxx
Trace Tab (Frequency vs.Time)
The Trace Tab allows you to set the display characteristics of the trace.
Setting
Description
Show
Shows / hides the trace.
Function
Selects the trace processing method. Available settings are: Normal, Average, Min
Hold, and Max Hold.
Averages
Sets the number of traces averaged to generate the displayed trace.
Freeze
Halts updates to the trace.
Save Trace As
Saves the selected trace to a file for later recall and analysis.
Show Recalled trace
Displays a saved trace instead of a live trace.
xxx
SignalVu Vector Signal Analysis Software Printable Online Help
151
Reference Topics
Trace Tab (Frequency vs.Time)
Trace Processing
Traces can be processed to display in different ways. The Function setting controls trace processing.
Normal - Each new trace is displayed and then replaced by the next trace. Each data point contains a
single vertical value.
Average - Multiple traces are averaged together to generate the displayed trace. There is one vertical
value for each underlying frequency data point. Once the specified number of traces have been
acquired and averaged to generate the displayed trace, each new trace takes the place of the oldest
trace in the calculation. The Number of Traces setting specifies how many traces averaged.
Max Hold - Displays the maximum value in the trace record since the acquisition began. Each new
trace display point is compared to the previous maximum value and the greater value is retained for
display and subsequent comparisons.
Min Hold - Displays the minimum value in the trace record since the acquisition began. Each new
trace display point is compared to the previous minimum value and the lesser value is retained for
display and subsequent comparisons.
Saving Traces
To save a trace for later analysis:
1. Select the Save Trace As button. This displays the Save As dialog box.
2. Type a name for the saved trace and click Save.
Recalling Traces
You can recall a previously saved trace for analysis. First, specify a trace for recall and second, enable
Show Recalled Trace.
152
SignalVu Vector Signal Analysis Software Printable Online Help
Reference Topics
Trace Tab (Spectrogram Display)
To display a previously saved trace:
1. Click the ... button to display the Open dialog box.
2. Navigate to the location of the saved trace.
3. Select the desired trace and click Open.
4. Check the Show Recalled Trace checkbox.
5. Verify that the Show checkbox is selected.
Trace Tab (Spectrogram Display)
The Traces Tab allows you to set the display characteristics of displayed traces.
Setting
Description
Selected Line
Displays the time at the Selected Line. The selected line is the first line of the current
acquisition. If Markers are enabled, the selected line is positioned by the selected marker.
Detection
Sets the Detector method used for the trace. Not available for saved traces.
Function
Selects the trace processing method. Available settings are: Normal, Average, Max
Hold, and Min Hold.
Time (Minutes)
Sets the period of time the spectrum trace is averaged to generate each line of the
displayed spectrogram.
Freeze
Halts updates to the selected trace.
Save Trace As
Saves the selected trace to a file for later recall and analysis.
Show Recalled trace
Displays a saved trace instead of a live trace.
xxx
Trace Processing
Traces can be processed to display in different ways. The Function setting controls trace processing.
SignalVu Vector Signal Analysis Software Printable Online Help
153
Reference Topics
Trace Tab (Spectrogram Display)
Normal - Each new trace is displayed and then replaced by the next trace. Each data point contains a
single vertical value.
Average - Multiple traces are averaged together to generate the displayed trace. There is one vertical
value for each underlying frequency data point. Once the specified number of traces have been
acquired and averaged to generate the displayed trace, each new trace takes the place of the oldest
trace in the calculation. The Number of Traces setting specifies how many traces averaged.
Max Hold - Displays the maximum value in the trace record for each display point. Each new trace
display point is compared to the previous maximum value and the greater value is retained for display
and subsequent comparisons.
Min Hold - Displays the minimum value in the trace record for each display point. Each new trace
display point is compared to the previous minimum value and the lesser value is retained for display
and subsequent comparisons.
Saving Traces
To save a trace for later analysis:
1. Select the Save Trace As button. This displays the Save As dialog box.
2. Type a name for the saved trace and click Save.
Recalling Trace
You can recall a previously saved trace for analysis. First, specify a trace for recall and second, enable
Show Recalled Trace.
To recall a previously saved trace:
1. Click the ... button to display the Open dialog box.
154
SignalVu Vector Signal Analysis Software Printable Online Help
Reference Topics
Trace Tab (Spurious)
2. Navigate to the location of the saved spectrogram trace.
3. Select the desired trace and click Open.
4. Check the Show Recalled Trace checkbox.
Trace Tab (Spurious)
Use the Trace tab to select the trace function or freeze the displayed trace.
Setting
Description
Function
Selects the trace processing method. Available settings are: Normal, Average, and
Max Hold.
Freeze
Halts updating of the trace in the display. Trace processing continues but the displayed
trace is not updated.
xxx
Trace Processing
Traces can be processed to display in different ways. The Function setting controls trace processing.
Normal - Each new trace is displayed and then replaced by the next trace. Each data point contains a
single vertical value.
Average - Multiple traces are averaged together to generate the displayed trace. There is one vertical
value for each underlying frequency data point. Once the specified number of traces have been
acquired and averaged to generate the displayed trace, each new trace takes the place of the oldest
trace in the calculation. The Number of Traces setting (the box with the number in it) specifies how
many traces averaged.
Max Hold - Displays the maximum value in the trace record for each display point. Each new trace
display point is compared to the previous maximum values and the greater value is retained for
display. The Number of Traces setting (the box with the number in it) specifies how many traces
are compared to determine the Max Hold value.
SignalVu Vector Signal Analysis Software Printable Online Help
155
Reference Topics
Trace Tab (RF I & Q vs.Time)
Trace Tab (RF I & Q vs.Time)
The Trace Tab allows you to set the characteristics of displayed traces.
Setting
Description
Trace
Specifies the selected trace.
Show
Specifies whether or not the selected trace is displayed.
Freeze
Halts updates to the selected trace.
Function
Selects the trace processing method. Available settings are: Normal, Average, Min
Hold, and Max Hold.
Averages
Sets the number of traces averaged to generate the displayed trace (visible only when
Function is set to Average).
Save Trace As...
Saves the selected trace to a file for later recall and analysis.
Show Recalled Trace
Displays a saved trace instead of a live trace.
xxx
Trace Processing
Traces can be processed to display in different ways. The Function setting controls trace processing.
Normal - Each new trace is displayed and then replaced by the next trace. Each data point contains a
single vertical value.
Average - Multiple traces are averaged together to generate the displayed trace. There is one vertical
value for each underlying frequency data point. Once the specified number of traces have been
acquired and averaged to generate the displayed trace, each new trace takes the place of the oldest
trace in the calculation. The Number of Traces setting specifies how many traces averaged.
Min Hold - Displays the minimum value in the trace record for each display point. Each new trace
display point is compared to the previous minimum value and the lesser value is retained for display
and subsequent comparisons.
Max Hold - Displays the maximum value in the trace record for each display point. Each new trace
display point is compared to the previous maximum value and the greater value is retained for display
and subsequent comparisons.
Saving Traces
To save a trace for later analysis:
156
SignalVu Vector Signal Analysis Software Printable Online Help
Reference Topics
Trace Tab (RF I & Q vs.Time)
1. Select the Save Trace As button. This displays the Save As dialog box.
2. Type a name for the saved trace and click Save.
Recalling Traces
You can recall a previously saved trace for analysis or comparison to a live trace.
To select a trace for recall:
1. Select the trace into which the recalled trace will be loaded, from the Trace drop-down list.
2. Check the Show checkbox.
3. Click the ... button to display the Open dialog box.
4. Navigate to the desired file and click Open.
5. Check the Show Recalled Trace checkbox.
6. Verify that the trace’s Show checkbox is selected (either on this tab or next to the drop-down list
located at the top-left corner of the graph).
SignalVu Vector Signal Analysis Software Printable Online Help
157
Reference Topics
Traces Tab (CCDF)
Traces Tab (CCDF)
The Traces tab enables you to select traces for display. You can choose to display a live trace, a saved
trace, and a reference trace.
Setting
Description
Trace
Selects a trace for display. Choices are Trace 1, 2, and Gaussian. Trace 1 and 2 can be
saved traces.
Show
Shows / hides the selected trace.
Freeze
Halts updates to the selected trace.
Save Trace As...
Saves the selected trace to a file for later recall and analysis.
Show recalled trace
Used to select a saved trace for display.
xxx
Saving Traces
To save a trace for later analysis:
1. Select the Save Trace As button. This displays the Save As dialog box.
158
SignalVu Vector Signal Analysis Software Printable Online Help
Reference Topics
Traces Tab (Amplitude vs.Time Display)
2. Navigate to the desired folder or use the default.
3. Type a name for the saved trace and click Save.
Recalling Traces
You can recall a previously saved trace for analysis or comparison to a live trace.
To select a trace for recall:
1. Select the trace into which the recalled trace will be loaded, from the Trace drop-down list.
2. Check the Show checkbox.
3. Click the ... button to display the Open dialog box.
1. Navigate to the desired file and click Open.
2. Check the Show Recalled Trace checkbox.
3. Verify that the trace’s Show checkbox is selected (either on this tab or next to the drop-down list
located at the top-left corner of the graph).
Gaussian Trace
The Gaussian trace is a reference trace that you can compare your trace against. Because the Gaussian
trace is for reference, there are no settings for the trace other than whether or not it is shown.
Traces Tab (Amplitude vs.Time Display)
The Traces Tab allows you to set the display characteristics of displayed traces.
SignalVu Vector Signal Analysis Software Printable Online Help
159
Reference Topics
Traces Tab (Amplitude vs.Time Display)
Setting
Description
Trace
Selects a trace.
Show
Shows / hides the selected trace.
Function
Selects the trace processing method. Available settings are: Normal, Average, Max
Hold, and Min Hold.
Averages
Sets the number of traces averaged to generate the displayed trace.
Freeze
Halts updates to the selected trace.
Save Trace As
Saves the selected trace to a file for later recall and analysis.
Show Recalled trace
Displays a saved trace instead of a live trace.
xxx
Trace Processing
Traces can be processed to display in different ways. The Function setting controls trace processing.
Normal - Each new trace is displayed and then replaced by the next trace. Each data point contains a
single vertical value.
Average - Multiple traces are averaged together to generate the displayed trace. There is one vertical
value for each underlying frequency data point. Once the specified number of traces have been
acquired and averaged to generate the displayed trace, each new trace takes the place of the oldest
trace in the calculation. The Number of Traces setting specifies how many traces averaged.
Max Hold - Displays the maximum value in the trace record for each display point. Each new trace
display point is compared to the previous maximum value and the greater value is retained for display
and subsequent comparisons.
Min Hold - Displays the minimum value in the trace record for each display point. Each new trace
display point is compared to the previous minimum value and the lesser value is retained for display
and subsequent comparisons.
Saving Traces
To save a trace for later analysis:
1. Select the Save Trace As button. This displays the Save As dialog box.
160
SignalVu Vector Signal Analysis Software Printable Online Help
Reference Topics
Traces Tab (Error vs.Time Display)
2. Navigate to the folder where you want to save the trace or use the default.
3. Type a name for the saved trace and click Save.
Recalling Traces
You can display saved traces for comparison by selecting the Show recalled trace checkbox.
To display a recalled trace:
1. Click the ... button to display the Open dialog box.
2. Navigate to the desired file and click Open.
3. Click the Show Recalled Trace checkbox so it is checked.
4. Verify that the trace’s Show checkbox is selected (either on this tab or next to the drop-down list
located at the top-left corner of the graph).
Traces Tab (Error vs.Time Display)
The Traces Tab allows you to set the display characteristics of the displayed trace.
SignalVu Vector Signal Analysis Software Printable Online Help
161
Reference Topics
Traces Tab (Math Trace)
Setting
Description
Points per Symbol
Select how many points to use between symbols when connecting the dots. Values:
1, 2, 4, 8.
xxx
Traces Tab (Math Trace)
This tab is not a distinct tab, it is just how the Traces tab appears when Math is selected in the Trace
drop-down list.
Trace 4 is a mathematically-derived trace defined as Trace A minus Trace B. You can select Trace 1, 2, or
3 to serve as either Trace A or Trace B.
Setting
Description
Trace
When set to Trace 4 (Math), this tab is displayed.
Show
Shows / hides the selected trace.
Freeze
Halts updates to the selected trace.
Save Trace As...
Saves the selected trace to a file for later recall and analysis.
Trace minus Trace
Selects which traces serve as Trace A and Trace B.
xxx
Traces Tab (Spectrum Display)
The Traces Tab allows you to set the display characteristics of displayed traces.
162
SignalVu Vector Signal Analysis Software Printable Online Help
Reference Topics
Traces Tab (Spectrum Display)
Setting
Description
Trace
Selects a trace.
Show
Shows / hides the selected trace.
Detection
Sets the Detection method used for the trace. Not available for saved traces.
Function
Selects the trace processing method. Available settings are: Normal, Average, Max
Hold, and Min Hold.
Number of Traces
Sets the number of traces averaged to generate the displayed trace. (Present only
when Function is set to Average.)
Freeze
Halts updates to the selected trace.
Save Trace As
Saves the selected trace to a file for later recall and analysis.
Show Recalled trace
Displays a saved trace instead of a live trace.
xxx
Trace
Available traces are: Trace 1, Trace 2, Trace 3, Math, and Spectrogram. Traces 1-3 are based on the
input signal and enable you to display the input signal using different processing. For example, you
could display Trace 1 with Function set to Normal, Trace 2 with Function set to Max Hold and Trace 3
with Function set to Min Hold.
The Math trace is the result of subtracting one trace from another.
The Spectrogram trace is displayed only if the Spectrogram display is shown. The Spectrogram trace
shows the trace selected in the Spectrogram as a spectrum trace.
Trace Processing
Traces can be processed to display in different ways. The Function setting controls trace processing.
Normal - Each new trace is displayed and then replaced by the next trace. Each data point contains a
single vertical value.
Average - Multiple traces are averaged together to generate the displayed trace. There is one vertical
value for each underlying frequency data point. Once the specified number of traces have been
acquired and averaged to generate the displayed trace, each new trace takes the place of the oldest
trace in the calculation. The Number of Traces setting specifies how many traces averaged.
SignalVu Vector Signal Analysis Software Printable Online Help
163
Reference Topics
Traces Tab (Spectrum Display)
Max Hold - Displays the maximum value in the trace record for each display point. Each new trace
display point is compared to the previous maximum value and the greater value is retained for display
and subsequent comparisons.
Min Hold - Displays the minimum value in the trace record for each display point. Each new trace
display point is compared to the previous minimum value and the lesser value is retained for display
and subsequent comparisons.
Saving Traces
To save a trace for later analysis:
1. Select the Save Trace As button. This displays the Save As dialog box.
2. Navigate to the desired folder or use the default.
3. Type a name for the saved trace and click Save.
Recalling Traces
You can recall a previously saved trace for analysis or comparison to a live trace.
To select a trace for recall:
1. Select the trace into which the recalled trace will be loaded, from the Trace drop-down list.
2. Check the Show checkbox.
3. Click the ... button to display the Open dialog box.
164
SignalVu Vector Signal Analysis Software Printable Online Help
Reference Topics
Units Tab
4. Navigate to the desired file and click Open.
5. Check the Show Recalled Trace checkbox.
6. Verify that the trace’s Show checkbox is selected (either on this tab or next to the drop-down list
located at the top-left corner of the graph).
Units Tab
The Units tab specifies the global Amplitude units for all the views in the analysis window.
Vertical
The SignalVu software analyzes only one signal at a time. Use the Vertical tab to specify which
oscilloscope channel is used for analysis by the SignalVu software.
SignalVu Vector Signal Analysis Software Printable Online Help
165
Reference Topics
Vertical
Setting
Description
Channel
Specifies the oscilloscope channel used for analysis.
Ref Level
Specifies the Reference Level, which determines the oscilloscope’s Vertical Scale
setting. If Vertical settings are not enabled in the Scope Settings tab, or while analyzing a
recalled data file, the Reference Level control only adjusts vertical display position.
Coupling
Display of the coupling setting on the selected channel.
Bandwidth
Display of the oscilloscope bandwidth setting.
Termination
Display of the termination setting for the selected channel.
xxx
166
SignalVu Vector Signal Analysis Software Printable Online Help
Glossary
Accuracy
Accuracy
The closeness of the indicated value to the true value.
ACLR
Adjacent Channel Leakage power Ratio is the ratio of the RRC (Root Raised Cosine) filtered mean power
centered on the assigned channel frequency to the RRC filtered mean power centered on an adjacent
frequency (defined in 3GPP).
ACPR Measurement
Adjacent Channel Power Ratio (ACPR) is the ratio of the mean power centered on the assigned channel
frequency to the mean power centered on an adjacent channel frequency. In the 3GPP specification, it
is called ACLR (Adjacent Channel Level Ratio) and both the main channel and adjacent channels are
required to be filtered with RRC (Root Raised Cosine) filters.
Acquisition
A series of time-contiguous frames. This is also called a Block.
Analysis Length
The length of time in the Analysis Time.
Analysis Time
The portion of the acquisition record over which one or more measurements are calculated.
SignalVu Vector Signal Analysis Software Printable Online Help
167
Glossary
ASK
ASK
Acronym for Amplitude Shift Keying. The process, or result of a process, in which the amplitude of the
carrier is varied in accordance with the state of a digital input signal.
Block
An integer number of time-contiguous frames. See also: Acquisition.
Calibrator
A signal generator producing a specified output used for calibration purposes.
Carrier
The RF signal upon which modulation resides.
Carrier Frequency
The frequency of the CW component of the carrier signal.
Carrier Signal
The electrical signal, typically a sine wave, upon which modulation is impressed.
Carrier-to-Noise Ratio (C/N)
The ratio of carrier signal power to average noise power in a given bandwidth surrounding the carrier;
usually expressed in decibels.
168
SignalVu Vector Signal Analysis Software Printable Online Help
Glossary
CDMA
CDMA
Acronym for Code Division Multiple Access.
Center Frequency
The frequency corresponding to the center of a frequency span of the analyzer display.
Check Mark Indicator
The check mark indicator in the upper-left corner of the display indicates the display for which the
acquisition hardware is optimized. When you have more than one display open, the display with the
check mark indicator has control over the acquisition hardware. To give a display priority over any
others, click its title bar.
CISPR
International special committee on radio interference. (Comité international spécial des perturbations
radioélectriques)
CW
Acronym for Continuous Wave.
CW Signal
Continuous wave signal - a sine wave.
DANL
Acronym for Displayed Average Noise Level. See Sensitivity (see page 178).
SignalVu Vector Signal Analysis Software Printable Online Help
169
Glossary
dBfs
dBfs
A unit to express power level in decibels referenced to full scale. Depending on the context, this is either
the full scale of the display screen or the full scale of the analog-to-digital converter (ADC).
dBm
A unit of expressed power level in decibels referenced to 1 milliwatt.
dBmV
A unit to express voltage levels in decibels referenced to 1 millivolt.
dBuV
A unit to express voltage levels in decibels referenced to 1 microvolt.
Decibel
Ten times the logarithm of the ratio of one electrical power to another.
Display Reference Level
A designated vertical position representing a specified input level. The level may be expressed in dBm,
volts, or any other units.
Distortion
Degradation of a signal, often a result of nonlinear operations, resulting in unwanted signal components.
Harmonic and intermodulation distortion are common types.
170
SignalVu Vector Signal Analysis Software Printable Online Help
Glossary
Dynamic Range
Dynamic Range
The maximum ratio of the levels of two signals simultaneously present at the input which can be measured
to a specified accuracy.
EVM
Acronym for Error Vector Magnitude.
Export
Save data to a file in a format other than application-native.
FastFrame
FastFrame segments the acquisition record into a series of frames and then captures acquisitions as single
frames. You can then view and measure each frame individually.
FFT
Fast Fourier Transform - a mathematical process to calculate the frequency spectrum of a discrete number
of time domain sample points.
Filter
A circuit that separates electrical signals or signal components based on their frequencies.
FM
Acronym for Frequency Modulation.
SignalVu Vector Signal Analysis Software Printable Online Help
171
Glossary
Frame
Frame
A series of time-contiguous samples, long enough in duration and at a sufficient sample rate to produce
a spectrum view of a specified span and RBW.
Frequency
A series of time-contiguous samples, long enough in duration and at a sufficient sample rate to produce
a spectrum view of a specified span and RBW.
Frequency Band
The continuous range of frequencies extending between two limiting frequencies, expressed in hertz.
Frequency Domain View
The representation of the power of the spectral components of a signal as a function frequency; the
spectrum of the signal.
Frequency Drift
Gradual shift or change in displayed frequency over the specified time due to internal changes in the
analyzer, where other conditions remain constant. Expressed in hertz per second.
Frequency Mask Trigger
A flexible real-time trigger based on specific events that occur in the frequency domain.
Frequency Range
The range of frequencies over which the performance of the instrument is specified.
172
SignalVu Vector Signal Analysis Software Printable Online Help
Glossary
Frequency Span
Frequency Span
A continuous range of frequencies extending between two frequency limits.
GPIB
Acronym for General Purpose Interface Bus, the common name for the communications interface system
defined in IEEE Std. 488.
Graticule
The calibrated grid overlaying the display screen of analyzers, oscilloscopes, and other test instruments.
Grayed Out
An on-screen control is “Grayed Out” if it is not adjustable.
I/Q
Acronym for In-phase / Quadrature.
IF
Acronym for Intermediate Frequency.
Import
Bring data into the application from a file of some format other than application-native.
SignalVu Vector Signal Analysis Software Printable Online Help
173
Glossary
Input Impedance
Input Impedance
The impedance at the desired input terminal. Usually expressed in terms of VSWR, return loss, or other
related terms for low impedance devices and resistance-capacitance parameters for high impedance
devices.
LISN
Acronym for Line Impedance Stabilization Network.
Local Oscillator (LO)
An oscillator which produces the internal signal that is mixed with an incoming signal to produce the IF
signal.
Marker
A visually identifiable point on a waveform trace, used to extract a readout of domain and range values
represented by that point.
Max Hold
Digitally stored display mode which, at each frequency address, compares the incoming signal level to
the stored level and retains the greater level. In this mode, the display indicates the peak level at each
frequency after several successive acquisitions.
MCPR (Multiple Carrier Power Ratio)
The ratio of the signal power in the reference channel or group of channel to the power in adjacent channels.
174
SignalVu Vector Signal Analysis Software Printable Online Help
Glossary
Min Hold
Min Hold
Digitally stored display mode which, at each frequency address, compares the incoming signal level to
the stored level and retains the lower level. In this mode, the display indicates the minimum level at
each frequency after several successive sweeps.
Modulate
To regulate or vary a characteristic of a signal, typically in order to transmit information.
Modulating Signal
The signal which modulates a carrier. The signal which varies or regulates some characteristic of another
signal.
Modulation
The process of varying some characteristic of a signal with a second signal.
Noise
Unwanted random disturbances superimposed on a signal which tend to obscure it.
Noise Bandwidth (NBW)
The exact bandwidth of a filter that is used to calculate the absolute power in dBm/Hz.
Noise Floor
The noise intrinsic to a system that represents the minimum limit at which input signals can be observed;
ultimately limited by thermal noise (kTB). The analyzer noise floor appears as a “grassy” baseline in the
display, even when no signal is present.
SignalVu Vector Signal Analysis Software Printable Online Help
175
Glossary
Occupied Bandwidth
Occupied Bandwidth
Bandwidth within which 99% of the power transmitted on a single channel lies.
Open (Recall)
Bring data into the application from a file of application-native format.
OQPSK
Acronym for Offset QPSK (Quadrature Phase Shift Keying).
PM
Acronym for Phase Modulation.
Primary Marker
The marker displayed in the Single Marker mode whose frequency and/or position is changed when
tuning with the general purpose knob.
PSK
Acronym for Phase Shift Keying. The process, or result of a process, in which the carrier phase is varied
discretely in accordance with a digital code.
QAM
Acronym for Quadrature Amplitude Modulation. The process, or result of a process, in which the amplitude
and phase of the carrier are varied concurrently by synthesizing two orthogonal ASK waves (see ASK).
176
SignalVu Vector Signal Analysis Software Printable Online Help
Glossary
Real-Time Analysis
Real-Time Analysis
Measurement technique based on triggering on an RF signal, seamlessly capturing it into memory, and
analyzing it in the frequency, time, and modulation domains.
Real-Time Bandwidth
The frequency span over which real-time seamless capture can be performed, which is a function of the
digitizer and the IF bandwidth of a Real-Time Spectrum Analyzer.
Real-Time Seamless Capture
The ability to acquire and store an uninterrupted series of time domain samples that represent the behavior
of an RF signal over a long period of time.
Reference Level
The signal level represented by the uppermost graticule line of the analyzer display.
Residual FM (Incidental FM)
Short term displayed frequency instability or jitter due to instability in the analyzer local oscillators. Given
in terms of peak-to-peak frequency deviation and expressed in hertz or percent of the displayed frequency.
Residual Response
A spurious response in the absence of an input signal. (Noise and zero pip are excluded.)
RBW
The RBW determines how well the analyzer can resolve or separate two or more closely spaced signal
components.
SignalVu Vector Signal Analysis Software Printable Online Help
177
Glossary
Secondary Marker
Secondary Marker
The “second” marker displayed only in the Delta Marker mode.
Sensitivity
Measure of a analyzer’s ability to display minimum level signals, usually expressed as displayed average
noise level (DANL (see page 169)).
Shape Factor (Skirt Selectivity)
The ratio of the frequency separation of the two (60 dB/3 dB) down points on the response curve to the
static resolution bandwidth.
Signal
As used in this online help, the signal refers to the input signal before it is processed. The signal is an input.
Span
Span is the range of frequencies displayed in a spectrum window. Span, start frequency and stop frequency
are related by the following equation: Span = (stop frequency) - (start frequency). The settings for center,
start and stop frequencies are related to the setting for span; when one parameter is changed, the other are
changed automatically.
Span per Division (Span/Div)
Frequency difference represented by each major horizontal division of the graticule.
178
SignalVu Vector Signal Analysis Software Printable Online Help
Glossary
Spectrogram
Spectrogram
Frequency vs. time vs. amplitude display where the frequency is represented on the x-axis and time on the
y-axis. The power level is indicated by variations in color.
Spectrum
The frequency domain representation of a signal showing the power distribution of its spectral component
versus frequency.
Spectrum Analysis
The technique or process of determining the frequency content of an RF signal.
Spectrum Analyzer
A device for determining the frequency components of a signal.
Spectrum Time
Analysis Time for spectrum analysis views. Spectrum time can be the same as Analysis Time, but it
can be different.
Spur
A spur is a signal peak that exceeds a user-definable threshold (See Spurious > Settings > Ranges) and
excursion setting. A spur that also exceeds a limit (either Absolute or Relative) specified on the Settings
> Limits tab is considered a violation.
SignalVu Vector Signal Analysis Software Printable Online Help
179
Glossary
Spurious Response
Spurious Response
A response to a analyzer wherein the displayed frequency is not related to the input frequency.
Time Reference
The point in time during the acquisition record used as the zero point for counting time. The time reference
can be set to either the start of the acquisition record or the trigger point.
Trace
As used in this online help, trace refers to the displayed signal. The displayed signal can be a processed
version of the input signal (for example, it may be averaged.) The trace is a result or output.
Vector Signal Analyzer
Like a spectrum analyzer, a device for determining the frequency components of a signal. However, unlike
a standard spectrum analyzer, the vector signal analyzer is optimized for analyzing digitally modulated
RF signals.
Vertical Scale Factor, Vertical Display Factor
The number of dB, volts, etc., represented by one vertical division of a spectrum analyzer display screen.
Violation
A violation is a spur that exceeds either an Absolute or Relative limit (depending on the selected mask)
specified on the Settings > Limits tab. A spur is a signal peak that exceeds a user-definable threshold (See
Spurious > Settings > Ranges) and excursion setting.
180
SignalVu Vector Signal Analysis Software Printable Online Help
Index
Index
A
C
Abort acquisition, 76
About the RTSA, 93
accuracy, 167
ACLR, 167
ACLR measurement, 95
ACPR measurement, 167
Acq BW too small, 105
Acquire control panel, 81
acquisition, 167
acquisition data
saving, 9
acquisition memory usage, 118
Actions Tab, 94
Adjacent Channel Power
measurement, 95
Advanced Params Tab, 95
Amplitude vs.Time display, 11
Amplitude vs.Time display
Settings, 82
Analysis control panel, 82
analysis length, 167
analysis time, 167
Analysis Time tab (Analysis control
panel), 96
Analysis Time tab (GP Digital
Modulation), 97
application presets, 70
saving, 9
ASK, 168
automatically generate filenames, 78
Average Channel Power
measurement, 98
Average ON Power measurement, 98
calibrator, 168
carrier, 168
Carrier Feedthrough measurement, 100
carrier frequency, 168
carrier signal, 168
carrier-to-noise ratio (C/N), 168
CCDF - Complimentary Cumulative
Distribution Function, 100
CCDF display, 28
CCDF display settings, 83
CDMA, 169
center frequency, 169
Channel, 165
Acquire control panel, 5
Vertical tab, 165
Channel Power and ACPR
(Adjacent Channel Power
Ratio) display, 29
Channel Power and ACPR Settings
control panel, 83
Channel Power measurement, 104
Channels tab (ACPR), 101
Channels tab (MCPR), 102
check mark indicator, 53
CISPR, 169
Colors tab, 78
Constellation display, 21
Constellation display settings, 84
Continuous Acquisition Mode, 77
Correct for Noise Floor, 122
creating application presets, 70
CW, 169
CW signal, 169
B
Blackman-Harris FFT Window, 98
block, 168
Blue background (cells), 37
BW Tab, 98
BW Tab (Amplitude vs.Time
display), 100
D
DANL, 169
Data file formats, 56
dBfs, 170
dBm, 170
dBmV, 170
dBuV, 170
SignalVu Vector Signal Analysis Software Printable Online Help
decibel, 170
default settings, restore, 89
Define Markers, 44
Define Peaks tab, 45
Define tab, 106
Define tab (Pulsed RF), 110
Delta Markers, 44
description
RSA6100A Series, 3
display reference level, 170
Displays, 77
distortion, 170
documentation, 4
Droop measurement, 112
Duty Factor (%) measurement, 112
Duty Factor (Ratio) measurement, 112
dynamic range, 171
E
Elements of the display, 53
error message
Windows Event Viewer, 110
Error messages, 59
Event Viewer, 110
EVM measurement, 113
EVM vs. Time display, 22
EVM vs. Time Settings, 84
export, 171
F
Fall Time measurement, 113
FastFrame, 171
FFT, 171
File formats, 56
File Menu, 67
filter, 171
Filter Parameter, 123
Filter Shape, 98
Find tab, 113
finding bursts in data, 113
FlatTop FFT Window, 98
FM, 171
181
Index
FMT (Frequency Mask Trigger), 172
frame, 172
Freq & Span tab, 115
Freq Estimation tab, 115
Freq, Span & RBW tab, 114
frequency, 172
frequency band, 172
Frequency Deviation
measurement, 117
frequency domain view, 172
frequency drift, 172
Frequency error measurement, 117
Frequency Mask Trigger (FMT), 172
frequency range, 172
frequency span, 173
Frequency tab, 117
Frequency vs. Time Settings, 85
Frequency vs.Time display, 12
Full Screen, 73
G
Gain Imbalance measurement, 117
GPIB, 173
GPIB tab, 78
graticule, 173
Graticule On/Off, 130
grayed out, 173
H
Hanning FFT Window, 98
Help Menu, 79
Hide sensitive readouts, 78
I
I/Q, 173
IF, 173
import, 173
Information messages, 59
input
selecting, 5
input impedance, 174
Installed options, 4
IQ Origin Offset measurement, 117
IQ Sampling Parameters Tab, 118
IQ vs. time view, 15
is greater than (search), 107
is inside mask, 106
182
is inside mask (search), 107
is less than (search), 107
is outside mask, 106
is outside mask (search), 107
K
Kaiser FFT window, 98
L
Levels tab, 118
Limit lines, 89
Limits tab (Spurious display), 119
LISN, 174
local oscilllator (LO), 174
Log (Horizontal), 147
M
Magnitude Error measurement, 121
Magnitude Error vs.Time display, 23
Magnitude Error vs.Time settings, 85
manuals, 4
marker, 174
Marker Noise mode, 48
Marker Properties tab, 44
Marker to Center Frequency, 121
Markers, 73
Marker Toolbar, 73
Using Markers, 46
Using Markers in Noise Mode, 48
Markers menu, 77
Mask Editor, 106
max hold, 174
Max number of pulses, 128
Max trace points, 13
Maximum Frequency Error
measurement, 121
Maximum Phase Error
measurement, 122
MCPR (multiple carrier power
ratio, 174
MCPR display, 32
MCPR settings, 86
Measurement Filter, 123
Measurement Params tab, 122
Measurement settings export, 9
Measurements, 7
Measurements tab, 122
Menus, 66
min hold, 175
modulate, 175
modulating signal, 175
modulation, 175
modulation measurements, 7
Modulation tab, 123
Multiple Carrier Power Ratio, 125
N
noise, 175
noise bandwidth (NBW), 175
noise floor, 175
Noise markers, 48
O
OBW Level Left/Right, 34
OBW Ref Power, 34
Occupied Bandwidth, 176
Occupied Bandwidth settings, 86
Occupied BW display, 34
online help, 126
Open (Recall), 176
Optimization, 122
Options
installed, 4
Options control panel, 78
OQPSK, 176
P
Parameters tab
CCDF display, 126
Occupied BW display, 127
Spurious display, 127
Params tab
Pulsed RF display, 128
Peak Excursion, 44
Peak Power measurement, 129
Peak Threshold, 44
Peak/Average Ratio Measurement, 129
Phase Deviation measurement, 130
Phase Error measurement, 130
Phase Error vs.Time display, 25
Phase Error vs.Time settings, 87
Phase vs. Time display, 13
Phase vs.Time settings, 87
SignalVu Vector Signal Analysis Software Printable Online Help
Index
pictures
saving, 9
Pk/Avg measurement, 129
PM, 176
power measurements, 7
Prefs tab, 130
Spectrum display, 130
Spurious display, 131
Preset (File menu), 72
Preset (Settings menu), 78
presets
application, 70
primary marker, 176
Print, 69
Print Preview, 69
Product Description, 3
PSK, 176
pulse measurements, 8
Pulse Statistics display, 40
Pulse Statistics display settings, 88
Pulse Table display, 41
Pulse Table display settings, 88
Pulse Trace display, 43
Pulse Trace display settings, 88
Pulse Width measurement, 132
Pulse-to-Pulse Carrier Phase
measurement, 132
Pulse-to-Pulse Frequency
Difference, 131
Q
QAM, 176
Quadrature Error Measurement, 132
R
Range file, 56
Ranges Tab
Spurious display, 132
RBW, 177
RBW min: 100 kHz, 105
real-time analysis, 177
real-time bandwidth, 177
real-time seamless capture, 177
Red background (cells), 37
Ref Level
Vertical tab, 165
Reference Filter, 123
Reference Level, 177
Reference tab
Spurious display, 134
Repeat, 137
Repetition Interval measurement, 137
Repetition Rate measurement, 137
Replay, 76
residual FM (incidental FM), 177
residual response, 177
results
saving, 9
Resume, 76
RF & IF Optimization, 98
RF Channel Power measurement, 137
RF I & Q vs.Time display, 15
RF I & Q vs.Time settings, 89
Rho measurement, 138
Ripple measurement, 138
calculation, 138
Rise Time measurement, 138
RMS Frequency Error
measurement, 139
RMS Phase Error Measurement, 139
Run, 75
Run menu, 75
S
Save and Export tab, 78
saved file types, 9
saving
acquisition data, 9
application presets, 70
pictures, 9
results, 9
setups, 9
Saving and Recalling Data, 9
SignalVu Vector Signal Analysis Software Printable Online Help
Scale tab, 140
Amplitude vs.Time display, 139
Frequency vs.Time display, 140
Phase Error vs.Time display, 141
Phase vs.Time display, 142
Pulse Statistics display, 143
Pulse Trace display, 143
RF I & Q vs.Time display, 144
RF Measurements, 145
Spectrogram display, 146
Spectrum display, 147
Spurious display, 147
Time Overview display, 148
Scope Data tab, 149
Scope Settings tab, 149
Search, 106
Search control panel, 94
Search For, 107
Search In, 107
search using a mask, 107
secondary marker, 178
Security tab, 78
Selected display is swept, 105
selecting the input, 5
sensitivity, 178
settings
Constellation display, 84
EVM vs.Time display, 84
Frequency vs.Time, 85
Magnitude Error vs.Time, 85
MCPR, 86
Occupied Bandwidth, 86
Options, 78
Phase Error vs.Time, 87
Phase vs.Time, 87
Pulse Statistics display, 88
Pulse Table display, 88
Pulse Trace display, 88
restoring defaults, 89
RF I & Q vs.Time, 89
Signal Quality, 90
Spectrogram display, 91
Spectrum display, 90
Spurious display, 91
Symbol Table display, 92
Time Overview display, 92
Settings, 80
Setup Menu, 77
183
Index
setups
saving, 9
shape factor (skirt selectivity), 178
Show Marker Readout in Graph, 130
Show Pulse Definition, 150
Show recalled trace, 151
signal, 178
Signal Quality display, 26
Signal Quality settings, 90
Single, 76
span, 178
span per division, 178
Span/RBW Ratio, 98
spectrogram, 179
Spectrogram display, 16
Spectrogram display settings, 91
Spectrogram trace, 162
spectrum, 179
spectrum analysis, 179
spectrum analyzer, 179
Spectrum display, 18
Spectrum display settings, 90
spectrum time, 179
Spectrum Time tab, 150
spur, 179
Spurious, 37
Spurious display settings, 91
184
spurious response, 180
Status Bar, 74
Symbol Table display, 27
Symbol Table display settings, 92
U
Uniform FFT window, 98
Units tab, 165
V
T
Time measurement, 150
Time Overview, 19
Time Overview display settings, 92
time reference, 180
Tools Menu, 78
Touch-screen Actions, 51
trace, 180
Trace tab
Constellation display, 151
Frequency vs.Time display, 151
RF I & Q vs.Time display, 156
Spectrogram display, 153
Spurious display, 155
Traces tab
Amplitude vs.Time display, 159
CCDF display, 158
Error vs.Time display, 161
Math Trace, 162
Spectrum display, 162
Transform Window, 98
VBW, 18
vector signal analyzer, 180
vertical scale factor, vertical display
factor, 180
Vertical tab
Acquire control panel, 165
View Menu, 73
violation, 180
W
Window Menu, 79
Windows Event Viewer, 110
X
x dB BW Ref Power, 34
x dB Level, 127
SignalVu Vector Signal Analysis Software Printable Online Help