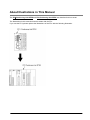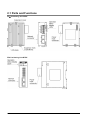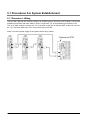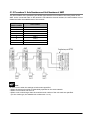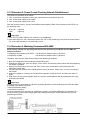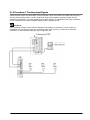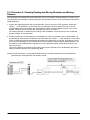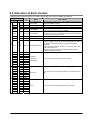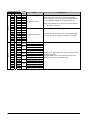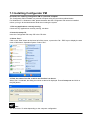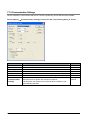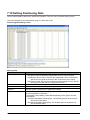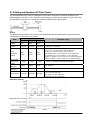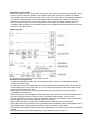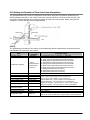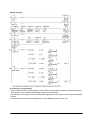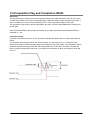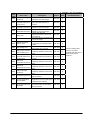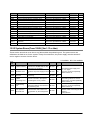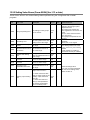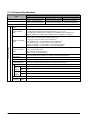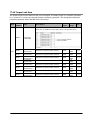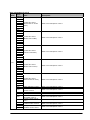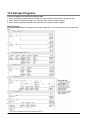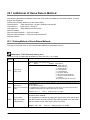
1
PROGRAMMABLE CONTROLLER
FPΣ/FP2
Positioning Unit RTEX
Technical Manual
FPΣ/FP2 Positioning Unit RTEX Technical Manual
ARCT1F421E-1 '08.02
http://www.mew.co.jp/ac/e/fasys/
Safety Precautions
Observe the following notices to ensure personal safety or to prevent accidents.
To ensure that you use this product correctly, read this User’s Manual thoroughly before use.
Make sure that you fully understand the product and information on safe.
This manual uses two safety flags to indicate different levels of danger.
WARNING
If critical situations that could lead to user’s death or serious injury is assumed by
mishandling of the product.
-Always take precautions to ensure the overall safety of your system, so that the whole system
remains safe in the event of failure of this product or other external factor.
-Do not use this product in areas with inflammable gas. It could lead to an explosion.
-Exposing this product to excessive heat or open flames could cause damage to the lithium battery
or other electronic parts.
-Battery may explode if mistreated. Do not recharge, disassemble or dispose of fire.
CAUTION
If critical situations that could lead to user’s injury or only property damage is assumed
by mishandling of the product.
-To prevent excessive exothermic heat or smoke generation, use this product at the values less than
the maximum of the characteristics and performance that are assured in these specifications.
-Do not dismantle or remodel the product. It could cause excessive exothermic heat or smoke
generation.
-Do not touch the terminal while turning on electricity. It could lead to an electric shock.
-Use the external devices to function the emergency stop and interlock circuit.
-Connect the wires or connectors securely.
The loose connection could cause excessive exothermic heat or smoke generation.
-Do not allow foreign matters such as liquid, flammable materials, metals to go into the inside of the
product. It could cause excessive exothermic heat or smoke generation.
-Do not undertake construction (such as connection and disconnection) while the power supply is on.
It could lead to an electric shock.
Copyright / Trademarks
-This manual and its contents are copylighted.
-You may not copy this manual,in whole or part,without written consent of Matsushita Electric
Works,Ltd.
-Windows and Windows NT are registered trademarks of Microsoft Corporation in the
United States and/or other countries.
-All other company names and product names are trademarks or registered
trademarks of their respective owners.
-Matsushita Electric Works,Ltd. pursues a policy of continuous improvement of the
Design and performance of its products, therefore,we reserve the right to change the manual/
product without notice.
Table of contents
Glossary
About Illustrations in This Manual
1.Functions of Unit and Restrictions on Combination
1-1
1.1 Functions of Positioning Unit RTEX ...................................... 1-2
1.1.1 Functions of Unit ................................................................ 1-2
1.1.2 Unit Types .......................................................................... 1-3
1.2 Restrictions on Units Combination ........................................ 1-4
1.2.1 Restrictions on Combinations Based on Current Consumption (FP2 only)
1.2.2 Restrictions on the Number of Units Installed .................... 1-4
1-4
2.Parts and Functions ............................................ 2-1
2.1 Parts and Functions .............................................................. 2-2
2.2 Operation Status Display LEDs ............................................. 2-3
3.Wiring.................................................................... 3-1
3.1 Wiring of Network .................................................................. 3-2
3.2 Network Connector ............................................................... 3-3
3.3 Wiring of Pulser Input Connector .......................................... 3-4
3.3.1 Input Specifications and Pin Configuration......................... 3-6
4.Power On/Off and Items to Check ...................... 4-1
4.1 Safety Circuit Design............................................................. 4-2
4.2 Before Turning On the Power................................................ 4-3
4.3 Procedure for Turning On the Power .................................... 4-4
4.3.1 Procedure for Turning On the Power.................................. 4-4
4.3.2 Procedure for Turning Off the Power.................................. 4-5
5.Preparation For Operation .................................. 5-1
5.1 Procedures For System Establishment ................................. 5-2
5.1.1 Procedure 1: Wiring............................................................ 5-2
5.1.2 Procedure 2: Axis Numbers and Unit Numbers of AMP ..... 5-3
5.1.3 Procedure 2: Power On and Checking Network Establishment
5-4
5.1.4 Procedure 3: Matching Parameters With AMP................... 5-4
5.1.5 Procedure 4: Checking Input Signals ................................. 5-5
5.1.6 Procedure 5: Checking Rotating and Moving Directions and Moving Distance
5.1.7 Procedure 6: Settings of Parameters and Positioning Data 5-7
5.2 Preparation For Operation..................................................... 5-8
5.2.1 Servo On/Servo Off ............................................................ 5-8
6.I/O Allocation........................................................ 6-1
6.1 Occupied I/O Area................................................................. 6-2
6.2 Allocation of Each Contact .................................................... 6-3
5-6
7.Setting Tool Configurator PM..............................7-1
7.1 Connection With Computer....................................................7-2
7.2 Functions of Configurator PM ................................................7-3
7.2.1 Overview.............................................................................7-3
7.2.2 Basic Specifications ............................................................7-4
7.3 Installing Configurator PM......................................................7-5
7.4 Starting Configurator PM .......................................................7-10
7.5 Treating Files .........................................................................7-11
7.5.1 New.....................................................................................7-11
7.5.2 Reading from Files..............................................................7-13
7.5.3 Saving Files ........................................................................7-14
7.5.4 Setting File Properties.........................................................7-15
7.6 Exiting Configurator PM .........................................................7-16
7.7 Connection to Positioning Unit...............................................7-17
7.7.1 Selecting Slot Number ........................................................7-17
7.7.2 Communication Settings .....................................................7-18
7.8 Parameter Settings ................................................................7-19
7.9 Changing Axis Information.....................................................7-21
7.10 Setting Positioning Data.......................................................7-22
7.11 How to Edit Positioning Data ...............................................7-24
7.11.1 Inputting Positioning Data .................................................7-24
7.11.2 Copying Positioining Data.................................................7-25
7.11.3 Selecting All Cells .............................................................7-25
7.11.4 Searching Character Strings .............................................7-26
7.11.5 Replacing Character Strings .............................................7-26
7.11.6 Selecting Lines .................................................................7-27
7.11.7 Selecting Colums ..............................................................7-27
7.11.8 Editing Data Items Collectively .........................................7-27
7.12 Customizing Software ..........................................................7-28
7.13 Checking Settings ................................................................7-30
7.13.1 Checking Parameters and Data Values ............................7-30
7.14 Transferring Setting Data.....................................................7-31
7.14.1 Uploading Setting Data from Positioning Unit RTEX.........7-31
7.14.2 Downloading Setting Data to Positioning Unit RTEX ........7-32
7.14.3 Writing Settings to FROM .................................................7-33
7.15 Data Monitor ........................................................................7-34
7.16 Status Display......................................................................7-35
7.17 Tool Operation .....................................................................7-36
7.17.1 Tool Operation – Servo On/Off .........................................7-37
7.17.2 Tool Operation – Home Return .........................................7-38
7.17.3 Tool Operation - Positioning .............................................7-39
7.17.4 Tool Operation – JOG Operation ......................................7-41
7.17.5 Tool Operation - Teaching ................................................7-43
8.Automatic Operation (Position Control).............8-1
8.1 Basic Operation .....................................................................8-2
8.1.1 Setting and Operation of E Point Control ............................8-3
8.1.2 Setting and Operation of P Point Control ............................8-5
8.1.3 Setting and Operation of C Point Control............................8-7
8.2 Interpolation Control...............................................................8-9
8.2.1 Setting and Operation of Two-Axis Linear Interpolation......8-12
8.2.2 Setting and Operation of Two-Axis Circular Interpolation ...8-14
8.2.3 Setting and Operation of Three-Axis Linear Interpolation ...8-16
8.2.4 Setting and Operation of Three-Axis Linear Interpolation ...8-19
9.Manual Operation (JOG Operation).................... 9-1
9.1 Setting and Operation of Home Return ................................. 9-2
9.2 Changing the Speed During JOG Operation ......................... 9-4
10.Manual Operation (Home Return)..................... 10-1
10.1 Setting and Operation of Home Return ............................... 10-2
11.Manual Operation (Pulser Operation) .............. 11-1
11.1 Setting and Operation of Pulser Operation.......................... 11-2
12.Stop Functions................................................... 12-1
12.1 Settings and Operations of Stop Functions ......................... 12-2
13.Supplementary Functions................................. 13-1
13.1 Dwell Time .......................................................................... 13-2
13.2 Software Limit ..................................................................... 13-3
13.3 Torque Limit ........................................................................ 13-4
13.4 Auxiliary Output Code and Auxiliary Output Contact ........... 13-5
13.5 Actual Speed/Torque Value Judgment................................ 13-6
13.6 Imposition Flag and Completion Width................................ 13-7
13.7 Home Change ..................................................................... 13-8
14.Precautions During Programming ................... 14-1
14.1 Precautions During Programming ....................................... 14-2
14.1.1 Turning Off Power Supply Clears Contents in Shared Memory
14-2
14.1.2 Once starting an Operation, ............................................. 14-2
14.1.3 How to Use Standard Area and Extended Area of Positioning Data
14.1.4 Operation When the Mode of PLC Changed to PROG. from RUN 14-4
15.Errors and Warnings ......................................... 15-1
15.1 Errors and Warnings ........................................................... 15-2
15.1.1 About Errors and Warnings .............................................. 15-2
15.1.2 Error and Warning Logs ................................................... 15-2
15.1.3 Errro and Warning Clear .................................................. 15-3
15.1.4 Errro and Warning Code Format ...................................... 15-3
15.1.5 Sample Program .............................................................. 15-3
15.2 Change in Error Recovery Process (Ver.1.13 or later) ........ 15-4
15.2.1 Overview of Operational Change ..................................... 15-4
15.2.2 State of Servo After an Error Occurred ............................ 15-4
15.3 List of Error Codes (Ver.1.00 to 1.01).................................. 15-5
15.3.1 AMP Errors (From 0001H) (Ver1.00 to 1.01).................... 15-5
15.3.2 System Errors (From 1000H) (Ver.1.00 to 1.01) .............. 15-7
15.3.3 AMP Communication Errors (From 2000H) (Ver.1.00 to 1.01
15.3.4 Axis Operation Errors (From 3000H) (Ver.1.00 to 1.01) ... 15-9
15.3.5 Setting Value Errors (From 0x4000)................................. 15-10
15.4 List of Warning Codes (Ver.1.00 to 1.01) ............................ 15-12
15.4.1 AMP Warnings (From A000H) (Ver.1.00 to 1.01) ............. 15-12
15.4.2 Unit Warnings (From B000H) (Ver.1.00 to 1.01) .............. 15-13
15.5 List of Error Codes (Ver.1.13 or later) ................................. 15-14
15.5.1 AMP Errors (From 0001H) (Ver.1.13 or later) .................. 15-14
15.5.2 System Errors (From 1000H) (Ver.1.13 or later) .............. 15-15
15.5.3 AMP Communication Errors (From 2000H) (Ver.1.13 or later)
15.5.4 Axis Operation Errors (From 3000H) (Ver.1.13 or later)... 15-17
15.5.5 Setting Value Errors (From 4000H) (Ver.1.13 or later) ..... 15-19
15.6 List of Warning Codes (Ver.1.13 or later) ............................ 15-22
15.6.1 AMP Warning (From A000H) (Ver.1.13 or later) .............. 15-22
15.6.2 Unit Warnings (From B000H) (Ver.1.13 or later) .............. 15-23
15-8
15-16
14-3
16.Troubleshooting .................................................16-1
16.1 Cannot Communication With AMP.......................................16-2
17.Specifications .....................................................17-1
17.1 Table of Specificationa.........................................................17-2
17.1.1 General Specifications ......................................................17-2
17.1.2 Network Specifications......................................................17-2
17.1.3 Performance Specifications of Units .................................17-3
17.1.4 Common Specifications ....................................................17-4
17.2 Table of I/O Area .................................................................17-6
17.3 Configuration of Shared Memory Areas...............................17-12
17.4 Details of Common Area in Shared Memory........................17-13
17.4.1 Configuration of Common Area ........................................17-13
17.4.2 Setting Parameter Control Area ........................................17-14
17.4.3 Operation Speed Rate Area..............................................17-14
17.4.4 Setting Parameter Control Area ........................................17-15
17.4.5 Home Change Data Area..................................................17-16
17.4.6 Torque Limit Area .............................................................17-17
17.4.7 Positioning Table Setting Area..........................................17-18
17.4.8 Error Annunciation & Clear Area.......................................17-19
17.4.9 Warning Annunciation & Clear Area .................................17-23
17.5 Details of Each Axis Information Area in Shared Memory ...17-27
17.5.1 Configuration of Each Axis Information Area ....................17-27
17.5.2 Each Axis Information & Monitor Area ..............................17-28
17.6 Details of Each Axis Setting Area in Shared Memory ..........17-37
17.6.1 Configuration of Each Axis Setting Area ...........................17-37
17.6.2 Parameter Setting Area ....................................................17-38
17.6.3 Positioning Data Setting Areas .........................................17-43
18.Dimensions .........................................................18-1
18.1 FP Positioning Unit RTEX .................................................18-2
18.2 FP2 Positioning Unit RTEX..................................................18-3
19.Sample Programs ...............................................19-1
19.1 Basic Configuration and Contact Allocations of Sample Programs 19-2
19.2 Sample Programs ................................................................19-4
19.2.1 When Setting Positioning Data in Extended Area Using Ladder Program
19.2.2 When Setting Positioning Data in Standard Area Using Ladder Program
20.Power ON/OFF(Ver.1.13 or later) .......................20-1
20.1 Operational Change When System Starts ...........................20-2
21.Position control (Ver.1.13 or later) ....................21-1
21.1 Positioning Repeat Function ................................................21-2
21.1.1 Function and setting method.............................................21-2
21.1.2 Examples of operations ....................................................21-3
21.1.3 Sample program ...............................................................21-3
21.1.4 Each Axis Information & Monitor Area ..............................21-4
21.2 Synchronous Operation .......................................................21-5
21.2.1 Synchronous Mode ...........................................................21-6
19-6
19-7
21.2.2 Home Return Method in Synchronous Operation
When using Synchronous Mode A ................................... 21-7
21.2.3 Home Return Method in Synchronous Operation
When using Synchronous Mode B ................................... 21-7
21.2.4 Synchronous Operation Setting ....................................... 21-8
21.2.5 Synchronous Operation Setting ....................................... 21-9
21.2.6 Canceling and Monitoring Synchronous Operation .......... 21-10
21.2.7 Positioning Parameters in Synchronous Operation .......... 21-11
21.2.8 Stop Operation During Synchronous Operation ............... 21-12
21.2.9 Precautions When Using Synchronous Operation ........... 21-12
21.2.10 Sample Program ............................................................ 21-13
21.2.11 Errors occurred in Synchronous Operation .................... 21-13
21.3 JOG Positioning Control...................................................... 21-14
21.3.1 Example of Operation....................................................... 21-14
21.3.2 Setting Method ................................................................. 21-15
21.3.3 Sample Program .............................................................. 21-17
21.3.4 Restrictions on JOG Positioning Control .......................... 21-18
21.3.5 Repeat Accuracy of JOG Positioning Control................... 21-18
22.Home Return (Ver.1.13 or later) ........................ 22.1
22.1 Additional of Home Return Method ..................................... 22.2
22.1.1 Setting Method of Home Return Methods ........................ 22.2
22.1.2 DOG method 1 ................................................................. 22.3
22.1.3 DOG method 2 ................................................................. 22.3
22.1.4 DOG method 3 ................................................................. 22.4
22.1.5 Limit Method 1.................................................................. 22.4
22.1.6 Limit Method 2.................................................................. 22.5
22.1.7 Phase Z Method ............................................................... 22.5
22.1.8 Stop-on-contact Method 1 ................................................ 22.5
22.1.9 Home Return Stop-on-contact Method 2.......................... 22.6
22.1.10 Data Set Method ............................................................ 22.6
22.1.11 Sample Program ............................................................ 22.6
23.Supplementary functions (Ver.1.13 or later) ... 23.1
23.1 Realtime Torque Limit ......................................................... 23.2
23.1.1 Restrictions on Real-time Torque Limit ............................ 23.2
23.1.2 Sample Program .............................................................. 23.2
23.1.3 Each Axis Information & Monitor Area.............................. 23.2
23.2 Auxiliary Contact (Delay Mode) ........................................... 23.3
23.2.1 Delay Mode Setting .......................................................... 23.3
23.3 Current Value Update Function........................................... 23.4
23.3.1 Differences with Home Offset Function ............................ 23.4
23.3.2 Current Value Update....................................................... 23.5
23.3.3 Coordinate Origin ............................................................. 23.5
23.3.4 Setting Method,Current Value Update.............................. 23.6
23.3.5 Coordinate Origin ............................................................. 23.7
23.3.6 Sample Program .............................................................. 23.7
23.3.7 Restrictions on Operation................................................. 23.7
23.4 Position Deviation Simple Monitor....................................... 23.8
23.4.1 Monitoring Method............................................................ 23.8
23.4.2 Sample Program .............................................................. 23.8
23.4.3 Restrictions on Operation................................................. 23.8
Glossary
RTEX
RTEX, which stands for Realtime Express, is the network exclusive for motion connecting the Positioning
Unit RTEX and AMP.
* Realtime Express is the name of the network servo system produced by Matsushita Electric Industrial
Co., Ltd..
AMP
AMP means a servo amplifier (which may be called a driver) that controls a servo motor.
Configurator PM
Configurator PM is a setting tool for Positioning Unit RTEX. Using the Configurator PM enables the
settings for positioning data and various parameters, and various monitoring. As a tool operation mode
to activate a motor without using ladder programs is provided in this tool, it is convenient especially to
confirm the operation at the time of an initial start-up.
PANATERM
This is a setup support tool for the servo amplifiers of MINAS series made by Matsushita Electric
Industrial Co., Ltd. By using this tool, the parameter settings within the AMP, monitoring control statuses,
the setup support or analysis of machines can be executed on PC.
E point control
This is a method of control which is initiated up to an end point, and in this manual is referred to as “E
point control”. This method is used for a single - speed acceleration/deceleration. It is also called a
trapezoidal control.
P point control
This refers to control which passes through a “Pass Point”, and is called “P point control” in this manual.
This method is used when a multi-stage speed is to be specified in the same motion.
C point control
This refers to control which passes through a “Continuance Point”, and is called “C point control” in this
manual. This method is used for executing continuous E point controls by one-time start.
Acceleration time/deceleration time
For the E point control or C point contro, the acceleration time is the time during which the speed
changes from the startup speed of a motor to the target speed. The deceleration time is the time during
which the speed changes from the target speed to the stop. For the P point control, the acceleraiton time
is the time during which the speed accelerates form the current speed to the next target speed, and the
deceleration time is the time during which the speed decelerates from the current speed to the next
target speed.
CW, CCW
Generally, these indicate the direction in which the motor is rotating, with CW referring to clockwise
rotation and CCW to counterclockwise rotation.
Absolute method (absolute value control method)
This is a control method in which the target position is specified as an absolute position from the home
position. This is specified on the positioning data editing screen of the Configurator PM.
Increment method (relative value control method)
This is a control method in which the distance from the current position to the target position is specified
as a relative position. This is specified on the positioning data editing screen of the Configurator PM.
Automatic operation
This is an operation to be automatically executed, and means a position control.
Manual operation
This is an operation to be executed for an initial boot or adjustments. The home return, JOG operation
and pulser operation are manual operations.
Position control
This is a generic term for the E point contro, P point control and C point control. For each control, the
control of a single axis and the interpolation control of multiple axes are available.The interpolation
control can be selected from a 2-axis linear interpolation, 2-axis circular interpolation, 3-axis linear
interpolation and 3-axis sprial interpolation.
JOG operation
This refers to an operation in which the motor is rotated only while operation commands are being input.
This is used to forcibly rotate the motor using input from an external switch, for instance when to make
adjustments. Depending on the circumstances, this can also be applied to unlimited feeding in some
cases.
Home return
The reference position for positioning is called a Home position and an operation to travel to a Home
position is called Home return. The home position should be set in advance. This operation moves to the
home position and its coordinate is set to be 0.
The motor rotation is reversed automatically when the limit input (+) or the limit input (-) is input and the
home position or the near home position is searched to return to the home position automatically.
Pulser operation
A manual operation is available using a device (pulser) which generates pulses manually. The output
similar to an encoder is obtained from the pulser, and the positioning unit RTEX is equipped with
exclusive input terminals. It is also called a manual pulse generator.
Deceleration stop
This is a function that interrupts the operation in progress, slows the rotation and brings it to a stop. The
deceleration time can be specified individually.
Emergengy stop
This is a function that interrupts the operation in progress, slows the rotation and brings it to a stop.
Generally, a time shorter than a time for a deceleration stop is set. The deceleration time can be
specified individually.
Positioning table (Table)
A series of positioning data such as acceleration/deceleration time, target speed and interpolation
operation that is necessary for a position control is managed as a positioning table. For example, one
table is necessary for the E point control, and multiple tables are necessary for the P point control and C
point control depending on the number of pass points and continuance points.
Limit input (+), limit input (-)
This is an input to set a limit the motor movement. Limit input (+) is the maximum limit and the limit input
(-) is the minimum limit. They are connected to the AMP for the positioning unit RTEX.
Near home (DOG) input
In order to stop the table at the home position, a position at which deceleration begins is called the near
home position. This is connected to an external input switch or sensor. It is connected to the AMP for the
positioning unit RTEX.
Dwell time
In case of the E point control, a time from the completion of a position commande until the operation
done flag turns on can be specified as a dwell time.In case of the C point control, a time from the
deceleration stop until the next table activates can be specified.
Auxiliary output code, auxiliary output contact
They are used to check the operation of a position control.
The auxiliary output code is a 16-bit code that can be specified for each positioning table, and enables to
monitor which positioning table is being executed.
The exeuction fo the position control can be confirmed by turning an exclusive auxiliary output contact on
for a constant time.
Software limi
Limits can be set for the absolute coordinate managed within the positioning unit RTEX. When
exceeding the setting range of the software limit, an error occurs, and the system decelerates and stops.
The decelration time can be set individually.
Torque limit
The output torque of the AMP can be limited arbitrary.
Servo lock/Servo free
According the command from the positioning unit, the state that the motor is controllable is called a servo
lock state, and the state that the motor is uncontrollable is called a servo free state. The servo on
operation is necessary to make it to the servo lock state.
Servo ON/Servo OFF
The operation that changes the servo free state to the servo lock state is called a servo on, and the
operation that changes the servo lock state to the servo free state is called a servo off.
Linear interpolation
This is the interpolation control that controls positions as the locas of the operations of the 2-axis motor
with the grouped X axis and Y axis or 3-axis motor with the grouped X axis, Y axis and Z axis becomes a
straight line. There are two setting methods, which are a composition speed specification and long axis
speed specification.
Circular interpolation
This is the inerpolation control that controls positions as the locas of the operation of the 2-axis motor
with the grouped X axis and Y axis becomes a circular arc. Therea re tow setting methods, which are a
center point specification and pass point specification.
Spiral interpolation
This is the interpolation control that controls positions as the loca of the operation of the 3-axis motor
with the grouped X axis, Y axis and Z axis becomes a spiral. Arbitrary 2 axes describe an arc, and the
remaining one axis moves to achieve a spiral There are two setting methods, which are a center point
specification and pass point specification.
Edge type
This is one of the methods to detect the request signals allocated to this unit. It executes each requested
process by detecting a trigger that is the leading edge when the request signal turns on.
Therefore, the next request cannot be accepted until the request signal turns off.
Level type
This si one of the methods to detect the request signals allocated to this unit. It executes each requested
process by detecting a trigger that the request signal is on, and continues the requested process while
the request signal is on.
About Illustrations in This Manual
The FPΣ Positioning Unit RTEX and FP2 Positioning Unit RTEX are described in this manual.
The illustrations in this manual shows the status with the FPΣ.
If you use the FP2, please replace the illustrations of the FPΣ with the following illustration.
Chapter 1
Functions of Unit and Restrictions on
Combination
1.1 Functions of Positioning Unit RTEX
1.1.1 Functions of Unit
Network control
The motion-only network Realtime Express (RTEX) enables to easily construct a system of network
servo motors using the cables with a category 5e shield .
Configuration of axes according to the system
In accordance with the number of required axes, 2-axis, 4-axis and 8-axis unit are available.
Can confirm operations without ladder programs
Using the tool operation function of the Configurator PM enables a test run without a ladder program,
and enables to confirm various items such as the rotating direction, various input contacts or automatic
operation settings.
Two-axis and three-axis interpolation controls
The 2-axis linear interpolation, 2-axis circular interpolation, 3-axis linear interpolation and 3-axis spiral
interpolation contols can be performed.
1-2
I/O required for the control is aggregated in the AMP
As the limit input and near home input is connected to the AMP and given to the positioning unit RTEX
through the network, the wiring can be simplified.
Remote I/O of 2-input and 2-output for one AMP
The 2-point general purpose input and output (transistors) can be connected to the AMP, and they can
be programmed by the X contact and Y contact of the positioning unit RTEX. They can be used as the
remote I/O for the input and output neighboring the AMP.
Supports the manual pulser
The maximum of three manual pulsers can be connected. It is possible to change the axes
corresponding to each pulser by the setting of the positioning unit RTEX.
1.1.2 Unit Types
FPΣ Positioning Unit RTEX
Type
Function
2-axis type
2-axis control
4-axis type
4-axis control
8-axis type
8-axis control
Part number
FPG-PN2AN
FPG-PN4AN
FPG-PN8AN
Product number
AFPG43610
AFPG43620
AFPG43630
FP2 Positioning Unit RTEX
Type
Function
2-axis type
2-axis control
4-axis type
4-axis control
8-axis type
8-axis control
Part number
FP2-PN2AN
FP2-PN4AN
FP2-PN8AN
Product number
AFP243610
AFP243620
AFP243630
Setting software
Name
Control Configurator PM
Specifications
English
Product number
AFPS66510
1-3
1.2 Restrictions on Units Combination
1.2.1 Restrictions on Combinations Based on Current Consumption (FP2 only)
For the FP2, when the system is configured, the other units being used should be taken into
consideration, and a power supply unit with a sufficient capacity should be used. (For the FPΣ, there is
no restrictions based on the current consumption.)
FP2 Positioning Unit RTEX
Type
Part number
2-axis type
FP2-PN2AN
4-axis type
FP2-PN4AN
8-axis type
FP2-PN8AN
Product number
AFP243610
AFP243620
AFP243630
Current consumption (from power supply)
300 mA
300 mA
300 mA
1.2.2 Restrictions on the Number of Units Installed
FPΣ Positioning Unit RTEX
The maximum of 2 units can be installed.
FP2 Positioning Unit RTEX
There is no restriction on the number of units installed if it is within the restrictions on the current
consumption.
1-4
Chapter 2
Parts and Functions
2.1 Parts and Functions
FPΣ Positioning Unit RTEX
FP2 Positioning Unit RTEX
2-2
2.2 Operation Status Display LEDs
FPΣ Positioning Unit RTEX
Name
STATUS
Color
Green
LINK
Green
LED on:
LED off:
LED on:
Status
Waiting for network
establishment
Network establishment
Not connected
Normal connection
LED blinks:
ERROR
Red
LED off:
LED blinks:
LED on:
Normal
A warning occurred.
An error occurred.
ALARM
Red
LED off:
LED on:
Normal
System error
Green
LED off:
Either pahse A or phase
B is in the off state
Both phase A and phase
B are in the on state
P1
P2
P3
LED on:
Remarks
The state that the TX of
the sending node and
the RX of the own node
are electrically
connected properly.
In case of warning, the
operation continues.
In case of error, the
operation stops.
If the LED turns on, the
power supply should be
turned off and on again.
Check the input signals
of the pulsers.
FP2 Positioning Unit RTEX
Name
STATUS
Color
Green
LINK
Green
ERROR
Red
ALARM
Red
P1A
P1B
P2A
P2B
P3A
P3B
Green
LED on:
LED off:
LED on:
Status
Waiting for network
establishment
Network establishment
Not connected
Normal connection
LED off:
LED blinks:
LED on:
LED off:
LED on:
LED off:
LED on:
Normal
A warning occurred.
An error occurred.
Normal
System error
Off state
On state
LED blinks:
Remarks
The state that the TX of the sending
node and the RX of the own node are
electrically connected properly.
In case of warning, the operation
continues.
In case of error, the operation stops.
If the LED turns on, the power supply
should be turned off and on again.
Check the input signals of the pulsers.
2-3
2-4
Chapter 3
Wiring
3.1 Wiring of Network
Use the LAN cable with the category 5e shielded type for the wiring of the network. To prevent the cable
from coming off, securely connect the connector of the cable to the network connector (RJ45 connector)
of the unit.
The length between each node should be within 60 m, and the total length of the communication loop
should be within 200 m.
3-2
3.2 Network Connector
RJ45 plug is connected to the network connector.
Pins of RJ45 plug
Connecting diagram
3-3
3.3 Wiring of Pulser Input Connector
Supplied connector/Suitable wire
A connector of the spring connection type is used. Use the following suitable wires for the wiring.
Supplied connector socket
The connector socket manufactured by Phoenix Contact Co. should be used.
Manufacturer
Number of pins
Part No.
Product No.
Phoenix Contact Co.
12 pins
FK-MC0, 5/12-ST-2,5
1881422
Suitable wires (strand wire)
Suitable wires
AWG# 28 to 20
Tightening torque
0.14 to 0.5 mm2
Pole terminal with a compatible insulation sleeve
If a pole terminal is being used, the following models manufactured by Phoenix Contact Co. should be
used.
Cross-sectional area
Manufacturer
Size
Part No.
(mm2)
0.34
AWG #22
A 0, 34-7
Phoenix Contact Co.
0.50
AWG #20
A 0, 5-6
Pressure welding tool for pole terminals
Manufacturer
Part No.
Phoenix Contact Co.
CRIMPFOX UD 6-4
Product No.
1205244
For tightening the connector
For inserting the wires, use a screwdriver (Phoenix contact Co., Product No. 1205202) with a blade size
of 0.4 × 2.0 (Part No. SZS 0.4×2.0).
3-4
Wiring method
(1) Remove a portion of the wire’s insulation.
(2) Press the orange switch of the connector using a tool such as a flat-blade screwdriver.
(3) Insert the wire into the connector until it stops with pressing the orange switch.
(4) Take the tool off the switch.
Precautions on wiring
• When removing the wire’s insulation, be careful not to scratch the core wire.
• Do not twist the wires to connect them.
• Do not solder the wires to connect them. The solder may break due to vibration.
• After wiring, make sure stress is not applied to the wire.
3-5
3.3.1 Input Specifications and Pin Configuration
Input terminals of pulser input connector
Pin
number
Item
1, 5, 9
Pulse input A (+)
Operating voltage
range
2, 6, 10
Pulse input A (-)
3, 7, 11
Pulse input B (+)
Pulse input B (-)
Input specifications
Signal name
4, 8, 12
Circuit
Minimum ON
voltage/current
Maximum ON
voltage/current
Input impedance
Minimum input
pulse width
Descriptions
3.5 to 5.25 V DC
(5 VDC, line driver
specifications)
3 V DC/4 mA
1 V DC/2.0 mA
Approx. 390 Ω
0.5 μs or more
(Max. 1 MHz for each
phase)
Note) When the pulser is connected to the pulse input, the elapsed value increases if the phase A is
proceeding more than the phase B.
3-6
Chapter 4
Power On/Off and Items to Check
4.1 Safety Circuit Design
Example of a safety circuit
Installation of the over limit switch
Install over limit switches as shown above.
Connect them to the CW and CCW driving inhibition input of the parallel I/O connector of AMP. For the
positioning unit RTEX, connect them to the limit input (+) and limit input (-) through the network.
Install the safety circuit recommended by the manufacturer of the motor being used.
4-2
4.2 Before Turning On the Power
Items to check before turning on the power
System configuration example
Checking connections to the various devices
Check to make sure the various devices have been connected as indicated by the design.
Checking the installation of the external safety circuit
Check to make sure the safety circuit (wiring and installation of over limit switch) based on an external
circuit has been installed securely.
Checking the procedure settings for turning ON the power supplies
Make sure settings have been entered so that power supplies will be turned on according to the
procedure outlined in section “Procedure for Turning On the Power”.
Checking the CPU mode selection switch
Set the PLC in the PROG. mode. Setting it in the RUN mode can cause inadvertent operation.
Note:
When the power to the PLC is turned on, the start flags for the various operations of the positioning unit
RTEX should be off. If they are on, they may activate improperly.
4-3
4.3 Procedure for Turning On the Power
When turning on the power to the system incorporating the positioning unit RTEX, the nature and
statuses of any external devices connected to the system should be taken into consideration, and
sufficient care should be taken that turning on the power does not initiate unexpected movements or
operations.
4.3.1 Procedure for Turning On the Power
Procedure
1. Turn on the power supplies for input and output devices connected to the PLC.
2. Turn on the power supply for the AMP.
3. Turn on the power supply for the PLC.
4-4
4.3.2 Procedure for Turning Off the Power
Procedure
1. Check to make sure the rotation of the motor has stopped, and then turn off the power supply for the
PLC.
2. Turn off the power supply for the AMP.
3. Turn off the power supplies for the input and output devices connected to the PLC.
4-5
4-6
Chapter 5
Preparation For Operation
5.1 Procedures For System Establishment
5.1.1 Procedure 1: Wiring
Use the LAN cable with the Ethernet category 5e shielded type for the wiring of the network. Connect the
positioning unit RTEX with each AMP in a loop. Connect the “TX” of the positioning unit RTEX to the
“RX” of an AMP, and then connect the “TX” of the AMP to the “RX” of the next AMP. At the end, connect
the “TX” of the last AMP to the “RX” of the positioning unit RTEX.
Note) Turn off the power supply of the system before wiring cables.
5-2
5.1.2 Procedure 2: Axis Numbers and Unit Numbers of AMP
The axis numbers of the positioning unit RTEX agree with the unit numbers of the rotary switch of the
AMP. As the connected order on the network is not related to the axis numbers, the axis numbers can be
determined after the establishment of the network.
AMP rotary
switch number
1
2
3
4
5
6
7
8
Axis number
Axis 1
Axis 2
Axis 3
Axis 4
Axis 5
Axis 6
Axis 7
Axis 8
Note:
An error occurs when the settings as below were specified.
• When the same unit number is redundantly specified on the same network.
• When a unit number was set to 0.
• When a unit number larger than the maximum axis number of the unit used was specified.
(For the 4-axis type, the settable unit numbers are 1 to 4.)
5-3
5.1.3 Procedure 2: Power On and Checking Network Establishment
The power-on procedure is as follows.
1. Turn on the power supplies for input and output devices connected to the PLC.
2. Turn on the power supply for the AMP.
3. Turn on the power supply for the PLC.
After the power turned on, check if the operation status display LEDs of the positioning unit RTEX is in
the following state.
STATUS : Lights up
LINK
: Lights up
Key Point:
• If the STATUS LED is blinking, the network is not established.
• If the LINK LED is off, the connection between the “RX” of the positioning unit RTEX (receiver) and the
“TX” of the AMP (sender) is not electrically correct.
5.1.4 Procedure 3: Matching Parameters With AMP
At the factory setting, the operating directions of the positioning unit RTEX and the AMP are
different as below.
• Parameters of positioning unit RTEX : CW direction is elapsed value (+) direction
• Parameters of AMP
: CW direction is elapsed value (-) direction
Therefore, they must be matched according to the following procedures.
1. Boot the Configurator PM and set the corresponding axis.
2. Specify the “Select slot” from the “Online” on the menu, and select the slot number that the positioning
unit RTEX is installed.
3. Specify the “Download to unit” from the “File” on the menu, and down the axis information and
parameter setting data.
4. The indication for writing into the FROM (flash memory) is shown. Select “Yes” to carry out writing to
the FROM.
5. After the completion of writing, turn off the power supplies of AMP and PLC, and then turn them on
again.
6. After turning on the power supplies again, the system will be operated with the parameters set in the
positioning unit RTEX.
Key Point:
Followings are the parameters to match the operating directions of the positioning unit RTEX and AMP
according to the above procedure.
“CW/CCW direction setting”
“Limit switch connection”
As these parameters are important to establish the system, they will be reflected to the operation of a
motor by turning on the power supply again after writing them into the FROM (flash memory) of the
positioning unit RTEX.
5-4
5.1.5 Procedure 4: Checking Input Signals
Check the input of the over limit switch for the protection circuit connected to the AMP and the input of
the near home (DOG) switch. Confirm whether the input of the signals is properly loaded into the
positioning unit RTEX or not, with operating each switch forcibly. The statuses of the input of switches
can be confirmed on the status indication disply of the Configurator PM.
Key Point:
If the operating direction of the motor is opposite to the position of the limits (+) and (-) after the
installation of the over limit switch, the connection of the limits (+) and (-) can be set to “Reverse
connection” in the parameter setting of the Configurator PM.
5-5
5.1.6 Procedure 5: Checking Rotating and Moving Directions and Moving
Distance
Check whether the rotating and moving direction of the motor and the moving distance is correct or not.
The operations can be easily confirmed using the tool operation function of the Configurator PM without
ladder programs.
1. Confirm the rotating direction and moving direction of the motor by the JOG operation. Select the
“Online” → “Tool operation” on the menu of the Configurator PM, and make the servo on for the
corresponding axis to execute the the JOG operation. When using the ladder program, turn on the
forward JOG and reverse contact after turning on the servo on contact.
The rotating direction is determined according to the installation of the ball screw or the “CW/CCW
direction setting” of the parameter.
2. Confirm whether the moving distance is as designed or not by the position control. Set the table 1 of
the positioning data using the Cofigurator PM, and select the “Online” → “Tool operation” on the menu
of the Configurator PM after downloading the table to the positioning unit RTEX, and make the servo
on for the corresponding axis to execute the the JOG operation. When using the ladder program, set
the position control starting table, and then turn on the positioning start contact after turning on the
servo on contact.
The moving distance is determined according to the pitch of the ball screw, deceleration gear rate or
setting movement amount of the positioning data.
Note) Execute the servo on, and make the AMP under the condition that the servo is locked before
performing the JOG operation and position control.
5-6
5.1.7 Procedure 6: Settings of Parameters and Positioning Data
The basic operation of the positioning system was checked in the procedure 5. In the procedure 6, set
the parameters and positioning data in accordance with the actual operation.
The parameters and positioning data is stored in the shared memory of the positioning unit RTEX.
Although there are two methods to store the data in the shared memory, it is recommended to set the
parameters that are not changed so often using the Configurator PM.
• Use the Configurator PM
• Use the ladder program to write into the shared memory
When using the Configurator PM
Boot the Configurator PM, and select “Set axis” → “Parameter settings” on the menu to set the various
parameters. Also, create the table for the positioning table on the positioning data editing screen. After
setting the parameters and data, download them to the positioning unit RTEX.
Note) After the parameters and posiioning data was downloaded, the display to select whether to write
them into the FROM (flash memory) or not is shown. When they are written into the flash memory, the
parameters and positioning data in the flash memory will be automatically reflected to the shared
memory when the power supply of the PLC turns on. When they are not written into the flash memory,
the parameters and positioning data finaly stored in the flash memory will be reflected when the power
supply of the PLC turns on.
When using the ladder program to write into the shared memory
Use the F151 instruction to write various parameters and positioning data into the shared memory.
Reference:
• For the information on the storage addresses of various parameters and postioning data,
<17.6 Details of Each Axis Setting Area in Shared Memory>
• For the information on writing positioning data using ladder programs,
<14.1.3. How to Use Standard Area and Extended Area of Positioning Data>
5-7
5.2 Preparation For Operation
5.2.1 Servo On/Servo Off
The servo motor should be in the state that the servo is locked in order to perform the JOG operation
and position control. Turn on the servo on request contat to make the servo motor to be the state that the
servo is locked. Turn on the servo off request contact to change the state that the servo is locked to the
state that the servo is free. Set either the servo on/servo off by the tool operation of the Configurator PM
without using the ladder program.
Each contact when the positioning unit RTEX is installed in the slot 0
Contact allocation
FPΣ
FP2
Y108
Y88
Y109
Y89
Y10A
Y8A
Y10B
Y8B
Y10C
Y8C
Y10D
Y8D
Y10E
Y8E
Y10F
Y8F
Y150
Y130
Y151
Y131
Y152
Y132
Y153
Y133
Y154
Y134
Y155
Y135
Y156
Y136
Y157
Y137
Target
Name
axis
1 axis
2 axis
3 axis
4 axis
Servo ON request
5 axis
6 axis
7 axis
8 axis
1 axis
2 axis
3 axis
4 axis
Request servo off
5 axis
6 axis
7 axis
8 axis
WY8
WY13
WY10
WY15
WX1
Target
Name
axis
1 axis
2 axis
3 axis
4 axis
Servo lock
5 axis
6 axis
7 axis
8 axis
WX11
Contact allocation
FPΣ
FP2
X110
X10
X111
X11
X112
X12
X113
X13
X114
X14
X115
X15
X116
X16
X117
X17
Descriptions
Turns on when the corresponding axis is in the state of servo
lock.
Descriptions
Requests the servo lock for the corresponding AMP.
The servo lock is executed by the ON edge of this contact.
The servo cannot be free automatically even in the program
mode.
To make the servo free, turn on the servo OFF request contact.
(The operation is the edge type.)
Requests the servo free for the corresponding AMP.
The servo free is executed by the ON edge of this contact.
(The operation is the edge type.)
Sample program
Note) The servo lock status continues if the PLC changed to the program mode.
5-8
Chapter 6
I/O Allocation
6.1 Occupied I/O Area
The input (X)/output (Y) should be allocated to use the Positioning Unit RTEX as well as other I/O units.
256 points (128-point input/128-point output) are occupied for any axis types.
Type
2-axis type
4-axis type
8-axis type
Number of occupied points (allocated using a tool software)
Input: 128 points
Output: 128 points
(128SX/128SY)
With the FPΣ or FP2, the I/O numbers vary depending on the installed position of the positioning unit
RTEX.
Reference: <FPΣ User’s Manual ARCT1F333>
<FP2/FP2SH User’s Manual ARCT1F320>
6-2
6.2 Allocation of Each Contact
Followings are occupied I/O when FPΣ/FP2 Positioning unit RTEX is installed in the slot 0.
Target
axis
Name
Link establishment
annunciation
-
X100
X0
All axes
X101
X102
X1
X2
-
X103
X3
All axes Write FROM
X104
X4
All axes Tool operation
X105
X106
X5
X6
-
X107
X7
All axes Recalculation done
X108
X109
X10A
X10B
X10C
X10D
X10E
X10F
X110
X111
X112
X113
X114
X115
X116
X117
X118
X119
X11A
X11B
X11C
X11D
X11E
X11F
X8
X9
XA
XB
XC
XD
XE
XF
X10
X11
X12
X13
X14
X15
X16
X17
X18
X19
X1A
X1B
X1C
X1D
X1E
X1F
1 axis
2 axis
3 axis
4 axis
5 axis
6 axis
7 axis
8 axis
1 axis
2 axis
3 axis
4 axis
5 axis
6 axis
7 axis
8 axis
1 axis
2 axis
3 axis
4 axis
5 axis
6 axis
7 axis
8 axis
-
WX0
WX1
WX11
WX10
Contact allocation
FPΣ
FP2
Descriptions
Indicates that the network link was established, and announce
the system started running.
Announces that data such as positioning parameters in the
shared memroy is being written in FROM.
Contact to indicate the Tool operation from Configurator PM.
The start-up from I/O is not available during the Tool operaiton.
If it performs, a warning will occur.
If the recalculation request contact (Y_7) turns on, the
positioning data of the shared memory (standard area) will be
restructured. This contact will turn on after restructuring
completes.
If the recalculation request contact (Y_7) turns on again, this
contact will be off once.
Note) It is used only when the positioning data has been
rewritten by laddar programs.
Each axis
connection
confirmation
Turns on when the corresponding axis exists.
Servo lock
Turns on when the corresponding axis is in the state of servo
lock.
BUSY
Turns on when the corresponding axis is operating.
6-3
6-4
WX2
WX3
WX4
WX14
WX13
WX12
Contact allocation
FPΣ
FP2
X120
X20
X121
X21
X122
X22
X123
X23
X124
X24
X125
X25
X126
X26
X127
X27
X128
X28
X129
X29
X12A
X2A
X12B
X2B
X12C
X2C
X12D
X2D
X12E
X2E
X12F
X2F
X130
X30
X131
X31
X132
X32
X133
X33
X134
X34
X135
X35
X136
X36
X137
X37
X138
X38
X139
X39
X13A
X3A
X13B
X3B
X13C
X3C
X13D
X3D
X13E
X3E
X13F
X3F
X140
X40
X141
X41
X142
X42
X143
X43
X144
X44
X145
X45
X146
X46
X147
X47
X148
X48
X149
X49
X14A
X4A
X14B
X4B
X14C
X4C
X14D
X4D
X14E
X4E
X14F
X4F
Target
axis
1 axis
2 axis
3 axis
4 axis
5 axis
6 axis
7 axis
8 axis
1 axis
2 axis
3 axis
4 axis
5 axis
6 axis
7 axis
8 axis
1 axis
2 axis
3 axis
4 axis
5 axis
6 axis
7 axis
8 axis
1 axis
2 axis
3 axis
4 axis
5 axis
6 axis
7 axis
8 axis
1 axis
2 axis
3 axis
4 axis
5 axis
6 axis
7 axis
8 axis
Name
Operation done
Descriptions
Turns on when the operation command for the corresponding
axis completed and the position error became in the specified
completion width.
For P point control and C point control of the automatic
operation, turns on when the operation for all the tables
completed.
After this contact turned on, the on-state continues until the next
control activates.
Turns on when the home return operation for the corresponding
axis completed.
Home return done
After this contact turned on, the on-state continues until the next
control activates.
-
-
Near home
Monitor contact for the near home input connected to the
corresnponding AMP.
Imposition
Turns on when the position error of the corresponding axis is
within the imposition range specified in AMP.
The setting of the imposition range can be changed by
PANATERM that is a tool of AMP.
Auxiliary contact
Turns on when the corresponding positioning table of the
corresponding axis was executed.
Use Configurator PM or directly write in the shared memory for
setting to able/disable the auxiliary contact.
WX5
WX6
WX7
WX17
WX16
WX15
Contact allocation
FPΣ
FP2
X150
X50
X151
X51
X152
X52
X153
X53
X154
X54
X155
X55
X156
X56
X157
X57
X158
X58
X159
X59
X15A
X5A
X15B
X5B
X15C
X5C
X15D
X5D
X15E
X5E
X15F
X5F
X160
X60
X161
X61
X162
X62
X163
X63
X164
X64
X165
X65
X166
X66
X167
X67
X168
X68
X169
X69
X16A
X6A
X16B
X6B
X16C
X6C
X16D
X6D
X16E
X6E
X16F
X6F
X170
X70
X171
X71
X172
X72
X173
X73
X174
X74
X175
X75
X176
X76
X177
X77
X178
X78
X179
X79
X17A
X7A
X17B
X7B
X17C
X7C
X17D
X7D
X17E
X7E
X17F
X7F
Target
axis
1 axis
2 axis
3 axis
4 axis
5 axis
6 axis
7 axis
8 axis
1 axis
2 axis
3 axis
4 axis
5 axis
6 axis
7 axis
8 axis
1 axis
2 axis
3 axis
4 axis
5 axis
6 axis
7 axis
8 axis
1 axis
2 axis
3 axis
4 axis
5 axis
6 axis
7 axis
8 axis
Name
Descriptions
Limit +
Limit Limit +
Limit Limit +
Limit Limit +
Limit Limit +
Limit Limit +
Limit Limit +
Limit Limit +
Limit -
Monitor contact of the limit + and – connected to the
corresponding AMP.
During the positioning operation, JOG operation or pulser
operation, performs the deceleration stop when the limit
input that is an extension of the operating direction turned
on.
The deceleration stop time during the limit input can be
changed in the shared memory.
It will be the contact for the automatic inversion when
performing the home return.
Error annunciation
Turns on when an error occurs on the corresponding axis.
The contacts of all axes turn on if an error occurs on all
axes.
The details of the error can be confirmed in the error
annunciation area of the shared memory.
Warning annunciation
Turns on when a warning occurs on the corresponding
axis.
The contacts of all axes turn on if a warning occurs on all
axes.
The details of the warning can be confirmed in the warning
annunciation area of the shared memory.
General-purpose input 1
General-purpose input 2
General-purpose input 1
General-purpose input 2
General-purpose input 1
General-purpose input 2
General-purpose input 1
General-purpose input 2
General-purpose input 1
General-purpose input 2
General-purpose input 1
General-purpose input 2
General-purpose input 1
General-purpose input 2
General-purpose input 1
General-purpose input 2
Monitor contact for the general-purpose input connected to
the corresnponding AMP.
The input status of this contact does not affect on the
operation of the motor or positioning unit.
6-5
Target
axis
Name
Y100
Y80
All axes System stop
Y101
Y102
Y103
Y104
Y105
Y106
Y81
Y82
Y83
Y84
Y85
Y86
-
-
Y87
All axes
Recalculation
request
Y107
WY8
WY10
Contact allocation
FPΣ
FP2
Descriptions
Contact for requesting the system stop. When it turns on, all
axes will stop at the deceleration time 0.
Turn on this signal when each positioning data (standard area) in
the shared memory was changed.
The positioning data after the table number starting the
recalculation specified in the shared memory can be restructured
and will be executable by turning on this signal.
When restructuring of the positioning data completes, the
recalculation done contact (X_7) will turn on.
6-6
WY9
Y108
Y109
Y10A
Y10B
Y10C
Y10D
Y10E
Y10F
Y110
Y111
Y112
Y113
Y114
Y115
Y116
Y117
Y118
Y119
Y11A
Y11B
Y11C
Y11D
Y11E
Y11F
Y120
Y121
Y122
Y123
Y124
Y125
Y126
Y127
Y128
Y129
Y12A
Y12B
Y12C
Y12D
Y12E
Y12F
WY10
WY12
WY11
Note) It is used only when the positioning data has been
rewritten by laddar programs.
Y88
Y89
Y8A
Y8B
Y8C
Y8D
Y8E
Y8F
Y90
Y91
Y92
Y93
Y94
Y95
Y96
Y97
Y98
Y99
Y9A
Y9B
Y9C
Y9D
Y9E
Y9F
Y100
Y101
Y102
Y103
Y104
Y105
Y106
Y107
Y108
Y109
Y10A
Y10B
Y10C
Y10D
Y10E
Y10F
1 axis
2 axis
3 axis
4 axis
5 axis
6 axis
7 axis
8 axis
1 axis
2 axis
3 axis
4 axis
5 axis
6 axis
7 axis
8 axis
1 axis
2 axis
3 axis
4 axis
5 axis
6 axis
7 axis
8 axis
1 axis
2 axis
3 axis
4 axis
5 axis
6 axis
7 axis
8 axis
Requests the servo lock for the corresponding AMP.
The servo lock is executed by the ON edge of this contact.
The servo cannot be free automatically even in the program
Servo ON request
mode.
To make the servo free, turn on the servo OFF request contact.
(The operation is the edge type.)
Requests the positioning control for the corresponding AMP.
The starting table is specified in the area for specifying the
position control starting table number in the shared memory.
Positioning start-up (The operation is the edge type.)
If this contact turns on during the Tool operation by Configurator
PM, a warning will be output.
Requests the home return for the corresponding AMP.
The settings for the direction or pattern of the home return are
specified by Configurtor PM or the home return operation setting
Home return start- area in the shared memory.
up
(The operation is the edge type.)
If this contact turns on during the Tool operation by Configurator
PM, a warning will be output.
JOG forward
JOG reverse
JOG forward
JOG reverse
JOG forward
JOG reverse
JOG forward
JOG reverse
JOG forward
JOG reverse
JOG forward
JOG reverse
JOG forward
JOG reverse
JOG forward
JOG reverse
Requests the JOG operation for the corresponding AMP.
The settings for acceleration time, etc are specified by
Configurator PM or the JOG operation settings in the shared
memory.
(The operation is the level type.)
If this contact turns on during the Tool operation by Configurator
PM, a warning will be output.
WY11
WY12
WY13
WY15
WY14
WY13
Contact allocation
FPΣ
FP2
Y130
Y110
Y131
Y111
Y132
Y112
Y133
Y113
Y134
Y114
Y135
Y115
Y136
Y116
Y137
Y117
Y138
Y118
Y139
Y119
Y13A
Y11A
Y13B
Y11B
Y13C
Y11C
Y13D
Y11D
Y13E
Y11E
Y13F
Y11F
Y140
Y120
Y141
Y121
Y142
Y122
Y143
Y123
Y144
Y124
Y145
Y125
Y146
Y126
Y147
Y127
Y148
Y128
Y149
Y129
Y14A
Y12A
Y14B
Y12B
Y14C
Y12C
Y14D
Y12D
Y14E
Y12E
Y14F
Y12F
Y150
Y130
Y151
Y131
Y152
Y132
Y153
Y133
Y154
Y134
Y155
Y135
Y156
Y136
Y157
Y137
Y158
Y138
Y159
Y139
Y15A
Y13A
Y15B
Y13B
Y15C
Y13C
Y15D
Y13D
Y15E
Y13E
Y15F
Y13F
Target
axis
1 axis
2 axis
3 axis
4 axis
5 axis
6 axis
7 axis
8 axis
1 axis
2 axis
3 axis
4 axis
5 axis
6 axis
7 axis
8 axis
1 axis
2 axis
3 axis
4 axis
5 axis
6 axis
7 axis
8 axis
1 axis
2 axis
3 axis
4 axis
5 axis
6 axis
7 axis
8 axis
-
Name
Emergency stop
Descriptions
Requests the emergency stop for the corresponding AMP.
The deceleration time for the emegency stop is specified by
Configurator PM or the emergency stop setting in the shared
memory.
(The operation is the level type.)
Note) The deviation counter cannot be cleared.
Deceleration stop
Requests the deceleration stop for the corresponding AMP.
The deceleration time for the deceleration stop is specified by
Configurator PM or the deceleration stop setting in the shared
memory.
(The operation is the level type.)
Note) The deviation counter cannot be cleared.
Pulser operation
enabled
Requests the permission for the pulser operation of the
corresponding AMP.
The multiple setting and other settings for the pulser operation
are specified by Configurator PM or the pulser operation setting
area in the shared memory.
(The operation is the level type.)
-
-
Request servo off
Requests the servo free for the corresponding AMP.
The servo free is executed by the ON edge of this contact.
(The operation is the edge type.)
-
-
6-7
6-8
WY14
WY15
WY17
WY16
Contact allocation
FPΣ
FP2
Y160
Y140
Y161
Y141
Y162
Y142
Y163
Y143
Y164
Y144
Y165
Y145
Y166
Y146
Y167
Y147
Y168
Y148
Y169
Y149
Y16A
Y14A
Y16B
Y14B
Y16C
Y14C
Y16D
Y14D
Y16E
Y14E
Y16F
Y14F
Y170
Y150
Y171
Y151
Y172
Y152
Y173
Y153
Y174
Y154
Y175
Y155
Y176
Y156
Y177
Y157
Y178
Y158
Y179
Y159
Y17A
Y15A
Y17B
Y15B
Y17C
Y15C
Y17D
Y15D
Y17E
Y15E
Y17F
Y15F
Target
Name
axis
1 axis
2 axis
3 axis
4 axis
Request error clear
5 axis
6 axis
7 axis
8 axis
1 axis
2 axis
3 axis
4 axis
Request warning clear
5 axis
6 axis
7 axis
8 axis
General-purpose output 1
1 axis
General-purpose output 2
General-purpose output 1
2 axis
General-purpose output 2
General-purpose output 1
3 axis
General-purpose output 2
General-purpose output 1
4 axis
General-purpose output 2
General-purpose output 1
5 axis
General-purpose output 2
General-purpose output 1
6 axis
General-purpose output 2
General-purpose output 1
7 axis
General-purpose output 2
General-purpose output 1
8 axis
General-purpose output 2
Descriptions
Requests the error clear for the corresponding AMP.
The processing to recover from errors is performed and
the error logs are cleared by turning on this signal.
Note) Unrecoverable errors cannot be recovered even if
this signal turned on.
Requests the warning clear for the corresponding AMP.
The warning logs are cleared by turning on this signal.
Contact for the general-purpose output connected to the
corresponding AMP.
The input status of this contact does not affect on the
operation of the motor or positioning unit.
Chapter 7
Setting Tool
Configurator PM
7.1 Connection With Computer
Install the Configurator PM on a computer, and connect it to the tool port of the FPΣ control unit like the
above example as well as a programming tool.
For the FP2, connect to the tool port of the FP2 CPU unit.
7-2
7.2 Functions of Configurator PM
7.2.1 Overview
The Configurator PM is the Windows®-compliant setting software for our FP2/FPΣ Positioning Unit
RTEX.
The positioning operations can be set by the input method similar to Microsoft® Excel.
Copy & Paste
Copies and pastes the data you are editing into Microsoft® Excel, etc.
Also, pastes the position data calculated in Microsoft® Excel into Configurator PM.
Parameters and data transfer
Transfers the setting parameter or positioning data to the positioning unit RTEX.
Also, reads the parameters or positioning data within the positioning unit RTEX.
Batch checking of parameters and data
Checks the contents of parameters and positioning data all at once.
Jumps to the place automatically if there are parameters or data out of the range.
Also, this function is automatically executed when sending parameters or positioning data to the
positioning unit RTEX.
Verify function
Verifies the parameter or positioning data you are editing with the files on the disk or the settings values
in the positioning unit RTEX.
You can jump the cursor to the data with differences from the dialog of the result of verification.
Search and Replace functions
The search or replacement for data item each is possible. Twenty search strings and twenty replace
strings can be memorized, so it is convenient for the repeated search or replacement.
Showing comments for all parameters and positioning data
Shows the guidance for all parameters and positioning data when making the settings.
Up to 100 one-byte characters of data comments can be input.
Up to 100 one-byte characters (50 two-byte characters) of comments can be input for thepositioning data
of 1 table each.
It is useful for the revision or the control of programs.
However, the comments cannot be stored within the positioning unit RTEX.
Tool operation
The tool operation enables to check the operation at the time that the system is installed or the operation
of setting parameters without any ladder program.
Also, the teaching function is provided, which reflects the current position to the movement amount of
data item.
7-3
7.2.2 Basic Specifications
Operating environment
Applicable OS
Required HDD capacity
Recommended CPU
Recommended resolution
Recommended memory
Recommended display colors
Application specifications
No. of characters of data comment
No. of histories of search/replace strings
7-4
Windows®95 (OSR2 or higher)
Windows®98
Windows®Me
WindowsNT® (Ver.4.0 or higher)
Windows®2000
Windows®XP
20MB or more
Pentium 200MHz or higher
800 * 600 or more
64MB or more (Depending on OS)
256 colors or more
100 bytes/table
20 each
7.3 Installing Configurator PM
Procedure for installing Configurator PM in a personal computer
The Configurator PM is installed in a personal computer using the procedure outlined below.
For Windows NT®, Windows® 2000, please be aware that the Configurator PM cannot be installed
unless you log in at the Administrator level when booting the system
1. Exit any applications currently running.
If there are any applications currently running, exit them.
2. Insert the setup CD.
Insert the Configurator PM setup CD in the CD drive.
3. Select “Run”.
Click on the “Start” button at the lower left of the screen, or press the Ctrl + ESC keys to display the start
menu of Windows® Operation System. Select “Run”.
4. Enter the name of the file on which the function is to be run.
When “Run” is selected, the dialog box shown at the left is displayed. Enter d:\setup.exe and click on
the [OK] button.
Note:
The drive name “d” varies depending on the computer configuration.
7-5
5. A confirmation message is displayed.
When the setup program is booted, a confirmation dialog box is displayed. Confirm the contents and
click on the [Next] button. To interrupt the installation, click on [Cancel].
6. Confirm the licensing agreement.
The licensing agreement confirmation box is displayed. If you agree to all of the items in the displayed
license agreement, click on [Yes].
The setup process begins.
7-6
7. Register the user information.
A user information dialog box is displayed. Fill in the [User Name], [Company Name] and [Serial
Number] items, and click on the [Next] button.
The serial number is noted on the user card included in the Configurator PM package. Make sure it is
entered correctly.
The contents entered here can be confirmed under “Version Information” on the splash screen, and in
the Help function, when the Configurator PM is booted.
8. Select the installation destination.
A dialog box is displayed where the folder to which the Configurator PM is to be installed can be
confirrmed. To install the program in the displayed folder, click on the [Next] button.
The standard destination is “c:\Program Files\Panasonic MEW Control”.
To install the program in a different folder, click on the [Browse] button and specify a folder.
7-7
9. Select the program folder.
A dialog box is displayed where the program folder name can be confirmed. To use the displayed folder
name, click on the [Next] button.
The standard folder name is “Panasonic MEW Control”.
To use a different folder name, simply enter that name.
10. The installation process begins.
A message is displayed on the screen indicating that the installation is in progress, and the Configurator
PM setup begins.
7-8
11. Display the Readme file.
When the setup process has been completed, a dialog box showing the completion is displayed.
The latest information is described in the Readme file.
Click on [Yes].
12. Reboot the computer.
When all of the process has been completed, a dialog box is displayed, confirming that the computer will
be rebooted.
Select either radio button, reboot at once or reboot later, aand click on [Finish].
Reference:
The above group icon is displayed only when the installation completed. The procedures of the start-up,
refer to the sections of “Starting Configurator PM” and “Exiting Configurator PM”.
Note:
Never eject the CD during the installation process.
7-9
7.4 Starting Configurator PM
Click the [Start] button on Windows, and click [Program], [Panasonic MEW Control] and [Setting
software] in the order. And then click [Configurator PM]. The following dialog is shown.
[New]
[Open]
[Upload from Unit]
[Exit]
7-10
Create a new setting data for the positioning unit RTEX.
Read the existing setting data.
Read the setting data of the positioning unit RTEX.
End this software.
7.5 Treating Files
7.5.1 New
Create a new file.
1. Select [File] → [New] in the menu bar, or click [New file] icon in the toolbar. The [Select axes]
dialog is shown.
2. Check the axes to use, and click [OK].
7-11
3. The [Interpolation group settings] dialog is shown. Set the grouping that the interpolation
operation is executed for the selected axes in the above setting.
[Independent]
[Interpolation group]
[Change group]
[OK]
[Cancel]
The area of the axes to be used as independent axes without performing
the interpolation operation.
The area of the groupings of the axes to perform the interpolation
operation. Up to 4 groups can be specified.
It is used to register the interpolation groups by other way than the drag
and drop with the mouse. Click the axis icon at the top of the window, and
select the groups to allocate by executing this function.
Determine the allocation of the interpolation groups.
Back to the previous setting for the axes to use.
4. Drag the axis icon at the top of the window with the mouse and drop it in any area of the
groups (A to D) at the bottom of the window to determine the axes of the interpolation groups.
Click [OK] to determine the interpolation groups.
5. The data setting screen is shown, which enables the setting.
7-12
7.5.2 Reading from Files
Read the parameter settings or data settings from files.
1. Select [File] → [Open] in the menu bar, or click [Open] icon in the toolbar. The following dialog
is shown.
2. Select the drive where the file is saved in the [Location of File] box.
3. Select the file name in the box listing the folders and files under the [Location of File] box.
If the file you want to read is not indicated, double-click the folder name where the file is saved.
Double-click the sub-folder names until the sub-folder where the file is saved is open.
4. Click the file name.
The following contents are recorded in the positioning setting file (* npm) that can be used in this
software.
・Axis information
・Parameter settings
・Data settings
・Data comments
5. Click [Open].
Key Point:
Click the file name indicated at the bottom of the [File] menu to open the file that was previously active
7-13
7.5.3 Saving Files
Save the parameter settings or data settings in files.
The contents saved in files are axis information, parameter settings, data settings and data comments.
1. The following methods are available to save files.
(The operation procedures and the behaviors of this software differ depending on the case of overwrite
save and the one saves as a new file.)
Saving a file by overwriting an existing file.
Select [File] => [Save] in the menu bar, or click the [Save] icon in the toolbar.
Saving a file by naming a new name.
Select [File] => [Save As] in the menu bar.
When saving a file by overwriting an existing file, the operation completes when the function is selected.
When saving a file by name a new name, the following dialog is shown.
2. Input a new file name in the [File name] box.
3. Click [Save].
7-14
7.5.4 Setting File Properties
Set the property of a file (creator and comment).
1. Select [File] => [File property] in the menu bar to specify the file property.
The following dialog is shown.
2. Input the creator and comment, and click [OK].
Up to 10 one-byte characters (5 two-byte characters) for the creator and 40 one-byte characters (20 twobyte characters) for the comment can be input.
7-15
7.6 Exiting Configurator PM
Select [File] → [Exit] in the menu bar to quit the Configurator PM.
If the file is not unsaved, a message asking for the save is shown.
・Click [Yes] to save the file.
・Click [No] to end the Configurator PM without saving the file.
7-16
7.7 Connection to Positioning Unit
7.7.1 Selecting Slot Number
When accessing the positioning unit RTEX in the Configurator PM, specify the slot number that the
positioning unit RTEX is installed in advance.
Select [Online] → [Select slot] in the menu bar. The following dialog is shown.
The slot numbers defined vary depending on the type of PLCs. See below.
PLC
FPΣ
FP2
Slot No.
The positioning unit RTEX is installed on the left side of the CPU unit, and defined as below.
Expansion unit 1 : Slot No. 0
Expansion unit 2 : Slot No. 1
Expansion unit 3 : Slot No. 2
Expansion unit 4 : Slot No. 3
The positioning unit RTEX is installed on the CPU unit with the motherboard. The slot
number for the unit installed on the right side of the CPU unit is the slot number 0, and then
the slot number varies depending on the installed position of the motherboard.
7-17
7.7.2 Communication Settings
Set the condition to communicate with the PLC that the positioning unit RTEX has been installed.
Select [Option] → [Communication settings] in the menu bar. The following dialog is shown.
Name
Port number
Baud rate
Data length
Stop bit
Parity
Timeout
Automatic
communication
settings
7-18
Setting value
Select a COM port to be used.
1200 to 115200 bps
7 bits, 8 bits: Set either 7 bits or 8 bits to send 1 byte.
1 bit, 2 bits
None, Odd, Even
Set the communication timeout time with PLC (0 to 60 seconds).
When the communication condition is different from the PLC,
check the items to search the matched conditions.
If all items are not checked, the communication condition is not
automatically searched.
Default
COM1
9600
8 bits
1 bit
Odd
5 seconds
All items are
checked.
7.8 Parameter Settings
Set the initial operation for the positioning unit RTEX.
1. Select [Set axis] → [Parameter settings] in the menu bar, or click the [Parameter setting] icon
in the toolbar.
2. The parameter setting dialog is shown. Set the parameters.
Setting items
Parameter name
Unit setting
Pulse number per rotation
Movement amount per rotation
CW/CCW direction setting
Limit switch
Limit switch connection
Software limit (Positioning control)
Software limit (Home return)
Software limit (JOG operation)
Upper limit of software limit
Lower limit of software limit
Auxiliary output mode
Auxiliary output ON time (ms)
Completion width(pulse)
Description
The unit to be used for setting each axis.
The pulse number per rotation.
(It should be cancelled down with the movement amount per
rotation.)
The movement amount per rotation.
(It should be cancelled down with the pulse number per
rotation.)
The directions of CW and CCW.
CW+: + direction is CW.
CCW+: + direction is CCW.
Enable/disable the limit switch.
The connections of the + direction limit switch and - direction
limit switch.
Standard: + direction limit is CWL. - direction limit is CCWL.
Reverse connection: + direction limit is CCWL. - direction limit
is CWL.
Enable/disable the software limit in the positioning control.
Enable/disable the software limit in the home return.
Enable/disable the software limit in the JOG operation.
The upper limit value of the software limit.
The lower limit value of the software limit.
Enable/disable the auxiliary output contact and auxiliary output
code.
The time that the auxiliary output contact is ON.
The width of the completion of command operation.
7-19
Parameter name
Monitor error – Torque judgment
Monitor error – Torque judgment
value (%)
Monitor error – Actual speed
judgment
Monitor error – Actual speed
judgment value
Home return – Setting code
Home return – Direction
Home return – Acceleration time
Home return – Deceleration time
Home return – Target speed
Home return – Creep speed
JOG operation –
Acceleration/Deceleration type
JOG operation – Acceleration time
JOG operation – Deceleration time
JOG operation – JOG target rate
Emergency stop deceleration time
(ms)
Limit stop deceleration time (ms)
Error stop deceleration time (ms)
Pulser operation setting code
Pulser operation ratio numerator
Pulser operation ratio denominator
Description
The judgment operation of the torque command for the motors
controlled by the AMP of each axis.
Not available: Not perform the torque judgment.
Available (Warning): If the torque of the AMP exceeded the
judgment value, a warning occurs.
The torque command value of the motors controlled by the AMP
of each axis.
The judgment operation for the actual speed of the motors
controlled by the AMP of each axis.
Not available: Not perform the actual speed judgment.
Available (Error): If the actual speed of the AMP exceeded the
judgment value, an error occurs.
Available (Warning): If the actual speed of the AMP exceeded
the judgment value, a warning occurs.
The actual speed of the motors controlled by the AMP of each
axis.
The pattern of the home return.
The operating direction of the home return.
The acceleration time in the home return.
The deceleration time in the home return.
The target speed in the home return.
The speed to search the home position after the proximity input.
The acceleration/deceleration type in the JOG operation.
The acceleration time in the JOG operation.
The deceleration time in the JOG operation.
The target rate in the JOG operation.
The deceleration time when the emergency stop is requested
by the input contact.
The deceleration time for the deceleration operation when the
limit is input.
The deceleration time for the deceleration operation when an
error occurs
The pulser input (1 to 3) in the pulser operation.
No. of movement pulse is calculated by multiplying the No. of
input pulse from the pulser by the ratio below.
(Numerator of ratio of pulser operation)/(Denominator of ratio of
pulser operation)
OK
Cancel
Copy axis
Update the parameter settings with the specified contents.
Close this dialog without updating the parameter settings.
Specify the axes of the source and destination to copy the parameter setting
between the axes.The following dialog is shown by clicking the [Copy axis]
button. Specify the axes and click [OK].
Initialize
Help
Initialize the parameter settings.
Indicate the help for this function.
3. Click [OK] to determine the settings.
Click [OK] to determine the edited settings.
Click [Cancel] to cancel the edited settings.
7-20
7.9 Changing Axis Information
Change the used axes or the groups for the setting data being edited.
Select [Set axis] → [Change axis] in the menu bar. The following dialog is shown.
The editing dialog for the interpolation axis group is shown by clicking [OK] after selecting the
used axes.
7-21
7.10 Setting Positioning Data
Set the various data to perform the positioning operation. They are set on the data setting screen.
This is an example for the interpolation group of 1 axis and 2 axis.
Positioning data editing screen
Setting items
Parameter Name
Operation pattern
Interpolation operation
X-axis control method
X-axis movement
amount
X-axis auxiliary point
7-22
Description
Select one from the following operation patterns.
・End point control: Execute the trapezoidal control of only one table.
・Continuance point control : Execute the trapezoidal control continuously.
Specify the end point at the end of the continuance point control.
・Pass point control: Execute the continuous speed change control. Specify
the end point at the end of the pass point control.
Select the operation of interpolation.
Select either increment or absolute coordinate.
Input the movement amount of X axis. The movement amount depends on
the unit system specified in the parameter settings.
It is used when the circular interpolation is selected, and ignored when the
linear interpolation is selected.
The details of the auxiliary points differ depending on the type of circular
interpolation.
・Circular interpolation (Center point): The auxiliary point is used as the X
axis of the center point.
・Circular interpolation (Pass point): The auxiliary point is used as the X
axis of the pass point.
Parameter Name
Y-axis movement
amount
Y-axis auxiliary point
Acceleration/deceleration pattern
Acceleration time (ms)
Deceleration time (ms)
Interpolation speed
Dwell time (ms)
Description
Input the movement amount of Y axis. The movement amount depends on
the unit system specified in the parameter settings.
It is used when the circular (spiral) interpolation is selected, and ignored
when the linear interpolation is selected.
The details of the auxiliary points differ depending on the type of circular
interpolation.
・Circular interpolation (Center point): The auxiliary point is used as the Y
axis of the center point.
・Circular interpolation (Pass point): The auxiliary point is used as the Y
axis of the pass point.
Select the pattern to accelerate/decelerate.
Set the acceleration time. It is set in the ms unit.
Set the deceleration time. It is set in the ms unit.
Set the interpolation speed.
Set the time from when the positioning command in the end point control
completes till when the completion flag (Y contact) turns on.
For the continuance point control, it is the wait time between each table. For
the pass point control, the dwell time is ignored.
Auxiliary output
Set the auxiliary output code. When the auxiliary output is set to enable in
the parameter settings, the auxiliary output code specified here is output.
Comment
Input the comments of tables.
The comments are saved in the positioning setting file (*.npm) of the PC
only. They are not saved in the positioning unit RTEX.
Note) The details for the settings in each parameter are indicated in the guidance bar.
7-23
7.11 How to Edit Positioning Data
7.11.1 Inputting Positioning Data
The cursor on the positioning data editing screen can be moved by clicking, double-clicking with the
mouse and with the arrow, Enter and Tab keys.
Move the cursor to the data item.
Using the arrow key enables to move the cursor to the adjacent cell in the direction of the arrow.
Using the mouse enables to move the cursor only by clicking the cell. If the cell you want to specify is not
in the data editing screen, scroll the screen using the scroll bar until you can see the cell.
Input the data item.
Pressing any character input key or double-clicking the mouse on the cell you want to input data enables
to input the data as below.
However, in the column with the combo box as below, the data item can be set only by inputting the
initial character on the keyboard. For example, input [C] directly in the column of the pattern. Then the
data item will be [C: Continuance point]. Also, it is possible to select with the arrow keys after the input is
enable.
Press [Enter] key to determine. Press [ESC] key to cancel.
Click the tab of a sheet to change to the sheet.
When using the keyboard, press [Ctrl]+[Page Up] or [Ctrl]+[Page Down].
7-24
7.11.2 Copying Positioining Data
The data contents can be stored in the clipboard by setting the preference field of the cells on the
positioning data editing screen. The data stored in the clipboard are pasted in Microsoft® Excel as well
as the data editing screen of this software.
Note:
Pasting is not possible if the content in the clipboard is different from the attributes of the pasted area.
If values are contained in the contents of the clipboard, the values can be pasted up to the maximum
digit number of the data item.
Key Point:
If the pasted area is different from the data in the clipboard, paste as shown below.
7.11.3 Selecting All Cells
All cells can be selected before the operations such as copy or paste are done.
It is convenient to copy all the settings of the specified axis to another axis.
Press [Ctrl] + [A] on the keyboard, or click the [Table No.] header on the upper-left corner of the data
editing screen with the mouse to select all cells.
7-25
7.11.4 Searching Character Strings
1. Select [Edit data] → [Find] in the menu bar, or click the [Find] icon in the toolbar. The following
dialog is shown.
2. Input the character string to search in the [Character string to find] box, and select the target
line (setting item).
3. Click [Next].
Key Point:
Press [Esc] to end the search.
Press [Replace] to change the replacement screen.
7.11.5 Replacing Character Strings
1. Select [Replace] → [Find] in the menu bar. The following diaglo is shown.
2. Input the character string to search in the [Character string to find] box.
3. Input the character string after the replacement in the [Character string after replacement].
4. Select the target line (setting item).
5. Click [Next] and [Replace], or [Replace all].
7-26
7.11.6 Selecting Lines
The cells in a line or multiple lines can be selected before the operations such as copy or paste are done.
Click the [Table No.] header on the upper-left corner of the positioning data editing screen with the
mouse to select the all the cells in one line. Drag the mouse up and down (holding down the left click) to
select multiple lines.
7.11.7 Selecting Colums
It is convenient for editing data collectively before the operations such as copy and paste, or for data
item each.
Click the header on the upper corner of the data editing screen to select all the cells in one column. Drag
the header holding down the left click on the mouse to select multiple columns.
7.11.8 Editing Data Items Collectively
Select a series of the data item in the same column and change them all at once.
1. Select the part to change with the mouse or the up and down arrows on the keyboard.
2. Input the data item. For example, press [A] on the keyboard to change the X-axis pattern from
“I: Increment” to “A: Absolute”.
3. Press the [Enter] key to determine the content of the data item.
The data item can be edited collectively in the above procedure.
Key Point:
When inputting the data item using the edit box (e.g. movement amount, acceleration time, etc.), input
the data item directly using the numbered keyboard.
7-27
7.12 Customizing Software
Changing Column Width
Widen the column width to enable all the characters to be shown during data editing, or narrow it when
the resolution of the PC you use is small. As the column width is saved when this software quits, the
same width will be recreated at the next time of the start-up.
1. The mouse cursor changes to a mark like “+” by moving the mouse cursor to the right end of
the column you want to widen the width in the header on the upper corner of the data editing
screen.
2. Move the cursor left and right with clicking down the left button of the mouse.
3. Release the left button of the mouse to finish the change in the column width.
Key Point:
The column width returns to the one on start-up by double-clicking the mouse in the state of the above
procedure 1.
- Showing/Hiding Toolbar
Set to show or hide the toolbar.
Select [View] → [Toolbar], and check or uncheck in the menu.
The toolbar is indicated with the check, and it is not indicated without the check.
- Showing/Hiding Status Bar
Set to show or hide the status bar.
Select [View] → [Status Bar], and check or uncheck in the menu.
The status bar is indicated with the check, and it is not indicated without the check.
- Showing/Hiding Parameter-Status Bar
Set to show or hide the parameter-status bar.
Select [View] → [Parameter-Status Bar], and check or uncheck in the menu.
The parameter-status bar is indicated with the check, and it is not indicated without the check.
- Showing/Hiding Guidance Bar
Set to show or hide the guidance bar on the main screen that provides guidance on various settings.
Select [View] → [Guidance Bar], and check or uncheck in the menu.
The guidance bar is indicated with the check, and it is not indicated without the check.
- Configuration setting
Select [Option] → [Configuration] in the menu bar. The following dialog is shown.
The current folder in the setting data file can be changed.
Current folder
Tool operation monitoring time
7-28
Specify a current folder to be used for this software.
Set the communication error detection time in the Tool operation.
- Setting Font
Select [Option] → [Font] in the menu bar. The following dialog is shown.
7-29
7.13 Checking Settings
7.13.1 Checking Parameters and Data Values
Collectively check the parameter setting first and then the positioning data if the values are within the
range. If an error is found in the parameter setting, the parameter setting dialog is automatically indicated
and the position where the error exists is focused. Also, if an error is found in the positioning data, the
cursor moves to the position where the error exists.
Select [Debug] → [Check Parameters and Data] in the menu bar, or click the [Check Parameter
and Data] icon in the toolbar.
Verifying File Contents
Verify the file currently being edited, and the files on the disk or the information in the unit. The following
procedure is for the verification with the files on the disk.
Verify the axis information, parameters and positioning data collectively.
Select [Debug] → [Verify] → [File] in the menu bar.
The dialog to select the file to verify is shown as below. Select the file to verify.
The contents of the file currently being edited are verified with the selected file and the result is indicated
in the dialog below.
Click [Close] to close the dialog.
7-30
7.14 Transferring Setting Data
7.14.1 Uploading Setting Data from Positioning Unit RTEX
Read the parameters and positioning data of the positioning unit RTEX.
1. Make the connection between a PC and PLC, and configure the settings. Then, select [File] →
[Upload from Unit] in the menu bar, or click the [Upload from Unit] icon in the toolbar.
2. Execute reading the unit.
Note:
The process of reading may take for a few minutes. Click [Cancel] to stop the read.
3. When the read completes successfully, a message asking if the data comment will be held is
indicated.
- Click [Yes] to leave all the comments set in the data.
- Click [No] to clear all the comments.
Note:
To execute the upload, previously determine the target positioning unit RTEXby the communication
settings and selecting the slot number.
The data comments are not stored in the positioning unit RTEX. They are managed in the setting files of
the PC.
7-31
7.14.2 Downloading Setting Data to Positioning Unit RTEX
Transfer the setting parameters and positioning data to the positioning unit RTEX.
1. Make the connection between a PC and PLC, and configure the settings. Then, select [File] →
[Download to Unit] in the menu bar, or click the [Download to Unit] icon in the toolbar.
The dialog is shown as below.
Axis information +
Select this to download axis information and parameter only.
Parameter setting data
Axis information +
Select this to download all setting data. The range of the positioning
Parameter setting data +
data to download can be specified.
Positioning setting data
Positioning setting data range
All
Download all setting data.
Table number range
Download the positioning data in the specified range.
OK
Start downloading with the selected settings.
Cancel
Stop downloading.
2. Click [OK] to start the download to the positioning unit. The time required for the download
depends on the range of the positioning setting data.
Note:
To execute the download, previously determine the target positioning unit RTEX by the communication
settings and selecting the slot number.
7-32
3. Once the download completes, the following dialog is shown.
Clicking [Yes] indicates the following dialog and save the setting data in the FROM (Flash Memory)
within the positioning unit RTEX. The saved setting data is automatically read when the power supply of
the PLC turns on.
⇒
Click [No] not to write the setting data to the FROM. The downloaded data is erased when the power
supply of the PLC turns off.
Note:
Writing to FROM is restricted up to 10000 times. The current number of write can be monitored with the
data monitor.
7.14.3 Writing Settings to FROM
Save the setting data written in the positioning unit RTEX in the FROM (Flash Memory) within the
positioning unit RTEX. The saved setting data is automatically read when the power supply of the unit
turns on.
Make the connection between a PC and PLC, and configure the settings. Then, select [Tool] →
[Write to FROM] in the menu bar. The following dialog is shown.
Clicking [Yes] indicates the following dialog and save the setting data in the FROM (Flash Memory) in
the unit. The saved setting data is automatically read when the power supply of the PLC turns on.
⇒
Click [No] not to write the setting data to the FROM. The downloaded data is erased when the power
supply of the PLC turns off.
Note:
Writing to FROM is restricted up to 10000 times. The current number of write can be monitored with the
data monitor.
7-33
7.15 Data Monitor
The internal data of the positioning unit RTEX can be monitored.
Make the connection between a PC and PLC, and configure the settings. Then, select [Online] →
[Data Monitor] in the menu bar. The following dialog is shown.
Axis [Group]
Active table number
Auxiliary output code
AMP current value(pulse)
Current value after unit
conversion
Torque command value
Actual speed (rpm)
State of axis
Error code
Error clear
Warning code
Warning clear
Help
Close
The axis No. and group names to be monitored.
The table number that the positioning data is being executed or has
completed.
Auxiliary output code
Monitor the value of feedback pulses.
Monitor the feedback value of the AMP after the unit conversion.
Monitor the torque command value of the AMP
Monitor the actual speed (rpm) of the AMP.
The operating states of axes or error and warning occurrences.
The latest error code when an error occurred.
Clear the error by clicking this button, when an error occurred.
Indicate the latest warning code when a warning occurs.
Clear the warning by clicking this button, when a warning occurred.
Indicate the help regarding this function.
Close this dialog.
Note:
If an recoverable error occurred in the positioning unit RTEX, click [Error Clear] to clear the error.
If a warning occurred in the positioning unit RTEX, click [Warning Clear] to clear the warning.
7-34
7.16 Status Display
The states of the motors of each axis can be monitored.
Make the connection between a PC and PLC. Then, select [Online] → [Status Display] in the
menu bar. The following dialog is shown.
Model
Axis [Group]
Connection status
Brand name
AMP model code
Motor model code
servo free
Status
Completion width
Home proximity
Limit +
Limit Number of writing to FROM
Version
Help
Close
The model name of positioning unit RTEX
The axis number and group names to be monitored.
Monitor the connection statuses of each axis
The individual brand names for each axis.
Obtain and display the model code of AMP.
Obtain and display the model code of a motor.
The state of the servo of the AMP whether it is locked or free.
The operating states of axes
The state of the deviation counter whether it is in the range of the
imposition or out of the range of the imposition.
The state of the AMP input contact whether the home return is input
or not.
The limit + input state of the AMP input setting.
The limit- input state of the AMP input setting.
The number of writing the setting data to FROM in the positioning
unit RTEX.
The version of the positioning unit RTEX
Indicate the help regarding this function.
Close this dialog.
7-35
7.17 Tool Operation
As the positioning unit RTEX can activate without a ladder program in the tool operation, the operation
can be checked quickly.
Select [Online] → [Tool operation] in the menu bar, and click the [Tool operation] icon in the
toolbar. The following dialog is shown.
The followings are the operations that are selectable in the tool operation.
Servo On/off
Control the on/off state of the servo.
Home return
Move to the home position in the machine coordinate.
Positioning
Operate from the starting table number according to the settings of the data stored in the positioning unit
RTEX.
JOG operation
The specified axis can be moved to the specified direction with the specified speed, while the operation
command is on.
Teaching
Control the axis manually using the same operation as the JOG operation, and reflect the resulting
positioning address on the data editing screen.
Note:
It is not possible to change the mode to the tool operation mode during the ladder operation of PLC.
If any communication error occurs during the tool operation, the positioning unit RTEX detects the error
and stops automatically.
If the previous tool operation did not finish properly due to a communication error, etc., the tool operation
mode will be cancelled forcibly when the next tool operation starts.
7-36
7.17.1 Tool Operation – Servo On/Off
Turn the servo on to make the motor be in the state that the servo is locked first in the operation of the
servo motor.
Therefore, in the tool operation, set the servo to ON using this settin.
1. Click [Servo ON/OFF] in Tool operation dialog. The following dialog is shown.
2. Set the servo to on/off by clicking the [Change ON/OFF] for the equivalent axes.
If the servo is on for the 1 axis to 3 axis, the setting is as below.
3. Click [Close] to close this dialog after completing the servo ON for the axes operated in the
tool operation. The tool operation dialog is automatically shown once the dialog is closed.
Note:
If the servo ON/OFF has been controlled using the ladder program before starting the tool operation, the
state of the servo lock/servo free is also kept in the tool operation.
7-37
7.17.2 Tool Operation – Home Return
After the power supply of the positioning unit RTEX turned on, the zero (home) of the machine position
(coordinate) does not always agree with the zero of the coordinate value in the positioning unit RTEX.
Therefore, coordinate the home of the machine position with the home of the positioning unit RTEX. This
setting is called Home return.
Note:
To perform the home return, the equivalent axes should be in the state that the servo is locked (servo
ON).
1. Click [Home Return] in the tool operation dialog. The following dialog is shown.
Axis [Group]
Zero offset
Unit
Home return mode
Start/Stop
State of axis
Error code
Error clear
Warning code
Warning clear
Speed rate
The axis numbers and group names to be monitored.
Monitor the feedback values after the unit system conversion for each axis.
Click [Change] to display the dialog for inputting value to change the value of
the zero offset.
The unit of position for each axis specified in the parameter settings.
Indicate the contents of the home return setting code specified in parameters.
Execute the operation to start/stop the home return.
・Click [Start] to execute the home return operation. The button name
changes to [Stop].
・Click [Stop] to execute the deceleration stop operation. The button name
changes to [Start].
The operating states of axes or error and warning occurrences.
The latest error code when an error occurred.
Clear the error by clicking this button, when an error occurred.
Indicate the latest warning code when a warning occurs.
Clear the warning by clicking this button, when a warning occurred.
The target speed of the home return specified in the parameter settings for
each axis is regarded as 100%, and the operation is executed in the specified
speed rate.
Clicking [Speed rate] shows the dialog for inputting the value.
The speed rate changed here is effective only in the tool operation, and it
changes to the original speed rate automatically once the tool operation quits.
Note:
If an recoverable error occurred in the positioning unit RTEX, click [Error Clear] to clear the error.
If a warning occurred in the positioning unit RTEX, click [Warning Clear] to clear the warning.
7-38
2. Click [Change] for the zero offset to change the offset after the home return operation. The
value can be changed during the home return operation as well.
3. Execute the home return. Click [Start] for the axis to execute the home return.
4. Click [Close] to close the dialog.
Note:
This dialog cannot be closed during the home return operation.
7.17.3 Tool Operation - Positioning
The test run is possible like actual positioning operations.
Specifying the starting table number enables to check if the positioning/interpolation from the starting
table operates properly.
Note:
For the positioning operation, the setting data should be downloaded to the positioning unit in advance.
For the positioning operation, the equivalent axes should be in the state that the servo is locked (Servo
ON).
The operations after the starting table number vary depending on the Operation patterns.
1. Click [Positioning] in the Tool operation dialog. The following dialog is shown.
7-39
Axis [Group]
Zero offset
Unit
Active table number
Starting table number
Operate/Stop
State of axis
Error code
Error clear
Warning code
Warning clear
Speed rate
The axis numbers and group names to be monitored.
Monitor the feedback values after the unit system conversion for each axis.
Click [Change] to display the dialog for inputting value to change the value
of the zero offset.
The unit of position for each axis specified in the parameter settings.
Monitor the table number during the operation or when it completes.
The starting table number for the positioning control.
Click [Change] to change the starting table number.
Execute the operation to start/stop the home return.
・Click [Operate] to execute the positioning operation. The button name
changes to [Stop].
・Click [Stop] to execute the deceleration stop operation. The button name
changes to [Operate].
The operating states of axes or error and warning occurrences.
The latest error code when an error occurred.
Clear the error by clicking this button, when an error occurred.
Indicate the latest warning code when a warning occurs.
Clear the warning by clicking this button, when a warning occurred.
The target speed of the home return specified in the parameter settings for
each axis is regarded as 100%, and the operation is executed in the
specified speed rate.
Clicking [Speed rate] shows the dialog for inputting the value.
The speed rate changed here is effective only in the tool operation, and it
changes to the original speed rate automatically once the tool operation
quits.
Note:
If an recoverable error occurred in the positioning unit RTEX, click [Error Clear] to clear the error.
If a warning occurred in the positioning unit RTEX, click [Warning Clear] to clear the warning.
2. Click [Change] in the starting table number field to specify the starting table number.
Specify the starting table number and click [Operate] to start the positioning opration.
Note:
• In the positioning unit RTEX, the positioning operation for the interpolation group is performed to
request the start and stop for the smallest number of axes in the group.
• In the tool operation, the positioning operation for the interpolation group is performed by clicking
[Operate] for any axes. However, due to the above specifications, a warning message is shown when
any [Operate] button other than the one for the smallest axis number is clicked.
3. Click [Change] for the zero offset to change the offset after the home return operation. The
value can be changed during the positioning operation as well.
4. Click [Close] to close the dialog.
Note:
This dialog cannot be closed during the positioning operation.
7-40
7.17.4 Tool Operation – JOG Operation
Each axis can be operated manually using the tool operation.
Note:
To perform the JOG operation, the equivalent axes should be in the state that the servo is locked (servo
ON).
1. Click [JOG operation] in the tool operation dialog. The following dialog is shown.
Axis [Group]
Zero offset
Unit
JOG target speed
JOG [+]
JOG [-]
State of axis]
Error code
Error clear
Warning code
Warning clear
Speed rate
The axis numbers and group names to be monitored.
Monitor the feedback values after the unit system conversion for each axis.
Click [Change] to display the dialog for inputting value to change the value
of the zero offset.
The unit of position for each axis specified in the parameter settings.
Monitor and display the target speed in the JOG operation.
Click [Change] to change the target speed for the JOG operation.
Click [+] to perform the forward rotation.
Click [-] to perform the reverse rotation.
The operating states of axes or error and warning occurrences.
The latest error code when an error occurred.
Clear the error by clicking this button, when an error occurred.
Indicate the latest warning code when a warning occurs.
Clear the warning by clicking this button, when a warning occurred.
The target speed of the home return specified in the parameter settings for
each axis is regarded as 100%, and the operation is executed in the
specified speed rate.
Clicking [Speed rate] shows the dialog for inputting the value.
The speed rate changed here is effective only in the tool operation, and it
changes to the original speed rate automatically once the tool operation
quits.
7-41
Note:
If an recoverable error occurred in the positioning unit RTEX, click [Error Clear] to clear the error.
If a warning occurred in the positioning unit RTEX, click [Warning Clear] to clear the warning.
2. Click the JOG[+] for the JOG operation in the forward rotation. Click the JOG[-] for the JOG
operation in the reverse rotation.
3. Click [Change] for the zero offset to change the offset after the home return operation. The
value can be changed during the JOG operation as well.
4. Click [Close] to close the dialog.
Note:
This dialog cannot be closed during the JOG operation.
7-42
7.17.5 Tool Operation - Teaching
Activate each axis manually by the tool operation, and register the positioning addresses where the axes
stopped as the point data.
Note:
To perform the teaching operation, the equivalent axes should be in the state that the servo is locked
(servo ON).
1. Click [Teaching] in the tool operation dialog. The following dialog is shown.
Axis [Group]
Zero offset
Unit
JOG target speed
JOG [+]
JOG [-]
Table number
State of axis]
Error code
Error clear
Warning code
Warning clear
Speed rate
The axis numbers and group names to be monitored.
Monitor the feedback values after the unit system conversion for each axis.
Click [Change] to display the dialog for inputting value to change the value of
the zero offset.
The unit of position for each axis specified in the parameter settings.
Monitor and display the target speed in the JOG operation.
Click [Change] to change the target speed for the JOG operation.
Click [+] to perform the forward rotation.
Click [-] to perform the reverse rotation.
Indicate the table number to perform the teaching.
Click [Teaching] to change the table number for the teaching and register the
current value.
The operating states of axes or error and warning occurrences.
The latest error code when an error occurred.
Clear the error by clicking this button, when an error occurred.
Indicate the latest warning code when a warning occurs.
Clear the warning by clicking this button, when a warning occurred.
The target speed of the home return specified in the parameter settings for
each axis is regarded as 100%, and the operation is executed in the specified
speed rate.
Clicking [Speed rate] shows the dialog for inputting the value.
The speed rate changed here is effective only in the tool operation, and it
changes to the original speed rate automatically once the tool operation quits.
7-43
Note:
If an recoverable error occurred in the positioning unit RTEX, click [Error Clear] to clear the error.
If a warning occurred in the positioning unit RTEX, click [Warning Clear] to clear the warning.
2. Click [Teaching] after stopping the axis at the desired position by the JOG operation, and input
the table number to execute the teaching operation.
3. Click [OK] after inputting the table number. The current value is registered for the movement
amount of the specified table number. Also, if the axis that the teaching operation is performed
is the interpolation axis, the current value is registered for the movement amount of the
equivalent coordinate in the interpolation group.
Note:
• The control method for the table number that the teaching operation was performed is automatically
changed to “Absolute”.
• The result of the teaching becomes effective once the tool operation quits and the setting data is
downloaded to the positioning unit RTEX.
4. Click [Close] to close the dialog.
Note:
This dialog cannot be closed during the JOG operation.
7-44
Chapter 8
Automatic Operation (Position Control)
8.1 Basic Operation
Type of perations
The automatic operation is an operation mode to be perform a position control. For the position control,
there are a single axis control and an interpolation control that starts and stops multiple axes
simultaneously.
For the operations of the position control, there are the E point control that uses the positioning data of 1
table, the P point control and C point control that use multiple tables for the single axis control or
interpolation control. Each operaton is as mentioned below, and the acceleration time and deceleration
time can be set individually. For the P point control and C point control, the E point should be set as the
last table. Also, in the P point control and C point control, the operation done flag turns on after the last
table was executed.
Operation flow of single axis control
Operation flow of interpolation control
The procedures to set the positioning data and to start the position control are the same for the E point
control, P point control and C point control. The operation of each cotntrol is determined according to the
contents of the positioning data to be set.
8-2
8.1.1 Setting and Operation of E Point Control
The example below is the case of a single axis control when using the FPΣ with the positioning unit
RTEX installed in the slot 0. The movement amount setting is the increment method, and the unit is set
to pulse. When using the FP2, change the contact and flag numbers appropriately.
Setting
The parameters necessary for the setting of the positioining data and parameters are specified by the
Configurator PM. The unit is set to pulse.
Item
Setting example
Allowable range
Operation pattern
Control method
E: End point
I: Increment
X-axis movement
amount
10000 pulse
C: Continuance point E: End point P: Pass point
I: Increment A: Absolute
Pulse: -1,073,741,823 to 1,073,741,823 pulse
μm (0.1 μm): -107,374,182.3 to 107,374,182.3 μm
μm (1 μm): -1,073,741,823 to 1,073,741,823 μm
inch (0.00001 inch): -10,737.41823 to 10,737.41823 inch
inch (0.0001 inch): -107,374.1823 to 1-7,374.1823 inch
degree (0.1 degree): -107,374,182.3 to 107,374,182.3 degree
degree (1 degree): -1,073,741,823 to 1,073,741,823 degree
Acceleration/decelerati
on pattern
Acceleration time (ms)
Deceleration time (ms)
L: Linear
L: Linear S: S-shaped acceleration/deceleration
100 ms
100 ms
Target speed
10000 pps
0 to 10000 ms
0 to 10000 ms
Pulse: 1 to 32,767,000 pps
μm: 1 to 32,767, 000 μm/s
Inch: 0.001 to 32,767.000 inch/s
degree:0.001 to 32,767.000 rev/s
Operation diagram
8-3
Operations of each contact
• The BUSY flag (FPΣ: X118, FP2: X18) indicating the state that a motor is running turns on when the
position control started, and it turns off when the operation completed.
• The operation done flag (FPΣ: X120, FP2: X20) indicating the state that an operation completed turns
on when the position control completed, and it will be held until any operation among the position
control, JOG operation, home return and pulser operation starts. The timing of that the flag turns on is
at the time that the current value of the AMP became within the completion width specified in the
parameter setting of the Configurator PM after sending the command to move to the target position.
Sample program
Precautions on programming
• If any value such as a movement amount, acceleration time, deceleration time or target speed is out of
the specified range, a setting value error will occur when the position control starts.
• The number of the startup contact and flag varies depending on the number of axes and the installation
position.
• The specified slot number varies depending on the installation position of the unit.
Operation at limit input
Condition
When E point control is
executed
During E point control
8-4
Direction
Forward
Reverse
Forward
Reverse
Limit status
Limit input(+):ON
Limit input (-):ON
Limit input(+):ON
Limit input (-):ON
Limit input(+):ON
Limit input (-):ON
Operation
Not executable, Error occurs.
Not executable, Error occurs.
Not executable, Error occurs.
Not executable, Error occurs.
Deceleration stop, Error occurs.
Deceleration stop, Error occurs.
8.1.2 Setting and Operation of P Point Control
The example below is the case of a single axis control when using the FPΣ with the positioning unit
RTEX installed in the slot 0. The movement amount setting is the increment method, and the unit is set
to pulse. When using the FP2, change the contact and flag numbers appropriately.
Setting
The parameters necessary for the setting of the positioining data and parameters are specified by the
Configurator PM. The unit is set to pulse.
Setting example
Item
Allowable range
Table 1
Table 2
Table 3
Operation
pattern
Control
method
X-axis
movement
amount
Acceleration/
deceleration
pattern
Acceleration
time (ms)
Deceleration
time (ms)
Target speed
P: Pass
point
I:
Increment
P: Pass
point
I:
Increment
E: End
point
I:
Increment
C: Continuance point E: End point P: Pass point
I: Increment A: Absolute
5000
pulses
10000
pulses
3000
pulses
Pulse: -1,073,741,823 to 1,073,741,823 pulse
μm (0.1 μm): -107,374,182.3 to 107,374,182.3 μm
μm (1 μm): -1,073,741,823 to 1,073,741,823 μm
inch (0.00001 inch): -10,737.41823 to 10,737.41823 inch
inch (0.0001 inch): -107,374.1823 to 1-7,374.1823 inch
degree (0.1 degree): -107,374,182.3 to 107,374,182.3 degree
degree (1 degree): -1,073,741,823 to 1,073,741,823 degree
L: Linear
L: Linear
L: Linear
L: Linear S: S-shaped acceleration/deceleration
100 ms
200 ms
30 ms
0 to 10000 ms
10 ms
20 ms
150 ms
0 to 10000 ms
5000 pps
Pulse: 1 to 32,767,000 pps
μm: 1 to 32,767, 000 μm/s
Inch: 0.001 to 32,767.000 inch/s
degree:0.001 to 32,767.000 rev/s
10000 pps
20000 pps
Operation diagram
8-5
Operations of each contact
• The BUSY flag (FPΣ: X118, FP2: X18) indicating the state that a motor is running turns on when the
position control started, and it turns off when the operation completed.
• The operation done flag (FPΣ: X120, FP2: X20) indicating the state that an operation completed turns
on when the position control completed, and it will be held until any operation among the position
control, JOG operation, home return and pulser operation starts. The timing of that the flag turns on is
at the time that the current value of the AMP became within the completion width specified in the
parameter setting of the Configurator PM after sending the command to move to the target position.
Sample program
Precautions on programming
• Once starting the table 1, the operation continues up to the table 3 automatically. The last table should
be set to E: End point.
• If any value such as a movement amount, acceleration time, deceleration time or target speed is out of
the specified range, a setting value error will occur when the position control starts.
• The number of the startup contact and flag varies depending on the number of axes and the installation
position.
• The specified slot number varies depending on the installation position of the unit.
Operation at limit input
Condition
When P point control is
executed
During P point control
8-6
Direction
Forward
Reverse
Forward
Reverse
Limit status
Limit input(+):ON
Limit input (-):ON
Limit input(+):ON
Limit input (-):ON
Limit input(+):ON
Limit input (-):ON
Operation
Not executable, Error occurs.
Not executable, Error occurs.
Not executable, Error occurs.
Not executable, Error occurs.
Deceleration stop, Error occurs.
Deceleration stop, Error occurs.
8.1.3 Setting and Operation of C Point Control
The example below is the case of a single axis control when using the FPΣ with the positioning unit
RTEX installed in the slot 0. The movement amount setting is the increment method, and the unit is set
to pulse. When using the FP2, change the contact and flag numbers appropriately.
Setting
The parameters necessary for the setting of the positioining data and parameters are specified by the
Configurator PM. The unit is set to pulse.
Setting example
Item
Allowable range
Table 1
Table 2
Table 3
Operation
pattern
Control
method
X-axis
movement
amount
Acceleration/
deceleration
pattern
Acceleration
time (ms)
Deceleration
time (ms)
Target speed
C:
Continuance point
I:
Increment
C:
Continuan
ce point
I:
Increment
E: End
point
C: Continuance point E: End point P: Pass point
I:
Increment
I: Increment A: Absolute
5000
pulses
10000
pulses
3000
pulses
Pulse: -1,073,741,823 to 1,073,741,823 pulse
μm (0.1 μm): -107,374,182.3 to 107,374,182.3 μm
μm (1 μm): -1,073,741,823 to 1,073,741,823 μm
inch (0.00001 inch): -10,737.41823 to 10,737.41823 inch
inch (0.0001 inch): -107,374.1823 to 1-7,374.1823 inch
degree (0.1 degree): -107,374,182.3 to 107,374,182.3 degree
degree (1 degree): -1,073,741,823 to 1,073,741,823 degree
L: Linear
L: Linear
L: Linear
L: Linear S: S-shaped acceleration/deceleration
100 ms
200 ms
30 ms
0 to 10000 ms
10 ms
20 ms
150 ms
0 to 10000 ms
10000 pps
20000 pps
5000 pps
Pulse: 1 to 32,767,000 pps μm: 1 to 32,767, 000 μm/s
Inch: 0.001 to 32,767.000 inch/s degree:0.001 to 32,767.000
rev/s
Operation diagram
8-7
Operations of each contact
• The BUSY flag (FPΣ: X118, FP2: X18) indicating the state that a motor is running turns on when the
position control started, and it turns off when the operation completed.
• The operation done flag (FPΣ: X120, FP2: X20) indicating the state that an operation completed turns
on when the position control completed, and it will be held until any operation among the position
control, JOG operation, home return and pulser operation starts. The timing of that the flag turns on is
at the time that the current value of the AMP became within the completion width specified in the
parameter setting of the Configurator PM after sending the command to move to the target position.
Sample program
Precautions on programming
• Once starting the table 1, the operation continues up to the table 3 automatically. The last table should
be set to E: End point.
• If any value such as a movement amount, acceleration time, deceleration time or target speed is out of
the specified range, a setting value error will occur when the position control starts.
• The number of the startup contact and flag varies depending on the number of axes and the installation
position.
• The specified slot number varies depending on the installation position of the unit.
Operation at limit input
Condition
When C point control is
executed
During C point control
8-8
Direction
Forward
Reverse
Forward
Reverse
Limit status
Limit input(+):ON
Limit input (-):ON
Limit input(+):ON
Limit input (-):ON
Limit input(+):ON
Limit input (-):ON
Operation
Not executable, Error occurs.
Not executable, Error occurs.
Not executable, Error occurs.
Not executable, Error occurs.
Deceleration stop, Error occurs.
Deceleration stop, Error occurs.
8.2 Interpolation Control
Type of perations
For the interpolation control, there are 2-axis linear interpolation control, 2-axis circular interpolation
control, 3-axis linear interpolation control, and 3-axis spiral interpolation control. The following methods
are available to specify the operation of each interpolation control. Select any of them as usage. The
axes in the relation of an interpolation are called X axis and Y axis for the 2-axis interpolation, and are
called X axis, Y axis and Z axis for the 3-axis interpolation.
In each interpolation control, the E point control tha tuses one table, P point control and C point control
that uses multiple tables can be combined arbitrarily as positioning data.
For example, using the P point control enables the continuous interpolation control from the 2-axis linear
control to the 2-axis circular interpolation control. The acceleration time and deceleration time can be
specified individually. For the P point control and C point control, the E point should be set as the last
table.
Type
2-axis
linear
interpolati
on control
2-axis
circular
interpolati
on control
3-axis
linear
interpolati
on control
3-axis
spiral
interpolati
on control
Operation specification method
Necessary data
Composite speed
Composite speed of X axis and Y axis
Long axis speed
Speed of long axis (Axis of which moving
distance is long)
Center point/CW direction
X-axis and Y-axis coordinate of center point
Center point/CCW direcvtion
X-axis and Y-axis coordinate of center point
Pass point
X-axis and Y-axis coordinate of pass point on arc
Composite speed
Composite speed of X axis and Y axis
Long axis speed
Speed of long axis (Axis of which moving
distance is long)
Center point/CW direction/
X-axis movement
Center point/CCW direction/
X-axis movement
Center point/CW direction/
Y-axis movement
Center point/CCW direction/
Y-axis movement
Center point/CW direction/
Z-axis movement
Center point/CCW direction/
Z-axis movement
Pass point/X-axis movement
Pass point/Y-axis movement
Pass point/Z-axis movement
Y-axis and Z-axis coordinate of center point
Y-axis and Z-axis coordinate of center point
X-axis and Z-axis coordinate of center point
X-axis and Z-axis coordinate of center point
X-axis and Y-axis coordinate of center point
X-axis and Y-axis coordinate of center point
Y-axis and Z-axis coordinate of pass point on arc
X-axis and Z-axis coordinate of pass point on arc
Y-axis and Z-axis coordinate of pass point on arc
8-9
8-10
When the X axis and Y axis is the moving axes, each axis in the above diagram is replaced.
8-11
8.2.1 Setting and Operation of Two-Axis Linear Interpolation
The example below is the case of a single axis control when using the FPΣ with the positioning unit
RTEX installed in the slot 0. The X axis is set to the 1st axis and the Y axis is set to the 2nd axis. The
movement amount setting is the increment method, and the unit is set to pulse. When using the FP2,
change the contact and flag numbers appropriately.
Setting
The parameters necessary for the setting of the positioining data and parameters are specified by the
Configurator PM. The unit is set to pulse.
Item
Setting example
Allowable range
Operation pattern
E: End point
Interpolation operation
0: Linear
(Composite speed)
Control method
X-axis movement
amount
X-axis auxiliary point
Y-axis movement
amount
Y-axis auxiliary point
I: Increment
10000 pulses
0
5000 pulses
0
C: Continuance point E: End point P: Pass point
0: Linear (Composite speed) 1: Linear (Long axis speed)
S: Circular (Pass point/CW direction)
T: Circular (Pass point/CCW direction U: Circular (Pass point)
I: Increment A: Absolute
Pulse: -1,073,741,823 to 1,073,741,823 pulse
μm (0.1 μm): -107,374,182.3 to 107,374,182.3 μm
μm (1 μm): -1,073,741,823 to 1,073,741,823 μm
inch (0.00001 inch): -10,737.41823 to 10,737.41823 inch
inch (0.0001 inch): -107,374.1823 to 1-7,374.1823 inch
degree (0.1 degree): -107,374,182.3 to 107,374,182.3 degree
degree (1 degree): -1,073,741,823 to 1,073,741,823 degree
Acceleration/
deceleration pattern
Acceleration time (ms)
Deceleration time (ms)
L: Linear
L: Linear S: S-shaped acceleration/deceleration
100 ms
100 ms
Interpolation speed
10000 pps
0 to 10000 ms
0 to 10000 ms
Pulse: 1 to 32,767,000 pps μm: 1 to 32,767, 000 μm/s
Inch: 0.001 to 32,767.000 inch/s degree:0.001 to 32,767.000 rev/s
Operation diagram
8-12
Operations of each contact
• The BUSY flag for the axis 1 and 2 (FPΣ: X118, X119, FP2: X18, X19) indicating the state that a motor
is running turns on when the position control started, and it turns off when the operation completed.
• The operation done flag for the axis 1 and 2 (FPΣ: X120, X121, FP2: X20, X21) indicating the state that
an operation completed turns on when the position control completed, and it will be held until any
operation among the position control, JOG operation, home return and pulser operation starts. The
timing of that the flag turns on is at the time that the current value of the AMP became within the
completion width specified in the parameter setting of the Configurator PM after sending the command
to move to the target position.
Sample program
Precautions on programming
• To start the interpolation control, turn on the positioning start contact of the axis with the smallest
number in the same group.
• The values of the X-axis auxiliary point and Y-axis auxiliary point are invalide for the linear interpolation.
• When setting the long axis speed, the composite speed is faster than the long axis speed.
• If any value such as a movement amount, acceleration time, deceleration time or target speed is out of
the specified range, a setting value error will occur when the position control starts.
• The number of the startup contact and flag varies depending on the number of axes and the installation
position.
• The specified slot number varies depending on the installation position of the unit.
8-13
8.2.2 Setting and Operation of Two-Axis Circular Interpolation
The example below is the case of a single axis control when using the FPΣ with the positioning unit
RTEX installed in the slot 0. The X axis is set to the 1st axis and the Y axis is set to the 2nd axis. The
movement amount setting is the increment method, and the unit is set to pulse. When using the FP2,
change the contact and flag numbers appropriately.
Setting
The parameters necessary for the setting of the positioining data and parameters are specified by the
Configurator PM. The unit is set to pulse.
Item
Setting example
Allowable range
Operation pattern
E: End point
Interpolation operation
S: Circular (Pass
point/CW direction)
Control method
X-axis movement
amount
X-axis auxiliary point
Y-axis movement
amount
Y-axis auxiliary point
I: Increment
0 pulse
0 pulse
20000 pulses
10000 pulses
C: Continuance point E: End point P: Pass point
0: Linear (Composite speed) 1: Linear (Long axis speed)
S: Circular (Pass point/CW direction)
T: Circular (Pass point/CCW direction U: Circular (Pass point)
I: Increment A: Absolute
Pulse: -1,073,741,823 to 1,073,741,823 pulse
μm (0.1 μm): -107,374,182.3 to 107,374,182.3 μm
μm (1 μm): -1,073,741,823 to 1,073,741,823 μm
inch (0.00001 inch): -10,737.41823 to 10,737.41823 inch
inch (0.0001 inch): -107,374.1823 to 1-7,374.1823 inch
degree (0.1 degree): -107,374,182.3 to 107,374,182.3 degree
degree (1 degree): -1,073,741,823 to 1,073,741,823 degree
Acceleration/
deceleration pattern
Acceleration time (ms)
Deceleration time (ms)
L: Linear
L: Linear S: S-shaped acceleration/deceleration
100 ms
100 ms
Interpolation speed
10000 pps
0 to 10000 ms
0 to 10000 ms
Pulse: 1 to 32,767,000 pps μm: 1 to 32,767, 000 μm/s
Inch: 0.001 to 32,767.000 inch/s degree:0.001 to 32,767.000 rev/s
Operation diagram
8-14
Operations of each contact
• The BUSY flag for the axis 1 and 2 (FPΣ: X118, X119, FP2: X18, X19) indicating the state that a motor
is running turns on when the position control started, and it turns off when the operation completed.
• The operation done flag for the axis 1 and 2 (FPΣ: X120, X121, FP2: X20, X21) indicating the state that
an operation completed turns on when the position control completed, and it will be held until any
operation among the position control, JOG operation, home return and pulser operation starts. The
timing of that the flag turns on is at the time that the current value of the AMP became within the
completion width specified in the parameter setting of the Configurator PM after sending the command
to move to the target position.
Sample program
Precautions on programming
• To start the interpolation control, turn on the positioning start contact of the axis with the smallest
number in the same group.
• In case of the center point specification, the X-axis auxiliary point is the center point of X axis, and the
Y-axis auxiliary point is the center point of Y axis. In case of the pass point, each pass point is set as
the pass point of X axis and Y axis.
• When the control method is increment, both the center point and pass point are the increment
coordinatefrom the start point.
• When the start point and the operaton done point is the same, it performs one circular operation when
using the center point method. However, when using the pass point method, an error occurs.
• In case of the pass point method, when the start point, pass point and operation done pont exsit in the
same straight line, an arc is not comprised, and an error occurs.
• When setting the long axis speed, the composite speed is faster than the long axis speed.
• If any value such as a movement amount, acceleration time, deceleration time or target speed is out of
the specified range, a setting value error will occur when the position control starts.
• The number of the startup contact and flag varies depending on the number of axes and the installation
position.
• The specified slot number varies depending on the installation position of the unit.
8-15
8.2.3 Setting and Operation of Three-Axis Linear Interpolation
The example below is the case of a single axis control when using the FPΣ with the positioning unit
RTEX installed in the slot 0. The X axis is set to the 1st axis and the Y axis is set to the 2nd axis. The
movement amount setting is the increment method, and the unit is set to pulse. When using the FP2,
change the contact and flag numbers appropriately.
Setting
The parameters necessary for the setting of the positioining data and parameters are specified by the
Configurator PM. The unit is set to pulse.
Setting
Item
Allowable range
example
Operation pattern
E: End point
Interpolation operation
0: Linear
(Composite
speed)
Control method
X-axis movement amount
X-axis auxiliary point
Y-axis movement amount
Y-axis auxiliary point
Z-axis movement amount
I: Increment
10000 pulses
0
5000 pulses
0
20000 pulses
Z-axis auxiliary point
0
C: Continuance point E: End point P: Pass point
0: Linear (Composite speed) 1: Linear (Long axis speed)
A: Spiral (Center point/CW direction/X-axis movemet)
B: Spiral (Center point/CCW direction/X-axis movemet)
C: Spiral (Center point/CW direction/Y-axis movemet)
D: Spiral (Center point/CCW direction/Y-axis movemet)
E: Spiral (Center point/CW direction/Z-axis movemet)
F: Spiral (Center point/CCW direction/Z-axis movemet)
L: Spiral (Pass point/X-axis movement)
M: Spiral (Pass point/Y-axis movement)
N: Spiral (Pass point/Z-axis movement)
I: Increment A: Absolute
Pulse: -1,073,741,823 to 1,073,741,823 pulse
μm (0.1 μm): -107,374,182.3 to 107,374,182.3 μm
μm (1 μm): -1,073,741,823 to 1,073,741,823 μm
inch (0.00001 inch): -10,737.41823 to 10,737.41823 inch
inch (0.0001 inch): -107,374.1823 to 1-7,374.1823 inch
degree (0.1 degree): -107,374,182.3 to 107,374,182.3 degree
degree (1 degree): -1,073,741,823 to 1,073,741,823 degree
Acceleration/
deceleration pattern
Acceleration time (ms)
Deceleration time (ms)
L: Linear
L: Linear S: S-shaped acceleration/deceleration
100 ms
100 ms
Interpolation speed
10000 pps
0 to 10000 ms
0 to 10000 ms
Pulse: 1 to 32,767,000 pps μm: 1 to 32,767, 000 μm/s
Inch: 0.001 to 32,767.000 inch/s degree:0.001 to 32,767.000 rev/s
8-16
Operation diagram
Operations of each contact
• The BUSY flag for the axes 1, 2 and 3 (FPΣ: X118, X119, X11A, FP2: X18, X19, X1A) indicating the
state that a motor is running turns on when the position control started, and it turns off when the
operation completed.
• The operation done flag for the axes 1, 2 and 3 (FPΣ: X120, X121, X122, FP2: X20, X21, X22)
indicating the state that an operation completed turns on when the position control completed, and it
will be held until any operation among the position control, JOG operation, home return and pulser
operation starts. The timing of that the flag turns on is at the time that the current value of the AMP
became within the completion width specified in the parameter setting of the Configurator PM after
sending the command to move to the target position.
8-17
Sample program
Precautions on programming
• To start the interpolation control, turn on the positioning start contact of the axis with the smallest
number in the same group.
• The values of the X-axis auxiliary point and Y-axis auxiliary point are invalide for the linear interpolation.
• When setting the long axis speed, the composite speed is faster than the long axis speed.
• If any value such as a movement amount, acceleration time, deceleration time or target speed is out of
the specified range, a setting value error will occur when the position control starts.
• The number of the startup contact and flag varies depending on the number of axes and the installation
position.
• The specified slot number varies depending on the installation position of the unit.
8-18
8.2.4 Setting and Operation of Three-Axis Linear Interpolation
The example below is the case of a single axis control when using the FPΣ with the positioning unit
RTEX installed in the slot 0. The X axis is set to the 1st axis and the Y axis is set to the 2nd axis. The
movement amount setting is the increment method, and the unit is set to pulse. When using the FP2,
change the contact and flag numbers appropriately.
Setting
The parameters necessary for the setting of the positioining data and parameters are specified by the
Configurator PM. The unit is set to pulse.
Setting
Item
Allowable range
example
Operation pattern
E: End point
Interpolation operation
E: Spiral
(Center point/CW
direction/Z-axis
movement)
Control method
X-axis movement amount
X-axis auxiliary point
Y-axis movement amount
Y-axis auxiliary point
Z-axis movement amount
I: Increment
0 pulse
0 pulse
20000 pulses
10000 pulses
5000 pulses
Z-axis auxiliary point
0
C: Continuance point E: End point P: Pass point
0: Linear (Composite speed) 1: Linear (Long axis speed)
A: Spiral (Center point/CW direction/X-axis movemet)
B: Spiral (Center point/CCW direction/X-axis movemet)
C: Spiral (Center point/CW direction/Y-axis movemet)
D: Spiral (Center point/CCW direction/Y-axis movemet)
E: Spiral (Center point/CW direction/Z-axis movemet)
F: Spiral (Center point/CCW direction/Z-axis movemet)
L: Spiral (Pass point/X-axis movement)
M: Spiral (Pass point/Y-axis movement)
N: Spiral (Pass point/Z-axis movement)
I: Increment A: Absolute
Pulse: -1,073,741,823 to 1,073,741,823 pulse
μm (0.1 μm): -107,374,182.3 to 107,374,182.3 μm
μm (1 μm): -1,073,741,823 to 1,073,741,823 μm
inch (0.00001 inch): -10,737.41823 to 10,737.41823 inch
inch (0.0001 inch): -107,374.1823 to 1-7,374.1823 inch
degree (0.1 degree): -107,374,182.3 to 107,374,182.3 degree
degree (1 degree): -1,073,741,823 to 1,073,741,823 degree
Acceleration/
deceleration pattern
Acceleration time (ms)
Deceleration time (ms)
L: Linear
L: Linear S: S-shaped acceleration/deceleration
100 ms
100 ms
Interpolation speed
10000 pps
0 to 10000 ms
0 to 10000 ms
Pulse: 1 to 32,767,000 pps μm: 1 to 32,767, 000 μm/s
Inch: 0.001 to 32,767.000 inch/s degree:0.001 to 32,767.000 rev/s
8-19
Operation diagram
Operations of each contact
• The BUSY flag for the axes 1, 2 and 3 (FPΣ: X118, X119, X11A, FP2: X18, X19, X1A) indicating the
state that a motor is running turns on when the position control started, and it turns off when the
operation completed.
• The operation done flag for the axes 1, 2 and 3 (FPΣ: X120, X121, X122, FP2: X20, X21, X22)
indicating the state that an operation completed turns on when the position control completed, and it
will be held until any operation among the position control, JOG operation, home return and pulser
operation starts. The timing of that the flag turns on is at the time that the current value of the AMP
became within the completion width specified in the parameter setting of the Configurator PM after
sending the command to move to the target position.
8-20
Sample program
Precautions on programming
• For X-Y plane, in case of the center point specification, the X-axis auxiliary point is the center point of X
axis, and the Y-axis auxiliary point is the center point of Y axis. In case of the pass point, each pass
point is set as the pass point of X axis and Y axis. These settings are the same for Y-Z plane and X-Z
plane.
• When the control method is increment, both the center point and pass point are the increment
coordinatefrom the start point.
• When the start point and the operaton done point is the same, it performs one circular operation when
using the center point method. However, when using the pass point method, an error occurs.
• In case of the pass point method, when the start point, pass point and operation done pont exsit in the
same straight line, an arc is not comprised, and an error occurs.
• When setting the long axis speed, the composite speed is faster than the long axis speed.
• If any value such as a movement amount, acceleration time, deceleration time or target speed is out of
the specified range, a setting value error will occur when the position control starts.
• The number of the startup contact and flag varies depending on the number of axes and the installation
position.
• The specified slot number varies depending on the installation position of the unit.
8-21
8-22
Chapter 9
Manual Operation (JOG Operation)
9.1 Setting and Operation of Home Return
The example below is a case when using the FPΣ with the positioning unit RTEX installed in the slot 0.
The unit is set to pulse. When using the FP2, change the contact and flag numbers appropriately.
Setting
The parameters necessary for the setting of the JOG operation are specified by the Configurator PM.
The unit is set to pulse.
Item
Setting example
Allowable range
Acceleration/deceleration pattern
0: Linear acceleration/deceleration
Acceleration time (ms)
Deceleration time (ms)
100 ms
100 ms
Target speed
10000 pps
0: Linear acceleration/deceleration
1: S-shaped acceleration/deceleration
0 to 10000 ms
0 to 10000 ms
Pulse: 1 to 32,767,000 pps
μm: 1 to 32,767, 000 μm/s
Inch: 0.001 to 32,767.000 inch/s
degree:0.001 to 32,767.000 rev/s
Operation diagram
Operations of each contact
• The BUSY flag (FPΣ: X118, FP2: X18) indicating the state that a motor is running turns on when the
JOG operation started, and it turns off when the operation completed.
• The operation done flag (FPΣ: X120, FP2: X20) indicating the state that an operation completed turns
on when the JOG operation completed, and it will be held until any operation among the position
control, JOG operation, home return and pulser operation starts. The timing of that the flag turns on is
at the time that the current value of the AMP became within the completion width specified in the
parameter setting of the Configurator PM after sending the command to move to the stop position of
the JOG operation.
9-2
Sample program
Precautions on programming
• The number of the startup contact and flag varies depending on the number of axes and the installation
position.
• The specified slot number varies depending on the installation position of the unit.
Operation at limit input
Condition
When JOG operation is
executed
During JOG operation
Direction
Forward
Reverse
Forward
Reverse
Limit status
Limit input(+):ON
Limit input (-):ON
Limit input(+):ON
Limit input (-):ON
Limit input(+):ON
Limit input (-):ON
Operation
Not executable, Error occurs.
Executable
Executable
Not executable, Error occurs.
Deceleration stop, Error occurs.
Deceleration stop, Error occurs.
9-3
9.2 Changing the Speed During JOG Operation
The target speed can be changed during the JOG operation.
Setting
The parameters necessary for the setting of the JOG operation are specified by the Configurator PM.
The unit is set to pulse.
Item
Setting example
Allowable range
Acceleration/deceleration pattern
0: Linear acceleration/deceleration
Acceleration time 1 (ms)
Deceleration time 1 (ms)
100 ms
50 ms
Target speed 1
10000 pps
Acceleration time 2 (ms)
Deceleration time 2 (ms)
200 ms
150 ms
Target speed 2
20000 pps
0: Linear acceleration/deceleration
1: S-shaped acceleration/deceleration
0 to 10000 ms
0 to 10000 ms
Pulse: 1 to 32,767,000 pps
μm: 1 to 32,767, 000 μm/s
Inch: 0.001 to 32,767.000 inch/s
degree:0.001 to 32,767.000 rev/s
0 to 10000 ms
0 to 10000 ms
Pulse: 1 to 32,767,000 pps
μm: 1 to 32,767, 000 μm/s
Inch: 0.001 to 32,767.000 inch/s
degree:0.001 to 32,767.000 rev/s
Operation diagram
Operations of each contact
• The BUSY flag (FPΣ: X118, FP2: X18) indicating the state that a motor is running turns on when the
JOG operation started, and it turns off when the operation completed.
• The operation done flag (FPΣ: X120, FP2: X20) indicating the state that an operation completed turns
on when the JOG operation completed, and it will be held until any operation among the position
control, JOG operation, home return and pulser operation starts. The timing of that the flag turns on is
at the time that the current value of the AMP became within the completion width specified in the
parameter setting of the Configurator PM after sending the command to move to the stop position of
the JOG operation.
9-4
Sample program
Precautions on programming
• As the acceleration time and deceleration time will be retrieved when the speed is changed during the
JOG operation, the acceleration/deceleration speed can be changed.
• The number of the startup contact and flag varies depending on the number of axes and the installation
position.
• The specified slot number varies depending on the installation position of the unit.
9-5
9-6
Chapter 10
Manual Operation (Home Return)
10.1 Setting and Operation of Home Return
The example below is a case when using the FPΣ with the positioning unit RTEX installed in the slot 0.
The unit is set to pulse. When using the FP2, change the contact and flag numbers appropriately.
Setting
The parameters necessary for the setting of the home return are specified by the Configurator PM. The
unit is set to pulse.
Item
Setting example
Allowable range
Return setting
Return direction
Acceleration time (ms)
Deceleration time (ms)
0: Near point dog type
0: Limit (-) direction
100 ms
100 ms
Target speed
10000 pps
Return creep speed
1000 pps
0: Near point dog type
0: Limit (-) direction 1: Limit (+) direction
0 to 10000 ms
0 to 10000 ms
Pulse: 1 to 32,767,000 pps
μm: 1 to 32,767, 000 μm/s
Inch: 0.001 to 32,767.000 inch/s
degree:0.001 to 32,767.000 rev/s
Operation diagram
Operations of each contact
• The BUSY flag (FPΣ: X118, FP2: X18) indicating the state that a motor is running turns on when the
home return started, and it turns off when the operation completed.
• The home return done flag (FPΣ: X128, FP2: X28) indicating the state that an operation completed
turns on when the home return operation completed, and it will be held until any operation among the
position control, JOG operation, home return and pulser operation starts. The timing of that the flag
turns on is at the time that the home return operation completed.
10-2
Sample program
Precautions on programming
• The number of the startup contact and flag varies depending on the number of axes and the installation
position.
• The specified slot number varies depending on the installation position of the unit.
Operation at limit input
Condition
When Home return operation
is executed
During Home return operation
Direction
Forward
Reverse
Forward
Reverse
Limit status
Limit input(+):ON
Limit input (-):ON
Limit input(+):ON
Limit input (-):ON
Limit input(+):ON
Limit input (-):ON
Operation
Executable
Executable
Executable
Executable
Automatic reverse operaiton
Automatic reverse operaiton
10-3
10-4
Chapter 11
Manual Operation (Pulser Operation)
11.1 Setting and Operation of Pulser Operation
The example below is a case when using the FPΣ with the positioning unit RTEX installed in the slot 0.
The unit is set to pulse. When using the FP2, change the contact and flag numbers appropriately.
Setting
The parameters necessary for the setting of the pulser operation are specified by the Configurator PM.
The unit is set to pulse.
Item
Setting example
Allowable range
Operation setting code
0: Pulser 1
0: Pulser 1, 1: Pulser 2, 2: Pulser 3
Pulser operation ratio numerator
2
1 to 32,767
Pulser operation ratio denominator
1
1 to 32,767
Operation diagram
Operations of each contact
• The BUSY flag (FPΣ: X118, FP2: X18) indicating the state that a motor is running turns on when a
pulser operation enabled contact turned on, and it turns off when the pulser operation enabled contact
turned off.
• The operation done flag (FPΣ: X120, FP2: X20) indicating the state that an operation completed turns
on when an pulser operation enabled contact turned off, and it will be held until any operation among
the position control, JOG operation, Home return and pulser operation starts.
11-2
Sample program
Precautions on programming
• The movement amount per an 1-pulse signal from the pulser can be changed by setting the ratio
numerator and ratio denominator for the input signal of the pulser.
• The number of the startup contact and flag varies depending on the number of axes and the installation
position.
• The specified slot number varies depending on the installation position of the unit.
Operation at limit input
Condition
Direction
Forward
When Pulser operation is
executed
Limit status
Limit input(+):ON
Limit input (-):ON
Limit input(+):ON
Reverse
Limit input (-):ON
Forward
Limit input(+):ON
Reverse
Limit input (-):ON
During Pulser operation
Operation
Not executable,
Limit error occurs.
Executable
Executable
Not executable,
Limit error occurs.
Deceleration stop,
Limit error occurs.
Deceleration stop,
Limit error occurs.
11-3
11-4
Chapter 12
Stop Functions
12.1 Settings and Operations of Stop Functions
Following stop functions are available during operations. Each deceleration time can be set individually.
Set the deceleration time according to each occurrence condition of the stop operation.
Name
Deceleration stop
Emergency stop
Limit stop
Software limit stop
Error stop
System stop
Occurrence condition
when the deceleration
stop contact turns on
when the emergency stop
contact turns on
when the input of limit
switch turns on
when exceeding the range
of the software limit
when an error occurred
when the system stop
contact turns on
Operation
Decelerate and stop
Time until stop
Deceleration condtion for
the control being
operated.
Decelerate and stop
Can be set individually.
Decelerate and stop
Can be set individually.
Decelerate and stop
Same as limit stop.
Decelerate and stop
Stop without
deceleraiton time
Can be set individually.
0
Refer to the following table for the stop by turning contacts on. It indicates the allocated I/O when the
FPΣ/FP2 positioning unit RTEX is installed in the slot 0.
Target
axis
Name
Y100
Y80
All axes System stop
Y130
Y131
Y132
Y133
Y134
Y135
Y136
Y137
Y138
Y139
Y13A
Y13B
Y13C
Y13D
Y13E
Y13F
Y110
Y111
Y112
Y113
Y114
Y115
Y116
Y117
Y118
Y119
Y11A
Y11B
Y11C
Y11D
Y11E
Y11F
1 axis
2 axis
3 axis
4 axis
5 axis
6 axis
7 axis
8 axis
1 axis
2 axis
3 axis
4 axis
5 axis
6 axis
7 axis
8 axis
12-2
WY11
WY13
Contact allocation
FPΣ
FP2
Emergency stop
Descriptions
Contact for requesting the system stop. When it turns on, all
axes will stop with 0-deceleration time.
Requests the emergency stop for the corresponding AMP.
The deceleration time for the emegency stop is specified by
Configurator PM or the emergency stop setting in the shared
memory.
(The operation is the level type.)
Note) The deviation counter cannot be cleared.
Deceleration stop
Requests the deceleration stop for the corresponding AMP.
The deceleration time for the deceleration stop is specified by
Configurator PM or the deceleration stop setting in the shared
memory.
(The operation is the level type.)
Note) The deviation counter cannot be cleared.
Chapter 13
Supplementary Functions
13.1 Dwell Time
The time taken until the next operation after the completion of an executed positioning table in the
automatic operation is called dwell time.
The operations of the dwell time vary according to control methods slightly. Followings are the
operations in each control method.
For E point control
The dwell time is the time taken from the completion of the position command until the operation done
flag turns on.
For P point control
In the P point control, the positioning table operates consecutively, therefore, the dwell time is ignored.
For the last table (E point), as well as the E point control, the dwell time is the time taken from the
completion of the position command until the operation done flag turns on.
For C point control
The dwell time is the waiting time for executing the next table from the completion of the positioning
talble (deceleraiton stop).
For the last table (E point), as well as the E point control, the dwell time is the time taken from the
completion of the position command until the operation done flag turns on.
13-2
13.2 Software Limit
The system is designed to mechanically set the limit (+) and limit (-) to restrict the moving range of a
motor.
Separately from the mechanical limits (+) and (-), the software limit is a function to add the limits for the
absolute coordinate managed within the positioning unit RTEX. As the software limit is a function for the
protection of the motor and AMP, it is recommended to set them to the values within the range of the
mechanical limits (+) and (-) as below.
When exceeding the setting range of the software limit (upper and lower limit values), an error occurs,
and the deceleration stop is executed. It is necessary to clear the erro and move the motor into the range
of the softwarelimit using an operation such as JOG operation after the stop.
Whether the software limit is set to be available or not can be specified individually for the positioning
control, JOG operation and home return each. For example, it is possible to set the limit software to be
invalid only in the home return operation.
13-3
13.3 Torque Limit
The positioning unit RTEX supports a function (torque limit) to change the maximum torque for the AMP
in real time. The torque limit can be arbitrarily changed during the torque limit operaiton, however, note
that the torque cannot be changed in the home return operation.
The specified torque limit value is used as the maximum torque during the torque limit operation. Also,
the torque limit cannot be specified by the setting tool, Configurator PM. Data must be written into the
shared memory from the PLC in order to carry out the torque limit. Followings are the details of the
shared memory to carry out the torque limit.
Torque limit setting area (Shared memory, Bank 0)
Address
0D8H
Name
Torque limit enabled flag
Descriptions
Sets whehter to enable or disable the
execution of the torque limit for each axis.
Default
Setting
value
range
Unit
0H
0D9H
to
Not used
0DFH
0E0H
Torque limit value of axis 1
Stores the torque limit value of axis 1.
3000
1 to 5000
0.1 %
0E1H
Torque limit value of axis 2
Stores the torque limit value of axis 2.
3000
1 to 5000
0.1 %
0E2H
Torque limit value of axis 3
Stores the torque limit value of axis 3.
3000
1 to 5000
0.1 %
0E3H
Torque limit value of axis 4
Stores the torque limit value of axis 4.
3000
1 to 5000
0.1 %
0E4H
Torque limit value of axis 5
Stores the torque limit value of axis 5.
3000
1 to 5000
0.1 %
0E5H
Torque limit value of axis 6
Stores the torque limit value of axis 6.
3000
1 to 5000
0.1 %
0E6H
Torque limit value of axis 7
Stores the torque limit value of axis 7.
3000
1 to 5000
0.1 %
0E7H
Torque limit value of axis 8
Stores the torque limit value of axis 8.
3000
1 to 5000
0.1 %
Torque limit enabled flag
bit
0
1
2
3
4
5
6
7
15 to 8
Name
Torque limit of axis 1
Torque limit of axis 2
Torque limit of axis 3
Torque limit of axis 4
Torque limit of axis 5
Torque limit of axis 6
Torque limit of axis 7
Torque limit of axis 8
-
Default value
0
0
0
0
0
0
0
0
-
Descriptions
0: Torque limit desabled (Default)
1: Torque limit enabled
-
Torque limit values of axes 1 to 8
bit
Name
15 to 0
Torque limit value
13-4
Default value
3000
Descriptions
Sets the torque limit value.
The unit is (0.1%).
If 2000 is written in this area, it operates with “2000 x 0.1
= 200 (%)” as the maximum torque.
13.4 Auxiliary Output Code and Auxiliary Output Contact
The auxiliary output contact is a function to inform about which table’s operation is performing when the
automatic operation (E point control, C point control, P point control) is executed.
The auxiliary output contact and the auxiliary output code can be used by setting the parameter “auxiliary
output mode” of each axis to the With mode.
Note that it is not available if the “auxiliary output mode” is not used.
Auxiliary output contact
When the automatic operation started, the auxiliary contact flag of the corresponding axis allocated to
I/O turns on. Also, the ON time of the auxiliary contact falg can be specified in the ms unit.
Auxiliary output data
The auxiliary output data (1 word) can be set for each table of the positioning data. The content of the
process currently carried out can be confirmed by setting the auxiliary output. The values in the auxiliary
output data are held until the next positioning table is executed. Also, the auxiliary output data that was
output just before the completion of the automatic operation is held.
13-5
13.5 Actual Speed/Torque Value Judgment
These are the functions that monitor the actual speed/torque of the AMP in real time and to give an error
or warning when the monitored values exceed the judgment values.
The judgment values for the actual speed and torque can be specified for axis each, and it is possible to
select either to give an error or warning.
When an error occurs, the oprationstops with the error stopdeceleration time, and the next operation
cannot be executed until performing the error clear.
When giving a warning, the warning is just informed, and the operation continues.
13-6
13.6 Imposition Flag and Completion Width
Imposition
The imposition flag is a flag to inform the imposition status of the AMP allocated to the I/O, and it turns
on when the position error of the corresponding axis is within the setting range speciifed in the AMP. It
does not relate to the control of the positioning RTEX. It is the imposiiton monitor of the AMP.
The imposition range must be directly specifieid in the AMP. Use the PANATERM that is a setting tool
for the AMP.
Note) The PANATERM is the setting tool software for the AMP manufactured by Matsushita Electric
Industrial Co., Ltd.
Completion width
It is used to set the timing to turn on the operaiton done flag allocated to the I/O of the positioning unit
RTEX.
The operation done flag turns when the current position is in the range of the +/- completion width
(pulse) of the target command position after the completion of the pulse output. The completion width is
monitored by the positioning unit RTEX unlike the position error of the AMP. Therefore, note that the
timing of which the imposition flag turns on may differ from the timing of which the operaiton done flag
turns on.
13-7
13.7 Home Change
The positionig unit RTEX manages the coordinate origin (default is 0). When the position command
method is set to “Absolute”, it operates as the position command for the coordinate origin.
The home change is a function to set the managed home position to an aubitrary coordinate positon.
Data must be written into the shared memory from the PLC in order to carry out the home change.
Followings are the details of the shared memory to carry out the home change.
Home change area (Shared memory, Bank 0)
address
Name
0C0H
Home change
request flag
0C8H
0C9H
0CAH
0CBH
0CCH
0CDH
0CEH
0CFH
0D0H
0D1H
0D2H
0D3H
0D4H
0D5H
0D6H
0D7H
Descriptions
Only when the corresponding bits fo reach axis changed to 1 from 0, the
coordinate origin managed in the positioning unit will be changed to the
following home change coordiates.
Afther the change, the positioning unit clear the corresponding bits to 0
automatically.
Home change
coordinate of axis 1
Stores the coordinate to change the original point of axis 1.
Home change
coordinate of axis 2
Stores the coordinate to change the original point of axis 2.
Home change
coordinate of axis 3
Stores the coordinate to change the original point of axis 3.
Home change
coordinate of axis 4
Stores the coordinate to change the original point of axis 4.
Home change
coordinate of axis 5
Stores the coordinate to change the original point of axis 5.
Home change
coordinate of axis 6
Stores the coordinate to change the original point of axis 6.
Home change
coordinate of axis 7
Stores the coordinate to change the original point of axis 7.
Home change
coordinate of axis 8
Stores the coordinate to change the original point of axis 8.
Procedures of home change
1. Write an coordinate to be the home in the home change coordinate area of the target axis.
2. Write the value at the time that the bit of the target axis set to 1 in the home change request flag area.
As the home change process is performed for the axis that is 1 in the home request flag area, do not
set any bit to 1 other than the target axis.
3. Execute the home return for the target axis to make the home change value valid. After the completion
of the home return, the operation is carried out with the coordinate specified in the above 1 as the
home position
13-8
Chapter 14
Precautions During Programming
14.1 Precautions During Programming
14.1.1 Turning Off Power Supply Clears Contents in Shared Memory
The data in the shared memory of the positioning unit RTEX is cleared when the power supply of the
PLC turns off. So, if you want to perform the positioning control with the current settings of the shared
memory the next time the power supply turns on, the positioning data should be written in the FROM
(flash memory) within the positioning unit RTEX.
When parameters and positioning data has been set using the Configurator PM, it is selectable whether
to store them in the FROM (flash memory) or not at the time of downloading to the positioning unit.
14.1.2 Once starting an Operation,
Once any start-up contact of the automatic operation (position control), manual operations (JOG
operation, home return, pulser operation) turns on and the operation starts, it will not change to another
operation even if the contact of the other contact turns on.
However, the stop operation (deceleration stop, emergency stop, system stop) can be executed during
other operations.
14-2
14.1.3 How to Use Standard Area and Extended Area of Positioning Data
When executing the automatic operation (position control) with the positioning unit RTEX, specify the
number of the positioning table that has been specified in advance, and start the position control. After
the start-up, the motor is automatically controlled according to the settings of the table. There are the
method that creates the positioning table using Configurator PM that is an exclusive setting tool, and the
other method that writes the positioning table in a prescribed address by ladder programs.
There are the standard area of 600 points that is specified by No. 1 to 600, and the extended area of 25
points that is specified by No. 10001 to 10025.
The standard area is used when the setting values of the positioning table are predetermined. It can be
set using Configurator PM, and can be rewritten from the ladder programs, too. However, if the
positioning table is changed by the ladder program, the caulculation is necessary to restructure the
positioning data before executing the automatic operation. This function enables to read the positioning
data of 600 points in advance and to prepare for the start-up within the positioning unit, and enables to
shorten the start-up time for the positioning. When using Configurator PM to download the positioning
data, the data is restructured automatically, so the calculation is not necessary. However, the calculation
is necessary after rewriting the poisitoning data from the ladder program. The procedures for the
calculation are as follows.
1. Change the positioning table in the shared memory.
2. Turn on the output contact Y_7 (recalculation request contact).
3. Confirm the input contact X_7 (recalculation done contact) is on (Confim the completion of the
recalculation.)
If the data is not recalculated after rewriting the positioning table by the ladder program, note that the
operation will be executed with the positioning table before the rewriting.
The extended area is used when the setting values of the positioning table cannot be determined until
just before executing the positioning operation. For example, in the application of alignment using an
image processing, the moving distance is determined by the image processing. Therefore, the
positioning table cannot be determined until just before sarting the positioning operation. In that case, the
positioning table is set just before the start-up of the positioning. In the extended area, the positioning
table can be rewritten as needed, and the recalculation is not necessary. However, it is up to 25 tables,
and Configurator PM cannot be used. The ladder programs should be used to write the positioning table
in the prescribed address in the shared memory. The start-up time is longer than the standard area, and
when performing the P point control or C point control in the extended area, note that the start-up time
varies depending on the number of tables to be executed consecutively.
How to use each area and the precautions are as below.
How to use
Standard
area
Extended
area
Area to be used when
the setting value of the
positioning table is
predetermined.
Area to be used when
the setting value of the
positioning table cannot
be determined until just
before executing the
positioning operation.
Number
of points
Table
number
Setting using
Configurator PM
600
points
1 to 600
Available
25 points
10001
to
10025
Not available
Setting using
ladder program
Available
(Calculation for
restructuring is
necessary.)
Available
(Calculation for
restructuring is
not necessary.)
14-3
14.1.4 Operation When the Mode of PLC Changed to PROG. from RUN
Any start-up contact of the automatic operation (position control), manual operations (JOG operation,
home return, pulser operation) turns on, and the operation will continue even if the PLC changes to the
PROG. mode from the RUN mode after starting the operation.
14-4
Chapter 15
Errors and Warnings
15.1 Errors and Warnings
15.1.1 About Errors and Warnings
When any operational unconformity occurs in the positioningn unit RTEX, errors or warnings will occur.
When errors or warnings occur, the following operations will be performed.
Errors
Warnings
Occurs in any abnormal conditions. When a motor is operating, the operation stops.
The motor stopped due to the occurrence of error will not activate until the error clear is
executed.
Occurs when any operational unconformity not abnormal conditions exist.
The operation can continue even after the occurrence of warnings, and the motor
continues running if the motor is operating.
The errors and warnings can be confirmed on the data monitor and status monitor screens of the
Configurator PM.
The errors and warnings occur in the positioning unit RTEX and AMP.
The area that errors/warnings occurred and the details can be indentified by the error/warning codes.
15.1.2 Error and Warning Logs
There are log areas to store the error/warning logs within the positioning unit RTEX.
Error log
Warnings log
Max. 7 error codes can be stored for each axis (axis 1 to 8).
Max. 7 warning codes can be stored for each axis (axis 1 to 8).
Once an error/warning occurs, the error/warning code will be stored in the log area of the axis that the
error occurred.
When an error/warning that is not related to the axes occurs, such as an failure in the unit, the
error/warning code will be stored in the log areas of all axes.
The latest error/warning codes for each axis can be checked with the Configurator PM.
When referring the error and warning logs for each axis, read the following shared memory from the PLC.
Error log area (Shared memory Bank 0)
Number of occcurrences of
errors/warnings
Error/warning annunciation
buffers (1 to 8)
15-2
Warning log area (Shared memory Bank 0)
Stores the number of occurrences of errors and warnings.
Stores error and warning codes.
The buffer 1 is always the latest code.
15.1.3 Errro and Warning Clear
When an error/warning occurred, it can be cleared at the each axis that the error occurred.
Note that all the contents of the error log will be initialized, once the error/warning clear is executed.
The error/warning clear can be executed on the data monotor screen of the Configurator PM, but
errors/warnings can be cleared by the error clear request flag or warning clear request flag allocated for
the I/O.
Note) When an error occurred, the axis that the error occurred will not be operated until the execution of
the error clear.
15.1.4 Errro and Warning Code Format
The error and warning codes are 32-bit data and in the format as follows.
32 bits (double word)
16 bits (word)
16 bits (word)
Not used
Error/warning code
15.1.5 Sample Program
The program below is a sample program to detect the occurrence of error, and to clear the error after
reading the error log.
15-3
15.2 Change in Error Recovery Process (Ver.1.13 or later)
15.2.1 Overview of Operational Change
For the Positioning Unit RTEX, the whole sysmem (RTEX and AMP) should be rebooted when an
unrecoverable error occurred. The methods to recover errors have been changed to decrease the manhour taken to recover errors.
The method to recover from error occurrence varies according to the states when errors occur.
Status when an error
occurred
Description
Recoverable state
(○)
-After an error occurred, the operating axes stop.
-After an error occurred, the Positioning Unit RTEX can recover
the error at any timing.
-Error when a critical trouble occurred on the Positioning Unit
RTEX system
-When an unrecoverable error occurred, the power supply of the
Positioning Unit RTEX should be restored.
-However, the power supply of the AMP does not need to be
restored.
-Error occurred when a problem was cuased on AMP such as a
network error and proteciton error during operation.
-When an error occurred, the error can be recoevered by
restoring the power supply of the AMP after removing the error
factor.
Unrecoverable state
(×)
Recovered state after
restoring the power
supply of the AMP
(△)
Error type
All error types
System error
AMP communication
error
Axis operation error
AMP error
* Refer to “List of Error Code” for the details of error types.
15.2.2 State of Servo After an Error Occurred
The state of the servo of the AMP after an error occurred varies depending on the occurred error types
and code.
Error type/Error code
State of servo when an error occurred
AMP error (From 0000H)
・When an error occurred on the AMP,
the servo automatically becomes free
regardless of the state of the error
occurrence.
・The servo lock flags (X10 to X17) also
turns off automatically.
-When communication time-out occurrred,
the error information on the AMP may not
be obtained. Therefoere, the state of
servo at that time is one of the followings.
Network communication
time-out (2003H)
-When the “Communication time-out
protection error” occurred on the AMP
When an error occurred, the serveo
automatically becomes free.
Other errors
15-4
-When an error occurred on the
Positioning Unit RTEX (no AMP error)
The state of servo is held even if an error
occurred.
-The state of servo is held even if an error
occurred.
State of servo after an error was
recovered
-If the state when an errro occcurred is
“Recovered state after restoring the
power supply”, remove the error factor
and restore the power supply of the AMP.
-After that, clear the error and make the
servo on request (Y88 to 8F) again.
-When the “Communication time-out
protection error” occurred on the AMP
After an error was recovered, make the
servo on request (Y88 to 8F) again lock
the servo.
-When an error occurred on the
Positioning Unit RTEX (no AMP error)
After an error was recovered, the servo
automatically returns to the state before
the occurrence of error.
After an error was recovered, the servo
automatically returns to the state before
the error occurrence.
15.3 List of Error Codes (Ver.1.00 to 1.01)
The areas that errors occurred can be identified according to the range of error codes. When the error
code is in the range of 0001H to 0FFFH, it indicates that the error occurred in the AMP. When the error
code is one from 1000H, it indicates that the error occurred in the positioning unit.
15.3.1 AMP Errors (From 0001H) (Ver1.00 to 1.01)
The alarms to be output from the AMP are output as error codes as they are.
The alarms occurred in the AMP is written in decimal, however, the error codes of the positioning unit
are written in hexadecimal.
(For the details of each error code and the way of handling, refer to the manual of the AMP.)
The errors occurred in the AMP cannot be basically cleared, and also the power supply of the unit must
be turned off and on again.
N/A: Not available
Error
code
000AH
000BH
000CH
000DH
000EH
000FH
0010H
0011H
0012H
0013H
0014H
0015H
0016H
0017H
0018H
0019H
001AH
001BH
001CH
001DH
001EH
0022H
0023H
0024H
0025H
0026H
0027H
0028H
0029H
002AH
002BH
002CH
002DH
002EH
002FH
Error name
Input voltage error (Generator error)
Control power supply shortage voltage protection
Overvoltage protection
Main power supply shortage voltage protection
Overcurrent protection
Overheat protection
Overload protection
A/D converter error protection
Regenerative overload protection
Motor thermal protection
Encoder Phase A/B error protection
Encoder Communication error protection
Encoder Wiring error protection
Encoder Communication data error
Positioning deviation overprotection
Hybrid deviation excessive error
Over-speed protection
Command error protection
External scale communication data error
Deviation counter overflow protection
CPU error/WDT error
Software limit protection
External scale communication error protection
EEPROM Parameter error protection
EEPROM Check code error protection
Drive inhibit input protection
External input trip command
Absolute System down error
Absolute Counter over error
Absolute Overspeed error
Absolute Battery error
Absolute One rotation counter error
Absolute Multi rotations counter error
Absolute Other errors
Absolute Status error
Description
Object
Clear
Refer to the specifications of AMP.
Refer to the specifications of AMP.
Refer to the specifications of AMP.
Refer to the specifications of AMP.
Refer to the specifications of AMP.
Refer to the specifications of AMP.
Refer to the specifications of AMP.
Refer to the specifications of AMP.
Refer to the specifications of AMP.
Refer to the specifications of AMP.
Refer to the specifications of AMP.
Refer to the specifications of AMP.
Refer to the specifications of AMP.
Refer to the specifications of AMP.
Refer to the specifications of AMP.
Refer to the specifications of AMP.
Refer to the specifications of AMP.
Refer to the specifications of AMP.
Refer to the specifications of AMP.
Refer to the specifications of AMP.
Refer to the specifications of AMP.
Refer to the specifications of AMP.
Refer to the specifications of AMP.
Refer to the specifications of AMP.
Refer to the specifications of AMP.
Refer to the specifications of AMP.
Refer to the specifications of AMP.
Refer to the specifications of AMP.
Refer to the specifications of AMP.
Refer to the specifications of AMP.
Refer to the specifications of AMP.
Refer to the specifications of AMP.
Refer to the specifications of AMP.
Refer to the specifications of AMP.
Refer to the specifications of AMP.
Each axis
Each axis
Each axis
Each axis
Each axis
Each axis
Each axis
Each axis
Each axis
Each axis
Each axis
Each axis
Each axis
Each axis
Each axis
Each axis
Each axis
Each axis
Each axis
Each axis
Each axis
Each axis
Each axis
Each axis
Each axis
Each axis
Each axis
Each axis
Each axis
Each axis
Each axis
Each axis
Each axis
Each axis
Each axis
N/A
N/A
N/A
N/A
N/A
N/A
N/A
N/A
N/A
N/A
N/A
N/A
N/A
N/A
N/A
N/A
N/A
N/A
N/A
N/A
N/A
N/A
N/A
N/A
N/A
N/A
N/A
N/A
N/A
N/A
N/A
N/A
N/A
N/A
15-5
A: Available N/A: Not available
Error
code
0030H
0031H
0032H
0033H
0034H
0035H
0036H
0037H
0038H
0039H
003AH
003BH
003CH
003DH
003EH
003FH
0040H
0041H
0042H
0043H
0044H
0045H
0046H
0047H
0048H
0049H
004AH
004BH
004CH
004DH
004EH
004FH
0050H
0051H
0052H
0053H
0054H
0055H
0056H
0057H
0058H
005EH
005FH
0060H
0061H
0062H
0063H
15-6
Error name
Description
Object
Clear
Encoder Phase Z error
Encoder CS signal error
External scales Status 0 Protection error
External scales Status 1 Protection error
External scales Status 2 Protection error
External scales Status 3 Protection error
External scales Status 4 Protection error
External scales Status 5 Protection error
Software limit input error
Current position overflow error
External scale Other error protection
Setup error
Self-diagnosis error
Self-diagnosis error
Self-diagnosis error
Self-diagnosis error
Self-diagnosis error
Self-diagnosis error
Self-diagnosis error
Self-diagnosis error
Self-diagnosis error
Self-diagnosis error
Self-diagnosis error
Self-diagnosis error
Self-diagnosis error
Self-diagnosis error
Self-diagnosis error
Self-diagnosis error
Self-diagnosis error
Self-diagnosis error
Self-diagnosis error
Self-diagnosis error
Parameter initialization sequence error
Serial communication error
Node address setting error
Continuous communication error protection
Communication timeout error proteciton
Optical communication ID duplicate error/Duplicate
MACID error
Cyclic-data not receivable
Emergency stop input error
Microcomputer memory error
Encoder EEPROM verify error
Motor automatic recognition error protection
SEN signal selection error protection
Control mode setting error protection
Microcomputer peripheral system error protection
Other errors
Refer to the specifications of AMP.
Refer to the specifications of AMP.
Refer to the specifications of AMP.
Refer to the specifications of AMP.
Refer to the specifications of AMP.
Refer to the specifications of AMP.
Refer to the specifications of AMP.
Refer to the specifications of AMP.
Refer to the specifications of AMP.
Refer to the specifications of AMP.
Refer to the specifications of AMP.
Refer to the specifications of AMP.
Refer to the specifications of AMP.
Refer to the specifications of AMP.
Refer to the specifications of AMP.
Refer to the specifications of AMP.
Refer to the specifications of AMP.
Refer to the specifications of AMP.
Refer to the specifications of AMP.
Refer to the specifications of AMP.
Refer to the specifications of AMP.
Refer to the specifications of AMP.
Refer to the specifications of AMP.
Refer to the specifications of AMP.
Refer to the specifications of AMP.
Refer to the specifications of AMP.
Refer to the specifications of AMP.
Refer to the specifications of AMP.
Refer to the specifications of AMP.
Refer to the specifications of AMP.
Refer to the specifications of AMP.
Refer to the specifications of AMP.
Refer to the specifications of AMP.
Refer to the specifications of AMP.
Refer to the specifications of AMP.
Refer to the specifications of AMP.
Refer to the specifications of AMP.
Each axis
Each axis
Each axis
Each axis
Each axis
Each axis
Each axis
Each axis
Each axis
Each axis
Each axis
Each axis
Each axis
Each axis
Each axis
Each axis
Each axis
Each axis
Each axis
Each axis
Each axis
Each axis
Each axis
Each axis
Each axis
Each axis
Each axis
Each axis
Each axis
Each axis
Each axis
Each axis
Each axis
Each axis
Each axis
Each axis
Each axis
N/A
N/A
N/A
N/A
N/A
N/A
N/A
N/A
N/A
N/A
N/A
N/A
N/A
N/A
N/A
N/A
N/A
N/A
N/A
N/A
N/A
N/A
N/A
N/A
N/A
N/A
N/A
N/A
N/A
N/A
N/A
N/A
N/A
N/A
N/A
N/A
N/A
Refer to the specifications of AMP. Each axis
N/A
Refer to the specifications of AMP.
Refer to the specifications of AMP.
Refer to the specifications of AMP.
Refer to the specifications of AMP.
Refer to the specifications of AMP.
Refer to the specifications of AMP.
Refer to the specifications of AMP.
Refer to the specifications of AMP.
Refer to the specifications of AMP.
N/A
Each axis
Each axis
Each axis
Each axis
Each axis
Each axis
Each axis
Each axis
Each axis
N/A
N/A
N/A
N/A
N/A
N/A
15.3.2 System Errors (From 1000H) (Ver.1.00 to 1.01)
These are the errors that occur due to any failure within the positioning unit. The system errors are
defined as the fatal errors for the system. Except for some items, the power supply must be turned off
and on again to recover from the errors.
A: Available N/A: Not available
Error
code
1000H
Error name
System
runaway
Hardware
1001H
error
1002H Unit error
System
1003H processing
error
1010H
Description
Object
System runaway (If the error occurred,
All axes
the ALARM LED on the positioning
unit is lighted.
An error occurred in the hardware test
All axes
when the power supply turned on.
Any error occurred in the internal
All axes
processing.
An error occurred in the system
processing due to any reason.
Clear
N/A
N/A
A
An error occurred when the positioning
FROM writing
settings were written in the positioning All axes
error
unit.
A
All axes
Turn off the power supply and
turn it on again.
If the error occurred repeatedly,
please contact us.
N/A
All axes
An error occurred in the
Tool
1020H operation
communication with a PC in the tool
abnormal end operation by the Configurator PM.
Countermeasures
A
Check the settings.
If the setting values are correct
and the error occurred repeatedly,
please contact us.
Rewrite into the FROM again.
If the error occurred repeatedly,
please contact us.
Check the connection of the
RS232C cable connecting the PC
and PLC.
Reboot the PC.
15-7
15.3.3 AMP Communication Errors (From 2000H) (Ver.1.00 to 1.01
These are the errors occurred in the communication beteween the positioning unit and AMP.
They occur when the communication data was judged as abnormal.
A: Available N/A: Not available
Error
code
Error name
Description
A communication error occurred
AMP
2000H Communication after the network communication
has been established.
error
Object
All axes
2001H
AMP Data
Failed in the data acquisition of
acquisition error each AMP.
Each axis
2002H
AMP Parameter The communication parameters of
error
each AMP are incorrect.
Each axis
AMP Excess
2010H No. of
connections
2020H
AMP Node
duplication
2030H
AMP Node No.
setting error
15-8
The number of the AMPs
connected to the network exceeded
All axes
the limit (maximum No. of axes) of
the positioning unit.
The AMPs with the same node
All axes
number exist in the network.
The AMP with a node number other
than the numbers below exists.
All axes
2-axis type: 1 to 2
4-axis type: 1 to 4
8-axis type: 1 to 8
Clear
Countermeasures
Check the power supply of the
AMP is on.
Check the communication
pathway. Carefully check the
connector failure and breaking of
N/A the communication cable.
Also, check if any excessive noise
is caused in the usage
environment.
If the error occurred repeatedly,
please contact us.
Check the status of the AMP that
N/A
the error occurred.
Check the communication
pathway. Carefully check the
connector failure and breaking of
the communication cable.
A Also, check if any excessive noise
is caused in the usage
environment.
If the error occurred repeatedly,
please contact us.
A
N/A
N/A
Afer checking the connection and
settings of the AMP, turn off the
power supply and turn it on again.
If the error occurred repeatedly,
please contact us.
15.3.4 Axis Operation Errors (From 3000H) (Ver.1.00 to 1.01)
These are the errors occurred while various operations are being executed.
A: Available N/A: Not available
Error
code
Error name
Description
Object
Clear
3000H Not servo ready
The axis that servo is not locked
was started.
Each axis
A
Servo off
3001H detection in
operation
The servo became off during the
operation being processed.
Each axis
A
Limit + signal
detection
Limit – signal
3011H
detection
The input on the plus side of the
limit turned on.
The input on the minus side of the
limit turned on.
Each axis
A
Each axis
A
3012H Limit signal error
Both inputs on the plus and minus
sides of the limit turned on.
Each axis
A
Software limit
3020H (plus side)
detection
Software limit
3021H (minus side)
detection
The movement amount of the
motor exceeded the upper limit of
the software limit.
The movement amount of the
motor exceeded the lower limit of
the software limit.
Each axis
A
Each axis
A
3010H
3030H
Axis operation
error
An error occurred in the operation
processing of each axis due to any Each axis
reason.
3031H
Operation
abnormal end
An error occurred in the operation
Each axis
processing of each axis due to any
All axes
reason.
3033H
Interpolation
operation error
The operation stopped as an error
occurred on other interpolation axis Each axis
during the interpolation operation.
Actual speed
3051H judgment value
error
This error occurs when setting
torque judgment to “Available”
annunciation method to
“Error”
The actual speed exceeded the
setting upper and lower limit
values.
This error occurs when setting
- actual speed judgment to
“Available”
- annunciation method to “Error”
Each axis
Each axis
Confirm the servo is locked while
each axis is operating.
Turn off the servo on input when
the Busy signal for the target axis
is not on.
Check the status of the AmP.
Move the motor into the range of
the limit by an operation such as
the JOG operation.
Check the limit singal is correct.
Check the status of the limit
signal.
Turn off the power supply and
turn it on again.
Move the motor into the range of
the limit by an operation such as
the JOG operation.
Check the setting values of the
software limit.
Check the setting values and
parameters of the positioning unit.
A If the error occurred repeatedly
with the correct setting values,
please contact us.
Turn off the power supply and
turn it on again.
N/A
If the error occurred repeatedly,
please contact us.
Check the setting values of the
positioning data for the
interpolation operation.
A
If the error occurred repeatedly
with the correct setting values,
please contact us.
The torque value exceeds the
setting upper and lower limit
values.
Torque
3050H
judgment error
Countermeasures
A
Design the system within the
range that the torque of the motor
does not exceed the judgment
value.
Check the torque judgment value.
A
Design the system within the
range that the actual speed of the
motor does not exceed the
judgment value.
Check the actual speed judgment
value.
15-9
15.3.5 Setting Value Errors (From 0x4000)
These are the errors in the various setting values specified using the Configurator PM or ladder
programs.
A: Available N/A: Not available
Error
code
Error name
Description
Object
Clear
4000H Axis group setting error
The settings of axis groups are
not correct.
Each axis
A
4002H Unit setting error
The unit system for the axis
setting is out of the range.
Each axis
N/A
4004H
Pulse number error per The pulse number is out of the
rotation
range.
Each axis
N/A
4005H
Movement amount
error per rotation
Each axis
N/A
Each axis
N/A
Each axis
A
Each axis
A
Each axis
A
Each axis
A
Each axis
A
Each axis
A
Each axis
A
Each axis
A
Each axis
A
Each axis
A
Each axis
A
Each axis
A
The upper or lower limit value of
software limit is out of the range.
The limit stop deceleration time is
4020H
out of the range.
The rror stop deceleration time is
4021H
out of the range.
The emergency stop deceleration
4022H
time is out of the range.
The posiitoning completion width
4041H
is out of the range.
The pulser input mode is
4042H Pulser setting error
incorrect.
The setting of the speed rate is
4044H Speed rate error
out of the range.
Home return target
The target speed of the home
4102H
speed error
return is out of the range.
Home return
The acceleration time of the home
4105H
acceleration time error return is out of the range.
Home return
The deceleration time of the home
4106H
deceleration time error return is out of the range.
Home return setting
The home return setting code is
4107H
code error
incorrect.
Home return creep
The creep speed of the home
4110H
speed error
return is out of the range.
Home return returning The moving direction of the home
4111H
direction error
return is out of the range.
4010H
15-10
Software limit setting
error
Limit stop deceleration
time error
Error stop deceleration
time error
Emergency stop
deceleration time error
Positioning completion
width error
The movement amount is out of
the range.
Countermeasures
Check the following items
in the settings of the axis
group and independent
axis.
The same axis
number has been
registered in more than
one group.
Four or more axes
have been set in one
group.
The group is
composed of one axis
only.
Check if the unit is one of
the followings.
Pulse, mm, inch, degree
Check the setting value.
If the setting value is out of
the range, reduce it by the
following formula.
(Pulse number per rotation)
/ (Movement amount per
rotation)
Check the setting value.
If the error occurred
repeatedly with the correct
setting value, please
contact us.
A: Available N/A: Not available
Error
code
Error name
JOG operation target
speed error
JOG operation
4203H acceleration/deceleration type error
JOG operation
4204H
acceleration time error
JOG operation
4205H
deceleration time error
4201H
4301H
Absolute/Incremental
setting error
4302H Dwell time error
4303H
Positioning starting
table No. error
4304H Table setting error
Positioning movement
4400H
amount setting error
Positioning rotating
4401H acceleration/deceleration type error
4402H
Positioning
acceleration time error
4403H
Positioning
deceleration time error
4404H
Positioning target
speed error
4500H Interpolation type error
4504H
Circular interpolation
not executable
4505H
Spiral interpolation not
executable
Description
The target speed of the JOG
operation is out of the range.
The acceleration/deceleration
type of the JOG operaiton is
incorrect.
The acceleraiton time of the JOG
operation is out of the range.
The deceleraiton time of the JOG
operation is out of the range.
A value other than the
absolute/increment is set for the
move method.
The setting value of the dwell time
is out of the range.
The specified table number is 0,
or it exceeds the maximum table
number.
The last table of the positioning
setting tables is not point E.
The movement amount of the
positioning operation is out of the
range.
The acceleration/deceleration
type of the positioning operation is
incorrect.
The acceleration time of the
positioning operation is out of the
range.
The deceleration time of the
positioning operation is out of the
range.
The target speed of the
positioning operation is out of the
range.
The setting of the interpolation
type is incorrect.
The parameter of the circular
interpolation (such as center point
or pass point) is incorrect.
The error occurred during the
spiral interpolation as the setting
value is incorrect.
Object
Clear
Each axis
A
Each axis
A
Each axis
A
Each axis
A
Each axis
A
Each axis
A
Each axis
A
Each axis
A
Each axis
A
Each axis
A
Each axis
A
Each axis
A
Each axis
A
Each axis
A
Each axis
A
Each axis
A
Countermeasures
Check the setting value.
If the error occurred
repeatedly with the correct
setting value, please
contact us.
15-11
15.4 List of Warning Codes (Ver.1.00 to 1.01)
Warning codes are from 0xA000 to differentiate from the error codes.
15.4.1 AMP Warnings (From A000H) (Ver.1.00 to 1.01)
These are the warning codes to be given by the unit when warnings occurred in the AMP. The warning
codes to be output are represented by the warning codes output from the AMP + 0xA000.
The warning codes of the AMP are written in decimal, however, the warning codes of the positioning unit
are written in hexadecimal.
(For the details of each warning code and the way of handling, refer to the manual of the AMP.)
N/A: Not available
Warning
code
A010H
A012H
A028H
A053H
A054H
A056H
A058H
A059H
15-12
Warning name
Overload warning
Regenerative warning
Battery warning
Continuous communication error warning
Communication error accumulated warning
Update Counter warning
Fan lock warning
External scale warning
Description
Object
Clear
Refer to the specifications of AMP.
Refer to the specifications of AMP.
Refer to the specifications of AMP.
Refer to the specifications of AMP.
Refer to the specifications of AMP.
Refer to the specifications of AMP.
Refer to the specifications of AMP.
Refer to the specifications of AMP.
Each axis
Each axis
Each axis
Each axis
Each axis
Each axis
Each axis
Each axis
A
A
A
A
A
A
A
A
15.4.2 Unit Warnings (From B000H) (Ver.1.00 to 1.01)
These are the warning codes to be given when the warnings occurred in the positioning unit.
A: Available N/A: Not available
Error
code
Error name
B000H Tool operation
Description
The following request signals were
turned on by the host PLC during the
Tool operation.
Positioning startup request flag
(each axis)
Home return request flag (each
axis)
JOG forward/reverse rotation
request flag (each axis)
The same axis was requested to start
B010H Duplicate startup even though the axis operation has not
completed.
Object Clear
Each
axis
A
Each
axis
A
Each
axis
A
Each
axis
A
The monitored torque value exceeded
the specified upper/lower limit value.
Torque judgment
This warning occurs when setting
value warning
- torque judgment to “Available”
annunciation method to “Warning”
The monitored actual speed exceeded
the specified upper/lower limit value.
Actual speed
B051H judgment value
This warning occurs when setting
warning
- actual speed judgment to “Available”
annunciation method to “Warning”
B050H
Countermeasures
Various requests from the PLC
cannot be executed during the
Tool operation, except the
following requests.
Deceleration stop
request flag (each axis)
Emergency stop request
flag (each axis)
System stop request flag
(all axes)
Pulser operation enabled
flag (each axis)
The requests for the axes
being operated cannot be
executed, except the following
requests.
Deceleration stop
request flag (each axis)
Emergency stop request
flag (each axis)
System stop request flag
(all axes)
Design the system within the
range that the torque of the
motor does not exceed the
judgment value.
Check the torque judgment
value.
Design the system within the
range that the actual speed of
the motor does not exceed the
judgment value.
Check the actual speed
judgment value.
15-13
15.5 List of Error Codes (Ver.1.13 or later)
The followings are the list of error codes to be displayed on the RTEX of Ver.1.13 or later.
The areas that errors occurred can be identified according to the range of error codes. When the error
code is in the range of 0001H to 0FFFH, it indicates that the error occurred in the AMP. When the error
code is one from 1000H, it indicates that the error occurred in the positioning unit.
Also, the recovery method for each error code varies according to the state when each error occurred. In
the following list of error code, the recoverable state is indicated with “○”, the unrecoverable state is
indicated with “×”, and the recovered state after restoring the power supply of the AMP is indicated with
“△”.
15.5.1 AMP Errors (From 0001H) (Ver.1.13 or later)
The alarms to be output from the AMP are output as error codes as they are.
The alarms occurred in the AMP is written in decimal, however, the error codes of the positioning unit
are written in hexadecimal.
(For the details of each error code and the way of handling, refer to the manual of the AMP.)
When an AMP error occurs,
When an error occurred on the AMP, the servo automatically becomes free. Execute the servo on
request again after clearing the error.
Error code Error name
Control power supply shortage voltage
000BH
protection
000CH
Overvoltage protection
Main power supply shortage voltage
000DH
protection
000EH
Overcurrent protection
000FH
Overheat protection
0010H
Overload protection
0012H
Regenerative overload protection
0015H
Encoder communication error protection
0017H
Encoder communication data error
0018H
Positioning deviation overprotection
0019H
Hybrid deviation excessive error
001AH
Over-speed protection
001BH
Command error protection
001CH
External scale communication data error
001DH
Deviation counter overflow protection
0022H
Software limit protection
External scale communication error
0023H
protection
0024H
EEPROM parameter error protection
0025H
EEPROM check code error protection
0026H
Drive inhibit input protection
0028H
Absolute system down error
0029H
Absolute counter over error
002AH
Absolute overspeed error
002CH
Absolute one rotation counter error
002DH
Absolute multi rotations counter error
002FH
Absolute status error
15-14
Description
Object
Clear
Refer to the specifications of AMP.
Each axis
○
Refer to the specifications of AMP.
Each axis
○
Refer to the specifications of AMP.
Each axis
○
Refer to the specifications of AMP.
Refer to the specifications of AMP.
Refer to the specifications of AMP.
Refer to the specifications of AMP.
Refer to the specifications of AMP.
Refer to the specifications of AMP.
Refer to the specifications of AMP.
Refer to the specifications of AMP.
Refer to the specifications of AMP.
Refer to the specifications of AMP.
Refer to the specifications of AMP.
Refer to the specifications of AMP.
Refer to the specifications of AMP.
Each axis
Each axis
Each axis
Each axis
Each axis
Each axis
Each axis
Each axis
Each axis
Each axis
Each axis
Each axis
Each axis
△
△
○
△
△
△
○
△
○
○
△
○
○
Refer to the specifications of AMP.
Each axis
△
Refer to the specifications of AMP.
Refer to the specifications of AMP.
Refer to the specifications of AMP.
Refer to the specifications of AMP.
Refer to the specifications of AMP.
Refer to the specifications of AMP.
Refer to the specifications of AMP.
Refer to the specifications of AMP.
Refer to the specifications of AMP.
Each axis
Each axis
Each axis
Each axis
Each axis
Each axis
Each axis
Each axis
Each axis
△
△
○
△
△
△
△
△
△
Error code
0030H
0031H
0032H
0033H
0034H
0035H
0036H
0037H
003AH
0052H
0053H
0054H
0056H
0057H
005FH
Error name
Encoder phase Z error
Encoder CS signal error
External scales status 0 protection error
External scales status 1 protection error
External scales status 2 protection error
External scales status 3 protection error
External scales status 4 protection error
External scales status 5 protection error
External scale other error protection
Node address setting error
Continuous communication error protection
Communication timeout error protection
Cyclic-data not receivable
Emergenty stop input error
Motor automatic recognition error
protection
Other errors
Description
Refer to the specifications of AMP.
Refer to the specifications of AMP.
Refer to the specifications of AMP.
Refer to the specifications of AMP.
Refer to the specifications of AMP.
Refer to the specifications of AMP.
Refer to the specifications of AMP.
Refer to the specifications of AMP.
Refer to the specifications of AMP.
Refer to the specifications of AMP.
Refer to the specifications of AMP.
Refer to the specifications of AMP.
Refer to the specifications of AMP.
Refer to the specifications of AMP.
Object
Each axis
Each axis
Each axis
Each axis
Each axis
Each axis
Each axis
Each axis
Each axis
Each axis
Each axis
Each axis
Each axis
Each axis
Clear
△
△
△
△
△
△
△
△
△
△
○
○
○
○
Refer to the specifications of AMP.
Each axis
△
Contact the dealer of the AMP.
Each axis
-
15.5.2 System Errors (From 1000H) (Ver.1.13 or later)
These are the errors that occur due to any failure within the positioning unit. The system errors are
defined as the fatal errors for the system. Except for some items, the power supply must be turned off
and on again to recover from the errors.
A: Available N/A: Not available
Error
code
Error name
1000H System runaway
1001H Hardware error
1002H Unit error
1003H
System
processing error
1010H
FROM writing
error
1020H
Tool operation
abnormal end
Description
Object
System runaway (If the error
occurred, the ALARM LED on the All axes
positioning unit is lighted.
An error occurred in the hardware
test when the power supply turned All axes
on.
Any error occurred in the internal
All axes
processing.
An error occurred in the system
processing due to any reason.
All axes
An error occurred when the
positioning settings were written in All axes
the positioning unit.
An error occurred in the
communication with a PC in the
All axes
tool operation by the Configurator
PM.
Clear
Countermeasures
N/A
N/A
Turn off the power supply and
turn it on again.
If the error occurred repeatedly,
please contact us.
N/A
A
A
A
Check the settings.
If the setting values are correct
and the error occurred repeatedly,
please contact us.
Rewrite into the FROM again.
If the error occurred repeatedly,
please contact us.
Check the connection of the
RS232C cable connecting the PC
and PLC.
Reboot the PC.
15-15
15.5.3 AMP Communication Errors (From 2000H) (Ver.1.13 or later)
These are the errors occurred in the communication beteween the positioning unit and AMP.
They occur when the communication data was judged as abnormal.
A: Available N/A: Not available
Error
code
Error name
AMP
2000H Communication
error
Description
Object
A communication error
occurred after the network
All axes
communication has been
established.
Clear
N/A
2001H
AMP Data
Failed in the data
acquisition error acquisition of each AMP.
Each
axis
A
2002H
The communication
AMP Parameter
parameters of each AMP
error
are incorrect.
Each
axis
A
Time-out occurred in
communication between
the Positioning Unit RTEX
and AMP, and
communication was cut
off.
The number of the AMPs
connected to the network
AMP Excess No.
exceeded the limit
2010H
of connections
(maximum No. of axes) of
the positioning unit.
The AMPs with the same
AMP Node
2020H
node number exist in the
duplication
network.
The AMP with a node
number other than the
AMP Node No. numbers below exists.
2030H
setting error
2-axis type: 1 to 2
4-axis type: 1 to 4
8-axis type: 1 to 8
Network
2003H communication
timeout
15-16
Each
axis
A
All axes
N/A
All axes
N/A
All axes
N/A
Countermeasures
Check the power supply of the AMP is on.
Check the communication pathway.
Carefully check the connector failure and
breaking of the communication cable.
Also, check if any excessive noise is
caused in the usage environment.
If the error occurred repeatedly, please
contact us.
Check the status of the AMP that the error
occurred.
Check the communication pathway.
Carefully check the connector failure and
breaking of the communication cable.
Also, check if any excessive noise is
caused in the usage environment.
If the error occurred repeatedly, please
contact us.
Check the status of the AMP.
(As information on the AMP cannot be
obtained when communication is cut off, an
error on the AMP may not be obtained.)
Check the communication cable.
Afer checking the connection and settings
of the AMP, turn off the power supply and
turn it on again.
If the error occurred repeatedly, please
contact us.
15.5.4 Axis Operation Errors (From 3000H) (Ver.1.13 or later)
These are the errors occurred while various operations are being executed.
Error
code
Error name
Description
3000H
Not servo ready
The axis that servo is not locked Each
was started.
axis
A
3001H
Servo off detection The servo became off during the Each
in operation
operation being processed.
axis
A
3005H
The servo on was requested
Main power supply
when the main power supply of
off error
the AMP was off.
Each
axis
A
Limit + signal
detection
Limit – signal
detection
Each
axis
Each
axis
3010H
3011H
3012H
3020H
3021H
Limit signal erro
Software limit
(plus side)
detection
Software limit
(minus side)
detection
The input on the plus side of the
limit turned on.
The input on the minus side of
the limit turned on.
Both inputs on the plus and
imnus sides of the limit turned
on.
The movement amount of the
motor exceeded the upper limit
of the software limit.
The movement amount of the
motor exceeded the lower limit
of the software limit.
Object
Clear
A
A
Each
axis
A
Each
axis
A
Each
axis
A
Countermeasures
Confirm the servo is locked while
each axis is operating
Turn off the servo on inptu when
the Busy signal for the target axis
is not on.
Check the status of the AMP.
- Turn the servo on after the main
power supply has been turned on.
- Check the voltage of the main
power supply.
Move the motor into the range fo
the limit by an operation such as
the JOG operation.
Check the limit signal is correct.
Check the status of the limit
signal.
Move the motor into the range of
the limit by an operation such as
the JOG operation.
Check the setting values of the
software limit.
Each
axis
A
Check the setting values and
parameters of the positioning unit.
If the error occurred repeatedly
with the correct settign values,
please contact us.
Each
axis
All axes
A
If the error occurred repeatedly,
please contact us.
3030H
Axis operation
error
An error occurred in the
operation processing of each
axis due to any reason.
3031H
Operation
abnormal end
An error occurred in the
operation processing of each
axis due to any reason.
3032H
Axis group
operation error
・The setting of axis group was
changed during the operation or
Each
when requesting the stop.
axis
・An unconnected axis was
specified for the axis group.
A
3033H
Interpolation
operation error
The operation stopped as an
error occurred on other
interpolation axis during the
interpolation operaiton.
Each
axis
A
3034H
Axis group not
settable
(In pulser
operation)
The setting of the axis group
was changed during the pulser
operaiton.
Each
axis
A
Changing the axis group should
be performed when the pulser
operation enalbed signal is off.
A
Design the system within the
range that the torque of the motor
does nto exceed the judgment
value.
Check the torque judgment value.
3050H
Torque judgment
erro
The torque value exceeds the
setting upper and lower limit
values.
This error occurs when setting
- torque judgment to “Available”
- annunciation emthod to “Error”
Each
axis
Changing the axis group should
be performed when the axis stops.
Also, do not make the stop
request.
Check the setting of the axis
group.
Check the setting values of the
positioning data for the
interpolation operation.
If the error occurred repeatedly
with the correct setting values,
please contact us.
15-17
Error
code
3040H
3042H
Error name
Synchronous
operation group
error
Synchronous
operation home
return error
Description
The synchronous group was
changed during the synchronous
operation or when requesting
the stop in the synchronous
operation.
Object
Each
axis
・An unconnected axis number
was specified.
・An error occurred in the home
return of the synchronous
operation.
・The home return process was
executed with setting the
synchronous operation to
“Enabled” when using the
Each
synchronous mode A.
axis
・A method other than the
usable home return mothods
was executed when using the
synchronous mode B.
3043H
Synchronous
operation error
The operation was stopped as
an error has occurred on
Each
another axis in the synchronous axis
operaiton.
3044H
Synchronous
operation not
settable
(In pulser
operation)
The setting of the synchronous
Each
opration was changed during the
axis
pulser operation.
3045H
Synchronous
operation
mismatch error
3050H
3051H
15-18
Torque judgment
erro
Actual speed
judgment value
error
The difference between the
movement amounts of the target
Each
axes for the synchronous
axis
operation exceeded the
specified difference threshold.
The torque value exceeds the
setting upper and lower limit
values.
Each
axis
This error occurs when setting
- torque judgment to “Available”
- annunciation emthod to “Error”
The actual speed exceeded the
setting upper and lower limit
values.
Each
axis
This error occurs when setting
- actual speed judgment to
“Available”
- annunciation method to “Error”
Clear
A
Countermeasures
Changing the synchronous group
should be performed when the
busy signal for the axes to be
synchronized is off.
Also, it should be performed when
various stop request signals
(system stop, emergency stop,
deceleration stop) are off.
Specify an axis number existing
on the network.
A
Simultaneous mode A:
Set the simultaneous operation to
“Disabled” when performing the
home return.
Simultaneous mode B:
Select a usable home return
method.
A
Check the unit setting of the
stopped axis and the AMP setting.
If the error occurred repeatedly
with the correct setting values,
please contact us.
A
Changing the setting of the
synchronous operation should be
performed when the pulser
operation enabled signal is off.
A
Check the operation of the target
axes for the synchronous
operation.
A
Design the system within the
range that the torque of the motor
does nto exceed the judgment
value.
Check the torque judgment value.
A
Design the system within the
range that the actual speed of the
motor does not exceed the
judgment value.
Check the actual speed jdgement
value.
15.5.5 Setting Value Errors (From 4000H) (Ver.1.13 or later)
These are the errors in the various setting values specified using the Configurator PM or ladder
programs.
Error
code
Error name
Description
Object
Clear
4000H
Axis group setting error
The settings of axis groups
are not correct.
Each
axis
A
4002H
Unit setting error
The unit system for the axis Each
setting is out of the range.
axis
A
4004H
Pulse number error per
rotation
The pulse number is out of
the range.
Each
axis
A
4005H
Movement amount error The movement amount is
per rotation
out of the range.
Each
axis
A
4010H
Software limit setting
error
Each
axis
A
4020H
4021H
4022H
4028H
Limit stop deceleration
time error
Error stop deceleration
time error
Emergency stop
deceleration tiem error
Auxiliary output setting
error
The upper or lower limit
value of software limit is out
of the range.
The limit stop deceleration
time is out of the range.
The error stop deceleration
time is out of the range.
The emergency stop
deceleration time is out of
the range.
The settings of auxiliary
output are not correct.
Each
axis
Each
axis
Each
axis
・A mode other than With
mode or Delay mode for the
Each
auxiliary output mode has
axis
been set.
・A value other than 0 to
100 (%) was specified for
the auxiliary output delay
ratio in the delay mode.
Countermeasures
Check the following items in the
settings of the axis group and
independent axis.
- The same axis number has
been registered in more than one
group.
- Four or more axes have been
set in one group.
- The group is composed of one
axis only.
Check if the unit is one of the
followings.
Pulse, mm, inch, degree
Check the setting value.
If the setting value is out of the
range, reduce it by the following
formula.
(Pulse number per rotation) /
(Movement amount per rotation)
A
A
A
Check the settign value.
If the error occurred repeatedly
with the correct setting value,
please contact us.
A
15-19
Error
code
Error name
Description
Object
Clear Countermeasures
The settings of synchronous group
are not correct.
4030H
4041H
4042H
4044H
4080H
4081H
4082H
4083H
4102H
4105H
4106H
4107H
4110H
4111H
Synchronous group
setting error
Positioning completion
width error
Pulser setting error
Speed rate error
JOG positioning
acceleration/deceleratio
n method error
JOG positioning
acceleration time error
JOG positioning
deceleration time error
JOG positioning target
speed error
Home return target
speed error
Home return
acceleration time error
Home return
deceleration time error
Home return setting
code error
Home return creep
speed error
Home return returning
direction error
4112H
Home return limit error
4115H
Home return stop-oncontact torque value
error
4116H
Home return stop-oncontact judgment time
error
4120H
Coordinate origin error
4201H
JOG operaiton target
speed error
15-20
・The same axis has been set for
the synchronous groups 1 and 2.
・Either master axis or slave axis
has not been set. (All bits are off.) Each axis
・Multiple axes have been set for
the master or slave axis.
・The same axis has been set for
the master and slave axes.
・The slave axis has been set to
the interpolation group.
The positioning completion width is
Each axis
out of the range.
The pulser inptu mode is incorrect. Each axis
The stting of th speed rate is out of
Each axis
the range.
The acceleration/deceleration
method of the JOG positioning is
out of the range.
The acceleration time of the JOG
positioning is out of the range.
The deceleration time of the JOG
positioning is out of the range.
The target speed of the JOG
positioning is out of the range.
The target speed of the home
return is out of the range.
The acceleration time of the home
return is out of the range.
The deceleration time of the home
return is out of the range.
The home return setting code is
incorrect.
The creep speed of the home
return is out of the range.
The moving direction of the home
return is out of the range.
The limit switch is disabled.
(It occurs when the home return
method is set to the stop-on-contact
method 1 or 2.)
The home return stop-on-contact
torque value is out of the range.
(It occurs when the home return
method is set to the stop-on-contact
method 1 or 2.)
The home return stop-on-contact
judgment time is out of the range.
(It occurs when the home return
method is set to the stop-on-contact
method 1 or 2.)
The coordinate origin is out of the
range.
The target speed of the JOG
operation is out of the range.
A
A
A
A
Each axis
A
Each axis
A
Each axis
A
Each axis
A
Each axis
A
Each axis
A
Each axis
A
Each axis
A
Each axis
A
Each axis
A
Each axis
A
Each axis
A
Each axis
A
Each axis
A
Each axis
A
Check the settign
value.
If the error occurred
repeatedly with the
correct setting value,
please contact us.
Error
code
4203H
4204H
4205H
4250H
4251H
4301H
4302H
4303H
4304H
4400H
4401H
4402H
4403H
4404H
4500H
4504H
4505H
Error name
Description
JOG operation
The acceleration/deceleration
acceleration/deceleratio type of the JOG operation is
n type error
incorrect.
The acceleration time of the
JOG operation
JOG operation is out of the
acceleration time error
range.
The deceleration time of the
JOG operation
JOG operation is out of the
deceleration time error
range.
Current value update
The setting value of the current
error
value update is out of the range.
Realtime torque limit
The specified realtime torque
value error
value is out of the range.
A value other than the
Absolute/incremental
absolute/increment is set for the
setting error
move method.
The setting value of the dwell
Dwell time error
time is out of the range.
The specified table number is 0,
Positioning starting table
or it exceeds the maximum table
No. error
number.
The last table of the positioning
Table setting error
setting tables is not point E.
The movement amount of the
Positioning movement
positioning operation is out of
amount setting error
the range.
Positioning
The acceleration/deceleration
acceleration/deceleratio type of the positioning operation
n type error
is incorrect.
The acceleration time of the
Positioning acceleration
positioning operation is out of
time error
the range.
The deceleration time of the
Positioning deceleration
positionign operation is out of
time error
the range.
The target speed of the
Positioning target speed
positioning operation is out of
error
the range.
The setting of the interpolation
Interpolation type error
type is incorrect.
The parameter of the circular
Circular interpolation not
interpolation (such as center
executable
point or pass point) is incorrect.
The error occurred during the
Spiral interpolation not
spiral interpolation as the setting
executable
value is incorrect.
Object
Clear
Countermeasures
Each axis A
Each axis A
Each axis A
Each axis A
Each axis A
Each axis A
Each axis A
Each axis A
Each axis A
Each axis A
Check the settign value.
If the error occurred
repeatedly with the
correct setting value,
please contact us.
Each axis A
Each axis A
Each axis A
Each axis A
Each axis A
Each axis A
Each axis A
15-21
15.6 List of Warning Codes (Ver.1.13 or later)
Warning codes are from A000H to differentiate from the error codes.
15.6.1 AMP Warning (From A000H) (Ver.1.13 or later)
These are the warning codes to be given by the unit when warnings occurred in the AMP. The warning
codes to be output are represented by the warning codes output from the AMP + A000H.
The warning codes of the AMP are written in decimal, however, the warning codes of the positioning unit
are written in hexadecimal.
(For the details of each warning code and the way of handling, refer to the manual of the AMP.)
A: Available
Warning code
A010H
A012H
A028H
A053H
A054H
A056H
A058H
A059H
15-22
Warning name
Overload warning
Regenerative warning
Battery warning
Continuous communication error
warning
Communication error accumulated
warning
Update Counter warning
Fan lock warning
External scale warning
Description
Refer to the specifications of AMP.
Refer to the specifications of AMP.
Refer to the specifications of AMP.
Object
Clear
Each axis
A
Each axis
A
Each axis
A
Refer to the specifications of AMP.
Each axis
A
Refer to the specifications of AMP.
Each axis
A
Refer to the specifications of AMP.
Refer to the specifications of AMP.
Refer to the specifications of AMP.
Each axis
Each axis
Each axis
A
A
A
15.6.2 Unit Warnings (From B000H) (Ver.1.13 or later)
These are the warning codes to be given when the warnings occurred in the positioning unit.
Error
code
Error name
Description
B000H
Tool operation
The following request signals
were turned on by the host PLC
during the Tool operation.
Positioning startup request flag
(each axis)
Home return request flag (each
axis)
JOG forward/reverse rotation
request flag (each axis)
B010H
Duplicate startup
The same axis was requested to
start even though the axis
operation has not completed.
B030H
“J point sepped change contact”
and J point positioning start
J point simultaneous
contact” was turned on
startup warning
simultaneously during the JOG
positioning (J point) operation.
The monitored torque value
exceeded the specified
upper/lower limit value.
B050H
Torque judgment
value warning
B051H
Actual speed
judgment value
warning
This warning occurs when
setting
- torque judgment to “Available”
annunciation method to
“Warning”
The monitored actual speed
exceeded the specified
upper/lower limit value.
This warning occurs when
setting
- actual speed judgment to
“Available”
annunciation method to
“Warning”
Object
Clear
Each
axis
A
Each
axis
A
Each
axis
○
Each
axis
Each
axis
Countermeasures
Various requests from the PLC
cannot be executed during the
Tool operation, except the
following requests.
Deceleration stop request flag
(each axis)
Emergency stop request flag
(each axis)
System stop request flag (all
axes)
Pulser operation enabled flag
(each axis)
The requests for the axes being
operated cannot be executed,
except the following requests.
Deceleration stop request flag
(each axis)
Emergency stop request flag
(each axis)
System stop request flag (all
axes)
When the both contacts have
been turned on simultaneously, “J
point positioning start contact”
has a priority, and “J point speed
change contact” is ignored.
A
Design the system within the
range that the torque of the motor
does not exceed the judgment
value.
Check the torque judgment value.
A
Design the system within the
range that the actual speed of the
motor does not exceed the
judgment value.
Check the actual speed judgment
value.
15-23
15-24
Chapter 16
Troubleshooting
16.1 Cannot Communication With AMP
16-2
Chapter 17
Specifications
17.1 Table of Specificationa
17.1.1 General Specifications
Item
Ambient operating
temperature
Ambient storage
temperature
Ambient operating
humidity
Ambient storage
humidity
Breakdown
voltage
Insulation
resistance
Vibration
resistance
Shock resistance
Noise immunity
Operating
environment
Internal current
consumption
Weight
Description
FPΣ Positioning Unit RTEX
FP2 Positioning Unit RTEX
0 to +55 °C
-20 to +70 °C
30 to 85 % RH (at25 °C non-condensing)
30 to 85 % RH (at25 °C non-condensing)
1500 V AC, 1 minute
500 V AC, 1 minute
Between the various pins of the
Between the various pins of the
external connector and the ground
external connector and the ground
(However, excluding F.E. terminal)
(However, excluding F.E. terminal)
100MΩ or more (measured with 500 V DC testing)
Between the various pins of the external connector and the ground
(However, excluding F.E. terminal)
10 to 55 Hz, 1 cycle/min.
Double amplitude of 0.75 mm, 10 min. each in the X, Y, Z directions
Shock of 98 m/s 2 or more, 4 times in the X, Y, Z directions
1500 V[P-P] with pulse widths 50ns
1000 V[P-P] with pulse widths 50ns
and 1µs (based on in-house
and 1µs (based on in-house
measurements)
measurements)
Free of corrosive gases and excessive dust
300 mA or less
300 mA or less
Approx. 90 g
Approx. 120 g
17.1.2 Network Specifications
Item
Baud rate
Physical layer
Cable
Topology
Insulation
Connector
Max. cable length
Communication
cycle
Max. number of axes
Operation command
17-2
Description
100 Mbps
100 BASE-TX Full duplex
Shielded twisted-pair cable (category 5e or more)
Ring
Pulse transformer (Common mode choke is built in.)
8-pin RJ45
Between nodes: 60 m Total length: 200 m
0.5 ms (1 ms for update of position command)
8 axes
Position command
17.1.3 Performance Specifications of Units
FPΣ Positioning unit RTEX individual specifications
Item
Product number
Part number
Number of axes
controlled
Occupied I/O points
Restriction on
installation
2-axis type
AFPG43610
FPG-PN2AN
Description
4-axis type
AFPG43620
FPG-PN4AN
8-axis type
AFPG43630
FPG-PN8AN
2 axes/1 system
4 axes/1 system
8 axes/1 system
Input: 128 points, Output: 128 points (SX128, SY128)
A maximum of 2 units can be connected on the left side of the control unit
regardless of number of axes.
FP2 Positioning unit RTEX individual specifications
Item
Product number
Part number
Number of axes
controlled
Occupied I/O points
Restriction on
installation
2-axis type
AFP243610
FP2-PN2AN
Description
4-axis type
AFP243620
FP2-PN4AN
8-axis type
AFP243630
FP2-PN8AN
2 axes/1 system
4 axes/1 system
8 axes/1 system
Input: 128 points, Output: 128 points (SX128, SY128)
Only the restriction of the supply current of power supply unit.
17-3
17.1.4 Common Specifications
Item
Number of axes controlled
Interpolation control
Occupied I/O points
Position setting
modes
Description
2-axis type
4-axis type
8-axis type
2 axes/1 system
4 axes/1 system
8 axes/1 system
2-axis linear interpolation,
2-axis linear interpolation, 3-axis linear interpolation
2-axis circular interpolation 2-axis circular interpolation, 3-axis sprial interpolation
Input: 128 points, Output: 128 points (SX128, SY128)
Absolute (absolute position setting), Increment (relative position setting)
pulse
Position setting
units
Speed command
range
Acceleration/
deceleration
Acceleration time
Deceleration time
Number of
positioning tables
Independent
2-axis
Linear
interCircupolation lar
3-axis
Linear
interSpiral
polation
Start-up speed
Other
Dwell
functions
time
Control method
Automatic operation
Position control
Position command
range
17-4
μm (Minimum command unit is selected from 0.1 μm or 1 μm.)
inch ((Minimum command unit is selected from 0.00001 inch or 0.0001 inch.)
degree ((Minimum command unit is selected from 0.1 degree or 1 degree.)
Pulse: -1,073,741,823 to 1,073,741, 823 pulse
μm (0.1 μm): -107,374,182.3 to 107,374,182.3 μm
μm (1 μm): 1,073,741,823 to 1,073,741,823 μm
inch (0.00001 inch): -10,737.41823 to 10,737.41823 inch
inch (0.0001 inch): -107,374.1823 to 107,374.1823 inch
degree (0.1 degree): -107,374,182.3 to 107,374,182.3 degree
degree (1 degree): -1,073,741,823 to 1,073,741,823 degree
Pulse:1 to 32,767,000 pps
μm: 1 to 32,767,000 μm/s
inch: 0.001 to 32,767.000 inch/s
degree: 0.001 to 32,767.000 rev/s
Linear acceleration/deceleration, S-shaped acceleration/deceleration
0 to 10,000 ms (can set in 1 ms)
0 to 10,000 ms (can set in 1 ms)
Each axis Standard area: 600 points, extended area: 25 points
PTP control (E point control, C point control), CP control (P point control)
E point, P point, C point control Composite speed or long axis speed specification
E point, P point, C point control Center point or pass point specification
E point, P point, C point control Composite speed or long axis speed specification
E point, P point, C point control Center point or pass point specification
Standard area: 3 ms or less, extended area: 5 ms or less
0 to 32,767 ms (can set in 1ms)
Item
Stop function
Pulser
Manual operation
Home return
JOG
Speed command
range
Acceleration/
deceleration
Acceleration time
Deceleration time
Speed command
range
Acceleration/
deceleration
Acceleration time
Deceleration time
Return method
Speed command
range
Deceleration stop
Emergency stop
Limit stop
Error stop
Other specifications
System
stop
Deceleration time
Deceleration time
Deceleration time
Deceleration time
Deceleration time
Software
limit
function
Setting
range
Monitor
judgment
Torque
judgment
Actual
speed
judgment
2-axis type
Pulse:1 to 32,767,000 pps
μm: 1 to 32,767,000 μm/s
inch: 0.001 to 32,767.000 inch/s
degree: 0.001 to 32,767.000 rev/s
Description
4-axis type
8-axis type
Linear acceleration/deceleration, S-shaped acceleration/deceleration
0 to 10,000 ms (can set in 1 ms)
0 to 10,000 ms (can set in 1 ms)
Pulse:1 to 32,767,000 pps
μm: 1 to 32,767,000 μm/s
inch: 0.001 to 32,767.000 inch/s
degree: 0.001 to 32,767.000 rev/s
Linear acceleration/deceleration
0 to 10,000 ms (can set in 1 ms)
0 to 10,000 ms (can set in 1 ms)
DOG method
Activates in synchronization with pulser input
Deceleration time of active operation
0 to 10,000 ms (can set in 1 ms)
0 to 10,000 ms (can set in 1 ms)
0 to 10,000 ms (can set in 1 ms)
Immediate stop (0 ms)
Pulse: -1,073,741,823 to 1,073,741, 823 pulse
μm (0.1 μm): -107,374,182.3 to 107,374,182.3 μm
μm (1 μm): 1,073,741,823 to 1,073,741,823 μm
inch (0.00001 inch): -10,737.41823 to 10,737.41823 inch
inch (0.0001 inch): -107,374.1823 to 107,374.1823 inch
degree (0.1 degree): 0.0 to 359.9 degree
degree (1 degree): 0 to 359 degree
Torque judgment Valid/invalid Error/warning selectable
0.0 to 500%
Actual speed judgment Valid/invalid Error/warning selectable
0.0 to ±5000 rpm
Backup
Parameters and positioning data are stored in flash memory. (Battery is not requred.)
Limit input CWL, CCWL monitor, Near home (DOG) monitor
General-purpose input: 2 points, general-purpose output: 2 points (Input/output from AMP)
Auxiliary output contact, auxiliary output code
Torque
17-5
17.2 Table of I/O Area
Followings are occupied I/O when FPΣ/FP2 Positioning unit RTEX is installed in the slot 0.
Target
axis
Name
Link establishment
annunciation
-
X100
X0
All axes
X101
X102
X1
X2
-
X103
X3
All axes Write FROM
X104
X4
All axes Tool operation
X105
X106
X5
X6
-
X107
X7
All axes Recalculation done
X108
X109
X10A
X10B
X10C
X10D
X10E
X10F
X110
X111
X112
X113
X114
X115
X116
X117
X118
X119
X11A
X11B
X11C
X11D
X11E
X11F
X8
X9
XA
XB
XC
XD
XE
XF
X10
X11
X12
X13
X14
X15
X16
X17
X18
X19
X1A
X1B
X1C
X1D
X1E
X1F
1 axis
2 axis
3 axis
4 axis
5 axis
6 axis
7 axis
8 axis
1 axis
2 axis
3 axis
4 axis
5 axis
6 axis
7 axis
8 axis
1 axis
2 axis
3 axis
4 axis
5 axis
6 axis
7 axis
8 axis
-
WX0
17-6
WX1
WX11
WX10
Contact allocation
FPΣ
FP2
Descriptions
Indicates that the network link was established, and announce
the system started running.
Announces that data such as positioning parameters in the
shared memroy is being written in FROM.
Contact to indicate the Tool operation from Configurator PM.
The start-up from I/O is not available during the Tool operaiton.
If it performs, a warning will occur.
If the recalculation request contact (Y_7) turns on, the
positioning data of the shared memory (standard area) will be
restructured. This contact will turn on after restructuring
completes.
If the recalculation request contact (Y_7) turns on again, this
contact will be off once.
Note) It is used only when the positioning data has been
rewritten by laddar programs.
Each axis
connection
confirmation
Turns on when the corresponding axis exists.
Servo lock
Turns on when the corresponding axis is in the state of servo
lock.
BUSY
Turns on when the corresponding axis is operating.
WX2
WX3
WX4
WX14
WX13
WX12
Contact allocation
FPΣ
FP2
X120
X20
X121
X21
X122
X22
X123
X23
X124
X24
X125
X25
X126
X26
X127
X27
X128
X28
X129
X29
X12A
X2A
X12B
X2B
X12C
X2C
X12D
X2D
X12E
X2E
X12F
X2F
X130
X30
X131
X31
X132
X32
X133
X33
X134
X34
X135
X35
X136
X36
X137
X37
X138
X38
X139
X39
X13A
X3A
X13B
X3B
X13C
X3C
X13D
X3D
X13E
X3E
X13F
X3F
X140
X40
X141
X41
X142
X42
X143
X43
X144
X44
X145
X45
X146
X46
X147
X47
X148
X48
X149
X49
X14A
X4A
X14B
X4B
X14C
X4C
X14D
X4D
X14E
X4E
X14F
X4F
Target
axis
1 axis
2 axis
3 axis
4 axis
5 axis
6 axis
7 axis
8 axis
1 axis
2 axis
3 axis
4 axis
5 axis
6 axis
7 axis
8 axis
1 axis
2 axis
3 axis
4 axis
5 axis
6 axis
7 axis
8 axis
1 axis
2 axis
3 axis
4 axis
5 axis
6 axis
7 axis
8 axis
1 axis
2 axis
3 axis
4 axis
5 axis
6 axis
7 axis
8 axis
Name
Operation done
Descriptions
Turns on when the operation command for the corresponding
axis completed and the position error became in the specified
completion width.
For P point control and C point control of the automatic
operation, turns on when the operation for all the tables
completed.
After this contact turned on, the on-state continues until the next
control activates.
Turns on when the home return operation for the corresponding
axis completed.
Home return done
After this contact turned on, the on-state continues until the next
control activates.
-
-
Near home
Monitor contact for the near home input connected to the
corresnponding AMP.
Imposition
Turns on when the position error of the corresponding axis is
within the imposition range specified in AMP.
The setting of the imposition range can be changed by
PANATERM that is a tool of AMP.
Auxiliary contact
Turns on when the corresponding positioning table of the
corresponding axis was executed.
Use Configurator PM or directly write in the shared memory for
setting to able/disable the auxiliary contact.
17-7
17-8
WX5
WX6
WX7
WX17
WX16
WX15
Contact allocation
FPΣ
FP2
X150
X50
X151
X51
X152
X52
X153
X53
X154
X54
X155
X55
X156
X56
X157
X57
X158
X58
X159
X59
X15A
X5A
X15B
X5B
X15C
X5C
X15D
X5D
X15E
X5E
X15F
X5F
X160
X60
X161
X61
X162
X62
X163
X63
X164
X64
X165
X65
X166
X66
X167
X67
X168
X68
X169
X69
X16A
X6A
X16B
X6B
X16C
X6C
X16D
X6D
X16E
X6E
X16F
X6F
X170
X70
X171
X71
X172
X72
X173
X73
X174
X74
X175
X75
X176
X76
X177
X77
X178
X78
X179
X79
X17A
X7A
X17B
X7B
X17C
X7C
X17D
X7D
X17E
X7E
X17F
X7F
Target
axis
1 axis
2 axis
3 axis
4 axis
5 axis
6 axis
7 axis
8 axis
1 axis
2 axis
3 axis
4 axis
5 axis
6 axis
7 axis
8 axis
1 axis
2 axis
3 axis
4 axis
5 axis
6 axis
7 axis
8 axis
1 axis
2 axis
3 axis
4 axis
5 axis
6 axis
7 axis
8 axis
Name
Descriptions
Limit +
Limit Limit +
Limit Limit +
Limit Limit +
Limit Limit +
Limit Limit +
Limit Limit +
Limit Limit +
Limit -
Monitor contact of the limit + and – connected to the
corresponding AMP.
During the positioning operation, JOG operation or pulser
operation, performs the deceleration stop when the limit
input that is an extension of the operating direction turned
on.
The deceleration stop time during the limit input can be
changed in the shared memory.
It will be the contact for the automatic inversion when
performing the home return.
Error annunciation
Turns on when an error occurs on the corresponding axis.
The contacts of all axes turn on if an error occurs on all
axes.
The details of the error can be confirmed in the error
annunciation area of the shared memory.
Warning annunciation
Turns on when a warning occurs on the corresponding
axis.
The contacts of all axes turn on if a warning occurs on all
axes.
The details of the warning can be confirmed in the warning
annunciation area of the shared memory.
General-purpose input 1
General-purpose input 2
General-purpose input 1
General-purpose input 2
General-purpose input 1
General-purpose input 2
General-purpose input 1
General-purpose input 2
General-purpose input 1
General-purpose input 2
General-purpose input 1
General-purpose input 2
General-purpose input 1
General-purpose input 2
General-purpose input 1
General-purpose input 2
Monitor contact for the general-purpose input connected to
the corresnponding AMP.
The input status of this contact does not affect on the
operation of the motor or positioning unit.
Target
axis
Name
Y100
Y80
All axes System stop
Y101
Y102
Y103
Y104
Y105
Y106
Y81
Y82
Y83
Y84
Y85
Y86
-
-
Y87
All axes
Recalculation
request
Y107
WY8
WY10
Contact allocation
FPΣ
FP2
Descriptions
Contact for requesting the system stop. When it turns on, all
axes will stop at the deceleration time 0.
Turn on this signal when each positioning data (standard area) in
the shared memory was changed.
The positioning data after the table number starting the
recalculation specified in the shared memory can be restructured
and will be executable by turning on this signal.
When restructuring of the positioning data completes, the
recalculation done contact (X_7) will turn on.
WY9
Y108
Y109
Y10A
Y10B
Y10C
Y10D
Y10E
Y10F
Y110
Y111
Y112
Y113
Y114
Y115
Y116
Y117
Y118
Y119
Y11A
Y11B
Y11C
Y11D
Y11E
Y11F
Y120
Y121
Y122
Y123
Y124
Y125
Y126
Y127
Y128
Y129
Y12A
Y12B
Y12C
Y12D
Y12E
Y12F
WY10
WY12
WY11
Note) It is used only when the positioning data has been
rewritten by laddar programs.
Y88
Y89
Y8A
Y8B
Y8C
Y8D
Y8E
Y8F
Y90
Y91
Y92
Y93
Y94
Y95
Y96
Y97
Y98
Y99
Y9A
Y9B
Y9C
Y9D
Y9E
Y9F
Y100
Y101
Y102
Y103
Y104
Y105
Y106
Y107
Y108
Y109
Y10A
Y10B
Y10C
Y10D
Y10E
Y10F
1 axis
2 axis
3 axis
4 axis
5 axis
6 axis
7 axis
8 axis
1 axis
2 axis
3 axis
4 axis
5 axis
6 axis
7 axis
8 axis
1 axis
2 axis
3 axis
4 axis
5 axis
6 axis
7 axis
8 axis
1 axis
2 axis
3 axis
4 axis
5 axis
6 axis
7 axis
8 axis
Requests the servo lock for the corresponding AMP.
The servo lock is executed by the ON edge of this contact.
The servo cannot be free automatically even in the program
Servo ON request
mode.
To make the servo free, turn on the servo OFF request contact.
(The operation is the edge type.)
Requests the positioning control for the corresponding AMP.
The starting table is specified in the area for specifying the
position control starting table number in the shared memory.
Positioning start-up (The operation is the edge type.)
If this contact turns on during the Tool operation by Configurator
PM, a warning will be output.
Requests the home return for the corresponding AMP.
The settings for the direction or pattern of the home return are
specified by Configurtor PM or the home return operation setting
Home return start- area in the shared memory.
up
(The operation is the edge type.)
If this contact turns on during the Tool operation by Configurator
PM, a warning will be output.
JOG forward
JOG reverse
JOG forward
JOG reverse
JOG forward
JOG reverse
JOG forward
JOG reverse
JOG forward
JOG reverse
JOG forward
JOG reverse
JOG forward
JOG reverse
JOG forward
JOG reverse
Requests the JOG operation for the corresponding AMP.
The settings for acceleration time, etc are specified by
Configurator PM or the JOG operation settings in the shared
memory.
(The operation is the level type.)
If this contact turns on during the Tool operation by Configurator
PM, a warning will be output.
17-9
17-10
WY11
WY12
WY13
WY15
WY14
WY13
Contact allocation
FPΣ
FP2
Y130
Y110
Y131
Y111
Y132
Y112
Y133
Y113
Y134
Y114
Y135
Y115
Y136
Y116
Y137
Y117
Y138
Y118
Y139
Y119
Y13A
Y11A
Y13B
Y11B
Y13C
Y11C
Y13D
Y11D
Y13E
Y11E
Y13F
Y11F
Y140
Y120
Y141
Y121
Y142
Y122
Y143
Y123
Y144
Y124
Y145
Y125
Y146
Y126
Y147
Y127
Y148
Y128
Y149
Y129
Y14A
Y12A
Y14B
Y12B
Y14C
Y12C
Y14D
Y12D
Y14E
Y12E
Y14F
Y12F
Y150
Y130
Y151
Y131
Y152
Y132
Y153
Y133
Y154
Y134
Y155
Y135
Y156
Y136
Y157
Y137
Y158
Y138
Y159
Y139
Y15A
Y13A
Y15B
Y13B
Y15C
Y13C
Y15D
Y13D
Y15E
Y13E
Y15F
Y13F
Target
axis
1 axis
2 axis
3 axis
4 axis
5 axis
6 axis
7 axis
8 axis
1 axis
2 axis
3 axis
4 axis
5 axis
6 axis
7 axis
8 axis
1 axis
2 axis
3 axis
4 axis
5 axis
6 axis
7 axis
8 axis
1 axis
2 axis
3 axis
4 axis
5 axis
6 axis
7 axis
8 axis
-
Name
Emergency stop
Descriptions
Requests the emergency stop for the corresponding AMP.
The deceleration time for the emegency stop is specified by
Configurator PM or the emergency stop setting in the shared
memory.
(The operation is the level type.)
Note) The deviation counter cannot be cleared.
Deceleration stop
Requests the deceleration stop for the corresponding AMP.
The deceleration time for the deceleration stop is specified by
Configurator PM or the deceleration stop setting in the shared
memory.
(The operation is the level type.)
Note) The deviation counter cannot be cleared.
Pulser operation
enabled
Requests the permission for the pulser operation of the
corresponding AMP.
The multiple setting and other settings for the pulser operation
are specified by Configurator PM or the pulser operation setting
area in the shared memory.
(The operation is the level type.)
-
-
Request servo off
Requests the servo free for the corresponding AMP.
The servo free is executed by the ON edge of this contact.
(The operation is the edge type.)
-
-
WY14
WY15
WY17
WY16
Contact allocation
FPΣ
FP2
Y160
Y140
Y161
Y141
Y162
Y142
Y163
Y143
Y164
Y144
Y165
Y145
Y166
Y146
Y167
Y147
Y168
Y148
Y169
Y149
Y16A
Y14A
Y16B
Y14B
Y16C
Y14C
Y16D
Y14D
Y16E
Y14E
Y16F
Y14F
Y170
Y150
Y171
Y151
Y172
Y152
Y173
Y153
Y174
Y154
Y175
Y155
Y176
Y156
Y177
Y157
Y178
Y158
Y179
Y159
Y17A
Y15A
Y17B
Y15B
Y17C
Y15C
Y17D
Y15D
Y17E
Y15E
Y17F
Y15F
Target
Name
axis
1 axis
2 axis
3 axis
4 axis
Request error clear
5 axis
6 axis
7 axis
8 axis
1 axis
2 axis
3 axis
4 axis
Request warning clear
5 axis
6 axis
7 axis
8 axis
General-purpose output 1
1 axis
General-purpose output 2
General-purpose output 1
2 axis
General-purpose output 2
General-purpose output 1
3 axis
General-purpose output 2
General-purpose output 1
4 axis
General-purpose output 2
General-purpose output 1
5 axis
General-purpose output 2
General-purpose output 1
6 axis
General-purpose output 2
General-purpose output 1
7 axis
General-purpose output 2
General-purpose output 1
8 axis
General-purpose output 2
Descriptions
Requests the error clear for the corresponding AMP.
The processing to recover from errors is performed and
the error logs are cleared by turning on this signal.
Requests the warning clear for the corresponding AMP.
The warning logs are cleared by turning on this signal.
Contact for the general-purpose output connected to the
corresponding AMP.
The input status of this contact does not affect on the
operation of the motor or positioning unit.
17-11
17.3 Configuration of Shared Memory Areas
The positioning unit RTEX manages all the setting values of parameters and positioning data in the
shared memory. Therefore, all the setting values can be specified by ladder programs as well as
Configurator PM.
Followings are the details of the shared memory.
Area name
Shared memory bank
Individual name of each area
Setting parameter control area
Operation speed rate area
Axis group setting area
Home change data area
Common area
00H
Torque limit area
Position control starting table number setting area
Error annunciation & clear area
Warning annunciation & clear area
1 axis Each axis information & monitor area
2 axis Each axis information & monitor area
3 axis Each axis information & monitor area
Each axis
4 axis Each axis information & monitor area
information area
01H
5 axis Each axis information & monitor area
Note)
6 axis Each axis information & monitor area
7 axis Each axis information & monitor area
8 axis Each axis information & monitor area
Parameter setting area
02H to 0BH
1 axis Positioning data setting area (Standard: for
600 points, Extended: for 25 points)
Parameter setting area
0CH to 15H
2 axis Positioning data setting area (Standard: for
600 points, Extended: for 25 points)
Parameter setting area
16H to 1FH
3 axis Positioning data setting area (Standard: for
600 points, Extended: for 25 points)
Parameter setting area
20H to 29H
4 axis Positioning data setting area (Standard: for
600 points, Extended: for 25 points)
Each axis setting
area
Parameter setting area
2AH to 33H
5 axis Positioning data setting area (Standard: for
600 points, Extended: for 25 points)
Parameter setting area
34H to 3DH
6 axis Positioning data setting area (Standard: for
600 points, Extended: for 25 points)
Parameter setting area
3EH to 47H
7 axis Positioning data setting area (Standard: for
600 points, Extended: for 25 points)
Parameter setting area
48H to 51H
8 axis Positioning data setting area (Standard: for
600 points, Extended: for 25 points)
Note) Firstly confirm that the link establishment annunciation flag is on when reading the axis information
area using the ladder program.
17-12
17.4 Details of Common Area in Shared Memory
17.4.1 Configuration of Common Area
The shared memory is composed of banks. The common area is allocated in the bank 00H in the shared
memory, and is used for the common settings of each axis.
17-13
17.4.2 Setting Parameter Control Area
This is the area to write the setting values of the positioning parameters and positioning data in the
shared memory into FROM, or to execute the recalculation of the positioning data.
The number of writing to FROM in the positioning unit is announced to the CPU unit (control unit)
through this area, and writing the positioning parameters and positioning data in the shared memory to
FROM is requested. Also, the recalculation starting table number is set to recalculate the positioning
data in the standard area.
Bank
Offset
address
080H
Name
Descriptions
Annunciation of
number of
writing to FROM
Announces the number of writing the
positioning parameters and data in the
shared memory into FROM.
When writing into FROM by Configurator
PM, the following procedures will be
automatically performed.
When writing into FROM by ladder
programs, it is necessary to achieve the
following Configurator PM operation by
the ladder programs.
081H
Request for
writing to FROM
085H
Recalculation
starting table
number
00H
1. Write 5555H in this area by the ladder
program.
2. The positioning unit checks 5555H,
and write 6666H over in the same
area.
3. Check 6666H by the ladder program,
and write AAAAH over.
(Time out of 6666H is 30 seconds.)
4. The positioning unit copies the content
of the shared memory into FROM.
5. The positioning unit checkes writing.
When OK: The unit sets 0000H.
When NG: The unit sets FFFFH.
6. When confirming 0000H by the ladder
program, the operation will be
completed successfully. When
confirming FFFFH, an error will occur.
In that case, write 0000H over in this
area.
When the recalculation request signal
(Y_7 contact) turns on, the positioning
unit will recalculate the positioning data
of all the axes from this table number to
No. 600.
Default
Setting
value
range
0
-
times
0000H
-
-
1
1 to 600
-
Default
Setting
value
range
100
1 to 100
Unit
17.4.3 Operation Speed Rate Area
Bank
00H
17-14
Offset
address
088H
Name
Descriptions
Operation speed
rate
All operations relating to axes
(positioning, JOG, home return) can be
perfomred at the specified rate.
The unit is %, and can be input in the
range of 1 to 100 (%).
Unit
%
17.4.4 Setting Parameter Control Area
The interpolation groups for each axis are set in this area. For the axis connected to network, set the bit
of the corresponding axis to 1 in any setting as below.
Bank
Offset
address
0B0H
0B1H
0B2H
0B3H
Name
Descriptions
Group A axis
settings
Group B axis
settings
Group C axis
settings
Set either independent or interpolation for each axis in this area. In case
of interpolation, each axis belongs to any group among A to D. For
example, the axes 1, 2, and 3 belong to group A and are 3-axis
interpolation, set the corresponding 3 bits to 1 in the interpolation axis
setting of group A. In case of single axis independent setting, it does not
belong to any group. Turn on the corresponding bits of the rest of the
independent axis settings.
Maximum number of interpolation axis per group is 3. The same axis
cannot be set in more than one group.
Group D axis
settings
00H
For the axes that do not belong to the interpolation relation, set the
corresponding bits to 1.
0B4H
Independent
axis settings
17-15
17.4.5 Home Change Data Area
To change the coordinate origin (default is 0) of each axis managed in the positioning unit, store the
changed coordinate in this area, and turn on the home change request flag.
Bank
Offset
address
Name
Descriptions
Only when the corresponding bits fo reach axis changed to 1 from 0, the
coordinate origin managed in the positioning unit will be changed to the
following home change coordiates.
Afther the change, the positioning unit clear the corresponding bits to 0
automatically.
0C0H
0C8H
0C9H
00H
0CAH
0CBH
0CCH
0CDH
0CEH
0CFH
0D0H
0D1H
0D2H
0D3H
0D4H
0D5H
0D6H
0D7H
17-16
Home change
request flag
Home change
coordinate of
axis 1
Home change
coordinate of
axis 2
Home change
coordinate of
axis 3
Home change
coordinate of
axis 4
Home change
coordinate of
axis 5
Home change
coordinate of
axis 6
Home change
coordinate of
axis 7
Home change
coordinate of
axis 8
Stores the coordinate to change the original point of axis 1.
Stores the coordinate to change the original point of axis 2.
Stores the coordinate to change the original point of axis 3.
Stores the coordinate to change the original point of axis 4.
Stores the coordinate to change the original point of axis 5.
Stores the coordinate to change the original point of axis 6.
Stores the coordinate to change the original point of axis 7.
Stores the coordinate to change the original point of axis 8.
17.4.6 Torque Limit Area
The output torque from the AMP to motor can be changed. The setting range of 1 to 5000 is equivalent
to 0.1 to 500.0 %. It cannot be changed during the positioning operation. The change done during the
positioning operation will be affected at the next start-up.
Bank
Offset
address
0D8H
00H
0E0H
0E1H
0E2H
0E3H
0E4H
0E5H
0E6H
0E7H
Name
Setting
Unit
value
range
Sets whehter to enable or disable the execution of the torque limit for
each axis. To enable the torque limit, set the corresponding bit to 1.
Descriptions
Default
Torque limit
enabled flag
Torque limit
value of axis 1
Torque limit
value of axis 2
Torque limit
value of axis 3
Torque limit
value of axis 4
Torque limit
value of axis 5
Torque limit
value of axis 6
Torque limit
value of axis 7
Torque limit
value of axis 8
Stores the torque limit value of axis 1.
3000
Stores the torque limit value of axis 2.
3000
Stores the torque limit value of axis 3.
3000
Stores the torque limit value of axis 4.
3000
Stores the torque limit value of axis 5.
3000
Stores the torque limit value of axis 6.
3000
Stores the torque limit value of axis 7.
3000
Stores the torque limit value of axis 8.
3000
1 to
5000
1 to
5000
1 to
5000
1 to
5000
1 to
5000
1 to
5000
1 to
5000
1 to
5000
0.1 %
0.1 %
0.1 %
0.1 %
0.1 %
0.1 %
0.1 %
0.1 %
17-17
17.4.7 Positioning Table Setting Area
Used to specify the table number to start the position control.
The setting ranges are 1 to 600 in the standard area, and 10001 to 10025 in the extended area.
Bank
Offset
address
100H
101H
102H
103H
00H
104H
105H
106H
107H
17-18
Name
Position control
starting table
number of 1st axis
Position control
starting table
number of 2nd axis
Position control
starting table
number of 3rd axis
Position control
starting table
number of 4th axis
Position control
starting table
number of 5th axis
Position control
starting table
number of 6th axis
Position control
starting table
number of 7th axis
Position control
starting table
number of 8th axis
Descriptions
Default
Setting
value
range
1 to 600
10001 to
10025
1 to 600
10001 to
10025
1 to 600
10001 to
10025
1 to 600
10001 to
10025
1 to 600
10001 to
10025
1 to 600
10001 to
10025
1 to 600
10001 to
10025
1 to 600
10001 to
10025
Stores the table number of 1st axis
starting the position control.
1
Stores the table number of 2nd axis
starting the position control.
1
Stores the table number of 3rd axis
starting the position control.
1
Stores the table number of 4th axis
starting the position control.
1
Stores the table number of 5th axis
starting the position control.
1
Stores the table number of 6th axis
starting the position control.
1
Stores the table number of 7th axis
starting the position control.
1
Stores the table number of 8th axis
starting the position control.
1
Unit
-
-
-
-
-
-
-
-
17.4.8 Error Annunciation & Clear Area
When an error occurs (that leads to the stop), the error and the number of occurrences for each axis will
be stored in this area. Once the error clear is executed, the error and number of occurrences will be
cleared, and then the error will be judged again. If the error condition still continues, the error will occur
again even after the execution of error clear. When an error targeted to all axes such as a network failure
occurs, it will be stored in the error annunciation buffers of all axes. Up to 7 errors are stored in the error
history.
The error clear can be executed by the error clear contact as well.
Bank
Offset
address
Name
Descriptions
Executes the error clear for each axis.
111H
Error clear
individual axis
setting
129H
Number of error
occurrences of
axis 1
12AH
12BH
12CH
12DH
12EH
00H
12FH
130H
131H
132H
133H
134H
135H
136H
137H
139H
13AH
13BH
13CH
13DH
13EH
13FH
Error code
annunciation
buffer 1 of axis 1
Error code
annunciation
buffer 2 of axis 1
Error code
annunciation
buffer 3 of axis 1
Error code
annunciation
buffer 4 of axis 1
Error code
annunciation
buffer 5 of axis 1
Error code
annunciation
buffer 6 of axis 1
Error code
annunciation
buffer 7 of axis 1
Number of error
occurrences of
axis 2
Error code
annunciation
buffer 1 of axis 2
Error code
annunciation
buffer 2 of axis 2
Error code
annunciation
buffer 3 of axis 2
Announces the number of occurrences of errors at axis 1.
Stores the latest error code from the buffer number 1 in order.
Announces the number of occurrences of errors at axis 2.
Announces the code when an error occurred.
Announces the code when an error occurred.
Announces the code when an error occurred.
17-19
Bank
Offset
address
140H
141H
142H
143H
144H
145H
146H
147H
149H
14AH
14BH
14CH
14DH
14EH
14FH
150H
151H
152H
00H
153H
154H
155H
156H
157H
159H
15AH
15BH
15CH
15DH
15EH
15FH
160H
161H
162H
163H
164H
165H
166H
167H
17-20
Name
Error code
annunciation
buffer 4 of axis 2
Error code
annunciation
buffer 5 of axis 2
Error code
annunciation
buffer 6 of axis 2
Error code
annunciation
buffer 7 of axis 2
Number of error
occurrences of
axis 3
Error code
annunciation
buffer 1 of axis 3
Error code
annunciation
buffer 2 of axis 3
Error code
annunciation
buffer 3 of axis 3
Error code
annunciation
buffer 4 of axis 3
Error code
annunciation
buffer 5 of axis 3
Error code
annunciation
buffer 6 of axis 3
Error code
annunciation
buffer 7 of axis 3
Number of error
occurrences of
axis 4
Error code
annunciation
buffer 1 of axis 4
Error code
annunciation
buffer 2 of axis 4
Error code
annunciation
buffer 3 of axis 4
Error code
annunciation
buffer 4 of axis 4
Error code
annunciation
buffer 5 of axis 4
Error code
annunciation
buffer 6 of axis 4
Error code
annunciation
buffer 7 of axis 4
Descriptions
Announces the code when an error occurred.
Announces the code when an error occurred.
Announces the code when an error occurred.
Announces the code when an error occurred.
Announces the number of occurrences of errors at axis 3.
Announces the code when an error occurred.
Announces the code when an error occurred.
Announces the code when an error occurred.
Announces the code when an error occurred.
Announces the code when an error occurred.
Announces the code when an error occurred.
Announces the code when an error occurred.
Announces the number of occurrences of errors at axis 4.
Announces the code when an error occurred.
Announces the code when an error occurred.
Announces the code when an error occurred.
Announces the code when an error occurred.
Announces the code when an error occurred.
Announces the code when an error occurred.
Announces the code when an error occurred.
Bank
Offset
address
169H
16AH
16BH
16CH
16DH
16EH
16FH
170H
171H
172H
173H
174H
175H
176H
00H
177H
179H
17AH
17BH
17CH
17DH
17EH
17FH
180H
181H
182H
183H
184H
185H
186H
187H
Name
Number of error
occurrences of
axis 5
Error code
annunciation
buffer 1 of axis 5
Error code
annunciation
buffer 2 of axis 5
Error code
annunciation
buffer 3 of axis 5
Error code
annunciation
buffer 4 of axis 5
Error code
annunciation
buffer 5 of axis 5
Error code
annunciation
buffer 6 of axis 5
Error code
annunciation
buffer 7 of axis 5
Number of error
occurrences of
axis 6
Error code
annunciation
buffer 1 of axis 6
Error code
annunciation
buffer 2 of axis 6
Error code
annunciation
buffer 3 of axis 6
Error code
annunciation
buffer 4 of axis 6
Error code
annunciation
buffer 5 of axis 6
Error code
annunciation
buffer 6 of axis 6
Error code
annunciation
buffer 7 of axis 6
Descriptions
Announces the number of occurrences of errors at axis 5.
Announces the code when an error occurred.
Announces the code when an error occurred.
Announces the code when an error occurred.
Announces the code when an error occurred.
Announces the code when an error occurred.
Announces the code when an error occurred.
Announces the code when an error occurred.
Announces the number of occurrences of errors at axis 6.
Announces the code when an error occurred.
Announces the code when an error occurred.
Announces the code when an error occurred.
Announces the code when an error occurred.
Announces the code when an error occurred.
Announces the code when an error occurred.
Announces the code when an error occurred.
17-21
Bank
Offset
address
189H
18AH
18BH
18CH
18DH
18EH
18FH
190H
191H
192H
193H
194H
195H
196H
00H
197H
199H
19AH
19BH
19CH
19DH
19EH
19FH
1A0H
1A1H
1A2H
1A3H
1A4H
1A5H
1A6H
1A7H
17-22
Name
Number of error
occurrences of
axis 7
Error code
annunciation
buffer 1 of axis 7
Error code
annunciation
buffer 2 of axis 7
Error code
annunciation
buffer 3 of axis 7
Error code
annunciation
buffer 4 of axis 7
Error code
annunciation
buffer 5 of axis 7
Error code
annunciation
buffer 6 of axis 7
Error code
annunciation
buffer 7 of axis 7
Number of error
occurrences of
axis 8
Error code
annunciation
buffer 1 of axis 8
Error code
annunciation
buffer 2 of axis 8
Error code
annunciation
buffer 3 of axis 8
Error code
annunciation
buffer 4 of axis 8
Error code
annunciation
buffer 5 of axis 8
Error code
annunciation
buffer 6 of axis 8
Error code
annunciation
buffer 7 of axis 8
Descriptions
Announces the number of occurrences of errors at axis 7.
Announces the code when an error occurred.
Announces the code when an error occurred.
Announces the code when an error occurred.
Announces the code when an error occurred.
Announces the code when an error occurred.
Announces the code when an error occurred.
Announces the code when an error occurred.
Announces the number of occurrences of errors at axis 8.
Announces the code when an error occurred.
Announces the code when an error occurred.
Announces the code when an error occurred.
Announces the code when an error occurred.
Announces the code when an error occurred.
Announces the code when an error occurred.
Announces the code when an error occurred.
17.4.9 Warning Annunciation & Clear Area
When a warning occurs (that does not lead to the stop), the warning and the number of occurrences for
each axis will be stored in this area. Once the warning clear is executed, the warning and number of
occurrences will be cleared, and then the warning will be judged again. If the warning condition still
continues, the warning will occur again even after the execution of warning clear. When a warning
targeted to all axes occurs, it will be stored in the warning annunciation buffers of all axes. Up to 7
warnings are stored in the warning history.
The warning clear can be executed by the warning clear contact as well.
Bank
Offset
address
Name
Descriptions
Executes the warning clear for each axis.
1A9H
1C1H
1C2H
1C3H
1C4H
1C5H
1C6H
00H
1C7H
1C8H
1C9H
1CAH
1CBH
1CCH
1CDH
1CEH
1CFH
1D1H
1D2H
1D3H
1D4H
1D5H
1D6H
1D7H
Warning clear
individual axis
setting
Number of
warning
occurrences of
axis 1
Warning code
annunciation
buffer 1 of axis 1
Warning code
annunciation
buffer 2 of axis 1
Warning code
annunciation
buffer 3 of axis 1
Warning code
annunciation
buffer 4 of axis 1
Warning code
annunciation
buffer 5 of axis 1
Warning code
annunciation
buffer 6 of axis 1
Warning code
annunciation
buffer 7 of axis 1
No. of warning
occurrences of
axis 2
Warning code
annunciation
buffer 1 of axis 2
Warning code
annunciation
buffer 2 of axis 2
Warning code
annunciation
buffer 3 of axis 2
Announces the number of occurrences of warnings at axis 1.
Stores the latest warning code from the buffer number 1 in order.
Announces the number of occurrences of warnings at axis 2.
Announces the code when a warning occurred.
Announces the code when a warning occurred.
Announces the code when an error occurred.
17-23
Bank
Offset
address
1D8H
1D9H
1DAH
1DBH
1DCH
1DDH
1DEH
1DFH
1E1H
1E2H
1E3H
1E4H
1E5H
1E6H
1E7H
1E8H
1E9H
1EAH
00H
1EBH
1ECH
1EDH
1EEH
1EFH
1F1H
1F2H
1F3H
1F4H
1F5H
1F6H
1F7H
1F8H
1F9H
1FAH
1FBH
1FCH
1FDH
1FEH
1FFH
17-24
Name
Warning code
annunciation
buffer 4 of axis 2
Warning code
annunciation
buffer 5 of axis 2
Warning code
annunciation
buffer 6 of axis 2
Warning code
annunciation
buffer 7 of axis 2
No. of warning
occurrences of
axis 3
Warning code
annunciation
buffer 1 of axis 3
Warning code
annunciation
buffer 2 of axis 3
Warning code
annunciation
buffer 3 of axis 3
Warning code
annunciation
buffer 4 of axis 3
Warning code
annunciation
buffer 5 of axis 3
Warning code
annunciation
buffer 6 of axis 3
Warning code
annunciation
buffer 7 of axis 3
No. of warning
occurrences of
axis 4
Warning code
annunciation
buffer 1 of axis 4
Warning code
annunciation
buffer 2 of axis 4
Warning code
annunciation
buffer 3 of axis 4
Warning code
annunciation
buffer 4 of axis 4
Warning code
annunciation
buffer 5 of axis 4
Warning code
annunciation
buffer 6 of axis 4
Warning code
annunciation
buffer 7 of axis 4
Descriptions
Announces the code when a warning occurred.
Announces the code when a warning occurred.
Announces the code when a warning occurred.
Announces the code when a warning occurred.
Announces the number of occurrences of warnings at axis 3.
Announces the code when a warning occurred.
Announces the code when a warning occurred.
Announces the code when a warning occurred.
Announces the code when a warning occurred.
Announces the code when a warning occurred.
Announces the code when a warning occurred.
Announces the code when a warning occurred.
Announces the number of occurrences of warnings at axis 4.
Announces the code when a warning occurred.
Announces the code when a warning occurred.
Announces the code when a warning occurred.
Announces the code when a warning occurred.
Announces the code when a warning occurred.
Announces the code when a warning occurred.
Announces the code when a warning occurred.
Bank
Offset
address
201H
202H
203H
204H
205H
206H
207H
208H
209H
20AH
20BH
20CH
20DH
20EH
00H
20FH
211H
212H
213H
214H
215H
216H
217H
218H
219H
21AH
21BH
21CH
21DH
21EH
21FH
Name
No. of warning
occurrences of
axis 5
Warning code
annunciation
buffer 1 of axis 5
Warning code
annunciation
buffer 2 of axis 5
Warning code
annunciation
buffer 3 of axis 5
Warning code
annunciation
buffer 4 of axis 5
Warning code
annunciation
buffer 5 of axis 5
Warning code
annunciation
buffer 6 of axis 5
Warning code
annunciation
buffer 7 of axis 5
No. of warning
occurrences of
axis 6
Warning code
annunciation
buffer 1 of axis 6
Warning code
annunciation
buffer 2 of axis 6
Warning code
annunciation
buffer 3 of axis 6
Warning code
annunciation
buffer 4 of axis 6
Warning code
annunciation
buffer 5 of axis 6
Warning code
annunciation
buffer 6 of axis 6
Warning code
annunciation
buffer 7 of axis 6
Descriptions
Announces the number of occurrences of warnings at axis 5.
Announces the code when a warning occurred.
Announces the code when a warning occurred.
Announces the code when a warning occurred.
Announces the code when a warning occurred.
Announces the code when a warning occurred.
Announces the code when a warning occurred.
Announces the code when a warning occurred.
Announces the number of occurrences of warnings at axis 6.
Announces the code when a warning occurred.
Announces the code when a warning occurred.
Announces the code when a warning occurred.
Announces the code when a warning occurred.
Announces the code when a warning occurred.
Announces the code when a warning occurred.
Announces the code when a warning occurred.
17-25
Bank
Offset
address
221H
222H
223H
224H
225H
226H
227H
228H
229H
22AH
22BH
22CH
22DH
22EH
00H
22FH
231H
232H
233H
234H
235H
236H
237H
238H
239H
23AH
23BH
23CH
23DH
23EH
23FH
17-26
Name
No. of warning
occurrences of
axis 7
Warning code
annunciation
buffer 1 of axis 7
Warning code
annunciation
buffer 2 of axis 7
Warning code
annunciation
buffer 3 of axis 7
Warning code
annunciation
buffer 4 of axis 7
Warning code
annunciation
buffer 5 of axis 7
Warning code
annunciation
buffer 6 of axis 7
Warning code
annunciation
buffer 7 of axis 7
No. of warning
occurrences of
axis 8
Warning code
annunciation
buffer 1 of axis 8
Warning code
annunciation
buffer 2 of axis 8
Warning code
annunciation
buffer 3 of axis 8
Warning code
annunciation
buffer 4 of axis 8
Warning code
annunciation
buffer 5 of axis 8
Warning code
annunciation
buffer 6 of axis 8
Warning code
annunciation
buffer 7 of axis 8
Descriptions
Announces the number of occurrences of warnings at axis 7.
Announces the code when a warning occurred.
Announces the code when a warning occurred.
Announces the code when a warning occurred.
Announces the code when a warning occurred.
Announces the code when a warning occurred.
Announces the code when a warning occurred.
Announces the code when a warning occurred.
Announces the number of occurrences of warnings at axis 8.
Announces the code when a warning occurred.
Announces the code when a warning occurred.
Announces the code when a warning occurred.
Announces the code when a warning occurred.
Announces the code when a warning occurred.
Announces the code when a warning occurred.
Announces the code when a warning occurred.
17.5 Details of Each Axis Information Area in Shared
Memory
17.5.1 Configuration of Each Axis Information Area
The shared memory is composed of banks. The each axis information area is allocated in the bank 01H
in the shared memory. Also the information on the axes 1 to 8 is allowcated for each address in this area.
Note: Firstly confirm that the link establishment annunciation flag is on when reading the axis
information area using the ladder program.
17-27
17.5.2 Each Axis Information & Monitor Area
These are the areas for the AMP system information of each axis and monitoring operation states.
Axis information of axis 1
Bank
01H
17-28
Offset
address
000H
001H
002H
003H
004H
005H
006H
007H
008H
009H
00AH
00BH
00CH
00DH
00EH
00FH
010H
011H
012H
013H
014H
015H
016H
017H
018H
019H
01AH
01BH
01CH
01DH
01EH
01FH
020H
021H
022H
023H
024H
025H
026H
027H
Default
Setting
value
range
Name
Descriptions
Unit
System ID of
axis 1
(Brand name or
vendor name)
Stores the brand name or vendor name.
Each information is stored as ASCII code
of 16 bytes (Max. 16 characters).
0H
-
-
System ID of
axis 1
(Model code of
AMP)
Stores the model code of AMP.
Each information is stored as ASCII code
of 16 bytes (Max. 16 characters).
0H
-
-
System ID of
axis 1
(Version of
firmware)
Stores the version of firmware of AMP.
Each information is stored as ASCII code
of 16 bytes (Max. 16 characters).
0H
-
-
System ID of
axis 1
(Model code of
motor)
Stores the model code of motor.
Each information is stored as ASCII code
of 16 bytes (Max. 16 characters).
0H
-
-
System ID of
axis 1
(Serial number
of motor)
Stores the serial number of motor.
Each information is stored as ASCII code
of 16 bytes (Max. 16 characters).
0H
-
-
Bank
Offset
address
Name
Descriptions
Defaul
Setting
t value
range
Unit
Stores the status indication of AMP
030H
Status indication
of axis 1
Stores the information of I/O connected to the AMPs of each axis.
01H
031H
External terminal
input monitor of
axis 1
032H
Torque
command of
axis 1
033H
Actual speed of
axis 1
038H
039H
03CH
03DH
03EH
03FH
Acitve table or
execution done
table of axis 1
Auxiliary output
code of axis 1
Feedback value
of axis 1
Unit system
conversion
feedback value
of axis 1
-
0 to
5000
0.1 %
Stores the actual speed monitor value.
-
0 to
5000
0.1
rps or
0.1
rpm
Stores the number of active positioning
table or when the operation completed.
1
1 to
600
-
Stores the auxiliary output code.
0
Stores the current value (absolute
coordinate) of AMP.
0
-
pulse
Stores the current value after the unit
was converted.
0
-
-
Stores the torque monitor value.
-
17-29
Axis information of axis 2
Bank
01H
Offset
address
040H
041H
042H
043H
044H
045H
046H
047H
048H
049H
04AH
04BH
04CH
04DH
04EH
04FH
050H
051H
052H
053H
054H
055H
056H
057H
058H
059H
05AH
05BH
05CH
05DH
05EH
05FH
060H
061H
062H
063H
064H
065H
066H
067H
070H
071H
072H
073H
078H
079H
07CH
07DH
07EH
07FH
17-30
Name
Descriptions
System ID of axis 2
(Brand name or vendor
name)
Refer to the descriptions of axis 1.
System ID of axis 2
(Model code of AMP)
Refer to the descriptions of axis 1.
System ID of axis 2
(Version of firmware)
Refer to the descriptions of axis 1.
System ID of axis 2
(Model code of motor)
Refer to the descriptions of axis 1.
System ID of axis 2
(Serial number of motor)
Refer to the descriptions of axis 1.
Status indication of axis 2
External terminal input
monitor of axis 2
Torque command of axis 2
Actual speed of axis 2
Acitve table or execution
done table of axis 2
Auxiliary output code of
axis 2
Refer to the descriptions of axis 1.
Refer to the descriptions of axis 1.
Refer to the descriptions of axis 1.
Refer to the descriptions of axis 1.
Refer to the descriptions of axis 1.
Refer to the descriptions of axis 1.
Feedback value of axis 2
Refer to the descriptions of axis 1.
Unit system conversion
feedback value of axis 2
Refer to the descriptions of axis 1.
Axis information of axis 3
Bank
01H
Offset
address
080H
081H
082H
083H
084H
085H
086H
087H
088H
089H
08AH
08BH
08CH
08DH
08EH
08FH
090H
091H
092H
093H
094H
095H
096H
097H
098H
099H
09AH
09BH
09CH
09DH
09EH
09FH
0A0H
0A1H
0A2H
0A3H
0A4H
0A5H
0A6H
0A7H
0B0H
0B1H
0B2H
0B3H
0B8H
0B9H
0BCH
0BDH
0BEH
0BFH
Name
Descriptions
System ID of axis 3
(Brand name or vendor
name)
Refer to the descriptions of axis 1.
System ID of axis 3
(Model code of AMP)
Refer to the descriptions of axis 1.
System ID of axis 3
(Version of firmware)
Refer to the descriptions of axis 1.
System ID of axis 3
(Model code of motor)
Refer to the descriptions of axis 1.
System ID of axis 3
(Serial number of motor)
Refer to the descriptions of axis 1.
Status indication of axis 3
External terminal input
monitor of axis 3
Torque command of axis 3
Actual speed of axis 3
Acitve table or execution
done table of axis 3
Auxiliary output code of
axis 3
Refer to the descriptions of axis 1.
Refer to the descriptions of axis 1.
Refer to the descriptions of axis 1.
Refer to the descriptions of axis 1.
Refer to the descriptions of axis 1.
Refer to the descriptions of axis 1.
Feedback value of axis 3
Refer to the descriptions of axis 1.
Unit system conversion
feedback value of axis 3
Refer to the descriptions of axis 1.
17-31
Axis information of axis 4
Bank
01H
Offset
address
0C0H
0C1H
0C2H
0C3H
0C4H
0C5H
0C6H
0C7H
0C8H
0C9H
0CAH
0CBH
0CCH
0CDH
0CEH
0CFH
0D0H
0D1H
0D2H
0D3H
0D4H
0D5H
0D6H
0D7H
0D8H
0D9H
0DAH
0DBH
0DCH
0DDH
0DEH
0DFH
0E0H
0E1H
0E2H
0E3H
0E4H
0E5H
0E6H
0E7H
0E0H
0E1H
0E2H
0E3H
0E8H
0E9H
0ECH
0EDH
0EEH
0EFH
17-32
Name
Descriptions
System ID of axis 4
(Brand name or vendor
name)
Refer to the descriptions of axis 1.
System ID of axis 4
(Model code of AMP)
Refer to the descriptions of axis 1.
System ID of axis 4
(Version of firmware)
Refer to the descriptions of axis 1.
System ID of axis 4
(Model code of motor)
Refer to the descriptions of axis 1.
System ID of axis 4
(Serial number of motor)
Refer to the descriptions of axis 1.
Status indication of axis 4
External terminal input
monitor of axis 4
Torque command of axis 4
Actual speed of axis 4
Acitve table or execution
done table of axis 4
Auxiliary output code of
axis 4
Refer to the descriptions of axis 1.
Refer to the descriptions of axis 1.
Refer to the descriptions of axis 1.
Refer to the descriptions of axis 1.
Refer to the descriptions of axis 1.
Refer to the descriptions of axis 1.
Feedback value of axis 4
Refer to the descriptions of axis 1.
Unit system conversion
feedback value of axis 4
Refer to the descriptions of axis 1.
Axis information of axis 5
Bank
01H
Offset
address
100H
101H
102H
103H
104H
105H
106H
107H
108H
109H
10AH
10BH
10CH
10DH
10EH
10FH
110H
111H
112H
113H
114H
115H
116H
117H
118H
119H
11AH
11BH
11CH
11DH
11EH
11FH
120H
121H
122H
123H
124H
125H
126H
127H
130H
131H
132H
133H
138H
139H
13CH
13DH
13EH
13FH
Name
Descriptions
System ID of axis 5
(Brand name or vendor
name)
Refer to the descriptions of axis 1.
System ID of axis 5
(Model code of AMP)
Refer to the descriptions of axis 1.
System ID of axis 5
(Version of firmware)
Refer to the descriptions of axis 1.
System ID of axis 5
(Model code of motor)
Refer to the descriptions of axis 1.
System ID of axis 5
(Serial number of motor)
Refer to the descriptions of axis 1.
Status indication of axis 5
External terminal input
monitor of axis 5
Torque command of axis 5
Actual speed of axis 5
Acitve table or execution
done table of axis 5
Auxiliary output code of
axis 5
Refer to the descriptions of axis 1.
Refer to the descriptions of axis 1.
Refer to the descriptions of axis 1.
Refer to the descriptions of axis 1.
Refer to the descriptions of axis 1.
Refer to the descriptions of axis 1.
Feedback value of axis 5
Refer to the descriptions of axis 1.
Unit system conversion
feedback value of axis 5
Refer to the descriptions of axis 1.
17-33
Axis information of axis 6
Bank
01H
Offset
address
140H
141H
142H
143H
144H
145H
146H
147H
148H
149H
14AH
14BH
14CH
14DH
14EH
14FH
150H
151H
152H
153H
154H
155H
156H
157H
158H
159H
15AH
15BH
15CH
15DH
15EH
15FH
160H
161H
162H
163H
164H
165H
166H
167H
170H
171H
172H
173H
178H
179H
17CH
17DH
17EH
17FH
17-34
Name
Descriptions
System ID of axis 6
(Brand name or vendor
name)
Refer to the descriptions of axis 1.
System ID of axis 6
(Model code of AMP)
Refer to the descriptions of axis 1.
System ID of axis 6
(Version of firmware)
Refer to the descriptions of axis 1.
System ID of axis 6
(Model code of motor)
Refer to the descriptions of axis 1.
System ID of axis 6
(Serial number of motor)
Refer to the descriptions of axis 1.
Status indication of axis 6
External terminal input
monitor of axis 6
Torque command of axis 6
Actual speed of axis 6
Acitve table or execution
done table of axis 6
Auxiliary output code of
axis 6
Refer to the descriptions of axis 1.
Refer to the descriptions of axis 1.
Refer to the descriptions of axis 1.
Refer to the descriptions of axis 1.
Refer to the descriptions of axis 1.
Refer to the descriptions of axis 1.
Feedback value of axis 6
Refer to the descriptions of axis 1.
Unit system conversion
feedback value of axis 6
Refer to the descriptions of axis 1.
Axis information of axis 7
Bank
01H
Offset
address
180H
181H
182H
183H
184H
185H
186H
187H
188H
189H
18AH
18BH
18CH
18DH
18EH
18FH
190H
191H
192H
193H
194H
195H
196H
197H
198H
199H
19AH
19BH
19CH
19DH
19EH
19FH
1A0H
1A1H
1A2H
1A3H
1A4H
1A5H
1A6H
1A7H
1B0H
1B1H
1B2H
1B3H
1B8H
1B9H
1BCH
1BDH
1BEH
1BFH
Name
Descriptions
System ID of axis 7
(Brand name or vendor
name)
Refer to the descriptions of axis 1.
System ID of axis 7
(Model code of AMP)
Refer to the descriptions of axis 1.
System ID of axis 7
(Version of firmware)
Refer to the descriptions of axis 1.
System ID of axis 7
(Model code of motor)
Refer to the descriptions of axis 1.
System ID of axis 7
(Serial number of motor)
Refer to the descriptions of axis 1.
Status indication of axis 7
External terminal input
monitor of axis 7
Torque command of axis 7
Actual speed of axis 7
Acitve table or execution
done table of axis 7
Auxiliary output code of
axis 7
Refer to the descriptions of axis 1.
Refer to the descriptions of axis 1.
Refer to the descriptions of axis 1.
Refer to the descriptions of axis 1.
Refer to the descriptions of axis 1.
Refer to the descriptions of axis 1.
Feedback value of axis 7
Refer to the descriptions of axis 1.
Unit system conversion
feedback value of axis 7
Refer to the descriptions of axis 1.
17-35
Axis information of axis 8
Bank
01H
Offset
address
1C0H
1C1H
1C2H
1C3H
1C4H
1C5H
1C6H
1C7H
1C8H
1C9H
1CAH
1CBH
1CCH
1CDH
1CEH
1CFH
1D0H
1D1H
1D2H
1D3H
1D4H
1D5H
1D6H
1D7H
1D8H
1D9H
1DAH
1DBH
1DCH
1DDH
1DEH
1DFH
1E0H
1E1H
1E2H
1E3H
1E4H
1E5H
1E6H
1E7H
1F0H
1F1H
1F2H
1F3H
1F8H
1F9H
1FCH
1FDH
1FEH
1FFH
17-36
Name
Descriptions
System ID of axis 8
(Brand name or vendor
name)
Refer to the descriptions of axis 1.
System ID of axis 8
(Model code of AMP)
Refer to the descriptions of axis 1.
System ID of axis 8
(Version of firmware)
Refer to the descriptions of axis 1.
System ID of axis 8
(Model code of motor)
Refer to the descriptions of axis 1.
System ID of axis 8
(Serial number of motor)
Refer to the descriptions of axis 1.
Status indication of axis 8
External terminal input
monitor of axis 8
Torque command of axis 8
Actual speed of axis 8
Acitve table or execution
done table of axis 8
Auxiliary output code of
axis 8
Refer to the descriptions of axis 1.
Refer to the descriptions of axis 1.
Refer to the descriptions of axis 1.
Refer to the descriptions of axis 1.
Refer to the descriptions of axis 1.
Refer to the descriptions of axis 1.
Feedback value of axis 8
Refer to the descriptions of axis 1.
Unit system conversion
feedback value of axis 8
Refer to the descriptions of axis 1.
17.6 Details of Each Axis Setting Area in Shared Memory
17.6.1 Configuration of Each Axis Setting Area
The shared memory is composed of banks. The each axis setting area is allocated in the banks 02H to
51H in the shared memory. The each axis setting area is used to store positioning parameters and
positioning data, and the setting values are allocated to every address from the axes 1 to 8. The
positioning setting area of each axis is composed of 600 tables of the standard area and 25 tables of the
extended area.
17-37
17.6.2 Parameter Setting Area
Positioning parameters of each axis
Data in the following foramts are stored from the starting address of positioning parameters of each axis.
Offset
address
Name
000H
Unit setting
001H
-
Setting
Unit
value
range
Sets the unit system of movement amounts of the positioning control for each axis.
The same unit system should be set for all interpolation axes.
Descriptions
Default
Sets the pulse number per rotation. It is necessary for the conversion of the pulse
number in the settings of mm, inch and degree.
002H
Pulse number
per rotation
003H
Sets the movement amount per rotation. It is necessary for the conversion of the
pulse number in the settings of mm, inch and degree.
004H
Movement
amount per
rotation
005H
006H
007H
008H
009H
00AH
-
00BH
Software limit
enabled/
disabled setting
Sets the software limit to be enabled or disabled for each control.
Sets the upper limit value of the software limit for absolute coordinates.
00CH
Upper limit of
software limit
00DH
17-38
Offset
address
Name
Descriptions
Default
Setting
value
range
Unit
Sets the lower limit value of the software limit for absolute coordinates.
00EH
Lower limit of
software limit
00FH
010H
011H
-
Sets the auxiliary output function of the auxiliary output contact and code to be
enalbed or disabled. The time that the auxiliary output contact is on is determined
by the following auxiliary output ON time.
012H
Auxiliary output
mode
013H
-
014H
AMP operation
settings
015H
016H
017H
018H
018H
01AH
-
01BH
Completion
width
01CH
Monitor value
error settings
01DH
Torque
judgment value
Sets the limit value of the torque.
5000
0 to
5000
0.1%
01EH
Actual speed
judement value
Sets the limit value of the actual speed.
5000
0 to
5000
0.1rps
or
0.1rpm
01FH
-
-
Sets to enble or disable the limit input of the AMP, and sets the moving direction
and connection method.
Note) This setting is should be written in the EEPROM within the AMP, and the
AMP should be rebooted after changing the setting.
After the movement of the specified amount in the
positioning control or JOG operation, the
10
Positive Pulse
completion flag will turn on when the current value
of the AMP becomes in this completion width.
This is the setting to give an error or warning by setting judgment values for the
torque monitor values and actual speed of each axis.
17-39
Offset
address
Name
Descriptions
Default
Setting
value
range
Unit
Sets the pattern of the home return.
020H
Home return
setting code
Sets the operating direction of the home return.
021H
Home return
direction
022H
Home return
acceleration
time
023H
Home return
deceleration
time
Sets the acceleration/deceleration time when performing the home return.
At the beginning of the home return, accelerates for the specified acceleration
time, decelerates for the specified deceleration time after the proximity input and
changes to the creep speed.
Sets the target speed when performing the home return.
When there is no proximity input after starting the home return, accelerates to the
target speed.
024H
Home return
target speed
025H
Sets the speed to search the home position after the proximity input.
Sets the value lower than the home return target speed.
026H
Home return
creep speed
027H
028H
-
029H
JOG operation
setting code
17-40
Sets the mode of the JOG operation.
Offset
address
Name
02AH
JOG operation
acceleraiton
time
02BH
JOG operation
deceleration
time
Setting
Unit
value
range
Sets the acceleration/deceleraion time when performing the JOG operaiton.
At the beginning of the JOG operation, accelerates for the specified acceleration
time, decelerates for specified deceleraiton time when the starting contact of the
JOG operation turns off, and stops.
Descriptions
Default
Sets the target speed when performing the JOG operation.
After starting the JOG operation, accelerates with the specified operation to the
target speed while the starting contact of the JOG operation is on. After reaching
the target speed, operates with the target speed.
02CH
JOG operation
target speed
02DH
02EH
02FH
030H
-
031H
Deceleration
stop
deceleration
time
032H
-
033H
Emergency stop
deceleration
time
034H
-
035H
Limit stop
deceleraiton
time
036H
-
037H
Error stop
deceleration
time
When the deceleration stop is requested by I/O, it will be valid, and the
deceleraiton operation will complete in this deceleration time.
When the emergency stop is requested by I/O, it will be valid, and the deceleration
operation will complete in this deceleration time.
When the limit is input, the deceleration operation will complete in this deceleration
time.
When an error occurred, it will be valid, and the deceleration operation will
complete in this deceleration time.
Specify one pulser among 1 to 3 for the input, for the case that pulser operation is
requested by I/O.
038H
Pulser operation
setting code
17-41
Offset
Name
address
Pulser operation
ratio numerator
039H
Default
Setting
Unit
value
range
Sets the multiplier for the input pulse string in the pulser operation.
(Moving pulse number of AMP) = (Pulse strings of input from pulser) x (Numerator
of ratio of pulser operation) / (Denominator of ratio of pulser operation).
Descriptions
03AH
Pulser operation
ratio
denominator
03BH
03CH
03DH
03EH
03FH
040H
041H
042H
043H
044H
045H
046H
047H
048H
049H
04AH
04BH
04CH
04DH
04EH
04FH
-
Sets the divisor for the input pulse string in the pulser operation.
(Moving pulse number of AMP) = (Pulse strings of input from pulser) x
(Denominator of ratio of pulser operation) / (Numerator of ratio of pulser operation).
-
Starting address of each positioning parameter
Axis 1
Axis 2
Axis 3
Axis 4
Axis 5
Axis 6
Axis 7
Axis 8
Bank No.
02H
17-42
0CH
16H
20H
2AH
34H
3EH
48H
Addre
ss
050H
Descriptions
Starting address of parameters
17.6.3 Positioning Data Setting Areas
They are the areas for setting positioning data. The positioning data for 8 axes can be set individually.
The positioning data is stored in the table format of 625 points per axis.
When executing the automatic operation (position control) with the positioning unit RTEX, specify the
number of the positioning table that has been specified in advance, and start the position control. After
the start-up, the motor is automatically controlled according to the settings of the table. There are the
method that creates the positioning table using Configurator PM that is an exclusive setting tool, and the
other method that writes the positioning table in a prescribed address by ladder programs.
There are the standard area of 600 points that is specified by No. 1 to 600, and the extended area of 25
points that is specified by No. 10001 to 10025.
The standard area is used when the setting values of the positioning table are predetermined. It can be
set using Configurator PM, and can be rewritten from the ladder programs, too. However, if the
positioning table is changed by the ladder program, the caulculation is necessary to restructure the
positioning data before executing the automatic operation. This function enables to read the positioning
data of 600 points in advance and to prepare for the start-up within the positioning unit, and enables to
shorten the start-up time for the positioning. When using Configurator PM to download the positioning
data, the data is restructured automatically, so the calculation is not necessary. However, the calculation
is necessary after rewriting the poisitoning data from the ladder program. The procedures for the
calculation are as follows.
1. Change the positioning table in the shared memory.
2. Turn on the output contact Y_7 (recalculation request contact).
3. Confirm the input contact X_7 (recalculation done contact) is on (Confim the completion of the
recalculation.)
If the data is not recalculated after rewriting the positioning table by the ladder program, note that the
operation will be executed with the positioning table before the rewriting.
The extended area is used when the setting values of the positioning table cannot be determined until
just before executing the positioning operation. For example, in the application of alignment using an
image processing, the moving distance is determined by the image processing. Therefore, the
positioning table cannot be determined until just before sarting the positioning operation. In that case, the
positioning table is set just before the start-up of the positioning. In the extended area, the positioning
table can be rewritten as needed, and the recalculation is not necessary. However, it is up to 25 tables,
and Configurator PM cannot be used. The ladder programs should be used to write the positioning table
in the prescribed address in the shared memory. The start-up time is longer than the standard area, and
when performing the P point control or C point control in the extended area, note that the start-up time
varies depending on the number of tables to be executed consecutively.
How to use each area and the precautions are as below.
Number
Table
How to use
of points number
Area to be used when
Standard
600
the setting value of the
1 to 600
area
positioning table is
points
predetermined.
Area to be used when
the setting value of the
10001
Extended
positioning table cannot
25 points
to
area
be determined until just
10025
before executing the
positioning operation.
Setting using
Configurator PM
Available
Not available
Setting using
ladder program
Available
(Calculation for
restructuring is
necessary.)
Available
(Calculation for
restructuring is
not necessary.)
17-43
Positioning tables
Data in the following formats is stored from the starting address of positioning tables of each axis.
Offset
address
Name
Descriptions
Sets the position setting mode and acceleration/deceleration pattern for the
positioning operation.
000H
Control code
Sets the independent and interpolation patterns for the positioning operation.
The relation of the inerpolation depends on the settings in the axis group setting
area in the common area of the shared memroy.
001H
002H
003H
004H
005H
Operation
pattern
Positioning
acceleration
time
Positioning
deceleration
time
006H
007H
17-44
Positioning
target speed
(interpolation
speed)
Sets the acceleration and deceleration time for the positioning operation.
The acceleration time and deceleration time can be set individually.
In case of the individual operation (no interpolation), it is the target speed of the
corresponding axis. In case of the interpolation operaiton, it is the target speed of
the interpolation.
In the interpolation operation, the target speed for the axis of the smallest number
in a group is valid.
Offset
address
Name
Descriptions
The area to set the movement amount for the positioning operation.
The interpretation is chagned for the increment movement amount or absolute
coordiate by the control code setting.
008H
Positioning
movement
amount
009H
The area to set the auxiliary points (center poijnt, pass point coordinates) in case
of the circular interpolation or spiral interpolation control.
00AH
Auxiliary point
00BH
00CH
Dwell time
00DH
Auxiliary output
code
00EH
00DH
-
After the completion of the positioning control of this table,
when the mode is C: Continuation point, stops the motor operation for the dwell
time and starts the operation of the next table.
when the mode is P: Pass point, this setting is ignored.
when the mode is E: End point, the positioning done contact will turn on after
waiting for the dwell time.
Sets the data to be output to the auxiliary output code in each axis information &
monitor area by the setting of the auxiliary output mode in the parameter setting
area.
-
17-45
Starting address of each positioning table
Axis 1
Axis 2
Axis 3
Axis 4
Axis 5
Axis 6
Axis 7
Axis 8
Bank No.
02H
17-46
0CH
16H
20H
2AH
34H
3EH
48H
Addre
ss
050H
060H
070H
080H
090H
0A0H
0B0H
0C0H
0D0H
0E0H
0F0H
100H
110H
120H
130H
140H
150H
160H
170H
180H
190H
1A0H
1B0H
1C0H
1D0H
1E0H
1F0H
200H
210H
220H
230H
240H
250H
260H
270H
280H
290H
2A0H
2B0H
2C0H
2D0H
2E0H
2F0H
300H
310H
320H
330H
340H
350H
360H
370H
380H
390H
3A0H
3B0H
3C0H
3D0H
3E0H
3F0H
Descriptions
Starting address of table 1
Starting address of table 2
Starting address of table 3
Starting address of table 4
Starting address of table 5
Starting address of table 6
Starting address of table 7
Starting address of table 8
Starting address of table 9
Starting address of table 10
Starting address of table 11
Starting address of table 12
Starting address of table 13
Starting address of table 14
Starting address of table 15
Starting address of table 16
Starting address of table 17
Starting address of table 18
Starting address of table 19
Starting address of table 20
Starting address of table 21
Starting address of table 22
Starting address of table 23
Starting address of table 24
Starting address of table 25
Starting address of table 26
Starting address of table 27
Starting address of table 28
Starting address of table 29
Starting address of table 30
Starting address of table 31
Starting address of table 32
Starting address of table 33
Starting address of table 34
Starting address of table 35
Starting address of table 36
Starting address of table 37
Starting address of table 38
Starting address of table 39
Starting address of table 40
Starting address of table 41
Starting address of table 42
Starting address of table 43
Starting address of table 44
Starting address of table 45
Starting address of table 46
Starting address of table 47
Starting address of table 48
Starting address of table 49
Starting address of table 50
Starting address of table 51
Starting address of table 52
Starting address of table 53
Starting address of table 54
Starting address of table 55
Starting address of table 56
Starting address of table 57
Starting address of table 58
Starting address of table 59
Axis 1
Axis 2
Axis 3
Axis 4
Axis 5
Axis 6
Axis 7
Axis 8
Bank No.
03H
0DH
17H
21H
2BH
35H
3FH
49H
Addre
ss
000H
010H
020H
030H
040H
050H
060H
070H
080H
090H
0A0H
0B0H
0C0H
0D0H
0E0H
0F0H
100H
110H
120H
130H
140H
150H
160H
170H
180H
190H
1A0H
1B0H
1C0H
1D0H
1E0H
1F0H
200H
210H
220H
230H
240H
250H
260H
270H
280H
290H
2A0H
2B0H
2C0H
2D0H
2E0H
2F0H
300H
310H
320H
330H
340H
350H
360H
370H
380H
390H
3A0H
3B0H
3C0H
3D0H
3E0H
3F0H
Descriptions
Starting address of table 60
Starting address of table 61
Starting address of table 62
Starting address of table 63
Starting address of table 64
Starting address of table 65
Starting address of table 66
Starting address of table 67
Starting address of table 68
Starting address of table 69
Starting address of table 70
Starting address of table 71
Starting address of table 72
Starting address of table 73
Starting address of table 74
Starting address of table 75
Starting address of table 76
Starting address of table 77
Starting address of table 78
Starting address of table 79
Starting address of table 80
Starting address of table 81
Starting address of table 82
Starting address of table 83
Starting address of table 84
Starting address of table 85
Starting address of table 86
Starting address of table 87
Starting address of table 88
Starting address of table 89
Starting address of table 90
Starting address of table 91
Starting address of table 92
Starting address of table 93
Starting address of table 94
Starting address of table 95
Starting address of table 96
Starting address of table 97
Starting address of table 98
Starting address of table 99
Starting address of table 100
Starting address of table 101
Starting address of table 102
Starting address of table 103
Starting address of table 104
Starting address of table 105
Starting address of table 106
Starting address of table 107
Starting address of table 108
Starting address of table 109
Starting address of table 110
Starting address of table 111
Starting address of table 112
Starting address of table 113
Starting address of table 114
Starting address of table 115
Starting address of table 116
Starting address of table 117
Starting address of table 118
Starting address of table 119
Starting address of table 120
Starting address of table 121
Starting address of table 122
Starting address of table 123
17-47
Axis 1
Axis 2
Axis 3
Axis 4
Axis 5
Axis 6
Axis 7
Axis 8
Bank No.
04H
17-48
0EH
18H
22H
2CH
36H
40H
4AH
Addre
ss
000H
010H
020H
030H
040H
050H
060H
070H
080H
090H
0A0H
0B0H
0C0H
0D0H
0E0H
0F0H
100H
110H
120H
130H
140H
150H
160H
170H
180H
190H
1A0H
1B0H
1C0H
1D0H
1E0H
1F0H
200H
210H
220H
230H
240H
250H
260H
270H
280H
290H
2A0H
2B0H
2C0H
2D0H
2E0H
2F0H
300H
310H
320H
330H
340H
350H
360H
370H
380H
390H
3A0H
3B0H
3C0H
3D0H
3E0H
3F0H
Descriptions
Starting address of table 124
Starting address of table 125
Starting address of table 126
Starting address of table 127
Starting address of table 128
Starting address of table 129
Starting address of table 130
Starting address of table 131
Starting address of table 132
Starting address of table 133
Starting address of table 134
Starting address of table 135
Starting address of table 136
Starting address of table 137
Starting address of table 138
Starting address of table 139
Starting address of table 140
Starting address of table 141
Starting address of table 142
Starting address of table 143
Starting address of table 144
Starting address of table 145
Starting address of table 146
Starting address of table 147
Starting address of table 148
Starting address of table 149
Starting address of table 150
Starting address of table 151
Starting address of table 152
Starting address of table 153
Starting address of table 154
Starting address of table 155
Starting address of table 156
Starting address of table 157
Starting address of table 158
Starting address of table 159
Starting address of table 160
Starting address of table 161
Starting address of table 162
Starting address of table 163
Starting address of table 164
Starting address of table 165
Starting address of table 166
Starting address of table 167
Starting address of table 168
Starting address of table 169
Starting address of table 170
Starting address of table 171
Starting address of table 172
Starting address of table 173
Starting address of table 174
Starting address of table 175
Starting address of table 176
Starting address of table 177
Starting address of table 178
Starting address of table 179
Starting address of table 180
Starting address of table 181
Starting address of table 182
Starting address of table 183
Starting address of table 184
Starting address of table 185
Starting address of table 186
Starting address of table 187
Axis 1
Axis 2
Axis 3
Axis 4
Axis 5
Axis 6
Axis 7
Axis 8
Bank No.
05H
0FH
19H
23H
2DH
37H
41H
4BH
Addre
ss
000H
010H
020H
030H
040H
050H
060H
070H
080H
090H
0A0H
0B0H
0C0H
0D0H
0E0H
0F0H
100H
110H
120H
130H
140H
150H
160H
170H
180H
190H
1A0H
1B0H
1C0H
1D0H
1E0H
1F0H
200H
210H
220H
230H
240H
250H
260H
270H
280H
290H
2A0H
2B0H
2C0H
2D0H
2E0H
2F0H
300H
310H
320H
330H
340H
350H
360H
370H
380H
390H
3A0H
3B0H
3C0H
3D0H
3E0H
3F0H
Descriptions
Starting address of table 188
Starting address of table 189
Starting address of table 190
Starting address of table 191
Starting address of table 192
Starting address of table 193
Starting address of table 194
Starting address of table 195
Starting address of table 196
Starting address of table 197
Starting address of table 198
Starting address of table 199
Starting address of table 200
Starting address of table 201
Starting address of table 202
Starting address of table 203
Starting address of table 204
Starting address of table 205
Starting address of table 206
Starting address of table 207
Starting address of table 208
Starting address of table 209
Starting address of table 210
Starting address of table 211
Starting address of table 212
Starting address of table 213
Starting address of table 214
Starting address of table 215
Starting address of table 216
Starting address of table 217
Starting address of table 218
Starting address of table 219
Starting address of table 220
Starting address of table 221
Starting address of table 222
Starting address of table 223
Starting address of table 224
Starting address of table 225
Starting address of table 226
Starting address of table 227
Starting address of table 228
Starting address of table 229
Starting address of table 230
Starting address of table 231
Starting address of table 232
Starting address of table 233
Starting address of table 234
Starting address of table 235
Starting address of table 236
Starting address of table 237
Starting address of table 238
Starting address of table 239
Starting address of table 240
Starting address of table 241
Starting address of table 242
Starting address of table 243
Starting address of table 244
Starting address of table 245
Starting address of table 246
Starting address of table 247
Starting address of table 248
Starting address of table 249
Starting address of table 250
Starting address of table 251
17-49
Axis 1
Axis 2
Axis 3
Axis 4
Axis 5
Axis 6
Axis 7
Axis 8
Bank No.
06H
17-50
10H
1AH
24H
2EH
38H
42H
4CH
Addre
ss
000H
010H
020H
030H
040H
050H
060H
070H
080H
090H
0A0H
0B0H
0C0H
0D0H
0E0H
0F0H
100H
110H
120H
130H
140H
150H
160H
170H
180H
190H
1A0H
1B0H
1C0H
1D0H
1E0H
1F0H
200H
210H
220H
230H
240H
250H
260H
270H
280H
290H
2A0H
2B0H
2C0H
2D0H
2E0H
2F0H
300H
310H
320H
330H
340H
350H
360H
370H
380H
390H
3A0H
3B0H
3C0H
3D0H
3E0H
3F0H
Descriptions
Starting address of table 252
Starting address of table 253
Starting address of table 254
Starting address of table 255
Starting address of table 256
Starting address of table 257
Starting address of table 258
Starting address of table 259
Starting address of table 260
Starting address of table 261
Starting address of table 262
Starting address of table 263
Starting address of table 264
Starting address of table 265
Starting address of table 266
Starting address of table 267
Starting address of table 268
Starting address of table 269
Starting address of table 270
Starting address of table 271
Starting address of table 272
Starting address of table 273
Starting address of table 274
Starting address of table 275
Starting address of table 276
Starting address of table 277
Starting address of table 278
Starting address of table 279
Starting address of table 280
Starting address of table 281
Starting address of table 282
Starting address of table 283
Starting address of table 284
Starting address of table 285
Starting address of table 286
Starting address of table 287
Starting address of table 288
Starting address of table 289
Starting address of table 290
Starting address of table 291
Starting address of table 292
Starting address of table 293
Starting address of table 294
Starting address of table 295
Starting address of table 296
Starting address of table 297
Starting address of table 298
Starting address of table 299
Starting address of table 300
Starting address of table 301
Starting address of table 302
Starting address of table 303
Starting address of table 304
Starting address of table 305
Starting address of table 306
Starting address of table 307
Starting address of table 308
Starting address of table 309
Starting address of table 310
Starting address of table 311
Starting address of table 312
Starting address of table 313
Starting address of table 314
Starting address of table 315
Axis 1
Axis 2
Axis 3
Axis 4
Axis 5
Axis 6
Axis 7
Axis 8
Bank No.
07H
11H
1BH
25H
2FH
39H
43H
4DH
Addre
ss
000H
010H
020H
030H
040H
050H
060H
070H
080H
090H
0A0H
0B0H
0C0H
0D0H
0E0H
0F0H
100H
110H
120H
130H
140H
150H
160H
170H
180H
190H
1A0H
1B0H
1C0H
1D0H
1E0H
1F0H
200H
210H
220H
230H
240H
250H
260H
270H
280H
290H
2A0H
2B0H
2C0H
2D0H
2E0H
2F0H
300H
310H
320H
330H
340H
350H
360H
370H
380H
390H
3A0H
3B0H
3C0H
3D0H
3E0H
3F0H
Descriptions
Starting address of table 316
Starting address of table 317
Starting address of table 318
Starting address of table 319
Starting address of table 320
Starting address of table 321
Starting address of table 322
Starting address of table 323
Starting address of table 324
Starting address of table 325
Starting address of table 326
Starting address of table 327
Starting address of table 328
Starting address of table 329
Starting address of table 330
Starting address of table 331
Starting address of table 332
Starting address of table 333
Starting address of table 334
Starting address of table 335
Starting address of table 336
Starting address of table 337
Starting address of table 338
Starting address of table 339
Starting address of table 340
Starting address of table 341
Starting address of table 342
Starting address of table 343
Starting address of table 344
Starting address of table 345
Starting address of table 346
Starting address of table 347
Starting address of table 348
Starting address of table 349
Starting address of table 350
Starting address of table 351
Starting address of table 352
Starting address of table 353
Starting address of table 354
Starting address of table 355
Starting address of table 356
Starting address of table 357
Starting address of table 358
Starting address of table 359
Starting address of table 360
Starting address of table 361
Starting address of table 362
Starting address of table 363
Starting address of table 364
Starting address of table 365
Starting address of table 366
Starting address of table 367
Starting address of table 368
Starting address of table 369
Starting address of table 370
Starting address of table 371
Starting address of table 372
Starting address of table 373
Starting address of table 374
Starting address of table 375
Starting address of table 376
Starting address of table 377
Starting address of table 378
Starting address of table 379
17-51
Axis 1
Axis 2
Axis 3
Axis 4
Axis 5
Axis 6
Axis 7
Axis 8
Bank No.
08H
17-52
12H
1CH
26H
30H
3AH
44H
4EH
Addre
ss
000H
010H
020H
030H
040H
050H
060H
070H
080H
090H
0A0H
0B0H
0C0H
0D0H
0E0H
0F0H
100H
110H
120H
130H
140H
150H
160H
170H
180H
190H
1A0H
1B0H
1C0H
1D0H
1E0H
1F0H
200H
210H
220H
230H
240H
250H
260H
270H
280H
290H
2A0H
2B0H
2C0H
2D0H
2E0H
2F0H
300H
310H
320H
330H
340H
350H
360H
370H
380H
390H
3A0H
3B0H
3C0H
3D0H
3E0H
3F0H
Descriptions
Starting address of table 380
Starting address of table 381
Starting address of table 382
Starting address of table 383
Starting address of table 384
Starting address of table 385
Starting address of table 386
Starting address of table 387
Starting address of table 388
Starting address of table 389
Starting address of table 390
Starting address of table 391
Starting address of table 392
Starting address of table 393
Starting address of table 394
Starting address of table 395
Starting address of table 396
Starting address of table 397
Starting address of table 398
Starting address of table 399
Starting address of table 400
Starting address of table 401
Starting address of table 402
Starting address of table 403
Starting address of table 404
Starting address of table 405
Starting address of table 406
Starting address of table 407
Starting address of table 408
Starting address of table 409
Starting address of table 410
Starting address of table 411
Starting address of table 412
Starting address of table 413
Starting address of table 414
Starting address of table 415
Starting address of table 416
Starting address of table 417
Starting address of table 418
Starting address of table 419
Starting address of table 420
Starting address of table 421
Starting address of table 422
Starting address of table 423
Starting address of table 424
Starting address of table 425
Starting address of table 426
Starting address of table 427
Starting address of table 428
Starting address of table 429
Starting address of table 430
Starting address of table 431
Starting address of table 432
Starting address of table 433
Starting address of table 434
Starting address of table 435
Starting address of table 436
Starting address of table 437
Starting address of table 438
Starting address of table 439
Starting address of table 440
Starting address of table 441
Starting address of table 442
Starting address of table 443
Axis 1
Axis 2
Axis 3
Axis 4
Axis 5
Axis 6
Axis 7
Axis 8
Bank No.
09H
13H
1DH
27H
31H
3BH
45H
4FH
Addre
ss
000H
010H
020H
030H
040H
050H
060H
070H
080H
090H
0A0H
0B0H
0C0H
0D0H
0E0H
0F0H
100H
110H
120H
130H
140H
150H
160H
170H
180H
190H
1A0H
1B0H
1C0H
1D0H
1E0H
1F0H
200H
210H
220H
230H
240H
250H
260H
270H
280H
290H
2A0H
2B0H
2C0H
2D0H
2E0H
2F0H
300H
310H
320H
330H
340H
350H
360H
370H
380H
390H
3A0H
3B0H
3C0H
3D0H
3E0H
3F0H
Descriptions
Starting address of table 444
Starting address of table 445
Starting address of table 446
Starting address of table 447
Starting address of table 448
Starting address of table 449
Starting address of table 450
Starting address of table 451
Starting address of table 452
Starting address of table 453
Starting address of table 454
Starting address of table 455
Starting address of table 456
Starting address of table 457
Starting address of table 458
Starting address of table 459
Starting address of table 460
Starting address of table 461
Starting address of table 462
Starting address of table 463
Starting address of table 464
Starting address of table 465
Starting address of table 466
Starting address of table 467
Starting address of table 468
Starting address of table 469
Starting address of table 470
Starting address of table 471
Starting address of table 472
Starting address of table 473
Starting address of table 474
Starting address of table 475
Starting address of table 476
Starting address of table 477
Starting address of table 478
Starting address of table 479
Starting address of table 480
Starting address of table 481
Starting address of table 482
Starting address of table 483
Starting address of table 484
Starting address of table 485
Starting address of table 486
Starting address of table 487
Starting address of table 488
Starting address of table 489
Starting address of table 490
Starting address of table 491
Starting address of table 492
Starting address of table 493
Starting address of table 494
Starting address of table 495
Starting address of table 496
Starting address of table 497
Starting address of table 498
Starting address of table 499
Starting address of table 500
Starting address of table 501
Starting address of table 502
Starting address of table 503
Starting address of table 504
Starting address of table 505
Starting address of table 506
Starting address of table 507
17-53
Axis 1
Axis 2
Axis 3
Axis 4
Axis 5
Axis 6
Axis 7
Axis 8
Bank No.
0AH
17-54
14H
1EH
28H
32H
3CH
46H
50H
Addre
ss
000H
010H
020H
030H
040H
050H
060H
070H
080H
090H
0A0H
0B0H
0C0H
0D0H
0E0H
0F0H
100H
110H
120H
130H
140H
150H
160H
170H
180H
190H
1A0H
1B0H
1C0H
1D0H
1E0H
1F0H
200H
210H
220H
230H
240H
250H
260H
270H
280H
290H
2A0H
2B0H
2C0H
2D0H
2E0H
2F0H
300H
310H
320H
330H
340H
350H
360H
370H
380H
390H
3A0H
3B0H
3C0H
3D0H
3E0H
3F0H
Descriptions
Starting address of table 508
Starting address of table 509
Starting address of table 510
Starting address of table 511
Starting address of table 512
Starting address of table 513
Starting address of table 514
Starting address of table 515
Starting address of table 516
Starting address of table 517
Starting address of table 518
Starting address of table 519
Starting address of table 520
Starting address of table 521
Starting address of table 522
Starting address of table 523
Starting address of table 524
Starting address of table 525
Starting address of table 526
Starting address of table 527
Starting address of table 528
Starting address of table 529
Starting address of table 530
Starting address of table 531
Starting address of table 532
Starting address of table 533
Starting address of table 534
Starting address of table 535
Starting address of table 536
Starting address of table 537
Starting address of table 538
Starting address of table 539
Starting address of table 540
Starting address of table 541
Starting address of table 542
Starting address of table 543
Starting address of table 544
Starting address of table 545
Starting address of table 546
Starting address of table 547
Starting address of table 548
Starting address of table 549
Starting address of table 550
Starting address of table 551
Starting address of table 552
Starting address of table 553
Starting address of table 554
Starting address of table 555
Starting address of table 556
Starting address of table 557
Starting address of table 558
Starting address of table 559
Starting address of table 560
Starting address of table 561
Starting address of table 562
Starting address of table 563
Starting address of table 564
Starting address of table 565
Starting address of table 566
Starting address of table 567
Starting address of table 568
Starting address of table 569
Starting address of table 570
Starting address of table 571
Axis 1
Axis 2
Axis 3
Axis 4
Axis 5
Axis 6
Axis 7
Axis 8
Bank No.
0BH
15H
1FH
29H
33H
3DH
47H
51H
Addre
ss
000H
010H
020H
030H
040H
050H
060H
070H
080H
090H
0A0H
0B0H
0C0H
0D0H
0E0H
0F0H
100H
110H
120H
130H
140H
150H
160H
170H
180H
190H
1A0H
1B0H
1C0H
1D0H
1E0H
1F0H
200H
210H
220H
230H
240H
250H
260H
270H
280H
290H
2A0H
2B0H
2C0H
2D0H
2E0H
2F0H
300H
310H
320H
330H
340H
350H
360H
370H
380H
390H
3A0H
3B0H
3C0H
3D0H
3E0H
3F0H
Descriptions
Starting address of table 572
Starting address of table 573
Starting address of table 574
Starting address of table 575
Starting address of table 576
Starting address of table 577
Starting address of table 578
Starting address of table 579
Starting address of table 580
Starting address of table 581
Starting address of table 582
Starting address of table 583
Starting address of table 584
Starting address of table 585
Starting address of table 586
Starting address of table 587
Starting address of table 588
Starting address of table 589
Starting address of table 590
Starting address of table 591
Starting address of table 592
Starting address of table 593
Starting address of table 594
Starting address of table 595
Starting address of table 596
Starting address of table 597
Starting address of table 598
Starting address of table 599
Starting address of table 600
Starting address of table 10001
Starting address of table 10002
Starting address of table 10003
Starting address of table 10004
Starting address of table 10005
Starting address of table 10006
Starting address of table 10007
Starting address of table 10008
Starting address of table 10009
Starting address of table 10010
Starting address of table 10011
Starting address of table 10012
Starting address of table 10013
Starting address of table 10014
Starting address of table 10015
Starting address of table 10016
Starting address of table 10017
Starting address of table 10018
Starting address of table 10019
Starting address of table 10020
Starting address of table 10021
Starting address of table 10022
Starting address of table 10023
Starting address of table 10024
Starting address of table 10025
17-55
17-56
Chapter 18
Dimensions
18.1 FPΣ Positioning Unit RTEX
18-2
18.2 FP2 Positioning Unit RTEX
18-3
18-4
Chapter 19
Sample Programs
19.1 Basic Configuration and Contact Allocations of
Sample Programs
In the sample programs, the internal relays are used for the start-up contacts of each operation.
If necessary, reconnect them to the input contacts that switches, etc are connected.
Basic Configuration
The FPΣ positioning unit RTEX is installed in the slot 0. Also, the axes 1 and 2 are designated as the
axes used, and the linear interpolation of 2 axes is designated as a sample operation, by the
Configurator PM in advance.
The FP2 positioning unit RTEX is also installed in the slot 0.
Used contacts and data registers
Number
Descriptions
R0
Request servo on
R1
Request servo off
R2
Request home return
R3
Request positioning start
R4
Request forward JOG for axis 1
R5
Request reverse JOG for axis 1
R6
Request forward JOG for axis 2
R7
Request reverse JOG for axis 2
R8
Request pulser operation for axis 1
R9
Request pulser operation for axis 2
R10
Error clear
R11
Request setting value change
R100
Operation enabled flag for axis 1
R101
Off edge of forward JOG for axis 1
R102
Off edge of reverse JOG for axis 1
R103
Off edge of pulser operation for axis 1
R200
Operation enabled flag for axis 2
R201
Off edge of forward JOG for axis 2
R202
Off edge of reverse JOG for axis 2
R203
Off edge of pulser operation for axis 2
19-2
Number
FPΣ
FP2
X100
X0
X104
X4
X107
X7
X108
X8
X109
X9
X110
X10
X111
X11
X118
X18
X119
X19
X160
X60
X161
X61
Y107
Y87
Y108
Y88
Y109
Y89
Y110
Y90
Y118
Y98
Y119
Y99
Y120
Y100
Y121
Y101
Y122
Y102
Y123
Y103
Y140
Y120
Y141
Y121
Y150
Y130
Y151
Y131
Y160
Y140
Y161
Y141
Number
DT0
DT101
DT102 to DT115
DT121
DT122 to DT135
DT10 to DT25
DT30 to DT45
Descriptions
Link establishment for all axes
Tool operation for all axes
Recalculation done flag
Connection confirmation for axis 1
Connection confirmation for axis 2
Servo lock for axis 1
Servo lock for axis 2
Busy flag for axis 1
Busy flag for axis 2
Error occurrence annunciation for axis 1
Error occurrence annunciation for axis 2
Request recalculation
Servo on for axis 1
Servo on for axis 2
Positioning start for axis 1
Home return for axis 1
Home return for axis 2
Forward JOG for axis 1
Reverse JOG for axis 1
Forward JOG for axis 2
Reverse JOG for axis 2
Pulser operation for axis 1
Pulser operation for axis 2
Servo off for axis 1
Servo off for axis 2
Error clear for axis 1
Error clear for axis 2
Descriptions
Starting table number
Number of errors of axis 1
Error contents of axis 1
Number of errors of axis 2
Error contents of axis 2
Positioning data (of 1 table) of axis 1
Positioning data (of 1 table) of axis 2
19-3
19.2 Sample Programs
There are 3 patterns for setting positioning data.
1. When the positioning data has been already set in the standard area with the Configurator PM.
2. When setting the positioning data in the extended area using the ladder program.
3. When setting the positioning data in the standard area using the ladder program.
Sample program
The positioning start is the setting that has been already set in the standard area by the Configurator
PM.
19-4
19-5
19.2.1 When Setting Positioning Data in Extended Area Using Ladder Program
Write positioning data in the extended area using the ladder program.
Recalculating the positioning data is not necessary as the extended area is used.
Replace the part of the positioning start program in the sample program
Positioning start program
19-6
19.2.2 When Setting Positioning Data in Standard Area Using Ladder Program
Write positioning data in the standard area using the ladder program.
Recalculating the positioning data is necessary after setting the positioining data.
Replace the part of the positioning start program in the sample program
Positioning start program
19-7
19-8
Chapter 20
Power ON/OFF(Ver.1.13 or later)
20.1 Operational Change When System Starts
Operational Overview
To start the Positioning Unit RTEX(Ver.1.00,1.01), both the control power supply and main power supply
of the AMP must be on.
The startup process is changed to enable the unit to normally start even if the main power supply of the
AMP is off, in order to respond to various startup methods.
20-2
Chapter 21
Position control (Ver.1.13 or later)
21.1 Positioning Repeat Function
When the same operation is repeated in an application for machines such as a coil widing machine.
21.1.1 Function and setting method
Set the repeat count in a prescribed address to repeat the operation for N times.
Operation of the positioning unit
Set the number of repeat count in the repeat count area of an axis number to be start before startring
positioning.
The positioning unit refers to the repeat count (positioning control area) when starting positioning.
When the operation completes (repeats for N times), the operation done signal will turn on.
The repeat count area will be cleared when the repeat operation completes for the target axes
regardless of a single axis and interpolation group.
Reference: 17.4.7 Positioning Table Setting Area
Addition of 17.4.7:Position control area (Ver.1.13 or later)
Bank
00H
Offset
Name
address
108H
Positioning repeat count of axis 1
109H
10AH
10BH
10CH
10DH
10EH
10FH
Positioning repeat count of axis 2
Positioning repeat count of axis 3
Positioning repeat count of axis 4
Positioning repeat count of axis 5
Positioning repeat count of axis 6
Positioning repeat count of axis 7
Positioning repeat count of axis 8
Descriptions
Sets the No. of times for
repeating the operation
starting from the position
control starting table No. of
the first axis until the E point.
Same as above.
Same as above.
Same as above.
Same as above.
Same as above.
Same as above.
Same as above.
Default
value
Setting
range
Unit
0
0 to 255
Times
0
0
0
0
0
0
0
0 to 255
0 to 255
0 to 255
0 to 255
0 to 255
0 to 255
0 to 255
Times
Times
Times
Times
Times
Times
Times
The following operations are performed depending on the setting values of the positioning repeat count.
Positioning
repeat count
0, 1
2 to 254
255
21-2
Positioning operation
The positioning repeat operation is not performed.
The specified positioning operation is performed only once.
The positioning operation is performed repeatedly for the specified number of times.
The positioning operation is performed repeatedly without limit.(Unlimited repeat)
The “Emergency stop” or “Deceleration stop” should be executed to stop the positioning operation.
21.1.2 Examples of operations
Examples of operations when N times have been specified
Table 1: P point
Table 2: P point
Table 3: P point
Table 4: E point
1.When N = 0 or N = 1
2.When N = 3, and when the dwell time = 0 at the E point table,
the E point in the repeat operation is treated as the P point.
3.When N = 3, and when the dwell time ≠ 0 at the E point table,
the E point in the repeat operation is treated as the C point.
The operations of the BUSY flag and operation done flag are the same as the Ver.1.00 and Ver.1.01
operation.
21.1.3 Sample program
Refer to “Repeat function ladder program for demo.fp”.
21-3
21.1.4 Each Axis Information & Monitor Area
Monitoring repeat count
The each axis information & monitor area to confirm the active repeat count.
Reference: 17.5.2 Each Axis Information & Monitor Area
Addition of 17.5.2 : Axis information of axis 1 to 8 (ver.1.13 or later)
Bank
Offset
Name
address
3AH
3BH
7AH
7BH
BAH
01H
BBH
FAH
FBH
13AH
13BH
17AH
17BH
1BAH
1BBH
1FAH
1FBH
21-4
Descriptions
Feeds back and stores the setting value of
the repeat count specified for the 1st axis.
Repeat count
This area is 1 if the positioning repeat does
setting value of axis 1 not perform (repeat count: 0, 1).
Also, when the repeat count is set to be
unlimited, 255 is stored in this area.
Repeat count that is currently being
performed on the first axis.
This area is 1 if the positioning repeat does
Repeat count
Current value of axis 1 not perform.
The upper limit is 65535 in this area. If the
repeat count exceeds the upper limit, the
count will be started from 0.
Repeat count
setting value of axis 2
Repeat count
Current value of axis 2
Repeat count
setting value of axis 3
Repeat count
Current value of axis 3
Repeat count
setting value of axis 4
Repeat count
Current value of axis 4
Repeat count
setting value of axis 5
Repeat count
Current value of axis 5
Repeat count
setting value of axis 6
Repeat count
Current value of axis 6
Repeat count
setting value of axis 7
Repeat count
Current value of axis 7
Repeat count
setting value of axis 8
Repeat count
Current value of axis 8
Defau
Setting
lt
range
value
Unit
0
0 to 255
Times
0
0 to 65535
Times
0
0 to 255
Times
0
0 to 65535
Times
0
0 to 255
Times
0
0 to 65535
Times
0
0 to 255
Times
0
0 to 65535
Times
0
0 to 255
Times
0
0 to 65535
Times
0
0 to 255
Times
0
0 to 65535
Times
0
0 to 255
Times
0
0 to 65535
Times
0
0 to 255
Times
0
0 to 65535
Times
21.2 Synchronous Operation
Overview of Synchronous Operation
The synchronous operation is a function to set master and slave axes and operate a slave axis with the
same operation (synchrounous) as the master axis. The features of the synchronous operation are as
below.
-A maximum of 2 groups can be set for the synchronous operation. (The master and slave axis can be
set for laxis each.)
-Supports two types of synchronous operation.
1. Synchronous mode A
This is a standard mode of the synchronous operation. It is possible to switch the setting of the
synchronous operation between “enabled” and “disabled”, and perform the synchronous operation as
necessary.
2. Synchronous mode B
This mode is used to drive a large-sized table such as a carrier machine with two motors. The
synchronous operation cannot be cancelled as the target axes (master and slave) are mechanically
coupled.
It is possible to switch the setting of the synchronous operation between “enabled” and “disabled”. (In the
synchronous mode A only)
21-5
21.2.1 Synchronous Mode
The followings are the differences in the operations between the synchronous modes supported with the
synchronous operation.
Synchronous
setting
Enabled/disabled
of synchronous
operation
Positioning
operation
JOG operation
Operation stop
Pulser operation
Home return
21-6
Synchronous mode A
Synchronous mode B
A maximum of 2 groups can be set for the synchronous group.
An individual operation mode can be set for each synchrounous group.
It can be selected either Enabled or Disabled.
【Synchronous: Enabled】
Operates with the setting of the master axis.
(The setting of the slave axis is ignored.)
The positioning starts for the master axis.
【Synchronous: Disabled】
The master and slave axes is operated with
each setting.
The positioning starts for each axis.
The home return is performed for each axis
individually.
(Executed with the setting that the
synchrounous operaiton is disalbed.)
Set the synchronous operation to be “Disabled”
when performing the home return. It is
necessary to cancel the synchronous operation.
If the home return is executed with the setting
that the synchronous operaiton is enabled, an
error will occur. The home return cannot be
executed.
Only Enabled (The Disabled setting is
ignored.)
Operates with the setting of the master axis.
(The setting of the slave axis is ignored.)
The positioning starts for the master axis.
It is not possible to perform the home
return for each axis individually.
(The synchronous operation cannot be set
to be disabaled.)
Therefore, the executable home return
methods are restricted.
The connection of sensors to the AMP may be
changed according to the home return
methods. (as hereinafter described)
21.2.2 Home Return Method in Synchronous Operation
When using Synchronous Mode A
In the synchronous mode A, the home return should be performed for each axis individually. Therefore,
set the synchronous operation to be disabled when performing the home return.
If the synchronous operation is enabled when the home return operation starts, an error will occur and
the home return cannot be executed.
All the home return methods currently supported by the Positioning Unit RTEX can be used.
21.2.3 Home Return Method in Synchronous Operation
When using Synchronous Mode B
As the synchronous operation cannot be set to be disabled (always enabled) in the synchronous mode B,
only the home return can be executed in the synchronous operation. Therefore, the executable home
return methods are restricted.
The followings are the home return methods to be available in the synchronous mode B.
1: DOG method 2
4: Limit method 2
6: Stop-on-contact method 1
8: Data set (* Each numbers are the home return setting code.)
Also, when performing the home return usign the “1: DOG method 2” and “4: Limit method 2”, the input
from the DOG sensor and limit sensor should be connected as below.
21-7
21.2.4 Synchronous Operation Setting
Note the precautions below when using the synchronous operation.
One slave axis can be specified for each synchronized master axis.
The master axis can belong to an inerpolation group, however, the slave can be specified for
independent axis.
Up to 2 groups of master/slave axes can be set.
If the synchronous setting is specified, the synchronous operation is always performed on the master
and slave axes.
The slave axis can be oprated individually by the setting “Synchronous group n Enabled/Disabled” in the
shared memory. (In the synchronous mode A only)
The slave axis is synchronized with the master slave during the synchronous operation, however, the
operations of the master and slave axes may not be synchronized due to a reason such as a mechanical
error. The Positioning Unit RTEX monitors the current values of the master and slave axes, and it stops
the operation if the difference in the operations of the master and slave axes exceeds a certain value
(synchronous operation difference value).
21-8
21.2.5 Synchronous Operation Setting
For the synchronous operation, one slave axis is set for one master axis. Up to two groups can be set.
Reference: 17.4.4 Setting Parameter Control Area
Addition of 17.4.4 : Setting Parameter Control Area (ver.1.13 or later)
Bank
Offset
addres Name
s
0B7H
Synchronous group 1
Synchronous mode
Description
Sets the operation mode of the synchronous operation.
00H: Synchronous mode A
01H: Synchronous mode B
Turn on the corresponding bit for the axes to be the master and
slave axes in the synchronous operation.
0B8H
0B9H
Synchronous group 1
Master axis
Synchronous group 1
Slave axis
00H
Bit
Name
0
Synchronous attribute of axis 1
1
Synchronous attribute of axis 2
2
Synchronous attribute of axis 3
3
Synchronous attribute of axis 4
4
Synchronous attribute of axis 5
5
Synchronous attribute of axis 6
6
Synchronous attribute of axis 7
7
Synchronous attribute of axis 8
15 to 8 -
Default Description
0
0
0
0
0
0
0
0
-
0: Not execute the
synchronous operation.
1: Synchronous
operation
master/slave
axis setting of group
-
Each synchronous axis can be set for only one axis.
0BAH
Synchronous group 2
Synchronous mode
Sets the operation mode of the synchronous operation.
00H: Synchronous mode A 01H: Synchronous mode B
Turn on the corresponding bit for the axes to be the master and slave axes
in the synchronous operation.
0BBH
Synchronous group 1
Master axis
0BCH
Synchronous group 1
Slave axis
Bit
Name
Default
0
Synchronous attribute of axis 1 0
1
Synchronous attribute of axis 2 0
2
Synchronous attribute of axis 3 0
3
Synchronous attribute of axis 4 0
4
Synchronous attribute of axis 5 0
5
Synchronous attribute of axis 6 0
6
Synchronous attribute of axis 7 0
7
Synchronous attribute of axis 8 0
15 to 8 -
-
Description
0: Not execute the
synchronous operation.
1: Synchronous operation
master/slave
axis setting of group
-
Each synchronous axis can be set for only one axis.
21-9
21.2.6 Canceling and Monitoring Synchronous Operation
The “synchronous operation control/monitor area” is added to the shared memory common area to set
the synchronous operation to be enalbed/disabled and to confirm the current synchronous setting.
Reference: 17.4 Details of Common Area in Shared Memory
Addition of 17.4: 17.4.10_Synchronous control/monitor area (ver.1.13 or later)
Bank
Offset
addres Name
s
2B0H
Description
The setting for the synchronous operation can be switched between “Enabled”
Synchronous group and “Disabled”.
When using the synchronous mode B, this setting is ignored, and an operation
1 operation
always being synchronized is perfomred.
Enabled/disabled
Bit
0
2B1H
Name
Default
Description
Group attribute of r axis 0
0: Execute the synchronous operation.
1: Cancel the synchronous operation.
Synchronous group
1-7
-
-
-
2 operation
15 to 8 -
-
-
Enabled/disabled
00H
Bit
Name
0
Axis 1 is synchronous.
1
Axis 2 is synchronous.
2
Axis 3 is synchronous.
3
Axis 4 is synchronous.
4
Axis 5 is synchronous.
5
Axis 6 is synchronous.
6
Axis 7 is synchronous.
7
Axis 8 is synchronous.
15 to 8 -
-
-
Default Description
0
0: Not syvchronous.
0
1: Synchronous operation target axis
0
The bit of the axis whrere the
0
synchronous operation performs is
0
turned on in this area,regardless of
0
a synchronous gourp master axis
0
or slave axis..
0
2B4H
Synchronous
operation monitor
2B8H
Difference threshold of the movement amounts of the master/slave axis that the
synchronous operation performs.
Synchronous
If the difference of he movement amounts of master/slaves axis exceeds this
operation difference
threshold, 3045H error will occur (synchronous axis operation mismatch error).
value
This difference value is specified in a unit used for the master axis.
Default:: 10000
1.This area is used to set the synchrounous operation to “Enabled” or “Disabled” for the synchronouls
gorup that is enabled and to monitor the synchronous state when the synchronous operation setting in
the axis group setting area has been set to be enabled.
2.When the bit1 in the synchronous operation enabled/disabled area is on, the synchronous operation
can be cancelled temporarily only when using the synchronous mode A, and the JOG operation, home
return and positioning operation can be independently executed.
3.The bit 1 in the synchronous operation enabled/disabled area is off, the synchronous operation is
enabled. The operation of the slave axis is perfectly synchronized with the master axis.
4.In the synchronous operation monitor area, when the synchronous operation is enalbed, the target bits
of all master/slave axes to be synchronized are turned on, and the bits of axes to be normally operated
and the axes of synchronous groups that the synchronous operation is disabled are turned off.
21-10
21.2.7 Positioning Parameters in Synchronous Operation
Operational Overview of Positioning Parameters
Various positioning parameters should be set to perform operations on the positioning unit RTEX. As the
table below, there are the parameters that operate by the types of positioning parameters and the ones
that operate by the settings for each axis during the synchronous operation. Note that when setting the
positioning parameters.
Positioning parameters
Parameter name
Unit setting
Pulse number per rotation
Movement amount per rotation
CW/CCW direction setting
Limit switch
Limit switch connection
Software limit (Positioning control)
Software limit (Home return)
Software limit (JOG operation)
Upper limit of software limit
Lower limit of software limit
Auxiliary output mode
Auxiliary output ON time (ms)
Auxiliary output Delay rate
Completion width (pulse)
Monitor error – Torque judgment
Monitor error – Torque judgment valeu (%)
Monitor error – Actual spped judgment
Monitor error – Actual speed judgment value
Home – Setting code
Home return – Direction
Home return – Acceleration time
Home return – Deceleration time
Home return – Traget speed
Home return – Creep speed
Home return – Stop-on-contact torque value
Home return – Stop-on-contact judgment
time
JOG operation – Acceleration/Deceleration
type
JOG operation – Acceleration time
JOG operation – Deceleration time
JOG operation – Target speed
JOG positioning operation setting code
JOG positioning operation acceleration time
JOG positioning operation deceleration time
JOG positioning operation target speed
Emergency stop deceleration time (ms)
Limit stop deceleration time (ms)
Error stop deceleration time (ms)
Pulser operation setting code
Pulser operation ratio numerator
Pulser operation ratio denominator
Operation during synchronous operation
Operates by the setting of each axis.
Specify the same settings for the axes to be synchronized when
performing the synchronous operation.
Follows the operation of the master axis during the synchronous
operation.
Varies depending on the operation mode of the synchronous
operation.
Synchronous mode A: Operates by the setting of each axis.
Synchronous mode B: Follows the operation of a master axis.
Follows the operation of the master axis during the synchronous
operation.
The operation varies according to the type of stop operations.
For the details, refer to “3.5.2 Stop Operation During Synchronous
Operation”.
Operates by the setting of each axis.
Specify the same settings for the axes to be synchronized when
performing the synchronous operation.
21-11
21.2.8 Stop Operation During Synchronous Operation
If the stop operaiton is executed for the master and slave axis during the synchronous operation, the
operation is as follows.
Axis requested to stop
Stop
operation
Emergency
stop
Operational overview
Master axis
All axes stop without
deceleration time.
All axes stop, regardless the master or slave axis.
Deceleration
stop
A specified axis stops
with a deceleration time.
Both master and slave axes stop
with the deceleraiton time for the
master axis.
Limit stop
Stops with a
decelerationn tiem when
a limit occurred.
Error stop
Stop the operation with a
deceleration time when
an error occurs.
Both master and slave axes stop
with the deceleraiton time for the
master axis.
After those stopped, the error
code occurred on the master axis
is set for the master/slave axes.
Slave axis
The request to stop the slave axis
is ignored.
Both master and slave axes stop
with the deceleraiton time for the
master axis.
After those stopped, the error
code occurred on the slave axis is
set for the master/slave axes.
21.2.9 Precautions When Using Synchronous Operation
-The positioning unit RTEX always performs the ysnchronous operation if the setting has been set to the
synchronous group.
Set the settings of the master and slave axes in the synchronous groups 1 and 2 to 0H (all bits: off) not
to perform the synchronous operation.
-During the synchronous operation, the Busy signal of the slave axis turns on once the operation of the
master axis starts, and the operaiton doen signal of the slave axis turns on when the operation of the
master slave completes.
-When the synchronous operation is enalbed, a request for the slave axis to operate is not accepted.
-The servo on/off can be executed independently regardless of whether the synchronous operation is
enabled or disabled.
-The slave axis can accept the request to stop the operation (deceleration stop, emergency stop and
system stop) regardless of whether the synchronous operation is enabled or disabled.. When requested
to stop, the master axis also stops being perfectly synchronized.
* When the synchronous group has been set to be disabled, the setting of the synchronous
group cannot be changed in the operation sample.
Set the synchronous group to “Enabled” you want to change the setting for changing the
synchronous group.
21-12
21.2.10 Sample Program
Refer to “Synchronous operation ladder program for demo.fp”.
21.2.11 Errors occurred in Synchronous Operation
The following operations are errors in the synchronous operation.
The operating synchronous group cannot be changed during the synchronous operation. If the group is
changed during the synchronous operation, the synchronous group error (3040H) will occur and the the
operating axis will stop.。
If the AMP error occrus during the synchronous operation, the synchronous operation error (3043H) will
occru on other corresponding axes, and the axes will stop.
The home return method during the synchronous operation vaires depending on the synchronous modes.
-Synchronous mode A: There is no restriction on the home return method, however, it is necessary to
set the synchoronous operation to “disabled” before the home return. If the synchronous operation is set
to “enabled”, the home return prodess will be an error.
-Synchronous mode B: If a home return method other than usable methods has been set, an error
occurs when starting the home return process, and the home return process cannot be executed.
The following settings specified for the synchronous group become errors.
Also, when both master and slave axes are not set (all bits are off), the normal operation is performed.
- The same axis has been set for the synchronous groups 1 and 2.
- Either master axis or slave axis has not been set. (All bits are off.)
- Multiple axes have been set for the master or slave axis.
- The same axis has been set for the master and slave axes.
- The slave axis has been set to the interpolation group.
21-13
21.3 JOG Positioning Control
Overview of Operation
The overview of the JOG positioning control function is as below.
1. The JOG positioning control can be set for independent axis only.
2. The JOG positioning is executed by combining the JOG positioning control (J point) and the
positioning control (E point).
3. Accelerates with a specified acceleration time after starting the speed control, and operates at a
constant speed (target speed).
4. The speed can be changed in multiple stages during the speed control. Also, the
acceleration/deceleration time can be changed according the change in speed.
The speed is changed by turning on the “J point speed change contact” that is allocated as I/O of PLC.
5. The speed control moves to the positioning control by turning on the “J point positioning starting
contact” that is allocated as I/O of PLC.
6. In the positioning contro, moves for the specified pulse number, and decelerates and stops. (The
operation completes)
21.3.1 Example of Operation
The positioning unit RTEX performs the control set for the positioning table up to E-point control
continuously. Therefore, numerous operations are achievable by bombining the positioning control (Ppoint, C-point and E-point control) and speed control (J-point control). The examples are as follows.
<< Example 1 >>
<< Example 2 >>
※Trg.1: J point speed change contact
21-14
Trg.2: J point positioning start contact
21.3.2 Setting Method
Each setting items to perform the JOG positioning control are described below.
1.“J: JOG positioning point” is added to the operation patterns of positioning operation.
The following item is added to the operation of offsett address below of the positioning table starting
address of each axis.
Reference: 17.6.3 Positioning Data Setting Areas
Addition of 17.6.3: Positioning Data Setting Areas (ver.1.13 or later)
001H
Operation
pattern
Area to set the single and interpolation operation pattern for the positioning operaiton.
The underlined black-faced parts are the additional contents.
Bit
Name
Default
Description
7 to 0
Control patterns
00H
00H: E point control (End point control)
01H: P point control (Pass point control)
02H: C point control (Continuance point control)
03H: J point control (JOG positioning control)
Any other settings will be an error.
15 to 8
control.
Interpolation setting 00H The interpolation setting is invalid for the J-point
The JOG positioning control (J point) is available only for a single axis control. The setting will be an
error if it is specified for the interpolation control.
2. Starts the JOG positioning control by writing the table number that the J-poin control has been
specified in the positioninga table settimg area and turning on the “positioning starting flag” for an
appropriate axis. After that, consecutive table numbers are exectued up to the table number that the end
point control (E point) has been specified. The acceleration/deceleration time and target speed when
starting the J-point operation is set in the positioning table area as well as other operation patterns.
For the details, refer to “17.6.3”.
The speed can be changed in during the J-point control. To change the speed, the “J-point speed
change contact” should be on after writing a prescribed value in the following offset address in the “each
axis positioning parameter area”.
21-15
《Each Axis Positioning Parameter Area》
The parameters for the JOG positionign control are set in the following offset addresses (words) in each
axis positioning parater area.
Reference: 17.6.2 Parameter Setting Area
Addition of 17.6.2: Parameter Setting Area (ver.1.13 or later)
Addres
Name
s
041H
Description
Sets the mode of the JOG positioning operation.
Bit
Name
Default Description
0
-
-
-
1
Acceleration/
0
0: Linear cceleration/deceleration
JOG positioning
deceleration pattern setting
1: S-shaped acceleration/deceleration
operation setting code
2 to 15 -
042H
043H
044H
045H
21-16
-
-
Sets the acceleration/deceleration time when performing the JOG positioning
JOG positioning
operation acceleration operation.
Bit
Name
Default Description
time
15to 0
JOG operation
100
Setting range: 0 to 10,000(ms)
JOG positioning
acceleration time
Any other settings will be an error.
operation
JOG operation
deceleration time
deceleration time
Set the target speed when performing the JOG positioning operation.
Bit
Name
Defaul Description
31 to 0 JOG operation 1,000
Setting range: 1 to 32,767,000
target speed
Any other settings will be an error. Interpretation
JOG positioning
is changed by the unit setting.
operation target speed
Pulse: 1 to 32,767,000 pps
μm:1 to 32,767,000 μm/s
Inch: 0.001 to 32,767.000 inch/s
Degree:0.001 to 32,767.000 rev/s
《 J point speed change contact 》
This flag is assigned to the following I/O that is directly controlled from the CPU unit. Note that the I/O
allocation varies according to the type of the JOG operation deceleration time CPU or the number of
connected units.
Reference: 17.2 Table of I/O Area
Addition of 17.2: Table of I/O Area (ver.1.13 or later)
WY12
WY14
Target
Contact allocation
axis
FPΣ
FP2
Y148
Y128 1 axis
Y149
Y129 2 axis
Y14A
Y12A 3 axis
Y14B
Y12B 4 axis
Y14C
Y12C 5 axis
Y14D
Y12D 6 axis
Y14E
Y12E 7 axis
Y14F
Y12F 8 axis
Name
J point speed
change contact
Descriptions
The speed changes by turning on this signal during the J-point
operation to the target speed with the specified
acceleration/deceleration time and pattern.
(The operation is the edge type.)
3.Turning on “J point positioning start contact” in the J-point operation proceeds the operation to the
positioning process for the next table, and completes the operation after performing the process for the
E-point table.
《 J point positioning start contact 》
Reference: 17.2 Table of I/O Area
Addition of 17.2: Table of I/O Area (ver.1.13 or later)
WY13
WY15
Contact allocation
Target
axis
FPΣ
FP2
Y158
Y138 1 axis
Y159
Y139 2 axis
Y15A
Y13A 3 axis
Y15B
Y13B 4 axis
Y15C
Y13C 5 axis
Y15D
Y13D 6 axis
Y15E
Y13E 7 axis
Y15F
Y13F 8 axis
Name
J point positioning
start contact
Descriptions
Turning on this signal during the J-poing operation for the
appropriate axis ends the J-point operation, and moves to the
process for the next table.
(The operation is the edge type.)
21.3.3 Sample Program
Refer to “J point control ladder program for demo.fp”.
21-17
21.3.4 Restrictions on JOG Positioning Control
The JOG positioning target speed can be changed by turning on the “J-point speed change contact” in
the JOG positioning contorol, however, the speed cannot be changed while it is accelerating or
decelerating.
Therefore, the “J-point speed change contact” is ignored while the speed is accelerating/decelerating.
After the speed becomes a constant speed, the speed will be changed.
Also, only the increment method is available for the position setting for points P, C and E following point
J.
21.3.5 Repeat Accuracy of JOG Positioning Control
As each request contact during the speed control (J point speed change cotnact, J point positionign start
contact) is controlled by I/O in the JOG positioning control, the positioning accuracy depends on the scan
time of I/O.
In JOG positioning control, the speed cange/positioning operation can be started within 1 to 2 ms after
the Positioning Unit RTEX detected the above contact signal. In the actual operation, the movement
amount at 1 ms that is calculated from the items such as the speed during the speed control and the
ratio of the motor rotations to the movement amount of the actual work becomes a repeat error. Also,
ladder programs to output the contact signals affect on the error note that when creating ladder
programs.
21-18
Chapter 22
Home Return (Ver.1.13 or later)
22.1 Additional of Home Return Method
The following 8methods are added to the home return method in addition to the DOG method. A total of
9 types are supported.
DOG method 2 (Edge detection of near home DOG)
DOG method 3 (Near home ODG + Phase Z (based on back-end))
Limit method 1
(Limit switch + Phase Z))
Limit method 2 (Edge detection of limit switch)
Phase Z method
Stop-on-contact method 1 (Stop-on-contact)
Stop-on-contact method 2 (Stop-on-contact & phase Z)
Data set method
22.1.1 Setting Method of Home Return Methods
The type of the home return is set to a prescribed address in the shared memory.
Reference: 17.6.2 Parameter Setting Area
Addition of 17.6.2: Positioning parameters of each axis (Ver.1.13 or later)
Offset
Name
address
Description
Sets the pattern of the home return.
Bit
Name
Default
15 to 0 Home return setting code 0
020H
03DH
Home return
setting code
It is used when the stop-on-contact method 1 or 2 has been specified for the home
return method.
By the stop-on-contact
Home return
Stop-on-cotnact torque It is regarded as a criterion for judging the home return once the torque value of
the AMP exceeded this set value by the stop-on-contact.
value
Default: 100(%) Unit: %
03EH
Home return
Stop-on-contact
judgment time
Setting range: 0 to 5000
It is used when the stop-on-contact method 1 or 2 has been specified for
the home return method.
It is regarded as a criterion for judging the home return once this set time
has passed after the torque value of the AMP exceeded the “home return
stop-on-contact torque value” by the stop-on-contact.
Default: 100(ms) Unit: ms
22-2
Descriptions
0:DOG method 1
1:DOG method 2
2:DOG method 3
3:Limit method 1
4:Limit method 2
5:Phase Z method
6:Stop-on-contact method 1
7:Stop-on-contact method 2
8:Data set
Any other settings will be errors.
Setting range: 0 to 10000
22.1.2 DOG method 1
The phase Z after detecting the rising edge of near home DOG becomes the starting point.
22.1.3 DOG method 2
The rising edge of near home DOG is detected. It becomes the starting point.
22-3
22.1.4 DOG method 3
Stops at the first phase Z in the home return direction by detecting the trailing edge(back-end) of near
home DOG, and the position becomes the starting point.
22.1.5 Limit Method 1
Reverses after detecting the rising edge of the limit switch on the opposite side of the home return
direction. After that, stops at the first phase Z, and that point becomes the starting point.
22-4
22.1.6 Limit Method 2
Detects the rising edge of the limit switch in the home return direction and stops. That point becomes the
starting point.
22.1.7 Phase Z Method
Moves toward the home return direction from the current value and stops at the first phase Z detection.
That point becomes the starting point.
22.1.8 Stop-on-contact Method 1
The position reached after a constant time has passed at the torque value higher than a specified value
using an automatic stop mechanism such as a stopper is regarded as orign.
22-5
22.1.9 Home Return Stop-on-contact Method 2
Although the operation is similar to the stop-on-contact method, the position where the first phase Z was
detected performing the reverse operation after the stop by a stopper is regarded as origin
22.1.10 Data Set Method
The current value is considered as the origin.
22.1.11 Sample Program
Refer to “Home return ladder program for demo.fp”.
22-6
Chapter 23
Supplementary functions (Ver.1.13 or
later)
23.1 Realtime Torque Limit
Operational Overview
It enables the torque limit value to be changed during the Busy state of the JOG operation or positioning
operation. (The torque value cannot be changed during the Busy state (in axis operation) by the
Positioning Unit RTEX Ver.1.00 and ver.1.01.)
23.1.1 Restrictions on Real-time Torque Limit
The realtime torque limit function cannot be used for the home return operation.
As a paramter of AMP “Primary torque limit value” is used, do not change the used torqu e limit by
PANATERM, etc when using the torque limit.
23.1.2 Sample Program
Refer to “Real-time limit ladder program for demo.fp”.
23.1.3 Each Axis Information & Monitor Area
Reference: 17.5.2 Each Axis Information & Monitor Area
23-2
23.2 Auxiliary Contact (Delay Mode)
Overview of Operation
The Delya mode is a new operation mode added to the auxiliary output contacts. Using this mode
enables the auxiliary output contact to turn on according to the ratio of the positioning movement amount.
(Example)
If the rate has been set to 50% in the delay mode, the auxiliary output contact will turn on once it moves
to the position where is 50% of the movement amount of the positioning table.
23.2.1 Delay Mode Setting
“Delay mode” is added to the auxiliary output mode. The Ver1.00 and Ver.1.01 auxiliary output mode is
“With mode”.
Also, the delay rate of the delay mode is added to “Each axis positioning parameter setting area”.
Reference: 17.6.2 Parameter Setting Area
Addition of 17.6.2:Each axis positioning parameter setting area (Ver.1.13 or later)
Offset
addres Name
s
012H
013H
Auxiliary output
mode
Auxiliary outptu
Delay rate
Descriptions
Set the auxiliary output contact and auxiliary output function of the auxiliary output code
whether to be used or unused.
The on time of the auxiliary output contact is determined by the following auxiliary output
on time.
Bit Name
Default
Description
0 to 7 Auxiliary output mode
0
0000H: Not use the auxiliary output function
(auxiliary output contact and code)
0001H: Use With mode.
0002H: Use Delay mode.
15 to 8 Auxiliary output on time 10
The setting range is 00H((0 ms) to FFH(225 ms).
When using the delay mode for the auxiliary output, specify the ratio (%) to output.
The setting range is 0(%) to 100(%). If the setting is 50%, the auxiliary output will be
perfomred when the positioning movement amount exceeds 50%.
Default:: 0 (%)
23-3
23.3 Current Value Update Function
Functional Overview of Current Value Update
The current value update function is a function to change the current value controlled by the Positioning
Unit RTEX to
an arbitrary value.
The “home change (home offset)” function is provided for the Positioning Unit RTEX(Ver.1.00 and
Ver.1.01), however, the “home offset” function is eliminated on the Positioning Unit RTEX of Ver.1.13 or
later, and the “current update” and “coordinate origin” functions are added.
23.3.1 Differences with Home Offset Function
The differences in the “home change (home offset)”, “current value update” and “coordinate origin” are
as below.
Version of
Positioning
Unit RTEX
Ver1.00,1.01
specifications
Function
Home change
(Home offset)
Current value
update
Note)
Ver.1.13
or later
specifications
Coordinate
origin
Operation
-This is a function to set the home position controlled by Positioning Unit RTEX
to an arbitrary coordinate position.
-The current coordinate controlled by Positioning Unit RTEX becomes the
offset value from the specified home position.
-Once the home return is executed, the set coordinate will be registered as
origin.
-The coordinate after the home return is as below.
Positioning Unit RTEX internal coordinate: Specified coordinate origin
AMP coordinate: 0
・The current vaue controlled by Positioning Unit RTEX is changed to an
arbitrary value.
・The coordinate origin does not change due to the current value update.
・The coordinate origin is changed to an arbitrary value.
・Once the home return is executed, the set coordinate will be registered as
origin.
・The coordinate after the home return is as below.
Positioning Unit RTEX internal coordinate: Specified coordinate origin
AMP coordinate: 0
・Unlike the home change (home offset) function, the current value is changed
after the home return has completed.
Note) In Configurator PM, “Current value update “ is written as “Home offset”.
23-4
23.3.2 Current Value Update
-Changes the current value that is controlled by the Positioning Unit RTEX to any value.
-The current value update can be executed only when the target axes stop. The current updated
executing during the axis operation (Busy) is ignored, and the current value will be updated once the axis
operation stops.
-The coordinate origin does not change.
-The current value update can be set in the unit specified in the parameter setting.
The settable range varies depending on the unit to be used as below.
Specified unit
Settable range
pulse
-1,073,741,823 to 1,073,741,823
μm(0.1μm)
-107,374,182.3 to 107,374,182.3
μm(1μm)
-1,073,741,823 to 1,073,741,823
inch(0.00001inch)
-10,737.41823 to 10,737.41823
inch(0.0001inch)
-107,374.1823 to 107,374.1823
degree(0.1degree)
-107,374,182.3 to 107,374,182.3
degree(1degree)
-1,073,741,823 to 1,073,741,823
23.3.3 Coordinate Origin
-Changes the coordinate origin to an arbitrary value.
-After setting the coordinate origin, the coordinate origin set by the coordinate origin is registered as
origin by performing the home return and when the home return completed.
-The coordinate origin is set in pulse units in regardless of the unit specified in the parameter setting.
-The coordinates after the home return are as follows.
Positioning Unit RTEX control coordinate: Specified coordinate origin
AMP coordinate: 0
23-5
23.3.4 Setting Method,Current Value Update
The “Home change data area” is changed to “Current value update data area”. The setting method is the
same as the one for the home change (home offset) function.
Current value update data area
Offset
Bank
addres Name
s
Description
Only when the corresponding bit for each axis changes to 1 from 0, the
current coordinate controlled by the positioning unit to the following current
value.
After change, the positioning unit clears the corresponding bits to 0
automatically.
Bit
Name
Default
0
Current value update request for axis 1
0
1
Current value update request for axis 2
0
2
Current value update request for axis 3
0
3
Current value update request for axis 4
0
Current value
4
Current value update request for axis 5
0
0C0H
update request flag
5
Current value update request for axis 6
0
6
Current value update request for axis 7
0
7
Current value update request for axis 8
0
Description
0: No change
1: Changes the current value of a target axis.
(After change, the positioning unit clears the correponding bits to 0
automatically.)
Bit
15 to 8
00H
0C8H Current value
update coordinate
0C9H
of axis 1
0CAH Current value
update coordinate
0CBH
of axis 2
0CCH Current value
update coordinate
0CDH
of axis 3
0CEH Current value
update coordinate
0CFH
of axis 4
0D0H Current value
update coordinate
0D1H
of axis 5
0D2H Current value
update coordinate
0D3H
of axis 6
0D4H Current value
update coordinate
0D5H
of axis 7
0D6H Current value
update coordinate
0D7H
of axis 8
Name
-
Default
-
Description
-
Stores the coordinate to update the current value of axis 1.
Stores the coordinate to update the current value of axis 2.
Stores the coordinate to update the current value of axis 3.
Stores the coordinate to update the current value of axis 4.
Stores the coordinate to update the current value of axis 5.
Stores the coordinate to update the current value of axis 6.
Stores the coordinate to update the current value of axis 7.
Stores the coordinate to update the current value of axis 8.
-Set the coordinate to update the current value, and turn on the current value update request flag.
-The positioning unit changes the current value to the specified coordinate.
-After changing the coordinate, the positioning unit turns off the current value update request flag
automatically.
23-6
23.3.5 Coordinate Origin
The “Coordinate origin” is added to each axis positioning parameter.
Reference: 17.6.2 Parameter Setting Area
Addition of 17.6.2:Each axis positioning parameter setting area (Ver.1.13 or later)
Offset
Name
Description
address
04AH
04BH
Cooridnate origin
Stores the value of coordinate origin after the home return.
-Set the coordinate origin after the home return to the coordinate origin of the target axis.
-Execute the home return process.
-After the home return completed, the coordinate origin is changed to a set value.
23.3.6 Sample Program
Current Value Update
Refer to “Current value update ladder program for demo.fp”.
Coordinate Origin
Refer to “Coordinate origin ladder program for demo.fp”.
23.3.7 Restrictions on Operation
The current value update can be executed only when the target axes stop. The current updated
executing during the axis operation (Busy) is ignored, and the current value will be updated once the axis
operation stops.
23-7
23.4 Position Deviation Simple Monitor
Functional Overview
The position deviation is the difference between the current value controlled by the positioning unit RTEX
and the AMP current position fed back from the AMP.
This function is the same as the deviation counter provided in the AMP. The difference between the
command value of the positionign unit in the positioning process and the current value of the AMP can
be confirmed by indicating this deviation in the monitor area on the positioning unit.
23.4.1 Monitoring Method
“Positioning deviation” is added in the each axis information & monitor area.
Reference: 17.5.2 Each Axis Information & Monitor Area
Addition of 17.5.2: Axis information of axis 1 to 8 (Ver.1.13 or later)
Bank
01H
Offset
addres
034H
035H
074H
075H
0B4H
0B5H
0F4H
0F5H
134H
135H
174H
175H
1B4H
1B5H
1F4H
1F5H
Name
Description
Posiition deviation of axis
1
Posiition deviation of axis
2
Posiition deviation of axis
3
Posiition deviation of axis
4
Posiition deviation of axis
5
Posiition deviation of axis
6
Posiition deviation of axis
7
Posiition deviation of axis
8
The posiition deviation calculated on the unit of axis 1 is stored.
The posiition deviation calculated on the unit of axis 2 is stored.
The posiition deviation calculated on the unit of axis 3 is stored.
The posiition deviation calculated on the unit of axis 4 is stored.
The posiition deviation calculated on the unit of axis 5 is stored.
The posiition deviation calculated on the unit of axis 6 is stored.
The posiition deviation calculated on the unit of axis 7 is stored.
The posiition deviation calculated on the unit of axis 8 is stored.
23.4.2 Sample Program
Refer to “Position deviation ladder program for demo.fp”.
23.4.3 Restrictions on Operation
-As the deviation to be displayed with the position deviation simple monitor is calculated within the
positioning unit, a deffirence may occur with the deviation counter value of the AMP.
-The display of the position deviation monitor is updated in 10-ms units.
23-8
Record of changes
Manual No.
Date
Desceiption of changes
ARCT1F421E
NOV.2006
First Edition
ARCT1F421E-1
Feb.2008
Addition function of Ver1.13 or later
http://www.mew.co.jp/ac/e/fasys/
2008
ARCT1F421E-1 200802
ACG-M421E-1