1
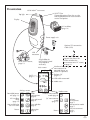
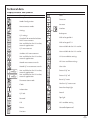
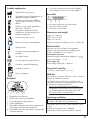
US ENGLISH NIOX MINO® User Manual 510(k) K101034 Remember •It is important to adhere to the specified operating conditions: Ambient temperature: 60 to 85°F (+16 to 30°C) Humidity: 20 to 60% RH (non-condensing) •Mobile phones and cordless phones might interfere with the instrument and should therefore be kept away from the instrument. Interference could make it impossible to perform a measurement. •When within the specified operating conditions it is recommended to keep NIOX MINO® with installed Sensor connected to a power outlet whenever possible. •It is recommended to allow a Sensor to be connected for two hours before the first measurement is done. •It is recommended not to use NIOX MINO in the proximity of areas where volatile substances such as organic fluids or disinfectants are being used. Special attention should be paid to aerosols and disinfection baths (either open vessels or ultrasonic baths). •Always use a NIOX MINO Bag (closed) for transportation and storage of NIOX MINO when it is disconnected from the power outlet. (The NIOX MINO Bag is sold separately.) •Shelf-life - NIOX MINO instrument: Minimum 3 years at time of delivery, or 3,000 measurements. NIOX MINO Sensor: Maximum 12 months when mounted in NIOX MINO or expiration date as stated on the sensor, whichever comes first. Note! This manual is intended for medical care personnel and for use when teaching patients how to use the NIOX MINO instrument. To aid this, a demonstration mode is available in the instrument. Please refer to the "Demonstration mode" section, page 7. Table of contents Warnings! .............................................................. 2 Intended use ......................................................... 2 Training requirements ........................................... 2 Presentation .......................................................... 3 Installation and set-up ........................................... 4 Measurement ........................................................ 5 Enter patient ID (optional)..................................... 5 Perform FeNO measurement................................. 6 View stored results ................................................ 7 Ambient NO measurement ................................... 7 Demonstration mode ............................................ 7 Change settings ..................................................... 8 Time and date....................................................... 8 Sound volume...................................................... 8 Top light intensity................................................. 8 Mode configuration - QC on/off............................ 8 Information menu ................................................. 9 External Quality Control procedure (QC) ........... 10 Selection and qualification of QC testers............ 10 QC measurement................................................ 11 View stored QC results....................................... 12 View QC information......................................... 12 Reset QC tester................................................... 12 Turn off NIOX MINO® ....................................... 13 Moving NIOX MINO.......................................... 13 General Care ....................................................... 13 Preventive inspections........................................ 13 Change Sensor.................................................... 13 Change NO scrubber.......................................... 14 Disposal of used/expired products...................... 14 Return shipments................................................ 14 Support............................................................... 14 Limited warranty................................................. 14 Troubleshooting .................................................. 15 Alert codes......................................................... 16 Technical data ..................................................... 17 Display buttons and symbols.............................. 17 Symbols explanation........................................... 19 Backplate............................................................ 19 Base label .......................................................... 19 Dimensions and weight...................................... 19 Electrical data..................................................... 19 Noise level (stand by)......................................... 19 Shelf-life............................................................. 19 Operating conditions.......................................... 19 Exhaled NO - performance data......................... 20 Linearity............................................................. 20 Precision............................................................. 20 Accuracy............................................................ 20 Method comparison............................................ 20 Inhalation parameters......................................... 20 Exhalation parameters......................................... 20 Memory capacity................................................ 20 Transport and storage.......................................... 20 Patient filter (mouthpiece)................................... 20 Responsible manufacturer................................... 20 NIOX MINO® parts and accessories ................... 21 Connect NIOX MINO® to a PC using USB ............................................................ 21 NIOX® Panel ....................................................... 21 Cautions .............................................................. 22 NIOX MINO surveillance procedures ................. 24 Clinical documentation ....................................... 24 Medical Device Reporting (MDR) ....................... 25 Guidance and manufacturer's declaration .......... 25 Electromagnetic emissions.................................. 25 User manual 000164 (EPM-000109), version 9, December 2014, for instruments with software version from 2005 to 20XX and 22XX to 23XX. X can be any number between 0 and 9. The version number for your instrument can be seen in the Information menu, see page 9. Information in this document is subject to change. Amendments will be made available by Aerocrine, Inc. as they occur. •NIOX MINO is 510(k) cleared, K101034, by FDA. •NIOX MINO is CE-marked according to In Vitro Diagnostic Device Directive 98/79/EC and approved for clinical use in EEC countries. •NIOX MINO is RoHS compliant. •Copyright © 2014 Aerocrine AB, Solna, Sweden. •Aerocrine, NIOX MINO and NIOX are registered trademarks of Aerocrine AB. 1 Warnings! •The NIOX MINO® instrument must always be used and handled as stated in this manual. Aerocrine accepts no responsibility for damaged equipment or faulty results, if the equipment is not used according to this manual. •Do not use a damaged NIOX MINO instrument or damaged components. •Use only the power supply unit provided. •Keep the instrument out of water. Ensure that no liquid is spilled or dripped on the instrument. •Do not heat or dispose of the instrument or Sensor in fire. Please refer to the "Handling of used/expired products" section. •Take care not to drop the instrument or subject it to strong impact. •It is recommended not to use NIOX MINO in the proximity of areas where volatile substances such as organic fluids or disinfectants are being used. Special attention should be paid to aerosols and disinfection baths (either open vessels or ultrasonic baths). •NIOX MINO should not be used adjacent to or stacked with other equipment. •The NIOX MINO Sensor contains chemicals that could be harmful if swallowed. •Touch only the grey cap when exchanging the Sensor. •Do not clean the sensor. Cleaning of the Sensor with ethanol or similar disinfectant might destabilize it for a non-predictable time period. •Keep the Sensor out of water! Ensure that no liquid is spilled or dripped on the Sensor. •The NO scrubber contains potassium permanganate and should be disposed of as hazardous waste in accordance with the local waste disposal regulations. •When selecting an accessory for your NIOX MINO please keep in mind that an accessory not recommended by Aerocrine may result in loss of performance, damage to your NIOX MINO, fire, electric shock, injury or damage to other property. The product warranty does not cover product failure or damage resulting from use with non-approved accessories. Aerocrine takes no responsibility for health and safety problems or other problems caused by the use of accessories not approved by Aerocrine. •No modification of the NIOX MINO instrument or the Sensor is allowed. Also see Cautions page 22. 2 Intended use NIOX MINO measures Nitric Oxide (NO) in human breath. Nitric Oxide is frequently increased in some inflammatory processes such as asthma. The fractional NO concentration in expired breath (FeNO), can be measured by NIOX MINO according to guidelines for NO measurement established by the American Thoracic Society. Measurement of FeNO by NIOX MINO is a quantitative, non-invasive, simple and safe method to measure the decrease in FeNO concentration in asthma patients that often occurs after treatment with anti-inflammatory pharmacological therapy, as an indication of the therapeutic effect in patients with elevated FeNO levels. NIOX MINO is suitable for children approximately 7 - 17 years, and adults 18 years and older. FeNO measurements provide the physician with means of evaluating an asthma patient’s response to anti-inflammatory therapy, as an adjunct to the established clinical and laboratory assessments in asthma. NIOX MINO should only be used as directed in the NIOX MINO User Manual and the NIOX MINO Quality Control Test User Manual, by trained physicians, nurses, respiratory therapists and laboratory technicians. NIOX MINO cannot be used with infants or by children approximately under the age of 7, as measurement requires patient cooperation. NIOX MINO should not be used in critical care, emergency care or in anaesthesiology. Training requirements NIOX MINO should only be used as directed in this manual, by trained physicians, nurses, respiratory therapists and laboratory technicians. “Trained” status is achieved only after careful reading of this manual. Presentation NIOX MINO® instrument NIOX® Filter Disposable patient filter that must be exchanged before each measurement session and patient Top light Display NO scrubber, (page 14) Power supply unit Optional PC connection. Cable (USB) USB connector NIOX Panel PC based program that allows the patient to follow the measurement on a PC screen, see page 21. Strap holder for NIOX MINO Hand Strap (optional accessory) NIOX MINO Sensor, (page 13) Main screen Set ID (page 5) Number of remaining measurements for mounted Sensor, or Patient ID (optional) Perform QC (page 11) USB cable connected Mode status Settings screen Controlled power off (page 13) NO scrubber setup (page 14) Not available for the US market Return Mode screen Mode Standard measurement configuration mode (page 6) (page 8) QC measurement Light and sound mode (page 8) (page 11) Time and date (page 8) Information (page 9) Return Ambient measurement (page 7) Demonstration mode (page 7) View measurement results (page 7) 3 Installation and set-up Caution! Be careful when opening the Sensor can. The inside of the opening has sharp edges. Do not touch or clean the white Sensor membrane. 1. Insert the Sensor into the compartment at the base of the instrument 7. Wait for the instrument to start up and press the Forward button 8. Reminder to insert a new NO scrubber. Press the Forward button 2. Turn the orange swivel until locked 9. Select USA on the display Note! This screen is only displayed at first start-up of the instrument. 3. Gently, spread the latches apart, one at a time, (Optionally: Use the red QC plug to spread the latches apart) ... and carefully pull out the cover 10.Select Settings 11.Select Clock 4. Insert the new NO scrubber into the cover Make sure to use a new NO scrubber, with an unbroken hole 5. Replace the cover and make sure it snaps in place 6. Attach the power supply unit to the instrument and to a power outlet 4 12.The time and date settings are shown UnbrokenBroken 13.Use the plus and minus buttons to set the time and date 14.Select the forward button to change between hour, minute, month, day, and year 15.Select OK to accept the changes 16. Select NO scrubber 17.Again select NO scrubber 18.Input the passcode 0000 using the number buttons to confirm that a new NO scrubber is installed Note: A twinkling asterisk on the screen indicates that the external Quality Control (QC) procedure is activated. A daily QC measurement is mandatory for clinical use. You should start the qualification process of at least one staff member for this procedure, see page 11. 19.Select OK to accept the changes 20.Optional: Connect a USB cable, see page 21 21. Select Return to go back to the Main screen 22.Allow the instrument to stabilize. Note! Stabilization of the instrument normally may take up to 30 minutes following connection of the power supply unit to the power outlet. However, it is recommended to allow the NIOX MINO® Sensor to be connected for two hours before the first measurement is done. Measurement Enter patient ID (optional) Note! If Patient ID is used, it has to be entered before each measurement (even if it is the same patient). Input a patient specific ID number, up to 10 digits. 1. Select the ID button on the main screen 2. Input the patient specific ID using the number buttons to Use the shift buttons to change between digits 0 to 4 and 5 to 9 3. Select OK to accept the patient ID Depending on what is shown on the display, proceed as follows: Stabilization in progress Wait until ready Instrument in sleep mode Touch the display Ready for use 5 Perform FeNO measurement Important! Always attach a new patient filter for each new patient Make sure that the instrument is ready for measurement (activate by pressing the display if in sleep mode) Choose one of three options in order to follow the measurement Listen to the sound signals and view the top light. Look at the display using a mirror. If the optional PC based NIOX® Panel is used, look at the PC screen. (see page 21) 1. Empty lungs 2. Inhale deeply through the filter to total lung capacity The cloud on the display is inflated and the top light is turned off while you inhale The sun/cloud is rising Inhalation time is displayed with buttons if meter is selected 3. Exhale slowly through the filter until the top light and sound turns off Continuous sound and steady light = OK Intermittent high frequency sound and flickering light = exhalation too hard Intermittent low frequency sound and flickering light = exhalation too weak 4. Wait for result 6 FeNO value Patient ID (if entered) Sequence number (each measurement result is given a unique identification number) View stored results Demonstration mode The measurement result is automatically displayed at the end of a measurement. All previous results are stored in the instrument, and can be viewed at any time. Use this mode for a new patient in order to demonstrate the different steps during a measurement and the corresponding illustrations on the display as well as light and audio feed-back. (Sound volume has to be activated.) 1. Select Mode 1. Select Mode 2. Select Measurement results 3. The latest stored measurement is displayed, showing: A. FeNO value B. Measurement mode C. Patient ID (if entered) D. Sequence number (each measurement result is given a sequence number) E. Time and date of measurement 4. Use the previous and next buttons to step through the stored measurements 5. Select Return to go back to the Mode screen A B C 3. The inhalation screen is shown and the top light is turned off D E Ambient NO measurement Note! A completed ambient NO measurement is counted as one measurement for the Sensor and NIOX MINO®. 1. Attach a new patient filter 2. Select Demo 4. Use the Forward button to advance to the next screen 5. The normal exhalation screen is shown Correct exhalation pressure: The cloud in a steady centered position, the top light is lit, and the audio emits a constant sound 6. Use the Forward button to advance to the next screen 7. The exhalation too weak pressure screen is shown 8. Use the Forward button to advance to the next screen 9. The exhalation too strong pressure screen is shown 2. Select Mode 3. Select Ambient measurement 4. Wait for result (approximately 4 minutes) 10. Use the Forward button to advance to the next screen 11. The wait for result screen is shown (static view) 12. Select Return to go back to the Mode screen 7 Change settings Time and date 4. The top light setting is shown 1. Select Settings 2. Select Clock 3. The time and date settings are shown 5. Use the minus and plus buttons to set the light intensity 6. Select OK to accept the changes 4. Select the time format icons to change between US and ISO time and date 5. Use the minus and plus buttons to set the time and date 6. Select the forward button to change between hour, minute, month, day, and year 7. Select OK to accept the changes Sound volume Mode configuration - QC on/off Note! For clinical use, the QC must always be on! 1. Select Settings 2. Select Mode Configuration 3. Select QC settings 4. The QC settings are shown 1. Select Settings 2. Select Sound and Light 3. The sound volume setting is shown 5. Use the buttons to deactivate or activate QC measurement 6. Select OK to accept the changes 4. Use the minus and plus buttons to set the sound volume 5. Select OK to accept the changes Top light intensity 1. Select Settings 2. Select Sound and Light 3. Select top light 8 Information menu 1. Select Settings 2. Select Information menu 3. The information screen shows: A. Number of remaining sensor measurements B. Sensor expiration date C. Sensor serial No. D. Number of remaining instrument measurements E. Instrument expiration date F. Instrument serial No. G. Instrument software version 4. Select Return to go back to the Settings screen A B C D E F G ... alternatively select A to view the alert codes 5. The alert code information screen is shown, showing the 16 latest alerts Note! The alert codes in the list are only to be used in contact with Aerocrine, Inc. Technical Support •Date of the alert •Alert code (for technical support purpose only) 6. Select Return to go back to the Information screen 9 External Quality Control procedure (QC) The external Quality Control is one of the procedures that ensures the system is operating within its specifications. For further information regarding NIOX MINO® surveillance procedures, see page 27. Note: The Quality Control function in NIOX MINO must always be activated as a daily QC measurement is mandatory when the instrument is clinically used. The external Quality Control consists of two parts. One positive control from a qualified staff member with a stable FeNO value providing a normal biological FeNO sample and a negative control consisting of a NO free gas sample, generated from ambient air. NIOX MINO will allow for one daily QC measurement that will not affect the number of remaining tests on the NIOX MINO Sensor. (During the first 20 days of instrument start-up, a maximum of four QC testers can be qualified without impact to the number of remaining tests on the Sensor.) Selection and qualification of QC testers A minimum of one individual (two individuals are recommended) needs to qualify for this procedure. Identify a third individual as a back-up, if possible. Identify the staff members who will perform the Quality Control and meet the following criteria: • Over 18 years of age. • No ongoing cold or known airway disease. • Non-smoker. • Expected stable FeNO values between 5 and 40 ppb. • Preferably no allergies (except seasonal, see below) or asthma. A QC tester will be qualified over the course of three days. Note! If the most recent QC measurement is older than 30 days, then the qualification is suspended and the QC tester needs to re-qualify according to the qualification procedure. Perform three QC measurements, one per day within seven days, according to the QC measurement section. A mean value is calculated from the three measurements that must be between 5-40 ppb. The following QC measurement on the fourth day must be within ± 10 ppb from the mean value and the NO scrubber result < 5ppb. Then the Quality Control has passed and the instrument is ready for clinical use. The next moving mean value is calculated when the QC tester performs a QC measurement following 7 10 days. Result screens for the QC tester qualification Day 1 Day 2 Day 3 After day 3 Positive control result: FeNO value and limits (mean value +/- 10 ppb) QC measurement The instrument will prompt for a daily QC procedure by showing a twinkling asterisk on the display. Always consider the following in order to obtain reliable results. Before any measurement: • Avoid nitrate rich food within 3 hrs before the measurement. • Avoid strenuous exercise at least 1 hour before the measurement. Preferably do not perform a measurement in case of: • Ongoing cold. • Acute seasonal allergy. 8. Wait for the analysis to be completed and the test result to be displayed (approximately 5 minutes) 9. The QC measurement result is displayed Note! During the qualification days of a new QC tester the result is displayed as presented Day 1-3. Day 1 Day 2 Day 3 1. Select Mode 2. Select QC mode 3. Select QC tester number (each QC tester must select an individual number) 4. Perform a normal FeNO measurement according to page 6. 5. Remove the patient filter After day 3 A. Positive control result: FeNO value and limits (mean value +/- 10 ppb) A B. QC tester number B C. Negative control result C (should be < 5 ppb) 10.Remove the QC plug Repeat the QC test if the positive and/or the negative control fail. If the QC failure persists, discontinue use of NIOX MINO® and contact Aerocrine Inc. Technical Support. 6. Immediately attach the QC plug 7. Select the Forward icon on the display 11 6. Select Return to go back to the Mode screen Note! If the daily Quality Control is not successfully performed, or if the results from the QC are outside limits, an asterisk will be displayed beside every measurement value Note! The prompt to QC the device will remain if the QC measurement was performed by a nonqualified QC candidate. It is not an indication of an unsuccessful (failed) QC measurement. View QC information QC tester information is stored in the instrument. 1. Select Mode 2. Select QC 3. Select QC info View stored QC results All previous QC results are stored in the instrument and can be viewed at any time by using the following procedure: 1. Select Mode 2. Select QC 3. Select QC measurement results 4. The QC information is displayed: A. Mean QC FeNO value and latest moving mean date for QC testers 1 and 2 B. Ongoing qualification, position in QC measurement sequence for QC tester 3, and latest qualification measurement date C. The QC tester 4 is not qualified 4. The latest stored measurement is displayed A. Positive control result: FeNO value and limits (mean value +/- 10 ppb) B QC tester number C. Negative control result (should be < 5 ppb) D. QC sequence number E. Time and date of measurement A A 4. Select Reset QC tester B 5. Select the QC tester to be reset The qualification results can also be displayed A. QC tester qualifying result B QC tester number C.QC sequence number 5. Use the previous and next buttons to step through the results 12 B A B C Reset QC tester C This procedure will delete the data for the selected individual D 1. Select Settings E 2. Select Mode Configuration 3. Select QC settings C 6. Select the crossed-out number to confirm reset of desired user ID Turn off NIOX MINO® Note! When within the specified operating conditions (see page 16) it is recommended to keep NIOX MINO with installed Sensor connected to a power outlet whenever possible. 1. Pull out the power supply unit connector from NIOX MINO Moving NIOX MINO The instrument can be moved to another power outlet with optimized initiating startup. Note! The instrument must be connected to the new power outlet within a few minutes. 1. Select Settings 2. Select Controlled power off 3. Select OK to confirm General Care •Use a new NIOX® Filter (patient filter) for each new patient. •Only clean the instrument with a cloth dampened with 70% ethanol, isopropanol or similar disinfectant. Be careful when using disinfectants as excess alcohol (ethanol) might permanently destroy the Sensor. Do not use spray detergents. Note! Never attempt to open or service the NIOX MINO instrument or Sensor. Preventive inspections Before each measurement, visually inspect: •that NIOX MINO is not damaged •that the Sensor is in place •that a NIOX Filter is attached •that the power supply cord is undamaged and correctly connected to the instrument and to the power outlet. If any item is missing or damaged contact Aerocrine Inc. Change Sensor Caution! Be careful when opening the Sensor can. The inside of the opening has sharp edges. Do not touch or clean the white Sensor membrane. 4. Move the instrument and connect it to a power outlet 1. Press and hold the blue button... 5. Wait until the instrument is ready to use ...while turning the orange swivel 2. Remove the Sensor 3. Insert the new Sensor 13 4. Turn back the orange swivel until locked 8. Input the passcode 0000 using the number buttons to confirm that a new NO scrubber is installed Change NO scrubber 9. Select OK 1. Spread the latches apart, one at a time, (Optionally: Use the red QC plug to spread the latches apart) Disposal of used/expired products •Used or expired NIOX MINO® Sensors should be recycled according to the local recycling program for electronic equipment. Note that there is a LiMnO2 battery inside the Sensor unit*. •An expired NIOX MINO should be recycled, according to the local program for electronic equipment. Note that there is a LiMnO2 backup battery inside the instrument*. •The NO scrubber contains potassium permanganate and should be disposed of as hazardous waste in accordance with the local waste disposal regulations. •NIOX MINO is RoHS compliant. * The batteries are not user-replaceable parts. ... and carefully pull out the cover 2. Remove the used NO scrubber from the cover 3. Insert the new NO scrubber into the cover Make sure to use a new NO scrubber, with an unbroken hole 4. Replace the cover and make sure it snaps in place 5. Select Settings 6. Select NO scrubber 7. Again select NO scrubber 14 Return shipments Contact Aerocrine Inc. before returning any instrument or accessory. See contact information at the end of this User Manual. Support UnbrokenBroken Please contact Aerocrine, Inc. Technical Support if you encounter problems, which you can not solve with the actions stated in this manual. For contact details, see back-page of this manual, and provide the following information: •Your name, address and telephone number. •Serial No. (both instrument and Sensor). •Alert description (as thorough as possible). •Alert codes or lists. Limited warranty Aerocrine Inc. provides a Limited Warranty for this instrument and original accessories delivered with this instrument. Conditions are defined at the time of purchase. Do NOT try to repair the instrument. It is NOT permitted to open the instrument. Any attempt to open the instrument will void the warranty and performance to specifications cannot be guaranteed. Troubleshooting Warning Action Asterisk shown. The instrument has not been verified by a daily QC. Perform a QC measurement. Daily QC measurement outside limits. Restart the daily QC measurement with another QC tester. The inhalation was too weak to initiate a measurement or an exhalation into the instrument was performed prior to an inhalation. Stop the procedure immediately when this warning appears. Wait until the main menu screen is displayed and repeat the inhalation with a stronger inhalation force. NO scrubber reminder. The symbol is shown at first start-up of the instrument as a reminder to insert and set the software for a new NO scrubber. See Installation and set-up section page 4. NO scrubber almost expired. Order a new NO scrubber. The symbol is shown when 10% of the measurements remain or 2 weeks before expiration date and continue until the NO scrubber has expired. A NO scrubber can be used for 1000 measurements or 1 year. Refer to the Change NO scrubber section on page 14. No Sensor connected. Insert a Sensor. Warning Action Sensor almost expired. Order a new Sensor. The symbol is shown when 10% of the measurements remain or 2 weeks before expiration date and will be shown until the Sensor has expired. Refer to the Change Sensor section page 13. Instrument almost expired. Order a new instrument. The symbol is shown 4 months before the instrument expires or when 10% of the measurements remain. The instrument will not work after the indicated date, or after the indicated number of measurements. It is still possible to view measurements stored in the instrument memory and download data to a PC. Make sure that the ambient temperature is between 60 and 85°F (+16 and +30°C). Wait for the Sensor to stabilize. Remove any sources of disturbance (such as cordless or mobile telephones, or gas emitting appliances). Wait for the Sensor to stabilize. Wait for the Sensor to stabilize. < 4 minutes (countdown started). 15 Alert codes Code Alert messages and other information are shown as codes at the top of the instrument display. The table below provides the recommended actions to be taken for an alert code. If alert persists, contact Aerocrine Inc. QC alerts A50 The mean value of the three qualification results does not fall between 5-40 ppb. Restart the QC tester qualification from qualification day 1. A51 There has been an attempt to perform several QC measurements at the same day with the same test person. Wait one day and perform the next QC measurement. A52 Moving mean value out of range. Restart the QC tester qualification from qualification day 1. A53 NO scrubber result over 5 ppb. Check that the QC Plug was attached when instructed. Restart the QC measurement. If continuously shown replace the NO scrubber. A54 Daily QC result lower than 5ppb. Restart the measurement with a test person who has a FeNO value higher than 5 ppb. A55 Daily QC result higher than 40 ppb. Restart the measurement with a test person who has a FeNO value lower than 40 ppb. A56 Failure to press the QC plug forward button in time (within 1:30 min). Repeat the QC measurement and make sure to press the forward button after the QC plug is inserted. Code Action User alerts A10 Exhalation too strong. Select Return and repeat the measurement with less force. A11 Exhalation too weak. Select Return and repeat the measurement with greater exhalation force and exhale until signal for completed exhalation is heard. A12 No exhalation detected. Select Return and repeat the measurement and exhale into the instrument directly after inhalation. A13 Select Return and repeat the measurement. Do not breathe through the patient filter during analysis. A14 Wrong passcode for NO scrubber exchange. Instruments alerts A20 Check that ambient temperature is within specification. If necessary, shut the instrument down, move it to another location and restart the instrument. A21 Remove any sources of disturbance (such as cordless/mobile telephones, or gas emitting appliances). When the instrument is ready try to repeat the measurement. If the alert persists, unplug and reconnect the power supply unit to restart the instrument. A22 Unplug and connect the power supply unit to restart the instrument. A23 Remove any sources of disturbance (such as cordless/mobile telephones, or gas emitting appliances). When the instrument is ready try to repeat the measurement. If the alert persists, unplug the power supply unit, remove and reinsert the Sensor, reconnect the power supply unit and restart the instrument. A24 Check that the supply voltage is within specification. If necessary replace the power supply unit. Connection alert A31 Check the USB connection to the PC 16 Action Instrument and Sensor expiration alerts A90 Instrument expiration date has passed or all instrument measurements have been used. It is still possible to view measurements stored in the instrument memory and download data to a PC. Contact Aerocrine, Inc. A91 Sensor expiration date has passed or all measurements on the Sensor have been used. Replace the Sensor. Technical data Display buttons and symbols Button Button Description Description Next Enter patient ID Decrease Mode Configuration Increase Measurement modes Settings to Number Backspace QC settings Standard 10 second exhalation FeNO measurement Not available for the US market, research application Shift to keypad 0-4 Shift to keypad 5-9 Not available for the US market QC measurement Ambient NO measurement Not available for the US market Not available for the US market, research application US time and date settings Stored measurement results ISO time and date settings Stored QC measurement results Alert info Not available for the US market, research application External QC on Not available for the US market, research application External QC off Demonstration mode Clock Information QC info Forward Reset QC tester Confirm QC tester reset Sound and top light Sound Top light OK NO scrubber setting Return Controlled power off Previous 17 Symbol Description Symbol Description Not available for the US market Sensor warning USB cable connected The instrument has not been verified by a daily QC Temperature warning Sleep mode Standard FeNO measurement Not available for the US market, research application NO scrubber expiration warning Wait Not available for the US market, research application Ambient NO measurement Not available for the US market, research application Wait, time Wait for temperature stabilization Wait for Sensor stabilization Insert QC plug Insert Sensor NO scrubber NO scrubber General warning Instrument expiration warning 18 Symbols explanation Responsible manufacturer The product meets the requirements of applicable European directives Conforms to ANSI/AAMI ES60601-1 and certified to CAN/CSA C22.2 No. 60601-1 Electrical safety Type B applied part 100-240 V ~50-60 Hz The product should be recycled according to the local program for electronic equipment. Consult instructions for use Refer to instruction manual/booklet Expiration date 1 2 3 1. Instrument expiration date (year:month) 2. Instrument article number 3. Instrument serial number Dimensions and weight Height: 9.1" (230 mm) Width: 5.0" (128 mm) Depth: 3.8" (96 mm) Weight of instrument including Sensor: 1.8 lb (0.8 kg) Electrical data Durability - period after opening Hazardous material Noise level (stand by) Class II equipment Shelf-life For single use only In vitro diagnostic medical device Backplate 1234567 1. 2. 3. 4. 5. Base label Electrical safety classification: The equipment complies with the requirements according to IEC 61010-1 and 60601-1 Class II Type B. NIOX MINO instrument Secondary voltage (external power adapter): 6 V Power consumption: < 15 VA Power supply unit Mains Voltage: 100-240 V ~50-60 Hz Transport and storage temperature limitation 12M 7. ETL-Listed. Conforms to ANSI/AAMI ES60601-1 and certified to CAN/CSA C22.2 No. 60601-1. Responsible manufacturer Refer to instruction manual/booklet In vitro diagnostic medical device Type B applied part The product should be recycled according to the local program for electronic equipment 6. The product meets the requirements of applicable European directives < 35 dBA, at a distance of 3.3 ft (1 m) NIOX MINO® instrument: Minimum 3 years at time of delivery or 3,000 measurements. NIOX MINO Sensor: Maximum 12 months when mounted in NIOX MINO or expiration date as stated on the sensor, whichever comes first. Always use a NIOX MINO Bag (closed) for transportation and storage of NIOX MINO when it is disconnected from the power outlet. (The NIOX MINO Bag is sold separately). Operating conditions Ambient temperature: 60 to 85°F (+16 to +30°C) Humidity: 20 to 60% RH (non-condensing) Atmospheric pressure range: 700 to 1060 hPa (10 to 15 psi) Ambient NO concentration: <300 ppb Exhaled flow rate during measurements at 50 ml/s 19 ± 10% BTPS (Body Temperature Pressure Saturated, 99°F (37˚C), 1013 hPa (14.7 psi), 100% RH) Exhaled NO - performance data Performance data typical for temperature range 60 to 85°F (+16 to +30˚C), Humidity range 20 - 60% RH, Pressure 1013 hPa (14.7 psi) Measurement range: FeNO: 5 to 300 ppb Lowest Detection Limit: 5 ppb Determination by analyzing gas concentrations around and below the detection limit. 5 ppb was the lowest detectable level Measurement time: < 2 min Temperature stabilization time: ≤ 30 min Ambient NO measurement time: < 4 min Linearity Squared correlation coefficient r2 ≥ 0.998, slope 0.95 -1.05, intercept ±3 ppb. Determined based on pooled regression analysis from 10 instruments using standard gas reference samples at 7 different concentration levels covering the operating measurement range. Precision < 3 ppb of measured value < 30 ppb, < 10% of measured value ≥ 30 ppb. Expressed as one standard deviation for replicate measurements with the same instrument, using a certified gas concentration of Nitric Oxide reference standard. Accuracy ±5 ppb or max 10%. Expressed as the upper 95% confidence limit, based on absolute differences for concentrations ≤ 50 ppb and relative differences for concentrations > 50 ppb, from certified gas concentration of Nitric Oxide reference standard. Method comparison < 10 ppb for values ≤ 50 ppb, < 20 % for values > 50 ppb Expressed as the difference between a NIOX MINO® FeNO value and the corresponding FeNO value measured with NIOX® instrument from Aerocrine. Inhalation parameters Inhalation to TLC (Total Lung Capacity) before start of exhalation to secure proper activation: Minimum -3 cm H2O (trigger only) 20 Exhalation parameters Exhalation time: Standard mode: 10 s (clinical use) All exhalations are to be performed at an exhalation pressure of 10 - 20 cm H2O, to maintain a fixed flow rate of 50 ±5 ml/s. Memory capacity 3,000 measurements Transport and storage NIOX MINO instrument (transport and storage in its unopened original package) Relative humidity range: 10 to 100%, including condensation. Temperature range: -5 to 140°F (-20 to +60°C) Atmospheric pressure range: 500 to 1060 hPa (8 to 15 psi) NIOX MINO Sensor (transport and storage in original package) Relative humidity range: 10 to 100%, including condensation. Temperature range: -5 to 140°F (-20 to +60°C) Recommended temperature range: 36 to 77 °F (+2 to +25°C) Atmospheric pressure range: 500 to 1060 hPa NIOX MINO, including sensor (transportation in NIOX MINO Bag) Relative humidity range: 10 to 95%, non-condensing Temperature range: 36 to 77 °F (+2 to +25°C) Atmospheric pressure range: 700 to 1060 hPa (10 to 15 psi When transporting the instrument from one location to another, a prolonged stabilization period might be required before measurements can be performed. Patient filter (mouthpiece) Disposable filter (NIOX Filter) to be changed for each new measurement session and for each new patient. Bacterial, viral filter, CE marked according to Medical Device Directive Class IIa. Responsible manufacturer Aerocrine AB Råsundavägen 18 SE-169 67 Solna Sweden www.aerocrine.com www.niox.com NIOX MINO® parts and accessories Warning! When selecting an accessory for your NIOX MINO product please keep in mind that an accessory not recommended by Aerocrine Inc. may result in loss of performance, damage to your NIOX MINO product, fire, electric shock, injury or damage to other property. The product warranty does not cover product failure or damage resulting from use with nonapproved accessories. Aerocrine Inc. takes no responsibility for health and safety problems or other problems caused by the use of accessories not approved by Aerocrine Inc. Parts included in NIOX MINO package (Item No. 09-1000) NIOX MINO instrument (09-1100) NIOX MINO Power Supply unit (incl. 4 supply adapters) (09-1005) NIOX MINO USB cable (09-1010) NIOX MINO QC plug (09-1015) NIOX Panel (on USB stick) (12-1003) ** NIOX Filter Disposable filter to be changed for every patient. Bacterial, viral filter according to Medical Device Directive Class IIa. Connect NIOX MINO® to a PC using USB Caution! •A PC connected to the USB connector has to be certified for one of the standards IEC 60601-1, IEC 61010-1, IEC 60950 or comparable with safety extra low voltage on the USB ports. •The connected PC should be placed out of reach from the patient. Do not, simultaneously, touch the connected PC and the patient. 1. Connect the USB cable from the instrument to the PC Parts delivered separately NIOX MINO NO scrubber (09-1300) NIOX MINO User Manual (EPM-000109) Accessories NIOX MINO Test Kit 100 (03-4000-US) (contains: 1 NIOX MINO Sensor* for 100 measurements and 150 NIOX Filters**) NIOX MINO Test Kit 300, (03-4001-US) (contains: 1 NIOX MINO Sensor* for 300 measurements and 350 NIOX Filters**) NIOX MINO Test Kit 500, (03-4007-US) (contains: 1 NIOX MINO Sensor* for 500 measurements and 550 NIOX Filters**) NIOX MINO Test Kit 1000 (03-4010-US) (contains: 1 NIOX MINO Sensor* for 1000 measurements and 1050 NIOX Filters**) NIOX MINO Bag (09-1020) USB cable from PC 2. The USB icon is shown on the NIOX MINO display to indicate that a USB connection is established. NIOX® Panel A USB memory stick is delivered with NIOX MINO containing the NIOX Panel. For instructions on how to install and use the program refer to the NIOX Panel User Manual. * NIOX MINO Sensor Pre-calibrated disposable sensor for 100, 300, 500 or 1000 measurements. Shelf-life: Maximum 12 months when mounted in NIOX MINO or expiration date as stated on the sensor, whichever comes first. (Use only NIOX MINO Sensors with Aerocrine item number 03-2005, 03-2010, 032030, 03-2050 or 03-2100.) 21 Cautions •Mobile phones and cordless phones might interfere with the instrument and should therefore be kept away from the instrument. Interference could make it impossible to perform a measurement. •Use of substances containing alcohol close to NIOX MINO® may cause erroneous measurement results. •Do not reuse the NIOX® Filters. •The NIOX MINO instrument might produce some heat during normal operation, the temperature could increase up to 10 degrees above the ambient temperature. Make sure that the base ventilation slots are not blocked. Do not place the instrument on a bed, sofa, carpet, or other soft surface. •A maximum of 10 measurements/hour can be performed during continuous use. However, it will be possible to perform 20 measurements per hour if the instrument is allowed to rest for a minimum of 30 minutes after that. •The NIOX MINO Sensor shall be kept in its original unopened package before installation. •Keep the NIOX MINO Sensor out of reach of children. •The NIOX MINO Sensor is sensitive to changes in ambient temperature and humidity. •Be careful when opening the Sensor can. The inside of the opening has sharp edges. Do not touch or clean the white Sensor membrane. •Best performance is achieved if the ambient conditions are stable. Refer to the "Operating conditions" section. Keep the instrument away from windows, sunshine, radiators, stove or open fire in order to avoid unstable conditions. When transporting the instrument from one location to another, a prolonged stabilization period before measurement might be required. Refer to the recommended transportation conditions in the “Transport and Storage” section. Always use a NIOX MINO Bag for transportation. Keep the NIOX MINO with mounted Sensor connected to the power outlet whenever possible. •NIOX MINO has been tested and found to comply with the limits for medical devices according EN/ IEC 60601-1 Safety requirements for medical electrical systems and electromagnetic compatibility. These limits are designed to provide protection against harmful interference in a typical medical installation. However, because of the increased use of radio-frequency transmitting equipment and other sources of electrical noise emitters in the health-care and home environments, such as base stations for radio, cellular/cordless telephones and land mobile radios, amateur radio, AM and FM radio broadcast 22 and TV broadcast, it is possible that high levels of such interferences due to close proximity or strength of a source, may result in disruption of performance of the device. If abnormal performance is observed, it may be necessary to reorient or relocate NIOX MINO. •A PC connected to the USB connector has to be certified for one of the standards IEC 60601-1, IEC 61010-1, IEC 60950 or comparable with safety extra low voltage on the USB ports. •The connected PC should be placed out of reach from the patient. Do not, simultaneously, touch the connected PC and the patient. Known patient factors that could interfere with FeNO measurement are described in the ATS guidelines (Am J Respir Crit Care Med 2005; 171: 912-930) as follows: To assure correct results when performing FeNO measurement with NIOX MINO®, the following cautions apply: •Respiratory maneuvers - Because spirometric maneuvers have been shown to transiently reduce exhaled NO levels, it is recommended that NO measurement be performed before spirometry. The same stipulation applies to other taxing respiratory maneuvers, unless these can be shown not to influence exhaled NO. The FeNO maneuver itself and body pletysmography do not appear to affect plateau exhaled NO levels. •Age/sex - In adults, there is no consistent relationship between exhaled NO level and age, but it has been reported that, in children, FeNO increases with age. In adults, there are conflicting reports regarding the effects of sex, menstrual cycle and pregnancy, so these patient characteristics should be recorded at the time of measurement. •Airway caliber - It has been demonstrated that FeNO levels may vary with the degree of airway obstruction or after bronchodilatation, perhaps because of a mechanical effect on NO output. Depending on the setting, it may be prudent to record the time of last bronchodilator administration and some measure of airway caliber, such as FEV1. •Food and beverages - Patients should refrain from eating and drinking before NO analysis. An increase in FeNO has been found after the ingestion of nitrate or nitrate-containing foods, such as lettuce (with a maximum effect 2 hours after ingestion) and drinking of water and ingestion of caffeine may lead to transiently altered FeNO levels. It is possible that a mouthwash may reduce the effect of nitratecontaining foods. Until more is known, it is prudent when possible to refrain from eating and drinking for 1 hour before exhaled NO measurement, and to question patients about recent food intake. Alcohol ingestion reduces FeNO in patients with asthma and healthy subjects. •Circadian rhythm - Although FeNO levels are higher in nocturnal asthma, there was no circadian rhythm in two studies, but another study did report a circadian pattern, so it is uncertain whether measurements need to be standardized for time of day. It is, however, prudent, where possible, to perform serial NO measurements in the same period of the day and to always record the time. •Smoking - Chronically reduced levels of FeNO have been demonstrated in cigarette smokers in addition to acute effects immediately after cigarette smoking. Despite the depressant effect of smoking, smokers with asthma still have a raised FeNO. Subjects should not smoke in the hour before measurements, and short- and long-term active and passive smoking history should be recorded. •Infection - Upper and lower respiratory tract viral infections may lead to increased levels of exhaled NO in asthma. Therefore FeNO measurements should be deferred until recovery if possible or the infection should be recorded in the chart. HIV infection is associated with reduction in exhaled NO. •Medications and exhaled NO - The potential effect of drugs on NO cannot be excluded, and so all current medication and time administered should be recorded. Exhaled NO falls after treatment with inhaled or oral corticosteroids in subjects with asthma and after inhaled NO synthase inhibitors. Leukotriene-axis modifiers also reduce FeNO. NO donor drugs and oral, inhaled, and intravenous L-arginine increase FeNO and nasal FeNO. Even if a certain medication does not affect NO production, it might affect the apparent level of NO through other mechanisms, such as changes in airway caliber. •Other factors - The manipulation of physiologic parameters has been shown to affect FeNO. Changing pulmonary blood flow has no effect in humans, but hypoxia decreases exhaled NO, and this may occur in subjects at high altitude, particularly those prone to high-altitude pulmonary oedema. The application of positive end-expiratory pressure has been shown to increase FeNO in animals, but airway pressure in humans does not affect exhaled NO plateau levels according to most reports, although one study suggests the opposite. Many studies have examined the effect of exercise on FeNO. During exercise, according to one report, FeNO falls, whereas NO output increases, and this effect may last up to 1 hour. Others have reported that FeNO remains stable after exercise. It would seem prudent to avoid strenuous exercise for 1 hour before the measurement. •Ethnic differences in ‘healthy’ FeNO levels have been observed. In schoolchildren Asian (boys) could have 6- 15 ppb higher FeNO levels than Caucasians boys . By contrast, Asian girls have elevated FeNO levels to a lesser extent. African-Americans children seem to have slightly higher ‘healthy’ FeNO levels than Caucasians; 17 ppb versus 12 ppb. In AfricanAmerican adults slightly higher average ‘healthy’ FeNO levels than Caucasians, 20 ppb versus 17-18 ppb have been observed. •Measurement results are to be used as an adjunct to established clinical and laboratory assessments in asthma. 23 NIOX MINO surveillance procedures At power up and during a normal measurement and sample analysis, a number of automatic surveillance procedures are executed by the NIOX MINO instrument software, to check for malfunction of the instrument itself, as well as the mounted sensor. The main surveillance procedures in the instrument are used in order to perform a measurement with NIOX MINO and to get a measurement value presented in the instrument. The internal process controls are performed: •at power up •to continually check if all parameters/instrument status are within acceptable limits •during inhalation by the user •during exhalation by the user •during measurement processing and measurement value calculation Apart from safety, operating condition, configuration and calibration data, these internal control procedures also include system functionality verification, status detection of critical device components and criteria assessment related to the measurement analysis. These standardized operations can not be influenced by the user and whenever a potential deviation is detected the appropriate alert message is presented on the display, making it impossible to continue the measurement, or alternately the procedure is aborted, whichever applies. Hence, a measurement result is only presented to the operator when the device operation and measurement processes are correctly executed. It is important that measurements are performed within the specified limits for temperature, humidity and ambient NO. See section “Operating conditions” on page 20. The sensor temperature is automatically maintained at 72°F as long as the ambient temperature is within specifications. It will not be possible to perform an accurate measurement if the sensor is outside the temperature specification. The relative humidity should be checked if suspected to be outside the specified range (see page 20). Ambient NO should be checked (as described on page 8) if it is suspected to be above 300 ppb. 24 Clinical documentation The procedure for online single breath measurements has been specified in the ATS guidelines to exclude NO from other sources. To avoid contamination from mouth NO early peaks shall be ignored according to the ATS guidelines, thus in NIOX MINO® the first part of the exhalation is discarded and not analyzed. NIOX MINO follows, in all essential aspects, the American Thoracic Society (ATS) and European Respiratory Society (ERS) 2005 equipment recommendations for measurement of exhaled NO.1 The recommendations are based on analysis of NO with the chemiluminesence method. However, NIOX MINO uses a different method (electrochemistry). One consequence of this is that the NIOX MINO Sensor does not need any field calibration*. Agreement has been demonstrated for the mean of two valid exhaled NO measurements in NIOX® and the first valid NO measurement in NIOX MINO.2-5 Supported by these data, one valid NO measurement should be considered sufficient instead of two as recommended in the guideline. 1 Am J Respir Crit Care Med 2005; 171: 912-930. 2 Alving K, Jansson C, Nordvall L: Performance of a new hand-held device for exhaled nitric oxide measurement in adults and children. Respiratory Research 2006;7:67-5. 3 McGill C, Malik G, Turner S. Validation of a handheld exhaled nitric oxide analyzer for use in children. Pediatr Pulmonol. 2006 Nov;41(11):10537. 4 Khalili B, Boggs PB, Bahna SL. Reliability of a new hand-held device for the measurement of exhaled nitric oxide. Allergy 2007;62:1171-1174. 5 Menzies D, Nair A, Lipworth BJ. Portable exhaled nitric oxide measurement: Comparison with the "gold standard" technique. Chest 2007;131(2):410-4. * The Sensor is already calibrated during manufacture and does not need to be recalibrated. Medical Device Reporting (MDR) Aerocrine, as a medical device manufacturer, must have a system in place to report to health authorities any adverse events that have occurred with its medical products, a so-called Medical Device Reporting system. The purpose of the Medical Device Reporting system is to ensure the health and safety of patients, users and others using medical products by reducing the likelihood of the same type of adverse event being repeated. This is achieved by immediate notification of experienced incidents to enable corrective and preventive actions. Specific guidelines, Medical Device Reporting system for user facilities, are applicable for users of medical devices. An MDR reportable event is an event about which a user facility becomes aware of information that reasonable suggests that a device has or may have caused or contributed to a death or serious injury. Manufacturers of medical devices are obliged to report adverse incidents to national health authorities. Any user of Aerocrine's products, who experience an adverse event related to the product, must therefore immediately (preferably within 10 days), report this to Aerocrine Inc. The report should contain the following information: • Description of the incident • When and where did the event occur? • What product / accessory was involved, serial number/batch number? • Was the event related to instructions for use of the product? • Was the risk foreseeable and clinically acceptable in view of potential patient benefit? • Was the outcome adversely affected by a patient's pre-existing condition? • Has the event been reported to the FDA? (only applicable if the use of the device has or may have caused or contributed to injury or a death) The report should be forwarded, by e-mail, fax or telephone, to: Aerocrine, Inc. 5151 McCrimmon Parkway, Suite 260, Morrisville, NC 27560, USA Phone: +1 (866) 275-6469, Fax: +1 (877) 329-6469 e-mail: [email protected] Guidance and manufacturer's declaration Electromagnetic emissions Caution! NIOX MINO® has been tested and found to comply with the limits for medical devices according EN/IEC 60601-1 Safety requirements for medical electrical systems and electromagnetic compatibility. These limits are designed to provide protection against harmful interference in a typical medical installation. However, because of the increased use of radiofrequency transmitting equipment and other sources of electrical noise emitters in the healthcare and home environments, such as base stations for radio, cellular/cordless telephones and land mobile radios, amateur radio, AM and FM radio broadcasts and TV broadcasts, it is possible that high levels of such interferences due to close proximity or strength of a source, may result in disruption of performance of the device. If abnormal performance is observed it may be necessary to reorient or relocate NIOX MINO. Warning! NIOX MINO should not be used adjacent to or stacked with other equipment. If adjacent or stacked use is necessary, NIOX MINO should be observed to verify normal operation in the configuration in which it will be used. Adjacent or stacked use together with NIOX® Nitric Oxide Monitoring System has been tested by Aerocrine and proven as acceptable. The technical description on the electromagnetic immunity test levels and electromagnetic environment guidance can be found on www.niox.com 25 Based on the company’s intellectual property, Aerocrine develops and commercializes product for the monitoring of nitric oxide (NO) as a marker of inflammation, to improve the management and care of patients with inflammatory disease in the airways. Patents: For information about patents relating to Aerocrine products see www.aerocrine.com A N E W D I M EN S I O N IN A S T H M A C A R E An ISO 13485 certified company Aerocrine, Inc. 5151 McCrimmon Parkway, Suite 260, Morrisville, NC 27560, USA Phone: +1 (866) 275-6469, Fax: +1 (877) 329-6469 e-mail: [email protected] www.aerocrine.com NIOX MINO® is CE marked according to European In Vitro Diagnostic Device Directive 98/79/EEC and is cleared by FDA, K101034. Copyright © 2014 Aerocrine AB, Solna, Sweden. Aerocrine, NIOX MINO® and NIOX® are registered trademarks of Aerocrine AB. 000164 (EPM-000109), version 09, December 2014, for instruments with software version from 2005 to 20XX and 22XX to 23XX. Information in this document is subject to change. Amendments will be made available by Aerocrine AB as they occur. © Copyright 2014: Aerocrine AB, SOLNA, Sweden.