1
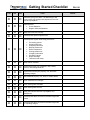
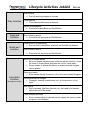
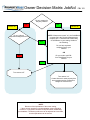
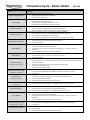
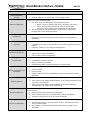
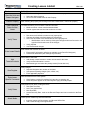
User Manual PropertyBoss JobAids Created: January 2011 Copyright © PropertyBoss Solutions, LLC. All Rights Reserved. PropertyBoss JobAids copyright © PropertyBoss Solutions, LLC. All rights reserved. The information contained in this document is subject to change without notice. This document contains proprietary information which is protected by copyright. All rights are reserved. No part of this document may be photocopied, reproduced, or translated to another language without the prior written consent of [company]. Home > PropertyBoss JobAids PropertyBoss JobAids PropertyBoss has developed several JobAids to help with the daily activities within PropertyBoss. The following JobAids are currently available: ● Getting Started Checklist ● Owner Decision Flowchart ● Lifecycle Activities ● Transaction Cycle - Overview ● Transaction Cycle - Detail ● QuickBooks Interface - Setup ● QuickBooks Interface - Sending Transactions ● Creating Merlin Reports ● Work Order Cycle - Detail ● Work Order Cycle - Overview ● Creating Properties and Units ● Creating Contacts ● Creating Owners ● Creating Leases ● Creating Prospects These JobAids are formatted in a variety of formats: ● Checklists - Utilized by marking the items on the list as 'Yes', 'No', or 'Not Applicable' and providing notes as needed. ● Task/Action Tables - Utilized by reading the Task to be completed on the left and the appropriate Actions to complete the Task on the right. ● Flowcharts - Utilized by starting at the top of the page and making decisions based on the questions in the matrix. The chart will provide the best recommended action. ● Task Cycle Diagram - Utilized by starting at the base of the cycle and reading up and to the right. The cycle will continue or conclude at the intersection of the last task and first task after the base (step 2). Getting Started Checklist Yes No NA Task Determine your go-live date – the date that you will begin posting rent charges and payments for the first time in PropertyBoss Install software Setup users and user security Review/update personal preferences • • Create Database Register Software/Database Review/update system-wide setup preferences • • • • • • • • • • Processing options Global preferences Autopost preferences Backup preferences Define transactions Closing preferences Company information Predefined values Report headings Task/work order setup Setup add-on modules Import/enter/review your properties, units, leases, tenants, and starting balances Import/enter /review your property, unit, and lease repeating charges Add additional property, unit, lease, or tenant details Enter scheduled rent changes Enter existing lease renewals Enter existing lease notices Setup the interface between PropertyBoss and QuickBooks Review/update Next Post Date and Paid through Date leases Review/update Next Post Date and Paid through Date for repeating charges PBJ 101 Notes Lifecycle Activities JobAid PBJ 102 Run autopost • Daily Activities Post all recurring charges for the day Close batches • Close batches taken/sent to the bank Export to QuickBooks • Reconcile PropertyBoss and QuickBooks Week-end Activities Month-end Activities Run summary reports • Reconcile with accounts and QuickBooks Close month in PropertyBoss • Ensures that PropertyBoss, accounts and QuickBooks balance Run summary reports • Reconcile with accounts and QuickBooks Move-out or Renew leases • Move-out leases that have given notice as well as evictions – ends the lease in PropertyBoss and frees the unit for a new lease • Renew leases to ensure that history is tracked and new charges can be posted Enter new leases • Enter leases through Prospects or the Units and Leases Navigator Intermittent Activities (throughout month) Post miscellaneous charges • Damages, cleaning, maintenance, etc. for the property, unit or lease Run reports • Verify renewals, late fees, deposits, etc. that need to be tracked before the end of the month Track prospect activities • Enter communications, transactions and update the status of each prospect in the database Owner Decision Matrix JobAid PBJ 103 Do you manage for 3rd party owners? NO YES Owners On Owners Off Do you collect a separate management fee? YES NOTE: If Owners are turned "on", the QuickBooks company file is the Property Management's company file. To determine the functionality of QuickBooks in your setting, decide on the following: Do you have separate company files for your owners? OR NO Do you need to pull P&L from QuickBooks for your owners? NO YES Turn owners “off” Turn owners “on” Create Owners for each property that has management fees collected on charged or collected rent. NOTE: Because of the implications of the owner setting, if there are any questions or doubts whether owners should be turned on or off, please contact the Help Desk when establishing your database. The Owner preference can be adjusted at a later date, but the implications can be serious. Transaction Cycle – Detail JobAid Task… PBJ 104 Action(s)… Verify Lease Information Post Charges Receive Payments Enter Bills (if applicable) Verify Register Information Create Deposit Make Deposit Send to Accounting (if using accounting package) Reconcile with Accounting (completed on a daily basis) Post Late Fees (as setup in the lease) Post Various Charges (as needed) Receive Payments Create Deposit Reconcile with Accounting (completed on at month end) Close Accounting Period Check that existing lease information is correct • Update any old leases with new information • Enter new lease information Run AutoPost • Verify ‘Rent Due’ amounts are correct • Verify any other ‘Repeating Charges’ are correct • Post charges to appropriate accounts (click ‘Execute) Record payments from tenants • Enter transactions using QuickPay or as individual transactions • Verify transaction information is correct (dates, amounts, payee, etc.) Record all bills for properties, units, or leases that are not recurring charges • Enter maintenance, repair, or cleaning bills paid by owner or profit/loss • Enter charges that tenants will be responsible for • Enter payments received from tenants to pay bills (credits owner when paid) Check that amounts charged and received are correct and accurate • Verify all transactions entered reflect accurate amounts • Verify balance amount Mark transactions to be included in deposit • Total collected should equal bank deposit slip • Verify transactions are of the correct type for the deposit (i.e. – Security, Tenant, etc. payments) • Click Create Deposit to add transactions to the deposit Close the Deposit in PropertyBoss • Verify amounts, payee, and dates are correct prior to closing • Take deposit to bank Verify all amounts and accounts in PropertyBoss PRIOR to sending to accounting • Ensure transactions are correct prior to sending to accounting to keep from having to correct multiple transactions • Verify transactions going to accounting through the General Ledger • Send transactions to accounting • View/Print General Ledger reports Verify amounts in PropertyBoss match bank account amounts, and accounting system • Ensure amounts in PropertyBoss, QuickBooks, and bank accounts are consistent • Print reports Run AutoPost • Verify ‘Late Fee’ charges in AutoPost are accurate based on lease settings • Correct all leases with discrepancies • Post charges to appropriate accounts (click ‘Execute) Record periodic monthly transactions • Enter tenant responsible charges (i.e. – damages, facility rentals, cleaning, etc.) Record payments from tenants • Enter transactions using QuickPay or as individual transactions • Verify transaction information is correct (dates, amounts, payee, etc.) Mark transactions to be included in deposit • Total collected should equal bank deposit slip • Verify transactions are of the correct type for the deposit (i.e. – Security, Tenant, etc. payments) • Click Create Deposit to add transactions to the deposit Verify amounts in PropertyBoss match bank account amounts, and accounting system • Ensure amounts in PropertyBoss, QuickBooks, and bank accounts are consistent • Print reports Mark period closed in Setup Preferences at end of transactional period (month end) • Close manually • Let PropertyBoss automatically close based on settings Transaction Cycle - Overview PBJ 105 Reconcile with Accounting • Verify amounts in PropertyBoss match bank account amounts, and accounting system • Ensure amounts in PropertyBoss, QuickBooks, and bank accounts are consistent • Print reports Send Charges/Deposits to Accounting • Verify all amounts, transactions, and accounts in PropertyBoss PRIOR to sending to accounting • Verify transactions going to accounting through the General Ledger and send to accounting • View/Print General Ledger reports Close Deposit • Close the Deposit in PropertyBoss • Verify amounts, payee, and dates are correct prior to closing • Take deposit to bank Create Deposit • Check to ensure monies collected equal amounts recorded in PropertyBoss • Deposit in PropertyBoss should equal bank deposit slip Receive Payments • Enter transactions using QuickPay or as individual transactions • Verify transaction information is correct (dates, amounts, payee, etc.) Note: After completing step 8, this will either end the accounting transaction cycle, the accounting period, or lead into the next accounting cycle of posting charges on existing leases. • • • • Post Charges Run AutoPost Verify ‘Rent Due’ amounts are correct Verify any other ‘Repeating Charges’ are correct Post charges to appropriate accounts (click ‘Execute) Verify Lease Information • Check that existing lease information is correct • Update any old leases with new information • Enter new lease information QuickBooks Interface JobAid Task… Define QuickBooks Account PBJ 106 Action(s)… Name the company file in PropertyBoss that describes how this file will be used • Extremely important when more than 1 accounting file is used Determine the type of accounting used Determine Application • • Cash (transactions sent when paid) – Can be defined two ways: o Simple – Sends over Deposits, Bills to Pay, and Checks to be written o Detail – Sends the above plus journal entries. All PropertyBoss transactions will be mapped to the QuickBooks chart of accounts Accrual (transactions sent when charged) – Sends Invoices, Credit Memos, Payments, Bills, Checks and Journal Entries Describe how this accounting file will be used Describe Use • Determine a prefix (3 characters) that will be used when sending batches to QuickBooks Locate the file on the drive or network Locate File • • If QuickBooks is located on a network drive, you must use a mapped drive for the location If found on remote site, see the Remote Settings below Determine the setting for the interface with QuickBooks Determine File Settings • • Utilize Classes (if used in QuickBooks) Utilize Vendor creation in PropertyBoss Determine settings for a remote site Remote Setup • • • Send Method – Save file and email Import – From file or email inbox Determine the location for the file (located on the local machine) Retrieve various information to establish setup in PropertyBoss Retrieve Information from QuickBooks • • • Chart of Accounts Classes (if used) Vendors – Master list is found in QuickBooks. All edits to information should be made there. All properties and Owners associated with the accounting file will be listed Accounting File Use • • Select from the Accounting Override dropdown on the Property Notebook if using more than 1 accounting file Select from the Accounting Override dropdown on the Owner Notebook –> Statement tab, if using more than 1 accounting file Each PropertyBoss Transaction will be mapped to a particular account in the QuickBooks Chart of Accounts Define Transaction Set • • • Select the appropriate account from the dropdown New transactions will need to be mapped before sending to QuickBooks Transactions marked with a red ‘X’ still need to be mapped Information related to QuickBooks that PropertyBoss will utilize will be imported Import from QuickBooks • • General Ledger Settings – Chart of Accounts, Vendors, and other setup values from the General Ledger Check Numbers – Check Numbers and Date Paid for Checks and Bills sent to QuickBooks Sending Transactions to QuickBooks JobAid Task… Action(s)… Open General Ledger Click on General Ledger • Once open, click on Pending Interface Runs • Select Accounting File (if more than 1 accounting file defined) Verify Items to Send Choose the items from the list • Payments Received (Income) • Bills to Pay/Checks (Expenses) • Other Transactions (Various PropertyBoss Transactions) View PropertyBoss Transactions All PropertyBoss Transactions being sent will show • Verify transactions being sent • Using Actions, mark transactions that are: o Already Sent o Need to be removed from the interface run • Verify and maintain batch information • Usually all transactions should be selected PBJ 107 View Transactions going to QuickBooks Verify Deposits and Expense totals • Check Details for specific information • Make corrections by clicking select PropertyBoss source transactions Send to QuickBooks When all information is verified, click Send to send information to the selected QuickBooks company file Print Reports Print recap and interface reports • Click View Previous Interface Runs and select the correct dates • Click Reports and choose the specific reports desired Creating Merlin Reports JobAid Task… Open a Navigator PBJ 108 Action(s)… Open appropriate Navigator • Rent Roll • Owner, Tenant, Vendor • Work Order Groups (Call Logging, Work Orders, Inspection) • Transaction Search Modify Report Open modify report window • Click Modify Report • Click past Merlin information (turn off iF desired) Modify Layout Open Layout options • Add details from information found in Unit/Leases • Move columns to left and right as desired for report • Remove columns by un-checking or double clicking on the item Modify Group(s) Modify Sort Modify Filter(s) Save Report Create groups based on detail item(s) chosen • Groups similar items together • Can provide subtotals (if checked) Create a sort field/sub field • Can be sorted ascending or descending by letter or number Create filters to exclude or include specific information • Click Edit the Filter and determine Standard filter settings • Modify Custom filters o Column – field to include or exclude o Condition – how the field will be included/excluded o Value – Numeric or text information Ask – can be modified when opened or refreshed Determine ‘Save’ conditions • Save to current report • Save as a new report • Rename report • Delete report Work Order Cycle – Detail JobAid Task… PBJ 109 Action(s)… Open Work Order Request Create a new task through one of the work order groups or in the particular level (property, unit, lease, etc.) • Click New in correct Work Order Group • Fill in short description, status, type and all applicable information Assign Work Order Assign task to either a PropertyBoss user or a vendor (internal/external) • Assign work order to vendor/internal maintenance • Work Orders/Inspections – Vendors • Call Logging – PropertyBoss Users Enter Description Assign Account Enter appropriate information for long description • Enter the Long Description information • Enter directly in text box (enters text only) • Use ‘Add Comment’ (enters text and time/date/user with comment) Assign task to appropriate level within the database • Assign to correct PropertyBoss account (property, unit, lease, etc.) • Will be tied to that account for tracking purposes on the notebook for that level Enter Details Enter details for the task that are required or for tracking specific information • Create and track work order groups specific details • Maintain detail fields in Setup Preferences -> Work Orders -> Details Verify Information Verify information associated with the vendor and tenant assigned t the task • Verify tenant, vendor and history information • Add information for warranty, requested by, and other pertinent information Enter Media Attach related media related to the task to provide documentation • Add Applicable media to the work order • Add pictures of damage, invoices, emails or other related documents Enter Transactions Enter Updates or Close Work Order Attach related transactions • Add transactions on the appropriate account o Will show on the appropriate register and have a link to the work order • Property/Unit: Transactions found in the Property/Unit transaction set • Lease: Transactions available in the Lease/Prospect transaction set Enter status updates, new description information and details or close the task and enter completion information • Add comments to the long description area, change the status as it progresses through creation to completion • Add related work orders, unrelated work orders or relate and initiating call to a new work order • Close task when work has been completed and enter comments Work Order Cycle JobAid Enter Media & Transactions • Add Applicable media to the work order • Add pictures of damages, invoices, or emails received or other related documents • Add transactions on the appropriate account (will show on the appropriate register and have a link to the work order) PBJ 110 Enter Updates or Close Work Order • Add comments to the long description area, change the status as it progresses through creation to completion • Add related work orders, unrelated work orders or relate and initiating call to a new work order • Close task when work has been completed and enter comments Verify Information • Verify tenant, vendor and history information • Add information for warranty, requested by, and other pertinent information Enter Details • Create and track work order groups specific details • Maintain detail fields in Setup Preferences -> Work Orders -> Details Assign Account • Assign to correct PropertyBoss account (property, unit, lease, etc.) • Will be tied to that account for tracking purposes on the notebook for that level Enter Description • Enter the Long Description information • Enter directly in text box (enters text only) • Use ‘Add Comment’ (enters text and time/date/user with comment) Note: After completing step 8, this will either end the work by closing the work order or continue the process by adding information or updating the information (transactions, media, status, etc.). Assign Work Order • Assign work order to vendor/internal maintenance • Work Orders/Inspections – Vendors • Call Logging – PropertyBoss Users Open Work Order Request • Click New in correct Work Order Group • Fill in short description, status, type and all applicable information Creating Properties/Units JobAid PBJ 111 Task… Action(s)… Open the Units and Leases Navigator The Units and leases Navigator is used to Create New Properties or add Units to multi-unit properties Create New Property Click on Create New Property to open a new Property Notebook • Select Single Unit or Multi-Unit Property Name the Property Create a unique name for the property • Name will show on Units and Leases Navigator list • Can be a company specific name or the address (numeric or text) Enter Property Specific Information Property information will carry into reports and the Rent Roll Navigator • Enter the property address, type and other relevant information for the property • Define the location of the unit number by adding <unit> in the desired location If using multiple QuickBooks files, you can also direct the accounting setup Enter Property Details Enter details that describe the property • Enter specific information (will also be available on the Rent Roll Navigator) • Create new detail fields (click Change Layout button) Attach Media Property specific media only should be attached • Includes: images, pdf documents, and Microsoft Office files • Should show images of property or floor plans or property related files Add Owners Relate owners of the property and define Management fees • Add already created owners or create new owners for the property • Define Leasing/Renewal, Rent Commission, Vacancy, and Surcharge fees as applicable Enter Repeating Charges/Credits Recurring transactions charged or credited can be set on the property level • Charges such as pest control, security systems, or HOA fees can be added • Charges that need vendor bills out of QuickBooks will need a vendor defined • All charges will be reflected under the Property Profit/Loss report Enter Defaults Single Unit Property defaults will be entered at the creation of a new lease • Terms (rent): transaction, market rent, and frequency • Late Fees: enter the type, day after rent is charged, and amount • Deposits: security, pet, or other required returnable deposits • Repeating Charges/Credits: utilities, concessions, or parking o These items are usually credited to the owner/property management when paid to cover property repeating charges Create Units (for multi-unit properties) Create the units that fall under the main property 1. Create as a Regular or Template format 2. Copy or model after an existing format 3. Name each unit, click new for additional units Enter Details Enter details that describe the unit • Enter specific information (will also be available on the Rent Roll Navigator) • Create new detail fields (click Change Layout button) Attach Media Enter Defaults Unit specific media only should be attached • Includes: images, pdf documents, and Microsoft Office files • Should show images of the unit or floor plans or property related files Multi-Unit defaults will be entered at the creation of a new lease • Terms (rent): transaction, market rent, and frequency • Late Fees: enter the type, day after rent is charged, and amount • Deposits: security, pet, or other required returnable deposits • Repeating Charges/Credits: utilities, concessions, or parking o These items are usually credited to the owner/property management when paid to cover property repeating charges Creating Contacts JobAid PBJ 112 Task… Action(s)… Contacts Navigator All contacts (tenants, residents, members) are found under the Contact Navigator Create Contact Click New to create contacts within the Contact Navigator or within the Lease (Create Contact) • Enter Contact Name Opens the Contact Notebook Choose the type of contact, individual or company • • Enter First and Last Name (creates file as name) If contact is a company, the name entered will be the primary contact Enter remaining contact info Contact Information • Information can be tracked on the Rent Roll and Contact Navigators for custom reports Enter details that describe the contact Enter Details • • Enter specific information (will also be available on the Contact Navigator) Create new detail fields (click Change Layout button) Complete address information Address Information • • • Addresses can be defined for mailing, billing, or forwarding Create address types in Setup Preferences (Predefined Values) Define the current for mailing and billing addresses Contact specific media only should be attached Attach Media • • Includes: images, pdf documents, and Microsoft Office files Should show images of contact or files specific to the contact Creating Owners JobAid Task… Owners Navigator PBJ 113 Action(s)… All owners are found under the Owners Navigator Click New to create contacts within the Owners Navigator Create Owner • Click ‘New’ • Opens the Owner Notebook From within the Property Notebook: • • • Click Owner Actions -> Add Owner Complete the Owners Name and ownership percentage Click ‘Yes’ to add owner on list of valid owners Choose the type of contact, individual or company Enter Owner Name • • Enter First and Last Name (creates file as name) If contact is a company, the name entered will be the primary contact Enter remaining contact info Owner Information • • • Add contact information (phone, address, 1099 information) Enter Reserve Amount (will be withheld when paying owners) Information can be tracked on the Rent Roll and Owner Navigators for custom reports Enter details that describe the contact Enter Details • • Enter specific information (will also be available on the Owner Navigator) Create new detail fields (click Change Layout button) View information associated with the owner View Ownership, Work Orders, and Transactions • • • Ownership shows all properties the owner is associated with Work Orders shows all associated work orders Transactions shows transactions that are related to the owner (Transfer of Rent Due, Payments to Owner, and Expenses) Define how the statement will be delivered Define Statement Default • Mail/Print format will not allow for email function • Email will be available and based on owner’s email address Note: The associated Accounting file can also be set if it is different than the default or if the Property/Owner Notebook value is selected from the General Ledger Setup Owner specific media only should be attached Attach Media • • Includes: images, pdf documents, and Microsoft Office files Should show images of contact or files specific to the contact Creating Leases JobAid Task… Open the Units and Leases Navigator Confirm Property Enter Start/End Dates for New Lease PBJ 114 Action(s)… The Units and leases Navigator is used to Create New Leases to properties • • Select the desired property Click on Create a New Lease for this Property After selecting the property and clicking on the New Lease button, confirm the property To create the lease, you must have a start and end date • • Month-to-month: current month as start/end date Annual: agreed start and end date as shown on lease Confirm rent amount, frequency, and enter lease comments Verify Terms • • • • • Rent amount will default to market rent of property/unit Charges will default to default charges of property/unit Late Fees will default to the default late fee of the property/unit o Modifications can be made by clicking the Charges and/or late fees tab or the hyperlink found under each of the charges Verify deposits Auto-Post desired charges Enter details that describe the lease Enter Lease Details • • Enter specific information (will also be available on the Rent Roll Navigator) Create new detail fields (click Change Layout button) Add tenants to the lease Add Tenants/Contacts • • • Add already created tenants or create new tenants for the lease Verify contact information is correct Mark tenant type and select the primary tenant (if more than one) Verify charges View Register Enter Lease Specific Comments • • • Deposits charged at the creation of the lease Auto-posted repeating charges (rent, utilities, etc.) Enter applicable payments Add comments that are lease specific • • Work Orders: provided for vendors for instruction on entering unit Lease Payment: appear on the Late Payment Aging Summary Report Verify dates as set when creating the lease Verify Dates Attach Media • • • • Rent Paid Thru Date Late Fees Applied Date Next Post Date Lease Renew By Date: used on the Renewal Report and can be tracked on the Rent Roll Lease specific media only should be attached • • Includes: images, pdf documents, and Microsoft Office files Add a scanned copy of the signed lease Creating Prospects JobAid Task… Prospects Navigator Create Prospect Enter Prospect Name PBJ 115 Action(s)… All prospects are found under the Prospect Navigator Click New to create contacts within the Prospect Navigator • Opens the Prospect Notebook Choose the type of prospect, individual or company • • Enter First and Last Name (creates file as name) If contact is a company, the name entered will be the primary contact Enter remaining prospect info • Prospect Information Contacts • • Information can be tracked on the Rent Roll and Contact Navigators for custom reports Enter Source (required field) Create Sources o Setup Preferences -> Add-on Modules -> Property Prospect o Create and edit fields under Define Sources Enter related contacts to prospect • Can be selected from existing contacts or can be created new Contact specific media only should be attached Attach Media • • Includes: images, pdf documents, and Microsoft Office files Should show images of contact or files specific to the contact Enter information found under the Guest Card/Interview sections • Enter Application Details • Enter specific information (will also be available on the Contact Navigator) Create Guest Card/Interview sections o Setup Preferences -> Add-on Modules -> Property Prospect o Create and edit fields under Define Guest Card/Interview Questions Track properties/units shown or put into a held status • Units Shown/Held • • Properties/Units shown will be tracked and do not relate to other prospects Properties/Units held will be placed on a held status and can be held through a date or released early Priorities can be defined for a wait status Record charges and payments for the prospect Register • • • Enter application and deposits charged Enter payments from the prospect Charges and payments will transfer to the lease register when/if they move into a managed unit Track activities related to the prospect Activity • • Record mailings, phone calls, and other forms of contact Change the status of prospect as they move throughout the application process