1
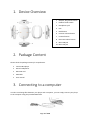
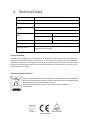
Version 1.0 Intenso Music Dancer Manual Page 1-7 GB Table of Contents Table of Contents .................................................................................................................................... 1 Notes ....................................................................................................................................................... 2 1. Device Overview .............................................................................................................................. 3 2. Package Content .............................................................................................................................. 3 3. Connecting to a computer ............................................................................................................... 3 a. Connecting to a device ................................................................................................................ 4 b. Disconnecting the device ............................................................................................................ 4 4. Rechargeable Battery ...................................................................................................................... 4 5. Operation ........................................................................................................................................ 5 6. a. On/Off.......................................................................................................................................... 5 b. Play / Pause ................................................................................................................................. 5 c. Volume – Settings........................................................................................................................ 5 d. Song – Selection .......................................................................................................................... 5 e. Button lock .................................................................................................................................. 5 f. Micro SD Card Reader ................................................................................................................. 5 Technical Data ................................................................................................................................. 6 Page 1 of 6 EN Notes Read and observe the user manual including warnings and notes before the first activation of the product. Please make sure before the first activation of the device that the rechargeable battery is fully charged. Avoid hard collisions of the device. Do not use the device in extremely cold, hot, wet or dusty areas. Also, do not expose it to direct sunlight. Do not put naked light sources such as burning candles near the product. Perform backups regularly to prevent possible data loss. Avoid using it in strongly magnetized fields. Protect the device against moisture. If moisture penetrates the device, please turn it off immediately and then please clean and dry the device. Do not use chemical solutions to clean the device. Only use a dry cloth. We are not liable for damages or data loss upon a malfunction, improper handling, and unauthorised repair of the device or changing of the battery. Please do not disassemble the device into its components and please do not try and repair it on your own, because otherwise the warranty expires. Do not block or cover the openings of the product. This product is only intended for private use and should not be used commercially or in industrial environments. Do not insert objects that are not intended for usage into the openings of the product. Damages that are not attributable to improper handling or disregard of the warnings or instructions of this user manual are not covered by the warranty. WARNING: Prolonged exposure to excessively loud music can result in temporary or permanent hearing damage or hearing loss. The use of the player in traffic is not recommended. It can cause the listener to react disregardful towards potential hazards such as approaching vehicles Page 2 of 6 EN 1. Device Overview 1. ON/OFF, Play/Pause button 2. Random mode switch 3. Headphone jack 4. LED 5. Back button 6. Increase volume button 7. Forward button 8. Decrease volume button 9. Mini-USB jack 10. Micro-SD jack 2. Package Content Please check the package content for completeness Intenso MP3 player Stereo headphones Micro SD card USB cable User manual 3. Connecting to a computer In order to exchange files between your player and a computer, you can simply connect your player to the computer using the provided USB cable. Page 3 of 6 EN a. Connecting to a device In order to connect the player to the computer, insert the USB 2.0 port of the USB cable with a free USB port of the activated computer and connect the Mini USB port of the cable with the player. It is now recognised as removable medium and is ready for data transfer with the computer. Now you can simply transfer the files from your computer to your player or vice versa using “Drag and Drop” or by "Copy and Paste“. b. Disconnecting the device Before removing the USB cable you must make sure that the data connection between the devices is separated! If you are using a Windows PC (XP or higher version), the player can also be disconnected via the computer. To do that, click on the “Remove hardware safely” symbol in the Windows taskbar. Now select the Music Dancer and follow your computer’s instructions, until it confirms the successful process. If you are using a Mac you can simply disconnect the player by dragging the player icon onto the trash symbol. The USB cable can now be separated safely from the player and computer. Note: Do not remove the player from the computer if the transfer of files between the devices is not finished. This can result in data loss and damage the medium. 4. Rechargeable Battery The player has a rechargeable battery fixed into its casing. Before the device is used for the first time, make sure that the rechargeable battery has been completely recharged. This process normally takes up to 2 hours. The rechargeable battery is recharged through the USB connection with your PC. To recharge the battery, connect the device with the PC using the USB cable. The recharging process will start automatically. While the player is recharging, the built-in LED will light. It will turn off as soon as the rechargeable battery has been completely recharged. Note: For ideal performance, the rechargeable batter must be used periodically. If that is not the case, the rechargeable battery should be completely recharged at least one per month. Page 4 of 6 EN 5. Operation a. On/Off To activate the device, press the ON/OFF button for 2-3 seconds. The built-in LED will start to light. To deactivate the player, repeat this process. The built-in LED will turn off. b. Play / Pause Briefly press the ON/OFF button in order to start or pause playback. During playback, the LED will blink. When paused, the LED will be continuously lit. c. Volume – Settings Briefly press the “+” or”-” buttons to increase or reduce the volume in steps. Keeping the respective button pressed will adjust the volume seamlessly. In compliance with the legal guidelines, this device has a protective function against the playback of loud music. Increase the volume using the “+” button. A beep will sound once a volume level has been reached that has been set in the factory. You will then have to press the Play/Pause Taste button immediately and then press the “+” button immediately after that to reach the desired volume level. If the sequence of buttons was not performed quickly enough, multiple beeps will sound. Simply repeat the process in this case and reduce the time between the individual Entries. d. Song – Selection To return to a song or change it, press the forward or backward within a song, simply keep the button pressed. back buttons. To jump forwards or e. Button lock To prevent undesired entries, the player has a button lock. Simply press the “-” button and the Play/Pause button simultaneously for 2-3 seconds to activate it. The built-in LED will begin to blink quickly to confirm this and the buttons will then be locked. To unlock them, perform these instructions again. With the button lock activated, the device will only react to entries by blinking the LED quickly. All other functions will be ignored. f. Micro SD Card Reader Inserting the memory card: place the included micro SD card or another compatible one with the impression towards the clip and the contacts pointed forwards into the card jack on the MP3 player, until they lock into place. Removing the memory card: Carefully press the inserted memory card deeper into the player until you feel a slight resistance and then release the card. The built-in spring will eject the card. Page 5 of 6 EN 6. Technical Data Dimensions 46 mm (H) x 32 mm (W) x 16mm (D) Weight ~ 12g PC connection USB 2.0 (PC) | micro USB port (Player) Rechargeable Li-Polymer battery, capacity: 100mAh Battery Music playback: ~ 8 hours (MP3 Music) Frequency range 20Hz - 20000Hz SNR > 70dB Music formats MP3/WMA 32Kbps – 320kbps Operating temperature 0 to 40 ° Celsius Operating system Windows XP / Vista / Win7 / Win8 / Win8.1, Mac 10.4 or above, Linux Kernel 2.4 or above Audio Exclusion of liability Changes to the firmware and / or hardware can be made at any time without prior notification. For this reason it is possible that parts of the manual, technical data and images in this documentation may deviate slightly from the product in your hand. All products described in this manual are only for the purpose of clarification and must not necessarily match any certain situation. No claims can be made based on this manual. Disposal of used electric devices Devices marked with this symbol are subject to the European Directive 002/96/EC. All electric and used electric devices must be separated from the household waste and disposed of at the provided public locations. With proper disposal of used electric devices you avoid damaging the environment. Page 6 of 6 EN