1
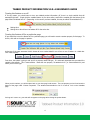
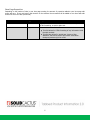
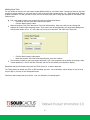
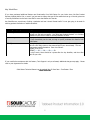
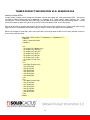
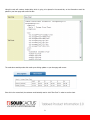
Contents Welcome ....................................................................................................................................................................3 Tabbed Product Information v2.0: A Beginner‟s Guide ...................................................................................................4 Turning the feature on or off ...................................................................................................................................4 Turning the feature off for a particular page .............................................................................................................4 Item Page Properties ...............................................................................................................................................5 Adding New Tabs ....................................................................................................................................................6 Key Identifiers .........................................................................................................................................................7 Tabbed Product Information v2.0: Advanced Use ..........................................................................................................8 Adding Custom HTML ..............................................................................................................................................8 2 WELCOME Thank you for purchasing Tabbed Product Information v2.0 for Yahoo Stores. Tabbed Product information gives you a way to place a great deal of information on a page without making the page too long for a shopper to bother scrolling through. It does this by hiding certain information inside a tab that a shopper can click to find more details if they so desire. In many cases, store owners have to make the tough decision of deciding which information is relevant to the sale for their customers. There may be extraneous information that a customer doesn‟t absolutely need to see in order to make an informed buying decision; however, having that information available to the more discerning shoppers would help capture the sale. This is where Tabbed Product Information truly shines! It allows you to prioritize how you‟d like this information to be shown to shoppers browsing your product information. If you‟d like a customer to only be presented with the main selling points of the product, you can set it up so those main selling points are what your customers see first. You‟ve provided them with more details which they can read or interact with if they choose to. If you need room on the page to link to a product manual, it‟s rather simple to add. Size charts and images no longer need to push your product information down the page to a spot where a shopper might not see them. Simply put the information in a tab. With Tabbed Product Information v2.0 for Yahoo Stores, you‟re ready to put a vast amount of information in a very limited amount of space. 3 TABBED PRODUCT INFORMATION V2.0: A BEGINNER’S GUIDE Turning the feature on or off If for any reason, you should want to turn your tabbed product information off, there is a single variable that will accomplish this task. Simply click the variables button in your store editor, and find the variable near the bottom of the page called “Sc-tabbed-info-on”. (Depending on the version you have installed, this may be called “Show-tabbed-info”). Setting this to Yes will turn the feature on for the entire site. Setting this to No will turn the feature off for the entire site. Turning the feature off for a particular page If you would like to turn the feature off for a particular page, you will need to create a custom property for that page. To do this, click edit on the page in question. At the top of the page presented (which houses all your product details) you will see a row of buttons in a black bar. Click “New Property” From here, the system is going to ask you for a property name and type. It is extremely important that you match the variable name exactly. This is case-sensitive. Name the new property “Sc-tabbed-info-on” (or “Show-tabbed-info‟) and select yes-no for the type. When you hit continue, you will be taken back to your item page‟s edit screen. The new property can be found near the bottom of the page under “Custom Properties” The variable should default to „No‟ if it‟s set as „Yes‟ on the Variables page. As long as it is set to no, your tabs will not appear on the page after clicking the update button. 4 Item Page Properties Depending on the number of tabs in your item page mockup, the amount of properties added to your item page edit screen will vary. If you only have 2 tabs showing on the mockup, then properties will be added to your item page edit screens for the first 2 tabs (title & text). Variable Name: Type: Purpose: Tab-1-title Text Tab-1-text Big-text Controls the name of the tab. This field is set to strip out any HTML formatting, so stick to plain text. Controls the content of the tab This field allows for HTML formatting of any information inside the tab‟s contents. This field also allows for special tags, known as „Key Identifiers‟ that can be used to pull certain Solid Cactus developed products right into a tab! 5 Adding New Tabs For any number of reasons, you may need to create additional tabs for only certain items. Perhaps you have an item that contains a product manual, or you would like to create a tab that offers measurements, etc. Solid Cactus built Tabbed Product Information v2.0 with just that in mind, and in true Cactus style, did so using open standards so the feature is as flexible as you. First, you‟ll need to create a new property for each of the items listed above. o Click edit on the item you‟d like to add an extra tab to. o Click the „New Property‟ button. Name the property „Tab-2-title‟ and choose Text, then click continue. Keep note, that you can‟t change the sequence of numbers without causing issues. If you have 3 sets of tab properties, you should start adding them with the next number in line. If 3 is the last one you see, then start with „Tab-4-title‟ and „Tab-4-text‟. o Click the „New Property‟ button again. o Name the property „Tab-2-text‟ and choose Big-text, then click continue. This will take you back to your home page‟s edit Screen, with 2 new properties (at the bottom of the page, under „custom properties‟). One for the title of the tab, and one for the content you would like to display. Remember that the title property strips out any HTML you put in, so stick to plain text. The Text property can accept any HTML or CSS formatting you enter. Do so cautiously, and as always, be sure to close all your tags or you may run into unexpected issues. Feel free to add as many tabs as you‟d like. Your only limitation is horizontal space! 6 Key Identifiers If you have purchased additional features and functionality from Solid Cactus for your Yahoo store, like Star Product Reviews, Multiple Add to Cart, or even if you just want to change the type of information that can go in the tab, place one of our Key Identifiers into the tab-#-text field to move that feature into the tab. Key Identifiers are a quick way of telling a particular tab how it should format itself if it‟s not just going to be used for entering product information or additional details. Item Page Property: Purpose: [REVIEWS] Placing this tag into the „text‟ field of any given tab will automatically place product reviews into the tab you specify. You must have Product Reviews 1.1 or higher installed on your store in order for this Key Identifier to work. Placing this Key Identifier in the „text‟ field will bring your Item Level Multiple Add to Cart functionality into the tab, as long as you‟ve purchased this feature from Solid Cactus. Placing this key identifier in the „text‟ field of any given tab will essentially turn that tab into a ID‟s field, similar to the contents field in your store already. This one does require specific formatting. Enter it as follows: [ITEMS] ID ID ID ID [ITEMS]spaceIDspaceIDspaceIDspaceID In other words, there should be a space after the key identifier, and then after each ID you enter. [MULTIADD] [ITEMS] If you need further assistance with this feature, Tech Support is only a call away! Additional charges may apply. Please refer to your Agreement for details. Solid Cactus Technical Support can be reached Mon-Fri from 9am – 7pm Eastern Time 1-800-898-4301 7 TABBED PRODUCT INFORMATION V2.0: ADVANCED USE Adding Custom HTML In many cases, you may want to format the information that you are putting into a tab using custom HTML. You can use this field to accept anything that can be displayed in a webpage, be it a table, images, video, flash files, etc. Tread carefully here. If you‟re not familiar with HTML code, you can cause some issues with your product page layout. You can use the files button to place any type of file you‟d like to call using custom HTML in your files library. Since all of the tabs on the page load at once, and we use CSS to hide their content until it is clicked, you‟ll want to keep page load time in consideration and carefully test your usage in order to keep page load time optimized. Below is an example of code that a store owner who sells t-shirts might want to add to one of their products in order to show a very simple size chart. <table width="480" border="1" cellspacing="1" cellpadding="1"> <caption> Men's / Unisex Size Chart </caption> <tr> <th scope="col"> </th> <th scope="col">XXS</th> <th scope="col">XS</th> <th scope="col">S</th> <th scope="col">M</th> <th scope="col">L</th> <th scope="col">XL</th> </tr> <tr> <td>Check (Inches)</td> <td>29-31</td> <td>30-32</td> <td>34-36</td> <td>38-40</td> <td>42-44</td> <td>46-48</td> </tr> <tr> <td>Waist (inches)</td> <td>27-29</td> <td>28-30</td> <td>30-32</td> <td>32-33</td> <td>33-34</td> <td>36-38</td> </tr> </table> 8 Using this code will create a simple table, which is going to be placed in the second tab, so the information would be placed in your item page edit screen like this: The code above would produce this result upon clicking update on your item page edit screen: Since this is the second tab, the customer would actually need to click “Size Chart” in order to see the chart. 9