1
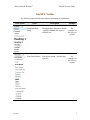
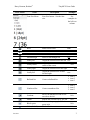
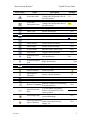
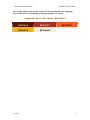
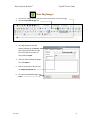
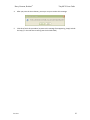
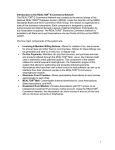
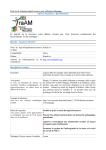
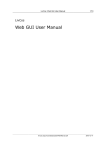
Harry Norman, Realtors® TinyMCE Users Guide TinyMCE Users Guide Introduction TinyMCE is a platform independent web based Javascript HTML WYSIWYG editor. What this means is that it will let you create html content on your web site. TinyMCE supports a lot of Operation Systems and browsers. Some examples are: Mozilla, Internet Explorer, Firefox, Opera, Safari and Chrome. TinyMCE has a large userbase and an active development community. This user manual will show you all the basics of the TinyMCE editor. Basics The default TinyMCE editor will look like this: On top you can see the toolbar, below the text area and at the bottom a resize bar. If you drag the lower right corner you can make the editor window bigger or smaller. This information was created for use by Harry Norman, Realtors® for the sole and propriety use by Harry Norman agents and employees. Any other use is not authorized or supported in any way. ©2009 Harry Norman, Realtors® All rights reserved. Questions? Comments? Contact [email protected] or call 404-504-7965 Version 1 1 Harry Norman, Realtors® TinyMCE Users Guide TinyMCE Toolbar The following table describes the function and output of each button. Icon / Menu Version 1 Name Description Example Paragraph Style Menu Paragraph Style Dropdown button See - Applies standard text styles to examples in selected text. the left icon column Font Family Menu Font Select button - Sets the font typeface. See examples in the left icon column 2 Harry Norman, Realtors® Icon / Menu Name Description Example Font Size Menu Font Size button - Sets the font size. See examples in the left icon column Bold Bolds selected text text Italic Italicizes selected text text Underline Underlines selected text text Strikethrough Places a line through text text Justify left Aligns the selected text to the left text Justify center Aligns the selected text to the center of the screen Justify right Aligns the selected text to the right Justify full Aligns the selected text to both left and right Bulleted list Creates a bulleted list text text text • item 1 • item 2 • item 3 1. item 1 2. item 2 3. item 3 Numbered list Creates a numbered list Out dent Moves an indented section of text one tab to the left N/A Indent Indents the selected text by one tab N/A Block quote Undo (Ctrl+Z) Version 1 TinyMCE Users Guide Indents entire paragraph to block quote style Undoes the last action. N/A N/A 3 Harry Norman, Realtors® Icon / Menu Name Redo (Ctrl+Y) Cut Find Find & Replace Copy Paste Paste in Plain Text Paste from Word TinyMCE Users Guide Description Redoes/Repeats the last action, which has been undone. Removes the selection from the active document and places it on the Clipboard. Find text in the editor's content area Find (and replaces) text in the editor's content area Copies the selection to the Clipboard. Inserts the contents from the Clipboard at the insertion point, and replaces any selection. Inserts the text from the Clipboard at the insertion point, and removes all formatting and leaves plain text. Inserts the text from the Clipboard at the insertion point and keeps all formatting. N/A N/A N/A N/A N/A N/A N/A N/A Insert Table Inserts a table N/A Row Properties Table row properties N/A Cell Properties Table cell properties N/A Insert Row Before Inserts a row before the current row N/A Insert Row After Inserts a row after the current row N/A Delete Row Deletes the current row N/A Insert Column Before Inserts a column before the current column Inserts a column after the current Insert Column After column Version 1 Example N/A N/A Delete Column Deletes the current column N/A Split Cells Splits the current cell N/A Merge Cells Merge the current cell with other cells N/A 4 Harry Norman, Realtors® Icon / Menu Name TinyMCE Users Guide Preview Insert Time Insert Date Description Example Text Color (foreground) button Changes the foreground color of Text the selected text. Text Color (background) button Changes the background color of Text the selected text. View page in preview mode N/A Inserts current time. N/A Inserts current date. N/A Insert Link Inserts or edits a link text Unlink Removes the current link text Insert Anchor Inserts or edits an anchor N/A Insert Image Inserts or edits an image N/A HTML Mode Edit the HTML source code N/A Full Screen Toggles fullscreen mode N/A Select text color Select text background color Direction Left to Right Direction Right to Left Left Justification Right Justification Print Print page contents Run Spell Checking Spell check page text Insert Emotions Insert Special Character Superscript Subscript Text Text N/A N/A Insert emoicons Inserts a special character Makes a text superscript Makes a text subscript Removes custom or all formatting Remove Formatting from selected text. (e.g. horizontal rule) button Insert Horizontal Inserts a horizontal line at the Rule cursor position. Allows users to define clickable Insert Image Map areas within image. Used in special situations. Used to Insert Non-Breaking insert a space between text, Space Character images, etc. ® Text2 Text2 N/A N/A N/A Version 1 5 Harry Norman, Realtors® TinyMCE Users Guide How to Modify Text You can use different fonts, sizes and colors to help separate Headings and Body text as well as Links and other information. All Tools used to change font properties are found on the Tool Bar To change the font of the text: Family To change the size of the text: Size To change the color of the text: the drop down Highlight the text and select the font under Font Highlight the text and select the size under Font Highlight the text and choose the Font Color from Note: Each line of text should have a designated Font Family and Font size. After you enter each line of text, be sure to highlight the text and select a Font Family and Font size. If this is not specified, a default font and size will be used and your text may display inconsistently on your agent page. Be sure to confirm the fonts and sizes when previewing your page before submitting for approval. How to change font color To apply a color to your text: 1. Highlight your text, then click the down arrow next to the Font Color button and choose More Colors 2. You can select any color in the Color Picker by clicking anywhere in the gradient 3. Click Apply Version 1 6 Harry Norman, Realtors® TinyMCE Users Guide It is strongly advised that you use consistent colors throughout your agent page. These colors will vary depending on the agent template you choose. Corporate Colors – Hex Colors Web Colors #330e00 #b80007 #ffb300 #f7edd4 #ff3600 Version 1 7 Harry Norman, Realtors® TinyMCE Users Guide Inserting Images 1. To insert an image, click on the space where you want to insert the image 2. Click the Insert/edit image icon 3. An image properties box will appear allowing you to browse your computer to find the image file. Select the file you wish to insert and click Open. 4. Once you have selected the image file, click Upload 5. Enter a Description of the file into the Image Description box 6. To insert the uploaded image, click Insert Version 1 8 Harry Norman, Realtors® TinyMCE Users Guide Inserting Links To create a Hyperlink: Select the text you wish to make a Hyperlink. Click the Insert/Edit Link Icon. 1. Type in the web address in the Link URL field. a. Creating an External Link: If you want to create a link to an external website, type the web address in the Link URL field. (Make sure you include the http:// for external links) b. Creating an email link: If you want to create an email link, type in mailto: followed by your agent email into the URL field (i.e. mailto:[email protected]) c. Link to an Internal Page: If you want to create a link to a page found on HarryNorman.com, visit the page you wish to link to and copy the link and paste it in the Link URL field. Each page will have a different id number and the URL should look similar to the following: http://harrynorman.com/AgentContent/?PageID=12 2. Choose the Target: open in a new window 3. At the bottom, click the Insert button. The text will now appear in the Web Builder window as underlined blue text. Version 1 9 Harry Norman, Realtors® 4. TinyMCE Users Guide After you press the insert button, you may or may not receive this message: 5. Click OK to finish this procedure (to prevent this message from appearing, simply include the http:// in the URL when entering into the Link URL field) Version 1 10 Harry Norman, Realtors® TinyMCE Users Guide Inserting Tables 1. To insert a table, click so that the cursor is flashing inside the Web Builder window 2. Click on the Table icon 3. The Table Properties window will appear. Complete the information according to the properties you need and select Insert. Make sure the entire width of your table is no wider than 770. The following settings are recommended for general use: Rows – determined by user needs Columns – 1 Cellpadding – none Cellspacing – none Alignment – left Border – 0 Width – 770 Height – default Class – none selected Table caption – not selected To insert a row or delete a row: o o o Insert Row Before icon ‐ the row will be inserted above the row in which your cursor is placed Insert Row After icon ‐ the row will be inserted below the row in which your cursor is placed Delete Row icon ‐ the row in which your cursor is placed will be deleted Editing the Table: To edit a table, right‐click inside the table and select Table Properties. You can also select Cell Properties, Row Properties, or Column Properties if you want to edit that part of the table. Version 1 11