1
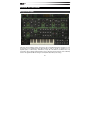
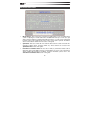
Introduction
Vacuum Pro is a polyphonic, vintage-style, analog-inspired virtual instrument. Based on the
®
®
original Vacuum instrument, found in the Creative Collection included with Avid Pro Tools ,
Vacuum Pro is a truly unique take on analog synthesis. Rather than sampling or modeling a
classic, well-known analog synth, Vacuum Pro personifies the overall style and sound of synths
from this era.
Vacuum Pro features two parts, which are expanded to four that give this synth an incredibly
rich, fat, multi-layered sound. Over 400 presets are included and many presets contain doubles
and layers. Intelligent randomization allows for quickly creating custom presets, and Part and
Randomization Locks help to refine sounds quickly without needing to adjust every parameter.
The Smart Page features eight macro knobs. Each knob is meticulously mapped to numerous
parameters on the Part Page to allow for intuitive, musical editing of the instrument sound. All
parameters can be mapped to a connected MIDI controller and all are automatable.
®
®
®
Vacuum Pro is available as a 64-bit VST™, 64-bit AU and RTAS plug-in for Mac OS X and
®
Windows .
2
System Requirements and Product Support
For complete system requirements, compatibility information, and product registration, visit the
AIR website: airmusictech.com.
Installation
Windows
1.
Right-click the .zip file you downloaded and select Extract All.
2.
Follow the on-screen instructions. By default, Windows will show you the extracted files
when it has finished extracting them.
3.
Double-click the .exe installer file
4.
Follow the on-screen instructions.
Note: Vacuum Pro uses PACE copy protection, so it will install the PACE InterLok driver on
your system if you do not already have it. As most audio software uses PACE copy protection,
though, this is probably already installed on your system.
Mac OS X
1.
Double-click the .zip file you downloaded. The archive utility will extract the files and put
them in a folder in the same location as the .zip file.
2.
Open the Vacuum Pro folder.
3.
Double-click the .pkg installer file.
4.
Follow the on-screen instructions.
3
Vacuum Pro Overview
Design Philosophy
Like many classic hardware synths, Vacuum Pro has a straightforward layout in which you can
see the flow of your signal from left to right and there is only one “mode” of operation (i.e., no
separate “play” or “edit” modes). Furthermore, nearly all of the buttons and knobs have only
one function. These design elements make it easy to develop “muscle memory” and confidently
reach for the right knob without having to actively think about what you’re doing.
4
Vacuum Pro Sections
•
Master Section: This section gives you high-level “global” features such as loading/saving
sounds or adjusting the volume between the two Parts that make up a sound. If you just
want to play the amazing sounds that ship with Vacuum Pro, you only need to understand
how this section works—exploring the other sections of the synth is optional. The Master
Section is described in detail in the next section of this guide
•
Synthesizer: This area contains all of the elements that create the sounds of Vacuum Pro
(including oscillators, filters, envelopes, LFOs, etc.) These elements are covered in the
Synthesizer Area section of this guide.
•
Performance and Effects Area: This area has a variety of performance-related controls
(keyboard, pitch and modulation wheels, and arpeggiator) as well as some “sweetening”
effects including Chorus/Phaser and Delay. For more information, please refer to the
Performance and Effects Area section of this guide.
5
The Master Section
1.
Page Select – These buttons select which page is currently being shown on screen.
• Part A, Part B: Each Vacuum Pro sound can have up to two independent, separately
programmed “parts” that make up the overall sound you hear. Each part has its own
page and can be accessed using the Part A and Part B buttons.
• Smart: Vacuum Pro features innovative Smart Controls page in which a handful of
“smart” knobs can simultaneously control many knobs on both part pages. These
controls are accessed by pressing the Smart button and are discussed in the next
section of this guide.
2.
Part A/B Power – These buttons switch each part on and off. The button’s backlight is
illuminated when the part is active.
3.
Part A/B Volume – These sliders set the level of each part.
6
4.
Part A/B Load – This section lets you load individual parts. This is done by clicking the
name display or the arrow icons next to the display. The =A button copies the contents of
Part A into Part B (the =B button copies Part B into Part A).
5.
Part A/B Randomization Enabling – The Rand button (see below) lets you quickly
randomize all of the parameters of a part. By default, it randomizes all parameters in all
sections of the synthesizer (Oscillator, Filter, Envelope, Modulation, or Output Amplifier).
However, it is possible to lock a section of the synthesizer to prevent changes being made
to that section. To do this, click the buttons (VTO, VTF, ENV, MOD, VTA) and make sure
the backlight is off so that randomization is not enabled.
6.
Part A/B Rand – This button lets you randomize the parameters of a part. If you’d like to
prevent a section of the synthesizer from being randomized, ensure that Randomization
Enabling is switched off for that section (see above).
7.
Load Locking – This is a unique feature to lock certain sections of Vacuum Pro as you
load new sounds. For example, if you lock the VTO (Oscillator), VTF (Filter) and ENV
(Envelope) sections while loading other sounds, those sections will not change as new
sounds are loaded.
Tip: If you load a sound that has some characteristics that you like but other
characteristics that you do not, lock the parameters that you like and try loading other
presets. This quickly lets you quickly construct a “hybrid” sound from many presets using
only the parts of each sound that you like.
8.
Voices – Vacuum Pro is a polyphonic instrument and can play up to six notes at the same
time. This parameter lets you limit the number of notes the instrument will play.
Tip: If you wish to play Vacuum Pro as a monophonic instrument, set this parameter to
Monophon.
7
9.
Eco – Switching this button on engages Economy Mode and can reduce CPU load by up
to 35%. This is achieved through a slight (often unnoticeable) reduction in the sampling
rate of the Vacuum Pro sound engine. If you have an older or less powerful computer, we
recommend engaging this mode in order to play complex sounds with higher polyphony.
10. Double – Switching this button on engages global unison-doubling. This creates a
significantly thicker sound but places higher demands on your CPU.
11. Save/Load – This section lets you load and save sounds.
• To load a sound, click the screen to bring up a categorized list of Vacuum Pro sound
presets. You can also use the arrow buttons to the right of the preset name to quickly
shift between sounds.
• To save a sound, click the Save button. If you wish to quickly overwrite the file you
are currently working on without changing the file name or bringing up the file
browser, you can do so by shift-clicking the Save button.
8
The Smart Controls Page
Vacuum Pro features an innovative Smart Controls page that provides “macro”-level control of
a sound. This makes it easy to take any existing sound and quickly modify it to suit your needs.
The knobs on the Smart Controls page are connected to all of the appropriate controls on the
Part A and Part B pages. This means that turning one Smart knob will cause several related
knobs on both Part pages to change simultaneously to help you achieve a desired sound. This
saves you from having to manually locate and change the controls on each Part page.
9
The Apply Button
When working with the Smart controls, you are always imparting modifications to the
parameters on the Part pages without actually overwriting those parameters. As you work with
the Smart controls, you may come across a heavily modified sound that you wish to use as a
starting point for even more modifications. To do this, simply click the Apply button.
When you click the Apply button, all of the temporary modifications being imparted from the
Smart controls become permanently imprinted into the Part pages. The Smart controls are then
reset to their baseline (“12 o’clock”) settings. You can then save the sound or continue using
the Smart controls for even more modification.
10
Performance and Effects Area
1.
2.
Arp – This cluster of controls affect the arpeggiator of Vacuum Pro.
•
On: This switch turns the arpeggiator on and off. When the arpeggiator is active, the
LED below the switch is illuminated and pulses with the running arpeggiator.
•
Rate: This knob sets the speed of the arpeggiator. Speeds are set in musical
divisions of your DAW’s (digital audio workstation's) master BPM.
•
Mode: This knob sets the progression of the chord you are arpeggiating.
o
Up steps notes from bottom to top and repeats.
o
Down steps notes from top to bottom and repeats.
o
U&D steps notes from bottom to top to bottom and repeats.
o
Rnd plays all of the notes in your chord in random order.
Keyboard and Pitch/Mod Wheels – The keyboard as well as the Pch (pitch) and Mod
(modulation) wheels respond to incoming MIDI data. You can also manipulate these
controls with a mouse.
11
3.
4.
5.
Chorus/Phaser – These controls affect the Chorus and Phaser effects of Vacuum Pro.
•
Selector: This three-position switch sets the effect: Chorus, Phaser 1, or Phaser 2.
•
Depth: This knob sets the intensity of the selected effect.
•
Rate: This knob sets the speed of the selected effect.
•
Mix: Determines how much of the effect is mixed in with the original (unprocessed)
signal. Note that if this knob is set fully counter-clockwise, you will not hear any
effect.
Delay – These knobs and switches control the delay effect of Vacuum Pro.
•
LPF: Sets the delay effect’s low-pass filter cutoff frequency.
•
HPF: Sets the delay effect’s high-pass filter cutoff frequency.
•
Time: Sets the delay time. If the Sync parameter is switched on, this parameter is
displayed as beat divisions. If the Sync parameter is off, this parameter is shown
displayed in seconds.
•
Fdbk: Determines how much of the outgoing signal is fed back into the delay
module, from 0-100%.
•
Mix: Determines how much of the effect is mixed in with the original (unprocessed)
signal. Note that if this knob is set fully counter-clockwise, you will not hear any
effect.
•
Sync: Engaging this switch synchronizes the Time parameter to the master clock of
your DAW. If this switch is off, the Time parameter is displayed in seconds.
•
L-R: This switch engages a “ping-pong” stereo delay mode.
Master – These knobs control the master output of Vacuum Pro.
•
Width: Sets the “width” of the stereo sound field, from mono (fully counter-clockwise)
to stereo (fully clockwise).
•
Level: Sets the output level of Vacuum Pro.
12
Synthesizer Area
This area is where all of the Vacuum Pro sounds are generated. Please note that this user
guide describes only the signal flow and unique features of Vacuum Pro but does not go into
the basics of synthesis and sound design. If you are not familiar with the building-block
concepts of synthesis (such as oscillators or envelopes) there are many great resources on the
Internet to help you learn. Also, Vacuum Pro has useful Tooltips that appear when you hold the
mouse over a control for one second. These Tooltips can be very helpful in identifying the
names of different controls as you are learning about synthesis.
You can also start by tweaking any of the preset sounds in Vacuum Pro! In our experience,
hearing how a knob twist affects overall sound is one of the most immediate and satisfying
ways of learning about synthesis.
13
Vacuum Pro Voice Path
The voice path of Vacuum Pro is similar to that of many classic synthesizers from the 1970-80s.
•
Oscillators with Quad Mode and Delay Controls: Vacuum Pro has two oscillators with
continuously variable wave shapes that are dialed in using the Shape knob. The second
oscillator can be synced to the first by using the Sync Mode switch.
o
Quad Mode: Each oscillator has a Quad mode on/off switch. This is a special mode
in which four oscillators play together to create a thick “super-saw” style sound.
However, unlike some classic synths, you are not limited to using saw waveshapes in
this mode—any waveshape can be quadrupled. Use the Detune knob to vary the
thickness of the sound by detuning each of the four oscillations.
o
Delay Controls: Each Oscillator features a very short (one-cycle) delay line with
knobs to set Delay Time and Delay Amount. This short feedback loop creates
interesting tonal characteristics by simulating the electro-acoustical feedback that
occurs while playing instruments like electric guitar. If Re-Pitch is switched off, it
takes a brief instant for the feedback spectra to shift to a new note that is played. This
results in a more “organic” transition. If switched on, Re-Pitch immediately resets the
feedback spectra at the start of each note, which some describe as being cleaner but
more “digital”-sounding. This can be set according to your needs.
14
•
Mixer with Ring Modulation and Drive: The oscillators are fed into a mixer that lets you
set the levels of each input. This mixer also includes a RingMod knob that lets you dial in
a classic ring-modulated sound. Finally, the mixer also has a Drive knob that simulates
tube saturation on its output.
•
Filters: The voice path has two filters—a low-pass/band-pass filter and a high-pass filter.
The Routing switch lets you use these filters in Serial, Parallel, or Complex. The serial
and parallel modes work as expected. Complex is a proprietary routing developed by the
AIR team in which the filters work primarily in parallel but a small amount of output from
each filter is fed back into the other filter. This results in an interesting sound due to the
unusual way in which the two filters interact with each other. Finally, each filter also has a
Sat knob to set the amount of saturation.
•
Output Amplifier: The output of the filters is passed to an output amplifier. This amplifier
is controlled by Envelope 3 and its A, D, S, R knobs. The output amplifier also provides
additional wave-shaping controls through the Shape knob.
15
Sound Modifiers (Envelopes, LFOs, and Modulation)
Vacuum Pro has a number of envelopes, LFOs and other modulation sources to help you
control the various parts of the synthesizer in new and interesting ways.
•
Envelopes: Vacuum Pro has four envelopes. Envelopes 1 and 2 share one set of knobs
and are used to control the first filter (HP), the second filter (LP), or Both. The third
envelope exclusively controls the output amplifier. You can assign the fourth envelope to
control various parts of the synthesizer by using the Destination drop-down menu.
o
Fourth Envelope: Vacuum Pro has a unique, “flat” fourth envelope that is quite
useful for pitch effects. This flat envelope does nothing in its default state (as shown
above). The Att Lvl knob sets the target level (positive if turned clockwise, negative if
counterclockwise) that will be reached over the time defined by the Att Time knob.
The Slope knob sets the post-attack behavior of the envelope while a note is being
held. If this knob is greater than zero, the envelope will drift upward; if it is lower than
zero, the envelope will drift downward. The Rel Slp knob performs the same function
as the Slope knob, except once a note has been released.
16
•
LFOs: Vacuum Pro has two low-frequency oscillators. The shape of the LFOs can be set
using the Shape menu and the LFOs can be synchronized to the master clock of your
DAW by using the Sync drop-down menu. Finally, the Fade knob allows you to fade in
and out (the default “12 o’clock” position produces no fade-in or -out; turning counterclockwise sets fade-out whereas turning clockwise sets fade-in).
•
Mod: The Mod section allows you to select a modulation Source and Destination using
drop-down menus. The Depth knob sets the amount of modulation that takes place. There
are three Velocity knobs that use the velocity of incoming MIDI note data to control the
filters and output amplifier sections.
17
Other Unique Controls
Vacuum Pro has two additional sections (Age and Setup) with controls may not be familiar.
•
Age: These controls model the effects of wear and tear experienced by classic
synthesizers. The Drift knob sets how much random variance (“drift”) you will hear in
pitch. When set fully counter-clockwise, there will be no pitch variance with each note
strike. When set fully clockwise, you may hear a great deal of random variance in pitch
with each note strike. The Dust control models the effects of dust and corrosion on the
contacts of keybed. This results in specific sonic artifacts that appear at the start of each
note.
•
Setup: These are controls that affect the behavior of the synthesizer. The Glide Time
knob sets the amount of time it takes to portamento (or glide) from one note to the next.
The Glide All switch determines whether notes glide at all times or if gliding only happens
when one note is already being held down. The Env Retr switch determines whether the
envelopes are retriggered with each key strike or if they begin with the first note strike and
continue until all notes are released.
18
Settings Page
The Settings page contains several global parameters that affect all areas of Vacuum Pro.
Clicking the wrench icon at the lower-right corner of the Performance and Effects area
accesses this page.
1.
Pitch Bend Range – This parameter sets how many semitones up or down your note will
be shifted when you use your MIDI controller’s pitch wheel. If this parameter is set to 0
Vacuum Pro will ignore pitch bend MIDI messages.
19
2.
Show Tooltips – Tooltips are helpful hints that appear when you hold the mouse over an
on-screen control for one second. If you’re already familiar with the instrument, you can
hide the tooltips by setting this parameter to No.
3.
MIDI Assignments – Nearly all of the Vacuum Pro controls can be re-mapped (“MIDIlearned”) to the buttons, knobs, or sliders of your MIDI controller. This is done by rightclicking the on-screen control and selecting Learn MIDI CC and then using that control on
your MIDI device.
If you have several different MIDI controllers that you wish to use with Vacuum Pro (for
example: a small, lightweight keyboard for live performance and a large “master” keyboard
for studio use), use the Save and Load buttons to quickly save or load “learned” MIDI
mappings for each controller. The Reset button removes all custom mapping and returns
Vacuum Pro to its default state.
4.
Parts Inherit Preset Names When Saved – This feature applies if you create new
sounds using parts of existing sounds. If No is selected, the names of the original parts
will remain in the new sound that is created and saved. If Yes is selected, the name of
each part will be changed to match the name that is chosen for the sound.
20
Support
For technical support, please contact us through the Support page of our website:
airmusictech.com/support.
Trademarks and Licenses
VST is a trademark of Steinberg Media Technologies GmbH.
Avid, Pro Tools, and RTAS are registered trademarks of Avid Technology, Inc. in the U.S. and
other countries.
Mac and OS X are trademarks of Apple Inc., registered in the U.S. and other countries.
Windows is a registered trademark of Microsoft Corporation in the United States and other
countries.
All other product or company names are trademarks or registered trademarks of their
respective owners.
21
airmusictech.com
Manual Version 1.0