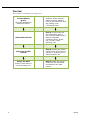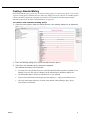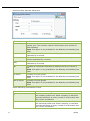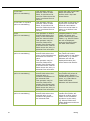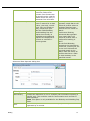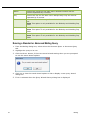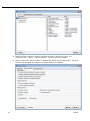
1
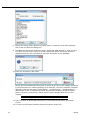
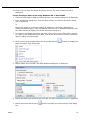
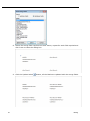
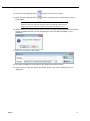
Oracle® Hospitality Suite8 Mailing User Manual Release 8.9 July 2015 Copyright © 1987, 2015, Oracle and/or its affiliates. All rights reserved. This software and related documentation are provided under a license agreement containing restrictions on use and disclosure and are protected by intellectual property laws. Except as expressly permitted in your license agreement or allowed by law, you may not use, copy, reproduce, translate, broadcast, modify, license, transmit, distribute, exhibit, perform, publish, or display any part, in any form, or by any means. Reverse engineering, disassembly, or decompilation of this software, unless required by law for interoperability, is prohibited. The information contained herein is subject to change without notice and is not warranted to be error-free. If you find any errors, please report them to us in writing. If this software or related documentation is delivered to the U.S. Government or anyone licensing it on behalf of the U.S. Government, then the following notice is applicable: U.S. GOVERNMENT END USERS: Oracle programs, including any operating system, integrated software, any programs installed on the hardware, and/or documentation, delivered to U.S. Government end users are "commercial computer software" pursuant to the applicable Federal Acquisition Regulation and agency-specific supplemental regulations. As such, use, duplication, disclosure, modification, and adaptation of the programs, including any operating system, integrated software, any programs installed on the hardware, and/or documentation, shall be subject to license terms and license restrictions applicable to the programs. No other rights are granted to the U.S. Government. This software or hardware is developed for general use in a variety of information management applications. It is not developed or intended for use in any inherently dangerous applications, including applications that may create a risk of personal injury. If you use this software or hardware in dangerous applications, then you shall be responsible to take all appropriate fail-safe, backup, redundancy, and other measures to ensure its safe use. Oracle Corporation and its affiliates disclaim any liability for any damages caused by use of this software or hardware in dangerous applications. Oracle and Java are registered trademarks of Oracle and/or its affiliates. Other names may be trademarks of their respective owners. Intel and Intel Xeon are trademarks or registered trademarks of Intel Corporation. All SPARC trademarks are used under license and are trademarks or registered trademarks of SPARC International, Inc. AMD, Opteron, the AMD logo, and the AMD Opteron logo are trademarks or registered trademarks of Advanced Micro Devices. UNIX is a registered trademark of The Open Group. This software or hardware and documentation may provide access to or information on content, products, and services from third parties. Oracle Corporation and its affiliates are not responsible for and expressly disclaim all warranties of any kind with respect to third-party content, products, and services. Oracle Corporation and its affiliates will not be responsible for any loss, costs, or damages incurred due to your access to or use of third-party content, products, or services. Contents Preface ........................................................................................................................... 5 Audience ............................................................................................................................ 5 Customer Support ............................................................................................................. 5 Documentation .................................................................................................................. 5 Revision History ................................................................................................................ 5 1 Mailing..................................................................................................................... 7 Standard & Advanced Mailings ....................................................................................... 7 Overview ............................................................................................................................ 8 Creating a Standard Mailing ............................................................................................. 9 Creating an Advanced Mailing Query ........................................................................... 15 Running a Standard or Advanced Mailing Query ........................................................ 22 Creation of Activities ....................................................................................................... 29 Merging to Word ............................................................................................................. 31 Merging to Excel .............................................................................................................. 33 Creation of email mailings .............................................................................................. 34 Creation of Documents and Attachments ...................................................................... 36 Letter Merge with a new or existing data file ................................................................ 42 2 Index ...................................................................................................................... 49 3 4 Preface Audience This user manual is intended for system users and system administrators. Customer Support To contact Oracle Customer Support, access My Oracle Support at the following URL: https://support.oracle.com/ When contacting Customer Support, please provide the following: Product version and program/module name Functional and technical description of the problem (include business impact) Detailed step-by-step instructions to re-create Exact error message received Screen shots of each step you take Documentation Oracle Hospitality product documentation is available on the Oracle Help Center at http://docs.oracle.com Revision History Date Preface Description of Change July, 2005 8.5.0.0 - First Issue Small Business Edition May, 2008 8.7 - Updated for Version 8.7 June, 2008 8.7.3.1 - Updated for Version 8.7.3.1 May, 2009 8.8 - Updates for Version 8.8 Sept, 2010 8.8 - Updates for Oracle 11gR1 Jan, 2012 8.9 - Updated for Version 8.9 Nov, 2012 8.9 - New cover page July, 2015 8.9 – Oracle template applied 5 1 Mailing Standard & Advanced Mailings Fidelio Suite8 offers two types of mailings: Standard and Advanced. The standard mailing allows users to enter values in a number of pre-defined fields from customer profiles, group/block and individual reservations, conference bookings, tasks and activities. The advanced mailing enable users to build queries based on pre-defined views, fields and values, with the possibility to create additional views at any time. A translation tool ensures that the field descriptions can be translated into multiple languages. Once a mailing query has been set up, it can be run at any time. All the matching records will be displayed and can be sorted as required. Users will have the ability to select records for processing; the selected records can then either be included or excluded in the mailing. After a mailing query has been processed, users will be able to select from a field list the fields to use in their mailing merge. Fields that will be used for the mail merge such as company name, street, city, zip code etc. can be taken from a pre-defined view. This approach offers great flexibility as the view can be changed at any time and more fields can be added if necessary. With the Mailing Option, you can: Create a standard mailing query using the mailing wizard Mailing Create an advanced mailing query Send out form letters and forms Create and print merge files, using Word or Excel Send mailings via email to selected profiles Send a mailing to in-house guests Print labels and envelopes Create tasks for all customer profiles included in the mailing 7 Overview The creation of a mailing is a 4 step process: Create Mailing Query Using the standard or advanced option. Step 1: Define the selection of the records based on query options such as all customers with the mailing code “Christmas Card”. Select the field list Step 2: Via the field list the information that is used for the data merge is defined. Example: customer name, street, city, country, letter greeting, etc. Select the profile criteria Step 3: Define the profile criteria such as the linking options or checking if an address exists, etc. Merge the data Create a new letter or use an existing one. 8 Step 4: Place the merge fields into the document and perform the data merge. Mailing Creating a Standard Mailing From the standard query screen you can edit an existing query or create a new query. You can also copy an existing query and then edit it to make any changes necessary. The list of available queries can be ordered as required by using the up and down arrow buttons. The description field is mandatory otherwise all fields as detailed below are optional. To create a new standard mailing query: 1. Click the menu option CRM and select MAILING, the mailing dialog box is displayed. 2. From the Mailing dialog box, select the tab STANDARD QUERY. 3. Click NEW, the standard query dialog box appears. The default selections are as follows: Mailing To search for active profiles but not to include individuals whose profile is marked as 'No Mailing', however, this may be changed via the add/edit query definition dialog box. All information that is entered is considered as an AND relation. Values selected from the same drop down lists and the C + I flag are considered as OR. The reservation status DEFINITE is taken as the default when running a query where reservations are included. 9 4. Enter a description for the mailing query. 5. Fill in the limiting criteria for your mailing list. Profile Information Criteria Profile Marketing Information Criteria Reservation Criteria Conference Booking Criteria Tasks / Activities Criteria 6. Click OK to save the query. Profile Information Criteria 10 This Field Is to limit a mailing to C Select this checkbox to select if the criteria should be on the company profile level. Either company or individual must be selected if an entry is made in a field which has the C and I checkboxes. Mailing Mailing I Select this checkbox to select if the criteria should be on the individual profile level. Either company or individual must be selected if an entry is made in a field which has the C and I checkboxes. Company: From-To Companies whose names fall within the alphabetical range entered. Leaving the From and To fields blank means not to restrict the mailing to a certain range of the alphabet. Individual: From-To Individuals whose names fall within the alphabetical range entered. Leaving the From and To fields blank means not to restrict the mailing to a certain range of the alphabet. ZIP Code: From-To Certain regions. For example, if the range is 9470094799, the mailing is limited to profiles from the San Francisco area. City Certain Cities. The mailing is limited to the city name entered. Country Individuals or companies from one or more particular countries. To restrict the mailing to individuals or companies from the USA and Canada, for instance, select USA and Canada from the drop-down list. State Certain States. The mailing is limited to the states selected. Profile Type Certain profile types. Select the profile types from the drop-down list. Created From-To The date the profile was created. Select a date from the calendar list box or enter a date range from / to. Created by Certain users. Select the users from the drop-down list. Sales Manager Search by responsible Sales Manager. Select the Sales Manager from the drop-down list. Language Certain Language codes. Select the language codes from the drop-down list. Birthday Click on DEFINE to enter the year, month and day of birth. Date fields can be further defined via the Advanced Date Operator dialog box, see the table below. Wedding Click on DEFINE to enter the wedding year, month and day. Date fields can be further defined via the Advanced Date Operator dialog box, see the table below. Active Select this checkbox if only active profiles should be included. The default is checked, i.e. include only active profiles. include No mailing Select this checkbox if you want to include those individuals who are marked as 'No Mailing'. The default is not selected, i.e. do not include individuals whose profile is marked as 'No Mailing'. include No mailing Select this checkbox if you want to include those individuals who are marked as 'No E-Mailing'. The default is not selected, i.e. do not include individuals whose profile is marked as 'No E-Mailing'. 11 Advanced Date Operator dialog box This Option Defines Anniversary Enables the definition of one or multiple years instead of entering a specific year. This could be used for anniversaries such as 50th or 60th birthdays. Note: This option is only available for the Birthday and Wedding Day fields. Year Defines the year for the date value. Multiple years may be entered separated by a comma. Month Defines the month for the date value. Multiple months may be entered separated by a comma. Day Defines the day for the date value. Multiple days may be entered separated by a comma. All Includes all individuals regardless of whether they are in-house or not. Note: This option is only available for the Birthday and Wedding Day fields. In-house Includes in-house guests. Note: This option is only available for the Birthday and Wedding Day fields. Not In-house Excludes in-house guests. Note: This option is only available for the Birthday and Wedding Day fields. Profile Marketing Information Criteria 12 This Field Is to limit a mailing to: C Select this checkbox to select if the criteria should be on the company profile level. Either company or individual must be selected if an entry is made in a field which has the C and I checkboxes. I Select this checkbox to select if the criteria should be on the individual profile level. Either company or individual must be selected if an entry is made in a field which has the C and I checkboxes. Mailing Action codes Certain action codes. Select the action codes from the drop-down list. Competition Certain competition codes. Select the competition codes from the drop-down list. Industry codes Certain industry codes. Select the industry codes from the drop-down list. Influence Certain influence, such as Booker, Contact or Negotiator. Select the influences from the drop-down list. Mailing Codes Certain mailing codes: Christmas mailing, summer mailing, new rates mailing, etc. Select the mailing codes from the drop-down list. Market Segment Certain market segments. Select the market segments from the drop-down list. Newspaper Certain newspaper preferences. Select the newspapers from the drop-down list Potentials Certain potential codes. Select the potential number of room nights/bookings from the drop-down list. Priority Certain priority codes. Select the priority codes from the drop-down list. Product interest Certain product interest codes. Select the product interest codes from the drop-down list. Scope Certain scopes such as National, International. Select the scopes from the drop-down list. Scope City Certain scope city codes. Select the scope city codes from the drop-down list. Source Certain source codes. Select the sources from the dropdown list. Specials Certain special codes. Select the special codes from the drop-down list. VIP Code Certain VIP codes. Select the VIP codes from the dropdown list. Rate Code Certain rate codes. Select the rate codes from the dropdown list. More Fields This option is only displayed if custom attributes have been defined. Click on the MORE FIELDS button to select from a list of user-defined attributes. Note: When this button is displayed in red it indicates that an attribute has been selected. Reservation Criteria Mailing This Field Is to limit a mailing to Groups Members of the specified groups. Select the group names from the drop-down list. Blocks Members of the specified blocks. Select the block names from the drop-down list. In-house Guests: From-To Guests who were in-house within the specified range of dates. 13 Arrival: From-To Individuals or companies who arrived within the specified range of dates. Departure: From-To Individuals or companies who departed within the specified range of dates. # of Nights: From-To # of Stays: From-To F F Individuals or companies with a number of room nights within the specified range. Includes also those checked in today. Select the option F to include future reservations. Individuals or companies who stayed at the hotel within the specified range. Includes also those checked in today. Select the option F to include future reservations. Forecast: From-To Individuals or companies whose forecasted revenue is within the specified range. Posted Revenue: From-To Individuals or companies whose posted revenue is within the specified range. Rate Code Certain rate codes. Select the rate codes from the drop-down list. Source Certain source codes. Select the source codes from the drop-down list. Market Certain market segments. Select the market segments from the drop-down list. More Fields Certain reservation attributes. Click on the MORE FIELDS button to select from a list of user-defined reservation attributes. Note: When this button is displayed in red it indicates that an attribute has been selected. Display only individuals linked to reservations If a company meets the query criteria then all individuals linked to that company will be displayed. Select this checkbox if you want to display only individuals from the company that are linked to the reservation. The default is not checked, i.e. display all individuals regardless if they are linked to this reservation or not. Conference Booking Criteria 14 This Field Is to limit a mailing to In house guests: From- To Individuals or companies that are already in house until the specified departure date. Arrival: From-To Individuals or companies that arrived within the specified range of dates. Departure: From-To Individuals or companies that departed within the specified range of dates. Conference Status Certain conference status codes. Select the conference status codes from the drop-down list. Room Status Certain room status codes. Select the room status codes from the drop-down list Mailing Account Manager Certain account managers. Select the account managers from the drop-down list. Conf. Manager Certain conference managers. Select the conference managers from the drop-down list. Rooms Manager Certain room managers. Select the rooms managers from the drop-down list. Market Certain market segments. Select the market segments from the drop-down list. Source Certain source codes. Select the source codes from the drop-down list. Display only individuals linked to booking If a company meets the query criteria then all individuals linked to that company will be displayed. Select this checkbox if you want to display only individuals from the company that are linked to the booking. The default is not checked, i.e. display all individuals regardless if they are linked to this booking or not. Tasks / Activities Criteria This Field Is to limit a mailing to Type Certain task/activity types. Select the task/activity types from the drop-down list. Start Date: From-To The task/activity start date is within the specified range of dates. End Date: From-To The task/activity end date is within the specified range of dates. Resp. Employee Certain responsible employees. Select the employees from the drop-down list. Description Tasks/Activities with this description. Display only individuals linked to activity If a company meets the query criteria then all individuals linked to that company will be displayed. Select this checkbox if you want to display only individuals from the company that are linked to the task/activity. The default is not checked, i.e. display all individuals regardless if they are linked to this task/activity. Completed / Uncompleted Select completed to include only completed tasks/activities. Select uncompleted to include only uncompleted tasks/activities. Creating an Advanced Mailing Query From the Advanced Query screen you can edit an existing query or create a new query. You can also copy an existing query and then edit it to make any changes necessary. The list of available queries can be ordered as required by using the up and down arrow buttons. The description field is mandatory otherwise all fields as detailed below are optional. Mailing 15 The default selections are as follows: To search for active profiles but not to include individuals whose profile is marked as 'No Mailing', however, this may be changed via the add/edit query definition dialog box. All information that is entered is considered as an AND relation. Values selected from the same drop down lists and the C + I flag are considered as OR. The reservation status DEFINITE is taken as the default when running a query where reservations are included. To create a new advanced mailing query 1. Click the menu option CRM and select MAILING, the mailing dialog box is displayed. 2. From the Mailing dialog box, select the tab ADVANCED QUERY. 3. Click NEW, the Definition of query dialog box appears. 4. In the QUERY DESCRIPTION box enter a name for the query. 16 Mailing 5. Click ADD to build the query, the Add/Edit query definition dialog box appears. 6. Complete the fields as detailed in the Add/Edit query definition and Mailing Operators tables below. 7. Date fields can be further defined via the Advanced Date Operator dialog box, see the table below. 8. Click OK. 9. Repeat from step 5 for each additional condition required. 10. Depending on the fields selected for the query additional options may be displayed when running a query for tasks & activities, conference bookings or reservations: Display only individuals linked to tasks, activities, conference bookings or reservations. If a company meets the query criteria then all individuals linked to that company will be displayed. Select this checkbox if you want to display only individuals from the company that are linked to an activity, task, conference booking or reservation. Future Nights - includes future nights in the query results. Only valid when running queries where reservations are included. Future Stays - includes future stays in the query results. Only valid when running queries where reservations are included. 11. When all conditions have been entered click OK. Note: The last defined condition must have no logical operator selected. Mailing 17 Add/Edit query definition dialog box This option Does this Left parenthesis Lets you select single or double left parenthesis if required. Usually required for complex queries such as (profiles with country=Germany and priority=A) OR (profile with country=Switzerland and priority=B). Views Lets you select the view the query should be based upon. Fields Lets you select specific fields for the query. C Select this checkbox to select if the criteria should be on the company profile level. Either company or individual must be selected if a field is selected which has the C and I checkboxes. Note: This checkbox is only displayed for certain query fields. I Select this checkbox to select if the criteria should be on the individual profile level. Either company or individual must be selected if a field is selected which has the C and I checkboxes. Note: This checkbox is only displayed for certain query fields. Operator Lets you select an operator such as, is exactly equal to, is less than, is an empty field, etc. See Operator table. Value Lets you select the valid options. The choices depend on the type of field selected: Option 1: Choice between 2 pre-defined values. Option 2: Choice from a list of pre-defined values such as country codes. Option 3: Entry of a free-format value, e.g. if the field selected is city then a valid value would be a city name such as Hamburg. Option 4: If the condition 'is an empty' field then the value field may be left blank. Right Parenthesis Lets you select single or double right parenthesis if required. Logical Operator Specifies the logical operator for the next connection. AND the first condition and the next condition must both be true. OR either the first or the second condition must be true. BLANK no logical operator selected. Mailing Operators table 18 This Operator May be used: Example is exactly equal to (Value is mandatory) This operator may be used for fields where the entry is selected from a list box or for fields which contain free-format text. Mailing Code is exactly equal to XMC will select only profiles that have the code XMC selected. Mailing Company Name 1 is exactly equal to Micros will select only profiles with the exact name Micros. Micros Fidelio will not be displayed as it is not the exact name. Mailing is not exactly equal to (Value is mandatory) This operator may be used for fields where the entry is selected from a list box or for fields which contain free-format text. Mailing Code is not exactly equal to XMC will select only profiles that do not have the code XMC selected. Company Name 1 is not exactly equal to Micros will select only profiles that do not have the exact name Micros. Micros Fidelio will be displayed as it is not the exact name. is an empty field (Value is not mandatory) This operator may be used for fields where the entry is selected from a list box or for fields which contain free-format text. Profile Mailing code is an empty field will select all profiles where no mailing code has been entered. Department is an empty field will select all profiles which have no value in the department field. is not an empty field (Value is not mandatory) This operator may be used for fields where the entry is selected from a list box or for fields which contain free-format text. Profile Mailing code is not an empty field will select all profiles where at least one mailing code has been entered. Department is not an empty field will select all profiles which have some value in the department field. is greater than (Value is mandatory) This operator may be used for value or date fields. It should not be used for fields where the entry is selected from a list box. Profile zip code is greater than 89000 will select all profiles with a zip code above 89000. Reservation Posted revenue is greater than 90,000 will select all reservations where the posted revenue is greater than 90,000. is greater than or equal to (Value is mandatory) This operator may be used for value or date fields. It should not be used for fields where the entry is selected from a list box. Arrival date is greater than or equal to 01.06.2006 will select all reservations where the arrival date is either on or after June 1st 2006. 19 20 is less than (Value is mandatory) This operator may be used for value or date fields. It should not be used for fields where the entry is selected from a list box. Profile zip code is less than 89000 will select all profiles with a zip code below 89000. is less than or equal to (Value is mandatory) This operator may be used for value or date fields. It should not be used for fields where the entry is selected from a list box. Arrival date is less than or equal to 01.06.2006 will select all reservations where the arrival date is either on or before June 1st 2006. is like (Value is mandatory) This operator is used to search fields where the entry in the field starts with the entered value. This operator may be used for fields which contain free-format text. It should not be used for fields where the entry is selected from a list box. Company Name 1 is like Fidelio will select only profiles which begin with Fidelio, e.g. Micros Fidelio will not be displayed because the name does not start with Fidelio. is not like (Value is mandatory) This operator is used to search fields where the entry in the field does not start with the entered value. This operator may be used for fields which contain free-format text. It should not be used for fields where the entry is selected from a list box. Company Name 1 is not like Fidelio will select profiles which do not begin with Fidelio, e.g. Fidelio Software will not be displayed because the name starts with Fidelio. contains text (Value is mandatory) This operator is used to search fields where the entered value is contained somewhere in the selected field. This operator may be used for fields which contain free-format text. It should not be used for fields where the entry is selected from a list box. Company Name 1 contains text Fidelio will select all profiles where Fidelio is contained anywhere in the name, e.g. both Micros Fidelio and Fidelio Software will be selected. not contain text (Value is mandatory) This operator is used to search fields where the entered value is not contained anywhere in the selected field. Company Name 1 does not contain text Fidelio will select all profiles where Fidelio is not contained anywhere in the name, e.g. Micros Fidelio and Fidelio Software would not be selected. Mailing This operator may be used for fields which contain free-format text. It should not be used for fields where the entry is selected from a list box. advanced date operator This operator enables the user to search for a date value, year only, month only, day and month or day, month and year. On the fields Birthday and Wedding Day the option Anniversary is available and additional options are displayed to include or exclude inhouse guests. Birthday advanced date operator month March will select all profiles where a birthday date has been entered for the month of March. Conference Booking advanced date operator year equals 2007 will select all profiles with a conference booking in 2007. On the field Birthday, activating the ANNIVERSARY check box, entering 50, 60 in the YEAR field and the required month in the MONTH field will select all profiles that have a 50th or 60th birthday in the specified month. Advanced Date Operator dialog box Mailing This Option Defines Anniversary Enables the definition of one or multiple years instead of entering a specific year. This could be used for anniversaries such as 50th or 60th birthdays. Note: This option is only available for the Birthday and Wedding Day fields. Year Defines the year for the date value. Multiple years may be entered separated by a comma. 21 Month Defines the month for the date value. Multiple months may be entered separated by a comma. Day Defines the day for the date value. Multiple days may be entered separated by a comma. All Includes all individuals regardless of whether they are in-house or not. Note: This option is only available for the Birthday and Wedding Day fields. In-house Includes in-house guests. Note: This option is only available for the Birthday and Wedding Day fields. Not In-house Excludes in-house guests. Note: This option is only available for the Birthday and Wedding Day fields. Running a Standard or Advanced Mailing Query 1. From the Mailing dialog box, select either the STANDARD QUERY or ADVANCED QUERy tab. 2. Highlight the query to be run. 3. Click the SELECT button; if there are saved wizard settings then you are prompted to use the saved wizard options. 4. Click YES to view the saved wizard options or NO to display a new query wizard dialog box. 5. If YES is selected then the Query Wizard History dialog box is displayed. 22 Mailing Note: Query Wizards which are no longer required may be deleted via the Query Wizard History dialog box by selecting the wizard and clicking the DELETE button. 6. Select the query wizard required and click OK, the mailing results screen is displayed. 7. If NO is selected then the Query wizard dialog box is displayed. Any pre-defined field lists are displayed; these are the lists of fields that are used for the mailing query results. Mailing 23 8. Click the FIELDS button to edit an existing field list or build a new one, see CONFIGURATION → SETUP → MISCELLANEOUS → MAILING for more details. 9. Select a FIELD LIST and click NEXT to display the profile criteria dialog box. The first field list will be taken by default if no other field list is selected. 24 Mailing 10. Mark the mailing option check boxes as required, the check boxes are explained in the table below. 11. Click NEXT, the query is run and a progress bar displays the status of the query, in addition the various stages of the query are displayed on top - Loading Data, Gathering Profiles, Validate Profiles and Links, Validate Family Members and Validate Address and Communications. 12. When the query finishes the query wizard displays the number of records found and the number of records matched. Number of records shows all selected records. Number of matched records shows the number of profiles that match the query. The number of records and the number of matched records could be different; for example, running a query for individuals with a certain action code, the mailing result will show both the number of individuals and the number of linked company profiles. Mailing 25 13. If a large number of records are found, a record range can be entered. To enter a range of records remove the check mark from the DISPLAY ALL checkbox field and complete the FROM and TO fields. 14. Click NEXT; you are prompted to 'Save current wizard settings?' Click YES to save the current wizard settings or NO not to save the wizard settings. 15. If you selected to save the wizard settings then the Wizard History dialog box is displayed. 16. Enter a DESCRIPTION for the wizard settings; the CREATION DATE is completed automatically with the current date. The Wizard History saves only the settings, so that the next time a query is run from the Wizard History all current records matching the query will be displayed. 17. Click OK, the mailing result screen appears. 26 Mailing The upper window of the screen shows the options that were used in the query. In the query results the values of the selected attribute categories will be displayed regardless if they have been used in the query or not, for example. A guest has the following attributes defined: The mailing query is setup to include the attribute code INFLUENCE equal to Decision Maker (DEC). The field list includes the fields INFLUENCE, ACTION CODES and PRODUCT INTEREST. In the mailing result the values of all three attribute categories are displayed in the result, however as the query included specifically the attribute value DECISION MAKER then this is displayed in brackets <DEC> indicating that it is part of the actual query. Mailing Records can be selected by selecting the check-box in front of the name or via the options MARK/UNM ALL or MARK/UNM SEL on the right hand side of the screen. 27 The selected mailing result can be exported to Word or Excel or sent via email by clicking the relevant button. Profile details may be viewed and edited via the EDIT PROFILE button. The button is not accessible if more than one profile is marked. If a profile is edited and changed so that it no longer meets the query criteria then a warning will be displayed, however the profile remains in the mailing result list. The profile can either be de-selected or the mailing query run again. If the profile criteria 'Display all linked individuals if company is selected' was selected then the buttons EXPAND and COLLAPSE can be used to expand or to collapse all linked individuals of all companies. By default these are not expanded. Clicking the and signs next to the company name expands and collapses the linked individual of the selected company. The profile HTML and tree may be viewed via the PROFILE INFO button. The button is not accessible if more than one profile is marked. Profile Criteria dialog box Select this checkbox To do this Linking Options Display matched individuals if company is selected If this option is selected individuals that are linked to a company and match the query will be shown in the result set. Display all linked individuals if company is selected If this option is selected individuals that are linked to a company will be shown in the result set. Example: If the query used was city=Hamburg and the company address is in Hamburg, but the address of the linked individual is not city=Hamburg, the linked individual will be shown as well. Display individuals without link to company If this option is selected individuals without a link to a company will be shown. Example: An individual without any company link with city=Hamburg will be displayed in the result set. Display company if individual is selected If this option is selected, the company that is linked to the individual will be displayed regardless of it meeting the query requirements. Example: Individual with city=Hamburg is linked to a company which has a city=Berlin. Due to the mailing query, the individual will be selected and if the option is selected the company will also be shown in the result set. Contact Preference This option defines which address preference should displayed and used in the mailing. Note: Only one or the other can be selected. Contact Preference Individual If this option is selected, the address entered on the individual level will be displayed in the result set. Contact Preference Company If this option is selected, the address entered on the company level will be displayed in the result set. Contact Persons 28 Mailing Mailing Contacts If this option is selected all individuals defined as mailing contacts will be selected Primary Contacts If this option is selected all individuals defined as primary contacts will be selected. Other If this option is selected all individuals other than mailing or primary will be selected Exclude non-mailing family members If this option is selected all family members which are not defined as family mailing contact will be excluded from the mailing. Note: This option is only available if the option 'Enable Family Wizard' is activated in Setup → Configuration → Global Settings → Profile Tab. Family greetings If this option is selected then the family address/letter greetings defined on the Family Wizard tab of the profile will be used in the mailing and not the individual address/letter greetings. Note: This option is only available if the option 'Enable Family Wizard' is activated in Setup → Configuration → Global Settings → Profile Tab. Address Check If this option is selected then only those profiles which match the query conditions and have an address (zip code and city) will be displayed in the query results. Email Check If this option is selected then only those profiles which match the query conditions and have an email address will be displayed in the query results. Sort By Users can define a sort order for each query by selecting it from the sort orders list, for example, users can define a sort order by country and then within the country by zip code and within the zip code in alphabetical order. Sort By 1. Click on the SORT ORDER button to display a list of defined sort criteria. 2. Choose the criteria required by selecting the checkboxes in the order required. 3. To change the sort order double-click on the column SORT ORDER and adjust the sort order number. 4. Right-click on the ORDER TYPE column to select whether the criteria should be sorted in ascending or descending order. The order of the fields that display the results is defined via the option LIST OF FIELDS under Configuration → Setup → Miscellaneous → Mailing. Creation of Activities At the same time as running a mailing, activities can be created for those that were included in the mailing. 1. Run a mailing as detailed in 'Running a Standard or Advanced Mailing Query'. 2. Select the records for which activities are to be created. Mailing 29 3. On the mailing results screen select ACTIVITIES, a message is displayed indicating how many activities will be created. 4. Click YES; the New Activity dialog box is displayed. 5. Complete the information as detailed in the table below. 6. Click OK to create the activities. Tip: Make sure the field DATE COMPLETED is filled in otherwise many unfinished activities may be created. 7. Continue with the mailing merge, create for example a follow-up activity or click CLOSE on the mailing result screen. 30 Mailing Activity Edit dialog box Fill in this field With this information Resp. Employee Employee for whom this activity belongs. Activity Type Type of Activity. Activity Description Free format field to further define the purpose of the activity or to give a description of activity. By default the field is completed with the activity type as defined in the previous field. All Day Event Checking this field will mark the activity as an all day event. An activity marked as an all day event is displayed at the top of the column under the date field and not on the grid itself. Check Availability Select this checkbox to check availability when an activity is entered. If this option is active then each time an activity is entered for the resp. employee for that day and time, the availability message is displayed. Start Date The starting date of the activity. Start Time The starting time of the activity. The default starting time is defined in the Global Settings → Profile 1 tab. End Date The ending date of the activity. End Time The ending time of the activity. The default ending time is defined in the Global Settings → Profile 1 tab. Show As Selecting an entry from this list box shows whether the activity is taking place out of the office, if the Sales Manager is busy or free, etc. Private Checking this field will mark the activity as private. Note: Functionality not yet implemented. Reminder A reminder can be set, ranging from 5 minutes to one month. Users then have the option to choose to 'Dismiss' or 'Snooze' the activity. The reminder is sent to the responsible manager and any assigned managers. Date Completed Date the activity was completed - select from calendar. Free format field to add any additional notes or information. The day, date, time and name of the logged in user can be added to the text of the note by pressing F7. Note: It is also possible to create activities for the future, for example, to make follow up calls. The field DATE COMPLETED should not be filled in this case. Merging to Word Selecting an existing document template: 1. Follow the steps for running a mailing as detailed in 'Running a Standard or Advanced Mailing Query'. 2. Mark the records to be included in the merge. Mailing 31 3. Click WORD, the Select document screen is displayed. Note: When the information is exported to e.g. Word, the file datasource.html is created automatically; this file is required to perform the mail merge and is stored in the path defined under Setup → Configuration → Global Settings → Workstation Defaults tab → Local Log Directory. During the merge to Word Fidelio requires that the first record in the datasource.html file be empty, this record is suppressed by default and in Word the mailing merge records start at number 2. 4. Select the required document template. 5. As the PREVIEW check box is selected by default then the document template is displayed in the preview window. The header and footer are not displayed in preview mode. 6. Click OPEN, MS Word opens the letter with the merge fields and automatically displays the mail merge toolbar. 7. If you are using Windows XP or Word2003 then the Select Table dialog box is displayed, click OK to close it. 32 Mailing 8. Select the button to view the merged data, move from record to record via the arrows . Note: The merged records start with record 2; record 1 is an empty record and is suppressed by default. 9. Make any changes required to the letter and then click the FINISH & MERGE icon, the merged results will then appear in a new document. 10. Print the merged letters. 11. To save the merged letters document click SAVE from the file menu in Word. 12. Allocate a name and select a location to save the document. Note: The following words and special characters may not be used in the file name when saving the document: CON, PRN, AUX , CLOCK$, NULCOM0, COM1..9, LPT0..9 and special characters: |, \, ?, *, <,", :, >, / 13. Click CLOSE, the Suite8 Select documents screen is displayed and you are prompted to save the document in the database. 14. Select NO, as you do not want to save the merged letter file in the Suite8 database, MS Word is closed automatically. 15. Click CLOSE to close the Select document screen. 16. Click CLOSE to close the Mailing Results screen, the main mailing is screen is displayed. Note: A dummy line is created in the datasource.html on top of the merge values passed to Microsoft. This is required due to Word interpreting the field zip code as a number if sorted by zip code and zip codes with letters were then displayed as 0. With this change zip codes are considered as a string value, the empty record is suppressed by default and the mailing record no. starts with 2 in Word. Merging to Excel 1. Follow the steps for running a mailing as detailed in 'Running a Standard or Advanced Mailing Query'. Mailing 33 2. Mark the records to be included in the merge. 3. Click EXCEL, MS Excel opens a worksheet showing the results of the merge. The columns listed are as defined in the selected field list. 4. To save the merged results click SAVE from the file menu in Excel. 5. Allocate a name and select a location to save the worksheet. 6. To close the worksheet, click CLOSE from the Excel file menu. 7. To close MS Excel click EXIT from the Excel file menu, the mailing results screen is displayed. Creation of email mailings Suite8 uses an internal mailing client, therefore all hotels, even if they do not have their own email system such as MS Outlook, will be able to use this feature. To use this feature the following files are needed: IPWORKS5.DLL (needs to be in the same directory as the MFMAIL.DLL) MFMAIL.DLL RegisterEDlls.bat (that registers the MFMAIL.DLL) Under Setup → Configuration → Global Settings → Generic tab, enter the email address of the property in the field HOTEL EMAIL. This email address will be used as the sender of emails. There are 2 ways of sending an email mailing: As body text - the text is then displayed directly when the email is opened. As an attachment – attachments are sent as a PDF files. An email mailing sent as an attachment can also use merge functionality and will be merged according to the email address, for example, a letter greeting can be used and will be displayed correctly for each email. Documents can be attached to the body of the email as follows: Selecting the required file via the Attachment button attached and it will be sent as is. - any type of file can be Selecting a document from the ATTACHMENTS column - these documents are sent as PDF files and can use merge functionality. How to create an email mailing 1. Follow the steps for running a mailing as detailed in 'Running a Standard or Advanced Mailing Query'. 2. Mark the records to be included in the merge. 3. Click the EMAIL button, the select document dialog box is displayed. 34 Mailing 4. The senders email address is taken from the global settings. 5. In the SUBJECT box enter the subject of the email. 6. Select the template to be used from the list displayed in the LETTERS / EMAIL BODY column or the ATTACHMENTS column. The PREVIEW TEMPLATE check box is selected by default, so the selected template is automatically displayed in the lower window. 7. Select the PREVIEW check box to preview the merged results of the email. Click the left and right buttons to page forwards and backwards through the merged records. 8. To attach a document to the body email there are two possibilities: Selecting the required file via the Attachment button be attached and it will be sent as is. Selecting a document from the ATTACHMENTS column - these documents are sent as PDF files and can use merge functionality. - any type of file can 9. To remove an attachment right-click on the attachment name and select DELETE ATTACHMENT, to remove an attachment document just de-select it. 10. Click SEND to activate sending, an 'Are you sure' message is displayed, click YES to continue with the sending of the emails or NO to cancel. The message: ‘Please wait while emails are being sent’ will display. Depending on the number of emails being sent this can take some time. The status of the emails can be checked under Miscellaneous → Logs → Email Log. Mailing 35 Note: The following Word Versions work with email mailings. Word 2002, Word 2003 + XP: all released Features. Word 2000: Picture & Logos are not getting sent. Creation of Documents and Attachments Templates and attachment documents may be created and stored for future use. The easiest and quickest way to do this is from the main mailing screen. From here you can directly access the document and attachment options. The exception to this would be if you need additional fields in which case you would have to create the query accordingly and then access the document templates option from the mailing results screen. A mailing query needs to be run at least once in order to create the file datasource.html. When the WORD button is pressed the data and field list from the last executed mailing are used. If the data of an actual mailing should be used then the required mailing query needs to be run. Create a new Document 1. Click the menu option CRM and select MAILING, the mailing dialog box is displayed. 2. From the Mailing dialog box, click the WORD button, the Select document dialog box is displayed. or Follow the steps for running a mailing as detailed in 'Running a Standard or Advanced Mailing Query' until the Mailing result screen is displayed and the profiles selected, then click the WORD button to display the Select document dialog box. 36 Mailing 3. To create a new Letter/Email body document click NEW next to the LETTER / EMAIL BODY column, to create a new attachment click NEW, next to the ATTACHMENTS column, MS Word opens a blank word document. Body documents are used for general letters and email mailings where the text should be displayed directly when the email is opened. Attachment document are used when the mailing is sent as a document attached to the email and not as text in the body of the email. 4. Depending on your Word settings the mail merge toolbar may be displayed automatically, if not, then on the Word View menu, point to TOOLBARS and then click CUSTOMIZE. 5. If you are using Windows XP or Word2003 then the Select Table dialog box is displayed, click OK to close it. Mailing 37 6. Select the INSERT MERGE FIELDS box. button to display the Insert Merge Field dialog 7. Select the merge field required and click INSERT, repeat for each field required and click CLOSE to close the dialog box. 8. Click the View Merged Data button to check the output. 9. Click the View Merged Data fields again. button a second time to display the merge Note: The document should be saved when the merge fields are displayed and not when the merged data is displayed; otherwise the merge data will be displayed when viewing the template preview. 10. Complete the document and then click CLOSE or EXIT from the file menu. Word is closed, the Suite8 Select document screen is displayed and you are prompted to save the document in the database. 38 Mailing 11. Click YES and enter a file name. At this point an Attachment document is saved as an rtf file and a Letter / Email Body document is saved as either an mhtml (Default) or an html file. The file is stored in the path defined in MAILING DOCUMENTS under Setup → Configuration → Global Settings → Workstation 5 tab. In addition for Body documents containing a header and or footer a directory containing a filelist.xml file and a header.html file are also created. Note: The file type *.mhtml is not valid for Word 2000. 12. The new body or attachment document is now listed in the Select document screen. 13. To view the document template mark the PREVIEW check box. 14. Click CLOSE to close the Select document screen, the main mailing screen is displayed. Note: If a document has been stored into the database and is deleted from the hard drive, it can be edited from within Suite8 and saved again. There are 2 possibilities for saving a body template document HTML - is faster and is recommended for documents with no embedded image logos. Text can be formatted but logos, headers & footers cannot be used. MHTML - web archive document where the images are compressed in the document, logos, headers & footers can be used. The file type *.mhtml is not valid for Word 2000. Note: It is not possible to save a document with a header/ footer as *.html - a warning will appear and word is opened again to save the document using the appropriate file extension. Mailing 39 Attachment documents can be saved as: RTF - which has the images encoded in the document, this is converted to *.PDF when sending emails. Attachment files that contain tables which have been drawn in tables are not displayed correctly when sent. How to copy a Document 1. Click the menu option CRM and select MAILING, the mailing dialog box is displayed. 2. From the Mailing dialog box, click the WORD button, the Select document dialog box is displayed. 3. Select the document to be copied from the list displayed in the LETTERS / EMAIL BODY or the ATTACHMENTS column. 4. Click COPY, the Copy Document dialog box is displayed. 5. In the DOCUMENT NAME box enter a name for the copied document. 40 Mailing 6. Select whether the new document should be copied as a LETTER / EMAIL BODY document or an ATTACHMENT. 7. Click OK, the copied document is displayed in the list of documents. 8. Click OPEN to edit the document. 9. If you are using Windows XP or Word2003 then the Select Table dialog box is displayed, click OK to close it. 10. Make the required changes to the copied document. 11. Click CLOSE, Word is closed, the Suite8 Select document screen is displayed and you are prompted to save the document in the database. 12. Click YES and enter a file name. 13. The new body or attachment document is now listed in the Select document screen. 14. To view the document template mark the PREVIEW check box. 15. Click CLOSE to close the Select document screen, the main mailing screen is displayed. How to edit a Document 1. Click the menu option CRM and select MAILING, the mailing dialog box is displayed. 2. From the Mailing dialog box, click the WORD button, the Select document dialog box is displayed. Mailing 41 3. Select the document to be edited from the list displayed in the LETTERS / EMAIL BODY or the ATTACHMENTS column. 4. Click OPEN to edit the document. 5. If you are using Windows XP or Word2003 then the Select Table dialog box is displayed, click OK to close it. 6. Make the required changes to the document. 7. Click CLOSE, Word is closed, the Suite8 Select document screen is displayed and you are prompted to save the document in the database. 8. Click YES and enter the same file name. 9. To view the document template mark the PREVIEW check box. 10. Click CLOSE to close the Select document screen, the main mailing screen is displayed. How to delete a document 1. Click the menu option CRM and select MAILING, the mailing dialog box is displayed. 2. From the Mailing dialog box, click the WORD button, the Select document dialog box is displayed. 3. Select the document to be deleted from the list displayed in the LETTERS / EMAIL BODY or the ATTACHMENTS column. 4. Click DELETE, a confirmation message is displayed. 5. Click YES to delete the document. Note: The document is deleted from the Suite8 database but remains on the hard drive. Letter Merge with a new or existing data file Using MS Word, mailing letters can be produced using a merged data file that contains all the required information. Either an existing letter template or a new letter template may be used. Merge a letter with a new or existing data file 1. Click the menu option CRM and select MAILING, the mailing dialog box is displayed. 2. From the Mailing dialog box, click the WORD button, the Select document dialog box is displayed. or Follow the steps for running a mailing as detailed in 'Running a Standard or Advanced Mailing Query' until the Mailing result screen is displayed and then click the WORD button to display the Select document dialog box. 3. To create a new body document click NEW next to the LETTER / EMAIL BODY column, to create a new attachment click NEW, next to the ATTACHMENTS column, MS Word opens a blank word document. 42 Mailing 4. In MS WORD open the letter that you want to use for the mailing. 5. On the mail merge toolbar click the SELECT RECIPIENTS EXISTING LIST to display the Select Data Source dialog box. button and select USE 6. Locate the datasource.html file and click OPEN. The datasource.html file is generated by Fidelio Suite8 when running a mailing query and is located in the directory defined in LOCAL LOG DIRECTORY under Setup → Configuration → Global Settings → Miscellaneous → Workstation Defaults 5 tab. Note: The directory C:\Documents and Settings\My Documents\ My Data Sources is opened by default, requiring the users to search for the datasource.html each time. To avoid this, a shortcut to the datasource.html can be created in the directory 'My Data Sources'. Users can then select the shortcut to locate the datasource.html. This shortcut has to be created manually on each workstation where it's needed. If the path in global settings is changed then the shortcut has to be changed accordingly. 7. Select the INSERT MERGE FIELDS box. Mailing button to display the Insert Merge Field dialog 43 8. Select the merge field required and click INSERT, repeat for each field required; click CLOSE to close the dialog box. 9. Complete the document and then either merge the data directly or click CLOSE or EXIT from the file menu. Word is closed, the Suite8 Select document screen is displayed and you are prompted to save the document in the database. 10. Click YES and enter a file name. At this point an Attachment document is saved as an rtf file and a Body document is saved as either an mhtml (Default) or an html file. The file is stored in the path defined in MAILING DOCUMENTS under Setup → Configuration → Global Settings → Workstation 5 tab. In addition for Body documents containing a header and or footer a directory containing a filelist.xml file and a header.html file are also created. Note: The file type *.mhtml is not valid for Word 2000. 11. The new body or attachment document is now listed in the Select document screen. 12. To view the document template mark the PREVIEW check box. 44 Mailing 13. Click CLOSE to close the Select document screen, the main mailing screen is displayed. Create Envelopes and Labels using Windows XP or Word2003 1. Click the menu option CRM and select MAILING, the mailing dialog box is displayed. 2. From the Mailing dialog box, click the WORD button, the Select document dialog box is displayed. or Follow the steps for running a mailing as detailed in 'Running a Standard or Advanced Mailing Query' until the Mailing result screen is displayed and then click the WORD button to display the Select document dialog box. 3. To create a new body document click NEW next to the LETTER / EMAIL BODY column, to create a new attachment click NEW, next to the ATTACHMENTS column, MS Word opens a blank word document. 4. On the mail merge toolbar select the START MAIL MERGE Main Document Type dialog box. button to display the 5. Select Labels and click OK, the Label Options dialog box is displayed. 6. Select the label type required and click OK, the label template screen is displayed. 7. Select the INSERT MERGE FIELDS box. Mailing button to display the Insert Merge Field dialog 45 8. Select the merge field required and click INSERT, repeat for each field required and click CLOSE to close the dialog box. 9. Click the Update Labels 46 button, all the labels are updated with the merge fields. Mailing 10. Click the View Merged Data button to check the output. 11. Click the View Merged Data fields again. button a second time to display the merge Note: The document should be saved when the merge fields are displayed and not when the merged data is displayed; otherwise the merge data will be displayed when viewing the template preview. 12. Click CLOSE or EXIT from the file menu. Word is closed, the Suite8 Select document screen is displayed and you are prompted to save the label template in the database. 13. Click YES and enter a file name. 14. The label template is now listed in the Select document screen. 15. Click CLOSE to close the Select document screen, the main mailing screen is displayed. Mailing 47 2 Deleting a document .......................... 36 Mailing Overview ..................................... 8 Merging to Excel ................................... 33 Merging to Word ................................... 31 Standard and Advanced Mailings ............ 7 Standard Mailing Creating a standard mailing ................. 9 Creation of tasks................................ 29 Running a standard mailing query ...... 22 A Advanced Mailing Creating an advanced mailing query ...... 15 Creation of tasks ................................... 29 D Documents and Attachments Mailing................................................... 36 E R Email Creation of email mailings ...................... 34 Requirements Roomplanner ........................................ 51 Excel Merging a Mailing .................................. 33 Roomplanner Requirements........................................ 51 L S Letter Merge Mailing Letters ....................................... 42 Merge a letter with an existing data file .. 42 Merge a new letter with an existing data file ......................................................... 42 Standard Mailing Creating a standard mailing ..................... 9 Creation of tasks ................................... 29 Running a standard mailing query ......... 22 M Mailing Advanced Mailing Creating an advanced mailing query .. 15 Creation of tasks ................................ 29 creation of email mailings ...................... 34 Documents and Attachments Copying a document .......................... 36 Creating a new document .................. 36 Index Index T Tasks Creating of mailing tasks ....................... 29 Templates Mailing Templates ................................. 36 W Word Merging a mailing .................................. 31 49 50 Index