1
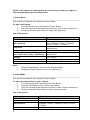
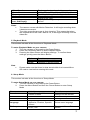
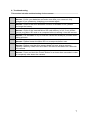
X7 Camera - Table of Contents Appendix – Installing the Camera to Your Car 1. 2. 3. 4. 5. 6. 7. 8. Introduction to the Full HD Car Camera a. System Requirements b. Features c. Unpacking the Camera d. About the Camera i. Front View ii. Top View iii. Back View iv. Rear View v. Button Description Getting Started a. Inserting a Micro SD Card b. Turning on the Camera c. Changing Modes Photo Mode a. List of Functions Video Mode a. List of Functions Playback Mode Setup Mode Other Modes Troubleshooting 1 Appendix – Installing the Camera to Your Car 1. 2. 3. 4. Install the camera a. Connect the magnet pole to the camera b. Then connect the suction cup to the magnet pole. Tighten the nut to secure it. Find a good area on your windshield to place the camera Push the buckle up to secure the suction cup to your windshield Adjust the camera position in order to get the best viewing position 1. Introduction to the Full HD Car Camera Read this section to learn about the features and functions of the Full HD Car Camera. This section also covers system requirements, package contents, and descriptions of the hardware components. (a) System Requirements The video camera requires a computer with the following specifications: Windows XP/2000/ME/98SE/Vista operating system Intel Pentium III 500 MHz CPU or higher Standard USB 1.1 port or higher 4x speed CD-ROM drive or higher At least 200MB of available disk space (b) Features The HD Car Camera offers a variety of features and functions such as: Auto Looping Video Recording, Max FHD (1920 x 1080) 100 ° Wide Angle Lens Digital Camera Function (Max 10 Mega Pixels) 2.0” Thin Film Transistor (TFT) Screen Built in lithium battery Image Anti-Shake Function Supports up to 32GB Micro SDHC memory card HDMI Video Output TV Output Unique Magnet Pole Design (c) Unpacking the Camera The following items should be included in the package. If any item is missing or appears damaged, contact your supplier immediately. 2 Car Camera USB Cable User Manual Car Charger Suction Cup (d) About the Camera Refer to the following to familiarize yourself with the buttons and controls of the car camera. (d1) Front View Magnet Pole USB Charger Port Lens (d2) Top View Car DVR Logo (d3) Back View Speaker Magnet Point Microphone Power Button Left Button Right Button Menu Button (d4) Rear View USB Port TF Slot HDMI Port TV Port (d5) Button Description Name Power Button Menu Button Left Button Right Button Function Holding the button Turns the power on/off Quickly pressing the button Shutter button Press to enter the Menu settings Pressing once Enters Video Mode Pressing twice Enters Playback Mode Press to go Left Press to go Right NOTE: This car camera comes with a 2.0” TFT Screen and four main function buttons. Pressing the Left and Menu button at the same time will reset the camera. 2. Getting Started This section covers basic functions such as turning the camera on, inserting memory cards, and configuring the preliminary settings. (a) Inserting a Micro SD Card Insert a Micro SD card with the label facing upwards. (b) Turning on the Camera Holding the Power Button down will turn the camera on/off. (c) Changing Modes There are a total of three main modes: Photo Mode Video Mode Playback Mode 3 NOTE: If the camera is connected to the car when you start your engine, it will automatically begin recording video. 3. Photo Mode This section includes all the functions of Photo Mode. To take a still image: 1. Turn the camera on by pressing the Power Button 2. Point the camera at the area/subject that you wish to take a picture of 3. Quickly press the Power Button to begin taking pictures List of Functions Mode Photo Mode Environment Exposure Image Resolution Capture Mode (Off, Self-Timer 2 sec., Self-Timer 10 sec., and Burst) Battery Status (Full, Half, Low, and Empty) Date Time Note: Function To take still pictures Settings for environment lighting: Auto, Daylight, Cloudy, Tungsten, Fluor H, Fluor L., Custom To adjust the light sources in the environment To change resolution settings To change timer settings for taking still pictures Displays remaining battery life on the TFT screen To change settings for the date To change settings for the time Press the Right Button once to enter Standby Mode. Holding the Power Button will turn the camera off. 4. Video Mode This section includes all the functions of Video Mode. To start recording video on your camera: 1. Turn the camera on by pressing the Power Button 2. Press the Left Button once to enter Video Mode 3. Point the camera at the area that you wish to take a video recording of 4. Quickly press the Power Button to being recording video List of Functions Mode Video Mode Seamless Mode Environment Date 4 Function To take video recordings 1 min, 3 min, 5 min, Off Settings for environment lighting: Auto, Daylight, Cloudy, Tungsten, Fluor H, Fluor L., Custom To change settings for the date Video Duration Movie Size Time Motion Detection SD Card Battery Status (Full, Half, Low, and Empty) Notes To change the duration of video recordings 1080p (30fps), 720p (60fps), 720 (30fps) To change settings for the time To turn motion detect on or off Status of SD Card Displays remaining battery life on the TFT screen The camera comes with Motion Detection. It will begin recording when it detects movement. The video recording process is Auto Looping. This means that when the inserted Micro SD card’s data is full, it will begin recording over the oldest file. 5. Playback Mode This section includes all the functions of Playback Mode. To enter Playback Mode on your camera: 1. Turn the camera on by pressing the Power Button 2. Press the Left Button twice to enter Playback Mode 3. Pressing the Menu Button will display settings. To confirm these settings, quickly press the Menu Button Mode Video Photo Function Playback of stored Video Playback of stored Photos Note Please make sure that there is data stored within the inserted Micro SD card to view before entering this mode. 6. Setup Mode This section includes all the functions of Setup Mode. To enter Setup Mode on your camera: 1. Turn the camera on by pressing the Power Button 2. Press the Menu Button and then the Power Button to enter Setup Mode Name Sounds Power Save Date & Time Language TV Output Selection Button Beep On/Off Volume Control Off, 1 min., 3 min., 5 min. YY/MM/DD English, Simplified Chinese, Japanese, Russian, Spanish, Korean NTSC, PAL Function Select the preferred sound settings for the camera Power Save options Settings for Date and Time Select menu language To select different TV Modes 5 Light Frequency Stabilizer 50HZ, 60HZ On, Off Format Yes, No Time Zones Country, Time System Information Frequency selection Image Stabilizer To format stored images and videos Select different country’s time zone Factory reset and information Note Setup Mode is available for both Photo and Video Mode 7. Other Modes This section includes all the functions of the modes that become available when the camera is connected to a computer. There are three other modes available when the camera is connected to a computer: Mode MSDC PC CAM WORK Function Connect to Mass Storage Mode Connect to PC CAM Mode Connect to Video Mode MSCC: To enter MSCC Mode 1. Turn the camera on by pressing the Power Button 2. Make sure that a Micro SD card with data is inserted in the camera 3. Plug the camera to a computer using the provided USB cable and select Mass Storage Mode by pressing the Power Button PC CAM Mode: To enter PC CAM Mode: 1. Turn the camera on by pressing the Power Button 2. Plug the camera to a computer using the provided USB cable and select PC CAM Mode by pressing the Power Button 3. You can now use the PC CAM WORK Mode: To enter WORK Mode: 1. Turn the camera on by pressing the Power Button 2. Plug the camera to a computer using the provided USB cable and select WORK Mode by pressing the Power Button 3. You can now use the WORK Mode 6 8. Troubleshooting This section includes troubleshooting for the camera. 1 2 3 4 5 6 7 Problem: My camera does not respond when I press the Power Button. Answer: Check your batteries and make sure that your camera is fully charged. If not, please try charging your camera again. Problem: My camera suddenly shut down. Answer: Check if the Auto-shutdown function is enabled. If not, please recharge the battery. Problem: My camera is not able to take still images or video recordings. Answer: Check if the inserted Micro SD card memory is full. If not, please format your Micro SD card on a computer before inserting it into the camera. Problem: The images taken on the camera are blurry. Answer: It is advisable to try to hold the camera as steady as possible when taking pictures. Problem: My Micro SD card does not work with the camera. Answer: Please format the Micro SD on a computer before use. Problem: My camera is unable to store images or videos. Answer: Please note that this camera does not have a large memory capacity. Memory cards such as a Micro SD card is advised to be used with this camera. Problem: I am unable to turn off my camera. Answer: Press and hold the Power Button for at least three seconds in order to completely shut down the camera. 7