1
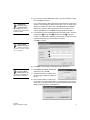
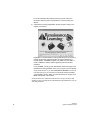
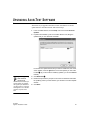
Software Installation Guide Renaissance Learning PO Box 8036 Wisconsin Rapids, WI 54495-8036 Telephone: (800) 338-4204 (715) 424-3636 Outside the US: 1.715.424.3636 Fax: (715) 424-4242 Email (general questions): [email protected] Email (technical questions): [email protected] Web Site: www.renlearn.com Copyright Notice Copyright © 2011 by Renaissance Learning, Inc. All Rights Reserved. This publication is protected by US and international copyright laws. It is unlawful to duplicate or reproduce any copyrighted material without authorization from the copyright holder. This document may be reproduced only by staff members in schools that have a license for AccelTest software. For more information, contact Renaissance Learning, Inc., at the address above. AccelTest, 2Know!, Accelerated Math, Advanced Technology for Data-Driven Schools, NEO, NEO 2, Renaissance, Renaissance Learning, the Renaissance Learning logo, Renaissance Place, Renaissance Receiver, and Renaissance Responder are trademarks of Renaissance Learning, Inc., and its subsidiaries, registered, common law, or pending registration in the United States and in other countries. Macintosh and QuickTime are registered trademarks of Apple Inc., registered in the US and other countries. Windows and Windows Vista are registered trademarks of Microsoft Corporation in the United States and/or other countries. InstallShield is a registered trademark and service name of InstallShield Software Corporation in the United States and/or other countries. Novell® is a trademark of Novell, Inc. UNIX is a registered trademark of The Open Group. Linux® is the registered trademark of Linus Torvalds in the U.S. and other countries. 6/2011 AT v.3.4 ATIG C ONTENTS Welcome . . . . . . . . . . . . . . . . . . . . . . . . . . . . . . . . . . 1 About This Manual . . . . . . . . . . . . . . . . . . . . . . . . . . . . . . . . . . . . . . . . . . . . . . . . . . . . 1 AccelTest and the 2Know! Classroom Response System . . . . . . . . . . . . . . . . . . . . . 1 About the 2Know! Toolbar . . . . . . . . . . . . . . . . . . . . . . . . . . . . . . . . . . . . . . . . . . . . . . 2 About the AccelScan Scanner. . . . . . . . . . . . . . . . . . . . . . . . . . . . . . . . . . . . . . . . . . . . 2 Things to Know Before Installing the Software . . . . . . 3 Default AccelTest Password . . . . . . . . . . . . . . . . . . . . . . . . . . . . . . . . . . . . . . . . . . . . . 3 Where to Find the System Requirements . . . . . . . . . . . . . . . . . . . . . . . . . . . . . . . . . . 3 Rights Required for the Program and Data Folders . . . . . . . . . . . . . . . . . . . . . . . . . 3 Rights Required to Use the Program . . . . . . . . . . . . . . . . . . . . . . . . . . . . . . . . . . . . . . . . . . 3 Rights Required for Data Folders. . . . . . . . . . . . . . . . . . . . . . . . . . . . . . . . . . . . . . . . . . . . .4 Installing AccelTest Software . . . . . . . . . . . . . . . . . . . 5 Windows Installation . . . . . . . . . . . . . . . . . . . . . . . . . . . . . . . . . . . . . . . . . . . . . . . . . . 5 Macintosh Installation . . . . . . . . . . . . . . . . . . . . . . . . . . . . . . . . . . . . . . . . . . . . . . . . . 5 Starting AccelTest after Installation . . . . . . . . . . . . . . 6 Upgrading AccelTest Software . . . . . . . . . . . . . . . . . . 9 C o n n e c t i n g A c c e l Sc a n t o Y o u r C o m p u t e r . . . . . . . . . 10 A c c e l T e s t S i t e L i c e n s e . . . . . . . . . . . . . . . . . . . . . . . 11 AccelTest Software Installation Guide i ii AccelTest Software Installation Guide W ELCOME About This Manual This manual explains how to install the AccelTest test creation, scoring, and gradebook software and how to connect an AccelScan scanner to your computer. If you have additional questions or need more information about AccelTest or other Renaissance Learning software, you can email us at [email protected]. For technical support, email questions to us at [email protected]. AccelTest and the 2Know! Classroom Response System AccelTest is designed to work with the optional 2Know! classroom response system, which includes a Renaissance Receiver and Renaissance Responders. This system encourages student participation, and it gives teachers instant information about student work on assignments. To connect the Receiver to your computer and set up the Responders, see the 2Know! Setup and Resource Guide. To find out how to use Responders with AccelTest, refer to the User Manual that is installed with AccelTest. NEO 2s can also be used with a Renaissance Receiver in place of (or in addition to) Renaissance Responders for any program that works with Responders. AccelTest Software Installation Guide 1 The 2Know! classroom response system works with one program at a time. If you are using the system with more than one program (such as AccelTest and the 2Know! Toolbar), the Receiver and Responders will only recognize the program that you started first. The 2Know! classroom response system can also be used by other programs, including the 2Know! Toolbar. Refer to the manual or instructions for the program you’re using to find out how to use Renaissance Responders with that program. About the 2Know! Toolbar To ask short answer questions, you must select a 2Know! Toolbar theme that includes a Short Answer button. The 2Know! Toolbar program can also be used with the classroom response system. This program makes it easy for you to get quick feedback from your students (or another group). You can ask true/false, multiple-choice, numeric-response, pulse, or short-answer questions verbally and get realtime responses from students who are using Responders or NEO 2s. You can also view a graph that shows student responses and allows you to select the correct response. You can install the 2Know! Toolbar from the CD included in your 2Know! Setup and Resource Guide. You will also find instructions for the Toolbar in that guide. About the AccelScan Scanner You may also have purchased one or more AccelScan scanners, which you can use to score student responses to some assignments. To use the scanner, you have students fill in their answers on score cards, which you then insert into the scanner for scoring. See page 10 to find out how to connect the AccelScan scanner to your computer. The AccelTest User Manual, which is installed with AccelTest, explains how to use the scanner to score assignments. 2 AccelTest Software Installation Guide T HINGS TO K NOW B EFORE I NSTALLING THE S OFTWARE De fault Acc elTe st Pass word The first time you log into AccelTest, you will need to use the default administrator password, which is admin. After you log in, you can change the password using the Password preference; for more information, refer to the User Manual that is installed with AccelTest. Where to Find the System Requirements Before you install AccelTest software on your classroom computer, make sure your computer meets the minimum hardware and software requirements. For the latest system requirements, visit www.renlearn.com/requirements and go to the 2Know! requirements. If you have questions, email us at [email protected]. Rights Required for the Program and Data Folders Rights Required to Use the Program Windows XP, Vista, and Windows 7 Computers AccelTest users need at least read access to the AccelTest program folder, and they need full access to the Renaissance Learning and Renaissance Wireless Server folders in Documents and Settings\All Users\Application Data for Windows XP or in the ProgramData folder on Windows Vista and Windows 7 computers. Windows Vista and 7 users also need full access to the Users\<user name>\Application data\Roaming\AccelTest\ folder. Macintosh OS 10 Computers AccelTest users need at least read access to the AccelTest program folder. The Owner, Group, and Everyone must have Read and Write permissions to the Renaissance Learning and Renaissance Wireless Server folders in Library : Application Support. They also need full access to the Users : <user name> : Library : Application Support : AccelTest folder. AccelTest Software Installation Guide 3 Ri ghts Required for Data Folders For Data Folders on a Network • Windows 2000 Server, Windows Server 2003, and Windows Server 2008 Networks: Grant the Modify permission to the data folder on your network, including all files. If you want to assign specific rights to the folder, make sure you include the Read, Write, and Delete permissions. • Novell Networks: Grant the following rights to the data folder on your network, including all files: [RWCEMF] (read, write, create, erase, modify, and file scan). • Unix/Linux Networks: Grant the following permissions to the data folder on your network (including all files) for the owner, group, and others: Read, Write, and Execute (drwxrwxrwx). If you have a group created for students and teachers, you can grant the Read, Write, and Execute permissions to the owner and to that group only (drwxrwx---). • OS 10 Networks: Grant the following permissions to the data folder on your network (including all files) for the Owner, Group, and Everyone: Read and Write. If you have a group created for students and teachers, you can grant the Read and Write permissions to the owner and to that particular group only. For Data Folders on Local Computers • Windows XP, Windows Vista, and Windows 7 Computers: If you put your data folder on your computer, but not in the default location, make sure you have full access to the data folder. • OS 10 Computers: If you put your data folder on your computer, but not in the default location, grant the Read and Write permissions for the Owner, Group, and Everyone. If you have a group created for students and teachers, you can grant the Read and Write permissions to the owner and to that particular group. 4 AccelTest Software Installation Guide I NSTALLING A CCEL T EST S OFTWARE To install AccelTest software see the instructions below for your type of computer. Important: If you want to upgrade from a previous version of AccelTest, see page 9. Windows Installation The AccelTest User Manual is installed with the AccelTest software. To open it, click Start Programs AccelTest User Manual. (You will need Adobe Reader installed to view the manual; if you don’t have it, you can download Adobe Reader at www.adobe.com.) 1. Insert the AccelTest CD into your computer. 2. If the AccelTest installation Wizard starts automatically, go on to step 3. If not, view the contents of the CD; then, double-click setup.exe. 3. When the Welcome panel of the AccelTest installation Wizard appears, click Next >. 4. Click Install to begin the installation. The installation progress will be shown. 5. Click Finish in the AccelTest installation wizard. To start AccelTest, see page 6. Note: QuickTime is no longer installed automatically with the AccelTest software because AccelTest itself supports the most common graphic formats. If you need to support additional formats or convert graphics, you can still install QuickTime from the AccelTest CD. Simply open the Extras\QuickTime\ folder on the CD and double-click QuickTimeInstaller.exe. Macintosh Installation The AccelTest User Manual is installed with the AccelTest software. To open it, open the Applications folder on your hard drive; then, open the AccelTest folder and doubleclick the file named ATSoftwareManual.pdf. 1. Insert the AccelTest CD into your computer. 2. If the AccelTest window does not open automatically, double-click the AccelTest CD icon on your desktop to view the contents of the CD. 3. Double-click AccelTest Installer. 4. If the program asks you to enter your password, enter the administrator password for this computer; then, click OK. This shows that you have the permissions required to install the software. 5. On the Welcome panel of the Installer, click Install. AccelTest Software Installation Guide 5 6. If the computer must be restarted, a message will notify you. Click Restart to restart the computer now or Continue to perform other tasks before restarting the computer. If a restart is not necessary, click Quit when the installation is complete. To start AccelTest, see the instructions below. S TARTING A CCEL T EST A FTER I NSTALLATION Follow these steps to start AccelTest: 1. Windows: Click StartProgramsAccelTestAccelTest. Macintosh: Open the AccelTest folder in your Applications folder. Doubleclick AccelTest A in that folder. If you select a data location somewhere else, you can choose a data location that you have already created, or you can create a new data folder. Although you can select the same data location that someone else is using, please note that only one person can use AccelTest with that data at any given time. 6 A 2. When the Data Location Preference opens, click one of the options. Then, click Next. AccelTest Software Installation Guide 3. If you chose to use the default data location, you will be asked to confirm this. Click Next to continue. On Macintosh computers, if you select a network data folder, make sure you connect to that network using an afp connection. If you chose to select a data location that is somewhere else, a dialog box will open. Find and open the folder that you want to use, or create a new folder in the location you prefer. Then, click OK (Windows) or Choose (Macintosh). Check the data location shown on the next panel. If it is correct, click Next. (If not, click Back to choose a different location.) 4. If AccelTest hasn’t been registered before for this data location, enter the serial number B, school name C, and teacher name D. The serial number is on a label that is attached to the CD case. It is also on the onepage instruction sheet you received with the software. Click OK to continue. Type the serial number carefully. Be careful not to confuse “Z” and “2,” “I” and “1,” “S” and “5,” or “O” and “0.” B C D 5. Click Done in the Summary for the Data Location Preference. After you log in, you may see a What’s New popup that tells you what has changed in the latest AccelTest release(s). 6. Enter admin (the default administrator password). Then, click OK. 7. AccelTest will check for updates. (See the next page for details if updates are found.) 8. Next, decide whether you want to set up the school year and click the button you prefer. When you set up the school year, you enter the school year and term dates that will be used for assignments and grades in the Gradebook. AccelTest Software Installation Guide 7 For more information about setting up the school year, refer to the information about the School Year preference in the AccelTest User Manual. 9. A Renaissance Learning Registration window will open, asking you to register your software. Registration on the Renaissance Learning Web site gives you access to product tips and other useful information as well as notifications of product updates. Click Now to register now, Later to be reminded in 2 weeks, or Never to continue without registering and without further reminders. If you click Now, you will go to the Renaissance Online Plus page on the Renaissance Learning Web site. There, you can log in if you have already set up a free account, or you can click Create an Account to set one up now. After you log in, you can select your products and the information you would like to receive. When you have submitted your changes, click Done at the bottom of the window. See the AccelTest User Manual to find out how to set up your classes and students, create your assignments, and add them to the Gradebook so you can start using AccelTest. 8 AccelTest Software Installation Guide U PGRADING A CCEL T EST S OFTWARE The easiest way to upgrade to the latest version of AccelTest is to use the update feature in the software itself. Follow these steps: 1. In the AccelTest software, click the Help menu and choose Check for Updates. 2. If updates are available, you’ll see a window like this one, listing the updates that you can download and install. A B If more than one update is listed, and you want to install some, but not all, of the updates, check the Ignore box next to the updates you don’t want to install A. (If you don’t want to install any updates, you can click Cancel instead.) If you are upgrading from AccelTest version 2.x to version 3.x, the next time you start AccelTest, the software will upgrade your database for use with version 3.x using the Data Migration Tool. The data migration may take some time. AccelTest Software Installation Guide 3. Click Download B. 4. Read and respond to the prompts on the screen to download and install the update(s). When you have finished, you will return to the Auto Update window. 5. Click Done. 9 C ONNECTING A CCEL S CAN TO Y OUR C OMPUTER Follow these steps to connect the AccelScan scanner to your computer. 1. For AccelScan models 2110 and 2210 or model 1100 Serial, plug the round connector on the AccelScan power cable into the matching port on the AccelScan, and plug the scanner into an electrical outlet. For AccelScan model 1100 USB, you received a power cord and a power supply box with a cable attached. Connect the power cord to the power supply box. Then, plug the small round connector into the AccelScan, and plug the power cord into an electrical outlet. 2. Connect the data cable coming from the AccelScan to the matching port on your computer. If the data cable has a USB connector, attach it to a USB port on your computer. If the data cable has a serial connector, do the following: • For Windows Computers: Attach the 9-pin serial port adapter to the end of the AccelScan cable and then attach the cable to your computer. • For Macintosh Computers: Connect the data cable to an 8-pin female serial port on your computer, such as the printer or modem port. 3. For AccelScan model 1100 USB, see the User’s Guide that came with your scanner to install the AccelScan drivers. 10 AccelTest Software Installation Guide A CCEL T EST S ITE L ICENSE Please read this License carefully before installing the enclosed software. By breaking the seal on this package and using the enclosed software, your organization (“Licensee”) agrees to be bound by the terms of this License. If your organization does not agree to these terms, return the software and materials to Renaissance Learning, Inc., (“RL”) for a refund. AccelTest Software Installation Guide 1. Grant of License. RL grants Licensee a non-exclusive, nontransferable license to use the enclosed software, which software may include embedded third-party software licensed to RL (“Software”). 2. Restrictions. Licensee shall have the right to install and use the Software on any and all stand-alone personal computers at a single “Site.” Site means a single building or a single campus wherein the buildings are less than 150 feet apart. Licensee shall not make the Software available in whole or in part in any other networked or timesharing environment. Licensee may make a backup or archival copy of the Software but may not otherwise copy any portion of the Software or translate, reverse-engineer, disassemble, or decompile it. In addition, Licensee may install on home computer for use related to licensed site needs. 3. Ownership. All rights in the Software and RL Content are owned, licensed by, and retained by RL. The Software and RL Content are protected under U.S. and international copyright laws and the source code of the Software is a trade secret of RL. Neither the Software nor the Licensee’s rights or obligations under this License may be sublicensed, leased, rented, distributed, assigned, or transferred in whole or in part to any third party. All RL Content provided with the Software shall be used solely by and within the Licensee. RL Content shall not be given away, posted, leased, sold, or licensed for use by any third party. RL Content shall not be used in conjunction with software other than that provided or authorized by RL. Licensee shall be prohibited from capturing or extracting RL Content by any means, or using content for any purpose other than the designated requirements of the product. 4. Term. This License is effective upon receipt by Licensee of the Software. Licensee may terminate this License at any time by returning all copies of the Software to RL. RL may terminate this License if the Licensee breaches any term of this License. Upon termination, Licensee will return all copies of the Product, and any portions there of, to RL or destroy the same and certify in writing to RL that it has done so. 11 12 5. Limited Warranty. RL warrants that, for a period of 30 days from the delivery (the “Warranty Period”), the Software will perform substantially in accordance with any accompanying written materials. This Limited Warranty is void if the failure of the Software results from accident, abuse or misapplication. If, during the Warranty Period, a defect appears, Licensee may return the Software to RL for replacement or refund at RL’s discretion. RL does not warrant the completeness or accuracy of any information contained in the Software, or that the use of the Software will meet Licensee’s needs or that its use will be uninterrupted or error free. THE FOREGOING CONSTITUTES LICENSEE’S SOLE AND EXCLUSIVE REMEDY FOR BREACH OF ANY WARRANTIES (EXPRESS OR IMPLIED) MADE UNDER THIS LICENSE. EXCEPT FOR THE WARRANTIES SET FORTH ABOVE, THE PRODUCT IS LICENSED “AS IS,” AND RL DISCLAIMS ANY AND ALL OTHER WARRANTIES, EXPRESS OR IMPLIED, INCLUDING WITHOUT LIMITATION ANY IMPLIED WARRANTIES OF MERCHANTABILITY, FITNESS FOR A PARTICULAR PURPOSE, TITLE AND NON-INFRINGEMENT. NO RL DEALER, DISTRIBUTOR, AGENT OR EMPLOYEE IS AUTHORIZED TO MAKE ANY MODIFICATION OR ADDITION TO THE FOREGOING WARRANTY. 6. Limitation of Liability. Licensee assumes responsibility for the selection of the Software to achieve its intended results, the use and acquisition of other software and/or equipment compatible with the Software, and the installation, use, and results obtained from the Software. INAS MUCH AS THE PRICE PAID FOR THE LICENSE RIGHTS GRANTED TO USE THE SOFTWARE MAY BE DISPROPORTIONATE TO THE VALUE OF PRODUCTS TO BE USED WITH THE SOFTWARE, AND TO LIMIT THE LIABILITY AGAINST RL TO AN AMOUNT REASONABLY PROPORTIONATE TO THE VALUE OF THIS TRANSACTION, LICENSEE AGREES THAT RL’S AND ITS LICENSOR’S CUMULATIVE LIABILITY TO LICENSEE AND ALL OTHER PARTIES FOR ANY LOSS OR DAMAGES RESULTING FROM ANY CLAIMS, DEMANDS, OR ACTIONS ARISING OUT OF OR RELATING TO THIS LICENSE SHALL NOT EXCEED THE FEE PAID BY LICENSEE FOR THE USE OF THE PRODUCT. RL SHALL NOT BE LIABLE FOR: (A) ANY LOSS OF USE OF LICENSEE’S COMPUTERS OR LOSS OR CORRUPTION OF DATA OR THE COSTS OF SYSTEM OR DATA RECOVERY; (B) ANY THIRD PARTY CLAIMS; OR (C) FOR ANY INDIRECT, SPECIAL, PUNITIVE, EXEMPLARY, INCIDENTAL, OR CONSEQUENTIAL DAMAGES OR LOST PROFITS, WHETHER BASED ON CONTRACT, NEGLIGENCE, STRICT LIABILITY, OR OTHERWISE, EVEN IF RL HAS BEEN ADVISED OF THE POSSIBILITY OF SUCH DAMAGES. AccelTest Software Installation Guide 7. Export Law Assurance. You may not use or otherwise export the Software except as authorized by U.S. law. In particular, but without limitation, the Software may not be exported (i) into (or to a national or resident of) any U.S. embargoed country (ii) to anyone on the U.S. Treasury Department’s list of Specially Designed Nationals or the U.S. Department of Commerce’s Table of Denial Orders. By using the Software you represent and warrant that you are not located in, under control of, or a national or resident of any such country, or on any such list. 8. Governing Law. This License shall be governed by the laws of the State of Wisconsin. 9. Complete Agreement. This License constitutes the entire agreement between the parties with respect to the Software. 8/10 AccelTest Software Installation Guide 13 14 AccelTest Software Installation Guide P.O. Box 8036, Wisconsin Rapids, WI 54495-8036 Phone: (800) 338-4204 Email: [email protected] Web: www.renlearn.com ATIG.0611