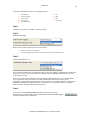
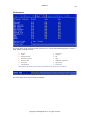
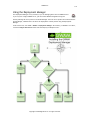
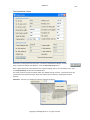
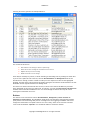
1
GWAVA 3.6 GWAVA 3.6 Installation Guide & User Manual Copyright © 2005 Beginfinite Inc. All rights reserved. i GWAVA 3.6 ii Getting Started ................................................................................................. 1 Introduction .............................................................................................................................. 2 Recommended Settings ................................................................................................................. 3 The GWAVA Manager .........................................................................................14 About .....................................................................................................................................16 Demo Options ....................................................................................................................16 Request Support..................................................................................................................16 Generate Install Report .........................................................................................................16 Licensing .................................................................................................................................21 Virus Scanning ...........................................................................................................................24 Oversized Messages.....................................................................................................................26 Attachment Blocking ...................................................................................................................27 Fingerprinting ...........................................................................................................................29 Content Filtering........................................................................................................................31 RBL/SuRBL ...............................................................................................................................34 Spam Heuristics .........................................................................................................................37 Address Blocking ........................................................................................................................42 Archiving .................................................................................................................................44 Exceptions ...............................................................................................................................49 Post Office Scan.........................................................................................................................52 Logging...................................................................................................................................62 Location of Files ........................................................................................................................70 Server Profile............................................................................................................................73 Surveillance .............................................................................................................................74 Notify Options ...........................................................................................................................77 Miscellaneous............................................................................................................................84 Advanced ................................................................................................................................88 Configuring Your AV Scanner ................................................................................92 Specific AV NLM configuration instructions..........................................................................................94 Notes on the Switches Placed in the MTA Startup File...................................................99 The GWAVA Program Interface ............................................................................ 100 The Import Tool ............................................................................................. 106 Using the Profile Manager.................................................................................. 111 Using the Deployment Manager ........................................................................... 116 The Deployment Manager............................................................................................................ 116 The Deployment Manager............................................................................................................ 117 GWAVA Quick Reference Sheet ..................................................................................................... 120 Copyright © 2005 Beginfinite Inc. All rights reserved. GWAVA 3.6 iii The Archive Viewer ......................................................................................... 122 Starting the Archive Viewer ......................................................................................................... 123 Folder Mode ........................................................................................................................... 129 SQL mode .............................................................................................................................. 130 Prompts ................................................................................................................................ 131 The Building Query window ......................................................................................................... 132 Using the Archive Viewer ............................................................................................................ 135 Smart Blocker................................................................................................ 144 Installing GroupWise Client Export Spam module ................................................................................ 145 Getting Started with the Assistant ................................................................................................. 148 The Optimization Screen ............................................................................................................ 149 What is Optimization in GWAVA Anti-spam?....................................................................................... 153 Vectors ................................................................................................................................. 161 Appendices ................................................................................................... 167 ConsoleOne ............................................................................................................................ 167 Configuring GWAVA 3 in a Clustered Environment (Updated)................................................................... 170 Templates and Variables............................................................................................................. 172 Additional Notification Templates Notes .......................................................................................... 174 The Tadmin.822 template ........................................................................................................... 177 Metavariables used in GWAVA 3 .................................................................................................... 190 Fingerprint Description ID file....................................................................................................... 202 Copyright © 2005 Beginfinite Inc. All rights reserved. GWAVA 3.6 1 Getting Started About GWAVA This manual is intended for IT administrators in their use of GWAVA or anyone wanting to learn more about GWAVA. It includes installation instructions and features descriptions as well as detailed instructions for the operation of GWAVA. GWAVA 3 is a powerful anti-virus agent, antispam filter, and content monitoring package designed for use with Novell GroupWise. GWAVA 3 defends against the spread of virus-infected email, prevents the receipt of unwanted Spam, blocks unwanted file attachments, filters and provides surveillance of messages for restricted or inappropriate content, prevents the transfer of oversized messages that could cause mail server performance issues, and more. GWAVA 3 is installed on each of your MTAs to protect your entire GroupWise environment (including post offices) from virus infection, to automatically administer corporate e-mail policies, and manage message archiving for compliance auditing needs. Technical Support If you have a technical support question, please consult the GWAVA Technical Support section of our website at http://www.gwava.com/. Your copy of GWAVA includes 30 days or three incidents (whichever comes first) of complimentary technical support. E-mail [email protected] Copyright Notices Technical support: (801) 437-5678. The content of this manual is for informational use only, and may change without notice. Beginfinite Inc. assumes no responsibility or liability for any errors or inaccuracies that may appear in this documentation. GroupWise is a registered trademark of Novell, and is copyrighted by Novell. Sales To contact a Beginfinite sales team member, please e-mail [email protected] or call Tel: 866GO-GWAVA (866-464-9282) in North America or +1 514 639 4850. Corporate Headquarters 100 Alexis Nihon Blvd., Suite 500 Montreal, Quebec, H4M 2P1, Canada This product includes software developed by vbAccelerator (http://vbaccelerator.com/). © 2005 Beginfinite Inc. All rights reserved. ® GWAVA is a registered trademark. TM SmartBlocker is trademarked. v-36i Copyright © 2005 Beginfinite Inc. All rights reserved. GWAVA 3.6 Introduction GWAVA is an anti-spam and anti-virus security layer for your GroupWise Messaging System. GWAVA is installed on your MTA server, where it manages AV scanning of messages, blocks Spam, blocks attachments, and filters message content. GWAVA provides better AV protection at a lower level than other perimeter AV solutions, protecting and filtering messages sent to, from, and within your domain. Capabilities include: Defending against e-mail virus attack Preventing receipt of unwanted spam Blocking attachments and oversized messages Filtering message content Archiving messages (and an integrated archive viewer with a secure browser) Notifying system administrator when a message triggers a GWAVA filter (optional) Multi-server deployment and management E-Mail surveillance and monitoring GWAVA is the most complete message scanning and filtering solution available for Novell’s GroupWise. Copyright © 2005 Beginfinite Inc. All rights reserved. 2 GWAVA 3.6 3 What is New in GWAVA 3.6 Kaspersky AV integration with its own 30-day evaluation demo Support for SuRBL ‘Find Mistakes’ feature in SmartBlocker helps identify problems with your ham/spam corpus which may prevent effective spam blocking Profile Manager and Deployment Manager now incorporated into the GWAVA configuration program. Archive File Name can now be specified in the search scope menus of the Archive Viewer Digest reports of blocked spam Improved multiple monitor support for MConfig, PMAN, DMAN and Arcview - Support for multiple monitors and complete saving/restoring of coordinate system for windows Installation Wizard improvement makes suggestions for optimizing your GWAVA installation Improved SmartBlocker speed: server-side compiles of PCRs are three to five times faster and take onetenth the memory. Password encryption Improved ruleset and score processing Improved cluster support Installation Report generation: with one click, GWAVA lists an inventory of all files in its installation Back end and front end redesigned interfaces. The backend features much more statistical information. The front end is much more quickly navigable thanks to mouse wheel support and keyboard navigation of buttons. GroupWise address book integration Redesigned and powerful Notification Templates, supporting tremendously increased functionality via a metalanguage, and supporting HTML/Text, customizable subjects and per event information, all fully localizable Scheduled Output - allowing you to schedule outputs or e-mails of specific information at times you request. This replaces the daily reports option. Event Logging - allowing nearly unlimited control of specific information you want outputted when events occur. This replaces the event.log schema used in earlier versions of GWAVA. Archive override control (per item per event basis) Spam Tagging or “Catch and Release” Event Order/Break on Event Multiple Event firing Decompress before everything occurs Archive Viewer: o SQL Integration permits fast and flexible searching, filtering, and sorting. o Speed enhancements o Web Browse html, jpeg, gif files in a safe browser interface (ActiveX, cookies, java, javascript are disabled) o o o o o o Block or view password protected Zip attachments and extract the contents. Open SpamID files directly. WhiteList/BlackList Export to HTML Submit as Spam/Ham to SmartBlocker Manager™ Search for text in columns SmartBlocker Manager™, a new technology for editing and creating spam rules. This includes a powerful iterative score generator. The PCR files created by SmartBlocker Manager are loaded much faster than compiling the rules from scratch. More granular control over archiving in general, including an on/off Archive when no events occurred. Prune/Control Spam ID and Archive files Supports GWAVA running in directories other than SYS:SYSTEM (particularly useful for clustering) Improved persistent install options Support for Protected Memory Import Tool—an easy way to install previously existing exceptions and customizations Copyright © 2005 Beginfinite Inc. All rights reserved. GWAVA 3.6 2 For a complete list of changes, consult C:\PROGRAM FILES\BEGINFINITE\GWAVA\README.TXT or visit www.gwava.com. System Requirements NetWare 5.1, 6.0, 6.5. Regular and Small Business editions supported. Disk space usage is 50 MB on the workstation, 48 MB on the server. (This excludes archive and log files, as well any spam/ham corpus built.) Most of this space is taken by the compiled .pcr file, which is optional (but greatly decreases the load time of the antispam engine) Memory usage on the server is about 8 MB without the anti-spam engine, and 38 MB with the anti-spam engine active A third-party anti-virus scanner product installed on the server (optional, for virus scanning). Alternatively, the integrated Kaspersky scanner included with GWAVA can be used for an additional fee after 30 days of evaluation. GWAVA must be installed on the same server as your Message Transfer Agent (MTA). The GroupWise MTA must be version 5.5.2 or greater (06/99 date stamp). 5.5 Enhancement Pack, GroupWise 6.0 and GroupWise 6.5 are all supported. The GroupWise MTA must be local to its domain. TCP/IP must be installed and configured on the servers running GWAVA even if the MTA is using UNC links to domains Long filename support must be enabled on the server with the GWAVA directories. /Attachmsg must be in the GWIA.CFG. It is by default. We STRONGLY recommend the latest GroupWise patches are applied to your system. At press time these were: GroupWise 5.5 (non-EP) SP5 GroupWise 5.5 (EP) SP5 (see Recommended Settings) GroupWise 6.0 SP4 GroupWise 6.5 SP5 GroupWise 7.0 No patches at this time Copyright © 2005 Beginfinite Inc. All rights reserved. GWAVA 3.6 3 Recommended Settings Internet Addressing should be enabled. This is set in the Internet Addressing options under GroupWise System Operations in NWADMIN or ConsoleOne. If this is not enabled, GWAVA may not be able to send notification messages to the system administrator (or to other notification recipients). To allow GWAVA to send notifications and administrative messages GWAVA will need to be able to login to your GWIA or SMTP server. This is accomplished by supplying GWAVA with an email ID and password that is stored in the Advanced SMTP Options under Notify Options. Remember this is usually a GroupWise user id and password, not an eDirectory login. If you are using GroupWise 5.5 or your SMTP server does not support authentication you will need to create a relay exception. Normally your GWIA or SMTP server should be configured to NOT allow relaying of mail messages. Set GWAVA subdirectories, as well as all the GWVSCAN directories to Immediate Purge of Deleted Files (a general Novell recommendation for any GroupWise server). This will prevent your GWAVA server from becoming too busy with old files in temporary directories. If you experience an issue with NGW-VSCANCONTROLLER errors when unloading or restarting the MTA, this is probably the issue. 5.5/5.5EP Service Pack FTF Update Novell has recently identified a bug in a program file that is essential to GWAVA’s functionality called GWMTAVS.NLM. Novell has updated the file; however, you must also apply the GroupWise 5.5 Service Pack FTF in order to take advantage of the updated NLM for GWAVA. GroupWise 6 and above do not require this procedure. To accomplish this: Unload the GroupWise agents (POA, MTA) Rename SYS:SYSTEM\GWMTAVS.NLM Download and install the following GroupWise 5.5 / 5.5 EP Agent FTF from Novell at: http://support.novell.com/servlet/tidfinder/2964030 Download and install the Updated GWMTAVS.NLM from Novell at: http://support.novell.com/servlet/tidfinder/2963978 Edit the MTA startup file for the domain and add the following switch indicating the TCP port on which you would like to have the MTA listen for communication from GWMTAVS. At the bottom of the startup file after the other vs switches, add /vsport=7108. Re-load the GroupWise agents Note: The Agent FTF, for Support Pack 3 or later is required to be able to configure the MTA to work with the new virus scan NLM. Licensing GWAVA is licensed on a per user basis. You must purchase a license for the appropriate number of users on your system. KAV licenses are sold separately, but can be obtained through GWAVA. Copyright © 2005 Beginfinite Inc. All rights reserved. GWAVA 3.6 4 Configuration When you run GWAVA for the first time after installation, the Configuration Wizard will guide you through the set up process. It is important to remember that the wizard will automatically complete some of GWAVA’s settings based on the information you enter. These will be easily updated through the GWAVA Manager, which opens when the wizard is complete. When the wizard is done, the GWAVA program files will be installed. The wizard will not run again unless you reinstall the system, or select Choose Another MTA Startup File from the GWAVA Manager. Note: Configuration changes will not affect the GWAVA program until the MTA is restarted. Installation To begin installing GWAVA, run the GWAVA___.EXE file, where “___” is the version number. Install to a local workstation that has mapped drive access to the server(s) on which you will install the GWAVA program files. Passwords Passwords are now encrypted/decrypted in all GWAVA ini files (MCONFIG, DMAN, IPSync, PMAN, ARCVIEW, GENKEY). Hence, in PMAN and MConfig, local password caching is now on and cannot be disabled. MCONFIG and PMAN will automatically switch off Encryption when saving to pre 3.1x configuration files. If you need to turn off Encryption entirely, create Encrypt.INI in the application directory with [Settings] EncryptPasswords=0 Upgrading If you are upgrading from a previous version of GWAVA: First run the GWAVA___.EXE file, where “___” is the version number. Install to a local workstation that has mapped drive access to the server(s) on which you will install the GWAVA program files. Then Instead of immediately launching the GWAVA Configuration Program, Click on START Run and input the following command: “C:\PROGRAM FILES\BEGINFINITE\GWAVA\MCONFIG.EXE” /FORCEUPGRADE Reverting to a pre-3.1 version of GWAVA You may encounter issues if you revert to a pre-3.1 edition of GWAVA. Encryption of Passwords: If you backrev to 3.03, you will probably have to reenter passwords as 3.03 doesn't understand the encryption, only plaintext. The 3.10 backend and front end can understand both encrypted and plaintext passwords. By default, when 3.10 front end saves a 3.10+ configuration files using encryption. (It will always save plaintext to a 3.03- configuration file however). Note: The pre 3.10 upgrade GMTACFG.INI is backed up to GMTACFG.310 in the GWAVA configuration directory. SPAMCFG upgrade: As part of the upgrade to 3.10, several files are fundamentally changed. If you must reinstall a previous version of GWAVA, then: Revert to the older version of SpamTools.EXE on the front end Restore the backed up files from the SPAMCFG\CFBAK3.10 directory on the backend to SPAMCFG. (Before you do so, delete all files currently extant in SPAMCFG directory, including the PCR file) Run SmartBlocker to recreate the PCR file GWAVA 3.1 CF files correspond to shipping rules and CFG have all user customizations. Thus to roll back all customizations is simply a matter of deleting CFG files from server CFG Copyright © 2005 Beginfinite Inc. All rights reserved. GWAVA 3.6 Configuration Wizard Step 1 Starting the Configuration Wizard The first step of the wizard is informational. Please read the information on this screen. If your NetWare and GroupWise installations do not meet the requirements outlined in this step, GWAVA will not function properly. Click Next to continue or Cancel to stop. Copyright © 2005 Beginfinite Inc. All rights reserved. 5 GWAVA 3.6 6 Step 2 Choosing the MTA startup file. Locate the MTA Startup File for the MTA server on which you are installing GWAVA. This step must be completed in order to continue with the configuration. The MTA startup file contains the configuration parameters for your MTA. If you are uncertain of this file’s location, consult GRPWISE.NCF. The MTA startup file is typically referenced in GRPWISE.NCF with the following line: LOAD SYS:\SYSTEM GWMTA @GWPRI.MTA In this example, GWPRI.MTA is the MTA startup file, and is located in SYS:SYSTEM. GWPRI.MTA is a standard text file, with the first few lines reading: ;========================================== ; GroupWise 5.5 MTA (or 6.0, etc.) ; Sample Startup File ;-----------------------------------------GWAVA needs access to this file for two reasons: The /HOME switch, which indicates the UNC Path to the Domain Directory is located in this file. GWAVA will use the contents of this switch as the default for the Domain Directory location in the Location of Files settings. It will also be used as the base directory for the default GWAVA directories. The switches activating the Virus Scanning API are written to this file. When you restart your MTA they will be active. Please read Switches Placed in the MTA Startup File for more information on these switches. Should you ever choose, removing these switches and restarting your MTA will effectively uninstall GWAVA. GWAVA only needs access to this file under these conditions: Initial set up When using the Deployment Manager if the validate startup switches option is selected. If MTA Startup options have been altered from the Miscellaneous screen. For further instructions on uninstalling GWAVA, please consult the README.TXT found in /Program Files/Beginfinite/GWAVA. Copyright © 2005 Beginfinite Inc. All rights reserved. GWAVA 3.6 7 Install a Dedicated PO Agent New to this screen in GWAVA 3, this option only installs GWAVAPOA to the server. It is useful when there's only a POA to protect on that machine. GWAVAPOA can be loaded by running typing SAPO on your server console. Notice that when Install Dedicated PO Agent is enabled, the button Locate MTA Startup File changes to read Create DUMMY MTA Startup. This can be useful when installing GWAVA in systems where directories, MTAs and Post Offices are located on different volumes. You will then be asked to specify the location of this Dummy MTA Startup file. (Usually Sys: System.) Click OK to confirm the path and return to the configuration process. The Next button will now be highlighted and should now be clicked to continue. 5000 Messages per folder limitation When performing a post office scan, GWAVA cannot be default scan more than 5000 items per folder. This is a built in limitation in Novell’s post office agent. With GroupWise 6.5.3, this limit can be bypassed by the inclusion of a switch in the POA start-up file: The new startup option for both POA and GWIA is /imapreadlimit-X. The X is a numeric variable representing thousands. For example, /imapreadlimit-2 instructs the IMAP server to read up to 2,000 items per folder, while –20 would be 20,000, and so forth. Notes about validations performed After you select the MTA startup file, a few validations are performed: GWAVA reads the MTA startup file to confirm the location of the /HOME switch. If the switch is missing, the configuration wizard will not be able to proceed. Filename Comment TCPIP.NLM TCP/IP must be configured on your server. If it is not, when the VS.NLM is loaded you will encounter “cannot find public symbols” errors. NETDB.NLM NETDB (and a host of supporting NLMs are used by GWAVA for TCP/IP library functions. VS.NLM will not load without the NETDB.NLM (but loads automatically if NETDB.NLM is present). GWMTA.NLM This is the GroupWise MTA file. It must be dated after June 1999. The following three files are checked to see if they exist on your system. If they do not, you will be warned of their importance, but the configuration will proceed without them. If you have installed the GWAVA program files into a directory other than SYS:SYSTEM, these errors can be safely ignored. Copyright © 2005 Beginfinite Inc. All rights reserved. GWAVA 3.6 8 The profile is compared to existing profiles to ensure duplicates are not created. If any of these are missing, an error log will open indicating Some odd configuration issues…. Note the problems, click Close Error Log, and reselect the MTA startup file. GWAVA will then ask you to select which version of GroupWise you are running. Choose your version of GroupWise and click OK. You will notice there are several options here. The reason for these options is to ensure correct configuration of the /VSPORT switch, if necessary, relative to which patch/service pack you have installed with GroupWise. When you make this selection, one of the following files will be copied to SYS:SYSTEM and renamed GWMTAVS.NLM GWMTAVS.55 – for GroupWise 5.5 and GroupWise 5.5 EP GWMTAVS.EP – for GroupWise 5.5 using post SP5 MTA patch GWMTAVS.BP – for GroupWise 6.0.0, 6.0.1, and 6.0.2 GWMTAVS.BP3 – for GroupWise 6.0.3 and subsequent releases GWMTAVS.HT – for GroupWise 6.5 and subsequent releases The GWMTAVS.EP, GWMTAVS.HT, and GWMTAVS.BP3 NLMs require the /VSPORT switch be configured. In this case, GWAVA will prompt you to configure the switch. GWAVA may grab a port address automatically, be certain this is correct. You will be able to change this setting, if you need, in the Miscellaneous settings section of the GWAVA configuration program. Copyright © 2005 Beginfinite Inc. All rights reserved. GWAVA 3.6 9 Upgrades and the Configuration Wizard If you upgrade your GroupWise installation with a version upgrade or a service pack or enhancement pack, you will need to re-run the configuration wizard and select the correct version of GroupWise. To do so, run MCONFIG.EXE with the command line option /forceupgrade to ensure the correct GWMTAVS NLM is copied. TCP port GWAVA requires the use of an unused TCP port on the MTA server so that GWAVA can communicate with the MTA. The port cannot already be in use by the MTA, POA or any program on the server except for this purpose. Choosing a TCP port in use might cause your server to malfunction. To determine whether a port is in use: Load TCPCON on your server console Choose TCP from the Protocol Information menu Choose TCP connections Make certain the port is unlisted Click OK This choice can be altered in the future by altering the VSPORT parameters in the Miscellaneous section of the GWAVA configuration program or by directly changing the /vsport parameter in the MTA startup file. Step 3 Configure your Internet Domain and Mail Host (IP Address) for GWAVA. The configuration wizard will use the values you enter in this step to set up the Notify Options, for sending GWAVA notification messages. You will be able to change these values later with the GWAVA Manager. Complete the Your Company’s Internet Domain and Mail Host (IP Address) to relay the mail to fields and click Next. After entering the Internet Domain and Mail Host settings, click Next to continue. Copyright © 2005 Beginfinite Inc. All rights reserved. GWAVA 3.6 10 Step 4 Enter SMTP and e-mail settings for GWAVA’s Notification Options. Enter your SMTP Engine’s host name, usually your dot-com domain used for e-mail. If you have more than one domain, enter your primary internet domain here. Additional domains may be configured in the Notification section of the GWAVA configuration program. Now, enter the From address you would like notification e-mail messages to appear to be sent by (please see Notify Options). Finally, enter your Administrator’s e-mail address. This address is where notification messages will be sent by GWAVA. These settings can be altered at a later time, if you choose, through the Notification Options settings accessed through the GWAVA Configuration program. When your settings have been entered, click Next. Step 5 Review the default directories This screen confirms the location of the domain is the same as that pointed to by the /HOME switch in the MTA startup file, as well as the location of the GWAVA directory as subdirectory of the domain directory. The information presented in this step is important, please read if before proceeding. It is particularly important at this step to note that specific file system rights need to be granted to a user account for GWAVA. In addition, the AV Scanner must be configured to ignore the MSLOCAL directory (for more information on configuration, see the section on directories to Exclude from Scanning). The last entry field notes where server program files will be installed. The default location for this is the same location as the MTA start up file. When done reading this information, click Next. Copyright © 2005 Beginfinite Inc. All rights reserved. GWAVA 3.6 11 Step 6 Set up a user account. Admin is the default set by the wizard. You can change the User Name and Password here if you have one ready, or change it later in the Miscellaneous section of the GWAVA Manager. Important Make sure that the user has RWCEMF rights to the Domain directory and all subdirectories. GWAVA supports both Bindery and NDS logins. For bindery login, please ensure your server is running bindery emulation, and that you have specified a leaf object in the Bindery Context (for example, Admin). You do not need to complete the NDS Server Context when performing a bindery login. For NDS logins, the User Name should be the FDN (.CN=Admin.O=Company), and the NDS Server Context should be the FDN as well (.CN=MyServer.O=Company), as shown in the screen capture above. Note: The only GWAVA feature requiring a valid login is Virus Scanning; all other features function without logging in. Virus scanning requires a valid login only if the File Locking integration has been selected. Once the required information is entered, click Next. Copyright © 2005 Beginfinite Inc. All rights reserved. GWAVA 3.6 12 Step 7 The last step of the Configuration Wizard is informational. This screen confirms your GWAVA configuration wizard is complete. Click Next to launch the GWAVA Manager. Please wait, this could take a few seconds. Once you have completed the configuration, you will need to restart the MTA to activate Virus Scanning. Remember to ensure your AV scanner is active and functioning properly. Program Files When the Configuration wizard is complete, or anytime the Configuration Program has been run, GWAVA checks to ensure if the latest program files have been installed. If the MconfigVersion in GMTACFG.INI is less than the version stored internally in the Configuration Program, the program files will be reinstalled. GWMTAVS.NLM is a Novell supplied file that acts as a communication layer between GWAVA and the GroupWise MTA. This file is normally installed in SYS:SYSTEM and is dependent on the version of GroupWise in use. Note for upgraders from GWAVA 2.x: /forceoverwrite no longer exists. It has been replaced by the new Update Control screen. Copyright © 2005 Beginfinite Inc. All rights reserved. GWAVA 3.6 Update Control The GWAVA 3 installer detects files that are newer than the ones to be installed, the administrator will be presented with the file overwrite editor. It allows staff to determine which older and newer files will be kept or replaced as the installer is run or re-run. The settings will be saved for future reuse. You may choose to overwrite, skip over or delete classes of files during the installation. The classes are: Program files – core GWAVA program files. Resource files – Everything stored under the RESOURCE subdirectory of the GWAVA server installation, consisting of notification templates, event log and scheduled event templates, help files, etc. CF/CFG files – Anti-spam configuration files. CF files are the core spam files provided with GWAVA. CFG files are created by the user, using SmartBlocker Manager™ – a new helper application now include with GWAVA 3. CFG files are loaded by GWAVA after CF files and thus in the event of conflicting rules take precedence. Resource File Language – This drop-down menu allows alternative languages to be used for some of the notification and digest templates. The main GWAVA user interface remains in English, however. There are three other options included in this window. Create SAPO.NCF so the GWAVA POA agent can be run as a stand alone agent. Delete all CF (but no CFG) files on the target before copying of rules, so that mismatches of rules are avoided. Once the GWAVA installer is run, you may need to restart your server. GWAVA Optimization Wizard GWAVA’s installer now includes an optimization wizard to ensure commonly used settings and features can be activated immediately to ensure proper “out of the box” operation of GWAVA. These include: Enable attachment blocking for commonly problematic attachments Enable RBL lookups and add common RBL servers Enable Super RBL lookups and add common RBL servers Enable Fingerprinting, block common executables and exploits Turn on administrative notification for these events Turn on archiving for these events Don’t show this prompt again except when configuring new servers Once the install Wizard runs, you are presented with the options of running GWAVA and the Export Spam module. Copyright © 2005 Beginfinite Inc. All rights reserved. 13 GWAVA 3.6 14 The GWAVA Manager When the GWAVA Manager launches, it opens to the About screen. The GWAVA 3 Interface From here, use the button bar on the left to access the features of the GWAVA Manager. The GWAVA Manager gives you access to all of GWAVA’s features (depending on which version of GWAVA you purchased). This interface contains all the tools necessary for configuring GWAVA’s many features. The first time you run the program, you will notice a number of settings that were established by the Configuration Wizard. For example, the operating MTA is always listed at the bottom of the screen between three buttons. Four buttons are present at the bottom of all screens in the Configuration Program— OK, Cancel, Apply, and Configure New Server. OK accepts and saves any changes you have made before exiting the program. Apply saves the changes, just as if you clicked OK, but does not exit the Configuration Program. Cancel undoes any changes you have made and exits the program; and Configure New Server runs the wizard so you can install GWAVA on another server. The location of the current MTA startup file is displayed at the bottom of the screen as well. Copyright © 2005 Beginfinite Inc. All rights reserved. GWAVA 3.6 15 What are the setting screens in GWAVA? Virus Scanning: toggle virus scanning options, specify messages to be scanned and set notification options. Oversized Messages: toggle oversized message filtering, limit the maximum size or maximum aggregate size of messages that can be sent by users, set exceptions to the rules, and set notification options. Attachment Blocking: Blocks attachments based on file name. Toggle attachment blocking options, specify filenames or file types to be blocked, set exceptions to rules, and set notification options. Fingerprinting: Blocks attachments based on file format. Configures GWAVA’s ability to identify file types even when their extensions have been changed. Content Filtering: toggle content filtering, set rules for blocking messages containing restricted or inappropriate content. RBL and SuRBL: configure GWAVA to check messages against Real-time Blackhole List database(s). Spam Heuristics: toggle and adjust settings for Anti-Spam Heuristics which test message based on a number of criteria. You can also launch SmartBlocker Manager™ from here, a new helper application for configuring spam/ham rules. Address Blocking: toggle Address Blocking, and manage the list of blocked addresses. Archiving: toggle archiving, specify criteria for archiving messages, and limit disk space used by the archive. Exceptions: global settings for user exceptions. Logging: Configure the creation of logs, event logs, schedule output at particular times, generate reports Post Office Scan: configure post office-level scans of messages traveling within your network. Post Office specific configurations possible. Location of Files: specify the location of the Domain and GWAVA directories, as well as the location of the notification templates. Server Profile: used to change settings for the currently loaded GWAVA profile. Surveillance: Configure GWAVA to scan and report rule violations without blocking mail. A discrete way to notify management of e-mail policy violations. Notify Options: configure the settings for sending notification messages. Miscellaneous: set the username and password for GWAVA, toggle and set up logging, clustering and toggle the decompression engine. Licensing: Enter BOTH your GWAVA license code and license key. Advanced: only adjust these settings under the guidance of GWAVA Technical Support, do not change these settings without contacting Beginfinite Technical Support. About: informational screen about GWAVA. Your version number is found here. You can also generate a report about all the major files involved in your GWAVA installation from this screen with one click. Note: The GWAVA Manager can be resized to fit the width of your workstation monitor. To adjust the width of the GWAVA 3 interface, hover your mouse over the left or right edge of the GWAVA Manager; when the mouse cursor changes to the resize arrows, click and drag the edge until the GWAVA manager has reached the desired width. This can also be adjusted by editing the LMTACFG.INI file in your /Program Files/Beginfinite/GWAVA. Please see Configuration File Format or further information. Copyright © 2005 Beginfinite Inc. All rights reserved. GWAVA 3.6 16 About This is the first screen visible each time the GWAVA Manager launches. You can confirm your GWAVA version number from this screen, as well as check for updates to the software. Demo Options If you are evaluating GWAVA without a valid license, you automatically enter Demo mode. Request Support The automated Request Support application makes it easy for you to communicate with our support team. Click the Request Support button to begin the process. You may cancel the request for support at any time. The more information you provide in the request, the greater the speed with which your support technician will have the answers to your problem. In some instances, our support team may first try to solve the issue by recreating it on a test machine. Generate Install Report The Installation Report button generates a report detailing all the files involved in your GWAVA installation. With one click, a HTML report will be printed to your GWAVA application directory, allowing you to see which files and versions are in use. This report can be useful for fine-tuning and debugging your installation of GWAVA. File categories included in the report generation include: GWAVA executables GroupWise files Server resource files Spam configuration files Server program files Beginning your request for support The first screen is informational. It explains the request support process: These are to compose a request, attach files if necessary, and the store the generated result in a password protected archive. The password is always set to “help”. The result may be sent to GWAVA manually or by auto-mailing GroupWise. Alternatively, you can send an e-mail to GWAVA directly at [email protected]. Click Next to continue. Copyright © 2005 Beginfinite Inc. All rights reserved. GWAVA 3.6 17 Step 1 Contact and system information required The Request Support screen is a contact information form. There are three sections: Identification information, Configuration information and A Few Questions related to your network set-up. Your entries—-including items in the drop-down menus—will be stored for your convenience so the same data does not have to be entered each time you wish to contact the GWAVA support team. Identification Information Enter the preferred Contact Name, Contact E-Mail, Contact Phone number and Organization name in the first section. Configuration The Configuration portion is where you provide details about the environment in which your copy of GWAVA is operating. Please enter which GroupWise Version and Service Pack are in use, what OS the MTA is running on, and any OS Service Pack installed. There are also fields for you to identify your CPU, the amount of RAM, the GWAVA version installed and your type of File System (I.E Traditional File System or NSS File System). There is also a checkbox asking if your system using protected memory. A Few Questions The final section of this screen is where you answer a few questions about your GWAVA configuration. Please tell us which AV Product is in use, and, if possible, the version number. Tell us how your anti-virus product is used with the And I Use drop-down menu to its right. Copyright © 2005 Beginfinite Inc. All rights reserved. GWAVA 3.6 18 As well, please estimate your approximate mail volume per day. Add any Other Configuration-Related information you believe would help us understand your set-up. Then, click Next to continue. Clicking Cancel returns you to the About screen. Step 2 Describe the issue The second page of the Request Support form has two sections. The top part is where you categorize your request. The second is a blank field where you detail your request for support. Categorizing Your Request Three drop-down menus are provided to help us direct your request for support to the appropriate staff. The Type menu has three request descriptions: Information Request Bug Report Enhancement Request The Regarding drop-down menu classifies your request into one of eight categories: AV Scanning Attachment Blocking AntiRelay Protection Mail Filtering/Forwarding Spam Heuristics Archiving Notification Something Else The Priority drop-down menu helps us prioritize your communication: Not Terribly Important; Just Wondering Of Some Importance Very Important to us CRITICALLY important to us Pretty Important to us Question or Problem? Please provide as much information as possible in the text entry field. Does it affect all users or only a specific subset? Is the trouble clearly related to a specific function? Did GWAVA function correctly until recently? Can the error be replicated easily? How frequently does the problem occur? Click Next once you have completed the form. Clicking Cancel returns you to the About screen while the Previous button allows you to edit the previous screen. Copyright © 2005 Beginfinite Inc. All rights reserved. GWAVA 3.6 19 Step 3 Attach documents to your request for support This screen is where you choose which files will be appended to your request. To attach configuration files, click Base configuration files checkbox. To ensure your security, the Conceal my Login and GroupWise password is on by default. There is also another checkbox option to Generate Configuration Report. If your system has been set up to generate ABEND.LOG or CONFIG.TXT files, and you believe this data may help us diagnose and resolve your support request, click the ABEND.LOG, CONFIG.TXT box to automatically attach them. The final option in this screen is the Don’t encrypt the zip file checkbox. This is unchecked by default. Other Files to Include Use the Add A File to the List button to attach any other documents to your request for support. This may include log files or error messages. Click Next once you have completed the form. Clicking Cancel returns you to the GWAVA Manager About screen while the Previous button allows you to edit the previous screen. Don’t forget! The Generate Install Report button creates a list of all files used by your GWAVA installation. You may find it helpful to include this request for support. Copyright © 2005 Beginfinite Inc. All rights reserved. GWAVA 3.6 Step 4 Confirm the request. This is the final step in the GWAVA Manager Request Support function. All the information in your request for support is now in a compressed archive in the GWAVA directory. You have two options: Exit the automated request support function without e-mailing the archive or E-Mail the archive automatically. Choose by clicking on one of the radio buttons. In either case, the archive will remain in the GWAVA program directory. Clicking Next returns you to the About screen. Copyright © 2005 Beginfinite Inc. All rights reserved. 20 GWAVA 3.6 21 Licensing Once you register your license on our web site, you will be automatically e-mailed licensing details which include your key and code, both of which are needed to unlock the demo. Note that the Key and Code are case sensitive. Notes about the Demo Version Without a licensed version of GWAVA, and provided your demo has not yet reached its 30-day time limit, you can switch between versions of GWAVA from the About screen. Unlocking the GWAVA3 Demo after installation In the GWAVA Configuration Program, click Licensing Copy & Paste in your v 3.0 License Key and License Code Click OK to exit the Configuration Program, select NO to a requested reload At the MTA Console, press F7 to unload the MTA At the Server Console, type NOGWAVA, then <enter> Once all the GWAVA modules have unloaded, reload the MTA GWAVA 3 should now be fully functional There is no need to re-install and reconfigure GWAVA as it remembers all of your settings and customizations. If your license is delivered to you in the form of a license file, you can also import an existing license key by means of the Import License File button. To use this feature, click the button and navigate to your existing license key file. Two-part combination GWAVA uses a two-part combination. There is a License Key and a License Code. For GWAVA to work properly, and not time out after 30 days, you must enter both pieces of information correctly. Invalid keys and codes or fields left blank will cause GWAVA3 to remain in Demo or By-Pass mode. Remember: Copy and paste the licensing key and code GWAVA e-mails to you to prevent retyping errors that will cause your installation to time out in 30 days. Copyright © 2005 Beginfinite Inc. All rights reserved. GWAVA 3.6 Kaspersky Licensing Options GWAVA is pleased to present Kaspersky Antivirus as an OEM offering to our users. This integration comes with a free 30 day fully functional demo of the Kaspersky AV system allowing GWAVA customers to have protection against spam and viruses “out of the box”. Licenses for Kaspersky must be purchased for continued use after the 30-day period expires. The integration will no longer function or update virus signatures after this period. Enter the: KAV License Key KAV License Code KAV Signature Code If you have purchased Kaspersky separately, see the Configuring your AV scanner section of this manual. Copyright © 2005 Beginfinite Inc. All rights reserved. 22 GWAVA 3.6 Multiple User Control GWAVA now has a multiple user safety feature built in to prevent conflicting edits to your settings being made. If more than one user appears to be using the GWAVA Configuration at the same time in the same network, a warning dialogue box will be presented Click OK to continue, or Cancel to quit. If you believe this caution has been shown to you erroneously, click Reset. Copyright © 2005 Beginfinite Inc. All rights reserved. 23 GWAVA 3.6 24 Virus Scanning Configure GWAVA’s virus scanning options. Turn on virus scanning by clicking the Scan for viruses checkbox. Notification Options There are four notification options for virus scanning: Archive infected message, notify the administrator of virus infections, notify the sender of virus infections and notify the recipient. The notify messages inform the recipients (administrator, sender, or intended recipient) that the message was blocked because of virus infection. The Attach Infected Attachment option in Virus Scanning is gone in GWAVA 3. The %%AttachSourceMessage variable is present for infected messages by default in the Administration notification template—Tadmin.822, and thus infected messages will be attached to the Administration notification automatically. It can be removed from this template if desired. See the appendices for more information about GWAVA 3’s metavariables and administrative templates. Also on this screen is the ability to Force multiple fires of virus scanners by enabling a checkbox. Normally, GWAVA stops processing a message after a single virus scan integration reports a virus infection in that message; this feature overrides that function and allows all virus scanners to scan the message. Specific Users To exempt users from the Virus Scanning rules, please use the Exceptions feature. This is not normally recommended, but may be useful for diagnostic purposes. Copyright © 2005 Beginfinite Inc. All rights reserved. GWAVA 3.6 AV Engine Options If you are running CA eTrust InoculateIT, Command Interceptor, Sophos SAVI or ETrust 7.0 on your server, you can select either or both of them, as well as a third AV engine to scan messages. To select which will be used by GWAVA click AV Vendor Integrations and click to enable one or more options. If you are running McAfee Netshield, Norton Corporate Edition, Sophos, Trend Micro, Panda or Command Antivirus (not Interceptor), please be certain to select File Locking. Integration Order GWAVA has the ability to alter the order of your AV integrations. Select the active AV integration in the AV Vendor Integrations window, then use the Up and Down arrows to the right to alter the scanning order. ETrust InoculateIT Scanning options for ETrust InoculatIT are also configured from this screen including: Scan Compressed Files, Enable Heuristics, CPU load preferences and the Path to the VIRSIG.DAT file (Normally it’s SYS:INOCULAN). CPU load preferences are managed by a drop down menu at the bottom of the window. The options available are low, medium and high. Kaspersky Virus signature update options for Kaspersky are configured from this screen including: the ability to Update Virus Signatures Hourly or Daily. There is also a checkbox, enabled by default, to log update activity. This is recorded in the log directory under KAV in the file in log.txt. 30 day evaluation - Kaspersky’s 30 day demo is separate from GWAVA’s 30 day demo. A Kaspersky licence key must be purchased for continued use of Kaspersky beyond its 30-day demo. Copyright © 2005 Beginfinite Inc. All rights reserved. 25 GWAVA 3.6 26 Oversized Messages This section configures how GWAVA processes large messages and attachments. Use the features in this section to prevent your mail servers from becoming overburdened with excessively large files. Turn on oversized message blocking by clicking the Block messages with attachments exceeding checkbox. Enter a message size limit in KB in the field provided. All messages with attachments larger than this limit will not be delivered. Enter an aggregate size limit in KB in the total size field to limit message broadcasts. Ignore MIME.822 in oversize calculations. Enabling this checkbox forces GWAVA to ignore the size of the MIME.822 file when calculating the message size. Notification Options There are four additional options for Oversized Messages: Archive oversized attachments Notify administrator Notify sender Notify recipient The notify messages inform the recipients (administrator, sender, or intended recipient) that the message was blocked because an attached file exceeded the limit at the top of this screen. Please see Notify Options for more on these messages. Copyright © 2005 Beginfinite Inc. All rights reserved. GWAVA 3.6 27 Attachment Blocking Options for preventing the sending and receipt of file attachments. Use the features here to prevent attachments from entering or leaving your system via GroupWise. This is not only an excellent secondary line of defense for preventing the spread of viruses, it also helps ensure that only business related information is moving through your e-mail network. It is strongly recommended that this feature be enabled in addition to Fingerprinting for maximum protection. Users and viruses may change file extensions to disguise the true nature of an attachment. To prevent the receipt of files that may be disguised as accepted file types, use the GWAVA’s Fingerprinting feature (see below), which opens the file for analysis to verify the file type against the extension in the file name. Getting started with attachment blocking Turn on attachment blocking by clicking the Block messages with specific attachments checkbox. To block an attachment by filename or file type, click Add under Restricted attachments. Complete file names—such as HAPPY99.EXE—can be blocked, as can wildcard filenames—such as *VBS or *EXE files. To an entry in the list, click that entry, and then click Edit. To remove an entry from the blocked list, click that entry. Then click Remove. The Comment field is optional, but is useful to remind or explain to system administrators and managers why this particular attachment block was created. Copyright © 2005 Beginfinite Inc. All rights reserved. GWAVA 3.6 28 Archive message There are three final options to this screen for archiving messages. These options are controlled via a drop down menu. The settings are archive message if archive is enabled, never and always. Notification Options There are three notification options for Blocked Attachment types: Notify administrator Notify sender Notify recipient Fingerprinting Copyright © 2005 Beginfinite Inc. All rights reserved. GWAVA 3.6 29 Fingerprinting This screen configures the options for identifying file types even when their extensions have been changed. In previous versions of GWAVA, Fingerprinting options were a subset of the Attachment Blocking settings. Fingerprinting takes attachment blocking a step further by opening the attached files to compare the actual file type versus the attachment’s extension. It is a powerful and strongly recommended feature. Differences between Fingerprinting and Attachment Blocking Fingerprinting is similar to, but different from Attachment Blocking. The simplest way to explain it: Attachment Blocking = block by file name, and Fingerprinting = block by file format. An attachment block for *DOC would only block a DOC file that has an extension of DOC, like test.doc. If you were to rename test.doc to test.123 the attachment would not be blocked. Fingerprinting ignores the file name and extension and concentrates on the file format, so a renamed DOC file like test.123 could not slip past GWAVA’s Fingerprinting. To exempt users from the Fingerprinting rules, please use the Exceptions feature. To enable fingerprinting, click the Enable Fingerprinting box in the Fingerprinting window. There are several options when enabling fingerprinting. The first is Skip Files With a TXT extension will ignore all files with a .txt extension regardless of what the file really is. Below this is a drop down menu with three general options for blocking: Block all forms of DOS and Windows executables Block selected list below, don’t subclass by extension Block selected list below, do subclass by extension The first option is a blanket blocking of all executables, but no document types. The second and third options are user selectable lists of file types that can be blocked. Copyright © 2005 Beginfinite Inc. All rights reserved. GWAVA 3.6 Options The window below this contains a wide range of file types for fingerprinting. Finally, this window also contains notification options for fingerprinted files. These include: archive the fingerprinted message, notify administrator of fingerprinted messages, notify sender of fingerprinted messages and notify recipient of fingerprinted messages. Password Protected and Corrupted Zip Archives GWAVA 3 has the ability to block or examine password protected and corrupted zip archives. While this has been classified as a Fingerprinting feature, it requires Scan Archive Shell to be enabled. This is found in the decompression engine settings in the Miscellaneous menu. And, naturally, both the Enable Fingerprinting and Password Protected/Corrupt Zip checkboxes in the Fingerprinting window must both be enabled. Note: Recursion Depth is controlled in the Decompression Engine screen. Copyright © 2005 Beginfinite Inc. All rights reserved. 30 GWAVA 3.6 31 Content Filtering The features here are used to both block spam and monitor messages with restricted content. GWAVA can prevent restricted text content in message subject lines, bodies, and attachments from being sent to and from the GroupWise system. GroupWise administrators have long sought content filtering for spam, and GWAVA provides this. Using GWAVA’s Content Filtering feature, administrators can block the flow of confidential, restricted, or inappropriate text in a company or institution. This help ensures that your e-mail network is used for professional purposes only, and that confidential information does not leave your firm. For additional anti-spam features, see the Spam Heuristics section. Turn on content filtering by clicking the Block messages containing restricted content checkbox. When this box is checked, the Add, Edit, and Remove buttons become active. Notification Options There are four notification options for content filtered messages: archive content filtered messages, notify administrator of content filtered messages, notify sender of content filtered messages and finally, notify recipient of content filter violations. Please see Notify Options for more about these messages. Copyright © 2005 Beginfinite Inc. All rights reserved. GWAVA 3.6 Add a Filter To add a new filter, click Add. Follow these steps to create a new filter: Enter a name for this rule in the Rule Name field. There are no requirements for naming filters but it is advisable that you use a plain, easy to understand name, which will help you, and other members of staff know at-aglance what content the filter is checking. Select what the filter applies to: Subject, Message, or Attachments. You can choose one, two, or all three message components for filtering. Add attachment types by clicking Add in the Attachment Types area. You then opt to Include or Exclude the attachment type from the filtering process. If, for example, you entered a type *.TXT, choosing Include will have GWAVA filter all *.TXT attachments for this content; choosing Exclude will have GWAVA scan all attachments but *.TXT for this content. Enter the text you want this filter to locate in the To Find field. GWAVA 3 also allows you to link phrases with the && operator. For example “make&&money” will filter out “make money”, “make lots of money”, “make more money”, etc. Note: ensure there are no spaces between the words and the && operators. Use the drop-down list below to choose where GWAVA should look for this content—at the beginning of, or anywhere in a line of text. Check Case Sensitive comparison if you want GWAVA to match character cases during the search. Check Match whole word? If you want GWAVA to treat the entry as a word rather than a sub string within a word. An example would be the word “ball.” If you add this word and select Match whole word, then only instances of the word “ball” will be filtered. If, however, you do not select Match whole word, all words containing the string “ball,” such as “ballgame” and “basketball” will be filtered. Copyright © 2005 Beginfinite Inc. All rights reserved. 32 GWAVA 3.6 33 Archiving Options You can set archiving options for fingerprinting from this screen with the drop down menu provided. Options here include archive if archive content filters are enabled, never and always. Create a new rule based on this rule Enabling the Create a new rule based on this rule checkbox and clicking OK will save the changes or additions you have entered above and immediately open a new window. You can then add a new name— possibly a derivative one—and then customize this rule further. Click OK to complete the filter. Select an existing filter and click Edit to change the parameters of that filter. To remove a filter, select it from the list and choose Remove. A removed filter will no longer affect message traffic. Filtering Order With more than one content filter enabled, the filter at the top of the list will be processed first. To change the order in which GWAVA uses your filters, select a filter and click the Up or Down arrows to move the filter. To exempt users from the Virus Scanning rules, please use the Exceptions feature. Content Filtering Ideas Because GroupWise sends MIME headers as attachments, and GWAVA can scan attachments for content filters, you can use Content Filtering to block full or partial IP addresses, or domain names. Consider these examples: IP blocking: by establishing a filter to scan attachments for 100.100. You can effectively block all email originating from any IP address that starts with 100.100. When a specific IP address is troublesome, you can create a filter for the specific IP. Scanning attachments will allow GWAVA to filter MIME.822. This is the MIME header (that will contain the IP address) and is delivered in the form of an attachment to the email. Domain blocking: to stop, for example, all mail from reallygreatdeals.com create a content filter to scan attachments for reallygreatdeals.com. In addition, since sub-domains are often involved in mail sending, using a wildcard extends the reach of this filter. For example, *hotmail.com will block messages originating at both hotmail.com and mail1.hotmail.com. Scanning attachments will allow GWAVA to filter TEXT.HTM and MIME.822. MIME.822 is the MIME header (that will contain domains) and TEXT.HTM will be present if the e-mail contains HTML (domain names will often appear in URL links embedded in HTML). Both files are delivered in the form of an attachment to the e-mail. Keyword blocking: to eliminate messages with certain keywords, create a filter with “keyword” and all instances of that word will be blocked. For example, to block all incoming mail with the word “offers” in the from email address/name, create a filter that scans attachments for “offers”. These are just a few creative ways you can use Content Filtering to further enhance the already powerful Anti-Spam features of GWAVA. For information about spam tagging, also known as “catch and release” of spam content, see the Spam section Copyright © 2005 Beginfinite Inc. All rights reserved. GWAVA 3.6 34 RBL/SuRBL RBL Lists—Real-time Blackhole Lists—are databases of known spammers and known mail servers that allow open-relay mail sending (of which spammers take advantage). SuRBL blocking—an innovation increasing the effectiveness of this kind of blocking—is also configured here. The RBL Lists feature of GWAVA compares the e-mail address and mail server information found in a message’s header against black lists you specify. This will block messages that arrived from a known spam source. RBL lists are typically subscription services. You must subscribe before you can attempt to use an RBL database with your installation of GWAVA. To add a RBL database to GWAVA, click Add and enter the internet server address of the RBL database to which you have subscribed. Once a RBL has been included, the Edit and Remove buttons become active. Then, click the Enable RBL Lookup for Incoming SMTP messages checkbox. Maximum Received Headers This setting helps if you are using a firewall or proxy server that will show up in the MIME headers as the most recent IP address to handle the message. Basically, it will ignore this hop and move to the second. A setting of 3 should be sufficient in 85% to 90% of cases. It is the default. If the RBL feature doesn’t seem to be catching any spam, increase this to 5 or 6. Do not increase this setting excessively. Notes about using the RBL feature Some RBL databases are very liberally maintained, and are therefore widely inclusive of e-mail and server addresses. While these lists provide a worthwhile means of preventing the receipt of spam in your organization, you should be certain your RBL subscription/use will not prevent you from receiving legitimate e-mail messages. To exempt users from the Virus Scanning rules, please use the Exceptions feature. Copyright © 2005 Beginfinite Inc. All rights reserved. GWAVA 3.6 35 More Information about RBL Lists For a lengthy list of Spam-blocking RBL databases, we suggest looking at http://moensted.dk/spam/ or http://www.declude.com/junkmail/support/ip4r.htm. These lists are among the most comprehensive available, however, we remind you that they are not definitive, and that you should research any RBL service provider before using their RBL database with GWAVA. Some RBL services you might consider: SPAMCOP: bl.spamcop.net SPAMHAUS: sbl.spamhaus.org ORDB: relays.ordb.org BLITZEDALL: opm.blitzed.org WIREHUB: blackholes.wirehub.net DSBL: list.dsbl.org, multihop.dsbl.org RSL: relays.visi.com MAPS: blackholes.mail-abuse.org, dialups.mail-abuse.org, relays.mailabuse.org (MAPS is a paid service; it is not free.) Notification Options There are four notification options for RBL blocks: Archive RBL blocked messages, Notify administrator of RBL block, Notify sender of RBL block and Notify recipient of RBL block. The notify messages inform the recipients (administrator, sender, or intended recipient) that the message was blocked because it violated a RBL blocking rule. Re-Order seek order GWAVA has the ability to change the order that the RBL lists are referenced by GWAVA. To change the order, select an entry in the list of RBLs and choose a direction—up or down. Arrows become grey when the top or bottom of the list is reached. Copyright © 2005 Beginfinite Inc. All rights reserved. GWAVA 3.6 36 SuRBL The traditional RBL is a list of IP addresses. The Super RBL is a more refined tool: this list is for blocking all Uniform Resource Identifiers— whether http address, ftp address, image, mailto, or gopher link. These are harder for spammers to change than their IP addresses since the spam message must provide a link to purchase the advertised product. To enable the Super RBL block, select the SuRBL tab from this portion of the GWAVA configuration program interface. Click the Enable SuRBL Lookup for Incoming SMTP messages checkbox. Beneath that is Stop checking on the first hit checkbox. Enabling this reduces the resources GWAVA requires by ceasing SuRBL analysis after a single correlation with any SuRBL list. To add a new or edit an existing SuRBL look-up, click the desired button. The functionality for both buttons is the same. GWAVA will present a dialogue box with two fields: entry and comment. In the entry field, include the SuRBL List’s host name or IP address. The comment field is optional, but should be filled out with a plain text explanation. To delete an entry, select it and click the remove button. Domain Exceptions SuRBL exceptions can also be customized. This is useful for white-listing specific domains if the SURBL server has wrongly classified them. Click the SuRBL Domain Exceptions button to present a dialogue box with a list of your configured SuRBL exceptions. The list is empty by default. To add or change an exception, click the Add or Edit buttons as needed and enter a domain to be excluded from the SuRBL lookup. To remove an entry from this list, select the needed item before clicking Remove. Notification Options There are four notification options for SuRBL blocks: Archive SuRBL blocked messages, Notify administrator of SuRBL block, Notify sender of SuRBL block and Notify recipient of SuRBL block. The notify messages inform the recipients (administrator, sender, or intended recipient) that the message was blocked because it violated a SuRBL blocking rule. Re-Order seek order GWAVA has the ability to change the order that the SuRBL lists are referenced by GWAVA. To change the order, select an entry in the list of SuRBLs and choose a direction—up or down. Arrows become grey when the top or bottom of the list is reached. Copyright © 2005 Beginfinite Inc. All rights reserved. GWAVA 3.6 37 Spam Heuristics GWAVA’s anti-spam heuristic features are configured here. How anti-spam heuristics work GWAVA intelligently analyzes messages to determine if they are spam. To do this, the message is analyzed part-by-part. GWAVA will look for typical signs that a message is spam. It will also score points, for example, if it was sent using a bulk mailer. A tally of points is kept, and if the message accumulates more points than the threshold you set (above), it will be considered Spam and blocked. It may be wise to archive messages blocked by the anti-spam heuristics until you have adjusted the threshold to minimize false positives (legitimate mail blockages). Using the Archive Viewer you will be able to resend legitimate messages that were blocked. Getting started To enable the anti-spam heuristics, click the Enable heuristic spam analysis checkbox. Once enabled, establish a Threshold score. A higher threshold means fewer messages will be blocked by anti-spam heuristics; a lower threshold means more messages blocked by anti-spam heuristics. At the bottom of this screen are four options for configuring spam heuristic notification options. They are: Archive spam messages Notify administrator of spam Notify sender of spam Notify recipient of spam Copyright © 2005 Beginfinite Inc. All rights reserved. GWAVA 3.6 38 Size considerations For professional spammers, business is a numbers game. They need to send out millions of e-mails per month in order to earn a living. Since bandwidth is finite, the smaller their e-mail messages are, the more spam they can send per day. If you were look at the size of the spam you receive, you'll probably notice that majority of it is between 2 and 15 Kilobytes. Some may be as large as 35 Kilobytes, but hardly any spam will be larger then that. We recommend lowering this setting to anywhere between 10 and 15 Kilobytes. By not scanning large messages (which are most certainly not spam) you save system resources, speed up the scanning process (by scanning less), and most importantly, you eliminate any risk of larger e-mail being falsely identified as spam. Scan only Internet mail The Scan only Internet mail checkbox makes GWAVA scan only internet mail, not internal mail; when enabled will cause the Anti-Spam Heuristics to ignore messages transferred within your domain, as naturally you do not expect spam to be circulating from within your organization. Teamwork: Heuristics, RBL and SuRBL Anti-Spam Heuristics can also consider RBL and SuRBLs when scoring messages. You have two options concerning RBL and SuRBL hits: Block message regardless of Spam score, which will block a RBL and SuRBL hits as spam regardless of the Anti-Spam Heuristics score received by the message; and Scored along with other Heuristics, which assigns the score you assigned to an RBL hit (entered in the field to the right of this option) and tallies it along with other anti-spam scoring. You can use RBL and SuRBLs together, separately or not at all. Notification Options There are four notification options for Spam Heuristics: Archive spam messages, Notify administrator, Notify sender and the Notify recipient. Spam Tagging GWAVA 3 allows administrators to tag or “catch and release” spam. It marks suspected spam with a changed subject, but allows the message to pass. What is the value? When implementing GWAVA, it can be useful in helping to identify the threshold that best serves your business or institution. It also helps mail users identify quickly messages that may or may not be spam. Click the Spam Tagging button to begin. Copyright © 2005 Beginfinite Inc. All rights reserved. GWAVA 3.6 Configuring Spam Tagging The spam tagging window has four columns: the score, custom subjects, enabled custom subjects, and the archive count. The Score field is used to edit the scoring values for the expression value column. Tip: Remember that GWAVA can score negative numbers and that a very useful way of ensuring that false positives are not halted by GWAVA is to create a list of terms very specific to your working environment, then give each of these terms strong negative values. Judicious balancing of these scores can create a zone where obvious spam is caught by GWAVA, but true mail with spam-like characteristics will be allowed safe passage through with a caution to the recipient To edit the Score values click on a score in the window, then type the new value into the entry field. Note: GWAVA ensures that you cannot accidentally have gaps between the scores. (ie. 0 to 6 = clean, 8 to 10 = possibly spam, leaving 7 unassociated with any action). GWAVA uses your current-most entry to ensure there are no gaps in your scoring system. Copyright © 2005 Beginfinite Inc. All rights reserved. 39 GWAVA 3.6 40 Enable Rewrite of subject Clicking the Enable the Rewrite of Subject box activates the entry field to its right. Here you can enter new subject headers to be attached to the messages falling into each scoring category. Note that the value %s will automatically insert the original subject. The variable %d will insert the message’s spam score as calculated by GWAVA on your installation. Note: Changes here apply to the messages falling inside the score range being edited, not all the other score ranges. TIP: You can use the included RULESET.EXE utility (found under the C:\Program Files\Beginfinite\GWAVA\Tools\Ruleset directory) to automatically create rules for users that move mail to a folder if the subject line contains a unique string. An even more sophisticated and complete rule creation utility, RuleCreate is a free download from Beginfinite, part of the GWAVA Freeware utilities. If your organization is running GroupWise 6.5.2 or later it would probably be simpler to enable the X-Spam headers as discussed below, under Enable X-Spam Headers. Archive spam There is one last option on this screen: archive spam. There are three options available from the drop down menu; archive this message: If Archive Spam is enabled Never Always Click OK to save changes made or Cancel to return to the previous screen with no changes saved. Enable X-Spam Headers The Add X-Spam headers to tagged messages checkbox is for adding two headers to tagged and re-sent messages. X-Spam-Flag - Yes (or No) .... indicates if the message was spam. This may be used in conjunction with GroupWise 6.5.2+'s new /xspam switch (added in gwia.cfg), which redirects such items to the Junk Mail handler. X-Spam-Status - This header provides miscellaneous information such as the spam score, etc. Enabling this option will add an extra X-Spam header to the MIME.822 file for inbound Internet email. With GroupWise version 6.5.2 or later, this setting is read by the Post Office Agent if the user has enabled Junk Mail handling. This allows the POA to place spam that has been tagged by GWAVA automatically in the Junk Mail folder for the user. The administrator must add /xspam to GWIA.CFG and restart the GWIA for this to take effect. TIP: There is nothing that the end user has to do to make this work other than be at GroupWise version 6.5.2 (or newer) on the GWIA, MTA, and POA, and client code in order for this to work properly. Copyright © 2005 Beginfinite Inc. All rights reserved. GWAVA 3.6 41 Spam Report Clicking the Spam Report button opens a window which allows you to customize how and what GWAVA reports its spam handling activities on the MTAs it has been configured to protect. The first setting is a drop down menu with four options Do not generate report files (the default) Generate report files for spam and nonspam Generate report files for spam only Generate report files for nonspam only When any of the last three are enabled, GWAVA will generate and save in the Anti-Spam log directory a text file report concerning each message that is blocked by Anti-Spam Heuristics. Append extra statistics to report files When enabled GWAVA will include additional spam statistics in the generated report files. Automatically prune files Depending upon the settings in your installation of GWAVA, and the amounts of mail and spam processed by GWAVA, the number of ID files recorded can become quite large. When the Automatically prune ID files checkbox is enabled, you can customize how long recorded ID files are kept before they are deleted. There are two entry fields for customizing this, the first measures the time in days, the second uses a 24 hour clock to determine the hour the files are wiped. SmartBlocker Manager SmartBlocker Manager is an application bundled with GWAVA 3. It enables administrators to simplify the maintenance and customization of spamblocking rules. Without SmartBlocker Manager this task must be done by hand editing configuration files. Click the Run SmartBlocker Manager button to begin See the SmartBlocker Manager section of this manual for details. Copyright © 2005 Beginfinite Inc. All rights reserved. GWAVA 3.6 Address Blocking Prevent the sending and receipt of unwanted mail and spam. Turn on address blocking by enabling the Block messages to/from some address checkbox. To block a specific senders or recipients, click Add in the Restricted Addresses list. For best results, use Internet addressing ([email protected]). Note that the functionality here is separate from RBL lists. You might use it to keep employees from sending mail to competitors, or to keep mail from a merchant with an aggressive communication program. When adding an email address in the list of exceptions Restricted Addresses, there are three options for how that e-mail address is handled. Add an Address Block The Add button creates a window for adding a user to block. There are four components to this window. Enter Address here. Reminder: For best results, use internet address format: [email protected] and not simply the user’s prefix. There is a drop down menu. It has three options Compare against the FROM field: this will only block the address if the message is sent from, but not to that address Compare against the TO field: which will only block the address if the message is sent to, but not from that address Compare against both fields: this blocks mail traveling to and from the given address. Copyright © 2005 Beginfinite Inc. All rights reserved. 42 GWAVA 3.6 43 Address book integration Click the Address Book icon to the left of the Address field to gain access to your address book. Note that you will be asked to log into GroupWise if you are not already running GroupWise. The Add Comment field is an optional section where you can add a descriptive piece of text which explains why the block has been installed. This might be very useful when several administrators may be required to be alerted, or your IT staff needs to edit the block, or as a reminder as new administrators may not be aware of outstanding issues. Comments There is one last option on this screen: archive. There are three options available from the drop down menu; archive this message: If archiving is enabled Never Always The Edit has similar functionality to the Add button. To remove a block, select the item required for deletion and click the Remove button. Wildcards The wildcard feature is accepted for addresses blocked by the Address Blocking filter. You can, therefore, block addresses from an entire domain (e.g. *@mail.com), or sub-domains--*mail.com will effectively block all mail from mail.com as well as server.mail.com. Note: The GroupWise system has evolved from multiple e-mail address formats. With Internet Addressing turned on, the FROM address should be in the same format as specified under the Internet Addressing dialogue box. Aliases do not affect this. FROM address comparisons are reliable. TO address comparisons likely require multiple entries, because these addresses are not normalized to one standard by GroupWise. The address of blocked TO addresses can vary. Send test messages to ensure the filter is functioning as expected. Tip - Address blocking is an effective way to prevent e-mail from entering or leaving your organization with an originating or destination address of a competing organization. Beginfinite always recommends framing your address blocks with asterisks. Here are some examples: *[email protected]* *@domain.com* *domain.com* *domain* WARNING: Never, ever place a wildcard before and after the @ sign (*@*.domain.com). GWAVA will interpret this as *@* and block all mail. To block sub-domains, the correct syntax is *domain.com* or *.domain.com* Notification Options There are four notification options for Address Blocking: Archive Address Blocked Message, Notify administrator, Notify sender, and Notify recipient. The notify messages inform the recipients (administrator, sender, or intended recipient) that the message was blocked because it was from, or sent to a restricted address. Please see Notify Options for more on these messages. To exempt users from the Virus scanning rules, please use the Exceptions feature. Copyright © 2005 Beginfinite Inc. All rights reserved. GWAVA 3.6 Archiving The functionality here manages how and which messages processed by GWAVA are archived. Use the features on this configuration screen to keep a record of messages triggering one of GWAVA’s many message filters and blocks. The first two checkboxes allow you to Archive messages where no events fire and Archive specific users. They are unchecked by default. Motivation and usage Archive where no event fires lets administrators archive messages even if they are not blocked by GWAVA due to virus infection, content filters or other triggers. It can be an important tool for an organization that needs to archive and retain ALL e-mail messages for long term storage and/or regulatory compliance like HIPAA, Sarbanes-Oxley, SEC Rule 17a, Sunshine Laws, etc… GWAVA also works with several third party retention and retrieval packages for more robust retention solutions. Archive Specific users lets administrators monitor messages to or from a specific e-mail address or domain. The e-mail is collected silently and without the senders’ or recipients’ knowledge. This feature has many applications. Some example uses would be to silently collect copies of a particular employee’s e-mail for Human Resources Copyright © 2005 Beginfinite Inc. All rights reserved. 44 GWAVA 3.6 45 or Legal purposes. To silently collect copies of all e-mail going to or from the domain of a competitor. To gain intelligence on which employees are spending too much time purchasing and selling items on ebay.com, to name but a few applications of this feature. Enabling Archive specific users activates the Add button in the Archive users’ messages portion of the screen. The Add button creates a window for adding a user to block. There are four components to this window. Enter the address to begin. Reminder: For best results, use internet address format: [email protected] and not simply the user’s prefix. There is a drop down menu: Compare against the FROM field: this will only block the address if the message is sent from, but not to that address Compare against the TO field: which will only block the address if the message is sent to, but not from that address Compare against both: which blocks mail traveling to and from the given address. The Add Comment field: an optional section where you can add a descriptive piece of text which explains why the block has been installed. This might be very useful when several administrators may be required to be alerted, or your IT staff needs to edit the block. This can be useful when making notes for archival purposes. Note: The wildcard feature is accepted when Archiving Specified Users. You can, therefore, except addresses from an entire domain (*@domain.com). The Edit and Remove buttons on the main screen of the Archiving section of the GWAVA configuration program have similar functionality to the Add button. To remove or edit an address, select it from the Archive user’s messages list and click Remove. Archiving – What does it create? Archiving creates ZIP or MIME files (see Advanced Archiving Options to select which) in a subdirectory under the Archive subdirectory. The specific tree structure is also selectable under Advanced Archiving Options. These files are known as “container” files, and contain the attachments as well as the message text of the original file. This is the way GWAVA has always stored archived information. In addition to container files, activating SQL storage in Advanced Archiving Options will also store additional information in a series of SQL databases. This is a major feature in GWAVA 3. It functions as a superset of the original GWAVA archival method – when SQL storage is activated, container files continue to be created exactly as before. However, many headers, a portion of the message text, and general information about the message is mirrored in the SQL database. These databases may be queried by Archive Viewer, and allow greatly increased flexibility in filtering, sorting, and searching your data warehouse. A 3rd party SQL server is not required. GWAVA 3 ships with a NLM-based SQL database which is automatically installed along with the rest of GWAVA. Copyright © 2005 Beginfinite Inc. All rights reserved. GWAVA 3.6 46 Advanced Archiving Options Clicking the Advanced Archiving Options button presents a configuration window. The Advanced Archiving Options window has three tabs: Storage options (the default tab), SQL options and Pruning options. Storage The first option in the Storage tab of the Advanced Archiving Options window is for controlling mail from which senders should be archived. There are three options: Internal — people within your domain, External —people outside your Both Internal and External — senders within and outside your domain The default is Internal only. Where to store archive Below the Archive Senders drop down menu is another drop down menu with three options for determining where archives are stored. The three options are Store directly in the archive directory, Store daily archive directory and store monthly archive directory. Depending on what you have elected to archive, and the amounts of storage you have available, you may wish to change this setting from the default: store directly in the archive directory. Store directly in the Archive directory: This saves all messages into the same directory. Store in a monthly subdirectory: This creates a new archive directory for each month. For example: ARCHIVE\2005\FEBRUARY. Store in a daily subdirectory: This creates a new archive directory for each day. For example: ARCHIVE\2005\FEBRUARY\26. MIME and ZIP format Messages can be saved in MIME or ZIP format, and an index file is created in the ARCHIVE directory. The index is a comma delimited (CSV) text file with date, time, from, to, subject, and other information listed about archived messages. This index is appended to each time a message is saved to the archive. You may need to prune this file from time-to-time to prevent it from becoming too long. It is strongly recommended to use Zip rather than MIME format. There is a performance gain with using ZIP format, and the ZIP archives are often considerably smaller in size. MIME continues to be supported mostly for legacy purposes (GWAVA 1.x) Stop Archiving if Disk Space is Below This field halts archiving if storage space falls below an entered size on the chosen volume. The default value is 8,192 kilobytes. To prevent your archive from taking up all of the server’s disk space, you can establish a lower limit for free disk space. Enter a value in KB in the Stop archiving if disk space is below field, and GWAVA will stop archiving messages when that limit is reached. If you have opted to archive many messages, you may find your archive reaches this limit quite quickly. Copyright © 2005 Beginfinite Inc. All rights reserved. GWAVA 3.6 47 Categorize by type of event With or without SQL mode, containers (zips or mime) which contain all the files are created just as they were before. They categorize by type of event is only relevant to where the container files are stored, not to the SQL database. To enable the Categorize by type of event, click the checkbox. Note: Archive by type only effects the location the containers are stored in. It is most useful in non-SQL mode for that reason. It has absolutely no effect on the SQL database, which always stores the different event information. Store MIME in archives during post office scan The last primary option on this screen is store MIME in archives during post office scanning operations. When this checkbox is enabled, MIME header information will be included in the archiving process. SQL options Enabling the Store Information in SQL Database checkbox will activate three data entry fields beneath it. These are: Maximum text to store (kb), Rollover database if size exceeds (mb) and Rollover database if age exceeds (days). Store information: This creates SQL databases storing information about GWAVA archives. This is particularly useful when used with the SQL mode in the GWAVA 3 Archive Viewer. Maximum text to store: This defines just how much message text is stored in the SQL database. Which in turn tells you how much message text can be searched from that file in the SQL archive viewer. There are significant tradeoffs between speed and disk space versus scope that is controlled by this option. The default is 16 KB. Finally, the rollover database options control how the database will be rolled over by both size and date. Note: These databases are always in <archivedir>\mta or <archivedir>\poa. Also, the overview.db in this directory is the metadatabase that list all the GWAVA databases. Copyright © 2005 Beginfinite Inc. All rights reserved. GWAVA 3.6 Automatically prune archives The final tab in the Advanced Archiving Options window controls Pruning. Enabling the Automatically prune archives checkbox activates the two data entry fields beneath it. The first controls the time in days before archive files are erased. The second is the time of day when the erasure will occur. This last field uses a 24 hour clock. All Archived messages can be viewed using the Archive Viewer, a separate program packaged with GWAVA. Note: Only the container files are removed, the SQL databases are not pruned. The SQL database information in general takes very little disk space overhead. You can manually remove data in Archive Viewer, or you can execute a SQL query. Copyright © 2005 Beginfinite Inc. All rights reserved. 48 GWAVA 3.6 49 Exceptions Used to set exceptions for user e-mail addresses. To add a new exception, click Add, which opens the Add a User Exception options screen. To make changes to an existing exception, select the user in the list of excepted users, and click Edit. To remove a user, select the user in the list and click Remove. Add User/Edit User Exception The Edit user exceptions screen has the same functionality as the Add a User Exception screen. Note the GroupWise Address Book integration. Copyright © 2005 Beginfinite Inc. All rights reserved. GWAVA 3.6 50 Exempting a user To exempt a user from one or more rules, enter the e-mail address, select a compare option—to, from, or both—choose which rules the specified e-mail address will not be affected by, and click OK. Throughout GWAVA 3 is GroupWise Address Book integration. Click the Address book icon next to gain access to your current address book entries. You can also find this button in the Archive by User and Address Blocking screens. You may statically expand a distribution list, as well. Exemptions can be applied to: Virus Scanning, Attachment Blocking, Address Blocking, Spam, Oversized Messages, Content Filtering, RBL, Fingerprinting and SuRBL. It is best recommended you use internet email formats for excepted e-mail addresses ([email protected]). You can use wildcards to exempt entire domains (*@domain.com). Here are some examples: *[email protected]* *@domain.com* *domain.com* *domain* Comments Comments may be added to the exception. The note typed into this entry field can be used to remind administrators of the purpose of the exception, or actions to take when certain events are triggered. Copyright © 2005 Beginfinite Inc. All rights reserved. GWAVA 3.6 51 Advanced options Advanced user exceptions determine how tightly or loosely multiple exceptions are enforced. This distinction is necessary when more than one recipient is specified in a message. If this is turned on and one user triggers a restriction, the message will be delivered to all recipients; if it is turned off and one user triggers a restriction, the message will not be delivered to any recipients. GWAVA is not able to selectively deliver messages. Typically, and unless otherwise specified by tech support, this should be off. Loose exceptions can be created for Virus Scanning, Attachment Blocking, Address Blocking, Spam, Oversized Messages, Content Filtering, RBL, Fingerprinting and SuRBL. Copyright © 2005 Beginfinite Inc. All rights reserved. GWAVA 3.6 52 Post Office Scan Post Office Scanning examines e-mail at the Post Office level. GWAVA’s ability to protect you at this level deep inside your GroupWise system means you have the best protection from internal threats. Post Office Scanning prevents the spread of viruses and also filters messages sent within GroupWise Post Offices your network. Post office scans can both be scheduled and run independently of each other. The same technology has other business applications. See the section on Surveillance to learn more. GroupWise 6.5 Post Office Scanning requires GroupWise 6.5 Post Offices. The POA should have IMAP enabled in Console One. From ConsoleOne, access your POA’s (Post Office Agent) Properties. Click the GroupWise tab and select Agent Settings. Select the Enable IMAP checkbox. If the GWIA is running on the same server and provides IMAP services, you may need to change the POA’s default IMAP port (143) so it does not collide with the GWIA (if GWIA is running on the same server as the POA). POA scanning runs on a scheduled basis, and is triggered by the GWAVAPOA program which can be autoloaded by the main GWAVA MTA program, or loaded independently by typing SAPO at the server console. GWAVA checks for new Post Office jobs regularly. You can alter the scanning time by changing the minute value on the Post Office Scan page. Click the Scheduling button to present the list of scheduled Post Office Scans on the current installation of GWAVA. Copyright © 2005 Beginfinite Inc. All rights reserved. GWAVA 3.6 53 Adding, Editing and Removing Post Office Settings To add a Post Office to your GWAVA configuration, click the Add button. Using the fields provided in the Add a Post Office window, enter a name, the IP address or hostname of the post office in the hostname field, and the IMAP port used by the Post Office. Trusted Application Key and Scheduled Post Office Scans GroupWise 6.5 and above make use of the trusted application feature. Trusted applications can gain access to any user mailbox in the system by means of a “key” generated by GroupWise. The relevance to GWAVA is that this key is used by GWAVA for scheduled post office scans. The first time GWAVA is run it will prompt users to generate a Trusted Application Key. Without such a key, the administrator would have to provide GWAVA with a list of every user and their passwords – clearly an unmanageable proposition. It is for this reason (and the POA IMAP support)that POA scanning is supported only with GroupWise 6.5 and above. Generating a Trusted Application Key To generate a Trusted Application Key, click Enable Post Office Scanning. A screen will be presented asking you to identify the path to your primary domain directory. Click the Browse button and navigate to the required location. The key file is generated automatically. Click OK to continue. This record will be inserted into the Post Office Scan section of the GWAVA configuration screen automatically. Copyright © 2005 Beginfinite Inc. All rights reserved. GWAVA 3.6 54 Adding or Editing a Post Office To add or edit the settings of an existing Post Office, select the desired Post Office from the listing and click either the Add or Edit buttons. The windows presented are identical apart from their title bars. Post Office Already Configured If you already have a Post Office configured with GWAVA, you can use that Post Office’s settings as template for the new post office by selecting a Post Office from the configuration file drop-down list. When you use the Create new configuration file option, you will see the base configuration file indicated in the Retrieve configuration from field. A file name, created from the name given to the new Post Office, will appear in the Save configuration to field. Begin by supplying a Name in the entry field at the top of the window; underneath this field are the host and IMAP port fields, which should already be populated. One change from previous versions of GWAVA is that the Configuration section has been re-ordered. The Retrieve configuration from field is presented first, then a choice between Use the MTA Configuration File, or a drop down menu presenting configured Post Offices. Lastly there is the Save configuration to path and a checkbox to Create a new configuration based upon the above selection. Click OK to save your configuration or Cancel to leave it unedited. You will be returned to the Post Office Scan window. Removing a Post Office To remove a Post Office from GWAVA, select the list of defined Post Offices. Click Remove. This Post Office will no longer be subject to GWAVA scans. IMPORTANT: You will not be asked to confirm the removal. Copyright © 2005 Beginfinite Inc. All rights reserved. GWAVA 3.6 55 Switching Configurations Once you have established which Post Offices will be scanned with the specific installation of GWAVA, you can open a separate GWAVA Manager Session for each Post Office. Click Switch Config to open the Switch Configuration selection window. The MTA Configuration entry represents the main GWAVA configuration for the present MTA. Each additional post office has its own entry. To re-launch the Post Office specific GWAVA Manager, select a configuration from the list provided. Click Ok. Color change: In the pink! The GWAVA Manager will shut down at this point—this is normal behavior—and will restart with the settings for the specific post office. You will also notice the navigation button area on the left of the GWAVA Manager will use a pink bar at the top of the navigation menu to differentiate the Post Office configuration from the main MTA configuration. Before the new configuration opens, you will be prompted to save the current configuration. If you have made changes since you launched the GWAVA manager, click Yes. If you have not made changes, or do not want to save, click No. To stop the re-launch of the GWAVA Manager, click Cancel. To return to the MTA configuration, without restarting the GWAVA Manager, select Post Office Scan from the buttons on the left, click Switch Config, choose MTA Configuration from the list, then click Ok. Copyright © 2005 Beginfinite Inc. All rights reserved. GWAVA 3.6 56 Editing Post Office Configurations You can use the GWAVA Manager for Post Office Configurations for many of the same functions as the main MTA Configuration. Virus Scanning: can only be turned on or off at the PO level, and notification options can be selected. Choosing AV engines can only be done at the MTA level. Oversized Messages: retains the same functionality as the MTA level. Attachment Blocking: retains the same functionality as the MTA level. Content Filtering: retains the same functionality as the MTA level. Address Blocking: retains the same functionality as the MTA level. Archiving: retains the same functionality as the MTA level. User Exceptions: retains the same functionality as the MTA level. Post Office Scan: allows access to switching configurations and to scheduling, however new Post Office profiles can only be defined at the MTA level. Reports: retains the same functionality as the MTA level. Notify Options: the address of the Administrator can be different from other Post Offices or the MTA, if you like; and options for sender and recipient notifications can be different from the MTA level. Changes cannot, however, be made to most SMTP settings. Your IDomain can be changed, and additional IDomains, however, can be added. Advanced: the Tuning features are not available at the PO level, however the Add/Edit Custom entries and Monitoring functionality is present. Location of Files, Profile, Miscellaneous, and Licensing: are not available at the PO level. When you have finished editing the Post Office configuration, you have two options to save. You can select Post Office Scan, Switch Configuration and respond Yes to the prompt to save the configuration, or you can click Ok at the far left of the GWAVA Manager. In either case, GWAVA will ask whether you want to reload the configuration. Select Yes to have changes take effect immediately. Scheduling Post Office Scans GWAVA Scans of Post Offices within the MTA can be forced on a schedule. To use this feature, click Scheduling on the main screen of Post Office Scan. The Scheduled Jobs master list is presented. This list contains lists all POA scans. You can sort them by name, status, control, schedule or seed time by clicking on the column headers. From this window, administrators can also create, edit, and remove POA scan jobs. To create a new job, click Create. To edit an existing job, select the job from the list and click Edit. To remove a job, select it from the list and click Delete. Create a New Post Office Scan Job After clicking Create in the Scheduled Jobs window, the Create New Job dialogue box opens. There are three tabs—Scheduling, Post Offices, and Mailbox Scope. By default, this window opens to the Schedule tab. The other tabs are Post Offices and Mailbox Scope. Copyright © 2005 Beginfinite Inc. All rights reserved. GWAVA 3.6 57 Step 1 Name the job An automatically generated name, based on a time stamp, will be given to the job if you do not enter a custom name. Select the starting date and time with the date drop-down, and the time scrollable menu. When you click on the date, a calendar appears: Click the date you wish to start the job on and the tool will close, and the date selected will appear in the job creation dialogue box. Jobs can be scheduled to occur once or repeatedly daily, weekly or monthly. Use the entry field and drop down menu to schedule the scans. You can also decide if Users (on by default) or Resources (off by default) are scanned. Finally, to scan the trash folders of users, enable the Scan trash folder for items. Copyright © 2005 Beginfinite Inc. All rights reserved. GWAVA 3.6 58 Step 2 Choose the post office To select which Post Offices will be scanned, click the Post Offices tab, then choose the post office needed for the job (the names will be the same as the Post Office profiles you have created). To change the order in which Post Offices are scanned, select it and click the up or down arrows on the left. To include all profiles, click All. To clear all selections, click None. Copyright © 2005 Beginfinite Inc. All rights reserved. GWAVA 3.6 59 Step 3 Determine the scope The next tab selects the Mailbox Scope. Use this tool to control which user mailboxes are scanned in the current job. You have the option of scanning all user mailboxes, only selected mailboxes, or all but those to be excluded. To add a user to the “only” or “exclude” list, select the Only these mailboxes or Exclude these mailboxes option, then click Add. The Edit and Remove buttons have similar functions and are used to alter this list. Copyright © 2005 Beginfinite Inc. All rights reserved. GWAVA 3.6 Step 4 Choose the date range for your post office scan The final task in creating, or editing your post office scan is to choose the date range. There are three basic choices which you choose from the drop down menu provided in the Date Range tab: Scan all messages, regardless of date Scan messages within the last [INSERT VALUE] days prior to the job’s starting date Scan only messages falling within a date range The first, scan all messages, has no additional options. The second, scan messages within the last [X] days prior to the job’s starting date, is determined by an entry field. Enter a value for the number of days going backward from the job’s first day. The default value for this field is one. The last option, scan messages between, modifies the date range screen to present two date selection fields. Copyright © 2005 Beginfinite Inc. All rights reserved. 60 GWAVA 3.6 61 You must choose a start and end date. The default for both fields is the current date. Clicking and holding the date drop down menu will bring up a When you click on the date, a calendar appears. Click the date you wish to start the job on and the tool will close, and the date selected will appear in the date range field. Do the same for both dates. When the appropriate mail boxes have been chosen, click Ok. GWAVA will prompt you with the following question: Would you like to submit this job? Answer Yes to have the job submitted (activated) immediately, or No to have it saved—in an inactive state—to the list of jobs. Delete a job If you want to delete a job, select the job to be eliminated then click Delete. GWAVA will prompt you to ensure you want to delete the job before it is removed. Refresh A deleted job may not disappear from the list instantly. Look on the main first screen of the Post Office Scan configuration to see how often GWAVA has been set to check for new Post Office Scan jobs. Click the Refresh Status button to update the list immediately. Edit and Submit Edit lets administrators alter existing jobs and is similar in function to the process for creating a new post office scan job. Note: You cannot edit a submitted or active job. Submit lets administrators tell GWAVAPOA to process the job. Normally one submits a job right after creating or editing, but there might, on occasions, be reasons for not doing so. Remove To remove a Post Office Scan job, first select it from the main screen of the Post Office Scan screen of the GWAVA configuration program. Click Remove. IMPORTANT: You will not be asked to confirm this removal. Copyright © 2005 Beginfinite Inc. All rights reserved. GWAVA 3.6 62 Logging The Event Logging screen is where GWAVA 3’s reporting is configured To turn on logging, click the Enable logging of console information to disk checkbox. When enabled, GWAVA will write activity logs in the LOG directory. To limit the size of the log files, enter a KB value in the Log files shouldn’t exceed field. You can also limit the length of time a log file is stored by entering a number of days in the Roll over log when older than days field. If you enter 7 in this field, log files will be purged after one week. Use the Level of date/time detail drop-down list to select how much information you would like logged. The options here are: No Date / Time display Display Date / Time Display Time Only Offline Logging enables log buffer that can be examined at the server console, if you desire. At the console, pressing the F9 key lets you browse a log as mail is still being processed. (You may note that when doing this, “F9- Browse Log” vanishes from the bottom of the console screen.) Use the arrow keys to navigate the offline log. To return to the active console processes, press the Escape key. Automatically prune logs helps you administer your log files automatically. Enabling this checkbox activates the two entry fields to the right: Remove archives older than and Remove at what time. The defaults for these are seven days and 2 a.m. respectively. Note: the time of day must be specified using a 24-hour clock. Verbose Logging To receive GWAVA debug messages, click the Verbose logging checkbox. Copyright © 2005 Beginfinite Inc. All rights reserved. GWAVA 3.6 63 Remote IP Logging Click the Remote IP Logging button to open the Remote IP Logging screen. Remote IP Logging sends logs to a remote location. To enable it, click Remote IP Logging, then click the Enable remote IP logging checkbox and enter the IP address in the entry field provided. Click OK when done. You can then run the IP Logger client included with the GWAVA front end to capture the logs. Click Cancel to leave your settings unchanged. Reports The Reports button will bring up a list of available configuration reports that GWAVA can generate. These include: list mail filters, list user exceptions, list blocked attachments and exceptions, list address blocks, list post offices, list archived users and list RBL sites There is a checkbox to launch the configured browser to view the report after generation. Otherwise, the report will be saved but not shown. The drop down menu has three options for report sorting: Primary sort, Sort by domain if available, Don’t sort, and List SURBL sites. To generate one or more reports, select the needed reports using the checkboxes, then click Generate. Reports will be created in separate windows. Choices include: List mail filters List user exceptions List blocked attachments / exceptions List address blocks List post offices List archived users List RBL sites Click the checkboxes to the left of the desired reports to select which will be generated. The reports are generated as HTML files for easy viewing and exporting Event Logging Click the Event Logging button to begin. When the Event Logging window is presented, enable the Enable Event Logging checkbox. Copyright © 2005 Beginfinite Inc. All rights reserved. GWAVA 3.6 64 You may now choose which statistical reports are chosen for generation. GWAVA 3 formats these reports using templates. From this screen you can add, edit or remove event logs or change the output paths. By default all the current templates are selected (have a checkbox next to them). You can either unselect them to temporarily disable them, or remove them entirely. Begin by clicking Add. To add a new event log, first name it in the Description field. Then choose a template using the Edit button, then, define the output path for the generated log. Note: The ABC button activates the metavariable glossary. These variables allow nearly unlimited control of specific information you want outputted when events occur. This makes obsolete Copyright © 2005 Beginfinite Inc. All rights reserved. GWAVA 3.6 65 GWAVA’s event.log methodology. Note also that functionality used formerly the archive.csv is also now superseded by the new Event Logging system in GWAVA 3. You must now choose what will be logged. Options include Normal messages (this can result in large logs but can be useful for testing. Remember to turn it off.) Virus scanning Attachment blocking From address blocking To address blocking Content filter for subject Content filter for body Oversized messages Oversized attachments Fingerprinting RBL Spam SuRBL Content filter for attachment Click OK to name and save your event log report or Cancel to quit. Note: For more about templates and variables, see Location of Files and the appendices for more information. Copyright © 2005 Beginfinite Inc. All rights reserved. GWAVA 3.6 66 Click the Scheduled Events button activate the window for managing scheduled statistical logs. Scheduled Output allows administrators to generate outputs or e-mails of specific information at specified times. This makes obsolete the old daily reports option familiar to users of previous versions of GWAVA. The daily statistics report has similar functionality to other configuration controls in this section. Begin by clicking the enable Scheduled Output checkbox. Ensure that the DLYTATS.822. template is enabled. The template we’ve provided that mimics the old daily statistics for administrators in earlier versions of GWAVA. Note: Event logs are is an output of a template that has been parsed. Dlystats.822: This is a reduced version of the Administration.822 template. (Yesterd.822 is the same as dlystats.822, but refers to yesterday’s statistics instead of today’s. Imagine the report firing at midnight for example – today’s stats will be more or less zero, and when in fact you may want yesterday’s instead.) For details about the template, consult the appendices. There you will find a breakdown of the contents in the TAdmin template for easy reference. Click Add. Copyright © 2005 Beginfinite Inc. All rights reserved. GWAVA 3.6 67 The Enable a scheduled output screen allows you to generate rich statistical reports regularly. The primary option, Output information on a weekly monthly basis is selected by a drop down menu. If monthly is chosen, then the days of the week appearing at the centre of the window change to a day of the month selector. Direct output to a file or e-mail address is the next option. The other option is to direct the output to a file. Note that the e-mail address can also be controlled using metavariables. Template filename determines which master template will be used to structure the output. Choosing the Edit button will allow you to edit or create a new template using the metavariables supported by GWAVA 3. Description is a plain text explanation of the purpose of the report. Create output on which days allows administrators to choose which days GWAVA will generate reports. Below this is the time of day window. To alter the time that reports are generated, click the Add button. The Edit and Remove buttons only become highlighted when a time of day is selected. This window uses a 24-hour clock. Enter the time of day required then click OK or Cancel. Copyright © 2005 Beginfinite Inc. All rights reserved. GWAVA 3.6 68 Enable Logging You may now choose which statistical reports are chosen for generation. GWAVA 3 formats these reports using templates. From this screen you can add, edit or remove event logs or change the output paths. Begin by clicking Add. To add a new event log, first name it in the Description field. Then choose a template using the Edit button, then, define the output path for the generated log. Note the ABC button that will activate the metavariable glossary. These variables allow nearly unlimited control of specific information you want outputted when events occur. This makes obsolete GWAVA’s event.log methodology. Note also that functionality used formerly the archive.csv is also now replaced by the Event Logging system in GWAVA 3. Refer to the appendices for more information. Copyright © 2005 Beginfinite Inc. All rights reserved. GWAVA 3.6 69 You must now choose what will be logged. Options include Normal messages (this can result in large logs but can be useful for testing) Virus scanning Attachment blocking From address blocking To address blocking Content filter for subject Content filter for attachment Content filter for body Oversized messages Oversized attachments Fingerprinting RBL SuRBL Spam Click OK to name and save your event log report or Cancel to quit. Copyright © 2005 Beginfinite Inc. All rights reserved. GWAVA 3.6 70 Location of Files Features in this section of the configuration program are used to keep track of file locations for files important to GWAVA. Variables The files available for modification here also include notification messages. Previous versions of GWAVA have used text files to alert users of triggering events. These have been replaced by more compact templates populated by variables. You should not need to change any of the file locations or the messages associated with the variables themselves. If you do find you need to, or are instructed to do so by a member of the GWAVA technical support team, do so by clicking Edit Path/Filename, and edit the path/filename information appearing in the Edit window. The title bar on the window which opens changes according to the file selected for alteration of its name or location. Here is a sample window, the Scheduled Events template: When directing GWAVA to use a new file, be certain you have already located the file you want to use in the required directory. The files and directories tracked here by default are the: GroupWiseDomain Directory, the GWAVA product Directory, the Archive directory, the Administrator Notification Template, the Sender Notification Template, the Recipient Notification Template, the Fingerprint ID file, the Event Log Template and the Scheduled Event template. The Resource directory, new to GWAVA 3, contains all the new templates as well as other configuration files. For more about GWAVA 3’s templates and metavariables, please consult the appendices. Copyright © 2005 Beginfinite Inc. All rights reserved. GWAVA 3.6 71 Note: The Scheduled Events template is the core configuration list of all the scheduled events and whether or not enabled. The Fingerprint ID template is a mapping template for fingerprint types and their text descriptions. For information about the other templates, see the appendices. File Locations The location of all files can also be confirmed from the GWAVA program by pressing Ctrl-E or F9 and scrolling through the GWAVA log file. Directory/Filename Default Setting Comments Domain Directory Set by the /HOME switch in the MTA setup file. This should point (in UNC format) to the directory containing WPDOMAIN.DB. It is the domain the MTA is servicing. There is no need for special file system rights at this level, but there should be an MSLOCAL subdirectory below. The GWAVA user account must have at least RF rights to the MSLOCAL subdirectory and all of its subdirectories. Note: The AV Scanner must ignore the MSLOCAL directory and all its subdirectories when scanning. GWAVA Root Directory The GWAVA subdirectory under the Domain Directory. GWAVA recognizes all of the informational and working directories as subdirectories of the GWAVA Root Directory. It is best recommended to assign RWCEMF rights to this directory. VWORK – this GWAVA subdirectory is where all messages and attachments are temporarily quarantined for virus scanning. This directory is exposed to the AV Scanner, and all files placed in it will be scanned for virus infection. The user assigned for GWAVA must have RWCEMF rights to this directory, and your AV Scanner must scan this directory. The VWORK directory must be located on the same server as the domain directory. LOG – this GWAVA subdirectory is where GWAVA stores log files. If logging is disabled, this directory will remain empty. The user assigned for GWAVA must have RWCEMF rights to this directory, and the directory must be located on the same server as the domain directory. LOG/ANTISPAM – this log subdirectory is where GWAVA stores antispam log files. If logging is disabled, this directory will remain empty. The user assigned for GWAVA must have RWCEMF rights to this directory, and the directory must be located on the same server as the domain directory. SMTPQ – this GWAVA subdirectory is where notification messages are built and stored prior to delivery. If you experience problems delivering these messages, they will remain in this directory. The user assigned for GWAVA must have RWCEMF rights to this directory. Note: Some AV Scanners cannot scan MIME format messages properly. You may need to exclude this directory from AV scans. ARCHIVE – this GWAVA subdirectory contains files archived by GWAVA. CONFIG - this GWAVA subdirectory contains for GWAVA configuration file. CONFIG/SPAMCFG – this CONFIG subdirectory contains the Anti-Spam Heuristics settings files. CONFIG – This directory contains notification templates Copyright © 2005 Beginfinite Inc. All rights reserved. GWAVA 3.6 72 Editing File Contents To edit the contents of an automated notification message, select it from the list, click Edit File Contents, and adjust the body of the message that appears in the Edit window. In previous versions of GWAVA, notification messages were stored in txt files. In GWAVA 3, more flexible and compact variables are used to populate templates. To edit a file, choose a file from the list then click the Edit File Contents button. To see what is held in the other default templates, see the appendices: it contains the complete TAdmin.822 template with an explanatory glossary. Tip: Click on the ABC button at the top of this window for a full list of the GWAVA 3 metavariables you can include in your notification templates. The meta-variables can be used to indicate message related information in the GWAVA notification messages. See the appendices for a complete list. You can cop the explanatory text in the bottom window by using the copy to Clipboard button. Copyright © 2005 Beginfinite Inc. All rights reserved. GWAVA 3.6 Server Profile This informational screen shows which profile is currently being viewed with the GWAVA Manager. Edit the server profile with the Profile Manager. Information displayed on this page includes: The server name MTA startup file path Server IP address TCP port to listen Configuration password entry field Use IP to load and save configuration Copyright © 2005 Beginfinite Inc. All rights reserved. 73 GWAVA 3.6 74 Surveillance For inspecting and monitoring e-mail activity without the knowledge of your end users By default, GWAVA blocks/deletes messages that violate its rules. The Surveillance screen allows you to override GWAVA’s default behavior for a variety of purposes. Surveillance mode can be enabled on a testby-test basis (i.e. enable surveillance on content filtering and spam, but not on any other type of test). Adjusting Surveillance settings is accomplished by highlighting the appropriate test (let’s choose “Content Filtering”) and changing the default behavior from “Delete” to “Allow”. The result is that any time a content filter rule is violated; GWAVA will log and archive the message, but will NOT block it. The sender and recipient will never know that you caught them discussing an unauthorized topic. Here are some examples of how to use Surveillance mode: Who is sending 25 megabyte-sized e-mails? Who is discussing a confidential topic? Who is communicating with a competitor? Who is wasting time on eBay? Who is sharing MP3 files? Now, combine Surveillance mode with GWAVA’s Post Office scanner, and some even more intriguing functionality now becomes possible: Show me ALL e-mails that exceed 25 megabytes? Show me ALL e-mails discussing a secret or confidential topic? We have a court order to produce copies of all communications concerning “Enron”. Show me ALL e-mails sent to or received from a competitor? We are having a legal or HR problem with an employee; show me ALL of that employee’s e-mail. Show me ALL e-mails containing MP3 files? Copyright © 2005 Beginfinite Inc. All rights reserved. GWAVA 3.6 75 Surveillance settings can be set for event triggers such as: An address block Attachment Blocking Content Filtering Fingerprinting RBL SuRBL Spam Virus Scanning Oversized Messages Step 1 Choose an event type. For example, “Content Filtering”. Step 2 Handling the message When the event class is triggered, there are two options: Delete the message, the default option Allow the message to pass (Surveillance mode). Make your choice with the drop-down menu Step 3 Choose an administrator list This is option determines who is alerted when specific events are triggered. If Administrative notification is active for a class of events, the default is for GWAVA to Use the standard admin address (set in the “Notify Options” menu). There are two other options available. To Use the auxiliary administration list, or to Use both address lists. The choice of which of these options is best depends upon the internal structure of your organization’s e-mail system and the purpose of the surveillance. For example, a specific group of non-IT department administrators might be needed for surveillance of e-mail communications, for example human resources, the legal department or supervisors. Step 4 If necessary, click the Auxiliary Admin List button to define your auxiliary administrators. A window listing all of the administrators with whom GWAVA trigger events are associated will be displayed. Copyright © 2005 Beginfinite Inc. All rights reserved. GWAVA 3.6 76 Step 5 Click Add. Enter the internet e-mail address of the person, or department responsible with oversight of that particular event trigger. Clicking OK twice returns you to the surveillance administration list, and then to the Surveillance tools main screen. TIP: Surveillance mode is a great way to try out new GWAVA features. For example, if you are apprehensive about using the anti-spam technology, set Spam to “Allow”. That way, you can observe how GWAVA’s anti-spam technology performs without worrying that legitimate messages are being blocked by mistake. You can make settings and tuning adjustments in surveillance mode, observe the results, and if you are satisfied, turn Surveillance mode off. It’s like having a live, real-world simulation to try out new GWAVA features. Copyright © 2005 Beginfinite Inc. All rights reserved. GWAVA 3.6 77 Notify Options Using GWAVA to inform administrators and system users when their messages trigger GWAVA filters. Global Notify Parameters Enter the administrator’s e-mail address in the Administrator’s Internet e-mail address field. By default, this was set to [email protected] by the configuration wizard. This address must use internet addressing. When sending notifications to senders and recipients, you have the option of sending them to Internal—people within your domain, External—people outside your domain, or Both. Choose the preferred options from the drop-down menu provided. Copyright © 2005 Beginfinite Inc. All rights reserved. GWAVA 3.6 78 SMTP Engine GWAVA cannot send e-mail messages directly. It relies on your SMTP engine deliver the message: GWAVA builds the message and relays it to your SMTP server. Parameter Comments Host Name This is the name GWAVA uses to identify itself to the mail server (it is what is used to negotiate the HELO transaction). Typically this is set to your domain name. You can also set it to a fully qualified host name (such as GWAVA.YOURCOMPANY.COM). By default, the Configuration wizard set this value at yourdomain.com. Mail Host This is the IP address of the mail server that will relay mail on behalf of GWAVA. It can be your GWIA or any SMTP server. By default, the Configuration wizard set this to the mail server IP address you entered in Step 3 of the wizard. Mail From This is the e-mail address that will appear in the From line of the message header. By default, the Configuration wizard set this value at [email protected]. IDomain This is the Internet domain used by your company. By default, the Configuration wizard set this value at yourdomain.com. If your company has more than one Internet domain, click Additional IDomains. A small dialogue box opens where you can Add, Edit, or Delete additional IDomains from the list. Charset Specifies the character set GWAVA uses for composing notification messages. Additional IDomains Use these settings to add additional Internet domains that you wish to be treated as internal. For example, if you have companyname.com and divisionofcompany name.com, you may wish to add divisionofcompanyname.com as an additional IDomain. To do so, click Additional IDomains. This presents a dialogue box: To add a new IDomain, click Add and complete the form that opens. Click Ok (twice) to save the addition and return to the main Notify Options screen. Copyright © 2005 Beginfinite Inc. All rights reserved. GWAVA 3.6 Advanced SMTP Agent Options GWAVA offers a number of additional SMTP options you can configure depending on the type of mail servers you are using for sending GWAVA notification messages. Parameter Comment Optional Secondary Mail Host Enter the IP address of the secondary external SMTP agent. If this field is left blank, GWAVA will use the primary SMTP agent, defined on the main Notify Options screen. Domain Exceptions If a secondary mail host is defined, messages sent to domains in this list—as well as to the internal IDomain—will be sent through the primary mail host. Maximum SMTP Threads Set at 16 by default, this defines the maximum number of simultaneous send sessions with the SMTP engine. Acceptable settings range from 1 to 255. Additional send sessions beyond this setting will be queued to wait for an available thread. IMPORTANT: do not adjust by more than one or two threads at a time. Enable External SMTP Logging If enabled, all SMTP sessions will be saved to SMTP.LOG in the GWAVA log directory. By default this is turned off to avoid using a large amount of disk space. It can be useful, however, for diagnosing relay or communication problems. Notify As The name or email address you would like to see in the From header of the notification message. SMTP Authentication Depends on your SMTP mail server. GWAVA supports four options for SMTP Authentication—no authentication; PLAIN method; LOGIN method; and CRAM-MD5 method. If you use your ISP’s SMTP server, an open relay, or have relay exceptions, use Do not use SMTP Authentication. If you are using a GWIA, select Login method, and remember to use a valid GroupWise username and password. For all other methods, please consult your mail server software documentation. Copyright © 2005 Beginfinite Inc. All rights reserved. 79 GWAVA 3.6 Digest Spam Digests are a new feature in GWAVA 3.5. These produce clickable reports that are sent to users. Any may caught as spam is listed and users can click the entries to request a release. The important thing to understand is that digests to not replace any other reports or GWAVA action as digests are only items sent to users. Think of spam digests as overlaying other GWAVA actions and notifications. Note that digesting is separate from resubmission as not all users who are given digests may be eligible to resubmit quarantined emails. Parameter Comment Enable Digests Clicking this checkbox so that it is check marked enables the GWAVA Digest Notification feature. Comma delimited list of hours to send digests (0…23) Using a 24 hour clock, enter the hours where you want your users to receive spam-block digests. For example, 10, 13, 16, 17, 18 will send digests listing blocked messages at ten a.m., one p.m., 4 p.m., five p.m. and six in the evening. Specify the events to generate digests for Enable checkboxes for the digest alerts required. Options for digest alerts include: virus scanning, attachment blocking, address blocking from, address blocking to, RBL, SuRBL, fingerprinting, oversized messages, oversized attachments, spam, content filtering of subject, content filtering of attachment and content filtering of body. IMPORTANT: Note that digests act in addition to, rather than as a replacement for standard notifications. Digest User Scope Once enabled, choose which mailboxes to have digests sent to. All mailboxes is the default. You can also customize which mailboxes by choosing only these mailboxes or exclude these mailboxes. Use the Add, Edit and Remove buttons to select which mailboxes are included in or excluded from digest alerts. Copyright © 2005 Beginfinite Inc. All rights reserved. 80 GWAVA 3.6 Here is a sample digest report. A list of blocked mail, starting with the sender is presented to the user. Additional information about the blocked e-mail included are the subject, time, block reason and archive. By default, users clicking on the link will be presented with window already addressed with a button to “Release” intercepted mail. The digest templates tdigesth.htm, tdigestr.htm and tdigestf.htm. can be edited. Note that resubmission is dependent upon digesting. Copyright © 2005 Beginfinite Inc. All rights reserved. 81 GWAVA 3.6 82 Resubmission New in GWAVA 3.5 is the ability for users to resubmit messages that have been intercepted as spam. This frees administrators from the task of having to release mail. Note that users cannot infect their own systems by releasing messages with infected attachments. These are quarantined by the anti-virus system. Begin by clicking the Enable user resubmission of items from digest checkbox. An alert may appear, cautioning that the archiving format ZIP has been activated. Note that archiving must be on for digest release to function, otherwise—logically—there is nothing for users to release. Click OK to acknowledge the alert. If the Use this IP address/host name in HTML links data entry field is left blank, it will be the server IP address entered in step 3 of the GWAVA Configuration Wizard installation process, however, it can be your GWIA or any SMTP server. For example – For a system and users behind a corporate firewall, an IP setting such as 111.111.111.1 may be acceptable, except that employees in remote offices who are outside the firewall will not be served. Therefore, mail.mycompany.com may be preferable. Copyright © 2005 Beginfinite Inc. All rights reserved. GWAVA 3.6 The Address to send BCC copy of each released item is a simple way of building a customized ham corpus. Clicking the Resubmission User Scope button allows administrators to permit or disallow resubmissions for individual users. The default is that All users are allowed to demand resubmits. To add a resubmit user, click the Add button. Wild cards are permitted, and optional comments can be added. To edit a user mailbox, select the entry from the Users list and click Edit. To delete a user from the digesting options screen, select the entry and click Remove. Copyright © 2005 Beginfinite Inc. All rights reserved. 83 GWAVA 3.6 84 Miscellaneous This section of the configuration program is used to control additional settings that can be adjusted in GWAVA 3. Login The User Name and Password were established in Step 6 of the Configuration wizard. You can change this user at any time, but ensure the user has the necessary file system rights before making this change. See Location of Files for more information on file rights. Note: GWAVAOSA logs in if it is initialized by a GWAVA agent (MTA or POA) that is going to use file locking integration. MConfig no longer loads and saves MTA Startup file by default. MTA Startup switches moved to Miscellaneous. This is a big architectural change as previously GWAVA routinely contacted MTA Startup files. DMAN still performs in this manner, but the rest try to avoid this method except on a new installation Configure HTTP ServerPort and files for Redline. By default this is disabled. If you assign a port in Miscellaneous, GWAVA will listen and serve SHTML from <gwava>\config\resource\http. If your environment is not yet using redline, administrators still might be useful to use this port, you can use any metavariables needed in the SHTML file. Note: It might be a security risk to open up an HTTP server needlessly, therefore it is off by default. Preserve statistics on restart This option presents the preserve statistics upon restarting of GWAVA. Enable this checkbox to ensure continuity of your installation’s statistics. GWAVA is installed in a cluster Prior to this version clustering required a manual editing of configuration settings. The GWAVA is installed in a cluster checkbox updates your configuration file automatically. Unchecking it removes these changes. Note - This does NOT ENSURE THAT THE PATHING Information is correct. It also will not help with the cluster and unload scripts. Copyright © 2005 Beginfinite Inc. All rights reserved. GWAVA 3.6 85 Event Text The Event Text button presents a list window for customizing the event text metavariables appearing in GWAVA notification messages, reports and logs. You can only edit this list, not add or subtract from it. The event types are Multiple Events Virus Attachment Block Source Address Block Destination Address Block RBL Block SuRBL Block Fingerprinting Oversized Message Oversized Attachment Spam Content Filter Subject Content Filter Attachment Content Filter Body MTA Startup File Clicking the MTA Startup file presents a dialogue box for configuring message scanning per domain. Begin by selecting the needed domain and then choosing All domains, Only these domains and Exclude these domains. Click the Add, Edit or Remove buttons to make changes to the list of domains. Click OK or Cancel to save your changes or close this window without making any changes. VS Threads - Specifies the maximum number of scanning tasks the Novell-supplied API can handle. The default setting is 16, and the acceptable range is 1 to 100. IMPORTANT: do not adjust by more than one or two threads at a time—your server could crash if you adjust by more. GroupWise 5.x can handle no more than 16 threads- this is a Novell imposed limitation. VSPORT - As noted above in discussion of the Configuration Wizard, you can configure the /VSPORT switch by entering its port address in the space provided here. Note: avoid using this setting unless you are certain of the correct port to assign to the /VSPORT switch. Copyright © 2005 Beginfinite Inc. All rights reserved. GWAVA 3.6 86 Message Attachment Clicking this button presents a window for editing and controlling which events and types of notification (not the same thing) have the original message attached. By default, none are selected, however GWAVA advises tat Virus events should be chosen for Administrator notifications. Event types controlled here include: Virus scanning Oversized messages Attachment Blocking Content Filtering Address Blocking RBL SuRBL Spam Fingerprinting Notification types have three classes: Administrator, Sender and Recipient. Decompression Engine The Decompression Engine, when enabled, will decompress archive files— such as .ZIP, .TAR—for AV scanning. To enable the engine, click Decompression Engine and the Enable Decompression Engine checkbox in the window that opens. IMPORTANT: to prevent performance lags, it is recommended you use your AV NLM’s decompression engine to open and scan archive files. Some AV engines cannot open archive files. GWAVA’s decompression engine exists to cover your decompression needs if your AV NLM is not able to decompress archive files. This screen also contains a caution: Decompressing archives before they are scanned will cause a performance drain. Copyright © 2005 Beginfinite Inc. All rights reserved. GWAVA 3.6 Setting Comment Recursion Depth The number you enter in this field specifies how deeply within an archive file GWAVA will look for additional archives Useful for blocking zips that are nested too deep within archives Also Scan Archive Shell When enabled will scan the archive file itself, in addition to its contents. Test EXEs for compressed formats When enabled will test EXE files to determine if they are self-extracting ZIP files. Decompress these Archive Types Choose which archive files GWAVA will decompress. Currently GWAVA can open ZIP, GZIP, and TAR archives. SNMP Click the SNMP button to open the SNMP settings screen. Enable SNMP traps of GWAVA via the SNMP manager you are using in conjunction with Netware. To use this feature, click SNMP in the main Miscellaneous screen, then Enable SNMP in the SNMP settings screen. When SNMP is enabled, GWAVA will send traps (short messages) to a configured host (specified using INETCFG on the server), notifying the SNMP manager at the host of events— virus caught, error, etc. To change the target location for messages, edit SYS:ETC\TRAPTARG.CFG. You can either use the default INETCFG community or specify your own here. Copyright © 2005 Beginfinite Inc. All rights reserved. 87 GWAVA 3.6 88 Advanced This section of the GWAVA configuration program is for adjusting advanced settings. Please avoid making any changes to these settings unless you are doing so with the guidance of GWAVA technical support. Setting Comment Maximum scan tasks Specifies the maximum number of concurrent tasks GWAVA can handle. The default setting is 256, and the acceptable range is 1 to 65535. Maximum virus scan timeout Specifies how long before a virus scan is timed out. The default setting is 10 minutes. Switching Controls the amount of context switching the NLM performs. The default value is 3, and the acceptable range is 1 to 5. Heartbeat The GWAVA NLM will create a file called ~HrtBeat.tmp in the <DOMAIN>\GWAVA directory at a set interval (in minutes). Context Span The lines around triggering items. Antispam Block Read Size This is the how much memory is allocated for running a spam scan. For example, it this value is set to 4Kb and the file is smaller, it will read in and scan the message with no further disk reads. An 8Kb file would be read in two chunks. The bigger the number, the less likely a file will need to be split up during processing. This feature offers a very minimal performance feature but can be turned up on servers with large amounts of RAM. However, each simultaneous thread takes this memory, so a server running 256 threads and a read buffer of 100kb will need 25 megabytes. Copyright © 2005 Beginfinite Inc. All rights reserved. GWAVA 3.6 89 Enable Context Metavariable This enables the %%FilterContext variable, which does degrade performance somewhat. Omit VS delays, Force Scan File to Disk These are performance related. If you have difficulty catching viruses, it may be necessary to change the defaults. Remember to consult GWAVA Technical Support before changing these settings. Tight Address Block? Tight Address Block? is enabled by default. Note: the Exceptions screens has a button called Advanced Options for giving administrators precise control over looseness and tightness of exceptions; however by default none are selected. Startup in bypass mode Used for diagnostic purposes. Only follow this course of action on the advice of GWAVA Technical Support. VS Reopen Mode Enabling this checkbox activates Virus Scanner Reopen mode. ScanPartXXX This is on by default, and with GroupWise 5.x, scans the PartXXX attachment that is incorrectly created by the GWIA. First Line RBL DNS This is a workaround for GroupWise 6.01 and newer releases. In these releases of GroupWise, if the “hello” matches the IP address of the sending server, only the hostname is sent in the header. With First Line RBL DNS enabled, a DNS lookup will be performed to determine the server’s IP address. Copyright © 2005 Beginfinite Inc. All rights reserved. GWAVA 3.6 90 Custom Entries These should NOT be adjusted unless you are instructed to do so by GWAVA support. This section is informational so that in the event you are ever instructed to adjust these settings you will be familiar with the interface. Click the Add/Edit Custom Entries button to begin. To open the Custom Entries dialogue box, click Add or Edit Custom Entries when you are instructed to add an entry by our support team. In the space provided, enter the custom field as explained by GWAVA support. Click Ok twice to return to the Advanced settings screen. Scan Task Order You can alter the order in which GWAVA scans mail. This innovation means you can customize GWAVA’s analysis of mail by determining which tasks are completed first, and ending the analysis process in special circumstances. For example, depending where this particular installation of GWAVA is in your GroupWise environment, you may wish to place virus scanning first and halting all analysis after the successful detection of a virus in an e-mail. Default Order The default order is from lowest processor use to highest. Do not alter this list without the guidance of GWAVA technical support. Begin by clicking the Scan Task Order button. This will bring to the fore the Scan Task Order window. In it is a flow chart listing all the test types GWAVA employs. Selecting a test type from the list at the left will activate one or both of the arrows at the right. An arrow will dim when the chosen item is at the end of the list and no further movement higher or lower in priority is possible. Copyright © 2005 Beginfinite Inc. All rights reserved. GWAVA 3.6 91 Stopping analysis T here may be times when, depending upon your configuration, you wish to halt GWAVA’s analysis. For example, during a virus outbreak, an administrator may wish to save system resources by simply halting GWAVA’s analysis of mail once an infection is detected so that it is deleted without any more time or system resources taken up. Also, the notifications and statistics will only reflect the events up to that point. This is sometimes called ‘break on event.’ Adding or Removing an Event or Analysis Break To do this, choose the test desired in the Alter the Task Processing Order screen and click it twice. A stop sign will appear to the left of the test. To remove it, double click it again. Note that clicking the root of a test tree halts the operations inside that tree. Copyright © 2005 Beginfinite Inc. All rights reserved. GWAVA 3.6 Configuring Your AV Scanner Virtually any server based AV program can be used with GWAVA. The following requirements must be met for your AV program to work with GWAVA: The AV program should be responsible for decompressing archive file attachments. While GWAVA does have a decompression engine (see Miscellaneous) the AV NLM’s engine is less likely to cause performance issues. The AV program must be configured to exclude (from its scans) the MSLOCAL subdirectory, and any of its subdirectories, in the GroupWise domain directory. The AV program must scan the WorkFile directory, and if viruses are found, they must be deleted from that directory. Do not set your AV program to clean viruses from this directory. The AV program must be loaded and ready before GWAVA is running or files will not be scanned. Copyright © 2005 Beginfinite Inc. All rights reserved. 92 GWAVA 3.6 93 Directory Reason for Excluding Any Post Office directories and their subdirectories; Any Document Management storage areas There is no valid reason for scanning these; they are stored in encrypted format. In addition, Novell recommends that these directories are always excluded from scanning. <DOMAIN>\GWAVA\SMTPQ This is where GWAVA stores notification messages as they queue up. Since the administrator's e-mail may include an infected attachment, scanning this directory could impede GWAVA functions. <DOMAIN>\GWAVA\ZWORK, If the decompression engine is enabled (check to see whether or not your AV scanner can do this on its own), this is where GWAVA does its decompression work. <DOMAIN>\GWAVA\WORK <DOMAIN>\GWAVA\ARCHIVE (and subdirectories) <DOMAIN>\WPCSOUT, <DOMAIN>\WPCSIN, <DOMAIN>\MSLOCAL This is where GWAVA archives messages. Since messages may include an infected attachment, scanning this directory could impede GWAVA functions. There is no valid reason for scanning these; they are stored in encrypted format. In addition, Novell recommends these always directories are always excluded from scanning. GWAVA also uses the MSLOCAL\GWVSCAN directory, and interference from the AV Scanner here will cause serious problems. <DOMAIN>\WPDOMAIN.DB This is the master domain database and should never be scanned. It can cause serious problems to do so. <DOMAIN>\WPGATE The gateways are normally installed under this directory. GWIA does briefly create the files in a format that can be scanned; however, interfering with its proper function with an AV Scanner has been documented to cause serious issues. Copyright © 2005 Beginfinite Inc. All rights reserved. GWAVA 3.6 94 Specific AV NLM configuration instructions GWAVA supports all of the AV Scanners discussed below, and any future/newer releases of these AV solutions. Earlier versions may work, but were not tested by Beginfinite labs. CA eTrust Antivirus (Formerly InoculateIT) 4.5 or higher Install InoculateIT, and run it (ISTART4.NCF). In the Configuration, and Real-Time Monitor menu, set Direction to Disabled. Save your changes. In the GWAVA Configuration Manager, click on the AV vendor integrations button, and select eTrust InoculateIT from the pull-down menu. Click OK. Note: If the virus scanner engine is not loaded when GWAVA starts, it will not use the integration. You cannot enable this after the fact, so the AVENGINE program must be loaded prior to GWAVA. In GWAVA, ensure Decompression Engine is enabled, as eTrust InoculateIT does not scan compressed files. CA eTrust 7.x (GWAVA 3.x Only) Install eTrust Antivrus , and run it (AVLAUNCH INOSTART at the server console). In the GWAVA Configuration Manager, click on the AV vendor integrations button, and select eTrust 7.0 from the pulldown menu. Save your changes by clicking OK. Configure your exclusions via the eTrust Antivirus Realtime settings (using the Exclusions section of the Filters tab on the Realtime Monitor Options dialog) Note: If the virus scanner engine is not loaded when GWAVA starts, it will not use the integration. You cannot enable this after the fact, so the AVENGINE.NLM must be loaded prior to GWAVA. In GWAVA, ensure Decompression Engine is enabled, as eTrust InoculateIT does not scan compressed files. NAI Netshield 4.11/4.5/4.6 (or higher) Install Netshield, and load the server-based NLM (NETSHLD.NCF). Then run the Netshield Console. Right-Click the NetShield On-Access Monitor and select Properties. In Scan, files written to and from the server should be scanned. In What To Scan, All Files should be scanned. In Actions, either Move Infected files to a folder or Delete Infected Files Automatically can be selected. Under Exclusions, add the excluded directories. In GWAVA, ensure the Decompression Engine is enabled; NetShield does not scan compressed files. Copyright © 2005 Beginfinite Inc. All rights reserved. GWAVA 3.6 95 Symantec Antivirus Corporate Edition 7 (or higher) Options for the server-based scanner are configured in the Symantec System Console (SSC), which requires an NT workstation or server machine. After you install the SSC and the server-based scanner, load the server based scanner as instructed. (LOAD VPSTART /INSTALL the first time, and VPSTART afterwards). Run the SSC. Select the Server, unlock it, and Choose the Server RealTime Protection Options The Enable file system realtime protection checkbox should be checked. Set File Types to All Types. In Macro Virus options, set the primary action to Quarantine, and the secondary action to Delete. Repeat for Non-Macro viruses. The Exclude selected files and folders checkbox should be checked. Click Exclusions and Add the excluded directories (see Directories to Exclude from Scanning). You may wish to enable/disable Display Message on infected computer. GWAVA does not need the Decompression Engine enabled, SAV can scan compressed files (must be enabled in SAV console). However, it is strongly recommended that decompression remains enabled in GWAVA. This will provide optimal protection against all threats.) NAV 7 Note: To work properly with compressed files, the primary action must be set to Quarantine or GWAVA will fail to detect the virus. Command Interceptor for GWAVA Interceptor is not the same as Command Antivirus. If you do not have Command Interceptor, please follow the Command Antivirus configuration or contact Command Software for information regarding Interceptor. Install the NLM, run it (LOAD CSSCAN). If you also have Command Antivirus running on your GWAVA server, disable real time scanning or exclude the ENTIRE Domain and Post Office directories (Ignore the directory exclusion instructions earlier. In the GWAVA Configuration Manager, click on the AV vendor integrations button, and select Command Interceptor from the pull-down menu. Save changes by clicking OK. Note: If the virus scanner engine is not loaded when GWAVA starts, it will not use the integration. You cannot enable this after the fact, so the CSSCAN.NLM must be loaded prior to GWAVA. In GWAVA, ensure Decompression Engine is enabled, as Command Interceptor does not scan compressed files. Copyright © 2005 Beginfinite Inc. All rights reserved. GWAVA 3.6 96 Command AntiVirus for NetWare 4.58 (or higher) Options for the server-based scanner are configured in a Windows based program (Command AntiVirus for Netware Administration). Install the program, run it (LOAD F-PROT), and run the Command AntiVirus for NetWare Administration. Select the Server, and under the Task Menu, choose Real-Time Scans In Settings, set Action on Infection to Quarantine or Delete. In Settings, select both Scans On Opens and Scans on Closes. In Exclude, add the excluded directories (see Directories to Exclude from Scanning). All subdirectories will automatically be added, although the interface does not make this obvious. In GWAVA, ensure Decompression Engine is enabled, as Command AntiVirus does not scan compressed files. Trend Micro's ServerProtect for NetWare 3.71/5.0/5.1 Options for the server-based NLM are configured in a Windows based program (Supervisor Configuration Utility). Install the program files. Make sure they are running (SPNW.NCF), then run the Supervisor Configuration Utility. Double-click the server, and unlock it. Then choose File Checking from the Configure Menu. In the RealTime tab, make sure ALL Files are selected for DOS. In the RealTime tab, enable all the Incoming/Outgoing File Checking options—all 5 checkboxes should be checked. In the Exception Tab, add the excluded directories (see Directories to Exclude from Scanning). In the Action Tab, set Action on Virus Identification to Wipe Out or Move. Trend users should use Bindery with Omit VS Scan Delays checked. Or use NDS, with Omit VS Scan Delays unchecked. You may wish to disable the Broadcast message for Configure Actions. GWAVA does not need the Decompression Engine enabled; ServerProtect can scan compressed files. (This is true of ServerProtect 5.0/5.1. However, ServerProtect 3.71 does require the Decompression Engine.) Copyright © 2005 Beginfinite Inc. All rights reserved. GWAVA 3.6 97 Panda Antivirus 2.5 (or higher) Options for the server-based scanner are configured in a Windows based program (Panda Administrator) Install Panda Enterprise Manage Deploy your Distribution Agent to the Novell Server Install Panda Antivirus to Netware Right click on server and choose Edit Settings. Under Antivirus make sure All files will be scanned instead of selected items Deletion will be performed on viruses instead of cleaning The directories below MUST be excluded in order for Panda to work. If this step is not completed fully, false positives will result. Panda is VERY particular here. You must exclude: Work Archive MSLocal GWAVA does not need the Decompression Engine enabled; Panda can scan compressed files. Sophos Antivirus 3.32 (or higher) In the Real-Time Configuration screen Status = active Volumes = the volume with GWAVA’s directories should be write only Workstations: all (or whatever is required) Server Processes: Do not monitor for file access Scanning options: Scanning Level (full), Compressed Files: Yes, Intercheck: any setting Removal options: purge infected files Notify group: any setting In the Administration screen Executables - make certain BIN has been added so that the virus scanner validation test passes. In GWAVA Configuration Create a user. Log in. Enable both file locking and virus scanning. Note: Ensure Omit VS Scan Delay checkbox in advanced is off. This significantly degrades performance but is needed due to a Sophos-specific issue, which can be eliminated by using SAVI. Copyright © 2005 Beginfinite Inc. All rights reserved. GWAVA 3.6 98 Sophos SAVI (GWAVA 3.x Only) Sophos SAVI is not the same as Sophos Sweep. If you do not have Sophos SAVI, please follow the Sophos Sweep configuration or contact Sophos for information regarding SAVI. Install the program files. Typically the virus definitions go into SYS:\SOPHOS\SAVI and the NLMS (SAVI and VEEX) got into SYS:\SYSTEM If you also have Sophos Sweep running on your GWAVA server, disable real time scanning or exclude the ENTIRE Domain and Post Office directories (Ignore the directory exclusion instructions earlier. In the GWAVA Configuration Manager, click on the AV vendor integrations button, and select Sophos SAVI from the pulldown menu. Save changes by clicking OK. Note: SAVI may be safely loaded before GWAVA starts. Alternatively GWAVA will automatically load it when needed. Kaspersky AntiVirus (Non-Integrated) GWAVA now includes an integrated version Kaspersky. See the anti-virus configuration screen of the GWAVA configuration program for details. However, if you already own Kaspersky, install it by: Unzip the encrypted KAV.ZIP (stored in <app>\v3\kav) to <productDir>\KAV The flag NeedToActivateKAV is set. Otherwise a pop up listing the Error Code is provided. Mconfig's NeedToActivateKAV is examined. If is KAV not activated, it activates, providing the following notice: The routine InstallKAV launches every time MConfig is launched. InstallKAV checks to see if any files exist in <productDir>\KAV. If so, it exits. Kaspersky AntiVirus (Integrated) When GWAVA is installed, a KAV subdirectory is installed under the GWAVA product directory. If the KAV integration is enabled, and you have a valid license for Kaspersky (separate from your GWAVA license), KAV is automatically loaded into memory as well as an auto-updating program. The auto-updater creates a new console screen for you to observe its progress. Norman Display messages on the system console – Select Yes for diagnostic purposes. You can always turn this option off later. Display monitor screen upon load: Select Yes. This option is very useful for watching scanning Common Scanning Options GWAVA suggests leaving all at the default settings except for the usual files included in Exclude category o RealTime Scanning Options o Scan Incoming, Outgoing, Outgoing with Write -- all yes o Add to the Include List for ServerBased Processes - the VWORK directory Sever Scanning Options: o Leave at the default settings. o Virus Detected options o Cleaning turned off o Purging turned on. Copyright © 2005 Beginfinite Inc. All rights reserved. GWAVA 3.6 99 Notes on the Switches Placed in the MTA Startup File The following switches are placed in the MTA Startup File. Switch Comments /vscan (values are include or exclude) include/exclude the domains listed in /vsdomain /vsdomain space delimited list of all GroupWise domains to include/exclude in the scan /vsnamevalue GWAVA /vstype message /vsport only added for specific versions of GroupWise (see Configuration Wizard). /vsthreads Controls how many simultaneous messages the MTA can transmit into GWAVA. Depending on the version of GroupWise, this can be as low as 100 or as high as 255. To uninstall GWAVA, remove all of these switches from the MTA startup file and restart the MTA server. The MTA API is fairly limited. There is no wildcarding permitted, so to allow the Scan All Domains option, the switches are set to: Switch comment /vscan exclude /vsdomain DUMMY Since there is no DUMMY domain, this fools the API into scanning all domains. Copyright © 2005 Beginfinite Inc. All rights reserved. GWAVA 3.6 100 The GWAVA Program Interface Additional GWAVA screen captures This appendix includes several screen captures to demonstrate GWAVA and GWAVA related events on your system. The NLM portion of GWAVA (VS.NLM) should be loaded automatically whenever the MTA is loaded. (If not, check Switches Placed in the MTA Startup File). You should never manually shut down the VS.NLM; it is dependent on GWMTAVS.NLM and upon the MTA (GWMTA.NLM). In normal operation, shutting down the MTA will shut down the GWMTAVS.NLM and VS.NLM. After unloading the MTA, GWMTAVS, and VS, go to the console and type NOGWAVA to unload all ancillary GWAVA program files. The Log Screen The default screen is the Log screen. It is available by pressing F1. It summarizes ongoing operations of GWAVA in your installation. Copyright © 2005 Beginfinite Inc. All rights reserved. GWAVA 3.6 101 Statistics The Statistics screen reports the cumulative ongoing operations of GWAVA. Statistics available include: Messages Scanned Messages Blocked Messages Resent Messages Archived Viruses Oversized Messages Oversized Attachments Source Address Blocks Destination Address Blocks Content Filters Fingerprinting RBL Spam SURBL (New in GWAVA 3.5) Attachment Blocks These are broken down further into all recorded events overall and per message as well as overall today and per message today. This screen is presented by pressing F2. Copyright © 2005 Beginfinite Inc. All rights reserved. GWAVA 3.6 102 Performance The Performance screen reveals how often events occur. It is useful when identifying spikes in viruses or spam. Statistics available include: Messages Viruses Messages Oversized Attachment Oversized Attachment Block Source Block Destination Block Content Filter Fingerprint RBL Spam SURBL (New in GWAVA 3.5) System Uptime Process Count These are broken down further into the frequency of recorded events per minute, per hour and per day. There is also a System Load bar graph at the bottom of the screen which reads from left to right. The Performance screen is presented by pressing F3. Copyright © 2005 Beginfinite Inc. All rights reserved. GWAVA 3.6 103 Events The Events screen reports GWAVA events including: Virus Detections Messages Oversize Attachments Oversize Attachment Blocks Source Blocks SURBL (New in GWAVA 3.5) Destination Blocks Content Filters Fingerprints RBL Spam Scan event Process Scan Item Details from the From header and other information are also included for each category. This screen is presented by pressing F4. Copyright © 2005 Beginfinite Inc. All rights reserved. GWAVA 3.6 104 Help The GWAVA Program also has a help file which lists key commands for the GWAVA NLM. Pressing F5 presents the list. This spans several pages. Use the Page Down and Page Up keys to navigate through these screens. GWAVA supports the following keyboard commands: ? – Display Version Information F1 – Log Screen F2 – Statistics Screen F3 – Performance Screen F4 – Events Screen F5 – Help Screens F9 – Activates the offline log browser. This is a buffer of recent “history” in the log. The default buffer size is 10KB. CTRL+B – Toggle GWAVA Bypass mode. Useful for diagnostics. CTRL+E – View the current log file (Edit.nlm must not be loaded) CTRL+L – Roll over the log CTRL+R – Initiate remote log connection CTRL+S – Dynamically reloads the configuration file; the MTA does not need a restart. CTRL+V – Display internal system configuration information CTRL+Z – Reset the statistics to zero CTRL+C – Clear the realtime log window Copyright © 2005 Beginfinite Inc. All rights reserved. GWAVA 3.6 105 The following commands can be typed directly at the console to report internal system parameters or trigger specific actions. Type them while viewing the Log tab (F1) to view the results. Build – Display both the NLM internal build number and GWAVA package version Shutdown – This initiates a forced shutdown of GWAVA Watchdog – This command shows the status of the watchdog/dispatcher process. This switch is for trouble shooting and should only be used on the advice of GWAVA technical support. TIMENUDGEn – Increment the internal watchdog clock by n minutes Finally, the Help section of the GWAVA NLM also includes information about your installation. Copyright © 2005 Beginfinite Inc. All rights reserved. GWAVA 3.6 The Import Tool This handy utility allows you to import lists of pre-existing words for Content Filtering, lists of e-mail addresses or domains for Address Blocking, or lists of the addresses/domains of friends, suppliers and customers for exceptions. Begin by launching the Import Tool from the Start Menu. By default, the program is installed in C:/Program Files/Beginfinite/GWAVA/import.exe. This will present you with the Import Tool main screen. The Import Tool allows you to insert into your GWAVA installation customizations for content filters, address blocks and user exceptions. The data for importing must be: In the format of a .txt file Delimited by carriage returns With ONLY ONE ITEM PER LINE Different files must be used for content, address blocks and user exceptions. The import tool will allow you to import improperly formatted data, causing odd GWAVA filtration behaviors. Copyright © 2005 Beginfinite Inc. All rights reserved. 106 GWAVA 3.6 107 Begin by filling out the Import From field. Type the path to the .txt file with your customizations. Ensure the needed configuration file has been selected: by default, the Import Tool chooses your current gmtacfg.ini file; however, this can be edited if you have multiple GWAVA installations. Warn about duplicates This checkbox compares the file being imported to data already in your configuration. It will merely warn that a duplicate has been found, it will not permit administrators to edit the duplicates. This must be done from within GWAVA. Choose type There are three basic types of customization: Content Filters Blocked Addresses User exceptions Choose the type that best matches the data in your selected file by clicking the radio button next to either Content Filters, Blocked Addresses or User Exceptions. Then, click the Import button. Default Mask Baselines must be determined for the data being imported. (For example, if these are address blocks, are they From address blocks or To address blocks?) There are different mask options available depending upon whether the operation is for importing content filters, blocked addresses or user exceptions. Copyright © 2005 Beginfinite Inc. All rights reserved. GWAVA 3.6 108 Content Filter Mask The first options on the Content Filter default mask determine if the customizations will be applied to Subjects Messages Attachments If the latter is chosen, attachment name and extensions can be added to the filter. Wild cards are supported for both the name and extensions. Enter an extension or name, for example, .AVI, then, from the drop down menu to the right, choose whether the named attachment type must be included or excluded. To add attachments, click the Add button. To change an attachment, select the attachment entry from the list and click Edit or Remove. Copyright © 2005 Beginfinite Inc. All rights reserved. GWAVA 3.6 109 Additional Options There is a two-item drop-down menu allowing administrators to determine if the filters will be applied To the start of messages Anywhere in the message Additionally, two check boxes are used to configure the Content Filter Mask: Case Sensitive Comparison and Match Whole Word. These can be enabled by clicking their checkboxes. Lastly, there is a drop down menu for archiving settings. The options are: If Archive content filters enabled Never Always Click OK begin importing or Cancel halt this process and return to the previous screen. Blocked Addresses Filter Mask The filter mask for blocked addresses is the simplest of the three filter masks in the Import Tool. Enter the number 0 to apply the filters you are importing to inbound mail. Enter 1 to apply the filters being imported exclusively to outbound mail. Enter the digit 2 to apply the filters to both inbound and outbound mail. Click OK to apply the directional settings to the data being imported, or Cancel to return to the previous screen. Copyright © 2005 Beginfinite Inc. All rights reserved. GWAVA 3.6 110 User Exceptions Filter Mask Selecting User Exceptions from the main screen of the Import Tool presents the following screen. First, choose the direction of the filter by using the drop down menu at the top of the screen: Compare against the From field Compare against the To field Compare against Both Fields Exemptions can be applied to: Virus Scanning, Attachment Blocking, Address Blocking, Spam, Oversized Messages, Content Filtering, RBL, and Fingerprinting. Click OK to apply the chosen filtrations to the data file selected for import, or Cancel to return to the previous screen Remember to Restart If GWAVA has been running during the importation process, you must restart it for the imported files to be included in GWAVA’s operations Copyright © 2005 Beginfinite Inc. All rights reserved. GWAVA 3.6 111 Using the Profile Manager The Profile Manager is only necessary if you are managing more then one GWAVA server. If you only have a single GWAVA server, just launch the GWAVA Configuration Program. The Profile Manager is not necessary. Starting with GWAVA 3.5, administrators need not go to the start menu to launch the profile manager as the Configure Server button in Mconfig can launch the Profile Manager. Click Configure New Server. Then, select Manage Server Profiles. Similarly, administrators can switch between defined server profiles quickly by selecting the server profile name from this menu. To launch the Profile Manager from Console One, select Tools > GWAVA > Profile Manager. You can also start the Profile Manager by running \Program Files\BeginFinite\GWAVA\pman.exe. When you launch the Profile manager, the following screen is presented. (Note: If you have yet to run this feature, there will not be any Server Profiles listed.) Changes in GWAVA 3.1 and Higher The Don't synch Server and Local checkbox used for preventing the loading and saving of server profiles has been renamed to a much clearer Work Offline. The old Check Server Profile button is renamed to a much clearer Manually Sync with Server Profile. In both cases functionality remains the same Copyright © 2005 Beginfinite Inc. All rights reserved. GWAVA 3.6 112 Adding a Profile To add a new GWAVA Server Profile, click the Add Profile button. This will make the Current Profile area of the Profile Manager screen active. Under the General tab (which is selected by default), enter a Profile Name in the field provided. Then click Browse to navigate to the location of the new server’s MTA Startup file. See the Product Config Directory. Click the browse button next to this entry field to select the needed file. A new Automatically sync if possible checkbox next to is added to the Profile Manager and is saved per local profile. Effectively this autoclicks button for the user when the item is selected in the Server Profiles List. So for profiles that the Admin is confident will generally sync (eg IP config is working or UNC config is working), they can, if desired have this happen as they select a profile. TCP/IP Under the TCP/IP Connection, tab, enter the IP address of the new server in the Server’s IP Address field. If the TCP Port for the server is different than 7120, which is the default setting, enter the correct Port address in the TCP Port to contact field. Enter a password for this server in the Set New Password to field. (Note that passwords must be greater than five characters.) Leave this blank if locally cached passwords are disabled. To disable locally cached passwords, check the Don’t cache password locally when saving profile checkbox. In this case you will be prompted for a password each time you edit this profile with the GWAVA Manager. Note: The TCP/IP Connection settings, as noted on the Profile Manager screen, are optional, and are only required if you check the Use IP to load/save configuration checkbox. Copyright © 2005 Beginfinite Inc. All rights reserved. GWAVA 3.6 113 IP versus UNC The Profile Manager contains a speed enhancement that has resulted in a change to the GUI. Previously, Profile Manager synchronized servers using UNC only. Over LANs this occasionally proved slow. The Profile Manager included in GWAVA 3 now first attempts to synchronize using IP. Failing to do so will automatically begin a UNC sync with no further input needed from the administrator. The Profile Manager needs several conditions to be met in order for the IP synchronization to occur. These are spread over two tabs in the Profile Manager: the TCP/IP Connection tab and the General tab. Click the TCP/IP Connection tab. Click the Add Profile or, alternatively, select an existing profile from the list then click the Edit Profile button. The lower half of the TCP/IP window now becomes active. Edit as needed (see below), then enable the Use IP to when possible to load/save configuration checkbox. Note: The TCI/IP configuration—server’s IP address, TCP port to contact and password—must be properly configured in order for the IP synchronization to be successful. Then Click the General tab and click the Manually Sync with Server Profile button. Click Save Profile to continue or Cancel to stop without saving changes. Licensing Under the Licensing tab, enter your GWAVA License Key and License Code. You can leave these blank if you like. Leaving them blank will not override the values set with the GWAVA Manager. GroupWise Version The GroupWise Version tab is where you identify the version of GroupWise in use. By default, AutoDetect is selected. However, a drop-down menu listing recent versions of GroupWise is provided in case another selection needs to be made. When you are done entering the settings for the new server, click Save Profile. To undo any changes and cancel the creation of the new profile, click Cancel Changes at any time through the process of creating the profile. Copyright © 2005 Beginfinite Inc. All rights reserved. GWAVA 3.6 114 The drop down menu presents the following options: Auto detect (with prompt) Auto detect (no prompt) GroupWise 5.5 (non EP) GroupWise 5.5 (EP) GroupWise 5.5 (EP post SP5) GroupWise 6.0 GroupWise 6.0 (Post SP2) GroupWise 6.5 Editing a Profile To edit an existing profile, select the profile from the list of Sever Profiles, and click Edit Profile. As with creating a new profile (above), this will activate the Current Profile area so changes can be made. Please refer to the descriptions of each profile feature above in Adding a Profile. Remember: click Save Profile to save any changes you have made when editing a profile; click Cancel Changes to undo any changes and revert to the previous settings.* When adding a new profile, administrators will be asked if they want to check for a preexisting server profile. If so, the sync is performed (it could well fail if a bad IP config or UNC config are specified), and if it succeeds, the server profile is loaded. This allows recovery of local profile info from the server profile. (The reverse is easy - simply choose each local profile, click edit, and then click save....the local profile will then sync upon exiting). Removing a Profile To remove a GWAVA profile, select the profile from the list of Server Profiles, and click Remove Profile. This will completely remove the profile—it will no longer be available for use with the GWAVA Manager, and it will no longer be listed under Tools > GWAVA > Configure Profile in Console One. Additional Profile Manager Features When a profile is selected in the list of Server Profiles, you can launch the GWAVA Manager using that profile by clicking Launch Configuration Program with Current Profile at the bottom left of the Profile Manager screen. Use IP when possible when loading/Saving is a global setting similar to the Use IP to load/save configuration visible in the TCP/IP tab of the Profile Manager. The latter, however, is for specific configurations. * Cannot be reverted if Save Profile has been clicked. Copyright © 2005 Beginfinite Inc. All rights reserved. GWAVA 3.6 115 Profile Manager can manage the synchronization between local and server profiles. To date, profiles are stored locally and on the server. When synchronized, the recent-most profile was chosen automatically. The choice to do so is done by enabling either the Don’t Synchronize the Local and Server Profiles, the default, or the Don’t Synchronize Local and Server Profiles checkbox. Check the Don’t cache password locally when saving profile checkbox to prevent saving the server password with the profile. As noted above, enabling this will require entering a password each time you edit this profile with the GWAVA Manager. Copyright © 2005 Beginfinite Inc. All rights reserved. GWAVA 3.6 116 Using the Deployment Manager The Deployment Manager is only necessary if you are managing more then one GWAVA server. If you only have a single GWAVA server, just launch the GWAVA Configuration Program. Start by defining the server profile in the Profile Manager. Once the server profiles are created with the Profile Manager, administrators can direct the deployment of these profiles using the Deployment Manager. From Console One, click Tools > GWAVA > Deployment Manager. Alternatively, in GWAVA 3.5 or above, click the Configure New Server button and select Deploy to Multiple Servers. Copyright © 2005 Beginfinite Inc. All rights reserved. GWAVA 3.6 117 The Deployment Manager The Deployment Options available are: Log deployment to DEPLOY.LOG Log sync of template and override files verbosely Check MTA file If values are bad, correct them Use /HOME to guess directory tree if needed Check NLM versions and install them If a newer version exists If they haven’t been installed Don’t overwrite existing spam rules Don’t overwrite existing resource files Use template file Select New Template Choose between static and dynamic source servers Use override file for this profile, if it exists Instead of writing configuration files directly to the server, create a deployment subdirectory Always install NLMS Copyright © 2005 Beginfinite Inc. All rights reserved. GWAVA 3.6 118 Note that administrators need not go to the start menu to launch Dman as the Configure Server button in Mconfig can now start the Deployment Manager. Log deployment to DEPLOY.LOG saves the output of the deployment in a text file in the \Program Files\BeginFinite\GWAVA\DEPLOY folder. Log sync of template and override files verbosely logs changes to the TEMPLATE.INI and override files verbosely. Check MTA File first checks to ensure the MTA file exists for the given profile and verifies the startup path. If the MTA file does not have correct RWCEMF rights, or does not have a /HOME switch, deployment of the profile will be aborted and the Deployment Manager will advance to the next profile. If values are bad, correct them checks the MTA’s /vs switches for validity and if necessary corrects them. Use /HOME to guess directory tree if needed helps in verifying the startup path. Check NLM versions and install them will compare the already installed NLMs (if installed) with those associated with the profile. If a newer version exists is checked, the NLMs will be updated to the newest version If they haven’t been installed is checked, the NLMs will be installed When Always install NLMS is checked, the NLMs will be updated regardless of the version found Use template file deploys GWAVA using a selected GMTACFG.INI as a template for all servers. This overwrites the existing configuration file. To select a GMTACFG.INI as template, click Select New Template. The Select new template button opens a dialogue box for locating a GMTACFG.INI file to use as template for deployment of GWAVA on your servers. This file is typically located in \\SERVER\SYS\SYSTEM, and will be checked by the Deployment Manager for correct parameters. If any are incorrect or missing, your will be notified as follows: If there are no problems with the GMTACFG.INI, you will be returned to the Deployment Manager without a notification message (assume, then, that the GMTACFG.INI has been accepted by the Deployment Manager as the new template). Use override file for this profile, if it exists, looks for OVERRIDE.INI, and replaces or adds key values or sections of the INI file as needed. Instead of writing configuration files directly to server, create deployment subdirectory when checked saves files into a separate deployment directory so they can be copied manually if necessary. Selecting Profiles for Deployment To select one or more profiles for deployment by the Deployment Manager, click the checkbox next to the Profile Name in the Select the Profiles to Deploy list. To select all profiles at once, click the Select All button; and to clear all selections, click the Clear All button. Copyright © 2005 Beginfinite Inc. All rights reserved. GWAVA 3.6 119 Deploying Profiles Once you have selected the profiles and the Deployment Options for the selected profiles, click the Deploy Servers button. As the profiles are deployed, a dialogue box appears. You do not need to worry about trying to read this as it passes, all text presented here is saved in DEPLOY.LOG (see above, Log deployment to DEPLOY.LOG). Copyright © 2005 Beginfinite Inc. All rights reserved. GWAVA 3.6 120 GWAVA Quick Reference Sheet This sheet contains quick, step-by-step guides to the following: Opening a Server Profile, Making Changes, Saving Changes, Launching Deployment Manager, Choosing Options or Template(s) with Deployment Manager, Duplicating Changes to Other Servers. Open a Profile Start ConsoleOne Start the Profile Manager Tools > GWAVA > Profile Manager Select a Server Profile An Alternative As an alternative to using ConsoleOne, You can also click Start > Programs > GWAVA > Profile Manager from the Windows start menu. Make and Save Changes to a Profile Continue from Step 3 of Open a Profile (above) Make Changes in Current Profile area Click Save Profile to save any changes To make changes to this Profile with the GWAVA manager, click Launch Configuration Program with Current Profile Note: Launching a profile with Profile Manager allows you to update rules and settings for pushing to other servers. Launch Deployment Manager Start ConsoleOne Start the Deployment Manager Tools > GWAVA > Deployment Manager Note: As an alternative to using ConsoleOne, run dman.exe in D:\Program Files\BeginFinite\GWAVA (where D represents the drive letter of the drive you run GWAVA from on your workstation). You can also click Start > Programs > GWAVA > Deployment Manager from the Windows start menu. Choose Deployment Options or Template Continue from Step 2 of Launch Deployment Manager (above) Select a Profile from the Select the Profiles to Deploy list Toggle options on or off with Deployment Options checkboxes To select a new template, click Select New Template Locate new template on network by navigating to <DOMAIN/SERVER>\GWAVA\CONFIG and selecting the GMTACFG.INI file (where DOMAIN/SERVER is the MTA for which changes were made via the Profile Manager). Reminder: The Deployment Manager is used to push new rules or updates to server settings made with the Profile Manager. Copyright © 2005 Beginfinite Inc. All rights reserved. GWAVA 3.6 121 Duplicate Changes to Other Servers Continue from Step 5 of Choose Deployment Options or Template Select Profiles from the Select the Profiles to Deploy list (select those MTA’s in need of update, you can omit the MTA for which you made changes through the Profile Manager, as they are already in place) Click Deploy Servers (this may take a while). Copyright © 2005 Beginfinite Inc. All rights reserved. GWAVA 3.6 122 The Archive Viewer The GWAVA Archive Viewer is a stand-alone application for viewing e-mails intercepted by GWAVA. Users of previous versions may note that the Archive Viewer included in GWAVA 3 includes many new features including: Archives can now be opened from within the main Archive Viewer SQL Integration permits fast and flexible searching, filtering and sorting. Web Browse html, jpeg, gif files in a safe browser interface View Zip attachments and extract the contents. Open SpamID files directly. WhiteList/BlackList Export to HTML Submit as Spam/Ham to the GWAVA 3 SmartBlocker Manager Search for text in columns The GWAVA Archive Viewer does more than provide access to stored messages. The Archive Viewer can also be used to submit mail items to the HAM or SPAM lists as well as the Allow or Block Address list. The Archive Viewer can view the archives in SQL or Folder modes. SQL mode is the recommended mode to view the archives as is provides a much faster and scalable architecture to viewing large GWAVA archives. Folder mode is supported for legacy purposes only, and only critical bug fixes will be made to its operation. You can convert your Folder mode database structure to SQL databases using the Import option in the Tools section of the Archive viewer. Archive Database Organization Before using Archive Viewer, it’s important to review and expand upon some concepts from previous chapters – location, format, and disposition of archive files. The “root” archive directory (henceforth referred to as <RootArchiveDirectory> – all archive-related files are stored under this directory tree. The default location is <ProductDirectory>\Archive. <ProductDirectory> itself usually defaults to <GWDomain>\GWAVA. You may change these values in the Location of files section in the Configuration Program. Under the “root” archive directory, each agent creates a subdirectory for itself. Hence the MTA agent creates <RootArchiveDirectory>\MTA and the POA agent creates <RootArchiveDirectory>\POA. Under both folder mode and SQL mode, Container Files are created, one for each archived message. These are either in MIME (.822 extension) or ZIP format (.ZIP extension). The format is controlled in the Configuration program and defaults to ZIP. The filename is uniquely generated. These files contain all of the following: Text (plain text and HTML) parts of the message Attachments MIME version of the messages (Internet or GWAVAPOA messages only, optional for the latter) ARCHIVE.INF – A text file containing basic header information, and GWAVA unique information (such as the reason for archiving). A copy of this is also made external to the container file with the same filename as the container file but an INF extension. This slightly speeds folder mode searches – it is not used at all in SQL mode. Pre-2.1 versions of GWAVA did not generate the INF file automatically, hence there is a Build INF File utility under TOOLS in Archive Viewer. Copyright © 2005 Beginfinite Inc. All rights reserved. GWAVA 3.6 123 Where the container files are stored depends upon your settings in Configuration. It may be stored directly in <RootAgentArchiveDirectory> (this is not recommended) or subdirectories corresponding to the day or the month). Also it may further be categorized by event if Archive by Type is selected in the Configuration Program. If storage by day and by event is selected possible example is <RootAgentArchiveDirectory>\2005\12\3\Virus\containerfilename.zip Container files are used in both SQL mode and Folder mode. Folder mode relies on these files exclusively. Hence, Folder mode is slow on a large archive directory, as each file has to individually be opened, unzipped and analyzed. SQL mode needs to open these files only when a specific item in the Archive Viewer is selected. To do this, SQL mode stores databases. The databases typically have filenames similar to YYYYMMDD.DB. These files are always stored in the <RootAgentArchiveDirectory>. They contain all of the MIME header information as well as basic information such as From, To, Subject, Attachment Names, Event types, etc. Hence the Archive Viewer in SQL mode can get all information from the SQL database and does not need the container files at all – with a few exceptions. These exceptions exist because otherwise the database would become unnecessarily bloated in size and slow in function. The exceptions are: Attachments (including MIME.822 if extant) are not stored in the SQL DB and are accessed from the container file when needed. The Text pieces are also not stored in the SQL DB, with the exception of a small subsegment. The default is 16k, configurable in the Configuration Program. This allows full text searching. Container Files can be deleted manually but also automatically. The automatic mechanism is available in the Archive Viewer. The manual mechanism is in the Archive Viewer - when you delete an entry, the associated container file is also deleted Database entries and database files are never pruned automatically. One other database exists: The Metadatabase. This is always stored in <RootAgentArchiveDirectory> and always named overview.db and created automatically by GWAVA. It is nothing more than a list of all the data databases, their locations, and the dates information was stored in them. Launching the GWAVA 3 Archive Viewer There are two ways of launching the Archive Viewer. It can be launched from inside the GWAVA Manager. See the Archiving section for more information. Or you can run the Archive viewer from the GWAVA menu, located under the Programs menu. Starting the Archive Viewer Begin by selecting your archive for viewing. Archive Viewer opens with a screen presenting the user with several buttons: Select Archive Folder, Tools, Switch to SQL Mode, Advanced and finally Done, which quits the Archive Viewer. Note: With Switch to SQL mode clicked, the button toggles to read Switch to Folder Mode. Above, the Select Archive Folder will now read Select MetaDatabase. Tip: See the Archiving section of the GWAVA Configuration Program. Copyright © 2005 Beginfinite Inc. All rights reserved. GWAVA 3.6 124 Select Archive Folder Locate the directory where the archives are stored. Select the archive folder and click OK. The archive viewer will open with the oldest archived message selected. Typically, the archives are in the active MTAs; however, should you wish to examine mail now moved to other volumes, the click Open Unlisted Database button. This is available in the SQL mode. Note: GWAVA 3’s Archive Viewer supports full support for legacy archives; however a few changes have been implemented: Each new archive item (text and attachments) contains a number followed by a pound symbol or hash mark (#). This is needed for supporting SQL mode. It is hidden in SQL mode, but unfortunately must be displayed in folder mode The Archive by Type option now stores some items in a “multiple” directory. GWAVA 3 supports multiple event fires, and it seemed more efficient not to make multiple copies in these cases. Wildcards and searches GWAVA can make use of wildcards in searches. The Archive Viewer now automatically wraps search phrases in wild cards; moreover, there are changes in how they operate in Folder versus SQL mode Unlimited in Folder mode is *, while in SQL mode this value is represented by % Single character in Folder mode is ? while in SQL mode this value is represented by _ Tools Compact database: Marking records as deleted does not regain any disk space unless you compact them. Doing so is an intensive operation that absolutely requires exclusive access to the database. Build INF Files: Used in Folder Mode: This creates information files from the archived messages. Each file, saved as an .INF, contains text information about the archived message. XML Export: Export messages into an XML format, for moving to another system. This tool lets you export messages into an XML UTF8 encoded format, for moving to another system. You will be prompted for an existing directory to export the archives too, and you will be asked if you want to export the attachments as well (which will take considerably longer). This is a fairly intensive process. To be XML and UTF8 compliant, some bytes are modified. Use these transformations to recover original pieces exactly-as-they-are: " ---> “ & ---> & > ---> > <BR/> --> <CR><LF> < ---> < Copyright © 2005 Beginfinite Inc. All rights reserved. GWAVA 3.6 125 XML export notes All text is UTF8 encoded per XML standard. Hence, all 8-bit text will appear in multiple bytes. However most browsers and parsers handle UTF8, and it is required in XML. The use of UTF8 may cause a problem with embedded html pieces that were already UTF8 encoded. Effectively the message has been double UTF8 encoded. Arcview tries to recognize UTF8 encoded HTML, and not double encode it. This is only about 95% accurate though. The exporter attempts to mark text parts as either text or html. This is a best guess scenario, which can be fooled. Container Import: This powerful addition to GWAVA 3 offers tremendous functionality, but it should be used with caution. The primary use of this tool is for GWAVA 2 Archive Viewer users to import folder data into GWAVA 3’s SQL format. It can also be used for recovery of damaged data. For example, it can be used to recreate metadata when corruption has left only container files. However this tool cannot recognize previously imported data, making it easy to import the same information multiple times. Begin by clicking the Container Import button from the Archive Viewer’s Tools screen. A caution dialogue box will be presented. Click the agree button to continue. The process has two steps: Choose a directory for establishing where the new SQL database will reside Choose and import the required files Depending on the size of the files, the time needed to import the files can be lengthy. After the warning, navigate to a target directory for the storing of your SQL database. Typically this will be in <domain\gwava\archive>. Click OK to continue or Cancel to stop this process without any effect on your data or installation of GWAVA. Create new database or import Any existing databases at this location will be shown. Click Select Metadatabase. Next, choose a source directory that contains the .zip and .ini files required for importation. A window will be presented for you to navigate to the source files that will be copied. Note: The importation tool does not screen for duplicate data. The KB maximum text import data entry field for text input determines the size of the chunk to be read into the database. The default value for this field is 16kb. Lastly, there is the Commit per insert checkbox. Off by default, enabling this slows down the importing operation but makes permanent all importations immediately. Select the needed files and click OK to continue. Copyright © 2005 Beginfinite Inc. All rights reserved. GWAVA 3.6 126 The importation process will begin and a reporting screen will be presented. Click OK once it is complete. Unique name Provide a unique name for the database. A name based upon the import processing date will be provided. You may re-name it as needed. If you make an error in the re-naming, click Cancel and the field will return to the originally generated name. Click OK to complete the process and return to the Tools screen. Copyright © 2005 Beginfinite Inc. All rights reserved. GWAVA 3.6 Advanced This screen is obtained by pressing the Advanced button at the introductory screen of the GWAVA 3 Archive Viewer, by pressing F – 12, or by selecting Preferences from the View Menu. It permits administrators to configure the GWAVA Archive Viewer’s operations. There are four tabs: General, View, Folder Mode and SQL Mode. The default first tab is General. Setting Comment Do not open archives exceeding This sets the upper limit of the size of archive that may be opened. The default is 15,000 kb. Do not search attachment bodies exceeding This value restricts the size of the attachment that will be searched. The default value is 1024 kb. Number of directories n history The default number of directories in the archive history is 20. When quitting The options available in this drop-down menu option allow you to automatically always clear the local cache, never clear the local cache or prompt to clear the local cache. Skip MIME.822 when resubmitting Enabling this checkbox speeds resubmit operations. Copyright © 2005 Beginfinite Inc. All rights reserved. 127 GWAVA 3.6 View Setting Comment Percentage of width for text view This setting customizes the width allocated for text in the Archive Viewer. Percentage of height for list This setting customizes the amount of space allocated for lists in the Archive Viewer. Show only primary domain in FROM DOMAIN column This restricts the data in the From column to the primary domain. For example: mail.anothercompany.com you want to show anothercompany.com. Convert headers from OEM to ANSI Enabling this option translates headers into ANSI. The MTA often stores subjects and other headers in DOS code that may be problematic to understand and diagnose. Automatically view last opened archive Activating this option will automatically open the last viewed archive. Copyright © 2005 Beginfinite Inc. All rights reserved. 128 GWAVA 3.6 Folder Mode Setting Comment Pre-Fetch this many items before displaying Administrators can also set the Archive Viewer to pre-fetch items for speedier browsing. Pre-sort by this column This drop-down menu allows administrators to pre-sort archives by date or filename. The default is none. Copyright © 2005 Beginfinite Inc. All rights reserved. 129 GWAVA 3.6 SQL mode Setting Comment Prefetch this many items Prefetch this many items (often called “Chunks”) entry field. The default for this value is 100. Note: You can navigate the pre-fetched items directly when in the Archive Viewer’s SQL mode by using the Chunk Navigator. While it may seem tempting to increase the number of pre-fetched chunks, doing so increases the memory requirements and display time dramatically. Never retrieve more items than The Maximum Number in Database. The default for this value is 100,000. Default SQL Filter This permits you to define the main screen’s default SQL filter. Track State On by default, enabling this checkbox allows messages that have been repeatedly processed to maintain their chosen black and white listed status. Copyright © 2005 Beginfinite Inc. All rights reserved. 130 GWAVA 3.6 Prompts Setting Comment Don’t confirm the file deletion Enabling this checkbox allows administrators to delete items without an additional confirmation prompt. Request information repeatedly with multiple resubmits This option separates information requests per item during bulk resubmit. Display pop-up when resubmitting mail or resubmitting spam and ham Enabling this checkbox will prompt the administrator with a pop-up when resubmitting. You will be prompted if there is an issue connecting or logging into the mail server. It has a similar function in the case of multiple items selected for resubmit. Copyright © 2005 Beginfinite Inc. All rights reserved. 131 GWAVA 3.6 132 The Building Query window Clicking the Default SQL Filter button in the Advanced window presents the Building Query window. There are two tabs: Criteria and Grouping. Criteria builds the elements of the SQL request while Grouping defines the priority of their processing. Click the … button under Criteria to begin constructing your query. The options are Add a new condition, add a new group, delete a condition, move up and move down. Click and release the mouse on the needed options. In our example, we will choose Add a new condition. This adds a line to the Criteria tab window. Copyright © 2005 Beginfinite Inc. All rights reserved. GWAVA 3.6 133 Building your Query The phrases Records where * is equal to * will appear. Each of the underlined portions is a customizable portion of the request. The second * changes depending upon what criterion was selected first; moreover, the middle portion of the equation is also variable. From Equal Subject Greater Recipient Less Recipient Type Greater or Equal Archive Path Less or Equal Event Not Equal GWAVA Date Is Empty GWAVA Time Is not empty Mime Date Contains Mime Time Starts with Attachment Count GWAVA Message ID Spam Score Spam ID Path Mime Header Mime Header Field To store your built query, click the Save button, or Clear to begin again. The Load button is used to edit existing queries. To leave the Building Query window without saving, you may also click Cancel. Copyright © 2005 Beginfinite Inc. All rights reserved. GWAVA 3.6 134 Grouping The grouping tab allows you to order the construction of your Query. Again, begin by clicking the ellipses (…) button The first field mirrors that in the Criteria tab: Subject Recipient Recipient Type Archive Path Event GWAVA Date GWAVA Time Mime Date Mime Time Attachment Count GWAVA Message ID Spam Score Spam ID Path Mime Header Mime Header field The Sort component of the equation has two options, Ascending and Descending. You may define more than one sort order, and the order of prioritization. Another way of starting the Query Builder It is not necessary to restart the Archive Viewer to gain access to the Query Builder. To gain access to the Query Builder from within the program, press the SQL button in the toolbar. Load and save Once the query has been generated, click the Save button. Enter a name in the entry field in the window that appears and click OK or Cancel. When saving, you will be asked whether or not you wish to apply the new filter. The Load button above the save button is used to edit an existing Query. Copyright © 2005 Beginfinite Inc. All rights reserved. GWAVA 3.6 135 Using the Archive Viewer Once you have located the archive folder you wish to view, a list of messages archived in that folder is presented in the Archive Viewer window. The GWAVA Archive viewer The main archive viewer screen has several regions: the button bar is on top, the message list is below it; underneath that are areas for displaying the selected message’s triggering events and other information as well as headers and text. Headers: displays the MIME header of the message and information about the archive. Text: displays a list of text files associated with the message (after it is broken into its component parts). Attachments: displays a list of attachments (if any) associated with the message. Text Body: displays the text content of the file selected in the Text area. Other Archives: lists all the messages, and the date they were saved, in the current archive folder including the .CSV list of archived files. Note: the archive viewer cannot open the .CSV file. New in the Archive Viewer: search by archive file name. Copyright © 2005 Beginfinite Inc. All rights reserved. GWAVA 3.6 136 Buttons Save the text or attachment from the currently opened message archive. This button also allows you to save HTML reports. (Control+S) Copy the text currently displayed in the text body to the clipboard so you can paste it into another application or into an e-mail message. (Control+C) Delete the selected message from the archive. Resend the selected message—allows the message to be resent independent of GWAVA’s filters and rules. (Control+R) Refresh the archive list. (F5) This button displays column display options for the Archive Viewer. Options include sorting the list view by File Name, Date, Subject, From, To, CC, BCC, Reason, SpamID, From Domain, InfStatus, Size, Cache Status for Text Headers, ATT list, TextList, and Real Date. Enable these by clicking on their respective checkboxes. Display Advanced options for customizing the Archive Viewer. (F12) Add to Spam Vector Set. (Turns the entry red) Add to Ham Vector Set. (Turns the entry green) BWJournal This is your list of black and white lists. (Control+B) Define SQL Query presents the Query Builder window. (Control+Q) Toggle the Search Bar the archived messages. (Control+F) The Chunk Navigator: Use the left and right arrows to navigate through the current SQL database. The value reported between them indicates which “chunk” is being viewed. The size of the chunks, or pre-fetched items in your SQL query session, can be changed in the advanced configuration settings. Increasing the value from its default of 100 will increase memory requirements. Note: The Chunk Navigator is only visible when in SQL mode. Exit the Archive Viewer or Select another archive. Print Copyright © 2005 Beginfinite Inc. All rights reserved. GWAVA 3.6 Menus New in the GWAVA 3 Archive Viewer are menus with keyboard shortcuts. File Open Archive Ctrl – O Save Text Ctrl – S Attachment HTML Report Ctrl - E Print Ctrl - P Window 1… Window 2… Window 3… Exit Edit Copy Message Text to the Clipboard Ctrl – C Delete Message Del Refresh F5 View Search Bar Ctrl – F Columns Ctrl – L Preferences F12 Journal of Blacklists and Whitelists Ctrl – J Actions Blacklists (Address blocks: From, To, CC & BCC) Whitelists (User Exceptions: From, To, CC & BCC) Add message to spam vector set Ctrl – A Add message to ham vector set Ctrl – H Resubmit to GWAVA Ctrl – R Search Attachment Names Text Body Attachment Body Header Archive File Name Search F - 11 SQL Set Filters Ctrl – Q Previous Chunk Shift – F6 Next Chunk F6 Go To Ctrl - G Copyright © 2005 Beginfinite Inc. All rights reserved. 137 GWAVA 3.6 138 View attachments Archive Viewer allows users to right click attachments so that the contents can be examined. For example, you can right click in the Attachments section of the Archive Viewer to see attachments in the secure browser. This addition to the GWAVA Archive Viewer feature set allows administrators to examine many attachments, including zip archives. This allows for fast analysis of attachments for both network security purposes, but also for the enforcement of corporate communication policies. The Archive Viewer secure browser disables ActiveX, cookies, java and javascript but you can also view HTML and graphics. Security precaution For security, image loading is off by default in the Archive Viewer’s embedded secure browser. It can be switched if needed. The reason disabling this is because of exploits that use image formats that can take control of computers. Right clicking The GWAVA 3 Archive viewer also introduces context sensitive right clicking. The mail elements in the rows and columns have meta attributes. These alter the way right clicking behaves. Depending upon what is being selected, context sensitive options available include: Copy selected column Find Text Previous Chunk Next Chunk Open Spam ID file in Notepad Blacklist address (From, To, CC BCC) Whitelist address (From, To, CC, BCC) Add the message to the SmartBlocker Manager spam vector set Add the message to the SmartBlocker Manager ham vector set The options available change depending upon the column. All options remain visible, but some may be greyed-out. Finally, the right click options available are the same in both Folder and SQL mode. Note that you can select multiple items in the overview. Copyright © 2005 Beginfinite Inc. All rights reserved. GWAVA 3.6 Red, Green and Blue Message IDs change can change colour when marked as Ham, Spam, and Resubmitted: Red for mail that was marked as spam and green for mail which marked as spam and Blue for resubmitted messages. Note that messages may also be marked grey when inaccessible. Track state is an option found in the Archive Viewer’s Advanced settings screen. Enabled by default, it allows messages to retain its status as a message is re-submitted to GWAVA. Messages may only have one state. When a message may be eligible for two states, the recent-most state will be the colour chosen. States will only be saved when operating in SQL mode. White and Black List Adding a message to your “book” of white or black lists is accomplished by first selecting the message, then selecting White List or Black List by right clicking. Note: The Happy or Unhappy Face buttons in the toolbar are NOT for black or whitelisting. They are for adding archived mail to SPAM and HAM vectors for spam optimization by the GWAVA SmartBlocker Manager. Copyright © 2005 Beginfinite Inc. All rights reserved. 139 GWAVA 3.6 140 There are more options available to whitelisted addresses than there are for blacklisted ones. Both White and Blacklists can be applied directionally (To, From or Both). However, whitelisting can be more customized to permit specific forms of white listing. For example, messages from a graphic arts firm may be exempted from oversized attachment blocks. Options include: Virus Scanning Attachment Blocking Address Blocking Spam Oversized Messages Content Filtering RBL SuRBL Fingerprinting Headers The message headers displayed in the Archive Viewer also contain information about why the message was blocked by GWAVA and stored in the archive. Remember that you must manually set GWAVA to archive a specific type of message or it will not appear in the Archive. GWAVA now inserts two X-headers when applicable: X-ArchiveReason: shows which GWAVA filter caused the message to be archived (an Address Block in the example above). X-IDFileName: shows the file attachment—either virus or blocked file—that caused the message to be archived. Additional Message Information The text and file attachments are also shown in the main viewer area when a message is selected. And, of course, the elements in these windows can be right clicked according to their attributes, as can much of the other archive entries in the viewer. Copyright © 2005 Beginfinite Inc. All rights reserved. GWAVA 3.6 141 Text Body section The bottom right corner of the GWAVA 3 Archive Viewer reveals the actual content of the message. You can see all the formatting information in plain code. It is of more use than reference as the right clicking options now allow you to inspect a message and take action regarding it in one step. Highlight a phrase using the mouse. Right clicking allows you to copy the text, open SpamID in Notepad, or add it directly to the spam or ham vector set in your GWAVA configuration. Moreover, black and white list information can also be added from here. Multiple Archive Selection GWAVA allows you to select and apply actions to more than one archive at a time from the list of Other Archives. Using traditional multiple file selection methods—holding the Shift or Control keys while selecting messages—you can print, delete, or resend messages saved in the GWAVA Archive. Searching an Archive To search through the messages contained in an archive, select the first message listed in the archive and click Search in the archive viewer window. In the field that opens in the toolbar, enter your search string. Then select a Scope—Attachment Name, Text body, Attachment body, Headers and Archive Name— for the search. Once you’ve entered your search phrase, click the traffic light button. The light will become green as the active records are searched. In folder mode, * and? are used to match multiple and single character wildcards. In SQL mode, % and _ are used. This simply reflects the difference between standard SQL and Microsoft’s string comparisons. Note: You can search more than one scope at once; ie. headers and text body. Search for Archive Name Searching for Archive Name is very useful in conjunction with spam digest. Administrators who are alerted that an e-mail must be released are given an archive name. Copy and paste the associated archive name into the Archive Viewer and set the search scope for Archive File Name. Copyright © 2005 Beginfinite Inc. All rights reserved. GWAVA 3.6 142 Selecting a scope You must select a scope when searching. If not, a dialogue box with an instruction to do so will appear asking you to choose at least one scope for your search, be it header, attachment names or text body. Note: You cannot search attachment bodies in SQL mode. Once the list of files containing the search string has populated, click a FileName and that file will be opened in the main Archive Viewer screen. You can leave the search screen open to browse the search results list. Click Done to close the search/results screen. Best Results IMPORTANT: While the Archive Viewer is searching for files in the Archive, you may receive notices from your AV software that a virus was found. The reason is that the viewer is opening the files—which may have been archived because they contained a virus—to search for the string you entered in the Search text box. Resubmitting Messages When resubmitting a message, it is tagged so that GWAVA will not run it through the GWAVA policies a second time. To resend a message, click the Resubmit button on the toolbar. To resend a message, click the Resubmit button. In the Resubmit Options window that opens, the To, From, and Subject information should already be in place. You can enter additional information to be delivered with the redirected message in the Notice text box. Note the check box to Clear comments between submissions. When enabled, the Comments field will be blank. When it is unchecked, the Comments field will contain what was typed previously. This allows you, if desired, to send out a consistent comment. Note: the message may also be blind carbon copied from this screen. Whitelisting A whitelisting component is included in the resubmit screen. The functionality is similar to ArcView’s whitelisting generally; however it is included in the Resubmit screen to speed user operations. Options include Do not add to Whitelist, Add from Whitelist, Add to Whitelist, Add CC to Whitelist and add BCC to Whitelist. Copyright © 2005 Beginfinite Inc. All rights reserved. GWAVA 3.6 Diagnostic of Resubmit If there is a problem with the resubmission, a diagnostic screen appears presenting the errors returned and an option to perform further diagnostics. Click Yes to continue or No to cancel. SMTP Engine To ensure the message will be delivered, click SMTP Engine and enter your SMTP server information, then click OK. This returns you to the Resubmit window. Clicking OK here now sends the message as originally intended. A confirmation notice will also require you to click OK. Relay host: Enter the IP address (not the host name) of your GWIA server. Relay Port: Should normally be left to 25, unless your GWIA uses an alternate port. User Name: A valid GroupWise (not NDS) UserID. This is necessary in order to authenticate to GWIA. Password: The GroupWise password that matches the UserID View Columns The Archive Viewer lets administrators customize which columns are shown for sorting. Select the Columns from the View Menu or press Control+L. A window listing the sorting columns available in the Archive Viewer will be presented. Enable the checkboxes needed to present the columns required. Copyright © 2005 Beginfinite Inc. All rights reserved. 143 GWAVA 3.6 144 Smart Blocker SmartBlocker ManagerTM is a helper application for GWAVA's anti-spam functions. It simplifies the maintenance and customization of rules your installation of GWAVA uses to block spam. Without SmartBlocker Manager this task must be done by hand editing configuration files. Given that there are nearly a thousand rules built into GWAVA, and users may add as many as they like, SmartBlocker Manager greatly reduces the chore of supervising and the anti-spam rule set up on your GWAVA 3 installation. SmartBlocker Manager has three main areas of functionality: Optimization Rule Maintenance Spam Vector Maintenance In fact, the Helper Screen, which is presented the first time SmartBlocker Manager is run, outlines the tasks needed for the successful operation of SmartBlocker Manager. New in SmartBlocker 3.5 Find Mistakes – This handy feature provides instant analysis of entries by sender, or which may have been included in both your ham and spam corpus directories. Get as large a sample of ham and spam as possible. The more ham and spam in your statistical sample, the better SmartBlocker Manager can be optimized. Each industry has its own technical terminology. Regularly including legitimate mail to your ham ruleset will help reduce false positives. Ideally, administrators should keep submitting new ham as well as spam mails for analysis. This will allow SmartBlocker Manager to create more accurate rules. Recommendation: Begin by adding at least 1,000 ham mails to SmartBlocker Manager to build your optimization rules. There is no limit to the number or mails that can be added to SmartBlocker Manager. GWAVA gives you all the tools to do this, but they are in several locations. Tip – Use the new digesting settings in GWAVA 3.5 to create a ham corpus each time users release blocked mail. Archive Viewer Use the and buttons to add spam and false positives. Note that the archive Viewer is not the best way to sample Ham. GroupWise ExportSpam GWAVA3 includes a new customization called ExportSpam that allows users to add Spam and Ham buttons. The GroupWise inbox is the best place to sample ham and borderline spam (See below). Copyright © 2005 Beginfinite Inc. All rights reserved. GWAVA 3.6 Installing GroupWise Client Export Spam module GWAVA 3 has the SmartBlocker Manager customization for GroupWise. Run the ExportSpam.Exe (typically in \Program Files\BeginFinite\GWAVA\Tools\ spamexp.exe) to add this functionality to your GroupWise client. This addition to the GroupWise client allows users to export ham and spam samples. Now when you run the client, a submenu is created under the Tools menu, containing the options. Export selected messages as SPAM Export selected messages as HAM Set output path Set subject match Setting Export Spam Preferences Once the ExportSpam module has been installed in your GroupWise client, it can be customized. Select the Set Options item from the Export Spam menu which should now appear in your client. Options for customization include: Export Directory – Ham and spam will be exported to separate subdirectories in this directory Subject Match – Pattern Matching for subjects, used only by Guinevere Maximum file size in bytes – Note that it is best to coordinate this field with the values set in GWAVA and Guinevere Ham Folder – Directory name for ham. See the first item in this list Spam Folder – Directory name for spam. See the first item in this list Delete after export – Once processed, should the chosen item be deleted? Options from this drop down menu include Prompt Me, Always and Never Click OK to save your changes. Copyright © 2005 Beginfinite Inc. All rights reserved. 145 GWAVA 3.6 146 Move the samples Once a sample of ham has been built, you can move them from the temporary directories, typically: \Program Files\BeginFinite\GWAVA\Tools\ham \Program Files\BeginFinite\GWAVA\Tools\spam …to the SmartBlocker Manager directories for access by SmartBlocker Manager for optimization. These are typically in: \Program Files\BeginFinite\GWAVA\ham \Program Files\BeginFinite\GWAVA\spam What’s next? Optimize. Optimize. Optimize. SmartBlocker Manager needs to process your data—your real world ham and spam—in order to create custom rules that benefit you, your users and your institution best. You might select users with good judgment from different departments within your firm or institution to submit ham and spam for you to use for rules optimization. Asking them to do so regularly will help tweak your spam and ham rules to ensure that false positives are kept to a minimum real spam is blocked. Selecting users with different needs and responsibilities will be useful for generating your spam/ham samples as they may encounter different types of spam as well as newsletters and mailings which may be borderline spam. Spam and ham selections from a trusted group of users will help build a strong set of “antibodies” to “immunize” your GroupWise system. On-going rules optimization is the best way to protect your organization from the protean threat of spam and viruses. Don’t just delete—mark mail as ham or spam in order to fine-tune your system. Auto optimize Use the BCC function in GWAVA 3.5’s spam digest release settings to submit released mail into a ham directory of your creating. This will help fine tune SmartBlocker to meet the needs of your users. Copyright © 2005 Beginfinite Inc. All rights reserved. GWAVA 3.6 147 Scores and Rules Optimization in SmartBlocker Manager means the process of assigning scores to rules. Scores affect how “strong” a rule is. If this is done incorrectly (or to be more precise, sub optimally), then too much non-spam (known as ham) could be blocked while more spam could get through. Given the sheer number of rules, and the complexity of their interaction, it can be preferable to let a program assign scores. Doing it by hand is a daunting task for more than a handful of rules. Rule Maintenance refers to the functions allowing you to view, search and test rules in the rule set. Users can: View all rules as a list Search or limit the list View and edit individual rules Test changes to the rules against the spam database or text that they enter. See how the rules interact with one another, and exactly which spam they catch. SmartBlocker Manager alters the configuration files directly to reflect any changes you make. Vector maintenance refers to functions for maintaining a database of usersupplied spam and non-spam for testing and optimizing your rules. SmartBlocker Manager is a remarkable tool for configuring ham and spam rules easily. While it has immense capabilities, the down side to its immensely powerful customization abilities is rules for processing mail and junk mail can be misconfigured as well as properly configured. The single most important factor in understanding how to properly configure SmartBlocker Manager is to understand how to properly assemble its statistical samples. It cannot be said often enough: the more samples of ham and spam submitted, the more accurately SmartBlocker Manager will be able to defend your inbox against junk mail. Copyright © 2005 Beginfinite Inc. All rights reserved. GWAVA 3.6 Getting Started with the Assistant When you first run SmartBlocker Manager, the Assistant screen is presented. It is an organizer for getting to the exact functions you need for quick fine tuning: Rule Maintenance, Spam Vector Maintenance and Optimization. If nothing else, these three steps is the SmartBlocker Manager process in one easy list. The first time SmartBlocker Manager runs, the last component will have a small warning message cautioning that there are no rules of any type in your database. This screen is presented by default and will be shown each time SmartBlocker Manager is run. This can be switched off by means of the checkbox at the bottom of the screen. First Action If this is the first time you are running SmartBlocker Manager, choose Optimization from the Optimization menu. Copyright © 2005 Beginfinite Inc. All rights reserved. 148 GWAVA 3.6 149 The Optimization Screen While there are many options on this screen, new users to SmartBlocker Manager can start using it quickly and without customization. Click the Start Optimizing button. When % spam caught and % false positives have stopped changing (and are at a satisfactory level), then click Stop Optimizing and then click the Save button. The target threshold value should ideally match your GWAVA settings. However, experienced users may experiment with threshold settings to obtain the optimum balance between caught spam and false positives. Remember: The wider your samples of both ham and spam the better. Copyright © 2005 Beginfinite Inc. All rights reserved. GWAVA 3.6 150 Optimization Parameters No. of rules The number of rules in your configuration files. Both user defined, and those shipped with GWAVA are counted. No. of spam vectors A count of the number of spam messages in your database. No. of ham vectors A count of the number of “ham” samples in your database. False positive weight & False negative weight Values that represents the relative “badness” of false positives and false negatives. A false positive is a ham that has been classed as spam. A false negative is a spam that has been classed as ham. It is suggested that false positives (which are real messages being missed) are much worse than receiving a few spam messages. In the example screen shot, false positives have been weighted at 1000 while false negatives weigh only 1.00. Target threshold The value that we are optimizing towards. The ideal optimized scenario will be such that all spam will be scored above or equal to this threshold and all hams below it. This value is quite arbitrary. It could be 10 or 1000, or any positive value. 5 is the default value for GWAVA. Minimum score The minimum value in your configuration. Maximum score The maximum value in your configuration. Score for non firing rules What score should the program give to rules that never fire in your sample database of ham and spam? The default value is 1. This value is needed otherwise the optimization process has no information to work with. Randomize score multipliers This option is useful for starting off an optimization by providing a multiplier for rules; or it can be used to re-zero a system by multiplying rules by 0. Population size This value refers directly to how the optimization algorithm works. It is currently a Genetic Algorithm which tries many different score sets as individuals then “breeds” the best individuals together. It is modeled around the concept of evolution and survival of the fittest. Population size simply reflects many how individuals there are. Larger populations will have more “genetic diversity” but unfortunately take the algorithm longer to calculate, in direct proportion to population size. The default value of 5 has been shown to be effective, but users are free to experiment with values as low as 2 or as high as 1000. Max Mutate Interbreeding is not the only way that scores are altered. There is also a very small random mutation of scores, to introduce more “genetic diversity.” Copyright © 2005 Beginfinite Inc. All rights reserved. GWAVA 3.6 151 This value can be altered, but the default of 1 has been shown to be effective. This means that the maximum amount an individual score could mutate in any generation is 1.0. Change Method There are eight methods for changing the way in which SmartBlocker Manager changes its optimization methods from random to systematic searches: Random Mutation - Each generation selects randomly N-Section Search - Seeks best weights Solve to Lower Limit – Searches for the highest ham score and lowest spam score above it. Changes weight to put spam on the threshold. Solve to Upper Limit - Searches for the highest ham score and lowest spam score above it. Changes weight to put ham just below the threshold. Flip-Flop Between Limits – Reversal between upper and lower limits Cycle Methods Periodically - The cycle secs box sets the amount of time before cycling to the next method Cycle After Flatline - The cycle secs box sets the amount of time a method must produce no improvements before changing to another method. Randomly Choose Method – Any of the above Feel free to experiment to obtain the best results for your population sample. Change method cycle seconds This data entry field is used to control how often methods change. This field only applies to “cycle after flatline” and “cycle periodically”. Optimization Results Current objective total The objective total is a summary of how far the algorithm thinks it has got. It is the number of false positives multiplied by the false positive weight, plus the number of false negatives times the false negative weight. The lower this total, the better the scores are at classifying ham and spam. The lowest possible score is zero, which would mean that there are no false positives or negatives. This is very difficult to achieve in practice. No. false positives & No. false negatives The total number of misclassified messages of each type at this point in time. Optimize time Amount of time the algorithm has been optimizing. % spam caught The number of spam messages that have been correctly classified divided by the number of spam e-mails in the database, expressed as a percentage. The range will be somewhere between zero and 100%. Naturally, we aim for 100%, but in practice will fall short of it, depending on the quality of our rules, and the amount of tricky spam and the samples of ham messages in your database. % false positives The number of falsely classified hams divided by the number of hams in the database, expressed as a percentage. SmartBlocker Manager aims for zero per cent. This is often achievable, Copyright © 2005 Beginfinite Inc. All rights reserved. GWAVA 3.6 152 depending on the rules and the database. Since false positives are far worse than false negatives, it is suggested that if the optimization is not quite reaching 0% after a long time, that users look consult the Spam Vector Maintenance screens to find the last few messages that are being incorrectly classified. This may show why the algorithm is having trouble – perhaps the last few messages are so similar to spam that it is actually impossible to differentiate them using the current rule set. In that case, alterations to the rules are needed, or you could choose to white list the senders in GWAVA, thus excluding these messages from being sent to the heuristic anti-spam engine. This is often needed for newsletters, which contain similar marketing messages and mailing lists to spam. % false negatives The number of falsely classified spam divided by the number of spam messages in the database, expressed as a percentage. This number should be equal to 1 – (% spam caught). It may also be thought of as OR “% spam not caught”. Generation The genetic algorithm used to select the scores goes through a steadily increasing number of generations. It will get through these generations faster or slower, depending on the population size, the number of ham and spam messages, and which change method is selected" Time since last improvement This reports the length of time since a change was recorded. Start Optimizing This button starts the optimization process. When you click it, the title of the button changes to Stop Optimizing. Click it again to stop the optimization process. Optimization will continue until you click Stop Optimizing or close the window. Note: When SmartBlocker Manager compiles rules, it creates a COMPILED.PCR file in SPAMCFG directory on front end If this file is deployed to a live SPAMCFG, it has these effects: Other .CF,.CFG is ignored Faster loading (precompiled) Save Changes When you have finished optimizing, or have decided that further rule changes are necessary, you have the option to save any changes, by clicking the Save button. Regardless, upon quitting the Optimization window you will be asked whether you wish to save your changes or not. Clicking Save will store any changes entered to the parameters in the optimization screen, and will save the latest “Population” of scores. It also separately saves a scores.cf file that contains the very best individual’s scores. GWAVA uses this file directly. Producing the scores.cf file could be considered almost the entire purpose of using the optimization screen. Copyright © 2005 Beginfinite Inc. All rights reserved. GWAVA 3.6 153 What is the difference between optimization and rule maintenance? As the spam filtering rules work intimately with one another, so do the functions and features of SmartBlocker Manager. Optimization tests the rule set against your ham/spam database (a.k.a. the vector set), adjusting the scores for each rule to maximize the spam blocked whilst minimizing the ham blocked to zero (if possible). You will encounter the need for Rule Maintenance functions when Spam is especially tricky and beats rules that should have caught it Or when ham is being blocked as spam by rules Spam vector maintenance is necessary so that the optimizer works with real data representing the kind of ham and spam you get. Without good spam and ham data, the optimizer can only guess at appropriate weightings for rules. Because spam changes as time passes (so that it can beat anti-spam systems, mainly), this data set must be kept up to date. What is Optimization in GWAVA Anti-spam? Optimization is the process of assigning scores to rules. This maximizes the spam caught and minimizes the ham falsely blocked. Scores govern how strongly rules affect the decision about whether messages are classified as spam or ham. This is needed because there can be any number of rules. One thousand rules ship with GWAVA 3, and any number can be added. Note: Optimization compares samples of Spam and Ham (provided by you) and adjusts the scores based on the usersupplied sample. If the samples are not representative of the kind of e-mail your organization receives, you may experience negative results. That means that you need a big and diverse vector set (that means samples). That means a minimum of 500 spam and a500 ham samples. Or 20 samples (10 ham & 10 spam) per GroupWise user. For example, if you have 100 users, you will need at least 2000 samples. If you have 1,000 users, you need a minimum of 20,000samples for the vectors to be statistically relevant. There is no limit. The bigger the sample, the better. Choosing scores by hand for every rule would be almost impossible for most users. Even choosing scores for their own rules may be difficult, as it is not always clear what the effect will be when tens of thousands of messages interact with the rule. When a message is passed to GWAVA’s anti-spam system, it is scanned against every anti-spam rule, both created by us, and created by you. The number of times every rule “fires” is counted. Every rule that fires at least once has its score added to a total. If this total exceeds a user defined threshold, then the message is deemed to be spam. An example We have rule in GWAVA detects the word Viagra in message subject lines. It has a score of 3.0. Another rule detects the existence of three consecutive exclamation marks in subject lines (!!!). This rule has a score of 2.5. The threshold for spam is set to 5.0. So a message that contains only Viagra in the subject would fire once, adding 3.0 to the total score for the message. This would not be sufficient to classify it as spam (in this example). If it also had “!!!” then it would have a further 2.5 added, bringing the total to 5.5 which would be enough to classify it as spam. Some rules can be set to “multifire” which means that the score will be counted multiple times – one for each fire of the rule. So a subject line containing “Viagra Viagra Viagra” would score 9 if the rule described above were set to multifire. It is also possible to put a lower bound for the number of fires on a rule. This would mean a rule fires at least that number of times before it starts affecting the total score for a message. Copyright © 2005 Beginfinite Inc. All rights reserved. GWAVA 3.6 154 What’s the score? So how does one choose scores for rules? There is no simple answer to this question. Essentially, one wants a set of scores that will Work in combination without causing side effects Block spam, and let real mail through In some cases it is easy to see that a rule should be set so that it will push a message over the threshold on its own – for example anything referring directly to a known spam product. But other spam indicators are subtler and only in combination will they detect spam with high probability. In most cases it is preferable to have a computer program decide these weights against a good sample of spam and ham. That is the purpose of the Optimization screen. It may take a few minutes to open, as it has to load the entire current rule set and all of the ham and spam in your corpus. Not working? Find Mistakes! New in SmartBlocker is the Find Mistakes button on the Helper screen. Clicking this button analyzes your spam and ham corpus sort by sender then ham/spam status, looking for mail that may have been submitted to both directories, or may be have contradictory conditions. If GWAVA appears to be not blocking e-mail the Find Mistakes process may reveal why. In the example screen, mail from the same address is marked as both ham and span. In this case, the reason why is that spoofed headers from the sender are marked as spam, but properly formed mail from is marked as spam. This is causing confusion. Select a rule from the results window and choose Rule Breakdown, Message Parts, Switch to Ham/Spam or Delete Vector to correct your filtration rules. Copyright © 2005 Beginfinite Inc. All rights reserved. GWAVA 3.6 155 Rule Maintenance Rule maintenance in this manual refers to the functions provided for making sure your SmartBlocker Manager rule set is up-to-date, and catching spam. These can be viewed, edited and tested. There are two main screens – the Rules screen that shows lists of rules, and Rule Detail screens, which break rules down into component parts, and allow you to test them. To enter the Rules screen, select from the Rules menu View Current Rule. Note: Opening may take a minute as rules may not yet be parsed. View rules by selecting a rule type from the drop down list. Subject Message body Raw body Text attachment HTML attachment MIME header Header to Header from Message body HTML Message body text An example This is a scrollable list of every rule of type “Message body.” The columns shown are described as follows: Type: The type of rule ID: The ID of the rule in the .cf files. These IDs are unique – no two rules may have the same ID. Description: The description of the rule in English. This is also contained in the .cf files. #fires: How many times this rule fires on the current ham/spam database. #spam fires: How many times this rule fires in spam in the database. #ham fires: How many times this rule fires in ham in the database. Number of False Positives Number of False Negatives Sort the columns by clicking on the titles. If you click with the left mouse button on any line in this list, the buttons Rule Details and Vectors Fired become active. Clicking those buttons will then apply that function to the selected rule. You can also get the same effect with double-clicks. Double clicking a line with the left button has the same effect as clicking the rule and selecting Rule Detail. Double clicking a line with the right mouse button has the same effect as clicking the rule and selecting Vectors Fired. Copyright © 2005 Beginfinite Inc. All rights reserved. GWAVA 3.6 156 New Rule Selecting the New Rule button presents the Rule Details screen, allowing you to edit and save a new rule. All of the elements to generate a rule, no matter how simple or complex, can be found on this screen. The many components of this screen are detailed throughout this section of the GWAVA manual. Rule Details Selecting the Rule Details button for any selected line in the rule list opens a Rule Details screen for that rule. Vectors Fired Selecting the Vectors Fired button for any selected line in the rule list takes you to a screen summarizing which ham/spam messages (if any) for which this rule fires. This screen is described in more detail under Spam Vector Maintenance. Rule Details This screen can be entered in a number of ways – from the Rules Screen, or from a ham/spam message analysis screen, or even from another Rule Details Screen. It will either be a new rule, and every field will be empty and waiting to be filled out, or it will show details of an existing rule. Copyright © 2005 Beginfinite Inc. All rights reserved. GWAVA 3.6 Specific details on the Rule Details of controls Rule ID Each rule has a unique identifier in the GWAVA configuration files. Once set, this can’t be altered for a rule. If you are creating a new rule, you can enter this value once. Consistency with the other rules will be checked, and from then the ID will be locked in. Description A text description of the purpose of a rule. Regular Expression The actual “Regular Expression” used in the GWAVA configuration files. This expression is run over the particular part of a message defined in “rule type.” For example if the words “mailing list” appear in the body of a message, then this rule will fire. Rule Type The part of the message this rule is to be run over to test for fires. There are currently 10 defined rule types, corresponding to 10 different pieces of a raw MIME message Score The current score for this rule. This may have been user defined, or it may have been automatically generated by the Optimization Screen. Suggest Score If you cannot judge what a score should best be, click this button, and SmartBlocker Manager will suggest a score based on a narrowing search. This is not guaranteed to be the best possible score, but it will never make the total performance on the ham/spam database worse. Suggest score mirrors Solve to Lower Limit. If the rule is bad, a score of zero will be suggested. This button can be reclicked so you can edit rule quickly. Lock Score If you are sure what the score should be then you can lock a score by ticking this box. The optimizer will not alter this score. For example, if the rule is a company specific name and you know it should therefore be a strong “ham detector,” you might want to give it a large negative score and lock it. Locking a score reduces work on the optimizer too. But it is only recommended if you are sure. Overridden by user Any rule shipped with GWAVA may be overridden by the administrator. This is the exception to the uniqueness of ID criterion. If a rule exists with the same ID in a user configuration file, or has been entered using this screen, then it overrides the preexisting GWAVA rule. This may be needed if a GWAVA rule is almost but not quite right, in an important way for some organization. Future revisions of GWAVA shipped rules will not then destroy this rule. (Deleted shipped riles go into deleted.cfg, and are kept in this file even if GWAVA distributes updated rules.) Another way to achieve the same effect would be to create a rule with a different name, and set the score in the preexisting rule to be zero, thus disabling it. Copyright © 2005 Beginfinite Inc. All rights reserved. 157 GWAVA 3.6 158 Modifiers Within the Rule Details group of controls there is a subgroup of Modifiers. These correspond to the modifier switches that are in the GWAVA configuration files, which occur after the definition of a regular expression. They are: Case insensitive Makes a rule insensitive to capitalization. Conversely, the absence of a tick here means that the rule is sensitive to case. In the screen depicted, the text “Mailing List” would also fire. If this box were not ticked, then the capital M and L would cause this text to not fire. Force quantifier Makes any numerical quantifiers for a rule work correctly. To leave this unticked changes any {m,n} quantifier to act as a “*”. An unfortunate consequence of the speed at which GWAVA’s anti-spam rule checker works is that for some kinds of expressions it can take a lot of memory. {m,n} quantifiers with large “n” values are particularly bad for this, and can often take too much memory. So proper quantification is off by default. But setting this modifier can turn it on, if it is needed. “*” on the other hand, takes very little memory. Other implementations of regular expressions struggle badly if “*” is included a lot, particularly at the end of an expression. Multifire A multifire rule will score multiple times if it fires multiple times in a message. If we set the depicted rule to multifire then every time a specific element occurred in the message body, it would add to the total. Letter substitution Gets around the various ways of “munging” a word to make it harder to detect. It is common to write Viagra as v1@gr@, for instance. Turning on this modifier will allow a rule to fire on any substitutions that may have been made. Negate rule Enabling this means it “fires if it doesn't fire”. Eg if it fired once in a message, then negate rule means that it would not add to the score. If it didn't fire on a message, negate rule would mean it DID add to the score. It is used to search for the absence of message elements and strings. Num fires to activate Sets a threshold for the minimum number of fires for a rule to fire. If you set the depicted rule to have a “num fires to activate” value of 5 then on the 5th occurrence of the offending word, this rule would fire. Any less than five and it will not fire. Setting this value to zero means that a rule will fire on its first occurrence. Override global ranges This setting permits this rule to trump the global ham and spam value settings. Optimize lower limit This data entry field is used to set the lower limit for optimizing this rule. Optimize upper limit This data entry field is used to set the lower limit for optimizing this rule. Copyright © 2005 Beginfinite Inc. All rights reserved. GWAVA 3.6 159 Other Functions of the Rule Details Screen The remaining functions on this screen are for information and testing alterations to a rule. Testing a Rule Using the Test Rule button will show you the effect of a rule change or how a rule is doing without changes, This will run the rule over either the ham/spam database, or a piece of text you have entered. The radio button in this diagram selects between the two different kinds of tests. Enabling the Show false only checkbox will show only false positives and false negatives. Show Vectors This Rule Fires Clicking this button will take you to a ham/spam database screen, which shows exactly which messages this rule is currently firing in. More detail on the ham/spam database screen is given below (Spam Vector Maintenance). In our example, Test on entire vector set is selected. If you click Test Rule in the Results group, the performance of this rule is shown. The Total number of fires shows how many times this rule activates in the current ham/spam database. Num spam fires shows only the fires in spam, likewise the Num ham fires shows only the fires in ham with corresponding Percentage of spam and Percentage of ham firings. (Num spam fires + Num ham fires should be equal to Total # fires.) Also listed are the Number of false positives and Number of false negatives. The Number of characters box is left blank because this is of little interest when testing against the ham/spam database. If you select Test on selected text then the box on the top right of the screen entitled Type or paste text here, then click Test Rule, becomes active. We have typed “mailing list A, mailing list B” into the box, and then clicked Test Rule. The Results group now shows only results for running this rule over that text. Notice that Num spam fires and Num ham fires now show N/A. This is because SmartBlocker Manager does not yet know whether the text is ham or spam. Nor does it matter for the purposes of testing the rule’s functioning. The Total # Fires shows a total of two. This is because the phrase “mailing list” occurs twice. Character Count Notice that he number of characters shows 30. This can be useful if you pasted text that contained non-visible characters. Copyright © 2005 Beginfinite Inc. All rights reserved. GWAVA 3.6 160 Folders The Edit menu also contains an entry for Folders. Selecting this will present a dialogue box for choosing where rules and scores will be stored. To change the location from the default, click the … button and navigate to your preferred location. Delete This Rule Clicking this button shall present two dialogue boxes in succession. The first asks you to confirm the deletion. Click OK to delete or Cancel. If you click OK, another screen will present asking if you wish to save changes now. Click OK to save or Cancel to stop without saving any alterations. Co-firing Rules This list shows what rules are currently also firing in a message when this rule fires. It is used to detect when a rule is overlapping with another rule. In some cases, two rules may have very similar functions and purposes. If so, it is often preferable to have only one more powerful rule, or to exclude the overlap by altering both rules. #Overlap The RuleID column identifies what rule is co-firing. The #Overlap column shows how many messages in which both rules fire. The %Overlap field divide the #Overlap by the greatest number of fires between the two rules. In the example depicted earlier, the rule NO_REAL_NAME fires in 1488 messages that PHRASE_MAILING_LIST also fires in. And the %Overlap of 5.24 means that these 1488 fires are %5.24 of the total num of times “NO_REAL_NAME” fires. Tip: Double-clicking the line in the list presents a Rule Detail screen for that rule. Spam Vector Maintenance Spam Vector Maintenance refers to functions for maintaining a database of spam and non-spam (a.k.a. ham) to test your rules against, and for the optimization function to optimize against. Users can add spam or ham to the database from their own store, or publicly available stores. There are four main screens in Spam Vector Maintenance: Vectors: Presents an overall list of messages in your database. This list can be limited to those firing certain rules. It can be sorted. And from it you can access Rule Breakdown and Message Parts for any selected message. Rule Breakdown: A view of what rules are firing in any particular message and what the rule-score total breakdown is. It also gives you access to the Message Parts screen for the message, or the Rule Detail, for any rule that is firing. Message Parts: Presents a detailed breakdown of what GWAVA sees are the various parts of this message. Headers, bodies, HTML raw, etc are all accessible. Add Vectors: To alter the spam/ham database. You can add individual messages, or a whole search pattern. You can also delete the database, and rebuild it from scratch here. Tip: Archive Viewer: The GWAVA Archive Viewer allows users to add processed messages to the SmartBlocker Manager ham and spam ruleset. Copyright © 2005 Beginfinite Inc. All rights reserved. GWAVA 3.6 161 Vectors The Vectors menu has two options: Add New Spam/Ham and View Current Vectors. Selecting View Current Vectors presents a vectors management screen. To get a list of ham/spam messages select a view type. All vectors: presents the complete spam/ham database. Ham: shows only ham. Spam: shows only spam. Falsely classified: presents every message that the current rule and score set classifies incorrectly. False positives: shows ham that the rule and score set thinks are spam. False negatives: shows spam that the rule and score set thinks are ham. Sender in Both Ham and Spam – This identifies corpus database elements which have senders reported in both as ham and spam Duplicate Subject/Sender – This identifies subjects and senders appearing twice in your corpus. There are also two buttons: Rule Breakdown and Message Parts. These allow you to view which rules fired and header information about selected messages. Copyright © 2005 Beginfinite Inc. All rights reserved. GWAVA 3.6 162 Selecting All Vectors generates an example similar to: The columns in this list are: H/S: H indicates a ham message, S indicates a spam message Score: The total score a message has received from the rule/score set. Subject: The subject line of the message Sender: The sender line of the message These may be sorted by any column, in either ascending or descending order by clicking the column title. If you click on a particular line in this list, then the Rule Breakdown and Message Parts buttons will become active. Clicking on either of them will take you to the respective screens for the highlighted message. The same effect can be achieved by double-clicking the line with the left mouse button for Rule Breakdown and the right mouse button for Message Parts. This screen can also be entered from other screens, in which case it will be automatically narrowed down, depending on the screen you came from. For instance, you may click Show Vectors This Rule Fires In button when in the Rule Breakdown screen. You will be brought to Vectors with only the vectors showing that caused that rule to fire. Buttons The Vectors screen also has four buttons: Rule Breakdown, Message Parts, Switch selection to Ham/Spam and Delete Vector. Rule breakdown shows which rules have been triggered while message parts presents a screen showing what parts of a message were rule triggering for GWAVA. Switch S/H changes the classification from spam to ham or vice versa. Lastly, delete vector removes a selected vector from the database. Important: You will NOT be asked to confirm the deletion. Copyright © 2005 Beginfinite Inc. All rights reserved. GWAVA 3.6 163 The Rules Breakdown Screen When you select a message in the Vectors screen, and then click Rule Breakdown (or double-click the message with the left mouse button), SmartBlocker Manager presents a screen listing what rules fired in a particular ham/spam message, and it also shows why the total score came out the way it did. (The Score box should present the sum of all values in the Total column.) The subject line of the message is shown for reference. The columns in this list are: Rule: The ID of a rule that fires in this message Multi: Whether this rule is multifire (meaning it can score more than once if it occurs more than once). #Fires: how many times this rule fires. Regardless of whether the rule is multifire Score: This rule’s score Total: What score this rule contributes. Will only differ from the Score column if the rule is multifire. A multifire rule will usually have a total of the #Fires value times the Score value. Double-clicking a rule will take you to the “Rule Detail” screen for this rule, where you can find out more about it, or test it. Clicking the Message Parts button will take you to a Message Parts screen which gives a breakdown of the pieces of this message as GWAVA sees it. Copyright © 2005 Beginfinite Inc. All rights reserved. GWAVA 3.6 164 The Message Parts Screen The Message Parts screen can be entered in two main ways. Either from the Vectors screen, by selecting a message and clicking the Message Parts button, or from the Rule Breakdown screen, by simply clicking the Message Parts button. Doing either of these will present a screen similar to this: As each rule can only fire on one message part, this screen reveals each portion of the selected message. Often it is not immediately clear from a message which part is which. The score and whether the message is ham or spam are shown for reference. The Message Parts list shows the various MIME pieces that GWAVA has extracted from this message. The Part Type is shown, and the first line of text in that part. Initially the Part Detail section will be empty. Clicking on a line in the Message Parts list will show more detail on the selected part. In the example above, Raw Body has been clicked, and this part of the message is now showing in the Part Detail box. Copyright © 2005 Beginfinite Inc. All rights reserved. GWAVA 3.6 165 The Add Vectors Screen To alter the ham/spam database, enter the Add Vectors screen by choosing Add Spam/Ham from the Vectors menu: This screen is for making alterations to the ham/spam database. The Vector Statistics group Reveals basic information on the messages currently loaded – how many total, and of each type, and how much total disk space the database takes. It also keeps track of changes to these values from this screen. The Reload Vectors button deletes vectors from memory, and reloads the saved message database from disk. The Kill Old Vectors button deletes the saved message database from disk, if you need to start afresh. Note that this does not delete the actual .822 files. The Add Vectors group of functions Provides various means to get messages into the database: The File(s) to add field allows administrators to choose one or more .822 files to add. Click on the … button to select files to add, then click Add as Spam or Add as Ham depending on the nature of the messages. Pattern to add allows you to choose whole patterns of files. This will be useful when there thousands of files to select. Enter a DOS-style file pattern, and then click Add as Spam or Add as Ham depending on the nature of the messages. Copyright © 2005 Beginfinite Inc. All rights reserved. GWAVA 3.6 166 Rebuild functions The Vector Rebuild option allows you to generate a new vectors.dat database file based on the vectors located in the defined spam and ham pattern directories. Clicking Rebuild: Deletes the entire current vector database from disk Clears the database from memory Adds the Rebuild spam pattern as spam Adds the Rebuild ham pattern as ham Loads the new database of messages into memory This allows you to generate the vector database that is used to help adjust the scores of your rules through the optimizer Remember that adding vectors does not automatically add them to the vectors.dat database. You must issue a rebuild in order to apply a new vector to the vectors.dat database. This is what the spam engine reads. Tip: Begin by adding at least 1,000 ham mails to SpamTools to build your optimization rules. There is no limit to the number of mails that can be added to SpamTools. Files Used .CF and .CFG files SpamTools.ini Vectors.dat GAParams.dat Scores.cf Files Produced (for information only) Falseneg.dat Falsepos.dat Errorlog.dat Redundant.dat Rulefires.dat Upgrading and Backrevving SmartBlocker to pre-3.1 SPAMCFG upgrade: As part of the upgrade to 3.10, several files were fundamentally changed. If you must backrev, make sure that you a) backrev SpamTools.EXE on the front end, b) restore the backed up files from the SPAMCFG\CFBAK3.10 directory on the backend to SPAMCFG. (Before you do so, delete all files currently extant in SPAMCFG directory, including the PCR file). Running SmartBlocker will recreate the PCR file. Copyright © 2005 Beginfinite Inc. All rights reserved. GWAVA 3.6 167 Appendices ConsoleOne This appendix outlines how to run the GWAVA Manager through Novell ConsoleOne, using the GWAVA Profile Manager and Deployment Manager. Installing the GWAVA Snap-In for ConsoleOne Once GWAVA is installed, you can install the GWAVA Snap-In for use with Novell ConsoleOne. To install the Snap In, click Start > Programs > GWAVA > Install ConsoleOne Snap-In. The installation will proceed automatically, and GWAVA will appear in the Tools menu of ConsoleOne the next time you start ConsoleOne. Note: As an alternative to using the Start menu, you can run the executable file snap.exe located in C:\Program Files\BeginFinite\GWAVA (where C represents the drive letter of the drive you run GWAVA from on your workstation). The SnapOne installer window opens. Copyright © 2005 Beginfinite Inc. All rights reserved. GWAVA 3.6 168 The ConsoleOne Snapin installation window The screen is an informational one, informing users that the ConsoleOne snapin is optional for GWAVA. It is not required for satisfactory operation of GWAVA. Use the browsing function of the window to choose where the ConsoleOne snapin is to be installed. Click Install to continue or Cancel to quit. Copyright © 2005 Beginfinite Inc. All rights reserved. GWAVA 3.6 169 Starting GWAVA Tools with Novell ConsoleOne When your ConsoleOne session is active, and GWAVA is installed on your network, you can start the GWAVA manager through the Tools menu. You have three options in the Tools > GWAVA menu: GWAVA Manager, Profile Manager, Deployment Manager, and Configure Profile. GWAVA Manager launches the GWAVA Manager. Profile Manager launches the Profile Manager (see below, this appendix), Deployment Manager launches the Deployment Manager (see below, this appendix) Copyright © 2005 Beginfinite Inc. All rights reserved. GWAVA 3.6 170 Configuring GWAVA 3 in a Clustered Environment (Updated) This appendix outlines how to install GWAVA in a NetWare clustered environment. Any version of NetWare clustering is sufficient. GWAVA 3 should now install seamlessly in a cluster and support protected memory. It is important to note that most Anti-Virus NLMs do NOT support protected memory so check your AV NLM for protected memory support. Step 1 Run the install and update your workstation. If you are updating an existing installation of GWAVA 3 do NOT run the GWAVA Config program as you must edit the GMTACFG.INI file manually. If the GWAVA configuration program is running, it may overwrite your changes. Edit your MTA start up File. Make certain your MTA switch is using a true UNC path. (\\ServerName\Volume\Directories) to the GroupWise server directory using the virtual server name. Netware will accept paths that are not true UNC. This may cause directory locations to be incorrect. Diagnostic note - If anything goes wrong, it will be with the MTA home switch. Files may end up everywhere. Step 2 Run the install and update your workstation. Step 3 Load the GWAVA configuration program. Go to the Miscellaneous screen and enable the GWAVA is installed in a cluster checkbox updates your configuration file automatically. Unchecking it removes these changes. Note - This does NOT ENSURE THAT THE PATHING Information is correct. Step 4 Add the cluster load script. Be certain to use the full path to the MTA startup file. Here's an example: -- Load Script -nss /poolactivate=DOM mount DOM VOLID=251 CLUSTER CVSBIND ADD vDom 1.2.3.4 NUDP ADD vSERVER 1.2.3.4 Add Secondary IPAddress 1.2.3.4 Search Add DOM:\System Load Address Space=GWMTA DOM:\System\gwmta @DOM:\System\gwmta\dom1.mta -- End Load Script -- Copyright © 2005 Beginfinite Inc. All rights reserved. GWAVA 3.6 171 Step 5 Modify the cluster unload script. Note that the MTA must be shut down before unloading the address space. Without the following commands the resource will not unload or go offline properly. UnLoad Address Space=GWMTA gwmta UnLoad Address Space=GWMTA UnLoad GWAVAOSA Once again a sample script: -- Unload Script -UnLoad Address Space=GWMTA gwmta UnLoad Address Space=GWMTA UnLoad GWAVAOSA Del Secondary IPAddress 1.2.3.4 CLUSTER CVSBIND DEL vSERVER 1.2.3.4 NUDP DEL vSERVER 1.2.3.4 nss /pooldeactivate=MAIL /overridetype=question -- End UnLoad Script -- Note: If GWAVA, GWAVAPOA, WASP, or more than one instance of any of these programs will ever be loaded simultaneously on the same node the UnLoad GWAVAOSA command should be removed from all cluster unload scripts. This is because GWAVAOSA is shared by all of these products and can only be loaded once per server. Inadvertently unloading GWAVAOSA while still in use by another process will cause the server to hang. Step 6 If the MTA is already running you should now be able to unload the MTA. Run the NOGWAVA.ncf script to make sure no GWAVA modules are left in memory. Finally, offline and then online the resource to get the MTA started correctly. You are now configured to run GWAVA in a clustered environment. Copyright © 2005 Beginfinite Inc. All rights reserved. GWAVA 3.6 172 Templates and Variables GWAVA 3 has been restructured internally to use new notification templates, supporting tremendously increased functionality via a metalanguage, and supporting HTML and text, customizable subjects and per event information. All of this is fully customizable. There are two types of notification templates included in GWAVA 3: the default 11 Notification and Report templates and the 822 Notification templates. They are similar in that they are all populated using metavariables and organized into sections. The primary 822 notification template is the TAdmin.822. The others contain, within varying degrees, the contents of this notification template, along with explanatory text detailing in English what the metavariables mean. An important variable to understand is SubstituteVarChar. Event Log templates are wrapped in substitutevar (",'), which effectively changes " chars in variables in these to ' chars. This avoids breaking comma-delimited fields such as "field1","field2","field3". For example, if one of the fields contained " it may break some importing methods. Format %%SubstituteVarChar([character to replace],[character(s) to write]) The source and replacement characters can be in plain text, or hex values, but a mix of both while it could be used, is not advised. Examples %%SubstituteVarChar(",') %%SubstituteVarChar(@,.at.) %%SubstituteVarChar(',\') %%SubstituteVarChar(0x27,0x5c0x27) %%SubstituteVarChar(0x27,\') %%SubstituteVarChar(',0x5c0x27) To disable a substitution rule, simply apply the rule for a character to itself: %%SubstituteVarChar(0x27,0x27) Complex, Customizable and Capable reporting Some of GWAVA 3’s variables can represent more than one value when used in an output report. For example, more than one attachment might be blocked for more than a single reason. Or, there might be a message with perhaps several attachments, some of which are infected with different viruses. The "delimit as a comma or carriage return" is good for single collection in outputs, but is limited when dealing with more complex tables. As delimit would generate one set of results, and then another. Cross correlating information becomes difficult. Hence: %%SubstituteVarChar(",')%%ForEach In our example using multiple variables to report multiple infections in several attachments, GWAVA will go through the infected file for each unique instance of the infected file, fire the %%Item metavariable. This collection reports the instance of infection in this file for this message: (%%InfectedFileName,SetCounter=%%IItem)"%%UniqueIDString_Message","%%InfectedFileName[%%IItem]" "%%VirusName[%%IItem]"%%EOL%%EndFor%%SubstituteVarChar(",") Copyright © 2005 Beginfinite Inc. All rights reserved. GWAVA 3.6 173 Three fields followed by the name, infected file and infected file name. %%EOL forces a carriage return. It is useful because in a ForEach loop that's the only way to force it go to the next line. An example: CFilter.Tpl This is the Content Filter Template: %%StripLineFeeds=1%%SubstituteVarChar(",') %%ForEach(%%ContentFilter_Subject_Name,SetCounter=%%IItem) "%%UniqueIDString_Message","S","%%ContentFilter_Subject_Name[%%IItem]","%%ContentFilter_Subject_Context[%%IItem] "%%EOL %%EndFor %%ForEach(%%ContentFilter_Text_Name,SetCounter=%%JItem) "%%UniqueIDString_Message","T","%%ContentFilter_Text_Name[%%JItem]","%%ContentFilter_Text_Context[%%JItem]"%%E OL %%EndFor %%ForEach(%%ContentFilter_Attachment_Name,SetCounter=%%KItem)"%%UniqueIDString_Message","A","%%ContentFilter_ Attachment_Name[%%KItem]","%%ContentFilter_Attachment_Context[%%KItem]"%%EOL %%EndFor%%SubstituteVarChar(",") The format of the Content Filter Template (cfilter.tpl) includes a unique alphanumeric string for tracking the message and the subject name followed by the context variable (the words immediately preceding and following the filtered word), with similar variables for events deeper in the message or its attachments, and statistical counter variables to track triggers. The templates allow administrators to customize data that is mined by GWAVA processes. Here is the same Content Filter template again, this time broken down into smaller sections: Explanation CFilter.Tpl Strip line is included as GWAVA may be handling content which may have its own carriage returns. %%StripLineFeeds=1%%SubstituteVarChar(",') %%ForEach Assists in delimiting For each content filter subject name and sets the counter increment. (%%ContentFilter_Subject_Name,SetCounter=%%IItem) The unique ID string will assist administrators track messages as they are processed by different filters and are reported upon in different logs. "%%UniqueIDString_Message","S","%%ContentFilter_Subject_Name[%%IItem]", Content filters firing in the text part "%%ContentFilter_Subject_Context[%%IItem]"%%EOL Closes a %%ForEach loop, in this case, the one at the start of the template. %%EndFor This underlines an important point: variable operations can be nested. %%ForEach(%%ContentFilter_Text_Name,SetCounter=%%JItem) "%%UniqueIDString_Message","T","%%ContentFilter_Text_Name[%%JItem]", "%%ContentFilter_Text_Context[%%JItem]"%%EOL %%EndFor Copyright © 2005 Beginfinite Inc. All rights reserved. GWAVA 3.6 174 Additional Notification Templates Notes This appendix details the notification templates used in GWAVA 3. They are populated by the GWAVA metavariables. Note that starting with GWAVA 3.1, Virus Attachments to Admin notifications are off by default in Tadmin.822 It can be activated again in the GWAVA configuration program’s Miscellaneous options section. TRecip and TOrig notification templates Trecip and Torig are the two other master notification templates used by GWAVA 3. They contain much the same information as the TAdmin file except that data and variable information included only contains recipient information while the Torig contains sender data. For example, Trecip.822 has the subject ‘Subject: GWAVA RecipientAdmin Notification’ while Torig.822 contains ‘GWAVA SenderAdmin Notification (%%EventFireListDelimitby=",") Dlystats.822 and Yesterd.822 The templates Dlystats.822 and yesterd.822 are simplified forms of the Administration.822 template. Yesterd.822 is the same as dlystats.822, but refers to yesterday’s statistics instead of today’s stats. Imagine the report firing at midnight for example – today’s stats will be more or less zero, and you probably want yesterday’s figures instead. The default time for dlystats.822 is set to 23:55. Note that the daily stats setting can be controlled in MConfig. SuRBL One of the new templates in GWAVA 3.5 is for SuRBLs. %%SubstituteVarChar(",')%%ForEach(%%SURBLBlockedDomain,SetCounter=%%IItem)"%%UniqueIDString_Message","%%SURBL BlockedDomain[%%IItem]","%%SURBLSite[%%IItem]"%%EOL%%EndFor%%SubstituteVarChar(",") The format of the address block template includes which blocked domain and a counter, a unique alphanumeric string for identifying the message, and a variable for identifying which SuRBL site was referenced for this block The Address Block Template %%SubstituteVarChar(",')%%ForEach(%%BlockedSourceAddress,SetCounter=%%IItem)"%%UniqueIDString_Message","%%Block edSourceAddress[%%IItem]"%%EOL%%EndFor%%ForEach(%%BlockedDestinationAddress,SetCounter=%%JItem)"%%UniqueIDS tring_Message","%%BlockedDestinationAddress[%%JItem]"%%EOL%%EndFor%%SubstituteVarChar(",") The format of the address block template includes a unique alphanumeric string for identifying the message and lists which blocked source or destination address or addresses, triggered the event. The Attachment Template %%SubstituteVarChar(",')%%ForEach(%%Attachment_Name,SetCounter=%%RCPItem)"%%UniqueIDString_Message","%%Attac hment_Name[%%RCPItem]","%%Attachment_Size[%%RCPItem]"%%EOL%%EndFor%%SubstituteVarChar(",") The format of the attachment template includes a unique alphanumeric string for identifying the message, and details about the attachment including its name and size. The Attachment Block Template %%SubstituteVarChar(",')%%ForEach(%%BlockedFileTypeName,SetCounter=%%IItem)"%%UniqueIDString_Message","%%Block edFileTypeName[%%IItem]"%%EOL%%EndFor%%SubstituteVarChar(",") The format of the address name block template includes a unique alphanumeric string for identifying the message and the name of the attachment which triggered the block. Copyright © 2005 Beginfinite Inc. All rights reserved. GWAVA 3.6 175 The Content Filter Template %%StripLineFeeds=1%%SubstituteVarChar(",') %%ForEach(%%ContentFilter_Subject_Name,SetCounter=%%IItem) "%%UniqueIDString_Message","S","%%ContentFilter_Subject_Name[%%IItem]","%%ContentFilter_Subject_Context[%%IItem] "%%EOL %%EndFor %%ForEach(%%ContentFilter_Text_Name,SetCounter=%%JItem) "%%UniqueIDString_Message","T","%%ContentFilter_Text_Name[%%JItem]","%%ContentFilter_Text_Context[%%JItem]"%%E OL %%EndFor %%ForEach(%%ContentFilter_Attachment_Name,SetCounter=%%KItem)"%%UniqueIDString_Message","A","%%ContentFilter_ Attachment_Name[%%KItem]","%%ContentFilter_Attachment_Context[%%KItem]"%%EOL %%EndFor%%SubstituteVarChar(",") The format of the address block template includes a unique alphanumeric string for tracking the message and the subject name followed by the context variable (the words immediately preceeding and following the filtered word), with similar variables for events deeper in the message or its attachments, and statistical counter variables to track triggers. The Fingerprint Template %%SubstituteVarChar(",')%%ForEach(%%FingerprintedAttachmentName,SetCounter=%%FPItem)"%%UniqueIDString_Message ","%%FingerprintedAttachmentName[%%FPItem]","%%FingerPrintFileType[%%FPItem]"%%EOL%%EndFor%%SubstituteVarCha r(",") The format of the address block template includes a unique alphanumeric string for tracking the message and the fingerprinted attachment name and type. The Messages Template %%SubstituteVarChar(",')"%%UniqueIDString_Message","%%YearLong-%%MonthofYearNumeric-%%PadDayofMonth %%HourofDay24:%%MinuteOfHour:%%SecondOfMinute","%%FROM","%%SUBJ","%%EventText","%%ArchiveFileName","%%Curre ntMessageSizeBytes"%%EOL%%SubstituteVarChar(",") The messages template includes a unique string for identifying the message, date and sender, its archival file name and size. The Oversize Template %%SubstituteVarChar(",')%%VarExists(%%EventFire_MessageOversize)"%%UniqueIDString_Message","%%MessageSizeLimitKB ","%%CurrentMessageSizeBytes","Text","M"%%EOL%%EndVarExists%%VarExists(%%EventFire_AttachmentOversize)%%ForEac h(%%OverSizeAttachmentName,SetCounter=%%JItem)"%%UniqueIDString_Message","%%AttachmentSizeLimitBytes","%%Ove rsizeAttachmentSize[%%JItem],"%%OverSizeAttachmentName[%%JItem],"A"%%EOL%%EndFor%%EndVarExists%%SubstituteV arChar(",") The oversize template format includes a unique string for identifying the message, and variables for both oversize messages or attachments as well as size limits. The RBL Template %%SubstituteVarChar(",')%%ForEach(%%RBLBlockedIP,SetCounter=%%IItem)"%%UniqueIDString_Message","%%RBLBlockedIP[ %%IItem]","%%RBLSite[%%IItem]"%%EOL%%EndFor%%SubstituteVarChar(",") The RBL template lists the blocked IP by the RBL and a unique id to identify the message and a variable for incrementing the relevant counter. The Recipient Template %%SubstituteVarChar(",')%%ForEach(%%RecipientAddress,SetCounter=%%RCPItem)"%%UniqueIDString_Message","%%Recipie ntAddress[%%RCPItem]","%%RecipientType[%%RCPItem]"%%EOL%%EndFor%%SubstituteVarChar(",") This template details which recipient address block was triggered, and contains counter controls for the triggering event as well as a unique string to identify the message. The Spam Template %%SubstituteVarChar(",')"%%UniqueIDString_Message","%%AntiSpamScore","%%AntiSpamThreshold","%%AntiSpamLogFile"% %EOL%%SubstituteVarChar(",") The spam template uses variables to report the score, the threshold and a variable which references the location of the anti-spam log file, if it exists. Copyright © 2005 Beginfinite Inc. All rights reserved. GWAVA 3.6 176 The Virus Template %%SubstituteVarChar(",')%%ForEach(%%InfectedFileName,SetCounter=%%IItem)"%%UniqueIDString_Message","%%InfectedFi leName[%%IItem]","%%VirusName[%%Item]"%%EOL%%EndFor%%SubstituteVarChar(",") The format of the virus block template includes the infected file names, a unique id string to identify the message, the infected file name and the virus name. Copyright © 2005 Beginfinite Inc. All rights reserved. GWAVA 3.6 177 The Tadmin.822 template Glossary TAdmin.822 template The TAdmin is in a sense the master template in GWAVA 3. Both the TRecip.822 and the TOrig.822 templates contain selected portions of the information in the TAdmin.822 Template. For example, recipients are not presented with the full details of content filtering monitoring information. Several of the variables are populated when you set up GWAVA, for example, %%AdministratorAddress. Many metavariables in GWAVA can represent multiple values. The reason why this is so is because single messages can fire multiple events. %%VarExists and %%EndVarExists are used to control how variables interact with one another. These two metavariables are the brackets enclosing analytical operations in GWAVA 3. To the right you see the preliminary and header information in the 822 template. What follows next is the Virus information section. We will also see an example of how VarExists and EndVarExists work. From: <%%SMTPMailFrom> MIME-Version: 1.0 Message-ID: <%%UniqueIDString_Message.%%AdministratorAddress> Subject: GWAVA Admin Notification (%%EventFireListDelimitby=",") Content-Type: multipart/mixed; boundary="%%UniqueIDString_Message.SHELL" This is a multi-part message in MIME format. --%%UniqueIDString_Message.SHELL Content-Type: multipart/alternative; boundary="%%UniqueIDString_Message.MAIN" %%Comment=" A NOTE TO GWAVA ADMINISTRATORS: The next section will only show up when viewing in plain text The HTML view is defined separately later, and is much easier to read (the layout capabilities of HTML shine here)" --%%UniqueIDString_Message.MAIN Content-Type: text/plain; charset=%%MIMECharset Content-Transfer-Encoding: 7bit A message was blocked by GWAVA - Content protection for Novell GroupWise. GWAVA Agent: %%GWAVASource GWAVA Server: %%FileServerName - %%AgentPlatform (%%ProfileName) The message was blocked for the following reason(s): %%EventFireList The message contained the following information: Subject: %%SUBJ From:%%FROM Recipient(s): %%TO_Addresses %%CC_Addresses %%BC_Addresses The following information details the events that prevented delivery of this message: Copyright © 2005 Beginfinite Inc. All rights reserved. GWAVA 3.6 Virus To the right, we see that %%VarExists=" has been used to begin the %%EventFire_Virus" process. If there is no %%EventFire_Virus" value appearing, then the VarExists enclosing it will prevent GWAVA from using resources by generating outputs that do not exist. 178 ===================================================== ======%%VarExists(%%EventFire_Virus) A virus was detected in the message. Please use caution when opening the contents. The following attachments within this message had viruses detected in them: %%InfectedFileNameDelimitBy=" " %%VarExists(%%VirusDetailAvailable)The following virus types were found:%%VirusNameDelimitBy=" "%%EndVarExists Again, to the right we see anther example, %%VarExists= "%%VirusName". Logically, if there is no virus event here, then no virus name will be inserted by the "%%VirusName" metavariable. We may therefore see how VarExists works to ensure that only existing variables are used for generating outputs and secondly, they can nest operations. In this case, virus found and then the virus name. Note: GWAVA only identifies the virus when used together with InoculateIT or Command Interceptor. Your server based AV solution may have more information on the specific type of infection in its logs Attachment Variables ===================================================== ======%%EndVarExists%%VarExists(%%EventFire_AttachmentType) One or more attachments within this message were blocked because of their file type. Next in the TAdmin.822 template are basic attachment variables. The following attachments were blocked: %%BlockedFileTypeNameDelimitBy=" " Copyright © 2005 Beginfinite Inc. All rights reserved. GWAVA 3.6 179 ===================================================== ======%%EndVarExists%%VarExists(%%EventFire_ContentFilter) Content within this message was disallowed. (This violates Content Filter Rule: %%ContentFilterName ) %%VarExists(%%EventFire_SubjectContentFilter) - Subject Content%%EndVarExists %%VarExists(%%EventFire_AttachmentContentFilter) - Attachment Content --%%ContentFilteredAttachmentNameDelimitBy="-"%%EndVarExists%%VarExists(%%EventFire_BodyTextContentFilter) - Body Text Content%%EndVarExists%%VarExists(%%FilterContext) Content Filter Variables The message included the following text %%FilterContextDelimitBy=" "%%EndVarExists Note the nesting of the %%EndVarExists. ===================================================== ======%%EndVarExists%%VarExists(%%EventFire_AddressBlock) Address bock variables Again, it is vital to understand that variables are in fact, multivariables: for example, more than one attachment might be blocked. The source or destination address of this message was rejected. The rejected addresses were: %%VarExists(%%BlockedSourceAddress) Sender: %%BlockedSourceAddress%%EndVarExists %%VarExists(%%BlockedDestinationAddress) Recipient(s): %%BlockedDestinationAddressDelimitBy=" "%%EndVarExists ===================================================== ======%%EndVarExists%%VarExists(%%EventFire_RBL) RBL Next in the TAdmin.822 template is the RBL section. Note that only one RBL event is permitted at present. SuRBL This message was rejected by a RBL server. The IP address of the blocked message is: %%RBLBlockedIP which the %%RBLSite RBL Server flagged. ===================================================== ======%%EndVarExists%%VarExists(%%EventFire_SURBL) This message was rejected by a SURBL server. The address of the blocked message is: %%SURBLBlockedDomain which the %%SURBLSite SURBL Server flagged. Copyright © 2005 Beginfinite Inc. All rights reserved. GWAVA 3.6 180 ===================================================== ======%%EndVarExists%%VarExists(%%EventFire_FingerPrint) Fingerprinting An attachment within this message was rejected because it was detected to be of a disallowed type. The following attachments were blocked: %%ForEach(%%FingerprintedAttachmentName,SetCounter=%%FPItem)%% FingerprintedAttachmentName[%%FPItem] %%FingerPrintFileType[%%FPItem]%%EOL%%EndFor ===================================================== ======%%EndVarExists%%VarExists(%%EventFire_Spam) Spam This message was considered to be spam, as The message scored %%AntiSpamScore, which exceeds the Anti-Spam Threshold of %%AntiSpamThreshold. If you have enabled the Generate Log Files--in the Advanced settings for AntiSpam Heuristics-- the following log files are available, and contain additional information about the message: %%VarExists(%%AntiSpamLogFile)%%IncludeAntiSpamLogFile %%EndVarExists Oversize Note that there are separate variables for oversized messages and oversized attachments. ===================================================== ======%%EndVarExists%%VarExists(%%EventFire_Oversize) The message exceeds the %%AttachmentSizeLimitKB KB limit set in GWAVA's Oversized Attachment Feature. %%VarExists(%%EventFire_MessageOversize) - Message%%EndVarExists %%VarExists(%%EventFire_AttachmentOversize) - Attachments%%EndVarExists Copyright © 2005 Beginfinite Inc. All rights reserved. GWAVA 3.6 Statistics GWAVA uses several types of additive statistics. To the right, we have %%StatTodaysTotalMessagesPr ocesseed. In addition to Today statistics, GWAVA generates Cumulative and Overall statistics for many statistical variables. Finally, if a statistical variable lacks a qualifier for Today, Cumulative or Overall, it will report for all firings of that variable in all GWAVA records on your installation. 181 ===================================================== ======%%EndVarExists Current Statistics (Today/Cumulative) System Version: %%NLMVersion Program Version:%%ProgramVersion GWAVA Location: %%GWAVABaseUNC Date: %%MonthOfYearNumeric/%%DayOfMonth/%%YearLong (%%HourOfDay24:%%MinuteOfHour:%%SecondOfMinute) %%VarExists(%%ArchiveFileName)Archived to File: %%ArchiveFileName%%EndVarExists Total messages processed: %%StatTodaysTotalMessagesProcessed/%%StatTotalMessagesProcessed Total virus infections detected: %%StatTodaysInfectedMessageCount/%%StatInfectedMessageCount Oversize messages: %%StatTodaysOversizeMessageCount/%%StatOversizeMessageCount Oversize attachments: %%StatTodaysOversizeAttachmentCount/%%StatOversizeAttachmentCount Messages blocked by address: %%StatTodaysAddressBlockedMessageCount/%%StatAddressBlockedMessag eCount Content filtered messages: %%StatTodaysContentFilteredMessageCount/%%StatContentFilteredMessage Count Blocked attachments: %%StatTodaysAttachmentBlockedMessageCount/%%StatAttachmentBlockedM essageCount Fingerprint detections: %%StatTodaysFingerPrintBlockedMessageCount/%%StatFingerPrintBlockedM essageCount RBL blocks: %%StatTodaysRBLBlockedMessageCount/%%StatRBLBlockedMessageCount SURBL blocks :%%StatTodaysSURBLBlockedMessageCount/%%StatSURBLBlockedMessag eCount Spam: %%StatTodaysHeuristicsBlockedMessageCount/%%StatHeuristicsBlockedMe ssageCount --%%UniqueIDString_Message.MAIN Content-Type: multipart/related; boundary="%%UniqueIDString_Message.BODY" --%%UniqueIDString_Message.BODY Content-Type: text/html; charset=%%MIMECharSet Content-Transfer-Encoding: 7bit Copyright © 2005 Beginfinite Inc. All rights reserved. GWAVA 3.6 HTML This is the easily formatted portion of the TAdmin.822 template. It is therefore easily customizable. The default template includes the GWAVA graphic and a table for reporting results. A link to GWAVA for support. The HTML form for reporting events. 182 <!doctype html public "-//w3c//dtd html 4.0 transitional//en"> <html> <table COLS=1 WIDTH="400" > <tr> <td> <!--- if you don't want the GWAVA graphic, delete the next line, and then remove the entire next mime part containing the actual graphical data, starting from (and INCLUDING) --%%UniqueIDString_Message.BODY but excluding the --%%UniqueIDString_Message.BODY-- Alternatively, you can also paste your own base64 encoded graphic as a replacement ---> <center><a href="http://www.gwava.com"><img SRC="cid:part1.%%[email protected]" height=72 width=229></a></center> </td> </tr> </table> <p>A message was blocked by GWAVA - Content protection for Novell GroupWise. <p>GWAVA Agent: %%GWAVASource <p>GWAVA Server: %%FileServerName - %%AgentPlatform (%%ProfileName) <p>The message was blocked for the following reason(s): <UL> <LI>%%EventFireListDelimitBy=" <LI>" </UL> <p>The message contained the following information:<P> <TABLE> <TR><TD><FONT COLOR="0000FF"><B>Subject:</B></FONT></TD><TD>%%SUBJ</TD>< /TR> <TR><TD><FONT COLOR="0000FF"><B>From:</B></FONT></TD><TD>%%FROM</TD></ TR> <TR><TD style="vertical-align: center;"><FONT COLOR="0000FF"><B>Recipient(s):</B></FONT></TD> <TD style="vertical-align: center;">%%TO_Addresses <br>%%CC_Addresses <br>%%BC_Addresses </TD></TR></TABLE> <P> The following information details the events that prevented delivery of this message:<P> <TABLE border="1"> <TR> <TD><FONT COLOR="0000FF"><B>Event</B></FONT></TD><TD><FONT COLOR="0000FF"><B>Details</B></FONT></TD> </TR> Copyright © 2005 Beginfinite Inc. All rights reserved. GWAVA 3.6 Virus Scanning HTML portion This segment fires only if there is a virus. A typical use of the Var Exists. 183 %%VarExists(%%EventFire_Virus) <!-- Here's the Virus scanning section --> <TR> <TD style="vertical-align: top;"> <FONT COLOR="FF0000"><B>Virus Detected!</B></FONT><P> </TD> <TD style="vertical-align: top;"> A virus was detected in the message. Please use caution when opening the contents.<P> The following attachments within this message had viruses detected in them:<P> <UL> <LI>%%InfectedFileNameDelimitBy="<LI> " </UL> %%VarExists(%%VirusDetailAvailable) The following virus types were found:<P> <UL> <LI>%%VirusNameDelimitBy="<LI> " </UL> <P> %%EndVarExists NOTE: GWAVA only identifies the virus when used together with<br> InoculateIT, Sophos SAVI, or Command Interceptor. Your server based AV solution<br> may have more information on the specific type of infection in its logs.<br> </TD></TR> <!-- THE NEXT VARIABLE (WHICH CAN BE REMOVED) INSERTS THE ORIGINAL MESSAGE (INCLUDING VIRUS) IN THE NOTIFICATION. Note you can also put the following variable in other event loops, if you want. If you do remove it, also remove it from the text/plain section above --> %%EndVarExists Attachment Blocking HTML portion %%VarExists(%%EventFire_AttachmentType) <!-- Here's the Attachment Blocking Section... --> <TR> <TD style="vertical-align: top;"> <FONT COLOR="FF0000">Attachment blocked</FONT><P> </TD> <TD style="vertical-align: top;"> One or more attachments within this message were blocked because of their file type.<P> The following attachments were blocked:<P> <UL> <LI>%%BlockedFileTypeNameDelimitBy="<LI> " </UL> </TD></TR> %%EndVarExists Copyright © 2005 Beginfinite Inc. All rights reserved. GWAVA 3.6 %%VarExists(%%EventFire_ContentFilter) <!--- Content Filter ---> <TR> <TD style="vertical-align: top;"> <FONT COLOR="FF0000">Content filtered</FONT><P> </TD> <TD style="vertical-align: top;"> Content within this message was disallowed.<br> (This violates Content Filter Rule:<br> %%ContentFilterName)<p> Content Filtering HTML portion Note the differentiating between subject, body and attachment and filters and context filters. <ul> %%VarExists(%%EventFire_SubjectContentFilter) <li>Subject Content %%EndVarExists %%VarExists(%%EventFire_AttachmentContentFilter) <li>Attachment Content: <ul> <li>%%ContentFilteredAttachmentNameDelimitBy="<LI> " </ul> %%EndVarExists %%VarExists(%%EventFire_BodyTextContentFilter) <li>Body Text Content %%EndVarExists <ul> %%VarExists(%%FilterContext) <p>The message included the following text<p> %%FilterContext %%EndVarExists <p> </TD></TR> %%EndVarExists Copyright © 2005 Beginfinite Inc. All rights reserved. 184 GWAVA 3.6 Address Blocking HTML portion It is similarly constructed to the content filtering section immediately preceding. %%VarExists(%%EventFire_AddressBlock) <!--- Address Block ---> <!--- Not used are the EventFire_SourceAddressBlock EventFire_DestinationAddressBlock metavariables ---> <TR> <TD style="vertical-align: top;"> <FONT COLOR="FF0000">Address block</FONT><P> </TD> <TD style="vertical-align: top;"> The source or destination address of this message was rejected.<P> The rejected addresses were:<P> %%VarExists(%%BlockedSourceAddress) Sender: %%BlockedSourceAddress<P> %%EndVarExists %%VarExists(%%BlockedDestinationAddress) Recipient(s):<P> %%BlockedDestinationAddressDelimitBy="<BR> " %%EndVarExists </TD></TR> %%EndVarExists RBL HTML portion %%VarExists(%%EventFire_RBL) <!--- RBL ---> <TR> <TD style="vertical-align: top;"> <FONT COLOR="FF0000">RBL block</FONT><P> </TD> <TD style="vertical-align: top;"> This message was rejected by a RBL server.<br> The IP address of the blocked message is:<br> %%RBLBlockedIP <br> which the %%RBLSite RBL Server flagged. </TD></TR> %%EndVarExists SuRBL HTML portion %%VarExists(%%EventFire_SURBL) <TR> <TD style="vertical-align: top;"> <FONT COLOR="FF0000">SURBL block</FONT><P> </TD> <TD style="vertical-align: top;"> This message was rejected by a SURBL server.<br> The domain of the blocked message is:<br> %%SURBLBlockedDomain<br> which the %%SURBLSite SURBL Server flagged. </TD></TR> %%EndVarExists Copyright © 2005 Beginfinite Inc. All rights reserved. 185 GWAVA 3.6 186 %%VarExists(%%EventFire_FingerPrint) <!--- Fingerprint ---> <TR> <TD style="vertical-align: top;"> <FONT COLOR="FF0000">Fingerprint</FONT><P> </TD> <TD style="vertical-align: top;"> An attachment within this message was rejected because it was detected to be of a disallowed type.<P> Fingerprinting HTML portion The following attachments were blocked:<P> <UL> %%ForEach(%%FingerprintedAttachmentName,SetCounter=%%FPItem)<LI> %%FingerprintedAttachmentName[%%FPItem] %%FingerPrintFileType[%%FPItem]%%EndFor </UL> </TD></TR> %%EndVarExists Spam HTML portion Checks to see if an Antispam log file exists. %%VarExists(%%EventFire_Spam) <!-- Spam --> <TR> <TD style="vertical-align: top;"> <FONT COLOR="FF0000">Spam</FONT><P> </TD> <TD style="vertical-align: top;"> The message scored %%AntiSpamScore, which exceeds the Anti-Spam Threshold of %%AntiSpamThreshold.<br> If you have enabled the Generate Log Files--in the Advanced settings for AntiSpam Heuristics--<br> the following log files are available, and contain additional information about the message:<br> %%VarExists(%%AntiSpamLogFile) <br><pre> %%IncludeAntiSpamLogFile </pre><br> %%EndVarExists </TD></TR> %%EndVarExists Copyright © 2005 Beginfinite Inc. All rights reserved. GWAVA 3.6 Oversized HTML portion <!-- Oversized --> %%VarExists(%%EventFire_Oversize) <TR> <TD style="vertical-align: top;"> <FONT COLOR="FF0000">Oversize</FONT><P> </TD> <TD style="vertical-align: top;"> The message exceeds the %%AttachmentSizeLimitKB KB <br> limit set in GWAVA's Oversized Attachment Feature.<br> <ul> %%VarExists(%%EventFire_MessageOversize) <li>Message %%EndVarExists %%VarExists(%%EventFire_AttachmentOversize) <li>Attachments %%EndVarExists </ul> </TD></TR> %%EndVarExists </TABLE> <!-- Administrator Statistics --> Copyright © 2005 Beginfinite Inc. All rights reserved. 187 GWAVA 3.6 Administrator Statistics HTML portion 188 <TABLE> <TR><TD style="vertical-align: top; horizontal-align: center;"> <FONT COLOR="0000FF">Current</FONT> <FONT COLOR="00FF00">GWAVA </FONT><FONT COLOR="0000FF">Statistics</FONT><BR> <FONT SIZE="-2">(system version %%NLMVersion / program version %%ProgramVersion)</FONT> </TD></TR> <TR><TD>GWAVA Location: %%GWAVABaseUNC</TD></TR> %%VarExists(%%ArchiveFileName) <TR><TD>Archived to file: %%ArchiveFileName</TD></TR> %%EndVarExists <TR><TD>Date: %%MonthOfYearNumeric/%%DayOfMonth/%%YearLong (%%HourOfDay24:%%MinuteOfHour:%%SecondOfMinute) </TR></TD> </TABLE> <TABLE BORDER="1"> <TR><TD><FONT COLOR="0000FF">Description</FONT></TD><TD><FONT COLOR="0000FF">Today</FONT></TD><TD><FONT COLOR="0000FF">Cumulative</FONT></TD> <TR><TD>Total messages processed</TD><TD>%%StatTodaysTotalMessagesProcessed</TD> <TD>%%StatTotalMessagesProcessed</TD></TR> <TR><TD>Virus infections detected</TD><TD>%%StatTodaysInfectedMessageCount</TD> <TD>%%StatInfectedMessageCount</TD></TR> <TR><TD>Oversize messages</TD><TD>%%StatTodaysOversizeMessageCount</TD> <TD>%%StatOversizeMessageCount</TD></TR> <TR><TD>Oversize attachments</TD><TD>%%StatTodaysOversizeAttachmentCount</TD> <TD>%%StatOversizeAttachmentCount</TD></TR> <TR><TD>Blocked attachments</TD><TD>%%StatTodaysAttachmentBlockedMessageCount</T D> <TD>%%StatAttachmentBlockedMessageCount</TD></TR> <TR><TD>Messages blocked by address</TD><TD>%%StatTodaysAddressBlockedMessageCount ( %%StatTodaysSourceAddressBlockedMessageCount, %%StatTodaysDestinationAddressBlockedMessageCount)</TD> <TD>%%StatAddressBlockedMessageCount (%%StatSourceAddressBlockedMessageCount, %%StatDestinationAddressBlockedMessageCount) </TD></TR> <TR><TD>Content filtered messages</TD><TD>%%StatTodaysContentFilteredMessageCount ( %%StatTodaysContentFilteredSubjectCount, %%StatTodaysContentFilteredMessageBodyCount, %%StatTodaysContentFilteredAttachmentCount) </TD> <TD>%%StatContentFilteredMessageCount (%%StatContentFilteredSubjectCount, %%StatContentFilteredMessageBodyCount, %%StatContentFilteredAttachmentCount) </TD></TR> <TR><TD>RBL blocks</TD><TD>%%StatTodaysRBLBlockedMessageCount</TD> <TD>%%StatRBLBlockedMessageCount</TD></TR> <TR><TD>SURBL blocks</TD><TD>%%StatTodaysSURBLBlockedMessageCount</TD> <TD>%%StatSURBLBlockedMessageCount</TD></TR> <TR><TD>Fingerprint detections</TD><TD>%%StatTodaysFingerPrintBlockedMessageCount</TD> <TD>%%StatFingerPrintBlockedMessageCount</TD></TR> <TR><TD>Spam</TD><TD>%%StatTodaysHeuristicsBlockedMessageCoun t</TD> <TD>%%StatHeuristicsBlockedMessageCount</TD></TR></TABLE> </html> Copyright © 2005 Beginfinite Inc. All rights reserved. --%%UniqueIDString_Message.BODY Content-Type: image/jpeg Content-ID: <part1.%%[email protected]> Content-Transfer-Encoding: base64 GWAVA 3.6 Copyright © 2005 Beginfinite Inc. All rights reserved. 189 GWAVA 3.6 190 Metavariables used in GWAVA 3 Note that this is a partial list of the metavariables available, however it does cover all the major metavariables. For a complete list, consult the glossary.ini file in your GWAVA installation. Name Description Category EventFireList Outputs a list of all the events (virus, spam, etc) that have occurred. Uses the localized text (see Miscellaneous in Configuration Program). General AttachExternalFile Attaches an external file as opposed to attached a parsed external file. The file’s metavariables are not parsed. File AttachSourceMessage Used in notification templates, this includes the original message and attachments as a forwarded attachment Can be used for any event; the default TADMIN.822 only uses it for viruses. File UniqueIDString_Message A random, unique string per message. Useful for building the notification messages, and for providing a guide for event logging. General UniqueIDString_Individual A random, unique string. This value, unlike %%UniqueIDString_Message, changes each time you use it. General AdministratorAddress The administrator address, as configured in the Configuration Program. EMail MIMECharSet The default MIME character set, as configured in the Configuration Program. EMail Comment="comment" Comments, which can span multiple lines. Typically embedded in the notification files have no function per se. General NLMVersion The version of the GWAVA NLM System ProgramVersion The version of GWAVA System StatTotalMessagesProcessed This statistical variable reports the total number of messages processed to date. Statistics Copyright © 2005 Beginfinite Inc. All rights reserved. GWAVA 3.6 191 StatInfectedMessageCount This variable inserts the infected message count statistic. Statistics StatOversizeMessageCount This variable inserts the oversized message count statistic. Statistics StatOversizeAttachmentCount This variable inserts the oversized attachment message count statistic. Statistics StatAttachmentBlockedMessageCount This variable details the number of blocked attachments to date. Statistics StatAddressBlockedMessageCount This statistical variable details the number of blocked messages to date. Statistics StatSourceAddressBlockedMessageCount This statistical variable reports the number of messages blocked according to source. Statistics StatDestinationAddressBlockedMessageCount This statistical variable reports the number of messages blocked according to destination. Statistics StatContentFilteredMessageCount This statistical variable details the number of messages filtered for content. Statistics StatContentFilteredSubjectCount This statistical variable counts the number of times content filters by subjects have been invoked. Statistics StatContentFilteredMessageBodyCount This statistical variable counts the number of times content filters in the message body have been invoked. Statistics StatContentFilteredAttachmentCount This statistical variable counts the number of times content filters in attachments have been invoked. Statistics StatRBLBlockedMessageCount This statistic reports the number of messages blocked by RBL. Statistics StatFingerPrintBlockedMessageCount This statistic reports the number of messages blocked because of fingerprint filtering. Statistics StatHeuristicsBlockedMessageCount This statistic reports the number of messages blocked because of spam filtering. Statistics StatOverallInfectedMessageCount This statistic reports the overall number of infected messages Statistics Copyright © 2005 Beginfinite Inc. All rights reserved. GWAVA 3.6 192 intercepted by GWAVA. StatOverallOversizeMessageCount This statistic reports the overall number of oversized messages. Statistics StatOverallOversizeAttachmentCount This statistic reports the overall number of oversized attachments. Statistics StatOverallAttachmentBlockedMessageCount This statistic reports the overall number of blocked attachments. Statistics StatOverallAddressBlockedMessageCount This statistic reports the overall number of messages blocked because of address-related filtering. Statistics StatOverallSourceAddressBlockedMessageCount This statistic reports the overall number of messages blocked because of their source addresses. Statistics StatOverallDestinationAddressBlockedMessage Count This statistic reports the overall number of messages blocked because of their destination addresses. Statistics StatOverallContentFilteredMessageCount This statistic reports the total number of messages filtered by content. Statistics StatOverallContentFilteredSubjectCount This statistic reports the overall number of messages filtered by content. Statistics StatOverallContentFilteredMessageBodyCount This statistic reports the overall number of e-mails filtered because of content in body of the messages. Statistics StatOverallContentFilteredAttachmentCount This statistic reports the overall number of attachments filtered by content. Statistics StatOverallRBLBlockedMessageCount This statistic reports the overall number of messages blocked because of RBL referencing. Statistics StatOverallFingerPrintBlockedMessageCount This statistic reports the overall number of messages blocked because of fingerprinting. Statistics StatOverallHeuristicsBlockedMessageCount This statistic reports the overall number of messages blocked because of spam analysis. Statistics StatTodaysTotalMessagesProcessed This statistic reports the overall number of messages processed on this calendar day. Statistics Copyright © 2005 Beginfinite Inc. All rights reserved. GWAVA 3.6 193 StatTodaysInfectedMessageCount This statistic reports the overall number of infected messages on this calendar day. Statistics StatTodaysOversizeMessageCount This statistical variable reports the number of oversized messages for this calendar day. Statistics StatTodaysOversizeAttachmentCount This statistical variable reports the number of oversized attachments for this calendar day. Statistics StatTodaysAttachmentBlockedMessageCount This statistical variable reports the number of attachment blocks for this calendar day. Statistics StatTodaysAddressBlockedMessageCount This statistical variable reports the number of messages blocked because of address filters for this calendar day. Statistics StatTodaysSourceAddressBlockedMessageCount This statistical variable reports the number of messages blocked because of source address filters for this calendar day. Statistics StatTodaysDestinationAddressBlockedMessage Count This statistical variable reports the number of messages blocked because of destination address filters for this calendar day. Statistics StatTodaysContentFilteredMessageCount This statistical variable reports the number of messages which triggered content filters for this calendar day. Statistics StatTodaysContentFilteredSubjectCount This statistical variable reports the number of messages which triggered subject header content filters for this calendar day. Statistics StatTodaysContentFilteredMessageBodyCount This statistical variable reports the number of messages which triggered body content filters for this calendar day. Statistics StatTodaysContentFilteredAttachmentCount This statistical variable reports the number of messages which triggered content filters in the attachments for this calendar day. Statistics StatTodaysRBLBlockedMessageCount This statistical variable reports the number of messages which were blocked because of filters associated with RBL servers for this calendar day. Statistics Copyright © 2005 Beginfinite Inc. All rights reserved. GWAVA 3.6 194 StatTodaysFingerPrintBlockedMessageCount This statistical variable reports the number of messages which were blocked because of fingerprint filters for this calendar day. Statistics StatTodaysHeuristicsBlockedMessageCount This statistical variable reports the number of messages which were blocked because of heuristic filters for this calendar day. Statistics StatTodaysOverallInfectedMessageCount This statistic reports the total of infected messages for this calendar day. Statistics StatTodaysOverallOversizeMessageCount This statistic reports the total of oversized messages for this calendar day. Statistics StatTodaysOverallOversizeAttachmentCount This statistic reports the total of oversized attachments for this calendar day. Statistics StatTodaysOverallAttachmentBlockedMessage Count This statistic reports the total of blocked attachments blocked for this calendar day. Statistics StatTodaysOverallAddressBlockedMessageCount This statistic reports the total of messages blocked because of address filter triggers for this calendar day. Statistics StatTodaysOverallSourceAddressBlockedMessage Count This statistical variable reports the overall count of messages blocked because of their source. Statistics StatTodaysOverallDestinationAddressBlocked MessageCount This statistical variable reports the overall count of messages blocked because of their destination today. Statistics StatTodaysOverallContentFilteredMessageCount This statistic reports the total of messages blocked on this calendar day because of content filtering in messages. (As opposed, for example, the attachment.) Statistics StatTodaysOverallContentFilteredSubjectCount This statistic reports the total of messages blocked on this calendar day because of content filtering of the subject. Statistics StatTodaysOverallContentFilteredMessageBody Count This statistic reports the total of messages blocked on this calendar day because of content filtering in the body. Statistics Copyright © 2005 Beginfinite Inc. All rights reserved. GWAVA 3.6 195 StatTodaysOverallContentFilteredAttachment Count This statistic reports the total of messages blocked on this calendar day because of content filtering in attachments. Statistics StatTodaysOverallRBLBlockedMessageCount This statistical variable inserts the overall count of messages blocked by RBL filtering today. Statistics StatTodaysOverallFingerPrintBlockedMessage Count This statistical variable reports the overall number of messages blocked because of fingerprinting today. Statistics StatTodaysOverallHeuristicsBlockedMessage Count This statistical variable reports the overall count of messages blocked by heuristic analysis today. Statistics MessageSizeLimitBytes The message size limit in bytes. Oversize MessageSizeLimitKb The message size limit in kilobytes Oversize MessageSizeLimitMb The message size limit in megabytes Oversize AttachmentSizeLimitBytes The attachment size limit in bytes. Oversize AttachmentSizeLimitKb The attachment size limit in kilobytes bytes. Oversize AttachmentSizeLimitMb The attachment size limit in megabytes. Oversize AntiSpamThreshold This useful reminder reports the setting of the anti-spam threshold. Spam IncludeAntiSpamLogFile This variable attaches the relevant contents of the log file to the notification message. Spam FROM The sender’s address. EMail TO To whom it was addressed. EMail CC To whom it was carbon copied. EMail BC To whom it was blind-carbon-copied. EMail RECIPIENTS This variable reports all the message’s recipients. EMail SUBJ The original subject of the triggering message. EMail Copyright © 2005 Beginfinite Inc. All rights reserved. GWAVA 3.6 196 DayOfWeekLong This variable inserts the weekday in long form. Date/Time DayOfWeekShort This variable inserts the weekday in short form. Date/Time DayOfWeekNumeric This variable reports the weekday as a numeric value. Date/Time DayOfMonth This variable inserts the day of the month. Date/Time MonthOfYearLong This variable inserts the month of the year data in long form, for example, January instead of Jan. Date/Time MonthOfYearShort This variable inserts the month of the year data in the short form, for example, Jan instead of January. Date/Time MonthOfYearNumeric This variable inserts the month of the year as a numeric value. Date/Time YearLong This variable inserts the year data in long form, for example, 2005 rather than 05. It will always be four digits long. Date/Time YearShort This variable inserts the year data in short form, for example, 05 rather than 2005. It will always be two digits long. Date/Time HourOfDay12 This variable appends the hour to the triggering event time report in a 12-hour clock format. Date/Time HourOfDay24 This variable appends the hour to the triggering event time report in a 24-hour clock format. Date/Time MinuteOfHour This variable appends the minutes to the triggering event time report. Date/Time SecondOfMinute This variable appends the seconds to the triggering event time report. Date/Time AMPMUpperCase This variable inserts the AM/PM time in upper case depending upon the event time. Date/Time AMPMLowerCase This variable inserts the am/pm time in lower case depending upon the Date/Time Copyright © 2005 Beginfinite Inc. All rights reserved. GWAVA 3.6 197 event time. ArchiveFileName Full path to the archive containing the message, if any. Archive RBLSite This variable details which RBL site or sites involved in the triggering decision. RBL RBLBlockedIP Collection of all the IP addresses listed in the RBL blacklists. RBL BlockedSourceAddress Collection of all addresses blocked by a “from” address block Address Block BlockedDestinationAddress Collection of all addresses blocked by a TO/CC/BCC address block. Address Block AntiSpamScore This variable reports the score of messages blocked by GWAVA’s antispam technologies. Spam AntiSpamLogFile This gives the location of the antispam log file, if it exists. Spam GWAVASource This variable identifies whether a MTA or POA GWAVA agent triggered the event. System EventFire_Virus True if Virus event occurred, blank otherwise. See %%VarExists. Virus EventFire_AttachmentType True if attachment blocking event occurred, blank otherwise. See %%VarExists. Attachment EventFire_SourceAddressBlock True if both address blocking event occurred and the item was a FROM address, blank otherwise. See %%VarExists., %%EventFire_AddressBlock Address Block EventFire_AddressBlock True if any type of address blocking event occurred, blank otherwise. See %%VarExists. Address Block EventFire_DestinationAddressBlock True if a destination of address blocking event occurred, blank otherwise. See %%VarExists. Address Block EventFire_RBL True if a RBL blocking event occurred, blank otherwise. See %%VarExists. RBL Copyright © 2005 Beginfinite Inc. All rights reserved. GWAVA 3.6 198 EventFire_FingerPrint True if a fingerprinting event occurred, blank otherwise. See %%VarExists. Fingerprint EventFire_Oversize True if an oversize event occurred, blank otherwise. See %%VarExists. Oversize EventFire_MessageOversize True if an oversized message event occurred, blank otherwise. See %%VarExists. Oversize EventFire_AttachmentOversize True if an oversized attachment event occurred, blank otherwise. See %%VarExists. Oversize EventFire_Spam True if a spam-related event occurred, blank otherwise. See %%VarExists. Spam EventFire_ContentFilter True if a content filtering event occurred, blank otherwise. See %%VarExists. Content Filter EventFire_SubjectContentFilter True if a subject content filtering event occurred, blank otherwise. See %%VarExists. Content Filter EventFire_AttachmentContentFilter True if an attachment content filtering event occurred, blank otherwise. See %%VarExists. Content Filter EventFire_BodyTextContentFilter True if a body content filtering event occurred, blank otherwise. See %%VarExists. Content Filter BlockedFileTypeName Collection of all attachment blocked attachments. Attachment Block EventText A collection of the different events localized according to Event Text section in GWAVA. (See Advanced) General FingerPrintFileType This variable reports the type of file fingerprinted. Fingerprint OversizeAttachmentName Collection of oversized attachments Oversize FingerprintedAttachmentName Collection of all fingerprinted attachments. Fingerprint ContentFilteredAttachmentName Collection of all content filtered attachments. Content Filter Copyright © 2005 Beginfinite Inc. All rights reserved. GWAVA 3.6 199 InfectedFileName Collection of all infected files found. Virus VirusName Name of the virus caught. Only available with API integrations. Virus InfectedFileDetail This variable reports details about an infected file. Virus ContentFilterName The collection of content filter names. Content Filter FilterContext If the Enable Context Metavariable (Advanced section of Configuration Program) option is enabled, this variable displays the context of the filtered text Content Filter EndVarExists Closes a %%VarExists loop. Logical VarExists Used to test for the presence of a variable. This is useful for checking if a particular event has fired. May nested. Logical EmbedExternalFile="File path" File path must be a full path. Embeds a file. Does NOT parse any metavariables in external file. File EmbedParsedExternalFile="File path" File path must be a full path. Embeds a file containing metavariables and parses it. File ForEach(<multivaluedvariable>,SetCount =%%Dummy) One of two ways to loop through a multivalued variable. Useful for retrieving individual values using the %%Dummy index). Logical EndFor Closes a ForEach loop Logical PadDayofMonth Day of month, with extra 0 prepended for days 1-9. Date/Time ServerHostName DNS Host Name of GWAVA server. System Server Host Name ServerIPAddress GWAVA Server's IP Address System IP AgentPlatform What NOS is the GWAVA Agent running on. System Netware ProfileName GWAVA profile name, if assigned. System Copyright © 2005 Beginfinite Inc. All rights reserved. GWAVA 3.6 200 StripLineFeeds Turns on/off a stripping mechanism for removing line feeds. Useful for parsing text without extra line feeds being stuck in--See %%EOL Logical EOL Inserts a line feed. Useful for controlling explicitly when a line feed occurs especially in conjunction with %%StripLineFeeds=1 Logical GWAVABaseNW That is the path of the GWAVA directory in NW format System GWAVABaseUNC This is path of GWAVA in the UNC format System ContentFilter_Subject_Name Collection of all subject content filter hits Content Filter ContentFilter_Text_Name Collection of all content filter body text hits Content Filter ContentFilter_Attachment_Name Collection of all content filter attachment hits Content Filter ContentFilterType Collection of "Subject","Text","Attachment" Content Filter ContentFilter_Subject_Context The Subject text context Content Filter ContentFilter_Text_Context The text context. Content Filter ContentFilter_Attachment_Context The attachment context. Attachment Content OversizeAttachmentSize The collection of oversized attachment sizes. Attachment Attachment_Name The collection of attachment names. Attachment Attachment_Size All attachment sizes regardless of event. Attachment ToRecipientAddress The Recipient’s address. General CCRecipientAddress Collections for the CC recipient address General BCCRecipientAddress Collections for the BCC recipient address General Copyright © 2005 Beginfinite Inc. All rights reserved. GWAVA 3.6 201 RFC822Date Date in RFC822 format: Thu, 12 Sept 2005 11:24:16 -0500 Date/Time SubstituteVarChar It prevents breaking comma delimitation issues. Logical %%SMPTMailFrom The SMTP engine address, which can be configured separately from the Admin Address. EMail %%VirusScanner This variable reports the active AV engine Virus %%SMTPMailFrom Used to report the sender General Copyright © 2005 Beginfinite Inc. All rights reserved. GWAVA 3.6 Fingerprint Description ID file 0=Unknown 1=DOS low confidence 2=DOS high confidence 3=COM low confidence 4=COM high confidence 5=Windows executable 6=Windows DLL 7=Windows screen saver 8=Windows VXD 9=ActiveX control 10=Windows control panel 11=Windows help 12=Java app 13=Windows PIF 14=Write 15=Windows group 16=Windows shortcut 17=Windows password list 18=Windows registry 19=Windows true type font 20=Windows clipboard 21=Windows card file 22=Windows find file 23=Windows calendar 24=Windows animated cursor 25=Generic OLE 26=WordPerfect generic 27=WordPerfect document 28=Word 29=Word macros 30=Excel 31=Excel macros 32=PowerPoint 33=Access 34=Visio 35=PCS art 36=Binder 37=PhotoShop 38=PDF 39=Postscript 40=Adobe font 41=PageMaker 42=WPWPG 43=TIFF 44=GIF 45=BMP low confidence 46=BMP high confidence 47=PNG 48=JPEG 49=WMF 50=PCX 51=DCX 52=TNEF 53=JAR 54=ARJ 55=RAR 56=GZIP 57=ZIP 58=CAB 59=MSCompress 60=UC2 61=BAG 62=LZH 63=ZOO 64=SIT 65=CorelDraw 66=CorelPresentation 67=RIFF 68=WAV 69=AVI 70=QuickTime 71=MP3 72=RA 73=RMF 74=IFF 75=MIDI 76=ASF 77=Paradox 78=Quattro 79=123 80=Notes 81=Organizer 82=Freelance 83=WordPro 84=AmiPro 85=ANM 86=DXF 87=DWG 88=AutoAnim 89=SCM 90=SYLK 91=DIF 92=ESRIShape 93=WAD 94=OE5 95=RTF 96=BZIP 97=NLM 98=Publisher 99=XPress 100=Ogg 101=MNG 102=SWF 1000=Text 1001=HTML 1002=Dbase Copyright © 2005 Beginfinite Inc. All rights reserved. 202 GWAVA 3.6 203 Contact Technical Support Your copy of GWAVA includes 30 days or 3 incidents (whichever comes first) of complimentary technical support. For all of your support and purchasing needs, please visit our home page at www.gwava.com. E-mail [email protected] Technical support: (801) 437-5678 Copyright © 2005 Beginfinite Inc. All rights reserved.