1
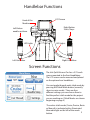
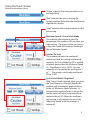
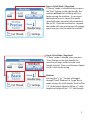
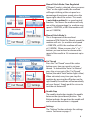
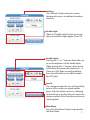
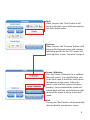
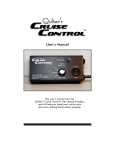
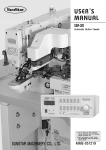
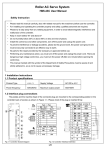
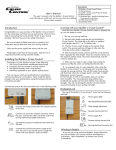
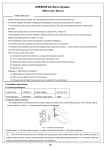
TL2200QVP
Stitch Regulator User Manual
1
Table of Contents
Using The Touch Screen
Handlebar Functions .................................................................................................
Main Menu Screen Layout .......................................................................................
Green and Red light indicator ...................................................................
Minimum Speed .............................................................................................
Stitches Per Inch .............................................................................................
Cruise Stitch Mode / Regulated ................................................................
Precise Stitch Mode / Regulated ...............................................................
Baste Stitch Mode (Small, Medium and Large)....................................
Manual Stitch Mode / Non-Regulated ....................................................
Manual Stitch Mode Percentage...................................................
Cut Thread ........................................................................................................
Auto Cut.................................................................................................
Settings Screen Layout .............................................................................................
Needle Lights ...............................................................................................................
Handlebar lights .............................................................................................
Sound .................................................................................................................
Tools Screen ..................................................................................................................
Screen Calibration ......................................................................................................
LCD Brightness level ..................................................................................................
Firmware ........................................................................................................................
3
3
4
4
4
5
5
5
6
6
6
6
7
7
7
7
8
8
9
9
2
Handlebar Functions
Head of the
Machine
LCD Screen
Right Button
Starts/Stops
Left Button
needle up/down.
LED Lights
LED Lights
Left Handlebar
Right Handlebar
Screen Functions
The Juki Quilt Virtuoso Pro has a 3.5” touch
screen mounted to the front handlebars.
The LCD screen can be removed and placed
on the optional rear handlebars.
You can toggle through each stitch mode by
pressing the Stitch Mode button (currently
show in cruise mode). There are four
different settings you can choose from to
find the perfect stitch mode for the project
you are working on. (Stitch Modes are shown
beginning on page 4)
The active stitch mode (Cruise, Precise, Baste
or Manual) is indicated with a illuminated
blue radio light on the left of the mode
3
button.
Using the Touch Screen
Machine and Handlebar Menus
“Green” indicates the sewing machine is on
and regulating.
“Red” indicates the user is moving the
sewing machine faster than the machine can
regulate the stitches.
“Grey” indicates the sewing machine is off or
not moving.
Minimum Speed / Cruise Stitch Mode
This indicates the minimum speed (in
percentage) the machine will sew when you
stop moving. This means when you slow to
a stop, the needle will continue stitching at
the set Minimum Speed.
Stitches Per Inch
This number indicates the number of
stitches per inch the sewing machine will
maintain (In Cruise Mode the SPI is applied
at speeds greater than the Minimum Speed
%). The default is set to 10 SPI. You can
manually set the number by pushing the “+”
or “-” . The number can be adjusted from 6
SPI to 16 SPI.
Cruise Stitch Mode / Regulated
With “Cruise” mode selected, when you press
the “Start Button” on the right handle the
machine will immediately begin stitching
at the set “Minimum Speed” percent. As
you move the machine faster or slower the
needle speed will adjust automatically to
maintain the set SPI. When the machine is
not moving, it will continue to sew at the
“Minimum Speed” until the machine is
turned off.
4
Precise Stitch Mode / Regulated
If “Precise” mode is selected when you press
the “Start” button on the right handle, the
machine will not start stitching until you
begin moving the machine. As you move
the machine faster or slower the needle
speed will adjust automatically to maintain
the set SPI. Once the machine has stopped,
the needle will stop moving, but will engage
again once you start to move the machine.
Baste Stitch Mode / Regulated
If “Baste” mode is selected when you press
“Start” button on the right handle, the
machine will begin to baste at the stitch
length selected. There is no Minimum Speed
for this stitch mode setting.
Medium
Pressing the “+” or “-” button will toggle
through “Small, “Medium” or “Large” baste
mode settings for stitch length. Small will be
1/2” stitch length, Medium will be a 1” stitch
length and Large will be 1 1/2” stitch length.
5
Manual Stitch Mode / Non-Regulated
If “Manual” mode is selected, when you press
“Start” on the right handle, the machine
will begin stitching at the set speed as a
percentage of maximum speed set on the
upper right side of the screen. This mode
is not stitch regulated it is a speed control
function. This means the machine will only
sew at the set percentage (i.e. machine max
speed = 2200 SPM, at 50% the machine will
sew at 1100SPM).
Manual Stitch Mode %
This is the percent of the machine’s
maximum SPM (Stitch Per Minute) speed the
machine will sew (i.e. machine max speed
= 2200 SPM, at 50% the machine will sew
at 1100SPM). When you press the “+” or “-”
buttons you can increase or decrease the
speed of the needle in 5% increments up to
100%.
Cut Thread
Press the “Cut Thread” area of the cutter
button every time you want to cut your
thread. To activate the “Auto Cut Feature”
press the scissor part of the “Cut Thread”
button (the radio “Auto” button light is blue).
When activated, every time you stop the
machine by pressing the off button on the
right handle, the machine will automatically
cut your thread. Simply push the scissor to
turn the cut feature off.
Needle Stop
The needle stop button toggles the needle
between the up and down position. The
Button indicates the position the needle will
end in when the machines is stopped.
Settings
The “Settings” button activates the settings
screen. See more on pages 7.
6
6
Settings
The “Settings” button activates a screen
that provides access to additional machine
functions.
Needle Light
When the “Needle Light” button is pressed
the rear needle bar light toggles On or Off.
Handle Lights
Pressing the “+” or “-” buttons allows the user
to set the brightness of the handle lights.
When pushing the “+” button a blue square
will indicate the power value between 1 - 5.
There are 3 LED lights on each handlebar.
Press the off button to turn off the handle
bar LED lights.
Sound
This setting provides the user with the ability
to turn off or on the over speed audible
beep. With this button set to on, a beeping
sound will occur anytime the user moves the
sewing machine faster then the machine can
stitch regulate.
Main Menu
Press the “Main Menu” button to go back to
the Main Menu.
7
Tools
When you press the “Tools” button it will
bring up the tools screen with more options.
See more details below.
Firmware
When you press the “Firmware” button it will
bring up the firmware screen with numbers
indicating specifics for the LCD screen and
stitch regulator system. See more on page 9
Screen Calibration
Press the “Screen Calibration” to re-calibrate
the touch screen. Use a detailed item such
as the lid of a pen to touch the small square
that appears on the screen. Follow this
process until all of the squares have been
touched. Once completed the screen will
remain black until you touch the lower right
corner of the screen to return to the main
menu.
Back
Pressing the “Back” button will automatically
take you back to your previous screen.
8
Brightness
Pressing the “+” or “-” buttons allows you
to set the brightness of your screen. Press
the “+” button to increase the brightness
and press the “-” button to decrease the
brightness.
Main Menu
When you press the “Main Menu” button you
will be returned to the Main Menu screen.
Firmware
The information contained in this menu will
identify the version numbers for the “LCD
Screen Firmware” and for the “Regulator
Firmware. ”
9