1
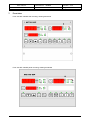
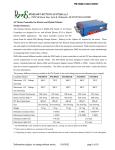
MC 785-MP
User manual
(Wall- and Panel-mount version with Dutch front)
Description :
MC 785-MP
Type:
Manual
Number of pages:
File:
Do080608 MC785-MP v22 EN
concept.wpd
MC785MP 031922 V3.04
By:
Software:
VDH Products BV - Roden - Holland
Signed:
28
HN
Doc.nr.:
080608
Version:
V2.2
Date:
File:
02-05-2013
Doc'08
User manual
Document nr. : 080608
Version : V2.2
MC 785-MP
Client : General
Page : 2 of 28
Table of contents
1.
Technical specifications . . . . . . . . . . . . . . . . . . . . . . . . . . . . . . . . . . . . . . . . . . . . . . . . . . . . . . . .
1.1 MC 785-MP controller . . . . . . . . . . . . . . . . . . . . . . . . . . . . . . . . . . . . . . . . . . . . . . . . . . . .
1.2 LMS RELAY MODULE (extension) . . . . . . . . . . . . . . . . . . . . . . . . . . . . . . . . . . . . . . . . . .
1.3 LMS Pt100 MODULE (extension) . . . . . . . . . . . . . . . . . . . . . . . . . . . . . . . . . . . . . . . . . . .
1.4 LMS RH/Pt100 MODULE (extension) . . . . . . . . . . . . . . . . . . . . . . . . . . . . . . . . . . . . . . . .
1.5 LMS SUPPLY MODULE for extension modules . . . . . . . . . . . . . . . . . . . . . . . . . . . . . . . .
3
3
6
6
6
6
2.
Functional specifications . . . . . . . . . . . . . . . . . . . . . . . . . . . . . . . . . . . . . . . . . . . . . . . . . . . . . . . 7
3.
Control . . . . . . . . . . . . . . . . . . . . . . . . . . . . . . . . . . . . . . . . . . . . . . . . . . . . . . . . . . . . . . . . . . . . . 9
3.1 Turning the controller on/off . . . . . . . . . . . . . . . . . . . . . . . . . . . . . . . . . . . . . . . . . . . . . . . . 9
3.2 Reading out the sensor groups . . . . . . . . . . . . . . . . . . . . . . . . . . . . . . . . . . . . . . . . . . . . . 9
3.3 Reading out sensors apart . . . . . . . . . . . . . . . . . . . . . . . . . . . . . . . . . . . . . . . . . . . . . . . . . 9
3.4 Reading out and changing setpoints . . . . . . . . . . . . . . . . . . . . . . . . . . . . . . . . . . . . . . . . . 9
3.5 Setting controller mode . . . . . . . . . . . . . . . . . . . . . . . . . . . . . . . . . . . . . . . . . . . . . . . . . . 10
3.6 Adjusting the ventilation cooling mode . . . . . . . . . . . . . . . . . . . . . . . . . . . . . . . . . . . . . . . 10
3.7 Adjusting the defrost mode . . . . . . . . . . . . . . . . . . . . . . . . . . . . . . . . . . . . . . . . . . . . . . . 10
3.8 Starting defrosting manually . . . . . . . . . . . . . . . . . . . . . . . . . . . . . . . . . . . . . . . . . . . . . . 10
3.9 Starting humidification manually . . . . . . . . . . . . . . . . . . . . . . . . . . . . . . . . . . . . . . . . . . . 10
3.10 Reading out and adjusting the time and pulse counters, reading inside RH . . . . . . . . . . 11
3.11 Manual day / night setting . . . . . . . . . . . . . . . . . . . . . . . . . . . . . . . . . . . . . . . . . . . . . . . . 11
3.12 Manual start drying . . . . . . . . . . . . . . . . . . . . . . . . . . . . . . . . . . . . . . . . . . . . . . . . . . . . . 12
3.13 Info menu . . . . . . . . . . . . . . . . . . . . . . . . . . . . . . . . . . . . . . . . . . . . . . . . . . . . . . . . . . . . . 12
4.
Adjusting internal parameters . . . . . . . . . . . . . . . . . . . . . . . . . . . . . . . . . . . . . . . . . . . . . . . . . . 12
5.
Sensor calibration . . . . . . . . . . . . . . . . . . . . . . . . . . . . . . . . . . . . . . . . . . . . . . . . . . . . . . . . . . . 20
6.
Alarms . . . . . . . . . . . . . . . . . . . . . . . . . . . . . . . . . . . . . . . . . . . . . . . . . . . . . . . . . . . . . . . . . . . . 20
7.
Front view . . . . . . . . . . . . . . . . . . . . . . . . . . . . . . . . . . . . . . . . . . . . . . . . . . . . . . . . . . . . . . . . . . 21
8.
Connections . . . . . . . . . . . . . . . . . . . . . . . . . . . . . . . . . . . . . . . . . . . . . . . . . . . . . . . . . . . . . . . . 22
9.
Dimensions . . . . . . . . . . . . . . . . . . . . . . . . . . . . . . . . . . . . . . . . . . . . . . . . . . . . . . . . . . . . . . . . 25
Appendix A: Items in the info menu . . . . . . . . . . . . . . . . . . . . . . . . . . . . . . . . . . . . . . . . . . . . . . . . . . . 27
This document was drawn up with utmost care and the information in it is believed to be correct. VDH
Products BV shall not however accept any liability whatsoever for any mistakes or errors and reserves the
right to adjust or modify this document without prior notice.
1.
User manual
Document nr. : 080608
Version : V2.2
MC 785-MP
Client : General
Page : 3 of 28
Technical specifications
1.1
MC 785-MP controller:
General
Type
: MC 785-MP (Multi Purpose) thermostat
Wall mounting:
Housing
Material
Dimensions
Front
: Grey plastic
: Polystyrol 454h KG 2 natur BASF
: 213 x 180 x 85mm (whd)
: Polycarbonate (IP-44)
Panel mounting:
Housing
Material
Dimensions
Panel cutout
Front
: Steel sheet panel
: Steel sheet sprayed silver-grey
: 217 x 155 x 85mm (whd)
: min. 208 x 146mm (wh)
: Polycarbonate (IP-44)
Temperature range
Power supply
Power consumption
Operation temperature
Storage temperature
Operation humidity
Accuracy
: -40.0/+50.0°C at 0.1°C
: 230 VAC; 50/60 Hz (-10/+5%).
: 9 VA
: -20/+50°C
: -20/+60°C
: 10/+90 % relative humidity non-condensing
: ± 0,5 % from the range
Note:
The software version number of the MC 785-MP controller can be retrieved using parameter
P991.
In order to make sure that multiple MC 785-MP controllers work together on a single alfanetwork, it is recommended that MC 785-MP controllers with similar software version numbers
should be used. Controllers with different software version numbers may not work together
properly.
User manual
Document nr. : 080608
Version : V2.2
MC 785-MP
Client : General
Page : 4 of 28
Front
Display
: 4-digit digital display (meetw)
4-digit digital display (set)
4-digit digital display (dag, tijd)
LEDs
: °C (measured value)
%RH (measured)
Sper (Blocking)
°C setp.
%RH setp.
for measured temperature / humidity
for setpoint setting
for hours counter, real-time clock with 7
day LEDs and measured internal RH
value
= LED Readout of measurement in °C on display
= LED Readout of measurement in %RH on
display
= LED Defrosting active
= LED Cooling active
= LED Heat regulation active
= LED Fan active (relay functions “fan on while
cooling evaporator” and/or “fan on during
ventilation”)
=
=
=
=
=
=
=
=
=
LED Blocking time active
LED Daytime mode active
LED Night-time mode active
LED Alarm active (blinking)
LED Drying active
LED Humidifying active
LED Readout setpoint value in °C on display
LED Readout setpoint value in %RH on display
LED Automatic ventilation active (Fan mode
cooling = automatic)
= LED Manual ventilation active (continuous)
The defrosting active LED blinks when the controller wants to defrost or has requested defrosting, but
is still unable to do so.
The ventilator LED lights up when a fan is on. This could be due to relay functions “fan on while cooling
an evaporator” (P401, P965 and P967) and/or “fan on during ventilation” (P402 to 412, P968).
The daytime mode active or night-time mode active LEDs next to the right display blink when rain is
detected.
The alarm active LED lights up continuously during the time that the door is open (door contact). P902
controls the maximum time.
The drying active LED blinks when the controller wants to dry but is unable to do so because a defrost
cycle is still running or has been requested.
The humidification active LED blinks when the controller wants to humidify but is unable to do because
cooling is still under way, whereas cooling and humidifying at the same time are not allowed (P562).
If a “Cleaning log” command (given through the RS485 network) is being carried out, the leftmost
decimal point in the temperature display (at the upper left) will blink.
User manual
Document nr. : 080608
Version : V2.2
MC 785-MP
Client : General
Page : 5 of 28
Buttons
: AAN/UIT (ON/OFF)
SENS.
SETP.
>
?
PRG
(FAN)
INKOEL FASE
BEWAAR FASE
(CLOCK)
(DAY)
(NIGHT)
=
=
=
=
=
=
=
=
=
=
=
=
on/off button for the controller with LED
sensor select button
setpoint pushbutton with LED
up button
down button
programming button with LED
ventilator mode button (auto or continuous)
pre-cooling phase start button with LED
storing phase start button with LED
button for setting the clock
manual button daytime mode with LED
manual button night-time mode with LED
Inputs and outputs
Sensors
: Temperature sensor-1 (Progr.)
Temperature sensor-2 (Progr.)
Temperature sensor-3 (Progr.)
(Pt-100, 3-wire DIN/IEC 751)
(Pt-100, 3-wire DIN/IEC 751)
(Pt-100, 3-wire DIN/IEC 751)
Digital input
: Digital input 1 (Progr.)
Communication
: I²C network (max. 5 m)
RS485 network (max. 1 km)
Relays outputs
: RY1 Relay-1 (Progr.)
(C/NO/NC, 250VAC/10A niet inductief)
The next relays have one central common (C);
RY2 Relay-2 (Progr.)
(NO, 250VAC/10A non-inductive)
RY3 Relay-3 (Progr.)
(NO, 250VAC/10A non-inductive)
RY4 Relay-4 (Progr.)
(NO, 250VAC/10A non-inductive)
RY5 Relay-5 (Progr.)
(NO/NC, 250VAC/10A non-inductive)
Analog output
: Analog output 1 (Progr.)
NOTE!
Input and output functions can be programmed using the internal
parameter settings.
NOTE!
Set up an RS485-network using 2x twisted pair shielded cable (at least
0,5mm2), where;
Pair-1:
has line-A connected with line-A and
line-B connected with line-B.
Pair-2:
has 2x GND (0V) connected with 2x GND (0V).
Shield:
the shielding must only be connected to a clean earth on 1 side
of the cable.
Make sure that the cable is laid without branches, up to a maximum total
length of 1km.
Both ends of the RS485-network cable must also be terminated with a
250-ohm resistor between line A and line B. If an Interface is placed at the
end of the network cable, then we advise to use the termination jumpers on
the Interface, instead of a resistor to terminate the network cable.
(C/NO, potential-free connection)
(2-wire shielded; 0V, SDA, SCL)
(2x twisted-pair shielded; 2x GND, A, B)
(0V/Signal, 0 to 10VDC)
Set up the I2C bus extender with a 2x 0.75mm2 shielded cable, where;
SCL:
SCL must be connected to SCL and
SDA:
SDA must be connteted to SDA
Shield:
the shielding is connected to 0V (do not connect to earth).
Make sure that the cable is laid without branches, up to a maximum total
length of 5 metres. This cable does not have to be terminated.
See installation diagram at the back of this manual.
1.2
User manual
Document nr. : 080608
Version : V2.2
MC 785-MP
Client : General
Page : 6 of 28
LMS RELAY MODULE (extension):
Type number
Supply
Communication
Address jumpers
:
:
:
:
Relays outputs
:
Note!
1.3
:
:
:
:
Pt100 inputs
:
Note!
1.4
(Maximum of 4 modules (using address jumper settings))**
901.000272
12 VDC (1,2 VA)
I2C network
(3-wire 0V,SDA,SCL)
Pt100 module 1;
install J1 and J2 and do not install J3 (Sensor 4 to 7)
Pt100 module 2;
install J2 and do not install J1 and J3 (Sensor 8 to 11)
Pt100 module 3;
install J1 and J2 and do not install J3 (Sensor 12 to 15)
Pt100 module 4;
do not install J1, J2 and J3
(Sensor 16 to 19)
Temperature sensor-1 (Progr.)
(Pt100, 3-wire DIN/IEC 751)
Temperature sensor-2 (Progr.)
(Pt100, 3-wire DIN/IEC 751)
Temperature sensor-3 (Progr.)
(Pt100, 3-wire DIN/IEC 751)
Temperature sensor-4 (Progr.)
(Pt100, 3-wire DIN/IEC 751)
Sensor functions are programmable.
LMS RH/Pt100 MODULE (extension): (Maximum of 4 modules(using address jumper settings)**
Type number
Supply
Communication
Address-jumpers
:
:
:
:
Pt100 inputs
:
RH-sens. inputs
:
Note!
**) Remark:
1.5
901.000212
12 VDC (1,2 VA)
I2C network
(3-wire 0V,SDA,SCL)
Relay module 1;
install J1 and J2
(Relais 6 to 9)
Relay module 2;
install J1 and do not install J2
(Relais 10 to 13)
Relay module 3;
install J2 and do not install J1
(Relais 14 to 17)
Relay module 4;
do not install J1 and J2
(Relais 18 to 21)
RY1 Relay 6 (Progr.)
(C/NO/NC, 250Vac/10A non-inductive)
RY2 Relay 7 (Progr.)
(C/NO, 250Vac/10A non-inductive)
RY3 Relay 8 (Progr.)
(C/NO, 250Vac/10A non-inductive)
RY4 Relay 9 (Progr.)
(C/NO, 250Vac/10A non-inductive)
Relay functions are programmable through the internal parameters
settings.
LMS Pt100 MODULE (extension):
Type number
Supply
Communication
Address jumpers
(Maximum of 4 modules (using address jumper settings))
901.000315
12 VDC (1,2 VA)
I2C network
(3-wire 0V,SDA,SCL)
RH/Pt100 module 1; install J1 and J2 and do not install J3 (Sensor 4 to 7)
RH/Pt100 module 2; install J2 and do not install J1 and J3 (Sensor 8 to 11)
RH/Pt100 module 3; install J1 and do not install J2 and J3 (Sensor 12 to 15)
RH/Pt100 module 4; do not install J1, J2 and J3
(Sensor 16 to 19)
Temperature sensor-1 (Progr.)
(Pt100, 3-wire DIN/IEC 751)
Temperature sensor-2 (Progr.)
(Pt100, 3-wire DIN/IEC 751)
RH-sensor-1 (Progr.)
(dc+(12V),rh+(0-1Vdc=0-100%RH),dc-(0V), 3-wire )
RH-sensor-2 (Progr.)
(dc+(12V),rh+(0-1Vdc=0-100%RH),dc-(0V), 3-wire )
Sensor functions are programmable.
The module numbers of the LMS PT100 MODULES and the LMS RH/Pt100
MODULES may not overlap (They both use the same address range).
So don’t use equal address-jumers settings on these both types.
LMS SUPPLY MODULE for extension modules
Type number
Supply
Output
:
:
:
901.000213
230 VAC, 50/60 Hz
3x 12 VDC (7 VA)
2.
User manual
Document nr. : 080608
Version : V2.2
MC 785-MP
Client : General
Page : 7 of 28
Functional specifications
-
De MC 785-MP has three phases, namely the pre-cooling phase, the storing phase and the
standby phase.
In the standby phase, the controller only assists for hot gas defrosting, where this
controller itself cannot defrost.
-
During the pre-cooling phase, the controller cools continuously (if the temperature is
higher than the setpoint temperature).
-
During the storing-phase the controller cools once during the cycle time (P307) minutes
until the temperature has dropped again or is equal to the setpoint temperature.
During this cooling, other controllers connected to the network are blocked too, so that
only one group (a group may have multiple controllers) is cooling.
If the temperature has exceeded the setpoint temperature plus the forced cooling
temperature (P306), cooling will always be activated, despite the fact that the controller in
the network is not allowed to cool. In that case cooling will take place until setpoint
temperature has been reached. This is done to avoid a situation where it will not be
possible within the cycle time, in the case of a large number of controllers, to cool all units
until they have reached the setpoint temperature.
-
The control parameters can be adjusted through internal programming.
-
A choice can be made between no defrosting, natural defrosting, electrical defrosting and hot
gas defrosting. Defrosting occurs on real-time basis (with no more than 12 switching points) or
after an interval (P156), which can be set between 1 and 48 hours.
As long as the temperature of the evaporator exceeds the defrost release temperature (P517),
defrosting cannot be started. The ventilator switches on again after defrosting, once the
ventilator delay time (P521) has ended.
a. no defrosting
The ventilator relay runs if the thermostat requests it to. After cooling has stopped, the fan
will run on for a programmable delay time (P401).
b. natural defrosting
Ventilator control during cooling as for (a). The fan runs on during defrosting. The defrost
relay will not switch on during defrosting. The defrost will finish on time (P518).
c. electrical defrosting
Ventilator control during cooling as for (a). Defrosting is stopped based on temperature
(P159), with a time limit (P518). Defrosting is also stopped if an input with defrost stop
function (P101, P102, P103 or P151) is closed. The ventilator is turned off during
defrosting. After defrosting, cooling and ventilator will be blocked during the drip-dry time
(P520), after which the ventilator switches on again once the ventilator delay time (P521)
has expired. In the event of a negative ventilator delay time (P521) the ventilator will run
for P521 seconds and cooling will start only after that.
d. hot gas defrosting
Ventilator control during cooling as for (a). With hot gas defrosting, the network will ask
whether one or more other units are cooling. If this is not the case, the controller will wait
for 15 minutes. If no units at all are cooling after that time, then cooling will be switched on
for the unit for which the target value differs most from the setpoint (for mechanical
cooling, see P304).
Defrosting is stopped based on temperature (P159), with a time limit (P518). Defrosting is
also stopped if an input with a defrost stop function (P101, P102, P103 or P151) is closed.
The fan is turned off during defrosting. After defrosting, cooling and ventilator will be
blocked during the drip-dry time (P520), after which the fan comes on again once the
ventilator delay time (P521) has expired. In the event of a negative ventilator delay time
(P521), the fan will run for P521 seconds and cooling will start only after that.
User manual
Document nr. : 080608
Version : V2.2
MC 785-MP
Client : General
Page : 8 of 28
-
If a sensor input that is used as an alarm input contact is closed, cooling (and the fan) will stop
and the alarm LED will light (to indicate this).
-
Operation of heating control
Heating control of the controller will be active if the temperature setting is below the
setpoint temperature minus the differential (P573 differential heating), and will stop again
if the temperature setting exceeds the setpoint temperature. The additional limitation here
is that heating control can only be activated P563 minutes after cooling. This also requires
a heat sensor (blow-in sensor).
Using the analogue output and/or relay heating (open and closed), the heating control
tries to make sure that the temperature of the heat sensor (blow-in sensor) reaches the
setpoint temperature. The heating setpoint must be adjusted to its correct value.
-
Working method: drying
The controller’s drying regulation function is activated through a manual start or when the
inside RH value exceeds the RH setpoint plus the RH drying differential (P563).
Depending on the settings and the available measurements, drying will take place for a
certain time interval (P558, if there is no inside RH measurement), or until the inside RH
is lower than the RH setpoint.
There will be no drying if the defrost cycle is still running or has been requested.
The method of drying and the settings that will be used can be adjusted using the internal
parameters.
Relay functions “fan on while cooling an evaporator” and “fan on during ventilation” are
active during drying.
If heating is desired too, its settings have to be adjusted as well (heating setpoint and
parameters).
-
Working method: humidification
The controller’s humidification regulator function is activated (depending on the settings)
by a manual start, because a lower RH value is measured inside than the RH setpoint
minus the RH humidification differential (P550), or based on a time interval (if an inside
RH measurement is not available).
The time interval can be selected optionally to be an elapsed clock time or an effective
cooling time. The time interval starts again after humidification has been concluded, after
a cut-off has been cancelled, and also after:
•
humidification has ended
•
cut-off function has been cancelled
•
door has been closed (provided P906 = 1)
If cooling is still under way, as humidification and cooling at the same time are not allowed
(P562); cooling will be stopped (if allowed because of hot gas supply).
During humidification (even when waiting until cooling has stopped), the relay functions
“fan on while cooling an evaporator” will be active.
Humidification stops after the RH setpoint has been reached or when the maximum
humidification time (P551) has expired (if no inside RH measurement is available).
3.
User manual
Document nr. : 080608
Version : V2.2
MC 785-MP
Client : General
Page : 9 of 28
Control
After the controller has been provided with a power supply, you have to wait a few seconds before the
controller functions. The upper right display shows “St.UP” (= Startup).
The displays on the left indicate the measured temperature during normal operation and the current
setpoint temperature. If desired, the display on the right indicates time, the number of cooling pulses,
cooling hours or the measured inside RH value.
3.1
Turning the controller on/off
The ON/OFF button activates or deactivates the controller.
3.2
Reading out the sensor groups
The average temperature of the active control sensors is shown on the temperature display
during normal operation. It is possible to read out the temperature and humidity of other active t
sensor groups by pressing the SENS. Button one or more times. To indicate what is being
shown, the display on the right shows which sensor group is being shown:
Prod
: the average value of the product sensors
buit
: the average value of the outside sensors
inbl
: the average value of the heating sensors (blow-in sensors)
ont1,2,3
: the lowest sensor from the defrost sensors from evaporator 1, 2 or 3
rhin
: the average of the rh inside.
rhou
: the average of the rh outside.
The readout always returns to the average value of the active control sensors after 20 seconds.
3.3
Reading out sensors apart
Push the SETP. button and the SENS. button at the same time; the temperature display shows
the value of sensor-1, while in the right display “SE 1" is shown to indicate that sensor-1 is being
displayed now. Pressing the UP and/or DOWN button will display the subsequent sensors
(“SE 2", “SE 3" etc.).
Pressing the ON/OFF button or not pressing any key for 20 seconds will let the controller return
to normal operation.
3.4
Reading out and changing setpoints
To change the setpoints, press the SETP. button. The decimal point on the setpoint display will
start to blink. The value can now be changed using the UP and DOWN buttons.
Pressing the SETP. button again will display the next setpoint.
Daytime setpoint temperature, daytime RH setpoint, night-time setpoint temperature, night-time
RH setpoint and heating setpoint will be shown successively.
The daytime/night-time LEDs and the %RH/°C LEDs indicate which setpoint is displayed.
The heating LED blinks and the LED °C lights up at showing the heating setpoint.
Pressing the SENS. button or not pressing any key for 20 seconds will let the controller return to
normal operation.
If a temperature setpoint connection with another controller has been set using parameter
P805, this can be viewed by showing in the measured-value display “n” symbol with the network
number of the other controller behind it. Daytime and night-time temperature setpoints can be
adjusted, but they will be set to the current temperature setpoint of the connected controller
again within a few seconds (if present on the network).
3.5
User manual
Document nr. : 080608
Version : V2.2
MC 785-MP
Client : General
Page : 10 of 28
Setting controller mode
The following phases can be selected to operate in:
Pre-cool phase:
Pressing the INKOEL-FASE button will activate pre-cooling. The LED
above this button lights up to indicate this.
Storing phase:
Pressing the BEWAAR-FASE button will activate storing. The LED above
this button lights up to indicate this.
Standby phase:
Pressing the INKOEL-FASE button and the BEWAAR-FASE button at the
same time lets the controller switch to the standby phase (provided P901 =
1), to indicate this mode, both LED’s above both buttons will by blinking at
the same time.
The controller remembers the phase to make sure that the phase will not change when switching
off and on again.
3.6
Adjusting the ventilation cooling mode
Pressing the
(fan) button lets the ventilation cooling mode switch from automatic (
ventilation to continuous ( ) ventilation (relay function “fan on while cooling an evaporator”).
)
During electrical or hot gas defrosting, however, the fan will be switched off. The LEDs next to
the setpoint display indicate the ventilation mode.
The controller remembers the ventilator cooling mode so that the ventilator cooling mode will not
change when switching off and on again.
3.7
Adjusting the defrost mode
Parameter P501 is used to adjust the defrost mode to;
- No defrost
- Natural defrost
- Electrical defrost or
- Hot gas defrost
3.8
Starting defrosting manually
Pressing the UP and DOWN buttons at the same time will start forced defrosting (manually),
independently of the defrost timer.
3.9
Starting humidification manually
Pressing the
(fan) and PRG buttons at the same time will start forced humidification
(manually), independently of the humidifying timer.
User manual
Document nr. : 080608
Version : V2.2
MC 785-MP
Client : General
Page : 11 of 28
3.10 Reading out and adjusting the time and pulse counters, reading inside RH
The upper right display indicates either the time, the number of cooling pulses, the cooling hourmeter or the inside RH. During normal operating condition is shown which was last selected with
the
key, as described below;
Pushing the
key will show the clock time on the display. The left display will show ‘cloc’ to
indicate that the clock time can be adjusted. The clock time can now be adjusted with the UP
and DOWN keys. The day of the week is shown by the day LEDs and can be adjusted by
pushing the PRG key for more than 1 second.
By pushing the AAN/UIT key or pushing no key for more than 30 seconds the clock returns to
its normal operation mode. As the AAN/UIT key is used, than the other MC 785-MP controllers
on the network will be synchronised with this new time of this controller.
By pushing the
key again the number of cooling pulses will be shown in the display. The left
display now shows ‘puls’. The number of cooling pulses is shown without a decimal point. It is
also to distinguish whether the number of cooling pulses or hours is being displayed.
By pushing the PRG key for more than 1 second, the counter can be reset to 0.
By pushing no key for more than 15 seconds the controller returns to its normal operation mode.
By pushing the
key again the number of cooling hours will be shown in the display. The left
display now shows ‘uren’. The number of cooling hours is shown with a decimal point in the
display. By pushing the PRG key for more than 1 second, the counter can be reset to 0.
By pushing no key for more than 15 seconds the controller returns to its normal operation mode.
By pushing the
key again the measured value of the inside RH-sensor is shown on the
display. The left display now shows ‘rhin’.
By pushing no key for more than 15 seconds the controller returns to its normal operation mode.
If the number of pulses or hours is larger than can be displayed on the display, "OFL" appears
on the display to indicate overflow.
3.11 Manual day / night setting
By pushing the DAY or NIGHT key the controller can be manually set into day or night mode.
This is also done automatically when the start-times are set in the parameters. The LEDs
and
next to the right display indicate the active day or night mode.
If the corresponding LED flashes, rain is being detected.
User manual
Document nr. : 080608
Version : V2.2
MC 785-MP
Client : General
Page : 12 of 28
3.12 Manual start drying
By pushing the DAY and NIGHT keys simultaneously the function (manual) drying can be
started.
3.13 Info menu
By pushing the UP and ON/OFF keys simultaneously the info menu is activated, meant for
advanced users. The Info menu can also be activated when the controller is switched off.
In the upper left display 'info' is shown. In the lower left display the item number is shown,
indicating which data appear in the right display. By pushing the UP and DOWN keys a item
number can be selected.
Appendix A contains a list of items and their meaning. The day LED’s mo .. so indicate the
status of relay 1 .. 7.
By pushing the ON/OFF key or 15 minutes choosing no other item, the controller returns to its
normal operation mode.
4.
Adjusting internal parameters
Push the PRG key.
If parameter P908 is not zero it is necessary to enter a password before it is possible to enter the
parameter menu. On the lower display appears ‘code’ and in the upper display the password can be
entered. The first digit flashes and with the UP and DOWN key the value can be changed. If the digit
has the right value it can be confirmed by pushing the SETP. key. Now the next digit can be entered. If
the last digit has been confirmed the controller will check the code. If this is the correct code the
parameter menu will be active. If the code isn’t correct the controller will retun to it’s normal operation
mode.
If P908 is zero than the password check is skipped and de parameter menu is entered directly.
In the parameter mode appears P101 in the temperature display. The is the parameter number, which
can be changed with the UP or DOWN key.
On the setpoint display appears the value from the parameter. By pushing the SETP. key and the UP
or DOWN key simultaneously the value of this parameter can be changed.
By pushing the ON/OFF key or if no key is being pushed for 30 seconds the controller will return to its
normal operation mode.
User manual
Document nr. : 080608
Version : V2.2
MC 785-MP
Client : General
Page : 13 of 28
Parameter table.
Nr
Description
Range
Unit
Default
0..7 and 10..13
-
1
0..7 and 10..13
0..7 and 10..13
-
2
3
0..7
0..7
0..7 or 8..9
0..7 or 8..9
0..7
0..7
0..7 or 8..9
0..7 or 8..9
0..7
0..7
0..7 or 8..9
0..7 or 8..9
0..7
0..7
0..7 or 8..9
0..7 or 8..9
-
0
0
0
0
0
0
0
0
0
0
0
0
0
0
0
0
0 = no, 1 = yes
-
0
0..2
-
0
Sensors group:
P 101
P 102
P 103
Function sensor-1 (MC 785-MP)
0 = not present
1 = control sensor
2 = product sensor
3 = defrost sensor
4 = defrost sensor evaporator 2
5 = defrost sensor evaporator 3
6 = outside temperature sensor
7 = heating sensor (inlet sensor)
8* = inside rh sensor (Only at LMS Pt100/RH)
9* = outside rh sensor (Only at LMS Pt100/RH)
10 = alarm contact in (no): controls uit
11 = door contact in (no): cooling + fan off
during max. time (P 902)
12 = blocking contact in (no): everything off
13 = stop defrost (no)
Function sensor-2 (MC 785-MP)
Function sensor-3 (MC 785-MP)
P 104
P 105
P 106
P 107
P 108
P 109
P 110
P 111
P 112
P 113
P 114
P 115
P 116
P 117
P 118
P 119
Function sensor-4
Function sensor-5
Function sensor-6
Function sensor-7
Function sensor-8
Function sensor-9
Function sensor-10
Function sensor-11
Function sensor-12
Function sensor-13
Function sensor-14
Function sensor-15
Function sensor-16
Function sensor-17
Function sensor-18
Function sensor-19
(LMS-UNIT-1 Pt100-1)
(LMS-UNIT-1 Pt100-2)
(LMS-UNIT-1 Pt100-3 or RH-1)
(LMS-UNIT-1 Pt100-4 or RH-2)
(LMS-UNIT-2 Pt100-1)
(LMS-UNIT-2 Pt100-2)
(LMS-UNIT-2 Pt100-3 or RH-1)
(LMS-UNIT-2 Pt100-4 or RH-2)
(LMS-UNIT-3 Pt100-1)
(LMS-UNIT-3 Pt100-2)
(LMS-UNIT-3 Pt100-3 or RH-1)
(LMS-UNIT-3 Pt100-4 or RH-2)
(LMS-UNIT-4 Pt100-1)
(LMS-UNIT-4 Pt100-2)
(LMS-UNIT-4 Pt100-3 or RH-1)
(LMS-UNIT-4 Pt100-4 or RH-2)
#
#
#
#
#
#
#
#
#) 8 and 9 only with LMS modules with RH sensors!!!!
P 150
P 151
Alternative sensor names
( sensor-group indications ‘Prod’, ‘buit’ en ‘inbl’ from
paragraph 3.2 replaced by ‘prd1', ‘prd2' en ‘prd3')
Function digital input 1
0 = not present
1 = rain detector (closed input at rain detected)
2 = stop defrost (stops defrost at closing the input)
Sensor offsets group: (for calibration)
P 201
P 202
P 203
Sensor-1 offset
Sensor-2 offset
Sensor-3 offset
(MC 785-MP)
(MC 785-MP)
(MC 785-MP)
-10.0..10.0
-10.0..10.0
-10.0..10.0
EC
EC
EC
0.0
0.0
0.0
P 204
P 205
P 206
P 207
Sensor-4 offset
Sensor-5 offset
Sensor-6 offset
Sensor-7 offset
(LMS-UNIT-1 Pt100-1)
(LMS-UNIT-1 Pt100-2)
(LMS-UNIT-1 Pt100-3 or RH-1)
(LMS-UNIT-1 Pt100-4 or RH-2)
#
#
-10.0..10.0
-10.0..10.0
-10.0..10.0
-10.0..10.0
EC
EC
EC(%RH)
EC(%RH)
0.0
0.0
0.0
0.0
P 208
P 209
P 210
P 211
Sensor-8 offset
Sensor-9 offset
Sensor-10 offset
Sensor-11 offset
(LMS-UNIT-2 Pt100-1)
(LMS-UNIT-2 Pt100-2)
(LMS-UNIT-2 Pt100-3 or RH-1)
(LMS-UNIT-2 Pt100-4 or RH-2)
#
#
-10.0..10.0
-10.0..10.0
-10.0..10.0
-10.0..10.0
EC
EC
EC(%RH)
EC(%RH)
0.0
0.0
0.0
0.0
0.0
#) Remark:
or Pt100 at LMS 4xPt100 module
or RH at LMS 2xPt100+2xRH module
User manual
Document nr. : 080608
Version : V2.2
MC 785-MP
Client : General
Page : 14 of 28
Nr
Description
P 212
P 213
P 214
P 215
Sensor-12 offset
Sensor-13 offset
Sensor-14 offset
Sensor-15 offset
(LMS-UNIT-3 Pt100-1)
(LMS-UNIT-3 Pt100-2)
(LMS-UNIT-3 Pt100-3 or RH-1)
(LMS-UNIT-3 Pt100-4 or RH-2)
P 216
P 217
P 218
P 219
Sensor-16 offset
Sensor-17 offset
Sensor-18 offset
Sensor-19 offset
(LMS-UNIT-4 Pt100-1)
(LMS-UNIT-4 Pt100-2)
(LMS-UNIT-4 Pt100-3 or RH-1)
(LMS-UNIT-4 Pt100-4 or RH-2)
#) Remark:
Range
Unit
Default
#
#
-10.0..10.0
-10.0..10.0
-10.0..10.0
-10.0..10.0
EC
EC
EC(%RH)
EC(%RH)
0.0
0.0
0.0
0.0
#
#
-10.0..10.0
-10.0..10.0
-10.0..10.0
-10.0..10.0
EC
EC
EC(%RH)
EC(%RH)
0.0
0.0
0.0
0.0
0,1..10,0
0..99
0..99
0..99
EC
minutes
minutes
minutes
0,5
0
0
99
0..2
-
1
0..10.0
EC
0.5
0..10.0
EC
1.5
10..240
minutes
90
0..1
-
0
-40.0..50.0
-40.0..50.0
EC
EC
-10.0
+40.0
or Pt100 at LMS 4xPt100 module
or RH at LMS 2xPt100+2xRH module
Cooling group:
P 300
P 301
P 302
P 303
Differential cooling
Minimal cooling time
Minimal time between two cooling actions
Maximal cooling time during storage
P 304
Mechanical cooling during night offset
0 = off
*
1 = on
2 = on day temperature setpoint, however when
temperature setpoint is linked (P805) to another
controller than the current temperature setpoint of
that controller is being used.
P 305
Maximal increasing cooling temperature below the
setpoint, after which the cooling will forced stop
Maximal temperature above the setpoint, after which the
cooling will forced start
Cooling cycle time during storage
P 306
P 307
P 308
Suction Valve Control
0 = The evaporator suction-valve is driven at the same
moments as the evaporator liquid-valve (apart from
a few seconds switching time).
There is one exception, namely during a defrost
cycle with several evaporators, one by one after the
other electrical or hotgas defrosting while all other
evaporators cool: In that situation at hotgas defrost
the evaporator suction valve is again actuated after
its suction valve delay time (P529) is finished and
at electric defrost it is again actuated after both his
suction valve delay time (P529) and his drip-off
time (P520) are finished.
(Software version 1.18 untill 2.01 has not yet supported
P308. It is the suction control valve in accordance with
P308 = 0 as described above).
1 = The evaporator suction valve is always controlled,
except during its hotgas defrost and P529 seconds
thereafter.
P 320
P 321
Minimum adjustable temperature setpoint
Maximum adjustable temperature setpoint
*) Note:
The night temperature setpoint is this still
important because a requested action or running
cool-action during the day/night transition still runs
or will be completed on the basis of the night
temperature setpoint.
User manual
Document nr. : 080608
Version : V2.2
MC 785-MP
Client : General
Page : 15 of 28
Nr
Description
Range
Unit
Default
-40.0..50.0
-40.0..50.0
EC
EC
-40.0
50.0
0..3
-
0
0..100
0..100
0..25.0
0..99
-15.0..15.0
%
%
EC
minutes
EC
0
100
5.0
0
0.0
0..25.0
EC
3.0
0..100
0..100
0..2
%
%
-
50
20
-10.0..40.0
1..10.0
0..99
EC
EC
minutes
1.0
5.0
0
0..99
minutes
0
0..2
-
0
0..999
0..999
minutes
minutes
0
0
00.00..24.00
00.00..24.00
00.00..24.00
00.00..24.00
00.00..24.00
00.00..24.00
00.00..24.00
00.00..24.00
hours.min
hours.min
hours.min
hours.min
hours.min
hours.min
hours.min
hours.min
24.00
24.00
24.00
24.00
24.00
24.00
24.00
24.00
Analog output group:
P 340
P 341
Analog output voltage 0V at temperatuur (as P350=3)
Analog output voltage 10V at temperature (as P350=3)
P 350
Function analog output (0..10V):
0 = air-valve drying
1 = air-valve cooling
2 = heating
3 = current temperature setpoint output
Cooling air valve group:
P 351
P 352
P 353
P 354
P 355
P 356
P 357
P 358
P 359
P 360
P 361
P 362
Parameters described below only for P350 = 1 !
Minimum position air valve
Maximum position air valve
P-band air valve cooling
I-time air valve cooling
Offset set point air valve cooling.
Minimum differential temperature between outdoor temp.
and control temp. at which air valve cooling is possible
Maximum position air valve at outdoor temp. below zero
Maximum position air valve at mechanical cooling
Air valve cooling during night offset
0 = off
1 = on
2 = at day set point, but at temperature setpoint
coupling (P805) at the actual temperature setpoint
of the controller to which it is been linked.
Minimum inlet temperature
P-band for limitation on minimal inlet temperature
I-time for limitation on minimal inlet temperature
Ventilation group:
P 401
P 403
P 404
Ventilation delay after cooling switches off
(relay function "ventilation during cooling evaporator")
Automatic ventilation mode:
(relay function “automatic ventilation”)
0 = no automatic ventilation
1 = automatic ventilation on real time
2 = automatic ventilation on pulse/pause
Pulse time automatic ventilation
Pause time automatic ventilation
P 405
P 406
P 407
P 408
P 409
P 410
P 411
P 412
Automatic ventilation start time nr-1
Automatic ventilation stop time nr-1
Automatic ventilation start time nr-2
Automatic ventilation stop time nr-2
Automatic ventilation start time nr-3
Automatic ventilation stop time nr-3
Automatic ventilation start time nr-4
Automatic ventilation stop time nr-4
P 402
(24.00 = not active)
(24.00 = not active)
(24.00 = not active)
(24.00 = not active)
(24.00 = not active)
(24.00 = not active)
(24.00 = not active)
(24.00 = not active)
User manual
Document nr. : 080608
Version : V2.2
MC 785-MP
Client : General
Page : 16 of 28
Nr
Description
Range
Unit
Default
0..3
-
0
0..1
-
0
0..1
-10.0..40.0
00.00..24.00
00.00..24.00
00.00..24.00
00.00..24.00
00.00..24.00
00.00..24.00
00.00..24.00
00.00..24.00
00.00..24.00
00.00..24.00
00.00..24.00
00.00..24.00
EC
hours.min
hours.min
hours.min
hours.min
hours.min
hours.min
hours.min
hours.min
hours.min
hours.min
hours.min
hours.min
0
5.0
24.00
24.00
24.00
24.00
24.00
24.00
24.00
24.00
24.00
24.00
24.00
24.00
Defrost group:
P 501
P 502
P 503
P 504
P 505
P 506
P 507
P 508
P 508
P 510
P 511
P 512
P 513
P 514
P 515
Defrost type
0 = no defrost
1 = off cycle
2 = electrical
3 = hot gas
Defrost mode
0 = on real time base
1 = on interval base
Off cycle defrost if control temp higher than:
Defrost time 1
(24.00 = not active)
Defrost time 2
(24.00 = not active)
Defrost time 3
(24.00 = not active)
Defrost time 4
(24.00 = not active)
Defrost time 5
(24.00 = not active)
Defrost time 6
(24.00 = not active)
Defrost time 7
(24.00 = not active)
Defrost time 8
(24.00 = not active)
Defrost time 9
(24.00 = not active)
Defrost time 10
(24.00 = not active)
Defrost time 11
(24.00 = not active)
Defrost time 12
(24.00 = not active)
P 516
P 517
P 518
P 519
P 520
Defrost interval time
#
Defrost release temperature
Maximal defrost time
#
Defrost end temperature
Drip off time
#
(Time runs from closing hot-gas valve / stop electric
defrost of the last evaporator, at simultaneous cooling
and defrosting than this time runs per evaporator)
1..480
-10.0..40.0
0..99
-10.0..40.0
0..99
0.1 hour
EC
minutes
EC
minutes
60
0.0
10
0.0
0
P 521
Fan-on delay time after defrosting
(applies to relay function "ventilation during cooling
evaporator," time starts after drip-off time, when
negative the fan will x minutes be on before any cooling
action)
-10..99
minutes
0
P 522
Maximum number of cells which are defrosting electrical
simultaneously
1..31
-
1
P 523
Maximum number of cells which are defrosting hot-gas
simultaneously
1..31
-
1
P 524
Minimum number of cells cooling needed for hot-gas
defrosting
Number of evaporators to be defrosted
Alarm delay after defrost
All evaporators off during defrost
(Blocks hot-gas defrost with its own evaporators)
Hot gas defrost possible with own evaporators
1..3
-
1
1..3
0..500
0..1
minutes
-
1
180
1
0..1
-
1
0..999
seconds
0
0 = no, 1 = yes
0 = no, 1 = yes
-
0
0
P 525
P 526
P 527
P 528
P 529
P 530
P 531
Delay time suction valve after defrost (see also P308)
(Time runs from closing hot-ga valve / stop electric
defrost)
Defrost interval on effective cooling time
During defrost with their own evaporators both evaporators
on (cooling)
#) Attention:
These parameters had a different
unit in software versions lower
than 3.00
User manual
Document nr. : 080608
Version : V2.2
MC 785-MP
Client : General
Page : 17 of 28
Nr
Description
Range
Unit
Default
0..100.0
0..99
0..96
0 = no, 1 = yes
%
minutes
hour
-
1.0
10
10
0
0..50.0
g/kg
0.5
0..50.0
0..99
g/kg
minutes
1.0
0
0..2
-
1
0..999
0..100
0..100
1..4
minutes
%
%
-
10
0
100
1
0 = no, 1 = yes
0..200
minutes
0
0
0..100.0
%
1.0
0.1..10.0
0..99
0..200
EC
minutes
seconds
2.0
0
50
Drying/humidifying group:
Remark:
Assign analog output for air-valve drying
with P350.
P 550
P 551
P 552
P 553
RH differential
Maximal humidification time
Humidification interval
Humidification interval on effective cooling time
P 554
Differential between absolute humidity indoor and outdoor
where above drying with the valve will be used
P-band valve control
I-tijd valve control
P 555
P 556
P 557
Humidifying:
0 = off
1 = only at pre cooling
2 = at pre cooling and storing
P 558
P 559
P 560
P 561
Dry time
Minimum valve position
Maximum valve position
Drying type
1 = only with the valve
2 = only with cooling and heating
3 = both, automatically controlled
4 = only with external dryer
P 562
P 563
Cooling en humidifying at the same time
Time between cooling and heating
P 564
RH differential drying
Heating group:
Remark:
P 570
P 571
P 572
Assign analog output for heating with P350
P band heating
I time heating
Run time heating valve
Alarms group:
P 601
P 602
P 603
P 604
P 605
P 606
P 607
P 608
Absolute minimum alarm at pre cooling
Absolute minimum alarm delay at pre cooling
Absolute maximum alarm at pre cooling
Absolute maximum alarm delay at pre cooling
Relative minimum alarm at pre cooling
Relative minimum alarm delay at pre cooling
Relative maximum alarm at pre cooling
Relative maximum alarm delay at pre cooling
-40.0..50.0
0..99
-40.0..50.0
0..99
-40.0..50.0
0..99
-40.0..50.0
0..99
EC
minutes
EC
minutes
EC
minutes
EC
minutes
0.0
0
50.0
0
-10.0
0
10.0
0
P 609
P 610
P 611
P 612
P 613
P 614
P 615
P 616
Absolute minimum alarm at storing
Absolute minimum alarm delay at storing
Absolute maximum alarm at storing
Absolute maximum alarm delay at storing
Relative minimum alarm at storing
Relative minimum alarm delay at storing
Relative maximum alarm at storing
Relative maximum alarm delay at storing
-40.0..50.0
0..99
-40.0..50.0
0..99
-40.0..50.0
0..99
-40.0..50.0
0..99
EC
minutes
EC
minutes
EC
minutes
EC
minutes
0.0
0
50.0
0
-10.0
0
10.0
0
P 617
Action at minimum alarm:
0 = Only report with alarm relay
1 = Report with alarm relay and everything off
Action at maximum alarm:
0 = Only report with alarm relay
1 = Report with alarm relay and everything off
0..1
-
0
0..1
-
0
P 618
User manual
Document nr. : 080608
Version : V2.2
MC 785-MP
Client : General
Page : 18 of 28
Nr
Description
Range
Unit
Default
Blocking group:
P 701
P 702
P 703
P 704
P 705
P 706
P 707
P 708
Blocking start time-1 Monday till Friday (24.00 = not active)
Blocking stop time-1 Monday till Friday
Blocking start time-2 Monday till Friday
Blocking stop time-2 Monday till Friday
Blocking start time-3 Monday till Friday
Blocking stop time-3 Monday till Friday
Blocking start time-4 Monday till Friday
Blocking stop time-4 Monday till Friday
00.00..24.00
00.00..24.00
00.00..24.00
00.00..24.00
00.00..24.00
00.00..24.00
00.00..24.00
00.00..24.00
hours.min
hours.min
hours.min
hours.min
hours.min
hours.min
hours.min
hours.min
24.00
24.00
24.00
24.00
24.00
24.00
24.00
24.00
P 709
P 710
P 711
P 712
P 713
P 714
P 715
P 716
Blocking start time-1 Saturday till Sunday
Blocking stop time-1 Saturday till Sunday
Blocking start time-2 Saturday till Sunday
Blocking stop time-2 Saturday till Sunday
Blocking start time-3 Saturday till Sunday
Blocking stop time-3 Saturday till Sunday
Blocking start time-4 Saturday till Sunday
Blocking stop time-4 Saturday till Sunday
00.00..24.00
00.00..24.00
00.00..24.00
00.00..24.00
00.00..24.00
00.00..24.00
00.00..24.00
00.00..24.00
hours.min
hours.min
hours.min
hours.min
hours.min
hours.min
hours.min
hours.min
24.00
24.00
24.00
24.00
24.00
24.00
24.00
24.00
1..31
-
1
P 802
Network number
(set a unique number for each controller in the network)
Storage group number:
Controllers with equal group numbers will cool
simultaneously during storage
(0 = not active)
0..31
-
0
P 803
P 804
Cooling capacity of this cell (If P 802 = 0 than not active)
Maximum cool capacity demand for pre-cooling
0..100
1..500
kW
kW
0
500
P 805
Set point (day and night) linked to actual temperature set
point of controller with network number
(0 = set point not linked)
Pre-cooling group number:
Controllers with equal group numbers will cool
simultaneously during pre-cooling
(0 = not active)
0..31
-
0
0..31
-
0
Network group:
P 801
P 806
Others group:
P 901
Cell may be used as standby-cell if hot-gas is needed
0 = no, 1 = yes
-
0
P 902
P 903
P 904
P 905
P 906
Maximum time door open
Heating off when door is open
Fan off when door is open
Cooling off when door is open
Humdifying off when door is open
0..92
0 = no, 1 = yes
0 = no, 1 = yes
0 = no, 1 = yes
0 = no, 1 = yes
minutes
-
5
1
1
1
1
P 907
P 908
Log interval
Password
1..120
[0000].[9999]
minutes
-
5
[0000]
P 909
Air-valve is closed at rainfall
(analogue output becomes 0Vdc, applicable if P350 = 0
or 1 and requires a rain-detector connected to the
controller or on the master in the network)
0 = no, 1 = yes
-
1
P 910
Drying off at open door
(cooling associated to drying set off with P905)
0 = no, 1 = yes
-
1
([0000] = not active)
Start times group:
P 920
P 921
Start time night set point
Start time day set point
(24.00 = not active)
(24.00 = not active)
00.00..24.00
00.00..24.00
hours.min
hours.min
24.00
24.00
P 922
P 923
Start time night set point weekend
Start time day set point weekend
(24.00 = not active)
(24.00 = not active)
00.00..24.00
00.00..24.00
hours.min
hours.min
24.00
24.00
User manual
Document nr. : 080608
Version : V2.2
MC 785-MP
Client : General
Page : 19 of 28
Nr
Description
Range
Unit
Default
0..21
-
0
P 952
P 953
Function solenoid valve to Relay
0
= no Relay assigned
1..5
= Relays-1..5 on controller
6..9
= Relays-1..4 on LMS relays module 1
10..13
= Relays-1..4 on LMS relays module 2
14..17
= Relays-1..4 on LMS relays module 3
18..21
= Relays-1..4 on LMS relays module 4
Function solenoid valve evaporator-2 to relay
Function solenoid valve evaporator-3 to relay
0..21
0..21
-
0
0
P 954
P 955
P 956
Function suction valve to relay
Function suction valve-2 to relay
Function suction valve-3 to relay
0..21
0..21
0..21
-
0
0
0
P 957
Function off cycle defrost to relay (natural defrost)
0..21
-
0
P 958
P 959
P 960
Function Electrical defrost evap.-1 to relay
Function Electrical defrost evap.-2 to relay
Function Electrical defrost evap.-3to relay
0..21
0..21
0..21
-
0
0
0
P 961
P 962
P 963
Function Hot gas defrost evap.-1 to relay
Function Hot gas defrost evap.-2 to relay
Function Hot gas defrost evap.-3 to relay
0..21
0..21
0..21
-
0
0
0
P 964
Function collect hot gas defrost to relay
0..21
-
0
P 965
P 966
P 967
Function ventilation during cooling evap.-1 to relay
Function ventilation during cooling evap.-2 to relay
Function ventilation during cooling evap.-3 to relay
0..21
0..21
0..21
-
0
0
0
P 968
Function ventilation during ventilaton to relay
0..21
-
0
P 969
Function heating to relay
0..21
-
0
P 970
Function humidifying to relay
0..21
-
0
P 971
Function alarm to relay
0..21
-
0
P 972
P 973
Function heating valve open to relay
Function heating valve close to relay
0..21
0..21
-
0
0
P 974
Function external dryer to relay
0..21
-
0
-
year/week
-
Relay assignment group:
P 951
Remark:
It is possible to assign more than one function to
a single relay.
Example; Ventilation during cooling (P 956) and
during ventilation (P 957) to the same relay.
Software / production group:
P 991
P 992
P 993
Software version number
Serial number
Production date
5.
User manual
Document nr. : 080608
Version : V2.2
MC 785-MP
Client : General
Page : 20 of 28
Sensor calibration
The temperature sensors 1 till 19 can be calibrated with the parameters P 201 till P 219.
If a temperature-sensor shows 0,2°C to much, than the according sensor-offset must be lowered with
0,2°C.
6.
Alarms
If a relay is configured (P 971) as a alarm relay (default relay-1), then normally the relay is closed and
opens when an alarm occurs. So there is also an alarm given when the supply voltage has been cut
off. During the LED alarm will flash on the front. Depending of the internal parameters the controller will
stop or continue.
If the LED Alarm is on continuously, than the door contact is closed.
An alarm can be caused by one of the following messages:
Sensor failure :
E1
E2
E3
= Temperature sensor-1 regelaar Sensor-1 defect
= Temperature sensor-2 regelaar Sensor-2 defect
= Temperature sensor-3 regelaar Sensor-3 defect
E4
E5
E5
E6
= Temperature sensor-4 LMS module-1 Pt100-1 defect
= Temperature sensor-5 LMS module-1 Pt100-2 defect
= Temperature sensor-6 LMS module-1 Pt100-3(or RH-1) defect
= Temperature sensor-7 LMS module-1 Pt100-4(or RH-2) defect
E4
E5
E5
E6
= Temperature sensor-8 LMS module-2 Pt100-1 defect
= Temperature sensor-9 LMS module-2 Pt100-2 defect
= Temperature sensor-10 LMS module-2 Pt100-3(or RH-1) defect
= Temperature sensor-11 LMS module-2 Pt100-4(or RH-2) defect
E4
E5
E5
E6
= Temperature sensor-12 LMS module-3 Pt100-1 defect
= Temperature sensor-13 LMS module-3 Pt100-2 defect
= Temperature sensor-14 LMS module-3 Pt100-3(or RH-1) defect
= Temperature sensor-15 LMS module-3 Pt100-4(or RH-2) defect
E16
E17
E18
E19
= Temperature sensor-16 LMS module-4 Pt100-1 defect
= Temperature sensor-17 LMS module-4 Pt100-2 defect
= Temperature sensor-18 LMS module-4 Pt100-3(or RH-1) defect
= Temperature sensor-19 LMS module-4 Pt100-4(or RH-2) defect
Temperature alarm :
A lo
A hi
r lo
R hi
= Absolute minimum temperature alarm
= Absolute maximum temperature alarm
= Relative minimum temperature alarm
= Relative maximum temperature alarm
Other alarms:
A1
= No hot gas defrost possible because there are no other
MC 785-MP’s in the network.
The alarm messages will appear on the temperature display (upper left).
If a new alarm occurs, than it will first be displayed continuously on display.
New alarms can be confirmed one by one with the UP or DOWN button. If all new alarms are
confirmed than the normal readout of the display will be shown alternating with the remaining alarms.
With the UP or DOWN key you can toggle between the remaining alarms.
7.
User manual
Document nr. : 080608
Version : V2.2
MC 785-MP
Client : General
Page : 21 of 28
Front view
Front view MC 785-MP wall mounting; drawing 040241w0
Front view MC 785-MP panel mounting; drawing 041864w0
8.
User manual
Document nr. : 080608
Version : V2.2
MC 785-MP
Client : General
Page : 22 of 28
Connections
Connections diagram MC 785-MP wall mount; drawing 031878w1
User manual
Document nr. : 080608
Version : V2.2
MC 785-MP
Client : General
Page : 23 of 28
Connections diagram MC 785-MP panel mount; drawing 041863w1
User manual
Document nr. : 080608
Version : V2.2
MC 785-MP
Client : General
Page : 24 of 28
Connections diagram MC785-MP with LMS-units; drawing 032152w1:
9.
User manual
Document nr. : 080608
Version : V2.2
MC 785-MP
Client : General
Page : 25 of 28
Dimensions
Dimensions MC785-MP wall mount; drawing 940024
User manual
Document nr. : 080608
Version : V2.2
MC 785-MP
Client : General
Page : 26 of 28
Dimensions MC785-MP panel mount; drawing 961271
Dimensions LMS Relay-module; drawing 970983 LMS Supply-, Pt100-, RH/Pt100-module; dr. 970908
User manual
Document nr. : 080608
Version : V2.2
MC 785-MP
Client : General
Page : 27 of 28
Appendix A: Items in the info menu
Item
Meaning/Values/Description
0
Master/slave mode
0
busy with determining
1
controller is slave
2
controller is master
1
Master-slave-counter, counter to determinate the master-slave-mode
2
Cool-mode
0
Cooling off
1
Cooling blocked
2
Cooling off, start permission requested
3
Cooling on until minimum cooling time
4
Cooling on until appropriate temperature is reached
5
Cooling on, stop cooling permission requested
7
Cooling off, time between cooling actions (P305)
6
Cooling off, in transition to next mode
8
Cooling on, stop permission requested for defrosting
20
One evaporator defrosting, one cools for hot gas, rest is off
21
One evaporator defrosting, rest cools
22
One evaporator defrosting, rest in transition to next mode
23
One evaporator defrosting (electric), rest is off
(LED cool is lit at 3, 4, 5, 6, 8)
At cooling modes 20..23 the cooling mode in the display is complemented by the cool-sub
mode (see item 21) separated by a dot.
3
Cool-command from master, see Cool-mode
4
Defrost-mode
0
Defrost off
1
Defrost off, start permission requested
2
Defrost off, start natural defrost permission requested
3
Defrost off, start electric defrost permission requested
4
Defrost off, start hot-gas defrost permission requested
10
Natural defrosting
11
Electric defrosting
12
Hot-gas defrosting
13
Defrost off, dripping off
14
Defrost off, in transition to next mode
15
Defrost off, pre-ventilation
16
One evaporator hot-gas defrosting, rest cooling or off
17
One evaporator electric defrosting, rest cooling or off
18
Defrost off, remaining suction valve delay is still running
(LED Defrost flashes at 1, 2, 3, 4)
(LED Defrost lit at 10, 11, 12, 13, 16, 17)
At defrost-modes 16 and 17 the defrost-mode in the display is complemented by the
defrost-sub mode (see item 20) and the index of evaporator (see item 22) separated by a
dot.
5
Defrost-command from master, see defrost-mode
6
Number of controllers in COOLING PHASE or STANDBY that are cooling (only at master)
7
Number of controllers in MAINTAIN PHASE that are cooling (only at master)
8
Number of controllers with hot-gas defrost request (only at master)
9
Number of controllers busy with hot-gas defrost (only at master)
10
Number of controllers busy with electric defrost (only at master)
User manual
Document nr. : 080608
Version : V2.2
MC 785-MP
Client : General
Page : 28 of 28
Item
Meaning/Values/Description
11
Blocking active (depends on contact and P701..P716)
0
Not blocked
1
Blocked
12
Door-mode (depends on contact, P902..P906 and P910)
0
No blocking because of door
> 0 One or more functions blocked by the door
13
Extern alarm (contact)
0
No alarm
1
Alarm
14
Number of MC 785-MP controllers detected on the network (only at master)
15
Forced cooling-counter (only at master)
16
Number of controllers available for forced cooling (only at master)
17
Humidifying-mode
1
No humidifying
2
Humidifying waits for cooling end
3
Active humidifying
18
Analog output percentage, 0..100 %
19
Heating-mode, "abc" (0 = function off, 1 = function on)
a
send heating-valve closing
b
send heating-valve opening
c
heating on
20
Defrost-sub-mode, valid at defrost-mode 16 and 17
1
evaporator to be defrosted is still cooling, stop permision requested
2
evaporator defrosting
3
evaporator not defrosting while dripping off
4
evaporator not defrosting, waiting at suction-valve delay
5
evaporator not defrosting, pre-ventilation
21
Cool-sub-mode, valid at cool-mode 20, 21, 22 and 23
values are reserved
22
Index (from 0) evaporators to be defrosted / defrosting at evaporators alternately defrost
23
Absolute humidity inside in g/kg (if known)
24
Absolute humidity outside in g/kg (if known)
25
Hot-gas defrost interrupted
0
Defrosting yet successful ended
1
Defrosting interrupted by blocking, alarm or master
26
Ventilation-mode, “abcd” (0 = function off, 1 = function on)
a
automatic ventilation
b
ventilation during cooling evaporator 1
c
ventilation during cooling evaporator 2
d
ventilation during cooling evaporator 3
30
Hexadecimal representation of energized relays 1..16 (bit 0..15)
0000 relay 1..16 not energized
0001 relay 1 energized, relay 2..16 not energized
..
FFFF relays 1..16 energized
31
Hexadecimal representation of energized relays 17..21 (bit 0..4)
0000 relay 17..21 not energized
0001 relay 17 energized, relay 18..21 not energized
..
FFFF relays 17..21 energized
-.-.-.-.-.-.-.-.-.-
@