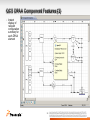
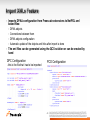
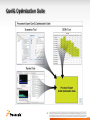
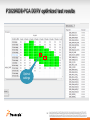
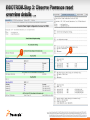
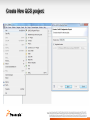
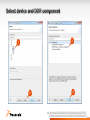
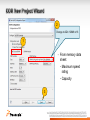
1
TM August 2013 • Before you leave today you will − Understand why configuration tools will help you − Understand some other tools for optimizing QorIQ devices − Configuration Tools specifically: Have undergone a basic walkthrough of the tools Used actual configurations and modified them based on customer requests to configure: • RCW – pre-boot loader settings • BOOTROM – P1/P2 devices without RCW use this tool • DDR – memory controller settings • Device Trees – Linux® hardware device tree settings • Data Path graphs – configuring the DPAA − Know TM where to get more information 2 • • • • Explore Configuration Tools available Explore Optimization Tools available Describe how people get the tools What is using QCS? − − − − − • • • Review each tool Pre-boot loader / RCW configuration DDR configuration Device Tree Editor Data Path graphs and configuring the DPAA Summary Where to get more information… Walkthrough Labs – backup slides − − − − − − Lab 1: Installing QCS Lab 2: Pre-boot loader / RCW Configuration Lab 3: Bootrom generator Lab 4: DDR configuration Lab 5: Device Tree Editor Lab 6: Data Path graphs and configuring the DPAA TM 3 Provide Development Systems − Provide Runtime software for QorIQ products − MKV, Hypervisor, Linux BSPs, Reference Designs Provide Bring-up tools and development systems − Complete boards for evaluation of QorIQ devices GNU tools, CodeWarrior debuggers, probes, boards Provide Configuration Tools to support your application of QorIQ on your custom board. − RCW, BootROM, Pin Mux − DDR Configuration − Device Tree Editing − DPAA Configuration Provide Optimization Tools to support runtime visibility into these complex parts to help calibrate and debug your systems. − DDR validation tool to ensure DDR functionally configured for custom board − Scenarios tool for collecting and visualizing runtime trace data − Packet tool for understanding the flow of packets within a QorIQ device TM 4 TM • Configuration of QorIQ processors is increasing in complexity − Even more complexity is around the corner − We support many, many configuration settings • • Reference manuals are huge and intimidating to new customers Configuration problems during board bring-up are HARD and COSTLY Learning command line tools requires more training, etc. • Solution/Strategy to solve these problems: • − Extensible suite of tools with a common user interface − Consolidate into a common tools framework (Processor Expert) − Provide new device support aligned with silicon roadmap − Add more configuration tools over time − Allow customers to add their own configuration tools to extend what we offer … TM 6 • QorIQ Configuration Suite v2.3.x is NOW AVAILABLE!!! − Supports all QorIQ and Qorivva devices − Works with Eclipse 3.6, Eclipse 3.7 development tools − • Pure Java solution for maximum choice of host system support Add-in to CodeWarrior Development Studio for PA, v10.1 or later Available from www.freescale.com/QCS – FREE DOWNLOAD* Includes the following configuration tools all designed to collaborate on consistent configuration: − PBL tool to define the Reset Control Word bit values and PBI data for the pre-boot − BOOTROM generator for those QorIQ without RCW functionality − DDR configuration supports setting the controller to a working state for any DDR − Data path graphical view helps to define data path configuration for the DPAA. − Hardware Device Tree editor supports references, synchronous GUI and XML editing, node validation based on specification bindings − Packaged as a separate product with installer and wizard functionality * Must be a QorIQ customer or under QorIQ NDA for download permission Actual URL is http://www.freescale.com/webapp/sps/site/prod_summary.jsp?code=PE_QORIQ_SUITE&tid=PEH TM 7 TM 8 • MCUs use Processor Expert to generate source code that is code-size optimized and only includes the minimal functions and operations to support initialization and peripheral drivers − Previously, − Now, • Processor Expert was included in CodeWarrior only Processor Expert plug-ins can be installed into any Eclipse Processors uses Processor Expert to generate configuration files used in the creation of a bootstrap typically to either Linux or another OS. − Installs as an Eclipse update package (under 20MB) − Supports configuration complexity without altering OS / Application software − Extensible with on-chip validation tools TM 9 • You need either CodeWarrior for PA 10.1 or later OR, you download an Eclipse version for free OR, you use an existing Eclipse workbench you have installed (Wind River, QNX, GNU, etc.) • Processor Expert for QorIQ Configuration Suite installs using the Eclipse updater’s “Add new software…” capability • The Configuration Suite is 100% pure Java so it should run on any Eclipse 3.6.1 or later host environment (Windows, Linux, Solaris, Mac OS, 32-bit/64-bit, …) TM 10 TM TM 12 • Chip version and errata information • Settings of RCW fields • Input/Output format selection • Possibility to add PBI data • Possibility to import RCW settings TM 13 TM From back of RDB box From DRAM datasheet TM 15 • Tool automatically computes tRCD, tRP, and CL! − User can change these values if required. TM 16 • From memory data sheet: − Maximum rating − Capacity TM 17 speed TM 18 TM 19 TM 20 TM 21 TM 22 TM Configure Component Create Project Select Component TM Validate Component 24 Generate Code Compile DTS • Operations on nodes − − − − − − • Go back / forward Expand/collapse Ascending/desce nding sort Insert node Delete node Rename node Other operations − Import device tree − Include device tree − Validate device tree − Search in device tree TM 25 define working set TM 26 • Each node has a “binding” representing its schema. It describes what properties are optional or required and what each means. TM 27 • • • The Include tree allows easy navigation among device tree fragments (dts, dtsi). Hovering support for properties and nodes: a tool-tip appears displaying their initial locations. Hyperlink detection for /include/ declarations and device tree references (Ctrl + left click). /include/ declaration node reference TM 28 • • • The Interrupts tree represents the hierarchy and routing of interrupts in the platform hardware. The left side displays the actual representation of the Interrupt tree starting from the root interrupt controller. The right side displays the interrupts sources for the selected device tree node. TM 29 • • • • Any hw device tree can be seen as a representation of different Local Access Windows (LAW). Each LAW maps to a specified target interface, such as DDR Controller, Localbus, PCI Express, etc. Each device tree node having reg and ranges properties defines a memory range inside/outside Configuration Control and Status Register (CCSR) space area. The Memory Map view pops-up automatically when a device tree component is selected inside Component Inspector view. TM 30 • • • • Device tree views GUI <=> text editor symmetry Memory map view => GUI editor symmetry Modifications are reflected in all editors TM 31 TM • • DPAA (Data Path Acceleration Architecture), provides the infrastructure to pass packets to/from cores, hardware accelerators and network interfaces The architecture contains several hardware components Network Interfaces − Frame Manager (FM) − Buffer Manager (BM) • Parse Congestion Mgmt − Queue Manager (QM) − HW accelerators: Security (SEC), Pattern Matching Engine (PME) FMan Policing Each hardware component is performing specific operations on the incoming/outgoing frames BM – Manages data storage buffer pools. Is a shared resource among cores, network interfaces, and HW accelerators − FM – supports in-line/off-line packet parsing and initial classification. It enables policing and flow and QoS – based packet distribution to the cores − QM – Manages the queuing of data between cores, network interfaces, and HW accelerators − − SEC – provides cryptographic acceleration − PME – high performance hardware pattern matching functionality TM 33 Classify QMan BMan Stash Context Enqueue Manage Work Q Cores Accelerators • • • • • • • Flowchart representation of DPAA component is a software solution intended to ease creation of complex DPAA configurations Have an intuitive graphical representation Easy to understand the overall architecture as well as individual DPAA components QCS integrated component designed to ease DPAA configuration for QorIQ devices Interactive and user friendly interface in order to provide the best user experience Allows customers to easily translate their own data flow into a valid driver configuration Designed to deal with complex DPAA user scenarios TM 34 WQ0 WQ0 WQ1 WQ1 WQ2 Channel 0x45 WQ2 Channel 0x60 WQ3 35 WQ4 660 SEC FQ IDs 650-700 WQ3 WQ4 Offline Port 0 WQ5 WQ5 WQ6 WQ6 WQ7 WQ7 FQ IDs 1-100 85-100 WQ0 Pass through WQ1 UDP 1 1 WQ2 101-124 Channel 0x21 WQ3 L2TPv3 2 WQ4 IPv4 ……. FQ IDs 101-500 123-236 UDP Pool channel 0 WQ5 1450-1470 WQ6 WQ7 FQ IDs 1400-1500 3 980-1100 MAC.dst ….. MAC .dst ….. 1000 FQ IDs 935-1200 WQ0 WQ1 1100 WQ0 WQ2 WQ1 Channel 0x0 WQ3 WQ2 Channel 0x4 WQ4 SW Portal 0 Core 0 WQ3 WQ5 WQ4 WQ6 WQ5 WQ7 WQ6 WQ7 TM 35 SW Portal 4 Core 4 • • Default values capability Easy access to configuration settings for each DPAA element Instant display of relevant description for each configuration parameter Automatic input validation, configuration constraints checking and instant display of relevant conflict messages TM 36 • On-the-fly configuratio n validation by highlighting correct choices and graying out the invalid ones TM 37 • Instant display of relevant configuration summary for each DPAA element TM 38 • Immediate code generation at user request in any stage of configuration • Immediate notification for all errors occurring during the code generation process TM 39 • Imports DPAA configuration from Freescale extensions to NetPDL xml based files: − DPAA objects − Connections between them − DPAA objects configuration − Automatic update of the objects and links after import is done • The xml files can be generated using the QCS solution or can be created by hand DPC Configuration PCD Configuration - this is the file that has to be imported TM 40 • The xmls can be imported at project creation time or later after the project is created TM 41 • • • Importing files previously generated by the QCS tool won’t produce the same output The objects’ coordinates are not saved in the xmls and are calculated using a “placement algorithm” at the import time Import demo: Using the xmls generated by the hands-on scenario presented in the upper slides TM 42 TM TM 44 • A new generation of products aimed at allowing customers to solve systems and application performance problems in the QorIQ and Layerscape Family of devices. − Users can analyze their applications unencumbered by the complexity of the debug IP − Provides a simple, clear and concise way of configuring the QorIQ debug IP to solve performance problems. − Continues the usage of the proven Scenarios Concept providing customers with ‘recipes’ to analyze common and complex performance problems − Transfer Freescale’s knowledge to customers – Scenarios. − Supports bare metal and Linux applications. Special focus on Linux User space applications. TM 45 TM Pricing $995 License file: <QCS Install directory>/eclipse/Optimization/license.dat TM 47 1 2 Test stages / scenarios Scenario details Tests to be executed per each scenario HW Connection setup TM 48 Checl the scenarios to be tested (TBD) 1 Double click on test to see its content Choose which test to be executed and how many times 2 3 TM 49 Test results per DDR configuration TM 50 Optimal DDR configuration is bolded 1 3 Tests to be executed can be changed between executions 2 Proceed to next validation step 4 TM 51 Optimal settings TM 52 Read DDR configuration from uboot => md ffe02000 ffe02000: 0000003f 00000000 00000000 00000000 ...?............ ffe02080: 80014202 00000000 00000000 00000000 ..B............. ffe02100: 00030000 00110104 6f6b8846 0fa8c8cc ........ok.F.... ffe02110: c7000008 24401040 00441421 00000000 ....$@[email protected].!.... ffe02120: 00000000 0c300100 deadbeef 00000000 .....0.......... ffe02130: 03000000 00000000 00000000 00000000 ................ ffe02160: 00220001 02401400 00000000 00000000 ."...@.......... ffe02170: 89080600 8675f608 00000000 00000000 .....u.......... => md ffe02b00 ffe02b00: 00000000 00000000 00000000 00000000 ................ ffe02b10: 00000000 00000000 00000000 00000000 ................ ffe02b20: 5dc07777 77000000 00000000 00000000 ].www........... TM Uboot values 53 • You need QCS 2.2.1 or later installed. Get it from www.freescale.com/qcs • Use Eclipse “Add new software..” Eclipse updater capability to install DDRV on top of QCS. Use as an update link: http://freescale.com/lgfiles/updates/Eclipse/Helios36/DDRValidation for installation over QCS installed over Eclipse 3.6 or CW PA 10 • http://freescale.com/lgfiles/updates/Eclipse/Indigo37/DDRValidation for installation over QCS installed over Eclipse 3.7 • DDRV is a licensed product. TM 54 TM • Customer Benefit: − − − − − • System Optimization – Cores and SoC Complexity Abstraction and ease of use. Streamlined to solve several performance issues Deliver FSL expertise to users Probe-less, field based usage. Target areas: − − − Select QorIQ devices (P3 – T4/B4) and future Layerscape devices. Linux Systems (focus), but also supports bare metal Performance Analysis including visualization Optimized workflow for efficiently narrowing down performance issues anywhere on the system TM 56 − Visually identify the system level problem areas in seconds. TM 57 A “particular” happening in the System on Chip is called an event. In this case, we are counting “Hammer hits” Peripheral QorIQ Counter : 0 02 1 Event Processing Unit TM 58 4 3 2 These counters could be 4 counting: 4 Misses 3 Cache 3 2 DDR2Access Or MORE!!! TM 59 4 3 2 Metric 1 Event A Counter 1 Event R … Event Z Counter n Scenario A scenario is a CONTAINER of : • required counters • key events for a measurement • counter<->event connections • metrics •a metric is a math equation of captured event-counts TM 60 Selected scenario captures overall traffic as well as individual subsystem traffic including traffic from cores, Fman and Qman CPU Accesses Total traffic to CPC1 and CPC2 Unbalance between platform caches Qman CPC2 Access Fman CPC2 Access • Imbalance can be seen by analyzing these subsystems: • Majority of CPC1 accesses are made by the CPU (top right) • Majority of CPC2 access are from Fman and Qman • Remainder of the traffic is due to PCI • LACK OF BALANCED ACCESSES suggests61DDR interleaving is not configured properly. • Fixing the configuration provides a performance boost. TM TM • Customer Benefits − − Complexity abstraction and ease of use Enables key use cases: • Target areas: − − − • Packet-Oriented System Level Performance Analysis SoC Data Plane Configuration Debug Packet Processing Latency Analysis Packet Processing Critical Resource Monitoring SoC debug/analysis feature enablement Linux Systems Analysis data interpretation and visualization Users − − External Customers Freescale internal developers TM 63 Packet Tracing Shows which parts of the system process the frames. For example, use this to verify that the frame flow is what you expect. Lost Packet Analysis Understand why the frames become “lost” in the system. For example, use this to check how the FM PCD changes affect where frames are sent. Latency Analysis Precisely measure the time spent processing frames at various points in the system. Packet Sequence Analysis See how an entire sequence of frames was processed. For example, use this to measure the performance of the SEC. QM Performance Analysis Use QM profile data to measure the performance of the system, at “data-flow” level. TM 64 • • Visibility into FM and QM activities via Nexus Trace Trace data − − − • − − Without interrupting it and Without affecting its performance Can be collected to on-board trace buffer Is timestamped so it can be used to precisely measure the timings Optionally output by each FM engine: BMI, KeyGen, Parser etc Timestamped internally by the FM clock The trace data contains: FD, FM port number, NIA etc QM trace − − • FM trace − • Can be collected from a running system Optionally output by each QM enqueue and dequeue point The trace data contains: FQID, channel, frame address, frame length, enqueue/dequeue flag, portal type and number etc Traced frames − − − Only the tagged frames are traced. “Tagged” = FD[DD] bits set. Rx flow – the frames tagged by the FM, as configured by the Packet Analysis Tool Other flows – the frames tagged by the instrumented software running on the cores TM 65 Target connection TAP configuration and system type (e.g. P5020) Scenarios • Python scripts containing predefined trace setting configurations • The scripts use the tool’s API for configuring the DPAA trace settings • The tool ships with scenarios for tracing all frames in FM1, FM2 and QM, for tracing frames only in QM, only in FM1 etc. • Also available: a scenario for analyzing trace from a file • The users can define their own scenarios TM 66 Trace buffer • NPC (Nexus Port Controller) – 16kB buffer for non-intrusive trace collection • DDR – trace buffer located to the system’s external memory, large capacity o DDR Intrusiveness depends on the system’s load and on the amount of trace data o Use Uboot to reserve memory for it (see the user manual) TM 67 • After defining the configuration, select Measure/Launch: • The results will appear in the Results folder of the project folder • Results are collected as part of the project and will appear (if the tool layout uses the default view) on the left side of the tool TM 68 Seven tabs are available at the bottom of the table view: • Analysis – system level analysis data, based on the QM trace • Frame Details – details for each traced frame • Decoded Trace Table – a table view showing the trace data; the key attributes of the trace data, such as frame address, timestamp etc are displayed using separate columns • Profile – a text view showing a trace based QM profile • Decoded Trace – a text view showing the decoded trace data • Configuration – a read-only display of the data that was used to collect the trace data • Notes – displays and also allows entering new annotations for the analysis data TM 69 Frame Address Trace Event Description Common Tstamp Trace Data Source Operation Type • • The data is automatically displayed after collection To see previously collected data, double-click on the project you want TM 70 Data Flows From Trace Data Frame Processing Stages Flow Level Latency Statistics TM 71 Frame Processing Path Frame Address Frame Processing Details TM Frame Processing Latencies 72 Scenario Name Description DPAA All Measures an overview of all of the DPAA activity DPAA All, Enable FM Timestamps Measures an overview of all of the DPAA Activity DPAA FM1 Overview of FM1 activity, FM1 marks the frames for debug and generates trace. DPAA FM2 Overview of FM2 activity, FM2marks the frames for debug and generates trace. DPAA QM FM1 and FM2 mark the frames for debug but don’t generate trace. Only QM generates Trace Decode Only Decodes and existing DPAA Binary Trace File TM 73 TM You should now − − • Be familiar with the QorIQ Configuration Suite basics v1 supports PBL & DDR configuration (available since June 2011) v2 adds Device Tree and DPAA Graphing tools (available since Nov 2011) v2.2 adds Bootrom tool & all QorIQ NPI (available since May 2012) Be familiar with the QorIQ Optimization Suite basics DDRv for on-chip validation of DDR controller configuration Scenarios tool for capturing running system results for various characteristics Packet tool for visualizing the flow of packets within a QorIQ device Solution/Strategy − Extensible suite of tools to solve these problems − Consolidate into a common tools framework (Processor Expert) − Provide new device support aligned with silicon roadmap − Add more configuration tools over time − Allow customers to add their own configuration tools to extend what we offer… TM 75 • • Freescale’s Processor Expert landing page − http://www.freescale.com/webapp/sps/site/prod_summary.jsp?code=PROCESSOR-EXPERT&tid=PEH − http://www.processorexpert.com/ QorIQ Configuration Suite - • QorIQ Optimization Suite - • http://www.freescale.com/webapp/sps/site/prod_summary.jsp?code=PE_QORIQ_SUITE&tid=PEH http://www.freescale.com/webapp/sps/site/prod_summary.jsp?code=PE_QORIQ_OPTI_SUITE&tid=PEH Freescale Component Store – purchasing embedded software - http://www.freescale.com/webapp/sps/site/homepage.jsp?code=BEAN_STORE_MAIN&tid=SWnT TM 76 TM 77 FUTURE ELECTRONICS CO.LTD ADVA OPTICAL NETWORK AEONIUM SERVICES LTD ALCATEL-LUCENT ALCATEL-LUCENT AG ALVARION ARROW ELECTRONICS ASB AVNET ELECTRONICS BARCO N.V. CANOGA PERKINS CEAC INT'L CES CREATIVE ELECTRONIC CHANGWON UNIV. CISCO CISCO SYSTEMS CONTINOUS COMPUTING CRYPTO AG CYAN INC DIALOGIC, INC. DSPACE GMBH EDIXIA EMBEDDED SOLUTIONS EMCOSYS FUTURE ELECT INC GAMMA SP. Z O.O. GE INTELLEGENT PLATFORMS LTD GIGAMON SYSTEMS GUODIAN NANJING AUTOMATION HEIDENHAIN GMBH IEP GMBH INTERFACE CONCEPT IPWIRELESS ISKRATEL ELECTRONICS ITEC CONSULTING AS JUNIPER NETWORKS JUNIPER NETWORKS INDIA KDS KOLLMORGEN KONTRON MODULAR COMPUTERS KPIT CUMMINS INFOSYSTEMS LTD L-3 COMMUNICATIONS A LOCKHEED MARTIN AERONAUTICS CO. MAGNETI MARELLI MOTORSPORT MERCURY COMPUTER SYSTEMS MIRANDA TECHNOLOGIES MOTOROLA MOBILITY INC. MYSTICAL ROSE TECHNOLOGIES NARI NETWORKS NKB VS PURESILICON, INC. REDCOM LABORATORIES INC ROHDE & SCHWARZ ROHDESCHWARZ GMBHCO. KG ROSS VIDEO SASET CHENGDU SERVERGY SERVERGY INC. SIMENA SOUTHERN FEDERAL UNIVERSITY SUSQUEHANNA INTERNATIONAL GROUP LLP TECHNOLOGY OF INFINITY THERMO FISHER SCIENTIFIC WB ELECTRONICS S.A. WINDRIVER WT MICROELECTRONICS CO. ZODIAC AEROSPACE QorIQ Configuration Suite TM 78 • Part numbers : CWA-QIQ-OPTP-FL (floating license) & CWAQIQ-OPTP-NL (node locked) • Price : $999 Annual Subscription • License Duration : 1 year • Support & Maintenance : Included • Availability − Scenarios − DDRv Tool – Now – Now TM 79 TM • D:\PEx Sessions\AMF-ENT-T1020 QCS\QCS233.zip • Skip if you already have QCS v2.2 installed − Setup Create a directory where you have read/write permissions • • for labs: Eg C:/QCS221 … from now on, we’ll call this directory <qcs> If you already have QCS installed, use that directory as <qcs> Follow the instructions in <qcs>/labs/ QORIQCSINSTALLUG.pdf TM 81 TM • Step 1: Import and decode low speed config rcw_0x10_5g_rev2_low.bin.txt Platform clock : 600MHz Core clock : 1.2GHz FMAN1/2 clock : • DDR clock : 450 MHz 600MHz ( 1.2GHz ) Step 2: Use PBL tool to increase clock speed up to Platform clock : 800MHz Core clock : 1.5GHz FMAN1/2 clock : DDR clock : 600 MHz 650MHz clock ( 1.3GHz ) • Step 3: Use PBL tool to generate new RCW and compare outcomes with rcw_0x10_5g_rev2_high.bin.txt • Step 4: Change Serdes Config to support 8 Gbe, compare result with rcw_0x16_all_rev2_high.bin TM 83 3 1 2 4 6 5 Only select the PBL tool for now… TM 84 1 The content of the file to be imported is displayed… 2 TM 85 Changed values are highlighted after import. TM 86 Changing the ratio to 8:1 makes platform clock 800 MHz 600 Mhz 800 Mhz And also changes the LBC and PME clocks TM 87 Changing the CC1/CC4 PLL_RAT for cores to 15:1 sets core clocks to 1.5 Ghz 1.2 Ghz 1.5 Ghz CC1 clocks core 0-3 CC4 clocks core 4-7 Note: Please change CC2 also, even if unused, to reach exact high rcw TM 88 Set MEM_PLL_RAT to 13:1 650 MHz 1.3 GHz TM 89 Set CC3_PLL_RAT to 12:1 to set Frame Manager clocks 450 MHz 600 MHz TM 90 Generating the PBL provides the same RCW as the high-speed RCW seen in the SDK TM 91 • Starting from previous rcw_0x10_5g_rev2_high.bin.txt config, let’s adapt Serdes protocol configuration to allow 2x4 SGMII SRDS_PRTCL 0x10 to 0x16 P4080DS slots as per user manual TM 92 SRIO requires 3.125 Ghz on Bank1 lane E,F,G,H. Set to Divide by 1. Set SRDS_RATIO_B2 to 10:1 SGMII requires 1.250 GHz on Bank2 and Bank3 TM 93 Generating the PBL now provides us the same RCW than the RCW seen in the SDK2.3 TM 94 TM Overview • Helps in Power-on Reset (POR) device configuration by definition of values for POR configuration signals and generates overview report including POR value required for each POR configuration pin (device specific) • Helps in building a configuration file to be used in a boot image creation process (boot_format) for various memory interfaces TM 96 • Power-on Reset (POR) configuration signal value – binary value 0b0 represents a signal pulled down to GND and a value 0b1 represents a signal pulled up to Vdd, regardless of the sense of the functional signal name on the signal • Configuration file – data structure including control and configuration words, two parts that needs to be put together with user’s code (typically u-boot image) to create booting image for a device Control Words structure SD/MMC card data structure Configuration Words structure TM 97 • • Step 1: Create configuration project for the P2020 device Step 2: Use BOOTROM tool to review & change settings • Details: • Change CCB and core clocking – 600 / 900 MHz • I/O port configuration – required interfaces: PCIe, SRIO and eTSEC • boot location – set to boot from SD/MMC card Step 3: Observe Power-on Reset overview details • • Step 4: Use BOOTROM tool to prepare configuration data file for boot image processing • • Generated overview report – txt/HTML Generated configuration file (.dat) – support of booting from on-chip ROM (e.g. eSDHC or eSPI), base data file for boot image processing using external booting utility application Step 5: Usage of configuration data file with external booting utility application (using boot_format - this application is a part of BSP release) TM 98 1 2 3 4 5 Select the BOOTROM tool … 6 TM 99 1 2 4 3 5 6 7 TM 100 1 2 3 Changing to desired CCB (6:1) 400 Mhz 600 Mhz 1600 Mhz 900 Mhz Changing the Core clocking ratio to 3:2 Changing I/O Port Selection to have PCIe, SRIO and eTSEC 0b0000 0b1101 4 Change eTSEC configuration for eTSEC 2 & 3 TM Serial Gigabit MII 101 0b1111 0b0111 Changing boot location to start booting from SD card 5 0b0 0b1 6 TM Changing boot configuration to allow booting on cpu0 102 2 1 TM 103 Booting image code length in bytes, e.g. RAMbased special UBoot image (0x00080000) Address in SRAM memory in which a booting image and RAM-based U-Boot code is copied to (0xF8F80000) 2 1 Starting address of the special U-Boot code as an offset from the SD/MMC card starting address (0x00001000) 3 Execution starting address, this is the first instruction of the U-Boot to be executed (0xF8FFF000) 4 TM 104 1 2 Adding configuration pairs (address + data) to be included into configuration data file Sample L2/SRAM configuration parameters 3 TM 105 Use a booting utility boot_format from a BSP package for P2020RDB/P102RDB Control Words Once you have installed BSP and let configured ltib to build root file system rootfs.tar.gz.uboot for Linux boot. Boot the board using this root file system and boot_format utility can be located under: [root@P1020RDB /]# cd /boot_format/ [root@P1020RDB /boot_format]# ls -l Config. Words -rwxr-xr-x 1 root root 10400 Apr 7 2010 boot_format -rw-r--r-- 1 root root 530 Apr 7 2010 config_sram.dat The utility shows how to use it when typing ./boot_format Usage: ./boot_format config_file image -sd dev [-o out_config] | -spi spiimage config_file image dev spiimage out_config : : : : : includes boot signature and config words the U-Boot image for booting from eSDHC/eSPI SDCard's device node(e.g. /dev/sdb, /dev/mmcblk0) boot image for SPI mode modified config file for SD mode BOOTROM tool generated config file can be used together with UBoot image and put on an SD/MMC card using command line, e.g. for /dev/mmcblk0: ./boot_format BOOTROM1_Boot_Config.dat u-boot.bin -sd /dev/mmcblk0 TM 106 TM TM 108 3 1 4 2 TM 109 2 Change to 2Gb: 128Mb x 16 1 • From memory data sheet: − Maximum rating − Capacity 3 TM 110 speed From back of RDB box From DRAM datasheet TM 111 • Tool automatically computes tRCD, tRP, and CL! − User can change these values if required. TM 112 TM 113 TM 114 TM 115 TM 116 TM 117 • Open the CW config file you want to adapt D:\Program Files\Freescale\CW PA v10.1\PA\PA_Support\Initialization_Files\QorIQ_P4\ P4080DS_init_core0.cfg • Replace DDR1 config section with the one from D:\Profiles\b08844\workspace\p4080\Generated_Code\ ddrCtrl_1.cfg • Use this new config file with your stationary project TM 118 TM U-Boot 2010.12-00001-g612800e (Jan 28 2011 - 22:20:46) • Deploy SDK2.3 u-boot • No interleaving "fsl_ddr:ctlr_intlv=null“ • Use CW to connect and dump DDR1 and DDR2 registers (Memory browser export function) TM CPU0: P4080E, Version: 2.0, (0x82080020) Core: E500MC, Version: 2.0, (0x80230020) Clock Configuration: CPU0:1499.985 MHz, CPU1:1499.985 MHz, CPU2:1499.985 MHz, CPU3:1499.985 MHz, CPU4:1499.985 MHz, CPU5:1499.985 MHz, CPU6:1499.985 MHz, CPU7:1499.985 MHz, CCB:799.992 MHz, DDR:649.994 MHz (1299.987 MT/s data rate) (Asynchronous), LBC:99.999 MHz FMAN1: 599.994 MHz FMAN2: 599.994 MHz PME: 399.996 MHz L1: D-cache 32 kB enabled I-cache 32 kB enabled Board: P4080DS, Sys ID: 0x17, Sys Ver: 0x01, FPGA Ver: 0x0c, vBank: 4 36-bit Addressing Reset Configuration Word (RCW): 00000000: 105a0000 00000000 1e1e181e 0000cccc 00000010: 40464000 3c3c2000 fe800000 61000000 00000020: 00000000 00000000 00000000 008b6000 00000030: 00000000 00000000 00000000 00000000 SERDES Reference Clocks: Bank1=125MHz Bank2=125MHz Bank3=125MHz I2C: ready DRAM: Initializing....using SPD Detected UDIMM(s) Detected UDIMM(s) 2 GiB left unmapped DDR: 4 GiB (DDR3, 64-bit, CL=9, ECC on) Testing 0x00000000 - 0x7fffffff Testing 0x80000000 - 0xffffffff Remap DDR 2 GiB left unmapped Hit any key to stop autoboot: 0 => md 0xfe008000 120 • File > New > QorIQ Configuration Project • Select P4080 rev 2 • Select only DDR tool • Take the default configuration TM 121 TM 122 TM 123 2 1 3 TM 124 • Open the CW config file you want to adapt D:\Program Files\Freescale\CW PA v10.1\PA\PA_Support\Initialization_Files\QorIQ_P4\ P4080DS_init_core0.tcl • Replace DDR1 config section with the one from: D:\Profiles\b08844\workspace\p4080\Generated_Code\ ddrCtrl_1.tcl • Use the new config file with your stationary project TM 125 TM NOTES: 1. THIS TOOL IS AN ADD-IN to QCS 2. This tool is 995$ and requires a TAP to be purchased separately. 3. Current version is v1.3 and is available from the Freescale website – use Buy Direct to purchase online. License file: <QCS Install directory>/eclipse/Optimization/license.dat TM 127 TM 128 • TM 129 Run basic test to confirm target connection 1 2 3 TM 130 • Click “cell” to choose Write level start and CLK_ADJ values. TM 131 • Click “cell” to choose optimized ODT value. TM 132 • Click “cell” to choose optimized ODT value. TM 133 • TM 134 Centering of clock scenario was re-run after finding the right ODT values Pricing $995 License file: <QCS Install directory>/eclipse/Optimization/license.dat TM 135 • At uboot prompt • • • => md ffe02000 − ffe02000: 0000003f 00000000 00000000 00000000 ...?............ − ffe02080: 80014202 00000000 00000000 00000000 ..B............. − ffe02100: 00030000 00110104 6f6b8846 0fa8c8cc − ffe02110: c7000008 24401040 00441421 00000000 ....$@[email protected].!.... − ffe02120: 00000000 0c300100 deadbeef 00000000 .....0.......... − ffe02130: 03000000 00000000 00000000 00000000 ................ − ffe02160: 00220001 02401400 00000000 00000000 ."...@.......... − ffe02170: 89080600 8675f608 00000000 00000000 .....u.......... ........ok.F.... => md ffe02b00 − ffe02b00: 00000000 00000000 00000000 00000000 ................ − ffe02b10: 00000000 00000000 00000000 00000000 ................ − ffe02b20: 5dc07777 77000000 00000000 00000000 ].www........... Save content to a file. TM 136 TM What we will do: • Define hardware device tree for P4040 starting from P4080 device tree − Import the P4080 (which has 8 cores) − Configure − Note • to P4040 (which has 4 cores) P4080 and P4040 are same SOC otherwise Walk through the next slides using QCS Hardware Device Tree editor to solve this scenario TM 138 TM 139 1. Steps: • • • • • File -> New -> QorIQ Configuration Project enter Project name -> Next select SoC (p4080_v2_0) -> Next select «Device Trees» component -> Next browse to an existing p4080ds.dts file -> Finish 2. Wait while the device tree component is updating with the imported data 3. Expand ProcessorExpert.pe -> Embedded Components -> click on DT1: HWDeviceTree component 4. The imported dts file is added under Imported_Files folder 5. Open generated device tree file Generated_Code/P4080_v2_0.dts. At this moment the imported dts and the generated one are identical TM 140 6. Search for CPU nodes in the tree view; you should see 8 cores with 3 properties each 7. Delete cpu4-cpu7, you have two options: • Using graphical editor • OR Select all 4 nodes and press delete. To reflect the modifications in the graphical editor too, save the file (Ctrl+S). Delete one node at a time. After each deletion, dts file is automatically generated. TM Using text editor 141 8. Look in the Properties view - There are 8 errors 9. Click on each error and go to the corresponding line in the device tree file 10. There are undefined references in some nodes pointing to the removed cpus: bman-portal@10000 bman-portal@14000 bman-portal@18000 bman-portal@1c000 qportal4 qportal5 qportal6 qportal7 8. Remove the above nodes in a similar manner 9. Save your changes TM 142 13. Go to Search menu -> select Device Tree Search tab -> enter cpus text -> press Search 14. In Search view select the found matches associated with the generated file New device tree has 4 cores and looks as follows: TM 143 • • • • TM 144 On a Linux® machine, create the device tree binaries before and after changes Boot the Linux kernel on a p4080DS board Check the number of CPUs that Linux kernel sees before and after changes (use /proc/cpuinfo command) You should obtain the results from left side, only 4 cores are in use with the new device tree • The sequence of steps for modifying hardware device trees has been presented • The benefits of using Hardware Device Tree tool are: − First device tree editor including two modes for editing, GUI and text − Easy to understand device trees structure due to the visual representation − Supports device tree bindings and validation − Allows users to add their own device trees − Provides features for all the main aspects of hardware device trees − It is an editor and a validation tool for creating valid and wellformed device trees − Works on Linux and Windows hosts TM 145 TM • Receive 1GE traffic on first FMAN • Split incoming traffic in IP frames and others • Frames with specified IP source are directed in specified FQIDs and then in SW Portal 0 IPv4 frames IP src = 32.xx.xx.32 FQID = 0x2B IP src = 48.48.48.48 FQID = 0x2C IP src = 16.16.16.16 FQID = 0x2D Other IPs 1 GE MAC dst = 0a:7a:76:xx:xx:xx FQID = 0x2E MAC dst = 55:55:55:xx:xx:xx FQID = 0x2F FQID = 0x20 FMan 1 TM Other frames 147 • • Build PCD configuration according to hands-on requirements Additional 1 FQ ranges and 1 FMan port channel to be used for transmission FMan1 PCD flow: Traffic received by FM1 port1 is split in IP frames and other frames by: Policy1, ipv4 distribution IP frames classified in one of the 3 defined ranges of IP source are directed into FQIDs 43-45 All other IP frames are classified by MAC destination and are directed into FQIDs 46 & 47 All other non IP frames are directed in FQID 32 TM 148 1. Create a new QCS project called Lab4 1. Choose P4080 rev2.0 2. Choose a DPAA component and select empty component 2. Maximize the DPAA Component Inspector TM 149 Properties Panel Graphing Panel Graphing Palette Frame Manager Ports Selecting an item on the graphing panel and doubleclick gets you the properties for that object. Resizable, scrollable view TM 150 • Policy – establishes the order of distribution • Distribution – sorts incoming frames • Classification – defines the classification and software portal • Policer – allows enforcement • Frame Queue(s) • Software Portals & Channels • Link between objects TM 151 1. QMan configuration: 1. Add a FQIDs range (FQR1) for enqueued frames and configure: FQId=1 and count=200 2. Switch to QMan tab and make the following settings: Total FQIDs=150000, Fqd/Pfdr mem partition=Primary DDR non-cacheable TM 152 1. Add SW Portal0 channel 2. Link FQIDs1 to WQ0 of SW Portal0 TM 153 1. Add a Policy1 to split IP frames traffic and then a link from port FM1 P2 to receive incoming frames 2. Add a distribution for IP frames and extract IPv4 protocol then configure: QBase = 39 TM 154 1. Add a Pass through distribution for other non IP frames and configure: QBase = 32 2. Link Policy1 to IPv4 distribution and then to Pass through in this order TM 155 • Add a classification for IP source and extract ipv4.src and remove ethernet.type TM 156 TM 157 TM 158 1. Link ipv4.src classification to ethernet.dst classification 2. Draw 3 links from ipv4.src classification to FQIDs1 TM 159 1. Select the ipv4.src classification 2. Go to the Entries tab in Property Panel 3. Set ethernet.dst Classification2: on-miss entry 4. To FQIDs1: 1. Data=0x20EEEE20 / Mask=FF0000FF / Queue base=0000002B 2. Data=0x30303030 / Mask=FFFFFFFF / Queue base=0000002C 3. Data=0x10101010 / Mask=FFFFFFFF / Queue base=0000002D TM 160 1. Link Pass through distribution to FQIDs1 2. Draw 2 links from ethernet.dst classification to FQIDs1 3. Configure ethernet.dst classification Entries to FQIDs1: 1. Data= 0a7a76000000 / Mask=FFFFFF000000 / Queue base=0000002E 2. Data= 555555000000 / Mask= FFFFFF000000 / Queue base= 0000002F TM 161 6. FMan 1 Port 1 configuration: 1. Port name= fm0port01 / MAC address=00:04:9f:00:02:66 / Interface=RGMII / Speed=1Gbps 2. Enable Loopback and Reset on Init 3. Enable Rx port: Error FQId=20 / Default FQId=20 4. Enable Tx port: Error FQId=40 / Default FQId=0 5. Add and use BufferPool0: Number of buffers=100 / Buffer pool Id=0 / Buffer Size=51200 7. FMan 1 Tx configuration: 1. Channel for FM1 Port 1: 1. Add a FQIDs range (FQR2) used to transmit frames on FM1 and configure: FQId=201 and count=1 2. Add FM1 port1 channel 3. Link FQIDs2 to FM1 port1 channel WQ0 TM 162 HW configuration P4080 v2.0 Loopback on FM ports used SW configuration CodeWarrior PA 10.1.2 NetCommSw v4.5 Usecase running Import DpaaQcsUseCases, NetCommSw and UserEnv for P4080 Replace generated code files: \user\env\bare\UseCases\common \controller\DPAA\QCS fmc_config.c dpc_struct.h Clean & build project Run on target Receive output TM 163 Use a serial terminal to receive usecase output Input frames Frames transmitted by usecase on FMAN port2: (5 frames on FM0 Port) - IPV4 - IPV4/UDP - VLAN - ARP - IPV4/TCP Output report Frames received are enqueued according to PCD: FM0 Port1: FQID=45(0x2D) FQID=46(0x2E) FQID=32(0x20) FQID=32(0x20) FQID=46(0x2E) TM 164 Output analysis FMan0: Frame1: IPV4 Frame - IP src = 16.16.16.16 : IP frame -> IP miss -> MAC match -> Enqueued: FQID=45(0x2D) Frame2: IPV4/UDP Frame - MAC dst = 0a:7a:76:5b:67:e9 : IP frame -> IP miss -> MAC match -> Enqueued: FQID=46(0x2E) Frame3: VLAN/non-IPV4 Frame: non-IP frame -> Enqueued: FQID=32(0x20) Frame4: ARP/non-IPV4 Frame: non-IP frame -> Enqueued: FQID=32(0x20) Frame2: IPV4/TCP Frame - MAC dst = 0a:7a:76:5b:67:e9 : IP frame -> IP miss -> MAC match -> Enqueued: FQID=46(0x2E) TM 165 • Outcome generated code for DPAA Hands-on: − • In order to accomplish DPAA hands-on requirements the following initialization code must be written: 220 lines of XML code 750 lines of C code Benefits of using QCS DPAA: − By using QCS DPAA tool the same result can be accomplished as follows: Requested configuration accomplished in approximately ten minutes Configuration done by using a few mouse clicks and visual parameters settings Provides an easy-to-understand overview of the entire DPAA hands-on architecture DPAA tool helps accomplish your desired configuration • by highlighting valid choices and prevent you making invalid selections • by performing automatic constraints checking • by providing instant access to configuration settings • by displaying relevant summary of current configuration • by immediate code generation at request in any stage of your work TM 166 TM