1
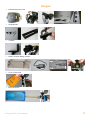
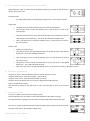
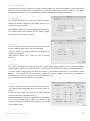
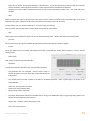
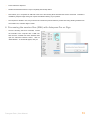
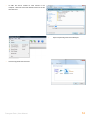
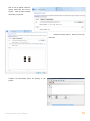
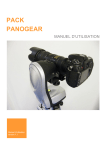
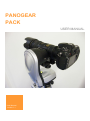
PANOGEAR PACK USER MANUAL User Manual version 1.1 Summary Images: ........................................................................................................................................................ 2 1. General description ............................................................................................................................. 3 1. 2. 3. 4. 5. 6. 7. 8. Motorized Panoramic Head ................................................................................................................ 3 Simple Bracket ................................................................................................................................... 3 L-Bracket ........................................................................................................................................... 3 Battery connecter, Battery, Charger ................................................................................................... 3 Tripod ................................................................................................................................................ 3 Touch control panel ........................................................................................................................... 3 Bluetooth module ............................................................................................................................... 4 Installation CD ................................................................................................................................... 4 Installation and Use............................................................................................................................. 5 1. 2. 3. Installing the motorized head ............................................................................................................. 5 Fastening your camera ...................................................................................................................... 5 Installing your controller/receptor ....................................................................................................... 6 Using the touch control panel ............................................................................................................ 6 1. 2. 3. 4. Installing the driver ............................................................................................................................. 6 Installing the software ........................................................................................................................ 7 Using the software ............................................................................................................................. 7 Using the controller in independent mode with the motorized head .................................................... 8 1. Profile selection menu .................................................................................................................... 8 2. Landscape mode ............................................................................................................................ 8 3. Portrait mode .................................................................................................................................. 8 4. Horizon level .................................................................................................................................. 8 5. The viewpoint: spherical, cylindrical, mosaic .................................................................................. 9 6. Operation parameters..................................................................................................................... 9 7. Operations menu ............................................................................................................................ 9 2. 3. 5. 1. 2. 3. 4. Using Papywizard and your Bluetooth module ................................................................................. 10 Connecting your Bluetooth module ............................................................................................... 10 Installing the software ................................................................................................................... 10 Connecting the software to your motorized head .......................................................................... 10 Using your software ...................................................................................................................... 11 6. Processing the session files (XML) with Autopano Pro or Giga ........................................................ 13 Links, resources ................................................................................................................................ 16 1. 2. 3. 4. Motorized head/ Pack ...................................................................................................................... 16 Krpano ............................................................................................................................................. 16 Autopano ......................................................................................................................................... 16 Papywizard ...................................................................................................................................... 16 Technical Features ............................................................................................................................ 17 1. 2. 3. 4. 5. 6. 7. Motorized Head................................................................................................................................ 17 Rail .................................................................................................................................................. 17 Battery connector ............................................................................................................................. 17 Batteries .......................................................................................................................................... 17 Charger ............................................................................................................................................ 18 Touch Control Panel ........................................................................................................................ 18 Bluetooth module ............................................................................................................................. 18 Legal information, GPL license, warranty........................................................................................ 19 1. 2. 3. Legal information and warranty ........................................................................................................ 19 Papywizard GP license .................................................................................................................... 19 Contact information, sales and service ............................................................................................. 19 4. 5. 6. Panogear Pack | User Manual 1 Images: Motorized Panoramic Head Simple Bracket L-Bracket Battery connecter/ Battery/ Charger Touch Control Panel Bluetooth Module Panogear Pack | User Manual 2 1. General description 1. Motorized Panoramic Head The Motorized Panoramic Head has the necessary motorization to put the camera in motion and control picture taking. A 3/8" threaded base is included on the head that can easily be attached to the grand majority of commercial tripods. The base's top compartment holds the batteries. The motorized head can be powered in three different ways: eight AA batteries, two LSM-160 batteries, or with an external 12V power supply. You should never use in same time both internal and external power supply ! On the medial section of the base, you will find (in order) : 1. An RJ-11 jack labeled HC which connects the original controller. 2. An RJ-11 jack labeled AUX which connects the Bluetooth transmitter and the touch control panel. 3. The on/off switch for the head and the connected periphery materials. On the external top compartment of the motorized head are three attachments : 1. Snap: a snap jack to connect the camera's trigger cable. 2. IN: to connect a 12V DC power supply for the head. 3. OUT: to connect a 12V DC power supply to an external device connected to the head. A simple bracket or an L-bracket can be connected to the fastening crown to attach the camera. 2. Simple Bracket Robust and easy-to-use, the simple bracket can be used directly on the attachment zone or can be connected to the provided L-bracket. Equipped with a millimeter ruler to aid with attachment and placement. 3. L-Bracket The L-Bracket included in your pack is essential when using a long focal length. The L-bracket permits you to use your camera in landscape mode on the motorized head. 4. Battery connecter, Battery, Charger In your pack you will find a set of necessary ion battery components to supply power to the head. These ion batteries can be used in place of those previously mentioned allowing you to have greater autonomy. The power kit includes: two 7.4V batteries, a battery connecter, and a universal charger. 5. Tripod A tripod comes with the motorized panoramic head enabling you to install your material in the most stable conditions. The height is adjustable for more convenience. 6. Touch control panel The touch control panel permits independent and intuitive control of your motorized head. Containing a large internal memory, you are able to program sessions ahead of time on your computer and then launch them on the spot, or to store your Panogear Pack | User Manual 3 already conducted scenarios which can be reused in the future. Thanks to this system, you are able to repeat a session an infinite amount of times in a simple and precise manner, or you can store your favorite shooting templates to save time when out in the field. You can choose: 1. Camera orientation (portrait or landscape) 2. View settings 3. Shot type : spherical, cylindrical, mosaic 4. Shot field boundaries 5. Time lapse Included is a settings software that runs exclusively with Windows, where you are able to save your configuration material in a personalized profile (focal length, camera's sensor size, nodal point distance, objective, portrait or landscape camera orientation, etc.) to use during a future session. 7. Bluetooth module The Bluetooth transmitter, which plugs in directly to the AUX jack, allows you to control the motorized head wirelessly. Papywizard software (http://www.papywizard.org) is used to drive the Bluetooth transmitter. It can be installed on a computer, or compatible device, equipped with a Bluetooth interface. 8. Installation CD The CD contains documentation and software you will need: Papywizard for various platforms, USB drivers and the settings software for the touch control panel. The latest version of all these documents is also available online. Panogear Pack | User Manual 4 2. Installation and Use 1. Installing the motorized head 1. Screw your motorized head to the tripod 2. Remove the motor's protective cover, located next to the level. To do so, press the black button located under the front of the cover. Pull gently up and then out on the cover. 3. Once the cover is removed, take out the two AA battery compartments. 4. Insert your battery connecter in place of the AA battery compartment. Make sure to clip them in. While inserting the connecter, you may need to apply a bit of pressure to give it a slightly curved shape. 5. Insert the ion batteries under the battery contacts; make sure to keep the ion batteries spread apart. Put the cover back on by pushing again on the black button to secure it in place. 2. Fastening your camera On the simple bracket 1. Fasten your camera to the bracket. 2. Insert the simple bracket into the crown of your motorized head and adjust it as shown in the adjacent image. On the L-bracket Panogear Pack | User Manual 5 1. Insert the L-bracket into the motorized head's crown to set it in place. 2. Make desired adjustments. On the simple bracket and the L-bracket 1. Attach the simple bracket to the L-bracket using the fixation screw then attach your camera to the simple bracket. 2. Make desired adjustments. Practical advice: Certain lenses and telephoto lenses include a tripod attachment. You can place this attachment directly on the simple bracket. Stability is enhanced when the load is balanced and you will be able to move more freely. Use the trigger cable from the pack to connect your camera to the motorized head. To do so, connect one end of the cable to the head's SNAP jack and the other to your camera's "Remote" jack. 3. Installing your controller/receptor Touch Control Panel 1. Install the driver and the drive software using the provided installation CD. (rf: chapter Using the touch control panel) 2. Connect one end of the provided cable to the controller, then connect the opposite end to the AUX jack on the motorized head. Bluetooth module 1. Connect your transmitter to the AUX jack on the head. 3. Using the touch control panel 1. Installing the driver Connect the controller to your computer using your mini-USB cable. Your controller displays "USB;" but the screen does not light up. Insert the installation CD. Your computer will alert you of the newly detected material. According to each version of Windows, the dialogue windows may differ slightly. You will need to reject the automatic driver search and manually choose the driver folder on the CD. Windows will then automatically install the driver and confirm that the controller has been detected. Panogear Pack | User Manual 6 2. Installing the software Once the CD has been inserted into your computer, open the explorer file and click on the folder named "Panorama_Eng". Double-click on the Setup.exe file to begin the software installation. Attention: You must have the Microsoft .Net 2.0 extension or higher to be able to install the software. If you receive an error message, download and install the extension for free from the Microsoft website: http://www.microsoft.com/downloads/frfr/results.aspx?freetext=.Net+2.0&displaylang=fr&stype=s_basic 3. Using the software Verify that your controller is connected to the computer with the USB cord (USB will be displayed on the controller's screen) then launch the Panorama software. At the startup a window will appear asking you to select the connected controller. If you only have one connected device, you can simply click on continue (if nothing happens, wait while the computer detects the device and then reopens the software). File Menu : 1. Save: Save the configuration on the hard drive. 2. Open: Open the saved configuration on the hard drive. Name: Name your profile (model/camera type: Nikon, Canon etc.) Focal Length: Define your focal length. Horizontal sensor: Define the camera's sensor width. For a full-frame, it's 36mm. APS-C or DX lens formats will be a smaller size. Reference your camera's instruction manual for the size. Vertical sensor: Define the camera sensor height. For example, 24mm for a full-frame. Nodal: Locate the nodal point (the value is determined by each model and varies according to the lens model). The distance will be given on the controller screen as a guide for setting up the camera. Select Portrait or Landscape: Select the camera orientation: portrait or landscape. Select Standard or Fisheye Lens : Select the lens type: Standard or Fisheye ( Fisheye, a field will appear allowing you to choose a diagonal view angle : 0° <-> 360°) Wire, IR Canon etc. : Connection mode. Always select « Wire ». Add : Add your created profile to the profile list Insert: Insert the profile to the indicated (highlighted) spot in the list. Read: Open the selected profile (highlighted). Remove: Delete the selected profile (highlighted). Panogear Pack | User Manual 7 Read Session: Import the controller's data (already conducted sessions) then save it under an XML file format so that you can reuse it with Autopano. (See using session files (XML) with Autopano section). Write USB Data: Save your profiles on the controller's memory. 4. Using the controller in independent mode with the motorized head Verify that your controller is connected to the motorized head then turn the head on. There will be a start-up screen displayed for 5 seconds indicating the version of the software (e.g. 1.0). Attention: For the autonomous touch screen controller to function correctly, the material profile must already be saved in the memory. (See using the software section). 1. Profile selection menu Use the up/down arrows to select your profile then use the right arrow to access the next menu. The screen displays, in order : 1. The profile name (Canon) 2. The focal length (0018) 3. The camera orientation (Portrait (P) or Landscape (L)) 4. The lens model (Standard (S) or Fisheye (F)) 5. The trigger mode ((W)-wire or (Infrared)) 6. The camera model uniquely in infrared mode ((C)-Canon, (P)-Pentax/Samsung, (N)-Nikon etc.) 2. Landscape mode Indicate the selected camera orientation: portrait or landscape. The parameters are displayed; the last four numbers represent the distance needing to be used for the montage at the Nodal point. In daylight, the retro lighting can be deactivated. The battery symbol has four levels. Level 1 indicates that you have about 1500 possible actions (with the Li-Ion batteries), 750 (with AA batteries). Click on the right arrow to access the next menu or on the left arrow to return to the previous menu. The motorized head moves slightly to measure the battery life. 3. Portrait mode Indicate the selected camera orientation: your camera must be mounted as indicated on the design. Cf: Landscape mode. Click on the right arrow to access the next menu or on the left arrow to return to the previous menu. 4. Horizon level Adjust the motorized head's horizontal position using the screen's up/down arrows. Click on the right arrow to access the next menu or on the left arrow to return to the previous menu. Panogear Pack | User Manual 8 5. The viewpoint: spherical, cylindrical, mosaic Select panorama, angle, or mosaic mode by pressing the symbol or by clicking on the left arrow to return to the previous menu. Panorama mode: 1. You will be taken directly to the operating shooting screen, no other entry is needed. Angle mode: 1. Using the arrows, shift the motorized head to the center of the panorama. 2. Click the right arrow to access the following menu or the left arrow to return to the previous menu. 3. Using the horizontal arrows, select the horizontal angle of the panorama (1) then the vertical angle of the panorama (2). The screen will indicate the minimum angle 4. Click on the right arrow to access the following menu or on the left arrow to return to the previous menu. Mosaic mode: 1. Define your shooting scene. 2. Using the four arrows, shift the motorized head to the bottom left corner of the desired field of view. The mosaic will begin at this point. 3. Click on the right arrow to access the following menu or on the left arrow to return to the previous menu. 4. Using the four arrows, shift the motorized head to the top right corner of the desired field of view. The mosaic will end at this point. 5. Click on the right arrow to access the following menu or on the left arrow to return to the previous menu. 6. Operation parameters Using the top arrows, select the desired number of shots for each pose. (0-99) Using the middle arrows, select the time lapse. (0-99 seconds) Using the bottom arrows, select the desired overlap. (0%-50%) Using the touch at the bottom right, you can have a glimpse before taking the shot. Click on the right arrow to begin. Start the shot by pushing on the right arrow or push on the left arrow to return to the previous menu. 7. Operations menu On top: the number of rows/columns of images (e.g.002) Above the progress bar: The number of conducted images/ the total number of images. The XXX information (e.g.008) shows the number of sessions that will be saved as XML data. The touch "II" pauses. Press the right arrow to start the session again or press the left arrow to stop the session and return to the software's settings menu. Panogear Pack | User Manual 9 You cannot pause while the camera is operating (during exposure time). 5. Using Papywizard and your Bluetooth module With the Bluetooth transmitter, you can control the motorized head wirelessly with the Papywizard software. This software functions with Windows, Mac, and Linux. Field operation is possible using devices such as Nokia, Neo, etc. 1. Connecting your Bluetooth module Connect your Bluetooth transmitter to the AUX jack on the motorized head then turn it on. (Once connected, the receiver should begin to blink). 2. Installing the software Papywizard is based on Python open-source language. It is compatible with Windows, Mac OS, Linux, Maemo, OpenMoko... A free download is available on the following site, as well as on the CD in your pack: http://www.papywizard.org/wiki/Download If your computer does not communicate with the motorized head that is because the computer is not equipped with a Bluetooth interface. You can use the Bluetooth transmitter (optional product) included in your pack. Please go to the forum dedicated to this software if you have problems during installation: http://www.autopano.net/forum/f14projet-de-ta-te-panoramique-motorisa-e-merlin,orion-papywizard 3. Connecting the software to your motorized head There are two ways to connect, the easiest is presented below. The other includes connecting the Bluetooth transmitter to the computer then declaring the serial port Papywizard uses. Open Papywizard You will find the configuration dialog on Papywizard's main screen. Here you can access the application settings. For now, we are going to focus on the "Hardware" tab. Click on hardware. Configure the Bluetooth driver then click "Choose". The window will appear and after a couple seconds it will display the MAC address of your motorized head's Bluetooth transmitter. Click OK. Check "Automatic connection" if you would like the Bluetooth transmitter to connect automatically to Papywizard at start up (Attention, Papywizard start up could be blocked due to the absence of a Bluetooth transmitter). The connection configuration is finished. Now, all you need to do is click "Connect..." on the Hardware menu to launch connection through the Bluetooth transmitter. (Papywizard will display "Connected" at the bottom of the window). Press one of the Papywizard arrows to begin moving the motorized head. If the head moves, everything is operational. Congratulations! Panogear Pack | User Manual 10 4. Using your software Papywizard can be used in two distinct ways: Mosaic mode and Preset mode. Here we will explain the easiest: Mosaic mode. First of all, you need to define certain parameters that are necessary for the software to function correctly. Let's begin at Papywizard's Configuration menu. (The parameters that are not indicated here are optional parameters). a) Shooting The Shooting tab allows you to define the camera orientation whether it be portrait or landscape mode (uniquely when using the simple bracket or the L-bracket). With stabilization delay, you are able to regulate the delay between the motorized head's last movement and the camera's trigger. Increase the value if your photos are blurry. b) Mosaic With the Mosaic tab, you are able to define the overlap between images (a minimum value of 25 to 30% is recommended). "Start from" allows you to define in what order you would like the sequence to be executed. "Initial direction" allows you to define the type of scanning sequence. c) Camera The "camera" tab allows you to modify the width of the shutter triggering pulse generated by the motorized head (if the camera triggers more than once, reduce the pulse. If, on the contrary, the camera does not trigger, increase the duration). The sensor setting is very important; it must be set according to your camera's specifications. For a "full-frame" camera, indicate 1. For cameras that are not full-frame, indicate the multiplier coefficient according to the manufacturer's specifications. (For Canon, it is often a ratio of 1.6 and for Nikon it is 1.5). Last, underneath indicate your camera's sensor resolution. d) Lens The "lens" tab allows you to choose the lens type. In Mosaic mode, only rectilinear lenses are possible (these are classic lenses, not fisheye). Choose the focal length then indicate the optical multiplier coefficient (when using a rectilinear lens only). Validate the settings to go back to Papywizard's principal screen. (If you haven't already done it, attach your camera to the attachment zone and reconnect the trigger cable from your camera to the motorized head). Panogear Pack | User Manual 11 Define the top, bottom, left and right restrictions of the panorama. Choose the restrictions according to what you would like and the hardware's potential physical constraints (contact point between the camera/lens and the base). Using the four arrows, shift the motorized head to the top right corner of the desired shooting scene. The mosaic will end at this point. Start: Define the bottom right corner of the panorama: using the four arrows, shift the motorized head to the bottom right corner of the desired shooting scene. (Attention, the lens and/or the camera cannot make contact with the base). Practical advice: Use your camera’s viewfinder or "Live View" to get your bearings. Once in position, click the Start button to save it as the starting point for the panorama. Stop : Repeat the process and define the top left corner of the desired shooting scene. Click the Stop button to save this position. Total Fov : On the Total Fov line, the software calculates the panorama's horizontal and vertical coverage in degrees. # Picts : On the line titled # Picts, the software will indicate the number of horizontal and vertical photos required to cover the desired shooting scene. Real overlap : Real overlap is indicated to provide verification. Resolution : Provides information and estimations of the final panorama resolution. The parameters are now configured. Click on shoot to begin. A window will appear so that you will be able to follow the shooting as it takes place. The window shows the matrix of photos to be taken for the desired panorama. (Here, 8 photos high by 39 photos on the horizontal level). Yellow box: The next photo to be taken. Green boxes: Photos already taken. Target: Actual position of the head. The bottom field indicates whether the motorized head is moving in the stabilization stage or trigger stage along with the time elapsed since the beginning of the sequence. Step-by-step: Move the system along step-by- step. Start: Launch the sequence. Panogear Pack | User Manual 12 Pause: Pause the sequence. Restart with the Restart button or stop it completely with the Stop button. Data: Allows you to recuperate an XML file at the end of the shooting which describes the session conducted. This data is readable by Autopano Giga which gives a quick and efficient stitching of your pictures. The sequence is finished. Now, all you need to do is extract the pictures and then process them using stitching software such as AutoPano Pro, AutoPano Giga or others. 6. Processing the session files (XML) with Autopano Pro or Giga Once the shooting has been conducted, connect the controller to the computer with a USB cord. Wait until the controller has been detected then open the Panorama software control. Click on "Read Session." A window will appear; click yes. Panogear Pack | User Manual 13 An XML file will be created for each session in the computer. Select the name and desired location for the file then click save. Open Autopana Giga then click File/Import. Choose Papywizard then click next. Panogear Pack | User Manual 14 Click on the top ellipsis, select the already saved XML file from the session. Click the bottom ellipsis then select your pictures. Define the desired options. Name your file then click finish. Autopano will automatically launch the stitching of your pictures. Panogear Pack | User Manual 15 4. Links, resources 1. Motorized head/ Pack To find more ample information, user advice or to enter your own comments on line: 1. On Kolor's information page: http://www.autopano.net/wiki-fr 2. On Kolor's forum : http://www.autopano.net/forum/ 2. Krpano To find more ample information, user advice or to enter your own comments on line: 1. On Kolor's information page: http://www.autopano.net/wiki-fr 2. On Kolor's forum: http://www.autopano.net/forum/ 3. On the Krpano website : http://krpano.com/ 3. Autopano To find more ample information, user advice or to enter your own comments on line : 1. On Kolor's information page: http://www.autopano.net/wiki-fr 2. On Kolor's forum: http://www.autopano.net/forum/ 3. On Kolor's website : http://www.autopano.net/fr 4. Papywizard To find more ample information, user advice or to enter your own comments on line: 1. On Papywizard's website: http://www.papywizard.org/ 2. On Autopano forum : http://www.autopano.net/forum/ Panogear Pack | User Manual 16 5. Technical Features 1. Motorized Head Aluminum cast, plastic cover Single arm Weight : 2,2kg Size: 280 x 210 x 120mm 360° rotation on 2 bases, no restrictions 30mm space between the vertical rotational axle and the L-bracket side (ø60 maxi lens) Power: eight AA batteries/ two LSM-160 batteries / external 12V battery. Asynchronous series dialogue type ASCII protocol. Max speed (x800) : 1. A complete turn takes place in 50s 2. The motor turns 6000tr/min 2. Rail Weight : 150 g Size : 190 x 44 x 15 mm Nodal Distance: 30 -150 mm Camera screw : ¼"x 21 mm Rail screw for L-bracket : ¼"x 25 mm Rail nut for L-bracket : ¼" Bushing for L-bracket : dia. 19/10 x 7 mm 3. Battery connector Weight : 15 g Size: 96 x 30 x 20 mm 4. Batteries Li-Ion SB-LSM 160 Amperage: 1600mAh Power: 7,4V. Weight : 89 grams Size : 53 x 30 x 31 mm Charge time : 4h-4h15 Autonomy : 10-11h/ 2500-3000 movements Panogear Pack | User Manual 17 5. Charger Li-Ion battery charger Weight : 82 grams Size : 90 x 51 x 35 mm Specifications : 1. AC input : 90V-250V 50/60Hz 2. DC input : 12V Car plug 3. DC output : 4.2-8.4V 800mA (max) 4. USB output : 5V 1000mA(max) 6. Touch Control Panel Touch screen : 30 mm x 50 mm Display illumination: LED orange Color: silver USB Mini B cord : PC RJ12-6 connector : Orion Head (RS232 + power supply) r 3.5 mm Stereo connector: Camera trigger (Shutter + Focus) 3.5mm Mono connector : Infrared diode cable Size : 100 x 62 x 26 mm Weight : 100 grams Connection: Plug for the motorized head provided. Length : 75 mm 7. USB Bluetooth Dongle Module Class 2 Auto-powered through USB connector Windows, Linux & Mac OSX compatible (no driver needed) 8. Bluetooth module Module Class 1 Power supplied by motorized head Pairing code : 1234 Panogear Pack | User Manual 18 6. Legal information, GPL license, warranty 1. Legal information and warranty Returns : All returns on physical products, no matter what the reason, must be agreed upon in advance. To do so, you must contact us to explain the reasons for return. Once we have agreed, we will send you instructions for returning the product. All returned products without a return agreement will not be refunded or exchanged. All potential returns must be done within fourteen days of receiving the product (date as postmark) and the product must be returned in perfect condition. Return fees will be charged to the client except in cases of an error on our part. License and software products do not have any warranty, in accordance with rules and regulations of the intellectual property and the author's rights. Replacements : If the products break down, please contact your vendor, depending on your place of purchase. Do not forget to include the product number in concern (if necessary) along with a copy of your receipt. Warranty All of the material elements in the pack have a one-year warranty, under reserve of the warranty and safety conditions. We decline all responsibility in the case of direct or indirect damages linked to product use. Warranty and safety conditions : Warranty valid uniquely if there is a malfunction during normal use of the product as stated in the present-day user manual. Attention: all modifications or changes to a part of the product or to the whole product will entail an immediate cancellation of the warranty and could alter safety conditions. Attention: all use that does not follow the present-day user manual could cause damages to the product and its environment. Use the product with care. Risk of damaging the product by impact, shock, drop, or movement. Keep the product away from moisture or significant temperature changes. Keep the product away from water and other liquids. Disposal instructions : Do not dispose of this product in your household garbage can. As the final user, you must bring your products to the collection locations made available by your community to ensure respect for the environment. For more details concerning collection locations, please contact your local authority on the subject. 2. Papywizard GP license Papywizard is not a commercial project. All of the Papywizard files and documents are under CeCILL, a free French license, and is GPL compatible: http://www.cecill.info/licences/Licence_CeCILL_V2-en.html 3. Contact information, sales and service For all questions, please first contact your vendor, according to your place of purchase. In the case of failure, contact our customer support service at the following address : [email protected] Documentation is non-contractual and may be incomplete. Panogear Pack | User Manual 19