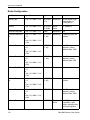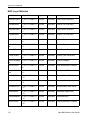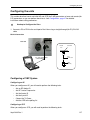
1
User Manual
Sept 2003 Rev 1
Software Version 3.1
Important
You can obtain the latest customer documentation for this product by visiting our web
site at www.wi-lan.com. Click on Support ➔ Customer Documentation. Updated
information will be posted regularly on this site and can be downloaded via the Internet.
WilLAN
2
Libra 5800 Series User Guide
Contents
Contents ........................................................................................................3
Important Information ................................................................................7
Safety considerations ..........................................................................................................7
Warning symbols used in this book
7
About this guide ..................................................................................................................8
Notices ...........................................................................................................9
Copyright notice .................................................................................................................9
Regulatory notice ................................................................................................................9
Other notices .....................................................................................................................10
Warranty & repair .............................................................................................................10
Customer support contacts ................................................................................................10
Distributor technical support
Contacting Wi-LAN Technical Support
Wi-LAN product information
10
11
11
Publication history ............................................................................................................11
Description ..................................................................................................13
Overview ...........................................................................................................................13
Libra 5800 Series System Features ...................................................................................13
About W-OFDM ...............................................................................................................14
About Point-to-Multi-Point (P-MP) Systems ...................................................................15
Access Point (AP) Equipment
Customer Premise Equipment (CPE)
Long Range Customer Premise Equipment (LCPE)
Radio Operation Background
15
16
16
17
About Point-to-Point (P-P) Systems .................................................................................18
Rapid Deployment (RD) Equipment
Extened Range (ER) Equipment
Sept 2003 Rev 1
18
19
3
Contents
Hardware ...........................................................................................................................20
Specifications ....................................................................................................................24
Configuration ..............................................................................................27
Overview ...........................................................................................................................27
Accessing the Main Menus ...............................................................................................28
Access Methods
Setting VT100 Arrows
28
30
Powering up the unit .........................................................................................................32
Quick-Start Menu .............................................................................................................33
Exiting Setup
Unit Configuration:
Radio Configuration:
Communication Parameters:
Access Configuration:
OFDM Channel Statistics
Link Test
33
34
35
35
37
38
38
PDA Setup Menu ..............................................................................................................39
Unit Configuration:
Radio Configuration:
Communication Parameters:
Setup Menu - Second Screen
39
40
41
42
Main System Menu ...........................................................................................................45
System Revision Information ...........................................................................................46
System Software ROM Images .........................................................................................48
Viewing system software ROM images
48
System Current Status .......................................................................................................48
Viewing system current status
48
System Security ................................................................................................................50
Setting Ethernet and wireless access to the TCP/IP Stack
Assigning Community Names
Setting Menu Passwords
Setting Auto Logout Timeout
50
52
53
59
System Commands ...........................................................................................................60
Setting Default System Image
Reboot Current Image
Rebooting a System Image
Restoring the Factory Configuration
Resetting MAC Layer Statistics
60
60
61
62
63
Network Configuration .....................................................................................................64
Setting the Internet IP Address
Setting the Internet IP Mask
VLAN Tagging
VLAN Tagging ID
4
64
65
65
67
Libra 5800 Series User Guide
VLAN Tagging User Priority
Setting Local Network MAC Filtering (LNMF)
68
68
Radio Configuration .........................................................................................................70
Setting the RF Station ID (P-MP Only)
Setting the Sector ID
Setting the Synchronization ID
Setting the RF Center Frequency
Setting Tx Power
Setting the Modulation Type
70
71
72
72
74
75
Remote Station Configuration Menu (P-MP Only) ..........................................................76
IP/MBR Filter Configuration ............................................................................................78
Setting the IP Filtering Option
Configuring the IP Filter
Setting the MBR Filtering Option
78
79
81
MAC Layer Statistics ........................................................................................................84
Using the Command Line .................................................................................................86
Field Installation ........................................................................................89
Introduction .......................................................................................................................89
Libra 5800 field installation ..............................................................................................90
Site preparation
Tools and equipment
Libra 5800 installation procedure
90
91
93
Troubleshooting .........................................................................................97
Preventative maintenance .................................................................................................97
Troubleshooting areas .......................................................................................................98
Troubleshooting chart
98
Appendix A: Upgrading Software ..........................................................103
Background Information .................................................................................................103
Upgrading software via ftp .............................................................................................103
Rebooting the Unit Using Menu Commands
Rebooting the Unit Using FTP "Reboot" Files
105
105
Appendix B: SNMP MIB .........................................................................107
Overview .........................................................................................................................107
Obtaining SNMP Software .............................................................................................108
Using Wi-LAN MIB Object Identifier Nodes ................................................................108
System Commands
Network Configuration
Radio Configuration
Sept 2003 Rev 1
108
109
110
5
Contents
System Security
IP Filter Configuration
System Current Status
MAC Layer Statistics
112
112
113
114
Appendix C: Simple Link Planning Worksheet ....................................117
AP (for P-MP) or Base (for P-P) Information ................................................................117
CPE (for P-MP) or Remote (for P-P) Information .........................................................118
Appendix D: Linktest and Link Statistics ..............................................119
Overview .........................................................................................................................119
Performing a Linktest .....................................................................................................119
Linktest variables
120
Appendix E: Bench Configuration Testing ............................................123
Overview .........................................................................................................................123
Setup process ..................................................................................................................123
Tools and equipment .......................................................................................................124
Checking shipping package contents ..............................................................................124
Assembling the Libra Units ............................................................................................126
Configuring the units ......................................................................................................127
Configuring a P-MP System
Configuring a P-P System
127
128
Testing the units ..............................................................................................................129
Testing the RF link with Linktest
Performing simple network tests
129
131
Glossary .....................................................................................................133
Index ..........................................................................................................145
Menu Map .................................................................................................153
6
Libra 5800 Series User Guide
Important Information
Safety considerations
This document must be reviewed for familiarization with the product, instructions, and safety symbols
before operation.
Verify that local safety regulations are adhered to during installation with regard to grounding and
lightning protection.
Verify that the correct AC power source is available for the Power Inserter.
Disconnect the product from operating power before cleaning.
Warning symbols used in this book
!
WARNING: Injury or death may result from failure to heed a WARNING.
Do not proceed beyond a WARNING until the indicated conditions are fully understood and
met.
! CAUTION: Damage to equipment may result from failure to heed a caution.
Do not proceed beyond a ! CAUTION until the indicated conditions are understood and met.
Important: Indicates critical information to be aware of which may affect the completion of a task or
successful operation of equipment.
!
WARNING
All antennas must be installed by a knowledgeable and professional
installer.
! CAUTION
An antenna must be connected to the AP, LCPE or ER units before
powering up the equipment. Powering up equipment without an antenna
connected can permanently damage the unit or the RF transmission cable
Sept 2003 Rev 1
7
Important Information
! CAUTION
Change the passwords and community names as soon as possible. Default
community names and passwords given in this book are provided to all customers and
are not secure.
About this guide
This guide describes the common features of the Libra 5800-Series Broadband Wireless Access
System family of products from Wi-LAN Inc.
This guide is organized in the following sections.
Description,page 13, explains Broadband Wireless Access, the theory behind W-OFDM, how a BWS
system operates, and the function of the various parts.
Configuration,page 27, describes how to configure the units so they will function as part of their new
network.
Field Installation,page 89 guides you through the process of setting up Customer Premise
Equipment units.
Troubleshooting,page 97, explains how to fix some of the most common problems.
Appendix A: Upgrading Software,page 103, tells how to upgrade software.
Appendix B: SNMP MIB,page 107, explains the Simple Network Management Protocol software
used to remotely control the APs and CPEs.
Appendix C: Simple Link Planning Worksheet,page 117, gives a worksheet for calculating the link
budget for a simple situation.
Appendix E: Bench Configuration Testing,page 123, explains how to set up the BWS units in a
controlled environment such as a lab, configure them and test their basic operation.
Glossary,page 133, explains product terminology.
Index,page 145, can be used to quickly locate information on particular topics.
Menu Map,page 153, shows the Main System Menu and its submenus.
8
Libra 5800 Series User Guide
Notices
Copyright notice
Copyright© July 2003 Wi-LAN, Inc.
All rights reserved.
This guide and the application and hardware described herein are furnished under license and are
subject to a confidentiality agreement. The software and hardware can be used only in accordance
with the terms and conditions of this agreement.
No part of this guide may be reproduced or transmitted in any form or by any means – electronic,
mechanical, or otherwise, including photocopying and recording – without the express written
permission of Wi-LAN, Inc.
While every effort has been made to ensure that the information contained in this guide is correct,
Wi-LAN, Inc. does not warrant the information is free of errors or omissions.
Information contained in this guide is subject to change without notice.
Regulatory notice
The specifications and parameters of the device described in this document are subject to change
without notice.
For Canadian regulatory information, go to www.ic.gc.ca. For American regulatory information, see
www.fcc.gov. For European regulatory information, see www.etsi.org.
This equipment generates, uses and radiates energy on radio frequencies and, if not installed and
used in accordance with this guide, may cause harmful interference to radio communications.
However, there is no guarantee that interference will not occur in a particular installation.
Sept 2003 Rev 1
9
Notices
If this equipment does cause harmful interference to radio or television reception, which can be
determined by turning the equipment off and on, the user is encouraged to correct the interference
by one or more of the following methods:
•
reorient or relocate the receiving antenna
•
move the equipment and receiver farther apart
•
connect equipment to an outlet on a circuit different from that to which the receiver is
connected
Other notices
Changes or modifications to the equipment not expressly approved by Wi-LAN, Inc., could void the
user’s authority to operate the equipment.
Appropriately shielded remote I/O serial cable with the metal connector shell and cable shield
properly connected to chassis ground shall be used to reduce the radio frequency interference.
All antenna installation work shall be carried out by a knowledgeable and professional installer.
The parts in some Libra 5800 versions are Imperial sizes – inches and fractions of a inch. Do not
attempt to mix Imperial nuts, bolts and screws with similar metric hardware. This will strip the
threads.
Warranty & repair
Please contact the party from whom you purchased the product for warranty and repair information.
Wi-LAN provides no direct warranty to end users of this product.
Customer support contacts
Users of Wi-LAN equipment who require technical assistance must contact their reseller or
distributor. For information on distributors in your area, please visit www.wi-lan.com/channel.
Distributor technical support
Distributors may contact Wi-LAN’s Technical Support on Wi-LAN’s products.
When requesting support, please have the following information available
• configuration of the system, including models of Wi-LAN equipment, versions and serial
numbers
• antenna type and cable lengths
• site information, including possible RF path problems, such as trees, buildings and other RF
equipment in the area
• distance of the RF link
• configuration of unit.
• description of the problem
10
Libra 5800 Series User Guide
Publication history
Contacting Wi-LAN Technical Support
By Telephone
Call: 1-403-273-9133
Business hours: 8:00 a.m. to 5:00 p.m. Mountain Standard Time (GMT - 7)
By e-mail
Send an e-mail message to:
[email protected]
Wi-LAN product information
To obtain information regarding Wi-LAN products, contact the Wi-LAN distributor in your region, or
call
1-403-273-9133 to speak with a Wi-LAN sales representative or visit our web site at www.wilan.com.
Publication history
Revision
Date
Description
Rev 1
July 2003
First public release of this manual.
Sept 2003 Rev 1
11
Notices
12
Libra 5800 Series User Guide
Description
Overview
This information in this guide applies to the "LIBRA 5800" Series products, including the following.
Data Rate / Channel Size
BWS Model
Frequency (TDD System)
32 Mbps, 12.5 MHz channel separation
Libra 5800 CPE
TX&RX:5725-5850
32 Mbps, 12.5 MHz channel separation
Libra 5800 LCPE
TX&RX:5725-5850
32 Mbps, 12.5 MHz channel separation
Libra 5800 AP
TX&RX:5725-5850
32 Mbps, 12.5 MHz channel separation
Libra 5800 RD
TX&RX:5725-5850
32 Mbps, 12.5 MHz channel separation
Libra 5800 ER
TX&RX:5725-5850
This chapter presents an overview of the LIBRA 5800 Series product.
Libra 5800 Series System Features
•
Point-to-Point (P-P) system: Rapid Deployment (RD) units with integral 23 dBi antena or
Extended Range (ER) units with N-Type (F) RF connector for use with high gain external
antenna.
•
Point-to-Multi-Point (P-MP) system: Access Point (AP) with N-Type (F) RF connector for use
with external sectoral, omni or other antennas, Customer Premise Equipment (CPE) with
integrated 23 dBi antenna and Long Range CPE (LCPE) with N-Type RF connector for use
with high gain external antenna
•
fast transmission speeds–up to 32 Mbps raw data rate in 10 MHz channel (12.5 MHz
separation)
•
Efficient use of spectrum
•
cost-effective–wireless solution is inexpensive compared to wire line alternatives
•
fast and easy to deploy
•
enhanced multipath capabilities enable non-, near- and obstructed-line-of-sight operation
•
operates in the unlicensed 5.8 GHz band
•
advanced error recovery and signal processing
•
easy-to-operate user interface and system configuration
Sept 2003 Rev 1
13
Description
About W-OFDM
The Libra system uses Wi-LAN’s patented Wide-band Orthogonal Frequency Division Multiplexing
(W-OFDM) technology to process, transmit and receive data in parallel fashion over the air. WOFDM divides a wide RF frequency band into several subchannels that work together to deliver
data, similar to splitting a road into several lanes that together can handle more traffic than a single
lane.
W-OFDM offers many advantages, including effective use of bandwidth, resistance to interference,
ability to take advantage of multipath characteristics, and advanced error correction and recovery.
Because data is spread across all the channels, interference usually affects only a few channels
rather than all channels, and lost data can be easily recovered. Since W-OFDM is insensitive to
interference, the amount of ongoing tuning, adjustment and maintenance is minimized. Both
multipoint networks and point-to-point backbone systems are supported.
The following diagram illustrates the main concept behind W-OFDM. The available frequency
spectrum is divided into subchannels. Each subchannel is orthogonal, meaning that the peak signal
strength of each signal occurs at the null or point of minimum signal strength of its neighbor, so
adjacent subchannels do not interfere with each other. Data is carried in parallel across the
subchannels.
Orthogonal Arrangement of W-OFDM Subchannels
Signal Strength
Subchannel (shaded for clarity)
Operating
Frequency Range
Frequency
Null
Zone
14
Libra 5800 Series User Guide
About Point-to-Multi-Point (P-MP) Systems
About Point-to-Multi-Point (P-MP) Systems
Two kinds of equipment are required for a wireless P-MP link: Access Point (AP) equipment and
Customer Premise Equipment (CPE). AP equipment is located at the service provider’s site and
CPE equipment is located at the customer’s site. The LIBRA 5800 P-MP product is available as an
AP, a CPE with integrated 23 dBi antenna or an LCPE for connection to higher gain external
antennas.
LIBRA 5800 P-MP System Components
Sectoral Antenna
CPE with
Integrated
Panel Antenna
Access Point
Outdoor CAT-5
Cable
Outdoor CAT-5
Cable
Power Inserter
Power Inserter
Workstation
Computer
Hub
Access Point (AP) Equipment
The AP controls communication within the wireless network and is the main access point to the
Ethernet.
The access point communicates with the CPE’s in the system to provide each CPE with Access to
the main network (ie Ethernet). The access point is typically located at a distance away from the CPE
that will provide adequate radio signal strength for the specified data rates.
Sept 2003 Rev 1
15
Description
The Access Point is responsible for any CPE data management functions.
The Libra 5800 AP consists of three parts: 1) AP radio unit, 2) Ethernet Power Inserter with CAT-5
cable (bought separately) and weatherproofing kit (included), and 3) the External Antenna and cable
(both bought separately).
•
LIBRA 5800 AP– The AP is the main piece of radio equipment. It is designed for outdoor
installation but can also be installed indoors if needed. The AP is equipped with an N-type (F)
RF connector so that the external antenna can be connected to it. Thus many different types
of base stations can be deployed using sectoral, omni or other specialized antennas.
•
Ethernet Power Inserter– This piece of equipment is a small box that connects between the
CPE and the P.C. This box also provides power for the AP equipment to run. A CAT-5 outdoor
cable is used to connect the Power inserter to the AP. The weatherproofing kit is used with
standard RJ-45 connector to ensure reliable connection for outdoor systems.
•
Antenna and Cable– In order to accomodate different frequency re-use plans and scalability
of the base stations the AP is designed to be used with an external antenna. Antennas and
cables are selected by the user based on the network requirements.
Customer Premise Equipment (CPE)
The CP equipment connects customers to the AP via a wireless link. The link enables customers to
communicate with other users of the wireless network and the Ethernet.
Customer Premise Equipment has two parts: 1) CPE radio unit and 2) Ethernet Power Inserter with
CAT-5 cable (bought separately) and weatherproofing kit (included).
•
LIBRA 5800 CPE– The CPE is the main piece of equipment that would normally be installed
outdoors (indoor installation is permitted when feasible) The CPE contains all of the
necessary radio equipment to provide a high-speed wireless link. The CPE also has an
integral antenna such that no RF cables are required for a typical installation.
•
Ethernet Power Inserter– This piece of equipment is a small box that connects between the
CPE and the P.C. This box also provides power for the CPE equipment to run. A CAT-5
outdoor cable is used to connect the Power Inserter to the CPE. The weatherproofing kit is
used with standard RJ-45 connector to ensure reliable connection for outdoor systems.
Wireless network activity focuses on the AP, which is both the main access point to the Ethernet
(LAN or WAN) and the destination for CPE-originated communications (CPEs do not communicate
directly with other CPEs—they communicate only via the AP). CPEs complete the customer-end of a
wireless link.
Long Range Customer Premise Equipment (LCPE)
The LCP equipment also connects customers to the AP via a wireless link. The LCPE enables the
customer to reach longer ranges by allowing the connection to a higher gain external antenna. It can
also be used for indoor installation of the units should severe weather conditions require it. The
antenna is then mounted outdoors and connected via appropriate RF cables to the unit. One other
alternative which customers may want to consider is to use lower gain antennas with systems that
are very close to the Base Station to mitigate some interference concerns without recourse to
dynamic power control.
16
Libra 5800 Series User Guide
About Point-to-Multi-Point (P-MP) Systems
The Libra 5800 LCPE consists of three parts: 1) LCPE, 2) Ethernet Power Inserter with CAT-5 cable
(bought separately) and weatherproofing kit (included), and 3) the External Antenna and cable (both
bought separately).
•
LIBRA 5800 LCPE– The LCPE is the main piece of equipment. It is designed for outdoor
installation but can also be installed indoors if needed. The LCPE is equipped with an N-type
connector so that the external antenna can be connected to it. Thus the range of the P-MP
system can be significantly increased by use of higher gain antennas. Also, in situations
where very severe conditions may be encountered outdoors the LCPE can be installed
indoors with cabling to the antenna outside.
•
Ethernet Power Inserter– This piece of equipment is a small box that connects between the
LCPE and the P.C. This box also provides power for the LCPE equipment to run. A CAT-5
outdoor cable is used to connect the Power inserter to the LCPE. The weatherproofing kit is
used with standard RJ-45 connector to ensure reliable connection for outdoor systems.
•
Antenna and Cable– In order to accomodate different range requirements for P-MP links,
the LCPE is designed to be used with an external antenna. Antennas and cables are selected
by the user based on the network requirements.
Radio Operation Background
The Libra 5800 communicates using a technique call Time Division Duplexing (TDD) in both the P-P
and P-MP configurations. TDD uses one frequency for both the Down Link (DL) Transmission (Base
to Remote in P-P, or AP to CPEs in P-MP), and for the Up Link (UL) (Remote to Base in PP or CPEs
to AP in P-MP). The DL and UL transmissions are performed at different times, therefore the system
is known as a Time Division Duplexing system. The available frequency band is therefore separated
into multiple TDD channels allowing for use of the whole frequency bands for very high capacity.
Time Division Duplexing Channels
F1
F2
F3
......
Fn
T D D C h an n els
In addition to using TDD, in a P-MP system, the AP and CPE also use Time Division Multiplexing
(TDM). TDM is a process of using time slots to allow the AP to transmit to multiple CPEs during a
single transmit cycle. During the Up Link cycle each CPE is polled and if it has data it transmits in
turn. This is known as Time Division Multiple Access (TDMA). All CPEs thus share the bandwidth
available by allocating time slots in turn to each of the units on both transmit and receive channels.
The following diagram shows TDM in a DL and TDMA in the UL. Each slot is allocated to a different
CPE. In the Wi-LAN system each slot may vary in time depending on traffic destined for each of the
CPEs. CPEs that are not very active will also be polled less frequently thus reducing the latency of
Sept 2003 Rev 1
17
Description
the system. Once they are ready to transmit or receive they will move up the polling list and will be
polled more often.
Time Division Multiplexing/Time Division Multiple Access (TDM/TDMA)
DL TDM
DL
slot1
DL
slot2
......
UL TDMA
DL slot-n
UL SF1
DL superframe
UL SF2
UL SFm
UL superframes
Antenna characteristics and placement are critical. Because of W-OFDM’s excellent Non-Line of
Sight performance and its resistance to frequency selective multipath fading CPE directional
antennas do not have to be pointed directly at the AP antenna. Having a clear line of sight is always
preferable, but is not necessary with the BWS series. There are cases in which the optimal
performance is acheived when the CPE antenna does not point directly to the AP (e.g. when using
reflection off a nearby structure to avoid an absorbing obstruction).
About Point-to-Point (P-P) Systems
For P-P systems Libra 5800 comes in two versions, the Rapid Deployment (RD) and the Extended
Range (ER) units. P-P links are used when only two locations are connected, for example for
backhaul purposes between P-MP Base Stations and the Network Operating Center for connection
to the Internet backbone, or in situations where throughput requirements between two locations are
such that the bandwidth can’t be shared.
Rapid Deployment (RD) Equipment
The RD equipment is intended for very rapid installation of a P-P link and can be used for links of up
to 16 kms (up to 12 kms at full 32 Mbps bandwidth).
RD Equipment has two parts: 1) RD and 2) Ethernet Power Inserter with CAT-5 cable (bought
separately) and weatherproofing kit (included).
18
•
LIBRA 5800 RD– The RD is the main piece of equipment that is normally installed outdoors
(indoor installation is permitted when the range and link budget allows it) The RD contains all
of the necessary radio equipment to provide a high-speed wireless link. The RD also has an
integral 23 dBi antenna such that no RF cables are required for a typical installation.
•
Ethernet Power Inserter– This piece of equipment is a small box that connects between the
RD and the Ethernet network. This box also provides power for the RD equipment to run. A
CAT-5 outdoor cable is used to connect the Power inserter to the RD. The weatherproofing kit
is used with standard RJ-45 connector to ensure reliable connection for outdoor systems.
Libra 5800 Series User Guide
About Point-to-Point (P-P) Systems
Extened Range (ER) Equipment
The ER Equipment allows for the use of different external antennas to achieve links of much longer
range (up to 66 kms). It can also be used for indoor installation of the units should severe weather
conditions require it. The antenna is then mounted outdoors and connected via appropriate RF
cables to the unit.
The Libra 5800 ER consists of three parts: 1) ER, 2) Ethernet Power Inserter with CAT-5 cable
(bought separately) and weatherproofing kit (included), and 3) the External Antenna and cable (both
bought separately).
•
LIBRA 5800 ER– The ER is the main piece of equipment. It is designed for outdoor
installation but can also be installed indoors if needed. The ER is equipped with an N-type
connector so that the external antenna can be connected to it. Thus the range of the P-P
system can be significantly increased by use of higher gain antennas. Also, in situations
where very severe conditions may be encountered outdoors the ER can be installed indoors
with cabling to the antenna outside.
•
Ethernet Power Inserter– This piece of equipment is a small box that connects between the
ER and the Ethernet network. This box also provides power for the ER equipment to run. A
CAT-5 outdoor cable is used to connect the Power inserter to the ER. The weatherproofing kit
is used with standard RJ-45 connector to ensure reliable connection for outdoor systems.
•
Antenna and Cable– In order to accomodate different range requirements for P-P links, the
ER is designed to be used with an external antenna. Antennas and cables are selected by
the user based on the network requirements.
Sept 2003 Rev 1
19
Description
Hardware
This section describes the LIBRA 5800 hardware. Although antennas are part of the equipment in
general, antennas are not discussed here.
The LIBRA 5800 product has two connectors on the back panel. 1) Power/Ethernet Port 2) Serial
Port. The connectors are common for all types of Libra 5800 equipment. The AP, ER and LCPE units
also have a female N-Type connector on the front panel for connection to the antenna.
Libra 5800 Connection Panell
Power/Ethernet Port
Serial Port
Power/Ethernet Port
Serial Port
Power/Ethernet Port
Standard RJ 45 Ethernet Connector. A weatherproofing kit is provided
with the unit, so that standard outdoor CAT-5 cable can be used.
Serial Port
5-pin female connector. A matching connector and cable is available
separately for local configuration
CAT-5 Weatherproofing Kit
20
Libra 5800 Series User Guide
Hardware
Libra 5800 AP, ER and LCPE Front Panel RF Connector
N-Type
Connector
Ethernet Power Inserter
2
1
3
Item
Description
1
To Ethernet LAN
2
To Libra 5800 Radio
3
Main AC Power Cord
Sept 2003 Rev 1
21
Description
Hardware Mounting Kit for Libra 5800
Unit can be rotated by 90o to
operate in either vertical or
horizontal polarization. See
the arrow on the antenna for
proper direction before
connecting to mounting
hardware.
Large Pipe Diameter Mounting Configuration
22
Libra 5800 Series User Guide
Hardware
Small Pipe Diameter Mounting Configuration
Wall Mounting Configuration
To Unit
Knuckle (allows for
Pan and Tilt; can be
used in all other
Configurations
To Wall
Sept 2003 Rev 1
23
Description
Specifications
Libra 5800 P-P
RD and ER
Libra 5800 P-MP
AP & CPE/LCPE
Radio Specifications:
Out put Power (average)
+17dBm to -3dBm, all
channels
+17dBm to -3dBm, all channel
RF Frequency Band (Tx/Rx)
5725 MHz t o 5850 MHz
5725 MHz t o 5850 MHz
Channel Assignments
Field Selectable in 0.25 MHz
steps
Field Selectable in 0.25 MHz
steps
Channel Size/Separation
10MHz/12.5 MHz
10MHz/12.5 MHz
Rx Sensitivity at 1E-06 BER
-84 dBm BPSK
-81 dBm QPSK
-75 dBm 16QAM
-84 dBm BPSK
-81 dBm QPSK
-75 dBm 16QAM
Data Rate Raw/Effective
32 Mbps/24 Mbps
32 Mbps/24 Mbps
Power / Ethernet Cable Length
Max Length:40m
Max Length: 40m
Integrated Antenna
23 dBi (RD Only)
23 dBi (CPE Only)
RF Connector
N Type (Female, ER only)
N Type (Female, AP/LCPE
Only)
RF Technology
W-OFDM (16 QAM, QPSK,
BPSK)
W-OFDM (16 QAM, QPSK,
BPSK)
Duplexing Format
TDD
TDD
Certification
FCC/IC/SRRC/Others on
demand
FCC/IC/SRRC/Others on
demand
Range (@BER 1E-6, 99.95%
Availability)
Up to 66 kms
Up to 35 kms
Serial Port Diagnostic Accessl
Weatherproof 5 Pin DIN RS232 Format
Weatherproof 5 Pin DIN RS232 Format
Monitor /Control
Via 5 Pin DIN RS-232
Via 5 Pin DIN RS-232
Network Connection
10/100 Base T with 802.3 &
Ethernet II
10/100 Base T with 802.3 &
Ethernet II
MAC Address Filtering
Prevents local MAC address
packet from RF transmission.
Prevents local MAC address
packet from RF transmission.
Diagnostics:
24
Libra 5800 Series User Guide
Description
Libra 5800 P-P
RD and ER
Libra 5800 P-MP
AP & CPE/LCPE
Wireless Networking:
Network Topologies
Point -to-Point
Point -to-Multipoint
RF Collision Management
Dynamic Polling with
Dynamic Time Allocation
Dynamic Polling with
Dynamic Time Allocation
Privacy
Proprietary Phase
Randomization over RF Link
Proprietary Phase
Randomization over RF Link
Configuration security
Password Protected
Password Protected
Remote Management
SNMP & Telnet
SNMP & Telnet
Local Management Port
RS-232 Serial Port, DB-9
Conn.
RS-232 Serial Port, DB-9
Conn.
Management Port
Functionality
Support system configuration,
security access control,
wireless LAN diagnostics &
management, menu driven
ASCI I interface.
Support system configuration,
security access control,
wireless LAN diagnostics &
management, menu driven
ASCI I interface.
Software Management
FTP, Flash upgradeable in the
field
FTP, Flash upgradeable in the
field
Configuration Access
Remote: SNMP, Telnet
Local :RS-232,Telnet ,SNMP
Remote: SNMP, Telnet
Local :RS-232,Telnet ,SNMP
Power Consumption
<30W
<30W
Dimensions CPE (w/h/d)
12"x12"x3.5" (RD)
9"x9"x2.5" (ER)
12"x12"x3.5" (CPE)
9"x9"x2.5" (AP/LCPE)
Dimensions Power Inserter (w/
h/d)
6.2/5/12.6cm
6.2/5/12.6cm
Weight
2.5 kgs (RD)
2.0 kgs (ER)
2.5 kgs (CPE)
2.0 kgs (AP/LCPE)
Operating Temperature
-45 to +50C
-45 to +50C
Security:
Management:
Physical:
25
Libra 5800 Series User Guide
Description
26
Libra 5800 Series User Guide
Configuration
Overview
This section explains how to access and use the configuration menus. Menu items are described in
the order that they appear in the main menu.
There are three different menu trees available to the user as follows:
• The Main System Menu - This is the normal menu used by the user and contains all of the
sub-menus and contains detailed information related to the operation of the unit.
• The Setup Menu - This menu is the one that comes up the first time the unit is powered up.
It displays configuration parameters that can be modified to allow the user to get the Libra
unit up and running quickly. When the user is done with the setup a command can be executed that will cause the Main System Menu to come up the next time the user logs in. The
Setup menu canbe brought up again at any time from the main menu by selecting the
"Setup" option.
• The PDA Setup Menu - This menu has its own logon id and like the Setup menu above is
used to allow the user to configure the Libra unit quickly. A PDA can be connected to the
serial port of the Libra unit using a special cable so that the installer can get the Libra unit
running where it is installed and not have to go to the user’s computer to determine if it is
communicating.
The menus described above are the starting points for all Libra configuration parameters. The Main
System Menu and the Setup Menu are accessed from a local PC connected via RS-232 to the Libra
unit. The PDA Setup Menu is accessed from a PDA device such as a Palm Pilot connected to the
Libra unit via RS-232 using a special Wi-LAN supplied cable.
The Libra 5800 is configured as either a P-MP system with AP, CPE or LCPE, or a P-P system with
base station and remote. The P-P units use a protocol optimized for P-P operation and therefore
cannot communicate with P-MP units. These configurations are factory set and cannot be changed
by the user. The description of the menus will highlight the differences between the different types of
units.
Sept 2003 Rev 1
27
Configuration
Accessing the Main Menus
Access Methods
There are several ways to access the configuration menu system on the Libra 5800. They are:
• Via Local PC RS 232 (Cable Required - 5 Pin DIN Connector)
• Via Telnet
• Via PDA RS-232 (Cable Required - 5 Pin DIN Connector - see note below
NOTE: When connecting to a PDA, a null modem or straight-through cable with a 5 pin DIN
connector is required. The Libra unit is configured as DCE so if the PDA is configured as DCE (most
typical), then a null modem cable is needed. If the PDA is configured as DTE then a straight-through
cable is needed.
➧
To access the main system menu via Local PC on the the serial port
1. Connect the RS-232 (5 pin din to DB9) cable from the serial port on the PC to the serial port on
the CPE as shown below.
Connect the RS-232 Port
5 Pin DIN
DB9 Serial Connector
5
2. Start a terminal emulation program.
3. Set the emulation program to use the following settings. (This example is for HyperTerminal®)
28
Bits per second
9600
Data bits
8
Parity
None
Stop bits
1
Flow control
None
Libra 5800 Series User Guide
Accessing the Main Menus
Send line ends with line feeds
No
Echo typed characters locally
No
Line delay
0
Character delay
0
Append line feeds to incoming line
ends
No
Force incoming data to 7-bit ASCII
No
Wrap lines that exceed terminal
width
Yes
VT-100 Arrows
On
4. Press Enter. The Libra 5800 login screen appears.
Started by Boot ROM (Power-On/Hard Reset)
Wi-LAN Libra Login Menu
Software:
Rev 3.0.1 (Jun 27 2002 17:02:44)
Enter Password:
5. Type a default password (user, supervisor, or PDA) or your personal password if you have
one.
Login Account
Default Password
Privileges
User
user
Read Only
Supervisor
supervisor
Read and Write
PDA
pda
Read and Write
The main menu is displayed.
Sept 2003 Rev 1
29
Configuration
How to use the main menus
•
To select an item from any of the menus, press the keyboard arrow
keys
to move the cursor –> next to the item. Press the Enter
Enter
key
to open the data entry field. This will make the field
highlight in black.
•
To scroll through items in the data entry field, press
Press
•
Enter
.
to select an item from the field.
To exit from a menu without making changes, press the Esc key.
Esc
➧
To access the main menu via telnet
1. Ensure that the unit has an Internet IP address configured, the Ethernet connection is
operational, and wire and remote access are enabled (see Setting Ethernet and wireless access
to the TCP/IP Stack, page 50).
2. Ensure that the VT100 Arrows feature in your telnet session is enabled. See Setting VT100
Arrows, page 30.
3. From a VT100 terminal emulation program, type telnet <IP address>, where
<IP address> is the address of the unit that you want to configure.
4. Press Enter. The login screen appears.
5. Type the password (supervisor). The Main System Menu appears.
For more information about passwords, see Setting Menu Passwords, page 53.
Setting VT100 Arrows
➧
To set the VT100 arrows in Microsoft telnet
1. Start a Microsoft telnet session.
2. Select Terminal, Preferences from the menu bar. The Terminal Preferences dialog box appears.
30
Libra 5800 Series User Guide
Accessing the Main Menus
3. Click the VT100 Arrows checkbox.
4. Click OK. The VT100 arrows are enabled in the telnet session.
You can now use the keyboard arrow keys to navigate the configuration menus.
Sept 2003 Rev 1
31
Configuration
Powering up the unit
If a CRT session is started on a laptop or PDA which is connected to the unit via an RS-232 cable,
the following power up sequence can be viewed on the screen.
Startup Self-Test Results
-------------------------
Flash CRC Test:
PASSED
Traffic Connectivity:
CONNECTED
I2C Communication Test:
PASSED
Ethernet Loopback Test:
PASSED
DSP Function Test:
PASSED
FPGA Function Test:
PASSED
BootROM Replacement Status:
PASSED
Hit Enter to Continue
These tests should all pass for a unit deployed in the field. Traffic Connectivity may show
"DISCONNECTED" for a unit when it has just been installed and is not communicating with an
Access Point.
The BootROM Replacement Status field is not normally displayed except in the very rare occurrence
when the unit's bootROM code is updated.
32
Libra 5800 Series User Guide
Quick-Start Menu
Quick-Start Menu
When the Libra unit starts up for the very first time, it will start up in setup mode. This a single screen
as shown below that displays all of the parameters that the user needs to set up the unit and get it
talking with the base station.
Libra Model 5800
- 12.5 MHz
Setup Menu
Unit Configuration
RF Station Id [1..2048] -> 2
Sector Id [0..31]
1
Synchronization Id [0..1]
0
Communication Parameters
Internet IP Address
192.168.1.100
Internet IP Mask
255.255.255.0
System Ethernet Access
on
Local Network Mac Filter
off
Radio Configuration
Modulation Type
Tx Power [-14..17]
Rx Center Freq (kHz)
Tx Center Freq (kHz)
Access Configuration
SNMP Priv Community
netman
Super Password
Press Enter
Confirm Super Pwd
Press Enter
User Pwd
Press Enter
Confirm User Pwd
Press Enter
PDA Password
Press Enter
Confirm PDA Pwd
Press Enter
QAM 16
17
5787000
5787000
OFDM Channel Statistics
RSSI
(dBm) -22
Null Depth
(dB)
0
Fade Margin (dB)
53
RF Link Status
Not Connected
to
to
to
to
to
to
change pwd
confirm pwd
change pwd
confirm pwd
change pwd
confirm pwd
Link Test
Link Test Type
Coarse (xE-5)
Dest Radio Id [1..2048]
9
Start Link Test
Activate changes and reboot
Exit setup and logout
Many of the fields on this menu can be found in more detailed menus as discussed later on in this
section.
Exiting Setup
When the setup procedure is complete and the unit has been re-booted to activate all the changes
you can exit the setup procedure.
➧
To exit setup
1. Move the cursor to the Exit setup and logout field and press Enter.
Sept 2003 Rev 1
33
Configuration
Unit Configuration:
Setting the RF Station ID
Each Libra unit requires a unique RF Station ID to identify it on the network. Every unit must have a
unique RF Station ID. No two units may have the same ID. In a P-P system you cannot access this
selection.
➧
To set the RF station ID
1. Select RF Station Id [1..2047] and press Enter. The entry field highlights.
2. Type a unique number for the RF Station ID and press Enter. Zero is not a valid Station ID.
3. Record the RF Station ID you have assigned to the unit.You will need to know this number when
you configure the polling list on the Access Point.
4. Reboot the system to effect the changes unless there are more changes you would like to make
at this time. To do this move the cursor down to the line, "Activate changes and reboot" and press
Enter
Setting the Sector ID
Each Libra unit can have a Sector ID to identify its AP within the cell on the network. This prevents
Libra units from accessing different APs which may have the same Center Frequency.
➧
To set the Sector ID
1. Move the cursor to the Sector Id [0..31] field and press Enter. The entry field highlights.
2. Type a unique number for the Sector ID and press Enter.
3. Reboot the system to effect the changes unless there are more changes you would like to make
at this time. To do this move the cursor down to the line, "Activate changes and reboot" and press
Enter
Setting the Synchronization ID
Because of OFDM’s superior multipath performance it is possible for the Libra to falsely synchronize
on an AP from a different sector operating at the same frequency. In order to avoid this type of error,
the APs and Libras of each sector can have one of two possible OFDM synchronization patterns.
These patterns are orthogonal, thus a Libra with a given Synchronization ID will never synch to an
AP with the other synch. Every Libra in the sector must have the same Synchronization ID as the AP
of that sector.
➧
To set the Synchronization ID
1. Move the cursor to the Synchronization Id [0..1] field and press Enter. The entry field
highlights.
2. Type a 0 or 1 to select the Synchronization ID and press Enter. Factory default is zero (0).
3. Reboot the system to effect the changes unless there are more changes you would like to make
at this time. To do this move the cursor down to the line, "Activate changes and reboot" and press
Enter. Setting the Modulation Type
34
Libra 5800 Series User Guide
Quick-Start Menu
Radio Configuration:
Setting the Modulation Type
The OFDM Modulation Type can be selected from among the following possible values: "QAM 16",
"QPSK" and "BPSK". The selected type will be added to the next superframe transmitted.
➧
To set the Modulation Type
1. Move the cursor to the Modulation Type field and press Enter. The field highlights.
2. Select from the list using the up and down arrow keys the Modulation type and press Enter. The
possible options are: QAM 16, QPSK, and BPSK. The new modulation type is applied after the
next reboot.
Setting the Tx power
➧
To set the Tx power
1. This configuration allows the user to program the output power from -3dBm to +17dBm
2. Move the cursor to the Set Tx Power field and press Enter. The field highlights.
3. Type in the signal strength. The new signal strength is applied.
Setting the RF Center Frequency
Libra 5800 equipment uses Time Division Duplexing (TDD). In TDD, the units transmit and receive
on the same frequency. They alternate in time to provide the duplexing capability. The frequency of
these channels depend on the model of equipment used.
The center frequency is a frequency located in the middle of each set of transmit and receive
channels and it defines the group of frequencies situated around it.
➧
To set the RF Center Frequency
1. Move the cursor to the Set RF Center Frequency field and press Enter. The entry field is
highlighted.
2. Enter the frequency value assigned to this unit in kHz and press enter to effect the changes. The
unit does not require rebooting for this change to become effective.
Communication Parameters:
Setting the Internet IP Address
An IP address must be assigned to each Libra unit in the network. Changes takes effect on the next
reset. You will require the IP address assigned by your system network administrator to your Libra
unit for this procedure.
1. Move the cussor to the Internet IP Address field and press Enter. The data entry field
highlights.
2. Type the unique Internet IP address for the unit and press Enter. The Internet IP address is
assigned to the unit.
Sept 2003 Rev 1
35
Configuration
3. Reboot the system to effect the changes unless there are more changes you would like to make
at this time. To do this move the cursor down to the line, "Activate changes and reboot" and press
Enter.
Setting the Internet IP Mask
You can obtain an IP Mask value from your system administrator and configure it into the unit.
➧
To set the Internet IP mask
1. Move the cursor to the Internet IP Mask and press Enter. The field highlights.
2. Type the Internet IP Mask for the unit and press Enter. The Internet IP Mask is assigned to the
unit.
3. Reboot the system to effect the changes unless there are more changes you would like to make
at this time. To do this move the cursor down to the line, "Activate changes and reboot" and press
Enter..
Setting Ethernet access to the TCP/IP Stack
Ethernet access to an Libra unit can be controlled by restricting the type of link that can be used to
make configuration changes. You can enable or disable the type of link independently with the two
different access settings. These settings do not affect the unit’s ability to carry traffic.
➧
To enable Ethernet access to the TCP/IP
4. Move the cursor to the System Ethernet Access field and press Enter.
5. Select the desired setting from the list by using the up and down arrow keys and press Enter.
on
Enable configuration access to the unit from
Ethernet
off
Disable configuration access to the unit from
Ethernet
6. Press Enter. The change has been made.
Setting Local Network MAC Filtering
This is also known as LANCAM (Local Area Network Content Addressable Memory) filtering. A Local
network MAC filter is simply a list of MAC addresses of units that are located on the same LAN. Data
flowing between units in the list is not sent across the wireless link. The table shows up to eight local
MAC addresses that are automatically discovered by the unit when Local Network Mac filtering is on.
This filtering enables data to be handled more efficiently and saves radio bandwidth for traffic that
really needs it.
➧
To set software Local Network Mac filtering
1. Move the cursor to the Local Network Mac Filter field and press Enter. The entry field
highlights.
36
Libra 5800 Series User Guide
Quick-Start Menu
2. Select On or Off from the list by using the up and down arrow keys and press Enter. The change
appears on the screen.
Access Configuration:
Assigning the SNMP Private Community Name
Community names are used to control Simple Network Management Protocol (SNMP) access to the
Libra unit. The Private Community Name allows read and write access. The factory default for the
SNMP Private Community Name it is netman. Any SNMP manager can access and configure any
unit on the network as long as the unit has the correct community names and Ethernet access is
enabled
! CAUTION
The default community names are public knowledge. Ensure you change
names during installation and record the name changes.
➧
To set the private community name
1. Move the cursor to the SNMP Private Community Name field and press Enter. The field
highlights.
2. Type a new name and press Enter. The change has been made.
Setting Menu Passwords
You can control access to configuration submenus with passwords. The default passwords are
user, supervisor, and pda. A user has read-only access and a supervisor can modify
settings. A new password is hidden by asterisks on the screen when you type it in.
Important
Default passwords are public knowledge. You should change the default
passwords at installation time and record them. When you restore the factory
configurations, the passwords revert to their defaults.
➧
To change the passwords
1. Move the cusor to the desired Password field and press Enter. The entry field changes to the edit
mode, meaning the field is highlighted in black and you can change the text there.
2. Type the new password and press Enter.
3. Move to the desired "Confirm Password" field and press Enter. The data field highlights.
4. Retype the new password to confirm it and press Enter. The password change is complete when
Success appears beside the confirmation field.
Sept 2003 Rev 1
37
Configuration
Note: If you retype the new password incorrectly, Failure appears and you must start again at Step
2.
OFDM Channel Statistics
The following values are displayed in real time on the Setup menu to help the installer determine how
well the Libra unit is communicating with the Access Point. These values are as follows:
OFDM Channel Statistics
RSSI (dBm)
Received Signal Strength Indicator in dBm
Null Depth (dB)
Difference in dB between the lowest signal sub carrier and the
highest signal sub carrier. This value is an indication of the level of
multi-path signals present in the link.
Fade Margin (dB)
Signal-to-noise ratio of the signal; value in dB above the sensitivity
level of the modulation being used (e.g. -75dBm for 16QAM, see
Specifications, page 24 for the values).
RF Link Status
This indicates whether any data is being transmitted from the Libra
unit.
Link Test
Once the unit has been configured as desired, the Link Test option can be selected from the setup
menu. This results in test data being transmitted to and from the Libra unit. Statistcs for RSSI and
BER (coarse and fine values) and shown in real-time to allow the person setting up the unit to adjust
it for the best performance (signal strength and BER).
Note: When the Libra-5800 is configured as a point-to-point unit, the "Dest Radio Id" field is not
selectable.
38
Libra 5800 Series User Guide
PDA Setup Menu
PDA Setup Menu
When logging into the unit using the PDA login, it will come up in setup mode. This is in the form of
two screens that display all of the parameters that the user needs to set up the unit and get it talking
with the base station.
Libra Setup
RF Station Id [1..2048] -> 244
Sector Id [0..31]
7
Synchronization Id [0..1]
0
Modulation Type
QAM 16
Tx Power [-14..17]
17
Rx Center Freq (kHz)
5787000
Tx Center Freq (kHz)
5787000
Internet IP Address
192.168.1.100
System Ethernet Access
on
Local Network Mac Filter
off
Monitor Screen
Logout
Activate changes and reboot
Many of the fields on this menu can be found in more detailed menus available when using a PC as
discussed later on in this section.
Unit Configuration:
Setting the RF Station ID
Each Libra unit in a P-MP network requires a unique RF Station ID to identify it on the network. Every
unit must have a unique RF Station ID. No two units may have the same ID. In P-P system you
cannot access this selection.
➧
To set the RF station ID
1. Select RF Station Id [1..2048] and press Enter. The entry field highlights.
2. Type a unique number for the RF Station ID and press Enter. Zero is not a valid Station ID.
3. Record the RF Station ID you have assigned to the unit.You will need to know this number when
you configure the polling list on the Access Point.
4. Reboot the system to effect the changes unless there are more changes you would like to make
at this time. To do this move the cursor down to the line, "Activate changes and reboot" and press
Enter
Sept 2003 Rev 1
39
Configuration
Setting the Sector ID
Each Libra unit can have a Sector ID to identify its AP/Base within the network. This prevents Libra
units from accessing different APs which may have the same Center Frequency.
➧
To set the Sector ID
1. Move the cursor to the Sector Id [0..31] field and press Enter. The entry field highlights.
2. Type a unique number for the Sector ID and press Enter.
3. Reboot the system to effect the changes unless there are more changes you would like to make
at this time. To do this move the cursor down to the line, "Activate changes and reboot" and press
Enter
Setting the Synchronization ID
Because of OFDM’s superior multipath performance it is possible for the Libra to falsely synchronize
on an AP from a different sector operating at the same frequency. In order to avoid this type of error,
the APs and Libras of each sector can have one of two possible OFDM synchronization patterns.
These patterns are orthogonal, thus a Libra with a given Synchronization ID will never synch to an
AP with the other synch. Every Libra in the sector must have the same Synchronization ID as the AP
of that sector.
➧
To set the Synchronization ID
1. Move the cursor to the Synchronization Id [0..1] field and press Enter. The entry field
highlights.
2. Type a 0 or 1 to select the Synchronization ID and press Enter. Factory default is zero (0).
3. Reboot the system to effect the changes unless there are more changes you would like to make
at this time. To do this move the cursor down to the line, "Activate changes and reboot" and press
Enter.
Radio Configuration:
Setting the Modulation Type
The OFDM Modulation Type can be selected from among the following possible values: "QAM 16",
"QPSK" and "BPSK". The selected type will be added to the next superframe transmitted.
➧
To set the Modulation Type
1. Move the cursor to the Modulation Type field and press Enter. The field highlights.
2. Select from the list using the up and down arrow keys the Modulation type and press Enter. The
possible options are: QAM 16, QPSK, and BPSK. The new modulation type is applied to the next
superframe to be transmitted.
3. Reboot the system to effect the changes unless there are more changes you would like to make
at this time. To do this move the cursor down to the line, "Activate changes and reboot" and press
Enter
40
Libra 5800 Series User Guide
PDA Setup Menu
Setting Tx Power
The Radio Frequency (RF) Board power setting enables you to adjust the strength of the transmit
signal sent from the Libra unit to the antenna. The range is -3dBm to +17dBm.
➧
To set the Tx power
1. Move the cursor to the Set Tx Power field and press Enter. The field highlights.
2. Type in the signal strength. The new signal strength is applied.
Setting the RF Center Frequency
Libra 5800 equipment uses Time Division Duplexing (TDD). In TDD, the units transmit and receive
on the same frequency. They alternate in time to provide the duplexing capability. The frequency of
these channels depend on the model of equipment used.
The center frequency is a frequency located in the middle of each set of transmit and receive
channels and it defines the group of frequencies situated around it.
➧
To set the RF Center Frequency
1. Move the cursor to the Set RF Center Frequency field and press Enter. The entry field is
highlighted.
2. Enter the frequency value assigned to this unit in kHz and press enter to effect the changes. The
unit does not require rebooting for this change to become effective.
Communication Parameters:
Setting the IP Address
An IP address must be assigned to each Libra unit in the network. Changes takes effect on the next
reset. You will require the IP address of yourLibra unit for this procedure. Your system administrator
should be able to provide it.
➧
To set the IP Address
1. Move the cussor to the Internet IP Address field and press Enter. The data entry field
highlights.
2. Type the unique Internet IP address for the unit and press Enter. The Internet IP address is
assigned to the unit.
3. Reboot the system to effect the changes unless there are more changes you would like to make
at this time. To do this move the cursor down to the line, "Activate changes and reboot" and press
Enter.
Setting Ethernet access to the TCP/IP Stack
Ethernet access to an Libra unit can be controlled by restricting the type of link that can be used to
make configuration changes. You can enable or disable the type of link independently with the two
different access settings. These settings do not affect the unit’s ability to carry traffic.
Sept 2003 Rev 1
41
Configuration
➧
To enable Ethernet access to the TCP/IP
4. Move the cursor to the System Ethernet Access field and press Enter.
5. Select the desired setting from the list by using the up and down arrow keys and press Enter.
on
Enable configuration access to the unit from
Ethernet
off
Disable configuration access to the unit from
Ethernet
6. Press Enter. The change has been made.
Setting Local Network MAC Filtering
This is also known as LANCAM (Local Area Network Content Addressable Memory) filtering. A Local
network MAC filter is simply a list of MAC addresses of units that are located on the same LAN. Data
flowing between units in the list is not sent across the wireless link. The table shows up to eight local
MAC addresses that are automatically discovered by the unit when Local Network MAC filtering is
on. This filtering enables data to be handled more efficiently and saves radio bandwidth for traffic that
really needs it.
➧
To set software Local Network MAC filtering
1. Move the cursor to the Local Network MAC Filter field and press Enter. The entry field
highlights.
2. Select On or Off from the list by using the up and down arrow keys and press Enter. The change
appears on the screen.
Setup Menu - Second Screen
The following set of parameters are available on page 2 of the setup screen. Move the cursor to the
Monitor field on the first screen and press the Enter key to get to the second screen as depicted
below.
42
Libra 5800 Series User Guide
PDA Setup Menu
OFDM Channel Statistics
RSSI
(dBm) -22
Null Depth
(dB)
25
Fade Margin (dB)
45
RF Link Status
Connected
Link Test
Link Test Type
-> Coarse (xE-5)
Dest Radio Id
26
Start Link Test
Logout
Press ESC to go to setup screen
OFDM Channel Statistics:
The following values are displayed in real time on the Setup menu to help the installer determine how
well the Libra unit is communicating with the Access Point. These values are as follows:
OFDM Channel Statistics
RSSI (dBm)
Received Signal Strength Indicator in dBm
Null Depth (dB)
Difference in dB between the lowest signal sub carrier and the
highest signal sub carrier. This value is an indication of the level of
multi-path signals present in the link.
Fade Margin (dB)
Signal-to-noise ratio of the signal; value in dB above the rated
sensitivity of the modulation type (e.g. -75 dBm for 16QAM)
RF Link Status
This indicates whether any data is being transmitted from the Libra
unit.
Link Test:
Once the unit has been configured as desired, the Link Test option can be selected from either setup
screen. This results in test data being transmitted to and from the Libra unit. Statistcs for RSSI and
BER (coarse and fine values) and shown in real-time to allow the person setting up the unit’s
antenna to adjust it for the best performance in terms of signal strenght, BER and Fade Margin.
Note: When the Libra-5800 is configured as a point-to-point unit, the "Dest Radio Id" field is not
selectable.
Sept 2003 Rev 1
43
Configuration
44
Libra 5800 Series User Guide
Main System Menu
Main System Menu
This is main menu used during normal operation of the unit when not in setup mode. It displays a set
up sub-menus that allow the user to set configuration parameters (if logged in as supervisor) or read
statistics related to the operation of the unit. At the bottom of the menu the Libra RF Board Model
name and Bandwidth are displayed. These are associated with the type of RF Board plugged into the
unit.
AP - Main System Menu
-> System Revision Information
System Software ROM Images
System Current Status
System Security
System Commands
Network Configuration
Radio Configuration
Remote Station Configuration
MAC Layer Statistics
RF Statistics
Setup
Logout
Libra Model 5800
Sept 2003 Rev 1
Bandwidth 12.5 MHz
45
Configuration
System Revision Information
The System Revision Information screen displays information about the Libra unit such as software
revision, firmware version and RF board model.
➧
To view system revision information
1. From the Main System Menu, select System Revision Information and press Enter. The
System Revision Information screen appears. This screen is view-only.
System Revision Information
Hardware Revision
CPLD Revision
DSP Revision
RF Board Model:
RF Board Serial Number:
File Name
Software Rev
Software Date
File Size
0x01
0x04
0x20507
13748-003
7233-455
RS Version
FE Version
BootROM Version
0x3001001
0x86001001
0
lib5800-3-2-2-bws.wil
3-2-2 (Wi-LAN Ethernet/OFDM)
Aug 08 2003 17:20:02
2097152
Hardware Revision
Static Integer
Identifies the hardware revision.
CPLD Revision
Static Integer
Identifies the CPLD revision. The
revision register is implemented
starting with CPLD revision 0xB4.
DSP Revision
Static Integer
Revision number of the DSP
image running on the unit.
RS Version
Static Integer
Version of Reed Solomon FPGA
running on the unit.
FE Version
Static Integer
Version of Front End FPGA
running on the unit.
BootROM Version
Static Integer
Version of the BootROM code
running on the unit.
RF Board Model
Static Integer
Model number of RF board as
displayed on the board in the unit
46
Libra 5800 Series User Guide
System Revision Information
RF Board Serial Number
Static Integer
Serial number of RF board as
displayed on the board in the unit
File Name
Static Text (0..31)
File name of the master system
image running on the unit. The
message "No Flash Images
Found" is displayed if no system
images are found in flash.
Software Rev
Static Text
Revision number of the master
system image running on the unit.
.
Software Date
Static Text
Timestamp of the master system
image running on the unit.
File Size
Static Integer
Size of the master system image
running on the unit as reported by
the dir command.
2. Press Esc to exit.
Sept 2003 Rev 1
47
Configuration
System Software ROM Images
Viewing system software ROM images
The System Software ROM Images screen lists all the images available in a unit. An image is the
software stored in Flash ROM that a unit uses to operate. This example lists only the Factory Image.
More than one image may be displayed. As new images become available, Wi-LAN places them on
their web site for downloading by customers.
➧
To view system software ROM images
1. From the Main System Menu, select System Software ROM Images and press Enter.
The System Software ROM Images screen appears. This screen is view-only.
System Software ROM Images
File Name
------------------lib5800-3-2-2-bws.wil
lib5800-3-2-1-bws.wil
Revision
Date
Time
Size
Default Current
-------- ----------- -------- ------- ------- ------3.2.2
3.2.1
Aug 08 2003 12:48:45 2097152
Aug 02 2003 17:20:02 1835008
No
Yes
No
Yes
File Name
Name(s) of system image files stored in the unit
Revision
Revision number of the system image file.
Date
Date the image file was created
Time
Time the image file was created
Size
Size of the image file in bytes
Default
Indicates which image file is the default. This is the image used at power up.
See Setting Default System Image, page 60. Possible values are Yes and
No.
Current
Indicates if the image file is currently operating on the unit. Possible values
are Yes and No.
System Current Status
Viewing system current status
The System Current Status screen displays administrative information, such as the time a unit has
been running and login statistics. This information enables you to view the current state of the
system and, if you are troubleshooting system problems, provides historical information.
48
Libra 5800 Series User Guide
System Current Status
Note:You can reset the Current Run-Time statistics to zero by resetting the system.
➧
To view current system status
1. From the Main System Menu, select System Current Status and press Enter.
The System Current Status screen appears. The screen is view-only.
System Current Status
Cumulative Run-Time
Days: 0 Hours: 3
Current Run-Time
Days: 0 Hours: 00:14:25
Power Cycles
6
Successful Logins
34
Unsuccessful Logins
1
Local User Logged In
Supervisor
Telnet User Logged In
None
FTP User Logged In
None
No RF Activity Reboot
0
Cumulative Run-Time
Number of hours the system has run since the first power-up. This
information is required for maintenance. Loading new images resets
this value. This field has a resolution of one hour.
Current Run-Time
Approximate time since the unit was last reset.
Power Cycles
Number of times that the unit has been turned off and on again
Successful Logins
Number of successful login attempts
Unsuccessful Logins
Number of failed login attempts
Local User Logged In
Identifies the user currently logged into the configuration menus via
the serial port: None, User or Supervisor
Telnet User Logged In
Identifies the user currently logged into the configuration menus via
telnet: None, User or Supervisor
FTP User Logged In
Identifies the user currently logged into the configuration menus via
FTP: None, User or Supervisor
Sept 2003 Rev 1
49
Configuration
System Security
The System Security menu enables you to control access to the Libra 5800 system. You can control
remote access, assign community names and set passwords and the timeout period.
Setting Ethernet and wireless access to the TCP/IP Stack
Access to a Libra unit can be controlled by restricting the type of link that can be used to make
configuration changes: wired (Ethernet) or wireless access. You can enable or disable the type of link
independently with the two different access settings. These settings do not affect the unit’s ability to
carry traffic just access to the unit’s local management functions.
➧
To enable Ethernet access to the TCP/IP
1. From the Main System Menu, select System Security and press Enter.
The System Security menu appears.
2. Select System Ethernet Access and press Enter.
3. Select the desired setting from the list by using the up and down arrow keys and press Enter.
on
Enable configuration access to the unit from
Ethernet
off
Disable configuration access to the unit from
Ethernet
4. Press Enter. The change has been made.
50
Libra 5800 Series User Guide
System Security
➧
To enable wireless access to the TCP/IP Stack
1. From the Main System Menu, select System Security and press Enter.
The System Security menu appears.
2. Select System Wireless Access. The field highlights.
3. Select the desired setting with the up and down arrow keys.
on
Enable configuration access to the unit from the air
off
Disable configuration access to the unit from the air
4. Press Enter. The change has been made.
Sept 2003 Rev 1
51
Configuration
Assigning Community Names
Community names are used to control Simple Network Management Protocol (SNMP) access to the
AP and CPE unit. The Public Community Name allows read-only access. The Private Community
Name allows read and write access. The factory default for the SNMP Public Community Name is
public and for the Private Community Name it is netman. Any SNMP manager can access and
configure any unit on the network as long as the unit has the correct community names and Ethernet
access is enabled (see Setting Ethernet and wireless access to the TCP/IP Stack, page 50).
! CAUTION
The default community names are public knowledge. Ensure you change
names during installation and record the name changes. If you restore
units to factory configurations, you also restore the default (public) names.
➧
To set the public community name
1. From the Main System Menu, select System Security and press Enter.
The System Security menu appears.
2. Select SNMP Public Community Name and press Enter.
3. Type a new community name and press Enter. The change has been made.
52
Libra 5800 Series User Guide
System Security
➧
To set the private community name
1. From the Main System Menu, select System Security and press Enter.
The System Security menu appears.
2. Select SNMP Private Community Name and press Enter. The field highlights.
3. Type a new name and press Enter. The change has been made.
Setting Menu Passwords
You can control access to configuration submenus with passwords. The default passwords are user
and supervisor. A user has read-only access and a supervisor can modify settings. A new
password is hidden by asterisks on the screen when you type it in.
! CAUTION
Default passwords are public knowledge. You should change the default passwords
at installation time and record them. When you restore the factory configurations,
the passwords revert to their defaults.
Sept 2003 Rev 1
53
Configuration
➧
To change the user password
1. From the Main System Menu, select System Security and press Enter.
The System Security menu appears.
2. Select Change User Password and press Enter. The entry field changes to the edit mode,
meaning the field is highlighted in black and you can change the text there.
3. Type the new password and press Enter.
54
Libra 5800 Series User Guide
System Security
4. Select Confirm User Password and press Enter. The data field highlights.
5. Retype the new password to confirm it and press Enter. The password change is complete when
Success appears beside the confirmation field.
Note: If you retype the new password incorrectly, Failure appears and you must start again at Step
2.
Sept 2003 Rev 1
55
Configuration
➧
To change the supervisor password
1. From the Main System Menu, select System Security and press Enter.
The System Security menu appears.
2. Select Change Supervisor Password and press Enter. The data field highlights.
3. Type the new password and press Enter.
56
Libra 5800 Series User Guide
System Security
4. Select Confirm Supervisor Password and press Enter.
5. Retype the new password and press Enter. The change is saved when Success appears beside
the confirmation field. If you retype the new password incorrectly, Failure appears and you must
start again at Step 2.
Sept 2003 Rev 1
57
Configuration
To change the PDA password
1. From the Main System Menu, select System Security and press Enter.
The System Security menu appears.
2. Select Change PDA Password and press Enter. The data field highlights.
3. Type the new password and press Enter.
4. Select Confirm PDA Password and press Enter.
58
Libra 5800 Series User Guide
System Security
5. Retype the new password and press Enter. The change is saved when Success appears beside
the confirmation field. If you retype the new password incorrectly, Failure appears and you must
start again at Step 2.
Setting Auto Logout Timeout
You can specify the maximum time the system can remain idle before a local, telnet or ftp session
automatically ends and the login menu reappears. This security feature ensures that the
configuration menus close when a user forgets to exit. You can enter any value from zero minutes,
meaning the system never times out, to 9,999 minutes – six days, 22 hours, 39 minutes.
➧
To set the automatic logout timeout period
1. From the Main System Menu, select System Security and press Enter.
The System Security menu appears.
2. From the System Security menu, select Auto Logout Timeout (Minutes) and press
Enter. The entry field highlights.
3. Type the period, in minutes, that you want to wait before the configuration menus close.
4. Press Enter. The change has been made.
Sept 2003 Rev 1
59
Configuration
System Commands
Master image files contain the software that runs the Libra. When a master image is rebooted, the
unit copies the MPC CPU code out of the master image in memory and runs it. It will also use the
DSP and FPGA code from the master image to boot those devices. If the master image also contains
a newer version of the BootROM code this will be updated as well.
When you first power up the unit, it runs from the default image loaded in at the factory. With the
System Commands menu you can control which master image file a unit uses to power up, and
which master image file a unit uses to reboot. These are typically the same except in the case where
you want to test an image before setting it as the default.
Note:Wi-LAN will make new images available on its website as they are developed.
Setting Default System Image
The default master image is the file used at power up. If you have more than one image saved on a
unit, you can change the default image. This default image is displayed in the System Revision
Information screen.
➧
To set the default image
1. From the Main System Menu, select System Commands and press Enter.
The System Commands menu appears.
System Commands
Set Default System Image
Reboot Current Image
Reboot a System Image
lib5800-3-2-0.wil
Press Enter to Execute
lib5800-3-2-1.wil
Restore Factory Configuration
Restore Poweron Configuration
Reset MAC Layer Statistics
Press Enter to Execute
Press Enter to Execute
Press Enter to Execute
2. Select Set Default System Image. The field highlights.
3. Press the up and down arrows to select the default image and press Enter. The new image file
will be used each time the Libra 5800 unit is powered up.
Reboot Current Image
Always use the Reboot Current Image command when the IP address changes or any other
parameter that requires an unit reboot to take effect. See Setting the Internet IP Address, page 64.
60
Libra 5800 Series User Guide
System Commands
➧
To reboot the current image
1. From the Main System Menu, select System Commands and press Enter.
The System Commands menu appears.
System Commands
Set Default System Image
Reboot Current Image
Reboot a System Image
lib5800-3-2-0.wil
Press Enter to Execute
lib5800-3-2-1.wil
Restore Factory Configuration
Restore Poweron Configuration
Reset MAC Layer Statistics
Press Enter to Execute
Press Enter to Execute
Press Enter to Execute
2. Select Reboot Current Image and press Enter. The Libra 5800 unit reboots using the
current image.
Rebooting a System Image
Any image in the System Software ROM Images menu including the current one may be used for
rebooting. When you reboot a system image, the system reboots with a new image of your choice,
but this does not change the default image. This is useful for testing an upgrade. If a new image fails
to boot the last running image will be booted.
➧
To reboot a system image
1. From the Main System Menu, select System Commands and press Enter.
The System Commands menu appears.
System Commands
Set Default System Image
Reboot Current Image
Reboot a System Image
lib5800-3-2-0.wil
Press Enter to Execute
lib5800-3-2-1.wil
Restore Factory Configuration
Restore Poweron Configuration
Reset MAC Layer Statistics
Press Enter to Execute
Press Enter to Execute
Press Enter to Execute
2. Select Reboot a System Image. The field highlights.
3. Use the up and down arrows to select the image you want to use and press Enter. The Libra
5800 unit reboots using the selected system image.
Sept 2003 Rev 1
61
Configuration
Restoring the Factory Configuration
You can restore a unit to its factory configuration to put it into a known state for troubleshooting or to
remove customized configurations when decommissioning a unit.
➧
To restore the factory configuration
1. From the Main System Menu, select System Commands and press Enter.
The System Commands menu appears.
System Commands
Set Default System Image
Reboot Current Image
Reboot a System Image
lib5800-3-2-0.wil
Press Enter to Execute
lib5800-3-2-1.wil
Restore Factory Configuration
Restore Poweron Configuration
Reset MAC Layer Statistics
Press Enter to Execute
Press Enter to Execute
Press Enter to Execute
2. Select Restore Factory Configuration and press Enter.The factory configuration
settings are restored.
Important
When you restore factory configurations, many settings revert automatically to
their default values, including passwords, IP Address, radio and configuration
settings.
➧
To restore the power-on configuration
1. From the Main System Menu, select System Commands and press Enter.
The System Commands menu appears.
System Commands
Set Default System Image
Reboot Current Image
Reboot a System Image
lib5800-3-2-0.wil
Press Enter to Execute
lib5800-3-2-1.wil
Restore Factory Configuration
Restore Poweron Configuration
Reset MAC Layer Statistics
Press Enter to Execute
Press Enter to Execute
Press Enter to Execute
2. Select Restore Poweron Configuration and press Enter. The configuration settings
change back to what they were the last time the unit powered up.
62
Libra 5800 Series User Guide
System Commands
Resetting MAC Layer Statistics
Statistics displayed in the MAC Layer Statistics screen are cumulative, but can be reset to track
specific events. See MAC Layer Statistics, page 84, for a list of these statistics and instructions on
how to view them.
➧
To reset the MAC layer statistics
1. From the Main System Menu, select System Commands and press Enter.
The System Commands menu appears.
System Commands
Set Default System Image
Reboot Current Image
Reboot a System Image
lib5800-3-2-0.wil
Press Enter to Execute
lib5800-3-2-1.wil
Restore Factory Configuration
Restore Poweron Configuration
Reset MAC Layer Statistics
Press Enter to Execute
Press Enter to Execute
Press Enter to Execute
2. Select Reset MAC Layer Statistics and press Enter. Success appears, indicating that
values in the MAC Layer Statistics Menu have been reset to 0.
Sept 2003 Rev 1
63
Configuration
Network Configuration
To enable the Libra to communicate via TCP/IP you need to assign an Internet IP address and IP
mask.
Important
When you change the IP address, you must reboot the current image for the
changes to take effect. See Reboot Current Image, page 60, for more information.
Note: The menu shown here is the one for the CPE or LCPE (in a P-MP system) and the remote in a
P-P system. The only difference for AP and base station is that VLAN tagging entries do not
appear.
Setting the Internet IP Address
An IP address must be assigned to each Libra unit in the network. Changes takes effect on the next
reset. You will require the IP address of your Libra unit for this procedure. Your system administrator
should be able to provide it.
➧
To set the Internet IP address
1. From the Main System Menu, select Network Configuration and press Enter.
The Network Configuration menu appears.
2. Select Internet IP Address and press Enter. The data entry field highlights.
3. Type the unique Internet IP address for the unit and press Enter. The Internet IP address is
assigned to the unit.
4. Reboot the current image to make changes take effect. See Reboot Current Image, page 60.
64
Libra 5800 Series User Guide
Network Configuration
Setting the Internet IP Mask
You can obtain an IP Mask value from your system administrator.
➧
To set the Internet IP mask
1. From the Main System Menu, select Network Configuration.
The Network Configuration menu appears.
2. Select Internet IP Mask and press Enter. The field highlights.
3. Type the Internet IP Mask for the unit and press Enter. The Internet IP Mask is assigned to the
unit.
4. Reboot the current image to make the changes take effect. See Reboot Current Image, page 60.
VLAN Tagging
Libra supports 802.1Q VLAN compatibility. In Libra the user can enable the VLAN Tagging option.
Under this option, ethernet packets received from the wired ethernet interface will be tagged with the
VLAN ID and user priority before being transmitted out to the RF interface (uplink tagging), and
ethernet packets received from the RF interface will be untagged before being transmitted out to the
wired ethernet interface (downlink untagging). Packets arriving over the air with different VLAN tags
than the VLAN ID configured on the CPE will be dropped before being sent on the local wire
interface.
Having VLAN tagging enabled can be used when the Libra and AP are under one VLAN domain;
however, the Libra unit does not require a VLAN switch to be connected to the ethernet network. If
the VLAN Tagging option is disabled, the Libra unit will transparently bridge 802.1Q tagged ethernet
Sept 2003 Rev 1
65
Configuration
packets between the wired ethernet interface and the RF interface. A sample scenario of this is when
both Libra and AP units are connected to VLAN switches.
There is no VLAN setting available on the AP. The AP transparently bridges VLAN packets in a
trunking fashion. If users plan to use VLAN functionality on their network, it is advisable to have a
VLAN switch located between the AP and its ethernet network.
Note: All packets with CFI=1 (Canonical Format Inidicator) in the 802.1Q VLAN tag control
information field will be discarded.
➧
To set VLAN Tagging
Note: VLAN Tagging can only be set for the CPE and LCPE in a P-MP system and on the remote in
a P-P system. This item does not appear in the Network configuration menu for the AP or for
the base station.
1. From the Main System Menu, select Network Configuration and press Enter.
The Network Configuration menu appears.
2. Select VLAN Tagging and press Enter. The entry field highlights.
3. Type Enable or Disable and press Enter. The change appears on the screen.
66
Libra 5800 Series User Guide
Network Configuration
VLAN Tagging ID
➧
To set VLAN Tagging ID
1. From the Main System Menu, select Network Configuration and press Enter.
The Network Configuration menu appears.
2. Select VLAN Id and press Enter. The entry field highlights.
3. Type the VLAN ID value (valid values are 1...4096) and press Enter. The change appears on the
screen.
Sept 2003 Rev 1
67
Configuration
VLAN Tagging User Priority
➧
To set VLAN Tagging User Priority
1. From the Main System Menu, select Network Configuration and press Enter.
The Network Configuration menu appears.
2. Select User Priority and press Enter. The entry field highlights.
3. Type the priority value and press Enter. The change appears on the screen.
Setting Local Network MAC Filtering (LNMF)
Local Network MAC Filtering also known as LAN CAM (Local Area Network Content Addressable
Memory) filtering enables you to filter MAC addresses so that data traffic is handled more efficiently.
A LNMF filter is simply a list of MAC address of units that are located on the same wired LAN. Data
flowing between units in the list is not sent across the wireless link. The table shows up to eight local
MAC addresses that are automatically discovered by the unit when LNMF filtering is on. LNMF
filtering enables data to be handled more efficiently and saves radio bandwidth for traffic that really
needs it.
68
Libra 5800 Series User Guide
Network Configuration
➧
To set LNMF filtering
1. From the Main System Menu, select Network Configuration and press Enter.
The Network Configuration menu appears.
2. Select Local Network Mac Filter and press Enter. The entry field highlights.
3. Type On or Off and press Enter. The change appears on the screen.
Sept 2003 Rev 1
69
Configuration
Radio Configuration
You can configure radio settings such as RF station IDs, Sector ID, Synchronization ID, center
frequencies transmit power and Base Station modulation type with the Radio Configuration menu.
Setting the RF Station ID (P-MP Only)
Each AP, CPE or LCPE unit requires a unique RF Station ID to identify it on the network. Every unit
must have a unique RF Station ID. No two units in a single sector (i.e. one controlled by a single AP)
may have the same ID.
➧
To set the RF station ID
1. From the Main System Menu, select Radio Configuration and press Enter.
The Radio Configuration menu appears.
Radio Configuration
OFDM Station Type
RF Station Id [1..2047]
Sector Id [0..31]
Synchronization Id [0..1]
Base Station
-> 2
1
0
Base Station Tx
Disable
Center Freq (kHz)
5787000
Set Tx Power (dBm) [-3...17]
Modulation Type
17
QAM 16
Note: Changes on this menu aside from Tx Power require that the
unit be rebooted to take effect.
2. Select RF Station Id [1..2048] and press Enter. The entry field highlights.
3. Type a unique number for the RF Station ID and press Enter. Zero is not a valid Station ID.
4. Record the RF Station ID you have assigned to the unit.You will need to know this number when
you configure the polling list on the Access Point.
5. Reboot the system to effect the changes. See Reboot Current Image, page 60.
70
Libra 5800 Series User Guide
Radio Configuration
Setting the Sector ID
Each Libra unit can have a Sector ID to identify its AP within the cell on the network. This prevents
Libra units from connecting to different APs which may have the same Center Frequency.
➧
To set the Sector ID
1. From the Main System Menu, select Radio Configuration and press Enter.
The Radio Configuration menu appears.
Radio Configuration
OFDM Station Type
RF Station Id [1..2047]
Sector Id [0..31]
Synchronization Id [0..1]
Base Station
-> 2
1
0
Base Station Tx
Disable
Center Freq (kHz)
5787000
Set Tx Power (dBm) [-3...17]
Modulation Type
17
QAM 16
Note: Changes on this menu aside from Tx Power require that
the unit be rebooted to take effect.
2. Select Sector Id [0..31] and press Enter. The entry field highlights.
3. Type a unique number for the Sector ID and press Enter. Zero is not a valid Sector ID.
4. Reboot the system to effect the changes. See Reboot Current Image, page 60.
Sept 2003 Rev 1
71
Configuration
Setting the Synchronization ID
Because of OFDM’s superior multipath performance it is possible for the CPE to falsely synchronize
on an AP from a different sector operating at the same frequency. In order to avoid this type of error,
the APs and CPEs of each sector can have one of two possible OFDM synchronization patterns.
These patterns are orthogonal, thus a CPE with a given Synchronization ID will never synch to an AP
with the other synch. Every CPE in the sector must have the same Synchronization ID as the AP of
that sector.
➧
To set the Synchronization ID
1. From the Main System Menu, select Radio Configuration and press Enter.
The Radio Configuration menu appears.
Radio Configuration
OFDM Station Type
RF Station Id [1..2047]
Sector Id [0..31]
Synchronization Id [0..1]
Base Station
-> 2
1
0
Base Station Tx
Disable
Center Freq (kHz)
5787000
Set Tx Power (dBm) [-3...17]
Modulation Type
17
QAM 16
Note: Changes on this menu aside from Tx Power require that
the unit be rebooted to take effect.
2. Select Synchronization Id [0..1] and press Enter. The entry field highlights.
3. Type a 0 or 1 to select the Synchronization ID and press Enter. Factory default is zero (0).
4. Reboot the system to effect the changes. See Reboot Current Image, page 60.
Setting the RF Center Frequency
Libra 5800 equipment uses Time Division Duplexing (TDD). In TDD, the units transmit and receive
on the same frequency. They alternate in time to provide the duplexing capability. The frequency of
these channels depend on the model of equipment used.
72
Libra 5800 Series User Guide
Radio Configuration
The center frequency is a frequency located in the middle of each set of transmit and receive
channels and it defines the group of frequencies situated around it.
➧
To set the RF Center Frequency
1. Move the cursor to the Set RF Center Frequency field and press Enter. The entry field is
highlighted.
2. Enter the frequency value assigned to this unit in kHz and press enter to effect the changes. The
unit does not require rebooting for this change to become effective.
Radio Configuration
OFDM Station Type
RF Station Id [1..2047]
Sector Id [0..31]
Synchronization Id [0..1]
Base Station
-> 2
1
0
Base Station Tx
Disable
Center Freq (kHz)
5787000
Set Tx Power (dBm) [-3...17]
Modulation Type
17
QAM 16
Note: Changes on this menu aside from Tx Power require that
the unit be rebooted to take effect.
Sept 2003 Rev 1
73
Configuration
Setting Tx Power
The transmitter power setting enables you to adjust the strength of the transmit signal sent from the
Libra unit to the antenna. The range is -3 dBm to 17 dBm.
➧
To set the Tx power
1. From the Main System Menu, select Radio Configuration and press Enter.
The Radio Configuration menu appears.
Radio Configuration
OFDM Station Type
RF Station Id [1..2047]
Sector Id [0..31]
Synchronization Id [0..1]
Base Station
-> 2
1
0
Base Station Tx
Disable
Center Freq (kHz)
5787000
Set Tx Power (dBm) [-3...17]
Modulation Type
17
QAM 16
Note: Changes on this menu aside from Tx Power require that
the unit be rebooted to take effect.
2. Select Set Tx Power and press Enter. The field highlights.
3. Type in the signal strength. The new signal strength is applied.
74
Libra 5800 Series User Guide
Radio Configuration
Setting the Modulation Type
The OFDM Modulation Type can be selected from among the following possible values: "QAM 16",
"QPSK" and "BPSK". The selected type will be added to the next superframe transmitted.
➧
To set the Modulation Type
1. From the Main System Menu, select Radio Configuration and press Enter.
The Radio Configuration menu appears.
Radio Configuration
OFDM Station Type
RF Station Id [1..2047]
Sector Id [0..31]
Synchronization Id [0..1]
Base Station
-> 2
1
0
Base Station Tx
Disable
Center Freq (kHz)
5787000
Set Tx Power (dBm) [-3...17]
Modulation Type
17
QAM 16
Note: Changes on this menu aside from Tx Power require that
the unit be rebooted to take effect.
2. Select Modulation Type and press Enter. The field highlights.
3. Use the up/down arrows to select the desired modulation type from the pull down list, and press
enter again. This change requires a reboot to take effect.
Sept 2003 Rev 1
75
Configuration
Remote Station Configuration Menu (P-MP Only)
This menu only appears on the Libra 5800 when set up as an AP. When setup as a P-P unit there is
only one unit to poll with an id of zero so this menu is not needed. It displays a portion of a larger
table. The table row order determines the polling sequence of the units. Changes to the table take
effect immediately.
The table cannot contain zeros between valid radio ids. If a radio Id within the table is set to zero
(hence removing the entry from the polling list), all values following this entry will be moved one entry
toward the beginning of the table.
Remote Station Configuration
Maximum Remote Distance (Km) (1...50)
Remote
Number
1
2
3
4
5
6
7
8
76
Radio Id
0..2047
1
2
0
0
0
0
0
0
Remote
Number
9
10
11
12
13
14
15
16
-> 10
Radio Id
0..2047
0
0
0
0
0
0
0
0
Remote
Number
17
18
19
20
21
22
23
24
Radio Id
0..2047
0
0
0
0
0
0
0
0
Field Name
Type
Comments
Maximum Remote
Distance (Km)
Static Integer
(1..50)
Sets the distance to the CPE farthest from
the AP. This value determines the timeout
for detecting late poll responses. Factory
default is 10.
Remote Number
Static Integer
(1..2048)
Sequential number for reference only.
Libra 5800 Series User Guide
Remote Station Configuration Menu (P-MP Only)
Field Name
Type
Comments
Radio Id
Variable Integer
(1..2048)
Identifies a unit to be polled. Values
correspond to the RF Station Id field in the
Radio Configuration Menu (see page 28). A
given ID may be listed more than once, in
which case that unit is polled more than
once in a single polling cycle. A value of
zero (an invalid RF Station ID) means the
table entry is not polled. Factory default is 1
for remote number 1, 2 for remote number
2, and zero for all other remotes.
Sept 2003 Rev 1
77
Configuration
IP/MBR Filter Configuration
IP filters help ensure that only valid subscribers use the wireless link. IP address filters are actually
tables that contain lists of IP addresses and masks on the local Ethernet. If an address is listed in the
table, the CPE will pass data packets to and from it. If the address is not defined by one of the filters,
the unit will not pass data packets to it or from it.
Air
IP Address Filter Table
xxx.xx.xx.x
xxx.xx.xx.x IP
xxx.xx.xx.x Addresses
Wire
Data packets pass only
if the IP address is
listed in the IP filter table
An IP address filter is defined by a range and a base value. IP address filtering improves system
security and helps manage data throughput.
The IP filter is created by combining the Subnet Mask and the IP Network address such that a binary
'1' in the subnet mask will preserve the corresponding digit in the IP Network address. For example
to filter on the range of addresses 192.8.62.0-255, a value of 192.8.62.0 would be entered as the IP
Network address and a value of 255.255.255.0 as the Subnet Mask. Alternatively to filter specifically
on the address 192.8.62.8, the values of 192.8.62.8 for the IP Network Address and
255.255.255.255 for the Subnet Mask would be entered.
The Maximum Burst Rate (MBR) option provides a means of limiting the maximum data rate on
individual CPE's. Use of this feature allows efficient management of the network by ensuring that
specific CPE's receive the level of service to which they are entitled.
Since the downstream Air link is broadcast, it is necessary to use MBR in conjunction with IP filtering.
This ensures that the maximum burst rate limit is applied only to data streams associated with the
particular CPE to which it is intended.Libra Unit
Setting the IP Filtering Option
You can set the IP Filtering Option to Disable to enable all data to pass through a CPE, or you can
set it to Filter to filter out certain IP address ranges defined in the IP Filter Configuration Menu.
The factory default is Disable. When set to IP Filtering, any packets other than IP and ARP
are rejected. When set to IP Filtering with MBR, the maximum burst rate for the CPE is
enforced in addition to filtering.
Note: IP Filtering is always set to disable on AP units. It can be set to Disable or IP Filtering
on CPEs.
78
Libra 5800 Series User Guide
IP/MBR Filter Configuration
➧
To set the IP Filtering option
1. From the Main System Menu, select IP/MBR Filter Configuration and press Enter.
The IP/MBR Filter Configuration menu appears.
2. Select IP Filtering Option. The field highlights.
3. Use the up and down arrow keys to select one of the following options.
Disable
Enables the passage of all received data through the remote unit
Filter
This prevents data destined for particular IP addresses from going through
particular remotes. This option does not appear on a base unit.
Filter with
MBR
This option will enforce filtering and enforce the maximum burst rate
4. Press Enter to select the option.
Configuring the IP Filter
To define an IP filter, you indicate host and mask IP addresses on the local Ethernet and set the filter
to On. Data packets sent to these addresses or originating from them will be passed by the CPE.
Packets coming from or bound for addresses not defined in the filters will be dropped by the CPE.
This provides privacy in two directions, by allowing only authorized users to send or receive. Only
remote units can have IP filters and the IP Filter Configuration option appears only on the menus of
the remote units.
If you set the IP Filtering Option to Filter as described in Setting the IP Filtering Option, page 78, but
set all the filters to off, as described in this section, then no IP packets can pass through the unit.
Sept 2003 Rev 1
79
Configuration
Note: If you turn on IP filtering and want to allow broadcast traffic to flow through the unit, enter the
IP Broadcast address into the list; i.e.
Host/Net Address = 255.255.255.255 and
Host/Net Mask = 255.255.255.255.
➧
To configure the remote IP filter
1. Follow the procedure in the previous section to enable IP Filtering Option by setting it to Filter.
Filter
A numbered list of the filters
Type
Filter type can be Off or On
Host/Net
Address
IP Filter net or host IP Address
Host/Net
Mask
Mask applied to the filter host or net address. Address and Mask = host and net
number
2. Select On in the filter row you are defining and press Enter. The entry field highlights.
3. Use the arrow keys to select the desired filter type where
80
Off
Do not filter the packets. This is the factory default
On
Filter the packets
Libra 5800 Series User Guide
IP/MBR Filter Configuration
4. Press the right arrow key on the keyboard to move to the Host/Net Address field and press
Enter.
The entry field highlights.
5. Type the IP Address of the Host/Net and press Enter. You have defined the IP Address.
6. Press the right arrow key on the keyboard to move to the Host/Net Mask field and press Enter.
The entry field highlights.
7. Type the IP Address of the Host/Net Mask and press Enter.
8. Repeat steps to create additional IP filters.
Setting the MBR Filtering Option
You can set the IP Filtering Option to IP Filtering with MBR to enforce a maximum allowable
burst rate for a given CPE. The factory default is Disable. When set to IP Filtering with
MBR, any packets other than IP and ARP are rejected and the maximum burst rate for the CPE is
enforced.
➧
To set the MBR Filtering option
1. From the Main System Menu, select IP/MBR Filter Configuration and press Enter.
The IP/MBR Filter Configuration menu appears.
2. Select IP Filtering Option. The field highlights.
Sept 2003 Rev 1
81
Configuration
3. Use the up and down arrow keys to select the following option.
Filter with
MBR
This option will enforce filtering and enforce the maximum burst rate
4. Press Enter to select the option.
5. Select the Uplink (Kbits/s) [0...2500]option to set the MBR from the CPE to the AP.
6. Type in the MBR allowed for that CPE. Note: entering zero in that field means that maximum
burst rate is NOT enforced for that CPE.
82
Libra 5800 Series User Guide
IP/MBR Filter Configuration
7. Select the Downlink (Kbits/s) [0...2500]option to set the MBR from the AP to the CPE.
8. Type in the MBR allowed for that CPE. Note: entering zero in that field means that maximum
burst rate is NOT enforced for that CPE.
Sept 2003 Rev 1
83
Configuration
MAC Layer Statistics
The MAC Layer Statistics screen displays various statistics about a unit’s performance, including
Ethernet receive statistics, OFDM decoder statistics, OFDM channel statistics, approximated BERs,
Ethernet transmit statistics, OFDM encoder statistics, OFDM unpacking statistics and throughput
statistics. The statistics for an AP and a CPE may not match exactly because of link quality. MAC
layer statistics are not automatically updated when viewed via telnet.
➧
To view the MAC layer statistics
1. From the Main System Menu, select MAC Layer Statistics and press Enter.
The MAC Layer Statistics screen appears. The screen is view-only.
Ethernet Receive Statistics
84
Ethernet Receive
Statistics
Describes the data received at the Libra Unit from the Ethernet (10/
100 BaseT connection)
Total Frames
Received
Number of Ethernet frames received
Frames For Local
Host
Number of Ethernet frames received and destined for the unit
Receive Errors
Number of Ethernet frames received with errors
Frames Dropped
Number of Ethernet frames dropped because the wireless link is
running at capacity
Libra 5800 Series User Guide
MAC Layer Statistics
OFDM Decoder Statistics
OFDM Decoder
Statistics
Describes Reed Solomon decoder statistics
Total Superframes
Decoded
Number of superframes decoded by the Reed Solomon decoder
Ethernet Frames
For Local
Number of Ethernet frames, destined for the unit, that went through
the Reed Solomon decoder without uncorrectable errors
Uncorrected
Superframes
Number of superframes received by the Reed Solomon decoder that
have uncorrected errors
Corrected Bytes
Number of bytes through the Reed Solomon decoder that have been
corrected
Total Words
Decoded (x1E6)
Number of words received by the Reed Solomon decoder that have
been decoded
OFDM Channel Statistics
RSSI (dBm)
Received Signal Strength Indicator in dBm
Null Depth (dB)
Difference in dB between the lowest signal sub carrier and the
highest signal sub carrier. This value is an indication of the level of
multi-path signals present in the link.
Fade Margin (dB)
Signal-to-noise ratio of the signal; value in dB above the sensitivity
threshold.
Approximated BERs
FEC BER (x1E-9)
Bit error rate after forward error correction, multiplied by 10-9
BER (x1E-9)
Bit error rate before Reed Solomon coding, multiplied by 10-9
LFEC BER
Lifetime FEC BER multiplied by 10-9. Cumulative from the last reboot
LBER
Lifetime BER, multiplied by 10-9. Cumulative from the last reboot
Ethernet Transmit Statistics
Ethernet Transmit
Statistics
Describes the data sent from the Libra UnitLibra Unit to the Ethernet
Total Frames
Transmitted
Number of frames sent to the wire from the Libra UnitLibra Unit
Frames From Local
Host
Number of Ethernet frames transmitted to the 10/100 Base-T
connection which originated from the unit
Frames Dropped
Number of frames not transmitted because of an error
Sept 2003 Rev 1
85
Configuration
OFDM Encoder Statistics
OFDM Encoder
Statistics
Describes Reed Solomon encoder statistics
Total Superframes
Encoded
Number of superframes encoded by the Reed Solomon encoder
Ethernet Frames
From Local
Number of Ethernet frames sent to the Reed Solomon encoder that
originated from the unit’s local stack
OFDM Unpacking Statistics
OFDM Unpacking
Statistics
Describes statistics on synchronization of OFDM superframes
Superframe Header
Errors
For Wi-LAN use only
Ethernet Header
Errors
For Wi-LAN use only
Synch Errors
For Wi-LAN use only
Late Poll
Responses
A Poll was sent to a CPE, but either there was no response or the
response was late.
Throughput Statistics
Average Throughput
Total throughput in bits per second (bps) with no overhead from the
Libra Unit; this measurement is made over a ten-second average
Maximum Throughput
Highest throughput in bps since the last statistics reset, with no
overhead
Using the Command Line
Libra 5800 units have a command line interface you can use to perform basic tasks while logged into
the configuration menus.
➧
To use the command line interface
1. Log onto a Libra 5800 and press Esc until the wilan> command line prompt appears.
2. Type the command after the prompt and press Enter.
3. Press Esc to return to the main menu.
86
Libra 5800 Series User Guide
Using the Command Line
➧
To display a list of available commands
Type help to display a list of commands.
wilan> help
Command Summary:
menu cls dir del ping linktest
logout exit quit
display help for a specific command:
help <name>
wilan>
List of Commands
Command
Explanation
Example
help
Shows the following command summary list:
menu cls dir del ping linktest logout exit quit
wilan>help menu
menu
Returns to the configuration menus
wilan>menu
cls
Clears the terminal screen
wilan>cls
dir
Shows a file directory
wilan>dir
del <name>
Deletes a file called <name>
wilan>del sample.txt
ping <name>
Pings a remote IP address called <name>
wilan>ping 198.168.200.5
linktest
Runs the Linktest utility
wilan>linktest 2
logout
Logs out of the command line interface
or terminates a remote telnet session
wilan>logout
peek
Displays the contents of a block of memory
wilan>peek 9000
rebootnewest
Reboot the latest master image downloaded
onto the unit (in regards to time, not image
version)
wilan>rebootnewest
rebootcurr
Reboot the current master image running on the
unit
wilan>rebootcurr
crc
Displays CRC values for Wi-LAN image files. If
the file is a master image the CRC for each
component sub-section is displayed.
wilan>crc
exit
Leaves the command line interface or
terminates a remote telnet session
wilan>exit
quit
Logs out of the command line interface or
terminates a remote telnet session
wilan>quit
Sept 2003 Rev 1
87
Configuration
The show command displays some additional information not available from the menu interface.
The following information is available:
wilan>help show
Displays a list of the show commands
wilan>show arp
Displays a list of the ARP cache
wilan>show exception
Displays post-mortem exception information
wilan>show images
Displays the system images files stored in the flash file system
wilan>show memory
Displays the system memory map
wilan>show time
Displays the current system time, measured in seconds, from the last reboot
wilan>show versions
Displays the processor type, part and mask numbers
wilan>show wdog
Displays the number of times the watchdog timer has reset the unit since the
system image was installed
88
Libra 5800 Series User Guide
Field Installation
Introduction
The information in this chapter is intended for qualified installers only.
!
WARNING
All antennas and equipment must be installed by a knowledgeable and
professional installer.
NOTE: WI-LAN RECOMMENDS THE USE OF LIGHTNING SUPRESSORS IN
ALL INSTALLATION.
Before you begin to install equipment in the field, you should develop a network plan, prepare the
customer site, and configure the equipment. The network plan describes the proposed system,
including a link budget, detailed list of all required hardware, Libra units (RD & ER for P-P links;
LCPE, CPE and Access Point for P-MP), antenna locations, cable routing, equipment configuration
settings, and other network requirements. (Wi-LAN offers Network Planning and Site Preparation
support. For more information on services and fees contact your Sales Representative or visit http://
www.wi-lan.com). Network planning should include visits to proposed sites to verify the feasibility of
the network plan and work out the details. Installers will use the network plan document to guide
them through final site preparation, installation, configuration and field testing of each unit. You can
see that a large amount of planning and preparation work is required before equipment is ready to
install. The better the preparation work, the more problem-free the field installation will be.
Sept 2003 Rev 1
89
Field Installation
Installation Process
Network
Plan
Site
Preparation
Configuration
Field
Installation
Testing
Libra 5800 field installation
This section discusses how to install, configure and test a Libra 5800 in the field.
Before you can install Libra equipment in the field
•
All units should be configured as described in Configuration, page 27
•
Site preparation work must be complete
•
Ensure all necessary tools and equipment are available
Site preparation
Site preparation involves checking actual customer site conditions and ensuring that the site is ready
for Libra installation. Each site is unique, however the following guidelines are provided.
1. Obtain a customer site plan or make a site plan. This document should describe where to place
the Libra unit, what kind of equipment to use, and the required configuration settings of the unit.
2. Cables should always be connected without exceeding their recommended bend radius.
3. Ensure that there is enough room for ventilation.
4. Confirm that AC power and Ethernet access are available.
5. Inspect the recommended Libra location to determine the following.
•
the mounting structure is suitable
•
LOS and Fresnel Zone clearances can be met. Because of OFDM’s superior Non Line of Sight
performance these requirements will not be as stringent as for other systems.
• location of the Libra is acceptable
6. Check cable routes and entry and exit points to ensure that they are practical.
90
Libra 5800 Series User Guide
Libra 5800 field installation
Tools and equipment
You will require the following tools and equipment
Standard tool kit
Test equipment, PDA with serial cable
and power
Drill and bits
Libra Unit
Weatherproofing materials
Libra mounting hardware
Ladder
Cables: Outdoor CAT-5 Cable, AC
power cable.
Compass or GPS
Customer acceptance form and
Installation record, if required
Binoculars
Libra 5800 Package Checklist
The CPE shipping package should contains the following items:
•
1x Libra 5800 Unit (with Integrated Antenna (CPE, RD units) or without (AP, LCPE, ER))
•
1x Power Cord
•
1x Power Inserter
•
1x Libra 5800 User Manual (CD ROM)
•
1x Mounting Kit
•
1x Mounting base
•
1x Wall Mount Clamp
•
1x Clamp
•
1x Arm
•
4x Washer Flat M5
•
4x Washer Spring M5
•
4x Nut M5
•
4x Screw Hex Cap M5x0.8 16mm
•
6 x Washer Flat M8
•
4x Washer Spring M8
•
2x Nut M8
•
4x Screw Hex Cap M8x40 (for 1 3/4" dia pole)
•
4x Screw Hex Cap M8x70 (for greater than 1 3/4" dia pole)
•
1x Weather Proof Kit
•
1x O Ring
•
1x Insert
•
1x Coupling Nut
Sept 2003 Rev 1
91
Field Installation
•
1x Shell
•
1x RJ 45 Connector
! CAUTION
Do not "hot plug" the power inserter into the Libra to power up the unit—the
Libra CAT-5/Power connector should first be plugged into the unit at the DIN
connector, and into the "TO RADIO" jack of the power inserter. Next, the
power supply cord should be plugged into the AC outlet to power up the unit.
!
WARNING
Do NOT plug the LAN RJ45 cable into the power inserter marked "TO RADIO",
as this port has power and may damage external equipment.
92
Libra 5800 Series User Guide
Libra 5800 field installation
Libra 5800 installation procedure
Installing the CPE requires assembling the mounting hardware, finding a suitable mounting location,
configuration, and then a link test to check the RF link integrity.
Libra 5800 assembly diagram.
➧
Mounting the Libra Unit
1. Mount the clamps without the Libra unit to the pole or wall as required. The versatile mounting
hardware can be used with large diameter and small diameter poles or as a wall mount.
Additionally an optional knuckle is provided that allows for both pan and tilt functionality while the
mounting clamp is firmly fixed to the pole or wall. See Hardware, page 20 for detailed diagrams of
the mounting hardware.
2. Connect the four pointed star bracket to the unit. Assemble the mounting kit. Ensure that this
connection is in the right direction so that the antenna polarization is as specified in the network
plan for the CPE and RD units and that the connectors are on the lower side of the unit when
mounted to the clamp.
NOTE: IF YOU NEED HORIZONTAL OR VERTICAL POLARIZATION. MOUNT THE LIBRA
ACCORDING TO THE POLARIZATION STICKER LOCATED ON THE BACK OF THE
ANTENNA.
3. For the AP, ER and LCPE mount the external antenna. Connect the antenna to the unit.
4. Point the antenna (Integrated or external) towards the desired location.
Sept 2003 Rev 1
93
Field Installation
5. For the CPE or RD, if Up or Down tilt is required, adjust the unit accordingly such that the face of
the antenna is pointed as directly to the Access Point or the other unit in the P-P link as possible.
6. Lightly tighten the bracket bolts to hold the unit in place.
➧
Connecting the Libra
1. Insert the end of the CAT-5/Power cable into the provided weatherproofing attachment.
2. Connect the CAT-5 / Power cable to the connector located on the back panel of the Libra Unit
and screw in the weatherproofing attachment.
3. Plug the RJ-45 end of the Libra CAT-5 cable into the power inserter in the "TO RADIO" jack.
4. Connect the "TO LAN" side of the power inserter to the PC or network.
5. Locate the AC power cord for the power inserter and plug AC power cord in, and to the AC wall
socket.
➧
Configuration & Link Test
1. Connect a laptop or PDA to the RS-232 port on the Libra. (See Configuration, page 27)
2. Configure unit to the proper center frequencies, etc if you have not done that previously (See
Quick-Start Menu, page 33 or PDA Setup Menu, page 39).
3. Run a "Link Test" for a minute or two (See Appendix D: Linktest and Link Statistics, page 119) to
verify RF link performance.
From the MAC Layer statistics screen (see MAC Layer Statistics, page 84):
•
The Late Poll Response number should not change
•
The fade margin should be adequate for the link conditions and availability requirements.
•
The uncorrected codewords and superframes figures should be zero.
From the Linktest result screen:
•
LBER and BER should both be zero
•
4.
5.
6.
7.
➧
LFade Margin and Fade margin should be similar to the one calculated from link availability
requirements
If the link results are satisfactory, proceed to Step 6 below.
If the link is unsatisfactory first turn the antenna in different directions to benefit from beneficial
multi-paths. If still unsuccessful look for another antenna location with better line-of-sight until you
find a location that is satisfactory.
Refer to the troubleshooting guidelines, Troubleshooting, page 97, if problems persist.
Adjust antenna position to achieve the best Link Test performance.
When Link test performance is satisfactory, tighten mounting hardware.
Test network connectivity
The next step is to verify that a computer attached to the Libra can communicate with a computer
on the other side of the wireless link.
1. Call up the Network Operations Center (NOC).
2. “Ping” the NOC from the CPE.
94
Libra 5800 Series User Guide
Libra 5800 field installation
3. Have the NOC “ping” the CPE from the NOC. A successful ping test means that the network
“sees” the CPE on the network.
4. Connect the CPE Ethernet Port to the customer LAN or PC.
5. Ping from the Customer LAN or PC to the NOC.
6. Use ftp to send some larger test files from the NOC to the PC or other IP device on the LAN.
7. Measure file transfer rates in both directions.
➧
Secure the installation
Finish up the installation by doing the following.
1. Secure all the cables and weatherproof outside cable connection points.
2. Clean up all boxes, cables and other materials.
3. Record installation information as required by the service provider such as
•
Link Distance
•
Site Locations (GPS coordinates)
•
Unit configuration
•
Link quality statistics
•
Antenna cable configuration
•
Unit model, Unit serial number, MAC address, IP address and IP submasks
•
Unit password
• Antenna azimuth.
4. Demonstrate to the customers that the installation works and that they can contact sites on the
far side of the wireless link and upload and download data.
5. Have the customers sign a document to indicate their acceptance of the installation.
Sept 2003 Rev 1
95
Field Installation
96
Libra 5800 Series User Guide
Troubleshooting
Preventative maintenance
Administering and maintaining your system properly can prevent many problems and alert you to
minor problems before they become serious. Some recommendations follow.
•
Measure and document system performance at the time of the original installation.
•
Change menu passwords so that only authorized people can reconfigure the system. See
Setting Menu Passwords, page 53.
•
Maintain the integrity of the system design when adding to or changing a system.
The introduction of new elements to a system can cause problems unless you revise the
network plan to take into account the changes. For example, improper installation of a colocated antenna can add unwanted system interference.
•
Keep records of all changes. Especially document the addition of units, hardware and
software changes, and changes to configuration settings. Configuration errors often cause
other problems. Current records can be compared with original installation records and
function as benchmarks to help in troubleshooting.
•
Keep a log of past and present problems and solutions. Store the log on-site for easy
reference, if possible. The log identifies common failure points and fixes.
•
Before contacting Wi-LAN’s Technical Assistance Center, document the symptoms of the
fault and the steps taken to diagnose and fix the problem. Record the current configuration of
the system.
•
Perform preventive maintenance at a regular interval, for example every six months. See
Appendix D: Linktest and Link Statistics, page 119 for information.
•
Perform link monitor tests to verify the system after periods of extreme weather, and inspect
towers, antennas, ODUs, cables, and connectors for damage.
•
Monitor system performance regularly. Environmental change as well as normal wear and
tear on components can affect system performance.
•
In some cases a bench test is a useful tool in diagnosing problems. See Appendix E: Bench
Configuration Testing, page 123 for information on how to perform a bench test.
Sept 2003 Rev 1
97
Troubleshooting
Troubleshooting areas
There are five areas to keep in mind when troubleshooting:
1. Network integrity: The continued performance and reliability of a network depend upon
maintaining the integrity of the network. If you change a network’s design, you will affect its
operation. Be aware of recent changes to your network.
2. Quality of RF links: Data communication depends first on good RF links. If you establish and
maintain high-quality RF links, then you can be sure the links will carry high-speed data. If the
quality of the RF links degrades for some reason, the quality of the data and the associated
performance will also degrade.
3. Radio Hardware: This consists of three parts: Main unit, antenna, and mounting hardware..
•
To verify the radio performance, you can run diagnostic tests, such as RSSI and link monitor
test.
4. Correct Unit Configuration: Units must be configured properly, according to the network plan.
Configuration errors can cause an inability to communicate or poor performance. The addition of
units or other changes to your system may require you to change configuration settings.
5. Embedded Software: Operate with a proven software image. Download new software if you
suspect that a unit’s software is corrupted. Software images are available from the Wi-LAN
website: http://www.wi-lan.com.
Troubleshooting chart
The following chart provides answers to some of the more common problems that can occur.
Indication
Possible Cause
Corrective Action
High BER
Signal strength is too
low
Perform an RSSI test to determine fade margin
Check for RF absorbent obstacles in the antenna path
Search for indirect RF paths between antennas (i.e.
ones that use beneficial reflections or multipaths)
Check and replace cables
Reposition Libra unit or if possible remove obstruction
Signal strength is too
high
Adjust antennas
Increase distance between units to add attenuation
Adjust Tx Power level
Interference
Change center frequency
Increase RF power
Change polarization of antennas
Increase separation or change location of antenna
Increase separation between co-located antennas
Radio
Performance(Tx/Rx)
Contact Wi-LAN technical support (see Customer
support contacts, page 10)
Bad CAT-5 cable
Visually inspect cable
Change cable
No Ethernet
connection
98
Libra 5800 Series User Guide
Troubleshooting areas
Indication
Low signal
strength/fade
margin
High packet
loss
Sept 2003 Rev 1
Possible Cause
Corrective Action
Bad connectors
Visually inspect connectors
Change cable/connectors
Temperature
Determine if ambient operating temperature is too high
or low
Change ambient temperature to specified range.
Bad radio
Bench test system
Change Libra unit
Poor antenna
alignment
Use RF diagnostics to realign antenna
Bad cable
Visually inspect cables/connectors
Sweep cable
Change cable/connectors
Incorrect radio
configuration
Bench test the radio to confirm configuration
Reconfigure radio
No Fresnel zone
clearance or severe
NLOS
Check LOS for obstacles such as trees
Change alignement of antenna to take advantage of
beneficial multipath signals
Increase antenna height to obtain clearance
Move antenna to better location or remove obstacle if
possible
Signal strength too
low
Perform RSSI test to determine fade margin
Check for obstacles in RF path
Check for interference
Point antenna in different directions to take advantage
of beneficial multipaths
Reposition Libra or antenna to establish better LOS
Replace Libra and perform bench test
Interference
Change center frequency
Increase RF power
Change polarization of antennas
Get separation or change physical location of antenna
Temperature
Determine if ambient operating temperature is too high
or low
Increase or reduce ambient temperature
99
Troubleshooting
Indication
Possible Cause
Corrective Action
No
communicatio
n between
units
Configuration
problems
Check the following configuration settings:
• Station ID–Each unit must have a unique RF
Station ID
• Sector ID-CPE must have the same as the
AP in their sector
• Synch ID-CPE must have the same as the AP
• Center frequency–Units must have the same
center frequency to communicate
• IP address/subnet mask–Incorrectly configured IP addresses result in units being unable
to communicate. Check that IP addresses are
unique for each unit within a subnet and that
the correct subnet mask is being used.
Poor link
performance
Distance
Check the maximum remote distance configuration
setting
Excessive Bit errors
and processing errors
Multipath interference–Align or relocate antennas or
radio.
Signal absorption
Check LOS for obstacles such as trees
Change alignement of antenna to take advantage of
beneficial multipath signals
Move antenna to better location or remove obstacle if
possible
Interference
Set units from different systems in the same
geographical area to different center frequencies–
overlapping wavelengths from other systems will
degrade performance
Overpowering colocated unit
Output power from one unit can overpower another, colocated, radio, even if units operate on different
channels
SNMP can’t
be activated
IP filtering configured
incorrectly for SNMP
Change IP filtering to enable SNMP
New
configuration
will not take
Incorrectly upgraded
software
Reload the software image using ftp
Unable to
access main
configuration
menu
Invalid passwords
Contact Wi-LAN for information about how to re-enter
your system. Units will need to be reset (see Customer
support contacts, page 10)
Unit will not
operate
Faulty unit
Bench test unit
100
Libra 5800 Series User Guide
Troubleshooting areas
Indication
Sept 2003 Rev 1
Possible Cause
Corrective Action
Corrupt unit software
Reload unit software
101
Troubleshooting
102
Libra 5800 Series User Guide
Appendix A: Upgrading Software
Background Information
Libra units can be upgraded by loading new Master Image Files to the unit. A Master Image File
contains all software components required by the processors running on the units. These
components are the main CPU, the FPGA, and the DSP. Upgrades may be skipped unless specified
otherwise on the Wi-LAN web site, when upgrading to newer Master Image versions.
Upgrading software via ftp
New Libra software images can be downloaded from www.wilan.com/support/. This section explains
how to use ftp to obtain a new software image for a Libra unit.
Before you can download a new software image you need the following items.
•
A copy of the software image file
•
A PC connected to the unit via the network
• Basic network software installed on a PC, including ftp, ping and telnet. SNMP manager is
optional.
➧
To download software with ftp
1. Download new image files from Wi-LAN’s web site to the PC.
2. Open a DOS session on your PC. From Windows®, choose Start, Programs, MS-DOS Prompt.
3. Copy the new image files to a known directory, for example c:\projects\wib\current\bin.
Create a new directory if a suitable directory does not already exist.
This directory is an example only.
C:> copy <image filename> c:\projects\wib\current\bin
4. Go to the directory by typing cd c:\projects\wib\current\bin and press Enter.
Sept 2003 Rev 1
103
Appendix A: Upgrading Software
5. On the Libra unit, type dir and press Enter to list the file/s existing on the unit.
6. Ensure that there is enough free space to hold the new Master Image file. If there is not, the files
that are not protected (protected files are identified by "PR") can be deleted using the "del"
command. Any files in use by the unit are always protected. Unused files will be listed as "read/
write" (RW), "read only" (RO), or "write only" (WO).
7. On the PC, type ftp <IP address> and press Enter, where the <IP address> is the IP
address of the Libra AP. The PC connects to the AP.
This IP address is an example only.
Enter the IP address of your AP in P-MP network or the
Base in P-P network.
c:\projects\wib\current\bin> ftp 192.168.3.85
Connected to 192.168.3.85
220 Wi-LAN xxxx OFDM Ethernet Bridge FTP Server
User (192.168.3.85(none)):
Note: ftp must be installed on your PC.
8. Type “ofdm” and press the Enter key. The password prompt appears.
9. Type “supervisor” for the password and press Enter. (Supervisor access is required to
change unit settings–see Setting Menu Passwords, page 53). The ftp> prompt appears.
10. After the ftp prompt, type the following “put” command.
ftp> put .\<image filename>
Note: Leave a single space after “put”.
where
104
.
Current directory that contains the image file (for example,
c:\projects\wib\current\bin)
<image filename>
Name of the Master Image file
Libra 5800 Series User Guide
Upgrading software via ftp
11. Press Enter. The image file transfers from the PC to the unit. The status of the transfer, the file
size and the transfer time are displayed.
ftp>put .\<image filename>
200 Port set okay
150 Opening binary mode connection
226 Transfer complete
10484 bytes sent in 0.11 seconds (95.31 Kbytes/sec)
ftp>bye
Tip: If you type ftp> help, online instructions for using ftp are displayed.
12. Type bye and press Enter. The prompt returns to c:\projects\wib\current\bin>, and the
ftp connection closes.
Rebooting the Unit Using Menu Commands
Select the new software image to run using the options from the System Commands menu. These
are described in Setting Default System Image, page 60 to select the new software.
Rebooting the Unit Using FTP "Reboot" Files
Special FTP reboot files can be used to reboot the current image running on the unit or to reboot the
newest image downloaded to the unit. Files can be created called "reboot_current" and
"reboot_newest" with no file extension. In these files are placed the supervisor password for the
Libra unit.
FTP in one of the files to the Libra unit. After receiving the file, the Libra unit will check the file for the
correct password. If the password matches the current supervisor password the unit will wait 30
seconds and the reboot using the current or newest image.
NOTE: "Newest Image" refers to the unit downloaded most recently. It can be in fact an image that is
has a version number older than what is currently running.
Sept 2003 Rev 1
105
Appendix A: Upgrading Software
106
Libra 5800 Series User Guide
Appendix B: SNMP MIB
Overview
Simple Network Management Protocol (SNMP) Management Information Base (MIB) and SNMP
Agent software come with each BWS unit. This software lets you configure, monitor, and control units
via the Ethernet or air.
This lets you easily configure units in remote and hard-to-reach locations, and network managers
can avoid or reduce downtime by monitoring network throughput, packet collision rates, and
interference.
SNMP is a protocol used to remotely manage network elements by polling, setting terminal values,
and monitoring network statistics and events. It provides a mechanism for the exchange of
management information in a TCP/IP-based Internet environment.
The SNMP manager uses community names to determine access privileges (see Assigning
Community Names, page 52).
SNMP management software is installed on a networked PC or workstation and enables a network
administrator to remotely manage BWS systems. MIB is simply a list of objects that SNMP can
monitor.
SNMP consists of three elements: a manager, an agent and an MIB.
SNMP Element
Description
Manager
Is installed on the network’s host computer and is controlled by the network
administrator. From the host, the Manager configures agents, or polls agents for
information.
Agent
Runs on each unit. An agent accepts configuration commands from the
manager and collects network and terminal information specified in the MIB.
Management
Information
Base (MIB)
Is a database accessed by commands that you execute using the SNMP
manager. There is a standard MIB and a Wi-LAN customized MIB that stores
information relevant to the operation of a wireless network.
Sept 2003 Rev 1
107
Appendix B: SNMP MIB
Obtaining SNMP Software
SNMP network management software is available commercially or as shareware. For instance, you
can download a free evaluation copy from www. mg-soft.com.
You also require a proprietary MIB file, which you can download from www. wi-lan.com or obtain by
contacting Wi-LAN’s Technical Assistance Center. After you download the MIB file, you must compile
it with the SNMP compiler.
Using Wi-LAN MIB Object Identifier Nodes
All OID (Object Identifier) nodes in the private Wi-LAN MIB are numbered 1.3.6.1.4.1.2686.n, where
“n” is a private Wi-LAN MIB node number or branch of numbers.
All nodes containing statistical information are cleared on powerup and reset.
Values in all writeable nodes are stored in Flash memory and are retained until overwritten by the
administrator, even following power down or reboot.
System Commands
Node Label
Object ID
Type
Access
Description
defaultImage
1.3.6.1.4.1.2686.1.
1.1
INTEGE
R
Read/
Write
Set Default System Image:
Factory Image (-2) or a file ID
displayed by the dir command
reboot
1.3.6.1.4.1.2686.1.
2.1
INTEGE
R
Write-only
Reboot Current Image
restFactory
1.3.6.1.4.1.2686.1.
2.2
INTEGE
R
Write-only
Restore Poweron Configuration
restPoweron
1.3.6.1.4.1.2686.1.
2.3
INTEGE
R
Write-only
Restore the Poweron/Reset
Configuration
rebootNewImag
e
1.3.6.1.4.1.2686.1.
2.4
INTEGE
R
Write-only
Reboots new image.
108
Libra 5800 Series User Guide
Using Wi-LAN MIB Object Identifier Nodes
Network Configuration
Node Label
Object ID
Type
Access
Description
ipAddr
1.3.6.1.4.1.2686.1.1.2
IpAddress
Read/
Write
Internet IP Address
ipMask
1.3.6.1.4.1.2686.1.1.3
PhysAddr
ess
Read/
Write
Internet IP Mask
macAddr
1.3.6.1.4.1.2686.1.1.4
PhysAddr
ess
Read-only
Ethernet MAC Address
lancamFilterFlag
1.3.6.1.4.1.2686.1.1.7
INTEGER
(0,1)
Read-only
Software LANCAM
Filtering: off (0) or on
(1)
swLANCAMFilterTa
ble
1.3.6.1.4.1.2686.1.1.8
Table
Read-only
N/A
lancamFilterNumber
1.3.6.1.4.1.2686.1.1.8.1
.1.1
to
1.3.6.1.4.1.2686.1.1.8.1
.1.8
INTEGER
(1..8)
Read-only
Software LANCAM
table row number
lancamFilterMACAd
dr
1.3.6.1.4.1.2686.1.1.8.1
.2.1 to
1.3.6.1.4.1.2686.1.1.8.1
.2.8
PhysAddr
ess
Read-only
LANCAM Addresses
routingType
1.3.6.1.4.1.2686.1.1.9
INTEGER
(1,3,4)
Read/
Write
IP Routing Option:
Transparent (1),
IP Filtering (3)
FilterWithBER(4)
VLAN Tag
1.3.6.1.4.1.2686.1.1.39
INTEGER
(0,1)
Read/
Write
VLAN tagging:
Enable(1) or
Disable(0)
VLANIdentity
1.3.6.1.4.1.2686.1.1.40
INTEGER
(1..4096)
Read/
Write
VLAN Identification
number
VLANUserPriority
1.3.6.1.4.1.2686.1.1.41
INTEGER
(0..7)
Read/
Write
VLAN User Priority
Sept 2003 Rev 1
109
Appendix B: SNMP MIB
Radio Configuration
Node Label
Object ID
Type
Access
Description
stationType
1.3.6.1.4.1.2686.1.1.10
INTEGER
(1,2)
Read-only
OFDM Station Type:
Base-Station (1)
or Remote (2)
radioId
1.3.6.1.4.1.2686.1.1.11
INTEGER
(0..2048)
Read/
Write
RF Station Id
rxCenterFreqTable
1.3.6.1.4.1.2686.1.1.12
Table
Read-only
N/A
rxCenterFreqNumb
er
1.3.6.1.4.1.2686.1.1.12.
1.1.1
to
1.3.6.1.4.1.2686.1.1.12.
1.1.64
INTEGER
(1..64)
Read-only
Frequency table row
number
rxCenterFreqValue
1.3.6.1.4.1.2686.1.1.12.
1.2.1
to
1.3.6.1.4.1.2686.1.1.12.
1.2.64
INTEGER
(1..64)
Read-only
N/A. (Receive
frequency values
obtained from ODU)
rxCenterFreqValue
1.3.6.1.4.1.2686.1.1.12.
1.2.1
to
1.3.6.1.4.1.2686.1.1.12.
1.2.64
NTEGER
(1..64))
Read-only
N/A. (Receive
frequency values
obtained from ODU
txCenterFreqTable
1.3.6.1.4.1.2686.1.1.13.
1.1.1
to
1.3.6.1.4.1.2686.1.1.13.
1.1.64
Table
Read-only
N/A
txCenterFreqNumb
er
1.3.6.1.4.1.2686.1.1.13.
1.1.1
to
1.3.6.1.4.1.2686.1.1.13.
1.1.64
INTEGER
(1..64)
Read-only
Frequency table row
number
txCenterFreqValue
1.3.6.1.4.1.2686.1.1.13.
1.2.1
to
1.3.6.1.4.1.2686.1.1.13.
1.2.64
INTEGER
Read-only
N/A. (Transmit
frequency values
obtained from ODU).
rxCenterFreq
1.3.6.1.4.1.2686.1.1.14
INTEGER
Read/
Write
Set RF Rx Center
Freq (MHz): valid
values are defined by
rxCenterFreqValue
110
Libra 5800 Series User Guide
Using Wi-LAN MIB Object Identifier Nodes
Node Label
Object ID
Type
Access
Description
txCenterFreq
1.3.6.1.4.1.2686.1.1.15
INTEGER
Read/Writ
Set RF Tx Center
Freq (MHz) : valid
values are defined by
txCenterFreqValue
ifibTxPower
1.3.6.1.4.1.2686.1.1.16
INTEGER
(0x00..0x1
F)
Read/Writ
Set IFIB Tx Power
sectorID
1.3.6.1.4.1.2686.1.1.30
INTEGER
(0..31)
Read/
Write
Sector ID
synchID
1.3.6.1.4.1.2686.1.1.33
INTEGER
(0..1)
Read/
Write
Synchronization ID
modulationType
1.3.6.1.4.1.2686.1.1.32
INTEGER
R/W
Modulation Type
QAM16(1),
QPSK(2),
BPSK(3)
Sept 2003 Rev 1
111
Appendix B: SNMP MIB
System Security
Node Label
Object ID
Type
Access
Description
passWord
1.3.6.1.4.1.2686.1.
1.17
DisplayStr
ing (Size
0..31)
Read/
Write
Change Supervisor
Password
ethernetAccess
1.3.6.1.4.1.2686.1.
1.18
INTEGER
(0,1)
Read/
Write
System Ethernet Access:
Disabled (0), Enabled (1)
wirelessAccess
1.3.6.1.4.1.2686.1.
1.19
INTEGER
(0,1)
Read/
Write
System Wireless Access:
Disabled (0), Enabled (1)
publicName
1.3.6.1.4.1.2686.1.
1.20
DisplayStr
ing (Size
0..31)
Read/
Write
SNMP Public Community
Name
privateName
1.3.6.1.4.1.2686.1.
1.21
DisplayStr
ing (Size
0..31)
Read/
Write
SNMP Private Community
Name
IP Filter Configuration
Node Label
Object ID
Type
Access
Description
ipFilterTable
1.3.6.1.4.1.2686.1.1.22
Table
Read-only
N/A
ipFilterNumber
1.3.6.1.4.1.2686.1.1.22.
1.1 to
1.3.6.1.4.1.2686.1.1.22.
1.1.1
INTEGER
Read-only
Filter
ipFilterOnOff
1.3.6.1.4.1.2686.1.1.22.
1.2.1 to
1.3.6.1.4.1.2686.1.1.22.
1.2.10
INTEGER
(0-1)
Read/
Write
Type: Off(0),
On (1)
ipFilterAddr
1.3.6.1.4.1.2686.1.1.22.
1.3.1 to
1.3.6.1.4.1.2686.1.1.22.
1.3.10
IpAddress
Read/
Write
Host/Net Address
ipFilterMask
1.3.6.1.4.1.2686.1.1.22.
1.4.1 to
1.3.6.1.4.1.2686.1.1.22.
1.4.10
IpAddres
S
Read/
Write
Host/Net Mask
112
Libra 5800 Series User Guide
Using Wi-LAN MIB Object Identifier Nodes
System Current Status
Node Label
Object ID
Type
Access
Description
systemStatus
1.3.6.1.4.1.2686.1.3.1
INTEGER
(0..1)
Read-only
N/A: Down (0), Up (1)
networkStatu
s
1.3.6.1.4.1.2686.1.3.2
INTEGER
(0..1)
Read-only
N/A: Off-line (0), On-line (1)
ExtinctParam
1.3.6.1.4.1.2686.1.3.3
INTEGER
Read-only
Obsolete: returns zero
totalHours
1.3.6.1.4.1.2686.1.3.4
Counter
Read-only
Cumulative Run-Time
Hours
systemHours
1.3.6.1.4.1.2686.1.3.5
Counter
Read-only
Current Run-Time Hours
powerCycles
1.3.6.1.4.1.2686.1.3.6
Counter
Read-only
Power Cycles
thermalFails
1.3.6.1.4.1.2686.1.3.7
Counter
Read-only
N/A
loginOkays
1.3.6.1.4.1.2686.1.3.8
Counter
Read-only
Successful Logins
loginFails
1.3.6.1.4.1.2686.1.3.
Counter
Read-only
Unsuccessful Logins
localUser
1.3.6.1.4.1.2686.1.3.1
0
INTEGER
(0..2)
Read-only
Local User Logged In:
None(0), User(1),
Supervisor(2)
telnetUser
1.3.6.1.4.1.2686.1.3.1
1
INTEGER
(0..2)
Read-only
Telnet User Logged In:
None(0), User(1),
Supervisor(2)
ftpUser
1.3.6.1.4.1.2686.1.3.1
2
INTEGER
(0..2)
Read-only
FTP User Logged In:
None(0), User(1),
Supervisor(2
Sept 2003 Rev 1
113
Appendix B: SNMP MIB
MAC Layer Statistics
Node Label
Object ID
Type
Access
Description
etherRxFrame
s
1.3.6.1.4.1.2686.1.4
.1
Counter
Read-only
Total Frames Received
stackRxEther
1.3.6.1.4.1.2686.1.4
.2
Counter
Read-only
Frames For Local Host
etherRxFrame
s
1.3.6.1.4.1.2686.1.4
.1
Counter
Read-only
Total Frames Received
stackRxEther
1.3.6.1.4.1.2686.1.4
.2
Counter
Read-only
Frames For Local Host
etherRxErrors
1.3.6.1.4.1.2686.1.4
.3
Counter
Read-only
Receive Errors
etherRxDroppe
d
1.3.6.1.4.1.2686.1.4
.4
Counter
Read-only
Frames Dropped
etherTxFrames
1.3.6.1.4.1.2686.1.4
.5
Counter
Read-only
Total Frames Transmitted
stackTxEther
1.3.6.1.4.1.2686.1.4
.6
Counter
Read-only
Frames From Local Host
etherTxDroppe
d
1.3.6.1.4.1.2686.1.4
.7
Counter
Read-only
Frames Dropped
decSFrames
1.3.6.1.4.1.2686.1.4
.8
Counter
Read-only
Total Superframes Decoded
unpackSHEAlo
ne
1.3.6.1.4.1.2686.1.4
.9
Counter
Read-only
Standalone SHE’s
stackRxOfdm
1.3.6.1.4.1.2686.1.4
.10
Counter
Read-only
Ethernet Frames For Local
uncorrectSfs
1.3.6.1.4.1.2686.1.4
.11
Counter
Read-only
Uncorrectable Superframes
uncorrectCWs
1.3.6.1.4.1.2686.1.4
.12
Counter
Read-only
Uncorrectable Code Words
correctedSfs
1.3.6.1.4.1.2686.1.4
.13
Counter
Read-only
Corrected Superframes
correctedBytes
1.3.6.1.4.1.2686.1.4
.14
Counter
Read-only
Corrected Bytes
encSFrames
1.3.6.1.4.1.2686.1.4
.15
Counter
Read-only
Total Superframes Encoded
114
Libra 5800 Series User Guide
Using Wi-LAN MIB Object Identifier Nodes
Node Label
Object ID
Type
Access
Description
ExtinctParam
1.3.6.1.4.1.2686.1.4
.16
Counter
Read-only
Obsolete: returns zero
stackTxOfdm
1.3.6.1.4.1.2686.1.4
.17
Counter
Read-only
Ethernet Frames From Local
sFHeadErrors
1.3.6.1.4.1.2686.1.4
.18
Counter
Read-only
Ethernet Frames From Local
enetHeadError
s
1.3.6.1.4.1.2686.1.4
.19
Counter
Read-only
Ethernet Header Errors
sYNErrors
1.3.6.1.4.1.2686.1.4
.20
Counter
Read-only
Synch Errors
latePollResp
1.3.6.1.4.1.2686.1.4
.21
Counter
Read-only
Late Poll Responses
currentRssi
1.3.6.1.4.1.2686.1.4
.22
INTEGER
Read-only
RSSI (dBm)
nullDepth
1.3.6.1.4.1.2686.1.4
.23
INTEGER
Read-only
Null Depth (dB)
fadeMargin
1.3.6.1.4.1.2686.1.4
.24
INTEGER
Read-only
FEC BER (x1E-9)
fecBER
1.3.6.1.4.1.2686.1.4
.25
INTEGER
Read-only
EC BER (x1E-9)
bER
1.3.6.1.4.1.2686.1.4
.26
INTEGER
Read-only
ER (x1E-9)
throughputMax
1.3.6.1.4.1.2686.1.4
.27
INTEGER
Read-only
Maximum Throughput
throughputAvg
1.3.6.1.4.1.2686.1.4
.28
INTEGER
Read-only
Average Throughput
throughputMax
T
1.3.6.1.4.1.2686.1.4
.29
INTEGER
Read-only
Maximum Total Throughput
throughputAvg
T
1.3.6.1.4.1.2686.1.4
.30
INTEGER
Read-only
Average Total Throughput
Sept 2003 Rev 1
115
Appendix B: SNMP MIB
116
Libra 5800 Series User Guide
Appendix C: Simple Link Planning Worksheet
This worksheet is suitable for planning a simple point-to-point link or a single link in a P-MP network.
AP (for P-MP) or Base (for P-P) Information
Configuration Information
IP Address:
Sector ID
Subnet Mask:
Synch ID:
Station Type:
Base Station
Center
Frequency:
RF Station ID:(PMP only)
Site Information
Environment/shelter
AC power access
Grounding
Ethernet access
Sept 2003 Rev 1
117
Appendix C: Simple Link Planning Worksheet
CPE (for P-MP) or Remote (for P-P) Information
CPE Configuration Information
IP Address:
Sector ID:
Subnet Mask:
Synch ID:
Station Type:
Remote
Rx Center Frequency:
RF Station ID: (PMP only)
Path Information
LOS Availablility
Distance to Base Station
Fresnel Clearance Required
(m)
Calculated Fade Margin
Measured Fade Margin
Site Information
Environment/Shelter
AC Power
Grounding
Ethernet access
Notes:
Antenna and Cable Requirements
Antenna Type
Model
Antenna Mounting Location
Transmission Cable Type
Length (m)
Notes:
118
Libra 5800 Series User Guide
Appendix D: Linktest and Link Statistics
Overview
You can test the ability of a link to send and receive data with Linktest. Linktest can be run from an AP or
CPE/LCPE in P-MP or from either base or remote in P-P systems.
You can also view performance statistics with the MAC Layer Statistics menu. Some of these statistics are
•
Bit Error Rate (BER)
•
Received Signal Strength Indicator (RSSI)
•
Fade Margin
•
BER after Forward Error Correction (FEC BER)
Note: BER and FEC BER are updated every one thousand million bits. For longer term BER, see LBER and
LFEC BER in MAC Layer Statistics, page 84.
About Linktest
Linktest is a diagnostic tool for testing and troubleshooting a wireless link. For more information (see
Link Test:, page 43)
You can run Linktest from an AP to a Libra CPE, and from a Libra CPE to an AP, but not from one
Libra CPE to another. (Only while running Linktest an AP can function as a remote unit.)The unit
running Linktest is called the local. It generates pseudo-random packets of data and transmits them
to the unit at the other end of the link, which is called the remote.
The remote unit compares the pseudo-random data and accumulates bit errors, RSSI, Fade Margin,
Forward Error Correction (FEC), and packet statistics. It sends these statistics and the data back to
the local unit. The local compares the original data to what it received and displays the accumulated
statistics.
To define the link for Linktest, you need to specify the Radio Station Id of the far-end (Linktest
remote) unit and the variables acc, var and pps. These variables are explained below. If you do not
set these three variables, the test uses default values, also explained in the table below.
Linktest produces invalid results if run from both ends of the same link at the same time.
Performing a Linktest
Linktest is a diagnostic tool for testing wireless links. Use Linktest to check or troubleshoot a link.
Sept 2003 Rev 1
119
Appendix D: Linktest and Link Statistics
The transmitting (local) unit generates pseudo-random packets of data that it sends to the receiving (remote)
unit at the other end of the link. The remote unit compares the packets and measures the BER (bit error rate),
RSSI, Fade Margin, Forward Error Correction (FEC) and other statistics. It sends those statistics and the
original data back to the local unit. The local unit reads the data and displays the accumulated statistics.
TIP: Linktest can run while the system carries user data, but the test overhead reduces the links data capacity. It is better to run Linktest while the system is idle.
Linktest can run from the base to any remote in a system, or from a remote to the base, but it cannot run from
one remote to another.
Linktest variables
You can set four variables when starting Linktest. They are station ID of the remote, accuracy of the test,
symbol variation and transmission speed.You must set the Radio Station ID. The system uses default values
for the others if you do not set them.
Before you start a Linktest, you must set the remote unit’s ID. See Setting the RF Station ID (P-MP Only), page
70 for information about viewing and setting station IDs.
Note: Linktest will produce invalid results if run at the same time from both ends of the same link.
➧
To run Linktest
1. Connect a PC, Laptop or PDA with terminal emulation software to the serial port of the unit from which
you will run Linktest. This can also be done via Telnet and TCP/IP.
2. Press the Esc key until you enter command line mode, as indicated by the wilan> prompt.
3. Type the following command line after the wilan> prompt.
Linktest <station id of remote> [<acc> <var> <pps>]
where
120
<station ID of
remote>
RF Station ID number of Linktest remote unit. This number is the Access
Point of the system if Linktest is run from a CPE.
<acc>
Accuracy of the test, expressed as 1E<acc> bits. The default accuracy is 6
(1E6) or one million. The <acc> value defines the number of bits sent for
each line of displayed statistics. Sending more bits produces more accurate
statistics, but increases the time needed to run the test. The test sends 10
times as many bits as the acc value. Choosing an acc of 6, or 1 million,
causes the test to send 1E7 bits, or 10 million.
Libra 5800 Series User Guide
Performing a Linktest
<var>
Symbol variation within the configured accuracy. The default is 16,
meaning the symbol changes every 781 frames, the equivalent of 1E6 bits.
A higher var value results in a slower test with more reliable BER
statistics.
Linktest takes only multiples of 16. For example, if <var> is set to 32, the
symbol changes every 390 frames. If it is set to 30, it still changes every
390 frames.
If <var> is set to 16, and <acc> is set to 7, then the symbol will change
every 7,810 frames.
<pps>
Transmission speed in packets per second. The default is 60 packets per
second. A low pps value means the Linktest decreases the proportion of
test data to message data. A high pps value means that Linktest increases
the proportion of test data to message data.
4. Press Enter. The test results are displayed.
wilan> linktest 2
Linktest symbol changes every 781 frames
RSSI
Fade Margin BER(x1E 6)
FEC corrected
R
L
R
L
R
L
R
L
----------------------60 -60
43
43
0
0
0
0
-60 -60
46
43
0
0
0
0
-60 -60
46
43
0
0
0
0
-60 -60
46
22
0
0
0
0
-60 -60
46
43
0
0
0
0
-60 -60
43
43
0
0
0
0
-60 -60
46
43
0
0
0
0
-60 -60
46
43
0
0
0
0
Sept 2003 Rev 1
Missed
Frames
----0
0
0
0
0
0
0
0
Loopback
Frames
-----781
781
781
781
781
781
781
781
121
Appendix D: Linktest and Link Statistics
R
Statistics measured at the Linktest remote
L
Statistics measured at the Linktest local
RSSI
Received signal strength indicator. A good value is -60 to -65. The receive
sensitivity is -75 for the CPE and -78 for the AP
Fade Margin
Number of dB by which the received signal strength exceeds the minimum
receiver sensitivity. A good value is 15, assuming the RSSI = -60. The higher
the fade margin the better.
BER(1E6)
Bit error rate before forward error correction. 1E-6 is the default setting. The
tester can configure this value. The ideal result is zero, using the default
setting.
FEC Corrected
Byte errors that were corrected by forward error correction. Ideally, this
should be zero, but 100,000 could be tolerated at RSSI = -75 to meet a BER
of 1E-6.
Missed Frames
The number of frames sent to, but not received by, the Linktest local. Ideally,
this number should be zero. The key numbers are the BER and the FEC
Corrected Bytes.
Loopback
Frames
The number of frames received by the local. This should be 781, using the
default setting of 1E-6. It changes according to the accuracy specified in the
Linktest.
For more information about RSSI, Fade Margin, BER, FEC Corrected and Missed Frames, see
MAC Layer Statistics, page 84
5. Press Esc to exit Linktest and return to the command line prompt.
122
Libra 5800 Series User Guide
Appendix E: Bench Configuration Testing
Overview
This chapter explains how to assemble, configure and test Libra equipment to familiarize yourself
with it or to help debug it should problems occur. Equipment will be tested in pairs consisting of an
AP and a CPE for a P-MP system or two P-P units (RD’s or ER’s) in a controlled environment such
as a lab.
Detailed information about configuring Libra units can be found in Configuration, page 27.
Field installation procedures are described in Field Installation, page 89.
Setup process
Bench testing your new Libra 5800 units includes four steps, from unpacking the shipping package to
performing simple network tests.
Setup steps
1
Check shipping
package contents
2
Assemble two units
3
Pre-configure the units
4
Sept 2003 Rev 1
Test the units
123
Appendix E: Bench Configuration Testing
Tools and equipment
You will need the following tools and equipment to perform a bench test.
3/16” nut driver
Cables: CAT-5 / Power cables with RJ-45 connector (not supplied with units).
PC or PDA with a terminal emulation software such as HyperTerminal and network
software (ftp and ping)
RS-232 cable to connect the PC or PDA to the serial port of the Libra. This is a
straight-through DB9 connector. (except for PDA which may differ depending on make
and model) Pins 2,3 and 5 correspond to transmit data, receive data, and ground. A
weatherproof RS-232 cable is available from Wi-LAN (part no. 6010-1404)
AC plug or converter for the Libra power inserter. Different countries have different
power supplies, so only the cord is supplied, not the plug.
For AP, LCPE and ER units an external antenna and RF Cable with N-type connector
is needed.
Checking shipping package contents
Check the shipping package contents to ensure that you have all the parts you need.
The CPE shipping package should contains the following items:
•
1x Libra 5800 Unit (with Integrated Antenna (CPE, RD units) or without (AP, LCPE, ER))
•
1x Power Cord
•
1x Power Inserter
•
1x Libra 5800 User Manual (CD ROM)
•
1x Mounting Kit
•
1x Mounting base
•
1x Wall Mount Clamp
•
1x Clamp
•
1x Arm
•
4x Washer Flat M5
•
4x Washer Spring M5
•
4x Nut M5
•
4x Screw Hex Cap M5x0.8 16mm
•
6 x Washer Flat M8
•
4x Washer Spring M8
•
2x Nut M8
•
4x Screw Hex Cap M8x40 (for 1 3/4" dia pole)
124
Libra 5800 Series User Guide
Checking shipping package contents
•
4x Screw Hex Cap M8x70 (for greater than 1 3/4" dia pole)
•
1x Weather Proof Kit
•
1x O Ring
•
1x Insert
•
1x Coupling Nut
•
1x Shell
•
1x RJ 45 Connector
Note: For ER, LCPE and AP you will also need an external antenna and an RF cable with N-type connector
Sept 2003 Rev 1
125
Appendix E: Bench Configuration Testing
Assembling the Libra Units
Once you have assembled either one AP and one CPE (for P-MP) or a base and remote (for P-P) for
familiarization, you may use the AP or the Base to bench test any CPEs or remotes that may have
problems in the field. This setup can also be used to pre-configure units before field installation or to
pre-test units.
➧
To assemble Libra units
Details of the assembly of the Libra units are provided in the Description chapter (see Description,
page 13) and in the Field Installation chapter (see Field Installation, page 89).
Libra test network set-up
Sectoral Antenna
CPE with
Integrated
Panel Antenna
Access Point
Outdoor CAT-5
Cable
Outdoor CAT-5
Cable
Power Inserter
Power Inserter
Computer
Hub
W orkstation
! CAUTION
Do not "hot plug" the power adapter into the Libra to power up the unit—the
Libra should first be plugged into the power inserter unit at the RJ-45 "TO
RADIO" connector. Next, the power inserter AC power supply cord should be
plugged into the AC outlet to power up the unit.
126
Libra 5800 Series User Guide
Configuring the units
Configuring the units
This section describes how to set intitial AP and CPE (for P-MP) parameters or base and remote (for
P-P) parameters so you can perform bench tests. See Configuration, page 27 for detailed
instructions about setting parameters.
➧
Hookup to Configure the Libra
1. Connect a PC or PDA to the serial port of the Libra using a straight-through (for PC) RS-232
cable
RS-232 Connection
Libra Unit
Detail
Serial Port
Libra
Serial Port
RS-232 Serial Cable
to PC COM port
Libra
Serial cable
DB9
(female)
PC
Configuring a P-MP System
Configuring an AP
When you configure an AP, you will need to perform the following tasks.
•
Set an RF Station ID
•
Set RF Center Frequencies
•
Set the Sector ID
•
Set the Synch ID
•
Choose the Tx Power
•
Add the CPE to the polling list
Configuring a CPE
When you configure a CPE, you will need to perform the following tasks.
Sept 2003 Rev 1
127
Appendix E: Bench Configuration Testing
•
Set the RF Station ID as configured in the AP polling list
•
Set RF Center Frequencies. Choose the same frequency as for the AP configuration.
•
Select the Synch ID to be the same as that for the AP
•
Select the Sector ID to be the same as that for the AP
•
Set IP Address Configuration
•
Select the Transmit Power
Note: In a lab environment the units are physically closely located. In order to avoid saturating the receivers
make sure that the power setting is low enough.
You should now have a functioning RF System. Proceed to the next section to test the RF and
Network performance.
Important
The quality of your digital data transmission depends on the quality of your RF link. Always try to
establish a good RF link first. A high-quality RF link results in high-quality data transmissions and
a low bit error rate (BER). A low-quality RF link will result in low-quality data transmissions and a
high BER. Digital data can always be sent across a high-quality RF link. If the RF link is of poor
quality, data either cannot be sent at all or will contain too many errors to be useful.
Configuring a P-P System
Configuring a Base Station
When you configure a Base Station, you will need to perform the following tasks.
•
Set RF Center Frequencies
•
Set the Sector ID
•
Set the Synch ID
•
Choose the Tx Power
Configuring a Remote
When you configure an AP, you will need to perform the following tasks.
•
Set RF Center Frequencies to be the same as the Base Station
•
Set the Sector ID to be the same as the Base Station
•
Set the Synch ID
•
Choose the Tx Power
Note: In a lab environment the units are physically closely located. In order to avoid saturating the
receivers make sure that the power setting is low enough.
Important
The quality of your digital data transmission depends on the quality of your RF link. Always try to
establish a good RF link first. A high-quality RF link results in high-quality data transmissions and
a low bit error rate (BER). A low-quality RF link will result in low-quality data transmissions and a
high BER. Digital data can always be sent across a high-quality RF link. If the RF link is of poor
quality, data either cannot be sent at all or will contain too many errors to be useful.
128
Libra 5800 Series User Guide
Testing the units
Testing the units
Test the units to make sure that a basic RF link exists and data can be sent over it. In this section you
will complete the following tasks.
A) Test the link with Linktest
B) Perform some simple network tests
Testing the RF link with Linktest
In this step, you will test the basic RF link with Linktest. Linktest verifies that a link can send and
receive test data.
➧
To test the RF link with Linktest
NOTE:In a lab environment the units are physically closely located. In order to avoid saturating the
receivers make sure that the power setting is low enough.
1.
2.
3.
4.
Connect a PC to the serial port of the Libra Unit and access the Main System Menu.
Log in using the supervisor password.
Press Esc until the wilan> command line prompt appears.
From the wilan> prompt type the following command.
linktest <station Id of the unit to test to> [<acc> <pps>]
where
station
ID
RF Station ID of the Linktest remote unit. This can be the base station of the
system if Linktest is run from another BWS unit.
acc
Accuracy of the test, expressed as 1E<acc> bits. The default is 6 (1E6), or one
million bits. The acc value defines the number of bits sent for each line of
displayed statistics. Sending more bits makes the statistics more accurate, but
takes longer. The test sends 10 times the acc value. Choosing an acc value of 6
(one part in a million) causes the test to send 1E7 (10 million) bits.
pps
Transmission speed in packets per second (pps). The default is 60 packets per
second. The lower the pps, the less bandwidth the Linktest takes up, and the less
it affects any message data being sent at the same time. A higher pps value
speeds up the test.
5. Press Enter. If the RF link has been configured properly the Linktest results appear.
Sept 2003 Rev 1
129
Appendix E: Bench Configuration Testing
wilan> linktest 2
Linktest symbol changes every 781 frames
RSSI
FadeMargin BER(x1E6)
FEC corrected
R
L
R
L
R
L
R
L
----- ----- ----- ----- ----- ----- ----- -----60
-60
43
43
0
0
0
0
-60
-60
46
43
0
0
0
0
-60
-60
46
43
0
0
0
0
-60
-60
46
22
0
0
0
0
-60
-60
46
43
0
0
0
0
-60
-60
43
43
0
0
0
0
-60
-60
46
43
0
0
0
0
-60
-60
46
43
0
0
0
0
Missed
Frames
----0
0
0
0
0
0
0
0
Loopback
Frames
----781
781
781
781
781
781
781
781
R
Statistics measured at the Linktest remote (the other unit to the one
from which Linktest is being initiated.
L
Statistics measured at the Linktest local (the unit from which the
Linktest is being initiated)
RSSI
Received signal strength indicator. This should be above the receive
sensitivity for the modulation chosen
Fade Margin
Number of dB by which the received signal strength exceeds the
minimum receiver sensitivity. The year round link availability depends
on the Fade Margin. Ensure that you have sufficient FM for the range
specified (see Appendix C: Simple Link Planning Worksheet, page
117 for calculation of Fade Margin).
BER(1E6)
Bit error rate before forward error correction. 1E-6 is the default. The
tester can configure this. The ideal value is zero for the default setting.
FEC Corrected
Byte errors that were corrected by forward error correction. Ideally,
this should be zero, but 100,000 could be tolerated at RSSI = -75 to
meet a BER of 1E-6.
Missed Frames
The number of frames sent to, but not received by, the Linktest local.
Ideally, this number should be zero. The key numbers are the BER
and the FEC Corrected Bytes.
Loopback
Frames
The number of frames received by the local. This should be 781,
using the default setting of 1E-6. It changes according to the accuracy
specified in the Linktest.
6. In some cases antennas that are too close can cause high BER. To solve this problem adjust the
signal strength. If the antennas are placed too close together, the strong signal causes distortion
at the receiving unit. The RSSI number in the MAC Layer Statistics can tell you if the link is good.
130
Libra 5800 Series User Guide
Testing the units
This number represents the signal strength at each ODU receiver. It should be somewhere
between -60 and -65 dB. You can change the RSSI number by adjusting the TX Power. It is
recommended that you set this parameter to 10 for bench testing. See Setting Tx Power, page 74
7. Press Esc to exit Linktest and return to the command line prompt.
Performing simple network tests
The purpose of this step is to test the ability of the wireless link to operate as part of a wired network.
➧
To perform a simple network test
1. Power up the Libra units.
2. Using the configuration PC or PDA, login to the AP (or Base for P-P) as “supervisor” and check
the AP/Base configuration settings. Perform the following checks.
• Access the System Security screen and ensure that System Ethernet Access and System
Wireless Access are set to On.
• Enter the Radio Configuration screen and ensure that the RF Center Freq are set to the
frequency you want.
• Enter the Remote Station Configuration menu and set up each CPE (not needed for P-P).
• Remove any CPEs present in the polling list that are not running as part of this test.
Do this by setting their Radio Station IDs to 0 in the remote Station Configuration screen
(Not needed for P-P).
• Access the Network Configuration menu and ensure that you have set the Internet IP
Address and Internet IP Mask.
3. Connect the configuration PC/PDA to the Libra CPE/remote serial port and check the same
configuration settings as in Step 2. The IP Address and Subnet Mask of the remote CPE/Remote
and PC/PDA must match, or you will not be able to run a ping test. For example, if the PC/PDA
has an IP Address of 192.168.2.10 and a subnet mask of 255.255.255.0, the Libra CPE/Remote
must have an IP Address of 192.168.2.n, where n is any number between 1 and 254 except 10.
4. Run ping across the wireless link from a PC on the AP side to a PC on the CPE side.
5. Use ftp to send a large test file from a PC on the AP/Base side to a PC on the CPE/Remote side.
(This requires that an FTP server application run on the PC connected to the CPE/Remote.).
When the file transfer is done, ftp displays the size of the file and the time it took to transfer the
file. From this information, calculate the data transfer rate and ensure that it meets system
performance expectations
Sept 2003 Rev 1
131
Appendix E: Bench Configuration Testing
.
Using ping and ftp
ping
From the command line prompt, type:
C:> ping IP Address
Example:
ping 192.163.2.88
ftp
To connect to the node, from the DOS prompt, type:
C:> ftp IP Address
For instructions about using ftp, type “help”
at the ftp prompt.
ftp> help
Follow the instructions.
6. View the MAC Layer Statistics screen at the configuration PC while using ftp to transfer a large
file from a PC on the AP side to a PC on the CPE side.
•
The Late Poll Response number should not change
•
The RSSI figure should be above the receiver sensitivity for the modulation type being tested.
•
The corrected superframe and byte figures should be low, ranging from zero to three. The
uncorrected superframes should preferably be zero. .
132
Libra 5800 Series User Guide
Glossary
A
absorption
Antennas mounted too close to “soft” objects, such as trees, may experience a reduction in signal
strength due to absorption. Absorption is most often encountered in antennas installed during fall or
winter. The problem does not start until the spring, when leaves appear.
Access Hub
A group of APs, each serving a group of CPEs. Also called a cell site.
Access Point
The base station of the BWS network. AP refers to the machinery – IDU, ODU, and antenna – that
comprises the link with the wired network. Sometimes AP means the point where the wireless
network touches the wired network.
agent
An agent runs on each unit in a Simple Network Management Protocol (SNMP) context. An agent
accepts configuration commands from the manager and collects network and terminal information
specified in the Management Information Base (MIB).
antenna
A device which takes electromagnetic energy from a circuit or wire and radiates it.
antenna gain
Gain of the antenna over a dipole antenna (dBd) or isotropic radiator (dBi).
•
Gain measures of the ability of an antenna to amplify signals in its tuned band.
•
Antenna gain comes from focusing the signal. A higher-gain antenna has a more tightly
directed signal.
ARP
Address Resolution Protocol. This is low-level protocol that maps IP addresses to Ethernet
addresses. An ARP request goes out to the network along with an IP address. The node with the
address responds to the request with a hardware address so the transmission can take place.
Sept 2003 Rev 1
133
Glossary
ASCII
American Standard Code for Information Interchange. A system used by personal computers to
convert letters, numbers and symbols into binary notation.
Automatic Frequency Control
A method by which the CPEs stayed tuned to the correct frequency for communicating with the AP,
despite frequency variations caused by the hardware.
attenuation
Any loss in signal strength, due to resistance, absorption, capacitance, or any characteristic of the
medium or design of the system.
B
Bandwidth
The size of a communications channel, measured in cycles per second. "Bandwidth" is often used as
a synonym for data rate.
base station
The central control unit of the wireless network. A base station polls remote units and routes traffic to
them. The base usually connects to a major access point of main network.
beamwidth
The beamwidth of an antenna describes how a signal spreads out from the antenna, as well as the
range of the reception area. Beamwidth is measured between the points on the beam pattern at
which the power density is half of the maximum power. These are often called the -3 dB points. A
high-gain antenna has a narrow beamwidth and may be more difficult to align.
BER
Bit Error Rate. The proportion of bits received with errors. The default measurement is per million
sent.
C
cable loss
The loss a signal experiences as it passes through a cable. Expressed in dB.
CAM
Content Addressable Memory.
channel
The width of the spectrum band taken by a radio signal, usually measured in kilohertz (kHz).
chip rate
Chip rate signifies the time occupied by a single frequency. Also the period of a code clock, or the
output of a code generator during one clock interval.
134
Libra 5800 Series User Guide
CPE
Customer Premise Equipment – the remote or subscriber unit in the Wi-LAN Broadband Wireless
Access System.
co-location
Placing antennas in the same place. One rooftop may host up to six antennas, each attached to a
different AP ODU and IDU.
coaxial cable
A type of wire that has an inner conductor surrounded by an outer conductor. The outer conductor
also serves as an electrical shield.
collision
A collision occurs when two devices send signals over the same medium at the same frequency at
the same time.
community names
A kind of password. The Public Community Name offers read-only SNMP access to the AP and CPE
IDUs. The Private Community name grants write access.
configuration menus
The menus in the user interface on the Access Points that allows the operator to view and configure
their parameters.
Cross-polarization discrimination
This specifies the signal isolation achieved when the receiving element of an antenna is
perpendicular to the radiating element. This is important when co-locating Access Points.
D
dB
Decibel. A relative measure used to specify power gains and losses. The difference between power
P1 and power P2 expressed in dB is:
dB = 10 log ( P1 ⁄ P2 )
DB-9
A D-shaped connector to the serial port on Wi-LAN equipment, with nine pins. Used to connect the
IDU and PC.
dBd
dBd is antenna gain referenced over a half-wave dipole. This is an antenna with a doughnut-shaped
radiation pattern.
Gain of a Standard Dipole = 2.14 dBi.
Sept 2003 Rev 1
135
Glossary
dBi
dBi is antenna gain referenced to an isotropic radiator. This a theoretical antenna that radiates
equally in all directions, like the sun.
Wi-LAN references antenna gain in dBi. The conversion factor is 0 dBd = 2.14 dBi
dBm
A power measurement with respect to one milliwatt. This is an absolute measure of power rather
than a relative measure such as a gain or a loss.
Default Gateway IP Address
This is the address of the gateway from the wireless network to the wired one. All packets bound for
a destination on the wireless network must go here first. All packets meant for the next network must
leave from here.
diffraction
Diffraction occurs when a radio signal bounces off a solid object. The level of diffraction could lead to
connectivity problems if the remaining signal level is too low. Two types of diffraction are shadowing
and multipath.
dipole
An antenna fed from the center. Antenna gains are often measured in relation to a standard dipole.
downtilt
Some antennas have a downtilt or an uptilt. The tilt further focuses the signal either downward or
upward with respect to the horizon. A tilt may be either electrically built into the antenna or achieved
mechanically with the mounting gear. A downtilt or uptilt may be required when there is a significant
deviation between the elevation of the remote sites and the base site.
dynamic time allocation (DTA)
A process for determining how active a CPE is. A poll allows a unit a brief time to respond before
considering that remote an idle one.
E
EEPROM
Electrically Erasable, Programmable Read Only Memory: Non-volatile memory, it must be removed
from board to be erased.
EIRP
Effective Isotropically Radiated Power. EIRP is the amount of power transmitted to the air by the
antenna. EIRP levels depend on the power of the radio transmitter, the type of antenna, and the
losses incurred in the antenna cable.
ERP
Effective Radiated Power. The power radiating from an antenna taking into account the output power
from the transmitter plus the antenna gain, less connector and cable losses.
136
Libra 5800 Series User Guide
ESD
Electrostatic Discharge. Caused by static electricity. ESD Protection should be used to protect
electronic components from damage.
F
fade margin
The amount by which the system gain plus the total antenna gain exceed the path loss is called the
fade margin. The fade margin is the number of dB that the received signal strength exceeds the
minimum receiver sensitivity.
FEC
Forward Error Correction. A method of correcting data errors without retransmission.
filtering
Filtering in remote stations limits certain data packets.
Flash
A type of electrically erasable non-volatile memory that can easily be erased without removal from a
unit. Using Flash, the Access Point can be upgraded in the field.
Fresnel zone
The line of sight between two antennas. It consists of one of a theoretically infinite number of a
concentric ellipsoids of revolution that define volumes in the radiation pattern of a usually circular
aperture.
•
The cross section of the first Fresnel zone is circular. Subsequent Fresnel zones are annular in
cross-section, and concentric with the first.
•
Odd-numbered Fresnel zones have relatively intense field strengths and even-numbered Fresnel
zones are nulls.
•
Fresnel zones result from diffraction by the circular aperture.
front to back ratio (F/B)
Directional antennas focus the signal in a forward path, reducing the signal in the opposite direction.
The proportion between the two is called the front-to-back ratio. A higher gain antenna typically has a
greater F/B ratio.
frost loading
A concern of antenna operation affected by low temperatures.
ftp
File Transfer Protocol. A method of copying files from one site to another. An operator of Wi-LAN
equipment might use ftp to download software upgrades.
Sept 2003 Rev 1
137
Glossary
G
Gain
The ability of a device to amplify a signal. Gain is the ratio of output power divided by input power,
usually expressed in decibels (dB). Gain can also be measured as an absolute value, referenced to
an input signal of one milliwatt (dBm). For antennas, gain measures the ability of an antenna to focus
a signal and is expressed in dBd (half-wave dipole reference) or dBi (isotropic radiator reference).
GPS
Global Positioning System. Wi-LAN Broadband Wireless Access Systems installers may use GPS
devices instead of maps and compasses to locate their unit and orient it toward another station.
I
Ice loading
A problem of antenna operation in cold countries. Ice collects on the antenna and degrades its
performance.
IEEE
Institute of Electrical and Electronics Engineers.
IFIB
Intermediate Frequency Interface Board.
image
An image is a collection of configurations or settings for a particular device. The System Image File
in the Access Point contains a collection of configurations used when the unit is rebooted.
interference
Any signal that tends to hamper the reception of a desired signal. This is equivalent to jamming,
except that interference is not hostile.
IP Address
A number assigned to a network node, domain, or subdivision. An IP Address consists of four
numbers in the form nnn.nnn.nnn.nnn. The first two identify the network and subnetwork, and the last
two identify unique nodes within the network. No two units may possess the same IP within a LAN.
IP Filter
Internet Protocol filtering allows the system administrator to permit only certain IP addresses to
receive or send data using a CPE. This keeps non-subscribers from using the network.
ISM
Industrial, Scientific, and Medical. This is the family of license-exempt radio bands in North America
and some European countries. These are described in part 15.247 of the FCC regulation that defines
the parameters for use of the ISM band in the U.S., including power outputs, spread spectrum, and
noninterference.
138
Libra 5800 Series User Guide
L
LAN
A localized network linking computers, servers, printers and other peripheral devices. Typical
configuration is within buildings or between closely situated buildings.
Line of Sight (LOS): Free Space
An unobstructed straight line between two transmitting devices. The transmission path is not
established by nor dependent upon reflection, refraction or diffraction. As long as 60 per cent of the
first Fresnel zone is clear, then it may be considered almost equivalent to LOS transmission.
Link budget
The amount of power, expressed in decibels, needed for a radio link to work.
Linktest
A method of proving a new radio link or troubleshooting an existing one. Linktest sends data packets
in both directions and accumulates statistics on the data that indicate how well the link works.
M
MAC address
Media Access Control address. Alphanumeric characters that uniquely identify a network-connected
device.
Management Information Base
See MIB.
Management Port
The DB-9 port on the IDU to which a PC may be attached.
manager
This element is installed on the network’s host computer and is controlled by the network
administrator when used in SNMP. From the host, the manager configures agents, or polls agents for
information.
MIB
Management Information Base. A set of commands that you can execute using the SNMP Manager
to access the MIB database. A standard MIB and a Wi-LAN-customized MIB store information
relevant to the operation of a wireless network.
multipath interference
As a radio signal travels, it may reflect off objects in the environment and take various paths to the
receiver. As a result, the signal arrives at the receiver at different times, confuses the receiver, and
causes bit errors and processing delays. A related type of interference is multipath fading, in which a
reflected signal shifts out of phase with the original signal and cancels it.
Sept 2003 Rev 1
139
Glossary
N
Near Line of Sight (NrLOS): Suburban
NrLOS is a visually-obstructed line of sight between two transmitting devices but a straight line can
still be drawn between them. Any combination of reflection, refraction and diffraction on a direct ray
between the transmitter and receiver may have occurred.
Non Line of Sight (NLOS): Dense Urban
No line can be drawn between two transmitting devices. Total visual blockage has occurred between
the transmitting and receiving devices. Extremely large amounts of reflection, refraction and
diffraction can occur on a direct ray between the transmitter and receiver.
null
An RF signal component with a smaller amplitude than the rest of the RF signal in multipath
interference. Nulls are caused by subtractive combination as a result of multipath fading.
null depth
The ratio in dB between the strongest OFDM carrier and the weakest carrier in multipath
interference. A null depth of zero indicates that there is no multipath reception.
O
Obstructed Line of Sight (OLOS): Urban
OLOS is a partially blocked elliptical cylinder, whose diameter depends on frequency and distance,
that can be drawn between two transmitting devices. An object is infringing or cutting into the
cylinder. OLOS can occur in various degrees of severity. Large amounts of reflection, refraction and/
or diffraction occur on a direct ray between the transmitter and receiver.
ODU
Outdoor Unit. This device sits between the Indoor Unit and the antenna. It converts signals from one
into the form needed by the other.
OFDM
Orthogonal Frequency Division Multiplexing. A method of splitting the data stream into a number of
channels, each transmitted simultaneously on a different frequency.
OFDM Station Type
Configuration setting where the base and remote are defined. The APs are base stations. The CPEs
are remote stations.
OID nodes
Object Identifier Nodes. These are the individual nodes in an MIB. See SNMP and MIB.
140
Libra 5800 Series User Guide
Orthogonal
An adjective that refers to the way the many carrier waves in a W-OFDM system affect each other.
The carriers are spaced in such a way that the center frequency of each signal lies in the null spot of
its neighbors. This minimizes interference.
overhead
Anything that reduces the payload capacity of a system is overhead, even if it is useful. Link monitor
data determines transmission statistics, but it reduces the message-carrying capacity of the system
and is considered overhead.
P
path loss
The total loss from one end of the path to the other. This includes propagation losses, cable losses,
and any other losses that affect the system performance.
ping
A method of testing a link. Executing the ping command sends a signal to the remote station. The
station returns the signal. If the signal comes back on time and intact, the link works. See ftp.
polarization
The orientation of the radiating element of an antenna with respect to Earth. The polarization of
antennas is usually described as vertical, horizontal, or circular.
PN
Pseudo-random noise. A code used to change a narrowband signal into a spread spectrum signal.
point-to-multipoint
A wireless system with one base unit communicating with many remote units. In the BWS system,
the AP is the base and the CPEs the remotes.
point-to-point
The simplest wireless system, consisting of a base and a remote.
polling
The AP unit handles multiple CPEs by contacting them in the order they appear in the polling list.
When an AP polls a CPE, they exchange data. The CPE cannot exchange information with the AP
until it is polled again.
Polling List
The order in which the AP contacts the CPEs in its sector.
propagation loss
The weakening of a signal as it travels through the air. Expressed in dB.
Sept 2003 Rev 1
141
Glossary
Q
QAM
Quadrature Amplitude Modulation. A kind of modulation that varies signal amplitude.
R
Reed-Solomon
A way of accomplishing Forward Error Correction. Reed-Solomon describes a data block in such a
way that errors in the data block can be detected and repaired without retransmission.
remote unit
A unit that can communicate with a base station or other remote units. A remote unit forms a wireless
link between a network segment and a base station. CPEs are the remote units in the BWS system.
RF
Radio Frequency. RF communication uses electromagnetic waves propagated through space.
Because of varying characteristics, radio waves of different lengths are used for different purposes
and are usually identified by their frequency.
RF Center Frequencies
Wi-LAN Broadband Wireless Access Systems sometimes use two center frequencies. The AP
transmits on one and the CPEs transmit on another.
RF Station ID
This is a configurable number, from one to 2,048, that identifies an AP or CPE to the network.
RS-232
RS-232 in this document is generally refers to the DB-9 connector that attaches a PC to an IDU. RS232 also refers to standards for serial communications, which define the voltages, currents, data
rates, and other factors about the signals to be used, as well as single-ended, differential, multi-drop
operation.
RSSI
Received Signal Strength Indicator. Strength of received signal expressed in dB. The Access Point
measures RSSI as a fade margin value.
S
sensitivity
The minimum signal strength required for usable performance, expressed in dBm.
shadowing
Shadowing is a form of diffraction typically caused by antennas being mounted too close to a
structure, where they lose a portion of the signal lobe due to reflection. The receiving antenna is in a
shadowed area. To minimize shadowing, mount the antenna higher.
142
Libra 5800 Series User Guide
SNMP
Simple Network Management Protocol. A protocol used to remotely manage a network element by
polling, setting terminal values, and monitoring network statistics and events. It is the de facto
internet work management standard, designed to provide a mechanism for exchanging management
information in a TCP/IP-based Internet environment.
SNMP NMS Trap IP Address
This is the address to which all the alarms and event messages are sent.
spectrum analyzer
An instrument that captures RF energy and displays its amplitude and frequency on a screen.
spread spectrum (SS)
Any of a group of modulation formats in which an RF bandwidth much wider than the signal
bandwidth is used to transmit data, resulting in a greater immunity to noise interference.
straight-through cable
A straight-through cable is wired the same at both ends. That is, pin one connects to pin one, pin two
to pin two, and so on. Straight-through cables are used to connect an IDU to a PC.
system gain
The maximum path loss that the system can support and produce usable data transmission.
system image file
The Access Point uses system image files to store system configuration settings. The default system
image file is called the factory image and is used when the units are first powered up.
T
telnet
An Internet communications protocol that enables a computer to function as a terminal working on a
remote computer. A computer with a network connection to an Access Point can telnet to any of the
units and access their configuration menus.
U
uptilt
See downtilt.
V
VSWR (Voltage Standing Wave Ratio)
VSWR is the voltage ratio of minimum to maximum across a transmission line. A VSWR of 2.0:1 or
less in an antenna is considered effective. Most antennas have a VSWR of 1.5:1. For example, when
using a radio with a four-watt output with an antenna VSWR of 1.5:1, the reflected power will be 160
milliwatts.
Sept 2003 Rev 1
143
Glossary
VT 100
A terminal emulation system.
W
WAN
Wide Area Network. A network covering a larger area than a Metropolitan Area Network which
covers a city.
Wind loading
A problem of antenna installation and operation.
W-OFDM
Wideband Orthogonal Frequency Division Multiplexing. A variation on the OFDM modulation
scheme that allows greater range with less power, higher data rates, less distortion and greater
immunity to interference.
Numbers
10/100 BaseT
The Ethernet cable that connects the Libra Unit to the wired network. 10 or 100 BaseT cable uses
category three or five twisted pair wiring. Maximum length is 100 meters.
144
Libra 5800 Series User Guide
Index
Numerics
B
Downlink (Kbits/s) 83
Uplink (Kbits/s) 82
Base Station modulation type 70
base stations
defined 134
basic command line 86
beamwidth
defined 134
bench test 129
BER
(x1E6) (Link Test Result) 122, 130
BER (x1E-9) field 85
bit and processing errors
troubleshooting 100
bit error rate (BER)
defined 134
BPSK 35, 40
A
About P-MP Systems 15
About W-OFDM 14
absorption
defined 133
troubleshooting 100
acc = field 129
acc defined 120
access configuration menus 31
accessing
units remotely 36, 41, 50
address
internet IP 64
agents
defined 133
SNMP 107
Antenna 19
antenna
alignment
troubleshooting 99
defined 133
gain 133
antenna alignment
troubleshooting 99
Antenna and Cable 16
AP assembly 126
AP Equipment 15
AP, RF Connector 21
Append line feeds to incoming line ends field 29
ARP defined 133
attenuation
defined 134
Average Throughput field 86
Sept 2003 Rev 1
C
cable loss
defined 134
cables
troubleshooting 98, 99
center frequency 35, 41, 70, 72
Change Supervisor Password field 56, 58
Change User Password field 54
channel defined 134
Character delay field 29
chip rate defined 134
cls command 87
coaxial cable 135
collision
and the SNMP manager 107
defined 135
co-location
defined 135
troubleshooting 100
Command Line
using 86
145
command line
basic commands 86
communication problems
troubleshooting 100
community names 37, 52
SNMP 107
configuration
IP/MBR Filter 78
MBR 78
troubleshooting 98, 100
configuration menus
defined 135
configuration settings
restoring factory configuration 62
restoring power-on settings 62
configuring
internet IP address 64
internet IP mask 36, 65
IP filtering options 78, 81
IP filters for remote stations 79
passwords 37, 53
radio 70
Remote IP filter 80
RF station ID 33, 34, 39, 70
Sector ID 34, 40, 71
Synchronization ID 34, 40, 72
Configuring the Polling List 78
Confirm Supervisor Password field 57, 58
Confirm User Password field 55
connectors
troubleshooting 99
Contacting Wi-LAN Technical Support 11
copyright notice 9
Corrected Bytes field 85
CP Equipment 16
CPE 16
CPLD Revision 46
crc 87
Cumulative Run-Time field 49
Current field 48
current image
rebooting 60
Current Run-Time field 49
Customer support contacts 10
D
Date field 48
Sept 2003 Rev 1
dB
defined 135
DB9
defined 135
dBd
defined 135
dBi
defined 136
dBm
defined 136
Decibel defined 135
decommissioning
restoring factory configurations 62
default
Default field 48
passwords 37, 53
system image file 60
defrag 87
del command 87
diffraction
defined 136
dir command 87
Disable field 79
distance
troubleshooting 100
Down Link 17
Downlink 83
downtilt
defined 136
DSP Revision 46
DTA defined 136
dynamic time allocation defined 136
E
Echo typed characters locally field 29
EEPROM
defined 136
effective isotropically radiated power
defined 136
effective radiated power
defined 136
EIRP
defined 136
electrically erasable, programmable read-only memory 136
ER Equipment 19
ER, RF Connector 21
146
ERP 136
ERP defined 136
errors in bit and processing
troubleshooting 100
ethernet
access 36, 41, 50
Ethernet Frames For Local field 85
Ethernet Frames From Local field 86
Ethernet Header Errors field 86
Ethernet Port 20, 21
Ethernet Power Inserter 16, 18, 21
Ethernet Receive Statistics 84
Ethernet Transmit Statistics field 85
events
tracking 63
excessive bit and processing errors
troubleshooting 100
exit command 87
exiting
Link Test 122, 131
exiting Link Test 122
LANCAM 68
MBR 81
Flash memory 60
Force incoming data to 7-bit ASCII field 29
Forward Error Correction
and Link Test 120
Frames Dropped field 84, 85
Frames For Local Host field 84
Frames From Local Host field 85
Fresnel zone
defined 137
troubleshooting 99
Front Panel RF Connector 21
front to back ratio
defined 137
ftp
upgrading software with 103
FTP User Logged In field 49
F
H
F/B
Hardware 20
hardware
troubleshooting 98
Hardware Mounting Kit for Libra 5800 22
Hardware Revision 46
help 87
high packet loss troubleshooting 99
high signal strength
troubleshooting 98
Host/Net Address field 80, 81
Host/Net Mask field 80, 81
defined 137
factory configuration
password reset 37, 53
restoring 62
Fade Margin
(dB) field 38, 43, 85
(Link Test Result) 122, 130
defined 137
fade margin/signal strength low
troubleshooting 99
FE Version 46
FEC
and Link Test 120
FEC BER (x1E-9) field 38, 43, 85
FEC Corrected
Link Test Result 122, 130
field 82
File Name field 48
Filter number field 80
Filter with MBR 82
Filter with MBR field 79
filtering
IP 78
Sept 2003 Rev 1
G
gain defined 138
I
IEEE defined 138
image
defined 138
image files
rebooting 61
rebooting current 60
setting 60
Incorrect radio configuration
troubleshooting 99
industrial, scientific and medical bands 138
Installation procedure 93
147
Institute of Electrical and Electronics Engineers 138
interference
defined 138
multipath interference 139
troubleshooting 98, 99
Interference troubleshooting 100
Internet IP Address
field 35, 41, 64
setting 35, 64
internet IP mask
setting 36, 65
Internet IP settings
defining 64
IP
address 64
filtering option 78
filters
configuring for remote stations 79
mask 36, 65
IP Address
defined 138
setting 41
IP Filter
configuration 78
field 79
troubleshooting 100
IP Filter Type field 80
IP Filtering Option 81
field 79
IP Gateway Address
setting 65
IP masks
configuring 64
IP Routing Option
field 82
IP/MBR Filter
configuration 78
IP/MBR Filter Configuration menu 79, 81
ISM defined 138
L
L (Link Test Result) 122, 130
LANCAM filtering 37, 42, 66, 67, 68, 69
Large Pipe Diameter Mounting Configuration 22
Late Poll Responses field 86
LBER field 85
LCP Equipment 16
Sept 2003 Rev 1
LCPE 16
LCPE, RF Connector 21
LFEC BER field 85
Libra 5800 Connection Panel 20
Libra 5800 Series System Features 13
Line delay field 29
line of sight
explained 139
link performance
troubleshooting 100
Link Test 129
38
byte errors corrected by FEC 122, 130
command 87
exiting 122, 131
performing 119, 122, 131
results 129
RSSI 122, 130
starting 120
variables 120, 129
LNA defined 139
Local User Logged In field 49
login timeout
logging in after 59
logout
command 87
Logout Timeout (Minutes) field 59
Loopback frames 122, 130
LOS
defined 139
low noise amplifier
defined 139
low signal strength
troubleshooting 98, 99
low signal strength/fade margin
troubleshooting 99
M
MAC address
defined 139
MAC layer statistics
menu 84
resetting 63
screen 63
main configuration menu
troubleshooting 100
Main Menu
148
instructions 30
using 30
Main System Menu 45
maintenance recommendations 97
Management Information Block 107
defined 139
manager
defined 139
SNMP 107
mask
IP 36, 65
Maximum Throughput field 86
MBR
filtering option 81
MBR configuration 78
Media Access Control Address
defined 139
memory
non-volatile 136
menus
access 87
MIB 107
compiling 108
defined 139
SNMP 107
Missed Frames 122, 130
modulation type 70
Modulation Type field 35, 40, 75
Modulation Type Selection 35, 40, 75
monitoring
link mode 119
Mounting, Hardware 22
Mounting, Large Pipe Diameter 22
Mounting, Small Pipe Diameter 23
Mounting, Wall Configuration 23
multipath interference
defined 139
N
Network
configuring ??–37, ??–42, 64–66, ??–67, ??–68,
??–69
network
plan 126
testing 95
Network Configuration menu 64, 65, 66, 67, 68, 69
network integrity
Sept 2003 Rev 1
troubleshooting 98
network plan template 117
nodes
OID 108
noise
pseudo-random 141
non-volatile memory 136
notices
copyright 9
null depth
defined 140
field 38, 43, 85
O
object identifier nodes
defined 140
OFDM Channel Statistics 38
OFDM Decoder Statistics 85
OFDM Encoder Statistics field 86
OID nodes defined 108, 140
option 83
overhead defined 141
overpowering co-located units 100
P
packet loss high
troubleshooting 99
passwords
changing 37, 54
recommendation 97
setting 37, 53
troubleshooting 100
path loss
defined 141
peek 87
ping command 87
P-MP 15
PN defined 141
Point of Presence
defined 141
Point-to-Multipoint System Components 15
point-to-point system defined 141
polarization defined 141
Power Connector 21
Power Cycles field 49
Power Inserter 19
Power Inserter, Ethernet 21
149
Power/Ethernet Port 20
Powering up the unit 32
power-on settings
restoring 62
P-P Systems 18
pps = field 129
private community names 37, 52
problem logging 97
processing errors
troubleshooting 100
propagation loss
defined 141
pseudo-random data
and Link Test 119
public community name 37, 52
put command
downloading new image files to unit 104
Q
QAM 16 35, 40
QPSK 35, 40
Quality of RF links
troubleshooting 98
quit command 87
R
R (Link Test Result) 122, 130
radio
frequency 142
hardware troubleshooting 98
troubleshooting 99
Radio Configuration 70
menu 75
radio configuration
menu 70, 71, 72
troubleshooting 99
Radio Operation Background 17
Radio Station ID 120
RD Equipment 18
Reboot Current Image field 61
rebooting
current image 60
system image files 60, 61
Receive Errors field 84
Received signal Strength Indicator
defined 142
records
Sept 2003 Rev 1
keeping records of system changes 97
remote access
setting 50
Remote IP filter
configuring 80
remote station configuration
configuring IP Filters 79
resetting
MAC layer statistics 63
statistics 63
Restore Factory Configuration field 62
Restore Poweron Configuration field 62
Revision field 48
RF Connector, Front Panel 21
RF defined 142
RF link
testing 129
troubleshooting 98
RF Rx Center Frequency field 35, 41, 73
RF Station ID 70
configuring 33, 34, 39, 70
setting 34, 39, 70
RF Station ID field 33, 34, 39, 70
ROM
viewing images 48
RS Version 46
RS-232 142
RS-232 Connection 127
RSSI
defined 142
Link Test display 122, 130
Link Test Result 122, 130
RSSI (dBm) field 38, 43, 85
S
Sector ID 70
configuring 34, 40, 71
setting 34, 40, 71
Sector ID field 34, 40, 71
security
remote access 36, 41, 50
setting login timeouts 59
setting passwords 37, 55
system 59
sensitivity defined 142
Serial Port 20, 21
setting
150
default system image file 60
ethernet access 36, 41, 50
internet IP address 64
internet IP mask 36, 65
IP filtering 78
IP filtering options 81
remote access 50
RF center frequencies 35, 40, 75
SNMP private community name 37, 52, 53
SNMP public community names 37, 52, 53
Software LANCAM Filtering 68
the IP Gateway Address 65
Tx power 35, 41, 74
wireless access 36, 41, 50
Setting MBR Filtering Option 81
shadowing 142
show command 88
signal absorption
troubleshooting 100
signal strength low
troubleshooting 99
Simple Network Management Protocol 107
defined 143
simple network test 131
Size field 48
Small Pipe Diameter Mounting Configuration 23
SNMP 107
agents 107
community names 107
defined 143
elements 107
manager 107
MIB 107
OID nodes 108
setting private community names 37, 52, 53
setting public community names 37, 52, 53
troubleshooting 100
SNMP Public Community Name field 37, 52, 53
Software
troubleshooting 98
Software Date 47
Software LANCAM Filtering
setting 68
Software LANCAM Filtering field 36, 42, 66, 67, 68,
69
Software Revision 47
Software Version 3.1 1
Sept 2003 Rev 1
spread spectrum defined 143
SS defined 143
station ID= field 129
statistics
MAC layer 63
resetting 63
Successful Logins field 49
Superframe Header Errors field 86
Synch Errors field 86
Synchronization ID 34, 40, 70, 72
configuring 34, 40, 72
Synchronization ID field 34, 40, 72
System Commands Menu 61
System Commands menu 60, 61, 62, 63
System Components, Point-to-Multipoint 15
System Current Status menu 49
System Features 13
system gain
defined 143
system image files
defined 143
rebooting 60
setting the default 60
working with ??–61
system information
current system status 49
system revision 46, 48
system software ROM images 48
system performance
documentation recommendation 97
monitoring recommendation 97
System Revision Information Menu 46
system security 59
System Security menu 50, 51, 52, 53, 54, 56, 58, 59
System Software ROM Images
viewing 48
System Software ROM Images screen 48
T
TDD 17
TDM 17
TDMA 17
Technical Support
Contacting 11
telnet
accessing unit via 30
defined 143
151
Telnet User Logged In field 49
temperature troubleshooting 99
template, network plan 117
Terminal Preferences dialog box 30
test setup 129
Time Division Duplexing 17
Time Division Multiple Access 17
Time Division Multiplexing 17
Time field 48
timeout 59
Total Frames Received field 84
Total Frames Transmitted field 85
Total Superframes Decoded field 85
Total Superframes Encoded field 86
Total Words Decoded (x1E6) 85
tracking
events 63
transmit power 70
troubleshooting 100
common problems 98
main areas 98
network integrity 98
RF links 98
Tx power
setting 35, 41, 74
VT100 30
W
Wall Mounting Configuration 23
weather monitoring recommendation 97
wireless access
setting 36, 41, 50
W-OFDM 14
Wrap lines that exceed terminal width field 29
www. wi-lan.com 108
U
Uncorrectable Superframes field 85
unit failure troubleshooting 100
Unsuccessful Logins field 49
Up Link 17
Uplink 82, 83
uptilt
defined 143
Using the Command Line 86
V
var defined 121
viewing
current system status 48
system current status 49
system revision information 46, 48
system software ROM images 48
voltage standing wave ratio
defined 143
VSWR
defined 143
Sept 2003 Rev 1
152
System Software ROM Images
Default and Current Running Images
System Current Status
Cumulative Run-Time
Current Run-time
Power Cycles
Successful Logins
Unsuccessful Logins
Local User Logged In
Telnet User Logged In
FTP User Logged In
RF Board Attached
System Security
System Ethernet Access
System Wireless Access
SNMP Public Community Name
SNMP Private Community Name
Change User Password
Confirm User Password
Change Supervisor Password
Confirm Supervisor Password
Change PDA Password
Confirm PDA Password
Auto Logout Timeout (Minutes)
Main System Menu
System Revision Information
System Software ROM Images
System Current Status
System Security
System Commands
Network Configuration
Radio Configuration
IP/MBR Filter Configuration
MAC Layer Statistics
RF Statistics
Data Usage
Setup
Logout
Data Usage
Ethernet User Data Received
Ethernet User Data Transmitted
RF Statistics (for Wi-LAN use)
DSP & FPGA debugging info
Network Configuration
Internet IP Address
Internet IP Mask
Ethernet MAC Address
VLAN Tagging Enable/Disable
VLAN Id
User Priority
Local Network Mac Filter
System Commands
Set Default System Image
Reboot Current Image
Reboot a System Image
Restore Factory Configuration
Restore Poweron Configuration
Reset MAC Layer Statistics
Radio Configuration
OFDM Station type (always Remote Unit)
RF Station ID (1-2048)
Sector ID (1..32)
Synchronization ID
Cycle Period (ms)
Rx Center Frequency (kHz)
Tx Center Frequency (kHz)
Set Tx Power (dBm) [-14 ... 17]
Modulation Type
IP / MBR Filter Configuration
IP/MBR Filtering Option
Maximum Burst Rate
Uplink (Kbits/s) [0...2500]
Downlink (Kbits/s) [0...2500]
Filter IP address & mask table
MAC Layer Statistics
View-only
Setup (Quick Setup Menu)
RF Station ID (1-2048)
Sector ID (1..32)
Synchronization ID
Rx Center Frequency (kHz)
Tx Center Frequency (kHz)
Set Tx Power (dBm) [-14 ... 17]
Modulation Type
RSSI (dBm)
Null Depth (dB)
Fade Margin (dB)
RF Link Status
Internet IP Address
Internet IP Mask
System Ethernet Access
Local Network Mac Filter
SNMP Private Community Name
Passwords (Super, User, PDA)
Link Test Type
Start Link Test
Menu Map
Sept 2003 Rev 1
System Revision Information
Hardware Revision
CPLD Revision
DSP Revision
RF Board Model
RF Board Serial Number
Image File Name, Rev, Date, & Size
RS and FE Version
BootROM Version
153
Menu Map
154
Libra 5800 Series User Guide
Product Code:5720-3005-01
Sept 2003 Rev 1
We are interested in your comments.
Please contact us by email at [email protected] if you have any
comments about this user guide.
Libra 5800 Series
User Guide
5720-3005-01
Sept 2003 Rev 1
Sept 2003 Rev 1
155
156
Libra 5800 Series User Guide