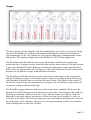
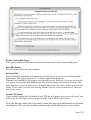
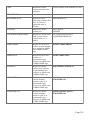
1
! Page !1 WeatherCat User Manual. Copyright © Trixology MMXV. All rights reserved. www: http://www.trixology.com Email: [email protected] 27th June 2015, Version 2.2.0 Although the author and Trixology have made a reasonable effort to ensure the accuracy of the information herein, they accept no responsibility for errors or omissions. The information in this manual is distributed “As Is,” without warranty of any kind. Neither Trixology nor the author shall be liable to any person or entity for any special, indirect, incidental, or consequential damages, including but without limitation to lost revenues or lost profits, that may result (or that are alleged to result) from the use of these materials. In other words, use this information at your own risk. WeatherCat is a trademark of Trixology. Any other trademarks, service marks, product names or named features that appear in this manual are assumed to be the property of their respective owners. Page !2 ABOUT WEATHERCAT ..............................................................................................................................8 REQUIREMENTS .....................................................................................................................................10 SUPPORT .................................................................................................................................................11 TERMS & CONVENTIONS USED IN THIS MANUAL..............................................................................12 INTRODUCTION AND CONCEPTS .........................................................................................................13 WEATHERCAT 2 ......................................................................................................................................16 UPGRADING TO WEATHERCAT 2 ..............................................................................................................16 GETTING STARTED .................................................................................................................................18 INSTALLATION ..........................................................................................................................................18 HARDWARE SUPPORT .............................................................................................................................19 SERIAL TO USB CONVERTERS ................................................................................................................19 RUNNING WEATHERCAT FOR THE FIRST TIME .........................................................................................20 BASIC SET-UP .........................................................................................................................................23 SETTING YOUR LOCATION .......................................................................................................................23 EMAIL SETUP ..........................................................................................................................................24 USER INTERFACE ...................................................................................................................................27 GRAPH TYPES ........................................................................................................................................27 WEATHERCAT CONTROLLER ....................................................................................................................29 TOOLS ....................................................................................................................................................31 Basic Graphs ....................................................................................................................................31 Custom Graphs ................................................................................................................................32 Gauges .............................................................................................................................................35 Communications Counts And Quality ............................................................................................................................36 Custom Gauges ...............................................................................................................................38 Satellite Imagery...............................................................................................................................43 Statistics/Reports .............................................................................................................................45 NOAA Style Reports .........................................................................................................................47 Live Video Preview ...........................................................................................................................49 Data Viewer/Editor ...........................................................................................................................51 Daily Snow Editor .............................................................................................................................52 Daily Rain Editor...............................................................................................................................54 Synthetic Channels ..........................................................................................................................56 Update Weather Now .......................................................................................................................60 The Journal .....................................................................................................................................60 To Create A New Entry...................................................................................................................................................60 To View An Entry ............................................................................................................................................................61 To Edit An Entry .............................................................................................................................................................61 To Delete An Entry .........................................................................................................................................................61 To View The Data For An Entry......................................................................................................................................61 Status ...............................................................................................................................................61 Data Export ......................................................................................................................................63 Backups............................................................................................................................................66 Data Restore..................................................................................................................................................................66 Safe Mode .....................................................................................................................................................................67 Backup notes .................................................................................................................................................................67 Station Options .................................................................................................................................68 WS23xx .........................................................................................................................................................................68 Davis Monitor/Wizard Options .......................................................................................................................................69 Davis Vantage/Vue Range .............................................................................................................................................70 Davis WeatherLink .........................................................................................................................................................73 Virtual VP .......................................................................................................................................................................74 WMR928/968 Options ...................................................................................................................................................75 WMR200 ........................................................................................................................................................................76 WMR88 ..........................................................................................................................................................................77 Fine Offset WH1080/2080 .............................................................................................................................................78 Fine Offset WH3080 ......................................................................................................................................................79 Page !3 Instromet MetPlus ..........................................................................................................................................................80 SUPPLIED PLUG-INS ..............................................................................................................................82 LIVE DATA ..............................................................................................................................................82 CURRENT CONDITIONS CALCULATOR .......................................................................................................83 BANNER GENERATOR ..............................................................................................................................85 SQL DRIVER ..........................................................................................................................................86 HOW DO I… ..............................................................................................................................................89 HOW DO I CHANGE THE UNITS USED BY WEATHERCAT?.........................................................................89 HOW DO I SEND DATA TO WUNDERGROUND? .........................................................................................89 HOW DO I SEND DATA TO THE CITIZEN’S WEATHER OBSERVER PROGRAM (CWOP)? ..............................91 HOW DO I USE A WEBCAM WITH WEATHERCAT? ....................................................................................92 HOW DO I UPLOAD WEB PAGES TO A WEB SERVER? ..............................................................................93 Simple Web Pages ...........................................................................................................................94 Custom Web Pages .........................................................................................................................98 HOW DO I CREATE A CUSTOM WEB TEMPLATE? ....................................................................................104 Additional WebTag Resources .......................................................................................................105 HOW DO I UPLOAD DATA TO UKWN OR NZWN? ..................................................................................106 HOW DO I SET UP A WEATHER ALERT?.................................................................................................107 Predefined Alerts ............................................................................................................................107 Custom Alerts .................................................................................................................................108 HOW DO I CONTROL MY ENVIRONMENT WITH WEATHERCAT? ................................................................109 HOW DO I USE APPLESCRIPT WITH WEATHERCAT? ...............................................................................110 HOW DO I SEND DATA IN REAL TIME TO A SERVER ON THE INTERNET? .................................................113 HOW DO I USE THE WEATHERCAT CLIENT PROGRAM? ..........................................................................116 iOS Clients......................................................................................................................................116 HOW DO I POST MY WEATHER DATA TO TWITTER? ................................................................................118 WEATHERCAT PREFERENCES ...........................................................................................................121 LOCATION/COLOURS .............................................................................................................................121 Basic Graphs/Gauges Colours .......................................................................................................122 PREFERENCES – EMAIL .........................................................................................................................123 SMTP Server: ..............................................................................................................................123 Port: .............................................................................................................................................123 User and Password: ....................................................................................................................123 Authentication: .............................................................................................................................124 Admin Addresses: .......................................................................................................................124 User Addresses: ............................................................................................................................124 Email Forecasts..............................................................................................................................124 Email Reports .................................................................................................................................124 Email new Records ........................................................................................................................124 Send Admin Emails ........................................................................................................................124 Daily Data Email .............................................................................................................................125 User Text ........................................................................................................................................125 PREFERENCES – ON-LINE .....................................................................................................................126 Simple Web ....................................................................................................................................126 Create Web Page ........................................................................................................................................................126 Update Pages Every: ...................................................................................................................................................126 Set Save Path: .............................................................................................................................................................126 Add Web Cam Pictures To Web Pages .......................................................................................................................127 Add Journal To Web Pages .........................................................................................................................................127 Enable FTP Upload .....................................................................................................................................................127 Edit FTP Account .........................................................................................................................................................127 About FTP....................................................................................................................................................................127 Simple Web - Text ..........................................................................................................................128 Test Web Pages Locally ..............................................................................................................................................128 Custom Web - Main........................................................................................................................129 Show Help ...................................................................................................................................................................129 Enable Custom Web Pages .........................................................................................................................................130 Page !4 Set HTML Source ........................................................................................................................................................130 Set Save Path ..............................................................................................................................................................130 Enable FTP Upload .....................................................................................................................................................130 Update Web Pages Every: ..........................................................................................................................................131 Sync. To Weather Fetch...............................................................................................................................................131 Custom Web – Additional Files ......................................................................................................132 Custom CGI....................................................................................................................................134 URL To CGI..................................................................................................................................................................134 Update Rate.................................................................................................................................................................134 Current Status..............................................................................................................................................................135 Wunderground PWS ......................................................................................................................136 Update Rate In Minutes ...............................................................................................................................................136 Rapid Fire Mode ..........................................................................................................................................................136 Update Rate In Seconds..............................................................................................................................................137 Enable Historical Uploads............................................................................................................................................137 Log Historical Uploads .................................................................................................................................................137 Send Internal Temp. And Hum. ....................................................................................................................................137 Upload Webcam Image ...............................................................................................................................................137 Current Status..............................................................................................................................................................137 C.W.O.P. .........................................................................................................................................139 Station ID .....................................................................................................................................................................139 Log Operation ..............................................................................................................................................................139 Current Status..............................................................................................................................................................139 Advanced Options .......................................................................................................................................................140 CWOP – Advanced Settings ..........................................................................................................140 Server 1 through 5 .......................................................................................................................................................140 Update Time ................................................................................................................................................................140 Passcode .....................................................................................................................................................................141 Data To Omit ................................................................................................................................................................141 Restore Factory Defaults .............................................................................................................................................141 Additional Services .........................................................................................................................142 Met Office WOW (World Of Weather) ..........................................................................................................................143 PWSWeather ...............................................................................................................................................................144 WeatherBug .................................................................................................................................................................145 Open Weather Map .....................................................................................................................................................146 WeatherCloud ..............................................................................................................................................................147 PREFERENCES – ALERTS 1 ...................................................................................................................148 Ice Alert ..........................................................................................................................................149 Rain Alert ........................................................................................................................................149 Clear Sky Alert................................................................................................................................149 PREFERENCES – ALERTS 2 ...................................................................................................................150 Rain Start Alert ...............................................................................................................................150 PREFERENCES - CUSTOM ALERTS .........................................................................................................151 Creating and editing custom alerts .................................................................................................151 Custom Alerts Email Macro Expansions ........................................................................................153 Testing of Custom Alerts.................................................................................................................154 Custom Alerts Programming Example ...........................................................................................155 Editing Alerts ..................................................................................................................................157 Alert Deltas .....................................................................................................................................157 Alert Persistence ............................................................................................................................158 PREFERENCES – UNITS/MISC1 ..............................................................................................................159 Units ...............................................................................................................................................159 Dock Icon Shows............................................................................................................................160 Floating Graphic .............................................................................................................................160 Weather Speech.............................................................................................................................160 Rain ................................................................................................................................................160 Rain Season Begins ....................................................................................................................................................160 Rain Season Offset ......................................................................................................................................................161 Annual Rain Offset .......................................................................................................................................................161 Rain Day Value ............................................................................................................................................................161 Weather Facts Editor......................................................................................................................161 Monitor & Re-launch WeatherCat ..................................................................................................162 Page !5 PREFERENCES - MISC 2 ........................................................................................................................163 Log FTP Operations .......................................................................................................................163 Set Calibration Data .......................................................................................................................163 Anemometer Height Compensation.............................................................................................................................164 Station Maintenance.......................................................................................................................164 Basic Graph Dotted Wind Gust Graph ...........................................................................................166 Calculate Live Wind Run Vector .....................................................................................................166 High-Res On Screen Basic Graphs................................................................................................167 Blue Thermometers If Below Freezing ...........................................................................................167 Temperature Type Gauges – Initial Maximum ................................................................................167 Wind direction plot style .................................................................................................................167 Day Types ......................................................................................................................................167 Heating/Cooling Degree Days ........................................................................................................169 Sampling ........................................................................................................................................169 PREFERENCES - WEBCAM .....................................................................................................................171 Image Source .................................................................................................................................172 Capture Image Every .....................................................................................................................172 Disable Webcam Uploads At Night ................................................................................................172 Keep Images For 24 Hours ............................................................................................................172 Movie Size ......................................................................................................................................172 Overlay ...........................................................................................................................................173 Create Daily Movies and Keep Daily Movies For 7 Days ...............................................................173 PREFERENCES – IMAGERY ....................................................................................................................174 PREFERENCES – ADVANCED ..................................................................................................................176 Use Older Webcam Driver Code ....................................................................................................176 Speak Log Entries ..........................................................................................................................177 Speak Log Entries ..........................................................................................................................177 Startup/Shutdown Actions ..............................................................................................................177 Quit Check......................................................................................................................................177 Station Comms. Fail Actions ..........................................................................................................178 Enable WeatherCat Server ............................................................................................................178 WEATHERCAT AND DATA ....................................................................................................................179 GENERAL..............................................................................................................................................179 CUSTOM RULES ....................................................................................................................................179 CUSTOM GRAPHS .................................................................................................................................179 JOURNAL ..............................................................................................................................................179 APPENDICES .........................................................................................................................................181 APPENDIX 1 - WEATHERCAT APPLESCRIPT INTERFACE ...........................................................................181 Simple Data Access .......................................................................................................................181 Deltas .............................................................................................................................................184 Working Channel ............................................................................................................................186 Working Channel Example .............................................................................................................188 Miscellaneous Properties ...............................................................................................................188 Queries ...........................................................................................................................................193 General AppleScript Tips ................................................................................................................194 APPENDIX 2 – EXAMPLE EMAIL SETTINGS ..............................................................................................195 APPENDIX 3 – COMMON USB TO SERIAL CONVERTER DRIVERS .............................................................197 APPENDIX 4 - WEATHERCAT WEB-TAGS REFERENCE .............................................................................198 Individual Stats ...............................................................................................................................207 Deltas ...........................................................................................................................................................................211 User Defined Date Range ............................................................................................................................................211 Tag Errors ....................................................................................................................................................................212 Latest Tags And More Information..................................................................................................212 APPENDIX 5 – FILE EXTENSIONS PROCESSED BY CUSTOM WEB PAGE PROCESSING ..............................213 APPENDIX 6 – UNINSTALLING WEATHERCAT ...........................................................................................214 APPENDIX 7 – FREQUENTLY ASKED QUESTIONS .....................................................................................215 Page !6 1. Q: WMR 928/968 - comms counts increasing fast and data bouncing up and down? ...............215 2. Q: WS23xx - rain is incorrect on historical download. ................................................................215 3. Q: Vantage - I wish to try WeatherCat and I've installed the latest USB drivers for the Vantage but WeatherCat is not seeing my station?......................................................................................215 4: Q: Is it OK to put my computer to sleep whilst running WeatherCat? ........................................215 5. Q: I sometimes get a message from WeatherCat saying communications have failed to the station and/or the USB driver has failed – is there anything I can do about this? ..........................216 6. Q: Wunderground says its running, but the counts aren’t incrementing and my Wunderground page shows no live data. ................................................................................................................216 RELEASE NOTES ..................................................................................................................................217 VERSION 2.2.0 ( SHADOWFAX) JUNE 2015 ............................................................................................217 VERSION 2.1.0 ( PEGASUS) MARCH 2015 .............................................................................................220 VERSION 2.0.0 SEPTEMBER 2014 .........................................................................................................223 VERSION 1.2.0 JULY 2013 ....................................................................................................................225 Highlights:.......................................................................................................................................225 V1.2.0 Detailed Change Notes .......................................................................................................226 VERSION 1.1.5 - 29 MAR 2013 .............................................................................................................230 VERSION 1.1.4 - 17 FEBRUARY 2013 ....................................................................................................230 VERSION 1.1.3 - 12 JANUARY 2013.......................................................................................................232 VERSION 1.1.2 DECEMBER 27TH 2012 ..................................................................................................233 VERSION 1.1.1 DECEMBER 23RD 2012 .................................................................................................233 VERSION 1.1.0 DECEMBER 18TH 2012 ..................................................................................................234 VERSION 1.02 15 JULY 2012 ................................................................................................................234 VERSION 1.01 JUNE 2012.....................................................................................................................234 VERSION 1.0 6 MAY 2012 .....................................................................................................................234 LICENSE .................................................................................................................................................236 CREDITS ................................................................................................................................................238 Page !7 About WeatherCat WeatherCat is weather station software for Macintosh computers. WeatherCat is designed to work with hardware-based weather stations and at the time of writing works with the following stations: • Davis Vantage, Vue, Envoy, Monitor and Wizard stations. WeatherCat also supports the WeatherLinkIP data-logger. • La Crosse WS23xx range of stations. • Oregon Scientific WMR 928/968 stations. • Oregon Scientific WMR200 stations. • Oregon Scientific WMR88 stations. • WeatherHawk stations equipped with an IP server module. • Fine Offset WH1080 and variants. This station is sold under a variety of brands including Maplin (W96GY), Ambient Weather, Conrad, Clas Ohlson, Watson (W8681) and others. • Fine Offset WH3080 and variants – this station has solar and UV sensors and again is sold under a variety of brands. • Instromet MetPlus stations. As data is gathered and stored in its database, WeatherCat allows you to view weather statistics such as the lowest temperature, or the highest wind speed over any time period stored in the database. In addition WeatherCat can generate and upload simple web pages which are quick to get going but lack customisation, as well as more complex ‘custom’ web pages containing current conditions, graphs, gauges, statistics, webcam image and time-lapse movies; these web pages can be uploaded to your server by WeatherCat for display via a web browser anywhere in the world. WeatherCat can also send your weather data to the Weather Underground (Wunderground), the Citizens Weather Observer Program (C.W.O.P.), the Met-Office WOW program, PWSWeather, WeatherBug, OpenWeatherMap and WeatherCloud. In addition it provides close to real time Custom C.G.I. upload to a web-server for your own web-based applications along with the ability to send your data to a MySQL database opening up a world of applications in charting and analysis. WeatherCat monitors the weather and can run a set of pre-defined and user programmed alerts that can trigger emails and/or run scripts should an alert trigger; for example to switch on your sprinklers, heating or cooling. In addition WeatherCat can integrate with other systems via its AppleScript interface. WeatherCat is designed to run 24/7/365 and doesn’t normally require user interaction or maintenance. Important events are notified via email – for example WeatherCat may detect Page !8 a problem uploading weather data to Wunderground – it will typically be able to resolve the issue, but if it can’t, will send you an email. Finally, daily and monthly reports are generated and saved to disk (as PDF’s), automatic exports can be programmed to export both raw and hourly data on a daily basis and a small client application is supplied which can display real-time weather gauges on one or more Macintosh computers connected either to the local network or over the Internet. Clients for iOS (iPhone and iPad) are also available in the AppStore. Page !9 Requirements Whilst WeatherCat works best on a computer that is always running and which is permanently connected to the Internet, it will work on any Intel based Macintosh running OS X 10.7.5 (or later) that has Internet access. Please note that PowerPC support has been dropped as of version 1.1.0 of WeatherCat. Version 1.02 is still available for PowerPC based Macs via our web-site. Version 1.24 is also still available for Intel based Macs running 10.6, again via our web-site. Page !10 Support If you have a problem or question with regards to WeatherCat, please check this manual first – it may contain what you are looking for. If this manual doesn’t help, there are active support forums at the following U.R.L.: http://athena.trixology.com Please post any comments, bugs, questions etc. on the forum. Finally, if you can't find the answer to your question on the forum, you can email us at [email protected] Page 1! 1 Terms & Conventions Used In This Manual Database – The collection of files WeatherCat maintains on disk to hold weather data. WeatherCat stores and retrieves samples from a simple database held in the users Library folder. The database is organised by year and month. Each month has a text file, (given a .cat extension), which stores the samples for that month along with a statistics file (given a .hrs extension). Interpolation – The calculation of additional data between 2 known values. For example if WeatherCat has data for 1P.M. and 2P.M. and it isn’t available for download from your data-logger then WeatherCat calculates the missing data in-between by calculating the incremental difference in the sample data between these two times and then applying and accumulating that difference to the missing samples between 1 and 2 P.M. Path Syntax – This manual occasionally uses a path to show the location of a file or folder. A path is the location of a particular item within your file system. We will use two types of path; the first is an absolute path, indicated by a slash at the start of the path. For example, in OS X 10.7 you can find the Console utility at the following path: /Applications/Utilities/Console The slash indicates the path starts at the root of the file system; your hard drive. The second type of path begins with a ~ (tilde). The tilde is a shortcut to your home directory, so the path to your documents directory (i.e. documents available only to you) is: ~/Documents If your name is Mary, then the absolute path to your documents is: /Users/Mary/Documents Sample – A set of data representing the weather at a given date. The sample consists of primary, calculated and secondary data. Primary data includes the temperature, humidity, barometric pressure, wind speed, wind direction, precipitation and current conditions – i.e. data available from the hardware weather station. Calculated data is data WeatherCat did not receive from a weather source but was able to calculate – an example might be the wind chill. Secondary data includes the date of the sample and the validation – i.e. if the data is real or synthesised (interpolated because no data was available at the time the sample was collected). Page !12 Introduction And Concepts WeatherCat can be thought of as a multi-track recorder; it captures the data from your weather station and records it to disk. WeatherCat works with ‘channels’ – each variable available from your station is assigned a channel; as an example, the external temperature is always assigned to channel 1.1 Periodically WeatherCat records all channels available from your station to disk. These periods can range from 1 minute up to 30 minutes and we call the act of recording the data to disk ‘taking a sample’. The faster the recording rate, the higher the resolution of your database but the more storage your database requires. Ideally we’d always record as fast as we can to maintain the highest resolution possible, but in reality the weather doesn’t change all that much one minute to the next and recording the data every minute can waste disk space. To avoid this problem, WeatherCat provides what we call ‘Adaptive Sampling’. In this mode, WeatherCat monitors important weather variables and only takes a sample if a variable changes; this way we maximise the resolution of the data whilst not wasting storage space (which over many years can amount to a lot of wasted space). If the weather is changing a lot, WeatherCat will record as frequently as once per minute; conversely, if the weather is essentially stagnant, WeatherCat will record less often as the data is changing less frequently. Thus WeatherCat adapts to how active the weather is. The database on disk is made up of text files that can be viewed or edited in a text editor. These text files are given a ‘.cat’ extension, for example ‘2_WeatherCatData.cat’ and each file holds the data for a month – in this example February. WeatherCat also maintains hourly statistics files – these are maintained by WeatherCat as each sample is taken and are given a ‘.hrs’ extension, for example ‘2_WeatherCatData.cat.hrs’. The database is organised by year and month making it easy to find a given file for a given date. WeatherCat knows what channels are available from your station – for example a Vantage can provide more than 50 channels, but typically many are not actually active as they don’t have any sensors attached. WeatherCat knows which channels are actually valid and only records those channels. For example, if you have an extra temperature sensor fitted and your station supports up to 3 additional temperature sensors, WeatherCat will only record the channel with the sensor actually fitted. WeatherCat provides a plug-in architecture for weather stations – at the heart of WeatherCat is the ‘Station Driver’ – this is a plug-in, loaded into WeatherCat when it launches. Typically a station driver updates the data to WeatherCat about once every two or three seconds. Some stations can provide all of their data within this time and some stations can take up to a minute or longer for all of their data to be made available. The station driver manages this and makes a consistent set of data channels available to WeatherCat. 1 For a list of all currently available channels, please see Appendix 1 Page !13 These channels are made available to the systems in WeatherCat that require access to the weather data; things like the AppleScript interface, web pages, emails (new weather record for example), statistics, on-line services, video overlay, clients, plug-ins and so on. As WeatherCat is channel based, it allows easy access to the data for external applications via AppleScript. Irrespective of the actual hardware WeatherCat is working with, the AppleScript interface always provides a consistent interface. With regards to design, there are a couple of decisions and philosophies at work within WeatherCat. The thinking behind the User Interface is to not provide a confusing jumble of options – wherever possible we try to choose a sensible default for operation. Unfortunately, there are more options than we would like, but we’ve tried to categorise them into logical groups and hide them when they aren’t frequently used – for example the C.W.O.P advanced preferences. Another line of thinking runs through the fault tolerance within WeatherCat. When a problem occurs, WeatherCat will try to correct the problem automatically. You may receive an email saying some system is having problems followed very shortly by another email indicating whether the problem has been cleared or not. Unfortunately it is not possible to guarantee bug-free operation 24/7/365 but WeatherCat is designed to run for these kinds of periods and thus has multiple checks in place to ensure it can run as trouble free as possible. Weather software can be complex and difficult to understand, so another philosophy at play in WeatherCat is that it should be easy to get going without having to worry about more complex issues. WeatherCat provides simple web pages that require just a few clicks to get on-line, basic graphs that immediately begin to show useful data, and easy to use but reliable Wunderground and CWOP uploads. Beyond these initial facilities, it is possible to create and generate beautiful web pages via WeatherCat’s Custom Web pages feature, control your home automation system either via simple rules that can trigger scripts or more complex programming in conjunction with WeatherCat’s AppleScript interface. In addition you can create stunning graphs that compare weather variables, beautiful gauges that can track up to four variables on the same gauge, synthesise your own channels from existing data, set up custom alerts to be informed of weather events you care about, be informed of new weather records as they happen, access real time data remotely via WeatherCat clients, create and upload timelapse movies and images from your webcam in addition to browsing comprehensive statistics and reports. Going back to the complexity issue of weather software, when launched for the very first time, WeatherCat will display just a few windows – the first being the ‘Daily View’, which shortly after WeatherCat is launched will be updated with the current weather. The others being the log window and release notes. This is deliberate – it is quite possible to Page !14 completely cover multiple monitors with WeatherCat windows but we believe it’s better to just display these few, and let you discover what’s available for yourself by clicking about (and maybe reading this manual sometime later ☺ ). Page !15 WeatherCat 2 If you've been running WeatherCat previously, your WeatherCat data will be upgraded when version 2 is first launched - depending on the amount of data, this may take a few minutes. WeatherCat 2 is fully backwards compatible with WeatherCat V1.2.4. If you are upgrading from WeatherCat 1, WeatherCat 2 introduces the following major features and changes: 1. Custom gauges (Tools->Custom Gauges). 2. Snow support (Tools->Daily Snow Editor). 3. Synthetic channels (Tools->Synthetic Channels) 4. Oregon Scientific WMR88 support. 5. Rain bucket multiplication for WMR200 stations. 6. Custom Alerts can now use any channel available on your station. 7. Current conditions calculator can now use up to three clauses per rule. 8. The WeatherCat controller window is now resizable. 9. Daily Types have been added - these allow the creation of custom day types displayed in the ‘Year Over Year’ statistics (for example a Wind Day) 10. Added averages to the year over year statistics. For a complete list of changes, please see the release notes (available from the ‘Help’ menu within WeatherCat). Upgrading to WeatherCat 2 To upgrade to WeatherCat 2 from WeatherCat 1, first quit WeatherCat 1 then replace your existing WeatherCat folder with the new one and launch WeatherCat 2. There will be a short delay on first launch as your weather data is updated to the WeatherCat 2 format; depending on the size of your data set this can take a while. Page !16 Page Intentionally Blank Page !17 Getting Started Installation After downloading WeatherCat, please drag the WeatherCat folder to a convenient location on your hard disk (we would suggest your Applications folder). If you wish WeatherCat's icon to stay in the dock, either drag the application to the dock before running it, or right click on its icon in the dock when running and use the pop-up menu to select 'Keep In Dock'. You may also wish to add WeatherCat to your 'Login Items' via the 'Accounts' pane of the System Preferences so that WeatherCat starts-up whenever you log-in to your computer. If you have automatic login enabled for the account then WeatherCat will start whenever the computer starts or restarts. Before running WeatherCat, please ensure you have the correct driver installed for your station or USB to serial converter. Without the correct driver installed, WeatherCat will not be able to communicate with your hardware. Note that WeatherLink IP, the WMR88, WMR200, WH1080/2080/3080 stations do not need a driver to be installed to be used by WeatherCat. Please see the next page for more details on USB drivers. Page !18 Hardware Support WeatherCat currently supports the La Crosse/Technoline 23xx series (2300, 08, 10, 15, 50 and others), Oregon Scientific WMR 88, Oregon Scientific WMR 928/968 stations (it may also work with 918’s), the Oregon Scientific WMR 200, the Davis Vantage range (Vantage, Vantage Pro, Vantage Pro 2, Vue & Weather Envoy – wired and wireless), the WeatherLinkIP data-logger, Davis Monitor and Wizard weather stations, Weather Hawk stations equipped with an IP server and the FineOffset WH1080/81/2080/3080 and variants. Serial To USB converters Many weather stations are serial devices and come equipped with a serial connection. Most Macintosh’s do not have serial ports but do have USB ports. If your weather station is not USB based, you will need to obtain a serial to USB converter. These little dongles convert from the weather station’s RS232 interface to USB so you can use the station with your Macintosh. ! Serial to USB converters are not generally expensive and are available to buy on-line or at electronics retailers. Prices range from about 15 UK Pounds (as per the converter in the image above) to about 40 UK Pounds for a branded item. Page !19 Most serial to USB converters require a driver to work with the Operating System. Before running WeatherCat, check you have the right drivers installed for your converter. A list of common driver software and download links can be found in Appendix 3. If running a USB Davis station, be aware that the latest Davis drivers rarely install correctly on OS X 10.7 or later and if they do, they are unreliable. In this case you can download the Silicon Labs drivers directly from http://www.silabs.com/products/mcu/ Pages/USBtoUARTBridgeVCPDrivers.aspx (download and install the VCP Driver Kit before running WeatherCat (V3.1 is current at time of writing)). If you need more advice on suitable RS232 to USB converters and their drivers, search and/or post on the WeatherCat forum for up-to-date help, or email us at [email protected] Running WeatherCat For The First Time Please ensure your weather station is installed and set up as per the manufacturers instructions. In particular, check the following: 1. The time and date is correct on your station and matches the time on your computer (check with your station manual as to how to do this). 2. Your station is plugged into your Macintosh with a suitable serial to USB converter (if necessary). 3. You have installed the driver for your serial to USB converter or USB based Davis station (see Appendix 3). 4. If your weather station is wireless, check that all sensors are being received reliably and consistently. Finally, make sure you have quit any other weather software that may be accessing the station. If you own a Davis weather station, make sure it is not in 'Setup' mode or that the forecast ticker is not running (both of these prevent communications with the weather station). When you run WeatherCat for the first time, you will be asked to select your station and if necessary, the relevant communications port as shown in the following picture: Page !20 ! If your station is I.P. based (WeatherLink I.P.2 or WeatherHawk), after selecting the station type, enter its I.P. address into the I.P. address field. If necessary specify the port with a colon – for example 192.168.1.110:22223 specifies the station can be found at I.P. address 192.168.1.110 on port 22223. If your station is USB based, the Comms Port and IP Address fields will be greyed out – these aren’t needed for USB based stations. When you have selected your station type and the communications port, press the 'Done' button whereupon the software will try to connect to your station and continue to launch. If the weather station hardware is not found, please check all your connections. Unplug your station from the computer, count to ten and plug it back in, then re-launch WeatherCat and try again. If your station still isn’t found and is one of the supported stations, search and/or post on the support forum for advice or send us an email as indicated in the support section of this manual. 2 If you are using WeatherLink IP, please see the WeatherLink IP Hardware Options section of this manual for information regarding finding its I.P. address. Page !21 Once your station is found by WeatherCat, it will continue to launch and will look something like the picture below: At this point WeatherCat is asking for your location and height – if you don’t have this information to hand, just click the ‘No’ button. Otherwise click ‘Yes’ and enter the details into WeatherCat’s preferences (see the following section ‘Basic Setup’ for more details). WeatherCat is now running and logging the weather; the next section will detail some of WeatherCat’s major user interface elements, but as a quick start, nearly all of WeatherCat’s set-up is performed via its Preferences available from the ‘WeatherCat’ menu [APPLE ,] and most of the data windows, graphs and gauges are accessed from the ‘Tools’ menu. Have a little look around, then come back to learn more about WeatherCat. Page !22 Basic Set-up Now we need to tell WeatherCat the name of your station, the location and altitude. The name is used in your web pages, the location and altitude is used when sending your data to C.W.O.P and when calculating things like cloud-base or sun-rise and sun-set times. Setting Your Location Open WeatherCat’s preferences from the WeatherCat menu: 1. Enter a name for your station in the ‘Location 1’ field. 2. Enter your Latitude and Longitude; please note that the format is Loran – i.e. Degrees, Minutes and Hundredths of a minute. 3 If you don’t have your altitude and longitude in Loran format, you can convert Degrees, Minutes and Seconds to Degrees, Minutes and Hundredths with the following formula: 3WeatherCat uses degrees, minutes, hundredths as it is more accurate than degrees, minutes and seconds. It is also the format sent to C.W.O.P. Page !23 Hundredths=Seconds / 60 * 100 (Where ‘/’ means divide). 3. Enter the station elevation in metres. Feet can be converted to metres by multiplying the height in feet by 0.3048. 4. After entering your data it is important you press the ‘Set Details’ button – if you do not, your details will not be registered and every time you start WeatherCat it will ask you if you want to set your location! (The ‘Set Location’ button prevents accidental editing of the location data.) Email Setup Next switch to the Email tab of the preferences and enter your mail server details. For some common email settings, please see Appendix 2, but at the very least you will need to enter the SMTP server address, an address in the ‘From’ field and at least one ‘Admin’ email address. The ‘Admin’ addresses receive all emails from WeatherCat whereas the ‘User’ addresses receive only weather alerts and records. You can enter more than one address by separating the addresses with commas. Page !24 You can test whether WeatherCat can send email by pressing one of the ‘Test Now’ buttons; this will send a test email to either the Admin or User addresses. If the test succeeds you’ll see a confirmation sheet as shown in the picture below: ! Page !25 If the test fails, then the specific error will be reported as shown below: ! In this particular case the mail server address had been entered incorrectly. WeatherCat now knows the name of your station, your location, height, email server details and email addresses so it can send you weather and administration alerts. We will cover setting up WeatherCat to perform more tasks, such as reporting to on-line weather services and generating and uploading web pages in the ‘How Do I…’ section of this manual a little later, but for now we should take a look at WeatherCat’s user interface. Page !26 User Interface Graph Types Before we get to deep into a description of WeatherCat’s user interface, we need to introduce the two types of graphs in WeatherCat; basic graphs and custom graphs. Basic graphs plot a single weather variable in a scrolling manner – as time progresses the data scrolls to the left. ! Custom graphs can graph up to three variables in either scrolling or anchored format. Anchored custom graphs are graphs that start at a specific historical point in time on the left-hand side; for example midnight or the start of the week4, month or year. 4 The week in WeatherCat starts on Sunday Page !27 ! Page !28 WeatherCat Controller When you first launch WeatherCat, the WeatherCat controller window (also known as the ‘Daily View’) will be displayed as shown below: At the top of the window is the date and time of the last known sample. You can change the date and time here and the data along with any open graphs (apart from anchored custom graphs) and satellite imagery will display the data for that day (assuming the data exists in your database). The buttons to the left and right of the calendar/clock allow you to scroll backwards and forwards in time – again, any open graphs (apart from anchored custom graphs) and the satellite imagery window, if open, will also update to reflect the historical data/imagery. Note that holding the ‘ctrl’ key down whilst scrolling will accelerate the scrolling rate. The main view of the window shows various daily data as collected from your station. Items in parentheses indicate the 1 hour delta, the exception being the Pressure which Page !29 displays the 3 hour delta. (These delta’s will read as ‘Cal’ during the first hour of data collecting). Note that the items displayed in this window will depend on the capabilities of your hardware. For example, if your hardware does not support or have fitted a solar radiation sensor, then solar radiation will not be displayed. Finally, the window may be resized by dragging the lower right corner of the window. Note: When WeatherCat launches for the very first time, there may be a delay (how long depends on your type of weather station) before this data appears. Page !30 Tools Most of WeatherCat’s windows are available from the ‘Tools’ menu. In this section we will examine each of them in turn. Basic Graphs All of WeatherCat’s basic graphs are available from the ‘Tools’ menu. Basic graphs are provided for all the main weather variables. To plot extra sensors available on your hardware, please see custom graphs on the next page. ! Here we can see the wind direction graph for the last twenty-four hours. In general, WeatherCat’s graphs auto-scale the vertical axis to provide the required range. WeatherCat’s ‘Location/Colours’ preferences contain a ‘Display Filter’ for basic graphs; here is the same graph with some filtering applied: ! Page !31 Basic graph window positions can be saved in user definable sets using the ‘Save Graph Window Positions’ command available from the ‘Windows’ menu. The ‘Load Graph Window Positions’ command can also be found there. Basic graphs are used in the simple web pages and can also be used in custom web pages. Basic graphs are configured in WeatherCat’s ‘Location/Colours’ pane of its preferences. Custom Graphs Custom graphs are available from WeatherCat’s ‘Tools’ menu. WeatherCat can manage an unlimited number of custom graphs and, like WeatherCat’s basic graphs, custom graphs can be displayed in custom-web pages. Each custom graph is fully independent of any other graph and can plot any channel available on your hardware including all extra channels and synthetic channels (see later). As mentioned above, WeatherCat supports two basic types of custom graphs – scrolling and anchored. Scrolling graphs can display data with a time range between 28 days and 1 hour and as time progresses the data scrolls to the left – (the same behaviour as basic graphs). Anchored graphs start at a specific point in time on the left and progress from there until the period is over – for example the start of a day, week, month or year. Figure 13 shows an anchored weekly graph. In this case it is anchored at the start of the week. As you can see this image was captured on a Friday. Page !32 ! Clicking the small disclosure triangle located at the top-left of the window allows custom graphs to be configured. Page !33 ! A custom graph can display up to 3 variables in a variety of graph types. Each variable can be drawn in a number of styles and the size of the graph displayed on the web can be set independently of the size as displayed on screen. We won’t describe each option here – the best approach is to create a new custom graph and examine the various options for yourself. To use the graph in a custom web page, simply use the WebTag as shown in the graphs’ controls – in this case it would be CUSTOMGRAPH$1$ (Please see later for details of custom web pages). Page !34 Gauges ! The basic gauges window displays real time conditions as received by your station. Along the top of the window are dial-type instruments and along the bottom are thermometertype instruments. At the very bottom are some figures indicating communications counts and quality. This display is replicated in the WeatherCat OS X Client application. The Wind Direction dial indicates the current immediate wind direction via the long pointer and the 10-minute average wind direction with the short pointer. If the short pointer is gray, then WeatherCat hasn’t had time to finish calculating the average wind direction; when it has, the pointer turns red. The figures in the centre of the dial are the current wind direction on top and the average wind direction on bottom. The Wind Speed dial indicates the current wind speed via the longer of the two pointers and the 10-minute average via the shorter pointer. Again, the average pointer will be gray until WeatherCat has had time to calculate the correct value. The figures in the centre of the dial are, from the top, the instantaneous wind speed, the 10-minute average speed, the 10-minute wind gust and the daily high. The Wind Rose gauge indicates all known wind vectors since midnight. Wind run is the amount of wind that has passed your location in a given time. For example if the wind was blowing at a constant 1 mile per hour for 1 hour, then the wind run would be 1 mile for that hour. If the wind velocity increased to 5 miles per hour then it would be 5 miles, or 120 miles in 24 hours. The wind run gauge goes one step further and displays the wind run for each degree of the compass – this gives a visual representation of where the wind has been blowing from over the last 24 hours. Page !35 The numbers at the bottom of the wind run gauge shows the total daily wind run and the current scale of the gauge – i.e. the length of the longest wind run vector being displayed. An option in WeatherCat’s preferences can overlay the current wind-run vector if required. The Pressure dial indicates the current reading and the daily low and high values via the red pointers. The numbers in the centre show the current pressure and the three-hour pressure change. The three-hour pressure change is a good indicator of what the weather is going to do. If the pressure is rising, then it is likely the weather is improving and if falling, the weather is likely to deteriorate. If the pressure is falling quickly, then it is possible a storm is on its way. The Calculated Cloud Base dial indicates the current calculated cloud base along with the daily low and high via the red pointers. The figures on the dials are in 1000’s of units; thus 1.5 reads as 1500. Calculated cloud base is derived from the air temperature and dew point and gives an approximate indication of the base of cumulus clouds. The Solar and U.V. gauges are not displayed by default; they can be enabled from the Misc 2 pane of WeatherCat’s preferences. The smaller pointer on the ‘Solar’ dial is the 10minute average, the larger pointer is the instantaneous reading. The top figure is the current value, the middle figure is the 10-minute average and the bottom figure is the daily high. The thermometer type gauges indicate the current values of various weather variables along with the daily high (red) and daily low (blue) values as horizontal bars. The appearance of the gauges can be adjusted in the ‘Location/Colours’ pane of WeatherCat’s preferences. Communications Counts And Quality At the bottom of the Gauges window are counts for ‘Good Data’, ‘Comms Error’, ‘Sensor Error’ and ‘Quality’. Every time WeatherCat requests data from the weather station it checks it for validity – if it is all valid then the Good Data count is incremented. If the station fails to respond (a time out) or responds with data that fails a simple error check then the ‘Comms Error’ count is incremented. If there is an error in the data - primarily a sensor value that is out of bounds with regards to the manufacturers specification, then for each error the ‘Sensor Error’ count is incremented. The Quality figure is simply the ratio between the Good Data and combined errors and can be used as a quick check that communications to the station are satisfactory. See also the Status window available from WeatherCat’s “Tools” menu. If you are receiving a lot of ‘Comms Errors’ then the problem lies with the connection between the computer and the weather station – check your USB dongle and/or driver along with any USB cables; in particular do not use USB extension cables between the weather station and your computer and make sure the station is connected to the computer, not any hubs or keyboards. Page !36 If there are a lot of sensor errors then the problem lies between the weather station and its sensors – if wireless try repositioning the station, if wired, check the connections. In all cases it’s worth checking any batteries. (Note, for Davis Vantage owners, WeatherCat can warn you when batteries and or power supplies are out of specification – see ‘Hardware Options’ from the ‘Tools’ menu.) The Live Data tool, available from WeatherCat’s “Tools” menu gives more information about the status of each channel available from your hardware and breaks down the comms errors into timeouts (your station did not respond to WeatherCat) and corruption (when WeatherCat checked the data from your station, an error was found). Page !37 Custom Gauges Just as there custom graphs, there are also custom gauges. Custom gauges are available from WeatherCat’s ‘Tools’ menu. WeatherCat can manage up to 16 custom gauges and, like WeatherCat’s custom graphs, custom gauges can be displayed in custom-web pages via their web-tag. Each custom gauge is fully independent of any other gauge and can display any channel(s) available on your hardware including all extra channels (including any synthetic channels) as well as daily high/low/average values. Features of the gauges include: • Unlimited gauge size. Page !38 • Up to 4 pointers per gauge. • The main pointer indicates channel data, secondary pointers can be another channel (WeatherCat decides which channels make sense) or one of daily min/ max/average. It's possible to display for example daily rain versus daily evapotranspiration on the one gauge. • Main pointer has two styles. • Secondary pointers can be a pointer or a 'bug' around the circumference. • All pointers have variable width, colour and opacity. • Six base styles. • Three glass styles. • Auto or manual scaling. • Choosable font and attributes for gauge label. • Usable on web pages via their custom web tag (web size independent of local display size). • Ability to clone one gauge from another for quick creation. When a custom gauge is created, its controls are initially visible. Once the gauge is configured, click the disclosure triangle to hide the controls - the gauge will expand to fill the whole window as per the picture below. Page !39 With the controls hidden, double clicking the gauge will remove the window borders and Page !40 background, leaving just the gauge. Dragging a gauge with its controls hidden displays its coordinates in the label area, allowing accurate alignment of multiple gauges. When resizing a gauge, the label area displays the current radius. When dragging a gauge with the window border hidden, holding the control key down will cause the gauge to align to a 12 by 12 grid to ease alignment with other gauges. Finally, right-clicking on a gauge will display a pop-up menu allowing you to clone the gauge (useful if you are creating multiple gauges in the same style) or delete the gauge. Page !41 Custom Gauge notes: a). Daily average calculated cloud-base will display as 0 as WeatherCat does not keep statistics information for calculated cloud base (however it can calculate the daily high and low values). b). A wind rose display is available in the custom gauges. In this mode, the digital display indicates the scale of the gauge (in user units) - i.e. the length of the longest vector. No other channel types are selectable in conjunction with this type. However, selecting 'Daily High' on any of the other pointers will display the accumulated daily linear wind run (subject to a maximum of 360 units). c). In some situations it may be impossible for WeatherCat to compute a solution for a suitable scale for the gauge - in this case the scale will appear blank. Workaround is to switch to manual scaling. Page !42 Satellite Imagery WeatherCat can record and play back up to 3 channels of satellite imagery. By default, imagery is disabled. To enable, open WeatherCat’s preferences and go to the Imagery tab. For each channel, select a suitable source (or enter your own) and enable the channel. The first image will appear within the time-frame set as the update period for that channel. There are two modes of operation for the imagery viewer: the first is to play back the imagery as a movie by setting the animation length and speed from the controls at the bottom of the window. The second is in conjunction with WeatherCat’s daily view window. As you scroll through time with the scroll buttons, if the imagery window is open, the imagery will update in synchronisation with the data – this allows you to scroll backwards and forwards through the imagery animation (this also works for direct date entry). Page !43 The imagery is stored in WeatherCat’s database on disk at: ~/Library/WeatherCatData/ Imagery as jpeg files. Each file is named ‘Imagery_hh_mm_dd_mm_yy,jpg’ to aid identifying each file by date. It is important to note that the update rate of the imagery (how often WeatherCat captures an image) has a direct effect on how large your database on disk will be. We would recommend setting the imagery update rate to no less than 2 hours and ideally, for the best animation and most efficient usage of space on disk, it should update at the same rate as the source image is updated. For example, if your source image is updated every 3 hours, and you set the update rate to every 2 hours then WeatherCat is going to be capturing some images twice. For example (assuming the source updates every 3 hours and WeatherCat is capturing every 2 hours): The source updates at 00:00 and WeatherCat captures it at that time. The next WeatherCat capture will be at 02:00 – the same image. The image changes at 03:00, WeatherCat captures it at 04:00. The image changes at 06:00, WeatherCat captures the new image. WeatherCat captures the same image at 08:00 and so it repeats. In this case, WeatherCat has captured the 00:00 image twice and the 06:00 twice, setting WeatherCat’s capture rate to 3 hours will ensure each image is only captured once. Over the months and years, a large number of files can accumulate on disk; you may want to prune or archive them periodically. As an example, an imagery file of average size 30KB, captured every 2 hours results in more than 4300 files totalling over 130 megabytes on disk each year. Page !44 Statistics/Reports The Statistics tool displays a range of statistics and reports. Select the report you’d like to see from the buttons at the top of the window. ! The statistics are updated every time WeatherCat takes a sample. At midnight every day, the Daily report is saved to disk at ~/Documents/ WeatherCatReports as a PDF file. At the end of the month, the monthly report is also saved to the same location on disk. (Note that if WeatherCat isn’t running at midnight, then no report will be saved). From the Statistics window you can also query the database via the ‘Query’ button. A sheet will appear as shown in the image below: Page !45 ! When processing a query, the database only considers valid samples; interpolated and invalid samples are not considered. Page !46 NOAA Style Reports Monthly and annual NOAA style reports are available and can be calculated for all years/ months present in your WeatherCat database. Monthly and Annual NOAA reports are automatically saved to disk at ~/Documents/ WeatherCatNOAAReports/. The current monthly report is updated every sample, the current annual report is updated hourly on the first sample past the hour. The report is saved as a simple text file (.txt). A 'Save' button on the NOAA reports window will save the report currently being displayed to disk at ~/Documents/WeatherCatNOAAReports/ (folders will be created for the year/month if they do not exist). Page !47 The ‘Save All’ button is useful if you wish to generate a complete set of reports from your database or you have changed something which would affect all historical reports (heating degree days base temperature for example). This will save all NOAA style reports to disk (overwriting any existing ones). This processing can take a while so is carried out as a background task. Task start and end are reported in the WeatherCat log window along with how long the task took to run. The extreme high and low temps for NOAA reports can be set in the 'Advanced' pane of WeatherCat's preferences (defaults are a high of 90°F/32.2°C and a low of 0°F/-17.7°C). NOAA style report web-tags are also available for use on custom web pages. Please see the Custom Web section of this manual for more details. Page !48 Live Video Preview WeatherCat can utilise a webcam to provide images and movies both locally and for your website. This tool displays the current picture, which is useful for checking the camera setup. The ‘Camera Adjustments’ button will open a window where various parameters can be adjusted – the parameters available will depend on your camera and how WeatherCat is obtaining the image. WeatherCat can take an image from a locally connected camera, from a file on disk (useful if you are using third party camera software) or via http, which is useful if you have an IP based camera with an in-built web-server that can make the image available. If updating from a local file, the image will update once every 2 seconds. If updating from an image served over http, the image will update once every 2 seconds if the preview window is open, otherwise at the capture rate set in the Webcam preferences (or 5 minutes, Page !49 whichever is the shorter). From a locally connected camera, the image will update approximately 10 times per second. For more information on the camera set-up and usage, please see “How Do I Use A Webcam With WeatherCat’ and the webcam preferences section. Page !50 Data Viewer/Editor This tool, as its name suggests, allows you to view your data by date in tabular form. You can also apply quick edits to the data – WeatherCat allows you to edit most of the channels it records, the exception being calculated channels such as wind chill. To edit other data or make more than simple changes we would suggest using a good text editor5 – please see ‘WeatherCat And Data’ later in this manual for more details. ! 5 Do not use a word processor or web editor – use a good text editor designed for editing raw text – something like TextWrangler. (Free from Bare Bones: http://www.barebones.com/products/textwrangler/) Page !51 Daily Snow Editor WeatherCat has a snow editor available from the ‘Tools’ menu. Daily snow can be entered and will be displayed in the year over year statistics (monthly totals and snow days) as well as in the monthly statistics. Snow data can be accessed in custom web tags with the SNOW and SNOWDAYS item. Daily snow can be entered for any date in WeatherCat's database including 'today'. It is not possible to enter snow either before the first date in WeatherCat's database or in the future. Page !52 When entering snow for a day, enter the new snow for that day, not the current total depth as WeatherCat adds daily values together to calculate accumulated snow over a given time range. Example STAT$ tag usage: Snow Snow Snow Snow Snow Snow Snow this season: STAT$SNOW:TOTAL:THISSEASON$ this year: STAT$SNOW:TOTAL:THISYEAR$ this week: STAT$SNOW:TOTAL:THISWEEK$ today: STAT$SNOW:TOTAL:TODAY$ tomorrow: STAT$SNOW:TOTAL:TOMORROW$ (J/K) days this year: STAT$SNOWDAYS:TOTAL:THISYEAR$ days last year: STAT$SNOWDAYS:TOTAL:LASTYEAR$ etc. Snow notes: a). If there are no snow entries at all, then snow won't show in the year over year statistics. b). The SNOW and SNOWDAYS items honour the rain season - so THISYEAR and THISSEASON may give different results if your rain season is not set to January. c). SNOW and SNOWDAYS will only work with the TOTAL custom web stats tag query type. Page !53 Daily Rain Editor WeatherCat has an easy-to-use daily rain editor available from the ‘Tools’ menu - this is useful for those occasions where you know the daily rain for a given date is wrong or isn't available until after the event (i.e. melting snow). Note: It is not possible to edit the daily rain for the current day (as the day is not yet over); wait until the next day to edit it. The editor affects all statistics queries (reports, tags etc) that output accumulated rain where the edited day is included in the date range of the query. When this tool is selected, a list of existing edits is displayed, sorted by date: ! Pressing the ‘New’ button will display the following sheet: Page !54 ! Use the calendar to select the day you wish to edit – the current daily rain value will be displayed. Enter the new value and press the OK button. Page !55 Synthetic Channels Synthetic channels are channels created by WeatherCat and added to the available channels from your station. Synthetic channels act as per normal channels with the exception that the data is user defined by a function. The function can take up to 5 existing channels as input parameters and return a new value, calculated by the function, which is then recorded by WeatherCat. In addition daily high/ low/average data can be used as parameters. Up to 5 synthetic channels can be defined, these are added to the channels from your hardware and act and be used as any other channel. Synthetic channels can be displayed on custom graphs or custom gauges. Synthetic channel values can be used on custom web pages via the following STAT$ tag types: SYN1, SYN2, SYN3, SYN4 and SYN5. Examples: Page !56 Current Synthetic Channel 1 value and one hour delta: STAT$SYN1:CURRENT$ (STAT$SYN1:DELTA1$) Lowest Synthetic Channel 1 value this week = STAT$SYN1:MIN:THISWEEK$ at STAT $SYN1:MIN:THISWEEK:TIME$ Average Synthetic Channel 1 value this week = STAT$SYN1:AVERAGE:THISWEEK$ etc. The channel function is defined in AppleScript - for example: — Simple heating/cooling load index (where +100 is max heating load and -100 is max cooling load). — The basic load is calculated from the difference between the internal and external temperatures. — Assume temperature units are Fahrenheit. — To use: — Set Param1 to internal temperature — Set Param2 to external temperature — Set the Channel Type to ‘No units’. — Get the temperature difference between internal temperature and external temperature into a variable called diff set diff to Param1-Param2 — We set the maximum differential temperature to +/-50°F if diff > 50 then set diff to 50 if diff <-50 then set diff to -50 —multiply by 2 to convert to an index in the range +/-100 set result to diff*2 return result There is no limit on the complexity of the function. To edit a synthetic channel, double click it from the editor window - a sheet will appear with the options for the channel. Page !57 The function can take up to 5 parameters defined by the ‘Param1’ through ‘Param5’ pop-up menus. For each parameter you have the choice of the current value, the current daily high, daily low or daily average. These parameters are used in your script as variables Param1 through Param5. The ‘Channel Type’ tells WeatherCat how to display the data - for example if it’s set to temperature then the value will display as X.X °F if your temperature units are set to Fahrenheit. If the data has no units, be sure to set the channel type to no units. The ‘Test’ button will cause the function to run - the ‘Status’ area will indicate any errors, or if there are none, the current result of the function. Page !58 A 'Forget Previous' button is available in the synthetic channel edit window - this will cause WeatherCat to forget all the data previously recorded for the channel (which is useful if the channel function or type has changed). Synthetic channel's notes: a). Synthetic channels are dependent on their input channels - if an input channel becomes invalid, the synthetic channel will also become invalid. b). Input channels are converted into user units before being passed to the synthetic channel function. c). Synthetic channels can be enabled and disabled - if disabled, they are not recorded. d). Synthetic channels values are not calculated for historical data (i.e. data downloaded from the logger because WeatherCat was not running). Synthetic channel data will be interpolated across these periods. e). Be sure not to introduce an infinite loop into a channel function, this will cause WeatherCat to hang requiring a forced quit. Should this happen, boot up WeatherCat into 'Safe mode' (hold the 'ctrl' key down whilst launching WeatherCat), then edit the synthetic channel to remove the loop, quit WeatherCat, then relaunch it normally. f). Synthetic channels are not currently available via WeatherCat's AppleScript interface nor do they appear in the data viewer/editor. g). After using the 'Forget Previous' button for a synthetic channel, it can be up to an hour before the data is actually forgotten. h). Synthetic channel values are calculated each time WeatherCat receives data from your station. i). If there is no channel function, the last parameter defined will be returned. j). Renaming a synthetic channel currently requires a reboot of WeatherCat before the new channel name is visible in custom gauges and graphs. k). External data can be pulled in to a channel function via AppleScript (for example electricity or gas consumption data) but be sure this processing is quick - due to operating system restrictions, channel functions execute on WeatherCat’s main thread and will impact UI responsiveness if the processing time for the channel function is significant. Page !59 Update Weather Now This menu item forces WeatherCat to take a sample now. The Journal ! WeatherCat provides a journal in which you can record notes about the weather. The journal automatically time-stamps each entry and can be uploaded to your web pages as a simple weather blog. The layout of the journal is as two panes; the left pane shows journal entries, with newest at the top. The right pane shows the actual journal entry. To Create A New Entry To create a new entry either click the ‘New Entry’ button at the bottom right of the journal or simply start typing in the right hand text field. Page !60 Links and in-line images can be inserted via the following html: Link: <A HREF="http://some.link.com" target="_blank">A cool link</A> Image: <img src="url" alt="descriptive text"/> (Note: The double quotes in the code are needed). Examples: Link Test: <A HREF="http://www.trixology.com/" target="_blank"> Trixology</A> Image Test: <img src="tempout.jpg" alt="Temperature gauge"/> Links and images will not be displayed in the Journal window within WeatherCat, but will be displayed once uploaded to your web-site. To View An Entry To view a journal entry, double click it in the left hand pane. To Edit An Entry To edit a journal entry, first double click it then edit the text in the right hand pane. To Delete An Entry To delete a journal entry, select an entry in the right hand pane then hit the ‘Delete Entry’ button. To View The Data For An Entry To view the data for a journal entry, first select the entry in the right hand pane, and then hit the ‘Show Entry On Graphs’ button. Status This shows the state of various internal systems and can help quickly diagnose problems. Please note: Weathercat is designed to automatically recover from failures where-ever possible - sometimes this can take up to an hour. Your first course of action when noticing a problem is to just leave WeatherCat alone for an hour to see if the problem clears up. The FTP section shows the state of WeatherCat’s FTP queues – the longer the bar, the more files are queued for upload. If the FTP queues become full, you’ll receive an admin email – typically this indicates a problem either with your local Internet connection (commonly the cause), or the FTP server (rare). Page !61 The On-Line Services section shows the state of some of the on-line services WeatherCat can send data to. Figures separated by a ‘/’ character indicate the number of transmissions versus the number of acknowledgements for that service. WeatherCat Core shows the current communications quality to your hardware, the status of the webcam and the watchdog. The Watchdog is a separate task within WeatherCat that monitors WeatherCat for hangs – it will reboot WeatherCat if it detects a problem or if WeatherCat unexpectedly quits (if enabled in WeatherCat’s preferences). ! Page !62 Data Export You can export data manually or on a daily schedule from WeatherCat using the Export tool. The data is exported as a comma separated values file (.csv), which should open directly in your favourite spreadsheet software. ! Two types of export are available - weather data or hourly data. The weather data is exported at the period specified, the hourly data consists of hourly minimum, maximum and average except for accumulated precipitation which is the total accumulated for the hour. All data is converted to user units. Page !63 Convenience date selectors are available (today, this year, etc.), custom ranges can be created by clicking the calendars to set the 'from' and 'to' dates. If the date range doesn't make sense, the export button will be greyed out. The export period can be set for raw weather data (i.e. every ten minutes). To export a particular day, select the same date on both calendars. Daily exports can be selected to run automatically (this feature is off by default) via the ‘Scheduled’ tab. Auto-exports are stored in ~/Documents/WeatherCatExports/year/month/ HourlyData and WeatherData (where ~ is your home directory). A daily export will run at the first opportunity - WeatherCat doesn't need to be running around midnight for the export to be processed (for example if WeatherCat is off for the night, the export for yesterday will happen when it's launched in the morning). The ‘Preview’ button will show you what will happen when you hit the ‘Export…’ button – the data will not be written to disk during a preview. Be aware that some spreadsheet software is limited to 65536 rows (i.e. samples). Page !64 ! Page !65 Backups Once per day, WeatherCat will create a backup copy of the WeatherCatData folder. You can set the time of the backup (20:00 local by default), where the backups are stored (by default ~/Library/WeatherCatBackups) and how many days backups should be kept for (default is 7 days). You can also request admin emails to be sent out when a backup is performed (by default this is on) - this email will indicate the result of the backup which will either be 'success' or report an appropriate error message should the backup fail. You can also manually schedule a backup via the 'Backup' button (the backup will start within approximately 10 seconds). Data Restore You can restore the data from a backup copy via the Backup window. A list of backups is presented, sorted by date - the newest at the top of the list is preselected. Hit the restore button to restore the data (please be sure before restoring the data that you have enough data in your data logger to fill in the hole that will be present after the restore is complete). Page !66 During a data restore, WeatherCat is halted and the only available option when the restore completes successfully is to quit WeatherCat. If the restore fails, your original data will be untouched and WeatherCat will continue running. Safe Mode WeatherCat also supports a special restore mode - hold the 'ctrl' key down when booting WeatherCat to restore data without fully booting WeatherCat. This is useful if your current data-set is corrupt. In 'safe mode', WeatherCat will boot to the Backup window from where a backup set can be chosen to restore from. No Weather processes will be running in this mode. Note: It is also possible to edit synthetic channels in safe mode - this is useful if you’ve introduced an infinite loop in a channel function. Backup notes • It is not possible to turn off the daily backup (this is a design decision), you can however set the length of time to keep backups to 1 day - this effectively limits WeatherCat to keep just one auto backup. • The destination for backups can be anywhere, for example a remote volume, but note that if the target volume is not mounted at time of backup, the backup will fail WeatherCat will not 'auto-mount' the target volume. • Backups run as a low priority background task and will not interfere with normal WeatherCat operation. • The backup is a straight copy of your data - the data is not compressed or modified in any way apart from a 'check' file that is added to the backup on completion. It is possible to manually restore a WeatherCat backup by simply replacing the current WeatherCatData folder with a backup folder (and renaming it to WeatherCatData). • Only the WeatherCat data folder is backed up - this includes weather data, statistics data, banner generator data, imagery files, calibration data, channel names, custom alerts, station maintenance schedule, custom graphs, daily rain edits, additional custom web uploads. Files excluded include WeatherCat's preferences, any temporary files (for example the time of the last Wunderground upload), your custom web page templates and other user data. • If a backup or restore is in progress when WeatherCat is asked to quit, the quit operation will be held up until the backup/restore completes - you will be notified via the shutdown window if this is happening. • Backups have a check file associated with them which is written when the backup completes - if this check file doesn't exist in the backup (for example the power went off during the backup operation), the backup will be greyed out in the list of backups available in the backup window and you won't be able to select it to restore from. Page !67 Station Options The facilities available here depend on your weather station hardware. These options can be accessed from the ‘Tools’ menu under the ‘Station Hardware Options’ menu item. WS23xx ! Here you can set your data-logger’s logging interval from 1 minute to 2 hours. The WS23xx series of stations can store 170 samples thus at 15 minute intervals it can store 42.5 hours and at 2 hour intervals, 240 hours (10 days) can be saved. Note that when setting the archive interval, WeatherCat also clears the data logger. You also have the option of clearing the data-logger after WeatherCat downloads historical weather from the station. This can lead to faster down-loads in future. Page !68 WeatherCat also allows you increase the area of your rain collector – this is a common modification to increase the sensitivity of the rain bucket supplied with the 23xx range. Davis Monitor/Wizard Options ! Here you can set your data-logger’s logging interval from 1 minute to 2 hours. The Davis Monitor and Wizard series of stations can store 1560 samples, so at 15-minute intervals it can store 390 hours (16.25 days) and at 2 hours it can store 3120 hours (130 days). Note that when setting the archive interval, WeatherCat also clears the data logger. The other options can set the station’s clock shortly after midnight to the time on your computer and clear the daily rain held in the console. Page !69 Davis Vantage/Vue Range ! Page !70 Here you can set your data-logger’s logging interval from 1 minute to 2 hours. The Davis Vantage range can store 2560 samples, thus at 15-minute intervals it can store 640 hours (26 days) and at 2 hours it can store 5120 hours (213 days). Note that when setting the archive interval, WeatherCat also clears the data logger. You also have the option of clearing the data-logger after WeatherCat downloads historical weather from the station. This can lead to faster down-loads in future. If ‘Synchronize station clock’ is ticked, WeatherCat will set your station’s clock shortly after midnight every day. WeatherCat monitors the Vantage power system including that of remote transmitters. By default, it will send you an email when it detects either a problem with the station power supply or a transmitter battery. The ‘Test Power System’ button causes WeatherCat to simulate various power failures – the display will update, and power fail and power restore emails will be sent if enabled. The ‘Set Channel Names’ button brings up a sheet where you can alter the default channel names as assigned by WeatherCat. These names are used in the Live Data View tool and custom graphs. Name changes made here will not take affect until WeatherCat is restarted. ! Page !71 Page !72 Davis WeatherLink ! Figure 31 - WeatherLinkIP Hardware Options Page !73 The WeatherLinkIP driver can be used with any Davis hardware that supports the WeatherLinkIP data-logger. This driver offers all the facilities of the normal Vantage/Vue driver; the only difference is the option to allow the logger to send data to weatherlink.com - this is enabled by default. To connect, select WeatherLinkIP in WeatherCat's communications connection window. Enter the I.P. address of the data-logger and hit the 'Done' button. By default WeatherCat uses the default port of 22222; if your logger is set to use another port, use a colon after the IP address followed by the port - for example 192.168.1.110:22222 If you do not know the I.P. address of your data-logger, a network scanning utility such as AutoScan-Network (free, available from: http://autoscan-network.com/download/) or Angry IP Scanner (http://angryip.org/download/#mac) will scan your network and display all available devices and their I.P. addresses. We suggest setting the data-logger to a fixed I.P. address via its web browser interface. For the greatest reliability it is suggested you turn off the upload to weatherlink.com via the loggers' configuration web page and turn the upload option off in WeatherCat. The reason for this is when uploading to weatherlink.com, the logger may lock-up if it can't resolve the weatherlink.com domain name and communications to WeatherCat will be lost. Virtual VP The WeatherLink IP driver can be used with Virtual VP. Normally WeatherCat reads the rain bucket resolution direct from the hardware, but it appears Virtual VP does not pass this information through (WeatherCat defaults to 0.2mm). However, it's possible to force the rain bucket resolution to 0.01" via a hidden preference as follows: Open a terminal window and enter the following command and hit the return key: defaults write com.trixology.weathercat VantageRainCollectorOverrideToInches YES This will force the WLIP to set the rain collector to 0.01" resolution. To revert back to auto-detect enter: defaults write com.trixology.weathercat VantageRainCollectorOverrideToInches NO This command only needs to be entered once - it isn't necessary to enter it every time WeatherCat is launched. If using Virtual VP, please turn off the ‘Allow connections to weatherlink.com’ option. Page !74 WMR928/968 Options ! The Area Multiplier is useful if you have increased the capture area of your rain bucket. You can edit the extra channel names available on your station - these names are displayed in the live data view and custom graphs. You can also pipe channel 3 to be the external temperature and humidity readings, which is useful if your main thermo/hygro unit is not serviceable. Page !75 WMR200 The only option for this station is the rain collector area multiplier. This is useful if you have increased the capture area of your rain bucket. Note: Altering this value can cause a large jump in the daily rain for that particular day. In this case, use a daily rain edit to correct to the correct value. Note that although the literature for this station claims up to 10 additional sensors, the interface to the computer supports only 8. WeatherCat maps extra channels 2 to 9 to its Aux. Temp. and Aux Hum. channels 1 to 8; a sensor on the WMR200’s channel 10 will not be seen by WeatherCat. Page !76 WMR88 WeatherCat’s WMR 88 station driver supports additional temp/thermo sensors, rain bucket area multiplication and short forecast. The only option for this station is the rain collector area multiplier. This is useful if you have increased the capture area of your rain bucket. Note: Altering this value can cause a large jump in the daily rain for that particular day. In this case, use a daily rain edit to correct to the correct value. Note that as the WMR88 does not have a data logger, data will be interpolated across periods when WeatherCat isn’t running. Also note that the station hardware code sent to CWOP is for a WMR-100. Page !77 Fine Offset WH1080/2080 ! The WH1080/81/2080/1090/91 etc. is sold under a variety of brands such as Ambient (WS1080/2080), Watson W-8681, Maplin, National Geographic, Elecsa 6975/76 and many others. The Hardware Options in WeatherCat allow you to set the data logger interval to any value from 1 to 59 minutes – we would suggest 5 minutes as a good compromise between resolution and the amount of time the station can collect data for if not connected to the computer. 5 minutes gives the logger a capacity of just over 14 days. Please note, WeatherCat uses your altitude to calculate relative barometric pressure with this station – please be sure your altitude is correctly set in WeatherCat’s preferences. Page !78 Fine Offset WH3080 ! The WH3080 is sold under a variety of brands such as Signatrol, Watson W-8681-Solar, Nevada WH3080 and many others. It can be difficult to tell the difference between a WH1080/2080 and 3080 – if the hardware has displays for solar and u.v. on the console then it’s a 3080. The Hardware Options in WeatherCat allow you to set the data logger interval to any value from 1 to 59 minutes – we would suggest 5 minutes as a good compromise between resolution and the amount of time the station can collect data for if not connected to the computer. 5 minutes gives the logger a capacity of just over 14 days. Please note, WeatherCat uses your altitude to calculate relative barometric pressure with this station – please be sure your altitude is correctly set in WeatherCat’s preferences. Page !79 Instromet MetPlus The Instromet MetPlus station is available from Instromet - http://www.instromet.co.uk/ MetPlus.html The MetPlus is a serial based station, a suitable USB to serial converter and driver will be needed to connect it to your Macintosh (see the section ‘Serial To USB Converters’ earlier in this manual). The hardware options in WeatherCat allow you to set the data logger period, whether the station clock is synchronised daily and the data associated with the temperature 2 input on the MetPlus PCB. Page !80 The temperature 2 input can be configured as wet-bulb, internal temperature or Aux. Temp 1. If set to ‘wet-bulb’, external humidity will be calculated from wet-bulb and external temperature. Setting the temperature 2 input to either 'Internal temperature' or 'Aux. Temp 1' will use the humitter as external humidity (if fitted). If not fitted, external humidity and derived channels will not be valid. Instromet notes 1. The sun sensor is digital - this is wired up to the Solar channel within WeatherCat - if the sun is shining, the solar channel will be set to maximum (1800W). From this, WeatherCat will calculate sun hours. 2. When calculating humidity from wet-bulb temperature, a barometric pressure of 1013mb is assumed if the optional barometer is not fitted. 3. The optional barometer, if not fitted, will read 1000mb. Calibration of the barometer can be performed via WeatherCat’s calibration options. 4. Internal humidity will always read 50% - it may be possible if wet-bulb and humitter fitted to use the humitter as internal humidity in a later release. 5. Switching off then back on again the ‘Synchronise station clock’ tick-box will cause a manual synchronisation of the clock. Page !81 Supplied Plug-ins Live Data ! The Live Data tool shows the raw data coming from your station (converted to your units). It is most useful for checking channel status and errors. In addition, at the bottom of the list of channels it maintains a count of communications errors – these errors are split up into time-outs and checksum/CRC errors. These values can aid fault finding spurious communication issues. Page !82 Current Conditions Calculator ! This tool allows you to select various channels, take their values, compare them to a given value and if the result is true then set the current conditions string to a user specified value. Page !83 For example, if the current rain rate is greater than 0.5 inches per hour then set the current conditions to 'Torrential Rain'. When calculating the current conditions the plug-in runs through the rules from top to bottom until it finds one that is true. If none are true then the default result is 'N/A'. NOTE: The channels available are determined by your hardware and a consequence of this becomes apparent if you change your station hardware. In this case WeatherCat will tell you the hardware has changed and that you need to check the current conditions rules to make sure the channels you previously were using are available with your new hardware (and conversely to check for new channels you can now use). The same applies to custom alerts and graphs. Because it is not possible to determine rules for all weather conditions, the tool provides a feature to override the calculated current conditions with a user provided description of the current conditions (manual override). This override will stay in force for a user settable time period via an expiry timer. As a convenience, the expiry timer is set to two hours in the future when the user conditions are enabled. When the expiry time is reached, the tool will revert to using the rules to calculate the current conditions automatically. This feature is useful for weather conditions such as 'snow' or 'haze', which are difficult to correctly detect. NOTE: Manual conditions and their expiry times are not saved; if WeatherCat is quit and re-launched the manual override conditions will be lost. Also note that via WeatherCat’s AppleScript interface it is possible to set the current conditions. Page !84 Banner Generator The banner generator can generate an image overlaid with current weather data and upload it to your Custom Web pages server on a regular basis. The banner can be linked to from web-pages, forum signatures and so on – instructions are included in the window as per the image below. Note that items can be nudged into position by first selecting the item to be moved, then holding down the ALT/Option key whilst using the arrow keys. Page !85 SQL Driver This tool can upload your weather data to a MySQL database opening up a world of applications not previously available to WeatherCat - charting and analysis for example (e.g. High-Charts, JpGraph, GraPHPite, pChart and so on). ! The tool features: •Auto-import of initial data. •Uploading of historical data. •Variable rate upload frequency depending on data (fast for wind, slower for other data), resolution down to 1 second. The database to use must exist – WeatherCat will not create it. Four tables are created and maintained in the database - one for wind (WindData), one for common variables (WeatherData) and one for extra sensors (ExtraData). An additional table is maintained for maintenance reasons - do not edit this additional table (_WeatherCatPrivate). If WeatherCat detects the database is new (i.e. has no tables), it will create the tables then import all of your existing WeatherCat data. The period of the data when uploading historical data can be set in the tool - the default is 5 minutes. Thereafter, data will be uploaded to fill in gaps (for example when WeatherCat isn't running or the database server is not available). When running in real-time, the wind data can be updated faster than the other data (down to 1 second) - this is handy if you have a station which updates wind data faster than other Page !86 data (Davis Vantage or Vue for example). The other data is updated at a user settable multiple of this period. If you wish to reset the database, stop the SQLDriver, drop all four tables (using something like phpMyAdmin), then start the SQLDriver again - it'll re-import your weather data. Notes: 1. If your database is managed via CPanel, be sure to enable external connections from your I.P. address (normally via RemoteMySQ) 2. Verbose errors are logged to WeatherCat's log window. On error, the SQLDriver will wait a minute before retrying the transaction. 3. SQLServers can block repeated unauthorised attempts to access. If your passsword is wrong, or there's some authentication problem, do not repeatedly keep hitting the 'start' button, or leave authentication errors repeat. If this does happen to you, the error reported in WeatherCat's log window should tell you what you need to do to unblock yourself. 4. The initial import to a new database can take a very long time. For example, importing 6 years worth of data (Vantage with extra channels) from a MacMini to a Synology 1512+ at the default 5 minute intervals took ~ 60 minutes at approximately 250KB's per second. For your entertainment, a progress bar and percentage complete are displayed during this time. Weather data collected by WeatherCat during initial import or 'hole filling' will not be lost. 5. At the end of the initial import or uploading of historic data, the SQLDriver will switch to real-time logging. 6. If the initial import or uploading of historic data is interrupted, it will resume when the SQLDriver is next able to make contact with the database. 7. The period of historic data uploads is read when the upload is started - if you want to change the period during an upload, hit the 'Stop' button, change the period then hit the 'Start' button. 8. The time field in the database tables is in U.T.C. 9. The data size reported in the tools' window is not the database size - merely the number of bytes transmitted to the server. Typically this is far greater than the actual data size in the database. Page !87 10. Imagery is not uploaded to the SQL server. 11. When running with live data, the minimum, average and maximum transaction time is logged in the window - these values can be reset with the small 'R' button. 12. Tested with MySQL 5.1.49. Should work with other versions of MySQL the minimum MySQL version in theory should be 4.1 (not tested). 13. If the server is running locally (i.e. on the same machine as WeatherCat), you can use 127.0.0.1 in the 'Server URL' field 14. Uses the MariaDB SQL connector - source code and Xcode project for this plug-in can be found at http://data.trixology.com/downloads/ WeatherCat_SQLDriver.zip. 15. Currently, synthetic channels are not uploaded to the database. Page !88 How Do I… This section details step-by-step instructions to perform common tasks with WeatherCat. How Do I Change The Units Used By WeatherCat? Open WeatherCat’s preferences from the File menu then go to the Misc1/Units pane. How Do I Send Data To Wunderground? WeatherCat can send real-time data to Wunderground. You will need a Wunderground ID; if you are not yet a Wunderground member you can get a Wunderground login ID from within WeatherCat. 1. Open WeatherCat’s Preferences and select the ‘On-Line’ tab. 2. Open the Wunderground PWS tab – it will look like the picture below (PWS is the abbreviation for ‘Personal Weather Stations’) Page !89 3. If you don’t have a Wunderground member I.D. click on the ‘Create Wunderground Account’ button. You web-browser will open and take you to the correct page to register with Wunderground. 4. Once you have a station I.D. and password, enter them into the ‘Station I.D.’ and ‘Password’ fields. 5. Click the ‘Start’ button and the ‘Current Status’ pane will start updating. If there is a problem with your login details or the connection to the Wunderground servers, this will be indicated in the ‘Current Status’ area. Clicking on the ‘Go To Your PWS Web Page’ button your web browser will open your Wunderground station page. Page !90 How Do I Send Data To The Citizen’s Weather Observer Program (CWOP)? WeatherCat can send data to CWOP – the procedure is similar to setting up for Wunderground. You will need a CWOP ID; if you are not yet a CWOP member you can create a login ID from within WeatherCat. 1. Open WeatherCat’s Preferences and select the ‘On-Line’ tab. 2. Open the CWOP tab – it will look like the picture below. ! 3. If you don’t have a CWOP Station I.D. click on the ‘Create CWOP Account’ button. Your web-browser will open and take you to the correct page to register with CWOP. 4. Once you have a station I.D. enter it into the ‘Station I.D.’ field. 5. Click the ‘Start’ button. Page !91 The ‘Current Status’ pane will start updating. If you get the message in the ‘Current Status’ that your ‘Lat/Long is not set’, then follow the ‘Basic Setup’ section at the start of this manual to enter your location and height into WeatherCat. Finally, if you click on the ‘Go To Your CWOP Web Page’ button your web browser will open your CWOP station page. How Do I Use A Webcam With WeatherCat? WeatherCat can work with any QuickTime compatible camera. It can also work with third party webcam software via its local file option and with IP based webcams if they make the image available via http. To use your camera with WeatherCat: 1. Ensure your camera is plugged in and no other program is using it. 2. Go to WeatherCat’s preferences and open the ‘Webcam’ tab. 3. Click on the ‘Web-cam Enabled’ check box. 4. Your camera may appear in the camera selector menu, if it does not… 5. Click on any other pane of the preferences then back on the Webcam pane – this causes WeatherCat to refresh the list of cameras. If still not there, unplug the camera, count to 10, plug it back in and repeat. 6. Check the webcam is working by opening the ‘Live Video Preview’ from the ‘Tools’ menu. You can now use the webcam image in web pages as described next. The webcam options will be described in the ‘Preferences’ section later in this manual. Page !92 ! Note: If you are using an external iSight camera (Firewire) with WeatherCat, please use the older webcam driver as described in the Advanced Preferences. If you do not, the camera will stop capturing images after a few hours running. How Do I Upload Web Pages To a Web Server? WeatherCat can create web pages in two ways – the fastest method is called the ‘Simple Web Pages’ which gives you ‘canned’ web pages with very little effort – you just need to know your FTP log-in details and create a directory on your server for WeatherCat to upload your files to. The second method is called ‘Custom Web Pages’. First we will describe the simple web pages. Page !93 Simple Web Pages By clicking a few buttons, entering some descriptive text and setting up your FTP details you can put your weather web pages on-line very quickly. An example of how these web pages look can be found on our web site at the following URL: http://www.trixology.com/live_weather/simple 1. Open WeatherCat’s Preferences and select the ‘On-Line’ tab. 2. Open the Simple Web tab – it will look like the picture below. ! 3. Check the Create Web Pages tick-box. Page !94 4. If you have enabled your webcam tick the ‘Add WebCam Picture To Web Pages’ tick-box. 5. If you wish to display your weather journal on your web site, check the ‘Add Journal To Web pages’ tick-box. 6. Click on the ‘Edit FTP Details’ button; a sheet will pop-up (picture below) where you can enter your FTP details. Be sure the URL ends in a ‘/’ character. You can use the ‘Test’ button to perform a test upload. ! 7. When your FTP details are set-up and tested, click the OK button. 8. (Optional) You can add some text describing your weather pages by clicking on the ‘Texts’ tab as per the next picture. Page !95 ! 9. Once you are happy with the texts, press the ‘Save Texts’ button. 10. Press the ‘Test Web Pages Locally’ button. WeatherCat will process your web pages and open them in your browser. 11. Go back to the ‘Setup’ tab and tick the ‘Enable FTP Upload’ tick-box. From now on, every 15 minutes WeatherCat will generate the web pages and FTP them to your web-server. You can change the upload rate with the ‘Update Web Pages Every’ pop-up menu. The remaining options will be described in detail in the ‘Preferences’ section of this manual later. The simple web pages are designed to give basic web pages for use on your site. For more complex web pages, using your own design, we need to look at WeatherCat’s custom web pages facilities. Page !96 Page !97 Custom Web Pages WeatherCat can take your own web pages, we will call them ‘templates’, replace any 'tags', with weather data, generate any needed graphics and movies requested by the tags and then upload the processed files to your web server. When processing your templates, WeatherCat takes the pages found in your source folder (set with the ‘Set HTML Source’ button), processes them for tag replacement and then saves the resultant pages at the save path (set with the ‘Set Save Path’ button). WeatherCat tags end in the ‘$’ symbol, so for example if, in your template file, you had the tag ‘WCAM$’, WeatherCat would replace it with the current webcam picture (actually it would replace it with the html code to draw the picture and make sure the webcam picture was also uploaded as a jpeg file). WeatherCat tags come in two varieties – high level tags which typically display more than one item and lower level tags which only display one item but are finer grained and hence more flexible. An example high-level tag is ‘CT$’ which is replaced with the current temperature, the temperature units string and 1 hour delta – it would be printed as ‘46.2°F (0.2)’. Another high-level tag is JOURNT$ which is replaced with the journal text for the station and STDAILY$ is replaced with the daily hourly statistics. STDAILY should normally be surrounded by preformatted tags; i.e. <PRE> STDAILY$ </PRE> Low-level tags are constructed from the STAT$ keyword and some parameters. The list of parameters starts and ends with a $ symbol. STAT$ tags create queries to WeatherCat’s Stats Manager and are replaced with the result of the query. The basic format is: STAT$ITEM:TYPE:PERIOD$ ITEM can be one of: RAIN, DAILYRAIN, RAINDAYS, FROSTDAYS, DAILYSUN, TEMPERATURE, DEWPOINT, WINDCHILL, HEATINDEX, PRESSURE, SNOW, SNOWDAYS, WINDSPEED, AVERAGEWINDSPEED, WINDGUST, WINDDIRECTION, WINDRUN, EXTHUMIDITY, INTHUMIDITY, INTTEMPERATURE, UV, SOLAR or SUNSHINEHOURS, SNOW or SNOWDAYS. TYPE can be one of: CURRENT, 24HRSAGO, MIN, MAX, AVERAGE, TOTAL. PERIOD can be one of: Page !98 TODAY, YESTERDAY, THISWEEK, LASTWEEK, THISMONTH, LASTMONTH, THISYEAR, LASTYEAR, THISSEASON, ALLTIME, SINCE9AM and HRS(x) (where x is the number of hours) By appending TIME we can display the time of the event: STAT$ITEM:TYPE:PERIOD:TIME$ For example, to find the highest temperature today: STAT$TEMPERATURE:MAX:TODAY$ STAT$TEMPERATURE:MAX:TODAY:TIME$. These tags are rendered as: 8.22 12:10 AM To find the highest temperature yesterday: STAT$TEMPERATURE:MAX:YESTERDAY$ STAT$TEMPERATURE:MAX:YESTERDAY:TIME$. These tags are rendered as: 9.39 9:00 PM CURRENT will display the real-time value of a given item. This is different to CT$ or CD $ etc. as those values are pulled from the database which has a resolution of 1 minute. In the case of CURRENT, the time field (TODAY, YESTERDAY etc) will be ignored and can be omitted. To display the current outdoor temperature: STAT$TEMPERATURE:CURRENT$ This is rendered as: 5.33 CURRENT can also return the value of the following additional sensors (if supported by your hardware): LW1, LW2, LW3, LW4 - leaf wetness sensors. SM1, SM2, SM3, SM4 - soil moisture sensors. ST1, ST2, ST3, ST4 - soil temperature sensors. T1, T2, T3, T4, T5, T6, T7, T8 - extra temperature sensors. H1, H2, H3, H4, H5, H6, H7, H8 - extra humidity sensors. DAILYET, MONTHLYET, YEARLYET - Daily, monthly or yearly evapotranspiration. i.e. STAT$T1:CURRENT$ This is rendered as: 11.7 24HRSAGO will display the value of a given item 24 hours ago. Page !99 In the case of 24HRSAGO, the time field (TODAY, YESTERDAY etc) will be ignored and can be omitted. To display the outdoor temperature 24 hours ago: STAT$TEMPERATURE:24HRSAGO$ This is rendered as: 8.1 DELTA1 will display the 1 hour change of a given item. For DELTA1 the time field (TODAY, YESTERDAY etc) will be ignored and can be omitted. ***NOTE that wind direction delta is not supported and will return an undefined value*** To display the current outdoor temperature 1 hour change: STAT$TEMPERATURE:DELTA1$ This is rendered as: 1.28 DELTACHAR is the same as DELTA1 but rather that returning the numerical value of the 1 hour delta returns one of the following characters: '↑↗→↘↓' which represents > 3 units, > 1.5 units, between 1.5 and -1.5, less than -1.5 and less than -3 units respectively (encoding is UTF-8 if accessed via the AppleScript interface). Note for pressure, the units for this comparison are millibars irrespective of the user set units. DELTACHAR arrows are translated in custom web processing to one of three arrows, up, right or down. Detail: if the value is rising by 1.5 units or more per hour then ⇑ is output. If the value is falling by more than 1.5 units or more per hour then ⇓ is output, otherwise ⇒ is output. DELTA24 will display the 24 hour change of a given item. For DELTA24 the time field (TODAY, YESTERDAY etc) will be ignored and can be omitted. ***NOTE that wind direction delta is not supported and will return an undefined value*** To display the current outdoor temperature 24 hour change: STAT$TEMPERATURE:DELTA24$ This is rendered as: 0.8 Notes: SUNSHINEHOURS can only be used with TOTAL (to find the total number of hours over a given date range) e.g. Hours of sunshine today = STAT$SUNSHINEHOURS:TOTAL:TODAY$ is rendered as: Hours of sunshine today = 0.52 Page !100 DAILYSUN can only be used with MAX (to find the sunniest day in a given date range) e.g. The sunniest day this year: STAT$DAILYSUN:MAX:THISYEAR:TIME$ (STAT $DAILYSUN:MAX:THISYEAR$ hours) is rendered as: The sunniest day this year: 18 Feb 2012 (0.52 hours) THISSEASON can only be used with RAIN e.g. STAT$RAIN:TOTAL:THISSEASON$ is rendered as: 91.60 or STAT$RAIN:AVERAGE:THISSEASON$ RAINUNITS$/h is rendered as: 0.0616 mm/h (The rain season start month is set in the preferences) DAILYRAIN can only be used with MAX or AVERAGE. e.g. STAT$DAILYRAIN:MAX:THISWEEK$ on STAT $DAILYRAIN:MAX:THISWEEK:TIME$ is rendered as: 2.80 mm on 18 Feb 2012 RAINDAYS can only be used with TOTAL and returns the number of rain days over a given period. e.g. STAT$RAINDAYS:TOTAL:THISMONTH$ is rendered as: 3 FROSTDAYS can only be used with TOTAL and returns the number of frost days (or air frosts)over a given period. e.g. STAT$FROSTDAYS:TOTAL:THISMONTH$ is rendered as: 8 Extra sensors can only be used with CURRENT. Stats and deltas are not currently supported for extra sensors - this is planned for a future version. Tag Errors In the case of an invalid tag configuration, the tag will either be processed - for example: Highest wind direction today = STAT$WINDDIRECTION:MAX:TODAY$ degrees returns an undefined value and is rendered as 'Highest wind direction today = 294.56 degrees'. Page !101 or it may render as an error. For example: Average wind direction today = STAT$WINDDIRECTION:AVERAGE:TODAY$ degrees on STAT$WINDDIRECTION:AVERAGE:TODAY:TIME$ renders as: Average wind direction today = 255.24 degrees on ***Error - No time available for averages*** Dials and graphs can be displayed with the ‘D” and ‘GR’ type tags – for example DTEMPO$ is replaced with the outside temperature gauge. ‘GRTEMPO$’ is replaced with the simple outside temperature graph. Custom graphs are displayed by using their web-tag as indicated in their settings. There are some miscellaneous tags for printing units strings – for example TEMPUNITS$ is replaced with the string for Temperature units – typical ‘C’ or ‘F’. A listing of all tags currently available is available in appendix 4. Example templates are supplied in the distribution. A very simple one, called ‘WeatherCat_All_Tags’ simply demonstrates all the tags currently available in WeatherCat. You can view a live demonstration of this template at: http://www.trixology.com/live_weather/custom/ Another template, ‘atkinsfamily.org’, written by Todd Atkins, demonstrates a more useful real world template. We will use the ‘atkinsfamily.org’ template, demonstrate what it looks like and then put it on-line. You can of course modify it to your needs or create your own template from scratch. We will now run through the steps to use one of the supplied templates, later we will look at how to create your own template. 1. Open WeatherCat’s Preferences and select the ‘On-Line’ tab. 2. Go to WeatherCat’s 'Custom Web Pages' tab of the preferences and, using the 'Set HTML Source' button, navigate to the 'WeatherCat/Web Templates/atkinsfamily.org' folder as per the picture below. This tells WeatherCat where to find the pages to be processed (see picture below). 3. Press the 'Test Web Pages Locally' button. Page !102 ! Figure 45 - Custom Web Example WeatherCat will process the template, generate the pages and required objects then open them in your web browser. WeatherCat tries to open all documents that are to be uploaded, so you may find a CSS file opened in a text editor, and if you are using a webcam and have used webcam tags in your template, these pictures and movies will open in your graphics editor and QuickTime Player. Examine the results and edit the template to suit your needs. After each change to a template file, save it and then press the ‘Test Web Pages Locally’ button to see how your changes look when processed. A complete list of WeatherCat tags can be found at Appendix 4, or by pressing the ‘Show Help’ button in the Custom Web tab of WeatherCat’s preferences. At this point you may want to create your own template – more details can be found below. NOTE: Whenever Page !103 you change templates, you need to delete the old processed files found in WeatherCat’s Save Path folder, otherwise the old objects will be opened every time you test your template. When you are happy with the results, you may now want to put your pages on the web as follows. 1. Press the 'Edit FTP Details' button and configure WeatherCat to FTP to your server (as shown previously in the Simple Web pages); you can test the FTP connection from the FTP dialog box that appears. Note that the directory to upload to must exist on the server WeatherCat will not create the directory or the path to the directory. 2. After testing you can FTP, select the 'Enable FTP Upload' check box. WeatherCat will now update your pages at the periods set with the 'Update Web Pages Every' pop-up menu. Notes: 1. Never put any items in the Save folder - the folder set with the 'Set Save Path' button. The contents of this folder may be deleted by WeatherCat. 2. You do not have to enable FTP for the custom web pages - you may just want them saved on your disk for use by another program or served from your Mac via the web server that comes with OS X. (Available from OS X’s System Preferences (under Sharing->Web Sharing)). 3. If you start receiving warning emails from WeatherCat with regards to ‘FTP Overload’ it means you may be generating web pages faster than they can be uploaded (typically these problems are spurious in nature). How Do I Create A Custom Web Template? 1. Create a folder somewhere for your web pages - for example in your Documents folder and call it something like "Weather Pages Source". 2. Referring to WeatherCat's tags reference at Appendix 4, create your web pages in your preferred web page editor and save them in your Weather Pages Source folder. Wherever you want a weather item to appear in your pages, insert the relevant tag, for example if you want the webcam image inserted, use the WCAM$ tag. 3. You can put other items in your source folder to be uploaded to your web site - for example, images. WeatherCat will look in files with extensions of .htm, .html, .htx, .css, .xml, .txt, .php, .shtml, .stm, and .shtm for tags to replace. All other types of file are not processed but are uploaded. Now continue as above for the pre-constructed templates. Page !104 Additional WebTag Resources A full reference for WeatherCat tags can be found in Appendix 4 or from within WeatherCat via the ‘Help’ button in the Custom Web Pages pane of the preferences. Finally, the WeatherCat Web Templates forum can be found at: http://athena.trixology.com/index.php?board=5.0 Page !105 How Do I Upload Data to UKWN or NZWN? Custom Web templates are provided that allows WeatherCat to upload data to the UK Weather Network (http://www.ukwx.net) and New Zealand Weather Network (http:// www.localweather.net.nz/smf/new-zealand-local-weather-network/). These sites work by reading a file from your web site at periodic intervals. The templates can be found in the ‘Web Templates’ folder of the WeatherCat distribution; simply copy the relevant template file into your custom web source directory. WeatherCat will now process and upload the file to your web site at the periods specified in WeatherCat’s Custom Web preferences. Alternatively, you can upload the files more frequently with the Custom Web ‘Additional Files’ feature. If you do not have a custom web site (and don’t plan on having one), set one up using just the UKWN or NZWN template as the only file that is processed. Page !106 How Do I Set Up A Weather Alert? WeatherCat can send emails and run items on your Mac (for example AppleScripts) when an alert triggers. Predefined Alerts WeatherCat comes with four pre-defined alerts – Ice, Rain, Clear Sky and Rain Start. To set up one of these alerts proceed as follows: 1. Open WeatherCat’s preferences and go to the ‘Alerts1’ or ‘Alert2’ tab. 2. Click on which actions you wish WeatherCat to perform when the alert triggers – ‘Send Email’ or ‘Launch User Item’. 3. Adjust any optional parameters, such as how heavy the rain needs to be. ! For details of the individual alerts, please see the ‘WeatherCat Preferences’ section later in this manual. Page !107 Custom Alerts WeatherCat allows you to create and edit an unlimited number of custom alerts. To create a new alert follow these steps: 1. 2. 3. 4. Open WeatherCat’s preferences and select the ‘Custom Alerts’ tab. Click the ‘New’ button. In the resultant sheet, select the criteria for the alert. Select the actions you wish to perform when the alert triggers and when the alert clears. 5. When you are happy with the Alerts settings, click the ‘OK’ button. The alert is now active. The custom alerts are described in more details in the ‘WeatherCat Preferences’ later in this manual. Page !108 How Do I Control My Environment with WeatherCat? There’s no ‘right’ way of doing this – WeatherCat provides facilities for external programs to monitor the data. The first option is to use the WXNOW.TXT file generated by WeatherCat when it is uploading to CWOP. This file is generated every time WeatherCat reports to CWOP and can be parsed periodically. The second option is to use WeatherCat’s custom web facilities to periodically parse an XML template to produce the data you need. The third way is to use the Custom Alerts to run scripts. The fourth way is via WeatherCat’s AppleScript interface. This provides access to the current weather data and WeatherCat’s status via AppleScript properties. Please see appendix 1 for a full description of this interface. The fifth way is to use WeatherCat’s SDK to write a native plug-in. Please see the WeatherCat SDK available as a separate download from our web-site. Page !109 How Do I Use AppleScript With WeatherCat? WeatherCat makes all channels and status information available via its AppleScript interface. Here’s a very quick example of how to use AppleScript to speak the current temperature as it changes. First, open the AppleScript editor program (/Applications/Utilities/AppleScriptEditor.app) – you should be presented with a screen looking like: ! Figure 46 - AppleScript Editor Page 1! 10 Now, paste the following AppleScript code into the window: tell application "WeatherCat" set oldCurrentTemperature to 40 -- set old temperature to something sensible repeat -- run around this loop forever, once every 10 seconds set currentTemperature to ExternalTemp -- read temperature from WeatherCat if oldCurrentTemperature ≠ currentTemperature then tell current application say "Current temperature is" say currentTemperature as string end tell end if set oldCurrentTemperature to currentTemperature -- save the current temperature so we can check for a change next time around the loop delay 10 end repeat end tell The window should now look like: Page !111 ! If you now hit the ‘Run’ button in the AppleScript Editor, the temperature will be spoken every time it changes (if WeatherCat isn’t running it will be launched when you press the ‘Run’ button). Finally, you can save the script as an application from the AppleScript Editor via ‘Save As…’ from its File menu. For more information on WeatherCat’s AppleScript interface, please see Appendix 1. Page 1! 12 How Do I Send Data In Real Time To A Server On The Internet? The Custom CGI feature allows you to transmit real-time weather data to a server on the Internet in an efficient fashion. We have supplied two simple php scripts by way of example (found in the ‘Server Scripts’ folder of the WeatherCat distribution). The first takes the data from WeatherCat and saves the data as a text file on your server. The second displays the data in a web page. To set up WeatherCat for Custom CGI follow these steps. 1. In the WeatherCat distribution open the ServerScripts folder found at the top level and upload the following two scripts and text file to your server: a). submit_weather.php b). watch_weather.php c). weather_data.txt (You may need to set the permissions of the files as appropriate for your server.) The submit_weather script is the script WeatherCat sends the current weather data to. The watch_weather script is loaded in your browser to see the current weather data. The weather_data.txt file is where the submit_weather script stores the data. Page 1! 13 ! 2. Enter the URL to the submit_weather.php script into the URL in the CustomCGI preferences - enter it exactly as above, just change the URL to your script. You'll probably only have to modify the www.yourserver.com part of the URL. The script by default expects the user name to be joeblog and the password to be xxxxxx. 3. Hit the start button. 4. In your web browser open http://www.yourserver.com/watch_weather.php If all has gone well, you should see live weather from your weather station. If not, check the URL's and the location of the scripts on your server. Check if your hosting provider allows you to run scripts; also check where you should put them. Page 1! 14 5. IMPORTANT: When everything is running correctly, edit the submit_weather script to change the user name and passwords! Notes 1. Please feel free to modify the scripts to suit your needs. The submit_weather script can be modified to save the data in any format you require - for example some flash based gauges need XML formatted data. 2. You may have other scripts you want to drive - you can write CGI's in whatever language you prefer - we have used PHP here as a simple example. 3. Any CGI you write must take the data as formatted by WeatherCat - you cannot change the format of the data WeatherCat sends. 4. The data WeatherCat is sending is displayed live in the Custom CGI preferences tab as it is transmitted. 5. We may add further data items to the request in the future, so your CGI should be able to handle new parameters - even if it’s just to ignore them until you can update the CGI. 6. If a data item is not available (because, for example that particular sensor is unserviceable) it may not be sent - your script needs to deal with this. Please see our web templates forum at http://athena.trixology.com/index.php?board=5.0 for discussion of this feature. Page 1! 15 How Do I Use The WeatherCat Client Program? WeatherCat is supplied with a small client program that can run on any Mac on either your local network or over the Internet. All you need to do is copy the client to the computer you wish to run it on and launch it (the client will run on OS X 10.6 or later). Within a couple of seconds it will pick up the data stream from WeatherCat and display weather gauges in real time. If you wish to connect to a WeatherCat server running over the Internet, open the preferences on the client and enter the URL to the server, then hit the connect button. You can run more than one client at a time; you can also run the client on the same machine as WeatherCat is running on. WeatherCat uses a fixed port in the range 49250 to 49254 to serve data to clients. If you are running WeatherCat on a machine with a firewall and the client is not working on other machines on your network then opening ports 49250 to 49254 on the machine WeatherCat is running on should allow the client to see WeatherCat and work correctly. Similarly for access from the Internet, you will need to ‘port forward’ these ports to the local I.P. address of the machine WeatherCat is running on in your Firewall (it’s best if the machine running WeatherCat has a fixed I.P. address. Check with your router documentation how to forward a range of ports). It’s likely your ‘Internet’ I.P. address will change over time; a dynamic D.N.S. company can aid here. They can provide a domain name that tracks your I.P. address over time so rather than having to know your I.P. address, you can use your ‘domain name’ to connect. Finally, you can disable all client access in the ‘Advanced’ pane of WeatherCat’s preferences. The WeatherCat client can be found in the ‘Companion Applications’ folder of the WeatherCat distribution. iOS Clients Poohbah Industries have made available clients for iOS devices that, like the Mac client, can work either over the local network or the Internet. Page 1! 16 ! To download the iOS clients please go to: http://itunes.com/app/poohbahindustries Support for the iOS client is provided via the WeatherCat iOS Client Forum Page 1! 17 How Do I Post My Weather Data to Twitter? Sylvester, a companion application for WeatherCat, integrates with the Twitter account on your Mac to post weather data at predefined times throughout the day to Twitter. Each tweet is defined by a template - there may be an unlimited number of templates. Each template is made up from one of the following WeatherCat tags: t12$ - time in 12 hours format t24$ - time in 24 hour format. de$ - date in the format d/my da$ - date in the format m/d/y STAT$ - any stat tag that can be processed by WeatherCat including TIME specifiers. Each template also has a list of tweet times associated with it, these times are defined to a resolution of one minute (i.e. a maximum of 1440 possible times per day). By default, 4 templates are provided - an hourly and 3 daily templates. You can add to, edit and delete the default templates. You can also save and load the templates as sets (from its ‘Tools’ menu). Page 1! 18 Usage: Make sure you have a Twitter account configured on your Mac (System Preferences->Internet Accounts). Launch Sylvester and select the account you wish to post to. Hit the 'Start' button then at the predefined times, the relevant tweet will be made. To edit a template, double click it. To add or delete templates, hit the relevant button. Note 1: Sylvester requires OS X 10.9 or later and a 64 bit processor. Note 2: Sylvester can be found in the ‘Companion Applications’ folder of the WeatherCat distribution. If Sylvester is moved to the same directory as WeatherCat, it will launch (as hidden) when WeatherCat launches and quit when WeatherCat quits. Page 1! 19 Page Intentionally Blank Page !120 WeatherCat Preferences This section details all of WeatherCat’s options. We suggest you read this section to finetune WeatherCat to your requirements and to get an understanding of the various options and facilities available in WeatherCat. Location/Colours This tab allows you to set up your location details and adjust some of the drawing options. ! Please see the basic setup section of this manual for a description of the Location details. Page !121 Basic Graphs/Gauges Colours This tab of the preferences also allows you to change the colour of various elements within WeatherCat Page !122 Preferences – Email ! SMTP Server: Enter the address of the SMTP server you wish to use to send email. Port: Enter the port on the SMTP server to use. Normally this is 25. User and Password: If your mail server requires it, enter your username and password in these fields. Page !123 Authentication: Tick this if your server is set to use authentication – typically this takes the form of SSL or TLS. WeatherCat automatically negotiates the best method to use. Admin Addresses: Enter the address(es) you would like all of WeatherCat’s alerts and other emails sent to; multiple addresses are separated by commas. After entering an email address you can test it is working with the ‘Test Now’ button. WeatherCat will try to send a test email and notify you of the results. If the test fails an error message will be displayed. The Admin Email addresses receive all emails sent from WeatherCat. If WeatherCat detects a problem it tries to send admin emails to these address. For example if WeatherCat detects the CWOP task is no longer responding, it will send an email to the Admin addresses and try to restart the task. The results of the restart will be emailed again to the Admin addresses. User Addresses: All emails apart from Admin emails are sent to these addresses. Again you can test them with the ‘Test Now’ button. Email Forecasts If this tick-box is ticked, and your hardware support forecasts, WeatherCat will email the current forecast at 7 a.m., 4 p.m. and midnight. This feature is currently supported by WS23xx’s, WMR200’s, Vantages and Vues. Email Reports If this tick-box is ticked, every 24 hours, WeatherCat will email the daily report. On the last day of the month it will also email the monthly report. Email new Records When this option is selected, whenever a new weather record is set, WeatherCat will send out an email detailing the record that has been broken; for example: ****New Low Pressure Record for MyStation! Previous low was 983.07mBar on 2012-09-16 17:41:12 +0000. New low is 982.06mBar**** Sent from WeatherBox Send Admin Emails When this option is selected, if WeatherCat has a problem it thinks you should be notified of, it will send an email to the Admin email addresses. Page !124 Daily Data Email This section allows you to set WeatherCat to send you an email with a tab-delimited data set covering the previous 24 hours weather data. You can select which items of data you want sent. The format of the message is as follows (we have snipped out most of the data as indicated by ‘…’): WeatherCat Daily Data Message. Posted at 00:00:03 17-Feb-12 Data for My Station follows: Temperature 6 6 6 6 … 6 6 6 Dewpoint 2 2 2 … 2 2 2 2 Windspeed 2 2 2 2 … 2 2 2 Pressure 1025 1025 1025 1025 1025 1025 1025 … User Text: Sent from Fellini END MESSAGE The data included in the email is spaced at 1-minute intervals, thus there are 1440 entries (24 hours x 60 minutes per hour) for each variable sent. The email is sent shortly after midnight each day. User Text Any text entered here is sent with all emails. You might for example want to use it to indicate from which machine the message was sent. Page !125 Preferences – On-Line This tab is split into a number of sub-panes and covers the settings for all of WeatherCat’s on-line features. Simple Web Create Web Page This option enables and disables all web related functions of the Simple Web pages. Update Pages Every: WeatherCat will generate and upload pages as per the time period set here. Set Save Path: Before WeatherCat uploads web pages to your web server it has to create and save them somewhere. The default location is ~/Library /Application Support/WeatherCatWeb. We Page !126 suggest you leave this as set. However, if you are serving the web pages via personal Web Sharing you may need to change this location (with the ‘Set Path’ button) to suite your local server. Typically this will be the ‘Sites’ folder in your home directory. Please make sure the user running WeatherCat, has write permissions to wherever you set this path. Add Web Cam Pictures To Web Pages WeatherCat can add a web cam picture to your web pages. You can use either your own web cam, or you can link to someone else’s web cam pictures. Please see the section ‘How Do I Use A Web-cam With WeatherCat’ for details of setting up your webcam. Alternatively, by clicking the ‘Or use the following URL…’ checkbox and entering the URL to the web cam picture you wish to use, WeatherCat will generate the required HTML code to link to the picture. Typically web cam’s can be found on Internet Search sites such as http://www.google.com WeatherCat can only link to picture based images; for example .jpg and .png files; Java based web cam images probably won’t work. Add Journal To Web Pages If this option is checked WeatherCat1 will upload a page for the journal and add a link to the main page. Enable FTP Upload If this option is ticked then WeatherCat will FTP the web pages up to your web server. You need to set the FTP login and server path via the ‘Edit FTP Account’ button. Edit FTP Account This button allows you to set and edit your FTP login name, password and the path on the server to where the web pages should be sent. A test button allows you to perform a test upload to the server. About FTP For WeatherCat to be able to upload the web pages to your server, the full path must already exist. For example if the path to upload your pages should be: ftp://ftp.myserver.com/www/WeatherCatWeb/ then the directory WeatherCatWeb must exist before WeatherCat can upload to it. To prevent possible problems with Firewalls WeatherCat always uses PASV mode when establishing an FTP connection. Page !127 Simple Web - Text ! This tab allows you to set the title of your web pages, add notes that are displayed on the page and set a custom background graphic. Please note that the texts are not automatically saved, you must press the ‘Save Texts’ button to commit the changes to your web pages. Test Web Pages Locally This button will cause WeatherCat to generate the web pages and display them in your default browser. This is a useful time saver when checking edits to the pages without have to upload them to your web site first. Page !128 Custom Web - Main ! WeatherCat can take your web page templates, replace WeatherCat tags within the files and upload the resultant file and related objects to your web-server. Show Help This button will open a window containing basic help for custom web pages and a full reference to the tags WeatherCat can use in custom web pages: Page !129 ! Enable Custom Web Pages This option enables and disables all web-related functions of the Custom Web pages. Set HTML Source Sets the source folder for your template. Set Save Path Before WeatherCat uploads web pages to your web server it has to create and save them somewhere. The default location is ~/Library/Application Support/ WeatherCatCustomWeb. We suggest you leave this as set. However, if you are serving the web pages via personal Web Sharing you may need to change this location (with the ‘Set Path’ button) to suit your local server. Typically this will be the ‘Sites’ folder in your home folder. Please make sure the user running WeatherCat has write permissions to wherever you set this path. Enable FTP Upload If this option is ticked then WeatherCat will FTP the web pages up to your web server. You need to set the FTP login and server path via the ‘Edit FTP Account’ button. Note also that the Simple Web Pages and Custom Web Pages are independent of each other including the FTP; you can run both simultaneously and to different servers if need be. Page !130 Update Web Pages Every: WeatherCat will process and upload pages as per the time set here. Custom web pages can be uploaded more frequently than the Simple Web pages. Sync. To Weather Fetch If this option is ticked, WeatherCat will wait until it takes a weather sample before processing the custom web pages. This ensures your pages are processed with the very latest data and statistics. For details of setting up a template and the tags you can use, please see the ‘How Do I Create A Custom Web Template’ section of this manual. Page !131 Custom Web – Additional Files ! WeatherCat's Custom web feature can process additional files independent of the main custom web processing. For each file, the processing period can be set from between 0.1 to 1000 minutes and the file, once processed, can be optionally uploaded to your custom web-site. This is useful for faster updates for certain parts of your web-site or generating files for on-line services that can pick up the processed file from your custom web-site. Note1: With the ability to process and upload files as fast as once every 6 seconds there is the potential for: a). Using far more bandwidth than you thought you'd use. b). Being identified as a denial of service attack by your FTP server (this can be extremely embarrassing). c). Generating files faster than WeatherCat can actually process them (this is dependent on your hardware and tags used - for example a webcam tag can take many seconds to Page !132 process as WeatherCat waits for the image to settle down). WeatherCat is protected against files being generated faster than they can be processed - it will log a message to the console log in this case. Note2: If Custom web is synchronised to weather sampling, additional files will not be processed whilst custom web is waiting for the sync (i.e. additional files are queued whilst custom web is waiting for sync). Page !133 Custom CGI ! The Custom CGI tab of the On-Line preferences allows you to send weather data in realtime to a server on the Internet. Please see the ‘How Do I…’ section for a tutorial on how to use this feature, here we will describe the preferences. URL To CGI Enter the URL to your CGI script here including any static parameters needed such as the user name and password. WeatherCat will append the real time data to the request as it runs. Update Rate Here you can set how often WeatherCat makes the request. You can set times as low as 0.1 second. Page !134 Current Status The Current Status Area indicates how many requests have been made (Reports Sent), how many acknowledgements have been received, the instantaneous and average response times and the number of bytes actually sent. The Current Stats field indicates any problems with the CustomCGI – a range of errors can be reported here which can aid in diagnostics, if there are no errors, ‘Running’ is shown. Page !135 Wunderground PWS WeatherCat can upload your weather data to Wunderground. Please see the ‘How Do I…’ section of this manual for details on how to set up the preferences on this tab. The section will detail the individual preferences. Update Rate In Minutes How often WeatherCat should upload data to Wunderground. WeatherCat can run in two modes – normal or RapidFire. Normal mode can update at a maximum rate of once per minute, RapidFire can update as fast as 1 second. We would recommend RapidFire set at about 5 seconds for good performance. Rapid Fire Mode Enables WeatherCat’s RapidFire mode. Page !136 Update Rate In Seconds If RapidFire mode is enabled, how often in seconds WeatherCat should upload the data. Enable Historical Uploads WeatherCat will upload missing records to Wunderground if it determines the last upload was more than 32 minutes ago. Historical records are uploaded at 5-minute intervals and all valid channels are uploaded. This can happen if for example WeatherCat was not running, your Internet stops working or the Wunderground servers go temporarily off-line. If WeatherCat has not been running for a period of time, the historical upload to Wunderground will be held off until WeatherCat has read the missing data from your datalogger. You can cancel a historical upload by disabling historical uploads, waiting a few minutes until real time operation resumes then re-enabling the feature to cover periods when WeatherCat isn’t running in the future If it appears WeatherCat is not transmitting live data to Wunderground, it may be uploading historical data. You can check this is the case by enabling logging of the historical uploads and checking WeatherCat’s log window. Log Historical Uploads If this is ticked, historical upload progress is logged to WeatherCat’s log window. Send Internal Temp. And Hum. If this is ticked, internal temperature and humidity data will be sent (if available from your station). Upload Webcam Image WeatherCat can upload your webcam image to Wunderground. Enable this tick-box, enter your Wunderground Camera ID and set the update rate in minutes. Note that the webcam must be enabled in the Webcam tab of WeatherCat’s preferences. You can get a Wunderground camera I.D. from your Wunderground members’ page. Current Status The Current Status Area indicates how many reports have been made (Reports Sent), how many acknowledgements have been received, the instantaneous and average response times and the number of bytes actually sent. The Current Stats field indicates any problems with the Wundergound PWS task – a range of errors can be reported here which can aid in diagnostics, if there are no errors, ‘Running’ is shown. Page !137 Programmatic access to WeatherCat’s Wunderground status can be obtained via the AppleScript interface. Page !138 C.W.O.P. WeatherCat can upload your weather data to the Citizen’s Weather Observer Program. Please see the ‘How Do I…’ section of this manual, for details on how to set up the preferences on this tab. The section will detail the individual preferences. ! Station ID Enter your CWOP station ID here. Log Operation If ticked, WeatherCat will report CWOP transmissions in its log window. Current Status Shows the current status of the CWOP task – as with other WeatherCat on-line tasks, a range of errors can be reported here which can aid in diagnostics. If there are no errors, ‘Running’ is shown along with the CWOP server WeatherCat last contacted. Page !139 Advanced Options This button opens a sheet with additional options for CWOP. Normally you shouldn’t need to touch these but occasionally things at CWOP change (servers for example) so you may need to adjust the data that is sent. CWOP – Advanced Settings ! Server 1 through 5 WeatherCat tries the CWOP servers, via the respective port in the order listed here. Only change these if you are sure of the new settings. If in doubt, ask on the WeatherCat support forum. Update Time Periodically CWOP changes their advice about how often to report – at the time of publication it is 10 minutes, if it changes you can adjust the time here. Page !140 Passcode If you need to use a passcode, enter it here. Data To Omit Data sent to CWOP is ingested by various weather organisations – MADIS is typical. From here the data is further disseminated to other organisations, such as The Weather Underground. Because of the importance placed on your data you may not want to transmit certain data if you know there is a problem with that data. The check boxes here allow you to disable certain items until such time that the data is good again. A typical example might be anemometer wind damage. Restore Factory Defaults Restores all the advanced settings back to defaults. Programmatic access to WeatherCat’s C.W.O.P. status can be obtained via the AppleScript interface. Page !141 Additional Services WeatherCat can upload your weather data to additional services. Click the service you wish to configure/view to open it. Page !142 Met Office WOW (World Of Weather) This tool can upload your weather data to the Met Office WOW website. ! You can create an account from within the tool. When you have your Site I.D. and PIN, enter them into the relevant fields then hit the ‘Start’ button. Notes: 1) Soil moisture is uploaded from soil moisture sensor #1. 2) Soil temperature is uploaded from soil temperature sensor #1 (soil temperature appears as grass temperature on the WOW site). 3). The Met-Office recommends upload intervals of at least 15 minutes (which is the default on a new installation) - WeatherCat will allow down to 1 minute intervals should the Met-Office recommend more frequent uploads in the future. Page !143 PWSWeather This tool can upload your weather data to the PWSWeather website. ! You can create an account from within the tool. When you have your Station I.D. and Password, enter them into the relevant fields then hit the ‘Start’ button. Page !144 WeatherBug This tool can upload your weather data to the WeatherBug website. ! You can create an account from within the tool. When you have your Publisher I.D., Station Number and Password, enter them into the relevant fields then hit the ‘Start’ button. Page !145 Open Weather Map This tool can upload your weather data to the OpenWeather Map website. ! You can create an account from within the tool. When you have your User Name and Password, enter them into the relevant fields then hit the ‘Start’ button. Page !146 WeatherCloud This tool can upload your weather data to the WeatherCloud website. You can create an account from within the tool. When you have your WeatherCloud I.D. and Key, enter them into the relevant fields then hit the ‘Start’ button. Note: When creating your device on the WeatherCloud web-site, the ‘Link type’ should be ‘WeatherCat’. Page !147 Preferences – Alerts 1 ! The Alerts tab contains pre-configured alerts for Ice, Rain and Clear Sky. The Alerts 2 tab contains a Rain Start alert (a single tip of the rain bucket). These alerts share the following characteristics: • A send email tick box; if ticked WeatherCat will send a pre-configured email if the alert triggers. • A ‘Launch User item’ tick-box. If ticked WeatherCat will launch the item you’ve set with the ‘Set Path’ button. This could be an application, AppleScript or anything else the Finder can launch. Page !148 Ice Alert This alert sends a warning email as the temperature falls below 4°C and then an alert email and launches the user item as the temperature falls below 1°C. Rain Alert You can customise this alert by setting the level of rain required to trigger the alert. You can set it to: ‘Showers Or Worse’, ‘Light Rain Or Worse’ or finally ‘Rain or worse’. Clear Sky Alert You can set the sensitivity of this alert to either ‘Clear’ or ‘Light Cloud/Clear’. In addition you can set it to only trigger during the night (1900 to 05:59) or day (06:00 to 18:59), or at any time. This alert might be useful if you’re an amateur astronomer. Page !149 Preferences – Alerts 2 Rain Start Alert This pane currently contains one alert – the Rain Start alert. This alert can be used to watch for a single tip of your rain bucket. It works by monitoring the rain from your station; if the rain increases (i.e. the bucket has tipped) the alert is triggered and a timer is started. Subsequent tips whilst the timer is running restart the timer. The alert is cleared if the timer expires or (if enabled) a rain rate is detected before the timer expires. ! Page !150 Preferences - Custom Alerts The basics of setting up custom alerts are covered in the ‘How Do I…’ part of this manual. This section details the individual options available when programming custom alerts and goes into more detail. ! Figure 63 - Preferences - Custom Alerts This tab allows you to create, edit and delete custom alerts. Press ‘New’ to create a new alert, ‘Edit’ to edit the selected alert or ‘Delete’ to delete the selected alert. Creating and editing custom alerts Pressing ‘New’ in the ‘Custom Alerts’ tab of the preferences creates a new alert. The alert will have template email texts already configured. Page !151 ! You can enter the alert name and then up to three conditions that need to match the current conditions for the alert to trigger. If the alert triggers you can set an item to launch and/or send an email. Similarly, when the alert clears you can set an item to launch and/or send an email alert. For an alert to clear, WeatherCat needs to see the conditions that caused an alert to be not present for a period of time (the de-bounce time). This can be 0 if you want the alert to clear immediately. This de-bounce time can be used to ensure the alert doesn't clear if the variable is a little unsteady - for example if we have an alert to trigger at 7°C and above and the temperature Page !152 becomes 7°C then the alert will trigger. Now it's possible for the temperature to drop to 6.9°C before moving back to 7°C - the de-bounce time can stop the alert clearing during this period. All custom alerts default to 2 hours; you will need to edit them to set the clear times you want. Custom Alerts Email Macro Expansions The text of the alert email can have macro expansions as follows: • N$ - The rule name. • L$ - the location being monitored • t$ - the local time • C$ - the current conditions • T$ - the current temperature • D$ - the current dew point • W$ - the current wind speed • Wd$ - the current wind direction • P$ - the current pressure • IT$ - the current internal temperature • IH$ - the current internal humidity • HI$ - the current heat index • R$ - the current rain rate • S$ - the current solar radiation (if supported by your station) • U$ - the current U.V. index (if supported by your station) • dT$ - the current hourly change in temperature • dD$ - the current hourly change in dew point • dW$ - the current hourly change in wind speed • dP$ - the current hourly change in pressure. • dIT$ - the current hourly change in internal temperature • dIH$ - the current hourly change in internal humidity • dHI$ - the current hourly change in heat index • dS$ - the current hourly change ins solar radiation • dU$ - the current hourly change in U.V. index The rule text is editable on a rule-by-rule basis. For example if you entered ‘Current Conditions = C$’, if the current conditions were sunny when the alert was triggered, the email as sent would read ‘Current Conditions = sunny’. Page !153 Testing of Custom Alerts You can test the alert before committing it by pressing the ‘Test’ button in the New/Edit custom alert dialog above. Here you can enter values for each of the three variables, then press the ‘Test’ button. The result is indicated in the ‘Result:’ text field. You can use this test dialog in conjunction with the ‘New/Edit’ custom alert dialog box to fine-tune the alert to your requirements. Page !154 Custom Alerts Programming Example WeatherCat allows you to set up to three conditions that must be matched before the alert triggers. These conditions are evaluated strictly top to bottom. As an example, let’s look at the following alert: ! Lets assume the temperature for location 1 is 4°C, the wind speed is 18 miles per hour and the rain rate is 0.2 inches per hour. When evaluating this alert WeatherCat first checks the temperature; it compares it to 3°C and finds it is greater, so sets the result of the first part of the IF to ‘False’. Next it checks if the wind speed is greater than 20 miles per hour. It isn’t so sets the result of the second part of the IF to ‘False’. Finally it checks it checks if the rain rate is greater than 0.1 mm per hour; it is so sets the result of the third part of the rule to ‘True’. Page !155 WeatherCat now takes the results of the first and second parts and logically AND’s them together – a ‘False’ anded with a ‘False’ gives a ‘False’ result. Next it AND’s the result of the third part with the intermediate result of the first and second parts – a ‘False’ AND’d with a ‘True’ is a False. This final result is tested and if ‘True’ the condition is triggered. In this case the final result is ‘False’ and so the alert is not triggered. Lets assume that an hour later that the wind speed has increased to 19 miles per hour, the temperature has dropped to 2 °C and the precipitation is still 0.2 mm’s per hour. Now the temperature comparison evaluates as ‘True’ and the rain comparison also evaluates as ‘True’ but the wind speed criteria still isn’t met – nothing happens. The wind keeps increasing however and ten minutes later the wind speed increases above the 20 miles per hour set in the alert. At this point, all the criteria evaluates as ‘True’ and the alert triggers. In this particular case, the Alert would send the following email: To: [email protected] Subject: ***WeahterCat 'Blizzard Alert' Triggered*** ***Custom Alert for My Station Triggered*** WeatherCat Rule 'Blizzard Alert' triggered at 20:16:16 21-Jan-12. Temperature: 2 °C Dewpoint: 1 °C Windspeed: 26.0 MPH Pressure: 1003.72 mb User Text: Sent from WeatherBox WeatherCat TimeStamp: 20:16:17 21-Jan-12 <END MESSAGE> Five minutes later, the wind speed drops below 25 miles per hour. Because the de-bounce time is set to 120 minutes, WeatherCat notices the drop in wind speed but does not clear the alert yet, instead the alert changes to the ‘clearing’ state. WeatherCat continues to monitor the wind speed over the de-bounce period (the next 115 minutes in this case) and if the wind speed does not increase above 20 miles per hour, then the alert will clear. However, if the wind speed does increase to over 20 miles per hour, WeatherCat resets the de-bounce timer. Hence, the alert will not clear until the conditions that caused it to trigger in the first place have been clear for the de-bounce time – in this case 120 minutes. Had we set the de-bounce time to 0 minutes, then the alert would clear as soon as any of the conditions it requires to be met are no-longer true. Thus, if you want an alert to clear immediately, set the de-bounce time to 0 minutes. Page !156 Once an alert has cleared, it is then ready to re-trigger. To sum up: Alerts in WeatherCat have 3 possible states – triggered, clearing and cleared. Alerts will trigger immediately the conditions they are dependent upon are true. Alerts will clear once the conditions they are dependent on have been clear for the de-bounce time. Once an alert has cleared it can retrigger immediately. If you are using alerts to post notifications via email and you find you are receiving emails pretty much constantly as the alert triggers and then clears, increase the de-bounce time in those alerts. This will ensure WeatherCat treats lulls in the conditions that are causing the alert as part of the same event. Editing Alerts WeatherCat’s custom alerts monitor the weather on a continuous basis. The latency within WeatherCat from the time data received from your station matches a particular alert and the alert actually reacts is in the order of 10 seconds. Because each alert is monitoring the weather there is a warm-up time associated with the alerts – in WeatherCat this warm up time is about a minute. Thus custom alerts are not running for the first minute after WeatherCat is launched. When you modify an alert, the modifications are carried out live and the editing can affect the trigger state of an alert. For example if we have a very simple alert that triggers if the external temperature is below 4°C and the current external temperature is 5°C - the alert is not triggered. If we then edit that alert so it triggers if the external temperature is below 6°C, the alert will trigger within 10 seconds of the OK button being pressed after making the modifications in the alert’s settings. Similarly, if the de-bounce time is set to 0, the alert will clear immediately if edited so that the trigger conditions are no-longer true. The only exception to this operation is when you add or delete a new alert. In this case, the alerts will start to reset. As noted above, this takes about a minute and when the alerts are finished resetting, any alerts that were previously triggered will trigger again as they have been reset. Alert Deltas Weather data deltas can be used in custom alerts – for example to test if the barometric pressure is falling at a rate greater than a given amount (a storm alert). In general the delta used is the one-hour delta actually measured over an hour – i.e. WeatherCat subtracts the reading obtained one hour ago from the current value to calculate the current one-hour delta. Page !157 The exceptions to this rule are Solar Radiation, U.V. and rain rate. These variables can change so quickly that WeatherCat uses a one-hour delta calculated over a 10 second period so as to be able to react to the very fast changes these variables can exhibit. Alert Persistence Alerts in WeatherCat are persistent across reboots of WeatherCat. This means that if an alert is triggered when WeatherCat is quit, if the alert is still triggered when WeatherCat reboots, it will not re-trigger. The exception to this is if WeatherCat is updated – all triggered states are cleared if WeatherCat detects it has been updated. Page !158 Preferences – Units/Misc1 Units This area allows you to select a unit for a given measurement. For example, you might want your temperature and dew point displayed in °F, the pressure in inches of Mercury Page !159 and the wind speed in kilometres per hour. Note that the units selected apply right throughout WeatherCat, including custom alerts, reports, graphs, gauges and so on. The temperature and dew point may be linked together to make relative humidity readings easier to interpret. Note that when linked, the dew point units will become the same as the temperature units. Also note that the Temperature Units are also used for wind chill and heat index. Dock Icon Shows The dock icon in Weather can show any of 9 different items or if nothing is selected, it shows WeatherCat’s default icon. The dock icon update time is programmable from 1 second to 59 seconds; this time is how quickly WeatherCat flips from one item, say the temperature, to the next. If the current data is not valid, the data in the dock icon is given a red hue. Floating Graphic WeatherCat can display a floating current conditions graphic on the Desktop. The ‘floater’ displays a graphic representation of the current conditions for a given location. Weather Speech WeatherCat can speak the current weather (as it samples), and the changes (i.e. falling, steady, rising) along with the time or a combination of any or all of these items. ‘Only If Change’ forces WeatherCat to only speak if something has changed since the last sample was taken; if nothing has changed, WeatherCat will be silent. Rain Rain Season Begins For use with the rain web-tag, WeatherCat allows you to specify when the rain season starts (normally either January or July depending on your location). Page !160 It can be used as per the following examples: Highest rain rate this season = STAT$RAIN:MAX:THISSEASON$ RAINUNITS$/h on STAT $RAIN:MAX:THISSEASON:TIME$ Average rain rate this season = STAT$RAIN:AVERAGE:THISSEASON$ RAINUNITS$ Rain this season = STAT$RAIN:TOTAL:THISSEASON$ RAINUNITS$ Rain Season Offset The Rain Season Offset is added to the result of the following web-tag and only affects the CURRENT rain season total result - it will not affect any other web-tag or rain time scale (for example THISYEAR): STAT$RAIN:TOTAL:THISSEASON$ Annual Rain Offset This can be used to correct the annual rain web-tag (STAT$RAIN:TOTAL:THISYEAR$) and the annual rain as displayed in the stats window in the first year of running WeatherCat. Be sure to set this to 0 on the 1st of January if you do have an offset programmed. Rain Day Value This value is used by WeatherCat when calculating rain days. Any day with a daily rain greater than this amount is a rain day. Weather Facts Editor This button will open the weather facts editor. Weather facts are small facts that can be displayed on your custom web site with the WEATHERFACTS$ tag. A new weather fact is selected from the currently running set of facts daily or on a restart of WeatherCat. Page !161 Facts can be added and deleted. In addition, the currently running facts can be saved and loaded allowing the creation of sets (you might for example have a set for Christmas, seasons of the year and so on). Monitor & Re-launch WeatherCat This option tries to keep WeatherCat running. We cannot guarantee WeatherCat will never crash hence this option, if ticked, will launch a small background process, which monitors WeatherCat. If WeatherCat unexpectedly quits it will be automatically re-launched within 20 seconds thus guaranteeing no lost data or frozen web pages. Changes to this option take effect immediately. This option also allows WeatherCat to monitor itself for hang-ups. If WeatherCat hangs for more than approximately 2 minutes it will reboot itself. Page !162 Preferences - Misc 2 Log FTP Operations If ticked, WeatherCat will log every file uploaded to its log window. Set Calibration Data Opens the calibration window: ! This allows fixed offsets to be applied to channels where this makes sense (for example it doesn't make sense on solar radiation, precipitation or wind speed not on derived data such as dew point (with is a function of humidity and temperature)). Multipliers are available for both wind gust and wind speed (average). Note that whilst the calibration window is open, weather sampling and weather related processes are halted until the window is closed. This avoids recording possibly incorrect data whilst adjustments are made - the gauges/live data view will continue to run and reflect the offsets applied in the calibration window. Processes that are halted include: sampling, web pages, alerts, Wunderground, CWOP & Custom CGI. Page !163 If there is no activity, the calibration window will close after 10 minutes, weather processing will be restarted and any changes made will be discarded. This avoids the problem where the phone rings, you take the message and rush out of the house on an important errand. Multipliers are available for average wind speed (10 minute) and gust wind speed (this includes instantaneous, 1 minute, 5 minute, 10 minute and 15 minute gust periods). Anemometer Height Compensation For anemometer height compensation, only the average multiplier should be adjusted. Height compensation values are available at the Met-Office's web site; see the 'Observer's Handbook' (chapter 5, section 5.2.2) at: http://www.metoffice.gov.uk/archive/observers-handbook-4th-edition-reprint The height compensation multipliers for anemometers located over land are copied below for heights up to 30m. Anemometer height of: 1m=1.37, 2m=1.28, 3m=1.22, 4m=1.18, 5m=1.14, 10m=1.00, 15m=0.93, 20m=0.87, 25m=0.83, 30m=0.81 Station Maintenance WeatherCat can send out periodic maintenance emails. When you click the Set Maintenance Details button the following sheet appears: Page !164 Page !165 ! You can set the date of the initial reminder and the period between subsequent reminders. You can edit the default text we have supplied by clicking anywhere in the text box. On the specified date WeatherCat will send you a reminder email and again at the periods specified. Basic Graph Dotted Wind Gust Graph If ticked, when graphing wind gust (plotted on the wind basic graph along with the average wind speed) WeatherCat will draw a dotted line rather than a solid line. Calculate Live Wind Run Vector If ticked, WeatherCat displays on the wind run gauge the instantaneous wind run vector. This tick-box also affects any WeatherCat client wind run gauges. Page !166 High-Res On Screen Basic Graphs If ticked WeatherCat always draws on-screen simple graphs using all samples available. If not ticked, on horizontal scales greater than 24 hours, WeatherCat skips samples to speed up the drawing. Blue Thermometers If Below Freezing If ticked, thermometer-type gauges are drawn in blue if the temperature is below freezing. This option is also present in the client. Temperature Type Gauges – Initial Maximum You can set the initial maximum value for thermometer-type gauges here. If the temperature exceeds the value set here, the gauge will auto-scale. At midnight, the scale will reset to the value set here (if possible). Wind direction plot style You can choose the plotting style for the basic wind direction graph. Available choices are Lines, Shortest Path and Dots. Day Types These are custom day types displayed in the 'Year Over Year' statistics; for example a 'Wind Day' might be a day where the wind run is greater than 100 miles. Day types are specified in the Misc 2 pane of WeatherCat's preferences via the 'Set Day Types' button. Click the ‘Set Day Types’ button to open the Day Types editor. Page !167 Hit the ‘New’ button to create a new day type, or double click an existing item to edit it. Page !168 Heating/Cooling Degree Days Individual base temperatures can be set for both heating degree days and cooling degree days in the preferences (these temperatures also affect HDD's and CDD"s on NOAA reports). Tick the ‘Show On Year Over Year Statistics to display these values on the year over year statistics. Sampling The sampling rate sets how often WeatherCat saves the weather data to your disk. A faster sampling rate gives better resolution but also uses more space on disk. The sampling rate can be set to between 1 and 30 minutes. WeatherCat will align its sampling to the local time – for example if you set WeatherCat to sample at 5 minute intervals, then the samples will be taken at 5 past the hour, 10 past, 15 minutes past and so on. This feature can be used in conjunction with the Custom Web Page !169 Pages ‘Sync. To Weather Fetch’ option to ensure data on your custom web pages is updated at the same times each hour assuming the custom web update rate is set to less than or the same as the sampling rate. With 'Adaptive' enabled WeatherCat will save the data at the period you specify but will also save more regularly if the weather changes between samples; this can give highresolution data and save disk space. When determining if the weather has changed, WeatherCat does not take into account the wind. With adaptive enabled WeatherCat will sample at a rate between once per minute and the period you have set in the Sampling Rate pop-up menu. Page !170 Preferences - Webcam ! WeatherCat can capture images from your camera at predetermined intervals. The webcam can be directly plugged in and controlled by WeatherCat or you can pick up an image from a local file (updated by third party webcam software for example) or from a URL, which is useful for IP based cameras with in-built web severs. The images WeatherCat captures can be used to create time-lapse movies of the weather (which can be used in your web pages) and/or provide images for use on Wunderground or your web site. In addition, there is the option to keep your pictures for up to 24 hours in the sequence they were recorded as time-stamped files. Your movies can be kept for up to 7 days again as time-stamped files. You can also overlay the current weather conditions along with a header and time/date onto the webcam image. These overlays will be present on movies, local images and Page !171 images uploaded to your web site. Images uploaded to Wunderground have no overlay apart from the time and header. Pictures and movies are stored in your Home/Library/Application Support/ WeatherCatMedia folder. The Webcam preferences contain the master enable for the webcam – the ‘Web-cam Enabled’ tick-box. If this isn’t ticked then webcam images and movies will not be available. Image Source As noted above, WeatherCat can capture an image from a locally connected camera, a local file or from a URL. Available cameras are listed in the ‘Camera’ pop-up menu. The ‘Camera Image Size’ pop-up menu selects the size WeatherCat should try to capture the image at. For locally connected cameras, WeatherCat will try to adjust the camera to the resolution selected here. For local or a file from a URL, WeatherCat will use the image size as it finds it. For use on your custom web pages there are various web-tags to produce a scaled image from the initial capture. Capture Image Every If the webcam is enabled then a picture is taken at the frequency specified here; the pictures are stored in the Pictures folder of the WeatherCatMedia folder. This also specifies how frequently a frame is added to the daily movie. 30 seconds to a minute is a good starting point. Disable Webcam Uploads At Night If set, uploads to Simple & Custom web pages along with Wunderground camera images are stopped at night-time. Keep Images For 24 Hours As noted above, a picture is taken periodically. These images are stored for up to 24 hours if this tick-box is ticked. Older images are automatically deleted. If this box is not ticked, then images are deleted as soon as they have been used. The images are named webcam_hh_mm_ss.jpg. Movie Size This pop-up menu specifies the frame size of the time-lapse movie. We strongly suggest you do not make this larger than the ‘Camera Image Size’ to avoid image degradation. Page !172 The larger the movie size the larger the movie and the more time it will take to process each frame as it is captured. Start with an initial size of 320x240, especially if you are uploading the movie to your web site. Overlay These options control overlay elements for images and movies. Create Daily Movies and Keep Daily Movies For 7 Days If enabled, WeatherCat will create a new time-lapse movie every hour – frames will be recorded at the rate specified by the ‘Capture An Image Every’ pop-up menu. The old 1hour movie will be renamed with the time in its file name. Time-lapse movies are available for use in custom web pages by using the MOVIE$ tag. At midnight all movies for that day are deleted unless ‘Keep Daily Movies For 7 Days’ is ticked, in which case, the current days’ movies are renamed with the date and a new daily movie folder is created. Movies older than 7 days are deleted. The movie files are named WeatherCatDailyMovie_hh_mm.mov. Movies for previous days are held in folders named WeatherCatDailyMovie_yyyy_mm_dd. Movies are uploaded to your web pages (simple web and/or custom web) after the turn of the hour. Shortly after the hour has changed, the current movie is renamed with its historical name, the web page processing is notified a new file is available and a new movie is created for the next hour. On the next upload of the web pages, the movie will also be uploaded. Page !173 Preferences – Imagery ! WeatherCat can fetch and store up to three ‘channels’ of imagery in its database. The satellite imagery window (Tools menu) can either display the most recent imagery as a static image, as a movie loop, or, as you scroll about the data from WeatherCat’s Daily View window, the historical image for that time and date (assuming it is present in your database). If no imagery is available in the database for a given date and time, WeatherCat will display colour bars. For each channel you can either set one of the supplied imagery URL’s or enter your own. The preview buttons show the image for a given URL. The update menus specify the Page !174 period between each fetch of the imagery for each location; these generally range from every 2 hours to every 6 hours. Note: Because of the storage requirements for satellite imagery, we recommend an imagery update interval of 2 hours or greater. The ‘Use As Desktop Picture’ menu can set the imagery for any of the channels as the Desktop picture on the main monitor as the imagery is updated. Page !175 Preferences – Advanced Use Older Webcam Driver Code WeatherCat uses QTKit to manage and work with cameras. Whilst this works with a wide range of cameras, for backwards compatibility WeatherCat also offers the use of an older technology driver. If your camera is not recognised by WeatherCat or is performing poorly, try selecting this option then rebooting WeatherCat. There are some limitations to the older driver: It only works with the system default camera (the camera selector menu in WeatherCat’s webcam preferences will be disabled) and modifications to the camera’s setting are not saved. Page !176 Note: If you are using an external iSight camera (Firewire) with WeatherCat, please use the older webcam driver. If you do not, the camera will stop capturing images after a few hours running. Speak Log Entries This will speak log entries apart from weather data updates (these can be enabled from the Misc 1 pane of the preferences). The speech is not buffered and will skip to the latest entry to keep up with log output as necessary. Speak Log Entries This option copies all the text in WeatherCat’s Log window to the System console log. Startup/Shutdown Actions WeatherCat has startup and shutdown items that are run as WeatherCat completes startup or is about to shutdown (Preferences->Advanced). These items are designed to launch scripts that launch or quit other scripts/processes thus synchronising WeatherCat with external programs. The startup item is launched after WeatherCat has taken the first sample, thus guaranteeing the data is ready. Quit Check If enabled, WeatherCat needs to be told twice in 5 seconds to quit (otherwise the shut down is aborted). Note, if enabled, this feature will cause an error to be returned to any AppleScript trying to quit WeatherCat ('User Cancelled') on the first quit command. To quit WeatherCat from an AppleScript, handle the error in your script and tell it to quit twice - for example: tell application "WeatherCat" try quit end try try quit end try end tell Page !177 Station Comms. Fail Actions This option can run a User Item – for example an AppleScript and/or play a sound if WeatherCat detects communications to the weather station have irretrievably failed. Enable WeatherCat Server By default, WeatherCat sets up a service to provide data to WeatherCat clients. You can turn this service off here. Page !178 WeatherCat and Data General WeatherCat stores its database in your ~/Library folder, for example: /Users/John/Library/ WeatherCatData/ Within the WeatherCatData folder will be a folder for each location. Within each of these folders lives the actual data organised by year and month folders. WeatherCat data is held in simple text-based files that can be viewed or edited in any text editor. These files are given a ‘.cat’ extension, for example ‘6_WeatherCatData.cat’, and each file holds the data for a month; in this example June. Each .cat file is commented at the top with the layout of the data making the data format more human friendly and easy to edit should you need to. Each sample takes up one line in the file and is simply appended to the current file. The data format uses a simple key/ value coding – if a channel is not present on your hardware, it isn’t recorded. WeatherCat also maintains hourly statistics files – these are maintained by WeatherCat as each sample is taken and are given a ‘.hrs’ extension, for example ‘6_WeatherCatData.cat.hrs’. Important Note: If you edit a .cat file, delete the corresponding .hrs file. WeatherCat will rebuild the .hrs when it launches. Never edit a .cat with WeatherCat running – always quit WeatherCat before editing the data. The satellite imagery is stored in WeatherCat’s database on disk at: ~/Library/WeatherCat/ Location1/Imagery as jpeg files. Each file is named ‘Imagery_hh_mm_dd_mm_yy,jpg’ to aid identifying each file by date. Custom Rules WeatherCat saves your custom rules in the same ‘~/Library/WeatherCatData’ folder in a text based XML format. Custom Graphs WeatherCat saves your custom graphs in the same ‘~/Library/WeatherCatData’ folder again in a text based XML format. Journal WeatherCat saves your journal entries in the ‘~/Library/WeatherCatData’ folder again in a text based XML format. Page !179 Page !180 Appendices Appendix 1 - WeatherCat AppleScript Interface This interface exposes station data and WeaterCat status information to your scripts/ applications. The interface provides both simple data access for quick and dirty access and a more flexible interface based on the notion of a ‘working channel’ which can save many lines of code in your AppleScripts. The interface also provides access to status information and allows the setting of the current conditions as displayed and logged. Simple Data Access Properties are provided to access the real-time value of any channel available on your hardware, along with the current 1 hour delta for that channel. These are named as you would expect - for example CurrentConditions returns a string with the current conditions and AverageWindSpeed returns the current average wind speed. These properties contain values converted to the units you have selected in WeatherCat's preferences. In the following list, the name of the property is in bold, this is followed by the ‘type’ of data where ‘text’ means the property is a string, ‘real’ means the property is a number and ‘boolean’ means the property is either ‘true’ or ‘false’. An ‘r/o’ following the type means the property is read only – i.e. you cannot set it. The following properties are currently available: CurrentConditions (text) : Returns the current conditions. Can also be used to set the current conditions - see below under ‘Miscellaneous Properties’ for more details. ExternalTemp (real, r/o) : Returns the current external temperature in the units as set in WeatherCat's preferences for temperature DewPoint (real, r/o) : Returns the current dew point in the units as set in WeatherCat's preferences for temperature Pressure (real, r/o) : Returns the current barometric pressure in the units as set in WeatherCats preferences for pressure Page !181 WindSpeed (real, r/o) : Returns the current wind speed in the units as set in WeatherCat's preferences for wind speed AverageWindSpeed (real, r/o) : Returns the current average wind speed in the units as set in WeatherCat's preferences for wind speed WindGust (real, r/o) : Returns the current 10 minute wind gust in the units as set in WeatherCat's preferences for wind speed WindDirection (real, r/o) : Returns the current wind direction in degrees AverageWindDirection (real, r/o) : Returns the current average wind direction in degrees PrecipitationPerHour (real, r/o) : Returns the current precipitation per hour in the units as set in WeatherCat's preferences for precipitation PrecipitationDaily (real, r/o) : Returns the current daily precipitation in the units as set in WeatherCat's preferences for precipitation Precipitation (real, r/o) : Returns the current raw precipitation in the units as set in WeatherCat's preferences for precipitation WindChill (real, r/o) : Returns the current wind chill in the units as set in WeatherCat's preferences for temperature ExternalRH (real, r/o) : Returns the current external humidity InternalTemp (real, r/o) : Returns the current internal temperature in the units as set in WeatherCat's preferences for temperature InternalRH (real, r/o) : Returns the current internal humidity SolarRadiation (real, r/o) : Returns the current solar radiation in watts per metre squared (if fitted) UVIndex (real, r/o) : Returns the current U.V. index (if fitted) T1 (real, r/o) : Returns the current extra temperature sensor 1 value in the units as set in WeatherCat's preferences for temperature (if fitted) T2 (real, r/o) : Returns the current extra temperature sensor 2 value in the units as set in WeatherCat's preferences for temperature (if fitted) T3 (real, r/o) : Returns the current extra temperature sensor 3 value in the units as set in WeatherCat's preferences for temperature (if fitted) Page !182 T4 (real, r/o) : Returns the current extra temperature sensor 4 value in the units as set in WeatherCat's preferences for temperature (if fitted) T5 (real, r/o) : Returns the current extra temperature sensor 5 value in the units as set in WeatherCat's preferences for temperature (if fitted) T6 (real, r/o) : Returns the current extra temperature sensor 6 value in the units as set in WeatherCat's preferences for temperature (if fitted) T7 (real, r/o) : Returns the current extra temperature sensor 7 value in the units as set in WeatherCat's preferences for temperature (if fitted) T8 (real, r/o) : Returns the current extra temperature sensor 8 value in the units as set in WeatherCat's preferences for temperature (if fitted) H1 (real, r/o) : Returns the current extra humidity sensor 1 value (if fitted) H2 (real, r/o) : Returns the current extra humidity sensor 2 value (if fitted) H3 (real, r/o) : Returns the current extra humidity sensor 3 value (if fitted) H4 (real, r/o) : Returns the current extra humidity sensor 4 value (if fitted) H5 (real, r/o) : Returns the current extra humidity sensor 5 value (if fitted) H6 (real, r/o) : Returns the current extra humidity sensor 6 value (if fitted) H7 (real, r/o) : Returns the current extra humidity sensor 7 value (if fitted) H8 (real, r/o) : Returns the current extra humidity sensor 8 value (if fitted) LW1 (real, r/o) : Returns the current leaf wetness sensor 1 value (if fitted) LW2 (real, r/o) : Returns the current leaf wetness sensor 2 value (if fitted) LW3 (real, r/o) : Returns the current leaf wetness sensor 3 value (if fitted) LW4 (real, r/o) : Returns the current leaf wetness sensor 4 value (if fitted) LT1 (real, r/o) : Returns the current leaf temperature sensor 1 value in degrees C (if fitted) LT2 (real, r/o) : Returns the current leaf temperature sensor 2 value in degrees C (if fitted) LT3 (real, r/o) : Returns the current leaf temperature sensor 3 value in degrees C (if fitted) Page !183 LT4 (real, r/o) : Returns the current leaf temperature sensor 4 value in degrees C (if fitted) SM1 (real, r/o) : Returns the current soil moisture sensor 1 value (if fitted) SM2 (real, r/o) : Returns the current soil moisture sensor 2 value (if fitted) SM3 (real, r/o) : Returns the current soil moisture sensor 3 value (if fitted) SM4 (real, r/o) : Returns the current soil moisture sensor 4 value (if fitted) ST1 (real) : Returns the current soil temperature sensor 1 value in degrees C (if fitted) ST2 (real) : Returns the current soil temperature sensor 2 value in degrees C (if fitted) ST3 (real) : Returns the current soil temperature sensor 3 value in degrees C (if fitted) ST4 (real) : Returns the current soil temperature sensor 4 value in degrees C (if fitted) Deltas Properties are also provided to get 1-hour deltas for major data types. In the case of barometric pressure Weathercat also provides a 3-hour delta. Note that unconverted deltas are also provided (see WeatherCat’s dictionary for full details). ExternalTempDelta1 (real, r/o) : Returns the external temperature 1-hour delta in the units as set in WeatherCat's preferences for temperature DewPointDelta1 (real, r/o) : Returns the current dew point 1-hour delta in the units as set in WeatherCat's preferences for temperature PressureDelta1 (real, r/o) : Returns the current barometric pressure 1-hour delta in the units as set in WeatherCat's preferences for pressure PressureDelta3 (real, r/o) : Returns the current barometric pressure 3-hour delta in the units as set in WeatherCat's preferences for pressure WindSpeedDelta1 (real, r/o) : Returns the current wind speed 1-hour delta in the units as set in WeatherCat's preferences for wind speed AverageWindSpeedDelta1 (real, r/o) : Returns the current average wind speed 1-hour delta in the units as set in WeatherCat's preferences for wind speed WindGustDelta1 (real, r/o) : Returns the current 10 minute wind gust 1-hour delta in the units as set in WeatherCat's preferences for wind speed Page !184 WindDirectionDelta1 (real, r/o) : Returns the current wind direction 1-hour delta in degrees PrecipitationPerHourDelta1 (real, r/o) : Returns the current precipitation per hour 1-hour delta in the units as set in WeatherCat's preferences for precipitation PrecipitationDelta1 (real, r/o) : Returns the current raw precipitation 1-hour delta in the units as set in WeatherCat's preferences for precipitation WindChillDelta1 (real, r/o) : Returns the current wind chill 1-hour delta in the units as set in WeatherCat's preferences for temperature ExternalRHDelta1 (real, r/o) : Returns the current external humidity 1-hour delta InternalTempDelta1 (real, r/o) : Returns the current internal temperature 1-hour delta in the units as set in WeatherCat's preferences for temperature InternalRHDelta1 (real, r/o) : Returns the current internal humidity 1-hour delta SolarRadiationDelta1 (real, r/o) : Returns the current solar radiation 1-hour delta in watts per metre squared (if fitted) UVIndexDelta1 (real, r/o) : Returns the current U.V. index 1-hour delta (if fitted) Page !185 Working Channel The above properties provide simple access to most channel data, but if you wanted access to a channel not directly provided, for example the Daily E.T. on a Vantage, or if you wanted to scan all channels on a regular basis, for example to save the data in a database or to display the data somewhere else, you’ll have to write a lot of lines of (laborious and repetitive) code. To make it easier to write more complex and useful scripts, WeatherCat provides the notion of a 'working channel'. When the working channel is set to a valid channel number, all future calls to working channel properties use the working channel number. NumberOfChannels (integer, r/o) : Returns the number of channels present on the current hardware. WorkingChannel (integer) : Set or read the channel used in WorkingChannelxxxx properties. Channel numbers run between 1 and NumberOfChannels. WorkingChannelValue (real, r/o) : Returns the real time converted value of the working channel. WorkingChannelValueUnconverted (real, r/o) : Returns the real time unconverted value of the working channel. WorkingChannelStatus (boolean, r/o) : Returns whether the working channel is currently valid. WorkingChannelName (text, r/o) : Returns the name of the working channel. Page !186 Channels within WeatherCat are numbered as follows: external_temperature dewpoint windchill pressure windspeed_instantaneous windspeed_average_10mins winddirection_instantaneous winddirection_average precipitation_per_hour precipitation_daily precipitation_raw (station dependent) external_rh, internal_rh, internal_temperature windgust_1mins windgust_5mins windgust_10mins windgust_15mins windgust_dir_1mins windgust_dir_5mins windgust_dir_10mins windgust_dir_15mins solar_radiation_WM2 uv_index 1 2 3 4 5 6 7 8 9 10 11 12 13 14 15 16 17 18 19 20 21 22 23 24 aux_temperature_1 aux_temperature_2 aux_temperature_3 aux_temperature_4 aux_temperature_5 aux_temperature_6 aux_temperature_7 aux_temperature_8 25 26 27 28 29 30 31 32 aux_rh1 aux_rh2 aux_rh3 aux_rh4 aux_rh5 aux_rh6 aux_rh7 aux_rh8 33 34 35 36 37 38 39 40 leaf_wetness1 leaf_wetness2 leaf_wetness3 leaf_wetness4 41 42 43 44 soil_moisture1 soil_moisture2 soil_moisture3 soil_moisture4 45 46 47 48 leaf_temperature1 leaf_temperature2 leaf_temperature3 leaf_temperature4 49 50 51 52 Page !187 soil_temperature1 soil_temperature2 soil_temperature3 soil_temperature4 53 54 55 56 monthly rain yearly rain daily et monthly et yearly et 57 58 59 60 61 (For WeatherCat SDK users, these channel numbers are defined in StationPlugInProtocol.h) Please note: NumberOfChannels may return more than 61. Channels above 61 are not yet documented. Working Channel Example repeat with theIncrementValue from 1 to NumberOfChannels set WorkingChannel to theIncrementValue set wcname to WorkingChannelName set wcvalue to WorkingChannelValue set wcstatus to WorkingChannelStatus -- do whatever you do with the data here end repeat Miscellaneous Properties WeatherCatASIFVers (real, r/o) : Returns the version number of WeatherCat's AppleScript interface. Return 5 for WeatherCat 2.2.0 onwards. StationDriverStatus (boolean, r/o) : Returns the station driver status where true means all OK, false means communications have failed to the hardware and WeatherCat was not able to rectify the situation. The CurrentConditions property is writable; this allows the current conditions within WeatherCat to be controlled by AppleScript which can offer extended capabilities to calculate the current conditions. When text is written to this property it becomes the active current conditions for 10 minutes. In this situation the Current Conditions Calculator window will append '(Ext)' to its display to show the current conditions are being controlled externally. Example: Page !188 tell application "WeatherCat" if ExternalTemp > 80 and WindSpeed > 20 then set CurrentConditions to "Warm but windy" end if end tell Assuming the temperature was greater than 80 and the wind speed greater than 20 then the current conditions calculator will be displaying: " The CWOPState property provides detailed information about the state of WeatherCat's CWOP driver. CWOPState returns an integer, which will be one of the following values (these values are guaranteed not to change in the future): CWOP_starting=0 States 0 to 92 are used to time the startup of WeatherCat's CWOP driver. CWOP_start=92 CWOP_disabled=100 CWOP is disabled in the preferences. CWOP_ok=200 Normal state if all OK and not in any other state. CWOP_transmitting=210 Transmitting packet CWOP_server1=250 Using CWOP server 1 CWOP_server2=251 Using CWOP server 2 CWOP_server3=252 Using CWOP server 3 CWOP_server4=253 Using CWOP server 4 CWOP_server5=254 Using CWOP server 5 CWOP_good_response=255 Packet acknowledged by CWOP CWOP_bad_data=400 Error in weather data (sensor error). If the error is permanent, omit the sensor in WeatherCat's advanced CWOP preferences. CWOP_no_station_name_error=500 CWOP station ID in the CWOP preferences is empty. The CWOP driver will stop. Page !189 CWOP_no_password_error=510 CWOP_no_response=710 Currently not in use (reserved for future use) Couldn't find a CWOP server (server down or DNS error). Temporary fatal. CWOP_error_no_reply=711 Server found but did not reply. WeatherCat will try again. CWOP_error_latlong=720 Latitude/Longitude not set in the preferences - can't send. The CWOP driver will stop. CWOP_internet_down=800 WeatherCat was not able to open a TCP/IP socket. WeatherCat will retry shortly. CWOP_server_busy=801 The CWOP server refused WeatherCat's connection request; WeatherCat will try another server. The CWOP state can change rapidly. Normally when working, the state will be switching between CWOP_transmitting (logging into the server), CWOP_serverX (where X is 1 through 5) (logged into server X - see WeatherCat's advanced CWOP preferences for the server addresses), CWOP_good_response (packet sent with no errors) and CWOP_OK (all done, last packet transmitted OK, idle waiting for next transmission). Normal running state can be determined by examining the CWOPState and if it's between 200 and 399, all is good. Many CWOP error states are spurious in nature; WeatherCat will try to correct the problem either by selecting another server, waiting for a small period of time and trying again or restarting its CWOP driver. Page !190 The WundergroundState property. This property provides detailed information about the state of WeatherCat's Wunderground driver. WundergroundState returns an integer value, which will be one of the following values (these are guaranteed not to change in future): wunderground_starting=0 States 0 to 90 are used to time the start-up of WeatherCat's Wunderground driver. wunderground_start=90 wundergound_disabled=100 Wunderground is disabled in the preferences. wunderground_ok=200 Normal state if all OK and not in any other state. wunderground_ok_historical=201 Normal state if all OK and uploading historical data and not in any other state. wunderground_transmitting=210 Transmitting packet wunderground_receiving=211 Receiving reply from Wunderground wunderground_bad_data=400 Error in weather data (sensor error). Will retry. wunderground_no_station_name_error=500 Wunderground station ID in the Wunderground preferences is empty. Correct station ID. wunderground_no_password_error=510 Wunderground password in the Wunderground preferences is empty. Correct the password. wunderground_reception_error=700 WeatherCat couldn't decode the reply from Wunderground. WeatherCat will retry. wunderground_no_response=710 WeatherCat timed out whilst waiting for the reply from Wunderground. WeatherCat will retry. wunderground_error_no_reply=711 WeatherCat received an empty reply from Wunderground. WeatherCat will retry. wunderground_error_could_not_transmit=712 WeatherCat couldn't open a connection to Wunderground. WeatherCat will retry. wunderground_pwd=720 Wunderground did not recognise station ID or wrong password. Correct log-in details. Page !191 wunderground_internet_down=800 The Internet is taking a nap. WeatherCat will retry. wunderground_error=990 General Wunderground error state not represented by any other state. WeatherCat will retry. Like the CWOP state, the Wunderground state can change very rapidly. Normally when working, the state will be switching between wunderground_transmitting (logging into the server), wunderground_receiving (receiving a reply from Wunderground), wunderground_ok (transaction complete with no errors). Like the CWOP state, normal running state can be determined by examining the wundergroundState property and if it's between 200 and 399, all is good. Many Wunderground error states are spurious in nature; WeatherCat will try to correct the problem either by waiting for a small period of time and trying again or by restarting its Wunderground driver. Status values 0 through 90 are used to delay Wunderground start-up by approximately 90 seconds when WeatherCat starts up - this is the countdown you can observe in WeatherCat's Status window just after it has started. The MailFailed property. This is set if WeatherCat failed to send an email. It is cleared when a mail is successfully sent. The FTPFailed property. This is set if WeatherCat failed to FTP a file. It is cleared when a file is successfully FTP'd. CommsCount (real) : Returns the current number of good packets WeatherCat has received from the hardware. CommsErrorsTO (real) : Returns the current number of communications errors(time-outs) WeatherCat has detected whilst communicating with the hardware. CommsErrorsVA (real) : Returns the current number of communications errors(validation) WeatherCat has detected whilst communicating with the hardware. SensorErrors (real) : Returns the current number of sensor errors WeatherCat has detected whilst communicating with the hardware. Page !192 UnixBootTime (real) : Returns the time WeatherCat was booted as the number of seconds elapsed since the first instant of 1 January 1970 GMT UpTime (real) : Returns the number of seconds elapsed since WeatherCat was launched WCIdentifier (text, r/o) : Returns WeatherCat's version and build number. SunriseTime (text, r) : Return todays sunrise time as a string (WeatherCat 2.1.0 onwards). SunsetTime (text, r) : Return todays sunset time as a string. (WeatherCat 2.1.0 onwards). DaylightTime (text, r) : Return todays daylight time as a string. (WeatherCat 2.1.0 onwards). FTPOverdriven (bool, r) : Set when FTP is being overdriven (files being generated faster than they can be uploaded). (WeatherCat 2.1.0 onwards). RunCustomWeb (bool, w) : Cause WeatherCat to process the custom web pages if the parameter passed is true. (WeatherCat 2.1.0 onwards). PrecipUnits (integer, r) : Returns 0 if precipitation units are metric, 1 if imperial. (V2.2.0 onwards) TemperatureUnits (integer, r) : Returns 0 if temperature units are Centigrade, 1 if Fahrenheit. (V2.2.0 onwards) WindSpeedUnits (integer, r) : Returns 0 if wind speed units are km/h, 1 if MPH, 2 if knots, 3 if m.s. (V2.2.0 onwards) PressureUnits (integer, r) : Returns 0 if pressure units are mB, 1 if inHg. (V2.2.0 onwards) Queries Query (text, w) : Set the current query (as a STAT$ tag query - i.e. STAT $TEMPERATURE:AVERAGE:TODAY$ QueryResult (real, r) : Read the result of the current query. Example: tell application "WeatherCat" set Query to "STAT$TEMPERATURE:AVERAGE:YESTERDAY$" set result to QueryResult end tell Page !193 QueryResultString (text, r) : Read the result of the current query as a string. (V2.2.0 onwards) Example: tell application "WeatherCat" set Query to "STAT$TEMPERATURE:MAX:TODAY:TIME$" set result to QueryResultString end tell result will contain a string representation of the time of the occurrence (formatted as per WeatherCat's user settings) General AppleScript Tips 1. If you are continuously calling WeatherCat from a loop in your script, it is wise to insert a delay in your loop so as not to cause 100% processor usage. 2. There are many good books available on AppleScript. In addition there is almost an infinite amount of information on the WWW. For help with AppleScript syntax and usage, your favourite search engine is your best friend. Page !194 Appendix 2 – Example Email Settings 1. Your Local ISP SMTP Server: Normally something like smtp.yourisp.com or mail.yourisp.com Port: Normally 25 (Check with your ISP if port 25 doesn’t work) User: Blank Password: Blank Authentication: Not checked Note: Check with your ISP if this doesn't work - they may require authentication checked, user, password and a different port. 2. MobileMe/iCloud SMTP Server: smtp.mail.me.com Port: 587 User: Your MobileMe user name (not [email protected]) Password: Your MobileMe password - note you’ll need an application specific password for WeatherCat if you are using two factor authentication with your Apple ID. For more information please see: https://support.apple.com/en-us/HT204397 Authentication: Checked Note: The email 'From' field in WeatherCat MUST be one of your registered email addresses. For example if your MobileMe email address is [email protected] then enter [email protected] into WeatherCat's Email 'From' field. 3. GMail or GoogleMail SMTP Server: smtp.gmail.com or smtp.googlemail.com (depending on your location) Port: 587 User: [email protected] or [email protected] Password: Your GMail/GoogleMail password. Authentication: Checked Page !195 Page !196 Appendix 3 – Common USB to Serial Converter Drivers Davis CP210x (WeatherLink USB) – http://www.silabs.com/products/mcu/Pages/ USBtoUARTBridgeVCPDrivers.aspx (Download VCP Driver Kit (version 4 is current at time of writing)). PL2303 based converters - http://www.prolific.com.tw/eng/downloads.asp?id=31 (Note: login required) FTDI – These are frequently found bundled with WS2350’s - http://www.ftdichip.com/ Drivers/VCP.htm Page !197 Appendix 4 - WeatherCat Web-Tags Reference This appendix details WeatherCat tags that can be used in custom web pages. WeatherCat tags are case sensitive and end in a dollar symbol "$". For example WCAM$ is correct whereas wcam$ is incorrect and will not work. Where a tag takes parameters, there must be no spaces between the tag and parameter or between successive parameters. Where a tag takes parameters, there must be no spaces between the tag and parameter or between successive parameters. For example HTML please see the file ‘index.html’ found in the WeatherCat_AllTags folder of the Web Templates folder of WeatherCat’s distribution. WeatherCat Tag Description Example CT$ Replaced with the current temperature, temperature units and hourly change in brackets. Temperature is CT$ CD$ Replaced with the current dew point, dew point units and hourly change in brackets. Dew point is CD$ CWC$ Replaced with the Wind chill is CWC$ current wind chill, wind chill units and hourly change in brackets. CX$ Replaced with the current wind direction and units. Wind direction is: CX$ CW$ Replaced with the current average wind speed and units. Average wind speed is CW$ CG$ Replaced with the current wind gust and units. Wind gust is CG$ CURRENT READINGS Page !198 CP$ Replaced with current barometric pressure, units and hourly change. Current pressure is CP$ CR$ Replaced with current hourly precipitation rate, units and hourly change. Current hourly precipitation is CR$ CC$ Replaced with current conditions (when available) Current conditions: CC$ CF$ Replaced with current forecast (Vantage/Vue/ WLIP/WS23xx only currently) Current forecast: CF$ CSF$ Replaced with current short forecast (Vantage/ Vue/WLIP only currently) Current short forecast: CSF$ CU$ Replaced with the time of the last valid data Time of data: CU$ WDTEXT$ Replaced with the current 16 sector 10minute average wind direction as text Current Wind Direction: WDTEXT$ WDDEGREES$ Replaced with the current 10-minute average wind direction as degrees Current Wind Direction: WDDEGREES$ DOMWDTEXT$ Replaced with the Dominant Wind Direction: current 16 sector DOMWDTEXT$ dominant wind direction (today) as text DOMWDDEGREES$ Replaced with the current dominant wind direction (today) as degrees (V1.1.3 onwards) Dominant Wind Direction Today: DOMWDDEGREES$ DOMWDDEGREES(PERIOD)$ Replaced with the current dominant wind direction over PERIOD as degrees (V1.1.4 onwards) Dominant Wind Direction today since 9AM: DOMWDDEGREES(TODAYSINCE9)$ Page !199 WINDBEARINGFROM10$ The 'lowest' clockwise bearing in the last 10 minutes rounded down to nearest 10 degrees (V1.1.4 onwards). WINDBEARINGFROM10$: WINDBEARINGFROM10$ WINDBEARINGTO10$ The 'highest' clockwise bearing in the last 10 minutes rounded down to nearest 10 degrees (V1.1.4 onwards). WINDBEARINGTO10$: WINDBEARINGTO10$ WINDROSE8$ Replaced with a list of 8 Windrose 8: WINDROSE8$ windrose values (starting at north and running clockwise, every 45 degrees) WINDROSE45$ Replaced with a list of 45 windrose values (starting at north and running clockwise, every 8 degrees) BTTEXT$ Replaced with the Current Barometric Trend: BTTEXT$ current barometric trend as text RS$ Rain storm value (Vantage/Vue/WLIP) Current rain storm value: RS$ RAINUNITS$ RSD$ Rain storm start date (Vantage/Vue/WLIP) Current rain storm start date: RSD$ RLD$ Last significant (0.6mm Last known rain date: RLD$ or more) rain date and amount RLDi$ Last significant (0.6mm Last known rain date: RLDi$ or more) rain date (ISO 8601 format) AT_Aus$ Replaced with the current apparent temperature (Australian version) Apparent temperature is AT_Aus$ AT_US$ Replaced with the current apparent temperature (US version) Apparent temperature is AT_US$ HUMIDEX$ Replaced with the current humidex Humidex is HUMIDEX$ Windrose 45: WINDROSE45$ Page !200 CPS$ Replaced with the current potential solar radiation Current potential solar radiation is CPS$ MISC ITEMS WEATHERFACT$ Replaced with a WEATHERFACT$ interesting weather fact/ note. A new fact is generated daily at random. JOURNT$ Replaced with the journal text. COUNTEDJOURNT$nnnn$ Replaced with the latest Last 5 station journal entries nnnn journal entries COUNTEDJOURNT$ 5$ (where nnnn is 1 to 9999). STRECORDS$ Replaced with station records as preformatted text (enclose in <PRE> and </PRE> HTML tags. Records: STRECORDS$ STRECENT$ Replaced with recent statistics as preformatted text (enclose in <PRE> and </PRE> HTML tags. Recent: STRECENT$ STDAILY$ Replaced with the current daily statistics as preformatted text (enclose in <PRE> and </PRE> HTML tags. Daily Statistics: STDAILY$ STMONTHLY1$ Replaced with the current monthly statistics (part 1) as preformatted text (enclose in <PRE> and </PRE> HTML tags. Monthly Statistics (part 1): STMONTHLY1$ STMONTHLY2$ Replaced with the current monthly statistics (part 2) as preformatted text (enclose in <PRE> and </PRE> HTML tags. Monthly Statistics (part 2): STMONTHLY2$ Station journal JOURNT$ Page !201 STMONTHLY$ Replaced with the current monthly statistics (all) as preformatted text (enclose in <PRE> and </PRE> HTML tags. Monthly Statistics: STMONTHLY$ STYEAROVERYEAR$ Replaced with the year over year statistics as preformatted text (enclose in <PRE> and </PRE> HTML tags. Year Over Year Statistics: STYEAROVERYEAR$ STNOAAMO$ Replaced with the current NOAA report for this month as preformatted text (enclose in <PRE> and </PRE> HTML tags. Current NOAA monthly report: STNOAAMO$ STNOAAPRMO$ Replaced with the NOAA report for the previous month as preformatted text (enclose in <PRE> and </PRE> HTML tags. NOAA monthly report for last month: STNOAAPRMO$ STNOAAYR$ Replaced with the current NOAA report for this year as preformatted text (enclose in <PRE> and </PRE> HTML tags. Current NOAA annual report: STNOAAYR$ STNOAAPRYR$ Replaced with the NOAA report for the previous year as preformatted text (enclose in <PRE> and </PRE> HTML tags. NOAA yearly report for last year: STNOAAPRYR$ Llat$ Station latitude Station latitude: Llat$ Llong$ Station longitude Station longitude: Llong$ Lelevf$ Station altitude in feet Station altitude in feet: Lelevf$ Lelevm$ Station altitude in metres Station altitude in metres: Lelevm$ D$ Date and time Date: D$ UT$ Uptime Uptime (days:hours:minutes): UT$ t12$ Time (12 hour clock) Time: t12$ Page !202 t24$ Time (24 hour clock) Time: t24$ t12s$ Time with seconds (12 hour clock) Time: t12s$ t24s$ Time with seconds (24 hour clock) Time: t24s$ da$ Date in the format of month/day/year Date: da$ de$ Date in the format of day/month/year Date: de$ ISO8601DATES$ Causes all dates/ times in STAT$ tag to be output in ISO8601 format. Can appear anywhere in the file and affects the whole file. SUNRISELOCAL$ Sunrise local time Sunrise today: SUNRISELOCAL$ SUNSETLOCAL$ Sunset local time Sunset today: SUNSETLOCAL$ SUNRISEUTC$ Sunrise time UTC Sunrise today (UTC): SUNRISEUTC$ SUNSETUTC$ Sunset (UTC) Sunset today (UTC): SUNSETUTC$ DAYLIGHTTIME$ Hours:Minutes of daylight today Daylight time today: DAYLIGHTTIME$ SUNRISELOCAL1$ Sunrise local time tomorrow Sunrise tomorrow: SUNRISELOCAL1$ SUNSETLOCAL1$ Sunset local time tomorrow Sunset tomorrow: SUNSETLOCAL1$ SUNRISEUTC1$ Sunrise time UTC tomorrow Sunrise tomorrow (UTC): SUNRISEUTC1$ SUNSETUTC1$ Sunset (UTC) tomorrow Sunset tomorrow (UTC): SUNSETUTC1$ DAYLIGHTTIME1$ Hours:Minutes of daylight tomorrow Daylight time tomorrow: DAYLIGHTTIME1$ DOTSEPARATORS$ Switches off localised decimal separators whilst processing STAT $ tags across a page WEBCAM Page !203 WCAM$ Replaced with the Current web-cam picture at camera current web-cam picture resolution at the resolution as set WCAM$ in the web-cam preferences. WCAM320$. Replaced with the current web-cam picture at a horizontal resolution of 320. The vertical resolution is a nominal 240 pixels but this is dependent on your camera as the aspect ratio is always maintained. We also provide WCAM640$, WCAM800$ and WCAM1280$ Current web-cam picture scaled to 320 pixels horizontal resolution (camera is running at 640*480) WCAM320$ MOVIE$ Replaced with a link to the last time-lapse movie. Latest time-lapse movie: MOVIE$ DALL$ Replaced with all dials. (Also available is DALLC$ which is replaced with all dials and comms counts) DALL$ DWINDD$ Replaced with current wind direction dial. DWINDD$ DWINDS$ Replaced with current wind speed dial. DWINDS$ DWINDR$ Replaced with current wind run dial. DWINDR$ DBARO$ Replaced with current barometer dial. DBARO$ DCLOUDB$ Replaced with current calculated cloud base dial. DCLOUDB$ DSOLAR$ Replaced with current solar meter. DSOLAR$ DTEMPO$ Replaced with current outside temperature meter. DTEMPO$ DIALS AND GAUGES Page !204 DDEW$ Replaced with current dew point meter. DDEW$ DWINDCH$ Replaced with current wind chill meter. DWINDCH$ DHEATI$ Replaced with current heat index meter. DHEATI$ DHUMO$ Replaced with current outside humidity meter. DHUMO$ DTEMPI$ Replaced with current inside temperature meter. DTEMPI$ DHUMI$ Replaced with current inside humidity meter. DHUMI$ DRAIN1$ Replaced with current 1 DRAIN1$ hour rain rate meter. DRAIN24$ Replaced with current 24 hour rain rate meter. DRAIN24$ DUV$ Replaced with current U.V. meter. DUV$ CUSTOMGAUGE$1$ Replaced with custom gauge #1. Up to 16 custom gauges may be defined. CUSTOMGAUGE$1$ GRTEMPO$ Replaced with current outside temperature graph. GRTEMPO$ GRDEW$ Replaced with current dew point graph. GRDEW$ GRHUMO$ Replaced with current GRHUMO$ outside humidity graph. GRWINDCH$ Replaced with current wind chill graph. GRWINDCH$ GRHEATI$ Replaced with current heat index graph. GRHEATI$ GRSOLAR$ Replaced with current solar radiation graph. GRSOLAR$ GRAPHS - BASIC Page !205 GRUV$ Replaced with current U.V. graph. Note: There's no U.V. sensor on the station here. GRUV$ GRWINDD$ Replaced with current wind direction graph. GRWINDD$ GRWINDS$ Replaced with current wind speed graph. GRWINDS$ GRPRESSURE$ Replaced with current barometric pressure graph. GRPRESSURE$ GRCLOUDB$ Replaced with current calculated cloud base graph. GRCLOUDB$ GRRAIN1$ Replaced with current 1 GRRAIN1$ hour rain rate graph. GRRAIN24$ Replaced with current daily rain rate graph. GRHUMI$ Replaced with current GRHUMI$ internal humidity graph. GRTEMPI$ Replaced with current internal temperature graph. GRTEMPI$ Custom Graphs - an unlimited number of custom graphs can be generated - here's an example CUSTOMGRAPH$1$ Replaced with custom graph #1. CUSTOMGRAPH$1$ Custom Graphs - here's another example - CUSTOMGRAPH$2$ Replaced with custom graph #2. CUSTOMGRAPH$2$ Custom Graphs - here's another example - CUSTOMGRAPH$3$ Replaced with custom graph #3. CUSTOMGRAPH$3$ TEMPUNITS$ Replaced with the current temperature units. Temperature units are set to: TEMPUNITS$ RAINUNITS$ Replaced with the current rain units. Rain units are set to: RAINUNITS$ PRESSUREUNITS$ Replaced with the current pressure units. Pressure units are set to: PRESSUREUNITS$ GRRAIN24$ GRAPHS - CUSTOM UNITS Page !206 HEIGHTUNITS$ Replaced with the current height units Height units are set to: HEIGHTUNITS$ WINDSPEEDUNITS$ Replaced with the current wind speed units. Wind speed units are set to: WINDSPEEDUNITS$ Individual Stats The STAT tag is used to create a query that is sent to WeatherCat’s statistics system and the result of the query replaces the text of the tag. The STAT tag takes a list of parameters which starts and ends with a $ symbol. The basic format is: STAT$ITEM:TYPE:PERIOD$ ITEM can be one of: RAIN DAILYRAIN RAINDAYS FROSTDAYS DAILYSUN TEMPERATURE DEWPOINT WINDCHILL HEATINDEX PRESSURE WINDSPEED AVERAGEWINDSPEED WINDGUST WINDDIRECTION WINDRUN EXTHUMIDITY INTHUMIDITY INTTEMPERATURE UV SOLAR SUNSHINEHOURS AT_US AT_AUS HUMIDEX SNOW SNOWDAYS Either rain rate or accumulated rain (depending on the query context) Total rain on a daily basis How many rain days over a given period How many frost days over a given period Total sun on a daily basis External temperature Dew point Wind chill Heat index Barometric pressure Wind speed (context sensitive - see notes below) Average wind speed (10-minute) Wind gust (10-minute) Wind direction Wind run External humidity Internal humidity Internal temperature U.V. radiation Solar radiation Sunshine hours Apparent Temperature (U.S. Calculation) Apparent Temperature (Australian Calculation) Humidex Accumulated snow How many snow days over a given period. Page !207 T1 through T8 H1 through H8 LW1 through LW4 SM1 through SM4 ST1 through ST4 SYN1 through SYN5 TYPE can be one of: CURRENT 24HRSAGO MIN MAX AVERAGE TOTAL Extra temperature sensors 1 to 8 Extra humidity sensors 1 to 8 Leaf wetness sensors 1 to 4 Soil moisture sensors 1 to 4 Soil temperature sensors 1 to 4 Synthetic channel data. Real time value The value 24 hours ago. Minimum Maximum Average Total PERIOD can be one of: TODAY SINCE9AM (Period covers from ‘now’ until the previous 9 a.m.) YESTERDAY THISWEEK LASTWEEK THISMONTH LASTMONTH THIS YEAR LAST YEAR THISSEASON ALLTIME HRS(x) (Period covers x number of hours from ‘now’– i.e. HRS(1) means the last hour.) DAYSAGO(x) (Period covers the day x days previous – i.e. DAYSAGO(1) means yesterday.) OR a user defined date range (see ‘User Defined Date Ranges’ below) By appending TIME we can display the time of the event: STAT$ITEM:TYPE:PERIOD:TIME$ For example, to display the highest temperature today: STAT$TEMPERATURE:MAX:TODAY$ To display the time of highest temperature today: STAT$TEMPERATURE:MAX:TODAY:TIME$ Page !208 Thus the follow code: Highest temperature today: STAT$TEMPERATURE:MAX:TODAY$ at STAT $TEMPERATURE:MAX:TODAY:TIME$. Is rendered as: Highest temperature today is 15.72 at 12:01 AM. We can use the TEMPUNITS$ tag to display the temperature units, so the complete line of code would look like: Highest temperature today: STAT$TEMPERATURE:MAX:TODAY$ TEMPUNITS$ at STAT$TEMPERATURE:MAX:TODAY:TIME$. Example: To find the highest temperature yesterday: STAT$TEMPERATURE:MAX:YESTERDAY$ STAT$TEMPERATURE:MAX:YESTERDAY:TIME$. These tags are rendered as: 23.17 5:39 PM Notes: CURRENT will display the real-time value of a given item – these queries are replaced with the data value at the time of the query. This is different to the higher level tags such as CT$ or CD$ etc. as those values are pulled from the database which has a resolution of 1 minute. In the case of CURRENT, the time field (TODAY, YESTERDAY etc) will be ignored and can be omitted. To display the current outdoor temperature: STAT$TEMPERATURE:CURRENT$ This is rendered as: 12.17 CURRENT can also return the value of the following additional sensors: LW1, LW2, LW3, LW4 - leaf wetness sensors. SM1, SM2, SM3, SM4 - soil moisture sensors. ST1, ST2, ST3, ST4 - soil temperature sensors. T1, T2, T3, T4, T5, T6, T7, T8 - extra temperature sensors. H1, H2, H3, H4, H5, H6, H7, H8 - extra humidity sensors. DAILYET, MONTHLYET, YEARLYET - Daily, monthly or yearly evapotranspiration SYN1 through SYN5 - synthetic channels. Page !209 Example: Current Soil Moisture 1: STAT$SM1:CURRENT$ Centibar<BR> 24HRSAGO will display the value of a given item 24 hours ago. In the case of 24HRSAGO, the time field (TODAY, YESTERDAY etc) will be ignored and can be omitted.<BR> To display the outdoor temperature 24 hours ago: STAT$TEMPERATURE:24HRSAGO$ 24HRSAGO may only be used with the following data types: TEMPERATURE, WINDCHILL, HEATINDEX, DEWPOINT, EXTHUMIDITY, PRESSURE, WINDSPEED, WINDGUST, AVERAGEWINDSPEED, WINDDIRECTION, RAIN (in this case the rain rate), INTTEMPERATURE, INTHUMIDITY, SOLAR, UV., SNOW, SYN1 through SYN5. SUNSHINEHOURS can only be used with TOTAL (to find the total number of hours over a given date range) e.g. Hours of sunshine today = STAT$SUNSHINEHOURS:TOTAL:TODAY$ is rendered as: Hours of sunshine today = 0.52 DAILYSUN can only be used with MAX (to find the sunniest day in a given date range) e.g. The sunniest day this year: STAT$DAILYSUN:MAX:THISYEAR:TIME$ (STAT $DAILYSUN:MAX:THISYEAR$ hours) is rendered as: The sunniest day this year: 18 Feb 2012 (0.52 hours) THISSEASON can only be used with RAIN e.g. STAT$RAIN:TOTAL:THISSEASON$ is rendered as: 92.20 or STAT$RAIN:AVERAGE:THISSEASON$ RAINUNITS$/h is rendered as: 0.0613 mm/h (The rain season start month is set in the preferences) DAILYRAIN can only be used with MAX or AVERAGE. e.g. STAT$DAILYRAIN:MAX:THISWEEK$ on STAT $DAILYRAIN:MAX:THISWEEK:TIME$ is rendered as: 3.40 mm on 18 Feb 2012 Page !210 RAINDAYS can only be used with TOTAL and returns the number of rain days over a given period. e.g. STAT$RAINDAYS:TOTAL:THISMONTH$ is rendered as: 3 FROSTDAYS can only be used with TOTAL and returns the number of frost days (or air frosts)over a given period. e.g. STAT$FROSTDAYS:TOTAL:THISMONTH$ is rendered as: 8 AT_US, AT_AUS and HUMIDEX are currently limited to a query range of 1 year back in time. Deltas DELTA1 will display the 1-hour change of a given item (i.e. the current value – the value an hour ago). For DELTA1 the time field (TODAY, YESTERDAY etc) will be ignored and can be omitted. ***NOTE that wind direction delta is not supported and will return an undefined value*** To display the current outdoor temperature 1 hour change: STAT$TEMPERATURE:DELTA1$ This is rendered as: -0.28 DELTA24 will display the 24-hour change of a given item (i.e. the current value – the value 24 hours ago). For DELTA24 the time field (TODAY, YESTERDAY etc) will be ignored and can be omitted. ***NOTE that wind direction delta is not supported and will return an undefined value*** To display the current outdoor temperature 24 hour change: STAT$TEMPERATURE:DELTA24$ This is rendered as: 3.2 Deltas may only be used with the following data types: TEMPERATURE, WINDCHILL, HEATINDEX, DEWPOINT, EXTHUMIDITY, PRESSURE, WINDSPEED, WINDGUST, AVERAGEWINDSPEED, WINDDIRECTION, RAIN (in this case, the rain rate), INTTEMPERATURE, INTHUMIDITY, SOLAR, UV, SYN1 through SYN05. User Defined Date Range Date ranges are specified as yyyy-mm-dd/yyyy-mm-dd. The time range runs from the first minute of the first date to the first minute-1 of the second date. Page 2! 11 Example: STAT$TEMPERATURE:MIN:2010-12-01/2011-04-01$TEMPUNITS$ Finds the lowest temperature between 1st December 2010 and 1st April 2011 and displays it along with the time of the occurrence. The above example would display as: -15.4°C You can also use a user defined date range with the time tag to print the time/date of a query result. For example, to print the time and date of the above query: STAT$TEMPERATURE:MIN:2010-12-01/2011-04-01:TIME$ The above example would display as a localised time and date - e.g. '8 December 2010 06:35 A.M'. Tag Errors Note that some configurations of this tag are invalid - in this case WeatherCat will either allow the tag to be processed - for example: Highest wind direction today = STAT$WINDDIRECTION:MAX:TODAY$ degrees returns an undefined value and is rendered as 'Highest wind direction today = 329.00 degrees'. or it may render as an error; for example: Average wind direction today = STAT$WINDDIRECTION:AVERAGE:TODAY$ degrees on STAT$WINDDIRECTION:AVERAGE:TODAY:TIME$ renders as: Average wind direction today = 83.78 degrees on ***Error - No time available for averages*** Latest Tags And More Information WeatherCat is continually evolving; for an up-to-date list of tags, please see: http://trixology.com/live_weather/custom In addition, the WeatherCat Web Templates forum offers hints, tips and templates: http://athena.trixology.com/index.php?board=5.0 Page !212 Appendix 5 – File Extensions Processed By Custom Web Page Processing The following file types will be processed by WeatherCat for tag replacement when processing custom web page: .htm .html .htx .css .xml .txt .php .shtml .stm .shtm All other file types will be uploaded but not processed for tag replacement. Note that when processing tags which generate html links to files, for example graphs or gauges, only the filename will be generated if the file is php, in all other cases, html code to link to the file will be generated. Page !213 Appendix 6 – Uninstalling WeatherCat Drag the ‘WeatherCat’ folder to the trash. To delete files created by WeatherCat, drag the following folders and files to the trash (some of these may not exist): ~/Library/WeatherCatData ~/Library/WeatherCatBackups ~/Library/Application Support/WeatherCatCustomWeb ~/Library/Application Support/WeatherCatMedia ~/Library/Application Support/WeatherCatTemp ~/Library/Application Support/WeatherCatWeb ~/Library/Preferences/com.trixology.weathercat.plist (where ~ is your home directory). Note that on OS X 10.7 or later, the Library folder is hidden. You can make it visible again via the following terminal command: chflags nohidden ~/Library/ Page !214 Appendix 7 – Frequently Asked Questions Actually, these aren't asked frequently at all, but we've seen them frequently enough to document them. 1. Q: WMR 928/968 - comms counts increasing fast and data bouncing up and down? A: Quit WeatherCat, unplug your serial to USB converter, count to 5, plug it back in and run WeatherCat. 2. Q: WS23xx - rain is incorrect on historical download. A. Historical rain counter is out of sync. with real-time rain counter in console. Quit WeatherCat. Unplug console from computer and mains power, take batteries out, count to 10, batteries back in, power up and connect to computer. Reset console by holding down Wind and Pressure buttons until console beeps (indicating it has reset). Set-up the console, especially the date & time then run WeatherCat. From the Tools Menu select ‘Station Hardware Options’ and set the data logger interval to your preferred interval. 3. Q: Vantage - I wish to try WeatherCat and I've installed the latest USB drivers for the Vantage but WeatherCat is not seeing my station? A. If you've used your Vantage with WeatherLink on a PC it may have switched your data logger to USB mode; WeatherCat needs it to be in serial mode before it will be able to see it. You should be able to switch the mode back to serial in WeatherLink for Windows. 4: Q: Is it OK to put my computer to sleep whilst running WeatherCat? A: We do not recommend putting your computer to sleep if running WeatherCat. Instead we suggest either quitting WeatherCat before putting the computer to sleep, or shutting the computer down entirely. Alternatively, set the Energy Saver to sleep the display but never sleep the computer. Page !215 5. Q: I sometimes get a message from WeatherCat saying communications have failed to the station and/or the USB driver has failed – is there anything I can do about this? A: Communication failures are typically caused by electrical or radio frequency noise interfering with and/or crashing the USB to serial driver supplied by either the station manufacturer or the manufacturer of your USB to serial converter; these drivers live in the kernel space so if you do get this message it is wise to re-boot your computer. The Davis USB data-logger is particularly prone to the problem and the driver crashes in such a way that WeatherCat is not able to restart the driver - the only recourse is to reboot. Davis have an F.A.Q. on their web site which may help but the general advice is to make sure you don’t have any sources of RF or electromagnetic interference near the console, its power supply or computer (TV’s, fluorescent lights, electrical switches, thermostats, RF transmitters etc) and to add some ferrite rings or clamps to the USB cable at both ends and the power supply cable as near as possible to the plug that plugs into the console. Another possible cause of communications failure is worn out batteries in the console. Replacing the batteries with new ones may cure the problem. 6. Q: Wunderground says its running, but the counts aren’t incrementing and my Wunderground page shows no live data. A: It’s most likely WeatherCat is uploading historical data. You can check if this is the case by switching on the ‘Log Historical Uploads’ tick box in the Wunderground preferences and then checking WeatherCat’s log window. You can cancel the historical upload by disabling historical uploads, waiting a few minutes until real time operation resumes then re-enabling the feature to cover periods when WeatherCat isn’t running in the future. Page !216 Release notes Version 2.2.0 ( ShadowFax) June 2015 1. Added a quit check (Preferences->Advanced->Quit Check). Disabled by default. If enabled, we now need to be told twice in 5 seconds to quit (otherwise the shut down is aborted). The normal shutdown process is unaffected in that we will still wait for the user definable delay for shutdown scripts and still wait if a backup or restore operation is inprogress after the shutdown check. Note, if enabled, this feature will cause an error to be returned to any AppleScript trying to quit WeatherCat ('User Cancelled') on the first quit command. To quit WeatherCat from an AppleScript, handle the error in your script and tell it to quit twice - for example: tell application "WeatherCat" try quit end try try quit end try end tell 2. Added a 'Save All' button to the NOAA reports window. This is useful if you wish to generate a complete set of reports from your database or you have changed something which would affect all historical reports (heating degree days base temperature for example). This will save all NOAA style reports to disk (overwriting any existing ones). This processing can take a while so is carried out as a background task. Task start and end are reported in the WeatherCat log window along with how long the task took to run. 3. Sylvester. Sylvester, a companion application for WeatherCat, integrates with the Twitter account on your Mac to post weather data at predefined times throughout the day to these services. Each tweet is defined by a template - there may be an unlimited number of templates. Each template is made up from one of the following WeatherCat tags: t12$ - time in 12 hours format t24$ - time in 24 hour format. Page !217 de$ - date in the format d/my da$ - date in the format m/d/y STAT$ - any stat tag that can be processed by WeatherCat including TIME specifiers. Each template also has a list of tweet times associated with it, these times are defined to a resolution of one minute (i.e. a maximum of 1440 possible times per day). By default, 4 templates are provided - an hourly and 3 daily templates. You can add to, edit and delete the default templates. You can also save and load the templates as sets (Tools menu). Usage: Make sure you have a Twitter account configured on your Mac. Launch Sylvester and select the account you wish to post to. Hit the 'Start' button then at the predefined times, the relevant tweet will be made. To edit a template, double click it. To add or delete templates, hit the relevant button. Note: Sylvester requires OS X 10.9 or later and a 64 bit processor. Note: If Sylvester is found in the same directory as WeatherCat it will launch (as hidden) when WeatherCat launches and quit when WeatherCat quits. Tags 1. Added 'DELTACHAR' as a type specifier to the STAT$ tag which is the same as DELTA1 but rather that returning the numerical value of the 1 hour delta returns one of the following characters: '↑↗→↘↓' which represents > 3 units, > 1.5 units, between 1.5 and -1.5, less than -1.5 and less than -3 units respectively (encoding is UTF-8 if accessed via the AppleScript interface). Note for pressure, the units for this comparison are millibars irrespective of the user set units. DELTACHAR arrows are translated in custom web processing to one of three arrows, up, right or down. Detail: if the value is rising by 1.5 units or more per hour then ⇑ is output. If the value is falling by more than 1.5 units or more per hour then ⇓ is output, otherwise ⇒ is output. AppleScript 1. WeatherCat's AppleScript interface version (WeatherCatASIFVers) now returns 5 (Pegasus was 4) Page !218 2. Added QueryResultString to the AppleScript interface which will return a string indicating the result of a query. For example: tell application "WeatherCat" set Query to "STAT$TEMPERATURE:MAX:TODAY:TIME$" set result to QueryResultString end tell result will contain a string representation of the time of the occurrence (formatted as per WeatherCat's user settings) 3. Added 'PrecipUnits' to the AppleScript interface. Returns 0 if mm's, 1 if inches. 4. Added 'TemperatureUnits' to the AppleScript interface. Returns 0 if Centigrade, 1 if Fahrenheit. 5. Added 'WindSpeedUnits' to the AppleScript interface. Returns 0 if km/h, 1 if MPH, 2 if knots, 3 if m/s. 6. Added 'PressureUnits' to the AppleScript interface. Returns 0 if mB, 1 if inHG. WeatherCat Client 1. Added dock icon weather display (settings in the preferences). Version changed to 1.5.0. Other Changes 1. Fixed an issue where heat index average in year over year statistics may be incorrect. 2. Fixed an issue where SNOW in STAT$ tag was displayed to 2 decimal places instead of 1. 3. Fixed a potential hang at the end of an export. 4. Removed the 'send times and how to turn off' text from forecast emails. 5. WMR200 - we now catch and correct for rain drops (both when running live and historical download). 6. WMR200 - if the dates on the records from the logger are obviously wrong (i.e. the date/time hasn't been set on the console), we will now display 'x of 0' records to be Page !219 downloaded during a historical download (as we can't calculate how many there are to come from the timestamps). 7. Added a 'Once Per Hour' option to the speech preferences (Units/Misc 1 pane). If ticked, the weather will be spoken on the first sample past the hour (rather than on every sample). 8. Improved pronunciation of 'millibars' for English speech. 9. Re-instated update notifications (Preferences->Units/Misc 1). Enabled by default. Version 2.1.0 ( Pegasus) March 2015 General: 1. Added NOAA style reports - Tools->NOAA Style Reports. Monthly and Annual NOAA reports are saved to disk at ~/Documents/ WeatherCatNOAAReports/. The monthly report is updated every sample, the annual report is updated hourly on the first sample past the hour. The report is saved as a simple text file (.txt). A 'Save' button on the NOAA reports window will save the report currently being displayed to disk at ~/Documents/WeatherCatNOAAReports/ (folders will be created for the year/month if they do not exist). The extreme high and low temps for NOAA reports can be set in the 'Advanced' pane of WeatherCat's preferences (defaults are a high of 90°F/32.2°C and a low of 0°F/-17.7°C). See Custom Web section below for NOAA related tags. 2. Added a Weather Facts editor (Prefs->Misc 1->Weather Facts Editor. Facts can be added and deleted. In addition, the currently running facts can saved and loaded allowing the creation of sets (you might for example have a set for Christmas, seasons of the year and so on). 3. Added heating degree days and cooling degree days as optional items in the year over year statistics. (Preferences->Misc 2). Individual base temperatures can be set for both heating degree days and cooling degree days in the preferences (these temperatures also affect HDD's and CDD"s on NOAA reports). 4. Added a generic XML based station driver. This connects to your server via HTTP and expects to read the real time weather data as an XML document. Page !220 In the I.P. field of the Station Communications window in WeatherCat enter the URL to the document - typically something like myserver.com/my_weather.cgi?action=1 From the XML document received, the following keys will be decoded: AirTemp_C, IntTemp_C, T1_C, T2_C, T3_C, T4_C - External, internal and 4 additional temperature sensors (°C) RH, IntRH - External and internal relative humidity (0-100) Solar - Solar radiation (W/M^2) UVIndex Barometer_hPa - barometer in hecto-pascals WindSpeed_ms - windspeed in m/s WindDirect_deg - wind direction in degrees Rain_mm - rain in millimetres - can be accumulating rain or daily rain The format of a data item in the document should be of the form: <value> <name>item name</name> <data>item value</data> </value> for example: <value> <name>RH</name> <data>52</data> </value> Notes: 1. The weather server is polled every 3 seconds. Custom Web: 1. CustomWeb - added 'STNOAAMO$' which is replaced with the current NOAA monthly report (Note: preformatted text, needs <PRE> and </PRE> tags) 2. CustomWeb - added 'STNOAAPRMO$' which is replaced with the NOAA monthly report for the previous month (Note: preformatted text, needs <PRE> and </PRE> tags) 3. CustomWeb - added 'STNOAAYR$' which is replaced with the current NOAA annual report (Note: preformatted text, needs <PRE> and </PRE> tags) 4. CustomWeb - added 'STNOAAPRYR$' which is replaced with the NOAA annual report for the previous year (Note: preformatted text, needs <PRE> and </PRE> tags) 5. Added 'HEIGHTUNITS$' custom web tag which will return either 'Metres' or 'Feet' (without the quotes) depending on the units selected by the user. 6. CLOUDBASE can now be used with the STAT$ tag to return the current cloud base for example: STAT$CLOUDBASE:CURRENT$ HEIGHTUNITS$ Page !221 Note: Will only work with CURRENT. 7. WINDROSE8$, WINDROSE8(PERIOD)$, WINDROSE45$ and WINDROSE45(PERIOD)$ custom web tags now return non-localised output. i.e. decimal points are always the '.' character. AppleScript: 1. Apple Script: WeatherCatASIFVers goes to 4 (Rocinante was 3). 2. Added SunriseTime - this will return the sunrise time for today as a localised string. 3. Added SunsetTime - this will return the sunset time for today as a localised string. 4. Added DaylightTime - this will return the daylight time for today as a localised string. 5. Added FTPOverdriven - this will be true if any of the FTP queues are full (else false). 6. Added RunCustomWeb - writing true to this property will start a custom web run. 7. Apple Script: Added two new properties to the Apple Script interface, Query and QueryResult. These two properties allow the processing of STAT$ tag type queries via the Apple Script interface - you place a query and then read the result (Note: does not support the TIME specifier - access to values only). Example: tell application "WeatherCat" set Query to "STAT$TEMPERATURE:AVERAGE:YESTERDAY$" set result to QueryResult end tell These can also be used from synthetic channel functions. Note that QueryResult will return a sentinel value of -1000000 if there's an error with the string passed to Query. Wunderground: 1. It is now possible to send internal temperature and humidity. Tick-box added to the Wunderground settings. Off by default. 2. It is now possible to log the sent packets to the console log. Tick-box added to the Wunderground settings. Off by default. Misc: 1. Turned off all smart editing features in a synthetic channel edit box (smart quotes for example). Page !222 2. It is now possible to change the font size as used in the statistics window between 8 and 12 - default is 10 (was 9) (Preferences->Units/Misc 1) 3. We will no longer show solar radiation on year over year statistics if the station in use is an Instromet. 4. It is now possible to add STAT$ tags to the banner generator (banner generator goes to version 1.5.0). Note that it is possible to embed the tag in other text - for example: Av. Temp Today: STAT$TEMPERATURE:AVERAGE:TODAY$ °C 5. Added a cream base for custom gauges. 6. Snow in year over year stats now displayed to 1 decimal point (d.p.) for all units (used to be 1 d.p. for metric and 2 d.p. for imperial). 7. Wind direction type custom gauges will now rotate through 0° when rotating around the top of the gauge rather than taking the long way round. 8. Snow entry now limited to 1 decimal place (was 2). 9. Added a hidden preference, 'WindChillWindType' This tells WeatherCat what wind variable to use for calculating wind chill for logging. 0 is the default and calculates wind chill from the average wind speed, 1 tells it to use the current wind speed and 2 tells it to use the largest gust speed seen over the sampling period. For example entering the following into the terminal: defaults write com.trixology.weathercat WindChillWindType -int 2 tells WeatherCat to use the maximum gust seen over the sample period for the windchill value to record. 10. Fixed an issue where the time for historical data between 00:00 and 01:00 in the WeatherCat controller would display as 24:xx (if time display was set to 24hr mode) 11. Fixed an issue where barometric pressure and rain data on WeatherCat controller would display strange values until the first sample of the data came in after midnight (if units were inHg and inches respectively). 12. Fixed bug on wind run custom gauge where values of 360 would be displayed as 0. Version 2.0.0 September 2014 1. Added Custom Gauges (Tools->Custom Gauges) 2. Added snow support (Tools->Daily Snow Editor). 3. Added synthetic channels (Tools->Synthetic Channels) 4. Added a WMR-88 station driver. Supports additional temp/thermo sensors, rain bucket area multiplication (Tools->Station Hardware Options) and short forecast . Note station hardware code sent to CWOP is for a WMR-100. No historical download support as the WMR88 does not have a logger. Page !223 5. Added rain bucket area multiplication to the Oregon Scientific WMR200 (Tools>Station Hardware Options). 6. Historic download progress window now shows time remaining for download from logger. 7. Custom alerts can now use any channel available on your hardware. In addition synthetic channels can also be used in custom alerts. 8. The Current Conditions Calculator now accepts up to 3 clauses per rule allowing rules such as 'Warm but windy' or 'Cold rain/sleet' etc. 9. Plugins now remember their visibility state across reboots of WeatherCat. 10. The Banner Generator is now built into WeatherCat as an internal plug-in (older versions found externally will be ignored). 11. The WeatherCat Controller window is now resizable and the date entry field has been replaced with a graphical date picker. Dragging the hands of the analogue clock allows the data to be scrubbed forward and backwards in time. The background image of the window will change depending on whether the date/time being displayed is night-time or day-time. (Requires coordinates and location are set correctly in WeatherCat's preferences). 12. Sunrise/sunset will no longer display in the WeatherCat Controller window if the location has not been set in WeatherCat's preferences. 13. Additional on-line services have been moved from the Tools menu to a new tab in the 'On-Line' tab of the preferences (Additional Services). (SDK update required). 14. Added 'Daily Types' - these are custom day types displayed in the 'Year Over Year' statistics; for example a 'Wind Day' might be a day where the wind run is greater than 100 miles. Day types are specified in the Misc 2 pane of WeatherCat's preferences via the 'Set Day Types' button. 15. Added averages to the year over year statistics for each month of the year and the yearly totals if there is more than one year displayed. 16. Humidex custom web tags now display to 1 decimal point. Page !224 17. Data restore mode is now 'Safe Mode' - to get into this mode, launch WeatherCat and hold down the control key immediately it starts launching. In this mode, no plugins are loaded (station drivers or additional tools), no data is loaded and weather related processes are not running. You can restore your data from a back up or use the synthetic channel manager to edit channels. When done, quit WeatherCat. Version 1.2.0 July 2013 Highlights: 1. Added stats for the following additional channels: T1 through T8 (extra temperature sensors 1 to 8) H1 through H8 (extra humidity sensors 1 to 8) LW1 through LW4 (leaf wetness sensors 1 to 4) SM1 through SM4 (soil moisture sensors 1 to 4) ST1 through ST4 (soil temperature sensors 1 to 4) These channels can now be graphed on 1 hour type custom graphs and can be queried with the STAT$ custom web tag. 2. Data Export (Tools->Data Export) - new implementation. Exports can be created manually or automatically on a daily basis. Two types of export are available - weather data or hourly data. 3. Added the following tools: Met-Office uploader, WeatherBug uploader, PWSWeather uploader, OpenWeatherMap uploader. 4. Added a MySQL driver. This tool can upload your weather data to a MySQL database opening up a world of applications not previously available to WeatherCat - charting and analysis for example (e.g. High-Charts, JpGraph, GraPHPite, pChart and so on). Features: Auto-import of initial data. Uploading of historical data. Variable rate upload frequency depending on data (fast for wind, slower for other data), resolution down to 1 second. 5. Various minor improvements and bug fixes. Note: When first run, version 1.2.0 will update your hourly data on disk - this may take a minute or two. Should you need to go back to an earlier release, this rebuilding will occur again when you run the older version. Page !225 V1.2.0 Detailed Change Notes 1. Fix WH3080 hardware code to CWOP. 2. WeatherCat Client update for heat index. Also note, this client is Intel build only - 10.6 or later required. 3. SDK update for V1.20. 4. Latest German resources thanks to Reinhard. 5. We now throw an error on email test if there isn't at least one email address to send to. 6. CWOP update for version 4 servers - we now send TCPIP rather than TCPXX. 7. Added a 'DOTSEPARATORS$' custom web tag. This tag is important if you run a nonEnglish version of WeatherCat - it switches off localised decimal separators whilst processing STAT$ tags across a page. For example if the result of a tag is normally something like '13,6', with this tag in effect the output will be '13.6'. This is handy if you know the output is going to be machine parsed and the script doing the parsing doesn't understand localised decimal separators. This tag may appear only once on a page, it can be placed anywhere and stays in effect for the whole page. 8. Fixed a bug where STAT$ tags calculating average AT_US, AT_AUS or HUMIDEX returned incorrect results if temperature units were set to Fahrenheit. 9. On a new install, imagery for location 1 is now off by default. 10. Heat index will no-longer calculate below 80°F - the formula used is not accurate below this value. 11. Maximum data logger periods for both 1080 and 3080 Fine Offset stations is now 59 minutes. 12. Fixed an issue where internal temperature/delta and heat index/delta values as entered into the test window were not being sent when testing a custom alert. 13. Added an OpenWeatherMap plug-in. (Tools->OpenWeatherMap). Sign up at http://openweathermap.org, enter your name and password (as you entered them Page !226 when you registered on OpenWeatherMap) into the tool and hit the 'Start' button. 14. Added a PWSWeather plug-in. (Tools->PWSWeather). Sign up at http://www.pwsweather.com/register.php, create a station then enter your station ID and password (as you entered them when you registered on PWSWeather) into the tool and hit the 'Start' button. 15. Added a MySQL driver plug-in (Tools->SQLDriver). This tool can upload your weather data to a MySQL database opening up a world of applications not previously available to WeatherCat - charting and analysis for example (e.g. High-Charts, JpGraph, GraPHPite, pChart and so on). Features: Auto-import of initial data. Uploading of historical data. Variable rate upload frequency depending on data (fast for wind, slower for other data), resolution down to 1 second. Details: The database must exist - WeatherCat will not create it. Four tables are created and maintained in the database - one for wind (WindData), one for common variables (WeatherData) and one for extra sensors (ExtraData). An additional table is maintained for maintenance reasons - do not edit this additional table (_WeatherCatPrivate). If WeatherCat detects the database is new (i.e. has no tables), it will create the tables then import all of your existing WeatherCat data. The period of the data when uploading historical data can be set in the tool - the default is 5 minutes. Thereafter, data will be uploaded to fill in gaps (for example when WeatherCat isn't running or the database server is not available). When running in real-time, the wind data can be updated faster than the other data (down to 1 second) - this is handy if you have a station which updates wind data faster than other data (Davis Vantage or Vue for example). The other data is updated at a user settable multiple of this period. If you wish to reset the database, stop the SQLDriver, drop all four tables (using something like phpMyAdmin), then start the SQLDriver again - it'll re-import your weather data. Notes: 1. If your database is managed via CPanel, be sure to enable external connections from your I.P. address (normally via RemoteMySQ) 2. Verbose errors are logged to WeatherCat's log window. On error, the SQLDriver will wait a second or two before retrying the transaction. Page !227 3. SQLServers can block repeated unauthorised attempts to access. If your passsword is wrong, or there's some authentication problem, do not repeatedly keep hitting the 'start' button, or leave authentication errors repeat. If this does happen to you, the error reported in WeatherCat's log window should tell you what you need to do to unblock yourself. 4. The initial import to a new database can take a very long time. For example, importing 6 years worth of data (Vantage with extra channels) from a MacMini to a Synology 1512+ at the default 5 minute intervals took ~ 60 minutes at approximately 250KB's per second. For your entertainment, a progress bar and percentage complete are displayed during this time. Weather data collected by WeatherCat during initial import or 'hole filling' will not be lost. 5. At the end of the initial import or uploading historic data, the SQLDriver will switch to real-time logging. 6. If the initial import or uploading of historic data is interrupted, it will resume when the SQLDriver is next able to make contact with the database. 7. The period of historic data uploads is read when the upload is started - if you want to change the period during an upload, hit the 'Stop' button, change the period then hit the 'Start' button. 8. The time field in the database tables is in U.T.C. 9. The data size reported in the tools' window is not the database size - merely the number of bytes transmitted to the server. Typically this is far greater than the actual data size in the database. 10. Imagery is not uploaded to the SQL server. 11. When running with live data, the minimum, average and maximum transaction time is logged in the window - these values can be reset with the small 'R' button. 12. The SQLDriver requires WeatherCat 1.2.0 build 600 or later. 13. Tested with MySQL 5.1.49. Should work with other versions of MySQL the minimum MySQL version in theory should be 4.1 (not tested). 14. Uses the MariaDB SQL connector - source code and Xcode project for this plug-in can be found at http://resources.trixology.com/downloads/ WeatherCat_SQLDriver.zip. 16. Fixed issue in WeatherCat API method to return the localised display value of a given channel. It was as returning one decimal place for additional precipitation and ET channels if units were set to inches (should have been 2). This affected plug-ins displaying these channels - i.e. Banner Generator. Affected channels were monthly rain, yearly rain, daily ET, monthly ET and annual ET. 17. If station communications have failed for longer than 20 minutes, all FTP processing Page !228 will halt until station communications are resumed. 18. Added a WeatherBug uploader (Tools->WeatherBug). 19. Added a Met-Office WoW uploader (Tools->MetOfficeWoW). Notes: 1) Soil moisture is uploaded from soil moisture sensor #1. 2) Soil temperature is uploaded from soil temperature sensor #1 (soil temperature appears as grass temperature on WoW site). 3). The Met-Office recommends upload intervals of at least 15 minutes (which is the default on a new installation) - WeatherCat will allow down to 1 minute intervals should the MetOffice recommend more frequent uploads in the future. 20. Added CPS$ custom web tag which is replaced with the current potential solar energy based on location and date/time. Uses the Ryan-Stolzenbach model with an atmospheric transmission factor of 0.8. Note it is not at all unusual to see the measured solar reading exceed the potential solar energy as the sensor measures not only direct radiation but also indirect radiation. 21. Fixed an issue where STAT$AVERAGEWINDSPEED:MAX would return the maximum gust speed. 22. Fixed an issue where stats for additional temperature type sensors was returning unconverted values. 22. Added stats for the following additional channels: T1 through T8 (extra temperature sensors 1 to 8) H1 through H8 (extra humidity sensors 1 to 8) LW1 through LW4 (leaf wetness sensors 1 to 4) SM1 through SM4 (soil moisture sensors 1 to 4) ST1 through ST4 (soil temperature sensors 1 to 4) These can be used with the STAT$ tag as per other variables - for example to find the maximum soil temperature this year: STAT$ST1:MAX:THISYEAR$ or STAT$H2:MAX:THISWEEK$ at STAT$H2:MAX:THISWEEK:TIME$ etc. 23. The hourly data for these additional sensors can now be graphed on custom graphs i.e. min/max/average, line or bar types. 24. Data Export (Tools->Data Export) - new implementation. Exports can be created Page !229 manually or automatically on a daily basis. Two types of export are available - weather data or hourly data. The weather data is exported at the period specified, the hourly data consists of hourly minimum, maximum and average except for accumulated precipitation which is the total accumulated for the hour. All data is converted to user units. The file format of the exports is .csv, which should open in any spreadsheet software. Convenience date selectors are available (today, this year, etc.), custom ranges can be created by clicking the calendars to set the 'from' and 'to' dates. If the date range doesn't make sense, the export button will be greyed out. The export period can be set for raw weather data (i.e. every ten minutes). To export a particular day, select the same date on both calendars. The channels that are exported are determined by the sensors fitted to your station. Daily exports can be selected to run automatically (this feature is off by default). Autoexports are stored in ~/Documents/WeatherCatExports/year/month/HourlyData and WeatherData (where ~ is your home directory). A daily export will run at the first opportunity - WeatherCat doesn't need to be running around midnight for the export to be processed (for example if WeatherCat is off for the night, the export for yesterday will happen when it's launched in the morning). FTP of daily exports to your custom web site is being considered for WeatherCat V2. 25. Fixed a bug in WH3080 driver where an invalid block on historical download would result in a solar reading of 1800W/m^2. Version 1.1.5 - 29 Mar 2013 1. Fix a potential crash on 10.8.3 whilst sending data to C.W.O.P. Version 1.1.4 - 17 February 2013 1. Added support for WH3080 stations - these are the Fine Offset stations with solar and u.v. Note: The console can display solar radiation in watts per square meter but this display reads low by a huge factor. WeatherCat corrects this. Because of this correction, the solar radiation displayed and recorded by WeatherCat will not match the solar radiation as Page !230 displayed on the console. The solar radiation as displayed by WeatherCat has been verified against the solar radiation as measured by a Davis Vantage (sensors in same location). 2. WMR200: Fixed a crash that could occur on start-up. 3. WMR200: Fixed an issue where additional channels may be missing from the first few samples on historic download. 4. Fixed a long-standing bug that could cause a spike on graphs at the start of a month. 5. Fixed an issue that could cause email to hang on some systems. 6. Scaling improvements when multiple humidity channels are present on a custom graph. 7. Tag additions/changes a. Added MAXGUSTDIR(PERIOD)$ custom web tag. This is replaced with the wind direction at the time of the maximum wind gust over the period. PERIOD can be any time period accepted by the STAT$ web tag. For example: MAXGUSTDIR(TODAY)$ Can be combined with STAT$ tags to find speed and time - for example: Max gust today: STAT$WINDGUST:MAX:TODAY$ from MAXGUSTDIR(TODAY)$ degrees at STAT$WINDGUST:MAX:TODAY:TIME$ b. Added MAXGUSTDIRTEXT(PERIOD)$ custom web tag. This is exactly the same as MAXGUSTDIR but the output is localised text, rather than degrees. c. Added a DUTC$ custom web tag, this outputs the current UTC date and time formatted as: yyyy,M,d,H,m,s - for example '2013,1,24,19,50,57' d. Improvements to DOMWDDEGREES$ and DOMWDTEXT$ tags - we now use a sector based calculation. e. Added DOMWDDEGREES(PERIOD)$ which calculates the dominant wind direction over a given time period, where PERIOD can be any period accepted by the STAT$ tag. f. Added WINDROSE8(PERIOD)$ and WINDROSE45(PERIOD)$ web tags. Replaced with a list of 8 or 45 wind rose values (starting at north and running clockwise, every 45 degrees or 8 degrees) over the period specified by PERIOD which can be any period accepted by the STAT$ tag. g. Added WINDBEARINGFROM10$ custom web tag which is replaced with the lowest wind bearing recorded in the last 10 minutes rounded down to the nearest 10 degrees. Page !231 h. Added WINDBEARINGTO10$ custom web tag which is replaced with the highest wind bearing recorded in the last 10 minutes rounded down to the nearest 10 degrees. i. Added AT_AUS (apparent temperature (Australian variant)), AT_US (apparent temperature (U.S. variant)) and HUMIDEX as variable types that can be used with the STAT$ tag. These types are currently limited to time periods that extend no further than 1 year in the past. Examples: STAT$AT_AUS:CURRENT$ (STAT$AT_AUS:DELTA1$) is replaced with the current apparent temperature (Aus) and the 1 hour delta. STAT$AT_US:MAX:TODAY$ TEMPUNITS$ at STAT $AT_US:MAX:TODAY:TIME$ is replaced with the highest apparent temperature (US) recorded today and the time of the high. STAT$HUMIDEX:AVERAGE:LASTMONTH$ is replaced with the average humidex for last month. j. Added COMMSFAILFLAG$ web tag - this is replaced with 0 if the station comms are good or 1 if the comms have failed (hardware fail or stale data). k. Fixed an issue where numbers in STAT$ tag results were not localised. l. Changed BD$ web tag (build info) to always output a non-localised decimal point. m. Added BDL$ which will output with a localised decimal point. [edit] Version 1.1.3 - 12 January 2013 1. Fixed an issue that could cause FTP to crash if passed an invalid path. 2. Mac OS X 10.8.3 compatibility update. 3. Added LLat$ and Llong$ custom web tags which are replaced with the station latitude and longitude respectively. These coordinates are displayed as degrees, minutes and seconds. Note that the seconds will be different to the coordinates entered into WeatherCat as WeatherCat needs the coordinates in degrees, minutes and hundredths of a minute (i.e. LORAN format). 4. Added Lelevf$ and Lelevm$ custom web tags - these are replaced with the station elevation in feet or metres respectively. 5. Added AT_US$ custom web tag - replaced with the current apparent temperature (US version) - http://www.ncdc.noaa.gov/societal-impacts/apparent-temp/ Page !232 6. Added AT_Aus$ custom web tag - replaced with the current apparent temperature (Australian version, non solar) - http://www.bom.gov.au/info/thermal_stress/ 7. Added HUMIDEX$ custom web tag - replaced with the current humidex (Canadian version) - http://ec.gc.ca/meteo-weather/default.asp?lang=En&n=6C5D4990-1#humidex 8. Added DOMWDTEXT$ custom web tag - replaced with the dominant wind direction today as text (i.e. ENE), localised. 9. Added DOMWDDEGREES$ custom web tag - replaced with the dominant wind direction today as degrees. 10. Added WINDROSE8$ custom web tag - replaced with a list of 8 wind rose values (starting at north and running clockwise, every 45 degrees). 11. Added WINDROSE45$ custom web tag - replaced with a list of 45 wind rose values (starting at north and running clockwise, every 8 degrees). Version 1.1.2 December 27th 2012 1. Fixed a crash that could occur in WMR200 and WH1080 drivers on start-up. 2. Added a DAYSAGO(x) function that can be used as a time specifier with the STAT$ web tag. Example: Highest temperature 2 days ago = STAT$TEMPERATURE:MAX:DAYSAGO(2)$TEMPUNITS$ at STAT$TEMPERATURE:MAX:DAYSAGO(2):TIME$ The valid range for this function is 1 to 99999 days, integers only. 3. Added Internal Humidity as a trigger for custom alerts. Version 1.1.1 December 23rd 2012 1. Added Fine Offset WH1080/2080 station driver. This station is sold under a variety of brands including Maplin (N96GY), Ambient Weather, Conrad, Clas Ohlson, Watson (W-8681) and others. 2. WMR200: Fixed an issue whereby UV would indicate as invalid when it should be valid. 3. WMR200: Fixed an issue whereby the historical download window would stop updating after 5 minutes (the download continues and completes). 4. Latest Italian translations courtesy of Federico Paoletti. Page !233 Version 1.1.0 December 18th 2012 1. Added calibration (Preferences->Misc 2). 2. Various bug fixes. 3. Added an SDK (see separate download) 4. Added daily backups (Tools menu). 5. Added Wd$ macro (wind direction) that can be used with custom alert emails. 6. Printing improvements - it is now possible to print all basic graphs and the current daily and monthly reports. 7. Plotting style of basic wind direction graph is now settable to one of line, shortest path or dots (Preferences->Misc 2) 8. Data export rewritten. It is now possible to export all raw data as a .csv file which should open directly in most spreadsheet software. 9. Tag additions: Added SINCE9AM as a period parameter that can be used in the STAT$ tag - example: Highest temperature since 9 A.M.= STAT$TEMPERATURE:MAX:SINCE9$TEMPUNITS$ at STAT $TEMPERATURE:MAX:SINCE9:TIME$ <BR> Added an HRS(x) function which can be used as the period parameter in the STAT$ tag, This function specifies a time period in hours from 'now' - examples. Highest temperature in the last 24 hours = STAT$TEMPERATURE:MAX:HRS(24)$TEMPUNITS$ at STAT $TEMPERATURE:MAX:HRS(24):TIME$<BR> 10. FTP re-architected to increase upload speed, reduce the number of connections and reduce latency of time sensitive data. 11. Holding down the 'ctrl' key whilst scrolling graphs and imagery via the WeatherCat Controller buttons now accelerates the scrolling. 12. Added Oregon Scientific WMR200 support. 13. Vantage VUE stability update. 14. Documentation update. Version 1.02 15 July 2012 1. Compatibility with Mac OS X 10.8 (GM). 2. Will now calculate heat index below 40% RH. Version 1.01 June 2012 1. Mac OS X 10.8 compatibility 2. Added optional shutdown delay to wait for scripts that are being closed 3. Updated localisations 4. Stability improvements Version 1.0 6 May 2012 Initial Release Page !234 Page !235 License WeatherCat License Single User Full Registered License The software accompanying this license, whether on disk, in read only memory, or on any other media (hereafter referred to as "the Software") and the related documentation are licensed to you by Trixology. You own the media on which the Software is recorded (if supplied on media) but Trixology retains title to the Software and related documentation. This License allows you to use the Software up to two (2) Apple Macintosh computers within your home. If you wish to run WeatherCat on more than two (2) computers within your home, please buy additional licenses (1 license for each additional computer). Business and Educational Full Registered Licenses If you wish to run WeatherCat in an Educational or Business environment please contact Trixology for site licensing prices. Restrictions The Software contains copyrighted and proprietary material. In order to protect them, and except as permitted by applicable legislation, you may not decompile, reverse engineer, disassemble or otherwise reduce the Software to a human-perceivable form. You may not modify, network, rent, lease, loan, distribute or create derivative works based upon the Software in whole or in part apart from via published API's that form part of the Software. Liability Trixology has used its best efforts to produce this software and documentation. The authors make no representation or warranties with respect to either the accuracy or completeness of either software or the manual for any particular purpose, and shall in no event be liable for any loss of profit or any other commercial or personal damage, including, but not limited to special, incidental, consequential, or other damages. WeatherCat will try its best to send out weather alerts and warnings. However we do not guarantee that any alert or warning generated will reach its intended recipient. Even in WeatherCat's display, glitches might occur. Before undertaking any journey or other activity that may be adversely affected by the weather, you should check with multiple sources of information and appraise local weather conditions yourself. With all these pieces of information you should make a judgment. Failure to do so could be fatal. Only you can know whether it is safe - WeatherCat cannot. With all this in mind, Trixology will not be held responsible for any accident, or loss of business, or other unfortunate event that might occur from decisions based upon WeatherCat. If your local laws do not allow this limitation of liability then you should not use WeatherCat. Remember - always take the safe option. Page !236 Acceptance By using the Software, you agree to the terms of this license. If you do not agree with the terms of this license then you are not licensed to use the Software. Page !237 Credits French Localisation: Michel Le Berre & Frederic Genevey German Localisation: Reinhard Unterwurzacher Italian Localisation: Federico Paoletti Floater Graphics: Charles Cohn Progress dialog graphics licensed from Polylooks For contributions, long-term testing and feedback, a very special thank you to: Todd Atkins Philip Beaudet Frederic Genevey Curt Hahn Tony Kissell Edouard Lagache Michel Le Berre Randall McElroy Michael Merwin Thomas O'Nan Federico Paoletti Michael Sinclair Jim Steckel Reinhard Unterwurzacher Rick Vartian Bill Wing Steve Morris Ken True Poohbah Industries Mark Crossley Johyn Blickenstaff Finally, a big ‘thank you’ to everyone on the forums who were brave enough to run development versions of WeatherCat and provide valuable feedback. This software is brought to you via the colour green and with the help of 3 cats, Dream Theater, Dvorak, Elgar, Beethoven, Nightwish/Tuomas Holopainen, Rush (old Rush, not new Rush), The Enid and occasional Sting. Page !238