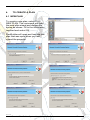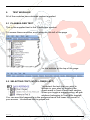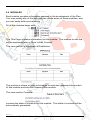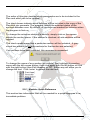
1
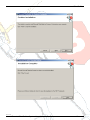
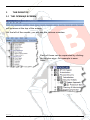
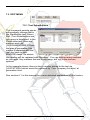
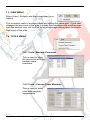
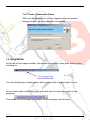
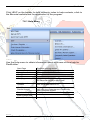
PlanBuilder
Copyright
The paragraphs, information and documentation provided in this product are
the property of Binomial International and as such are protected under
international copyright laws. The information stored on disk and the
documentation may only be copied by the original purchaser of same and
only for the purposes of backup. However, the plan and databases produced
by this software may be for the use of the purchaser or for customers of the
purchaser. This means that you, the purchaser, may use this software for
your own use or for the use of your customers, but you are not permitted to
give away the software because that would be piracy and piracy is subject to
all the penalties provided for by law.
Copyright 2011 Binomial International
812 Proctor Avenue
Ogdensburg, New York USA 13669
5497 Colony Heights Road
Manotick, Ontario Canada K4M 1A7
All rights reserved
Version 2011 printed 2011
Copyright and Software License Issues for PlanBuilder Users
The PlanBuilder Software License is a Single-User License
(unless you have purchased one of our network versions).
This means that you CAN:
•
•
•
Install the system only on your own computer;
Use the software only on your own computer;
Use the software to develop plans for your own company or
department or for your own clients.
This means that you CANNOT:
•
"Share" the software with friends, colleagues, or associates
who have not purchased their own PlanBuilder license.
This manual applies to the following products:
•
PlanBuilder for Business Continuity Planning
•
PlanBuilder for Security Planning
•
PlanBuilder for Pandemic Planning
for all vertical versions of these systems.
110803
2011-07-26
Binomial PlanBuilder System User Manual
2
PlanBuilder
TABLE of CONTENTS
1.
THE PHILOSOPHY
2.
INSTALLING PLANBUILDER
3
4.
5.
6.
6
7
2.1 Demo Version
2.2 Registration Dialog
11
11
THE DESKTOP
12
3.1 The Opening Screen
3.2 PlanBuilder Operation
12
13
TO CREATE A PLAN
15
4.1
4.2
4.3
4.4
4.5
15
16
16
16
16
New Plan
Open
Delete
Backup Plan
Master Plan
TEXT MODULES
17
5.1
5.2
5.3
5.4
PlanBuilder Text
Selecting text (note lower left)
Automatic renumbering of sections
Modules
5.5.1 Module: Quick Reference
5.5.2 Module: Introduction
5.5.3 Module: Preparation
5.5.4 Module: Response
5.5.5 Module: Recurring Tasks
5.5.6 Module: Team Tasks
5.5.7 Module: Key Data
5.5.8 Module: Additional Resources
5.5.9 Module: Appendices
5.6 Module: Teams
5.6.1 To Change the Name of a Team or Team Section
5.6.2 To Add a Team
5.6.3 To Modify a Team
17
17
18
19
20
21
21
22
22
23
24
24
27
28
28
28
28
EDITING
29
6.1 Text Substitutions
6.2 Edit Section
29
30
2011-07-26
Binomial PlanBuilder System User Manual
3
PlanBuilder
6.3
6.4
6.5
6.6
7.
ADD / EDIT Notes
Manage Personnel
Choose Team
Print / Export Module
31
32
32
33
MENU COMMANDS
34
7.1 FILE MENU
7.2 EDIT MENU
7.2.1 Text Substitutions
7.3 VIEW MENU
7.4 TOOLS MENU
7.4.1 Tools | Manage Personnel
7.4.2 Tools | Choose Team Members
7.4.3 Tools | Customize Plans
7.6 HELP MENU
7.6.1 Help Menu
7.6.2 Help|Getting Started
7.6.3 Help|Online Manual & Help
7.6.4 Help|Web|Tutorials
7.6.5 Help|Web|Resources
7.6.6 Help|Web|Support
7.6.7 Help|Web|Check for Updates
7.6.8 Help| Web|Purchase or Renew Support
7.6.9 Help| Purchase/Register
7.6.10 Help| Enter License Info
7.6.11 Help| About PlanBuilder
34
35
35
36
36
36
36
37
37
38
39
39
39
39
39
39
40
40
40
40
8.
OUTPUT
41
9.
TABLE OF CONTENTS
42
10.
SAMPLE DATA
42
11.
FINISHING YOUR PLAN
42
12.
ADDITIONAL INFORMATION TO INCLUDE IN YOUR PLAN
44
13.
ADVANCED TOPICS
45
DRAG AND DROP
COPY AND PASTE
45
45
2011-07-26
Binomial PlanBuilder System User Manual
4
PlanBuilder
14.
TECHNICAL SUPPORT
46
APPENDIX 1:
48
Teams to consider in your plan:
48
APPENDIX 2:
50
Backing Up and Restoring PlanBuilder Plans.
50
APPENDIX 3:
51
Team Continuity Plan Certification
51
APPENDIX 4:
53
Installation Files: What Is Installed Where ?
53
APPENDIX 5:
54
Known Installation Issues
54
APPENDIX 6:
55
Known Issues
55
APPENDIX 7:
56
Troubleshooting
56
APPENDIX 8:
57
Tips & Tricks
57
2011-07-26
Binomial PlanBuilder System User Manual
5
PlanBuilder
1.
THE PHILOSOPHY
The PlanBuilder (Binomial PlanBuilder Planning System) program is used to
create your Plan by assisting you in the selection of planning content and in
the generation of a fully formatted document.
All businesses depend heavily upon information and the ability to process
and analyze this information. These businesses increasingly depend on
computer-supported information processing and telecommunications.
Technology and automated systems are often used to process and analyze
information and their disruption for even a few days could cause severe
financial loss and threaten the very survival of the business. This
dependency will continue to grow with the trend toward decentralizing
information technology to individual organizations within companies. The
increasing dependency on computers and telecommunications for
operational support poses the risk that a lengthy loss of these capabilities
could seriously affect the overall performance of the company.
If your staff cannot be at their place of business because of the effects of an
unfortunate event, such as a security breach, a disaster, or a pandemic, then
you will not be able to continue your business unless you have planned for
this eventuality.
A Plan gives your company a competitive advantage because you will still be
in business.
PlanBuilder is a menu-driven system in Windows that helps you to produce
such a Plan for your enterprise.
You decide which topics to include in your Plan and which databases to
include and PlanBuilder will do the rest. It is an automated system which will
quickly and easily generate the components of your Plan. PlanBuilder
contains the information that you need to quickly prepare a Plan.
The advantages of PlanBuilder are:
1. speed of development of your Plan,
2. comprehensive content right out of the box,
3. low price, and
4. easy maintenance of your Plan
After you have created the plan, PlanBuilder is used to continue to maintain
the Plan, through modifying text and updating data.
2011-07-26
Binomial PlanBuilder System User Manual
6
PlanBuilder
2.
INSTALLING PlanBuilder
PlanBuilder will self-install. Simply place the CD in your CD drive and close
the door.
When you close the door on the CD the AutoRun program starts (if your
settings do not allow AutoRun to start, then run the file Setup.exe file in the
root directory of the CD and follow the installation instructions
The setup program will then install PlanBuilder on your computer.
You will have the option of selecting the directory into which PlanBuilder will
be installed. The default directory is :
C:\Program Files\Binomial International Inc\Binomial PlanBuilder for Business Continuity
but you can change this if you wish.
2011-07-26
Binomial PlanBuilder System User Manual
7
PlanBuilder
You will be presented with this screen:
Select the correct download for the version you wish to install.
Enter the requested information.
2011-07-26
Binomial PlanBuilder System User Manual
8
PlanBuilder
When the program has finished installing, the PlanBuilder window with the
program icon is displayed.
2011-07-26
Binomial PlanBuilder System User Manual
9
PlanBuilder
2011-07-26
Binomial PlanBuilder System User Manual
10
PlanBuilder
Note that you need to have administrative privileges on XP/Vista/Windows 7
to install the software.
2.1 DEMO VERSION
PlanBuilder is installed as a demo version. To make it into a full version,
select Help – Registration and enter the numbers requested there. The
correct numbers will complete the registration.
If you do not have the registration numbers, these may be obtained by
placing an order for the system. We accept purchase orders from
recognized companies and credit cards (through Google Checkout).
2.2 REGISTRATION DIALOG
The demo version of PlanBuilder enables you to view the Table of Contents
of all of the plan and selected parts of the content, but not to edit nor print
any of the plan. When you purchase PlanBuilder, all of the rest of the
content will be unlocked. You will be sent a serial number, user count, and
registration code. Enter these values into the following dialog box in order to
enable PlanBuilder.
The OK button only becomes enabled if the information is correct.
You can order your copy from:
• www.binomial.com
or
•
•
•
by calling 1-877-246-6642 or
by calling 1-800-361-8398
by faxing us at (928) 441-4170.
2011-07-26
Binomial PlanBuilder System User Manual
11
PlanBuilder
3
THE DESKTOP
3.1 THE OPENING SCREEN
will be seen at the top of the screen.
On the left of the screen, you will see the various modules:
Each of these can be expanded by clicking
on the plus sign. An example is seen
here:
2011-07-26
Binomial PlanBuilder System User Manual
12
PlanBuilder
3.2 PLANBUILDER OPERATION
Once PlanBuilder is installed, there will be the PlanBuilder icon
on your
desktop. To run PlanBuilder, either click on the PlanBuilder icon or follow the
Start | Programs | Binomial Security Planning System | PlanBuilder
path.
The splash screen will be displayed briefly and the PlanBuilder desktop will
open behind the splash screen.
The plan is divided up into modules, each of which can be published
separately. There are twelve areas to the PlanBuilder desktop (although you
can add more):
Executive Summary
The Executive Summary explains the nature of Security, the
motivation for Security planning, and gives an overview of this plan.
Quick Reference
This section has information that will be needed for a quick response
to an immediate problem.
Introduction
This section covers the rationale for emergency planning and your
company’s response. Select or modify the sections you need based
upon your analysis of the risks your company faces.
Background
The Background Module contains a large amount of information on
security and advice on reducing security risks.
Requirements
The Requirements Module describes your organization's security
requirements.
Risk Assessment
The Risk Assessment Module contains your assessment of the risks
facing your organization.
Actions Now
2011-07-26
Binomial PlanBuilder System User Manual
13
PlanBuilder
The Actions Now module describes the immediate actions you plan
to undertake to reduce security risks.
Team Tasks
In this section you select the teams that will take part in the security
process. For each team, you determine what that team will do
before, during, and after a security incident.
Recurring Tasks
For the plan to be effective, the plan must be exercised and staff
must be trained. The plan must also be maintained and updated, and
regular audits should be carried out. These topics are covered in this
module.
Appendices
The Appendices Module contains useful information for carrying outt
tasks in the plan, including forms and checklists.
Planning Guide
The Planning Guide module contains advice on how to write your
security plan, and how to choose suitable security policies.
PlanBuilder will start with a Sample Plan. This plan will demonstrate some of
the features of the software as it creates sample data.
2011-07-26
Binomial PlanBuilder System User Manual
14
PlanBuilder
4.
TO CREATE A PLAN
4.1 NEW PLAN
To create a new plan, select FILE |
NEW PLAN. This command will open
the new plan wizard and display the
boxes as shown. Fill in the information
required and select OK.
PlanBuilder will open and load the last
plan that was open when you last
closed the program.
2011-07-26
Binomial PlanBuilder System User Manual
15
PlanBuilder
4.2 OPEN
With PlanBuilder, you are able to manage several different plans. This
command is used to load the plan that you want to use.
4.3 DELETE
If you wish to delete a plan, then delete it in Windows Explorer. This is done
to ensure that you really wanted to delete the plan. Note that a plan that is
currently open cannot be deleted.
4.4 BACKUP PLAN
It is important to back up your plan so that it isn’t lost with a computer
problem. You will be prompted to make a copy of your plan using Windows
Explorer.
4.5 MASTER PLAN
You may have a situation in which you wish to create multiple plans within
your organization, but start from the same basis. To do this, first create a
master plan starting from our PlanBuilder text, then copy it to create a
starting point for your own plans.
2011-07-26
Binomial PlanBuilder System User Manual
16
PlanBuilder
5.
TEXT MODULES
All of the modules have detailed content supplied
5.1 PLANBUILDER TEXT
This is the supplied text in the PlanBuilder product.
To access these modules, scroll down on the left of the page
or the buttons at the top of the page.
5.2 SELECTING TEXT (NOTE LOWER LEFT)
You select the text that you wish to
include in your plan by toggling the
check-mark in front of each text section.
When you toggle a major section, all subsections belonging to it are also toggled.
You can see this happening in the progress bar at the lower left corner of
your screen. Unchecked text is grayed out.
2011-07-26
Binomial PlanBuilder System User Manual
17
PlanBuilder
5.3 AUTOMATIC RENUMBERING OF SECTIONS
In the on-screen menu, the sections are not numbered as in a regular Plan.
This is because your numbers, if you omitted any sections, would not be in
the correct order. So, to overcome this, the program automatically numbers
all of the section that have been selected when the Plan is generated.
2011-07-26
Binomial PlanBuilder System User Manual
18
PlanBuilder
5.4 MODULES
Each module contains information required in the development of the Plan.
You may modify any of the text, you can delete some of these modules, and
you can easily add more modules.
All of the modules begin with:
The Title Page contains information on this module. The method to edit this
will be explained later in “How to Edit Content”
The next section is Approvals & Distribution.
This section is where to keep information on who has approved the content
of this module and who has copies of this module.
The next section Contents:
contains the table of contents for this module. This table of contents will be
automatically generated.
2011-07-26
Binomial PlanBuilder System User Manual
19
PlanBuilder
The writer of this plan decides which paragraphs are to be included in the
Plan and which are to be ignored.
The check boxes indicate which sections will be included in the copy of the
Plan that you generate. The program retains the selected status of the
sections between runs. By default, all sections are marked for inclusion when
the program is first run.
To change the selection status of a section, simply click on the square
beside the section name. If the section is checked, all sub-sections will be
toggled.
The check marks mean that a particular section will be included. A gray
check box means not all sub-sections for that section are selected.
If no sections have been selected, this message is presented:
To change the name of any section (or module), first highlight the section
name with the left mouse button, then click again with the left button or click
with the right button (then Edit Heading or F2). Either way will allow you to
change the text. Click ‘enter’ to accept the new text.
5.5.1 Module: Quick Reference
This section has information that will be needed for a quick response to an
immediate problem.
2011-07-26
Binomial PlanBuilder System User Manual
20
PlanBuilder
5.5.2 Module: Introduction
This section covers the rationale for emergency planning and your
organization’s response. Select or modify the sections you need based upon
your analysis of the risks you face.
[<ORGANIZATION>] will be replaced with the name of your organization
(company, hospital, department, etc.) when you generate the plan.
5.5.3 Module: Preparation
This module covers the steps that must be taken to prepare for a disaster,
including vulnerability assessment, preventative measures, emergency
communications, administration, and logistics.
2011-07-26
Binomial PlanBuilder System User Manual
21
PlanBuilder
5.5.4 Module: Response
This module gives an overview of your response to a disaster, including
determining whether the emergency response plan should be activated, the
activation of your emergency response plan, and the follow-up and
evaluation following a disaster response.
5.5.5 Module: Recurring Tasks
For a plan to be effective, the plan must be exercised and staff must be
trained. The plan must also be maintained and updated, and regular audits
should be carried out. This module contains the information that you need to
make this happen.
2011-07-26
Binomial PlanBuilder System User Manual
22
PlanBuilder
5.5.6 Module: Team Tasks
This module describes what should be done now to increase your current
security.
2011-07-26
Binomial PlanBuilder System User Manual
23
PlanBuilder
5.5.7 Module: Key Data
This module contains the essential lists of information you need to prepare
and execute your plan.
This area is a repository for critical information not easily available
elsewhere.
5.5.8 Module: Additional Resources
This module contains references to the external documents and procedures
used during the preparation and maintenance of the plan, or that may be
required during its execution.
This section also contains links to Binomial resources on the internet for use
with with this program.
2011-07-26
Binomial PlanBuilder System User Manual
24
PlanBuilder
Often a plan will rely on documents which are already maintained elsewhere.
For example, you probably already have good documentation explaining how
to backup and restore your accounting system. You may already have
checklists used to identify vulnerabilities in various systems.
Assuming such documents are already stored in a secure location which will
be available in an emergency, you should not attempt to replicate such
documents in your plan because you will then have to maintain two
documents. Instead you should include references to their location and
content so that a person reading the plan during an emergency can identify
and retrieve the appropriate documents.
For resources of a general nature, this module is the recommended place to
reference these documents in your plan. If the documents are on a web
server, you should include the complete URL in the plan. PlanBuilder will
recognize a complete URL (e.g. http://www.example.com/) and automatically
generate a link to the website. This allows you to quickly check that links are
correct.
Using file URLs you can also refer to documents on a file server. For
example, to refer to the file \\binomial\release\testing.txt, use the URL:
file://binomial/release/testing.txt
2011-07-26
Binomial PlanBuilder System User Manual
25
PlanBuilder
For resources specific to a team there is a trade-off between ease of
reference by the team during an emergency, and ease of reference by the
plan maintainer. We recommend including the resource details in this module
for centralized maintenance then referring to this section within the individual
team plans.
2011-07-26
Binomial PlanBuilder System User Manual
26
PlanBuilder
5.5.9 Module: Appendices
This modules references external documents and procedures which may be
used during the preparation and maintenance of the plan, or are required
during execution of the plan.
2011-07-26
Binomial PlanBuilder System User Manual
27
PlanBuilder
5.6 MODULE: TEAMS
The PlanBuilder Teams Module contains textual information for inclusion in
the Plan. This includes all of the teams that could be a part of the plan and
the tasks that each team will perform, before, during and after a disaster.
In the Teams Module, the user decides which paragraphs are to be included
in the Plan and which are to be omitted.
The Teams window shows the sections in the Teams document. The check
boxes indicate which sections will be included in the copy of the Plan that
you generate. The program retains the selected status of the sections
between runs. By default, all sections are marked for inclusion when the
program is first run.
To change the selection status of a section, simply click on the square
beside the section name. If the section is checked, all sub-sections will be
toggled.
The check marks mean that a particular section has been included. A gray
check box means not all sub-sections for that section are selected.
5.6.1 To Change the Name of a Team or Team Section
To change the name of any team (or team section), first highlight the team
name (or team section) with the left mouse button, then click again with the
left button or click with the right button. Either way will allow you to change
the text. Click ‘enter’ to accept the new text.
5.6.2 To Add a Team
By right-clicking, you have the option to add a team. Be sure to position the
cursor at the correct place in the plan.
5.6.3 To Modify a Team
To modify team text, treat the sections as any other text.
2011-07-26
Binomial PlanBuilder System User Manual
28
PlanBuilder
6.
EDITING
PlanBuilder has been designed so that all editing is done in Microsoft Word.
The huge benefits of this are the comprehensive formatting capabilities of
Word.
The available actions are:
a) Start Page – goes to opening screen
b) Edit Section – used to edit the sections in the place.
This is where most of your editing will be done.
c) Add/EditNotes – used to add non-printing notes
(shown in red) on the screen
d) Choose Team – used to work on individual teams
e) Manage Personnel – to add, edit & delete personnel
f) Text Substitutions - used to make macro
substitutions of text
g) Print / Export Module – generates and prepares the
current module for printing
h) Quick Start – manual for experienced users
i) View Manual – detailed manual
6.1 TEXT SUBSTITUTIONS
PlanBuilder has the capability of exchanging set fields with pre-determined
information. The set fields have the format [<ALL CAPS>]. An example is
[<ORGANIZATION>]. When PlanBuilder encounters this type of structure, it
searches through the text substitution table and makes the substitution to the
name of your organization.
2011-07-26
Binomial PlanBuilder System User Manual
29
PlanBuilder
The ones that you will want to input are;
• the name of your organization
• the name of the client for this plan
• the long, or official, name of your organization
• the short, of common, name of your organization
• your location
• the type of your organization (company, hospital, government, etc.0
In addition, there are system-defined fields that you should investigate as
well.
This is a very powerful tool that you will definitely want to use.
6.2 EDIT SECTION
The edit section tool is the way that text is edited in PlanBuilder. Select a
section from the left-side menu and it is displayed in the center panel. To
2011-07-26
Binomial PlanBuilder System User Manual
30
PlanBuilder
edit the content, select the ‘edit selection’ from the right panel. The section
will then open in Word so that you can make your edits.
Once your edits are done, select either the ‘save changes’ button or ‘cancel
changes’ button to save or abandon the edits.
All of your edits in each section and team will be made in this manner.
6.3 ADD / EDIT NOTES
This tool is used to add or edit notes to any section in the plan. These notes
only show on the screen but not in print. They are meant to record some
information or guides to help in the development of the plan.
2011-07-26
Binomial PlanBuilder System User Manual
31
PlanBuilder
This example from the Foundation Module shows the notes (in black) as
keyed in. The notes (in red) show only on the screen.
6.4 MANAGE PERSONNEL
This feature is used to manage your personnel. Key in the people who will
be on your teams.
6.5 CHOOSE TEAM
This feature has two functions. The first is to decide what the roles of the
team members should be. The supplied roles are Team Leader, Deputy
Leader, and Team Members but these may be changed.
The second function is to assign personnel , who have been added in the
above tool (Manage Personnel) to teams. This selection process is done
separately for each team.
2011-07-26
Binomial PlanBuilder System User Manual
32
PlanBuilder
Note that the last option on the Personnel drop down is <Add New>. This
can be used to add a person to the plan without using the Manage Personnel
dialog.
6.6 PRINT / EXPORT MODULE
This feature is how you will be able to print your plan. Select a module from
the left-side menu by highlighting anywhere within the module. Then select
this option from the right-side panel. The entire module will be generated in
Word and the table of contents will be automatically selected. Note that only
the topics that you selected will be included and that the sections within the
modules will be numbered correctly in the table of contents.
2011-07-26
Binomial PlanBuilder System User Manual
33
PlanBuilder
7.
MENU COMMANDS
These are the Title Bar commands. Each is explained below:
7.1 FILE MENU
File Commands
New Plan…
Open Plan…
Close Plan…
Recent Files
Exit
Description
Creates a new plan.
Opens an existing plan.
Closes current plan.
Displays backed up plans to restore
Exits PlanBuilder.
2011-07-26
Binomial PlanBuilder System User Manual
34
PlanBuilder
7.2 EDIT MENU
7.2.1 Text Substitutions
This command permits you to
automatically change text in
the PlanBuilder text. Select
Edit | Text Substitutions and
this menu is displayed. In the
PlanBuilder text, there are
markers such as
[<ORGANIZATION>]. When
the plan is generated, this
marker is replaced with the
text you have in your
MARKUP menu. As shown,
this marker will be replaced with ‘Binomial’. You can add as many markers
as you wish. Any markers that are in the menu, but not in the text are
ignored.
In the example shown, there is also a marker added to the text as
[<LOCATION>] which would be replaced by ‘Your Company Location’ at
generation time.
See section 6.1 in this manual for a more detailed explanation of this feature.
2011-07-26
Binomial PlanBuilder System User Manual
35
PlanBuilder
7.3 VIEW MENU
Select View | Refresh and the current plan is reloaded.
This is mainly useful if multiple users are editing the same plan. If one user
changes the structure of the plan in a way that interferes with another user,
then the second user will receive an error message asking them to refresh
their copy of the plan.
7.4 TOOLS MENU
7.4.1 Tools | Manage Personnel
This is used to input
the personnel who will
become team
members.
7.4.2 Tools | Choose Team Members
This is used to team
roles and member
assignments
2011-07-26
Binomial PlanBuilder System User Manual
36
PlanBuilder
7.4.3 Tools | Customize Plans
This can be used to re-run the original series of wizard
dialogs shown when a new plan is created.
7.6 HELP MENU
In the left of the upper toolbar, this shows the name of the plan that you are
working on.
You should always create a plan with a name that is meaningful to you.
In the lower right corner, this tells you that this is a licensed copy of the
program:
The name of the licensed purchaser of the program will be here.
2011-07-26
Binomial PlanBuilder System User Manual
37
PlanBuilder
Click HELP on the toolbar for help contents, index to help contents, a link to
the Binomial website and for registration of the program.
7.6.1 Help Menu
Use the Help menu to obtain information about or access on-line help for
PlanBuilder.
Start Page
Manual
Quick Start Guide
Web|Tutorials
Web|Resources
Web|Support
Displays opening screen
Displays the PDF version of this document
Displays the Quick Start Guide
Displays tutorials
Shows security resources
Launches your web browser and points it to
the Binomial security support form
Web|Check for
Updates
Launches your email client and creates a
new email addressed to us
Web|Purchase or
Renew Support
Displays the registration dialog where you
can enter the codes that turn PlanBuilder
into a complete system
Displays version information for PlanBuilder
Purchase/Register
Enter License Info
About PlanBuilder
2011-07-26
Binomial PlanBuilder System User Manual
38
PlanBuilder
7.6.2 Help|Getting Started
Choose this menu item to display a point-by-point
procedure for starting your new plan.
7.6.3 Help|Online Manual & Help
Choose this menu item to get
• help about the current dialog box.
• a list of available topics when there are multiple
topics to choose from.
7.6.4 Help|Web|Tutorials
This will link to tutorials on our websites to help answer
your questions about PlanBuilder.
7.6.5 Help|Web|Resources
Choose this menu item to open your web browser and
go directly to help areas with resource information on
Securitys.
The Binomial website is at www.binomial.com
7.6.6 Help|Web|Support
Use this menu item to visit the Binomial website to
request technical support. The program will
automatically fill in the answers to some of the questions
on the support form, so this is the preferred method of
obtaining technical support.
7.6.7 Help|Web|Check for Updates
This menu item visits our website to check if you have
the latest version of PlanBuilder installed.
2011-07-26
Binomial PlanBuilder System User Manual
39
PlanBuilder
7.6.8 Help| Web|Purchase or Renew Support
Choose this menu option to visit our website to purchase
a copy of PlanBuilder or to renew your support contract.
7.6.9 Help| Purchase/Register
Choose this menu option to visit our website to purchase
a copy of PlanBuilder or to renew your support contract.
7.6.10 Help| Enter License Info
Choose this menu option to enter or check your license
and support contract information.
7.6.11 Help| About PlanBuilder
This menu option displays an About dialog box with
information about the PlanBuilder program.
The About dialog box has a support button which shows
a dialog with lots of information our technical support
team may need to diagnose a problem.
The support information can be easily copied to the
clipboard and pasted into an email or support form.
2011-07-26
Binomial PlanBuilder System User Manual
40
PlanBuilder
8.
OUTPUT
All of the output from PlanBuilder is
button. See section 6.6 in this manual.
through the
2011-07-26
Binomial PlanBuilder System User Manual
41
PlanBuilder
9.
TABLE of CONTENTS
The Tables of Contents are generated automatically when you print each
module.
10.
SAMPLE DATA
When PlanBuilder is installed, the plan contains sample data to aid in
understanding the formats.
When you are familiar with the program, you should either start a new plan,
or delete the sample data to avoid confusion.
11.
FINISHING YOUR PLAN
Now that you have generated the PlanBuilder Plan, you need to finish it by
customizing it for your situation. This will involve the following:
•
•
backing up your output files or copying them to another directory so
that they are not inadvertently overwritten by a subsequent revision
of the plan;
reviewing the content of each of the sections you have included in
the plan.
In attempting to satisfy the needs of a great many customers, the
"PlanBuilder" sections may contain too much detail or may not present the
information quite the way you would.
Feel free to update the content however you like. Note that you can use any
language that you can enter and edit in Microsoft Word.
This is your plan!
If you did not select all of the "PlanBuilder" sections, you may wish to revisit
the sections you omitted. It is also a good idea to generate the whole plan
the first time you use the procedures so that you can view it and decide
which sections you may not need.
2011-07-26
Binomial PlanBuilder System User Manual
42
PlanBuilder
A good plan is one that is practical and maintainable (and maintained). Plan
maintenance includes ensuring that all procedures in the plan are kept up to
date.
2011-07-26
Binomial PlanBuilder System User Manual
43
PlanBuilder
12.
ADDITIONAL INFORMATION TO INCLUDE IN YOUR PLAN
Additional information you should consider including in your plan:
Alternate work locations
Useful external telephone numbers
References to related company plans and
procedures
Always ask yourself if a piece of information would be readily accessible
during a Security. If it might not be, then it should be included in the plan.
2011-07-26
Binomial PlanBuilder System User Manual
44
PlanBuilder
13.
ADVANCED TOPICS
DRAG AND DROP
Sections can be moved in PlanBuilder in two ways.
• To move a section to elsewhere in your Plan, left click on the section
heading and move the cursor to another section heading. The
‘moved’ section will be inserted in front of the target heading.
• To move a section to elsewhere in your Plan, and demote it, left click
on the section heading, move the cursor to another section heading
and then to the right, clear of any words. Release the button and the
section will be moved and shifted to the right. A section can also be
promoted by drop in on the senior heading.
• Note that all of these operations can happen within or across
modules.
• Note also that there is no undo function in PlanBuilder.
COPY AND PASTE
Text can be copied, just as you would normally do in Word.
•
•
•
•
•
•
•
•
Select a section
Select ‘edit section’
Select the desired text in the Word panel.
Close the panel
Go to the target section
Select ‘edit section’
Paste the save text
Save the changed section.
2011-07-26
Binomial PlanBuilder System User Manual
45
PlanBuilder
14.
TECHNICAL SUPPORT
Should you require further assistance or experience any problems with this
product, Binomial International can be contacted at the following:
Mail :
Binomial International,
812 Proctor Avenue,
Ogdensburg, New York 13669
Phone :
(613) 692-4000
Fax :
(928) 441-4170
email
:
World Wide Web :
[email protected] (sales)
[email protected] (support)
http://www.binomial.com
We recommend that you purchase the annual support package which
provides you with unlimited support and all upgrades. The cost is 15% of the
current product price.
Within your company, you should designate someone as being the single
point of technical contact. (This is a requirement for multi-user and site
discounts). In this way, you will develop the technical expertise within your
company and will only need to contact Binomial only for situations that
exceed that expertise. It helps to have the skills in-house when an incident
happens.
2011-07-26
Binomial PlanBuilder System User Manual
46
PlanBuilder
15. NETWORK INSTALLATION
To run PlanBuilder on a network, with each user sharing the same set of
plans, you need to perform the following steps.
1. Install a copy of PlanBuilder on each workstation on which it will be
used. Note that PlanBuilder cannot be run directly from the server,
because this will not correctly register the components used. You
should be a system administrator when performing the installation.
2. Create a directory on your file server. We suggest using the name
PlanBuilderData or PlanBuilderPlan for this directory. Enable sharing
for this directory, restricting access to those users you wish to be
able to modify your emergency Security plans.
3. Create a new plan using one of the desktops on which PlanBuilder is
installed, and save the new plan to the shared directory.
4. On each workstation, run PlanBuilder. Open the plan in the shared
directory from the File menu.
5. All the workstations will now share a common PlanBuilder plan.
6. Note that for performance reasons each running copy of PlanBuilder
keeps a local copy of parts of the plan structure. If more than one
person is editing the plan, the local copy could get out-of-sync with
the plan on the server. If this happens, you will receive an error
message asking you to refresh your local copy. Use the Refresh
menu item on the View menu to refresh the local copy of the plan.
2011-07-26
Binomial PlanBuilder System User Manual
47
PlanBuilder
APPENDIX 1:
TEAMS TO CONSIDER IN YOUR PLAN:
2011-07-26
Binomial PlanBuilder System User Manual
48
PlanBuilder
2011-07-26
Binomial PlanBuilder System User Manual
49
PlanBuilder
APPENDIX 2:
BACKING UP AND RESTORING PLANBUILDER PLANS.
You should ensure that the PlanBuilder Plan is included in your regular
computer backup plans.
Do not try and copy a plan while it is open in PlanBuilder.
In addition to this backup, you should make sure you have a copy of your
license key and a copy of the appropriate PlanBuilder install program (e.g.
XYZPlanBuilderSetup.msi) in a safe place.
2011-07-26
Binomial PlanBuilder System User Manual
50
PlanBuilder
APPENDIX 3:
Use this form to get each Team Leader to certify that their team is
prepared.
TEAM CONTINUITY PLAN CERTIFICATION
Business Team:
_________________________________
Date:
_________________________________
I have provided the BCP coordination group with a current copy of my
Team’s continuity plan.
I am satisfied that this version of our plan is complete, accurate and up to
date to the degree required for us to continue to execute our critical business
processes in the event of a major disruption.
Plan Review Checklist:
Yes
No
This plan was reviewed within the last 30 days.
All members of my business team have a current copy of
this plan.
New staff are briefed on the BCP and our team’s specific
plans.
Business characteristics, processes and responsibilities
have not materially changed since the last Business Impact
Analysis.
Activities identified in our plan as “Preparation” tasks have
been assigned to members of my team and are being
maintained.
Dependencies on other teams assumed in our plan have
been confirmed.
2011-07-26
Binomial PlanBuilder System User Manual
51
PlanBuilder
Essential materials required by my team are safely stored
off-site and have been recently reviewed for completeness
and currency.
For any of the items you have checked “No” please indicate your plans:
________________________________________________
________________________________________________
________________________________________________
________________________________________________
________________________________________________
________________
Team Leader’s signature: _____________________________________
2011-07-26
Binomial PlanBuilder System User Manual
52
PlanBuilder
APPENDIX 4:
Installation Files: What Is Installed Where ?
This information is intended primarily for use by system administrators.
By default, PlanBuilder installs a set of files under:
C:\Program Files\Binomial International Inc\Binomial Security Planning
System\
Microsoft .Net libraries may also be installed during the installation process.
2011-07-26
Binomial PlanBuilder System User Manual
53
PlanBuilder
APPENDIX 5:
Known Installation Issues
The largest source of installation errors is truncated downloads from the
Binomial website. Check that the size of the file downloaded matches the
size of the file specified on the download page.
During installation, the install program may request that you install the
Microsoft .Net Framework. A URL will be provided from which the framework
may be downloaded and installed.
2011-07-26
Binomial PlanBuilder System User Manual
54
PlanBuilder
APPENDIX 6:
Known Issues
1. If Microsoft Word has an open dialog when the program is started,
the program will not be able to communicate with Microsoft Word, an
error message will be produced, and the program will shut itself
down.
2. On some Microsoft Word installations, occasionally the main screen
of the program will not redraw its display of the current section
correctly. Changing the selected plan section will refresh the display
and clear this problem.
3. The main screen may not always be redrawn when the program
does not have "input focus" (i.e. is not the program you are
currently interacting with). When you click on the program's window
to return input focus the screen will redraw.
Check the Read Me file included in your installation for the latest list of
known issues.
2011-07-26
Binomial PlanBuilder System User Manual
55
PlanBuilder
APPENDIX 7:
Troubleshooting
Most installation problems are caused by incomplete Internet
downloads. Check the size of the installation file against the size
displayed on the web site.
Many problems can be resolved by re-installing the software.
Problems with screen updating can often be fixed by simply selecting
a different section on the left hand side of the screen, the reselecting
the original section.
Some badly-behaved Microsoft Word Add-ins can cause problems
with PlanBuilder. Try running Microsoft word with any add-ins
disabled to see if this cures the problem. The Support Info button (on
the PlanBuilder About Box dialog) will list all the Word add-ins
detected by the program. The Word Add-Ins dialog can be used to
disable add-ins. If this proves to be the problem, check with the
supplier of the add-in to see if a more recent version is available.
If the above does not resolve the problem, please contact us at
[email protected] .
2011-07-26
Binomial PlanBuilder System User Manual
56
PlanBuilder
APPENDIX 8:
Tips & Tricks
Some of these tips and tricks will probably only make sense once you are
familiar with all the features of the program.
1. Keep regular backups of your plan.
2. If you wish to import a large document into PlanBuilder, create one or
more sections to hold the document, then copy and paste part of the
document into each section. You can then use the Break Apart function (see
right-click context menu on the tree on the left hand side of the screen) to
create additional sections with copies of the document content. Try to
eliminate unnecessary formatting and styles before importing the document:
for best results only leave the Word "Normal" and "Heading n" styles in the
document and remove any section numbering.
3. De-select sections (using the tick boxes) rather than deleting them. This
excludes the section from the published plan, but allows you to copy content
from the excluded section (or re-select it) at a later date.
Support
1. For fastest response, use the forms on the Binomial website to request
support as these prompt you for all the information we need to handle your
support request. If you are able to use the program's Help/Support menu
item to access the website, most of the required information will be
automatically filled in.
The support URL is: http://www.binomial.com/software/support.php
2011-07-26
Binomial PlanBuilder System User Manual
57