1
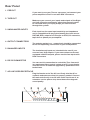
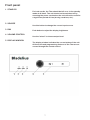
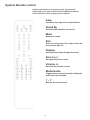
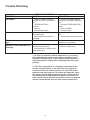
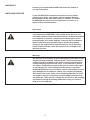
Bladelius
Thor
Table of contents
Warnings and Information
Introduction
“Burn-In”
Design
Balanced signal transmission
Unpacking Placement Cleaning
Rear panel
Front panel
Remote control
Input settings
Input level
Name
Surround mode
Installing/Changing batteries in the remote control
Troubleshooting
Warranty
Obtaining Service 2
3
4
4
4
4
5
5
5
6
7
8
9
9
9
9
10
11
12
12
This symbol is intended to alert you to the presence of un-insulated, dangerous
voltage within the unit’s case that may be sufficient magnitude to constitute a
risk of electric shock.
This symbol is intended to alert you to the presence of important operating and
maintenance instructions in the literature accompanying this unit.
To prevent fire or shock hazard, do not expose this unit to rain or moisture.
To avoid electrical shock, do not open the unit’s case, there are no serviceable
parts inside.
Refer all servicing to qualified personnel only.
Do not dispose this product with communal waste.
Please adhere to local regulations regarding disposal of electronic equipment. If you are uncertain, please contact your dealer.
Marking by the “CE ” symbol (shown left)indicates compliance of this device
with the EMC (Electromagnetic Compatibility)and LVD (Low Voltage Directive)
standards of the European Community.
The information contained in the manual is subject to change without notice. The most current version of this manual will be posted on our web site at http://www.bladelius.com.
3
Introduction
Thank you for purchasing the BLADELIUS Thor amplifier.
Your Thor is a state-of-the-art unit, and has been assembled
by highly skilled BLADELIUS craftsmen to provide you with
many years of listening pleasure. Our unit’s esteem arises
from the way we handle musical signals. BLADELIUS develops products for people who wish an absolutely natural and
enjoyable music reproduction.
Burn- in
Due to the extremely advanced circuitry designed and built
into this piece of equipment, a significant “burn-in” period
is required before the unit will reach its maximum sonic
potential.
We recommend the unit be left on (or in standby mode) at all
times, especially during the first 5-6 weeks of operation, in
order to speed the “burn-in” process.
For best results, the Thor should be left on or in the standby
mode at all times. The unit should not be switched off by
removing the power cord unless the unit will not be used for
a significant period of time (during vacations, etc.).
Design
Reduction is the principle for the shaping of all BLADELIUS components. The unobtrusive design harmonizes with
almost every environment and does not compete with your
personal sphere. The form refers to the tonal ability of the
product line, whose composure and strength manifests a
well-balanced equilibrium.
Balanced signals
Balanced signal transmission means that two signal lines
are used which carry the same signal with opposite phase.
On the receiving side, the signals are mixed. Since any
noise interference that has arisen during transmission will
be present in both lines with identical phase, such noise
is cancelled out, leaving only the pure original signal. Balanced connection therefore keeps the signal transfer free
from any kind of interference.
4
Unpacking
When you have received your Thor, you should make sure
that the shipping box is not damaged. If however, that
should not be the case, please contact your dealer. Please
unpack your unit carefully; there are several parts that can
be damaged. We suggest that you to keep your box and
shock absorbers. Save your plastic bag, inserts, and carton.
You may need these later for transporting the Thor or for
shipment in the event it ever requires factory service.
Record the serial number (on rear panel) here for future
reference: ____________________
Please make sure that your shipping box contains the following:
BLADELIUS Thor
Remote control
Power cord
2 LR03 (AAA) batteries (mounted in the remote control)
Owner’s manual
Placement
The Thor functions best when placed on a flat, stable surface. Never place the Thor near heat sources such as radiators, stoves, fireplaces or other heat-producing appliances.
Avoid placing the Thor where it will be subjected to direct
sunlight or extremely low temperature.
Avoid placing the Thor near strong electromagnetic fields,
such as large power amplifiers. Placement of the unit near
these fields can lead to problems with hum.
Cleaning
To clean the unit, use only a soft tissue (Kleenex type).
Never apply abrasive cleaners to the outer surfaces of the
unit.
Note!
At no time should liquid cleaners be applied directly to the Thor, as direct application of liquids
may result in damage to electronic components
within the unit.
5
Rear Panel
1. Pre Out
If you want to use your Thor as a pre-amp, just connect your
power amplifier to the Pre out with RCA connectors.
2. Tape Out
Make sure you connect your inputs and outputs of the Right
and Left channels consistently; otherwise channels could
be reversed when you replay a tape you had recorded
through this system.
3. Unbalanced inputs
Each input has the same input sensitivity and impedance
and is compatible with any typical analog line level source:
DAT, MD, DVD, output of a Laserdisc or VCR, D-A converter,
tape deck or phono pre-preamplifier.
4. Output Connectors
The outputs marked + or - respectively should be connected
to the corresponding connectors on your loudspeakers.
5. Balanced inputs
The two balanced inputs are intended to be used if your
sources have XLR-outputs. If your source/sources are not
equipped with XLR-outputs, please use the line-inputs with
RCA-connectors.
6. RS 232 Connector
You can use this connection to control the Thor from auxiliary equipment like a control system or a PC. It can also be
used for service or software upgrades by qualified service
technicians.
7. AC Line Cord Receptacle
Plug the female end of the AC cord firmly into the AC receptacle and make sure that it is properly seated. Connect
the male end directly to an AC wall outlet. Avoid use of an
extension cord or power strip since these often degrade
sound quality.
6
Front panel
1. Stand by
For best results, the Thor should be left on or in the standby
mode at all times. The unit should not be switched off by
removing the power cord unless the unit will not be used for
a significant period of time (during vacations, etc.).
2. Source
Use this button to change the current input source.
3. Dim
Push button to adjust the display brightness.
4. Volume control
Use the “wheel” to choose output level.
5. Display window
The display window indicates the current status of the unit.
All functions and programming features of the Thor are accessed through the remote control.
7
System Remote control
Please note that this is a system remote control which
means that it can also control other BLADELIUS products.
Several functions do not apply to this amplifier.
Amp
Activates Amp specific control buttons
Stand By
Switches the amplifier on and off
Mute
Mutes the sound
Dim
Dims the front panel. Four steps- three different levels and off.
Display
Activates and steps through the menu
Source +/-
Changes the source input
Volume +/-
Controls the master volume
Mode/Audio
Toggles the surround mode by holding for
more than two seconds.
1–7
Selects the source input
8
Input Settings
Input level
To change the input level, select the input you wish to
change, then step through the menu by pressing DISPLAY
until “Input level” is shown in the display window. To adjust
input sensitivity, simply press VOL+ to increase the input
level or VOL- to decrease the input level. When set to the
desired level, exit the menu by pressing the DISPLAY button
4 times until your input name is again displayed. Your new
level is now stored in memory. You may store different levels
for each input as they are stored independently in memory.
If you do not wish to use this feature, it is best to leave the
input levels at their factory preset level of “0”.
Name
Select the input name you want to change by using the
SOURCE +/- button. Press the DISPLAY button to activate
the menu and continue to press the DISPLAY button until
EDIT INP NAME is shown in the display. Press VOL + and
you will see the first character of your previously selected
input name flash. Use VOL +/- to change the character and
then step to the other characters using SOURCE +/-. When
you have finished changing the name exit the menu by
pressing the DISPLAY button 3 times until your new name is
displayed.
Surround mode
To bypass the preamplifier section of the Thor you press the
MODE/AUDIO button on your remote for 2 seconds. “SURR”
will be displayed next to your currently selected input. In
this mode Line 5 (TAPE) will be directly connected to the
amplifier bypassing the internal preamplifier circuits.
If you have a surround sound processor and want to use
your Thor in “pre-amplifier bypass” mode, press the MODE/
AUDIO button for more than two seconds. Select which input you want to connect to the TAPE OUT connectors on the
back of your Thor. You can now use TAPE OUT as an input
to your surround sound processor. TAPE is then used as
your input coming back from the surround sound processor
and will be connected to the internal amplifier.
NOTE:
The Thor is equipped with a non-volatile memory which will
remember all of the settings you have edited, allowing automatic access to the same settings (volume, input selection,
alias names, etc.) that you last used before placing the unit into
standby mode or if you turn the mains switch off.
9
Installing/Changing
batteries in the remote
control
This remote control uses two AAA 1.5V batteries.
Open/ Close
the battery cover
Remove the 2 screws that hold the cover on the back of
the remote. When replacing the batteries please be sure to
match the batteries with the (+) and (–) markings inside the
battery compartment during installation. Replace the cover
and 2 screws on the back of the remote.
10
Trouble Shooting
Problem
No sound.
No sound in one channel.
Weak bass/ poor stereo image.
Remote control handset not
working.
Trouble shooting
Cause
Solution
• Power AC Mains cable un
plugged or power not switched
on.
• TAPE MONITOR is
selected.
• Mute on.
• Internal fuse blown.
• Speaker not properly connected or damaged.
• Input lead disconnected or
damaged.
• Speakers wired out of phase.
• Check if AC Mains cable is
plugged in and power switched
on.
• De-select TAPE MONITOR
mode.
• Switch off Mute.
• Consult dealer.
• Check connections and speakers.
• Check leads and connections.
• Batteries need replacement, or
are incorrectly inserted.
• IR transmitter or receiver windows obstructed.
• Check or replace batteries.
• Remove obstruction.
• Check connections to all
speakers in the system.
1.) If only one channel remains inoperative, try reversing
the Left and Right cables to your power amplifier (turn it
off before moving wires). If the same channel stays out, it
indicates trouble could be with something other than your
preamp.
2.) The Thor preamplifier is completely controlled by the
remote control handset. If the unit does not respond to
commands from the remote control, the useful life of the
batteries may have expired. To replace the batteries, open
the battery access door on the back of the remote control
and replace the two AAA batteries. Make sure that the remote control sensor window on the front of the unit and the
remote control emitter lens are kept clean and dust free.
11
Warranty
Contact your authorized BLADELIUS dealer for details of
our warranty policy.
Obtaining Service
If your BLADELIUS component must be serviced, please
contact your dealer. Your dealer will then decide whether
the problem can be remedied locally, or whether to contact
BLADELIUS for further service information or parts, or to
obtain a Return Authorization.
Important!
Return authorization must be obtained from our Technical Services Department BEFORE a unit is shipped for Service. It is
extremely important that information about a problem be explicit
and complete. A specific, comprehensive description of the
problem helps your dealer and the Technical Services Department locate and repair the difficulty as quickly as possible.
A copy of the original bill of sale will serve to verify warranty
status. Please include it with the unit when it is brought in for
warranty service.
Warning!
All returned units must be properly packaged (preferably in their
original packing material), and the proper return authorization
numbers must be marked on the outer carton for identification.
If the packaging to protect the unit is, in our opinion or that of
our dealer, inadequate to protect the unit, we reserve the right
to repackage it for return shipment at the owner’s expense.
Neither BLADELIUS nor your dealer can be responsible for shipping damage due to improper (that is, non-original) packaging.
Your dealer can order a new set of shipping materials for you if
you need to ship your component and no longer have the original materials. There will be a charge for this service. We strongly
recommend saving all packing materials in case you need to
ship your unit some day.
12
Bladelius
13
http://www.bladelius.com