1
8VHU*XLGH
®
K3949V2 12/11/00 (ax)
8VHU*XLGH
®
7DEOHRI&RQWHQWV
System Overview .......................................................................................................... 5
Introduction .................................................................................................................................................5
System Basics ............................................................................................................................................5
Accessing the System.................................................................................................................................5
Navigating and Selecting Options ...............................................................................................................6
List of Options .............................................................................................................................................6
Listening to Your Messages (option 01)..................................................................... 8
About Messages .........................................................................................................................................8
How to Listen to Your Messages ................................................................................................................9
Recording Memos (option 02) .................................................................................... 10
About Memos............................................................................................................................................10
How to Record a Memo ............................................................................................................................10
Caller ID Log (option 03)............................................................................................. 11
About the Caller ID Log.............................................................................................................................11
How to View the Caller ID Log ..................................................................................................................11
Privacy Feature (option 04) ........................................................................................ 12
About the Privacy Feature.........................................................................................................................12
How to Turn the Privacy Feature On/Off ...................................................................................................12
How to Override Privacy Mode .................................................................................................................12
Recording Greetings (option 05)................................................................................ 13
About Greetings (outgoing messages)......................................................................................................13
How to Record Greetings..........................................................................................................................13
Setting the System Time (option 07) ......................................................................... 14
About the System Time.............................................................................................................................14
How to Set the System Time.....................................................................................................................14
Caller ID Display/Announcements (option 08) .......................................................... 15
About Caller ID Displays and Announcements .........................................................................................15
How to Turn Caller ID Display at the Keypad On/Off ................................................................................15
How to Turn Caller ID Announcements On/Off and How to Set the Volume.............................................15
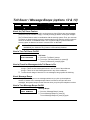
Toll Saver / Message Beeps (options 12 & 13).......................................................... 16
About the Toll Saver Feature ....................................................................................................................16
How to Turn Toll Saver On/Off..................................................................................................................16
How to Check for Messages while Toll Saver is On..................................................................................16
About Message Beeps ..............................................................................................................................16
How to Turn Message Beeps On/Off ........................................................................................................16
-2-
Call Screening (options 14, 15, 16) ............................................................................ 17
About Call Screening ................................................................................................................................17
How to Connect to a Call when Telephone Call Screening is On .............................................................17
How to Turn Call Screening On/Off...........................................................................................................17
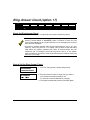
Ring Answer Count (option 17).................................................................................. 18
About the Ring Answer Count...................................................................................................................18
How to Set the Ring Answer Count...........................................................................................................18
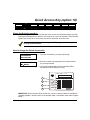
Quick Access Key (option 18) .................................................................................... 19
About the Quick Access Key.....................................................................................................................19
How to Assign the Quick Access Key .......................................................................................................19
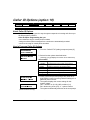
Caller ID Options (option 19)...................................................................................... 20
About Caller ID Options ............................................................................................................................20
How to Program Caller ID Options ............................................................................................................20
Memory Dial Numbers (option 20) ............................................................................. 23
About Memory Dial Numbers ....................................................................................................................23
How to Program Memory Dial Numbers....................................................................................................23
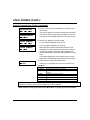
User Codes (option 21) ............................................................................................... 25
About User Codes.....................................................................................................................................25
How to Program User Codes ....................................................................................................................25
Zone Voice Tags (option 22) ...................................................................................... 27
About Zone Voice Tags.............................................................................................................................27
How to Record Zone Voice Tags ..............................................................................................................27
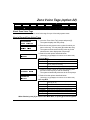
Area Code (option 23)................................................................................................. 28
About the Area Code ................................................................................................................................28
How to Enter the Area Code .....................................................................................................................28
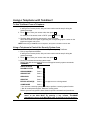
Using a Telephone with TeleSmart ............................................................................ 29
About Using a Telephone to Control TeleSmart........................................................................................29
Using a Telephone with TeleSmart ............................................................................ 30
To Use TeleSmart From a Telephone.......................................................................................................30
Using a Telephone to Control the Security System from...........................................................................30
Using a Telephone with TeleSmart ............................................................................ 31
Making Telephone Calls............................................................................................................................31
-3-
:HOFRPHWR
7HOH6PDUW
-4-
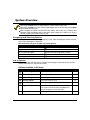
6\VWHP2YHUYLHZ
,QWURGXFWLRQ
Welcome to TeleSMARTthe exciting telephone system that provides you and your
family with the conveniences of a digital answering machine, plus control over your
security system. The list of options on the following pages briefly describes the various
system features.
6\VWHP%DVLFV
Mailboxes
The system has four mailboxes for storing messages and memos,
and users can be assigned access to any combination of mailboxes.
This lets each user listen to his/her own messages without having to
listen to messages intended for the other users.
Greetings
When TeleSMART answers a call, a recorded greeting can instruct
the caller to press a key (1-4) to leave a message for a particular
user. The number corresponds to that user’s primary mailbox. The
system then announces the greeting for that user and automatically
stores the caller’s message in that mailbox.
User Codes
4-digit User codes are needed to use the TeleSMART options. The
system has one Master code and one Installer code, but you can
assign up to five additional User codes.
Security System
TeleSmart keypads can be used to control your security system by
using security system user codes. The system can also be set so
that a user’s messages are automatically played whenever that user
disarms the security system from a TeleSMART keypad.
Options
The TeleSMART system lets you choose from a series of options,
which are displayed one at a time at the keypad. Simply scroll to the
desired option and turn it on or off by following the prompts.
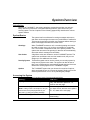
$FFHVVLQJWKH6\VWHP
The TeleSMART system has three levels of access as shown below:
Entering…
Lets You…
the programmed Quick Access key
hear messages in the common mailbox
only, and use menu options 01 - 07,
listed on the next page
your user code + [∗]
hear messages in all mailboxes to which
NOTE: If calling in from a remote phone, dial your
you have access, and use menu options
home number, then press [#] followed by your
01 - 07, listed on the next page
user code + [∗] during the greeting message.
the Master code + [∗]
use all menu options, except unattended
downloading
-5-
6\VWHP2YHUYLHZ
• While using TeleSMART from your home telephone, you are unable to receive calls.
• When using TeleSMART from your security system keypad, you can receive calls, but TeleSMART
cannot answer the call for you.
• When navigating the options, be aware that some options start a menu (e.g., selecting “Hear
Messages” starts the Message menu), while other options simply turn a feature on or off (e.g,
selecting “System” turns answer mode on or off).
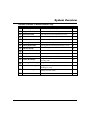
1DYLJDWLQJDQG6HOHFWLQJ2SWLRQV
Each option is identified by a 2-digit number (01-24). After accessing the system, the first
option (Hear Messages) is displayed.
Use the following keys to navigate and select options:
To…
Press…
[∗]
Display the next option
[#]
Display the previous option
[7] then enter the 2-digit option number
Go to a particular option
[0]
Select the displayed option
[9]
Exit the system
/LVWRI2SWLRQV
The following table lists the options available and the page number where you can find
detailed instructions for using these options.
Options Available to All Users
No.
Used To…
01
Menu Option
Hear Messages
02
Record Memo
record memos for other users of the system
10
03
Caller ID Log
view the log of callers
11
04
Privacy On/Off
turn privacy mode on or off
12
05
Record OGM
record greeting for each mailbox
13
06
System On/Off
turn answer mode on or off
n/a
listen to messages and memos
Page
8
The system must be ON before TeleSMART can
record messages from incoming callers.
07
System Time
set the system’s time
-6-
14
6\VWHP2YHUYLHZ
Options Available to Master/Installer Only
No.
Used To…
08
Menu Option
CID Display On/Off
turn the CID display at keypads on or off
Page
15
09
Keypad CID On/Off
turn CID announcement at keypads on or off
15
10
Aux CID On/Off
turn CID announcment at speakers on or off
15
11
Aux Volume
set the auxiliary speaker volume
15
12
Toll Saver On/Off
turn the toll saver feature on or off
16
13
Message Beeps On/Off
turn dial tone message beeps feature on or off
16
14
HF Keypad On/Off
turn keypad call screening (hands-free) on or off
17
15
HF Aux On/Off
turn auxiliary speaker hands-free on or off
17
16
Handset On/Off
turn handset hands-free on or off
17
17
Ring Answer
set the ring answer count (2-8)
18
18
Access Key
assign the Quick Access key (1-4)
19
19
Caller ID Settings
program distinctive ring, mailbox, voice tag for
incoming calls
20
20
Memory Dial Settings
program memory dial phone numbers
23
21
User Code Settings
program user codes, mailbox access, keypad
message on or off
25
22
Zone Voice Tags
record zone voice tags that are announced when
activity on a zone occurs
27
23
Area Code
assign the area code for the system
28
-7-
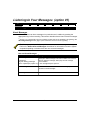
/LVWHQLQJWR<RXU0HVVDJHV (option 01)
01
02
03
04
05
06
07
08
Hear Messages
Record Memo
Caller ID Log
Privacy On/Off
Record OGM
System On/Off
System Time
CID Display
NAVIGATION: [∗] = Next Option; [#] = Previous Option; [7] = GOTO prompt; [9] = Exit System.
$ERXW0HVVDJHV
Callers and users can leave messages in a particular user’s mailbox by pressing the
appropriate key† before recording. This section describes how to listen to these messages.
† The key (1-4) corresponds to the user’s mailbox number and can be identified in the greeting. See
Recording Greetings section (page 13) for instructions on how to record a greeting.
The Message option is available only if there are new or saved messages in the system.
Refer to the New and Saved Messages chart below for information on how the system
responds depending on whether there are new or saved messages.
New and Saved Messages
If there are…
new messages or memos
The system…
automatically goes to the Message Menu and begins
playing the oldest message in the user’s mailbox. You can then
save or erase the message, and/or play the next message
Indicated By:
in that mailbox.
Keypad: blinking yellow light
Phone: rapid beeps (if option on*) * The message-beeps is option 13.
saved messages or memos
starts the Main Menu. You can select the Message option
to listen to saved messages.
no messages or memos
starts the Main Menu.
-8-
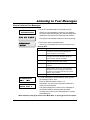
/LVWHQLQJWR<RXU0HVVDJHV
+RZWR/LVWHQWR<RXU0HVVDJHV
1. Go to the “Hear Messages” prompt and press [0].
463+6%1 13()
,)%6 1)77%+)7
MEMO WED 01:23PM
If there are new messages or memos in your mailbox,
the system automatically plays the oldest message and
displays the day and time the message was received.
The system automatically advances to the next prompt.
2. Select from options described below.
MESSAGE MENU
(Pressing [∗] or [#] displays the choices on the bottom line.)
Message Menu
1 REPEAT
1 – Repeat
Plays back the current message.
2 – Save
Saves the current message, then plays the next
message. If you do not save the message, the
system treats it as a new message.
3 – Erase
Erases the current message, then plays the next
message. After the last message is played, this
option becomes “erase all” messages.
4 – Next
Stops the current message and begins the next
message in the order in which received.
5 – Previous
Stops the current message and begins the previous
message.
6 – Sel. Mailbx Lets you select another mailbox by entering the
desired mailbox number (1-4). The system then
displays the number of messages in that mailbox
followed by the messages themselves. See “Enter
Mailbox” prompt at below.
Returns to the Main options.
8 – Menu
)28)6 1E-0&3<
#)2(
1%-0&3< '
1)13 Enter the desired mailbox number, 1-4.
2);
17+
3. To hear messages in another mailbox, press [6] from
the “Message” Menu, then:
Remember, you can access only those mailboxes to
which you are authorized.
The system displays the number of new messages in
the selected mailbox and plays back the oldest
message, then returns to the “Message Menu” prompt
described above.
When finished, press [8] to return to the Main Menu, or press [9] to exit the system.
-9-
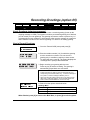
5HFRUGLQJ0HPRVoption 01
Hear Messages
02
Record Memo
03
04
05
06
07
08
Caller ID Log
Privacy On/Off
Record OGM
System On/Off
System Time
CID Display
NAVIGATION: [∗] = Next Option; [#] = Previous Option; [7] = GOTO prompt; [9] = Exit System.
$ERXW0HPRV
A memo is a message you can record for other users of the system to hear. For example,
you might want to let them know you went to the store. These users would then use the
Message Menu to listen to your memo.
When you record a memo, you can play it back and/or erase it using this menu.
However, once you exit this menu, the memo can only be erased by using the Message
Menu described in the previous section.
+RZWR5HFRUGD0HPR
463+6%1 13()
1. Go to the “Record Memo” prompt and press [0].
6)'36( 1)13
ENTER MAILBOX:
(1-4)
#-END
MAILBOX: COMMON
RECORD AT TONE!
2. Enter the mailbox number for the intended user.
To cancel this prompt, press the [#] key, then see the
“Memo Menu” prompt described below.
3. The display shows the selected mailbox.
Begin recording your memo after the tone.
Press any key to end the recording.
The memo is automatically saved and the system
displays the next prompt.
1&' 6)4 6)'
)6%7) 1)29
4. Select from the options described below.
Memo Menu
1 – Repeat
Plays back the recorded memo.
3 – Erase
Erases the recorded memo.
6 – Record
Returns to the “Enter Mailbox” prompt.
8 – Menu
Returns to the Main Menu.
When finished, press [8] to return to the Main Menu, or press [9] to exit the system.
-10-
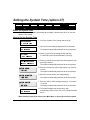
&DOOHU,'/RJoption 01
02
Hear Messages
Record Memo
03
Caller ID Log
04
05
06
07
08
Privacy On/Off
Record OGM
System On/Off
System Time
CID Display
NAVIGATION: [∗] = Next Option; [#] = Previous Option; [7] = GOTO prompt; [9] = Exit System.
$ERXWWKH&DOOHU,'/RJ
The Caller ID Log is a record of the phone number and/or name of callers (depending on
the type of Caller ID service you subscribe to). Use this menu to display this log. Refer to
the Caller ID Options section on page 20 for other TeleSMART Caller ID features
available if you subscribe to Caller ID service.
You must subscribe to Caller ID service from your telephone service provider to use the
Caller ID Log.
+RZWR9LHZWKH&DOOHU,'/RJ
463+6%1 13()
1. Go to the “Caller ID Log” prompt and press [0].
'%00)6 -( 03+
MSG: DAY, TIME
PHONE NUMBER
'%00)6 -( 03+
(-74 )6%7)
2. The system displays the day, time, and phone number
of the most recent caller, then automatically advances
to the “Caller ID Log” Menu prompt.
3. Select from the options described below.
(Pressing [∗] or [#] displays the choices on the bottom line.)
Caller ID Log Menu
1 – Display
The name for the call is displayed on the bottom line
for 3 seconds (only if you have the “name” Caller ID
service).
3 – Erase
Erases all entries in the Caller ID log.
(NOTE: Any user can erase the Caller ID log.)
4 – Next
Displays the next call. Pressing [4] repeatedly scrolls
through the Caller ID log.
5 – Previous
Displays the previous call. Pressing [5] repeatedly
scrolls through the Caller ID log.
8 – Menu
Returns to the Main Menu.
When finished, press [8] to return to the Main Menu, or press [9] to exit the system.
-11-
3ULYDF\)HDWXUHoption 01
02
03
Hear Messages
Record Memo
Caller ID Log
04
Privacy On/Off
05
06
07
08
Record OGM
System On/Off
System Time
CID Display
NAVIGATION: [∗] = Next Option; [#] = Previous Option; [7] = GOTO prompt; [9] = Exit System.
$ERXWWKH3ULYDF\)HDWXUH
The Privacy feature turns off all telephone ringers and lets TeleSMART answer your calls.
This can be useful if you do not wish to be disturbed at certain times. For example, you may
wish to turn Privacy on during dinner to avoid being interrupted by phone calls.
• When the Privacy feature is on, it remains on for 8 hours, or until you turn it off. It
automatically turns off after 8 hours.
• Use the Message Menu to check for any messages that may have been left while
Privacy was turned on (message light will be on at the keypad).
+RZWR7XUQWKH3ULYDF\)HDWXUH2Q2II
463+6%1 13()
46-:%'= 3**
1. Go to the “Privacy” prompt.
2. To turn the Privacy feature on, press [0].
To turn Privacy off, press [0] again.
463+6%1 13()
46-:%'= 32
+RZWR2YHUULGH3ULYDF\0RGH
When you call in to the system, you can manually override Privacy mode if it is on:
1. Dial in to the system. When TeleSMART answers the call, the system announces
“privacy on” before the greeting to let you know it is turned on.
2. Press [0] during the greeting. You are then connected to the system and your voice can
be heard at the TeleSMART keypads and auxiliary speaker.
3. Simply speak into the telephone mouthpiece and say “pick up the phone” or
something similar to get the attention of those at the premises. Remember, the phone
does not ring at the premises, so your voice is the only alert they have to your call.
You can also set the system to automatically override Privacy mode for calls from a
specific phone number. See Caller ID Options on page 20 for details.
-12-
5HFRUGLQJ*UHHWLQJVoption 01
Hear Messages
02
03
04
Record Memo
Caller ID Log
Privacy On/Off
05
Record OGM
06
07
08
System On/Off
System Time
CID Display
NAVIGATION: [∗] = Next Option; [#] = Previous Option; [7] = GOTO prompt; [9] = Exit System.
$ERXW*UHHWLQJVRXWJRLQJPHVVDJHV
When TeleSMART answers a call, the caller hears a recorded greeting (known as the
outgoing message or OGM). The system includes a pre-recorded greeting, but if desired,
you can record your own greetings. The greeting can instruct a caller to press a key 1-4
(corresponding to user mailboxes), which lets the caller record a message in a particular
user’s mailbox. Use this menu to record a greeting or to listen to an existing greeting.
+RZWR5HFRUG*UHHWLQJV
463+6%1 13()
1. Go to the “Record OGM” prompt and press [0].
6)'36( 3+1
ENTER MAILBOX:
(1-4)
#-END
MAILBOX: COMMON
RECORD AT TONE!
2. Enter the mailbox number (1-4) for which the greeting
is to be recorded or reviewed. You can record a
greeting only in a mailbox to which you have access.
To cancel the entry, press [#]. The system displays the
“Greetings Menu” prompt, described below.
3. Begin recording your greeting after the tone.
Press any key to end the recording. The greeting is
automatically played back once and saved.
WHEN MAKING A GREETING MESSAGE:
1. Include instructions for callers to press the appropriate key (1-4)
corresponding to the desired mailbox. E.g., “To leave a message for
Tom, press 2; to leave a message for Melissa, press 3.”
2. Leave a few seconds of silence at the end of your greeting to give
callers time to make their selection. This is because callers must
make a mailbox selection before the “record now” beep.
:
1&'
6)4)%8
6)'36( 1)29
4. Select from the options described below.
Greetings Menu
1 – Repeat
The recorded memo is played.
6 – Record
The system returns to the “Enter Mailbox” prompt.
8 – Menu
The system returns to the Main Menu.
When finished, press [8] to return to the Main Menu, or press [9] to exit the system.
-13-
6HWWLQJWKH6\VWHP7LPHoption 01
02
03
04
05
06
Hear Messages
Record Memo
Caller ID Log
Privacy On/Off
Record OGM
System On/Off
07
System Time
08
CID Display
NAVIGATION: [∗] = Next Option; [#] = Previous Option; [7] = GOTO prompt; [9] = Exit System.
$ERXWWKH6\VWHP7LPH
The internal clock is used to time-stamp all messages. Use this menu to set or view the
system’s time setting.
+RZWR6HWWKH6\VWHP7LPH
463+6%1 13()
7=78)1 8-1)
7=78)1 8-1)
792
%1
7)8 8-1)#
1. Go to the “System Time” prompt and press [0].
- =)7
1)29
(%=# ;)(2)7(%=
∗ 2)<8
7)0)'8
ENTER HOUR
-- (01-12)
ENTER MINUTES
-- (00-59)
ENTER AM/PM
- 1AM 2PM
7=78)1 8-1)
792
%1
2. The current time setting is displayed for five seconds.
The system automatically advances to the next prompt.
3. Press [1] (yes) to begin setting the day and time.
To cancel and return to the Main Menu, press [8].
4. Press [∗] until the correct day of the week appears, then
press [0] to select it.
The system automatically advances to the next prompt.
5. Enter the current hour (use 2-digit entries; e.g., 09 for 9
o’clock).
The system automatically advances to the next prompt.
6. Enter the current minute (use 2-digit entries).
The system automatically advances to the next prompt.
7. Enter the “AM” or “PM” setting by pressing “1” for AM or
“2” for PM.
The system automatically advances to the next prompt.
8. The system displays the day and time, then
automatically returns to the “Set Time” prompt described
above.
When finished, press [8] to return to the Main Menu, or press [9] to exit the system.
-14-
&DOOHU,''LVSOD\$QQRXQFHPHQWV option 01
02
03
04
05
06
07
Hear Messages
Record Memo
Caller ID Log
Privacy On/Off
Record OGM
System On/Off
System Time
09
10
Aux CID
11
Aux Volume
12
13
14
15
08
CID Display
16
Toll Saver
Message Beeps
HF Keypad
HF Aux
Handset On/Off
Keypad CID
NAVIGATION: [∗] = Next Option; [#] = Previous Option; [7] = GOTO prompt; [9] = Exit System.
$ERXW&DOOHU,''LVSOD\VDQG$QQRXQFHPHQWV
TeleSmart can provide Caller ID information if you subscribe to Caller ID service from
your telephone provider.
Caller ID Display and Announcement options let you:
• display Caller ID information at TeleSmart keypads
• announce Caller ID information at the keypad and/or auxiliary speaker
• set the auxiliary speaker volume.
+RZWR7XUQ&DOOHU,''LVSOD\DWWKH.H\SDG2Q2II
463+6%1 13()
'-( (-7432
CID Keypad Display:
1. Go to the “CID Display” prompt.
2. To turn the CID keypad display on, press [0].
To turn the display off, press [0] again.
+RZWR7XUQ&DOOHU,'$QQRXQFHPHQWV2Q2IIDQG+RZWR6HWWKH9ROXPH
463+6%1 13()
/)=4( '-(32
CID announcements at the keypad:
1. Go to the “Keypad CID” prompt.
2. To turn the CID announcement on, press [0].
To turn the announcement off, press [0] again.
463+6%1 13()
%9< '-(32
CID announcements at the auxiliary speaker:
1. Go to the “Aux CID” prompt.
2. To turn the announcement on, press [0].
To turn the announcement off, press [0] again.
463+6%1 13()
%9< :30 1)(
)28)6 :3091)
03; 1)( ,-
Speaker Volume:
1. Go to the “Aux Volume” prompt and press [0].
2. Press [1] for low, [2] for medium, or [3] for high volume.
The system automatically returns to the Main Menu
with the new volume setting in effect.
-15-
7ROO6DYHU0HVVDJH%HHSV options 09
Keypad CID
10
11
Aux CID
Aux Volume
12
Toll Saver
13
Message Beeps
14
15
16
HF Keypad
HF Aux
Handset On/Off
NAVIGATION: [∗] = Next Option; [#] = Previous Option; [7] = GOTO prompt; [9] = Exit System.
$ERXWWKH7ROO6DYHU)HDWXUH
The Toll Saver feature lets you call in to the system to check if there are new messages
(determined by the number of rings). This lets you hang up before incurring toll charges.
The Toll Saver feature works in combination with the security system. First, you must turn
Toll Saver on (shown below), but then it becomes active only when the security system is
armed in the AWAY or MAXIMUM mode. The Toll Saver feature is inactive when the
security system is disarmed or when it is armed STAY or INSTANT.
When Toll Saver is active (option is on and system is armed AWAY or
MAXIMUM), the “distinctive ring” feature is automatically disabled.
+RZWR7XUQ7ROO6DYHU2Q2II
463+6%1 13()
8300 7%:) 32
Toll Saver:
1. Go to the “Toll Saver” prompt.
2. To turn the Toll Saver feature on, press [0].
To turn Toll Saver off, press [0] again.
+RZWR&KHFNIRU0HVVDJHVZKLOH7ROO6DYHULV2Q
1. Call in to the system and listen for the number of rings:
2.
2 rings = There are new messages/memos in one or more of the mailboxes
4 rings = There are no new messages/memos in any of the mailboxes
To save the toll charge if there are no new messages, hang up after the third ring.
$ERXW0HVVDJH%HHSV
The system can alert you to new messages whenever you pick up the telephone
receiver, if desired. If the message beeps feature is turned on and you have new
messages, the system beeps over the dial tone when you pick up the telephone receiver.
+RZWR7XUQ0HVVDJH%HHSV2Q2II
463+6%1 13()
17+ &))4 3**
Message Beeps
1. Go to the “Message Beeps” prompt.
2. To turn Message Beeps on, press [0].
To turn Message Beeps off, press [0] again.
-16-
&DOO6FUHHQLQJoptions 09
Keypad CID
10
11
12
13
Aux CID
Aux Volume
Toll Saver
Message Beeps
14
HF Keypad
15
HF Aux
16
Handset On/Off
NAVIGATION: [∗] = Next Option; [#] = Previous Option; [7] = GOTO prompt; [9] = Exit System.
$ERXW&DOO6FUHHQLQJ
Call Screening lets TeleSMART answer your calls while you listen in from any phone and/or
keypad or auxiliary speaker (depending on programming) without the caller hearing you.
Call Screening From…
Telephone (handset)
Keypad and/or Speaker
Lets you…
listen to a caller’s incoming message from the telephone
without the caller hearing you. You can then connect to the
call or let TeleSMART continue recording the caller’s
message. This is known as Handset Call Screening. See how
to connect in paragraph below.
hear a caller’s incoming message at the keypad and/or
auxiliary speaker without the caller hearing you. You can then
pick up a telephone receiver to connect to the call or let
TeleSMART continue recording the caller’s message. This is
known as Hands Free (abbreviated “HF”) call screening.
+RZWR&RQQHFWWRD&DOOZKHQ7HOHSKRQH&DOO6FUHHQLQJLV2Q
1. Pick up the telephone receiver.
2. As you hear the caller leaving a message, click the “off-hook” button once, in the
same way you would when switching between callers if you had Call Waiting service.
Alternatively, you can press the “flash” key if your telephone has one.
You are automatically connected to the call and you can begin your conversation.
+RZWR7XUQ&DOO6FUHHQLQJ2Q2II
463+6%1 13()
,* /)=4%(3**
463+6%1 13()
,* %9< 3**
463+6%1 13()
,%2(7)8
Call Screening at the Keypad:
1. Go to the “HF Keypad” prompt.
2. To turn keypad Call Screening on, press [0].
To turn keypad Call Screening off, press [0] again.
Call Screening at the Auxiliary Speaker:
1. Go to the “HF Aux” prompt.
2. To turn speaker Call Screening on, press [0].
3. To turn speaker Call Screening off, press [0] again.
Call Screening at the telephone:
1. Go to the “Handset” prompt.
2. To turn telephone Call Screening on, press [0].
To turn telephone Call Screening off, press [0] again.
-17-
5LQJ$QVZHU&RXQWoption 17
18
19
Ring Answer
Access Key
Caller ID Prog
20
21
Memory Dial
User Code
22
23
24
Zone Voice Tag
Area Code
Unsolic Downld
NAVIGATION: [∗] = Next Option; [#] = Previous Option; [7] = GOTO prompt; [9] = Exit System.
$ERXWWKH5LQJ$QVZHU&RXQW
Use this menu to set the number of rings before the system answers the phone.
• The Ring Answer Count does not apply if Toll Saver is active (option is on and
system is armed AWAY or MAXIMUM). When Toll Saver is active, the ring
count is automatically set to 4 rings if there are no new messages and 2 rings if
there are new messages.
• If keypad or auxiliary speaker Caller ID announcements are set to “on” (see
page 15), set the ring count to “4” or higher, since it takes at least that many
rings before the system completes the Caller ID announcement and can
answer the call. For example, even if the ring count is set to “2,” the system
does not answer a call until the Caller ID announcement is finished, which may
take up to 3 or 4 rings.
+RZWR6HWWKH5LQJ$QVZHU&RXQW
463+6%1 13()
1. Go to the “Ring Answer” prompt and press [0].
6-2+ %27;)6
)28)6 6-2+7
#)2(
2. Enter the desired number of rings (2-8) you want to
occur before the system answers a call.
To cancel and return to Main Menu, press [#].
3. The system automatically returns to the Main Menu.
-18-
4XLFN$FFHVV.H\option 17
Ring Answer
18
Access Key
19
Caller ID Prog
20
21
Memory Dial
User Code
22
23
24
Zone Voice Tag
Area Code
Unsolic Downld
NAVIGATION: [∗] = Next Option; [#] = Previous Option; [7] = GOTO prompt; [9] = Exit System.
$ERXWWKH4XLFN$FFHVV.H\
You can assign a Quick Access key that lets users access the TeleSmart system by simply
pressing and holding that key down for two seconds (no user code needed). This makes the
system easy to use, since a user does not need to remember an access code.
Make sure the Quick Access key IS NOT programmed for any other
security system function.
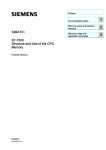
+RZWR$VVLJQWKH4XLFN$FFHVV.H\
463+6%1 13()
1. Go to the “Access Key” prompt and press [0].
%'')77 /)=
)28)6 %'')77 /)=
=3**
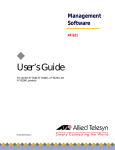
2. Enter the number corresponding to the desired access
key (see figure below.
3. The system automatically returns to the Main Menu,
and the selected Access key is active.
1
2
ARMED
READY
MESSAGE
3
1
OFF
2 AWAY
3
4
MAX
5
TEST
6 BYPASS
8 CODE
9 CHIME
0
#
7 INSTANT
STAY
MIC
READY
4
®
6162-002-V0
IMPORTANT: When using the Quick Access key, only the common mailbox is available for
message playback, and the top line of the prompts reads, “User Mode” rather than “Program
Mode.”
-19-
&DOOHU,'2SWLRQVoption 17
Ring Answer
18
Access Key
19
Caller ID Prog
20
21
Memory Dial
User Code
22
23
24
Zone Voice Tag
Area Code
Unsolic Downld
NAVIGATION: [∗] = Next Option; [#] = Previous Option; [7] = GOTO prompt; [9] = Exit System.
$ERXW&DOOHU,'2SWLRQV
TeleSMART lets you program the way the system responds to incoming calls from up to
25 different phone numbers.
Caller ID Option Programming lets you:
• set a distinctive ring for certain phone numbers
• assign a mailbox where messages from a number are automatically recorded
• record a voice tag for certain phone numbers.
+RZWR3URJUDP&DOOHU,'2SWLRQV
463+6%1 13()
1. Go to the “Caller ID Tbl” (table) prompt and press [0].
'%00)6 -( 8&0
'-( 03'%8-32 7)0)'8
(Pressing [∗] or [#] displays the choices on the bottom line.)
Caller ID Menu
)28)6 03'%8-32
2. Select from the options described below.
# )2(
03' << 1& < 62 <
<<< <<<<<<<
(Caller ID Review Prompt)
1 – Select
Location
2 – Review
Lets you enter a Caller ID location (01-25) to store
the settings (see “Enter Location” prompt below).
Displays the selected location’s settings.
3 – Erase
4 – Next
5 – Previous
6 – Program
8 – Menu
Erases the settings for the selected location.
Shows the CID settings in the next location.
Shows the CID settings in the previous location.
Starts the Caller ID Program Menu.
Returns to the beginning of the Program Menu.
3. Press [1] from the previous prompt, then enter the 2digit location number for storing Caller ID settings for a
particular phone number.
The system displays the current settings for this
location, where:
LOC = location no. (01-25); MB = mailbox (1-4)
RN = distinct ring count (2-5); “x” = phone number
The system automatically advances to the next prompt.
-20-
&DOOHU,'2SWLRQVFRQW
+RZWR3URJUDP&DOOHU,'2SWLRQVFRQWLQXHG
4,32) 291&)6#
=)7 23 129
)28)6 4,32) 23
<<< <<<<<<<
4. Press [1] (yes), then enter the phone number for this
Caller ID location. You can enter up to 10 digits,
including area code.
• To define a display for private numbers, press [#] [1].
• To define a display for out-of-area nos., press [#] [2].
Press [#] [0] to continue.
E.g.: To define calls from “private” numbers, press [1] (yes), then
[#] [1] (private no.). You can then assign a distinctive ring,
mailbox, and voice tag for calls received from “private” numbers.
To skip the “Phone Number” prompt, press [2] (no).
(-78-2'8 6-2+#
=)7 23 129
)28)6 (-78 62+
#)2(
1E-0&3<#
=)7 23 129
)28)6 1%-0&3<
#)2(
:3-') 8EK#
=)7 23 129
:3-') 8EK
6)4)%8
:3-') 8EK
6)'36( %8 832)
5. Press [1] (yes), then enter the distinctive ring count (25) for calls from this phone number.
The distinctive ring lets you identify a caller by the
number of short rings the system makes when calls are
received from that caller.
The system automatically advances to the next prompt.
To skip the “Distinct Ring” prompt, press [2] (no).
6. Press [1] (yes), then enter the mailbox number where
you want messages received from this phone number
to be stored.
The system automatically advances to the next prompt.
To skip the “Mailbox” prompt, press [2] (no).
7. Press [1] (yes) if you want to record a voice tag for this
phone number. If a voice tag is recorded, it is
announced when calls from this number are received.
Select from the options described below:
(Pressing [∗] or [#] displays the choices on the bottom line.)
Voice Tag Menu
1 – Repeat
Press to play back voice tag.
3 – Erase
Press to erase the voice tag.
6 – Record
Press to begin recording voice tag (see display
at left). Press any key to stop the recording.
8 – Menu
Advances to the “Override Privacy” prompt.
After voice tag is recorded, press [8] to continue.
To skp the “Voice Tag” prompt, press [2] (no).
-21-
&DOOHU,'2SWLRQVFRQW
3:)66-() 46-:#
=)7 23 129
3:)66-() 46-:#
32
3**
129
$W WKLV WLPH WKHUH LV
8. Press [1] (yes) to display the “Override Priv” on/off
prompt.
To turn Override Privacy on, press [1].
To turn Override Privacy off, press [2].
Turn this feature on if you want calls from this phone
number to automatically override the Privacy feature.
The system automatically returns to the “Caller ID
Review” prompt.
QR GLVSOD\ WR OHW XVHU
NQRZ LI RYHUULGH LV RQ
RU RII
When finished, press [8] to return to the CID Location prompt, then press [8]
again to return to the Main Menu, or press [9] to exit the system.
-22-
0HPRU\'LDO1XPEHUVoption 17
Ring Answer
18
19
Access Key
Caller ID Prog
20
Memory Dial
21
User Code
22
23
24
Zone Voice Tag
Area Code
Unsolic Downld
NAVIGATION: [∗] = Next Option; [#] = Previous Option; [7] = GOTO prompt; [9] = Exit System.
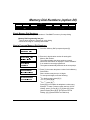
$ERXW0HPRU\'LDO1XPEHUV
You can store up to 15 phone numbers in TeleSMART’s memory for easy dialing.
Memory Dial Programming lets you:
• enter a phone number in memory for quick dialing
• record a voice tag for a memory dial number.
+RZWR3URJUDP0HPRU\'LDO1XPEHUV
463+6%1 13()
1. Go to the “Memory Dial” prompt and press [0].
1)136= (-%0
7)0)'8 1)1 03'
#)2(
03'%8-32 %:%-0%&0)
4,32) 291&)6#
=)7 23 129
)28)6 4,32) 23
<<< <<<<<<<
2. Enter the 2-digit location number for storing this
Memory Dial number.
The system displays the phone number currently
entered for this location or displays “Location Available”
if no number is currently programmed.
The system automatically advances to the next prompt.
3. Press [1], then enter the phone number for this Memory
Dial location.
Phone numbers may be up to 16 digits.
To enter special digits, enter the following:
• For dialing pause, press [#] [1].
• For “#,” press [#] [#].
• For “∗,” press [#] [∗].
Press [#] [0] to complete the telephone number entry.
Example: To store a phone number and turn off Call
Waiting, press: [1] then [#] [∗] [7] [0] then [#] [1] then
[phone number] then [#] [0]. ([#∗70] turns off Call
Waiting; [#] [1] pauses before new dial tone)
-23-
0HPRU\'LDO1XPEHUVFRQW
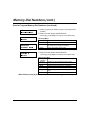
+RZWR3URJUDP0HPRU\'LDO1XPEHUVFRQWLQXHG
:3-') 8%+#
=)7 23 129
4. Press [1] (yes) if you want to record a voice tag for this
location.
5. Select from the options described below:
(Pressing [∗] or [#] displays the choices on the bottom line.)
:3-') 8EK
6)4)%8
:3-') 8EK
6)'36( %8 832)
03'%8-32 7)0)'8
Voice Tag Menu
1 – Playback
Plays back the voice tag for this phone number.
3 – Erase
Erases the voice tag for this phone number.
6 – Record
Lets you begin recording voice tag (see display at
left). Press any key to stop the recording.
8 – Menu
Goes to the Location Select prompt.
6. Select from the options described below.
(Pressing [∗] or [#] displays the choices on the bottom line.)
Memory Dial Menu
1 – Select
Location
2 – Review
Lets you enter a 2-digit memory location (01-15).
3 – Erase
4 – Next
5 – Previous
6 – Program
Erases the phone number from memory.
Shows the phone number in the next location.
Shows the phone number in the previous location.
Goes to the “Phone Number” prompt (see previous
page).
Returns to the Main Menu.
8 – Menu
Displays the selected location’s phone number.
When finished, press [8] to return to the Main Menu, or press [9] to exit the system.
-24-
8VHU&RGHVoption 17
Ring Answer
18
19
Access Key
Caller ID Prog
21
User Code
20
Memory Dial
22
23
24
Zone Voice Tag
Area Code
Unsolic Downld
NAVIGATION: [∗] = Next Option; [#] = Previous Option; [7] = GOTO prompt; [9] = Exit System.
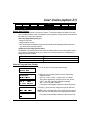
$ERXW8VHU&RGHV
User codes are required to access the system. The system supports a Master code and
up to 5 additional User codes. The Master code can perform certain system functions that
the other user codes cannot perform.
User code programming lets you:
• assign a user code
• assign mailbox access
• turn on/off keypad messages (system automatically enters Message Menu when this
user disarms the security system).
TeleSmart vs. Security System codes
TeleSMART user numbers and user codes are independent from security system codes,
but, if desired, TeleSmart can let you control your security system from a telephone by
assigning codes as follows:
If TeleSmart user code is…
unique to TeleSmart system
same as a security system code
That user can access…
TeleSmart system only
TeleSmart system and security system
+RZWR3URJUDP8VHU&RGHV
463+6%1 13()
1. Go to the User Code prompt and press [0].
97)6 '3()
)28)6 97)6
# )2(
976 9' <<<<
4& 32
1& <<<<
97)6 '3()#
=)7 23 129
)28)6 97)6 '3()
2. Enter the user number (location) for the code being
assigned, where:
user 1-5 = users; user 6 = master; user 7= installer.
The system displays the settings for this user, where:
USR = user; PB = playback (keypad message);
UC = user code; MB = mailbox
The system automatically advances to the next prompt.
3. Press [1], then enter the 4-digit user code for this user.
NOTE: If the code assigned is also a valid security system
code, this user can also perform security system functions.
The system automatically advances to the next prompt.
-25-
8VHU&RGHVFRQW
+RZWR3URJUDP8VHU&RGHVFRQWLQXHG
1%-0&3< %'')77
=)7 23 129
)28)6 1%-0&3<)7
#)2(
/)=4%( 1)77%+)#
=)7 23 129
4. Press [1], then enter the mailboxes (1-4) that this user
can access.
The order in which you enter the mailboxes is the order
in which the system plays back messages for this user.
The system automatically advances to the next prompt.
5. Press [1] to display the On/Off prompt.
To turn keypad messages on, press [1].
To turn keypad messages off, press [2].
/)=4%( 1)77%+)#
32 3**
When ON, the system automatically checks for new
messages in a user’s mailbox when that user disarms
the security system. If there are new messages, the
system automatically enters the Message Menu for that
user.
The system displays the user’s settings (see previous
page), then automatically advances to the next prompt.
97)6 7)0)'8
6. Select from the options described below.
(Pressing [∗] or [#] displays the choices on the bottom line.)
User Menu
1 – Select User Lets you enter a user number (1-7) to be programmed.
Displays the selected user’s settings.
2 – Review
Deletes the user’s settings and user number from the
3 – Erase
system.
Displays the next user number.
4 – Next
Displays the previous user number.
5 – Previous
Starts the User Program Menu.
6 – Program
Returns to the Main Menu.
8 – Menu
See the Users and Mailbox Access section of the appendix for a list of functions that are
available for the three levels of user codes: user, master, installer.
When finished, press [8] to return to the Main Menu, or press [9] to exit the system.
-26-
=RQH9RLFH7DJVoption 17
Ring Answer
18
19
20
21
Access Key
Caller ID Prog
Memory Dial
User Code
22
Zone Voice Tag
23
24
Area Code
Unsolic Downld
NAVIGATION: [∗] = Next Option; [#] = Previous Option; [7] = GOTO prompt; [9] = Exit System.
$ERXW=RQH9RLFH7DJV
You can use this menu to record voice tags for up to 22 security system zones.
+RZWR5HFRUG=RQH9RLFH7DJV
463+6%1 13()
>2) :3-') 8%+
7)0)'8 >32)
#
#)2(
:3-') 8EK
6)4)%8
1. Go to the “Zone Voice Tag” prompt and press [0].
The system displays the next prompt.
2. Enter the security system zone number for which you
want a voice tag. You can press [#] to abort the entry.
The system announces the existing voice tag for the
selected zone, then displays the next prompt.
3. Select from the options described below:
(Pressing [∗] or [#] displays the choices on the bottom line.)
Voice Tag Menu
1 – Repeat
3 – Erase
6 – Record
8 – Menu
:3-') 8%+
6)'36( %8 832)
>32) 8%+
7)0)'8
Plays back the existing voice tag for this zone.
Erases the existing voice tag for this zone.
Lets you begin recording voice tag for this zone. Press
any key to stop the recording.
Goes to the Zone Tag prompt (see below).
4. Press [6] (record), begin the voice tag recording after
the tone. Press any key to end the recording.
The system automatically advances to the next prompt.
5. Select from the options described below:
(Pressing [∗] or [#] displays the choices on the bottom line.)
Zone Tag Menu
1 – Select
2 – Review
3 – Erase
4 – Next
5 – Previous
6 – Program
8 – Menu
Lets you enter the zone for which you want another
voice tag (01-22).
Announces the selected zone’s voice tag.
Erases the voice tag for the selected zone.
Announces the voice tag for the next zone.
Announces the voice tag for the previous zone.
Starts the Voice Tag Menu (see above).
Returns to the Main Menu.
When finished, press [8] to return to the Main Menu, or press [9] to exit the system.
-27-
$UHD&RGHoption 17
Ring Answer
18
19
Access Key
Caller ID Prog
20
21
Memory Dial
User Code
22
Zone Voice Tag
23
Area Code
24
Unsolic Downld
NAVIGATION: [∗] = Next Option; [#] = Previous Option; [7] = GOTO prompt; [9] = Exit System.
$ERXWWKH$UHD&RGH
Use this menu to enter the area code in which the system is located. By doing this, the
system omits announcing the area code for incoming calls originating within this area
code. If Area Code is not programmed, the system announces the area code for all calls.
+RZWR(QWHUWKH$UHD&RGH
463+6%1 13()
1. Go to the Area Code prompt and press [0].
%6)% '3()
%6)% '3() <<<
463+6%1 1)29
)28)6 %6)% '3()
2. Press [6] at the program prompt.
3. When the “Enter” prompt appears, enter the area code
in which the system is located.
The system automatically returns to the Area Code
prompt and displays the entered area code.
<<<
When finished, press [8] to return to the Main Menu, or press [9] to exit the system.
-28-
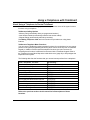
8VLQJD7HOHSKRQHZLWK7HOH6PDUW
$ERXW8VLQJD7HOHSKRQHWR&RQWURO7HOH6PDUW
TeleSmart offers several calling options and lets you access some of the system’s menu
functions using a telephone.
TeleSmart’s Calling Options
• Memory Dial (automatically dial a pre-programmed number)
• Last Number Redial (automatically redial the last number called)
• Repeat Dialing (automatically redial busy numbers)
See Making Telephone Calls later in this section for procedures on using these
features.
TeleSmart’s Telephone Menu Functions
You can control TeleSmart’s typical operating functions from a telephone, but you cannot
perform most system programming functions, (which can be done only from a TeleSmart
keypad). In addition to these restricted telephone functions, the menu structure for
accessing these functions is different from that used with a TeleSmart keypad. Refer to
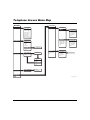
the Telephone Access Menu Map at the inside back cover (page 42) to help navigate the
telephone menu system.
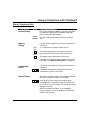
The following table lists the functions that you can and cannot perform from a telephone.
From a Telephone, You Can…
Control the security system
Listen to your messages
Record a memo
Record a greeting
Turn privacy on/off
Turn toll saver on/off
Turn the CID display on/off
Turn keypad CID announcement on/off
Turn aux CID announcement on/off
Set the aux speaker volume
Turn message beeps on/off
Turn call screening on/off
By Pressing…
[1] then desired arming command
[2]
[4] then follow the prompts
[7] [2] then follow the prompts
[7] [1] [3]
[7] [1] [4]
[7] [1] [6]
[7] [1] [1] [1]
[7] [1] [1] [2]
[7] [1] [1] [4]
[7] [1] [2] [4]
[7] [1] [2] then follow the prompts
Refer to the previous sections in this manual for full descriptions of these
functions.
-29-
8VLQJD7HOHSKRQHZLWK7HOH6PDUW
7R8VH7HOH6PDUW)URPD7HOHSKRQH
1. Pick up any telephone handset.
If calling from a remote phone, dial your home number and do step 2 during the
greeting message.
2. Press # , then enter your access code, then press ∗ .
For example, if the access code is “5678”: press # [5-6-7-8] ∗ .
3. The Main Menu options are announced in numerical order.
Select the desired menu option by pressing the corresponding option number on the
telephone keypad at any time.
NOTE: While using TeleSMART from a telephone, the system is unable to receive calls.
8VLQJD7HOHSKRQHWR&RQWUROWKH6HFXULW\6\VWHPIURP
You can control your security system from a telephone by using TeleSmart.
1. Pick up any telephone handset.
If calling from a remote phone, dial your home number and do step 2 during the
greeting message.
2. Press # , then enter your access code, then press ∗ .
3. Press [1] to activate the security system mode.
Refer to the table shown below for some of the typical security system commands.
COMMAND
PRESS
∗
CHECK STATUS
DISARM SYSTEM
Code* + 1
ARM MAXIMUM**
Code* + 4
ARM INSTANT
Code* + 7
ARM AWAY
Code* + 2
ARM STAY
Code* + 3
BYPASS A ZONE(S)
Code* + 6 + 2-digit zone no. to be bypassed
CHIME MODE
Code* + 9
* You must use a security system user code to perform a security system function.
** Not all control panels support “Maximum” arming mode.
Refer to your security system’s User Guide for specific commands and procedures.
Once you enter the Security System Menu from the telephone, you cannot
return to the Main Menu by pressing a key. Instead, TeleSMART
automatically returns to the Main Menu after 10 seconds of no key presses.
-30-
8VLQJD7HOHSKRQHZLWK7HOH6PDUW
0DNLQJ7HOHSKRQH&DOOV
Type of Call
Normal Dialing
Press
Action/What Happens
Pick up any telephone handset in your home and listen
for a dial tone. Rapid beeps (if enabled) mean that
there are new messages waiting.
phone
number
To place a call, simply dial as usual after the beeps
end.
First pick up any telephone in your home and listen for
a dial tone.
Memory
Dialing
[XX]
then
xx = 2-digit memory location number (01-15)
The system announces a voice tag (if recorded) or
phone number for that location after you press [∗].
∗
then
The system begins dialing after you press [1].
1
To program memory/speed dial numbers and optional
voice tags, see “Memory Dial Numbers” on page 23.
First pick up any telephone in your home and listen for
a dial tone.
Last Number
Redial
9
9
∗
TeleSMART automatically redials the last number
called from any phone in the house.
After dialing a number, hang up the telephone handset,
then pick it up again and listen for a dial tone.
Repeat Dialing
6
6
∗
Press [6] [6] [∗], then hang up the handset again.
TeleSMART will automatically redial the number once
per minute for up to 30 minutes. The system then stops
dialing that number.
When the number is available, your TeleSMART
keypad will beep; pick up the telephone handset and
continue with your call.
-31-
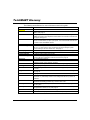
7HOH60$57*ORVVDU\
The following are definitions for most of the terms used in this guide.
7HUP
Area Code
Aux CID On/Off
Aux Volume
Caller ID
Caller ID Log
Call Screening
CID Display On/Off
Clock
Common Mailbox
Distinctive Ring
Downlaod
Erase
Exit
Greeting
Hands Free
Keypad CID On/Off
Last Number Redial
Mailbox
Master Code
Memory Dial
Memory Location
Memo
Menu
'HILQLWLRQ
A feature that causes Caller ID information to be announced at the auxiliary
speaker. See page 15.
Lets you adjust the auxiliary speaker volume: 1 = low; 2 = medium; 3 = high
NOTE: The keypad volume adjustment is described in the instructions included with
the keypad. See page 15.
A service of the telephone company that lets you see or hear the name and phone
number of a caller before you pick up the phone. You must subscribe to this service
to activate certain TeleSMART features.
A feature that lets you view the Caller ID information for calls received. See page 11.
A feature that lets you “listen-in” while a caller leaves a message. The caller cannot
hear you. You then have the option of answering the call or letting the system
record a message. See also “Hands Free.” See page 17.
A feature that causes Caller ID information to be displayed at TeleSmart keypads.
See “System Time.”
A mailbox to which all users have access.
A feature that lets you assign the number of short rings the phone will make when
incoming calls from a particular number are received. See page 20.
See “Unattended Download.”
A function that deletes the selected item from the system. You can delete
messages, memos, phone numbers, and users.
A function that ends your TeleSMART session by pressing the [9] key.
See “Outgoing Messages.”
A call screening feature that describes the use of the keypad or speaker for listening
in to calls.
A feature that causes Caller ID information to be announced at TeleSmart keypads.
See page 15.
See page
A place where messages and memos are stored. The system provides 4 mailboxes
(numbered 1-4). Each family member can be assigned access to any number of
mailboxes.
A 4-digit code that gives users access to all of the system’s functions, except
unattended downloading (installer only). See also “User Code.”
A feature that lets you dial a phone number that has been previously programmed
into the system.
A storage place for phone numbers up to 16 digits, where each is identified by a
two-digit location number (01-15). See page 23.
A message recorded for another user. See page 10.
A collection of voice prompts announced after certain keys are pressed.
-32-
7HOH60$57*ORVVDU\
(continued)
Message
Message Beeps
New Messages
Outgoing Message
(OGM)
Out-of-Area Number
Previous
Privacy Mode
Privacy Override
Private Number
Quick Access Key
Repeat
Repeat Dialing
Ring Answer Count
Save
Saved Message
System Time
Toll Saver
Unattended Download
User
User Code
Voice Tag
Zone Voice Tag
A recording left by a caller in one of the assigned mailboxes. During message
playback, oldest messages are announced first. See also “New Messages” and
“Saved Messages.”
A feature that causes the system to beep over the dial tone when you pick up a
phone if there are messages waiting.
A message(s) that have not yet been listened to; causes the yellow “message” LED
at the TeleSMART keypad to flash.
A pre-recorded greeting that is announced to callers when TeleSMART answers a
call. See page 13.
Phone numbers originating from a different area code.
A function that lets you display the previous message or memory location.
A feature that turns off the telephone ringers and lets the system answer all calls. If
Privacy mode is “on,” all telephone ringers are turned off for 8 hours, or until Privacy
mode is turned off. See page 12.
A feature that lets you set specific numbers to automatically override the Privacy
feature if it is on. Phones ring when calls are received from the programmed phone
numbers.
An unlisted phone number. These numbers do not display Caller ID information.
A programmed key that lets you access the system by pressing the key rather than
having to enter your user code first. See page 19.
A function that replays a message.
A feature that automatically redials a busy phone number. Once started,
TeleSMART continues to redial the number once per minute for 30 minutes. When
the dialed number is available, your security system keypad rings, alerting you to
pick up the phone and continue with your call.
A programmed setting that determines the number of rings that occur before the
system answers incoming calls. See page 18.
A function that stores a message in the system.
A message that has been listened to and that has been saved by a user.
A programmed setting that lets the system time-stamp messages. See page 14.
A feature that lets you call in to the system and determine by the number of rings if
you have new messages/memos. This gives you the option of hanging up before
incurring toll charges. See page 16.
A function that lets the installer program the system from a computer located at at a
remote office. See page Error! Bookmark not defined..
Any person in your home with access to the TeleSMART system.
A 4-digit code that gives users access to the system’s basic functions. See also
“Master Code.” See page 25.
A recorded name for each Memory Dial or Caller ID number. This name is
announced when calls are received from the caller.
A recorded name for up to 20 security system zones. These names are announced
when events (faults, etc.) occur on the respective zones. See page 27.
-33-
$SSHQGL[
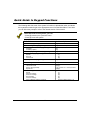
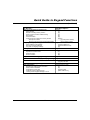
Users and Mailbox Access
For a list of access levels and their meanings, as well as instruction on how to set
up mailboxes and user codes for you and your family members, refer to the User
Codes section on page 25.
Use the following table to record access levels and mailbox assignments by
entering the mailbox number (1-4) in the desired priority location (primary,
second, etc.). Mailbox 1 is the system’s common mailbox.
Users and Mailbox Worksheet
Access
Mailbox Access† Keypad
Title
Code
1st 2nd 3rd 4th Message
01
user 1
[1111]
02
user 2
03
user 3
04
user 4
05
user 5
06
Master
[2468]
07
Installer
[1234]
† Enter the mailbox numbers to which the user has access. The first mailbox is the user’s default
mailbox.
User Name
For example, see the entries below.
e.g. John
user 2
5432
2
1
4
on
John’s default mailbox is mailbox 2. He also has access to mailboxes 1 and 4, but cannot access
mailbox 3.
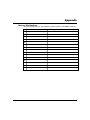
User Functions
Function
User 7
(Installer)
yes
yes
yes
yes
yes
yes
yes
yes
yes
yes
yes
yes
yes
yes
yes
yes
yes
Listen to messages remotely
View Caller ID log*
Record memos
Operate security system
Change system clock
Record outgoing messages
Turn answer mode on/off*
Clear Caller ID log*
Turn Privacy on/off
Assign Master and User codes
Record zone voice descriptors*
Program area code*
Change Caller ID table*
Change Memory Dial locations*
Turn Call Screening on/off
Change mailbox options
Perform unattended download
User 6
(Master)
yes
yes
yes
yes
yes
yes
yes
yes
yes
yes
yes
yes
yes
yes
yes
yes
no
Users
1-5
yes
yes
yes
yes
yes
yes
yes
yes
yes
no
no
no
no
no
no
no
no
* These functions can be performed only from a keypad (not available from a telephone).
-34-
$SSHQGL[
Memory Dial Numbers
Use the following table to record phone numbers stored in TeleSMART memory.
Phone Number
Voice Tag (who)
01
02
03
04
05
06
07
08
09
10
11
12
13
14
15
-35-
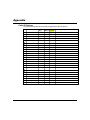
$SSHQGL[
Caller ID Options
Use the following table to record the programmed Caller ID options.
Phone Number
01
Distinct Default Privacy Voice Tag (who)
Ring
Mailbox Override
???
02
03
04
05
06
07
08
09
10
11
12
13
14
15
16
17
18
19
20
21
22
23
24
25
-36-
5HJXODWRU\$JHQF\6WDWHPHQWV
FEDERAL COMMUNICATIONS COMMISSION (FCC) Part 15 STATEMENT
This equipment has been tested to FCC requirements and has been found acceptable for use. The FCC requires the following
statement for your information:
This equipment generates and uses radio frequency energy and if not installed and used properly, that is, in strict accordance
with the manufacturer's instructions, may cause interference to radio and television reception. It has been type tested and found
to comply with the limits for a Class B computing device in accordance with the specifications in Part 15 of FCC Rules, which
are designed to provide reasonable protection against such interference in a residential installation. However, there is no
guarantee that interference will not occur in a particular installation. If this equipment does cause interference to radio or
television reception, which can be determined by turning the equipment off and on, the user is encouraged to try to correct the
interference by one or more of the following measures:
• If using an indoor antenna, have a quality outdoor antenna installed.
• Reorient the receiving antenna until interference is reduced or eliminated.
• Move the radio or television receiver away from the receiver/control.
• Move the antenna leads away from any wire runs to the receiver/control.
• Plug the receiver/control into a different outlet so that it and the radio or television receiver are on different branch circuits.
If necessary, the user should consult the dealer or an experienced radio/television technician for additional suggestions. The user
or installer may find the following booklet prepared by the Federal Communications Commission helpful: "Interference
Handbook"
This booklet is available from the U.S. Government Printing Office, Washington, DC 20402.
The user shall not make any changes or modifications to the equipment unless authorized by the Installation Instructions or
User's Manual. Unauthorized changes or modifications could void the user's authority to operate the equipment.
-37-
5HJXODWRU\$JHQF\6WDWHPHQWV
FEDERAL COMMUNICATIONS COMMISSION (FCC) PART 68 NOTICE
This equipment complies with Part 68 of the FCC rules. On the front cover of this equipment is a label that contains, among other
information, the FCC registration number and ringer equivalence number (REN) for this equipment. If requested, this information
must be provided to the telephone company.
This equipment uses the following jacks:
An RJ31X is used to connect this equipment to the telephone network.
The REN is used to determine the quantity of devices that may be connected to the telephone line. Excessive RENs on the telephone
line may result in the devices not ringing in response to an incoming call. In most, but not all, areas, the sum of the RENs should not
exceed five (5.0). To be certain of the number of devices that may be connected to the line, as determined by the total RENs, contact
the telephone company to determine the maximum REN for the calling area.
If this equipment causes harm to the telephone network, the telephone company will notify you in advance that temporary
discontinuance of service may be required. If advance notice is not practical, the telephone company will notify the customer as soon
as possible. Also, you will be advised of your right to file a complaint with the FCC if you believe it is necessary.
The telephone company may make changes in its facilities, equipment, operations, or procedures that could affect the operation of
the equipment. If this happens, the telephone company will provide advance notice in order for you to make the necessary
modifications in order to maintain uninterrupted service.
If trouble is experienced with this equipment, please contact the manufacturer for repair and warranty information. If the trouble is
causing harm to the telephone network, the telephone company may request that you remove the equipment from the network until
the problem is resolved.
There are no user-serviceable components in this product, and all necessary repairs must be made by the manufacturer. Other repair
methods may invalidate the FCC registration on this product.
This equipment cannot be used on telephone company-provided coin service. Connection to Party Line Service is subject to state
tariffs.
When programming or making test calls to an emergency number, briefly explain to the dispatcher the reason for the call. Perform
such activities in the off-peak hours, such as early morning or late evening.
IN THE EVENT OF TELEPHONE OPERATIONAL PROBLEMS
In the event of telephone operational problems, disconnect the control by removing the plug from the RJ31X (CA38A in
Canada) telephone wall jack. We recommend that your certified installer demonstrate disconnecting the phones on
installation of the system. Do not disconnect the phone connection inside the control/communicator. Doing so will result in
the loss of your phone lines. If the regular phone works correctly after the control/communicator has been disconnected
from the phone lines, the control/communicator has a problem and should be returned for repair. If, upon disconnection of
the control/communicator, there is still a problem on the line, notify the telephone company that it has a problem and
request prompt repair service. The user may not under any circumstances (in or out of warranty) attempt any service or
repairs to the system. It must be returned to the factory or an authorized service agency for all repairs.
-38-
5HJXODWRU\$JHQF\6WDWHPHQWV
CANADIAN EMISSIONS STATEMENTS
This Class B digital apparatus complies with Canadian ICES-003.
Cet Appareil numérique de la classe B est conforme à la norme NMB-003 du Canada.
CANADIAN TELEPHONE STATEMENT
NOTICE: The Industry Canada Label identifies certified equipment. This certification means that the
equipment meets telecommunications network protective, operational, and safety requirements as
prescribed in the appropriate Terminal Equipment Technical Requirements document(s). The Department
does not guarantee the equipment will operate to the user’s satisfaction.
Before installing this equipment, users should ensure that it is permissible to be connected to the facilities of
the local telecommunications company. The equipment must also be installed using an acceptable method
of connection. The customer should be aware that compliance with the above conditions may not prevent
degradation of service in some situations.
Repairs to certified equipment should be coordinated by a representative designated by the supplier. Any
repairs or alterations made by the user to this equipment, or equipment malfunctions, may give the
telecommunications company reason to request the user to disconnect the equipment.
Users should ensure for their own protection that the electrical ground connections of the power utility,
telephone lines and internal metallic water pipe system, if present, are connected together. This precaution
may be particularly important in rural areas.
Caution: Users should not attempt to make such connections themselves but should contact appropriate
electric inspection authority, or electrician, as appropriate.
NOTICE: The Ringer Equivalence Number (REN) assigned to each terminal device provides an indication
of the maximum number of terminals allowed to be connected to a telephone interface. The termination on
an interface may consist of any combination of devices subject only to the requirement that the sum of the
Ringer Equivalence Numbers of all the devices does not exceed 5.
AVIS: L’étiquette d’Industrie Canada identifie le matériel homologué. Cette étiquette certifie que le matériel
est conforme aux normes de protection, d’exploitation et de sécurité des réseaux de télécommunications,
comme le prescrivent les documents concernant les exigences techniques relatives au matériel terminal. Le
Ministère n’assure toutefois pas que le matériel fonctionnera à la satisfaction de l’utilisateur.
Avant d’installer ce matériel, l’utilisateur doit s’assurer qu’il est permis de le raccorder aux installations de
l’enterprise locale de télécommunication. Le matériel doit également être installé en suivant une méthode
acceptée da raccordement. L’abonné ne doit pas oublier qu’il est possible que la conformité aux conditions
énoncées ci-dessus n’empêche pas la dégradation du service dans certaines situations.
Les réparations de matériel nomologué doivent être coordonnées par un représentant désigné par le
fournisseur. L’entreprise de télécommunications peut demander à l’utilisateur da débrancher un appareil à la
suite de réparations ou de modifications effectuées par l’utilisateur ou à cause de mauvais fonctionnement.
Pour sa propre protection, l’utilisateur doit s’assurer que tous les fils de mise à la terre de la source
d’energie électrique, de lignes téléphoniques et des canalisations d’eau métalliques, s’il y en a, sont
raccordés ensemble. Cette précaution est particulièrement importante dans les régions rurales.
Avertissement: L’utilisateur ne doit pas tenter de faire ces raccordements lui-même; il doit avoir racours à
un service d’inspection des installations électriques, ou à un électricien, selon le cas.
AVIS: L’indice d’équivalence de la sonnerie (IES) assigné à chaque dispositif terminal indique le nombre
maximal de terminaux qui peuvent être raccordés à une interface. La terminaison d’une interface
téléphonique peut consister en une combinaison de quelques dispositifs, à la seule condition que la somme
d’indices d’équivalence de la sonnerie de tous les dispositifs n’excède pas 5.
-39-
4XLFN*XLGHWR.H\SDG)XQFWLRQV
The following table lists most of the system’s functions in alphabetical order and shows
the keystrokes needed to get to the appropriate menu from the Main Menu. From there
you can follow the prompts or refer to the related section of this manual.
Remember that from any menu, you can:
• Press [8] to back up to a previous menu.
• Press [9] to exit the system.
To Do This…
Use Menu Option…
System on/off (keypad only)
Area Code Programming (keypad only)
Caller ID announcement on/off (keypad only)
at keypad
at auxiliary speaker
Caller ID Display at keypad on/off (keypad only)
Caller ID Log Display (keypad only)
Repeat
Next call
Previous call
Caller ID Options
(keypad only)
[06]
[23] (enter area code)
Call Screening on/off
Dialing
Last number redial
Memory dial (speed dial)
Repeat dial
Listen to messages
Repeat
Save the message
Erase the message
Next message
Previous message
Select a different mailbox’s messages
[14-16]
-40-
[09]
[10]
[08]
[03] then:
[1]
[4]
[5]
[19] then:
[9] [9] [∗]
xx [∗] [1] where “xx” = memory location
[6] [6] [∗]
[2] then:
[1]
[2]
[3]
[4]
[5]
[6] (enter mailbox number 1-4)
4XLFN*XLGHWR.H\SDG)XQFWLRQV
(continued)
To Do This…
Use Menu Option…
Memory Dial Programming (keypad only)
Select location
Review an existing memory location
Erase a memory location’s data/voice tag
Next location
Previous location
Program a phone number in a memory location
Enter phone number
Record a voice tag for the programmed location
Outgoing Messages (Greetings)
Select mailbox for the greeting
Record an outgoing message
Play back an outgoing message
Privacy on or off
Record a memo for other users
Repeat the recorded memo
Erase the memo
Re-record memo
Ring Answer Count setting (keypad only)
Speaker volume at the auxiliary speaker (keypad only)
Time
[20] then:
[1]
[2]
[3]
[4]
[5]
[6] then:
[1] (enter phone number)
[2] then follow prompts
[05] then:
[1] (enter mailbox no.)
[2] (record after the tone)
[3]
[04]
[02] (enter mailbox no., record after tone)
[1]
[3]
[6]
[17]
[11]
[07] (displays current time) then:
[1] (yes) to set time
[12]
[21] (enter user no.) then:
[2]
[3]
[6] [enter code]
[enter mailbox nos.]
Toll Saver on or off (keypad only)
User Programming
Reviewing an existing user’s information
Erase a user’s information
Programming a user code
Assigning a user’s mailbox access
Turning a user’s keypad message on or off
-41-
7HOHSKRQH$FFHVV0HQX0DS
Program Menu
MAIN MENU
1 - Security System
Security Menu
1 - System
System Menu
Disarm: code+[1]
1 - Speaker
Check Status: [ ]
Speaker Menu
Arm Away: code+[2]
1 - Keypad CID On/Off
Arm Stay: code+[3]
2 - Aux CID On/Off
Arm Inst: code+[7]
3 - Phone CID On/Off
Arm max: code+[4]
4 - Aux Volume #
Bypass Zone(s):
8 - Previous Menu
code [6]+2 digit zone
9 - Exit
number to be bypassed
2 - Call Screen
2 - Hear Messages
Message Menu
Call Screen Menu
3 - Privacy On/Off
1 - Handset On/Off
1 - Repeat
4 - Toll Svr On/Off
2 - HF Aux On/Off
2 - Save
6 - CID Disp. On/Off
3 - HF Kypd On/Off
3 - Erase
8 - Previous Menu
4 - Msg Bp On/Off
4 - Next
9 - Exit
8 - Previous Menu
9 - Exit
5 - Previous
mailbox
6 -- Select
Select
Mailbox
Enter Mailbox No.
8 - Previous Menu
9 - Exit
2 - Mailbox
4 - Record Memo
Enter
Mailbox
Enter Mailbox
No.No.
Record at Tone
Mailbox Prgm Menu
8 - Previous Menu
1 - Select Mailbox
9 - Exit
2 - Record OGM
or press [#]
3 - Play OGM
to cancel
8 - Previous Menu
First select a mailbox for
the greeting before using
the other mailbox options.
9 - Exit
Memo Menu
1 - Repeat
3 - Erase
4
Record
Memo
4 -- Record
Memo
8 - Previous Menu
9 - Exit
Goes to
6 - Select Mailbox
EnterMailbox
Mailbox No.
Enter
No.
Message Menu
7 - Programming
9 - Exit
Access_Menu_Map.eps
-42-
127(6
-43-
ADEMCO ONE YEAR LIMITED WARRANTY
Alarm Device Manufacturing Company, a Division of Pittway Corporation, and its divisions, subsidiaries
and affiliates ("Seller"), 165 Eileen Way, Syosset, New York 11791, warrants its security equipment (the
"product") to be free from defects in materials and workmanship for one year from date of original
purchase, under normal use and service. Seller's obligation is limited to repairing or replacing, at its
option, free of charge for parts, labor, or transportation, any product proven to be defective in
materials or workmanship under normal use and service. Seller shall have no obligation under this
warranty or otherwise if the product is altered or improperly repaired or serviced by anyone other than
the Seller. In case of defect, contact the security professional who installed and maintains your
security equipment or the Seller for product repair.
This one year Limited Warranty is in lieu of all other express warranties, obligations or liabilities. THERE
ARE NO EXPRESS WARRANTIES, WHICH EXTEND BEYOND THE FACE HEREOF. ANY IMPLIED WARRANTIES,
OBLIGATIONS OR LIABILITIES MADE BY SELLER IN CONNECTION WITH THIS PRODUCT, INCLUDING ANY
IMPLIED WARRANTY OF MERCHANTABILITY, OR FITNESS FOR A PARTICULAR PURPOSE OR OTHERWISE,
ARE LIMITED IN DURATION TO A PERIOD OF ONE YEAR FROM THE DATE OF ORIGINAL PURCHASE. ANY
ACTION FOR BREACH OF ANY WARRANTY, INCLUDING BUT NOT LIMITED TO ANY IMPLIED WARRANTY OF
MERCHANTABILITY, MUST BE BROUGHT WITHIN 12 MONTHS FROM DATE OF ORIGINAL PURCHASE. IN NO
CASE SHALL SELLER BE LIABLE TO ANYONE FOR ANY CONSEQUENTIAL OR INCIDENTAL DAMAGES FOR
BREACH OF THIS OR ANY OTHER WARRANTY, EXPRESS OR IMPLIED, OR UPON ANY OTHER BASIS OF
LIABILITY WHATSOEVER, EVEN IF THE LOSS OR DAMAGE IS CAUSED BY THE SELLER'S OWN NEGLIGENCE
OR FAULT. Some states do not allow limitation on how long an implied warranty lasts or the exclusion or
limitation of incidental or consequential damages, so the above limitation or exclusion may not apply
to you.
Seller does not represent that the product may not be compromised or circumvented; that the
product will prevent any personal injury or property loss by burglary, robbery, fire or otherwise; or that
the product will in all cases provide adequate warning or protection. Buyer understands that a
properly installed and maintained alarm may only reduce the risk of a burglary, robbery, fire or other
events occurring without providing an alarm, but it is not insurance or a guarantee that such will not
occur or that there will be no personal injury or property loss as a result. CONSEQUENTLY, SELLER SHALL
HAVE NO LIABILITY FOR ANY PERSONAL INJURY, PROPERTY DAMAGE OR OTHER LOSS BASED ON A
CLAIM THE PRODUCT FAILED TO GIVE WARNING. HOWEVER, IF SELLER IS HELD LIABLE, WHETHER DIRECTLY OR INDIRECTLY, FOR ANY LOSS OR DAMAGE ARISING UNDER THIS LIMITED WARRANTY OR
OTHERWISE, REGARDLESS OF CAUSE OR ORIGIN, SELLER'S MAXIMUM LIABILITY SHALL NOT IN ANY CASE
EXCEED THE PURCHASE PRICE OF THE PRODUCT, WHICH SHALL BE THE COMPLETE AND EXCLUSIVE
REMEDY AGAINST SELLER. This warranty gives you specific legal rights, and you may also have other
rights which vary from state to state. No increase or alteration, written or verbal, to this warranty is
authorized.
165 Eileen Way Syosset, New York 11791
Copyright © 2000 PITTWAY CORPORATION
¬.9^l
K3949V2