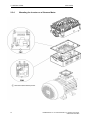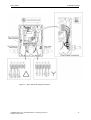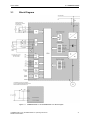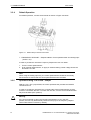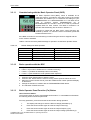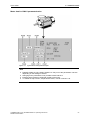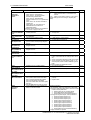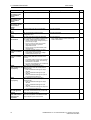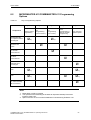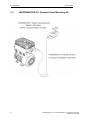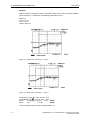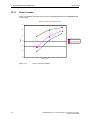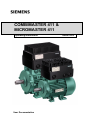
1
COMBIMASTER 411 &
MICROMASTER 411
Operating Instructions
User Documentation
Issue 03/02
MICROMASTER 411 DOCUMENTATION
Getting Started Guide
Provides for Quick Commissioning of the Inverter.
Operating Instructions
Gives information about features of the MM411,
Installation, Commissioning, Control modes, System
Parameter structure, Troubleshooting, Specifications
and available options of the MM411.
Parameter List
The Parameter List contains the description of all
Parameters structured in functional order and a
detailed description. The Parameter list also includes
a series of function plans.
Catalogues
In the catalogue you will find all the necessary
information to select an appropriate inverter, as well
as Operator Panels and Communication Options.
Overview
1
Installation
2
Commissioning
3
Using the
4
COMBIMASTER 411 &
MICROMASTER 411
COMBIMASTER 411
MICROMASTER 411
Operating Instructions
User Documentation
System Parameters
5
Troubleshooting
6
COMBIMASTER 411
7
MICROMASTER 411
Specifications
Valid for Release
Inverter Type
COMBIMASTER 411 &
MICROMASTER 411
Control Version
Options
8
Electro-Magnetic
9
Compatibility
March 2002
Engineering
10
Information
Appendices
Issue: 03/02
Index
A
B
C
Further information is available on the Internet under:
http://www.siemens.de/micromaster
Approved Siemens Quality for Software and Training
is to DIN ISO 14001, Reg. No. 2160-01
The reproduction, transmission or use of this document, or its
contents is not permitted unless authorized in writing.
Offenders will be liable for damages. All rights including rights
created by patent grant or registration of a utility model or
design are reserved.
© Siemens AG 2002. All Rights Reserved.
MICROMASTER® is a registered trademark of Siemens.
Other functions not described in this document may be
available. However, this fact shall not constitute an obligation
to supply such functions with a new control, or when
servicing.
We have checked that the contents of this document
correspond to the hardware and software described. There
may be discrepancies nevertheless, and no guarantee can be
given that they are completely identical. The information
contained in this document is reviewed regularly and any
necessary changes will be included in the next edition. We
welcome suggestions for improvement.
Siemens handbooks are printed on chlorine-free paper that
has been produced from managed sustainable forests. No
solvents have been used in the printing or binding process.
Document subject to change without prior notice.
Order Number. 6SE6400-5CA00-0BP0
Printed in the United Kingdom
4
Siemens-Aktiengesellschaft.
COMBIMASTER 411 & MICROMASTER 411 Operating Instructions
6SE6400-5CA00-0BP0
Issue 03/02
FOREWORD
Foreword
User Documentation
!
Warning
Before installing and commissioning, you must read the safety instructions and
warnings carefully and all the warning labels attached to the equipment. Make
sure that the warning labels are kept in a legible condition and replace missing or
damaged labels.
MICROMASTER documentation is structured within three distinct levels:
Ø
Getting Started Guide
The Getting Started Guide is designed to give you quick access to all the basic
information required to install and set up your COMBIMASTER 411 &
MICROMASTER 411 for operation.
Ø
Operating Instructions
The Operating Instructions provide detailed information for installation and operation
of your COMBIMASTER 411 & MICROMASTER 411.
Ø
Parameter List
The Parameter List contains a complete detailed listing of all MICROMASTER 411
parameters.
Information is also available from:
Technical Support Nuremberg
Tel:
Fax:
Email:
+49 (0) 180 5050 222
+49 (0) 180 5050 223
[email protected]
Monday to Friday: 7:00 am to 5:00 pm (Central European Time)
Internet Home Address
Customers can access technical and general information at:
http://www.siemens.de/micromaster
COMBIMASTER 411 & MICROMASTER 411 Operating Instructions
6SE6400-5CA00-0BP0
5
FOREWORD
Issue 03/02
Definitions and Warnings
!
Danger
!
Warning
!
Caution
For the purpose of this documentation and the product warning labels, "Danger"
indicates that death; severe personal injury or substantial damage to property will
result if proper precautions are not taken.
For the purpose of this documentation and the product warning labels, "Warning"
indicates that death; severe personal injury or substantial damage to property can
result if proper precautions are not taken.
For the purpose of this documentation and the product warning labels, "Caution"
indicates that minor personal injury or material damage can result if proper
precautions are not taken.
Note
For the purpose of this documentation, "Note,” indicates important information
relating to the product or highlights part of the documentation for special
attention.
Qualified personnel
For the purpose of this Instruction Manual and product labels, a "Qualified
person" is someone who is familiar with the installation, mounting, start-up and
operation of the equipment and the hazards involved.
He or she must have the following qualifications:
1. Trained and authorized to energize, de-energize, clear, ground and tag
circuits and equipment in accordance with established safety procedures.
2. Trained in the proper care and use of protective equipment in accordance
with established safety procedures.
3. Trained in rendering first aid.
Use for intended purpose only
The equipment may be used only for the application stated in the manual and only in
conjunction with devices and components recommended and authorized by Siemens.
Contact address
Should any questions or problems arise while reading this manual, please contact the
Siemens office concerned using the form provided at the back this manual.
6
COMBIMASTER 411 & MICROMASTER 411 Operating Instructions
6SE6400-5CA00-0BP0
Issue 03/02
FOREWORD
Safety Instructions
The following Warnings, Cautions and Notes are provided for your safety and as a means
of preventing damage to the product or components in the machines connected. This
section lists Warnings, Cautions and Notes, which apply generally when handling
COMBIMASTER 411 & MICROMASTER 411 Inverters, classified as General, Transport
& Storage, Commissioning, Operation, Repair and Dismantling & Disposal.
Specific Warnings, Cautions and Notes that apply to particular activities are listed at
the beginning of the relevant chapters and are repeated or supplemented at critical points
throughout these chapters.
Please read the information carefully, since it is provided for your personal safety
and will also help prolong the service life of your COMBIMASTER 411 &
MICROMASTER 411 Inverter and the equipment you connect to it.
General
!
Warnings
♦
♦
♦
♦
♦
!
This equipment contains dangerous voltages and controls potentially
dangerous rotating mechanical parts. Non-compliance with Warnings or
failure to follow the instructions contained in this manual can result in loss of
life, severe personal injury or serious damage to property.
Only suitable qualified personnel should work on this equipment, and only
after becoming familiar with all safety notices, installation, operation and
maintenance procedures contained in this manual. The successful and safe
operation of this equipment is dependent upon its proper handling,
installation, operation and maintenance.
Risk of electric shock. The DC link capacitors remain charged for five minutes
after power has been removed. It is not permissible to open the
equipment until 5 minutes after the power has been removed.
HP ratings are based on the Siemens 1LA motors and are given for guidance
only; they do not necessarily comply with UL or NEMA HP ratings.
Do not operate the equipment in direct sunlight.
Caution
♦
♦
Children and the general public must be prevented from accessing or
approaching the equipment!
This equipment may only be used for the purpose specified by the
manufacturer. Unauthorized modifications and the use of spare parts and
accessories that are not sold or recommended by the manufacturer of the
equipment can cause fires, electric shocks and injuries.
Notes
♦
♦
♦
Keep these operating instructions within easy reach of the equipment and
make them available to all users
Whenever measuring or testing has to be performed on live equipment, the
regulations of Safety Code VBG 4.0 must be observed, in particular § 8
“Permissible Deviations when Working on Live Parts”. Suitable electronic
tools should be used.
Before installing and commissioning, please read these safety instructions
and warnings carefully and all the warning labels attached to the equipment.
Make sure that the warning labels are kept in a legible condition and replace
missing or damaged labels
COMBIMASTER 411 & MICROMASTER 411 Operating Instructions
6SE6400-5CA00-0BP0
7
FOREWORD
Issue 03/02
Transport & Storage
!
Warnings
♦
♦
♦
!
Correct transport, storage, erection and mounting, as well as careful
operation and maintenance are essential for proper and safe operation of the
equipment.
Use the lifting eyes provided if a motor has to be lifted. Do not lift machine
sets by suspending the individual machines! Always check the capacity of the
hoist before lifting any equipment.
Do not paint over the black case finish of the inverter, as this will affect the
unit’s thermal performance.
Caution
♦
Protect the inverter against physical shocks and vibration during transport
and storage. Also be sure to protect it against water (rainfall) and excessive
temperatures.
Commissioning
!
Warnings
♦
♦
♦
♦
♦
♦
♦
!
8
Work on the device/system by unqualified personnel or failure to comply
with warnings can result in severe personal injury or serious damage to
material. Only suitably qualified personnel trained in the setup, installation,
commissioning and operation of the product should carry out work on the
device/system.
Only permanently wired input power connections are allowed. This equipment
must be grounded (IEC 536 Class 1, NEC and other applicable standards).
If a Residual Current-operated protective Device (RCD) is to be used, it must
be an RCD type B.
Machines with a three-phase power supply, fitted with EMC filters, must not
be connected to a supply via an ELCB (Earth Leakage Circuit-Breaker - see
DIN VDE 0160, section 5.5.2 and EN50178 section 5.2.11.1).
The following terminals can carry dangerous voltages even if the inverter is
inoperative:
- power supply terminals L1, L2, L3.
- motor terminals U, V, W.
This equipment must not be used as an ‘Emergency Stop mechanism’ (see
EN 60204, 9.2.5.4).
The inverter electronics contain static sensitive devices therefore precautions
must be taken against electrostatic discharge (ESD) when handling the
separated inverter assembly (See Figure 2-2). These include not touching
the internal surfaces of the inverter and ensuring that personnel are earthed
while handling the unit. The terminal housing, including Filter and I/O
modules, contain no sensitive components and therefore no special handling
precautions are required when separated.
Caution
The connection of power, motor and control cables to the inverter must be carried
out as shown in Figure 2-9 and Figure 2-10 respectively, to prevent inductive and
capacitive interference from affecting the correct functioning of the inverter.
COMBIMASTER 411 & MICROMASTER 411 Operating Instructions
6SE6400-5CA00-0BP0
Issue 03/02
FOREWORD
Operation
!
Warnings
♦
♦
♦
♦
♦
♦
♦
♦
MICROMASTER 411/COMBIMASTER 411 operate at high voltages.
When operating electrical devices, it is impossible to avoid applying
hazardous voltages to certain parts of the equipment.
Emergency Stop facilities according to EN 60204 IEC 204 (VDE 0113) must
remain operative in all operating modes of the control equipment. Any
disengagement of the Emergency Stop facility must not lead to uncontrolled
or undefined restart.
Wherever faults occurring in the control equipment can lead to substantial
material damage or even grievous bodily injury (i.e. potentially dangerous
faults), additional external precautions must be taken or facilities provided to
ensure or enforce safe operation, even when a fault occurs (e.g. independent
limit switches, mechanical interlocks, etc.).
Certain parameter settings may cause the inverter to restart automatically
after an input power failure.
This equipment is capable of providing internal motor overload protection.
2
Refer to P0610 (level 3) and P0335, I T is ON by default. Motor overload
protection can also be provided using an external PTC via a digital input.
This equipment is suitable for use in a circuit capable of delivering not more
than 10,000 symmetrical amperes (rms), for a maximum voltage of 460V
when protected by an H or K Class fuse. (See Table on page 85).
This equipment must not be used as an ‘emergency stop mechanism’ (see
EN 60204, 9.2.5.4)
Repair
!
Warnings
♦
♦
♦
Repairs on equipment may only be carried out by Siemens Service, by
repair centers authorized by Siemens or by qualified personnel who are
thoroughly acquainted with all the warnings and operating procedures
contained in this manual.
Any defective parts or components must be replaced using parts contained in
the relevant spare parts list.
Disconnect the power supply before opening the equipment for access.
Dismantling & Disposal
Notes
♦
♦
Inverter packaging is re-usable. Retain the packaging for future use or return
it to the manufacturer.
Easy-to-release screw and snap connectors allow you to break the unit down
into its component parts. You can then re-cycle these component parts,
dispose of them in accordance with local requirements or return them to
the manufacturer.
COMBIMASTER 411 & MICROMASTER 411 Operating Instructions
6SE6400-5CA00-0BP0
9
FOREWORD
10
Issue 03/02
COMBIMASTER 411 & MICROMASTER 411 Operating Instructions
6SE6400-5CA00-0BP0
Table of Contents
1
Overview ................................................................................................................................ 15
1.1
COMBIMASTER 411 & MICROMASTER 411 .....................................................................16
1.2
Design Features ...................................................................................................................16
2
Installation ............................................................................................................................. 19
2.1
General.................................................................................................................................20
2.2
Ambient operating conditions ...............................................................................................21
2.3
Mechanical Installation MICROMASTER 411......................................................................21
2.4
Mechanical Installation COMBIMASTER 411 ......................................................................29
2.5
Electrical Installation.............................................................................................................32
3
Commissioning ..................................................................................................................... 39
3.1
Block Diagram ......................................................................................................................41
3.2
General Information..............................................................................................................42
3.3
Commissioning Procedure Overview ...................................................................................42
3.4
General operation.................................................................................................................56
4
Using the COMBIMASTER 411 & MICROMASTER 411 ..................................................... 57
4.1
Frequency Setpoint ..............................................................................................................58
4.2
Command Sources (P0700).................................................................................................58
4.3
OFF and Braking Functions .................................................................................................59
4.4
Control Modes (P1300) ........................................................................................................60
4.5
Faults and warnings .............................................................................................................60
5
System Parameters............................................................................................................... 61
5.1
Introduction to COMBIMASTER 411/MICROMASTER 411 System Parameters................62
5.2
Parameter List (short form) ..................................................................................................64
6
Troubleshooting.................................................................................................................... 73
6.1
Troubleshooting with the Inverter LED. ................................................................................74
6.2
Troubleshooting with the Basic Operator Panel...................................................................74
7
MICROMASTER 411/COMBIMASTER 411 Specifications ................................................. 81
7.1
Technical Data......................................................................................................................82
7.2
Case Size Rating Information...............................................................................................83
7.3
Tightening Torque, Cable cross sections for Power Supply and Motor Terminals ..............84
7.4
Tightening Torque for Fixing Screws ...................................................................................84
7.5
Fuses and Circuit Breakers ..................................................................................................85
COMBIMASTER 411 & MICROMASTER 411 Operating Instructions
6SE6400-5CA00-0BP0
11
8
Options .................................................................................................................................. 87
8.1
MICROMASTER 411/COMBIMASTER 411 User Options ..................................................88
8.2
MICROMASTER 411/COMBIMASTER 411 Programming Options ....................................89
8.3
Basic Operator Panel (BOP) ................................................................................................90
8.4
Advanced Operator Panel (AOP) .........................................................................................91
8.5
PROFIBUS Module (for MICROMASTER 411) ...................................................................92
8.6
Electromechanical Brake Control Module ............................................................................93
8.7
MICROMASTER 411 Operator Panel Mounting Kit.............................................................94
8.8
PC to Inverter Connection Kit...............................................................................................95
8.9
PC to AOP Connection Kit ...................................................................................................96
8.10
Door Mounting Kit for Single Inverter control .......................................................................97
8.11
Wall Mounting Kit..................................................................................................................98
9
Electro-Magnetic Compatibility (EMC)................................................................................ 99
9.1
Electro-Magnetic Compatibility (EMC) ...............................................................................100
10
Engineering Information .................................................................................................... 105
10.1
Current Limit and Overload Operation ...............................................................................106
10.2
Control and Operating Modes ............................................................................................109
10.3
Braking ...............................................................................................................................118
10.4
Derating Factors .................................................................................................................120
10.5
Thermal Protection and Automatic De-rating .....................................................................121
10.6
Operation from Unearthed Supplies...................................................................................122
10.7
Lifetime of Inverters ............................................................................................................122
10.8
Working with Binary Connectors (BiCo) .............................................................................122
10.9
Harmonic Currents .............................................................................................................129
10.10
Use of MM4 Input Chokes ..............................................................................................129
10.11
Power Losses .................................................................................................................130
10.12
Shock and Vibration........................................................................................................131
10.13
PROFIBUS......................................................................................................................132
10.14
PROFIBUS Module.........................................................................................................133
10.15
Variant Independent Options ..........................................................................................136
Appendices
A-
Applicable Standards ......................................................................................................... 140
B-
List of Abbreviations .......................................................................................................... 141
C-
MICROMASTER 411/COMBIMASTER 411 Parts Identification. .................................... 142
Index
12
................................................................................................................................ 139
................................................................................................................................ 143
COMBIMASTER 411 & MICROMASTER 411 Operating Instructions
6SE6400-5CA00-0BP0
List of Illustrations
Figure 1-1
Figure 2-1
Figure 2-2
Figure 2-3
Figure 2-4
Figure 2-5
Figure 2-6
Figure 2-7
Figure 2-8
Figure 2-9
Figure 2-10
Figure 2-11
Figure 3-1
Figure 3-2
Figure 3-3
Figure 3-4
Figure 3-5
Figure 3-6
Figure 5-1
Figure 10-1
Figure 10-2
Figure 10-3
Figure 10-4
Figure 10-5
Figure 10-6
Figure 10-7
Figure 10-8
Figure 10-9
Figure 10-10
Figure 10-11
Figure 10-12
Figure 10-13
Figure 10-14
Figure 10-15
Figure 10-16
Figure 10-17
MICROMASTER 411 and COMBIMASTER 411 Variable Frequency Inverters. .............17
Installation of Cable Gland................................................................................................23
MICROMASTER 411 Internal Layout ...............................................................................26
MICROMASTER 411 General Layout ..............................................................................27
MICROMASTER 411 Gland Dimensions .........................................................................27
MICROMASTER 411 Case Size B Dimensions ...............................................................28
MICROMASTER 411 Case Size C Dimensions...............................................................28
COMBIMASTER 411 Case Size B Dimensional Detail ....................................................30
COMBIMASTER 411 Case Size C Dimensional Detail....................................................31
Motor and Power Supply Connections .............................................................................35
COMBIMASTER 411 & MICROMASTER 411 Control Terminals ................................36
PTC Connections ..........................................................................................................37
COMBIMASTER 411 & MICROMASTER 411 Block Diagram .........................................41
MICROMASTER 411/COMBIMASTER 411 Commissioning Guide ................................42
Ramp Time Jumpers ........................................................................................................43
Control Circuit Jumpers ....................................................................................................44
Default Setup Terminal Connections ................................................................................46
Typical Motor Rating Plate Example.................................................................................55
Parameter Structure with Filter (P0004) ...........................................................................63
Current Limit Interaction..............................................................................................106
PTC Resistor Connections..........................................................................................108
Boost Level..................................................................................................................109
Quick response with overshoot: P2280 = 0.30; P2285 = 0.03s.................................112
Quick response with overshoot, but instability:P2280 = 0.55; P2285 = 0.03s............112
Damped response: P2280 = 0.20; P2285 = 0.15s......................................................113
Response to 5 Hz step: L = 100 ms............................................................................114
Response to 5 Hz step: T = 700 ms............................................................................114
Step Response in PI control with P2280 = 9.84 and P2285 = 0.30............................115
PI Basic Block Diagram..............................................................................................116
Energy Saving Mode..................................................................................................117
Frequency Ramp Down .............................................................................................118
DC Braking .................................................................................................................118
Compound Braking ....................................................................................................119
Derating with Temperature.........................................................................................120
Derating with Altitude .................................................................................................120
Power Losses CM411/MM411 ...................................................................................130
COMBIMASTER 411 & MICROMASTER 411 Operating Instructions
6SE6400-5CA00-0BP0
13
List of Tables
Table 2-1
Table 2-2
Table 3-1
Table 3-2
Table 3-3
Table 3-4
Table 3-5
Table 3-6
Table 3-7
Table 6-1
Table 6-2
Table 6-3
Table 7-1
Table 7-2
Table 7-3
Table 8-1
Table 9-1
Table 9-2
Table 9-3
Table 9-4
Table 9-5
Table 10-1
Table 10-2
Table 10-3
Table 10-4
Table 10-5
Table 10-6
Table 10-7
Table 10-8
Table 10-9
Table 10-10
Table 10-11
Table 10-12
Table 10-13
14
Gland Plate Detail .............................................................................................................27
MICROMASTER 411 Dimension Detail ...........................................................................28
Ramp Time Adjustment Jumpers .....................................................................................43
Ramp Time Jumper Behaviour .........................................................................................44
Control Circuit Jumper Settings ........................................................................................44
Control Circuit Jumper Behaviour.....................................................................................45
Default Settings for BOP Operation..................................................................................51
Basic Operator Panel Controls .........................................................................................53
Changing Drive Parameters with the BOP .......................................................................54
Inverter LED Indication .....................................................................................................74
MICROMASTER411/COMBIMASTER411 Fault Codes ..................................................75
COMBIMASTER 411/MICROMASTER 411 Warning Codes ...........................................77
MICROMASTER 411/COMBIMASTER 411 Performance Ratings..................................82
Case Size B ......................................................................................................................83
Case Size C ......................................................................................................................83
Key to Programming Options............................................................................................89
Environment - General Industrial ....................................................................................101
Environment - Filtered Industrial.....................................................................................101
Environment - Filtered for Residential, Commercial and Light Industry .........................102
EMC Compliance Table..................................................................................................103
MICROMASTER 411 Measured Results........................................................................103
Current Limit and Overload.............................................................................................106
Measured Current Monitoring Accuracy .........................................................................107
Trip Levels ......................................................................................................................109
Boost Parameters ...........................................................................................................110
Derating with Switching Frequencies .............................................................................121
BiCo Connections (r0019 to r0054) ................................................................................125
BiCo Connections (r0055 to r1119) ................................................................................126
BiCo Connections (r1170 to r2050) ................................................................................127
BiCo connections (r2053 to r2294) .................................................................................128
Three Phase 400V Connection ...................................................................................129
Maximum Cable Lengths for Data Transfer Rates......................................................135
Technical data – 411 PROFIBUS Module ..................................................................136
PROFIBUS Ordering information ................................................................................136
COMBIMASTER 411 & MICROMASTER 411 Operating Instructions
6SE6400-5CA00-0BP0
Issue 03/02
1
1. OVERVIEW
Overview
This Chapter contains:
A summary of the major features of the COMBIMASTER 411 & MICROMASTER 411
range.
1.1
COMBIMASTER 411 & MICROMASTER 411 .....................................................................16
1.2
Design Features ...................................................................................................................16
COMBIMASTER 411 & MICROMASTER 411 Operating Instructions
6SE6400-5CA00-0BP0
15
1. OVERVIEW
1.1
Issue 03/02
COMBIMASTER 411 & MICROMASTER 411
The Siemens COMBIMASTER 411 & MICROMASTER 411 variable frequency (V/f) range
of inverters are used to control the speed of three phase AC induction motors.
MICROMASTER 411 offers an Inverter for adaptation to a compatible motor frame and
COMBIMASTER 411 provides for a ready to use Inverter/Motor combination unit.
Inverters are available in the following ranges:
Ø
370 W to 3.0 kW 380/480 VAC for three phase units.
Inverters are microprocessor-controlled and use state-of-the-art Insulated Gate BipoIar
Transistor (IGBT) technology. This makes them reliable and versatile. A special pulsewidth modulation method with selectable Pulse frequency permits quiet motor operation.
Comprehensive protection is included as standard for both motor and inverter circuits.
Operating modes, parameters and menus can be modified and the performance
enhanced if the inverter is equipped with one of several options; these are described in
the Appendices at the rear of this manual.
MICROMASTER 411/COMBIMASTER 411 can be used in 'stand-alone' applications as
well as being integrated into complete automation systems.
1.2
Design Features
Key design features include:
Ø
Ø
Ø
Ø
Ø
Ø
Ø
Ø
Ø
Ø
Ø
Ø
Ø
Ø
Ø
16
Easy to install, parameterize and commission.
Closed loop control using Proportional, Integral (PI) control loop function.
High starting torque with programmable starting boost.
Optional remote control capability via serial interface.
Factory default parameter settings pre-programmed for European and North
American requirements.
Output frequency (and hence motor speed) can be controlled by one of four
methods:
♦ Internal Speed Control Potentiometer.
♦ Analogue setpoint (voltage or current input).
♦ Fixed frequencies via binary inputs.
♦ Serial interface.
Built-in dc injection braking.
Acceleration/deceleration timed with programmable smoothing.
Programmable signal relay output incorporated.
Options for external control from: Basic Operator Panel (BOP) Advanced
Operator Panel (AOP), RS232 serial interface.
Options Case provides for the addition of Fieldbus (e.g., PROFIBUS DP) and/or
Electromechanical Brake Control.
Fast Current Limit (FCL) for reliable trip-free operation.
Optional Integrated class B filter (Radiated emissions Class A).
MICROMASTER 411 Protection to IP66. Approximately equivalent to NEMA 4X.
COMBIMASTER 411 Protection to IP55. Equivalent to NEMA 4.
COMBIMASTER 411 & MICROMASTER 411 Operating Instructions
6SE6400-5CA00-0BP0
Issue 03/02
1. OVERVIEW
MICROMASTER 411 Variable Frequency Inverter
COMBIMASTER 411 Variable Frequency Inverter – Motor Combination
Figure 1-1
MICROMASTER 411 and COMBIMASTER 411 Variable Frequency Inverters.
COMBIMASTER 411 & MICROMASTER 411 Operating Instructions
6SE6400-5CA00-0BP0
17
1. OVERVIEW
18
Issue 03/02
COMBIMASTER 411 & MICROMASTER 411 Operating Instructions
6SE6400-5CA00-0BP0
Issue 03/02
2
2. INSTALLATION
Installation
This Chapter contains:
Ø
Ø
Ø
Ø
General data relating to installation
Inverter Dimensions
Wiring guidelines to minimize the effects of EMI
Details concerning electrical installation
2.1
General.................................................................................................................................20
2.2
Ambient operating conditions ...............................................................................................21
2.3
Mechanical Installation MICROMASTER 411......................................................................21
2.4
Mechanical Installation COMBIMASTER 411 ......................................................................29
2.5
Electrical Installation.............................................................................................................32
COMBIMASTER 411 & MICROMASTER 411 Operating Instructions
6SE6400-5CA00-0BP0
19
2. INSTALLATION
!
Warnings
♦
♦
♦
♦
♦
♦
♦
♦
!
2.1
Issue 03/02
Work on the device/system by unqualified personnel or failure to comply with
warnings can result in severe personal injury or serious damage to material. Only
suitably qualified personnel trained in the setup, installation, commissioning and
operation of the product should carry out work on the device/system.
Only permanently wired input power connections are allowed. This equipment must
be grounded (IEC 536 Class 1, NEC and other applicable standards).
If a Residual Current-operated protective Device (RCD) is to be used, it must be an
RCD type B.
Machines with a three-phase power supply, fitted with EMC filters, must not be
connected to a supply via an ELCB (Earth Leakage Circuit-Breaker EN50178
Section 5.2.11.1).
The following terminals can carry dangerous voltages even if the inverter is
inoperative:
- power supply terminals L1, L2, L3.
- motor terminals U, V, W.
Always wait 5 minutes to allow the unit to discharge after switching off before
carrying out any installation work.
This equipment must not be used as an ‘emergency stop mechanism’ (see EN
60204, 9.2.5.4)
The minimum size of the earth-bonding conductor must be equal to or greater than
the cross-section of the power supply cables.
Caution
The connection of power and motor cables to the inverter must be carried out as shown
Figure 2-9 to prevent inductive and capacitive interference from affecting the correct
functioning of the inverter.
General
Installation after a Period of Storage
Following a prolonged period of storage, you must reform the capacitors in the inverter.
The requirements are listed below. The period of storage should be calculated from the
date of manufacture and not from the time of delivery by your supplier.
Period of
Storage
Required Action
Preparation
Time
1 year or less
No reforming required
No preparation
1 to 2 years
Apply power to the inverter for one hour before issuing the run command
2 to 3 years
3 years and
over
20
Ü Use a variable AC supply.
Ü Apply 25% of input voltage for 30 minutes.
Ü Increase volts to 50% for a further 30 minutes.
Ü Increase volts to 75% for a further 30 minutes.
Ü Increase volts to 100% for a further 30 minutes.
þ Inverter ready for run signal.
Ü Use a variable AC supply.
Ü Apply 25% of input voltage for 2 hours.
Ü Increase volts to 50% for a further 2 hours.
Ü Increase volts to 75% for a further 2 hours.
Ü Increase volts to 100% for a further 2 hours.
þ Inverter ready for run signal.
1 hour
2 hours
8 hours
COMBIMASTER 411 & MICROMASTER 411 Operating Instructions
6SE6400-5CA00-0BP0
Issue 03/02
2.2
2. INSTALLATION
Ambient operating conditions
Temperature
Frame Size
B
C
Min. [° C]
-10
-10
Max. [° C]
40
40
Humidity Range
99% Non-condensing
Altitude
If the inverter is to be installed at an altitude > 1000m, derating will be required. Refer to
Section 10.4.2 for details.
Shock
Do not drop the inverter or expose to sudden shock.
Electromagnetic Radiation
Do not install the inverter near sources of electromagnetic radiation.
Overheating
MICROMASTER 411/COMBIMASTER 411 are cooled by natural convection. Mount the
inverter with the heatsink fins above to ensure optimum cooling.
Mounting the inverter with the heatsink upside down is not allowed.
Ensure that airflow around the inverter housing is not obstructed. Allow 100 mm
clearance above and below the inverter.
2.3
Mechanical Installation MICROMASTER 411
!
Warning
♦
THIS EQUIPMENT MUST BE GROUNDED.
♦
To ensure safe operation of the equipment, it must be installed and commissioned
by qualified personnel in full compliance with the warnings laid down in these
operating instructions.
♦
Take particular note of the general and regional installation and safety regulations
regarding work on dangerous voltage installations (e.g. EN 50178), as well as the
relevant regulations regarding the correct use of tools and personal protective gear.
♦
The Power supply, DC and motor terminals, can carry dangerous voltages even if
the inverter is inoperative; wait 5 minutes to allow the unit to discharge after
switching off before carrying out any installation work.
4
COMBIMASTER 411 & MICROMASTER 411 Operating Instructions
6SE6400-5CA00-0BP0
21
2. INSTALLATION
2.3.1
Issue 03/02
Preparation
Remove the MICROMASTER 411 installation kit from the packing. Check packing box
contents against the advice note supplied.
The installation kit should comprise the following items:
1.
Inverter cover
9.
2 off M25 sealing plugs
2.
Terminal Housing
10.
2 off M25 Gland Fixing Plates
3.
Filter Module & screws (captive)
11.
2 off U-clamp & screws (for
earth/ground connection)
4.
Input – Output Board & screws
(captive)
12.
4 off M4 Inverter to Motor fixing
screws (CSC only: additional 4 off
M5 screws)
5.
Earth Lead
13.
Motor Cable Sheath
6.
10 Off Terminal Jumpers
14.
1 off Motor Gasket (CSC only:
additional 1 off Motor Gasket)
7.
Getting Started Guide and CD
15.
1 off M12 connector blanking plug
8.
2 off Glands M25 IP68 with
O-ring
Any defective or missing items should be reported immediately to your local Siemens
Distributor or Sales Office.
2.3.2
Installation Procedure
Note:
MICROMASTER 411 ONLY:
Prior to installation it may be necessary to fit an Adaptation Plate to a non-Siemens
motor. The Adaptation Plate is prepared by the respective motor manufacturer.
Normally the Adaptation Plate makes use of the existing motor gasket.
Physical dimensions and characteristics for installation of MICROMASTER 411 are given
in section 2.3.7. and in section 2.4.2 for COMBIMASTER 411.
With the product items removed from their packaging carry out the following installation
procedure.
1. Separate the two halves (Inverter Cover and Terminal Housing).
2. Remove the Filter Module and I/O board.
!
Caution
Do not knock out cable gland blanking plates unless the inverter ‘electronics’ (Filter &
I/O boards) have been removed.
3. Remove the cable gland blanking plates (knockouts) as required. See Figure 2-1.
The preferred gland arrangements are shown in the General Layout Diagram –
Figure 2-3.
4. Fit cable glands to terminal housing, ensuring the O-rings are fitted to ensure the seal
is maintained.
5. Fit the earth lead to the earth terminal within the motor terminal box. If required fit a
Motor PTC cable (not supplied).
6. Run all cables between the motor and inverter within the cable sheath provided.
22
COMBIMASTER 411 & MICROMASTER 411 Operating Instructions
6SE6400-5CA00-0BP0
Issue 03/02
2. INSTALLATION
7. Using the appropriate motor gasket, fix the terminal housing to the motor.
Screw fixing torque values are: 1.5 Nm – M4 and 2.5 Nm – M5.
8. Insert power and control cables through glands and make off ends as required.
9. Fit the Filter board (See Figure 2-2).
10. Secure Filter board with M3 taptite screws (see Table on Page 84 for torque values).
11. Connect power cables as detailed in section 2.5.2.
12. Connect up the motor terminals in either star or delta configuration as explained in
section 2.5.2.
13. Connect control wires as detailed in section 2.5.2.
14. Fit the I/O board (See Figure 2-2).
15. Secure I/O board with M3 taptite screws.
16. Fit jumpers as required – see Section 3.3.
17. Place the inverter cover onto the assembled terminal housing.
18. Secure the inverter cover with the four M5 captive screws.
Use either a 4-5 mm flat bladed screwdriver or a 2pt Pozidrive Head screwdriver.
2.3.3
Installation of Cable Glands
Before power and control cables can be connected to their respective circuits it will first
be necessary to fit the cable glands supplied.
Each gland should be located ideally to allow for convenient cable runs to the terminals
located on the Filter and I/O boards.
1. Using a hammer and a flat-head
screwdriver as shown opposite strike
the gland plate or ‘knockout’ to obtain
a clearance for the 25 mm cable
gland.
Note:
Care must be taken to prevent
damage to the Terminal Housing, as
this may affect the IP rating of the
inverter.
2. Remove any sharp edges from the
gland area and any swarf from the
terminal housing.
3. After the knockout has been removed
it should be safely discarded and the
cable glands fitted as shown in the
assembly diagram opposite.
Figure 2-1
Installation of Cable Gland
COMBIMASTER 411 & MICROMASTER 411 Operating Instructions
6SE6400-5CA00-0BP0
23
2. INSTALLATION
2.3.4
24
Issue 03/02
Mounting the Inverter on a Siemens Motor
COMBIMASTER 411 & MICROMASTER 411 Operating Instructions
6SE6400-5CA00-0BP0
Issue 03/02
2.3.5
2. INSTALLATION
Wall Mounting the Inverter
COMBIMASTER 411 & MICROMASTER 411 Operating Instructions
6SE6400-5CA00-0BP0
25
2. INSTALLATION
Issue 03/02
Inverter Cover (CSB)
Terminal Housing (CSB)
(Cable glands shown in preferred positions)
Figure 2-2
26
MICROMASTER 411 Internal Layout
COMBIMASTER 411 & MICROMASTER 411 Operating Instructions
6SE6400-5CA00-0BP0
Issue 03/02
2. INSTALLATION
Figure 2-3
2.3.6
MICROMASTER 411 – Cable Gland Dimensions.
Figure 2-4
Table 2-1
MICROMASTER 411 General Layout
MICROMASTER 411 Gland Dimensions
Gland Plate Detail
Case
Size
Gland Pitch
mm (Inches)
Height
mm
(Inches)
Sealing
surface
mm (Inches)
Knock –out
Diameter
mm (Inches)
GW1
GW2
GW3
GH
GD1
GD2
B
42.9
(1.68)
82.9
(3.26)
175.0
(6.89)
27.6
(1.09)
35
(1.38)
26
(1.02)
C
43.0
(1.69)
83.0
(3.27)
203.4
(8.01)
38.3
(1.51)
36
(1.42)
26
(1.02)
COMBIMASTER 411 & MICROMASTER 411 Operating Instructions
6SE6400-5CA00-0BP0
27
2. INSTALLATION
2.3.7
Table 2-2
Issue 03/02
MICROMASTER 411 Dimensional Detail
Figure 2-5
MICROMASTER 411 Case Size B Dimensions
Figure 2-6
MICROMASTER 411 Case Size C Dimensions
MICROMASTER 411 Dimension Detail
Case Size
28
Overall Dimensions
mm (Inches)
Weight
kg (lbs)
Power Range
kW (hp)
Height (H)
Length (L)
Width (W)
B
135.6
(5.31)
222
(8.74)
154
(6.06)
4.9
(10.77)
0.37 – 1.5
(0.5 – 2.0)
C
170.6
(6.61)
255
(10.04)
177
(6.97)
7.4
(16.34)
2.2 – 3.0
(3.0 – 4.0)
COMBIMASTER 411 & MICROMASTER 411 Operating Instructions
6SE6400-5CA00-0BP0
Issue 03/02
2. INSTALLATION
2.4
Mechanical Installation COMBIMASTER 411
2.4.1
COMBIMASTER 411 Installation Procedure
Ensure that any lifting eyes are tightened down prior to moving the COMBIMASTER into
position.
Use the lifting eyes provided if a motor has to be lifted. Always check the capacity of the
hoist before lifting any equipment.
!
Warning
Do not attempt to lift the COMBIMASTER 411 using the inverter housing as this could
result in severe damage to the inverter or motor and possibly severe personal injury.
Move the COMBIMASTER 411 into the required position and secure by inserting suitable
foundation bolts through the motor feet (see Figure 2-7 and Figure 2-8). Allow adequate
clearance of 100mm minimum around the unit to provide for air circulation.
COMBIMASTER 411 is supplied with a Power Supply Gland fitted to the preferred cable
entry port (see Figure 2-3). Should it become necessary to select other cable entry ports
for either Power supply or Control then cable glands must be removed and the redundant
port blanked off. Always remember to remove Inverter electronics before knocking out
blanking plates. Blank off all redundant cable ports.
!
Caution
Do not knock out cable gland blanking plates unless inverter ‘electronics’ (Filter & I/O
boards) have been removed
Carry out the following checks prior to commissioning the COMBIMASTER 411:
1. The rotor is correctly aligned and free to rotate without obstruction.
2. Transmission elements are adjusted correctly (e.g. belt tensioned) and suitable
for the given operating conditions.
3. All electrical connections, mounting screws and connecting elements tightened
and fitted correctly.
4. Protective conductors installed properly
5. Any auxiliary equipment that might be fitted (e.g. mechanical brake) is in working
order.
6. Protection guards are installed around all moving and live parts and any relevant
safety notices displayed.
COMBIMASTER 411 & MICROMASTER 411 Operating Instructions
6SE6400-5CA00-0BP0
29
2. INSTALLATION
2.4.2
Issue 03/02
COMBIMASTER 411 Dimensional Detail
2.4.2.1
COMBIMASTER 411- Case Size B
Frame
Size
Motor
Poles
TL
TW
TH
MF1
MF2
MF3
MS1
MS2
MB1
71M
1LA7 070
2-4
240
(9.4)
132
(5.2)
278.6
(11.0)
45
(1.8)
90
(3.5)
112
(4.4)
30
(1.2)
14
(0.6)
7
(0.3)
80M
1LA7 080
2-4
274
(10.8)
150
(5.9)
296.6
(11.7)
50
(2.0)
100
(3.9)
125
(4.9)
40
(1.6)
19
(0.7)
9.5
(0.4)
165
(6.5)
314.6
(12.4)
56
(2.2)
100
(3.9)
140
(5.5)
50
(2.0)
24
(0.9)
10
(0.4)
1LA7 073
1LA7 083
90S
1LA7 090
1LA7 096
309
(12.2)
2-4
331
(13.0)
Notes
1.
2.
Figure 2-7
30
All dimensions given in millimeters (and inches).
MF dimensions use Motor construction type IMB3.
COMBIMASTER 411 Case Size B Dimensional Detail
COMBIMASTER 411 & MICROMASTER 411 Operating Instructions
6SE6400-5CA00-0BP0
Issue 03/02
2. INSTALLATION
2.4.2.2
COMBIMASTER 411 - Case Size C
Frame
Size
Motor
Poles
TL
TW
TH
MF1
MF2
MF3
MS1
MS2
MB1
90L
1LA7 096
4
332
(13.1)
165
(6.5)
349.5
(13.8)
56
(2.2)
100
(3.9)
140
(5.5)
50
(2.0)
24
(0.9)
10
(0.4)
100L
1LA7 100
2-4
373
(14.6)
196
(7.7)
370
(14.6)
63
(2.5)
140
(5.5)
160
(6.3)
60
(2.4)
28
(1.1)
12
(0.5)
Notes
1. All dimensions given in millimeters (and inches).
2. MF dimensions use Motor construction type IMB3.
Figure 2-8
COMBIMASTER 411 Case Size C Dimensional Detail
COMBIMASTER 411 & MICROMASTER 411 Operating Instructions
6SE6400-5CA00-0BP0
31
2. INSTALLATION
2.5
Electrical Installation
!
2.5.1
!
Issue 03/02
Warning
♦
THIS EQUIPMENT MUST BE GROUNDED.
♦
To ensure the safe operation of the equipment, it must be installed and
commissioned by qualified personnel in full compliance with the warnings laid down
in these operating instructions.
♦
Take particular note of the general and regional installation and safety regulations
regarding work on dangerous voltage installations (e.g. EN 50178), as well as the
relevant regulations regarding the correct use of tools and personal protective gear.
♦
Power supply and motor terminals can carry dangerous voltages even if the inverter
is inoperative; wait 5 minutes to allow the unit to discharge after switching off
before carrying out any installation work.
General
Warning
The inverter must always be grounded. If the inverter is not grounded correctly,
extremely dangerous conditions may arise within the inverter which could prove
potentially fatal.
Operation with Residual Current Device
If an RCD (also referred to as ELCB or RCCB) is fitted, the MICROMASTER 411
Inverters will operate without nuisance tripping, provided that:
þ
þ
þ
þ
A type B RCD is used.
The trip limit of the RCD is 300mA.
The neutral of the supply is grounded.
Only one inverter is supplied from each RCD.
Operation with long cables
!
32
Caution
The control and power supply cables must be laid separately. Do not feed them through
the same cable conduit/trunking. Never use high voltage insulation test equipment on
cables connected to the inverter.
COMBIMASTER 411 & MICROMASTER 411 Operating Instructions
6SE6400-5CA00-0BP0
Issue 03/02
2.5.2
!
2. INSTALLATION
Cable Connections
Warning
♦
♦
♦
!
Isolate the electrical power supply before making or changing connections to the
unit.
Ensure that the motor is configured for the correct supply voltage – 380 to 480 V
three-phase supply.
When synchronous motors are connected or when coupling several motors in
parallel, the inverter must be operated with voltage/frequency control characteristic
(P1300 = 0, 2 or 3).
Caution
After connecting the power and motor cables to the proper terminals, make sure that the
cover has been replaced properly before supplying power to the unit!
Note
♦
♦
♦
Ensure that the appropriate circuit-breakers/fuses with the specified current rating
are connected between the power supply and inverter. (Refer to Section 7.5)
o
Use Class 1 75 C copper wire only (for UL compliance). For tightening torque see
table on Page 84.
To tighten up the power terminal screws use either a 4-5 mm flat bladed screwdriver
or a 2pt Pozidrive Head screwdriver.
Access to the power and motor terminals
The procedure for accessing the power and motor terminals on the COMBIMASTER 411
& MICROMASTER 411 Inverter is illustrated in Figure 2-9 Motor and Power Supply
Connections.
2.5.2.1
Power Connections
The information given in Figure 2-9 shows the connection of the motor wires to the
filter board terminals. Power cables should be connected to the inverter terminals as
detailed in the following procedure. For cable size and rating refer to the Table on
Page 84.
1.
If the Inverter cover (the top-half) has already been fitted, unscrew the four M5
cross-head captive screws on the inverter cover.
2.
Remove inverter (cover) to access the connection terminals.
3.
Feed the power cable into the terminal housing via the appropriate gland hole.
4.
Connect power leads to terminals L1, L2, L3 and to the separate earth.
To avoid snagging on components when the inverter halves are brought
together, run cables along the base of the terminal housing.
o
5.
Use Class 1 75 C copper wire only. Use a 4-core cable. If crimp terminals are
used they must be insulated. If crimps are not used, the strip length must not
exceed 5mm. Use a 4 - 5 mm cross-tip screwdriver to tighten the terminal
screws.
6.
Recommended tightening torque for power supply terminals is as given in the
Table on Page 84.
7.
A ‘drip loop’ is recommended when connecting the mains and control cables.
COMBIMASTER 411 & MICROMASTER 411 Operating Instructions
6SE6400-5CA00-0BP0
33
2. INSTALLATION
!
8.
Ensure that the power source provides the correct voltage and is designed for
the rated current. Use appropriate circuit-breakers with specified current rating
between the power supply and inverter.
9.
Ensure the appropriate circuit breakers/fuses with the specified current rating
are connected between the power supply and the inverter. (See Section 7.5)
Warning
♦
♦
2.5.2.2
Issue 03/02
It is essential that the Inverter be correctly earthed to the motor earth. Severe
injury may result if the motor is not correctly earthed.
If the Inverter is being installed after a period of storage please refer to the
information in Section 2.1.
Motor Connections for Star/Delta.
The information given in Figure 2-9 also shows the connection of motor wires to the filter
board inverter/motor terminals. Motor wires should be connected in either star or delta
configuration in accordance with the motor rating plate. For cable size and rating refer to
the Table on Page 84.
34
COMBIMASTER 411 & MICROMASTER 411 Operating Instructions
6SE6400-5CA00-0BP0
Issue 03/02
2. INSTALLATION
Figure 2-9
Motor and Power Supply Connections
COMBIMASTER 411 & MICROMASTER 411 Operating Instructions
6SE6400-5CA00-0BP0
35
2. INSTALLATION
2.5.2.3
Issue 03/02
Control Cable Connections
1.
Feed the control cables into the inverter via one of the gland holes at the I/O
module end of the terminal housing.
2.
Run the control cable underneath the I/O board toward the control terminals.
3.
Connect the control wires in accordance with the terminal information given in
Figure 2-10.
4.
Use screened cable for all control wiring.
Note:
If a PTC resistor is fitted,
this should be connected
between 4 (+24 V) and 3
(DIN 3).
Terminal
Inputs
Parameter
Default operation
1
DIN 1
P0701 = ‘1’
ON/OFF1
2
DIN 2
P0702 = ‘12’
Reverse
3
DIN 3
P0703 = ‘9’
Fault Acknowledge
AIN (-/+)
P0756 = 0
0 – 10 V Analogue Input
Option: DIN 4
P0704 ≠ 0
Output Relay
P0731 = ’52.3’
6/7
8/9
Fault identification
Figure 2-10 COMBIMASTER 411 & MICROMASTER 411 Control Terminals
36
COMBIMASTER 411 & MICROMASTER 411 Operating Instructions
6SE6400-5CA00-0BP0
Issue 03/02
2. INSTALLATION
2.5.2.4
Motor PTC Connections
In order for the inverter to monitor the motor PTC (if fitted) it will be necessary to connect
the Motor PTC to the Inverter Digital input 3 (DIN3) terminal. Connect the Motor PTC
extension cable (provided with the Inverter) between the Inverter I/O terminals 3 & 4 and
the Motor PTC terminals within the motor terminal housing.
The arrangement is as shown in Figure 2-11 below.
Note
DIN 3 must be configured to read the PTC input [(P0703 = 29) (external trip)]
Figure 2-11 PTC Connections
2.5.3
Avoiding Electro-Magnetic Interference
The inverters are designed to operate in an industrial environment where a high level of
EMI can be expected. Usually, good installation practices will ensure safe and troublefree operation. If you encounter problems, follow the guidelines stated below.
Action to Take
Ø
Ø
Ø
Ø
Make sure that any control equipment connected to the inverter (such as a PLC) is
connected to the same ground or star point as the inverter via a short, thick link.
Flat conductors are preferred as they have lower impedance at higher frequencies.
Separate the control cables from the power connections as much as possible, using
0
separate trunking, if necessary at 90 right angles.
Whenever possible, use screened leads for the connections to the control circuitry.
COMBIMASTER 411 & MICROMASTER 411 Operating Instructions
6SE6400-5CA00-0BP0
37
2. INSTALLATION
Ø
Ø
Ø
!
38
Issue 03/02
Ensure that contactors are suppressed, either with R-C suppressors for AC
contactors, or 'flywheel' diodes for DC contactors, fitted to the coils. Varistor
suppressors are also effective. This is important when the contactors are controlled
from the inverter relay.
Screened motor cables should be used when the motor is mounted separately from
the inverter.
Maximum motor cable length is 5 meters (16.40 feet).
Warning
Safety regulations must not be compromised when installing inverters!
COMBIMASTER 411 & MICROMASTER 411 Operating Instructions
6SE6400-5CA00-0BP0
Issue 03/02
3
3. COMMISSIONING
Commissioning
This Chapter contains:
Ø
Ø
Ø
Description of the Operator Panel controls.
A brief description of the optional Operator Panels available and an explanation of the
operation of the Basic Operator Panel (BOP).
An 8-step guide at the end of the Chapter, which provides a simple procedure for
changing parameters.
3.1
Block Diagram ......................................................................................................................41
3.2
General Information..............................................................................................................42
3.3
Commissioning Procedure Overview ...................................................................................42
3.4
General operation.................................................................................................................56
COMBIMASTER 411 & MICROMASTER 411 Operating Instructions
6SE6400-5CA00-0BP0
39
3. COMMISSIONING
!
Warning
♦
♦
♦
♦
♦
♦
♦
♦
!
Issue 03/02
COMBIMASTER411/MICROMASTER 411 operates at high voltages.
When operating electrical devices, it is impossible to avoid applying hazardous
voltages to certain parts of the equipment.
Emergency Stop facilities according to EN 60204 IEC 204 (VDE 0113) must
continue to function in all operating modes of the control equipment. Any
disengagement of the Emergency Stop facility must not lead to uncontrolled or
undefined restart.
Wherever faults occurring in the control equipment may lead to substantial material
damage, or even grievous bodily injury, (i.e. potentially dangerous faults), additional
external precautions must be taken or facilities provided to ensure or enforce safe
operation, even when a fault occurs (e.g. independent limit switches, mechanical
interlocks, etc.).
Certain parameter settings may cause the inverter to restart automatically after an
input power failure.
This equipment is capable of providing internal motor overload protection. Refer to
2
P0610 (level 3) and P0335, I T is ON by default. Motor overload protection can also
be provided using an external PTC via a digital input.
This equipment is suitable for use in a circuit capable of delivering not more than
10,000 symmetrical amperes (rms), for a maximum voltage of 460V when
protected by an H or K Class fuse (see Table on Page 85).
This equipment must not be used as an ‘emergency stop mechanism’ (see EN
60204, 9.2.5.4).
Caution
Only qualified personnel may enter settings in the control panels. Particular attention
must be paid to safety precautions and warnings at all times.
The COMBIMASTER 411 & MICROMASTER 411 is supplied with default parameter
settings that cover the following requirements:
Ø The motor rating data, voltage, current and frequency are all compatible with the
inverter data.
Ø Linear V/f motor speed, controlled by the control potentiometer.
-1
Ø Maximum speed 3000 min-1 with 50 Hz (3600 min with 60 Hz), controllable via the
control potentiometer or by using a potentiometer via the inverter’s analogue input.
Ø Ramp-up time / Ramp-down time = 10 s.
If more complex application settings are required, please refer to the parameter listing in
these Operating Instructions.
To change parameters you will need one of the optional modules "Basic Operator Panel"
(BOP) or the "Advanced Operator Panel" (AOP) described in later sections.
40
COMBIMASTER 411 & MICROMASTER 411 Operating Instructions
6SE6400-5CA00-0BP0
Issue 03/02
3.1
3. COMMISSIONING
Block Diagram
Figure 3-1
COMBIMASTER 411 & MICROMASTER 411 Block Diagram
COMBIMASTER 411 & MICROMASTER 411 Operating Instructions
6SE6400-5CA00-0BP0
41
3. COMMISSIONING
3.2
Issue 03/02
General Information
For basic operation no additional equipment is required. However, for more complex
operation either the Basic Operator Panel (BOP), Advanced Operator Panel (AOP) or
Fieldbus options can be used. These are available as non-standard options and must be
ordered separately.
When delivered the inverter has a frequency setpoint range of between 0 Hz and 50 Hz.
Regardless of its initial position the Control Potentiometer must be turned fully counterclockwise before the inverter can start.
!
3.3
Warning
The inverter does not have a power supply switch and is therefore live when the
power supply is connected.
Commissioning Procedure Overview
Mechanical
Installation
Installation
Electrical
Installation
Default
Command
Source
DIN1
ON/OFF1
BOP/AOP Keypad
Parameter
P0700 = 1
Jumper: Pot = Run
Control
Potentiometer
Commissioning
Keypad Control
Commissioning
Terminal Control
Analogue setpoint
Speed
Reference
Default
Reference
Source
BOP setpoint
Internal
(Control Pot.)
Parameter
P1000 = 1
External
Fit Potentiometer
(setpoint added to
Control Pot.)
Jumpers
Parameters (keypad)
Ramp Times
No Jumpers
Fit Jumpers
(see section
3.2.1.)
Set Ramp Parameter
Up = P1120
Down = P1121
Start the Motor
Figure 3-2
42
MICROMASTER 411/COMBIMASTER 411 Commissioning Guide
COMBIMASTER 411 & MICROMASTER 411 Operating Instructions
6SE6400-5CA00-0BP0
Issue 03/02
3.3.1
3. COMMISSIONING
Ramp Times Using Jumpers
Inverter ramp times are set using a series of 5 jumpers (fit jumper to enable function).
When jumpers are used, the Inverter ramp times are reset from their default (or current)
values. The inverter recognizes when jumper values have been set when power is reapplied.
Caution
Jumpers have priority in setting ramp times. When the jumpers are removed the ramp
times are not changed. It is then possible to change ramp times via the parameters (using
the BOP).
Ramp times apply to Ramp Up and Ramp Down. Jumper locations are as shown below:
Figure 3-3
Ramp Time Jumpers
Using up to 5 jumpers allows ramp times to be set between 1 - 240 secs. See Jumper
Reference Table for further clarification.
Table 3-1
Ramp Time Adjustment Jumpers
Time
1sec
1s
ü
2s
3s
ü
2sec
5sec
ü
7s
8s
10s
ü
ü
20s
30s
ü
ü
ü
ü
70s
80s
90s
ü
ü
ü
ü
ü
100s
120s
ü
ü
140s
150s
160s
180s
ü
ü
210s
240s
ü
ü
ü
ü
ü
ü
ü
50s
60s
X20
ü
ü
5s
6s
X10
ü
ü
ü
COMBIMASTER 411 & MICROMASTER 411 Operating Instructions
6SE6400-5CA00-0BP0
ü
ü
ü
ü
ü
ü
ü
ü
ü
ü
ü
ü
ü
ü
ü
ü
ü
ü
ü
ü
ü
ü
ü
ü
ü
ü
ü
ü
ü
ü
ü
ü
ü
43
3. COMMISSIONING
Issue 03/02
Ramp Time Jumpers
In Table 3-2 the behaviour of the Ramp Time Jumpers are explained:
Table 3-2
Ramp Time Jumper Behaviour
Status before action(s)
Action(s)
Ø No jumper fitted
Ø Power down
Ø Ramp times have arbitrary setting
Ø Fit jumper(s)
Reaction(s) of the inverter
Ø Inverter uses the ramp times defined by the
current jumper setting
Ø Power up
Ø At least 1 jumper is fitted
Ø Cycle power
Ø Inverter uses the ramp times defined by the
current jumper setting
Ø At least 1 jumper is fitted
Ø Power down
Ø Ramp times have arbitrary setting
Ø Remove jumper(s)
Ø Inverter uses the ramp times that were used
before removing the jumper(s)
Ø Ramp times have arbitrary setting
Ø Power up
3.3.2
Control Circuit Jumpers
Control Jumpers are provided for the following functions (fit jumper to enable function).
Jumpers can only be accessed when the cover is removed (see Table 3-3):
1. Pot = Run: Enables the control potentiometer as the Command Source (auto restart
is enabled).
2. 24 V Analogue input: to change analogue input range from 0 -10V to 0 - 24V.
3. DC Brake: to change Stop function from OFF1 to DC Brake.
2
4. Fan/Pump: M~n : to change V/f curve from Linear to Quadratic curve.
5. 60Hz operation: to change motor default settings from 50Hz to 60 Hz.
Figure 3-4
Table 3-3
Control Circuit Jumpers
Control Circuit Jumper Settings
Jumper
Jumper Fitted
Jumper Removed
Pot = Run
P0700 = 2
P0705 = 1
P1210 = 6
P0700 = 2
P0701 = 1
P1210 = 0
24 Ain
No software effect
No software effect
DC Brake
Uses the ramp jumper setting to derive the ramp down value.
Otherwise the value in P1233 (DC Brake Duration) is ramp down
time multiplied by motor nominal current, divided by the inverter
nominal current if the value is within the range of P1233
otherwise it is clamped at the upper limit.
P1233 = 0
Fan/Pump
P1300 = 2 (fan curve/quadratic vf)
P1300 = 0 (linear vf)
50/60 Hz
Rated Motor Frequency = 60 Hz
Rated Motor Frequency = 50 Hz
44
COMBIMASTER 411 & MICROMASTER 411 Operating Instructions
6SE6400-5CA00-0BP0
Issue 03/02
3. COMMISSIONING
Control Jumpers
In Table 3-4 the behaviour of the Control Jumpers are explained:
Table 3-4
Control Circuit Jumper Behaviour
Status before action(s)
Action(s)
Ø Jumper not fitted
Ø Power down
Ø Fit jumper(s)
Reaction(s) of the inverter
Ø Parameters influenced by jumper will have
jumper default values
Ø Power up
Ø Jumper not fitted
Ø Cycle power
Ø Parameters influenced by jumper are not
changed
Ø Jumper fitted
Ø Power down
Ø Parameters influenced by jumper will have
“jumper removed“ default values (normally
factory default)
Ø Remove jumper
Ø Power up
Ø Jumper not fitted
!
3.3.3
Ø Cycle power
Ø Parameters influenced by jumper are not
changed
Warning
With the DC Brake jumper set, when stopping the inverter, DC Braking is applied
for a period proportional to the Ramp Down Time.
Frequency use of long periods of DC injection braking can cause the motor and
the inverter to overheat.
Default setup
To change parameters it is necessary to use a Basic Operator Panel (BOP), Advanced
Operator Panel (AOP) or an external serial interface. The CM411 is therefore delivered
with the following default settings:
♦
♦
♦
♦
♦
Setpoint control from the Analog input in addition to Control Potentiometer.
Supply frequency set for 0 to 50 Hz.
Digital inputs:
DIN 1 ON/OFF1.
DIN 2 Reverse.
DIN 3 Fault Acknowledge
Jumpers for Ramp and Control circuits set to open (CM411default settings).
Refer to Commissioning Procedure in section 3.3 for jumper selection.
Relay – Fault conditions.
COMBIMASTER 411 & MICROMASTER 411 Operating Instructions
6SE6400-5CA00-0BP0
45
3. COMMISSIONING
3.3.4
Issue 03/02
Default Operation
For default operation, connect the terminals as shown in Figure 3-5 below.
Figure 3-5
Default Setup Terminal Connections
Ø FREQUENCY SETPOINT – Setpoint addition: Control potentiometer and Analog input
(P1000 = 27).
In order to provide the unit with a Frequency Setpoint the user can either:
1. Turn the control potentiometer.
2. Fit an external potentiometer, or apply an external analog control voltage across the
terminals 6 & 7 AIN.
Note
When using the analog input only, the control potentiometer should be turned fully
anti-clockwise to ensure that the control potentiometer is de-activated.
3.3.5
Operation using “Pot = Run” Jumper
With the “Pot = Run” jumper fitted, the control potentiometer provides the ON/OFF
command source.
In order to provide the unit with a Run command the Control Potentiometer must be
turned in a clockwise direction. To switch the unit OFF, turn the Control Potentiometer
fully anti-clockwise (OFF position).
!
46
Warning
If the unit is powered up when the Control Potentiometer is not in the OFF
position, the unit may automatically restart and ramp-up to the frequency setpoint
(Auto-restart function is active by default).
COMBIMASTER 411 & MICROMASTER 411 Operating Instructions
6SE6400-5CA00-0BP0
Issue 03/02
3. COMMISSIONING
Ø FREQUENCY SETPOINT – Setpoint addition: Control potentiometer and Analog input
(P1000 = 27).
In order to provide the unit with a Frequency Setpoint the user can either:
1. Turn the control potentiometer.
2. Fit an external potentiometer, or apply an external analog control voltage across the
terminals 6 & 7 AIN.
Notes:
♦
♦
3.3.6
The ‘Internal’ frequency setpoint set by the Control Potentiometer is ADDED to the
external frequency setpoint (set by either external potentiometer or control voltage).
On mains break or fault, the inverter will automatically re-start on power-up (Auto
restart P1210 = 6 – default).
Non - Default Modes of Operation
Non-default modes of operation require the use of either a Keypad (e.g., Basic Operator
Panel or Advanced Operator Panel) or a Commissioning tool (e.g., Drive Monitor) in order
to change from the default parameter settings.
The Basic Operator Panel (BOP) – Part Number: 6SE6400-0BP00-0AA0 is housed in an
Operator Panel Mounting Kit (6SE6401-1DF00-0AA0) and connected via the Interface
Link Cable to the Inverter serial comms port. This arrangement is shown below.
COMBIMASTER 411 & MICROMASTER 411 Operating Instructions
6SE6400-5CA00-0BP0
47
3. COMMISSIONING
3.3.6.1
Issue 03/02
Stopping the Motor
When the inverter is being operated using the Run/Stop switch (connected to DIN1)
setting the switch to OFF will override the potentiometer setting and bring the motor to a
controlled stop.
3.3.7
Operation - Keypad Control
This method of operation requires either a Basic Operating Panel (BOP) (Order No.
6SE6400-0BP00-0AA0) or a serial link connection.
When using the BOP it will be necessary to set parameter P0700 to 1. This changes the
command source to BOP control. For details on using the BOP refer to Commissioning
with the Basic Operator Panel (BOP) on page 51.
3.3.7.1
Stopping the Motor
Where the inverter is being operated using digital control from the BOP the inverter can
be stopped by pressing the Stop Inverter button .
3.3.8
If the Motor does not start up
Refer to Section 6 – Troubleshooting for further information.
3.3.9
If a fault occurs:
1) Switch the Inverter off.
2) Disconnect the power supply.
3) Reconnect the power supply.
4) Switch on again.
5) Faults are acknowledged by using digital input DIN 3 (default setting).
Switch off if the fault condition persists.
48
COMBIMASTER 411 & MICROMASTER 411 Operating Instructions
6SE6400-5CA00-0BP0
Issue 03/02
3.3.10
3. COMMISSIONING
Commissioning Overview with BOP or AOP
Prerequisites:
Mechanical and electrical Installation is completed.
Setting the motor frequency
Jumper 60Hz: Off = 50 Hz / ON = 60 Hz
Power ON
Quick Commissioning P0010 = 1
See Section 3.3.10.1
Further Commissioning via P0004 and P0003
An overview of the parameter structure is given in
Section 5.2
For a detailed description of parameters, see the
Parameter List.
Note
We recommend the commissioning according this scheme. Nevertheless an expert user
is allowed to do the commissioning without the filter functions of P0004.
3.3.10.1
Quick commissioning (P0010=1)
It is important that parameter P0010 is used for commissioning and P0003 is used to select the
number of parameters to be accessed. This parameter allows a group of parameters to be selected
that will enable quick commissioning. Parameters such as Motor settings and Ramp settings are
included.
At the end of the quick commissioning sequence, P3900 should be selected, which, when set to 1,
will carry out the necessary motor calculations and clear all other parameters (not included in
P0010=1) to the default settings. This will only happen in the Quick Commissioning mode.
COMBIMASTER 411 & MICROMASTER 411 Operating Instructions
6SE6400-5CA00-0BP0
49
3. COMMISSIONING
Issue 03/02
Flow chart Quick Commissioning (Level 1 Only)
P0010
Start Quick Commissioning
0
Ready to Run
1
Quick Commissioning
30 Factory Setting
Note
P0010 must always be set back to '0' before
operating the motor. However if P3900 = 1 is set
after commissioning this is done automatically.
P0100
Operation for Europe/N. America
0
Power in kW; f default 50 Hz
1
Power in hp; f default 60 Hz
2
Power in kW; f default 60 Hz
Note
Settings 0 & 1 can be changed using the 60Hz
Jumper to allow permanent setting.
P0304
Rated Motor Voltage1)
10 V - 2000 V
Nominal motor voltage (V) from rating plate
P0700
Selection of Command Source 2)
(on / off / reverse)
0 Factory Setting
1 Basic Operator Panel
2 Terminal / Digital Inputs (Default)
P1000
Selection of Frequency Setpoint 2)
0
No frequency setpoint
1. BOP frequency control ↑↓
2. Analogue Setpoint
27. Setpoint Addition: Analogue Setpoint & Control
Potentiometer(Default)
P1080
Min. Motor Frequency
Sets minimum motor frequency (0-650Hz) at which
the motor will run irrespective of the frequency
setpoint. The value set here is valid for both
clockwise and anti-clockwise rotation.
P0305
Rated Motor Current1)
0 - 2 x inverter rated current (A)
Nominal motor current (A) from rating plate
P1082
Max. Motor Frequency
Sets maximum motor frequency (0-650Hz) at which
the motor will run at irrespective of the frequency
setpoint. The value set here is valid for both
clockwise and anti-clockwise rotation.
P0307
Rated Motor Power1)
0 kW - 2000 kW
Nominal motor power (kW) from rating plate.
If P0100 = 1, values will be in hp
P1120
Ramp-Up Time
0 s - 650 s
Time taken for the motor to accelerate from
standstill up to maximum motor frequency.
P0310
Rated Motor Frequency1)
12 Hz - 650 Hz
Nominal motor frequency (Hz) from rating plate
P0311
Rated Motor Speed1)
0 - 40000 1/min
Nominal motor speed (rpm) from rating plate
P1121
Ramp-Down Time
0 s - 650 s
Time taken for motor to decelerate from maximum
motor frequency down to standstill.
P3900
End Quick Commissioning
0 No Quick Commissioning.
1 Perform Quick Commissioning with factory reset
of all other Parameters (Recommended).
1) Motor related parameters – please refer to motor rating plate drawing.
2) Denotes parameters that contain more detailed lists of possible settings for use in specific applications. Please refer to the
Parameter List and Operating Instructions on the CD.
50
COMBIMASTER 411 & MICROMASTER 411 Operating Instructions
6SE6400-5CA00-0BP0
Issue 03/02
3.3.11
3. COMMISSIONING
Commissioning with the Basic Operator Panel (BOP)
The Basic Operator Panel (BOP), which is available as an
optional accessory, provides the user with access to the inverter
parameters and enables you to customize the settings of your
COMBIMASTER 411 & MICROMASTER 411. The BOP can be
used to configure several COMBIMASTER 411 &
MICROMASTER 411 Inverters. There is no need to purchase a
separate BOP for each inverter. The BOP is mounted in an
Operator Panel Mounting Kit, as shown in Section 8.7
It should be noted that the BOP motor control functions are
disabled by default. To control the motor via the BOP, parameter
P0700 should be set to 1.
If the BOP connection is removed during normal running the drives is stopped and the
motor coasts to standstill.
Table 3-5 shows the factory default settings for operation via the Basic Operator Panel.
Table 3-5
Default Settings for BOP Operation
Parameter
P0100
3.3.12
Meaning
Operating Mode Europe/US
Default Europe (North America)
50 Hz, kW (60Hz, hp)
P0307
Power (rated motor)
kW (hp)
P0310
Motor frequency rating
50 Hz (60 Hz)
P0311
Motor speed rating
1395 (1680) rpm [depending on variant]
P1082
Maximum Motor Frequency
50 Hz (60 Hz)
Basic operation with the BOP
Prerequisites
Ø P0010 = 0 (in order to initiate the run command correctly).
Ø P0700 = 1 (enables the start/stop button on the BOP).
Ø P1000 = 1 (this enables the motor potentiometer setpoints).
1. Press the green (RUN) button to start the motor.
2. Press the ‘UP’ button while the motor is turning. Motor speed increases to 50 Hz.
3. When the inverter reaches 50 Hz, press the ‘DOWN’ button. Motor speed and display
is decreased.
4. Change the direction of rotation with the FORWARD/REVERSE button.
5. The red button STOPS the motor.
3.3.13
Basic Operator Panel Function (Fn) Button
Use of Function button.
The Function button is used to view additional information. To view additional information
the following actions should be performed:
From any parameter, press and hold the function button during operation.
1.
The display will change to show the DC link voltage (indicated by d).
2.
Press the function button again to show the output current (A).
3.
Press the function button again to show the output frequency (Hz).
4.
Press the function button again to show the output voltage (indicated by o).
COMBIMASTER 411 & MICROMASTER 411 Operating Instructions
6SE6400-5CA00-0BP0
51
3. COMMISSIONING
5.
Issue 03/02
Press the function button again to show the function that has been selected
for display in P0005. (If P0005 is set to show any of the above (3, 4, or 5) then
this will not be shown again.)
Note
Additional presses will toggle around the above displays.
Press and hold the function button at any point in the cycle to display the parameter
number you started from (e.g. r0000) and release to return to the previous display.
Scrolling Function
When the user is required to change a value of a parameter, the
button and the
button on the BOP are used to increase and decrease the value respectively.
Changing single digits in Parameter values
For changing the parameter value rapidly, the single digits of the display can be changed
by performing the following actions:
1.
2.
3.
4.
5.
6.
Ensure you are in the parameter value changing level.
Press
(function button), which causes the right hand digit to blink.
Change the value of this digit by pressing
/ .
(function button) again causes the next digit to blink.
Press
Perform steps 2 to 4 until the required value is displayed.
Press the
to leave the parameter value changing level.
Note
The function button may also be used to acknowledge a fault condition.
Jump Function
From any parameter (rXXXX or PXXXX) a short press of the Fn button will immediately
jump to r0000, you can then change another parameter, if required. Upon returning to
r0000, pressing the Fn button will return you to your starting point.
3.3.14
Reset to Factory default
To reset all parameters to the factory default settings; the following parameters should be
set as follows:
1. Set P0010=30.
2. Set P0970=1.
Notes
1. The reset process can take up to 3 minutes to complete.
2. Refer to Parameter P0399 for description on saving motor data sets while
performing a reset to the factory defaults.
52
COMBIMASTER 411 & MICROMASTER 411 Operating Instructions
6SE6400-5CA00-0BP0
Issue 03/02
3. COMMISSIONING
Buttons on the Basic Operator Panel
Table 3-6
Basic Operator Panel Controls
Panel/Button
H
Function
P(1)
Hz
Effects
Indicates Status
The LCD displays the settings currently used by
the inverter.
Inverter Start
Pressing the button starts the inverter. This button
is disabled by default. To enable this button set
P0700 = 1.
Inverter Stop
OFF1 Pressing the button causes the inverter to
come to a standstill at the selected ramp
down rate. Disabled by default, to enable set
P0700 = 1.
OFF2 Pressing the button twice (or once long)
causes the motor to coast to a standstill.
This function is always enabled.
Change direction
Jog motor
Press this button to change the direction of rotation
of the motor. Reverse is indicated by a minus (-)
sign or a flashing decimal point. Disabled by default,
to enable set P0700 = 1.
Pressing this button while the inverter has no output
causes the motor to start and run at the preset jog
frequency. The inverter stops when the button is
released. Pressing this button when the
inverter/motor is running has no effect.
This button can be used to view additional
information. See also Section 5.1.2.
Functions
It works by pressing and holding the button. It
shows the following, starting from any parameter
during operation:
1. DC link voltage (indicated by d – units V).
2. Output current. (A)
3. Output frequency (Hz)
4. Output voltage (indicated by o – units V).
5. The value (selected in P0005).
Access
parameters
Pressing this button allows access to the
parameters.
Increase value
Pressing this button increases the displayed value.
To change the Frequency Setpoint via the BOP set
P1000 = 1.
Decrease value
Pressing this button decreases the displayed value.
To change the Frequency Setpoint via the BOP set
P1000 = 1.
COMBIMASTER 411 & MICROMASTER 411 Operating Instructions
6SE6400-5CA00-0BP0
53
3. COMMISSIONING
Issue 03/02
Changing parameters with the BOP
Table 3-7
Changing Drive Parameters with the BOP
The following descriptions show how to change the parameters; use this description as a
guide for setting any parameters using the ‘BOP’.
Changing P0004 – parameter filter function
Step
Result on display
1
Press
to access parameters
2
Press
until P0004 is displayed
Press
to access the parameter
3
value level
4
Press
or
5
Press
value
to confirm and store the
6
Only the motor parameters are visible
to the user.
to the required value
Changing P1082 an indexed parameter – setting maximum motor frequency
Step
Result on display
1
Press
to access parameters
2
Press
until P1082 is displayed
Press
to access the parameter
3
value level
4
Press
to display current set value
5
Press
or
6
Press
value
to confirm and store the
7
Press
until r0000 is displayed
8
Press
to return the display to the
standard drive display (as defined by
the customer)
to the required value
The required maximum frequency has now been stored.
Note - Busy Message
In some cases - when changing parameter values - the display on the BOP shows
. This means the inverter is busy with tasks of higher priority.
54
COMBIMASTER 411 & MICROMASTER 411 Operating Instructions
6SE6400-5CA00-0BP0
Issue 03/02
3. COMMISSIONING
Motor data for CM411 parameterization
Figure 3-6
Typical Motor Rating Plate Example
Note
♦
♦
♦
♦
P0308 & P0309 are only visible if P0003 ≥ 2. Only one of the parameters is shown
depending on the settings of P0100.
Changing motor parameters is not possible unless P0010=3.
Ensure that the inverter is configured correctly to the motor.
To enable the trip function, set parameter P0701, P0702 or P0703 = 29.
COMBIMASTER 411 & MICROMASTER 411 Operating Instructions
6SE6400-5CA00-0BP0
55
3. COMMISSIONING
3.3.15
Issue 03/02
Commissioning with the Advanced Operator Panel (AOP)
The Advanced Operator Panel (AOP) is available as an option.
Its advanced features include the following:
Ø
Ø
Ø
Ø
Multilingual clear text display
Upload/download facility for multiple parameter sets
Programmable via PC
Multidrop capability to drive up to 30 MICROMASTER 4’s
Please refer to the AOP Manual for details or contact your
local Siemens sales office for assistance.
3.4
General operation
For a full description of standard and extended parameters refer to the Parameter List.
Notes
56
♦
The inverter does not have a main power switch and is live when the power supply
is connected. It waits, with the output disabled, until the RUN button is pressed or
for the presence of a digital ON signal at terminal 1 (ON/OFF1).
♦
If a BOP or an AOP is fitted and the output frequency is selected to be displayed
(P0005 = 21) the corresponding setpoint is displayed approximately every 1.0
seconds while the inverter is stopped.
♦
The inverter is programmed at the factory for standard applications on Siemens
four-pole standard motors that have the same power rating as the inverters. When
using other motors it is necessary to enter the specifications from the motor's rating
plate. See Figure 3- for details on how to read motor data.
♦
Changing motor parameters is not possible unless P0010 = 1.
♦
You must set P0010 back to 0 in order to initiate a run.
COMBIMASTER 411 & MICROMASTER 411 Operating Instructions
6SE6400-5CA00-0BP0
Issue 03/02
4
4. USING COMBIMASTER 411/MICROMASTER 411
Using the COMBIMASTER 411 &
MICROMASTER 411
This Chapter contains:
Ø
An explanation of the various methods of controlling the inverter
Ø
An outline of some of the more commonly used parameters of the COMBIMASTER
411/MICROMASTER 411 which will allow the user to configure the inverter for a
number of applications.
Ø
A brief summary of all the inverter’s control modes and an introduction to the inverter’s
fault and warning reporting capability.
Ø
More detailed information can be found in the Parameter List associated with the
COMBIMASTER 411/MICROMASTER 411.
4.1
Frequency Setpoint ..............................................................................................................58
4.2
Command Sources (P0700).................................................................................................58
4.3
OFF and Braking Functions .................................................................................................59
4.4
Control Modes (P1300) ........................................................................................................60
4.5
Faults and warnings .............................................................................................................60
COMBIMASTER 411 & MICROMASTER 411 Operating Instructions
6SE6400-5CA00-0BP0
57
4. USING COMBIMASTER 411/MICROMASTER 411
!
Warnings
♦
♦
♦
♦
♦
♦
♦
♦
4.1
Issue 03/02
When operating electrical devices, it is impossible to avoid applying hazardous
voltages to certain parts of the equipment.
Emergency Stop facilities according to EN 60204 IEC 204 (VDE 0113) must remain
functional in all operating modes of the control equipment. Any disengagement of
the Emergency Stop facility must not lead to uncontrolled or undefined restarts.
Faults occurring in the control equipment can lead to substantial material damage,
or even grievous bodily injury (i.e. potentially dangerous faults). Additional external
precautions must be taken, or facilities provided, to ensure safe operation, (e.g.
independent limit switches, mechanical interlocks, etc.).
COMBIMASTER 411/MICROMASTER 411 operate at high voltages.
Certain parameter settings may cause the inverter to restart automatically after an
input power failure.
This equipment is capable of providing internal motor overload protection. Refer to
2
P0610 (level 3) and P0335. I T is ON by default. Motor overload protection can also
be provided using an external PTC via a digital input.
This equipment is suitable for use in a circuit capable of delivering not more than
10,000 symmetrical amperes (rms), for a maximum voltage of 460V when protected
by a H or K Class fuse (see Table on page 85)
This equipment must not be used as an ‘Emergency Stop mechanism’ (see EN
60204, 9.2.5.4)
Frequency Setpoint
Ø
Ø
Default:
Options
Setpoint Addition: Terminal 6/7 (AIN+/ AIN -)/Control Potentiometer
see P1000
Notes
For frequency setpoint via PROFIBUS see PROFIBUS Instructions.
4.2
Command Sources (P0700)
Starting the motor
Ø
Ø
Default
Other Settings
Terminal 1 (DIN 1): (P0700=2)
see P0700 to P0704
Stopping the motor
There are several ways to stop the motor:
Ø Default
Ø
♦ OFF1
Terminal 1 (DIN 1): (P0700=2)
♦ OFF2
Off button on BOP/AOP. Pressing the Off button once (two
seconds) or twice (with default settings). This is not possible without
BOP/AOP.
♦ OFF3
Other Settings
no standard setting
see P0700 to P0704
Reversing the motor
Ø Default
Terminal 2 (DIN 2)
Ø Other Settings see P0700 to P0704
58
COMBIMASTER 411 & MICROMASTER 411 Operating Instructions
6SE6400-5CA00-0BP0
Issue 03/02
4. USING COMBIMASTER 411/MICROMASTER 411
4.3
OFF and Braking Functions
4.3.1
OFF1
This command (produced by canceling the ON command) causes the inverter to come to
a standstill at the selected ramp-down rate.
Ø Parameter to change ramp time see P1121
Notes
Ø ON and the following OFF1 command must have the same source.
Ø If the ON/OFF1 Command is set to more than one Digital input, only the last set
Digital Input is active e.g. DIN3 active.
Ø OFF1 can be combined with DC braking or Compound braking
4.3.2
OFF2
This command causes the motor to coast to a standstill.
Note
The OFF2 command can have one or more sources. By default the OFF2 command is
set to BOP/AOP. This source still exists even if other sources are defined by one of the
following parameters, P0700, P0701, P0702, P0703 and P0704.
4.3.3
OFF3
An OFF3 command causes the motor to decelerate rapidly.
For starting the motor when OFF3 is set, the binary input has to be closed (high). If OFF3
is high, the motor can be started and stopped by ON/OFF1 or ON/OFF2.
If OFF3 is low the motor cannot be started.
Ø Ramp down time:
see P1135
Note
OFF3 can be combined with DC braking or compound braking
4.3.4
DC braking
DC braking is possible together with OFF1 and OFF3. A DC current is applied to stop the
motor quickly.
Ø set DC braking:
see P0701 to P0704
Ø set braking period:
see P1233
Ø set braking current:
see P1232
Note
If no digital input is set to DC braking and P1233 ≠ 0, DC braking will be active after every
OFF1 command.
4.3.5
Compound Braking
Compound Braking is possible with both OFF1 and OFF3. For Compound Braking a DC
component is added to the AC current.
Set the braking current:
see P1236
COMBIMASTER 411 & MICROMASTER 411 Operating Instructions
6SE6400-5CA00-0BP0
59
4. USING COMBIMASTER 411/MICROMASTER 411
4.4
Issue 03/02
Control Modes (P1300)
The various modes of operation of the MICROMASTER 411 control the relationship
between the speed of the motor and the voltage supplied by the inverter. A summary of
the control modes available are listed below:
Ø Linear V/f control,
P1300 = 0
Can be used for variable and constant torque applications, such as conveyors and
positive displacement pumps.
Ø Linear V/f control with FCC (Flux Current Control),
P1300 = 1
This control mode can be used to improve the efficiency and dynamic response of the
motor.
Ø Quadratic V/f control
P1300 = 2
This mode can be used for variable torque loads, such as fans and pumps.
Ø Multi-point V/f control
P1300 = 3
Multi-point V/f allows the user to define their own V/f Characteristics.
This characteristic uses two fixed coordinates and three pairs of variable coordinates.
Fixed co-ordinates are: Boost as defined in P1310 at 0Hz.
Nominal voltage P0304 at nominal frequency P0310
Variable co-ordinates may be obtained from the following three pairs of coordinates
P1320 (frequency) -P1321 (voltage)
P1322 (frequency) -P1323 (voltage)
P1324 (frequency) -P1325 (voltage)
User programmable V/f characteristics are often used to provide correct torque at
correct frequency, which can be useful when using the Inverter with synchronous
motors. See Parameter List for further detail.
4.5
Faults and warnings
LED Fault Indication
Fault states and warnings are indicated by the LED within the control potentiometer on
the inverter, see section 6.1 for further information.
BOP fitted
If a BOP is fitted, the fault states (P0947) and warnings (P2110) are displayed should a
fault condition occur. For further details, please refer to section 6.2.
AOP fitted
If the AOP is fitted, fault and warning codes are displayed on the LCD panel.
60
COMBIMASTER 411 & MICROMASTER 411 Operating Instructions
6SE6400-5CA00-0BP0
Issue 03/02
5
5. SYSTEM PARAMETERS
System Parameters
This Chapter contains:
Ø
A functional overview of the parameters available for customizing your
COMBIMASTER411 or MICROMASTER CM411 Inverter
Note
For an in-depth description of Parameters refer to the Parameter List (see Documentation
CD-ROM).
5.1
Introduction to COMBIMASTER 411/MICROMASTER 411 System Parameters................62
5.2
Parameter List (short form) ..................................................................................................64
COMBIMASTER 411 & MICROMASTER 411 Operating Instructions
6SE6400-5CA00-0BP0
61
5. SYSTEM PARAMETERS
5.1
Issue 03/02
Introduction to COMBIMASTER 411/MICROMASTER 411
System Parameters
Parameters can only be changed by using the Basic Operator Panel (BOP), the
Advanced Operator Panel (AOP) or Serial Interface.
Note
Full details of the COMBIMASTER 411 /MICROMASTER 411 Parameters can be found
in the separate document “COMBIMASTER 411/MICROMASTER 411 – Parameter List”.
This document is included in the CD ROM delivered with the product.
Parameters may be changed and set (using the BOP) to adjust the desired properties of
the inverter, such as ramp times, minimum and maximum frequencies etc. The parameter
numbers selected and the setting of the parameter values are indicated on the optional
five-digit LCD display.
♦ Read only parameters are indicated with r instead of P.
♦ P0010 initiates “Quick Commissioning”. Set P0010 to 1.
♦ The inverter will not run unless P0010 is set to 0 after it has been accessed. This
function is automatically performed if P3900 > 0.
♦ P0004 acts as a filter, allowing access to parameters according to their functionality
group.
♦ If an attempt is made to change a parameter that cannot be changed in this status, for
example, cannot be changed whilst running or can only be changed in quick
commissioning, then
will be displayed.
♦ Busy Message
In some cases - when changing parameter values - the display on the BOP shows
for maximum of five seconds. This means the inverter is busy with tasks of
higher priority.
5.1.1
Access Levels
There are three access levels available to the user; Standard, Extended and Expert. The
level of access is set by parameter P0003. For most applications, the Standard and
Extended levels are sufficient.
The number of parameters that appear within each functional group depends on the
access level set in parameter P0003. For further details regarding parameters, see the
Parameter List on the Documentation CD-ROM.
62
COMBIMASTER 411 & MICROMASTER 411 Operating Instructions
6SE6400-5CA00-0BP0
Issue 03/02
5. SYSTEM PARAMETERS
P0004 = 2
Inverter Unit.
P0004 = 2, P0003 = 4,
Parameters level 1, 2, 3 and
4 concerning the inverter unit
P0004 = 0
(no filter function)
allows direct access
to the parameters,
For BOP and AOP
depending on the
selected access level
P0004 = 2, P0003 = 2,
Parameters level 1 and 2
concerning the inverter unit
P0004 = 2, P0003 = 3,
Parameters level 1, 2 and 3
concerning the inverter unit
P0004 = 2, P0003 = 1,
Parameters level 1
concerning the inverter unit
P0004 = 22
P0004 = 2
PI Controller
Inverter Unit
P0004 = 21
P0004 = 3
Alarms, Warnings &
Monitoring
Motor Data
P0004 = 4
P0004 = 20
Speed sensor
Communication
P0004 = 5
P0004 = 13
Technology
Application / units
Motor Control
P0004 = 7
P0004 = 12
Commands and
Digital I/O
Drive Features
Figure 5-1
P0004 = 10
P0004 = 8
Setpoint Channel &
Ramp Generator
Analogue I/O
Parameter Structure with Filter (P0004)
COMBIMASTER 411 & MICROMASTER 411 Operating Instructions
6SE6400-5CA00-0BP0
63
5. SYSTEM PARAMETERS
5.2
Issue 03/02
Parameter List (short form)
Three states are possible for all the parameters:
Ø Commissioning C
Ø Ready to run
T
Ø Run
U
This indicates when the parameter can be changed. One, two or all three states may be
specified. If all three states are specified, this means that it is possible to change this
parameter setting in all three inverter states.
Always
ParNr
ParText
Default
Acc
WS
QC
r0000
Drive display
-
1
-
-
P0003
User access level
1
1
CUT
N
P0004
Parameter filter
0
1
CUT
N
P0010
Commissioning parameter
0
1
CT
N
P0199
Equipment system number
0
2
UT
N
ParText
Default
Acc
WS
QC
P0100
Europe / North America
0
1
C
Q
P3900
End of quick commissioning
0
1
C
Q
Quick Commissioning
ParNr
Parameter reset
ParNr
ParText
Default
Acc
WS
QC
P0970
Factory reset
0
1
C
N
ParText
Default
Acc
WS
QC
r0018
Firmware version
-
1
-
-
r0026[1]
CO: Act. filtered DC-link volt.
-
2
-
-
r0037[1]
CO: Inverter temperature [°C]
-
3
-
-
r0039
CO: Energy consumpt. meter [kWh]
-
2
-
-
P0040
Reset energy consumption meter
0
2
CT
N
r0200
Act. power stack code number
-
3
-
-
P0201
Power stack code number
0
3
C
N
r0203
Act. inverter type
-
3
-
-
r0204
Power stack features
-
3
-
-
r0206
Rated inverter power [kW] / [hp]
-
2
-
-
r0207
Rated inverter current
-
2
-
-
r0208
Rated inverter voltage
-
2
-
-
Inverter Unit (P0004 = 2)
ParNr
r0209
Maximum inverter current
-
2
-
-
P0210
Supply voltage
230
3
CT
N
P0290
Inverter overload reaction
2
3
CT
N
P0292
Inverter overload warning
5
3
CUT
N
P1800
Pulse frequency
4
2
CUT
N
r1801
CO: Act. pulse frequency
-
3
-
-
P1802
Modulator mode
0
3
CUT
N
64
COMBIMASTER 411 & MICROMASTER 411 Operating Instructions
6SE6400-5CA00-0BP0
Issue 03/02
5. SYSTEM PARAMETERS
ParNr
ParText
Default
Acc
WS
QC
P1820[1]
Reverse output phase sequence
0
2
CT
N
Motor data (P0004 = 3)
ParNr
ParText
Default
Acc
WS
QC
r0034[1]
CO: Motor temperature (i2t)
-
2
-
-
P0300[1]
Select motor type
1
2
C
Q
P0304[1]
Rated motor voltage
230
1
C
Q
P0305[1]
Rated motor current
3.25
1
C
Q
P0307[1]
Rated motor power
0.75
1
C
Q
P0308[1]
Rated motor cosPhi
0.000
2
C
Q
P0309[1]
Rated motor efficiency
0.0
2
C
Q
P0310[1]
Rated motor frequency
50.00
1
C
Q
P0311[1]
Rated motor speed
0
1
C
Q
r0313[1]
Motor pole pairs
-
3
-
-
P0320[1]
Motor magnetizing current
0.0
3
CT
Q
r0330[1]
Rated motor slip
-
3
-
-
r0331[1]
Rated magnetization current
-
3
-
-
r0332[1]
Rated power factor
-
3
-
-
P0335[1]
Motor cooling
0
2
CT
Q
P0340[1]
Calculation of motor parameters
0
2
CT
N
P0344[1]
Motor weight
9.4
3
CUT
N
P0346[1]
Magnetization time
1.000
3
CUT
N
P0347[1]
Demagnetization time
1.000
3
CUT
N
P0350[1]
Stator resistance (line-to-line)
4.00000
2
CUT
N
r0384[1]
Rotor time constant
-
3
-
-
r0395
CO: Total stator resistance [%]
-
3
-
-
P0399
Motor mirror mode
2
3
CT
N
P0610[1]
Motor I2t temperature reaction
2
3
CT
N
P0611[1]
Motor I2t time constant
100
2
CT
N
P0614[1]
Motor I2t overload warning level
100.0
2
CUT
N
P0640[1]
Motor overload factor [%]
150.0
2
CUT
Q
P1910
Select motor data identification
0
2
CT
Q
r1912[1]
Identified stator resistance
-
2
-
-
Default
Acc
WS
QC
-
Command and Digital I/O (P0004 = 7)
ParNr
ParText
r0002
Drive state
-
2
-
r0019
CO/BO: BOP control word
-
3
-
-
r0052
CO/BO: Act. status word 1
-
2
-
-
r0053
CO/BO: Act. status word 2
-
2
-
-
r0054
CO/BO: Act. control word 1
-
3
-
-
r0055
CO/BO: Act. control word 2
-
3
-
-
P0700[1]
Selection of command source
2
1
CT
Q
P0701[1]
Function of digital input 1
1
2
CT
N
P0702[1]
Function of digital input 2
12
2
CT
N
P0703[1]
Function of digital input 3
9
2
CT
N
P0704[1]
Function of digital input 4
0
2
CT
N
P0705[1]
Function of digital input 5
0
2
CT
N
r0720
Number of digital inputs
-
3
-
-
COMBIMASTER 411 & MICROMASTER 411 Operating Instructions
6SE6400-5CA00-0BP0
65
5. SYSTEM PARAMETERS
Issue 03/02
ParNr
ParText
Default
Acc
WS
QC
P0719[2]
Selection of cmd. & freq. setp.
0
3
CT
N
r0722
CO/BO: Binary input values
-
2
-
-
P0724
Debounce time for digital inputs
3
3
CT
N
r0730
Number of digital outputs
-
3
-
-
P0731[1]
BI: Function of digital output 1
52:3
2
CUT
N
r0747
CO/BO: State of digital outputs
-
3
-
-
P0748
Invert digital outputs
0
3
CUT
N
P0800[1]
BI: Download parameter set 0
0:0
3
CT
N
P0801[1]
BI: Download parameter set 1
0:0
3
CT
N
P0810
BI: CDS bit 0 (Local / Remote)
0:0
2
CUT
N
P0840[1]
BI: ON/OFF1
722:0
3
CT
N
P0842[1]
BI: ON reverse/OFF1
0:0
3
CT
N
P0844[1]
BI: 1. OFF2
1:0
3
CT
N
P0845[1]
BI: 2. OFF2
19:1
3
CT
N
P0848[1]
BI: 1. OFF3
1:0
3
CT
N
P0849[1]
BI: 2. OFF3
1:0
3
CT
N
P0852[1]
BI: Pulse enable
1:0
3
CT
N
P1020[1]
BI: Fixed freq. selection Bit 0
0:0
3
CT
N
P1021[1]
BI: Fixed freq. selection Bit 1
0:0
3
CT
N
P1022[1]
BI: Fixed freq. selection Bit 2
0:0
3
CT
N
P1035[1]
BI: Enable MOP (UP-command)
19:13
3
CT
N
P1036[1]
BI: Enable MOP (DOWN-command)
19:14
3
CT
N
P1055[1]
BI: Enable JOG right
0:0
3
CT
N
P1056[1]
BI: Enable JOG left
0:0
3
CT
N
P1074[1]
BI: Disable additional setpoint
0:0
3
CUT
N
P1110[1]
BI: Inhibit neg. freq. setpoint
0:0
3
CT
N
P1113[1]
BI: Reverse
722:1
3
CT
N
P1124[1]
BI: Enable JOG ramp times
0:0
3
CT
N
P1140[1]
BI: RFG enable
1:0
3
CT
N
P1141[1]
BI: RFG start
1:0
3
CT
N
P1142[1]
BI: RFG enable setpoint
1:0
3
CT
N
P1230[1]
BI: Enable DC braking
0:0
3
CUT
N
P2103[1]
BI: 1. Faults acknowledgement
722:2
3
CT
N
P2104[1]
BI: 2. Faults acknowledgement
0:0
3
CT
N
P2106[1]
BI: External fault
1:0
3
CT
N
P2220[1]
BI: Fixed PID setp. select Bit 0
0:0
3
CT
N
P2221[1]
BI: Fixed PID setp. select Bit 1
0:0
3
CT
N
P2222[1]
BI: Fixed PID setp. select Bit 2
0:0
3
CT
N
P2235[1]
BI: Enable PID-MOP (UP-cmd)
19:13
3
CT
N
P2236[1]
BI: Enable PID-MOP (DOWN-cmd)
19:14
3
CT
N
-
Analogue I/O (P0004 = 8)
r0750
Number of ADCs
-
3
-
r0752[2]
Act. input of ADC [V]
-
2
-
-
P0753[1]
Smooth time ADC
3
3
CUT
N
r0754[2]
Act. ADC value after scaling [%]
-
2
-
-
r0755[2]
CO: Act. ADC after scal. [4000h]
-
2
-
-
P0756[1]
Type of ADC
0
2
CT
N
P0757[1]
Value x1 of ADC scaling [V]
0
2
CUT
N
P0758[1]
Value y1 of ADC scaling
0.0
2
CUT
N
66
COMBIMASTER 411 & MICROMASTER 411 Operating Instructions
6SE6400-5CA00-0BP0
Issue 03/02
5. SYSTEM PARAMETERS
P0759[1]
Value x2 of ADC scaling [V]
10
2
CUT
N
P0760[1]
Value y2 of ADC scaling
100.0
2
CUT
N
P0761[1]
Width of ADC deadband [V]
0
2
CUT
N
P0762[1]
Delay for loss of signal action
10
3
CUT
N
Acc
WS
QC
Setpoint Channel and Ramp Generator (P0004 = 10)
ParNr
ParText
Default
P1000[1]
Selection of frequency setpoint
27
1
CT
Q
P1001[1]
Fixed frequency 1
0.00
2
CUT
N
P1002[1]
Fixed frequency 2
5.00
2
CUT
N
P1003[1]
Fixed frequency 3
10.00
2
CUT
N
P1004[1]
Fixed frequency 4
15.00
2
CUT
N
P1005[1]
Fixed frequency 5
20.00
2
CUT
N
P1006[1]
Fixed frequency 6
25.00
2
CUT
N
P1007[1]
Fixed frequency 7
30.00
2
CUT
N
P1016
Fixed frequency mode – Bit 0
1
3
CT
N
P1017
Fixed frequency mode – Bit 1
1
3
CT
N
P1018
Fixed frequency mode – Bit 2
1
3
CT
N
r1024
CO: Act. fixed frequency
-
3
-
-
P1031[1]
Setpoint memory of the MOP
0
2
CUT
N
P1032
Inhibit reverse direction of MOP
1
2
CT
N
P1040[1]
Setpoint of the MOP
5.00
2
CUT
N
r1050
CO: Act. Output freq. of the MOP
-
3
-
-
P1058[1]
JOG frequency right
5.00
2
CUT
N
P1059[1]
JOG frequency left
5.00
2
CUT
N
P1060[1]
JOG ramp-up time
10.00
2
CUT
N
P1061[1]
JOG ramp-down time
10.00
2
CUT
N
P1070[1]
CI: Main setpoint
755:0
3
CT
N
P1071[1]
CI: Main setpoint scaling
1:0
3
CT
N
P1075[1]
CI: Additional setpoint
755:1
3
CT
N
P1076[1]
CI: Additional setpoint scaling
1:0
3
CT
N
r1078
CO: Total frequency setpoint
-
3
-
-
r1079
CO: Selected frequency setpoint
-
3
-
-
P1080[1]
Min. frequency
0.00
1
CUT
Q
P1082[1]
Max. frequency
50.00
1
CT
Q
P1091[1]
Skip frequency 1
0.00
3
CUT
N
P1092[1]
Skip frequency 2
0.00
3
CUT
N
P1093[1]
Skip frequency 3
0.00
3
CUT
N
P1094[1]
Skip frequency 4
0.00
3
CUT
N
P1101[1]
Skip frequency bandwidth
2.00
3
CUT
N
r1114
CO: Freq. setp. after dir. ctrl.
-
3
-
-
r1119
CO: Freq. setpoint before RFG
-
3
-
-
P1120[1]
Ramp-up time
10.00
1
CUT
Q
P1121[1]
Ramp-down time
10.00
1
CUT
Q
P1130[1]
Ramp-up initial rounding time
0.00
2
CUT
N
P1131[1]
Ramp-up final rounding time
0.00
2
CUT
N
P1132[1]
Ramp-down initial rounding time
0.00
2
CUT
N
P1133[1]
Ramp-down final rounding time
0.00
2
CUT
N
P1134[1]
Rounding type
0
2
CUT
N
P1135[1]
OFF3 ramp-down time
5.00
2
CUT
Q
COMBIMASTER 411 & MICROMASTER 411 Operating Instructions
6SE6400-5CA00-0BP0
67
5. SYSTEM PARAMETERS
Issue 03/02
ParNr
ParText
Default
Acc
WS
QC
r1170
CO: Frequency setpoint after RFG
-
3
-
-
Drive Features (P0004 = 12)
ParNr
ParText
Default
Acc
WS
QC
P0005[1]
Display selection
21
2
CUT
N
P0006
Display mode
2
3
CUT
N
P0007
Backlight delay time
0
3
CUT
N
P0011
Lock for user defined parameter
0
3
CUT
N
P0012
Key for user defined parameter
0
3
CUT
N
P0013[20]
User defined parameter
0
3
CUT
N
P1200
Flying start
0
2
CUT
N
P1202[1]
Motor-current: Flying start
100
3
CUT
N
P1203[1]
Search rate: Flying start
100
3
CUT
N
P1210
Automatic restart
1
2
CUT
N
P1211
Number of restart attempts
3
3
CUT
N
P1215
Holding brake enable
0
2
T
N
P1216
Holding brake release delay
1.0
2
T
N
P1217
Holding time after ramp down
1.0
2
T
N
P1232[1]
DC braking current
100
2
CUT
N
P1233[1]
Duration of DC braking
0
2
CUT
N
P1236[1]
Compound braking current
0
2
CUT
N
P1240[1]
Configuration of Vdc controller
1
3
CT
N
r1242
CO: Switch-on level of Vdc-max
-
3
-
-
P1243[1]
Dynamic factor of Vdc-max
100
3
CUT
N
P1253[1]
Vdc-controller output limitation
10.00
3
CUT
N
P1254
Auto detect Vdc switch-on levels
1
3
CT
N
ParText
Default
Acc
WS
QC
r0020
CO: Freq. setpoint before RFG
-
3
-
-
r0021
CO: Act. frequency
-
2
-
-
r0022
Act. filtered rotor speed
-
3
-
-
r0024
CO: Act. output frequency
-
3
-
-
r0025
CO: Act. output voltage
-
2
-
-
r0027
CO: Act. output current
-
2
-
-
r0056
CO/BO: Status of motor control
-
3
-
-
Motor Control (P0004 = 13)
ParNr
r0057
Jumper status
-
2
-
-
r0067
CO: Act. output current limit
-
3
-
-
r0071
CO: Max. output voltage
-
3
-
-
r0078
CO: Act. current Isq
-
3
-
-
r0086
CO: Act. active current
-
3
-
-
P1300[1]
Control mode
0
2
CT
Q
P1310[1]
Continuous boost
50.0
2
CUT
N
P1311[1]
Acceleration boost
0.0
2
CUT
N
P1312[1]
Starting boost
0.0
2
CUT
N
P1316[1]
Boost end frequency
20.0
3
CUT
N
P1320[1]
Programmable V/f freq. coord. 1
0.00
3
CT
N
P1321[1]
Programmable V/f volt. coord. 1
0.0
3
CUT
N
P1322[1]
Programmable V/f freq. coord. 2
0.00
3
CT
N
68
COMBIMASTER 411 & MICROMASTER 411 Operating Instructions
6SE6400-5CA00-0BP0
Issue 03/02
5. SYSTEM PARAMETERS
ParNr
ParText
Default
Acc
WS
QC
P1323[1]
Programmable V/f volt. coord. 2
0.0
3
CUT
N
P1324[1]
Programmable V/f freq. coord. 3
0.00
3
CT
N
P1325[1]
Programmable V/f volt. coord. 3
0.0
3
CUT
N
P1333[1]
Start frequency for FCC
10.0
3
CUT
N
P1335[1]
Slip compensation
0.0
2
CUT
N
P1336[1]
Slip limit
250
2
CUT
N
r1337
CO: V/f slip frequency
-
3
-
-
P1338[1]
Resonance damping gain V/f
0.00
3
CUT
N
P1340[1]
Imax controller prop. gain
0.000
3
CUT
N
P1341[1]
Imax controller integral time
0.300
3
CUT
N
r1343
CO: Imax controller freq. output
-
3
-
-
r1344
CO: Imax controller volt. output
-
3
-
-
P1350[1]
Voltage soft start
0
3
CUT
N
Communication (P0004 = 20)
ParNr
ParText
Default
Acc
WS
QC
P0918
CB address
3
2
CT
N
P0927
Parameter changeable via
15
2
CUT
N
r0965
Profibus profile
-
3
-
-
r0967
Control word 1
-
3
-
-
r0968
Status word 1
-
3
-
-
r0964[5]
Firmware version data
-
3
-
-
P0971
Transfer data from RAM to EEPROM
0
3
CUT
N
P2000[1]
Reference frequency
50.00
2
CT
N
P2001[1]
Reference voltage
1000
3
CT
N
P2002[1]
Reference current
0.10
3
CT
N
P2009[2]
USS normalization
0
3
CT
N
P2010[2]
USS baudrate
6
2
CUT
N
P2011[2]
USS address
0
2
CUT
N
P2012[2]
USS PZD length
2
3
CUT
N
P2013[2]
USS PKW length
127
3
CUT
N
P2014[2]
USS telegram off time
0
3
CT
N
r2015[4]
CO: PZD from BOP link (USS)
-
3
-
-
P2016[4]
CI: PZD to BOP link (USS)
52:0
3
CT
N
r2018[4]
CO: PZD from COM link (USS)
-
3
-
-
P2019[4]
CI: PZD to COM link (USS)
52:0
3
CT
N
r2024[2]
USS error-free telegrams
-
3
-
-
r2025[2]
USS rejected telegrams
-
3
-
-
r2026[2]
USS character frame error
-
3
-
-
r2027[2]
USS overrun error
-
3
-
-
r2028[2]
USS parity error
-
3
-
-
r2029[2]
USS start not identified
-
3
-
-
r2030[2]
USS BCC error
-
3
-
-
r2032
BO: CtrlWrd1 from BOP link (USS)
-
3
-
-
r2031[2]
USS length error
-
3
-
-
r2033
BO: CtrlWrd2 from BOP link (USS)
-
3
-
-
r2036
BO: CtrlWrd1 from COM link (USS)
-
3
-
-
r2037
BO: CtrlWrd2 from COM link (USS)
-
3
-
-
P2040
CB telegram off time
20
3
CT
N
P2041[5]
CB parameter
0
3
CT
N
COMBIMASTER 411 & MICROMASTER 411 Operating Instructions
6SE6400-5CA00-0BP0
69
5. SYSTEM PARAMETERS
Issue 03/02
ParNr
ParText
Default
Acc
WS
QC
r2050[4]
CO: PZD from CB
-
3
-
-
P2051[4]
CI: PZD to CB
52:0
3
CT
N
r2053[5]
CB identification
-
3
-
-
r2054[7]
CB diagnosis
-
3
-
-
r2090
BO: Control word 1 from CB
-
3
-
-
r2091
BO: Control word 2 from CB
-
3
-
-
Alarms and Warnings (P0004 = 21)
ParNr
ParText
Default
Acc
WS
QC
P0952
Total number of faults
0
3
CT
N
r0947[8]
Last fault code
-
2
-
-
r0949[8]
Fault value
-
3
-
-
r0948[12]
Fault time
-
3
-
-
P2100[3]
Alarm number selection
0
3
CT
N
P2101[3]
Stop reaction value
0
3
CT
N
P2111
Total number of warnings
0
3
CT
N
r2110[4]
Warning number
-
2
-
-
r2114[2]
Run time counter
-
3
-
-
P2150[1]
Hysteresis frequency f_hys
3.00
3
CUT
N
P2155[1]
Threshold frequency f_1
30.00
3
CUT
N
P2156[1]
Delay time of threshold freq f_1
10
3
CUT
N
P2164[1]
Hysteresis frequency deviation
3.00
3
CUT
N
P2167[1]
Switch-off frequency f_off
1.00
3
CUT
N
P2168[1]
Delay time T_off
10
3
CUT
N
P2170[1]
Threshold current I_thresh
100.0
3
CUT
N
P2171[1]
Delay time current
10
3
CUT
N
P2172[1]
Threshold DC-link voltage
800
3
CUT
N
P2173[1]
Delay time DC-link voltage
10
3
CUT
N
P2179
Current limit for no load ident.
3.0
3
CUT
N
P2180
Delay time for load missing
2000
3
CUT
N
r2197
CO/BO: Monitoring word 1
-
2
-
-
Default
Acc
WS
QC
PI Controller (P0004=22)
ParNr
ParText
P2200[1]
BI: Enable PID controller
0:0
2
CUT
N
P2201[1]
Fixed PID setpoint 1
0.00
2
CUT
N
P2202[1]
Fixed PID setpoint 2
10.00
2
CUT
N
P2203[1]
Fixed PID setpoint 3
20.00
2
CUT
N
P2204[1]
Fixed PID setpoint 4
30.00
2
CUT
N
P2205[1]
Fixed PID setpoint 5
40.00
2
CUT
N
P2206[1]
Fixed PID setpoint 6
50.00
2
CUT
N
P2207[1]
Fixed PID setpoint 7
60.00
2
CUT
N
P2216
Fixed PID setpoint mode - Bit 0
1
3
CT
N
P2217
Fixed PID setpoint mode - Bit 1
1
3
CT
N
P2218
Fixed PID setpoint mode - Bit 2
1
3
CT
N
r2224
CO: Act. fixed PID setpoint
-
2
-
-
P2231[1]
Setpoint memory of PID-MOP
0
2
CUT
N
P2232
Inhibit rev. direct. of PID-MOP
1
2
CT
N
P2240[1]
Setpoint of PID-MOP
10.00
2
CUT
N
70
COMBIMASTER 411 & MICROMASTER 411 Operating Instructions
6SE6400-5CA00-0BP0
Issue 03/02
5. SYSTEM PARAMETERS
ParNr
ParText
Default
Acc
WS
QC
r2250
CO: Output setpoint of PID-MOP
-
2
-
-
P2253[1]
CI: PID setpoint
0:0
2
CUT
N
P2254[1]
CI: PID trim source
0:0
3
CUT
N
P2255
PID setpoint gain factor
100.00
3
CUT
N
P2256
PID trim gain factor
100.00
3
CUT
N
P2257
Ramp-up time for PID setpoint
1.00
2
CUT
N
P2258
Ramp-down time for PID setpoint
1.00
2
CUT
N
r2260
CO: PID setpoint after PID-RFG
-
2
-
-
P2261
PID setpoint filter timeconstant
0.00
3
CUT
N
r2262
CO: Filtered PID setp. after RFG
-
3
-
-
P2264[1]
CI: PID feedback
755:0
2
CUT
N
P2265
PID feedback filter timeconstant
0.00
2
CUT
N
r2266
CO: PID filtered feedback
-
2
-
-
P2267
Max. value for PID feedback
100.00
3
CUT
N
P2268
Min. value for PID feedback
0.00
3
CUT
N
P2269
Gain applied to PID feedback
100.00
3
CUT
N
P2270
PID feedback function selector
0
3
CUT
N
P2271
PID transducer type
0
2
CUT
N
r2272
CO: PID scaled feedback
-
2
-
-
r2273
CO: PID error
-
2
-
-
P2280
PID proportional gain
3.000
2
CUT
N
P2285
PID integral time
0.000
2
CUT
N
P2291
PID output upper limit
100.00
2
CUT
N
P2292
PID output lower limit
0.00
2
CUT
N
P2293
Ramp-up /-down time of PID limit
1.00
3
CUT
N
r2294
CO: Act. PID output
-
2
-
-
P2390
Energy saving setpoint
0
3
CUT
N
P2391
Energy saving timer
0
3
CT
N
P2392
Energy saving restart setpoint
0
3
CT
N
COMBIMASTER 411 & MICROMASTER 411 Operating Instructions
6SE6400-5CA00-0BP0
71
5. SYSTEM PARAMETERS
72
Issue 03/02
COMBIMASTER 411 & MICROMASTER 411 Operating Instructions
6SE6400-5CA00-0BP0
Issue 03/02
6
6. TROUBLESHOOTING
Troubleshooting
This Chapter contains:
Ø
An overview of the inverter state indicated by the LED on the Inverter. The LED is
located within the control potentiometer.
Ø
Some general information on a variety of troubleshooting measures.
Ø
A list of the fault codes that may appear on the display of the BOP. The cause and
recommended corrective action are indicated for each fault code listed.
6.1
Troubleshooting with the Inverter LED. ................................................................................74
6.2
Troubleshooting with the Basic Operator Panel...................................................................74
COMBIMASTER 411 & MICROMASTER 411 Operating Instructions
6SE6400-5CA00-0BP0
73
6. TROUBLESHOOTING
!
Warnings
♦
Repairs on equipment may only be carried out by Siemens Service, by repair
centers authorized by Siemens or by qualified personnel who are thoroughly
acquainted with all the warnings and operating procedures contained in this
manual.
Any defective parts or components must be replaced using parts contained in the
relevant spare parts list.
Disconnect the power supply before opening the equipment for access.
♦
♦
6.1
Issue 03/02
Troubleshooting with the Inverter LED.
Check the status of the LED located within the control potentiometer. A list of the LED
status indications are given in Table 6-1 below.
Table 6-1
6.2
Inverter LED Indication
Condition
Status
200 ms on/800 ms off
Power On/Ready
Continuous on
Running
800 ms on/200 ms off
Warning (general)
500 ms on/500 ms off
Trip (general)
Off
Off/Mains supply fault/No
inverter power
Troubleshooting with the Basic Operator Panel
If the display shows a fault or warning code, please refer to Table 6.2 for CM411 Fault
Codes or Table 6-3 CM411 Warning Codes.
If the motor fails to start when the ON command has been given:
•
•
•
•
Check that P0010 = 0.
Check that a valid ON signal is present.
Check that P0700 = 2 (for Terminal I/O control) or
P0700 = 1 (for BOP control).
Check that the setpoint is present (0 to 10V on Terminal 7) or the setpoint has
been entered into the correct parameter, depending upon the setpoint source
(P1000). For further details see the Parameter List.
If the motor fails to run after changing the parameters, set P0010 = 30 then P0970 = 1
and press P to reset the inverter to the factory default parameter values.
By using a switch between terminals 1 and 4 on the I/O board, the drive should now run
to the defined setpoint (established by analog input and/or control potentiometer).
Note
For the MICROMASTER 411 the motor data must relate to the inverter data power range
and voltage.
74
COMBIMASTER 411 & MICROMASTER 411 Operating Instructions
6SE6400-5CA00-0BP0
Issue 03/02
6.2.1
6. TROUBLESHOOTING
MICROMASTER 411/COMBIMASTER 411 Fault Codes
Please note that in the event of a fault, the inverter switches off and a fault code appears
on the display.
NOTE
To reset the fault code, one of three methods listed below can be used:
1. Cycle the power to the drive.
2. Press the
button on the BOP or AOP.
3. Via Digital Input 3 (Default Setting).
Table 6-2
MICROMASTER411/COMBIMASTER411 Fault Codes
Fault
Possible Causes
Diagnose & Remedy
Quit
F0001
OverCurrent
Ø Motor power (P0307) does not
correspond to the inverter power (r0206)
Ø Motor lead short circuit
Ø Earth faults
OFF2
F0002
OverVoltage
Ø DC-link voltage (r0026) exceeds trip level
(P2172)
Check the following:
1. Motor power (P0307) must correspond to inverter
power (r0206).
2. Cable length limits must not be exceeded.
3. Motor cable and motor must have no shortcircuits or earth faults
4. Motor parameters must match the motor in use
5. Value of stator resistance (P0350) must be
correct
6. Motor must not be obstructed or overloaded
Ø Increase the ramp time
Ø Reduce the boost level
Check the following:
1. Supply voltage (P0210) must lie within limits
indicated on rating plate .
2. DC-link voltage controller must be enabled
(P1240) and parameterized properly.
3. Ramp-down time (P1121) must match inertia of
load.
4. Required braking power must lie within specified
limits.
NOTE
Higher inertia requires longer ramp times; otherwise,
apply braking resistor.
Check the following:
1. Supply voltage (P0210) must lie within limits
indicated on rating plate.
2. Supply must not be susceptible to temporary
failures or voltage reductions.
Check the following:
Ø Fan must turn when inverter is running
Ø Pulse frequency must be set to default value
Ø Ambient temperature could be higher than
specified for the inverter
Ø Additional meaning for Mega Master:
Ø P949 = 1: Rectifiere overtemperature
Ø P949 = 2: Ambient overtemperature
Ø P949 = 3: EBOX overtemperature
Check the following:
1. Load duty cycle must lie within specified limits.
2. Motor power (P0307) must match inverter power
(r0206)
Check the following:
1. Load duty cycle must be correct
2. Motor thermal time constant (P0611) must be
correct
3. Motor I2t warning level must match
Ø Overvoltage can be caused either by too
high main supply voltage or if motor is in
regenerative mode.
Regenerative mode can be cause by fast
ramp downs or if the motor is driven from
an active load.
F0003
UnderVoltage
Ø Main supply failed.
Ø Shock load outside specified limits.
F0004
Inverter Over
Temperature
Ø Ventilation inadequate
F0005
Inverter I2T
Ø Inverter overloaded.
Ø Duty cycle too demanding.
Ø Motor power (P0307) exceeds inverter
power capability (r0206).
Ø Motor overloaded
F0011
Motor Over
Temperature
Ø Ambient temperature is too high.
COMBIMASTER 411 & MICROMASTER 411 Operating Instructions
6SE6400-5CA00-0BP0
75
OFF2
OFF2
OFF2
OFF2
OFF1
6. TROUBLESHOOTING
Issue 03/02
Fault
Possible Causes
Diagnose & Remedy
Quit
F0041
Motor Data
Identification
Failure
Motor data identification failed.
Ø Alarm value =0: Load missing
Ø Alarm value =1: Current limit level
reached during identification.
Ø Alarm value =2: Identified stator
resistance less than 0.1% or greater than
100%.
Ø Alarm value = 30: Current controller at
voltage limit
Ø Alarm value = 40: Inconsistence of
identified data set, at least one
identification failed
Percentage values based on the impedance
Zb = Vmot,nom / sqrt(3) / Imot,nom
Ø Read or write failure while saving nonvolatile parameter.
0:
OFF2
Ø Factory Reset and new parameterization
Ø Change drive
OFF2
Ø Read failure for power stack information
or invalid data.
Ø Internal communications failure
Ø Change drive
OFF2
Ø If fault persists, change inverter
Ø Contact Service Department
Ø Check CB and communication partner
OFF2
Ø Check USS master
OFF2
Ø No setpoint values from USS during
telegram off time
Ø Check USS master
OFF2
Ø External fault triggered via terminal inputs
Ø Disable terminal input for fault trigger.
OFF2
Ø Signal from Encoder lost
OFF2
Ø Software error or processor failure
1. Check encoder fitted. If encoder not fitted, set
P400 = 0 and select SLVC mode (P1300 = 20 or
22)
2. Check connections between encoder and inverter
3. Check encoder not faulty (select P1300 = 0, run
at fixed speed, check encoder feedback signal in
P66)
Increase encoder loss threshold in P492
Ø Run self test routines
Ø PID Feedback below min. value P2268.
Ø Change value of P2268. Adjust feedback gain.
OFF2
Ø PID feedback above max. value P2267.
Ø Change value of P2267.Adjust feedback gain.
OFF2
Fault value:
1. Some power section tests have failed
2. Some control board tests have failed
4. Some functional tests have failed
8. Some IO module tests have failed. (MM
420 only)
16. Internal RAM failed on power-up check
Ø Load conditions on motor indicate belt
failure or mechanical fault.
Ø Drive may run but some features will not work
properly.
Ø Replace drive.
OFF2
Check the following:
1. No breakage, seizure or obstruction of drive train.
2. If using an external speed sensor, check for correct
function.Check parameters:
Ø P0409 (pulse per min at rated speed).
Ø P2191 (Belt failure speed tolerance).
Ø P2192 (delay time for permitted deviation)
3. If using the torque envelope, check parameters:
Ø P2182 (threshold frequency f1)
Ø P2183 (threshold frequency f2)
Ø P2184 (threshold frequency f3)
Ø P2185 (upper torque threshold 1)
Ø P2186 (lower torque threshold 1)
Ø P2187 (upper torque threshold 2)
Ø P2188 (lower torque threshold 2)
Ø P2189 (upper torque threshold 3
Ø P2190 (lower torque threshold 3)
Ø P2192 (delay time for permitted deviation)
4. Apply lubrication if required.
OFF2
F0051
Parameter EEPROM
Fault
F0052
power stack Fault
F0060
Asic Timeout
F0070
CB setpoint fault
F0071
USS (BOP-link)
setpoint fault
F0072
USS (COMM link)
setpoint fault
F0085
External Fault
F0090
Encoder feedback
loss
F0101
Stack Overflow
F0221
PID Feedback below
min. value
F0222
PID Feedback above
max. value
F0450
BIST Tests Failure
F0452
Belt Failure
Detected
76
Ø No setpoint values from CB
(communication board) during telegram
off time
Ø No setpoint values from USS during
telegram off time
Check that the motor is connected to the
inverter.
1-40: Check if motor data in P304-311 are correct.
Check what type of motor wiring is required (star,
delta).
COMBIMASTER 411 & MICROMASTER 411 Operating Instructions
6SE6400-5CA00-0BP0
OFF2
OFF2
Issue 03/02
Table 6-3
6. TROUBLESHOOTING
COMBIMASTER 411/MICROMASTER 411 Warning Codes
Alarms
Possible Causes
Diagnose & Remedy
Quit
A0501
Current Limit
Ø Motor power does not correspond to the
inverter power
Ø Motor leads are too long
Ø Earth faults
---
A0502
Overvoltage limit
Overvoltage limit is reached.
This warning can occur during ramp down, if
the dc-link controller is disabled (P1240 = 0).
Main supply failed
Main supply (P0210) and consequently DClink voltage (R0026) below specified limit
(P2172).
Warning level of inverter heat-sink
temperature (P0614) is exceeded, resulting in
pulse frequency
reduction and/or output frequency reduction
(depending on parametrization in (P0610)
Ø Warning level exceeded, current will be
reduced if parameterized (P0610 = 1)
Ø Motor overloaded.
Ø Load duty cycle too high.
Check the following:
1. Motor power (P0307) must correspond to inverter
power (r0206).
2. Cable length limits must not be exceeded.
3. Motor cable and motor must have no shortcircuits or earth faults
4. Motor parameters must match the motor in use
5. Value of stator resistance (P0350) must be
correct
6. Motor must not be obstructed or overloaded
Ø Increase the ramp-up-time.
Ø Reduce the boost.
If this warning is displayed permanently, check drive
input voltage .
A0503
UnderVoltage Limit
A0504
Inverter
OverTemperature
A0505
Inverter I2T
A0511
Motor
OverTemperature
I2T
A0535
Braking Resistor
Hot
A0541
Motor Data
Identification Active
A0600
RTOS Overrun
Warning
A0700
CB warning 1 see
CB manual for
details.
A0701
CB warning 2 see
CB manual for
details.
A0702
CB warning 3 see
CB manual for
details.
A0703
CB warning 4 see
CB manual for
details.
A0704
CB warning 5 see
CB manual for
details.
A0705
CB warning 6 see
CB manual for
details.
A0706
CB warning 7 see
CB manual for
details.
---
Check main supply voltage (P0210).
---
Check the following:
1. Ambient temperature must lie within specified
limits
2. Load conditions and duty cycle must be
appropriate
Check that duty cycle lies within specified limits
---
Check the following:
1. P0611 (motor I2t time constant) should be set to
appropriate value
2. P0614 (Motor I2t overload warning level) should
be set to suitable level
-----
--Motor data identification (P1910) selected or
running
-----
CB (communication board) specific
See CB user manual
---
CB (communication board) specific
See CB user manual
---
CB (communication board) specific
See CB user manual
---
CB (communication board) specific
See CB user manual
---
CB (communication board) specific
See CB user manual
---
CB (communication board) specific
See CB user manual
---
CB (communication board) specific
See CB user manual
---
COMBIMASTER 411 & MICROMASTER 411 Operating Instructions
6SE6400-5CA00-0BP0
77
6. TROUBLESHOOTING
Issue 03/02
Alarms
Possible Causes
Diagnose & Remedy
Quit
A0707
CB warning 8 see
CB manual for
details.
A0708
CB warning 9 see
CB manual for
details.
A0709
CB warning 10 see
CB manual for
details.
A0710
CB communication
error
A0711
CB configuration
error
A0910
Vdc-max controller
de-activated
CB (communication board) specific
See CB user manual
---
CB (communication board) specific
See CB user manual
---
CB (communication board) specific
See CB user manual
---
Communication with CB (communication
board) is lost
Check CB hardware
---
CB (communication board) reports a
configuration error.
Check CB parameters
---
Vdc max controller has been de-activated,
Check the following:
since controller is not capable of keeping DC- 1. Input voltage (P0210) must lie within range.
link voltage (r0026) within limits (P2172).
2. Load must be match.
Ø Occurs if main supply voltage (P0210) is
permanently too high.
Ø Occurs if motor is driven by an active
load, causing motor to goes into
regenerative mode.
Ø Occurs at very high load inertias, when
ramping down.
A0911
Ø Vdc max controller is active; so rampVdc-max controller
down times will be increased
active
automatically to keep DC-link voltage
(r0026) within limits (P2172).
A0912
Vdc min controller will be activated if DC-link
Vdc-min controller
voltage (r0026) falls below minimum level
active
(P2172).
Ø The kinetic energy of the motor is used to
buffer the DC-link voltage, thus causing
deceleration of the drive!
Ø So short mains failures do not necessarily
lead to an undervoltage trip.
A0920
ADC parameters should not be set to
ADC parameters not identical values, since this would produce
set properly.
illogical results.
Ø Index 0: Parameter settings for output
identical
Ø Index 1: Parameter settings for input
identical
Ø Index 2: Parameter settings for input do
not correspond to ADC type
A0921
DAC parameters should not be set to
DAC parameters not identical values, since this would produce
set properly.
illogical results.
Ø Index 0: Parameter settings for output
identical
Ø Index 1: Parameter settings for input
identical
Ø Index 2: Parameter settings for output do
not correspond to DAC type
A0922
No Load is applied to the inverter.
No load applied to
As a result, some functions may not work as
inverter
under normal load conditions.
A0923
Both JOG right and JOG left (P1055/P1056)
Both JOG Left and
have been requested. This freezes the RFG
JOG Right are
output frequency at its current value.
requested
78
---
---
---
---
---
-----
COMBIMASTER 411 & MICROMASTER 411 Operating Instructions
6SE6400-5CA00-0BP0
Issue 03/02
6. TROUBLESHOOTING
Alarms
Possible Causes
Diagnose & Remedy
Quit
A0952
Belt Failure
Detected
Load conditions on motor indicate belt failure
or mechanical fault.
Apply lubrication if required.
Check the following:
---
1. No breakage, seizure or obstruction of drive train.
2. If using an external speed sensor, check for correct
function.Check parameters:
Ø P0409 (pulse per min at rated speed).
Ø P2191 (Belt failure speed tolerance).
Ø P2192 (delay time for permitted deviation)
3. If using the torque envelope, check parameters:
Ø P2182 (threshold frequency f1)
Ø P2183 (threshold frequency f2)
Ø P2184 (threshold frequency f3)
Ø P2185 (upper torque threshold 1)
Ø P2186 (lower torque threshold 1)
Ø P2187 (upper torque threshold 2)
Ø P2188 (lower torque threshold 2)
Ø P2189 (upper torque threshold 3)
Ø P2190 (lower torque threshold 3)
Ø P2192 (delay time for permitted deviation)
4. Apply lubrication if required.
COMBIMASTER 411 & MICROMASTER 411 Operating Instructions
6SE6400-5CA00-0BP0
79
6. TROUBLESHOOTING
80
Issue 03/02
COMBIMASTER 411 & MICROMASTER 411 Operating Instructions
6SE6400-5CA00-0BP0
Issue 03/02
7
7. COMBIMASTER 411/MICROMASTER 411 SPECIFICATIONS
MICROMASTER 411/COMBIMASTER 411
Specifications
This Chapter contains:
Ø
In Table 7-1 the common technical data to the MICROMASTER 411/COMBIMASTER
411 Inverters
Ø
In Table 7-3 divided into several tables - an overview of the specific technical data of
every MICROMASTER 411/COMBIMASTER 411 Inverter.
Ø
In Table 7- the wire sizes and terminal torques
7.1
Technical Data......................................................................................................................82
7.2
Case Size Rating Information...............................................................................................83
7.3
Tightening Torque, Cable cross sections for Power Supply and Motor Terminals ..............84
7.4
Tightening Torque for Fixing Screws ...................................................................................84
7.5
Fuses and Circuit Breakers ..................................................................................................85
COMBIMASTER 411 & MICROMASTER 411 Operating Instructions
6SE6400-5CA00-0BP0
81
7. COMBIMASTER 411/MICROMASTER 411 SPECIFICATIONS
7.1
Issue 03/02
Technical Data
Table 7-1
MICROMASTER 411/COMBIMASTER 411 Performance Ratings
Feature
Power supply Operating Voltage &
Power Ranges
Protection Level
Specification
380 to 480 V ± 10% 3AC
0.37 kW – 3.0 kW
IP66 for MICROMASTER 411
IP55 for COMBIMASTER 411
Operating Temperature
-10°C to +40°C (50ºC with derating)
Storage Temperature
-40°C to +70°C
Humidity
99% RH – non-condensing
Operational Altitudes
Up to 1000m above sea level without derating
Control Method
Linear V/f; Flux Current Control (FCC); Quadratic V/f; Multi-point V/f.
Overload Capability
1.5 * nominal output current for 60 seconds (every 300 seconds)
Electromagnetic Compatibility
Optional EMC filters to EN55011 Class B. (Radiated Emission: Class A)
Protection Features
Undervoltage,
Overvoltage,
Short circuit,
Stall Prevention,
Motor Overtemperature I2t, (Option for PTC)
Inverter Overtemperature
Input Frequency
47 to 63 Hz
Setpoint Resolution
0.01Hz Digital, 0.01 Hz Serial, 10 bit Analog
Output Frequency Resolution
0.01Hz Digital, 0.01 Hz Serial, 10 bit Analog
Pulse Frequency
2kHz to 16kHz (2kHz steps) 4kHz default
Digital Inputs
3 programmable inputs. 3 Digital Inputs & 1 Analog input which can be configured
as a fourth digital input.
Fixed Frequencies
7 programmable
Skip Frequencies
4 programmable
Relay Outputs
1 programmable 30 V DC / 5 A (resistive), 250 V AC 2 A (inductive)
Analogue Input
1 for setpoint or PI 0 to +10/24 V Input (Also used for DIN4)
NOTE: 0 to 10 V input – calibrated input range.
For 0 to 24 V, full scale reached at 22.5 V (6% tolerance) – scaling
programmable using parameters.
Serial Interfaces
RS-232.
Design/Manufacture
In accordance with ISO 14001
Standards
CE
CE Marked
Conformity with EC Low Voltage Directive 73/23/EEC
and Electromagnetic Compatibility Directive 89/336/EEC
Cos Ø
≥0.95
Inverter Efficiency
94% to 97% at maximum power
Inrush Current
Less than 4 A for CSB and less than 7.7 A for CSC.
Braking
DC Braking, Compound Braking and Electro-mechanical Brake control as option.
82
COMBIMASTER 411 & MICROMASTER 411 Operating Instructions
6SE6400-5CA00-0BP0
Issue 03/02
7.2
Table 7-2
7. COMBIMASTER 411/MICROMASTER 411 SPECIFICATIONS
Case Size Rating Information
Case Size B
MICROMASTER 411/COMBIMASTER 411
Case Size B
Frame size:
2 pole
71
71
80
80M
90S
4 pole
71
80
80
90S
90S
0.37kW
0.55kW
0.75kW
1.1kW
1.5kW
0.5hp
0.75hp
1.0hp
1.5hp
2.0hp
Motor Output Rating:
Operating Input Voltage:
AC 380V – 480 Vrms ± 10% Three phase
Operating Input
Frequency:
47 – 63 Hz
Output Frequency
2 pole
0 –650Hz
4 pole
Inrush Current:
Input Current:
Output Current (max):
Table 7-3
Less than 4 A
1.6 A rms
2.1 A rms
2.8 A rms
4.2 A rms
5.8 A rms
1.2 A
1.6 A
2.1 A
3.0 A
4.0 A
Power Supply fuse:
10 A
Power Supply Lead
cross-section
4 mm2 (max)
Case Size C
MICROMASTER 411/COMBIMASTER 411
High Voltage Three Phase Units for Case Size C
Frame size:
2 pole
90L
4 pole
100L
100L
2.2kW
3.0hp
3.0 kW
4.0 hp
Motor Output Rating:
Operating Input Voltage:
100L
AC 380 – 480 V rms ± 10% Three phase
Operating Input Frequency:
47 – 63 Hz
Output Frequency
2 pole
0 – 650Hz
4 pole
Inrush Current:
Input Current:
Output Current (max):
Less than 7.7 A
7.8 A rms
10 A rms
5.9 A
7.7 A
Power Supply fuse:
16 A
Power Supply Lead
cross-section
4 mm2 (max)
COMBIMASTER 411 & MICROMASTER 411 Operating Instructions
6SE6400-5CA00-0BP0
83
7. COMBIMASTER 411/MICROMASTER 411 SPECIFICATIONS
7.3
Table 7-4
Tightening Torque, Cable cross sections for Power Supply
and Motor Terminals
Power Supply & Motor Terminal Wire Sizes/Tightening Torques (per case size)
Terminals
Terminal Tightening Torque
Minimum Cable Cross Section
Maximum Cable Cross Section
7.4
Table 7-5
Units of
measurement
CSB
CSC
[Nm]
1.3
1.3
[lbf.in]
12
12
[mm2]
1.5
2.5
[AWG]
16
14
[mm2]
4
4
[AWG]
12
12
Tightening Torque for Fixing Screws
Fixing Screw Recommended Tightening Torque
Description
Inverter Cover Screws
Filter Board Retention Screws
I/O Board Retention Screws
Terminal Housing to Motor
Fixing Screws
84
Issue 03/02
Units of
measurement
CSB
CSC
[Nm]
2.5
(M5)
2.5
(M5)
[lbf.in]
21.3
(M5)
21.3
(M5)
[Nm]
0.8
(M3)
0.8
(M3)
[lbf.in]
7.0
(M3)
7.0
(M3)
[Nm]
0.8
(M3)
0.8
(M3)
[lbf.in]
7.0
(M3)
7.0
(M3)
[Nm]
1.5/2.5
M4/M5
2.5
(M5)
10.6/21.3 M4/M5
21.3
(M5)
[lbf.in]
COMBIMASTER 411 & MICROMASTER 411 Operating Instructions
6SE6400-5CA00-0BP0
Issue 03/02
7.5
Table 7-6
7. COMBIMASTER 411/MICROMASTER 411 SPECIFICATIONS
Fuses and Circuit Breakers
MICROMASTER 411/COMBIMASTER 411 Fuses and Circuit Breakers
Inverter
Power
kW
Hp
Case Size
Fuses
Circuit Breakers
MICROMASTER 411 COMBIMASTER 411
0.37
0.5
B
3NA3803
3RV1021-1CA10
(without filter)
0.55
0.75
B
3NA3803
3RV1021-1DA10
380 V to 480 V 3 AC
0.75
1.0
B
3NA3803
3RV1021-1EA10
1.1
1.5
B
3NA3803
3RV1021-1GA10
1.5
2.0
B
3NA3803
3RV1021-1HA10
2.2
3.0
C
3NA3805
3RV1021-1JA10
3.0
4.0
C
3NA3805
3RV1021-4KA10
MICROMASTER 411 COMBIMASTER 411
0.37
0.5
B
3NA3803
3RV1021-1CA10
(with Class B filter)
0.55
0.75
B
3NA3803
3RV1021-1DA10
380 V to 480 V 3 AC
0.75
1.0
B
3NA3803
3RV1021-1EA10
1.1
1.5
B
3NA3803
3RV1021-1GA10
1.5
2.0
B
3NA3803
3RV1021-1HA10
2.2
3.0
C
3NA3805
3RV1021-1JA10
3.0
4.0
C
3NA3805
3RV1021-1KA10
COMBIMASTER 411 & MICROMASTER 411 Operating Instructions
6SE6400-5CA00-0BP0
85
7. COMBIMASTER 411/MICROMASTER 411 SPECIFICATIONS
86
Issue 03/02
COMBIMASTER 411 & MICROMASTER 411 Operating Instructions
6SE6400-5CA00-0BP0
Issue 03/02
8
8. OPTIONS
Options
This Chapter contains:
Ø
The following accessories are available as options for your COMBIMASTER
411/MICROMASTER 411 Inverter.
8.1
MICROMASTER 411/COMBIMASTER 411 User Options ..................................................88
8.2
MICROMASTER 411/COMBIMASTER 411 Programming Options ....................................89
8.3
Basic Operator Panel (BOP) ................................................................................................90
8.4
Advanced Operator Panel (AOP) .........................................................................................91
8.5
PROFIBUS Module (for MICROMASTER 411) ...................................................................92
8.6
Electromechanical Brake Control Module ............................................................................93
8.7
MICROMASTER 411 Operator Panel Mounting Kit.............................................................94
8.8
PC to Inverter Connection Kit...............................................................................................95
8.9
PC to AOP Connection Kit ...................................................................................................96
8.10
Door Mounting Kit for Single Inverter control .......................................................................97
8.11
Wall Mounting Kit..................................................................................................................98
COMBIMASTER 411 & MICROMASTER 411 Operating Instructions
6SE6400-5CA00-0BP0
87
8. OPTIONS
8.1
88
Issue 03/02
MICROMASTER 411/COMBIMASTER 411 User Options
Description
Reference
Order No
Basic Operator Panel (BOP)
See Section 8.3
See Section 10.15.1
6SE6400-0BP00-0AA0
Advanced Operator Panel (AOP)
See Section 8.4
See Section 10.15.2
6SE6400-0AP00-0AA0
PROFIBUS Module
(for MICROMASTER 411)
See Section 8.5
See Section 10.15.3
6SE6401-1PB00-0AA0
Electromechanical Brake Control Module
See Section 8.6
6SE6401-1EM00-0AA0
MICROMASTER 411 Operator Panel Mounting Kit
See Section 8.7
6SE6401-1DF00-0AA0
MICROMASTER 411 Interface Link Cable
See Section 8.7
6SE6401-1BL00-0AA0
PC to Inverter Connection Kit
See Section 8.8
See Section 10.15.4
6SE6400-1PC00-0AA0
PC to AOP Connection Kit
See Section 8.9
6SE6400-0PA00-0AA0
BOP/AOP door mounting kit for single inverter
control
See Section 8.10
See Section 10.15.5
6SE6400-0PM00-0AA0
MICROMASTER 411 5m Cable Assembly for Door
Mount Kit
See Section 8.10
6SE6401-1CA00-0AA0
Wall Mount Kit
See Section 8.11
6SE6401-0WM00-0AA0
COMBIMASTER 411 & MICROMASTER 411 Operating Instructions
6SE6400-5CA00-0BP0
Issue 03/02
8.2
8. OPTIONS
MICROMASTER 411/COMBIMASTER 411 Programming
Options
Table 8-1
Key to Programming Options
Option 1
Component
MICROMASTER
411 Operator Panel
Mounting Kit
Operator Panel
programming
Option 2
Option 3
PC
Programming
PC
Programming
(without Isolation)
(with Isolation)
þ 2)
Desk
Programming of
AOP for Inverter
programming
Option 5
Door mounted
operator panel
þ 2)
þ
Interface Link
Cable
Option 4
þ
þ
PC-Inverter
Connection Kit
þ
PC-AOP
Connection Kit
þ.
BOP/AOP door
mounting kit
BOP
þ1)
AOP
þ1)
þ1)
þ
5m cable assembly
(M12 connector)
þ1)
þ.
Notes
1. Either BOP or AOP is required.
2. The Operator Panel Mounting Kit includes an Operator Desktop Frame and
Interface Cable Link.
3. Options 2 and 3 are for use with DriveMonitor Commissioning Software Tool.
COMBIMASTER 411 & MICROMASTER 411 Operating Instructions
6SE6400-5CA00-0BP0
89
8. OPTIONS
8.3
90
Issue 03/02
Basic Operator Panel (BOP)
COMBIMASTER 411 & MICROMASTER 411 Operating Instructions
6SE6400-5CA00-0BP0
Issue 03/02
8.4
8. OPTIONS
Advanced Operator Panel (AOP)
COMBIMASTER 411 & MICROMASTER 411 Operating Instructions
6SE6400-5CA00-0BP0
91
8. OPTIONS
8.5
92
Issue 03/02
PROFIBUS Module (for MICROMASTER 411)
COMBIMASTER 411 & MICROMASTER 411 Operating Instructions
6SE6400-5CA00-0BP0
Issue 03/02
8.6
8. OPTIONS
Electromechanical Brake Control Module
COMBIMASTER 411 & MICROMASTER 411 Operating Instructions
6SE6400-5CA00-0BP0
93
8. OPTIONS
8.7
94
Issue 03/02
MICROMASTER 411 Operator Panel Mounting Kit
COMBIMASTER 411 & MICROMASTER 411 Operating Instructions
6SE6400-5CA00-0BP0
Issue 03/02
8.8
8. OPTIONS
PC to Inverter Connection Kit
COMBIMASTER 411 & MICROMASTER 411 Operating Instructions
6SE6400-5CA00-0BP0
95
8. OPTIONS
8.9
96
Issue 03/02
PC to AOP Connection Kit
COMBIMASTER 411 & MICROMASTER 411 Operating Instructions
6SE6400-5CA00-0BP0
Issue 03/02
8.10
8. OPTIONS
Door Mounting Kit for Single Inverter control
COMBIMASTER 411 & MICROMASTER 411 Operating Instructions
6SE6400-5CA00-0BP0
97
8. OPTIONS
8.11
98
Issue 03/02
Wall Mounting Kit
COMBIMASTER 411 & MICROMASTER 411 Operating Instructions
6SE6400-5CA00-0BP0
Issue 03/02
9
9 ELECTRO-MAGNETIC COMPATIBILITY.
Electro-Magnetic Compatibility (EMC)
This Chapter contains:
Ø
9.1
EMC information.
Electro-Magnetic Compatibility (EMC) ...............................................................................100
COMBIMASTER 411 & MICROMASTER 411 Operating Instructions
6SE6400-5CA00-0BP0
99
9. ELECTRO-MAGNETIC COMPATIBILITY
9.1
Issue 03/02
Electro-Magnetic Compatibility (EMC)
All manufacturers / assemblers of electrical apparatus which “performs a complete intrinsic function
and is placed on the market as a single unit intended for the end user” must comply with the EMC
directive EEC/89/336.
There are three routes for the manufacturer/assembler to demonstrate compliance:
9.1.1
Self-Certification
This is a manufacturer's declaration that the European standards applicable to the electrical
environment for which the apparatus is intended have been met. Only standards that have been
officially published in the Official Journal of the European Community can be cited in the
manufacturer's declaration.
9.1.2
Technical Construction File
A technical construction file can be prepared for the apparatus describing its EMC characteristics.
This file must be approved by a ‘Competent Body’ appointed by the appropriate European
government organization. This approach allows the use of standards that are still in preparation.
9.1.3
EC Type Examination Certificate
This approach is only applicable to radio communication transmitting apparatus. All MICROMASTER
units are certified for compliance with the EMC directive, when installed in accordance with the
recommendations in Section 2 of this document.
9.1.4
EMC Directive Compliance with Harmonics Regulations
EN 61000-3-2 "Limits for harmonic current emissions (equipment input <= 16A per phase)".
All Siemens variable speed drives of the MICROMASTER, MIDIMASTER, MICROMASTER Eco and
COMBIMASTER ranges, which are classified as "Professional Equipment" within the terms of the
standard, fulfill the requirements of the standard.
100
COMBIMASTER 411 & MICROMASTER 411 Operating Instructions
6SE6400-5CA00-0BP0
Issue 03/02
9.1.5
9 ELECTRO-MAGNETIC COMPATIBILITY.
Environment Classes of EMC performance
Environment: General Industrial
Compliance with the EMC Product Standard for Power Drive Systems EN 61800-3 for use in
Second Environment (Industrial) and Restricted Distribution.
Table 9-1
Environment - General Industrial
EMC Phenomenon
Standard
Level
Radiated Emissions
EN 55011
Level A1
Conducted Emissions
EN 61800-3
European Amendment EN61800-3-A13
Emissions:
Immunity:
Electrostatic Discharge
EN 61000-4-2
8 kV air discharge
Burst Interference
EN 61000-4-4
2 kV power cables, 1 kV control
Radio Frequency Electromagnetic Field IEC 1000-4-3
26-1000 MHz, 10 V/m
Environment: Filtered Industrial
This level of performance will allow the manufacturer/assembler to self-certify their apparatus for
compliance with the EMC directive for the industrial environment as regards the EMC performance
characteristics of the power drive system. Performance limits are as specified in the Generic
Industrial Emissions and Immunity standards EN 50081-2 and EN 50082-2.
Table 9-2
Environment - Filtered Industrial
EMC Phenomenon
Standard
Level
Emissions:
Radiated Emissions
EN 55011
Level A1
Conducted Emissions
EN 55011
Level A1
Immunity:
Supply Voltage Distortion
IEC 1000-2-4
(1993)
Voltage Fluctuations, Dips, Unbalance,
Frequency Variations
IEC 1000-2-1
Magnetic Fields
EN 61000-4-8
50 Hz, 30 A/m
Electrostatic Discharge
EN 61000-4-2
8 kV air discharge
Burst Interference
EN 61000-4-4
2 kV power cables, 2 kV control
Radio Frequency Electromagnetic
Field, amplitude modulated
ENV 50 140
80-1000 MHz, 10 V/m, 80% AM, power
and signal lines
Radio-frequency Electromagnetic Field, ENV 50 204
pulse modulated
COMBIMASTER 411 & MICROMASTER 411 Operating Instructions
6SE6400-5CA00-0BP0
900 MHz, 10 V/m 50% duty cycle, 200 Hz
repetition rate
101
9. ELECTRO-MAGNETIC COMPATIBILITY
9.1.6
Issue 03/02
Environment: Filtered - for residential, commercial and light industry
This level of performance will allow the manufacturer / assembler to self-certify compliance of their
apparatus with the EMC directive for the residential, commercial and light industrial environment as
regards the EMC performance characteristics of the power drive system. Performance limits are as
specified in the generic emission and immunity standards EN 50081-1 and EN 50082-1.
Table 9-3
Environment - Filtered for Residential, Commercial and Light Industry
EMC Phenomenon
Standard
Level
Radiated Emissions
EN 55011
Level A (Restricted Distribution)
Conducted Emissions
EN 55011
Level B
Emissions:
Immunity:
Supply Voltage Distortion
IEC 1000-2-4
(1993)
Voltage Fluctuations, Dips, Unbalance,
Frequency Variations
IEC 1000-2-1
Magnetic Fields
EN 61000-4-8
50 Hz, 30 A/m
Electrostatic Discharge
EN 61000-4-2
8 kV air discharge
Burst Interference
EN 61000-4-4
2 kV power cables, 2 kV control
Radio Frequency Electromagnetic
Field, amplitude modulated
ENV 50 140
80-1000 MHz, 10 V/m, 80% AM, power
and signal lines
Radio-frequency Electromagnetic Field, ENV 50 204
pulse modulated
900 MHz, 10 V/m 50% duty cycle, 200 Hz
repetition rate
Notes
Ø
Ø
Ø
102
MICROMASTER 411/COMBIMASTER 411 inverters are intended exclusively
for professional applications. Therefore, they do not fall within the scope of the
harmonics emissions specification EN 61000-3-2.
Class A filtered inverters can be used in this environment under “Restricted
Distribution” (Professional Applications) in accordance with EN61800 Part 3.
Dedicated EMC Product Standards can exist for this
equipment/units/machine/plant, which the manufacturer must then observe.
COMBIMASTER 411 & MICROMASTER 411 Operating Instructions
6SE6400-5CA00-0BP0
Issue 03/02
9.1.7
9 ELECTRO-MAGNETIC COMPATIBILITY.
EMC Compliance Tests
Table 9-4
EMC Compliance Table
Model
Remarks
Environment – General Industrial
6SE6411-6U***-**A1
Unfiltered units, all voltages and powers.
1UA1**-**U**
Environment – Filtered Industrial (All EU countries for year 2002)
6SE6411-6B***-**A1
Filtered units all voltages and powers.
1UA1**-**B**
Environment – Filtered for residential, commercial and light industry
6SE6411-6B***-**A1
Filtered units all voltages and powers.
1UA1**-**B**
* Denotes any value is allowed.
9.1.8
MICROMASTER 411 – EMC Compliance
The MICROMASTER 411 inverters will, when correctly installed and put to their intended use,
satisfy the requirements of the EEC Directive 89/336/EEC concerning electromagnetic compatibility.
If the guidelines on installation to reduce the effects of electromagnetic interference are followed, the
devices are sutiable for installation in machines. According to the machinery directive, these
machines must be separately certified.
TABLE below lists the measured results for emissions of an immunity to interference for the
MICROMASTER 411 inverters.
Table 9-5
MICROMASTER 411 Measured Results
Test Standard
Measurement
Test Value
Limit Value
RFI Emisions
Conducted via Mains Cable
150 kHz to 30 MHz
Unfiltered – not tested Class B
Emitted by the inverter
30 MHz to 1 GHz
All devices – Class A
COMBIMASTER 411 & MICROMASTER 411 Operating Instructions
6SE6400-5CA00-0BP0
103
9. ELECTRO-MAGNETIC COMPATIBILITY
104
Issue 03/02
COMBIMASTER 411 & MICROMASTER 411 Operating Instructions
6SE6400-5CA00-0BP0
Issue 03/02
10
10 ENGINEERING INFORMATION.
Engineering Information
This Chapter contains:
Ø
Ø
Ø
Operating Modes.
Derating Factors.
Motor and Inverter Protection.
10.1
Current Limit and Overload Operation ...............................................................................106
10.2
Control and Operating Modes ............................................................................................109
10.3
Braking ...............................................................................................................................118
10.4
Derating Factors .................................................................................................................120
10.5
Thermal Protection and Automatic De-rating .....................................................................121
10.6
Operation from Unearthed Supplies...................................................................................122
10.7
Lifetime of Inverters ............................................................................................................122
10.8
Working with Binary Connectors (BiCo) .............................................................................122
10.9
Harmonic Currents .............................................................................................................129
10.10
Use of MM4 Input Chokes ..............................................................................................129
10.11
Power Losses .................................................................................................................130
10.12
Shock and Vibration........................................................................................................131
10.13
PROFIBUS......................................................................................................................132
10.14
PROFIBUS Module.........................................................................................................133
10.15
Variant Independent Options ..........................................................................................136
COMBIMASTER 411 & MICROMASTER 411 Operating Instructions
6SE6400-5CA00-0BP0
105
10. ENGINEERING INFORMATION
10.1
Issue 03/02
Current Limit and Overload Operation
The inverter will always protect itself, the motor and the system from possible damage.
Where a short circuit exists on the output of the inverter, the unit will trip almost
instantaneously to protect itself. In the event of short and/or long term overload
conditions, current limit protection now operates rapidly to reduce inverter current and
prevent a trip occurring. Table 10-1 describes the levels available.
Table 10-1
Current Limit and Overload
Electronic Trip
This is a very fast current limit, which operates if there is a short circuit (line
to line or most of line to earth faults) on the output. It is a fixed level trip and
operates within a few microseconds.
Overload Limit
This is a very fast limit, which operates within a few microseconds and
removes some of the output pulses to limit the current and protect the
inverter. If this pulse dropping occurs during overload, the operating
condition will usually recover and the motor will continue to run without
tripping.
Long Term Overload
Limit
This is a slower limit which allows an overload of at least 60 seconds where
the current lies above the motor limit but below the Electronic Trip and
Overload Limit.
Continuous Limit
This is the level set as the maximum continuous motor current. The inverter
will control the current to this level after other overloads have timed out.
Figure 10-1 illustrates the interaction of parameters associated with current limit. Read
Only parameters r0027, r0034, r0037 and r0067 help with fault diagnosis.
Motor Model P03XX
Measured Current
Motor I2t Calculator P0611, P0614
I2t Progress r0034
Current Limit Setting P0640
OR
SUM
2
Inverter I t Calculator P0294
Inverter Heatsink Temperature
Faults & Warnings:
A0501 Current Limit
A0504, F004 Inverter Overtemperature
A505, F0005 Inverter I2t
A0506 Inverter Duty Cycle
A05011, F0011 Motor I2t
Actual Inverter
Temperature r0037
Action:
Reduce Frequency
Reduce Voltage
Reduce Pulse Frequency
Raise Warning
Trip
Modified Current
Limit Value r0067
Imax Controller
P1340 P Term
P1341 I Term
Reaction to:
I2t P0610
Inverter Temperature P0290
Resulting Current
Figure 10-1 Current Limit Interaction
106
COMBIMASTER 411 & MICROMASTER 411 Operating Instructions
6SE6400-5CA00-0BP0
Issue 03/02
10.1.1
10 ENGINEERING INFORMATION.
Current Monitoring Accuracy
Table 10-2 shows sample results comparing current measured with a current scope, and
the current displayed on the inverter, using measurements taken from a variety of
inverters at various switching frequencies, current loads, frequency setpoints and cable
lengths.
Table 10-2
Measured Current Monitoring Accuracy
Inverter
CSB 1.5kW 400 V
CSC 3.0 kW 400 V
Switching frequency
4 kHz
4 kHz
Load on inverter
Nominal load 4.0 A
Nominal load 7.7 A
Frequency setpoint
45 Hz
45 Hz
Scope current (long cable)*
4.00 A
7.70 A
Drive current
4.05 A
% difference (inverter/scope)* 1.32%
*Typical % error from 5 Hz to 50 Hz at nominal Current
10.1.2
7.46 A
-3.9%
Fast Current Limit
Fast Current Limit (FCL) is a cycle-by-cycle hardware current limit built into the inverter.
The current is rapidly reduced by pulse dropping, that is by turning off the Insulated Gate
Bipolar Transistors (IGBTs) on a pulse by pulse (cycle by cycle) basis. The normal
current limit operation then takes over.
The FCL threshold is set slightly below the software overcurrent trip threshold and reacts
much quicker (i.e. in milliseconds), thus preventing spurious and unwanted trips when
sudden loads are applied or fast accelerations requested.
FCL is especially useful when working in open loop control to override unwanted
currents.
COMBIMASTER 411 & MICROMASTER 411 Operating Instructions
6SE6400-5CA00-0BP0
107
10. ENGINEERING INFORMATION
10.1.3
Issue 03/02
Positive Temperature Coefficient Resistor Use
Many motors are available with a Positive Temperature Coefficient (PTC) resistor built
into the windings. The resistance of the resistor rises rapidly at a particular temperature
and this change can be detected by the inverter. If the resistor is connected to the
inverter terminals as shown in Figure 10-2, and the PTC input enabled by setting
parameter P0703=29, then if the resistance rises above 2 kΩ, the inverter will trip and
Fault Code F004 displayed.
Most Motor Protection PTC resistors have a resistance of 2-300 ohms when cold and this
value rises rapidly at the ‘knee point’ to typically 10 kΩ and greater. The PTC input is set
so that it will operate at 1 kΩ minimum, 1.5 kΩ nominal, and 2 kΩ maximum. On this
basis two or three PTCs may be connected in series when a motor has more than one
PTC built in, or if two or three motors are connected to the inverter output and require
individual protection.
Figure 10-2 PTC Resistor Connections
10.1.4
I2t Performance
When the motor is running at low speed and high load, the built-in cooling fan may not
provide enough cooling and the motor may overheat. Parameter P074 allows a
2
frequency dependent I t limit to be enabled to protect the motor.
When the inverter is operating in the region above the selected curve (i.e. at low
frequency and high current), a timer is started, and after some time, (based on the
current, the motor size and previous operating history), the inverter will trip or reduce
output frequency. Trip or reduction of output frequency will depend on the parameter
setting.
10.1.5
Internal Overtemperature
Under normal circumstances, the inverter will not overheat. The heatsink maintains the
inverter at normal operating temperature. Careful consideration when mounting the
inverter will ensure adequate ventilation and reduce the likelihood of overheating. Check
to see that airflow remains unrestricted. There should be a minimum clearance of 100
mm free space around the Inverter.
Heatsink temperature is monitored using a PTC resistor and the inverter will trip if the
maximum temperature is exceeded. If the inverter persistently trips, you should check for
high ambient temperature or blocked airflow.
You can verify heatsink temperature by displaying Parameter r0037. Units are given in
o
degrees Celsius ( C).
108
COMBIMASTER 411 & MICROMASTER 411 Operating Instructions
6SE6400-5CA00-0BP0
Issue 03/02
10.1.6
10 ENGINEERING INFORMATION.
Overvoltage and Trip Levels
The inverter will protect itself from both supply overvoltage and undervoltage. Trip levels
are shown in Table 10-3. Internal overvoltage can occur during braking where internal
voltages are forced high by energy from an external load.
Table 10-3
Trip Levels
Input
Supplies
Undervoltage trip
levels
Overvoltage trip
levels
3 Phase 400 V
410 V DC
820 V DC
When output pulses are disabled from the inverter an undervoltage trip will not occur. An
overvoltage trip will occur at any time when the overvoltage threshold is exceeded.
!
Caution
Check to ensure you have matched the input supply to the inverter. If the supply
voltage is too high, you may damage the inverter even if it trips.
10.2
Control and Operating Modes
10.2.1
Boost
Boost is used to increase the output voltage in order to overcome losses and non-linearity
at low frequencies. If the correct amount of boost is applied, the current and torque will
be increased at low frequencies. However, if too much boost is applied, the motor may
overheat if run at low frequencies for a long time and excessive boost may also saturate
the motor, leading to loss of torque.
2
The I t function helps protect the motor under these circumstances. Boost is calculated
such that 100% boost is the voltage given by:
Stator resistance (P0350) multiplied by rated motor current (P0305).
Which means that changing the value of these parameters will affect the boost level.
Voltage
Boost Increases
voltage here
Frequency
Figure 10-3 Boost Level
COMBIMASTER 411 & MICROMASTER 411 Operating Instructions
6SE6400-5CA00-0BP0
109
10. ENGINEERING INFORMATION
Table 10-4
Issue 03/02
Boost Parameters
Parameter
Description
P1310
This parameter sets the % boost applied at 0 Hz. The boost level is then
reduced with increasing frequency to a minimum value, set by P1316, typically
around about 10 Hz.
P1311
This parameter sets a boost voltage, as P1310, except that the boost is
applied only during acceleration, either following a start command or from set
point changes.
P1312
This parameter allows a constant linear boost, again as P1310, to be applied
following a start command only to improve ‘first time’ starting.
Maximum values of P1310, 1311,and 1312 are 250%, but the overall maximum boost is
limited by P0640, the motor overload setting. The boost voltage will also be limited by the
2
operation of the I t function, so boost may be reduced further if the motor is in danger of
2
overheating. The progress of the I t function can be monitored by parameter r0034.
The default settings (P1310 = 50, P1311 and P1312 = 0) allow satisfactory operation with
most loads. Increasing the boost up to say 200% (note that P0640 setting will limit) on
smaller motors and 100% on larger motors will often give improved torque at low
frequencies. Use P1311 and P1312 to limit this to accelerating boost only (e.g. P1310 =
100, P1312 = 100), to reduce the possibility of overheating.
10.2.2
Proportional and Integral Control (PI)
Note
MICROMASTER 411/COMBIMASTER 411 have a built-in PI controller. References to
“PID” control within parameter descriptions relates to “PI” control.
10.2.2.1
What is Closed Loop control?
Closed loop control is widely used in industrial applications to control a wide variety of
processes. Control engineering is a complex subject, but a simple closed loop control
uses a feedback signal from the process (such as temperature, pressure, speed) a
desired value or setpoint (often set manually) and a control system that compares the two
and derives an error signal. The error signal is then processed and used to control the
inverter and motor (in this case) to try to reduce the error.
The error signal processing can be very complex because of delays in the system. The
error signal is usually processed using a Proportional and Integral (PI) controller whose
parameters can be adjusted to optimize the performance and stability of the system.
Once a system is set up and stable, very efficient and accurate control can be achieved.
See Figure on Page 116.
10.2.2.2
Implementation on MICROMASTER 411/COMBIMASTER 411
MICROMASTER 411/COMBIMASTER 411 have a built in PI controller that can be
enabled by the user to allow for closed loop control. Once the PI controller is enabled
(using P2200), the PI controller internally generates the motor frequency necessary to
minimize the error between the PI setpoint and the PI feedback. It does this by
continuously comparing the feedback signal with the setpoint and uses the PI controller to
determine the necessary motor frequency. The normal frequency setpoint (P1000
setting) and ramp times (P1120 & P1121) are automatically disabled but the minimum
and maximum output frequency settings (P1080 and P1082) remain active.
110
COMBIMASTER 411 & MICROMASTER 411 Operating Instructions
6SE6400-5CA00-0BP0
Issue 03/02
10 ENGINEERING INFORMATION.
10.2.2.3
Setting up the PI controller
Accessing PI parameters
The PI parameters are in the range between P2200 and P2294. For most applications,
the level 2 parameters are sufficient for setting up the PI controller. To access only the PI
controller parameters, you can use the parameter filter as follows:
P0003 = 2
P0004 = 22
Enabling PI control
PI control is enabled using parameter P2200. For constant enabling of the PI controller
this should be set to 1. It is also possible to use a digital input (or other BiCo functions) to
enable the PI controller, e.g. the PI controller can be enabled using DIN 2 by setting
P0702 = 99 and P2200 = 722.1. This allows the user to switch between frequency
control and PI control when the inverter is not running.
PI Feedback signal
PI control requires a feedback signal from the process to monitor how the system is
behaving. For the majority of applications, this will be in the form of an analogue sensor.
The MICROMASTER 411/COMBIMASTER 411 has one analogue input, terminal
connections 6 & 7, and the feedback signal can be connected to this input. The source of
the PI feedback signal must then be defined using P2264 = 755 (source of PI feedback =
analogue input 1). If required the analogue input can be scaled using parameters P0757
– P0760. If a different source of feedback signal is used (e.g. USS), P2264 must be set
appropriately. The value of the feedback signal can be viewed via parameter r2266.
The relation between the sensor signal and the manner in which the PI controller
changes the motor frequency must also be defined at this point. This is done using
P2271 (PI transducer type). There are 2 possible settings for this parameter, 0 and 1.
The difference between these settings is whether the PI controller increases or decreases
output frequency as a response to a positive error signal (i.e. where the feedback signal
is less than the setpoint). The parameter description for P2271 describes in detail how to
determine which setting is correct for your application.
PI setpoint
The PI controller controls the inverter frequency by comparing the actual system behavior
(via the feedback signal) with the desired system behavior. The desired behavior is
defined using a setpoint. The user selects the source of the setpoint with parameter
P2253. MICROMASTER 411/COMBIMASTER 411 only have one analogue input and
this is most commonly used for the feedback signal, so an internal digital setpoint is
usually used. There are two methods of doing this, either using the “fixed PI setpoint ” or
the “keypad (motorized potentiometer) setpoint”.
1.
P2253 = 2224
Fixed PI setpoint
2.
P2253 = 2250
Keypad (motorized
potentiometer)
setpoint.
This method allows the user to define up to 7 setpoint
values using parameters P2201 to P2207 and select
between these using binary signals, usually via the digital
inputs. The different selection methods are described in the
parameter list under P2201.
This method allows the user to set a fixed value in P2240.
The setpoint can be increased or decreased either with the
arrow keys on the BOP or more commonly via digital inputs
(e.g. P0702 = 13 “increase” and P0703 = 14 ”decrease”).
Note
Values are given in % rather than Hz, and the running frequency of the inverter is
determined by the difference between the setpoint and feedback signals and the
action of the PI controller.
COMBIMASTER 411 & MICROMASTER 411 Operating Instructions
6SE6400-5CA00-0BP0
111
10. ENGINEERING INFORMATION
10.2.2.4
Issue 03/02
PI Setpoint ramp times
When PI control is enabled using P2200, the normal frequency ramp up and ramp down
times (P1120 and P1121) are bypassed. The PI setpoint has its own ramp times, P2257
and P2258, which allow ramped PI setpoint changes.
The ramp up time, P2257, is active when the PI setpoint is changed or when a RUN
command is given. The ramp down time, P2258 is only effective on PI setpoint changes.
The ramp down times used after OFF1 and OFF3 commands are set in P1121 and
P1135 respectively.
10.2.2.5
PI Controller Proportional and Integral terms
The user can tune the performance of the PI controller to suit the process demands by
adjusting P and I terms, P2280 and P2285. The demands of the process will determine
the optimal type of response, from a rapid recovery response with overshoot to a damped
response. By adjusting the P and I parameters it is possible to achieve different types of
response.
Example:
The following figures show how different responses to a 5% PI setpoint step change on a
pressure control system. The traces show the PI feedback signal, with 1 V = 10%. The
different responses are achieved by varying the settings of P2280 and P2285.
Figure 10-4 Quick response with overshoot: P2280 = 0.30; P2285 = 0.03s
Figure 10-5 Quick response with overshoot, but instability:P2280 = 0.55; P2285 = 0.03s
112
COMBIMASTER 411 & MICROMASTER 411 Operating Instructions
6SE6400-5CA00-0BP0
Issue 03/02
10 ENGINEERING INFORMATION.
Figure 10-6 Damped response: P2280 = 0.20; P2285 = 0.15s
Values of P2280 and P2285 are determined by the relationship between motor frequency
and the PI control quantity (e.g. pressure).
When optimizing a control process an oscilloscope is recommended to monitor the
feedback signal to see the system response. Most commonly small PI setpoint step
changes (1- 10%) without the PI ramp times (P2257 = P2258 = 0.0 s) are used to
evaluate the system response. Once the desired response profile has been achieved,
the operational ramp times are then set.
It is recommended to start with a small P term (e.g. P2280 = 0.20) and adjust the I term
until stable operation constant is achieved. A small PI setpoint change should then be
given and depending on the system response the parameters adjusted according to the
tendencies shown in the figures above.
In general, the most stable control is achieved by using both proportional and integral
terms, and if the system is liable to experience sudden disturbances we would not
recommend setting the P term (P2280) greater than 0.50.
A block diagram showing the relationships and interaction between PI Setpoint and PI
Feedback is shown on Page 116.
10.2.3
Ziegler-Nichols method of Optimization
The Ziegler-Nichols method is a means of calculating the Proportional gain and Integral
time by measuring the system response to a step change in open loop. This is done by
putting the inverter in frequency control and monitoring the feedback signal. From the
feedback response, the time before the system starts to respond, L, and the dominant
time constant, T, which is measured by estimating when the system response would have
reached its stationary value if the maximum slope were maintained. (Typically measure
to where the system response has reached 85% of its final value).
From L, T and the ratio between the frequency step ∆f(as % of Fmax) to the feedback
value change ∆x (%), it is possible to calculate the P and I terms for a PI control process
as follows:
P gain = (0.9)(T)(∆f) / (L)(∆x)
I time = 3L
COMBIMASTER 411 & MICROMASTER 411 Operating Instructions
6SE6400-5CA00-0BP0
113
10. ENGINEERING INFORMATION
Issue 03/02
Example:
With the inverter in frequency control, a frequency step of 5 Hz is given and the feedback
signal monitored. To allow this, the following parameters are set:
P2200 = 0
P1120 = 0.0 s
P1121 = 0.0 s
P1080 = 50.0 Hz.
Figure 10-7 Response to 5 Hz step: L = 100 ms
Figure 10-8 Response to 5 Hz step: T = 700 ms
The frequency step ∆f = 5 Hz / 50 Hz = 10%
The feedback step ∆x = 0.64 V / 10 V = 6.4%
P gain
= (0.9)(T)(∆f) / (L)(∆x) = 9.84 = P2280
I time
= 3L
= 0.30 s
= P2285
The PI controller should now be enabled (P2200 = 1).
114
COMBIMASTER 411 & MICROMASTER 411 Operating Instructions
6SE6400-5CA00-0BP0
Issue 03/02
10 ENGINEERING INFORMATION.
Figure 10-9 Step Response in PI control with P2280 = 9.84 and P2285 = 0.30
10.2.4
PI Output Limits
The PI controller generates the frequency at which the inverter runs. This is generated
as a % which is normalized into Hz via P2000. The user can limit the output range of the
controller using parameters P2291 and P2292. While the inverter will only operate within
the frequency range defined by Fmin (P1080) and Fmax (P1082), the PI output limits can be
used to further limit the output frequency. Once one of the limits has been reached a bit
is set (P0053.A or P0053.B) which can be connected to the digital output via P0731, or
used for internal control purposes using BiCo.
Note
If Fmax (P1082) is greater than the value in P2000, then either P2000 or P2291 should
be adjusted to allow Fmax to be reached.
Setting P2292 to a negative value allows bipolar operation of the PI controller.
COMBIMASTER 411 & MICROMASTER 411 Operating Instructions
6SE6400-5CA00-0BP0
115
10. ENGINEERING INFORMATION
10.2.5
Issue 03/02
Further features
Further features, such as a PI setpoint trim can be accessed in user access level 3
(P0003 = 3). These features are described in the Parameter List.
PID
MOP
ADC
PID
FF
P2254
P2253
USS
BOP link
USS
COM link
CB
COM link
P2253
0
PID
SUM
PID
RFG
PID
PT1
PID
PT1
PID
−
∆PID
1
Motor
control
PIDOutput
PID
SCL
P2200
ADC2
Figure 10-10
10.2.6
PI Basic Block Diagram
Energy Saving Mode
When the PI controller output goes below the Energy Saving Setpoint (P2390) a timer is
started. If the PI output returns above the Energy Saving Setpoint before the timer
expires, then the timer is aborted.
When the timer (P2391) expires, Energy Saving Mode takes control of the output and the
inverter performs an OFF1 command. The inverter is now in an Energy Saving state; a
substate of the running state. This state enables the running status to remain set;
indicating that the inverter has a valid run signal and can start up at any time.
Once the PI error (P2273) exceeds the Energy Saving Restart Error (P2392) the inverter
exits Energy Saving Mode and ramps the inverter back up to the value set in P2390 + 5%
and then passes control back to the PI controller. It should be noted that this must be a
POSITIVE error when operating in a positive direction.
Should the inverter be required to restart having been powered off and on in Energy
Saving Mode, it is necessary to activate the Auto-restart function of the inverter (using
P1210=6).
Figure 10-11 illustrates the Energy Saving Mode function.
Notes
Ø
Ø
116
Energy Saving Mode only operates in a positive direction.
Energy Saving Setpoint (P2390) must be greater than Fmin.
COMBIMASTER 411 & MICROMASTER 411 Operating Instructions
6SE6400-5CA00-0BP0
Issue 03/02
10 ENGINEERING INFORMATION.
Energy
saving
mode
PID
setpoint
PID
RFG
−
PID
feedback
Motor
control
PID
limit
PID
Pressure
equalizing
reservoir
Pressure
sensor
f Motor
P2273
(∆PID)
f(t)
Load
PID feedback
(Sensor)
%
PID setpoint
P2392
t
f
∆PID
f* PID setpoint
f Motor
f Restart
P2390 [Hz]
P1080
P2391
PID active
fRestart = P2000 ⋅
P2390 + 5%
100 %
P2390 [Hz] = P2000 ⋅
P2390
100 %
Figure 10-11
tx
t
ty
Energy saving mode active
PID active
P1080
⋅ P1121
P1082
fRestart
ty =
⋅ P1120
P1082
tx =
Energy Saving Mode
COMBIMASTER 411 & MICROMASTER 411 Operating Instructions
6SE6400-5CA00-0BP0
117
10. ENGINEERING INFORMATION
10.3
Issue 03/02
Braking
Reducing the output frequency of the inverter will cause the motor to slow down and as
the frequency is gradually reduced to zero the motor will stop. Reducing the output
frequency too rapidly may cause the motor to act as a generator and cause a negative
current (regeneration) to return to the DC link. To overcome this possibility the
MICROMASTER 411/COMBIMASTER 411 employs a number of methods to control
braking. These options are described in the following paragraphs.
The method of bringing the motor to a standstill is selected by the user depending on
operational requirements.
10.3.1
Normal Braking
The usual or normal braking method is to allow the motor to come to a standstill at the
selected ramp-down rate (OFF1), to coast to a standstill (OFF2) or to quickly ramp down
(OFF3) without applying any additional braking. (Refer to parameters P0701, P0702 and
P0703). However, if regeneration does cause tripping, DC or Compound braking
methods may be considered.
Figure 10-12
10.3.2
Frequency Ramp Down
DC Braking
In this method a controlled DC voltage is applied to the rotor. When using DC braking,
the inverter output pulses are disabled and the actual time taken to bring the motor to a
standstill cannot be predicted. Stored energy in the motor and the load is dissipated in
the rotor therefore no regeneration occurs.
The DC braking current is defined as a percentage of nominal motor current using
parameter P1232. The current will be applied only when the motor is sufficiently
demagnetized. If the demagnetization time for the motor (P0347), is reduced too much
then the drive will trip on over current (F0001) when DC braking is activated. DC braking
can be enabled by an external source such as a digital input.
Figure 10-13
DC Braking
Caution
Ø
Ø
118
When DC Braking is applied via P1230 (BICO Source) and an ON-Command is
present; when DC Braking is removed the motor will automatically ramp up to the
configured frequency setpoint.
Frequent use of DC Braking can cause the motor to overheat.
COMBIMASTER 411 & MICROMASTER 411 Operating Instructions
6SE6400-5CA00-0BP0
Issue 03/02
10.3.3
10 ENGINEERING INFORMATION.
Vdc Max Controller
The MICROMASTER 411/COMBIMASTER 411 has a controller to limit the DC voltage
(Vdc Max controller). When braking a load faster than would normally be possible,
excess energy has to be dissipated. This energy is unable to go back into the input
supply so the result is that the DC link voltage rises. If this voltage rises too high, the trip
level will be reached and the output pulses disabled to prevent damage to the inverter.
The Vdc Max controller automatically increases the frequency and extends the ramp
down period so that the braking is not as fast, thus reducing the risk of an overvoltage trip
and keeping the system running. This means that the system will ramp down on the
voltage limit until a standstill or a new setpoint is reached. (Refer to Parameter P1240 for
configuration details).
10.3.4
Compound Braking
When Compound braking is used, most of the energy is dissipated in the motor instead of
coming back into the DC link. This has the advantage that the braking performance of
the inverter can be increased, without tripping the inverter and without the use of a
braking resistor.
Compound braking combines the braking power of DC braking with the control offered by
a ramp down. When using Compound braking, the ramp-down time is defined and the
level of current to be used in Compound Braking is defined using P1236.
Figure 10-14
Compound Braking
COMBIMASTER 411 & MICROMASTER 411 Operating Instructions
6SE6400-5CA00-0BP0
119
10. ENGINEERING INFORMATION
Issue 03/02
10.4
Derating Factors
10.4.1
Derating with Temperature
Operation of the inverter outside its recommended ambient operating temperature would
normally cause the inverter to trip with an overtemperature fault code. To avoid such
tripping, the inverter automatically reduces its switching frequency (e.g. from 16kHz to
8kHz), thus reducing the temperature of the heatsink, enabling the application to continue
running trip free. Should the load or ambient temperature then reduce, the inverter will
first check to see if it is safe to increase the switching frequency again and if considered
safe will then do so.
100
80
Rated Output Current
60
40
20
0
-10
0
10 20
30
40
50
60
70
Degrees Celsius
Figure 10-15
10.4.2
Derating with Temperature
Derating with Altitude
Figure 10- shows the permissible rated input voltage and output current for inverter
installations from 500 m to 4000 m above sea level.
90
100
Rated output current
Input voltage
100
Permissible rated input voltage
as a percentage of the
nominal voltage
80
70
60
Permissible rated output
current
as a percentage of the
nominal current
90
80
70
60
500
1000
2000
3000
4000
500
1000
2000
3000
4000
Installation altitude in metres above sea level
Figure 10-16
120
Derating with Altitude
COMBIMASTER 411 & MICROMASTER 411 Operating Instructions
6SE6400-5CA00-0BP0
Issue 03/02
10.4.3
10 ENGINEERING INFORMATION.
Derating with Switching Frequency
Losses within the power module rise with increasing switching frequencies, leading to
higher heatsink temperatures.
The default switching frequency of the MICROMASTER 411/COMBIMASTER 411 is
4 kHz for high voltage units (400 V). This is usually adequate for most applications and
will allow full performance to be obtained from all products over the full temperature
range.
Select the switching frequency using P1800. High voltage units are automatically derated
by reducing the continuous output current if switching frequencies above 4 kHz are
selected. Deratings are shown at P1800 in the System Parameter list.
The switching frequency will be automatically reduced if the internal temperature of the
inverter becomes too high (see r0037, inverter temperature). This reduces losses and
allows continued operation. This feature is controlled by P0290.
Under extreme conditions of overload, the switching frequency may momentarily reduce
to protect the inverter.
Derating applies to constant torque and variable torque settings. Table 10-5 shows the
value to which the maximum outputs are reduced.
Table 10-5
Derating with Switching Frequencies
Power
kW (hp)
10.4.4
Measured Output Current
4 kHz
6 kHz
8 kHz
10 kHz
12 kHz
14 kHz
16 kHz
0.37
(0.5)
1.2
1.2
1.2
1.2
1.2
1.2
1.2
0.55
(0.75)
1.6
1.6
1.6
1.6
1.6
1.6
1.2
0.75
(1.0)
2.1
2.1
2.1
2.1
1.8
1.8
1.2
1.10
(1.5)
3.0
3.0
2.7
2.7
1.8
1.8
1.2
1.50
(2.0)
4.0
4.0
2.7
2.7
1.8
1.8
1.2
2.20
(3.0)
5.9
5.9
5.1
5.1
3.5
3.5
2.3
3.00
(4.0)
7.7
7.7
5.1
5.1
3.5
3.5
2.3
Derating for Inverter Orientation
The inverter must not be mounted in an upside down orientation. Other mounting
orientations are possible without derating.
10.5
Thermal Protection and Automatic De-rating
The MICROMASTER 411/COMBIMASTER 411 has comprehensive hardware and
software thermal protection.
Hardware: Fitted to the heatsink is a PTC resistor that will cause the inverter to trip if the
temperature reaches 95 °C.
COMBIMASTER 411 & MICROMASTER 411 Operating Instructions
6SE6400-5CA00-0BP0
121
10. ENGINEERING INFORMATION
Issue 03/02
Software: When the heatsink reaches a temperature of within 5ºC of the trip level, the
switching frequency and output frequency of the inverter will both be reduced. This
reduces the Inverter losses and current and attempts to prevent an overtemperature trip.
It is possible to prevent this reduction and select an immediate trip if desired. See
parameters P0290, P0292 for further details.
2
The inverter is further protected by an Inverter I t calculation that determines how hot the
Insulated Gate Bipolar Transistors (IGBTs) are and will reduce the current limit (P0640)
2
when this calculation reaches 95%. (User defined in P0294). If the I t continues to rise to
2
100% an Inverter I t trip will occur (F0005).
Overtemperature in the inverter is usually caused by a high ambient temperature or
blocked convection.
10.6
Operation from Unearthed Supplies
The MICROMASTER 411 cannot be used on unearthed input supplies.
10.7
Lifetime of Inverters
When the inverters are used in conjunction with Siemens motors (1LA7 and 1LA9) the
liftetime of the inverter is >= 20,000 hours.
10.8
Working with Binary Connectors (BiCo)
10.8.1
Introduction
To make use of BiCo you will need access to the full parameter list. At this level many
new parameter settings are possible, including BiCo functionality. BiCo functionality is a
more flexible way of setting and combining input and output functions. It can be used in
most cases in conjunction with the simple, level 2 settings.
10.8.2
How does BiCo work?
The BiCo system, used on more complex drives such as Masterdrives, allows complex
functions to be programmed. Boolean and mathematical relationships can be set up
between inputs (digital, analogue, serial etc.) and outputs (inverter current, frequency,
analogue output, relays etc.).
The MICROMASTER 411/COMBIMASTER 411 uses a simplified version of BiCo, (which
is still very flexible) contained within the parameter set. The system can be set up without
using additional software or hardware.
122
COMBIMASTER 411 & MICROMASTER 411 Operating Instructions
6SE6400-5CA00-0BP0
Issue 03/02
10 ENGINEERING INFORMATION.
Example 1
Use BiCo parameterization to enable the output relay using Digital Input 2.
Step
1
2
Action
Set P0003 to 3 to access all parameters.
Set P0702 to 99 to enable BiCo parameterization on Digital Input 2.
Note:
If P0701, 2, 3, or 4 are set to 99, it is not possible to change them to another value;
the inverter must be reset to factory defaults.
3
Because Digital input 2 is ‘open’ to BiCo settings, a new value 722.1 now appears in
P0731.
The value 722.1 means ‘connect to digital input 2’
(722.0 = input 1, 722.2 = input 3 etc.).
Set P0731 to 722.1
4
Run the inverter using input 1 and operate the relay using input 2.
Note
BiCo is a ‘reverse’ connection. That is, the output function is connected back to the
input so it is not possible to tell from P0702 (99) what the digital input is controlling.
However, there are many diagnostic parameters that can assist in setting up BiCo
functions. (See following examples).
Example 2
Using OFF3 instead of OFF1.
Set P0701 = 99 to enable BiCo function.
Set P0840 = 722.0 (On right via digital input 1).
Set P0848 = 722.0 (OFF3 via digital input 1).
Now the inverter will ramp between set points using the normal ramp time as set in
P1120 and 1121. However, at switch off from digital input 1, the inverter will turn off with
an OFF3, using the ramp rate set in P1135, which may be different to P1121.
An additional advantage is that the OFF3 function usually requires a second digital input;
here the BiCo function permits digital input 1 to perform a run right and an OFF3.
Example 3
Selecting an alternative ramp time when a certain fixed frequency is selected.
Three fixed frequencies are selected using three digital inputs.
The digital inputs also select ‘on right’.
The third digital input also selects the alternative (Jog) ramp times.
Note:
This will only enable an alternative ramp up time, because, when digital input 3 is
switched low it will also de-select the alternative ramp time. Normal ramp down time
will therefore be used.
COMBIMASTER 411 & MICROMASTER 411 Operating Instructions
6SE6400-5CA00-0BP0
123
10. ENGINEERING INFORMATION
Step
Issue 03/02
Definition
Action
1
Use fixed frequencies.
P1000 = 3
Result
2
Enable BiCo functionality.
P0701 = 99
P0702 = 99
P0703 = 99
3
Define source of Fixed
Frequencies.
P1020 = 722.1
P1021 = 722.2
P1022 = 722.3
Defines the source of each fixed frequency
as digital input 1, 2, and 3.
4
Define mode of operation.
P1016 = 2
P1017 = 2
P1018 = 2
Sets the mode of operation of fixed
frequencies to “select fixed frequency and
on right command”.
5
Select Jog ramp times
instead of normal ramp
times.
P1124 = 722.2
Enables digital input 3.
Note
Steps 3 and 4 use BiCo functions to set digital input 1 and 2. This function can also
be set using normal parameterization in Level 2.
10.8.3
Using Control and Status Words with BiCo
Many MICROMASTER 411/COMBIMASTER 411 read only parameters consist of control
words. The parameter is made up of a 16-bit number, each bit representing a particular
value. For example, parameter P0052 (Status Word 1) gives various value settings such
as Inverter ready (bit 0), or Motor Current Limit (bit b).
This parameter is displayed using the vertical segments of the BOP display to show
status; that is the status of each bit can be read from the BOP display. These bits can
also be accessed by BiCo using the parameter number and bit state. Set parameter
P0731 to 52.b (i.e. parameter P0052, bit b), for the relay to operate at current limit. This
is actually a level 2 setting but many more settings can be selected in level 3 using BiCo
functions.
Each bit of the control and status words (r0052 to r0056) can be connected to several
output functions.
For example:
Setting P0731 to 56.5 (i.e. parameter P0056, bit 5) will indicate that starting boost is
active. That is, if P1312 (Starting Boost) is set to enable some starting boost, the relay
will be active during the ramping phase as starting boost is applied.
Similarly, if P0731 is set to 56.6, and P1311 (Acceleration Boost) enabled, the relay will
be energized any time that the set point is changed.
Setting P0731 to 56.C would enable the relay when the Voltage Controller is active. As
this occurs during regeneration it could be used to indicate excessive load, or too fast a
ramp down.
Table 10-6 to Table 10-9 show the BiCo connections. The shaded/green boxes indicate
the applicable cross connections.
124
COMBIMASTER 411 & MICROMASTER 411 Operating Instructions
6SE6400-5CA00-0BP0
Issue 03/02
CIB
CIB
CIB
CIB
CIB
CIB
CIB
CIB
CIB
CIB
CIB
CIB
CIB
CIB
CIB
CIB
CIB
CIB
CIB
CIB
CIB
CIB
CIB
CIB
CIB
CIB
CIB
CIB
CIB
CIB
CIB
CIB
CIB
CIB
CID
CIF
CID
CIF
CIW
CIW
CIW
CIB
CIF
CIF
CIF
CO
CO
CO
CO
CO
CO
0026
0027
0034
0036
0037
0039
0052 COBO
CO: Act. DC-link voltage
CO: Act. output current
CO: Motor utilization
CO: Drive utilization
CO: Drive temperatures
CO: Power consumption [kWh]
CO/BO: Statusword 1
0054 COBO
CO
0025
CO: Act. output voltage
CO/BO: Controlword 1
CO
0024
CO: Act. output frequency
0053 COBO
CO
0021
CO: Act. frequency
COMBIMASTER 411 & MICROMASTER 411 Operating Instructions
6SE6400-5CA00-0BP0
CO/BO: Statusword 2
CO
0020
7
7
7
7
7
7
7
7
7
7
7
7
7
7
7
7
7
7
7
7
7
7
7
7
7
7
7
7
7
7
7
7
7
7
10
10
10
10
20
20
20
22
22
22
22
CO: Frequency setpoint
BI: Binary output
BI: Download parameter set 0
BI: Download parameter set 1
BI: CDS Bit 0 (local/remote)
BI: ON/OFF1
BI: ON/OFF1 reverse
BI: 1. OFF2
BI: 2. OFF2
BI: 1. OFF3
BI: 2. OFF3
BI: Pulse enable
BI: Fixed frequency selection bit 0
BI: Fixed frequency selection bit 1
BI: Fixed frequency selection bit 2
BI: Enable MOP (UP-command)
BI: Enable MOP (DOWN-command)
BI: Enable JOG right
BI: Enable JOG left
BI: Disable additional setpoint
BI: Inhibit reverse direction
BI: Reverse
BI: Enable JOG ramp times
BI: RFG enable
BI: RFG start
BI: RFG enable setpoint
BI: Enable DC braking
BI: 1. Faults acknowledgement
BI: 2. Faults acknowledgement
BI: External fault
BI: Fixed PID setpoint selection bit
BI: Fixed PID setpoint selection bit
BI: Fixed PID setpoint selection bit
BI: Enable MOP (UP-command)
BI: Enable MOP (DOWN-command)
CI: Main setpoint
CI: Main setpoint scaling
CI: Additional setpoint
CI: Additional setpoint scaling
CI: PZD to BOP-Link (USS)
CI: PZD to Comm-Link (USS)
CI: PZD to CB
BI: Enable PID controller
CI: PID setpoint
CI: PID trim source
CI: PID feedback
0019 COBO
Functional Grouping
BiCo
BiCo Connections (r0019 to r0054)
Name
0731
0800
0801
0810
0840
0842
0844
0845
0848
0849
0852
1020
1021
1022
1035
1036
1055
1056
1074
1110
1113
1124
1140
1141
1142
1230
2103
2104
2106
2220
2221
2222
2235
2236
1070
1071
1075
1076
2016
2019
2051
2200
2253
2254
2264
Source
Parameter Number
arNr
Table 10-6
BiCo Connections
CO/BO: BOP control word
10.8.4
10 ENGINEERING INFORMATION.
125
10. ENGINEERING INFORMATION
CIB
CIB
CIB
CIB
CIB
CIB
CIB
CIB
CIB
CIB
CIB
CIB
CIB
CIB
CIB
CIB
CIB
CIB
CIB
CIB
CIB
CIB
CIB
CIB
CIB
CIB
CIB
CIB
CIB
CIB
CIB
CIB
CIB
CIB
CID
CIF
CID
CIF
CIW
CIW
CIW
CIB
CIF
CIF
CIF
126
1079
1114
1119
CO: Selected frequency setpoint
CO: Frequency setpoint after DIR ctrl
CO: Frequency setp. of the AFM module
CO
1078
CO: Total frequency setpoint
COMBIMASTER 411 & MICROMASTER 411 Operating Instructions
6SE6400-5CA00-0BP0
CO
1050
CO: Output frequency of the MOP
CO
1024
CO: Act. fixed frequency
CO
0755
CO: Act. ADC characteristic value [40
CO
0747 COBO
CO/BO: State of binary outputs
CO
0722 COBO
CO/BO: Binary input values
CO
0086
CO: Act. active current
CO
0078
CO: Connector
CO
0071
CO: Max. output voltage
CO
0067
CO: Act. max. current
CO
0056 COBO
CO/BO: Statusword 1 for V/F and VC
7
7
7
7
7
7
7
7
7
7
7
7
7
7
7
7
7
7
7
7
7
7
7
7
7
7
7
7
7
7
7
7
7
7
10
10
10
10
20
20
20
22
22
22
22
0055 COBO
BI: Binary output
BI: Download parameter set 0
BI: Download parameter set 1
BI: CDS Bit 0 (local/remote)
BI: ON/OFF1
BI: ON/OFF1 reverse
BI: 1. OFF2
BI: 2. OFF2
BI: 1. OFF3
BI: 2. OFF3
BI: Pulse enable
BI: Fixed frequency selection bit 0
BI: Fixed frequency selection bit 1
BI: Fixed frequency selection bit 2
BI: Enable MOP (UP-command)
BI: Enable MOP (DOWN-command)
BI: Enable JOG right
BI: Enable JOG left
BI: Disable additional setpoint
BI: Inhibit reverse direction
BI: Reverse
BI: Enable JOG ramp times
BI: RFG enable
BI: RFG start
BI: RFG enable setpoint
BI: Enable DC braking
BI: 1. Faults acknowledgement
BI: 2. Faults acknowledgement
BI: External fault
BI: Fixed PID setpoint selection bit
BI: Fixed PID setpoint selection bit
BI: Fixed PID setpoint selection bit
BI: Enable MOP (UP-command)
BI: Enable MOP (DOWN-command)
CI: Main setpoint
CI: Main setpoint scaling
CI: Additional setpoint
CI: Additional setpoint scaling
CI: PZD to BOP-Link (USS)
CI: PZD to Comm-Link (USS)
CI: PZD to CB
BI: Enable PID controller
CI: PID setpoint
CI: PID trim source
CI: PID feedback
CO/BO: Controlword 2
Functional Grouping
BiCo
BiCo Connections (r0055 to r1119)
Name
0731
0800
0801
0810
0840
0842
0844
0845
0848
0849
0852
1020
1021
1022
1035
1036
1055
1056
1074
1110
1113
1124
1140
1141
1142
1230
2103
2104
2106
2220
2221
2222
2235
2236
1070
1071
1075
1076
2016
2019
2051
2200
2253
2254
2264
Source
Parameter Number
arNr
Table 10-7
Issue 03/02
Issue 03/02
1242 CO
1337 CO
1343 CO
1344 CO
1801 CO
2015 CO
2018 CO
2032 BO
2033 BO
2036 BO
2037 BO
2050 CO
CO: Slip frequency
CO: Imax controller freq. limit outpu
CO: Imax controller voltage output
CO: Act. switching frequency
CO: PZD from BOP-Link (USS)
CO: PZD from Comm-Link (USS)
BO: ControlWord1 from BOP-Link (USS)
BO: ControlWord2 from BOP-Link (USS)
BO: ControlWord1 from COMM-Link (USS)
BO: ControlWord2 from COMM-Link (USS)
CO: PZD from CB
7
7
7
7
7
7
7
7
7
7
7
7
7
7
7
7
7
7
7
7
7
7
7
7
7
7
7
7
7
7
7
7
7
7
10
10
10
10
20
20
20
22
22
22
22
CO: Switch-on level Vdc-max controlle
BI: Binary output
BI: Download parameter set 0
BI: Download parameter set 1
BI: CDS Bit 0 (local/remote)
BI: ON/OFF1
BI: ON/OFF1 reverse
BI: 1. OFF2
BI: 2. OFF2
BI: 1. OFF3
BI: 2. OFF3
BI: Pulse enable
BI: Fixed frequency selection bit 0
BI: Fixed frequency selection bit 1
BI: Fixed frequency selection bit 2
BI: Enable MOP (UP-command)
BI: Enable MOP (DOWN-command)
BI: Enable JOG right
BI: Enable JOG left
BI: Disable additional setpoint
BI: Inhibit reverse direction
BI: Reverse
BI: Enable JOG ramp times
BI: RFG enable
BI: RFG start
BI: RFG enable setpoint
BI: Enable DC braking
BI: 1. Faults acknowledgement
BI: 2. Faults acknowledgement
BI: External fault
BI: Fixed PID setpoint selection bit
BI: Fixed PID setpoint selection bit
BI: Fixed PID setpoint selection bit
BI: Enable MOP (UP-command)
BI: Enable MOP (DOWN-command)
CI: Main setpoint
CI: Main setpoint scaling
CI: Additional setpoint
CI: Additional setpoint scaling
CI: PZD to BOP-Link (USS)
CI: PZD to Comm-Link (USS)
CI: PZD to CB
BI: Enable PID controller
CI: PID setpoint
CI: PID trim source
CI: PID feedback
1170 CO
Functional Grouping
CIB
CIB
CIB
CIB
CIB
CIB
CIB
CIB
CIB
CIB
CIB
CIB
CIB
CIB
CIB
CIB
CIB
CIB
CIB
CIB
CIB
CIB
CIB
CIB
CIB
CIB
CIB
CIB
CIB
CIB
CIB
CIB
CIB
CIB
CID
CIF
CID
CIF
CIW
CIW
CIW
CIB
CIF
CIF
CIF
Name
Source
arNr
Parameter Number
0731
0800
0801
0810
0840
0842
0844
0845
0848
0849
0852
1020
1021
1022
1035
1036
1055
1056
1074
1110
1113
1124
1140
1141
1142
1230
2103
2104
2106
2220
2221
2222
2235
2236
1070
1071
1075
1076
2016
2019
2051
2200
2253
2254
2264
CO: Frequency setpoint
BiCo Connections (r1170 to r2050)
BiCo
Table 10-8
10 ENGINEERING INFORMATION.
COMBIMASTER 411 & MICROMASTER 411 Operating Instructions
6SE6400-5CA00-0BP0
127
10. ENGINEERING INFORMATION
CIB
CIB
CIB
CIB
CIB
CIB
CIB
CIB
CIB
CIB
CIB
CIB
CIB
CIB
CIB
CIB
CIB
CIB
CIB
CIB
CIB
CIB
CIB
CIB
CIB
CIB
CIB
CIB
CIB
CIB
CIB
CIB
CIB
CIB
CID
CIF
CID
CIF
CIW
CIW
CIW
CIB
CIF
CIF
CIF
128
2294
CO: PID output
COMBIMASTER 411 & MICROMASTER 411 Operating Instructions
6SE6400-5CA00-0BP0
CO
2273
CO: PID error
CO
2272
CO: PID scaled feedback
CO
2266
CO: PID feedback
CO
2262
CO: PID filtered setpoint
CO
2260
CO: PID setpoint
CO
2250
CO: Output setpoint of the MOP
CO
2224
CO: Act. fixed PID setpoint
CO
2197 COBO
CO/BO: Statusword 1 of monitor
BO
2091
BO: Controlword 2 from CB
7
7
7
7
7
7
7
7
7
7
7
7
7
7
7
7
7
7
7
7
7
7
7
7
7
7
7
7
7
7
7
7
7
7
10
10
10
10
20
20
20
22
22
22
22
BO
2090
BO: ControlWord 1 from CB
BI: Binary output
BI: Download parameter set 0
BI: Download parameter set 1
BI: CDS Bit 0 (local/remote)
BI: ON/OFF1
BI: ON/OFF1 reverse
BI: 1. OFF2
BI: 2. OFF2
BI: 1. OFF3
BI: 2. OFF3
BI: Pulse enable
BI: Fixed frequency selection bit 0
BI: Fixed frequency selection bit 1
BI: Fixed frequency selection bit 2
BI: Enable MOP (UP-command)
BI: Enable MOP (DOWN-command)
BI: Enable JOG right
BI: Enable JOG left
BI: Disable additional setpoint
BI: Inhibit reverse direction
BI: Reverse
BI: Enable JOG ramp times
BI: RFG enable
BI: RFG start
BI: RFG enable setpoint
BI: Enable DC braking
BI: 1. Faults acknowledgement
BI: 2. Faults acknowledgement
BI: External fault
BI: Fixed PID setpoint selection bit
BI: Fixed PID setpoint selection bit
BI: Fixed PID setpoint selection bit
BI: Enable MOP (UP-command)
BI: Enable MOP (DOWN-command)
CI: Main setpoint
CI: Main setpoint scaling
CI: Additional setpoint
CI: Additional setpoint scaling
CI: PZD to BOP-Link (USS)
CI: PZD to Comm-Link (USS)
CI: PZD to CB
BI: Enable PID controller
CI: PID setpoint
CI: PID trim source
CI: PID feedback
CO
2054
CO: CB diagnosis
Functional Grouping
0731
0800
0801
0810
0840
0842
0844
0845
0848
0849
0852
1020
1021
1022
1035
1036
1055
1056
1074
1110
1113
1124
1140
1141
1142
1230
2103
2104
2106
2220
2221
2222
2235
2236
1070
1071
1075
1076
2016
2019
2051
2200
2253
2254
2264
Name
Source
Parameter Number
arNr
BiCo
CO
2053
BiCo connections (r2053 to r2294)
CO: CB identification
Table 10-9
Issue 03/02
Issue 03/02
10.9
10.9.1
Table 10-10
10 ENGINEERING INFORMATION.
Harmonic Currents
Harmonic currents with 1% mains impedance
Three Phase 400V Connection
MLFB
Filter Type
6SE6411-6UD13-7AA1
UNFILTERED
6SE6411-6BD13-7AA1
Class B
6SE6411-6UD15-5AA1
UNFILTERED
6SE6411-6BD15-5AA1
Class B
6SE6411-6UD17-5AA1
UNFILTERED
6SE6411-6BD17-5AA1
Class B
6SE6411-6UD21-1AA1
UNFILTERED
6SE6411-6BD21-1AA1
Class B
6SE6411-6UD21-5AA1
UNFILTERED
6SE6411-6BD21-5AA1
Class B
6SE6411-2UD22-2AA1
UNFILTERED
6SE6411-6BD22-2AA1
Class B
6SE6411-2UD23-0AA1
UNFILTERED
6SE6411-6BD23-0AA1
Class B
10.10
Power
CT
(kW)
Fundamenta
l
Amps
5th
Amps
7th
Amps
11th
Amps
13th
Amps
17th
Amps
19th
Amps
0.37
1.50
1.29
1.10
0.67
0.46
0.15
0.09
0.55
2.00
1.69
1.42
0.79
0.51
0.14
0.11
0.75
2.60
2.13
1.75
0.87
0.51
0.13
0.15
1.1
3.71
2.98
2.35
1.05
0.53
0.18
0.22
1.5
4.92
3.80
2.95
1.11
0.49
0.26
0.28
2.2
7.89
7.01
6.18
4.19
3.11
1.30
0.60
3
10.09
8.69
7.69
4.68
3.45
1.05
0.39
Use of MM4 Input Chokes
When the inverter is operating it gives rise to a non-sinusoidal current from the mains
supply with harmonics. The amplitude of the harmonics can be reduced by fitting input
chokes.
When the mains supply impedance is less then 1% it is necessary to use an input choke
with the inverter.
It is recommended to use the standard MM4 range of input chokes, details of which can
be obtained from the DA51.2 MICROMASTER 420/440 Catalogue.
The choke must be housed in a mechanical enclosure appropriate to the environment.
10.10.1
Mains Supply Impedance
This is the ratio of the inverter rated power to mains short-circuit power. If the mains
supply impedance is below 1%, the lifetime of the electrolytic capacitors could be
reduced.
The mains short-circuit power may be obtained from the power supply company, or may
be read from the Type Plate of the supplying power transformer.
COMBIMASTER 411 & MICROMASTER 411 Operating Instructions
6SE6400-5CA00-0BP0
129
10. ENGINEERING INFORMATION
10.11
Issue 03/02
Power Losses
Figure 10-16 below shows the power loss for the MICROMASTER 411/COMBIMASTER
411 Inverters.
Efficiency vs Frequency CSB 1.5kW & CSC 3.0kW
98%
96%
Efficiency
94%
Efficiency at Max Line CSB
Efficiency at Min Line CSB
Efficiency at Max Line CSC
Efficiency at Min Line CSC
92%
90%
88%
86%
0Hz
5Hz
10Hz
15Hz
20Hz
25Hz
30Hz
35Hz
40Hz
45Hz
50Hz
Output Frequency
Figure 10-17
130
Power Losses CM411/MM411
COMBIMASTER 411 & MICROMASTER 411 Operating Instructions
6SE6400-5CA00-0BP0
Issue 03/02
10.12
10 ENGINEERING INFORMATION.
Shock and Vibration
The inverter has been tested for compliance with the following standards.
10.12.1
10.12.2
10.12.3
Vibration Stress during Operation (Single Sine Sweep)
Required Standards:
Test standards:
EN 60721-3-3 class 3M6 and 3M8
EN60068-2-6, test Fc
Case Size B:
Case Size C:
Class 3M6: 10-58Hz/ 0.15mm, 58-200Hz/ 2g
Class 3M6: 10-58Hz/ 0.15mm, 58-200Hz/ 2g
Shock Stress during Operation (Half Sine Shock)
Required Standards:
Test standards:
EN 60721-3-3
EN 60068-2-27, test Ea
Case Size B:
Case Size C:
Peak acceleration 5g - duration of shock 30ms
Peak acceleration 5g - duration of shock 30ms
Vibration and Shock stress during Transport
Required Standards:
Test standards:
EN 60721-3-3
EN 60068-2-27, Test Ea
Class 2M2:
Class 2M1:
5-9Hz/ 3.5mm, 9-200Hz/ 1g
Peak acceleration 15g - duration of shock 11ms.
The inverter meets class 2M2 for Vibration stress and 2M1 for shock stress in product
packaging.
COMBIMASTER 411 & MICROMASTER 411 Operating Instructions
6SE6400-5CA00-0BP0
131
10. ENGINEERING INFORMATION
10.13
PROFIBUS
10.13.1
Overview
Issue 03/02
PROFIBUS is an open standard communication protocol which has been designed and
developed for use in general industrial applications. The standard is defined in EN50170
(volume 2) and has been developed, agreed and adopted by many manufacturers
worldwide.
PROFIBUS control is now available for a wide variety of products, from many different
companies manufacturing drives, actuators, valves, as well as Programmable Logic
Controllers (PLCs) and other system controllers. PROFIBUS operates over a variety of
hardware interconnections such as fiber optics and RS485.
There are three versions of PROFIBUS: FMS, DP and PA and all these versions will work
together. The most commonly used version is the DP version, intended for general
industrial applications. This is the version supported by Siemens Drives.
10.13.2
Using the PROFIBUS
In order to connect to a PROFIBUS system, a PROFIBUS module is required. This
module mounts on the side of the drive and uses a TTL serial port to communicate with
the drive.
The drive may be controlled and monitored via the main PROFIBUS system.
A PROFIBUS system offers the following advantages:
Ø
Ø
Ø
Ø
Ø
Ø
Ø
Ø
Ø
Ø
Ø
Ø
Ø
132
Open, clearly defined system.
Many different products from many different manufacturers.
Well proven in many industrial applications.
Reduced wiring; easy set up re-programming, monitor and control.
Ease of commissioning with the SIMATIC S7 PLC System at a later date.
Flexibility to expand and modify the automatic system at a later date.
Remote diagnostics reduce the downtime in the event of a problem.
Very fast; up to 12Mbaud.
Up to 125 slaves on one DP system.
Single or Multi-master operation.
One to one or broadcast communications.
Support and development software available.
Routing Functionality.
COMBIMASTER 411 & MICROMASTER 411 Operating Instructions
6SE6400-5CA00-0BP0
Issue 03/02
10.14
10 ENGINEERING INFORMATION.
PROFIBUS Module
This option allows the MICROMASTER 411/COMBIMASTER 411 to be controlled via a
PROFIBUS-DP serial bus (SINEC L2-DP).
PROFIBUS-DP is a cost-effective high-speed serial communication system optimized for
the actuator/sensor area where very short system reaction times are critical. It operates
as a decentralized I/O system whereby the traditional wiring to sensors and actuators is
replaced by an RS485 serial bus system linking the stations together.
The suitability of the system for such applications has been enhanced by an extension of
the bus speed up to 12 MBd. Protocol is defined as DIN19245 and also as EN50170
guaranteeing open, multi-vendor communications between PROFIBUS-DP stations.
Up to 125 stations can be networked together using this single bus system and a very
flexible data structure allows the system to be optimized to exactly match the
requirements of each device.
PROFIBUS-DP lies at the heart of the new generation of SIMATIC S7 automation
systems offered by Siemens. Using this single bus system, all engineering, visualization
and PLC control operations can be integrated. To configure a SIMATIC based
automation system, all that is required is the associated STEP7 configuration tool running
on a PC. Bus configuration is performed by using a drag and drop technique in a
graphically displayed PROFIBUS-DP network.
10.14.1
Features of PROFIBUS Module
Ø
Ø
Ø
Ø
Ø
Ø
Ø
Ø
Ø
Ø
Ø
Ø
Ø
Ø
Ø
Permits fast cyclic communications via a PROFIBUS connection.
Supports all PROFIBUS baud rates up to 12 MBd.
Control of up to 125 inverters using PROFIBUS-DP protocol (with repeaters).
Conforms to EN50170 guaranteeing open communications on a serial bus system. It
can be used with other PROFIBUS-DP/SINEC L2-DP peripheral devices on the serial
bus. Data format conforms to the VDI/VDE directive 3689 “PROFIBUS Profile for
Variable Speed Drives”.
Acyclic communications channel for connecting SIMOVIS or other service tools.
Support for the PROFIBUS control commands SYNC and FREEZE.
Can be easily configured using the S7 Manager software, or any proprietary
PROFIBUS commissioning tool.
Simple integration into a SIMATIC S7 PLC system using specially designed software
modules (S7).
Module can be powered by external +24V Power Supply if required.
No separate power supply necessary.
Digital and analog inputs can be read and digital output is controlled via the serial
bus.
5 msec response time to process data.
Output frequency (and therefore motor speed) can be controlled locally on the drive
or over the serial bus.
Multi-mode operation possible, whereby control data can be input via the terminal
block (digital inputs) and setpoint over the serial bus. Alternatively, the setpoint can
be from a local source (analogue input) with the drive control over the serial bus.
Inverter parameters are accessible over the serial link.
COMBIMASTER 411 & MICROMASTER 411 Operating Instructions
6SE6400-5CA00-0BP0
133
10. ENGINEERING INFORMATION
Issue 03/02
Caution
Ø
Ø
The PROFIBUS Module can only be fitted and removed from the inverter when
the inverter is powered off.
The PROFIBUS Module must be connected to the drive using the cable
supplied.
The data structure for communication over PROFIBUS-DP can be either PPO type 1 or
PPO type 3 as specified in VDI/VDE 3689. This means in practice that process data
(control words, setpoints in the transmitted telegram and status words, actual values in
the received telegram) are always sent. Parameter data exchange may, however, be
blocked if bus bandwidth or PLC memory space is at a premium. The data structure, and
thus the PPO type, is normally specified by the bus master. If no PPO type is specified
(e.g. if a combined PROFIBUS DP/PROFIBUS FMS bus master is used), the default PPO
type is type 1 (parameter data exchange enabled).
Process data from the serial link always has a higher priority than parameter data. This
means that a setpoint change or drive control change command will be processed faster
than a parameter change command.
Parameter write access over the serial link can be enabled or blocked as required.
Parameter read access is permanently enabled, allowing continuous read-out of drive
data, diagnostics, fault messages etc. A visualization system can thus be realized with
minimal effort.
Local control of the drive with the On, Off, Jog and Reverse buttons is possible at all
times in an identical fashion to when the module is not present.
PROFIBUS cables are connected to terminals within the Module. Cables are fed into the
module via cable glands.
134
COMBIMASTER 411 & MICROMASTER 411 Operating Instructions
6SE6400-5CA00-0BP0
Issue 03/02
Table 10-11
10 ENGINEERING INFORMATION.
Maximum Cable Lengths for Data Transfer Rates
Data transfer rate
(Kbit/s)
Max. cable length of a segment
(m)
9.60
19.20
93.75
187.50
500.00
500.00
12000.00
1200
1200
1200
1000
400
200
100
The shield of the cable must be connected to the housing of the PROFIBUS Module (i.e.,
recommended use of metal cable glands for this purpose).
A segment can be extended by using RS485 repeaters.
Recommendation: SINEC L2 repeater RS485 (Order No: 6ES7972-0AA00-0XA0).
For reliable operation of the serial bus system, the cable must be terminated at both ends
using terminating resistors. Bus terminations with the MICROMASTER 411 PROFIBUS
Module is achieved using the Bus Termination Switch (see above). Additionally, for
12 MBd operation, no stub length from the main bus cable is allowed.
COMBIMASTER 411 & MICROMASTER 411 Operating Instructions
6SE6400-5CA00-0BP0
135
10. ENGINEERING INFORMATION
10.14.2
Issue 03/02
Quick Guide to setting up PROFIBUS
The bus cable between the master device and the drive must be connected correctly. this
includes the necessary termination resistors.
Bus Termination within the PROFIBUS module can be achieved using the termination
switch (SW1). See illustration on previous page.
The bus cable must be screened and the screen must be connected to the housing of the
cable connector.
The PROFIBUS master must be configured correctly so that communications can be
realized with a DP slave using PPO type 1 or PPO type 3 (only PPO type 1, if the PPO
type cannot be configured via remote operator control).
Installation should be in conformance with EMC directives and regulations (this is
described in detail in the operating manuals for the drive and the PLC).
10.14.3
Table 10-12
PROFIBUS Module - Data
Technical data – 411 PROFIBUS Module
Item
Dimensions H x W x D
Table 10-13
10.15
Description
107.8 mm x 128 mm x 40.5mm
Degree of protection
IP66
Maximum bus speed
12 MBd
PROFIBUS Ordering information
Designation
Order No.
PROFIBUS module
6SE6401-1PB00-0AA0
Variant Independent Options
Several options are available for use with Siemens Standard inverters. These are
intended to assist product selection, installation and commissioning in certain
applications.
10.15.1
Basic Operating Panel (BOP)
MICROMASTER default settings can be changed through the Basic Operator Panel
(BOP) drive option. The BOP provides direct access to the MICROMASTER 411
operating parameters. Speed, frequency, motor direction, current and torque values can
all be accessed and displayed. The BOP has the capacity to actively interface with the
parameter sets stored in the drive.
The BOP consists of a keypad control panel array and a 5-digit LCD display with
backlight. Available in hand held or panel-mounted form the unit provides a visual
interface with the inverter control. Access to internal parameters and functions is
achieved from the pushbutton set on the panel fascia. Navigational push-buttons are
provided for movement through parameters and values.
136
COMBIMASTER 411 & MICROMASTER 411 Operating Instructions
6SE6400-5CA00-0BP0
Issue 03/02
10.15.2
10 ENGINEERING INFORMATION.
Advanced Operating Panel (AOP)
The Advanced Operator Panel (AOP) enhances the interface/communication capability of
the MICROMASTER range of frequency inverters. Available in either Desk or Panel
mounted form the unit provides the user with an intelligent, clear text inverter interface.
This gives direct access to the control, programming, storage and monitoring of
MICROMASTER series operating parameters.
For local control of individual inverters the AOP is mounted into a Desk Mount platform.
Each unit supports software capable of carrying out configuration and storage of inverter
parameter sets. Software menus, inverter parameters, associated values and help text is
displayed on a compact dot matrix LCD screen. Operator commands for software are
derived from a keypad located directly below the LCD screen. Communication with
dependent inverters is achieved via RS232 interface terminals.
Summary
The AOP has several practical uses. For example:
Ø
Ø
Ø
Ø
10.15.3
The AOP may be Desk Panel mounted and used to control the inverter directly.
The AOP can be mounted on a Door Mount Kit (using an optional cable of up to 5 m)
to enable remote control and monitoring of the inverter.
The AOP can be used to allow for communication with a PC.
Parameter sets can be stored in the AOP and uploaded or downloaded as required.
Particularly useful where many inverters require programming in production.
PROFIBUS Module
The PROFIBUS module allows full PROFIBUS connection of up to 12 Mbaud. You can
supply the module from an external 24 V supply which keeps PROFIBUS active even
when the inverter is removed from its power. The module permits full remote control of
PROFIBUS or local control or a mixture of both.
10.15.4
PC to Inverter Connection Kit
The PC to Inverter Connection Kit is used for controlling an inverter directly from a PC
provided the correct software has been installed. The hardware includes an opto-isolated
RS232 adapter board and a RS 232 Serial Comms cable for reliable point-to-point
connection.
10.15.5
BOP/AOP Door Mounting Kit for Single Inverter Control
This kit is used to mount an operator panel in a cabinet door. It must be used in
conjunction with a MICROMASTER 411 5m cable assembly.
This kit extends the existing RS232 interface, bringing connections and power from the
interface connector to terminals, which can then be wired to the AOP or BOP mounted in
the door. Although RS232 should be limited to 3 m of cable, up to 20 m of cable can
operate satisfactorily, but this is not guaranteed.
10.15.6
Electromechanical Brake Module
The Electromechanical Brake Control Module is used to provide an output to the drive
coil of a DC electromechanical motor brake. The brake output can be software configured
for fast and slow coil operation.
The coil voltages of the respective motor brakes are listed in the Electromechanical Brake
Module Operating Instructions.
COMBIMASTER 411 & MICROMASTER 411 Operating Instructions
6SE6400-5CA00-0BP0
137
10. ENGINEERING INFORMATION
138
Issue 03/02
COMBIMASTER 411 & MICROMASTER 411 Operating Instructions
6SE6400-5CA00-0BP0
Issue 03/02
APPENDICES
Appendices
This Appendices contains:
A-
Applicable Standards ............................................................................................................ 140
B-
List of Abbreviations.............................................................................................................. 141
C-
MICROMASTER 411/COMBIMASTER 411 Parts Identification......................................... 142
COMBIMASTER 411 & MICROMASTER 411 Operating Instructions
6SE6400-5CA00-0BP0
139
APPENDICES
Issue 03/02
A- Applicable Standards
European Low Voltage Directive
The MICROMASTER product range complies with the requirements of the Low
Voltage Directive 73/23/EEC as amended by Directive 98/68/EEC. The units are
certified for compliance with the following standards:
EN 60146-1-1 Semiconductor inverters – General requirements and line
commutated inverters
EN 60204-1
Safety of machinery – Electrical equipment of machines
European Machinery Directive
The MICROMASTER product range does not fall under the scope of the Machinery
Directive. However, the products have been fully evaluated for compliance with the
essential Health & Safety requirements of the directive when used in a typical
machine application. A Declaration of Incorporation is available on request.
European EMC Directive
When installed according to the recommendations described in this manual, the
MICROMASTER product range fulfils all requirements of the EMC Directive as
defined by the EMC Product Standard for Power Drive Systems EN61800-3.
ISO 14001
Siemens plc operates a quality and environmental management system, which
complies with the requirements of ISO 14001.
ISO 9001
Siemens plc operates a quality management system, which complies with the
requirements of ISO 9001.
140
COMBIMASTER 411 & MICROMASTER 411 Operating Instructions
6SE6400-5CA00-0BP0
Issue 03/02
APPENDICES
B- List of Abbreviations
AOP
Advanced Operator Panel
AC
Alternating Current
AIN
Analog Input
BI
Binector Input
BO
Binector Output
BOP
Basic Operator Panel
CI
Connector Input
CIB
Connector Input Byte
CID
Connector Input Double Word
CIF
Connector Input Floating
CIW
Connector Input Word
CO
Connector Output
DC
Direct Current
DIN
Digital Input
EU
European Union
ELCB
Earth Leakage Circuit Breaker
EMC
Electro-Magnetic Compatibility
EMI
Electro-Magnetic Interference
FCC
Flux Current Control
FCL
Fast Current Limitation
IGBT
Insulated Gate Bipolar Transistor
LCD
Liquid Crystal Display
LED
Light Emitting Diode
MOP
Motor Potentiometer
PI
Proportional and Integral
PLC
Programmable Logic Controller
PTC
Positive Temperature Coefficient
RCCB
Residual Current Circuit breaker
RCD
Residual Current Device
RH
Relative Humidity
RPM
Revolutions Per Minute
COMBIMASTER 411 & MICROMASTER 411 Operating Instructions
6SE6400-5CA00-0BP0
141
APPENDICES
C-
Issue 03/02
MICROMASTER 411/COMBIMASTER 411 Parts
Identification.
Item
142
Description
1
Inverter Cover
2
Inverter Retaining Screw
3
Sealing Gasket
4
Filter Module retaining screws
5
Filter Module
6
Terminal Housing
7
Gland Knock – outs
8
Motor Terminal Box
9
Motor Frame
10
Motor Terminal Box Gasket
11
Input Output Board
12
Serial Interface Socket
COMBIMASTER 411 & MICROMASTER 411 Operating Instructions
6SE6400-5CA00-0BP0
Issue 03/02
INDEX
Index
A
Access Levels · 62
Advanced Operating Panel (AOP) · 137
Advanced Operator Panel (AOP) · 56, 91
Altitude · 21
Ambient operating conditions · 21
AOP
details · 137
Applicable standards
European EMC Directive · 140
European Low Voltage Directive · 140
European Machinery Directive · 140
ISO 14001 · 140
ISO 9001 · 140
Automatic De-rating · 121
B
Basic Operating Panel (BOP) · 136
Basic operation
changing parameters with BOP · 54
Basic Operation · 46
Basic Operator Panel (BOP) · 51, 90
BiCo · 122
cross connections · 125
operation · 122
using control words · 124
using status words · 124
worked examples · 123
Binary Connectors · 122
BiCo · 122
Block Diagram · 41
Boost · 109
BOP/AOP Door Mounting Kit · 137
Braking · 118
compound · 119
dc · 118
normal · 118
Vdc max controller · 119
parameter interaction · 106
parameters controlling · 106
Current Monitoring · 107
accuracy · 107
D
DC braking · 59
DC Braking · 118
Default setup · 45
Derating
automatic · 121
for sideways installation · 121
with altitude · 120
with switching frequency · 121
with temperature · 120
Derating Factors · 120
Design Features · 16
Dimensional Detail · 28, 30
Dimensions · 27
Door Mounting Kit · 97
E
Electrical Installation · 32
Electro-Magnetic Compatibility
EC type-examination certificate · 100
general · 99, 100, 139
self-certification · 100
technical construction file · 100
Electro-Magnetic Interference · 37
Electromagnetic radiation · 21
Electromechanical Brake Control Module · 93
EMC · 100
EMC Compliance Tests · 103
EMC Directive Compliance · 100
EMC performance
filtered for residential, commercial and light industry
· 102
filtered industrial class · 101
general industrial class · 101
C
F
Cable Connections · 33
Case Size Rating Information · 83
Changing single digits · 52
Chokes · 129
Closed Loop
control · 110
implementation · 110
setting up · 111
COMBIMASTER 411 & MICROMASTER 411
fault codes · 75
specifications · 81
COMBIMASTER 411 Installation Procedure · 29
Command Sources · 58
Commission Overview · 49
Commissioning · 39
Commissioning Procedure · 42
Compound Braking · 59, 119
Control and Operating Modes · 109
Control Cable Connections · 36
Control Circuit Jumpers · 44
Control Modes · 60
Current Limit · 106
Fast Current Limit · 107
Fault codes
with the Basic Operator Panel fitted · 74
Faults and warnings · 60
AOP fitted · 60
BOP fitted · 60
SDP fitted · 60
Flow chart Quick Commissioning · 50
Flux Current Control · 60
Frequency Setpoint · 58
Function (Fn) Button · 51
Fuses and Circuit Breakers · 85
COMBIMASTER 411 & MICROMASTER 411 Operating Instructions
6SE6400-5CA00-0BP0
G
General operation · 56
Gland Dimensions · 27
H
Harmonic Currents · 129
tables · 129
143
INDEX
Humidity Range · 21
I
Installation · 19
Installation after a Period of Storage · 20
Installation of Cable Glands · 23
Installation Procedure · 22
Intended purpose · 6
Internal Overtemperature · 108
Internet Home Address · 5
J
Issue 03/02
Programming Options · 89
Proportional and Integral Control (PI) · 110
Protection Characteristics
fast current limit · 107
overtemperature · 108
overvoltage and trip · 109
thermal · 121
using PTC resistors · 108
Q
Quadratic V/f control · 60
Qualified personnel · 6
Quick commissioning · 49
Jump Function · 52
L
Linear V/f control · 60
M
Mechanical Installation · 21, 29
Motor Connections for Star/Delta. · 34
Motor data for CM411 parameterization · 55
Motor PTC Connections · 37
Multi-point V/f control · 60
N
Non - Default Modes of Operation · 47
O
Operation
starting and stopping the motor · 59
Operation with long cables · 32
Operation with Residual Current Device · 32
Operator Panel Mounting Kit · 94
Options · 136
Overheating · 21
Overload Operation · 106
Overvoltage · 109
R
Ramp Times Using Jumpers · 43
Reset to Factory default · 52
Reversing the motor · 58
S
Safety instructions · 7
Scrolling Function · 52
Shock · 21, 131
Starting the motor · 58
Status Display Panel
default settings with BOP · 51
Stopping the motor · 58
Stopping the Motor · 48
System Parameters · 62
T
Technical Data · 82
Technical Support · 5
Temperature · 21
Temperature Coefficient · 108
Thermal Protection · 121
Tightening Torque & Cable cross section · 84
Trip Levels · 109
Troubleshooting · 73
P
U
Parameter List (short form) · 64
Parameters
changing parameters with BOP · 54
system parameters · 61
Parts Identification · 142
PC to AOP Connection Kit · 96
PC to Inverter Connection Kit · 95, 137
PI Controller
limits · 115
responses · 112
PI Output Limits · 115
PI setpoint · 111
Power Connections · 33
Power Losses · 130
output graphs · 130
Preparation · 22
PROFIBUS · 132
characteristics · 132
setting up · 136
PROFIBUS Module · 92
Unearthed Supplies · 122
operation · 122
User Options · 88
144
V
Variant Independent Options · 136
Vibration · 131
W
Wall Mounting Kit · 25, 98
Warnings, cautions & notes
definitions · 6
general · 7
Z
Ziegler-Nichols · 113
COMBIMASTER 411 & MICROMASTER 411 Operating Instructions
6SE6400-5CA00-0BP0
Suggestions and/or Corrections
To: Technical Documentation Manager
Siemens Automation & Drives
Siemens plc
Automation & Drives
Varey Road, Congleton, CW12 1PH
Suggestions
Corrections
For Publication/Manual:
COMBIMASTER 411 & MICROMASTER
411
Fax: +44 (0)1260 262143
Email: Technical Documentation Department
From
User Documentation
Operating Instructions
Name:
Order Number.: 6SE6400-5CA00-0BP0
Date of Issue: 03/02
Company/Service Department
Should you come across any printing
errors when reading this publication,
please notify us on this sheet.
Suggestions for improvement are also
welcome.
Address:
Telephone: __________ /
Telefax: ________ /
Order Number
6SE6400-5CA00-0BP0
Drawing Number
G85139-K1790-U345-A1
A&D SD SM4
© Siemens AG, 2002
Subject to change without prior
notice
Siemens Aktiengesellschaft
Order No.: 6SE6400-5CA00-0BP0
Printed in UK.
Date: February 2002