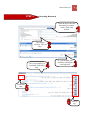
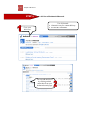
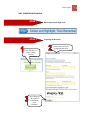
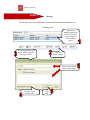
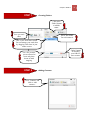
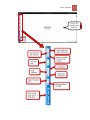
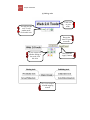
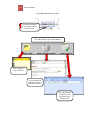
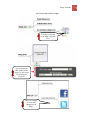
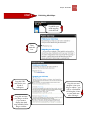
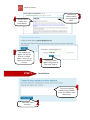
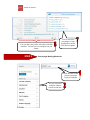
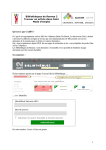
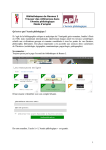
1
Web 2.0 Research Tools: A Quick Guide MOHAMED AMIN EMBI Centre for Academic Advancement Universiti Kebangsaan Malaysia 2012 Table of Contents i TABLE OF CONTENTS Page CHAPTER 1 CITEULIKE What is citeULike?...............……………………………………………………...11 Benefits of citeULike...…………………….……………………………………..1 1 Ways of using citeULike as a research tool……………………………………22 Get started with citeULike...………...…………………………………………..44 References……………………………………………………………………....14 14 CHAPTER 2 GOOGLE SCHOLAR What is Google Scholar?....……………………………………………………..15 15 Features of Google Scholar…………....….……………………………………15 15 Benefits of Google Scholar...…………...….……………………………………15 15 Ways of using Google Scholar as a research tool……………………………...16 16 Get started with Google Scholar..…...…………………………………………18 18 References……………………………………………………………………......8 22 CHAPTER 3 DE.ICIO.US What is del.icio.us?……...……………………………………………………..2323 Advantages of using del.icio.us…....…………………………………………...2323 Ways of using del.icio.us ……..…....……………………………………..........2424 Get started with del.icio.us..…………………………………………………..2525 References…………………………………………………………………….3232 CHAPTER 4 DIIGO What is DIIGO?...…………....…....…………………………………………….33 33 Benefits of using DIIGO………………………….………………………….....33 33 Ways of using DIIGO as a research tool……………………………………....33 33 Get started with DIIGO………………………………………………………..35 35 References……………………………………………………………………....47 47 ii Table of Contents CHAPTER 5 WEBNOTES What is WebNotes?............…………………………………………………….48 48 Benefits of WebNotes………………....….……………………………………48 48 Ways of using WebNotes as a research tool…………………………………4949 Get started with WebNotes………...…………………………………………50 50 References……………………………………………………………………....57 57 CHAPTER 6 WALLWISHER What is Wallwisher?………………………………………....…………...........5858 Benefits of using Wallwisher……………………………………….…………5858 Using Wallwisher as a research tool………………………………...................5959 Get started with Wallwisher…………………………………………………6060 References……………………………………………………………………6565 CHAPTER 7 EVERNOTE What is Evernote?.………………………………………………....…………...66 66 Benefits of using Evenote……..………………………………………….….......66 66 Ways of Evernote as a research tool…………………………………...............67 67 Get started with Evernote……………………………………………………...68 68 References……………………………………………………………………....79 79 CHAPTER 8 DROPBOX What is Dropbox?.....…………………………………………………………8080 Benefits of using Dropbox…....……………………………………………….8080 Ways of using Dropbox.……....……………………………………………...81 81 Benefits of using Dropbox as a research tool………………………………..8181 Get started with Dropbox..……………………………………………...........8383 References……………………………………………………………………....91 91 Table of Contents CHAPTER 9 iii BUBBL.US What is Bubbl.us?...…………………………………….……………………….92 92 Benefits of Bubbl.us…………...….…………..…………………………………92 92 Ideas for usage as a research tool…......….…………………………………….93 93 Get started with Bubbl.us……….…...…………………………………………94 94 References…………………………………………………………………...102 102 CHAPTER 10 MIND42 What is Mind 42?...…………………………….……………………………...103 103 Advantages of Mind42………………….….………………………………….103 103 Using Mind42…………………………...….………………………………….104 104 Get started with Mind42………...…...……………………………………….105 105 References…………………………………………………………………….114 114 CHAPTER 11 GOOGLE DOCS What is Google Docs?………………………………………………………115 115 Using Google docs as a research tool..………………………………………115 115 Get started with Google docs……………………………………………….118 118 References…………………………………………………………………….123 123 CHAPTER 12 VYEW What is Vyew?.………………………………………………....………….......124 124 Advantages of Vyew………………….……..…………………………………124 124 Ways of using Vyew…………………………………………………………..125 125 Get started with Vyew………………………………………………………..127 127 References…………………………………………………………………….134 134 iv Table of Contents CHAPTER 13 SURVEYMONKEY What is SurveyMonkey?..……………………………………………………..135 135 Advantages of SurveyMonkey ……………………………………………….135 135 Benefits of using SurveyMonkey as online survey……………………………136 136 Get started with SurveyMonkey...……………………………………..............137 137 References…………………………………………………………………….146 146 CHAPTER 14 KWIK SURVEYS What is Kwik Surveys?.......……………………………………………………147 147 Benefits of Kwik Surveys...…..………………………………………………...147 147 Get started with Kwik Surveys........…………………………………………148148 References…………………………………………………………………….159 159 CHAPTER 15 ZOOMERANG What is Zoomerang?.........……………………………………………………160 160 Advantages of Zoomerang…..…..……………………………………………160 160 Get started with Zoomerang….....…………………………………….............161 161 References……………………………………………………………………165 165 CHAPTER 16 CONNOTEA What is Connotea?...............…………………………………………………166166 Benefits of Connotea………………...….……………………………………166 166 Advantages of Connotea as a research tool………………………………….167 167 Get started with Connotea……...…...……………………………………….169 169 References…………………………………………………………………….179 179 CHAPTER 17 ZOTERO What is Zotero?..................……………………………………………………180 180 Benefits of Zotero……………………...….…………………………………180 180 Advantages of Zotero………...….……………………………………………181 181 Zotero as a research tool……….……………………………………………181 181 Get started with Zotero………...…...………………………………………183 183 References……………………………………………………………………194 194 Table of Contents v CHAPTER 18 BIBME What is BibMe?..................…………………………………………………….195 195 Using BibMe for research……………...….…………………………………..195 195 Advantages of BibMe………...….………………………………………….…196 196 Get started with BibMe………...…...……………………………………...…197 197 References……………………………………………………………………203 203 CHAPTER 19 SLIDESHARE What is Slideshare?………………………………………………....…………204 204 Ways of using Slideshare…………………………………………......................204 204 Slideshare as a research tool………………………………………………….205 205 Get started with Slideshare…………………………………………………...206 206 References…………………………………………………………………….212 212 CHAPTER 20 LINKEDIN What is a Linkedin?...………………………………………………………….213 213 Advantages of Linkedin for reseachers……………………………………….213 213 Get started with Linkedin..……………………………………………………215 215 References…………………………………………………………………….220 220 Chapter 1: citeULike 1 Chapter 1 CITEULIKE WHAT IS CITEULIKE? CiteULike is a Web-based tool to help scientists, researchers and academics store, organise, share and discover links to academic research papers. It has been available as a free Web service since November 2004 and like many successful software tools, it was written to solve a problem the authors were experiencing themselves (http://www.ariadne.ac.uk/issue51/emamy-cameron). CiteULike has grown to be one of the biggest and most popular social reference management websites by helping users streamline their process of storing and managing academic references (http://www.springer.com/about+springer/citeulike?SGWID=0-164102-0-0-0) BENEFITS OF CITEULIKE The following are some benefits of citeULike: Time-saving scholarly bookmarking services. Automated article recommendations. One-click extraction of bibliographic references. Tag and rate the references. See what others are reading and share resources with peers. Export libraries in various citation formats. Import existing libraries. Access from any computer with an Internet connection. Source: http://www.springer.com/about+springer/citeulike?SGWID=0-164102-0-0-0 Chapter 1: citeULike 2 WAYS OF USING CITEULIKE AS A RESEARCH TOOL (a) Keep track of journal articles and other texts. CiteULike has filled the academic bookmarking niche by allowing users to collect and organize research links, manage citation details, and extract bibliographic data from a web page automatically. CiteULike provides a forum for sharing resources for faculty, fellows, and graduate students also researcher to engage in more intensive research. (b) Organizing research. CiteULike offers a free signup and lets users install a bookmarklet so that they can save the relevant articles from the web with one click. Users can then tag entries and search their personal library. CiteULike is focused on scholarly articles, books, and other research-related resources. It has some special features, including the ability to export to BibTeX and EndNote (two reference management tools frequently used in academia) and the ability to browse through articles by journal title. If the articles are save from a supported site (e.g., JSTOR), then the citation details are automatically picked up when the page is saved using the bookmarklet. (d) Sharing and collaborating with CiteULike. CiteULike offers a group feature that allows a group of people to add/share articles that they all collectively find useful. An academic department or a research team might create a group on CiteULike, they can collaborating on a large project and share information within the group members. Many academics use CiteULike to see what other people in their field are reading, so it can serve as a catalog for browsing as much as a tool to organize research. Source: 64082.html http://voices.yahoo.com/organize-research-collect-articles-citations-with- Chapter 1: citeULike 3 (e) Promoting and increasing the visibility of the articles. CiteULike help to promote and increasing the visibility of the finding and research articles to the potential readers. Add the article to the personal CiteULike library to share with others, which helps them discover literature which is relevant to their field or using CiteULike invite a friend feature. Source: http://journalauthors.tandf.co.uk/pdfs/howtopromote.pdf 4 Chapter 1: citeULike GET STARTED WITH CITEULIKE STEP 1 Go to: http://www.citeulike.org/ STEP 2 Joining citeULike Click the ‘Join now’ button or the ‘Join now with facebook’ if you wish to register using your facebook account. Fill in the required information. Then, click the ‘Sign up Now!’ button. Chapter 1: citeULike 5 This message will be shown after you have successfully registered. Then, click ‘Continue’ to start using CiteULike. STEP 3 Posting a Paper to CiteULike In your citeULike page, click at the ‘CiteULike’ tab. Then, go to the ‘Browser Button’. 6 Chapter 1: citeULike Now, you have successfully installed the browser button of the ‘Post to CiteULike’. You will view the procedure of ‘How to post a paper to CiteULike’. Choose the type of your browser. Click and hold ‘Post to CiteULike’ and drag it onto the toolbar. Then, click the ‘Post to CiteULike’ toolbar. View any article, book, journal and etc you like to cite. Chapter 1: citeULike 7 The information of the article will automatically be inserted in your CiteULike library. This is the title of the article and all the information regarding the article in the library. The summary of the article is listed here. 8 Chapter 1: citeULike STEP 4 Exporting Citations Go to the ‘MyCiteULike’ tab. Then click ‘Export’. Choose the program you would like to export your library to your computer. Chapter 1: citeULike Then, go to the ‘Export’ tab. Or, you can export the article individually by clicking at the title of the article. Choose the type of the program you would like to export the article. 9 10 Chapter 1: citeULike STEP 5 Importing Citations In your ‘MyCiteULike’, go to ‘Import’. Then choose the file in your computer. You also can paste BibTex or RIS of the article here. Then click the ‘Import BibTeX file…’ or ‘Import RIS file…’ button. Chapter 1: citeULike STEP 6 11 Finding Groups In your ‘MyCiteULike’, go to ‘Group’. Type the name of the group you want to search. Then click the ‘Search Groups’ button. Choose the group you wish to join and click ‘Join this group’. 12 Chapter 1: citeULike For example, you are now a member of ‘Group: Web2Learning’. You can access the group’s library. STEP 7 Click at the ‘MyCiteULike’ tab. Creating Groups Then, go to ‘Groups’. Chapter 1: citeULike 13 Click at ‘create it’ to create your own group. Fill in the required information. Then click the ‘Create Group’ button. 14 Chapter 1: citeULike This is an example of a group created. REFERENCES http://www.ariadne.ac.uk/issue51/emamy-cameron [16 May 2012] http://www.springer.com/about+springer/citeulike?SGWID=0-164102-0-0-0) [16 May 2012] http://voices.yahoo.com/organize-research-collect-articles-citations-with-64082.html [16 May 2012] http://journalauthors.tandf.co.uk/pdfs/howtopromote.pdf [16 May 2012] Chapter 2: Google Scholar 15 Chapter 2 GOOGLE SCHOLAR WHAT IS GOOGLE SCHOLAR? Google Scholar provides a simple way to broadly search for scholarly literature. From one place, you can search across many disciplines and sources: articles, theses, books and abstracts from academic publishers, professional societies, online repositories, universities and other web sites. Google Scholar helps you find relevant work across the world of scholarly research. Source: http://scholar.google.com/intl/en/scholar/about.html FEATURES OF GOOGLE SCHOLAR Some features of Google Scholar: Search diverse sources from one convenient place. Find articles, theses, books or abstracts. Locate the complete document through your library or on the web. Learn about key scholarly literature in any area of research. Source: http://scholar.google.com/intl/en/scholar/about.html BENEFITS OF GOOGLE SCHOLAR Some benefits of Google Scholar: It is a reliable search tool to browse/access the academic literature. General free tool for academic literature and easy-to-use familiar interface. Searchable – can search about 100,000,000,000 items discreet files, pages and journal articles. 16 Chapter 2: Google Scholar Is a handy tool to locate the open-access literature. Provides access to unique content not in other search tools. Free and openly-accessible. Source: http://blogs.ubc.ca/dean/2007/12/top-five-5-benefits-of-google-scholar/ WAYS OF USING GOOGLE SCHOLAR AS A RESEARCH TOOL (a) Google Scholar citations Google Scholar Citations provides a simple way for authors to keep track of citations to their articles. We can check who is citing our publications, graph citations over time, and compute several citation metrics. We can also make profile public, so that it may appear in Google Scholar results when people search for our name. It is quick to set up and simple to maintain even if we have written hundreds of articles and our name is shared by several different scholars. We can add groups of related articles, not just one article at a time; and citation metrics are computed and updated automatically as Google Scholar finds new citations to our work on the web. We can even choose to have our list of articles updated automatically or we can choose to review the updates ourself, or to manually update at any time. Source: http://scholar.google.com/intl/en/scholar/citations.html (b) Finding research paper topic Brainstorm a topic - type in a general single or double word term into Google Scholar about the topic we are interested. The topic chosen does not have to be exactly what the result is refering to. Keep looking through all the results. The results are all just titles of books or articles. However, they can give an idea to start writing a paper. Chapter 2: Google Scholar 17 Locate primary resources - Google Scholar has a tool that can help us to quickly identify the primary resources on any given topic. Find and note which resources have been cited the most and make it as the main resources of our research paper because they are obviously the authority on the topic. Source: http://vreccc.hubpages.com/hub/Finding-Research-Paper-Topics-with-GoogleScholar 18 Chapter 2: Google Scholar GET STARTED WITH GOOGLE SCHOLAR STEP 1 Go to: http://scholar.google.com.my/# STEP 2 Searching a Paper Fill in the information of the article you want to search. Then, click this button. Chapter 2: Google Scholar This is an example of the articles searched. 19 Click this link to view the article in PDF format. Example of the article viewed. 20 Chapter 2: Google Scholar STEP 3 Creating My Citation Log in your Google account. Then fill in the required information in this profile form. Click ‘Next step’. Then, click the ‘Search articles’ button. To find the article you have written and published, insert your name here. The list of your articles will be shown. Click this button to insert the article into your profile. Chapter 2: Google Scholar For profile updates, choose ‘Automatically update the list of articles in my profile. (recommended)’. Then, click ‘Go to my profile’. STEP 4 My Citation Open the Google Scholar page, then click ‘My Citation’ on the top of the page. 21 22 Chapter 2: Google Scholar Number of citation to all publications. Articles cited statistic. The largest number h such that h publications have at least h citations. The number of publications with at least 10 citations. List of your articles published online. Number of citation. Year of the article published. REFERENCES http://vreccc.hubpages.com/hub/Finding-Research-Paper-Topics-with-Google-Scholar [18 May 2012]. http://scholar.google.com/intl/en/scholar/about.html [17 May 2012] http://blogs.ubc.ca/dean/2007/12/top-five-5-benefits-of-google-scholar/ 2012]. http://scholar.google.com/intl/en/scholar/citations.html [18 May 2012]. [17 May Chapter 3:del.icio.us 23 Chapter 3 DEL.ICIO.US WHAT IS DEL.ICIO.US? In brief, del.icio.us (formerly del.icio.us, pronounced "delicious") is a social bookmarking web service for storing, sharing, and discovering web bookmarks (http://en.wikipedia.org/wiki/Delicious_%28website%29). It is allows users to tag, save, manage and share web pages from a centralized source. With emphasis on the power of the community, del.icio.us greatly improves how people discover, remember and share on the Internet (http://www.delicious.com/help/about). ADVANTAGES OF USING DEL.ICIO.US Several advantages of using del.icio.us include: 1. Saving and accessing bookmarks online. 2. Promoting our own sites. 3. Finding bookmarks from other users on your network. 4. Networking with other users who are in your network. 5. Reading your network’s bookmarks, since del.icio.us provides convenient RSS feeds. 6. Using a “profile” tag, such as users’ bookmarks tagged with “profile” on del.icio.us to feature sites, best posts and articles and important sites linking to you. Source:http://onlinesapiens.wordpress.com/2008/07/19/using-delicious-in education/ Chapter 3:del.icio.us 24 WAYS OF USING DEL.ICIO.US The following are several ways of using del.icio.us: (a) Information Gathering (public or private) Use del.icio.us to gather relevant information. Search for the articles of interest to your research. You can determine whether or not each bookmark will be seen publicly, and you decide if you want others to know what you are researching. (b) Follow Users Find and follow fellow that upload bookmarks whom has same interest of your research. (c) Follow Tags “Subscribe” to specific tags of interest in del.icio.us. This action sends all your subscriptions directly to your del.icio.us home page. You can also create an RSS (really simple syndication) feed to automatically update whenever new articles with the subscribed tag are bookmarked. You can also create an RSS feed of any user’s bookmarks. (d) Collaboration Create a custom organizational intranet for sharing bookmarks. No need to copy and send the URLs by email and also no re-posting to your members. When everyone in the group is encouraged to share articles, the volume of news/articles sharing increases. Source: http://www.communityorganizer20.com/2009/08/10/using-delicious-for- research-sharing-and-website-dynamism/ Chapter 3:del.icio.us 25 GET STARTED WITH DEL.ICIO.US. STEP 1 Go to: http://www.delicious.com/ STEP 2 Join Now/Sign In To start using “delicious”, click ‘Join Now’ or ‘Sign In’. You can join or sign in using your Yahoo account. If you do not have a Yahoo account, you can sign in using your ‘Facebook’ or ‘Google’ account. 26 Chapter 3:del.icio.us STEP 3 Bookmarking Copy the URL of the web you like to bookmark. At your “delicious” page, go to ‘Bookmarks’ and click ‘My Bookmarks’. Click ‘Save a new bookmark’. Paste the URL of the web here. Then click ‘Next’. Chapter 3:del.icio.us 27 \ The ‘Title’ and ‘URL’ will be inserted automatically. Insert tags and notes (optional). If you want to make your bookmark private, check ‘Make private’. Then click ‘Save’. This indicates the number of people who here bookmarked this URL. Your bookmark will look like this. Your tags. 28 Chapter 3:del.icio.us STEP 4 Private and Public View You can share your bookmark using ‘twitter’, ‘email’ and ‘delicious’. Now, in your bookmark, you can view your public bookmark. To view your public bookmark, click ‘Public’. Chapter 3:del.icio.us STEP 5 29 Searching Bookmark Insert the keyword of the bookmark you want to search. Then, click ‘Search’. You can also search by ‘Filter by Tags’. This is an example of a bookmark ‘Filtered by tags’. Or, you can filter your search by clicking any of the tags here. Bookmark date. Filter by tag. 30 Chapter 3:del.icio.us STEP 6 Go to your del.icio.us del.icio.us Bookmark Network Use of Network: Alternative way for content delivery. See friends’ bookmarks. You can add other users by clicking on their names here from your bookmark search page. Chapter 3:del.icio.us Then, click ‘Add a user to Network’. Or, insert the username of the user and click ‘Add’ to add in your network. Now, “Kafarlee” is your network. You can see Kafarlee bookmarks and share them. To view your Network, go to ‘People’ and click ‘My Network’. Here you can see the number of your network. Click on any name to view other peoples’ bookmarks. 31 32 Chapter 3:del.icio.us REFERENCES http://en.wikipedia.org/wiki/Delicious_%28website%29 [25 March 2011] http://onlinesapiens.wordpress.com/2008/07/19/using-delicious-in-education/ [25 March 2011] http://www.delicious.com/help/about [25 March 2011] http://www.communityorganizer20.com/2009/08/10/using-delicious-for-researchsharing-and-website-dynamism/ [18 May 2012] Chapter 4:Diigo 33 Chapter 4 DIIGO WHAT IS DIIGO? Diigo is a social bookmarking tool that helps you read, share and organize the web pages you look at. In addition, it allows you to share your bookmarks, as well as browse bookmarks created by others. Diigo has dual purpose - it acts as a bookmarking tool and social networking tool (Educause 2009). BENEFITS OF USING DIIGO Diigo can be used as follows: 1. Take personal notes. 2. Highlights text information on web pages. 3. Bookmark and save notes for further use. 4. Add tags to keep them organized. 5. Share information when using tags. Source: http://www.slideshare.net/poutasi/what-is-diigo WAYS OF USING DIIGO AS A RESEARCH TOOL Diigo allows users not only to share bookmarks but also to digitally annotate web pages. Collaborative annotation allows users to highlight specific content on a web page and add a note explaining their thoughts or pointing to related resources. Users can highlight text or images, add their own comments, and share annotations with others. In addition, bookmarks and comments can be grouped and tagged to provide organization. As a result, members of research 34 Chapter 4:Diigo groups can compile an annotated bibliography of useful sites, with marked paragraphs they found important and notes about why a site is significant. Anyone who use annotation tools for academic research can build a collection of their own studies and observations in much the same way they have saved texts with highlighted passages, scribbled comments, and sticky notes. Those who are planning to pursue academic work as a career or for researchers working on long-term projects, the ability to collect these research components can be very valuable. Collaborative annotation tools involve researcher in a more active investigation and evaluation of resources (Educause 2009). Chapter 4:Diigo GET STARTED WITH DIIGO STEP 1 STEP 2 Go to http://www.diigo.com/ Creating an Account Create your account by completing the form. Click ‘Join Now’ to create a Diigo account. After filling up the required information, click ‘Continue’. 35 36 Chapter 4:Diigo Diigo will send you an email. You need to click the link given so that you can activate your Diigo account. After verifying, you will be invited to install the Diigo toolbar and learn more about Diigo’s capabilities. STEP 3 Installing Diigo’s Toolbar 3 steps to install the Diigo toolbar. First, you need to click ‘Allow’. Now, you can start installing your Diigo toolbar by clicking this button. Chapter 4:Diigo This window will appear and you need to click ‘Install Now’. Now, your Diigo toolbar is already installed on your computer. Bookmark Highlight Read later 37 38 Chapter 4:Diigo STEP 4 Diigo Toolbar Chapter 4:Diigo STEP 5 Bookmarking First, open the web page or URL you want to bookmark. Click the ‘Bookmark’ button to add a bookmark. This window will appear automatically. Insert your tag. Click ‘Save’ to save your bookmark in your Diigo library. 39 40 Chapter 4:Diigo To view your bookmark, go to the ‘Diigo’ toolbar and choose ‘My Library’. Now, the web you bookmarked will appear in your Diigo Library together with the relevant tags. Chapter 4:Diigo STEP 6 Highlighting Then, click the ‘Highlight’ button toolbar. First, you need to select the text you want to highlight from the web page. Now, the text you have selected are already highlighted. This button will appear automatically. 41 42 Chapter 4:Diigo Choose ‘View in my library’ to view your selected text in your Diigo library. After you view it in your Diigo library, only the highlighted paragraph will appear. Chapter 4:Diigo STEP 7 Using Sticky Notes First, click the‘Comment’ button and choose ‘Add a floating sticky note to this page’. Next, place your sticky note everywhere you like on the page. Now, you can write a comment on your sticky note. You also can make your note private or you can share it with public or your group. You also can add a sticky note on the text you have highlighted. 43 Chapter 4:Diigo 44 STEP 8 Hiding Sticky Notes Sometimes you would prefer to see only your own notes, or specific group annotation but not public sticky notes from all other users. With diigo toolbar installed, you can hide them To start hiding your sticky note, click ‘Hide public sticky notes’. This window will appear and you need to choose ‘Do not show me public sticky notes on this page’. Then click ‘OK’. Chapter 4:Diigo STEP 9 Capturing Image/Page First, click the ‘Capture’ button and choose either ‘Capture Selected Area’ or ‘Capture Entire Page’. If you choose ‘Capture Selected Area’, press hold and select the area you want to capture. Before you save, you can edit the image using these tools. After clicking the ‘save’ icon, the image you capture will automatically appear in your Diigo library. 45 46 Chapter 4:Diigo STEP 10 Creating Groups In your Diigo page, you can create your own group. Click ‘My Group’ to open your group page. Click ‘Create a group’ to start creating your Diigo group. Fill up the form to create a group. After that you are allowed to invite your friends to join your group. Then, click ‘Create my group’. Once your group have been created, you can invite your friends to join your group either through your Diigo friends or you can invite by inserting your friends’ emails. Chapter 4:Diigo 47 Example of a Diigo group. All members can post bookmarks and topics for discussion. Click ‘Invite people’ to invite friends to join your group. REFERENCES SlideShare. What is Diigo? http://www.slideshare.net/poutasi/what-is-diigo. Educause. 2009. 7 Things you should know about Collaborative annotation. http://www.educause.edu/eli. retrieved on [8 March 2011]. Chapter 5: WebNotes 48 Chapter 5 WEBNOTES WHAT IS WEBNOTES? WebNotes is a research tool developed for researchers, that allows anyone to highlight and add sticky notes to the web pages and have those notes instantly added to a web-based research file. Source: http://lifehacker.com/5272528/webnotes-highlights-sticky+notes-and- organizes-web-research BENEFITS OF WEBNOTES Here are some benefits of WebNotes: WebNotes makes it easy to highlight and add notes to web pages from directly within the web browser. Notes are saved automatically and will reappear any time when visit the page. Zoom in and out, search for text, and use WebNotes’ highlighting, commenting, and note-taking tools with online PDF viewer. Organize notes, bookmarks, and documents into folders, or tag them for easy reference. Search through the notes to find information instantly. WebNotes can be accessed from anywhere, either through our browser plug-in, or the WebNotes web site. Highlighted web pages and PDFs can be shared with others through email, permalink, or Twitter. Recipients will see the notes without having to download software or register for WebNotes. Share notes and clippings with colleagues and research team member by generating beautiful reports with WebNotes. Simply select one or more folders, choose a report template, and use WebNotes rich-text editor to Chapter 5: WebNotes 49 make final changes. Then send the report by email, or export it to a PDF or HTML document. Source: http://notanotherhistoryteacher.edublogs.org/2011/09/10/help-students-withonline-research-using-webnotes/ WAYS OF USING WEBNOTES AS A RESEARCH TOOL The following are some ways of using WebNotes: (a) Take Notes Online Use a virtual highlighter and sticky note tool to make notes on web pages or PDFs from online sources such as the PubMed, Factiva or ProQuest. Notes are automatically saved to your online account. (b) Organize Research Maintain your thesis research in an organized fashion by compiling your annotated content into nested folders. All annotations are searchable to make sure you never lose another source. (c) Collaborate with Colleagues and Research Team Compile your analysis into emailable reports. Reports may also be used as an outline to help you write. All of your notes and data, complete with source, will be readily available. Source: http://www.webnotes.net/Solutions/Academic/ 50 Chapter 5: WebNotes GET STARTED WITH WEBNOTES STEP 1 Go to: http://www.webnotes.net/ STEP 2 Signing Up Click the ‘Sign Up’ button. Choose your plan and click ‘Sign Up’. Chapter 5: WebNotes Fill in the required information. 51 Then, click ‘Create Account’. STEP 3 Adding Webnotes Toolbar/Bookmarklet At your Webnotes page, go to the WebNotes Bookmarklet. Then, drag this ‘Annotate’ link onto your bookmark toolbar. 52 Chapter 5: WebNotes Next, click the ‘Annotate’ button to activate your WebNotes toolbar. WebNotes tutorial will be open automatically once after you have activated the WebNotes toolbar. To start using the WebNotes, you need to click this button. WebNotes toolbar button will be shown here and you can use it to annotate your web page and document. Chapter 5: WebNotes STEP 4 Highlighting Then, click the ‘Annotate’ button to open the WebNotes toolbar. First, open the web page Click ‘Highlighter’ at your WebNotes toolbar. At the text you had highlighted, you will see this button. You can add comments, change the color of your highlighter or delete the highlights. Select the text you want to highlight. 53 54 Chapter 5: WebNotes STEP 5 Click the ‘Sticky Note’ at your WebNotes toolbar. Adding Sticky Notes Open the web page. You can put the sticky note anywhere you like at the web page. Chapter 5: WebNotes STEP 6 55 Sharing the Annotation Page Click the ‘Annotate’ button to open the WebNotes toolbar. Click at ‘Share this page’. You can share the annotated page by the list given. STEP 7 Annotating PDF Click at the ‘My WebNotes’ tab. Next, go to ‘Upload PDF’. 56 Chapter 5: WebNotes Click the ‘Browse…’ button. Then, click at the ‘Upload PDF’ button. Now, you have successfully uploaded your pdf document. Click at ‘Open with WebNotes’ to start annotating. Chapter 5: WebNotes 57 To share the document you have annotated, click at ‘Share this page’. Click ‘Highlighter’ at the WebNotes toobar to highlight the text in your pdf document. Click ‘Sticky Note’ at the WebNotes toobar to add the note. REFERENCES http://lifehacker.com/5272528/webnotes-highlights-sticky+notes-and-organizes-webresearch [15 May 2012]. http://notanotherhistoryteacher.edublogs.org/2011/09/10/help-students-with-onlineresearch-using-webnotes/ [15 May 2012]. http://www.webnotes.net/Solutions/Academic/ [15 May 2012]. 58 Chapter 6: Wallwisher Chapter 6 WALLWISHER WHAT IS WALLWISHER? Wallwisher is a collaborative tool that lets users be prosumers rather than consumers (Sharon Tonner 2011). It allow users to post their thoughts on a common topic using electronic sticky notes on a shared digital wall. They can type a maximum of 160 characters per electronic sticky note that can incorporate an image, audio or video using the appropriate web address link (Sharon Tonner 2011). Wallwisher can be also used for personal note taking, to-do lists, feedback collection, etc. Best of all there is no signup needed- simply create a wall and start posting (Anon. 2011). BENEFITS OF USING WALLWISHER The following are some benefits of using Wallwisher: 1. To allow a collaborative conversation. 2. To brainstorm an idea. 3. To access discussions and ideas. 4. To provide an interactive area that incorporates text, audio and visual materials. 5. To make the survey interactive through responding using mobile devices that has internet accessibility. 6. A wall that offers individual feedback when determining a decision that needs a group vote. 7. A wall that tracks the completion status for each group member's task (Anon. 2011). Chapter 6: Wallwisher 59 USING WALLWISHER AS A RESEARCH TOOL Collaborative research by working in small groups to find information (http://year6wykeham.blogspot.com/2012/01/science-wallwisherresearch.html). Provides a very simple way to gather feedback from respondents (http://staffweb2tools.wordpress.com/walls/). Brainstorm and share simple ideas of research among research group (http://www.teachmaths-inthinking.co.uk/conferences/harare-2012-what-isibl.htm). Receive and record the feedback of the research. 60 Chapter 6: Wallwisher GET STARTED WITH WALLWISHER STEP 1 Go to:http://www.wallwisher.com/ STEP 2 Log in/Register To start using the Wallwisher, first you need to login (if you already have an account) or register (if this is your first time). Click the login/register button a the top right hand corner. Click ‘Build a wall’ if you do not want to go at login/register page. For the first time user. Free Fill up the the Wallwisher account, then click ‘create my account’. If you already have an account, just sign in and click ‘Let me in’. Chapter 6: Wallwisher STEP 3 At the ‘Click to select image’, you can choose the existing image you want or you can browse the image you like from your computer. 61 Building & Customizing Walls Click here to change your wall title and description. Choose the theme of your wall. STEP 5 STEP 6 If you click ‘Build a wall’ at step 3, this box will appear and you need to fill in your name and email. Then, your Wallwishers’ password account will be sent to your email. At preferences area ‘you can choose your wall URL’ and select the preferences of your viewers and sticky notes post. Click ‘done’ once you have finished customizing your wall. 62 Chapter 6: Wallwisher STEP 4 Typing Sticky Notes Double click at the wall to add sticky notes. Enter your name. Write your message not more than 160 characters. Add an image, audio or video from a web link by pasting the URL location here. Chapter 6: Wallwisher STEP 5 63 Inserting Images An example of an image URL location from Google image search engine. Click ‘VIEW’ to view the image. 64 Chapter 6: Wallwisher STEP 6 Inserting Videos Click ‘PLAY’ to view the video. An example of a URL location of a video link from a YouTube source. STEP 7 Inserting Documents Click ‘View’ to view the file. 9 An example of URL location of PDF files from Google search. Chapter 6: Wallwisher STEP 8 65 Sharing Wallwisher Now, you can enjoy using your Wallwisher and share with others by send publish Wallwisher URL location to the public or person and group you want REFERENCES Anon. 2011. Wallwisher: A new way to promote student collaboration for online colleges. http://blog.ecollegefinder.org/post/Wallwisher-A-New-Way-to- Promote-Student-Collaboration-for-Online-Colleges.aspx [14 March 2011] Sharon Tonner. 2011. Wallwisher. http://i-c-t.wikispaces.com/WALLWISHER [14 March 2011] http://year6wykeham.blogspot.com/2012/01/science-wallwisher-research.html May 2012] [17 http://staffweb2tools.wordpress.com/walls/ [17 May 2012] http://www.teachmaths-inthinking.co.uk/conferences/harare-2012-what-is-ibl.htm [17 May 2012] 66 Chapter 7: Evernote Chapter 7 EVERNOTE WHAT IS EVERNOTE? Evernote is a useful Web 2.0 tools. It allows us to capture pictures of almost anything we wish to remember. In a few quick short steps, pictures can be saved into Evernote, organized, and given a brief short description making the picture easily accessible in the future. This application is unique in a number of ways. Unlike any other web applications, it is not linear. In other words, when using this application we are able to add text or information, pictures, videos and links. Evernote allows us to begin to capture all ideas and experiences from our real lives and from a digital standpoint and the memories or ideas will not slip away. In short, the possibilities are endless because Evernote allows us to capture information in any environment while using whatever platform or device we want (Benjamin 2008). BENEFITS OF EVERNOTE Capture Anything - Notes can be text that you type in directly, a voice recording make with a mobile device, or a photo from smartphone. If we go to a webpage and want to save the Evernote, we can use Evernote Web Clipper . Evernote is a great place to store important files that we may need to quick access such as user manuals or research articles. Access Notes Anywhere - Ability to access and update Evernote using computer (Windows and Mac OS X) and tablet, or smartphone. For mobile access, apps are available; iOS, Android, Blackberry, and Windows Phone 7. Find Things Fast - Searches can be based on keywords, tags, dates, or note types (such as images, audio, PDF, etc.) Chapter 7: Evernote 67 Share with Friends and Colleagues - Evernote lets us share our notebooks with whoever we want. Notebooks can be made public via a link that can be posted on a webpage or included in an email. Go Paperless - Instead of printing an article from a webpage, we can send it to Evernote and read it through mobile device. Source: http://www2.palomar.edu/pages/atrc/2012/04/17/5-reasons-you-should-be- using-evernote/. BENEFITS OF EVERNOTE AS A RESEARCH TOOL (a) Organizing in Evernote Gathering all of the preliminary information we will need to start the writing process. With Evernote, all quotes, statistics and reference material pages are in one place, easily accessible and searchable by keywords, notebooks and tags. This is very helpful when information coming from all sorts of places for example from the Web, handwritten notes, typed notes, and even photographs. Source: http://blog.evernote.com/2011/02/11/evernote-for-students-the-ultimate- research-tool-education-series/. (b) Researcher’s Digital Toolbox Capture all or parts of a web page. Save typed or dictated notes. Add files and images. Save email messages, even Tweets. Photograph/scan a record with smartphone and send it to collection. Share notebooks with others to compare notes Source: http://moultriecreek.us/gazette/?p=7430. 68 Chapter 7: Evernote GET STARTED WITH EVERNOTE STEP 1 STEP 2 Go to http://www.evernote.com/ Installing Evernote Application Click ‘Save File’. Click here. Chapter 7: Evernote Open the Evernote file which you have saved in your program file location. Then click ‘Run’. Tick ‘I accept the terms in the License Agreement’. Start installing by the clicking the ‘Install’ button. Click ‘Finish’ once you have finished installing your application. The Evernote icon will appear on your desktop. 69 70 Chapter 7: Evernote STEP 3 Before you start using Evernote, you need to ‘Sign in’ first or you need to ‘Register’ if you have not created an Evernote account. Sign In/Registering Evernote Chapter 7: Evernote STEP 4 71 Creating Notebook Evernote stores your notes in separate containers called “Notebooks.” Your account starts with one notebook, but you can make additional notebooks at any time. Two ways in creating notebook 1. Go to File New Notebook ‘Create Notebook’ page will appear. Type your unique notebook name. Choose local notebook (the notebook stored on your computer and are never uploaded to the Evernote Web service) or Synchronized notebook (the notebook are uploaded to the Evernote Web service, and will be available via other forms of the Evernote Service (Evernote Web, Evernote for Mac, Evernote Mobile Web, Evernote for iPhone, etc) by logging into your Evernote account). 72 Chapter 7: Evernote 2. Click in the Left-Hand Notebook Pane and hit the “Insert” key, or Right-Click in the Notebook Pane and select “New Notebook”. Notebook Pane. STEP 5 Exporting & Importing Notes 1. Exporting notes With Evernote, you have the option to save your notes to an external file for backup purposes, or for easy transfer amongst friends and colleagues. You can Export individual notes or entire Notebooks at once. Clik ‘File’. Export: (Or Ctrl+Shift+X). (This option can also be activated by Right-Clicking on one or more selected notes). You can then choose what file type you would like, .enex (Evernote Backup), html, .mht. If exporting to .enex, you can choose to export your note tags as well. Chapter 7: Evernote 73 2. Importing Notes You can import files exported from Evernote, databases from previous versions of Evernote, notes from Microsoft OneNote 2007, and entire folders of supported Files. Clik ‘File’. Click ‘Import’. You can choose to export the file/notes from evernote export file or OneNote. 74 Chapter 7: Evernote STEP 6 Creating a Note/Ink Note/Webcam Note Click the “New Note” button in the main toolbar. Or, Go to File New Note/New Ink Note/New Webcam Note New Note. New Webcam Note. New Ink Note. Chapter 7: Evernote STEP 7 75 Creating a Multimedia Note Add image and other file content to your notes. Note: Only files of type PDF, JPG, WAV, PNG, MP3, GIF, AMR are supported for Free users. Premium members may attach files of any type, but Evernote can only preview files of supported file types. 1. Drag and Drop Take a file from anywhere on your Computer and drag it into a new or existing note. STEP 8 Tagging You can tag your notes for easier retrieval and memorizing. You can create your own tags, at any time and drag and-drop them to tagged notes. Creating a new tag Right-Click on a Tag Section or on a Tag. You can create a tag or rename and delete the existing tag. Insert the name of your tag. Then, click ‘OK’. 76 Chapter 7: Evernote STEP 9 Sharing You can share your notes with friends, whether they have Evernote installed or not. 1. Emailing notes Select one or multiple notes in the list (Ctrl+Click on notes' toolbars to select multiple notes). An email application will appear with a composed message window. Click the ‘Email’ button. Enter your recipients address and message. Number of your selected notes. Click ‘Send’. Chapter 7: Evernote 2. Sharing notebooks Select a Notebook from the Notebook pane and rightclick to select ‘Properties’. You will be taken to the Evernote Web site, where you need to select ‘Sharing’ from the left-hand pane, then ‘Sharing Setup’. Click the ‘Sharing and Collaboration options’ link. On the next page, click ‘Start Sharing,’ or ‘Stop/Modify Sharing’ for the notebook you wish to Share. 77 78 Chapter 7: Evernote You will then have the option to publish your notebook publicly, or to specific individuals. If you choose ‘Share with the World’, you will be able to create a custom URL at which your notebook can be accessed, as well as modify the sort order and give it a custom description. If you choose ‘Share with Individuals’, you can select which individuals should receive a link to your notebook. Premium members also have the ability to allow other people to view, create, edit and delete notes within the shared notebook. Once you click ‘Save’, your notebook will be published at the listed Public URL. Once you select ‘Send Invitations’, your guests will receive an email with a private link to your notebook that only they can access. Chapter 7: Evernote 79 REFERENCES Benjamin Michael Spivey. 2008. Unique Ways of Using this Application!. https://wiki.itap.purdue.edu/display/Social/Unique+Ways+of+Using+this+Applic ation%21. [8 March 2011] http://www2.palomar.edu/pages/atrc/2012/04/17/5-reasons-you-should-be-usingevernote/ [17 May 2012] http://blog.evernote.com/2011/02/11/evernote-for-students-the-ultimate-researchtool-education-series/ [15 May 2012] http://moultriecreek.us/gazette/?p=7430 [15 May 2012] 80 Chapter 8: Dropbox Chapter 8 DROPBOX WHAT IS DROPBOX? Dropbox is a simple online virtual storage utility that allows you to make your files accessible from almost anywhere. Designed for those who are tired of e-mailing files to themselves and carrying around flash drives, Dropbox looks to revolutionize the way you store and share files. Source: http://acomputerblog.blogspot.com/2009/05/just-what-is-dropbox.html. BENEFITS OF USING DROPBOX The following are some benefits of using Dropbox suggested by Chris Clark (2010): 1. Access it anywhere. 2. Use it on multiple devices (eg. – laptop, tablet, or smartphone). 3. Works across platforms – sync up a to-do list from a Windows machine and modify it on a Blackberry, Mac, Linux, iPhone, or Android device. 4. The application is optional – If the computer at your work place doesn’t have Dropbox installed, you simply access your files from a browser. 5. Sharing –set up a folder to be accessible by a specific set of Dropbox accounts. 6. Make items public – anything in “Public” folder is available to the world. 7. Back up essential files – everything save in a Dropbox folder is automatically copied, not only to “the cloud” but also to other devices connected to your account. 8. Keep files in sync – always have your most recent to-do list or folder of browser bookmarks. 9. Fewer things to forget – become less reliant on that USB flash drive or portable hard drive. Chapter 8: Dropbox 10. 81 History – an account maintains 30 days of “undo”, allowing you to return to last draft preparation notes if you are accidentally deleted that awesome anecdote. 11. Keep costs low –no fee for 2 GB of space. WAYS OF USING DROPBOX According to Ryan Battles (2011), Dropbox can be used in the following ways: 1. Free backup: Save any files in Dropbox and it will instantly have secure backup to Dropbox's servers. 2. Restoring Previous Versions: Anything in the Dropbox folder can be restored to a previous version, even deleted file. Public File Sharing: Easily send large attachment to others without using 3. email and worries about the file size. Upload the file to Dropbox and use the built-in public link tool to simply send a link to the recipient, where they can download the file at their convenience. 4 Collaborating with Others: Helps to have access to the same files and share a folder via Dropbox. 5. Instant Mobile Viewing: Store all documents within Dropbox, and use the Dropbox App to download them whenever you need to view it. BENEFITS OF USING DROPBOX AS A RESEARCH TOOL There are no worries if we forgot to bring our documents/computer because all files saved in to Dropbox will be instantly saved in our computers, phones, and the Dropbox website. (http://thethesiswhisperer.wordpress.com/2011/10/13/how-i-use-technologyin-my-phd/). Save a paper/research document in the Dropbox folder on laptop and within seconds, the paper is synced to the cloud and available from a secure log in, iPad, desktop, iPhone or any smart mobile. The paper/research document 82 Chapter 8: Dropbox can be shared with other collaborators/research member. (http://thethesiswhisperer.wordpress.com/2011/10/13/how-i-use-technologyin-my-phd/). Dropbox is most useful for researchers or individual who do their work on more than one computer or device. (http://degreedirectory.org/articles/Digital_Research_Tools_Dropbox_Revie wed.html/). Dropbox has an ability to use as a sort of backup safeguard against losing important documents on a computer that could be lost or stolen. It can also be useful if we forgot and do not always remember to keep a USB drive handy for file transfer. (http://degreedirectory.org/articles/Digital_Research_Tools_Dropbox_Revie wed.html/). Chapter 8: Dropbox GET STARTED WITH DROPBOX STEP 1 Go to: http://www.dropbox.com/ STEP 2 Downloading Dropbox At the Dropbox page, click the ‘Download Dropbox’ button. Then, run ‘Dropbox.exe’. Click ‘Yes’ to allow for installation. 83 84 Chapter 8: Dropbox Then, click the ‘Install’ button. STEP 3 Creating a Dropbox Account If you do not have Dropbox account, click here. Then, click ‘Next’. Fill in the information required. Click the ‘Next’ button again. Chapter 8: Dropbox Choose your Dropbox size. If you want more size you can choose the paid account. Click ‘Next’. Then, you can take a brief tour of Dropbox or you can ‘Skip tour and finish’. 85 86 Chapter 8: Dropbox Finally, click the ‘Finish’ button. STEP 4 Dropbox Desktop Double click your Dropbox desktop. Chapter 8: Dropbox Dropbox added two folders and ‘Getting Started’ file. You can view these to see how it works. (a) Using Public Folder You also can add folders or drag and drop files in the Dropbox Desktop. 87 88 Chapter 8: Dropbox (a) Public Folder Double click the ‘Public’ folder. The public folder in Dropbox allows you to share the document with others even though they do not have a Dropbox account. To start sharing, drop your file in this folder. Then, right click on the file. Go to ‘Dropbox’ and click at ‘Copy public link’. This copies the Internet link to your file. You can now share this file with others: just paste the link into e-mails, instant message conversations, blogs, etc. Chapter 8: Dropbox 89 (b) Photos Folder Double click ‘Photos’ Make a folder inside the Photos folder, and give it a name. Put photos inside the folder you have just created. Now you can view and share this photo gallery online by going to http://www.dropbox.com/photos 90 Chapter 8: Dropbox STEP 5 Dropbox Website Go to https://www.dropbox.com/ and click Log in. Insert your email address and password. Then, click the ‘Log in’ button. (a) Files toolbar (b) Sharing toolbar Chapter 8: Dropbox 91 REFERENCES http://acomputerblog.blogspot.com/2009/05/just-what-is-dropbox.html [16 November 2011] Ryan Battles. 2011. The Benefits of Dropbox. http://joviawebstudio.com/blog/the_benefits_of_dropbox/ [16 November 2011] Chris Clark. 2010. A dozen benefits of Dropbox file storage – and some caveats http://ltlatnd.wordpress.com/2010/12/15/dropbox-benefits-caveas/ [16 November 2011] 92 Chapter 9: Bubbl.us Chapter 9 BUBBL.US WHAT IS BUBBL.US? Bubbl.us is a Web 2.0 tool that enables users to create mind mapping and brainstorming diagrams online. To begin, the main topic or concept is entered into the parent bubble. Then ideas and thoughts are recorded in colorful text bubbles linked to the parent bubble. Users can continue to add text bubbles which are color coded according to hierarchy. The site is simple and easy to use. The application is Flash-based so the latest Flash viewer needs to be installed. Source: http://www.web2teachingtools.com/bubbl_us.html BENEFITS OF BUBBL.US Some benefits for using bubbl.us: Easy to use. Saving time, supplies, and money. Does not require an account unless to save work. Helps to organize thoughts and explore relationships. Aids in generating ideas. Encourages risk taking. Encourages group discussions. Incorporates multiple intelligences. Source: http://www.web2teachingtools.com/bubbl_us.html Chapter 9: Bubbl.us 93 IDEAS FOR USAGE AS A RESEARCH TOOL Bubbl.us allows users to create the mind mapping without the use of paper and pen. Here are some ideas in using bubb.us as a research tool: Create flow charts for grant proposals. Presenting the ideas of research. Create a mind map of a brainstorming session for research planning that can be shared with all research team members using the collaboration feature or pasted into a blog or wiki. Organize sources or notes for a paper or research article, in order to aid in the writing process and narrow the focus of each topic. Source: http://rbuerkett.edublogs.org/2009/03/08/reflections-on-bubblus/ 94 Chapter 9: Bubbl.us GET STARTED WITH BUBBL.US STEP 1 Go to: https://bubbl.us/ STEP 2 Creating Account Fill in the required information. Then, click ‘Create account’. Chapter 9: Bubbl.us After you have registered, you need to sign in. Insert your Username/email and password. Then, click the ‘Sign In’ button. STEP 3 Click the ‘Sheet’ button. Creating Mind Mapping 95 96 Chapter 9: Bubbl.us This is your bubbl.us sheet. Now you can start creating your mind mapping. Change the size of the text. Draw a directional line to another bubble. Delete the bubble. Change the bubble background color. Create new bubble. Create new child bubble. Chapter 9: Bubbl.us An example of a mind mapping created STEP 4 Bubbl.us toolbar 97 98 Chapter 9: Bubbl.us STEP 5 Printing Click at ‘Print’ icon. Choose your print layout. Then, click the ‘Print’ button. STEP 6 Exporting Choose your export option, either image or HTML Outline. Click at the ‘Export’ icon. For the image option, select your image format. Then, click the ‘Export’ button. Chapter 9: Bubbl.us STEP 7 99 Creating Folders Click at the ‘Folder’ button to add the folder. Save you work sheet. This is your folder. You can rename it. This is your work sheet created. You can manage your work sheet by dragging it this sheet in your folder created. ‘Delete’ button for deleting your folder or sheet created. For a free account, you are allowed to create only three sheets of mind mapping. STEP 8 Adding Contacts Go to ‘Contacts’ and click at ‘Add Contacts’. 100 Chapter 9: Bubbl.us Type your friends’s name/email then click at the ‘Find’ button. This is your selected friend. List of your friends will list here. Select your friend. Then, click at ‘Add to Contacts’. When done, you can click ‘Close’ to close this dialogue box. STEP 9 Creating Groups Click at the ‘Group’ button. This is your new group created. You can rename your group. You can drag your contact in the group created. Use this ‘Delete’ button to delete your contact or your group created. Chapter 9: Bubbl.us STEP 10 101 Sharing Click at the ‘Sharing’ button to start sharing your mind mapping. If you click ‘HTML embed code’ this dialogue box will appear. Copy the HTML code to insert your mind mapping in your blog or website. If you click here, you can see ‘Read-only link to sheet’ and ‘HTML embed code’. If you click ‘Read-only link to sheet’ this dialogue box will appear. Copy the URL given and share with your friends through IM or email. Click the desired permission to set read or edit access of your mind mapping. Select the sheet you like to share. Then choose your friend. Lastly, click ‘Apply Permission & Close’. 102 Chapter 9: Bubbl.us REFERENCES http://www.web2teachingtools.com/bubbl_us.html [4 April 2012] http://www.web2teachingtools.com/bubbl_us.html [4 April 2012] http://rbuerkett.edublogs.org/2009/03/08/reflections-on-bubblus/ [4 April 2012] Chapter 10:Mind42 103 Chapter 10 MIND42 WHAT IS MIND42? Mind42 is a browser-based free mindmapping application which allows private, public or group shared maps to be created. Nodes are automatically arranged in space, but each node can be enriched with colours, icons, links to websites, notes and so on. Collaboration is easily arranged, using email addresses to invite viewers or participants. Source: http://www.knowledgenetworklearning.net/tools/10greattools/mind42/ ADVANTAGES OF MIND42 Some advantages for using mind42 No installation Accessable everywhere Intuitive interface Many node attributes (icons, colors, images, text styles, links) Collaboration (simultaneous editing) Easy publishing and distribution of maps Source: http://wssdshares.wikispaces.com/Mind42 104 Chapter 10:Mind42 USING MIND42 (a) Affordance Mind42 successfully links all streams of thought without cluttering the workspace. The simplicity of this application benefits a user by getting straight to it and providing focus. These tools enable a user to attach different forms of external information. This incorporates an opportunity to clearly depict, better explain or deepen thoughts. The attachment of notes, images or linking to external web content, a map of thinking is revealed. A user is now presented with a full and contextualised visualisation of thinking. (b) Group application Mind42 has the potential to be very effective in the visualisation of a groups overall objectives and activity. With the commitment of all members to update and contribute to a mind map, group activity can be easily monitored. Any members that may not be contributing are quickly identified. Any areas or ideas that may have been over looked can also be quickly identified by the group and acted upon. If a group implement’s icons for each member, ideas can be voted upon and highlighted for further research. Mind42.com offers groups a shared platform with an easy to use interface. Source: http://net205-2011-curtin.wikidot.com/hartnett-mind42 Chapter 10:Mind42 105 GET STARTED WITH MIND42 STEP 1 Go to: http://www.mind42.com/ STEP 2 Signing Up In Mind42 home page click at the ‘Sign up’ button. Fill in the required information. Then, click the ‘Sign up’ button. 106 Chapter 10:Mind42 Mind42 will send an email to your registered email account. Check your email and click at the link given. Now you can start login. Insert your registered username and password. Then, click the ‘Signin’ button. STEP 3 Creating Mind Mapping When you launch Mind42, the ‘Mind map manager’ dialogue box will open. Go to ‘New mind map’. Type your mind map title. Next, click the ‘Create’ button. Chapter 10:Mind42 107 This is your Mind42 sheet look like. 108 Chapter 10:Mind42 (a) Adding node Click once at your node. You will see this tool. To add another node, click at this icon. Retype the name of your new node. If you want to add another sibling of the node, click this icon. Then click the ‘Apply’ button. This is an example of mind mapping created. Chapter 10:Mind42 109 (b) Adding link to a node ‘Add new link’ dialogue box will appear. Go to the ‘External’ tab. Then click the ‘Apply’ button. Insert the selected URL address here. Then, click the ‘Apply’ button. Or, you can search links by inserting the keyword here. This is the page preview of your link added. 110 Chapter 10:Mind42 (c) Adding attachments to a node To add an attachment to your selected node, click this icon. You can add three types of attachments. You can type the short note here. You can attach the Wikipedia article at your selected node. You can attach the ‘Todo-list’ or the progress of your selected node. Chapter 10:Mind42 (d) Convert text nodes to images To change a text node to an image, click this icon. You can insert the URL address of the image, or you search by inserting the keyword. This is an example of a text node change into an image. 111 112 Chapter 10:Mind42 STEP 4 Inviting & Managing Collaborators To invite and manage collaborators, click at this icon. You can enter one or more email addresses here. Then, click the ‘Invite’ button. STEP 5 Viewing Revision To view the changes revision of your mind mapping created, click at this icon. This is the list of your mind mapping revision. Select the revision you want to view. Then, click this icon to load the mind mapping you want to view. Chapter 10:Mind42 STEP 6 113 Publishing Mind Maps To publish your mind mapping, click this icon. Then, mark this box. Copy this URL and send to your friend or colleagues. Copy this text into your blog or website if you want to display the mind map embedded in the blog or website. Copy this text and integrate it into your blog or website - you will see a link which will bring the visitors to your mind map after clicking it. 114 Chapter 10:Mind42 REFERENCES http://www.knowledgenetworklearning.net/tools/10greattools/mind42/ 2012] http://wssdshares.wikispaces.com/Mind42 [12 April 2012] http://net205-2011-curtin.wikidot.com/hartnett-mind42 [17 May 2012] [12 April Chapter 11:Google Docs 115 Chapter 11 GOOGLE DOCS WHAT IS GOOGLE DOCS? Google Docs is an online word processor, spreadsheet and presentation editor that enables you to create, store and share instantly and securely, and collaborate online in real time. You can create new documents from scratch or upload existing documents, spreadsheets and presentations. There is no software to download, and all work is stored safely online and can be accessed from any computer. Source: http://www.google.com/educators/p_docs.html USING GOOGLE DOCS AS A RESEARCH TOOL Here is some information on how to use Google docs as a research tool: (a) Google Docs features for authors Multiple authors can edit a document simultaneously, each author’s changes appearing immediately beside an individually coloured cursor. Authors can annotate selected areas of text with comments in explaining the decisions behind an edit, or querying another author’s work. These comments can be threaded, and removed once marked as “resolved”. All of the comments are retained for posterity in a separate “Discussions” document, which it can always refer back to. A chat window is available which is handy for resolving issues in real-time. A full revision history is maintained and can revert to previous versions very easily. Source : http://bitesizebio.com/articles/using-googledocs-to-write-collaborative- research-papers/ 116 Chapter 11:Google Docs (b) Collaborating on documents Google Docs is an online tool that enables collaborators to work in a synchronous environment on a single research document. Rather than passing a research document between authors, Google Docs allows authors at different physical locations to work together on the same document in real time. Changes made to the document can be tracked and attributed. Source : http://blogs.bournemouth.ac.uk/research/2011/04/16/using-google-docs-tocollaborate-on-documents/ (c) Creating online survey Google Docs have an inbuilt feature of creating online surveys. It is free and can collect unlimited responses Questionnaire created as a Google form can be distributed and shared using a web link (URL) through email to get responses from the target respondents. If the researchers have a website, the questionnaire can be easily embed into the web pages to give it a more professional look and feel. Source : http://www.amisampath.com/2009/11/how-to-create-online.html (d) Analyze data using spreadsheet The respondents’ feedback from the survey created using Google form will be inserted automatically In the Google Docs spreadsheet. Researchers can analyze the data from Google Docs spreadsheet. The data also can be downloaded in many different file formats, which might be more convenient for researchers. If the data is export as Excel or CSV, it might easily import it back to SPSS and do advanced statistical analysis of collected data. Source : http://www.amisampath.com/2009/11/how-to-create-online.html Chapter 11:Google Docs GET STARTED WITH GOOGLE DOCS STEP 1 Go to: http://www.google.com.my/ STEP 2 Creating a Google Account At the right top corner of Google homepage, click ‘Sign in’. Then, click ‘Sign up for a new Google Account’. 117 118 Chapter 11:Google Docs Fill in the required information. Click ‘I accept. Create my account’. Chapter 11:Google Docs STEP 3 119 Creating Google Documents After creating a Google account and logging in, go to ‘More’ at the Google page and select ‘Documents’. Click the ‘CREATE’ button and choose any type of the documents to start creating. Or, you can click this icon to upload your existing document in Google docs. 120 Chapter 11:Google Docs (a) Creating Documents If you click ‘Document’, this is your viewing page. To rename this document, click ‘Untitled document’. This is your toolbar with editing functions. You can type your document similar to a word processer. (b) Creating Presentation This is the presentation toolbar with the editing functions. Add new slide. If you click ‘Presentation’, this is your viewing page. Create your presentations here similar to a power point presentation. Chapter 11:Google Docs 121 (c) Creating Spreadsheets If you click ‘Spreadsheet’, this is your viewing page. To rename this spreadsheet, click at ‘Untitled spreadsheet’. This is your spreadsheet toolbar with the editing functions. Start using your spreadsheet here similar to an excel format. (d) Creating Form Click ‘Add item’ to add questions or others in your form. Click ‘Theme:Plain’ to choose from many of the interesting themes. If you click ‘Form’, this is your viewing page. Click here to give your form a title. An example of a question. You can edit, duplicate and delete your questions. 122 Chapter 11:Google Docs STEP 4 Sharing To change your sharing setting and invite others to collaborate with your documents click the ‘Share’ button. This icon shows that your document is private and only you can access it. Choose your sharing setting and click ‘Save’. Then, click the ‘Done’ button. To invite specific peoples, enter names, email addresses or groups. Chapter 11:Google Docs STEP 5 Viewing Comments Click ‘Show comment stream’ to see any comments regarding the documents. Choose your comment’s notification settings. Then, click the ‘OK’ button. REFERENCES http://www.google.com/educators/p_docs.html [17 November 2011] http://electronicportfolios.com/google/UsingGoogleDocsintheclassroom.pdf [17 November 2011] 123 124 Chapter 12: Vyew Chapter 12 VYEW WHAT IS VYEW? Vyew is a browser-based collaboration and conferencing platform that enables web users to share and create together in real-time and over time (meaning anytime they want). Vyew users can upload and annotate files (.doc, .odt, .xls, .ods, .ppt, .odp, .jpg, .gif, .png, .swf, .mp3), take screen captures of their desktop, and draw with whiteboard tools. They can also share their desktop in real-time. Source: http://vyew.com/site/help/guide/#Getting-Started-with-Vyew ADVANTAGES OF VYEW Here are some of the advantages of Vyew: Easy - Its very easy to use and configure this online meeting room, and you do not need to install anything because everything is web based. Compatible –The web based meeting solution is compatible with PC, Mac, Linux, power points, documents, images, videos, mp3′s, flash files. Free – The free version is free forever with unlimited use for up to 10 people. Collaboration features – Continuous rooms are always-on and saved always. Voice-notes, track/log activity and contextual discussion forums are just some more additional features. Resuming of sessions - Allows users to resume a meeting and complete their work again even if they exit a meeting in the middle. Conferencing options - Includes a range of options like online whiteboard, video conferencing, screen sharing, Voice-over-IP. Chapter 12: Vyew Source: 125 http://www.ilovefreesoftware.com/14/webware/vyew-free-online-meeting- software.html WAYS OF USING VYEW a) Meet and Present Give presentations, host webinars, or conduct team meetings. Leave content available for access over time. Conduct meetings in real time using a shared workspace, webcam, voice over IP (VoIP), free teleconferencing, text chat and desktop sharing. In addition to uploading, sharing and presenting content, participants can be invited to annotate and collaborate on content during the meeting. Participants can be allowed to navigate the workspace independently to collaborate on different portions of the content. Record the meeting for playback also available. The meeting room and content are always available for review and collaboration until the moderator removes access. b) Review and Annotate Upload, create, and collaborate on content with your team. Vyew provides an always-on workspace that reviewers and content creators can access and annotate at their convenience. Provides a transparent process for review and annotation. All participants can see each other’s comments and arrive at a final version more easily and quickly than emailing their comments to the content owner. Sidebar comments provide a contextual forum for discussions that can be filtered by user and flagged to indicate their status. Other collaborators outside organization can easily access the workspace anytime with no software to install. User can upload, create and collaborate on almost any type of content in Vyew regardless of the software or platform used to create it. 126 Chapter 12: Vyew Vyew’s always-on clear-view workspaces provide the environment that collaborators need to review and annotate content together in real time or independently over time. Source: http://vyew.com/site/product/vyew-in-action/uses Chapter 12: Vyew GET STARTED WITH VYEW STEP 1 Go to: http://vyew.com/s/ STEP 2 Signing Up/Register Click ‘SIGN UP: FREE’ or you can take a test drive first. Fill in the required information to register. 127 128 Chapter 12: Vyew Choose the free version of Vyew. Click ‘Continue’. Vyew will send an email to your email account. Click the link given and you can start login. Now you can start creating your room by click ‘Continue to Vyew Home dashboard’. Chapter 12: Vyew STEP 3 129 Getting Started Tutorial This is your dashboard. Click at ‘Getting Started (Tutorial)’ if you like to take a tour how to get started a room. Here is an example of the getting started tutorial. 130 Chapter 12: Vyew STEP 4 Creating Rooms You can choose to create your room by uploading content or just create new List of the room created will appear here. To create a room by uploading the content, select a file to upload. Vyew can import these types of content. Chapter 12: Vyew Room Tools STEP 5 Insert new page, blank page in your current room. Inserting Content Insert content from your computer. You can insert any format file: Microsoft office, pdf, images (jpg, png, gif, bmp), Flash movies, audio files (mp3). Insert a full or cropped snapshot of your desktop into your room. 131 132 Chapter 12: Vyew STEP 6 Inviting People Send the link given to invite people. Insert email address and invitation message to invite people to your room. You can specify what each person role is, for example, whether they can edit content in the room, or just view it. Chapter 12: Vyew STEP 7 Drawing/Annoting STEP 8 Communicating 133 Using Mic/Headset - Ideal when there will be 3 or 4 speakers (all listeners must have speakers or earphones). Webcam Up to 4 people can broadcast their webcams to everyone. Chat and private chat. Phone conference call -For international caller except US have to dial-in via Skype. 134 Chapter 12: Vyew REFERENCES http://vyew.com/site/help/guide/#Getting-Started-with-Vyew [26 January 2012] http://vyew.com/site/product/vyew-in-action/uses [27 January 2012] http://www.ilovefreesoftware.com/14/webware/vyew-free-online-meetingsoftware.html [21 May 2012] Chapter 13: SurveyMonkey 135 Chapter 13 SURVEY MONKEY WHAT IS SURVEYMONKEY? SurveyMonkey is an online survey tool. It allows user to easily create professional surveys. Both free and paying user can design surveys, collect responses, and analyze the responses of their created surveys. The results of the surveys can be shared instantly with targeted respondents. These surveys from SurveyMonkey can be on any subjects. Users can also change the font and color of the survey page. The results of the survey are viewed in real time. SurveyMonkey lets the user send out the survey on email lists or put a URL link on a web page to make it easy to get the desired audience for the survey. The survey also can be used in education to improve learning and teaching experiences. Source: https://wiki.itap.purdue.edu/display/INSITE/SurveyMonkey#SurveyMonkeyhistory. ADVANTAGES OF SURVEYMONKEY Additional advantages to using Survey Monkey include: No limits - You can create surveys with an unlimited number of questions. Skip / conditional logic - You can set the survey up to automatically skip questions that are not applicable to the respondent based on their answers to other questions. Randomize answer choices - The ordering of choices within a question can introduce an unintended bias. This service enables you to randomize answer choices to eliminate order bias. Filter results - Helps you find patterns in your results. 136 Chapter 13: SurveyMonkey Share results - You can let others view the results without giving them access to your Survey Monkey account. You can also control which results are visible. Download results - All of the data can be downloaded to your computer for further analysis. The results can be exported into Excel to create graphs. User-friendly surveys - The user experience is enhanced through interactivity. Source: http://www.helium.com/items/205331-conducting-online-polls-review-ofsurveymonkeycom. BENEFITS OF USING SURVEYMONKEY AS ONLINE SURVEY (a) Access to unique populations Ability to provide access to groups and individuals who would be difficult, if not impossible, to reach through other channels. (b) Save time for researchers Allow a researcher to reach thousands of people with common characteristics in a short amount of time, despite possibly being separated by great geographic distances. Allowing researchers to collect data while they work on other tasks Responses to online surveys can be transmitted to the researcher immediately via email, or posted to an HTML document or database file. This allows researchers to conduct preliminary analyses on collected data while waiting for the desired number of responses to accumulate. No need to key in the data since it allows collecting and analyzing the responses data using statistical analysis (eg: SPSS). (c) Cost Save money by moving to an electronic medium from a paper format. Eliminating the need for paper and other costs, such as those incurred through postage, printing, and data entry. Source: http://jcmc.indiana.edu/vol10/issue3/wright.html Chapter 13: SurveyMonkey 137 GET STARTED WITH SURVEYMONKEY STEP 1 Go to: http://www.surveymonkey.com/ STEP 2 Sign up/ Registering Click on the ‘Sign Up FREE’ button here. 138 Chapter 13: SurveyMonkey Fill in the information required. Click on ‘Create Account’. Users can sign up with their facebook or google account. STEP 3 Creating a Survey 3 simple steps on creating a survey. Chapter 13: SurveyMonkey Click on ‘Create survey’. Fill in the survey title and select a category from the list given. Click ‘Continue’. Select from the available templates. 139 140 Chapter 13: SurveyMonkey Select a theme. Click here to go back to add questions. Users can change the theme of the survey. Chapter 13: SurveyMonkey Click on ‘Add Question’. Users can choose from various question type. 141 142 Chapter 13: SurveyMonkey Ex: Do you like how the lesson is conducted? Yes No Users can create the question and the answers options for the question. Options available for users. Click ‘Save Changes’. Chapter 13: SurveyMonkey Users can add more questions. Users can add pages. 143 144 Chapter 13: SurveyMonkey Click on ‘Send Survey’. Users can customize the link. Users can use other options to send the survey. Chapter 13: SurveyMonkey 145 Users can view the analysis of completed survey. Survey analysis options. Users can also use questions in the question bank based on available categories. E.g. Education, community. Various category of questions. 146 Chapter 13: SurveyMonkey REFERENCES SurveyMonkey. http:// www.surveymonkey.com. [ 27 September 2011] O’shea,Kevin (2010). Edited by Lolkus, M.R. SurveyMonkey. https://wiki.itap.purdue.edu/display/INSITE/SurveyMonkey#SurveyMonkey-history.[25 September 2011] Survey Monkey User Manual. http://s3.amazonaws.com/SurveyMonkeyFiles/UserManual.pdf. [25 September 2011] Chapter 14: Kwik Survey 147 Chapter 14 KWIK SURVEY WHAT IS KWIK SURVEYS? Kwik Surveys is a free web-based application that allows anyone to quickly and easily create their own surveys and share them across a wide array of sites and services. Simply sign up for an account and then create a new survey in which you have the options of making a title and questions, along with being able to modify the colors and background of the survey. Source: http://www.killerstartups.com/Web-App-Tools/kwiksurveys-com-create-andanalyze-surveys BENEFITS OF KWIK SURVEYS The following are some benefits of using Kwik Surveys: Upload an appropriate photo to be used as the background of the survey created. Distribute surveys for people to answer by email, YouTube, Facebook or post them in online forums. Get survey results instantly. Download and print the survey created and survey result. Set up account for email notifications if someone new has responded to the survey. Source: http://www.killerstartups.com/Web-App-Tools/kwiksurveys-com-create-andanalyze-surveys 148 Chapter 14: Kwik Survey GET STARTED WITH KWIK SURVEYS STEP 1 Go to: http://kwiksurveys.com/ STEP 2 Signing Up Click the ‘Sign up’ button to register. Fill in the required information. Chapter 14: Kwik Surveys 149 Kwik Surveys will send this email to your registered email account. Click the link given to validate your email address and you can start using Kwik Surveys. STEP 3 Creating a Survey Share your survey with “Twitter” and ‘Facebook”. Type your Survey title. Add your page title here. Insert your page description. Click the ‘Add Question’ button to add and create more questions. You can ‘Add’, ‘Move’, ‘Copy’, ‘Delete’ and ‘Skip’ the selected page of your survey. 150 Chapter 14:Kwik Survey STEP 4 Adding Questions At your survey editor page, click ‘Add Click ‘Question text’ to add Click ‘Answer & Options’ to choose answering type. Click the ‘Preview’ button to preview the survey before you save and publish. Click ‘Save & Exit’ to save the survey Text editor toolbar. Type your question here. Chapter 14: Kwik Surveys 151 (a) Multiple Choice Questions First, you need to create your question in the ‘Question text’. Then, click the ‘Answer & Options’ button. Lastly, click ‘Save & Exit’. Choose multiple choice answer option (either single or multiple) answers. Or, you can select from a predefined answer set. Insert list of answers here. An example of Multiple choice (Multiple answers) questions created. 152 Chapter 14:Kwik Survey (b) Drag and Drop Ranking Choose ‘Drag and drop ranking’ at question type. Type possible answers here. An example of a drag and drop ranking question. Chapter 14: Kwik Surveys 153 (c) Star Rating Choose ‘Star Rating’ at question type. Type possible answers here. An example of a star rating question. (d) Single Textbox Choose ‘Single Text Box’ at the question type. At the question options, you can choose either text, number or email address. 154 Chapter 14:Kwik Survey An examples of a single textbox question. (e) Matrix of Choices Choose ‘Matrix of Choices (Single or multiple answers)’ at the question type. In the ‘Column Headings’, select your predefined answer set. Or you can add your own scale. Type your statement or question at the ’Row Heading’ area. Chapter 14: Kwik Surveys 155 An example of a ‘Matrix of choices’ question. (f) Multiple Text Boxes Choose ‘Multiple Text Boxes’ at the question type. Select your answer option. An example of a ‘Multiple text boxes’ question. 156 Chapter 14:Kwik Survey STEP 5 Survey Setting Click ‘Setting’. At the ‘Survey status’, you can select either to do an open or close survey. Also, you can insert survey dates and edit participant options and number of responses. STEP 6 Click ‘Style’. Style Chapter 14: Kwik Surveys 157 At the ‘Theme editor’ in the ‘Style’ setting, you can edit your survey layout. STEP 7 Results Click ‘Result’. You can print and view your survey result. 158 Chapter 14:Kwik Survey STEP 8 Exporting Click ‘Export’. You can export your survey question in pdf or doc format. STEP 9 Launch Click ‘Launch’. Click ‘Create Link’ to create and customize the link of your survey. Chapter 14: Kwik Surveys 159 REFERENCES http://www.killerstartups.com/Web-App-Tools/kwiksurveys-com-create-and-analyzesurveys [27 February 2012] 160 Chapter 15: Zoomerang Chapter 15 ZOOMERANG WHAT IS ZOOMERANG? Zoomerang is an online survey tool that allows individuals to quickly and easily create online surveys to collect and share feedback. Zoomerang also offers polling application. Zoomerang polls delivers a unique, engaging online polling applications allowing users them to post a poll on any website. Source: http:// www.zoomerang.com ADVANTAGES OF ZOOMERANG Simple and easy to use by users; equipped with skip logic Saves time and money. The survey/poll results appear in real-time and can be shared easily. Zoomerang enables users to leverage social networking platforms to get a fast read on timely issues and drive easier decision making. Users can customize color schemes and the ability to randomize up to five answer options gives the feel of traditional online surveys to these onequestion polls. Users can easily take the poll they created on any social media networking sites (MySpace or Facebook) and host it on a web site or blog. Source: http://www.idealware.org/articles/fgt_online_surveys.php. Chapter 15: Zoomerang GET STARTED WITH ZOOMERANG STEP 1 Go to: http://www.zoomerang.com/ STEP 2 Sign up/Registering Fill in the required information here. Click ‘Sign Up Now’. 161 162 Chapter 15: Zoomerang STEP 3 Creating a Survey Click ‘Create Survey’. Create a title for the survey. Click ‘Get Started’. Click ‘Add a Question’. Chapter 15: Zoomerang 163 Users can choose type of questions. Type the question and answers. Click ‘Save’. Users can change the survey settings. Use the link given to the survey. 164 Chapter 15: Zoomerang STEP 4 Creating a Poll Click ‘Create Poll’. Fill in the poll name and question. Poll preview. Available options for the poll. Copy and embed this code at any website. Users can share their polls on various networking sites. To see poll results, click here. Chapter 15: Zoomerang REFERENCES Leland,E. 2011. A Few Good Online Survey Tools. http://www.idealware.org/articles/fgt_online_surveys.php. [23 September 2011] Zoomerang. http:// www.zoomerang.com. [26 September 2011] 165 166 Chapter 16: Connotea Chapter 16 CONNOTEA WHAT IS CONNOTEA? Connotea is a free online reference management for all researchers, clinicians and scientists. Source: http://www.connotea.org/ BENEFITS OF CONNOTEA With Connotea you can: Save, organize, share, and discover references to research citations and anything addressable by a URL. Store and organize bookmarks and journal citations in a way that can easily be exported to EndNote and other bibliographic management tools. Find people who share same research interests, and see the citations they have collected. Use Connotea to collaborate with colleagues from around the world. Connotea is available to anyone, free of charge. Source: http://library.duke.edu/services/instruction/connotea.html Chapter 16: Connotea 167 ADVANTAGES OF CONNOTEA AS A RESEARCH TOOL It is very quick and easy to use; by locating the URL of a journal paper online, it can be pasted in to a form which populates details of the citation automatically. Connotea is able to recognise specific scientific resource websites. However, there are some notable websites (e.g. JStor) and less mainstream journals which it is unable to produce a full citation for; these citations require fields to be filled manually. Connotea can also add an ‘Add to Connotea’ button to web browsers, so a web page being currently viewed can be added to the library just by clicking the button. Each paper can be ‘tagged’ with a number of user-specified ‘keywords’, which means that a lengthy library can be interrogated with respect to any of the keywords, improving accessibility. Users can further explore the literature by looking at articles tagged by other users using the same keywords. Once papers are in the library, they can be accessed from the publishers’ own site by a single click. The library has its own unique URL, so it can be linked to. This way, it can be accessed by anyone in a ‘read only’ mode; the main user must be logged in to add or edit references. Users are encouraged to start their own personal libraries. It is compatible with a wide range of operating systems, including Windows, Mac OS X, Linux, BSD and Unix; several other online bibliographic tools are not. Source: http://www.bioscience.heacademy.ac.uk/ftp/resources/jordan_connotea.pdf 168 Chapter 16: Connotea GET STARTED WITH CONNOTEA STEP 1 Go to: http://www.connotea.org/ STEP 2 Registering Click the ‘sign up now’ button. Chapter 16: Connotea Fill in the required information. Then, click the ‘register’ button. 169 170 Chapter 16: Connotea You will be viewed this message. Next you need to check your email inbox. Connetea will send you this email. Click at the link given. Then, this page will appear. Now you can start using your connotea. For easy-useaccess connotea, you need to add connotea browser. Chapter 16: Connotea STEP 3 171 Adding the Connotea Browser Button Open the ‘Getting started with Connotea’ page. Then choose your main browser. Go to step 3, and right click this button. Then, click ‘Bookmark This Link’. 172 Chapter 16: Connotea The ‘New Bookmark’ dialogue box will appear. Go to ‘Bookmark Menu’ and click at ‘Bookmark Toolbar’. Now ‘Add to Connotea’ browser button will be automatically installed at your toolbar. STEP 4 Adding Articles Click at the ‘Add Connotea’ button. Open any article from your web browser. Connotea form will be shown. Your article information will be directly added in the Connotea form. Then, click at ‘Add to my library’. Chapter 16: Connotea STEP 5 173 Adding an Article Using DOI Open any article from your web browser. Copy the DOI link. Then, insert the DOI link here. Click ‘Add a bookmark’. Click at the ‘Look Up’ button. 174 Chapter 16: Connotea Now your article information is added in Connotea. Insert your articles’ tag and click ‘Add to my library’. Click ‘Add to my library’. STEP 6 Importing References At your Connotea page, go to ‘My library’. Under the ‘Toolbox’, click ‘Import from local file’. Chapter 16: Connotea 175 Browse the reference file you want to upload. Then click the ‘Upload’ button. The reference you imported will be uploaded in your library. Choose type of the reference uploaded. STEP 7 Exporting References Then click at ‘EXPORT LIST’. Go to your ‘My Library’ page. Or you can click at ‘Export My library’ to export all your references. 176 Chapter 16: Connotea Choose the format of the references you want to import and then click the download button. Chapter 16: Connotea STEP 8 Creating a Tag Note Under ‘Toolbox’ at your library page, click ‘Create a tag note’. Insert the tag you want to describe. Then, click the ‘Add’ button. Type the description of the tag you have inserted. 177 178 Chapter 16: Connotea This is an example of your tag note. This is example of the tag of the note. STEP 9 Creating a Group Under ‘Toolbox’ at your library page, click ‘Create a new group’. Chapter 16: Connotea Insert the name of the group you want to create. 179 Insert the description of the group. Enter the username of the member of this group. Then click the ‘Add’ button. REFERENCES http://www.connotea.org/ [20 April 2012] http://library.duke.edu/services/instruction/connotea.html [21 May 2012] http://www.bioscience.heacademy.ac.uk/ftp/resources/jordan_connotea.pdf [21 May 2012] 180 Chapter 17: Zotero Chapter 17 ZOTERO WHAT IS ZOTERO? Zotero is a free, easy-to-use tool to help users collect, organizes, cite, and share research sources. It is Firefox plug-in which allows users to capture and record bibliographic information about Web pages, images, and online journal articles, and export them as both a formatted bibliography and a text file suitable for EndNote import. Unlike other bibliographic tools, Zotero can extract key metadata from Web pages and insert them into citations. Zotero has also been developing plug-ins for additional applications such as Microsoft Word and OpenOffice. Source: http://ets.tlt.psu.edu/wp-content/uploads/zotero_hot_team.pdf BENEFITS OF ZOTERO a) Collect everything Save your citations with one click from within in your browser. Zotero can recognize and store citation information from most scholarly databases, as well as Amazon, Youtube, and more. It also saves related files such as PDFs, and snapshots of websites so that you can view them later. b) Organize & Annotate With an iTunes™–like interface, Zotero makes it easy to organize your sources. Drag and drop items between collections, or use the search feature to locate citations. Additionally, Zotero offers a variety of methods so that you can organize and annotate your citations however you like. Chapter 17: Zotero 181 c) Cite Anywhere With a simple plugin for Word or Open Office, Zotero lets you insert and manipulate your citations from while you write. Zotero supports all major citation styles, and thousands of journal styles. You can also use it to generate quick bibliographies to share in e-mail, blogs or anyplace else. Source: http://www.lib.utk.edu/agvet/agriculture/zotero/zotero.html ADVANTAGES OF ZOTERO Annotate and organize research results, including video. Save information about a reference, including author, title, and other publication information. Create libraries and save searches, and share collections with other people. Attach files, links, notes, and PDFs to records. Store a screenshot of a web page. Export information as formatted citations in word processing programs (Word, Open Office, Google Docs). Tag and sort records and perform advanced searches. View records in personal collection when offline. Cite records in any language Source: http://libguides.mit.edu/zotero ZOTERO AS A RESEARCH TOOL Zotero is an ideal tool for teaching students basic research methodology such as finding, cataloging, and selecting data resources. The output functionality of the formatting tools can increase the quality of bibliographies in student papers dramatically. The data can be exported to other documents in a variety of formats including EndNote, RDF, HTML formatted bibliography, or RTF bibliography. 182 Chapter 17: Zotero One of the first research tools to leverage the concept of tagging, Zotero organizes user-generated information including snapshots, images (e.g., from Flickr), notes, attachments, tagging, and related items. The Zotero Commons will be a set of Web-based services for data sharing, annotation, and scholarly collaboration hosted by the Internet Archives and will provide users with a permanent archive of digital content, the ability to share resources publicly, and opportunities for discovery of resources, as well as enabling new collaboration opportunities since contributions to the commons are credited to users. It has an ability to automatically extract certain types of metadata, such as the URL, date and time accessed, and title from common online archives such as Flickr, Google Scholar and YouTube. This not only reduces manual transcription on the part of the student user, but also improves accuracy. Source: http://ets.tlt.psu.edu/wp-content/uploads/zotero_hot_team.pdf Chapter 17: Zotero GET STARTED WITH ZOTERO STEP 1 Go to: http://www.zotero.org/ STEP 2 Registering Clickt at ‘Register’ if this is your first time using Zotero. Fill in the required information. Then, click the ‘Register’ button. 183 184 Chapter 17: Zotero Zotero will send a conformation email. Check your email inbox to validate your email. Click at the link given to activate your account. This message will appear after your email is successfully validated. To open Zotero, you need to log in. Insert your registered ‘Username or Email’ and your password. Then, click ‘Login to Zotero’. Now you can see the ‘zotero’ icon in the bottom-right corner of the Firefox window. Chapter 17: Zotero STEP 3 185 Downloading Zotero (a) Zotero for firefox Go to ‘Home’ tab. Then, click the ‘Download Now’ button. To install Zotero at the Firefox window as an add on Firefox extension, click here. Wait for Zotero to finish install. Now, your Zotero extension is ready. You need to restart your Firefox to update the Zotero. 186 Chapter 17: Zotero (b) Zotero Standalone Choose the suitable application for your computer to install the Zotero Standalone. Wait for the Zotero Standalone to finish downloading. Click the ‘Run’ button. Then, click the ‘Next’ button. Select at the ‘Standard’ at click ‘Next >’ button again. Click the ‘Install’ button. Chapter 17: Zotero 187 Click the ‘Finish’ button. Click ‘Yes’ to import the data from Zotero for Firefox in Zotero Standalone. Now, you have successfully installed your Zotero Standalone and you can start using it even though you are in offline mode. You will see the zotero shortcut on your desktop. 188 Chapter 17: Zotero (c) Zotero for Microsoft Words When you install zotero standalone, the zotero word processor plugin for Microsoft word will be available automatically. For viewing the Zotero in Microsoft word, go to the ‘AddIns’ tab. This is the Zotero toolbar. Edit an existing citation. Edit an existing bibliography. Insert a new citation in your document. Insert a bibliography at the cursor location. Open the Document Preferences window, e.g. to change the citation style. Remove Zotero field codes from the document. Refresh all citations and the bibliography. Chapter 17: Zotero STEP 4 189 Adding a Item to the Zotero Library (a) Inserting search item This icon will appear. Click the icon. Go to the web page of the item. This is the example of the item. This message will be shown up to inform you that the item is saved in your Zotero library. Click here to view the Zotero library. You will find the item you have saved is now listed here. The information of the item you saved will be automatically inserted. 190 Chapter 17: Zotero (b) Inserting ISBN, DOI or PMID The ISBN of the item. At the Zotero library, click this icon. Enter the ISBN, DOI or PMID here and click ‘Enter’ at your keyboard. This is the item you add using ISBN number. The information of the item will be added automatically. STEP 5 Organising Items Click this icon or you can right click at ‘My Library’ and go to ‘New Collection. Then, click ‘OK’. The ‘New Collection’ dialogue box will be appear. Enter the name of your collection. Chapter 17: Zotero 191 Drag the item you want to organize in your collection. Your new collection will be added here. This is an example of an item added in the ‘book’ collection. STEP 6 Generating Bibliography and Citation You need to open the Zotero Standalone. Open your words document and go to the ‘Add-Ins’ tab. Click this icon to insert the citation. Choose your citation style. Then, click the ‘OK’ button. 192 Chapter 17: Zotero The Zotero browser appear. Go to ‘Classic View’. Choose the item for citation. Then, click the ‘OK’ button. To insert the bibliography, click this icon. This is the bibliography based on the citation inserted. This is an example of the citation inserted using zotero. Chapter 17: Zotero STEP 7 193 Creating Groups Click the ‘New Group’ icon located at Zotero firefox or Zotero Standalone. Choose group type and click the ‘Create Group’ button. Create your group name. To open you group library, go to the ‘Group’ tab at your Zotero web page. Insert the information required and then click ‘Save Setting’. Click ‘Group Library’. This is your group library. Click enabled data syncing to enable the group library in Zotero for firefox or Zotero Standalone. 194 Chapter 17: Zotero Click ‘Open Sync Preferences’. Insert your Zotero registered ‘Username’ and ‘Password’. Then, click the ‘OK’ button. The ‘Group Libraries’ will appear in the left column of your Zotero for firefox or Zotero Standalone. REFERENCES http://ets.tlt.psu.edu/wp-content/uploads/zotero_hot_team.pdf [15 may2012] http://www.lib.utk.edu/agvet/agriculture/zotero/zotero.html [9 May 2012]. http://libguides.mit.edu/zotero [15 May 2012]. http://ets.tlt.psu.edu/wp-content/uploads/zotero_hot_team.pdf [15 may2012] Chapter 18:BibMe 195 Chapter 18 BIBME WHAT IS BibMe? BibMe is an automated citation creator and bibliography generator. It can save you loads of time building and formatting your references, time that is understandably valuable and would be better served working on your paper. BibMe can find your source from external databases, fill in the information, and then accurately format the citation. Source: http://www.bibme.org/help USING BIBME FOR RESEARCH Build a database of your references. Attach articles to references so that all your research is in one place. Store notes with references. Search references Cite your sources in your paper with a touch of a button. Automatically build your bibliograhy (also called works cited/reference list). Easily change your citation style if needed(e.g. APA to MLA, Chicago, etc) . Source: http://libguides.tyndale.ca/content.php?pid=163925&sid=1384008 196 Chapter 18:BibMe ADVANTAGES OF BIBME Creates citations and biblioraphic references for MLA, APA, Turabian, and Chicago styles that you can copy and paste into your paper. Look up feature allows you to look up your reference (e.g. by URL, title, ISBN, etc) and automatically convert into a citation and bibliographic reference. Allows you to create a free account and save you references for future use. Source: http://libguides.tyndale.ca/content.php?pid=163925&sid=1384008 Chapter 18:BibMe 197 GET STARTED WITH BIBME STEP 1 Go to: http://www.bibme.org STEP 2 Registering Click ‘Register’ on the top right corner of your bibme page. Fill in the required information. Then, click the ‘Register’ button. 198 Chapter 18:BibMe STEP 3 Making a Bibliography Go to the ‘Bibliography Maker’ Choose type of citation. For example, click at the ‘Book’ tab. Search by inserting title, author or ISBN. Then, click the ‘Find Book’ button. Bibme will list all books based on the keyword. Choose your selected books and click at the ‘Select’ icon. Chapter 18:BibMe 199 Bibme will automatically insert the information of the books and the authors. Then, click the ‘Add to My Bibliography’ button. This is how your citation will look like. If you would like to start with a new bibliography, click here. You can delete or edit this citation. You can change the format of your bibliography either using APA, MLA, Chicago or Turabian. Click ‘Save to Account’ if you want to save your bibliography. 200 Chapter 18:BibMe STEP 4 Manual Entry Bibliography If you did not find the citation in the browser, this message will appear. Click at ‘Manual entry mode’ to insert the bibliography manually. Insert the required information. If the author is more than one, click ‘Add another author’. Then, click ‘Add to My Bibliography’. Chapter 18:BibMe STEP 5 201 My Saved Bibliographies Go to the ‘My Saved Bibliographies’ tab. Click ‘Open & Edit’ to edit the bibliography. Click ‘Download’ to download the bibliography in Microsoft words. You can delete this bibliography. You can rename the title of your bibliography. Click ‘edit tags’ if you want to edit add or change tags. You can change the format of your bibliography either APA, MLA, Chicago or Turabian. 202 Chapter 18:BibMe STEP 6 Sharing a Bibliography Click at ‘Shared’ here. Then, copy the link given and send it to your friends or others. Chapter 18:BibMe REFERENCES http://www.bibme.org/help [16 April 2012] http://libguides.tyndale.ca/content.php?pid=163925&sid=1384008 [14 May 2012] http://libguides.tyndale.ca/content.php?pid=163925&sid=1384008 [14 May 2012] 203 Chapter 19:SlideShare 204 Chapter 19 SLIDESHARE WHAT IS SLIDESHARE? SlideShare is a media site for sharing presentations, documents and pdfs. SlideShare features a vibrant professional community that regularly comments, favorites and downloads content. Content also spreads virally through blogs and social networks such as LinkedIn, Facebook and twitter. Individuals and organizations upload documents to SlideShare to share ideas, connect with others, and generate leads for their businesses. Anyone can view presentations and documents on topics that interest them. Source: http://www.slideshare.net/about?PHPSESSID=cdcd1c967d45a922f503f2147b6d3902 WAYS OF USING SLIDESHARE According to Daniel (2010), the following are some of the things you can do on SlideShare: 1. Embed slideshows into your own blog or website. 2. Share slideshows publicly or privately. There are several ways to share privately. 3. Synch audio to your slides. 4. Market your own event on slideshare. 5. Join groups to connect with SlideShare members who share your interests. 6. Download the original file. Chapter 19:SlideShare 205 SLIDESHARE AS A RESEARCH TOOL Slideshare is one of the Web 2.0 based slide hosting services. It is a powerful way of distributing presentations, tutorials, documents, videos, podcasts and webinars. Users can upload files privately or publicly in the following formats e.g. Powerpoint, PDF, Keynote or Open Office. Presentations can be linked to at the site itself or else embedded in a web page. Slideshare provides users the ability to rate, comment on, and share the uploaded content. You can always edit your uploads and publicise it. You can use Slideshare tool for sharing presentations about your research and searching the other presentations or documents related to your research topic. You can use the ideas you find from the presentations in Slidehare. Source: http://www.hallicious.com/2010/01/25/slideshare-for-research/ 206 Chapter 19:SlideShare GET STARTED WITH SLIDESHARE STEP 1 STEP 2 Go to: http://www.slideshare.net/ Sign In/Sign Up If you already have a Slideshare account, you can start login. You also can login using your Facebook account. Insert your username or email and password. Click ‘LOGIN’. Fill in the details here. Click ‘SIGN UP’. Chapter 19:SlideShare STEP 3 207 Searching Presentations Insert the keyword of the slide you want to search. Click ‘Search’. Select the slide you would like to view. This are some examples of the presentation views and tools. 208 Chapter 19:SlideShare STEP 4 Uploading Presentations At the top of the Slideshare page, click ‘UPLOAD’. Click ‘UPLOAD publicly’ (all can view your file). If you have “Slideshare Pro” account, you can ‘UPLOAD privately’. Select the presentation from your file. If you want to upload more than one file, use the Ctrl key (you can also upload PDF documents). Now your presentation will appear in the Slideshare and everyone can view it. Chapter 19:SlideShare STEP 5 209 Adding Youtube Videos To start editing your presentation, click ‘My Uploads’. Choose the presentation you want to add the video and click ‘Edit’. Go to the ‘Insert YouTube videos’ tab. 210 Chapter 19:SlideShare At the ‘YouTube’ web, find the video you want to insert in your presentation and copy the URL. Paste the ‘YouTube video URL’ here. Next, click ‘Insert & Publish’ and you are done. To add another video, you can click here. Select the position to insert your video in the presentation. If you want to remove the video you have inserted, tick at remove box and click ‘Remove Selected’. Chapter 19:SlideShare STEP 6 211 Posting a Comment To start commenting at the presentation slide view, go to the bottom of the page. Write your comments here. Then, click ‘Post Comment’. 212 Chapter 19:SlideShare REFERENCES Daniel St. Pierre. 2010. What is SlideShare and how can it Benefit You? http://www.cybergenica.com/blog/business-post/what-is-slideshare-and-howcan-it-benefit-you/ [6 April 2011] http://www.slideshare.net/about?PHPSESSID=cdcd1c967d45a922f503f2147b6d3902 [6 April 2011] http://www.hallicious.com/2010/01/25/slideshare-for-research/ [21 May 2012] Chapter 20: Linkedin 213 Chapter 20 LINKEDIN WHAT IS LINKEDIN? LinkedIn is a huge database of professionals. The standardized information entered by users such as “Profile Headline”, “Summary”, “Education”, “Company”, etc. categories allow us to pinpoint the person we are looking depending on specific factors. In short, LinkedIn is the place to find and be found (Neal Schaffer 2009). ADVANTAGES OF LINKEDIN FOR RESEARCHER (a) Keep track LinkedIn is a useful way to keep track of your network. The information we need tends to be hit or miss, so we can quickly filtering through the site rather than spending a lot of time on it. (b) Profiles Use LinkedIn to find people with same research interest. Some people have started showing their blog and Twitter information on their profiles. LinkedIn is a good jumping-off point for taking a look at those and seeing if the topics are relevant. LinkedIn can be a great place to find sources for your research. Using the basic search box and entering a name and etc to get the information of the person you would like to connect. (c) Groups and answers Create or participate in groups or answers to discuss about the research or find the information related. Source: http://www.brekiri.com/blog/260/using-linkedin-for-research/ 214 Chapter 20: LinkedIn (d) Promoting and increasing the visibility Promote your paper to potential readers. LinkedIn is an interconnected network of experienced professionals from around the world with over 55 million members. It is not just for career opportunities. When you create your profile that summarizes your professional expertise and accomplishments also you can include a mention of your articles. Source: http://journalauthors.tandf.co.uk/pdfs/howtopromote.pdf Chapter 20: Linkedin GET STARTED WITH LINKEDIN STEP 1 Go to: http://www.linkedin.com/ STEP 2 Join Now/Sign Up If you do not have a LinkedIn account, you need to register and fill in the required information. Then, click ‘Join Now’. 215 216 Chapter 20: LinkedIn LinkedIn will send an email to your registeration email. Click the link to confirm your email address. This window will appear. You need to click the ‘Confirm’ button’. Now you can sign in your LinkedIn account. STEP 3 Insert you email address and password. Then click ‘Sign In’. Invite Friends To invite friends and connect using LinkedIn, insert your friends’ email address here. Then click ‘Send Invitation’. Chapter 20: LinkedIn STEP 4 217 Editing Your Profile To start editing your profile, click the ‘Profile’ tab here. Go to ‘Edit Profile’. Adding profile photo To add/change your photo profile, click ‘Add Photo’. You also can post and share your updates here. Browse picture from your computer file. Click the ‘Upload Photo’ button. 218 Chapter 20: LinkedIn You can share your profile with others LinkedIn members. You also can save and print it in pdf format. STEP 5 You can check the percentages of your completeness profile. Click them to update. Searching & Adding Networks Insert the name of the person you want to search in LinkedIn. Or, you can search using the advance search version here. Chapter 20: LinkedIn 219 List of people in the search result. Number of search results. Choose and click at the person you want to add as a network. Click here to add to your network. Or, you can send an email before you add. 220 Chapter 20: LinkedIn REFERENCES What is LinkedIn and Why Should You Join? http://windmillnetworking.com/2009/08/26/what-is-linkedin-and-why-shouldyou-join/ [11 August 2011] http://www.brekiri.com/blog/260/using-linkedin-for-research/ [14 May 2012] http://journalauthors.tandf.co.uk/pdfs/howtopromote.pdf [16 May 2012]