1
RENR
ONLINE REGISTRATION
SYSTEM (ORS)
Manual for the Centre User
January 2015
RENR: ORS Manual for the Centre User
TABLE OF CONTENTS
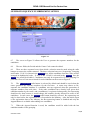
INTRODUCTION
Definitions
Online Registration System
Flowchart of Activities
Menu Options/User Privileges
Accessing the ORS
3
3
4
4
5
5
REGISTRATION MENU OPTION
Registering Candidates
Registering a New Candidate
Special Characters and Accents
Registering a Candidate from a Previous Sitting
Selection of A Candidate’s Subjects
Edit Candidate’s Personal Details
Edit Candidate’s Subjects
Querying for Candidates
View Candidate Details
Candidate Privileges
7
7
8
9
12
15
17
19
20
21
21
GENERATE SEQUENCE NUMPERS OPTION
22
Forward Registration Files to Ministry
Forward Amendment Files to Ministry
Export Database Fields
23
24
25
REPORT MENU OPTION
25
MINISTRY USERS MODULE
Forward Registration Files to CXC
28
28
2/28
9 October 2014
RENR: ORS Manual for the Centre User
INTRODUCTION
1.
This manual provides information on the operation of the Online Registration System
(ORS) application. Part A deals with the role of the Centre User and Part B deals with the
role of the Ministry (Local Registrar’s office).
2.
The ORS application was originally developed for use with the mainstream
examinations offered by CXC®, thus, some of the functionalities present in the system will
not be applicable to the RENR Users.
Definitions/Acronyms
3.
For the purposes of this manual, the following definitions/acronyms are given:
i. CXC® – Caribbean Examinations Council
ii. CCSLC® – Caribbean Certificate of Secondary Level Competence
iii. CSEC® – Caribbean Secondary Education Certificate
iv. CAPE® – Caribbean Advanced Proficiency Examination
v. CVQ® – Caribbean Vocational Qualification
vi. RENR – Regional Examination for Nurse Registration
vii. Candidate number – a 10-digit number assigned to a candidate at
each sitting. The number normally varies from one sitting to another.
viii. ORS – Online Registration System
ix. Ministry – the Local Registrar’s office
x. New Candidate – a candidate who is taking the RENR examination
for the first time or who registered for CSEC examinations before
2004, or CAPE examinations before 2005
xi. Former Candidate - a candidate who was registered for CSEC
examinations in 2004 or afterwards, CAPE and CCSLC examinations
in 2005 or afterwards, RENR examinations in October 2014 or
afterwards, or for the CVQ programme
xii. Student Portal – a website (https://ors.cxc.org/studentportal ) where
candidates can view their registration records, individual timetables
and examination results
xiii. Password - MUST be at least eight (8) characters in length and
include one (1) upper case, one (1) lower case, one (1) digit and one
(1) special character. Example: JohnDA3$. Here the $ represents the
special character. Other special characters include !, @, #, %, &, (,
+. The asterisk (*) should not be used as a special character.
3/28
9 October 2014
RENR: ORS Manual for the Centre User
xiv. UCN – Unique Candidate Number. It is an eleven digit number: digits
1-4 represent the year in which the UCN was first issued and digits 5-ll
are randomly generated numbers
xv. User – any person interfacing with the ORS
Online Registration System Application (ORS)
4.
The ORS is a web-based application that operates with browsers Internet Explorer 6
(or later versions) and Mozilla Firefox. The Google Chrome browser sometimes present
challenges when changes are made to the ORS application and its use is not
recommended.
5.
The data keyed in the ORS are forwarded by the Centre to CXC via the Ministry.
The data files are then loaded by CXC into its Examining Processing System (EPS). The
processed files are copied back to the ORS and may be accessed through the various reports
available in the ORS. There may be some differences between the data keyed in the ORS by
the Centres and the data in the EPS since the data in the latter are unlikely to contain some of
the irregularities present in the ORS.
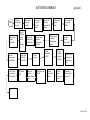
Flow of Activities
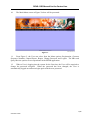
The flow of activities from the creation of a Centre Administrator to the submission of
registration data file to CXC is given in the diagram at Appendix I.
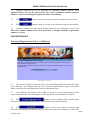
Menu Options/User Privileges
Register Candidate
Edit Candidate’s Data
View Candidate’s Data
View Candidate’s Data– List
Candidate Privileges
Export Registration Data
Export Amendment Data
Export Database Fields
Reports
Add/Remove User
Yes
-Yes
Yes
-----Yes
--
-Yes
Yes
Yes
-----Yes
--
--Yes
Yes
-----Yes
--
Super
User
Registration
Registration
Registration
Registration
Registration
Generate Sequence Numbers
Import/Export
Import/Export
Import/Export
Reports
User
View
Menu Sub-Option
Edits
Menu Option
Additions
6.
The Administrator may assign Users into different groups and the group a User is
assigned determines the User’s rights or privileges to interface within the Menu and Menu
Sub-Options as shown in the table below.
Yes
Yes
Yes
Yes
Yes
Yes
Yes
Yes
Yes
Yes
-4/28
9 October 2014
RENR: ORS Manual for the Centre User
7.
A User may be assigned into one of the following Groups:
i.
Additions - add candidates;
ii.
Edits - edit candidates’ records;
iii.
View - view candidates’ records;
iv.
Super User - interfaces within all the areas of the ORS except Add/Remove
Users and set-up the Local Fees Maintenance Table. Each centre must have a
Super User even if none of the other types of Users named in the above table.
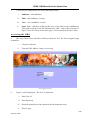
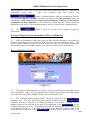
Accessing the ORS
8.
The steps listed below should be followed when the User has been assigned login
credentials.
i.
Connect to Internet
ii.
Type the URL address: https://ors.cxc.org/
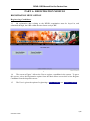
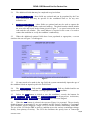
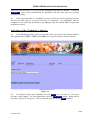
Figure 1
9.
Figure 1 will be displayed. The User is required to:
i.
Enter User Id
ii.
Enter Password
iii.
Select the particular period required from the dropdown arrow
iv.
Select Login.
5/28
9 October 2014
RENR: ORS Manual for the Centre User
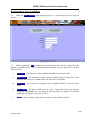
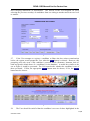
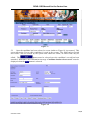
10.
The Main Menu screen at Figure 2 below will be presented.
Figure 2
11.
From Figure 2, the User can select from the Menu options: Registration, Generate
Sequence Numbers, Import/Export, Report, Change Password and Logout. The SBA and
Query/Review options are not operational in the RENR application.
12.
When a User is logging into the system for the first time, the User will be required to
change the password assigned. When the password has been changed, the User is
automatically logged out and must login again with the new password.
6/28
9 October 2014
RENR: ORS Manual for the Centre User
PART A: REGISTRATION MODULE
REGISTRATION MENU OPTION
Registering Candidates
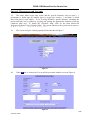
13.
All registration data relating to the RENR examination must be keyed in, and
submitted through, the ORS within the time-frame set by CXC.
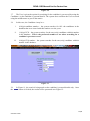
Figure 3
14.
The screen at Figure 3 allows the User to register a candidate in the system. To get to
this screen, select the Registration option from the Main Menu screen then select Register
Candidate from the dropdown arrow.
15.
The User is given the option of registering a New Candidate or a Former Candidate.
7/28
9 October 2014
RENR: ORS Manual for the Centre User
Registering a New Candidate
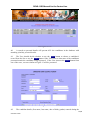
16.
When the New Candidate radio button at Figure 3 is selected, the screen at Figure 4
appears.
Figure 4
17.
When registering a New candidate, the personal details must first be completed on the
Register Candidate screen. It is recommended that candidates use the name given on their
birth certificate.
i.
First Name – the first name of the candidate should be keyed in this field.
ii.
Middle Name – the candidate’s middle name(s) should be keyed in this field. If the
candidate does not have a middle name, the field can be left blank.
iii.
Last Name – the last name or surname of the candidate MUST be entered in this
field.
iv.
Date of Birth – the date of birth must be keyed. The format of the date must be
entered as Day/Month/Year - two digits for the Day (DD), two digits for the Month
(MM) and four digits for the Year (YYYY).
v.
Gender – this compulsory field must be entered as either Male or Female.
8/28
9 October 2014
RENR: ORS Manual for the Centre User
Special Characters and Accents
18.
The name fields accept only letters and the special characters such as space ( ),
apostrophe ('), dollar sign ($), number sign (#), at sign (@), accent (` ´) and tilde (~) which
may form part of some names. If one is using Windows, special character, including the
accent and tilde can be added by copying and pasting the appropriate character from the
Character Map tool. To obtain the Character Map, click on the Start Menu>All
Programs>Systems Tools>Character Map. The accent characters the system can accept are:
É Ñ è ñ é ó ` ´ À Â È Á â à á Ё ё.
19.
The screen at Figure 4 when populated looks like that at Figure 5.
Figure 5
20.
When OK tab is clicked, the User would be presented with the screen at Figure 6.
Figure 6
9/28
9 October 2014
RENR: ORS Manual for the Centre User
21.
The additional fields that may be completed are given below.
i.
Comments 1, 2 and 3 – these fields are optional and can be populated by the User
with information that may be specific to the candidate/Centre or for any nondefinitive use.
ii.
Cell Number and Email – these fields are optional and may be used to capture the
candidate’s cell phone number and email address. The phone number should include
the area code and keyed in the format given in Figure 7 – no space between the area
code and the cell number. The email address is required in the event of a need to
contact the candidate or verify the candidate’s authenticity.
22.
When the additional optional fields have been populated as appropriate, a screen
similar to the one at Figure 7 would appear.
Figure 7
23.
No entry needs to be made in the Age field: the system automatically inputs the age of
the candidate based on inputs keyed in the D.O.B field.
24.
The Previous Period field and the Previous Candidate # field are disabled and do not
appear on the screen when a candidate is being registered as a New candidate.
25.
Before the Save button is clicked to save the candidate’s records, the buttons for
Subject, Fees, Add, Delete, Preview and Amendment History are all grayed out. At this time,
the Unique Candidate #, Candidate # and Sequence # have not been assigned.
26.
When the Save button is selected, the screen at Figure 8 is presented. The previously
disabled buttons at paragraph 25 are now enabled and the Unique Candidate # is assigned.
Each candidate will be assigned a single UCN for his/her lifetime relationship with CXC.
The use of the UCN helps CXC to track a candidate across the various examination sittings,
ideally, from primary to tertiary. The UCN also facilitates the speedy issue of Transcripts
10/28
9 October 2014
RENR: ORS Manual for the Centre User
and Certifying Statements of Performance. The success of the UCN depends on Users
selecting the previous record(s) of candidates from one sitting to another and from one level
to another.
Figure 8
27.
If the User attempts to register a candidate as New who has written examinations
before, the system would prompt the User when the Save button is selected. However, this
prompting will only occur if the candidate’s personal details (firstname, lastname, date-ofbirth and gender) match those of a candidate(s) in the database. A modal box similar to the
one at Figure 9 would be presented. The User must decide whether the candidate is one of
those presented. If Yes, the appropriate Select button must be chosen, if No, the Cancel
button must be chosen.
Figure 9
28.
The User should be satisfied that the candidate is not one of those highlighted in the
11/28
9 October 2014
RENR: ORS Manual for the Centre User
database before selecting the Cancel button. If the User selects the Cancel button, the modal
box would be closed and the User returned to the Register Candidate screen.
The
button saves the data entered into the system and displays a
confirmation message – Candidate data have been saved!
29.
The
button saves the data which were entered then clears the screen
allowing the User to add a different candidate into the system.
30.
The
button displays the candidate’s subject(s) – more on this topic is
given in the next section of this manual.
31.
The
in the RENR application.
button displays the candidate’s fees – this topic is not applicable
32.
The
button removes a candidate from the system.
33.
The
button exits the page or screen.
34.
The Preview button displays the candidate’s Subjects Registered Report.
35.
The Amendment History button shows all the amendments that were made for a
candidate after the registration cutoff date.
Registering a Candidate from a Previous Sitting
36.
When a candidate who has written examinations before is being registered, the User
must select the Former Candidate radio button in Figure 3 above. The screen at Figure 10
appears.
12/28
9 October 2014
RENR: ORS Manual for the Centre User
Figure 10
37.
The User is given the option for searching for the candidate’s past record by using the
Candidate # or the candidate’s personal details. The system does not allow the User to search
using the middle name as part of the matrix.
38.
In this case, the Candidate # may be a:
i.
10-digit candidate number – the system searches for ALL the candidates in the
database that were issued with this number over the years.
ii.
11-digit UCN – the system searches for the one (only) candidate with this number
in the database. This is the preferred number to use when searching for a
candidate’s previous record.
iii.
16-digit CVQ number – the system searches for the one (only) candidate with this
number in the database.
Figure 11
39.
In Figure 11, the search is being made on the candidate’s personal details only. Once
the Search button is clicked, the results will be presented as at Figure 12.
13/28
9 October 2014
RENR: ORS Manual for the Centre User
Figure 12
40.
A search on personal details will present ALL the candidates in the database with
matching (similar) personal details.
41.
The User should decide whether to use the Select button to choose a candidate’s
record from the list or use the Cancel button if the User believes that none of the candidates
presented match the candidate being registered. If the User chooses the Select button from
one of the rows, a screen similar to Figure 13 will be presented.
Figure 13
42.
The candidate details (first name, last name, date of birth, gender) entered during the
14/28
9 October 2014
RENR: ORS Manual for the Centre User
search selection would be over-written by the registration data from the database. In addition
Candidate # field would automatically be populated with the data from the previous
examination sitting.
43.
If the personal details of a candidate are incorrect from a previous registration period,
the incorrect data must be re-used at the time of registration. An amendment must be
completed in the ORS and forwarded to the Ministry after the official CXC’s registration
deadline has passed.
Selection of the Candidate’s Subject
44.
In the RENR application, only one selection needs to be made for the subject unlike in
other applications (CCSLC, CSEC and CAPE) where specific subjects must be selected.
Figure 14
45.
To select the subject for a candidate, select the Subject tab - see Figure 8. The screen
at Figure 14 will appear. The User should then select the Add Subject button. When this has
been done, Figure 15 will appear. The User should check (click) the Select checkbox.
15/28
9 October 2014
RENR: ORS Manual for the Centre User
Figure 15
46.
There are the two optional Comments fields in which the User may add any type of
comment or notation. None of the other data fields are applicable: Subject, Teacher, SBA,
Resit, Alt, Repeat, Self-Tutored, Transfer from Unit 1, Transfer from U 2, and Year.
47.
It is imperative that Users run the report in the ORS called ‘Candidates without
Subjects’ before forwarding the registration data to the Ministry. Candidates who were
not assigned a subject will be listed.
48.
The
button is used to save the information on the screen and it
displays a confirmation message ‘Candidate’s subject data have been saved!’ After the
prompt, the User is returned to the Candidate Subjects screen.
49.
The
50.
The
information.
button is not used in RENR application.
button exits the Candidate Subjects screen without saving any
16/28
9 October 2014
RENR: ORS Manual for the Centre User
Edit Candidate’s Personal Details
Figure 16
51.
To edit a candidate’s personal record, the User must first search for the candidate in
the database. This is done by highlighting the Registration option on the Main Menu screen,
then selecting Edit Candidate from the dropdown arrow. The User would be presented with
the screen at Figure 16. The User should then search in any of the opened fields such as First
Name, Last Name, et cetera, for a particular candidate or search on the default ALL which
brings up all the candidates in the centre’s database. When the search button is activated, a
screen giving the list of candidates matching the search criteria would be presented as at
Figure 17. The User should select the appropriate candidate from the list.
17/28
9 October 2014
RENR: ORS Manual for the Centre User
Figure 17
52.
Once the candidate has been selected, a screen similar to Figure 18 is presented. This
screen allows the User to edit a candidate’s record in the system. The fields such as Period
and Centre Code are locked by the system and cannot be edited; all other fields may be
edited. The
button must be selected once the candidate’s record has been
amended. Remember, the confirmation message ‘Candidate data have been saved!’ must be
displayed when the Save button is selected.
Figure 18
18/28
9 October 2014
RENR: ORS Manual for the Centre User
Edit Candidate’s Subject
53.
In the RENR application, the only amendment that can be done after the subject has
already been selected is to delete it. To delete the subject, the User must first select the
Registration option on the Main Menu screen, then select Edit Candidate from the dropdown
arrow. A search for the particular candidate must be made. The screen at Figure 18 will
appear. Select the
button and the screen at Figure 19 appears.
Figure 19
54.
When the User selects the
deleted. The
application.
55.
The
56.
The
screen.
button and the
button, the candidate’s subject will be
button are not used in the RENR
button is used to save what is on the screen.
button should exit the screen and return to the Candidate Details
19/28
9 October 2014
RENR: ORS Manual for the Centre User
Querying on Candidates
Figure 20
57.
The screen at Figure 20 allows the User to search for candidates. The screen is
reached by selecting the Registration option on the Main Menu screen, then selecting View
Candidate. A search must then be made for the candidate(s). In the view mode, the
candidate’s details cannot be edited.
58.
This screen is used to perform a search for candidates based on specific input values.
The fields on the top section of the screen include Period, Centre No, Form, Class, Sequence
No., and New. All the fields can be populated with data EXCEPT the Period and Centre
Code fields.
59.
The First Name, Last Name, Date of Birth (if available) and Gender should be entered
to make the search results more precise.
60.
The result of the selecting the Search tab in Figure 20 is a table at the bottom half of
Figure 20 with the following information: School, Form, Class, Seq. No., Last Name, First
Name, Middle Name, Date of Birth and Gender. The View tab must be selected for the
particular candidate.
61.
The
button is used to carry out the search.
62.
The View button is used to select the specific candidate from the list shown. It would
take the User to the Edit Candidate Details screen.
63.
The
button is used to exit the screen without saving any information.
20/28
9 October 2014
RENR: ORS Manual for the Centre User
View Candidate Details
Figure 21
64.
When the User selects the View Candidate Details from the Registration dropdown
arrow on the Main Menu screen, the screen at Figure 21 appears. It displays the list of
candidates and when a particular candidate has been highlighted, the list of subjects will
appear in the Candidate’s Subjects field on the right hand side. In the view mode, the
candidate’s details cannot be edited. By selecting the Close button, the User is returned to
the Main Menu screen.
Candidate Privileges
65.
The ORS is by default configured to allow candidates to view online their personal
and subject details (Subject Registered Report), timetables and examination results on the
Student Portal. CXC recommends that candidates be permitted to view their Subject
Registered Reports and individual timetables. The Centre may determine whether to give the
candidates access to view their results.
66.
If a User wants to prevent candidates from having access to their results, the User
should select the Registration option on the Main Menu screen, then the Candidate Privilege
sub-option and uncheck the checkbox for Allow Results. The Preview Results checkbox can
also be unchecked for specific candidates from the Edit Candidate screen box. The disabling
of the checkbox must be done prior to the date the results are issued by CXC.
21/28
9 October 2014
RENR: ORS Manual for the Centre User
GENERATE SEQUENCE NUMBERS MENU OPTION
Figure 22
67.
The screen at Figure 22 allows the User to generate the sequence numbers for the
candidates.
68.
The two fields, the Period and the Centre Code cannot be edited.
69.
There are three separate boxes from which a selection must be made using the radio
buttons to narrow the results returned. The three selection boxes are: Sequencing, Grouping
and Gender. If ALL is chosen in the Grouping box, all the candidates from the Centre will be
arranged in alphabetical order. If ALL or BY CLASS is selected in the Grouping box, the
Gender box would be disabled. Candidates may only be sequenced in CLASS grouping if a
particular Class or Form was selected for each candidate on the screen at Figure 8.
70.
The Re-sequencing radio button is selected by default and should be used when the
centre generates the sequence numbers for the first time. A centre may choose to Resequence the candidate numbers if a candidate was not registered when the generation of
sequence numbers first took place. If the other candidates have already been given their
candidate number by the centre, and a candidate(s) is registered subsequently, Re-sequencing
should not be done because it would change the numbers already allocated to some of the
candidates. In such cases, the Append radio button should be selected. Re-sequencing can
only be done before the registration file is forwarded to the Ministry. After the initial export
of the registration data to the Ministry, the Re-sequencing button is disabled and only the
Append button is available when adding new candidates.
71.
When the Append function is used, the candidate would be added with the last
candidate number in the grouping.
22/28
9 October 2014
RENR: ORS Manual for the Centre User
72.
Sequence numbers will not be generated for candidates without subjects. It is
imperative that Users run the report in the ORS called ‘Candidates without Sequence
Numbers’ before forwarding the registration data to the Ministry.
73.
The
74.
The
button is used to generate the sequence numbers for the Centre.
button is used to exit the screen without saving any information.
75.
Sequence numbers are three digits starting from 001 and continuing as far as 999.
When the sequence numbers have been generated, a 10-digit candidate (registration)
number is created.
IMPORT/EXPORT
Forward Registration Files to Ministry
Figure 23
76.
The screen at Figure 23 allows the User to Forward Registration Files from the Centre
to the Ministry. It is reached when the User selects the Import/Export option on the Main
Menu screen then Forward Registration from the dropdown arrow.
77.
If the Ministry forwards the file to CXC or rejects it, an Alert should appear on the
Centre’s Main Menu screen notifying the Centre that the file was forwarded or rejected.
78.
The
button is used to send data files from the Centre
and make them available for viewing or for some other action by the Ministry.
79.
The
button is used by the Centre to recall the data
files sent to the Ministry so that they may be edited and resent to the Ministry at a later time
23/28
9 October 2014
RENR: ORS Manual for the Centre User
when completed. The recall of files can only be done during the period prior to the official
registration cutoff date.
After the deadline date has passed,
the
button is disabled and late entries or amendments must be
done using the Register Candidate option for late entries or the Edit Candidate option for
amendments. Once a file has been recalled from the Ministry, it must be resent after the
amendment has been completed. A file cannot be recalled after the official registration
deadline date has passed. An amendment must be done by using the Edit Candidate option.
80.
The
information.
button is used to exit the screen without saving any
Forward Registration Amendment Files to Ministry
81.
When an amendment or late entry has been done after the registration cutoff date, the
Forward Amendment facility should be used instead of the Forward Registration. This
facility operates similarly to that of Forward Registration and it is reached by selecting the
Import/Export option on the Main Menu screen, then selecting Forward Amendments.
Export Database Fields
Figure 24
82.
The purpose of this function is to permit Centres to export data from the ORS into an
Excel spreadsheet. Figure 24 is generated from the Import/Export option on the Main Menu
screen, then selecting Export Database Fields from the dropdown arrow.
83.
The Candidate Subject Option Details should be selected in the Choose a Query
dropdown box. The User must select the particular field(s)s from the Available Fields
dropdown box that is required in the Excel spreadsheet to be created. A single field or
multiple fields may be selected at one time to be transferred to the Selected Fields box by
using the Shift key or Ctrl key. The highlighted fields are transferred to the Selected Fields
by clicking the arrow (>). Conversely, any field(s) in the Selected Fields box that is not
required may be transferred to the Available Fields dropdown box by using the arrow (<) or
24/28
9 October 2014
RENR: ORS Manual for the Centre User
the Clear Fields button.
84.
The information required in the spreadsheet may be further refined by using the Filter
Data button. When the button has been selected, the screen at Figure 25 appears.
Figure 25
85.
Once the respective fields have been populated, the Export Data button should be
selected. When the Excel file has been generated, the User will be given the option to Open,
Save or Cancel the file.
REPORT MENU OPTION
Figure 26
86.
Figure 26 allows the User to generate reports out of the ORS. It is obtained from the
25/28
9 October 2014
RENR: ORS Manual for the Centre User
Reports option on the Main Menu screen then selecting Report Selection from the dropdown
arrow.
87.
Reports are available in two types of file formats, an Excel spreadsheet and a pdf,
from which the User may choose. Some reports are generated from data keyed directly into
the ORS by Centres and others are generated from data loaded directly out of CXC’s
Examining Processing System (EPS). The EPS data (refined) represent data loaded out of the
ORS (raw) and ‘cleaned up’ by CXC. The User is given the option to input different
parameters (Centre code, subject, sequence number, et cetera) to expand or reduce the type of
report to be generated.
88.
From time to time, Reports are added to, amended or removed from, the ORS.
89.
The User may find that some of the Reports available in the ORS are not applicable to
the RENR application.
Amendment History Detailed/ Amendment History Report by
School/Amendment History Report by Territory
90.
These reports provide a detailed listing/summary of all amendments and late entries
made by the Centre for each candidate.
Amendment Forward Status Detailed/Amendment Forward Status
Summary/Amendment History Detailed – Forwarded/Amendment
History Detailed – Not Forwarded/Amendments – Not Forwarded
by Centre
91.
These reports give details on amendments and late entries made that have been
forwarded or are to be forwarded by the Centre to the Ministry or by the Ministry to CXC.
Candidates Personal Details by Centre/Candidates Personal
Details by Name
92.
These reports show the personal details of all candidates registered at a particular
Centre. They are particularly useful for the Centre to post on a website or notice board so
that candidates may obtain their centre number and candidate number in order to gain access
to the student portal. The Candidates Personal Details by Centre report lists candidates in
candidate number order whereas the Candidates Personal Details by Name report lists
candidates in alphabetical order.
Candidate Timetable
93.
This report generates the candidates’ timetable for the Centre or for individual
candidates.
Candidates without Sequence Numbers
94.
This report shows the candidates for whom sequence numbers have not been
26/28
9 October 2014
RENR: ORS Manual for the Centre User
assigned. This report should be generated before the registration data file is forwarded
to the Ministry. Any anomalies must be corrected at this point.
Candidates without Subjects
95.
This report lists the candidates who have been registered but have not been assigned
any subjects. This report should be generated before the registration data file is
forwarded to the Ministry. Any anomalies must be corrected at this point.
Centre Forward Status/Centre Forward Status (CXC to Action)/To
be Forwarded
96.
The Centre Forward Status report shows the date when keying of registration data
began, when or if the data files were forwarded to the Ministry and to CXC. The Centre
Forward Status (CXC to Action) report shows the Centres whose data have been forwarded
to CXC but have not been loaded in the EPS. The To Be Forwarded report lists the Centres
whose registration data files have not been forwarded to the Ministry and/or to CXC.
CXC Billing
97.
This report shows the Candidate Entry Fees, Subject Fees, Late Fees and Amendment
Fees payable to CXC by the Centre. It is generated out of the CXC’s EPS and it is the
billing that will be sent by CXC to the Centre.
CXC Final Register
98.
This report shows all the candidates from a Centre with their personal and subject
details. It is generated out of the CXC’s EPS.
Final Register ORS/ ORS Final Register by Centre
99.
These reports show all the candidates from a Centre with their personal and subject
details. They are generated out of the ORS.
Possible Duplicate Candidates
100. This report gives a list of candidates whose registration details might be duplicated in
the ORS. This report should be generated before the registration data file is forwarded
to the Ministry. Any anomalies must be corrected at this point.
Subject Registered
101. This report lists the personal and subjects details of each candidate registered at a
Centre. The Subject Registered Report should be printed and given to ALL candidates
to review and sign off on the accuracy of the data keyed on their behalf by the Centre.
User Listing/ User Listing by Centre
102.
These reports list the Users that interface with the ORS at a Centre(s)
27/28
9 October 2014
RENR: ORS Manual for the Centre User
PART B: MINISTRY MODULE
FOR MINISTRY USERS (Only)
Forward Registration Files by Ministry to CXC
Figure 27
103. The screen at Figure 27 allows the User at the Ministry to Forward Registration Files
to CXC. The User at the Ministry accesses the screen by the Forward option on the Main
Menu screen then selecting Forward Registration from the dropdown arrow.
104. When the Ministry has forwarded a file(s) to CXC, CXC is able to view/action the
file(s) sent. If a Centre wants to recall a data file that has already been exported to CXC, the
Ministry must select the Recall Files button. The Ministry should then Reject the file. This
allows the centre to be able to edit the file or candidates’ records. Recalling of files by the
Ministry can only be done before the official registration cutoff date because the Recall Files
button is disabled after that date. The Ministry must ensure that all files recalled by
Centres are resent to the Ministry for onward submission to CXC.
105. When a file has been forwarded by a Centre to the Ministry, the Ministry is given an
opportunity to view that file. At that time, a decision should be made whether to forward the
file or reject it. If it is rejected, it would be returned to the Centre for correction. The system
prompts the Ministry to give a reason for the rejection of the data file.
The
button is used to exit the screen without saving any information.
28/28
9 October 2014
ACTIVITIES FLOWCHART
START
CXC or Ministry
creates Admin User
login account
Centre User makes
changes to
candidates’ data
Centre User
forwards (exports)
data file to Ministry
Centre User checks
data and liaise with
CXC as appropriate
Admin User logs into
ORS and creates
Centre User(s)
Centre User
prints Subject
Registered
Report and
gives
candidates to
verify
Ministry checks
and forwards
data file to CXC
CXC reloads data
in ORS
Centre User logs into
ORS and starts
registration of
candidates
Centre User runs
and checks Report:
Possible Duplicates
Centre User (Super
User) inputs
personal details of
candidates
Centre User runs and
checks Report:
Candidates without
Sequence Nos.
CXC loads and
processes data
file
CXC loads and
processes
amendments and late
entries
Ministry forwards data
file to CXC
Appendix I
Centre User adds the
subject for the
candidates
Centre User runs and
checks Report:
Candidates without
Subjects
CXC reloads
processed data file
into the ORS
Centre User
forwards data file
to Ministry
Centre User checks the
data keyed for all
candidates
Centre User
generates
sequence numbers
Centre User
checks Reports
and candidates’
data in the ORS
Centre User
generates
sequence nos. for
late entries
Centre User advises
candidates to check
records on Student
Portal
Centre User keys
amendments and late
entries in ORS
CXC……….
22 January 2014