1
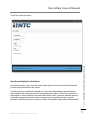
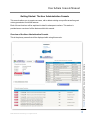
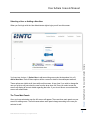
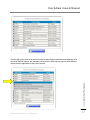
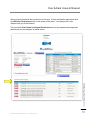
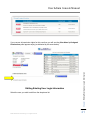
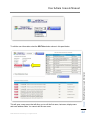
User Admin
Console Manual
Nationwide Title Clearing, Inc.
©2015 Nationwide Title Clearing, Inc. All rights reserved.
User Admin Console Manual
USER ADMINISTRATION CONSOLE
USER MANUAL
TABLE OF CONTENTS
INTRODUCTION TO THE USER ADMINISTRATION CONSOLE.............. 4
Initial Login ................................................................................................................................................ 4
User Access Rights to this Feature .......................................................................................................... 5
GETTING STARTED: THE USER ADMINISTRATION CONSOLE ............ 6
Chapter: Introduction to the User Administration Console
Overview of the User Administration Console .......................................................................................... 6
Selecting a User or Adding a New User ................................................................................................... 7
The Three Main Panels ............................................................................................................................ 7
HOW TO CREATE A NEW USER............................................................. 10
Rules for Creating New Users ................................................................................................................ 11
New User Error Messages...................................................................................................................... 12
View of New User Screen ....................................................................................................................... 13
ABOUT USER PERMISSIONS ................................................................. 15
Assigning User Permissions ................................................................................................................... 16
Changing a User Permission .................................................................................................................. 20
Removing User Permissions .................................................................................................................. 20
EDITING EXISTING USER LOGIN INFORMATION ................................. 21
How to Change an Existing User’s Password ........................................................................................ 23
How to Delete a User .............................................................................................................................. 24
How to Lock a User................................................................................................................................. 25
NAVIGATING THE USER ADMINISTRATION CONSOLE....................... 25
Manage Your Profile ............................................................................................................................... 26
Manage User Credentials Screen:.......................................................................................................... 26
©2015 Nationwide Title Clearing, Inc. All rights reserved.
2
User Admin Console Manual
Manage Password Screen:..................................................................................................................... 27
Manage My Profile Screen: .................................................................................................................... 28
Troubleshooting ...................................................................................................................................... 29
Chapter: Introduction to the User Administration Console
PLEASE CONTACT NTC FOR MORE INFORMATION. .......................... 30
©2015 Nationwide Title Clearing, Inc. All rights reserved.
3
User Admin Console Manual
Introduction to the User Administration Console
This is an online function that allows you to create, maintain and control the logins of people that
access your online accounts and information through ntcLINK, the Secure Client Access portal
on the Nationwide Title Clearing (NTC) website.
You use ntcLINK to access your accounts and detailed information for the services that NTC is
performing for you. There are several web-based services and features available within
ntcLINK, these are TrackingLINK, ReportsLINK and ReleaseLINK.
Depending on the specific services NTC is performing for you there may be several different
accounts or contracts available to you. An “account” typically refers to contracts or statement of
work that applies to a specific project or on-going workflow that NTC was hired to perform for
your company. Some NTC clients may have 1 account while others may have 15 different
accounts. This is specific according to your contracts with NTC and is usually separated by the
service being performed.
Chapter: Introduction to the User Administration Console
An important new feature with ntcLINK is the ability for you to access multiple accounts and
services with one user name and login. You can now also create and manage different users at
your shop and control the access rights for each user. You can assign permission for specific
users to gain access to certain accounts or to restrict access to accounts or functions at your
discretion. This user maintenance feature is helpful to track accountability of specific employees
and greatly improve security standards.
Initial Login
Your Account Manager will give you the user name and password for the User Administration
Console. Typically only one user name/login will be created for your company that will have
permission to access to this feature for security reasons. We recommend that you keep this
user name and password very secure. Only an NTC Administrator can create and edit users
with access to your User Administration Console. This administrator login only has access to
this feature and has no access to other functions of ntcLINK such as TrackingLINK,
ReportsLINK or ReleaseLINK. If you want access to these other functions you may create an
additional login for yourself to access those features under that login.
The client login screen will always appear the same and be in the same location on the NTC
website. You can find this at: www.nwtc.com and select the “Client Login” button and this will
take you to: www.nwtc.com/portal. You may bookmark that page and it will always remain the
same. The only thing that changes is that each user will have custom access to different
functions of ntcLINK and what they see after they login will be unique to their user account.
©2015 Nationwide Title Clearing, Inc. All rights reserved.
4
User Admin Console Manual
Chapter: Introduction to the User Administration Console
This is the initial login screen:
User Access Rights to this Feature
As mentioned earlier, only a user with administrator rights can access the User Administration
Console feature described in this manual.
All additional users created and managed by you (the User Administrator) will automatically
have standard user rights and cannot be given administrator rights. Only NTC personnel have
authorization to create additional users with administrator rights. Users with standard rights are
individually managed under this console to assign access to specific accounts as well as
permission within each account to features such as TrackingLINK, ReportLINK or ReleaseLINK.
©2015 Nationwide Title Clearing, Inc. All rights reserved.
5
User Admin Console Manual
Getting Started: The User Administration Console
This console allows you to create new users, edit or delete existing user profiles as well as grant
or deny permission to ntcLINK features.
Each of these functions will be explained in detail in subsequent sections. This section is
provided as an overview of all the features within this console.
Overview of the User Administration Console
Chapter: Getting Started: The User Administration Console
This is the primary screen that will be displayed while using this console:
©2015 Nationwide Title Clearing, Inc. All rights reserved.
6
User Admin Console Manual
Selecting a User or Adding a New User
Chapter: Getting Started: The User Administration Console
When you first login with the User Administrator rights login you will see this screen:
You have two choices: 1) Select User to edit an existing user under the dropdown list, or 2)
Add a New User. Each of these options will be covered in detail in the subsequent sections.
These options are visible at all times while on this screen. At any time if you wish to change the
user you wish to edit just select the user from the drop down list. Once you select a user the
screen will display all current details regarding that user. If you do not have a user selected the
screen will remain blank.
The Three Main Panels
Once you have selected a user the full screen will appear. There are three main panels on your
screen for editing users. The field names above each panel change according to the user you
selected to edit.
©2015 Nationwide Title Clearing, Inc. All rights reserved.
7
User Admin Console Manual
1) Add User Access Permissions for (User Name).
2) (User Name’s) User Information
3) (User Name’s) Assigned Permissions.
These three panels are indicated below:
Panel 1
Chapter: Getting Started: The User Administration Console
Panel 2
Panel 3
©2015 Nationwide Title Clearing, Inc. All rights reserved.
8
User Admin Console Manual
These panels are shown here with more detail.
1) Add User Access Permissions for (User Name).
Chapter: Getting Started: The User Administration Console
This is where you can select the permissions for this particular user. This list will be
custom according to your specific overall services and contracts.
2) (User Name’s) User Information
This is where you can view, edit or delete a user.
©2015 Nationwide Title Clearing, Inc. All rights reserved.
9
User Admin Console Manual
3) (User Name’s) Assigned Permissions.
This is where you can view the current assigned permissions and delete permissions.
How to Create a New User
Add
Chapter: How to Create a New User
To create a new user for your account, click the Add a New User button.
This will open a new window for you to enter the basic user information for the new user.
©2015 Nationwide Title Clearing, Inc. All rights reserved.
10
User Admin Console Manual
Rules for Creating New Users
Note on User Email Addresses: The user email address is primarily used in the event that
the user forgot their password. In that case they may request it to be sent to them and the
system will automatically send it to the email address on record. This email address may
also be used in the future for notices or updates to the system. As the system administrator
you can opt to set each individual user up with their existing email address or enter your
own email address in place of theirs at your own discretion.
When finished entering all the fields click the Create New User button.
©2015 Nationwide Title Clearing, Inc. All rights reserved.
Chapter: How to Create a New User
The general rules for creating new users are as follows:
1) You must create a unique user name for each individual.
2) Passwords must contain a minimum of 7 characters. You may use any combination of
letters and/or numbers with no restrictions other than length.
3) It is recommended that the email address provided should match the user, however, the
system does not prevent you from entering duplicate email addresses for different users.
11
User Admin Console Manual
Selecting Cancel will allow you exit this screen without saving.
If there was any trouble creating the new user, you will get an error message indicating the
error. Some possible errors might be not completing all mandatory fields, incorrect password
format, duplicate user name, etc. Follow the prompts to enter the new user correctly.
©2015 Nationwide Title Clearing, Inc. All rights reserved.
Chapter: How to Create a New User
New User Error Messages
12
User Admin Console Manual
View of New User Screen
You will now return to the main User Administration Console screen as shown below. This
new user will now be accessible from the drop down list for the future as well as displayed on
your screen for editing.
©2015 Nationwide Title Clearing, Inc. All rights reserved.
Chapter: How to Create a New User
Once you have created the new user correctly you will get a message indicating that the new
user was successfully created. Click Continue.
13
User Admin Console Manual
When adding a new user the system does not assign any permission rights. If the user does not
have any permissions assigned to them, you will see the (User Name’s) Assigned
Permissions panel appear empty. You will need to assign permissions before this user will be
able to access any features.
Main User Administration Console screen:
Chapter: How to Create a New User
This new user information is now visible on the right panel on the screen titled (User Name’s)
User Information as shown below.
©2015 Nationwide Title Clearing, Inc. All rights reserved.
14
User Admin Console Manual
About User Permissions
The procedure of adding permissions is the same for existing users as it is for new users. This
can be done at any time and immediately updates the system.
Select the user you wish to edit as shown below:
This will open up the full view of the User Administration Console which will appear different
for users with no permissions than users with existing permissions.
Chapter: About User Permissions
User with No Permissions:
©2015 Nationwide Title Clearing, Inc. All rights reserved.
15
User Admin Console Manual
Assigning User Permissions
To assign new permissions, you perform this function in the panel labeled Add User Access
Permissions for (User Name). This list contains all accounts, services and features
associated with your company.
©2015 Nationwide Title Clearing, Inc. All rights reserved.
Chapter: About User Permissions
User with Existing Permissions
16
User Admin Console Manual
Chapter: About User Permissions
Click the [+] symbol next to the account name to open the drop down box and expand a list to
see which special features are available to that account. Each service type will have different
options that are applicable to that type of service.
©2015 Nationwide Title Clearing, Inc. All rights reserved.
17
User Admin Console Manual
Chapter: About User Permissions
Rights are assigned per type of service, feature access and by access levels within each
feature. There are helpful descriptions within each feature to help you understand all permission
levels. If the user is not given any rights to the service or feature it will simply not appear on their
screen when they login. To assign rights for this particular user put a checkmark or select the
button next to the features or level of permission you want to give them access to, as shown
below.
©2015 Nationwide Title Clearing, Inc. All rights reserved.
18
User Admin Console Manual
After you have selected all the permissions for this user, to finish and add the permissions click
the ADD User Permissions button at the bottom of the panel. Your changes will not be
reflected until you click this button.
Chapter: About User Permissions
The panel titled (User Name’s) Assigned Permissions will now be expanded and display the
permissions you just assigned, as shown below:
©2015 Nationwide Title Clearing, Inc. All rights reserved.
19
User Admin Console Manual
Changing a User Permission
To change an existing user permission you must first delete any pre-existing permission to that
service and feature. Click the DELETE button next to the access you wish to change for this
individual. This only removes the access from this list for this user. Next return to the add user
permissions panel and select the user permission you wish to assign. This applies for example,
if you had user with an existing permission to TrackingLINK Full Access for Recon Contracts
and you wanted to change this to Restricted Access for Recon Contracts.
Removing User Permissions
To remove a user permission click the DELETE button next to the access you wish to unselect
for this individual. This only removes the access for this user. If you made an error you can
easily add it back as described in the above section regarding adding user permissions.
©2015 Nationwide Title Clearing, Inc. All rights reserved.
Chapter: About User Permissions
If you try to assign a different permission to a particular feature when one is already assigned
you will get this error message. This is helpful to ensure that you don’t inadvertently change
existing user permissions.
20
User Admin Console Manual
Editing Existing User Login Information
Select the user you wish to edit from the drop down list.
©2015 Nationwide Title Clearing, Inc. All rights reserved.
Chapter: Editing Existing User Login Information
If you remove all permission rights for this user then you will see the (User Name’s) Assigned
Permissions panel appear empty (as indicated by the arrow below).
21
User Admin Console Manual
This will open a new screen that will allow you to edit the first name, last name, display name
and email address fields. You cannot edit the user name.
©2015 Nationwide Title Clearing, Inc. All rights reserved.
Chapter: Editing Existing User Login Information
To edit the user information select the EDIT User button shown in this panel below:
22
User Admin Console Manual
How to Change an Existing User’s Password
This will open a new window to enter the new password. Select the Change Password button
to finish. Press Cancel to back out without changing the password.
©2015 Nationwide Title Clearing, Inc. All rights reserved.
Chapter: Editing Existing User Login Information
You can change the user’s password directly in the system by clicking the Change Password
hyperlink in the Update User Account window.
23
User Admin Console Manual
How to Delete a User
If you need to remove a user entirely, simply click the DELETE User button. Caution: Clicking
this button immediately deletes the user without confirmation.
©2015 Nationwide Title Clearing, Inc. All rights reserved.
Chapter: Editing Existing User Login Information
You can also force the password to be changed by the user the next time they log in by
checking the Force Password Change box.
24
User Admin Console Manual
How to Lock a User
If you don’t want to delete the user, but need to restrict the account from logging in you can lock
the account by checking the box Lock User Account. To remove this lock, unselect the
checkbox.
Under this feature you can only edit users or edit your own profile. Navigation is therefore very
simple. The top right corner displays your current user name (shown here as “Sample”) and a
button to Logout.
©2015 Nationwide Title Clearing, Inc. All rights reserved.
Chapter:
Navigating the User Administration Console
25
User Admin Console Manual
Manage Your Profile
If you click your user name at the top right, you can edit your own profile including password,
email address, etc. All users you create for your company will have this same feature. There are
three options across the top: Manage User Credentials, Manage Password and Manage My
Profile.
Chapter: Navigating the User Administration Console
Manage User Credentials Screen:
©2015 Nationwide Title Clearing, Inc. All rights reserved.
26
User Admin Console Manual
Chapter: Navigating the User Administration Console
Manage Password Screen:
©2015 Nationwide Title Clearing, Inc. All rights reserved.
27
User Admin Console Manual
Chapter: Navigating the User Administration Console
Manage My Profile Screen:
©2015 Nationwide Title Clearing, Inc. All rights reserved.
28
User Admin Console Manual
Troubleshooting
Chapter: Navigating the User Administration Console
If for any reason throughout ntcLINK you encounter the error page below, hit the BACK button
on your browser two times to return to the previous screen you were on.
©2015 Nationwide Title Clearing, Inc. All rights reserved.
29
User Admin Console Manual
Please contact NTC for more information.
800-346-9152 ext 225
2100 ALT 19 North, Palm Harbor FL, 34683
Questions or Comments?
Please email us: [email protected]
Visit our website: www.nwtc.com
©2015 Nationwide Title Clearing, Inc. All rights reserved.
Chapter: Please contact NTC for more information.
This ntcLINK User Administration Console Manual is provided by
30