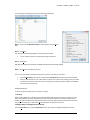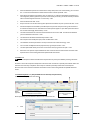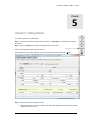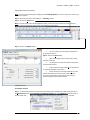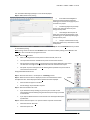
1
EasyCars 2000 User Manual Jeal Computer Services Pty Ltd P.O. BOX 1013, ST MARYS, NSW 1790 AUSTRALIA Reg. office Unit 5/190 Queen St. St Marys N.S.W. 2760 Australia Mobile 0412281158 Fax (02) 9673 4063 Last revised 10.04.2013 P H ( 0 2 ) 9 6 2 3 6 4 0 3 Table of Contents CHAPTER 1 : INTRODUCTION ...................................................................... 5 Welcome to EasyCars 2000 ............................................................................................................ 5 Legal Requirements ........................................................................................................................ 5 Hardware Requirements ................................................................................................................ 6 Conventions used in this manual ................................................................................................... 6 CHAPTER 2 : INSTALLATION ........................................................................ 7 Where do I start? ............................................................................................................................ 7 Installing EasyCars 2000 ................................................................................................................. 7 Demonstration Data ....................................................................................................................... 8 Moving around EasyCars 2000 ....................................................................................................... 8 Exiting from EasyCars 2000 ............................................................................................................ 9 CHAPTER 3 : GETTING STARTED................................................................. 10 ...................................................................................................................................................... 10 Creating a New Database ............................................................................................................. 10 Importing Lookup Lists .............................................................................................................. 11 Adding to Lookup Lists ............................................................................................................... 12 Setting your defaults .................................................................................................................... 13 GST ............................................................................................................................................. 15 Registration ................................................................................................................................ 15 Users (Security) .......................................................................................................................... 18 Upgrading from the Internet ........................................................................................................ 19 CHAPTER 4 : USING EASYCARS 2000 .......................................................... 21 Entering Information .................................................................................................................... 21 Adding Vehicles .......................................................................................................................... 21 Editing or Adding Additional Data ............................................................................................. 26 Adding Pictures to Vehicles ....................................................................................................... 28 Adding Photos to your Cars: ...................................................................................................... 28 Adding Trade-ins ........................................................................................................................ 29 Creating Purchase Orders (PO) (Only available to users with Easy Cars 2000) ....................... 29 Paying Purchase Orders/Updating to an Expense ..................................................................... 30 (Only available to users with Easy Cars 2000) .......................................................................... 30 Transferring Expense Types (Only available to users with Easy Cars 2000) ............................ 32 Floorplan Vehicles (Only available to users with Easy Cars 2000) ......................................... 33 How to put a car on Floorplan ................................................................................................... 33 2 How to make a curtailment (payment) for a car on Floorplan (Only available to users with Easy Cars 2000).......................................................................................................................... 34 Adjustments to Floorplan vehicles (Only available to users with Easy Cars 2000) .................. 35 Searching ...................................................................................................................................... 36 Searching for Individual Vehicles ............................................................................................... 36 Searching for Multiple Vehicles ................................................................................................. 37 CHAPTER 5 : SELLING VEHICLES ................................................................. 40 To a Private Customer or to another Dealer .............................................................................. 40 Sending Forms to Dealers via Fax .............................................................................................. 47 Entering Monies Received. ........................................................................................................ 48 Cancelling Sales and Purchases .................................................................................................... 48 Determining the Action Required .............................................................................................. 49 Cancelling a Sale ........................................................................................................................ 52 Cancelling a Purchase ................................................................................................................ 53 Adjusting a Sale / Purchase Amount .......................................................................................... 53 CHAPTER 6 : SENDING AND RECEIVING INFORMATION ............................... 55 Jeal Computer Services ................................................................................................................ 55 Send Data to Jeal ....................................................................................................................... 55 Get Data from Jeal ..................................................................................................................... 55 Car History ................................................................................................................................. 55 TO BE COMPLETED ..................................................................................................................... 55 Advertising ................................................................................................................................ 56 Setting up for Advertising .......................................................................................................... 56 Sending to Advertisers ............................................................................................................... 56 EasyCars Car History Report uploads for dealers with a JCS website ...................................... 57 CHAPTER 7 : PRINTING NOTICES AND FORMS............................................. 60 Printing Forms .............................................................................................................................. 60 Reprinting Invoices for a Sold Vehicle ........................................................................................ 61 RTA Disposal Forms.................................................................................................................... 61 RTA Acquisition Forms ............................................................................................................... 62 Police Book................................................................................................................................. 63 Log of Changes ........................................................................................................................... 64 Consignment Memorandum Form ............................................................................................ 65 Printing Reports ......................................................................................................................... 66 (Only available to users with Easy Cars 2000, users with Easy Cars Lite have an Unsold Stock Report Only) .............................................................................................................................. 66 Stocktake Report........................................................................................................................ 68 Unsold Stock Report .................................................................................................................. 68 Acquisitions/General stock lists ................................................................................................. 68 Profit On Sold Stock Report ....................................................................................................... 69 Debtors Report .......................................................................................................................... 69 Payments Received on Sold Stock ............................................................................................. 70 Salesman’s Commission Report ................................................................................................. 70 Salesman’s Average Profit Report ............................................................................................. 70 Invoice List ................................................................................................................................. 71 Floorplan Outstanding Report ................................................................................................... 71 Creditors Outstanding Report .................................................................................................... 71 Floorplan / Creditors Repayments Report ................................................................................. 72 3 Matched Debtors / Creditors Report ......................................................................................... 72 Accrual Basis Report GST Business Activity Statement. ............................................................. 72 Cash Basis Report GST Business Activity Statement ................................................................. 73 GST Transactions by Stock Number ........................................................................................... 74 Browse GST Transactions ........................................................................................................... 75 Expenses / Orders / Warranty Expenses Report ........................................................................ 75 Warranty Profit .......................................................................................................................... 75 Incomplete Police Book / Notice Information ........................................................................... 76 Stock Cards................................................................................................................................. 76 (Only available to users with Easy Cars 2000) .......................................................................... 76 Description Cards (Only available to users with Easy Cars 2000) ............................................ 77 Mailing Lists .................................................................................................................................. 80 Toll Forms........................................................................................................................ ............81 CHAPTER 8 : BULK SALE AND PURCHASE OPTIONS...................................... 83 (Only available to users with Easy Cars 2000) .......................................................................... 83 Pickups (Quick Acquisitions) ...................................................................................................... 83 Sales/Invoicing ........................................................................................................................... 84 Bulk Receipts .............................................................................................................................. 85 Viewing Receipts Audit Trail ...................................................................................................... 86 Bulk Payments to Creditors ....................................................................................................... 86 Bulk Payment/Receipts Audit trail ............................................................................................. 86 CHAPTER 9 : GENERAL INFORMATION AND HINTS ...................................... 88 Backing Up Your Data ................................................................................................................ 88 Telephone Support and Program Maintenance ........................................................................ 89 The Telephone Support Numbers .............................................................................................. 90 Telephone Support via Internet ................................................................................................. 91 Using Remote Admin ................................................................................................................. 91 4 U S I N G E A S Y C A R S 2 0 0 0 Chapter 1 Chapter 1 : Introduction WelcometoEasyCars2000 EasyCars was designed specifically to reduce the time consumed by a dealer handling paperwork, including most government forms as well as acquisitions, disposals, Car History and Advertising etc. It also provides a comprehensive record of all incoming and outgoing vehicles. The police book records are automatically updated as each vehicle is purchased or sold. The entire paperwork routine necessary when a vehicle is sold by retail sale or wholesaled from one yard to another is automated. In the case of routine wholesale purchases and/or sales, a dealer information bank (created by you) removes the need to key in each dealer’s details - all necessary information is automatically entered, thereby releasing you from repetitive typing. A complete set of information relating to any dealer of your choice is typed onto the disposal screen, acquisition screen, form 7, police book, new vehicle record etc. with only two or three keystrokes. A further time saving is achieved when a client's details are automatically copied from the sold vehicle to his trade-in, thus avoiding double entry of information and reducing the possibility of errors. LegalRequirements The Commissioner for the Department of Fair Trading requires, amongst other things, that: 1. "A procedure for ‘backup’ to the system be implemented and carried out at least on a weekly basis. The backup procedure must enable the restoration of information following a computer failure. A second ‘backup’ copy file of information must be stored off the premises and made available to an authorised person on demand." 2. "All information must be able to be accessed by terminal screen and hard copy on immediate request by an authorised person" (Our emphasis). THIS MEANS THAT, DURING BUSINESS HOURS, THERE MUST ALWAYS BE SOMEONE ON YOUR PREMISES WHO KNOWS HOW TO PRINT A "POLICE BOOK UPDATE" FROM EASYCARS, OTHERWISE YOU ARE NOT COMPLYING WITH REQUIREMENTS UNDER THE MOTOR DEALERS ACT. It is, in any case, in your own best interests to ensure that more than one person knows how to use the computer to print reports and update the information. Information must be kept up-to-date even when your regular computer operator is away sick or on holidays. 3. The "LOG OF CHANGES" must be printed at least weekly. 5 U S I N G E A S Y C A R S 2 0 0 0 HardwareRequirements You will require a Windows XP, Vista, or Windows 7 Computer. EasyCars is not supported on Apple. A minimum requirement of RAM is 2GB. 32 Bit is sufficient. Conventionsusedinthismanual The symbols < and > are used to indicate a single keystroke. For example <F10> means you should tap the function key at the top of the keyboard marked F10 (not the keys F then 1 then 0). Another example is <Page Down>, which refers to the key with the words Page Down written on it. We will sometimes tell you to use two keys at the same time like this: <Alt> + <Q>. This means hold down the first key (the Alt key); while holding it down, tap the second key (Q), and then release the first key. Another example could be <Ctrl> + <End> which means hold down the Ctrl key, tap the End key, then release the first key. Sounds difficult? No way! When we refer to selecting from the options displayed as choices in a menu, the option to be selected will be shown underlined like this: Change. 6 U S I N G E A S Y C A R S 2 0 0 0 Chapter 2 Chapter 2 : Installation WheredoIstart? JCS will normally organise a time with you to do your initial setup, to ensure it is done correctly. Please contact our office to organise a time to suit you. 02 9623 6403 Before you can start using EasyCars 2000, it will need to be installed onto your hard disk. Depending on your particular setup, you will need to follow some or all of the steps outlined below. InstallingEasyCars2000 Step 1 – Insert the EasyCars 2000 compact disk into the CD drive and wait 15 seconds or so for the following menu to display. Step 2 – Select EasyCars 2000 from the install menu and then click the Run button Step 3 – A prompt will ask you to close other programs that may be running on your computer. 7 U S I N G E A S Y C A R S 2 0 0 0 If all other programs are closed, select Next. Step 4 – If you agree to the terms and conditions outlined in the license agreement select Yes. If you do not agree to these terms select No and you will not proceed any further with the installation of EasyCars 2000. If you are familiar with directories then you may wish to change the installation directory, however we do not advise this. Except if you have Windows Vista. The directory must be C:\Users\Public\EasyCars Step 5 – A prompt will ask you to install EasyCars 2000 to the destination folder C:\Program Files\EasyCars\ If this is acceptable to you, select Next. If you use Windows Vista or Windows 7, we suggest using C:\Users\Public\EasyCars\ Step 6 – You will now be asked which additional tasks you would like to be performed during the installation. Leave the Create a desktop icon ticked and an icon will be placed on your desktop to allow easy access to EasyCars 2000. The “Create a Quick Launch” tick box will add a shortcut to EasyCars 2000 in the Quick-Launch Toolbar. Step 7 – Click Install to complete the installation Step 8 – Click Finish to exit the Setup. DemonstrationData You will find a set of demonstration data will be installed ready for you to experiment with. It will be in the directory you installed to. When starting EasyCars for the first time you have the option to use demo data. At this point in time your program will be in Demonstration Mode. Use the Demonstration data in conjunction with the user’s manual to become familiar with EasyCars. MovingaroundEasyCars2000 There are several ways in which you can move through the screens, windows and menu options in EasyCars. 8 U S I N G E A S Y C A R S 2 0 0 0 To select a menu option from the tool bar either: Point and click with your mouse, or You can select the <ALT> key and the letter that is underlined for the option you want to select. For example to select the menu option File would be <ALT F>. To move through fields on the screen you can either: Point and click with your mouse, or Use the <Tab> key to move to the next field. If you have to move in a backwards direction use <Shift> + <Tab> key together. Using the Navigator Window as a Main Menu: If you want to use the Navigator window you will have to open it by selecting the View menu option, then selecting Navigator Window. Once the Navigator window is displayed just click on the task you wish to perform. To Close the Navigator window select the View menu option, then selecting Navigator Window. ExitingfromEasyCars2000 NEVER EXIT FROM EASYCARS BY SWITCHING OFF OR RESETTING THE COMPUTER! Leave the program by selecting File then Exit on the main menu. 9 U S I N G E A S Y C A R S 2 0 0 0 Chapter 3 Chapter 3 : Getting Started When EasyCars 2000 has been installed on your Hard Drive, it is time to get it ready for use. The following are a few steps that show you how to set up EasyCars for your individual use. EasyCars installation will create a desktop icon or a quick start icon, use either to start the application (When you run EasyCars for the first time, it will display these windows/screens. Answer ‘Yes, I want to use Glasses’ if you have support) As a reminder, JCS Support Staff should do this for you to ensure everything is setup correctly CreatingaNewDatabase Step 1 – From the File menu, select Close. Step 2 – From the File menu, select New. A box asking what you want to do will appear. Select “Start using EasyCars”. 10 Click Continue. U S I N G E A S Y C A R S 2 0 0 0 The “Save new data file as” window will be displayed. Step 3 – In the File name field, type a name for the new database that you wish to create, for example: “Jeal Stock”. This is the name of your database and should be remembered, as this is the file that should be backed up. Step 4 – Click Save. A dialog box will tell you that your new database has been created. Step 5 – Click Ok. TheImport message box is displayed. If you do not wish to Import data select No. If you do want to import data to be used in the lookup lists follow the instructions below. Importing Lookup Lists After you have created a new database using the steps outlined above, EasyCars 2000 will ask you if you want to import information such as lookup lists and other data into your new database. The information in our demonstration data file is a good starting point to creating your own database. To import this information, follow the steps outlined. After you have created your new database, the Import dialog box will be displayed. Step 1 – Click on Yes to import from an existing set of EasyCars data. 11 U S I N G E A S Y C A R S 2 0 0 0 The “Import from existing EasyCars data” window will be displayed. Step 2 – Click on the file DemoData.mdb so that it appears in the File name field. Step 3 – Click Open. The “Import” box will be displayed with some lookup lists selected. Tick or untick the options as required by clicking on the boxes. Step 4 – Click Import. After the importing process has been completed, the Import box will change slightly. Step 5 – Click Close to complete the process. You can view, edit, delete and add to lookup lists at any time. To do this you can either: Select the Data Entry menu option, and then select Lookup Lists. Select the list you wish to update. While in a Stock Screen you can make entries on-the-fly. This is done when making an entry on a field that draws from the lists. If the entry you are making is not already in the list you will be prompted to make this a permanent entry. Adding to Lookup Lists To add to any of the lookup lists you can do this in 2 ways: 1. On the fly When entering details for a vehicle and you enter data that would normally be stored in a lookup list, if that data is not already stored in the appropriate lookup list you will be asked if you would like to add it. If you answer Yes it will be added to the appropriate list and can be used again by selecting it from the list from the screen you are working on. If you answer No the data will be used for this entry only. 2. Adding, editing or deleting from the list directly From the Data Entry menu, select Lookup Lists then the list you wish to add/edit or delete information. 12 U S I N G E A S Y C A R S 2 0 0 0 Add, edit or delete information as required. Settingyourdefaults The option Setup menu is used to set your defaults for EasyCars. It is found on the toolbar at the top of the screen. This menu is used to: Set default Options. Set the GST Rate. Complete the Registration of the program (if manually entering) and add your Company Logo. Retrieve Registration over the Internet. Change the Default Data Entry Dates. View the Link and Link History is using EasyCash Professional in conjunction with EasyCars. Create Users and Passwords. Options Step 1 – From the Setup menu, select Options. The “Options” screen will be displayed with the General tab available for entry. 13 U S I N G E A S Y C A R S 2 0 0 0 If you would like to Display the Stock screen each time you start EasyCars check the box. We suggest that all Backup options be selected. These backup options do not replace external backups made to a USB or zip disk. External backups to USB or zip disk are critical and MUST be carried out routinely. If you wish to check the printer to be used or amend the pages to be printed select the Show Print Dialog box. When adding to Lookup Lists, we suggest that the lookup lists always use UPPERCASE. Step 2 – Select the Display tab. If you would like to be warned if you are entering Duplicate Registration Numbers check the box. If you would like to be warned if you have entered a vehicle that was not acquired with a Tax Invoice, check the box. This warning will be displayed each time you edit a vehicle without a tax invoice. Click on the default vehicle type and select Used. If not operating in QLD, make sure the Rego Label/Check Digit isn’t checked. Step 3 – Select the Stock Entry tab. 14 If you would like to Automatically Transfer Acquisition Cost to Creditors tick the box. This will create a record on the Creditor/Payments tab for the amount you have entered in the Consideration Given (how much you paid for the vehicle) for each vehicle you acquire. If you would like to maintain a mailing list of customers who have purchased vehicles from you, tick Automatically transfer purchaser details to mailing list. If you want to add Default Lot/Load Fund Amount to the costing tab for every vehicle you acquire enter the amount here. If you want to add Default Warranty Allowance to the costing tab for every vehicle you acquire enter the amount here. U S I N G E A S Y C A R S 2 0 0 0 Select when you want to Default REVS Check. Vehicles will be added to the REVS Check screen based on your selection. Determine how you would like Consignments Transfer to Creditors. Add any Default expense(s) that will be added to all vehicles you acquire. If using EasyCash Professional these Default expenses are NOT transferred to EasyCash Pro. The options set here can be changed at any time, however there are no adjustments made to vehicles already in stock. For example, if you change the amount of the default Warranty Allowance, any vehicles entered into stock prior to the change will have the old amount. Any vehicles entered into stock after the change will have the new amount. Step 5 – Select the Glasses tab. Make sure the Glasses guide is used for data entry by ticking this box. Make the Glasses matches 15 before showing the select NVIC screen for best performance when using the Glasses information service. Step 6 – Select the Internet tab. The information that is already entered here is to allow you to send your data to Jeal Computer Services and should not be changed unless instructed to do so by Jeal Computer Services. Step 5 – Click on Apply. Step 6 – Click on Ok. GST Step 1 – From the Setup menu, select GST. This option allows you to change the GST Tax rate in accordance with Government guidelines. At the time of writing, this was 10%. Note: For information about GST compliance within this program see the GST Help section which can be found under the Help menu. Step 2 – Click on Apply. Step 3 – Click on Ok. Registration When convenient, contact Jeal Computer Services Pty Ltd. on (02) 9623 6403 for your registration number. You will be issued with a password. Click on the Setup menu, and select Retrieve Registration from Jeal. You will get a firewall prompt, click continue. Enter the password and click ok. If you don’t have access to the Internet you will need to follow these steps: Step 1 – From the Setup menu, select Registration. 15 U S I N G E A S Y C A R S 2 0 0 0 The “EasyCars User Registration” screen will be displayed. The Name and address details once entered here will be used to print on your forms and invoices. They MUST match your Dealers License details. Once you have installed a registration number you can start entering your own set of data. Note: Some functions of this program are not available unless you have obtained a Pre-Paid Support Registration Number. Please contact Jeal support staff for more information. Adding your Company Logo Step 1 – In the Registration screen, click on the button at the end of the Logo Location field. The “Select logo image” window will be displayed. Step 2 – Use the Look in field to select the correct drive and folder containing your logo. Note: The picture must be of file type bmp, gif, jpg or wmf. Step 3 – Click on the picture filename. 16 U S I N G E A S Y C A R S 2 0 0 0 Step 4 – Click Open. The picture should now appear in the Registration screen. Step 5 – Click Register in the Registration screen. Now the options in the Sell screen, Finance screen and Vehicle Description Cards can be ticked to include your Company Logo. Once a successful registration number is entered, the registration details displayed in some fields CANNOT be changed unless a new registration number is also entered. Changing those fields without entering a newly issued registration number will convert the program back to a demonstration program. The only fields that can be changed without contacting Jeal Computer Services are telephone or fax numbers. Note: A new registration number to correspond with any new registration details will only be issued after payment of a new license fee, except in the case of “renewable” registrations. 17 U S I N G E A S Y C A R S 2 0 0 0 Users (Security) Creating a Master Password To protect your data, a facility has been installed so that passwords can be used to restrict access to authorised personnel only. To utilise this facility, the first time that you access the Users function under the Setup menu, you will be asked to enter a ‘Master Password’ where the following dialog box will be displayed. Step 1 – From the Setup menu, select Users. The “Enter Users Password” box will be displayed. Choose a name, type the same password in both boxes and click on the Ok button. The master password always has all access rights enabled; you cannot change the settings for the master password. NOTE: IT IS VERY IMPORTANT THAT YOU REMEMBER YOUR MASTER PASSWORD BECAUSE YOU WILL BE ASKED TO ENTER IT EVERY TIME YOU START EASYCARS 2000. Adding Users This allows you to add users to the program and allocate access rights to those users. Step 1 – From the Setup menu, select Users. The “Users” window will be displayed. Step 2 – From the Users menu, select Add. The “Enter User Password” dialog box is displayed. Enter a new password then type again to verify. Step 3 – Click Ok. Step 4 – Select the functions/screens this user can access. 18 If this user can access all screens select Allow all button. This will tick all boxes. If this user can access most screens select Allow most button. This will tick all boxes. If this user can access some screens select Allow some button. This will tick some boxes. If you are not happy with any of these suggested setting select Allow none and make your own selections by clicking boxes along side the screen you wish this user to access. U S I N G E A S Y C A R S 2 0 0 0 Step 5 – Click Ok. Editing Users Access Rights Step 1 – From the “Users” screen select the user you wish to change. Make the changes as per the instructions above. Step 2 – Click Ok. Changing User Passwords Step 1 – From the Setup menu, select Users. The “Users” screen will be displayed. Select the User you wish to change. Step 2 – From the Users menu, select Change password. The “Enter User Password” dialog box will be displayed. Step 3 – Enter the account name you want to change and then enter the new password in both boxes and click on the Ok button. Deleting Users Step 1 – From the “Users” screen select the user you wish to delete. Step 2 – From the “Users” menu, select Delete. The Delete dialog box will be displayed. Step 3 – Click Yes to delete the user. UpgradingfromtheInternet Note: This option is only available if you have a Pre-Paid Support Number. See Chapter 3 – “Registration” or contact Jeal support staff. Step 1 – Connect to the Internet, preferably without running your web browser (Internet Explorer or Netscape etc.). Step 2 – Start EasyCars 2000. Step 3 – From the Update menu, select Check for an Update. 19 U S I N G E A S Y C A R S 2 0 0 0 A “Checking for an update” dialog box will be displayed. Select Yes to continue. The download will now begin. Step 4 – When the download is complete select Yes to install now. If you select No, and do not specify otherwise the new exe file will be saved to the directory your data stored in a folder named Upgrades. * If using Dial-up Internet, remember to disconnect. * Note: 20 If you are running EasyCars on a Network, each computer in that network MUST be running the same version at all times. So don’t forget to upgrade ALL machines. Simply go to the menu Update, and then select Install from network. U S I N G E A S Y C A R S 2 0 0 0 Chapter 4 Chapter 4 : Using EasyCars 2000 When you have finished setting up EasyCars 2000, it is time to start using the program. EasyCars 2000 allows you to enter information, search for specific information, send and receive information and print out relevant information. EnteringInformation Adding Vehicles To add a vehicle into the EasyCars database, you need to get to the Stock screen. Step 1 – Click on the Data Entry menu and then click Stock. The Stock screen will be displayed. Step 2 – Click on the Add vehicle button or press <Alt> + <A>. The Stock screen will change to Edit mode to allow data entry. 21 U S I N G E A S Y C A R S 2 0 0 0 All fields that are highlighted in green are mandatory (they must be filled in before a Form can be printed for display in the window of a vehicle). It is best to enter as much accurate information as possible now. You can however go back and add more details or make changes at a later date. Press the <Tab> button to move to each of the fields. Pressing the <F2> function key will enter today’s date in the date fields or can duplicate information where appropriate. 22 The cursor will initially be in the Registration field. Enter the Registration Number of the vehicle you are entering into stock. <Tab> If you are a Dealer in QLD enter the check digit. <Tab> Enter the date on which the Registration Expires. <Tab> Enter the State in which the vehicle is registered. <Tab> Groups can be used to help you group vehicles together for reporting purposes. If you want to use this enter a Group <Tab> Enter the Built Date of the vehicle. <Tab> If the Compliance date is the same as the built date you can press <F2> and the date will be entered for you. If it is different you will have to enter this in now. <Tab> Other can be used to record things such as the Radio PIN number etc. If in VIC, WA or SA this field with be entitled Year First Registered. <Tab> Enter the Engine Number. <Tab> Enter the VIN/Chassis Number. If this number is completely or partially the same as the engine number you can use <F2> to duplicate it here. For example if you were entering the details for a Ford select <F2> to duplicate the engine number, then select the <Home> key which will place the cursor at the beginning of the field and type 6FPAAA. <Tab> The make/model/body/colour and trim of the vehicle can be selected from the Lookup List by selecting the at the end of each of the fields or by typing it in. If not already in the list you can add U S I N G E A S Y C A R S 2 0 0 0 it at this point. If sufficient information is entered, the glasses database if used will show a list of possible matches to select which may fill in more information. <Tab> Tick the Commercial/exempt box if the vehicle you are entering falls into this category otherwise leave it blank. <Tab> Tick the 2 Tonne or more box if the vehicle you are entering falls into this category otherwise leave it blank. <Tab> The Engine and Transmission fields can be entered if required. These fields will be displayed on the Stock Cards and other reports. <Tab> Trading Stock should always be ticked. If this is removed you will not get your GST credits when sold. <Tab> Enter the figure that is currently displayed on the vehicles Odometer. <Tab> Only tick No odometer if this is the case. For example trail bike, caravan or wreck. <Tab> Enter the Distance Travelled. If this is the same as the odometer press <F2>. The distance travelled is used when the odometer is not a true record of the distance travelled eg: Odometer replaced etc. <Tab> Select if the odometer/distance travelled is Klm or Miles. EasyCars automatically updates the Form Type and Form No. When forms are printed through EasyCars. This information is stored in your Police Book. Therefore if you had an existing handwritten form on the vehicle the type and number would be entered here. <Tab> The Description field allows you to enter any descriptive text. This text can also be displayed on reports. <Tab> Up to 2 Previous Vehicle Registration numbers can be entered here if necessary. Step 3 – When all details have been entered, click on the Options tab or press the <Page Down> key to display the Options screen. If used, the Glasses database will have a list of standard extras that come with the specific car. To add to the Glass’s Optional Extras, right click on that area and click on Add Extras, select the desired extras and click Add Selected. If you want this vehicle to be included when sending vehicles to your web page created by EasyWeb, tick this box. If you want this vehicle to be included when sending vehicles to your advertising site, check this box. If a REVS check has been performed select the time it was done either on Acquisition or Disposal (When you sell the car). If a REVS check hasn’t been done, select none. If the REVS result is Unknown, passed or failed, select the respective result, otherwise select not done. If the REVS check has been done enter the certificate number, Certificate date and REVS batch, if applicable. If the vehicle has been rebuilt after a REVS check, tick the REVS Writeoff box. If desired, add a description in the Description box. This will be shown on advertising sites if advertising this vehicle. 23 U S I N G E A S Y C A R S 2 0 0 0 Step 4 – When all details have been entered, click on the Acquisition tab or press the <Page Down> key to display the Acquisition tab. Enter the Date on which you acquired the vehicle. Note that the date shown will be today’s date. This can be changed by typing over it or using the + or – (plus or minus) at the end of the field, or the + or – keys on your keyboard located on the number pad, or alternatively the drop down will bring up a calender and you can select the date on here. <Tab> Enter how you acquired this vehicle, purchase, or consignment. Note: Only enter T (Trade-in) if you have not entered this vehicle during the sale of another. For example T could be used for entering trades on hand at the time of implementing EasyCars. For more detailed information on entering Trade-ins, see Chapter 5 – “Selling Vehicles”. <Tab> Leave the tick in the Print Acquisition Rego to have this vehicle added to the list of vehicle to be transferred. For more information on printing acquisition transfers, see Chapter 7 – “Printing Notices and Forms”. <Tab> Enter the Trust Account Number and Type of Consignment if displayed (will only be available if How Acquired is C). <Tab> If the Dealer you purchased the vehicle from has organised floorplan on your behalf, tick the Floorplan by Vendor box. See the section on Floorplan to complete the floorplan details. The floorplan screen will automatically be displayed once this vehicle is saved. Enter the Name and Address details of the person or company you acquired the vehicle from. Note: if it was a company do not use the First Name field. You can select dealers from the lookup list. IMPORTANT NOTE: Select the option that defines the tax status of how the vehicle was purchased. The default will be Awaiting Tax Invoice, but should be changed to one of the following: Tax Invoice Provided must be checked if you have received a Tax Invoice. GST inputs credits can be claimed in the current accounting period. Awaiting Tax Inv box must be checked if you are to receive a tax invoice but are awaiting this. NOTE: You MUST receive a Tax Invoice within 28 days of purchase. No ITC must be checked if the vehicle is purchased with a GST rate of 0% that is GST free, e.g.: If the vehicle is purchased from a charity, no input credits are to be claimed. Non-Registered must be checked when vehicles are purchased from private persons or nonregistered entities. Input credits will only be claimed when the vehicle is sold. 24 U S I N G E A S Y C A R S 2 0 0 0 Complete additional name and address details if the vehicle was registered in joint names. <Tab> Enter the Salesman who acquired the vehicle. This information can be used to produce reports for commission etc. <Tab> If you have paid for the rego transfer you can enter the cheque number and the date paid here. <Tab> If this vehicle was used as a trade-in on a vehicle that was purchased; select the stock number from the list. Step 5 – When all the details have been filled in, click on the Costing tab or press the <Page Down> key to display the Costing tab. The Costing tab is divided into parts Estimates and Actual Costs. The left-hand side of the tab contains estimates, while the right hand side are the actual figures. You are required to enter values into both areas to be able to produce forms. If unticked, GST details for totals only will be displayed Estimates Only Automatically updated by the Expenses and Orders screens Not updated until the vehicle is SOLD Enter the amount you paid for the vehicle, or the amount you gave as the trade-in equity in the Consideration Given field. This amount will be transferred to the Creditor/Payments tab. <Tab> If the vehicle was a trade-in enter the difference between the equity given to the customer and what the vehicle is actually worth. This is the Overallowance amount. Any amount entered here will reduce the total cost of the vehicle but not affect GST. <Tab> The Market Value will default to the same value as the consideration given. This value will appear on the RTA transfer form, and can be changed if needed. <Tab> If an amount was not automatically defaulted into the Lot Load Fund it can be added now. It can also be deleted if not required on the vehicle. Any amount entered here is taken off the profit of the vehicle when sold and not taken into consideration when GST calculations are made. <Tab> Enter the value of the Warr Allowance applicable. <Tab> You can estimate the Total Expenses for the vehicle and enter this here. <Tab> The Estimated Selling Price must be entered before a form can be printed for display in the window of a vehicle. This will allow an estimated profit on sale figure to be calculated. <Tab> 25 U S I N G E A S Y C A R S 2 0 0 0 The Estimated Profit on Sale figure is now displayed. If you were aiming for a particular profit on this vehicle you can enter the preferred profit, the estimated selling price will be adjusted accordingly. <Tab> The Market Value on disposal, if known, can be entered at this time and may be displayed on the RTA disposal. <Tab> The Fire Sale Value is used as an estimate that can be used for reporting purposes only. <Tab> Step 8 – Click on the Save button or press <Alt> + <S>. This will now save the vehicle into stock. Note: The next available stock number will be automatically used for this vehicle. Editing or Adding Additional Data Now that the vehicle has been entered into stock if you need to enter additional information or change what you have entered you will have to Edit the vehicle. In some cases you may even have to cancel the purchase and or the sale to allow you to make changes. This would be so if you have acquired a vehicle that had a Tax Invoice and you now have to amend the Consideration Given, as you would have already received Input Tax Credits for the purchase. For more on this see Chapter 5 – “Cancelling Sales and Purchase”. Locate the vehicle you wish to amend. Select the appropriate tab. Select Edit. Make the changes required then select Save. If you do not want to save the changes you have made select Cancel. Some of the data you may wish to add to your vehicle would be found in the tabs Expenses, Orders and Creditor Payments. The Expenses tab: Note: Orders and Expenses will be transferred to EasyCash Pro only if they are added by creating a Purchase Order. 26 Click on the Add button. The Add Expense window will be displayed. U S I N G E A S Y C A R S 2 0 0 0 Enter the Date the expense was created. If it is today’s date, select <F2>. Alternatively, you can select the at the end of the field and select a date from the calendar provided. <Tab> Enter whom the expense was Paid to. (You can select the at the end of the field and select from a list of suppliers). If the supplier that you enter is not already on the list, you will be asked if you would like to save that supplier to the list as a new entry. <Tab> Enter the Amount Inc GST. <Tab> Did you receive a Tax Inv from the supplier? (Was GST included in the price.) If so tick this box. <Tab> Should this expense be included in your BAS report? If you have said yes to having a tax invoice this should also be ticked. You can still elect to have this expense appear on your BAS report even if there was no GST involved (eg: RTA transfers). <Tab> The GST amount does not have to be entered if the tax rate is set to 10%. This will be the default if you have ticked the Tax Inv box. <Tab> The Amount Ex GST will be automatically created. <Tab> If this expense has already been paid, enter the Date Paid. <Tab> The GST Rate should only be either 0 or 10 (current GST rate at time of writing). <Tab> You can enter the Reference of the payment here, eg: Cheque number. <Tab> The description field allows you to enter a free text comment, eg. Nature of repair. <Tab> More than one expense may be added at this time. Once the stock record has been saved the Total Expenses value on the Costing tab will be updated with these values. The Orders tab: Note: Orders and Expenses will be transferred to EasyCash Pro only if they are added by creating a Purchase Order. An Order is much like an Expense except that no work has been carried out or possibly not ordered. Orders are entered in the same way as Expenses. Once they are marked as paid they will become a Paid Expense. Once the stock record has been saved the Total Orders value on the Costing tab will be updated with these values. The Creditor Payments tab: (Only available to users with Easy Cars full version) This is the amount you paid for the vehicle. When payment Obtained from the Costing screen, Consideration Given field. you make a to the Person/Company you purchased the vehicle from it is entered in this Click Shows how much you still owe for this vehicle. tab. the Add 27 U S I N G E A S Y C A R S 2 0 0 0 button. The Add Creditor Payment window will appear. Enter the Date the payment was made. Enter the Amount inc GST that you have paid. A Reference number can be entered to record the cheque number used to make this payment. A Description can be entered if required. When you are finished, click Save. The name of the Person/Company you purchased the vehicle from (as entered on the Acquisition tab) will be displayed in the Paid To field on the Creditor/Payments tab. Adding Pictures to Vehicles Pictures can be added to Vehicles using the “Photos” button on the right hand side of the screen. Once you click on that you’ll be greeted with the Photo Screen: Adding Photos to your Cars: 28 On the left-hand side of this screen is where you select the car you wish to put photos on. In the middle column is where you find where the photos are saved on your computer. On the Right-hand side is where the vehicle photos are shown. Once you’ve found the photo’s in the middle column, select the car you wish to add photos on to by clicking on the small grey box next to it. This will select the whole row in blue. To add the photos on to the car left click once on the photo in the right-hand screen. This will then show the photo in one of the 12 grey boxes along the bottom of the screen. After you’ve selected all the photos you want on that car (maximum of 12), you then click on the save pictures button along the bottom, alternatively you just select the next car from the left-hand menu and it will prompt you to save the pictures on the car. U S I N G E A S Y C A R S 2 0 0 0 Adding Trade-ins There are two methods with which you can add a trade-in to the EasyCars 2000 database: 1. As a purchase in the “Stock screen”. 2. Via “Sell screen” – during a sale. The more convenient way to enter a trade-in would be at the time of sale (in the SELL screen). This will ensure the invoice for the customer is correct and the trade will be entered into stock automatically, saving you time and reducing errors. Creating Purchase Orders (PO) (Only available to users with Easy Cars 2000) Step 1 – From the Data Entry menu, select Purchase Orders then New Purchase Orders, or click on the new PO button. The “New Order Screen” will be displayed. Step 2 – Enter the details for the Purchase Order. Enter the PO Date for this order. <Tab> Enter the Supplier Invoice. <Tab> Enter the Contractors details for this PO, or choose from the list provided. <Tab> The New Purchase Order may be marked as Received if you have in fact received the goods or you are sure of the quantities and prices, if you are running EasyCash Professional, marking a Purchase Order as received will also post this purchase order to the General Ledger and create a Creditor. If necessary the Purchase Order may be marked as Paid at this time. This also creates the payment in EasyCash Professional. <TAB> In the Authorised By field enter in the code for the person approving the Purchase Order. These codes are drawn from your Salesman’s list. New identities can be entered at this time. <Tab> If the costing information is to be attached to a vehicle, enter that Stock No. here, or you can enter in the Rego No. Note: A purchase order can be created and printed even though it is not attached to a vehicle. To do this, leave the Stock Number field blank. If however if the Purchase Order is not for a vehicle expense and you have EasyCash Professional you would be better to create the purchase order in EasyCash Professional as then the appropriate account can be used. <TAB> In the Description enter details of work required or goods to be received. This is a mandatory field and if a description is not entered the purchase order cannot be updated. <TAB> If an estimated cost is known or required enter it in Estimated inc GST field. This will update the Orders value in the Costing tab for that vehicle. <TAB> 29 U S I N G E A S Y C A R S 2 0 0 0 If the Contractor usually gives you a Tax Invoice, the Tax Inv and BAS tick boxes can be ticked. This is for convenience only and should be verified when or if a Tax Invoice is issued. This will also calculate the GST Amount and Amount Ex-GST based on the tax rate. <TAB> If more items are to be included on this PO, tab down to blank stock number field and continue entering details as required. Step 3 – If you require any messages on the purchase order, selecting the Options tab at the top of the screen will allow you to enter them here. Changes can also be made to the purchase order heading and the look of the form from this screen. Step 4 – Select Preview to verify all details are correct or select Print. If printed successfully, answer yes. This will update the cost of those vehicles and attach the Purchase Orders to the Orders screen on related vehicles or Expenses tab if marked as received. If you do not require a printed copy of the Purchase Order just click Update. This will update the cost of those vehicles and attach the purchase orders to the orders screen on related vehicles. Paying Purchase Orders/Updating to an Expense (Only available to users with Easy Cars 2000) Step 1 – If you are using EasyCash Professional then it is preferable to mark your Purchase Orders as Paid in the Cashbook, however if EasyCars is a standalone program then from the Data Entry menu, select Purchase Orders then select View/reprint/update existing Purchase Orders, or click on the Prev POs box. The “Existing PO” screen will be displayed. 30 U S I N G E A S Y C A R S 2 0 0 0 Step 2 – Make the necessary changes to the purchase order. By selecting this field you can choose to view only PO’s that are not marked as Paid. If a PO is marked as either Received or Paid then you cannot edit it. If the PO is not marked as Received the Amount for the line items may be edited by clicking the Edit button and making the relevant changes. OR Select “Mark all items received” if all entries on the purchase order have been received. If they have been paid enter the date they were paid or select <F2> to enter today’s date. OR Select “Mark all items received and paid” if all entries on the purchase order have been received and paid. The date entered in the Payment Date field will be today’s date. If date is not correct it can be changed at this time. To print details of the Payment created use the “Print Payment Advice” button. Things to Note: WHEN YOU EXIT FROM THIS SCREEN, any order items which are associated with a stock number and which have been received OR paid for (or both) are automatically transferred as expenses. If you require the Expense to be shown as a Warranty then you will need to manually transfer the Expense to the Warranty screen. GST records are created for items transferred as expenses and marked for inclusion in the BAS. 31 U S I N G E A S Y C A R S 2 0 0 0 If a PO item is still an "Order" (Type "O") all details pertaining to this order can still be changed. Once an item becomes an expense or warranty expense only the description can be changed. If you want to change anything else then you will have to cancel it and create a new one. Items that are not associated with a Stock Number remain "Orders" and are not transferred as expenses or warranty expenses. They cannot be marked for inclusion in the BAS. Purchase Orders can be cancelled or deleted by using the Delete button, this removes the Purchase Order from EasyCars. Transferring Expense Types (Only available to users with Easy Cars 2000) Step 1 – Search for the vehicle – See Chapter 4 – “Searching”, for more information on this. Step 2 – Once the correct vehicle is displayed, select Edit or press <Alt> + <E>. Step 3 – Select the Orders tab to bring up the “Orders” tab. Step 4 – Highlight the line item to be transferred. Hint: To select more than one entry, hold down the <Ctrl> key and click on subsequent entries on the far left grey column, or to select a range of entries after selecting the first one, hold the <Shift> button while clicking on the last entry in the range. If selected it will be coloured blue. Step 5 – Click on the transfer button and then select the category of which you want to transfer the selected item(s). For example if you would like the Order to become a paid expense select the Expense option. The “Costs Transfer” dialog will be displayed asking for confirmation of the transfer. Select Ok if you are happy to proceed. Select Cancel if you need to change your selection. Step 6 – The Orders are now moved to the Expenses tab with the Date Paid showing as today’s date. You can edit the entry if required, then select the Save button or press <Alt> + <S>. NOTE: 32 You cannot transfer an Expense or a Warranty Expense back to an Order. Changing or Deleting an Expense can only be done if the BAS report for that period has not already been printed. U S I N G E A S Y C A R S 2 0 0 0 Floorplan Vehicles (Only available to users with Easy Cars 2000) How to put a car on Floorplan Step 1 – Search for the vehicle – See Chapter 4 – “Searching”, for more information on this. Step 2 – When the correct vehicle is displayed, click the Floorplan button on the right hand side of screen. The “Print Floorplan Invoice” screen will be displayed with the Buyer screen ready for input. Enter the Floorplan Date. If you are using the EasyCash Professional, this date must be within your current Financial year. Enter the Reference if required. Select the Bailment tick box if floorplan involves bailment. IMPORTANT NOTE: Bailment is subject to GST. EMA is not. If your floorplan involves bailment, you must leave the bailment box ticked. When a vehicle is placed on bailment, it is effectively sold to the finance company for the bailment amount. Since this sale is subject to GST, and you are liable to remit the GST in the period the vehicle is bailed. 33 U S I N G E A S Y C A R S 2 0 0 0 Select the tick box Claim ITC on payment of first curtailment. In selecting this option your specifying if bailment input credit can be taken on first curtailment payment, or whether to wait until bailment is fully paid. THIS DEPENDS ON WHEN YOU GET A TAX INVOICE FROM THE FINANCE COMPANY. YOU CANNOT CLAIM AN INPUT CREDIT WITHOUT A TAX INVOICE. If ITC on first curtailment is not ticked, entire ITC is claimed once the bailment is paid in full; it is claimed for the period in which the last curtailment was made. Enter in the Finance Company details in or select the drop down arrow and select from the list provided. Step 3 – Select the Vehicle(s) tab. NOTE: The appropriate vehicle should be highlighted otherwise select the correct vehicle using the mouse or the up and down arrows to highlight the correct vehicle and press the <Spacebar> to select or deselect. Enter in the Floorplan amount including GST. To insert Consideration Given you can press the <F2> key and the amount will be entered into this field. Enter any withheld amounts and then, Check the GST rate field. Step 4 – Select the Preview button to check if details on Invoice are correct. Step 5 – Select the Print button to print the Invoice. A message will be displayed. If you answer Yes to this, the floorplan will be updated. If the bailment tick box had been selected then the vehicle should now show as “Bailed” in the top right hand side of Stock Screen. Step 6 – Select the Update button to finalise Floorplan. This step is not required if you have printed the Invoice and answered Yes, to ‘Did the Invoice print correctly?’. If the bailment tick box had been selected then vehicle should now show as “Bailed” in the top right hand side of stock screen. How to make a curtailment (payment) for a car on Floorplan (Only available to users with Easy Cars 2000) Payments can be made through the Cashbook if using EasyCash Professional, alternatively: Step 1 – Select the correct vehicle – See Chapter 4 – “Searching”, for more information on this. 34 U S I N G E A S Y C A R S 2 0 0 0 Step 2 – Select the Floorplan tab then select the Edit button or press <Alt >+<E>. Click on the Add button. The Add Floorplan window will appear. Enter in the Date the payment was made. If the payment was made today press the <F2> key, otherwise enter the correct date. The Paid To field will default to the Finance Company as entered during the Floorplan setup. Enter the Amount Inc GST that you have paid. A Reference number can be entered if required. A Description can be entered if required. Click on the save button. Step 3 – Again, click on the Save button or press <Alt> + <S>. The Repayments made and the Floorplan Outstanding will be updated by this amount. When you pay the curtailments, you effectively buy the vehicle back from the Finance Company. You can claim an Input Credit for the curtailments paid, but when you claim these input credits depends on your contract with your Finance Company. You cannot claim Input Credits unless you have a tax invoice from the Finance Company. IMPORTANT NOTE: For more information regarding Floorplan, curtailments and GST see Help and GST Help. Adjustments to Floorplan vehicles (Only available to users with Easy Cars 2000) Step 1 – Select the correct vehicle – see “Searching” section. 35 U S I N G E A S Y C A R S 2 0 0 0 Step 2 – Click on the Floorplan button down right hand side of stock screen. The Print Floorplan Invoice screen will be displayed. Step 3 – Click on the Vehicles tab. Enter in the Adjustment Date. Enter in the Amount of Adjustment Inc GST, using a minus key if decreasing the amount. Note: Only the difference is to be entered, not the total of the new amount. Step 4 – Select Update to save the new Floorplan amount. You can Print a new invoice by selecting the Print button. Searching The “Stock” screen allows you to search for vehicles that already exist in your EasyCars 2000 database. There are different methods you can use to find the vehicle or vehicles you are looking for. You can search for individual vehicles, or use a query to find multiple vehicles that match a certain criteria. Searching for Individual Vehicles To search for individual vehicles you can use any of the following buttons in the top row of the “Stock” screen. Search, Find, Browse, Previous or Next. Changing the Order in which vehicles are displayed. The default order in which vehicles are displayed either in the Stock screen or the Browse stock screen is set to Stock Number. This can be changed at any time. To confirm which order you have set, check the very top line in the EasyCars screen. To change the order click on the OrderBy button or press <Alt> + <Y> and select the order in which you would like your stock to be displayed. This order will remain active until you change it. Using the Next or Previous buttons. Using these buttons allows you to sequentially browse through the vehicles contained in your EasyCars 2000 database. Simply click on the Next button or press <Alt> + <N> to move forward, and the Previous button or press <Alt> + <P> to move backwards through the database. The next or previous vehicles will be displayed according to the current order. Using the Browse button This option allows you to view all vehicles in EasyCars and select the vehicle you wish to appear on the main stock screen. 36 U S I N G E A S Y C A R S 2 0 0 0 Step 1 – Click on the Browse button or press <Alt> + <B> and the “Browse Stock” screen will be displayed with all the stock in your EasyCars 2000 database listed in the order in which you have selected. Step 2 – You can re-sort the way this screen is displayed temporarily by clicking on the column footer of the field you wish the sort order to be. E.g. if you want this screen displayed in Make order, click on the column heading labelled Make. You can also change the length of the columns by clicking and holding on the line on the right side of the column in the green area and then drag your mouse to the left or right to increase or decrease the size of the column respectively. Also if you click and hold on the green space you can move the columns and align them in different orders. Click the Save your layout button to remember the layout for next time. Step 3 – Highlight the vehicle required and select it by double clicking with the mouse on any part of the vehicle listing. The selected vehicle will now be displayed on the main Stock Screen. Using the Search button This button allows you to search for vehicles using the current sort order you have set. As a default (if you have not changed the sort order) Stock Number will be set. Step 1 – Click on the Search button or press <Alt> + <S> and the following dialog box will be displayed. Step 2 – Enter the Stock Number (or what is required based on your sort order) and click OK. The selected vehicle will now be displayed on the main stock screen. Searching for Multiple Vehicles EasyCars 2000 allows you the option of displaying all vehicles that meet a certain criteria, for example all the Fords in stock, or all the Sedans or even all black Porsches! The Find and the Query buttons are used for this purpose. Using the Find button This option allows you to search for specific vehicles that meet a certain criteria, for example ‘Holden’s’, or ‘vehicles that cost less than $5,000’. Step 1 – Click on the Find button or press <Alt> + <F> and the “Find Record” dialog box will be displayed. 37 U S I N G E A S Y C A R S 2 0 0 0 Step 2 – In the Fields column select the field that contains the information you are looking for. For example if you were looking for a ‘Holden’ you would first select the ‘Make’ field. Step 3 – Select the type of comparison you would like to use in the Operators column. Step 4 – In the Value or Expression column, type in the criteria or value you are looking for. E.g. ‘Holden’. Step 5 – Click on the OK button to search for the specific vehicle that matches your criteria. Step 6 – If the results found more than one match to your query use the < > either side of the Find button to move through these. Using the Query Button Step 1 – Click on the Query button or press <Alt> + <U>. The “Query” screen will be displayed. Step 2 – In the Fields column select the field that contains the information you are looking for. Step 3 – Select the type of comparison you would like to use in the Operators column. The available operators are = equal to <> does not equal >= great than or equal to <= less than or equal to > greater than < less than empty empty Like similar to Step 4 – In the Value or Expression column, type in the criteria or value you are looking for, e.g. HOLDEN. Step 5 – Click on the Add button. The query you have created will appear in the Select where section. Hint : If you require more than one condition to be met, for example all ‘Black Holden’s’, then repeat the above steps choosing the appropriate Fields, Operators and Expressions. Select the And button if you want both conditions met, or select the Or button to match either condition. Step 6 – If required, select the order in which the filtered vehicles will be displayed by clicking in the Select Order box, and choose the desired field. Step 7 – If you wish to use this query at a later date, enter a name in the Query name field and then click on the Save button. 38 U S I N G E A S Y C A R S 2 0 0 0 Step 8 – Click on the Run Query button to view the selected vehicles. You will now be taken back to the main stock screen. The very top line of the EasyCars screen will tell you that you have a Query running. The same steps are taken when selecting data to appear on a report. Cancelling the existing Query To display all the vehicles in your EasyCars 2000 database, you need to cancel the query you have created. Step 1 – Click on the Query button or press <Alt> + <U>. The “Query” screen will be displayed. Step 2 – Select Cancel button. Check the top line of the EasyCars screen to ensure you have cancelled the query. 39 U S I N G E A S Y C A R S 2 0 0 0 Chapter 5 Chapter 5 : Selling Vehicles To a Private Customer or to another Dealer Step 1 – Search for the vehicle you wish to sell. See Chapter 4 – “Searching” for more details on searching for vehicles. Step 2 – Click on the Sell button located on the right hand side of the screen, and the currently displayed vehicle will be selected. The Sell Vehicle(s) screen will be displayed, opened and ready for input on the first page – Buyer. Step 3 – Complete the details on the Buyer screen. 40 Enter the Date of the sale. Today’s date will automatically be defaulted into this field and should be changed if not correct. <Tab> U S I N G E A S Y C A R S 2 0 0 0 Select the correct option for How Sold. In most cases this will be either S or W. If you are selling the vehicle to another dealer you should select W. <Tab> If you require EasyCars to print the RTA disposal notice tick Print Disposal Rego Transfer. <Tab> If the vehicle is being sold to a private person enter their First Name into the First Name field. <Tab> If the vehicle is being sold to a private person enter their Last Name into the Last/Company field. If the vehicle is being sold to a dealer enter their Company name into the Last/Company field or select from the list provided. <Tab> Enter the Address details for the purchaser. <Tab> If being sold to a dealer enter their dealers licence number in the MD field. <Tab> You can enter the purchaser’s Drivers Licence and DOB if known. <Tab> If being sold to a dealer enter their ABN if known. <Tab> If you don’t want the purchase cost of this vehicle to be shown on the sell screen tick the Hide purchase cost box. This is helpful if the customer can see what you are entering. <Tab> If you are to receive a trade-in as part of this sale select the tax status here for the Trade. In most circumstances this will remain at Non Registered, as you don’t usually get trade-ins from other dealers. See Chapter 4 for more information on tax status. <Tab> If the vehicle being sold is to go into 2 names enter the Name and Address details for the joint purchaser. <Tab> Enter the Salesman who completed the sale. This information can be used in the Salesman Commission Report. <Tab> Enter the Trust A/c if the vehicle being sold is a consignment and you have not yet entered the account number. <Tab> Step 4 – Once all details are entered, click on the Vehicle(s) tab or press the <Page Down> key or press <Alt> + <H>. Complete the details on the Vehicle(s) screen. Note: The appropriate vehicle should be highlighted otherwise select the correct vehicle using the mouse or the up and down arrows to highlight the correct vehicle and press the <Spacebar> to select or deselect. Enter the Sell Price Inc GST for this vehicle. <Tab> If you have given the purchaser a Discount Inc GST and want this figure to appear on the invoice enter the amount of the discount here. This is best used when trying to avoid an Overallowance on a tradein. See ‘Overallowances vs Discount’ under the Help menu. <Tab> Enter the GST Rate. This should in most cases be left at 10%, however you may need to change it if you are selling this vehicle to a customer who has a GST exemption. In that case you would change this to 0. <Tab> Purchase Cost is displayed and able to be entered here only if the vehicle was a consignment and the purchase amount is determined on selling. <Tab> Tick the Tax Invoice box if the vehicle was being consigned from a business and you are sure you would receive a tax invoice for the purchase amount (your buying price). <Tab> 41 U S I N G E A S Y C A R S 2 0 0 0 Enter the odometer reading in the Odometer Now field. If this is the same as was entered when bringing the vehicle into stock you can press the <F2> key and that value will be duplicated here. <Tab> If No Odometer check this box. <Tab> Enter the Inspection Rpt number for vehicles requiring this. <Tab> Enter the Report Date. You can use the <F2> key if it was today’s date. <Tab> If the customer purchased any Extras at time of sale enter them here now. Receipt any money you have received from the customer for a deposit here now. Enter any money you have paid to the customer as a negative amount. This will show on the Receipts screen. If you wish this to show on the invoice and be deducted from the amount owed ensure that the On Inv field shows Yes. Note: If more than 1 vehicle is to be included, repeat the above steps selecting (highlighting) a different vehicle each time. The ‘Sell Price’ and ‘Odometer Reading’ must be filled in for each vehicle being sold. Step 5 – Once all details are entered, click on the Trade-in 1 tab or press the <Page Down> key or press <Alt> + <1>. Complete the details on the Trade-in 1 tab if required. If the vehicle being used as a trade-in has already been entered into the EasyCars database select the Stock No. from the list provided. <Tab> If not previously entered, continue to complete the rest of the information on this tab. Once updated, this information will be used to enter this vehicle into stock in the EasyCars database, so care should be taken to get the details correct. 42 Enter the Registration Number of the vehicle you are entering into stock. <Tab> If you are a Dealer in QLD enter the check digit. <Tab> The Date Acquired will default to the date of the sale. <Tab> Enter the Registration Expiry date of the vehicle registration. <Tab> U S I N G E A S Y C A R S 2 0 0 0 Enter the State in which the vehicle is registered. <Tab> Groups can be used to help you group vehicle together for reporting purposes. If you want to use this enter a Group. <Tab> Enter the Built date of the vehicle. <Tab> If the Compliance date is the same as the built date you can press <F2> and the date will be entered for you. If it is different you will have to enter it manually. <Tab> Enter any Previous Vehicle Registration numbers if known. <Tab> Other Info can be used to record things such as the Radio PIN number etc. <Tab> Enter the Engine Number. <Tab> Enter the VIN/Chassis Number. If this number is completely or partially the same as the engine number you can use <F2> to duplicate it here. <Tab> The make/model/body/colour and trim of the vehicle can be selected from the Lookup List by selecting the at the end of each of the fields or by typing it in. If not already in the list you can add it at this point. <Tab> Enter the figure that is currently displayed on the vehicle’s Odometer. <Tab> Enter the Distance Travelled. If this is the same as the odometer press <F2>. The distance travelled is used when the odometer is not a true record of the distance travelled eg. Odometer replace, etc. <Tab> Select if the odometer/distance travelled is klm or miles. The Engine and Transmission fields can be entered if required. These fields will be displayed on the Stock Cards and other reports. <Tab> The Description field allows you to enter any descriptive text. This text can also be displayed on reports. <Tab> If a REVS check has been performed enter the result’s status. <Tab> Enter the amount in the Allowance field the customer was told they would get for the trade-in. This will become the consideration given. <Tab> If an Overallowance is needed enter it here. <Tab> Enter the Estimated Selling Price inc GST as this figure is required to print forms and will be updated on the costing tab. <Tab> If there is a Payout figure to be sent to a Finance Company enter it here. <Tab> Enter To whom the payout is to be made (name of Finance Company). <Tab> T’fer Payout to creditors is to be ticked if you require the payout figure to be recorded as a creditors amount. You can update this once the payment has been made. Step 6 – Once all details are entered, click on the Trade-in 2 tab or press the <Page Down> key or press <Alt> + <2>. Complete the details on the Trade-in 2 as outlined above if required. Step 7 – Once all details are entered, click on the Invoice/Notice tab or press the <Page Down> key or press <Alt> + <I>. Complete or check the details on the Invoice/Notice tab. 43 U S I N G E A S Y C A R S 2 0 0 0 If selling the Vehicle directly to a Private Person or Company (not another Dealer) The Invoice Type should be in Invoice or Contract and Notices should be Current Form and RTA Copy. If selling the Vehicle to a Private Person or Company (not another Dealer) through a Finance Company. Additional fields will be displayed if Finance Company selected. Finance should be selected for Invoice Type and Current Form and RTA Copy should be selected for Notices. If Credit Regulated is ticked, the Invoice will display Invoice to Purchaser and Financed By Finance Company. If Credit Regulated is not ticked, the Invoice will display Invoice to Finance Company and Delivery To Purchaser. The Finance Company Name and Address details will also have to be entered. If you are selling the Vehicle to another Dealer Intertrade should be selected for the Invoice Type - and either Form 7A for multiple transfers or 7 for a single transfer should be selected for Notices. If you are unable to make these selections go back and check that you have entered W – (Wholesale) for how sold - and that you have selected a motor dealer in the Buyer’s tab. For all option ensure that the printing options and margins are correct. These usually do not change once they have been set. 44 U S I N G If selected, the Name and Address details as entered in the Registration screen will be printed in plain text as a header on the invoice. If selected, the conditions of sale as entered in the Invoice Text screen will be printed on the invoice. E A S Y C A R S If selected, the heading as entered in the Invoice Text screen will be printed as a header on the invoice. 2 0 0 0 If selected, the Invoice Message text as entered in the Invoice Text screen will be printed in the body of the invoice. Step 8 – Once all details are entered, click on the Invoice Text tab or press the <Page Down> key or press <Alt> + <T>. Complete or check the details on the Invoice Text tab. Most details on this tab will not change once they have been set. If you like to have a fancy header on your invoice these can be created in the Custom Heading section using standard word processing skills with the icons provided. If you require your banking details or other additional text to appear on the invoice this can be entered in the Invoice Message section. A standard Conditions of Sale has been entered as a default. If you wish to change it you can do so. Note: For these options to be used on the invoice you must select them in the print options on the previous page. Step 9 – Once all details are entered, click on the Contract Text tab or press the <Page Down> key or press <Alt> + <C>. A standard Contract Text has been entered as a default. If you wish to change it you are free to do so. Note: Invoice Type must be set to Contract to enable this text to print as part of the Invoice. 45 U S I N G E A S Y C A R S 2 0 0 0 Step 10 – If you are happy with what you have entered it is always a good idea to preview what you have done. Select the Preview button from the top row of the tab. You can look through what is going to be printed by using the arrows at the top of the page. Close the preview window to proceed. You can do this by either selecting the X in the top right hand corner or by selecting File then Exit. There are a few ways to proceed here: 1. If the preview showed you what you were expecting, you can print the invoices and forms - and automatically update the sale and Police Book. 2. If the preview did not show you the forms, there may have been some Missing information. This means you will have to make changes and return. 3. You may choose to update the sale without printing the forms (Print forms later). 4. You may choose to Cancel the sale - do not proceed. 1. Print and Update the Sale Click on the Print button. After confirming that the correct printer is being selected, click on Ok. The Forms and Invoice(s) should now be available at the printer and should be checked. If they printed correctly answer Yes to the box that now will be displayed on the screen. If they did not print correctly answer No. You will now be returned to the Sell screen. You can make the necessary changes and return to the Print option. Destroy any incorrectly printed forms immediately. 2. Preview did not show forms After closing the preview window the Notice Errors <Alt> + <N> screen will be automatically displayed if no forms were produced (unless you selected No Forms on the Invoice/Notice screen). 3. This screen displays the reason why no Forms were printed. Go back through the sell screen and complete the required information. Information that appears in brackets are not mandatory Police Book information and does not have to be entered in order to print forms, however it is best to have this complete. Once the changes have been made you can preview and print the forms and invoice(s). Update without printing forms If the Invoice details are correct, but there are no forms to preview and you have also checked the Notice Errors and have an error that says there is No Current Notice printed or there is missing information, you 46 U S I N G E A S Y C A R S 2 0 0 0 can still update the sale and print the invoices. You will have to make changes (possibly resulting in a New form to be printed) and print the Forms from the Notice icon. To do this, display the vehicle you are working on, on the “Stock” screen. 4. Make and save any changes if required. Select the Notice icon on the right hand side of the screen. Ensure the correct Form number to be completed. Select the Print button, then print the NEW form and answer YES to “Did the Notice print correctly?” You will now be back at the Stock Screen. Select the Notice icon on the right hand side of the screen again. This time the option to print the Customer and RTA copies should be ticked depending on the Form required, eg: Form 4 there is no Customer Copy. Select the Print button then print the form(s) and answer YES to “Did the Notice print correctly?”. You will now be back at the stock screen. is selected and that there is no Missing Information that needs Do Not Proceed (cancel) Select to close the Sell Vehicles screen. You can do this by either clicking on the X in the top right hand corner or by clicking on the icon in the top left-hand corner then Close. Answer Yes to the dialog box displayed and you will be returned to the Stock screen. The vehicle will not be marked as sold. Sending Forms to Dealers via Fax Note: Fax software must be installed on your computer for this option to work. When completing details on the Sell screen, it is important to check what is setup on the Invoice/Notice screen. If you tick Fax customer copies via modem, the form 7 or 7a and the customer’s invoice will be created electronically. A File Copy of the form 7 or 7a will be printed and an invoice will also be printed if you have the number of invoice copies to be greater than one. After completing all the sale information, select Print. This will print your form and invoice copy (if any). The print box will be displayed and will display your fax software automatically. 47 U S I N G E A S Y C A R S 2 0 0 0 Note: If an invoice is required, select 2 for the number of invoice copies. This will send one invoice to the dealer via modem, and one to your selected printer. Follow your fax software guide to continue. Once the fax has been sent successfully, click Ok to print your copies. If no forms are printed, check the Notice Errors screen for details on why they have not been printed. Entering Monies Received. Once you received money for the vehicle that you have sold it should be receipted. EasyCars does not produce a receipt for money that was received after time of purchase. However EasyCars can reprint an Invoice showing receipts. See Chapter 7 – “Reprinting Invoices for a Sold Vehicle”. Step 1 – Search for the vehicle. See Chapter 4 – “Searching”, for more information on this. Step 2 – Select the Debtor/Receipts tab select Add. Step 3 – Enter the details of the additional money received and select Save when complete. In the example below the receipt that has already been entered was done so at time of the sale. 48 U S I N G E A S Y C A R S 2 0 0 0 CancellingSalesandPurchases Determining the Action Required Before determining which action you need to take have a look at the table below as a guide. Tax Status on Acquisition Tax Invoice Provided Not Sold Changing Changing Changing Changing Changing Consideration Given Date Acquired Tax Status Sale Price Date Sold Adjust/ Purchase Cancel/Purchase Cancel/ Purchase N/A N/A Adjust/Sale Cancel/Sale Returning to Owner Cancel/ Purchase Cancel/Sale Edit Stock Screen* Cancel/Sale Edit Stock Screen Tax Invoice Provided Cancel/Sale Adjust/ Purchase Cancel/Sale ** Sold Cancel/Purchase Cancel/ Purchase Remove Disposal Date Only Cancel/ Sale Cancel/ Purchase Cancel/Sale Cancel/Sale (No Sale) * Edit Stock Screen (No Sale) * Edit Stock Screen Non Registered Edit Stock Screen Edit Stock Screen Edit Stock Screen Adjust/ Purchase Cancel/S ale Cancel/Sale Not Sold Non Registered Sold N/A Cancel/ Purchase Adjust/Sale ** Edit Stock Screen Edit Stock N/A Cancel/Sale Remove Disposal Date Only Cancel/Sale Cancel/ Purchase 49 U S I N G Screen 50 E A S Y C A R S 2 0 0 0 U S I N G E A S Y C A R S Changing Changing Changing Changing Changing Tax Status on Acquisition Consideration Given Date Acquired Tax Status Sale Price Date Sold Awaiting Tax Invoice Not Sold Edit Stock Screen Edit Stock Screen Edit Stock Screen N/A N/A Edit Stock Screen Edit Stock Screen Edit Stock Screen Adjust/Sale** No ITC Sold Cancel/ Purchase Remove Disposal Date Only Edit Stock Screen Edit Stock Screen Edit Stock Screen Edit Stock Screen Edit Stock Screen Edit Stock Screen N/A Cancel/Sale Cancel/ Purchase N/A Cancel/ Purchase Adjust/Sale** Cancel/Sale Remove Disposal Date Only * Returning to Owner Cancel/ Purchase Awaiting Tax Invoice Sold No ITC Not Sold 2 0 0 0 Cancel/Sale Cancel/ Purchase Remember to adjust the GST rate to 10% when prompted and to re-enter costing information. ** This will only produce an adjustment note, which you will have to give to the customer along with the original invoice. If this option is not suitable you will have to cancel the sale ensuring you remove disposal date only and correct the selling price and resell. 51 U S I N G E A S Y C A R S 2 0 0 0 Cancelling a Sale Step 1 – Search for the vehicle – see Chapter 4 – “Searching”. Step 2 – When the correct vehicle is displayed, click on the Cancel button. The “Adjustments / Cancellations” screen will be displayed. Cancellation and Sale must be selected Tick here if you do not have to remove all details pertaining to the sale. Ensure the Adjustment Type is set to Cancellation. <Tab> Ensure the Transaction Type is Sale. <Tab> Tick Remove disposal date only if you do not have to remove all information about the sale. See matrix on previous page. <Tab> Enter the Adjustment Date. Care should be taken when entering the date here, as you have to consider that you may have already completed your BAS report and received an input credit for the purchase/sale of this vehicle. Enter the Salesman who cancelled the sale. He will then be recorded in the Audit Trail. This is only available with the Auction version of EasyCars. <Tab> If you would like to Fax customer copy via modem tick this box. <Tab> Enter the Number of copies of Adjustment Notes required. <Tab> Step 3 – Click on the Options tab. Depending on what you are doing with this vehicle select or deselect the When cancelling a sale options (This doesn’t apply if you use EasyCash Pro with EasyCars). Step 4 – Click the Update button or the Print button if an Adjustment Note is required. A message will be displayed confirming the cancellation. If you are happy to continue, click Ok. Once you have clicked on Ok you will be asked if the Adjustment Note printed successfully. If you answer Yes to this the Sale will be cancelled and you will be returned to the stock screen. 52 U S I N G E A S Y C A R S 2 0 0 0 Cancelling a Purchase Step 1 – Search for the vehicle – see the ‘Searching’ section. Step 2 – When the correct vehicle is displayed, click on the Return button. The “Adjustments / Cancellations” screen will be displayed. Ensure the Adjustment Type is set to Cancellation. <Tab> Ensure the Transaction Type is Purchase. <Tab> Enter the Adjustment Date. Care should be taken when entering the date here, as you have to consider that you may have already completed your BAS report and received an input credit for the purchase/sale of this vehicle. Step 3 – Click on the Options tab. Depending on what you are doing with this vehicle (are you really returning it, or just cancelling the purchase to make further changes) select or deselect the When returning a vehicle to original owner options (This doesn’t apply if you use EasyCash Pro with EasyCars). Step 4 – Click on the Update button. A message will be displayed confirming the cancellation. If you are happy to continue select Ok. You will now be returned to the stock screen, the vehicle will show as Sold with the How Sold (Disposal tab) being No Sale. Adjusting a Sale / Purchase Amount Step 1 – Search for the vehicle – see Chapter 4 – “Searching” section. Step 2 – When the correct vehicle is displayed, click on the Cancel button. The “Adjustments / Cancellations” screen will be displayed. Adjustment and either Sale/Purchase must be selected Ensure the Adjustment Type is set to Adjustment. <Tab> 53 U S I N G E A S Y C A R S 2 0 0 0 Ensure the Transaction Type is Sale or Purchase depending on the figure you have to adjust. <Tab> Enter the Adjustment Date. Care should be taken when entering the date here, as you have to consider that you may have already completed your BAS report and received an input credit for the purchase/sale of this vehicle. Enter the Adjustment Amount Inc GST. IMPORTANT: You only enter the difference between what is currently on file and the amount it should be. There are 2 examples here using an adjustment to a sale. The same applies to adjusting purchases. In the example above the vehicle was sold for $14 300 and it should have been $15 300. In this case, enter $1 000. If the sale price should have been $14 000, enter in -300. The minus sign can entered just by selecting the - (either on the number pad or the key on the same row as the numbers) key on the keyboard. The figures will be displayed in red text and be in brackets ($300.00). If the GST Rate was incorrect at time of purchase/sale it can be changed now. You do not have to adjust the price to change the GST rate. <Tab> Enter the Salesman who cancelled the sale. He will then be recorded in the Audit Trail. This is only available with the Auction version of EasyCars. <Tab> If you would like to Fax customer copy via modem tick this box. <Tab> Enter the Number of copies of Adjustment Notes required. <Tab> Step 3 – Select either Update or Print. If the adjustment was to the Purchase Cost click on the Update button as there is no printing required. A message will be displayed confirming the adjustment. If you are happy to continue click Ok. The adjustment to the purchase price will now be made. If the adjustment was to the Sale Price and you require a printed Adjustment Note click on the Print button. A message will be displayed asking if the Adjustment Note printed successfully. Once you answer Yes to this the adjustment will be made. If you don’t require a printed Adjustment Note just click Update. 54 U S I N G E A S Y C A R S 2 0 0 0 Chapter 6 Chapter 6 : Sending and Receiving Information This chapter explains how you are able to send and receive information to various places such as Jeal Computer Services, REVS, and many other online Advertisers. JealComputerServices From time to time it may be necessary to send your data here to us. To make this as easy as possible we have incorporated this into the EasyCars 2000 product. You can also retrieve your data from us and have it sent back onto your computer. Send Data to Jeal Step 1 – Make sure you are connected to the Internet. Step 2 – Start EasyCars and from the File menu, select Send data file to Jeal. Get Data from Jeal Step 1 – Make sure you are connected to the Internet. Step 2 – Start EasyCars and from the File menu, select Get data file from Jeal. Car History TO BE COMPLETED Step 1 –From the File menu, select REVS Check. Step 2 – The “REVS Vehicle Check” screen will be displayed and the Check screen will be ready for selections to be made. 55 U S I N G E A S Y C A R S 2 0 0 0 Advertising Setting up for Advertising EasyCars can send your vehicles to various online advertisers. To get set up for using advertisers, call JCS on (02) 9623 6403. JCS will supply you with a Dealer Name, Username and Password depending on which advertiser is being sent to. To enter your advertising settings: Step 1 – Click on the Advertising button, then click on the Setup tab and select the tab in the lower section with the name of the advertiser you are getting set up for. Step 2 – Enter the Username, Password and or Dealer ID, depending on what is required. Step 3 – Click back on the To Send tab. You are now ready to send for this advertiser. Sending to Advertisers Step 1 – Click on the Advertising button. The “Vehicles Transfer Selection” window will appear showing your vehicles. Step 2 – Select the vehicles to be sent to your advertisers by clicking on the registration or stock number of that vehicle. A selected vehicle will be coloured blue. You can select all vehicles by clicking on the Select All button and unselect all by clicking on the Clear All button. Step 3 – Select the advertisers you want to send to, in the To Send tab, click on the icon of the advertisers you want to use on the left, and make sure its tick box is ticked. To send the information click on the Create and Send button. To check the status of your advertiser, un tick the icon of the advertiser you wish to check status on and tick it again and you will see the icon of the advertiser you selected in the top right-hand corner. If you click on the Check Status button, a webpage will be opened with your Internet browser showing the status of your vehicles sent to the particular advertiser selected in the top right. Notes: In the To Send tab, if you click on one particular vehicle it will display that vehicle’s details on the right hand side. Vehicles sent to advertisers can include photos and a description. This can be changed by editing the vehicle in the Stock screen under the Options tab. You can also choose what type of info you want to send to the advertisers such as the Colour and Descriptions, by going to the Setup tab and in the Send/Don’t Send section click on the Select All button under the name that you wish to select. You can also omit certain features by clicking on the Unselect all button under the name you wish to omit. While in the Setup tab there is also an Extra Description box which will be displayed on every car advertised. 56 U S I N G E A S Y C A R S 2 0 0 0 EasyCars Car History Report uploads for dealers with a JCS website 1. EasyCars has two tick boxes at the bottom of the Web Pages tab in the Setup - Options screen. 2. There is also a line on the Options tab in the Stock screen: ‘Include Vehicle History Report, if available, when sending this vehicle to your website’. This box will automatically be ticked for any new vehicle added into stock, if the relevant box is ticked on the Setup – Options screen above. 57 U S I N G E A S Y C A R S 2 0 0 0 3. Another Setup – Options tick box is ‘Disable Upload Vehicle History report message when obtaining a Car History report’. If left unticked, then when a new Car History report is requested, the dealer will see the following message: Click Yes Click ‘OK’ and PDF version of Car History report is opened. If the option box is ticked, the above messages will not appear. 4. The dealer may go back through previous stock and edit the ‘Include Vehicle History Report, if available, when sending this vehicle to your website’ option for any vehicle that he has a Car History report stored. 5. When the dealer first does an advertising feed for the website after making these changes, the Car History PDF files will be uploaded, and the details will appear in the feed file, similar to sending new photos. (In subsequent feeds, only PDF files that have been changed since the last feed will be uploaded.) NOTE: Only full Car History Reports will be uploaded, not PPSR certificates. 58 U S I N G E A S Y C A R S 2 0 0 0 6. The dealer website will need to be updated by the JCS Web Design Team to reflect the new Car History options. 7. If a customer clicks on either the ‘Click here’ line under the photo of the car, or the Car History Report tab, or the ‘Free Report’ tick box to the right, they will be presented with a box asking for their name, e-mail address and phone number. ‘Name’ field requires a minimum of three alpha characters. ‘E-mail address’ needs to be a valid e-mail address, as that is where the Car History report will be sent to. ‘Telephone Number’ needs to be eight or ten digits. When completed, they click Submit. They then receive an e-mail with a PDF attachment of the Car History report. 8. The dealer also receives a copy of that e-mail, showing the clients contact details. 59 U S I N G E A S Y C A R S 2 0 0 0 Chapter 7 Chapter 7 : Printing Notices and Forms This section explains the different notices, forms and reports that can be printed out by your EasyCars 2000 program. They have been arranged into two categories, Notices/Forms and Reports. PrintingForms Step 1 – Search for the vehicle you wish to print forms for. See Chapter 4 – “Searching” section. Step 2 – If the correct vehicle is displayed and all details correct, click on the Notice button. The “Print Forms” box will be displayed with the current vehicle selected and the correct form chosen. If a different form is required then click the triangle in the This Form field. A drop down box will be displayed with all available forms. Select the appropriate form. Take note of any missing information in red. The field names appearing in brackets are optional and do not have to be entered to produce the form. However fields that are not in brackets DO have to be entered to print the form and are required Police Book information. Step 3 – Click on the Print button. If the form is printed correctly click Ok or press the <Enter> key. After confirming that the correct printer is being selected, click on Ok. The forms should now be available at the printer and should be checked. 60 If they printed correctly, answer Yes to the box being displayed on the screen. If they did not print correctly answer No. You will now be returned to the Notice screen. You can make the necessary changes and return to the Notice screen and select the Print option again. U S I N G E A S Y C A R S 2 0 0 0 Reprinting Invoices for a Sold Vehicle Note: Invoices are printed during the Selling process. See Selling Vehicles. If an error is found in an invoice, you may wish to reprint it. Step 1 – Search for the vehicle. See Chapter 4 – “Searching” section. Step 2 – Click on the Invoices tab. Note: The most recent invoice will be highlighted. If this is not the one that you wish to reprint, select the correct invoice by clicking the empty column to the left of the invoice date. Step 3 – Click on the Reprint button. The Reprint Invoice/Print Credit Note screen will be displayed. You can change any of the options required here for printing the Invoice. Step 4 – Click on the Print button. After confirming that the correct printer is being selected, click on Ok. The Invoice should now be available at the printer and should be checked. If they printed correctly answer Yes to the box that is now being displayed on the screen. If they did not print correctly answer No. You will now be returned to the Invoices screen. If the amount is incorrect you will have to Cancel the sale and make the relevant changes and proceed from there. RTA Disposal Forms For Multiple Vehicles Step 1 – To automatically have all current vehicles selected (vehicles needing the transfer notice printed), on the Notices/Forms menu select Acquisition and Disposal Transfers then select Disposals – with the name of the respective state included. 61 U S I N G E A S Y C A R S 2 0 0 0 The Print Notice of Disposal screen will be displayed. Step 2 – Select Vehicles to be included. Only vehicles due to be printed will be highlighted. If more vehicles need to be selected, click on each vehicle with the mouse. Select Bulk for multiple vehicles. You can enter the Name of person effecting the transfer to be printed on the form. Change the Date sent if you need to. Preview to see if satisfactory. Click on Print to print the report to be sent to the RTA. For Single Vehicles Note: This option will only include the vehicle you currently have on the stock screen. Step 1 – Click on the Disposal button or press <Shift> + <F4>. The “Print Notice of Disposal” screen will be displayed. Change the layout to Single for the one vehicle. You can enter the Name of person affecting the transfer to be printed on the form. Change the Date sent if you need to. Preview to see if satisfactory. Click on Print to print the report to be sent to the RTA. RTA Acquisition Forms For Multiple Vehicles Step 1 – To automatically have all current vehicles selected (vehicles needing the transfer notice printed), from the Notices/Forms menu, select Acquisition and Disposal Transfers then select Acquisitions. 62 U S I N G E A S Y C A R S 2 0 0 0 The “Print Transfer of Registration to Dealer” screen will be displayed. Step 2 – Select Vehicles to be included. Only vehicles due to be printed will be highlighted. If more vehicles need to be selected, click on each vehicle with the mouse. Select Bulk for multiple vehicles. You can enter the Name of person affecting the transfer to be printed on the form. Change the Date sent if not correct. Click on Print to print the report to be sent to the RTA. For a Single Vehicle Note: This option will only include the vehicle you currently have on the stock screen. Step 1 – Click on the Transfer button or press <Shift> + <F3>. The ‘Print Transfer of Registration to Dealer’ screen will be displayed. Select Single for one vehicle. You can enter the Name of person affecting the transfer to be printed on the form. Change the Date sent if not correct. Click on Print to print the report to send to the RTA. Police Book For all stock Step 1 – From the Notices/Forms menu, select Police Book then Police Book/Consignment Book and then select the State you are in. 63 U S I N G E A S Y C A R S 2 0 0 0 The “Print Police Book/Consignment Book” screen will be displayed. Step 2 – Use the mouse to select or deselect the pages that you wish to print. Tick the options as required. Ensure that there is a tick in Print only those pages which need updating if you don’t require all pages to be printed. You can use the Select All or Clear All buttons if all are required. Step 3 – Click the Preview button if you are unsure of your selection. Note: Printing cannot be done from the Preview screen. Close the window by selecting the File menu and then Exit or click on the x in the top right hand corner. Step 4 – Click on the Print button. After confirming that the correct printer is being selected, click on Ok. The report should now be available at the printer and should be checked. If they printed correctly, answer Yes to the box that will be displayed on the screen. The page will now be shown as being printed. If they did not print correctly answer No. Nothing will be updated and you will now be returned to the Stock screen. For a Specific Vehicle If you require the Police Book Information to be printed for a specific vehicle and you are unsure of what page this information is on you can perform the following steps. Step 1 – Search for the vehicle – see Chapter 4 – “Searching” section. Step 2 – Click on the P’book button or press <Shift> + <F10>. The “Print Police Book/Consignment Book” screen will be displayed with the page highlighted for the vehicle. Step 3 – Click the Preview button if you are unsure of your selection. Note: Printing cannot be done from the Preview screen. Close the window by selecting the File menu and then Exit or click on the x in the top right hand corner. Step 4 – Click on the Print button. After confirming that the correct printer is being selected, click on Ok. The report should now be available at the printer and should be checked. If they printed correctly answer Yes to the box that will be displayed on the screen. The page will now be shown as being printed. If they did not print correctly answer No. Nothing will be updated and you will now be returned to the Stock screen. Log of Changes Step 1 – From the Notices/Forms menu, select Police Book then Log of Changes. 64 U S I N G E A S Y C A R S 2 0 0 0 The “Print Police Book Log of Changes” screen will be displayed. Step 2 – Make selections for printing. If the Show Print Dialog Box if ticked print dialog box will be displayed, allowing you to choose which pages to print and how many copies. Include only pages not previously printed. This option will allow only new changes to be printed. Print all Pages this will print all pages even previously printed pages. In the print dialog you can specifically select pages that you wish to print. Print for a selected stock no only. Using drop-down menu, select stock number to be printed. Step 3 – Click the Preview button if you want to check before printing. Note: Printing cannot be done from the Preview screen. Close the window by clicking on the File menu and then Exit or click on the X in the top right hand corner. Step 4 – Press the Print button. After confirming that the correct printer has been selected, click on Ok. The report should now be available at the printer and should be checked. If they printed correctly answer Yes to the box that is now being displayed on the screen. This will mark all changes as being printed and reduce the size of the next report. If they did not print correctly answer No. Nothing will be updated and you will now be returned to the Stock screen. Consignment Memorandum Form Step 1 – Search for the vehicle – see Chapter 4 – “Searching” section. Step 2 – When the correct vehicle is displayed, click on the miscellaneous button. Print Option Screen” will be displayed and the Options tab will be displayed. Enter the date to appear on the form. Printer settings may be altered if required. “Select Step 3 – Select the Contract Text 1 tab. If you would like a fancy heading on your form you can enter it in the Consignment Contract Heading using standard word processing as provided on the task bar. If you require additional text it can be entered in the Text before Description of vehicle box. Step 4 – The first time this option is run you will need to import the contract text. Select the Contract Text 2 tab. Select the Import icon. 65 U S I N G E A S Y C A R S 2 0 0 0 Step 5 – The Import dialog box is now displayed. Ensure the path that is selected is where your EasyCars program is installed. This is usually C:\Program Files\EasyCars\ Highlight the ConsText.rft. This will now appear in the File name field. Select Open. Step 6 – The Declaration by Consignor should be displayed on your screen. You must read the text and make any adjustments if necessary. These adjustments will be saved on exiting of this screen. Step 7 – Click the Preview button if you want to check before printing. Note: Printing cannot be done from the Preview screen. Close the window by clicking on the File menu and then Exit or click on the x in the top right hand corner. Step 8 – Click on the Print button. After confirming that the correct printer is being selected, click on Ok. The report should now be available at the printer and should be checked. If they printed correctly answer Yes to the box that now will being displayed on the screen. If they did not print correctly answer No. Printing Reports (Only available to users with Easy Cars 2000, users with Easy Cars Lite have an Unsold Stock Report Only) Most of the standard reports with EasyCars are generated using similar printing options and are selfexplanatory. To avoid repetition here we will outline the basics that are used by most reports. We will highlight any exceptions to this on the individual report. Previewing and printing the reports are all done in the same manner. Report Selection Criteria 66 Report Date – This is the date that will show on the report as the date printed. This does not have to be the same as the Date From – Date To. As at Date – The date you want data to be included to. Note on Selecting Dates. If the date you wish to enter is today’s date, press the <F2> key. If you would like to select a date from a calendar, click on the triangle at the end of the date field and a calendar will be displayed. Page through the calendar using the left and right arrows. Select the date required by clicking on it. This date will now be entered in the date field. Print Sequence – The order in which you want the data to be sorted. Other Fields – Drop-down boxes - Click on the triangle at the end of the box then select from the list provided. U S I N G E A S Y C A R S 2 0 0 0 Query Name – A temporary query can be used to filter the information to appear on the report. See Chapter 4 – “Searching” for multiple vehicles for more details on how to write a Query. To utilize the query feature select the Query button and either run an existing query or write a new query prior to previewing the report. Previewing a Report on the screen Once you have made your report selections you must preview the report The report will then be displayed on the screen. From here you can do 3 things. Page through the report using the arrows Export Data from the File menu Close the Report by clicking on the X Printing specific pages only If you only want to print specific pages of a report, this can be done by first previewing the report to determine the page number(s). When the print dialog box is displayed enter the page number(s) required. In the example shown below there are 3 pages to the report and I only want to print the first page. I have also requested 2 copies. Enter number of copies required Select the page number(s) required Viewing data in graph form. Some reports allow you to view the results of the report as a graph. If the report you are using utilises this feature there will be a Graph button on the toolbar. 67 U S I N G E A S Y C A R S 2 0 0 0 Not all print sequences allow data to be shown in a graphical format. Change the print sequence until the Graph button can be selected. The standard graph is a bar chart, but you can easily change this display. To do this once you have the graph displayed select the View menu option and choose the style that best suits you. Exporting Report Data Once you have made your report selections, you must preview the report by selecting the Preview button on the toolbar. Once the report is on the screen, select the drop down menu File and choose the Export Option that best suits your requirements. Stocktake Report Step 1 – From the Reports menu, select Stocktake. The “Print Stocktake Report” screen is displayed. There are two pages for this report selection. They should both be checked before printing to determine what will show on the report. Use the mouse to select or deselect the fields you want included in the report. Any field that contains a tick or a dot will be included in the report. Step 2 – Click the Preview button to view the document before printing. Step 3 – Click the Print button to print the report. Step 4 – This report also allows you to view this data in a graphical format. Click on the Graph button to view your data in this manner. Only some of the Print Sequence types allow the report to be viewed in this manner. You will have to modify your print sequence until the Graph button can be selected (not greyed out). Once you have your graph on the screen you can print it by selecting File then Print. Unsold Stock Report Step 1 – From the Reports menu, select Unsold Stock. The “Print Unsold Stock Report” screen is displayed. There are 2 pages to this report selection. They should both be checked before printing to determine what will show on the report. Use the mouse to select or deselect the fields you want included in the report. Any field that contains a tick or a dot will be included in the report. Step 2 – Click the Preview button to view the document before printing. Step 3 – Click the Print button to print the report. Step 4 – This report also allows you to view this data in a graphical format. Click on the Graph button to view your data in this manner. Only some of the Print Sequence types allow the report to be viewed in this manner. You will have to modify your print sequence until the Graph button can be selected (not greyed out). Once you have your graph on the screen you can print it by selecting File then Print. Acquisitions/General stock lists Step 1 – From the Reports menu, select Acquisition/General stock list. The “Print Acquisitions Report” screen is displayed. 68 U S I N G E A S Y C A R S 2 0 0 0 There are 2 pages to this report selection. They should both be checked before printing to determine what will show on the report. Use the mouse to select or deselect the fields you want included in the report. Any field that contains a tick or a dot will be included in the report. Step 2 – Click the Preview button to view the document before printing. Step 3 – Click the Print button to print the report. Step 4 – This report also allows you to view this data in a graphical format. Click on the Graph button to view your data in this manner. Only some of the Print Sequence types allow the report to be viewed in this manner. You will have to modify your print sequence until the Graph button can be selected (not greyed out). Once you have your graph on the screen you can print it by selecting File then Print. Profit On Sold Stock Report Step 1 – From the Reports menu, select Sold Stock then select Profit on Sold Stock. The “Print Sold Stock Profit Report” screen is displayed. There are 2 pages to this report selection. They should both be checked before printing to determine what will show on the report. Use the mouse to select or deselect the fields you want included in the report. Any field that contains a tick or a dot will be included in the report. By changing the print sequence to be Last Name/Company (Acq 1) you can easily see the profit made on vehicles that were purchased from either private persons or wholesalers. Subtotals will be included if the print sequence is either Last Name/Company (Acq 1) or Dealer Licence (Acq 1). Step 2 – Click the Preview button to view the document before printing. Step 3 – Click the Print button to print the report. Step 4 – This report also allows you to view this data in a graphical format. Click on the Graph button to view your data in this manner. Only some of the Print Sequence types allow the report to be viewed in this manner. You will have to modify your print sequence until the Graph button can be selected (not greyed out). Once you have your graph on the screen you can print it by selecting File then Print. Debtors Report Step 1 – From the Reports menu, select Sold Stock then select Debtors. The “Print Debtors Report” screen is displayed. This report will list money that is owed to you for vehicles that you have sold. Use the mouse to select or deselect the fields you want included in the report. Any field that contains a tick or a dot will be included in the report. By changing the print sequence to be either Last Name/Company (Disp 1) or Dealer Licence (Disp 1) you can easily see the total amount owed to you by Dealers or private persons. If you have vehicles listed here that have been paid either in whole or in part, you will have to return to the stock screen and record these payments. This is done on the Debtor/Receipts tab. See page 48 for further information on this. Step 2 – Click the Preview button to view the document before printing. Step 3 – Click the Print button to print the report. 69 U S I N G E A S Y C A R S 2 0 0 0 Step 4 – This report also allows you to view this data in a graphical format. Click on the Graph button to view your data in this manner. Only some of the Print Sequence types allow the report to be viewed in this manner. You will have to modify your print sequence until the Graph button can be selected (not greyed out). Once you have your graph on the screen you can print it by selecting File then Print. Payments Received on Sold Stock Step 1 – From the Reports menu, select Sold Stock then select Payments Received on Sold Stock. The “Payments received on Sold Stock” screen is displayed. This report lists all payments that have been paid to you for vehicle purchases. If there are payments here that are incorrect you will have to return to the stock screen and amend these payments. This is done on the Debtor/Receipts tab - see page 48 for further information. Select to print all payment types or specific types only. Step 2 – Click the Preview button to view the document before printing. Step 3 – Click the Print button to print the report. Salesman’s Commission Report Step 1 – Click on the Reports menu, select Sold Stock then select Salesman’s Commission. The “Print Salesman’s Commission on Sold Stock Report” screen is displayed. There are 2 pages to this report selection. They should both be checked before printing to determine what will show on the report. The salesman who acquired and/or sold the vehicle must be entered on the acquisition or sale screens must be included in the report. For commission percentages to be calculated you must enter the salesman’s commission on the Salesman’s Lookup List see Chapter 3 for future details on this. Use the mouse to select the fields you want included in the report. Any field containing a tick or a dot will be included in the report. If you would like the report printed and sorted based on the Acquisition Salesman the Print Sequence must be Acquisition Salesman. If you would like the report printed and sorted based on the Disposal Salesman the Print Sequence must be Disposal Salesman. Step 2 – Click the Preview button to view the document before printing. Step 3 – Click the Print button to print the report. Step 4 – This report also allows you to view this data in a graphical format. Simply click on the Graph button. Only some of the Print Sequence types allow the report to be viewed in this manner. You will have to modify your print sequence until the Graph button can be selected (not greyed out). Once you have your graph on the screen you can print it by selecting File then Print. Salesman’s Average Profit Report Step 1 – Click on the Reports menu, select Sold Stock then select Salesman’s Average Profit. The “Print Salesman’s Average Profit Report” screen is displayed. 70 The salesman who acquired and/or sold the vehicle must be entered on the acquisition or sale screens must be included in the report. U S I N G E A S Y C A R S 2 0 0 0 For commission percentages to be calculated you must enter the salesman’s commission on the Salesman’s Lookup List see Chapter 3 for further details on this. Use the mouse to select or deselect the fields you want included in the report. Any field that contains a tick or a dot will be included in the report. If the Print Sequence is set to Acquisition Salesman/Acquired From the report will show whom the vehicles were purchased from and the profit when sold. If the Print Sequence is set to Disposal Salesman/Sold To the report will show who the vehicles were sold to and the profit when sold. Step 2 – Click the Preview button to view the document before printing. Step 3 – Click the Print button to print the report. Invoice List Step 1 – From the Reports menu, select Sold Stock then select Invoice List. The “Print Invoice List” screen is displayed. This report will list invoices that have been produced for vehicles you have sold. Select to print All Invoice types or specific types only. Step 2 – Click the Preview button to view the document before printing. Step 3 – Click the Print button to print the report. Floorplan Outstanding Report Step 1 – From the Reports menu, select Floorplan Outstanding. The “Print Floorplan Report” screen is displayed. In order to subtotal the Floorplan amounts the Print Sequence should be Finance Company or Last Name/Company (Acq 1). If the amounts on this report are incorrect you will have to return to the Creditor/Payments tab to make the relevant changes - see Chapter 4 for further details on how to do this. Step 2 – Click the Preview button to view the document before printing. Step 3 – Click the Print button to print the report. Step 4 – This report also allows you to view this data in a graphical format. Click on the Graph button to view your data in this manner. Only some of the Print Sequence types allow the report to be viewed in this manner. You will have to modify your print sequence until the Graph button can be selected (not greyed out). Once you have your graph on the screen you can print it by selecting File then Print. Creditors Outstanding Report Step 1 – From the Reports menu, select Creditors Outstanding. The “Print Creditors Report” screen is displayed. This report lists everyone you owe money to for the purchase of vehicles. If the amounts on this report are incorrect you will have to return to the Creditor/payments tab to make the relevant changes. See Chapter 4 for further details on how to do this. In order to subtotal the amounts the Print Sequence should be Last Name/Company (Acq 1). Step 2 – Click the Preview button to view the document before printing. 71 U S I N G E A S Y C A R S 2 0 0 0 Step 3 – Click the Print button to print the report. Step 4 – This report also allows you to view this data in a graphical format. Click on the Graph to view this. Only some of the Print Sequence types allow the report to be viewed in this manner. You will have to modify your print sequence until the Graph button can be selected (not greyed out). Once you have your graph on the screen you can print it by selecting File then Print. Floorplan / Creditors Repayments Report Step 1 – Click on the Reports menu, select Floorplan/Creditors repayments. The “Print Floorplan/Creditors Repayments” screen is displayed. This report will show payments made by you to Creditors and Floorplan companies. In order to subtotal the amounts the Print Sequence should be Last Name/Company (Acq 1). Step 2 – Click the Preview button to view document before printing. Step 3 – Click the Print button to print the report. Matched Debtors / Creditors Report Step 1 – From the Reports menu, select, the Matched Debtors/Creditors report. The “Print Matched Debtors/Creditors Report” is displayed. This report will show the balance due as at any date for all vehicles purchased and sold subtotalling purchase/buyers. Step 2 – Click the Preview button to view the document before printing. Step 3 – Click the Print button to print the report. Accrual Basis Report GST Business Activity Statement. Step 1 – From the Reports menu, select GST then select Business Activity Statement GST Report Accruals (Non-Cash) Basis. This report is for use if you are reporting on an accruals (non-cash) basis. If you are unsure of the accounting method you should be using please check with your accountant. The “Print BAS GST Report – Accruals” screen is displayed. By entering the usual reporting period, and after successfully printing the entire report, BAS period dates will be automatically carried over and closed off. Step 2 – Click the Preview button to view the document before printing. Step 3 – Click the Print button to print the report. IMPORTANT NOTE: If the final report has been printed and is correct, click Yes. All GST transactions will be marked and recorded in that accounting period. If any of those transactions are altered the entire report must be reprinted. NOTE: All accounting periods must be finalised to prevent transactions being recorded in next accounting periods. IMPORTANT NOTES: 72 U S I N G E A S Y C A R S 2 0 0 0 EasyCars does NOT produce a complete Business Activity Statement GST report. You will also need to take into account other supplies (e.g. Commissions received on the sale of finance) and other acquisitions (e.g. Expenses such as electricity and rent). If your BAS report does not look right it may be because you still have vehicles in “Awaiting Tax Invoice” status. Any vehicle left in this status will not have the credit for the purchase included in any BAS report, until the status is changed to either Tax Invoice Provided or Non Registered. To locate these vehicles you can execute the following query on the stock screen: Cash Basis Report GST Business Activity Statement Step 1 – From the Reports menu, select GST then Business Activity Statement GST report Cash Basis. This report is for use if you are reporting on a cash basis. If you are unsure of the accounting method you should be using please check with your accountant. The “Print BAS GST Report - Cash Basis” screen is displayed. By entering the usual reporting period, and after successfully printing the entire report, BAS period dates will be automatically carried over. The Cash Basis report reflects payments and receipts as shown in the stock screen at the time of printing. Once the report has been printed for a period and your BAS has been finalised, you must not make changes/additions/deletions, which affect the completed period (eg: If you forgot to enter a date paid for an expense, enter the date as the first day of the next period so it will be claimed in the next report). You MUST ensure ALL Receipts, Creditor Payments and Trade Allowances are entered accurately. If you are using expenses information from this report, 'Date Paid' must be entered. If you have floorplan, dates, amounts and curtailment payments MUST be entered accurately. Do NOT change information for a period for which a BAS has already been completed. Step 2 – Click the Preview button to view the document before printing. Step 3 – Click the Print button to print the report. IMPORTANT NOTE: If the final report has been printed and is correct, click Yes. All GST transactions will be marked and recorded in that accounting period. If any of those transactions are altered the entire report must be reprinted. IMPORTANT NOTES: NOTE: EasyCars does NOT produce a complete Business Activity Statement GST report. You will also need to take into account other supplies (e.g. commissions received on the sale of finance) and other acquisitions (e.g. expenses such as electricity and rent). 73 U S I N G 74 E A S Y C A R S 2 0 0 0 If your BAS report does not look right it may be because you still have vehicles in “Awaiting Tax Invoice” status. Any vehicle left in this status will not have the credit for the purchase included in any BAS report, until the status is changed to either Tax Invoice Provided or Non Registered. To locate these vehicles you can execute the following query on the stock screen: U S I N G E A S Y C A R S 2 0 0 0 GST Transactions by Stock Number Step 1 – From the Reports menu, select GST then select GST transaction by Stock Number. The “Print GST transaction by Stock Number” screen is displayed. Select stock number or leave blank for selecting all stock. Step 2 – Click the Preview button to view the document before printing. Step 3 – Click the Print button to print the report. Browse GST Transactions Step 1 – From the Reports menu, select GST then select Browse Transactions. The “Browse GST Transactions” screen is displayed. Using the Browse transactions option allows you to view all GST records for stock and individually select them. Hint: To change the order in which the vehicles are sorted, click on the heading of the column in which you want the vehicles sorted. This will automatically re-sort the vehicles. Expenses / Orders / Warranty Expenses Report Step 1 – From the Reports menu, select Expenses/Orders/Warranty Expenses. The “Print Expenses/Orders/Warranty Expenses Report” screen is displayed. Use the mouse to select or deselect the fields you want included in the report. Any field that contains a tick or a dot will be included in the report. To print sub totals for Contractors set the Print Sequence to Contractors. Step 2 – Click the Preview button to view the document before printing. Step 3 – Click the Print button to print the report. Warranty Profit Step 1 – From the Reports menu, select Warranty Profit The “Print Warranty Profit Report” screen is displayed. Use the mouse to select or deselect the fields you want included in the report. Any field that contains a tick or a dot will be included in the report. Step 2 – Click the Preview button to view the document before printing. Step 3 – Click the Print button to print the report Step 4 – This report also allows you to view this data in a graphical format. Click on the Graph button to view your data in this manner. Only some of the Print Sequence types allow the report to be viewed in this manner. You will have to modify your print sequence until the Graph button can be selected (not greyed out). Once you have your graph on the screen you can print it by selecting File then Print. 75 U S I N G E A S Y C A R S 2 0 0 0 Incomplete Police Book / Notice Information Step 1 – From the Reports menu, select Incomplete Police Book/Notice Information. The “Print Incomplete Police Book / Notices Information” screen is displayed. Use the mouse to select or deselect the fields you want included in the report. Any field that contains a tick or a dot will be included in the report. Step 2 – Click the Preview button to view the document before printing. Step 3 – Click the Print button to print the report. Stock Cards (Only available to users with Easy Cars 2000) For Multiple Vehicles Step 1 – From the Reports menu, select Stock Cards. The Print “Stock Cards” screen is displayed with the Vehicles tab ready for selections to be made. Highlight the vehicles you wish to print stock cards for. You can do this by selecting the vehicles with the mouse or using the Unsold, Sold or Select All buttons. You can select vehicles that were acquired/sold between specific dates by entering the date required. Step 2 – Select the Options 1 tab to determine what you want printed on the report. Use the mouse to select the fields you want included in the report. Any field that contains a tick or a dot will be included in the report. You select all fields by clicking on the Select All button. You can clear all selections by clicking on the Clear All button. Click on the More… button to move to the Options 2 tab and complete what is required there. Step 3 – Click the Preview button to view the document before printing. Step 4 – Click the Print button to print the report. For a Single Vehicle Step 1 – Search for the vehicle. See Chapter 4 – “Searching” section. Step 2 – When the correct vehicle is displayed, click on the Cards button. The Print “Stock Cards” screen is displayed and the Vehicles tab is ready for selections to be made. 76 Select Stock Card from the box now displayed. The vehicle you were working with will now be highlighted in the list. Use the mouse to select the fields you want included in the report. Any field that contains a tick or a dot will be included in the report. U S I N G E A S Y C A R S 2 0 0 0 You select all fields by clicking on the Select All button. You can clear all selections by clicking on the Clear All button. Click on the More… button to move to the Options 2 tab and complete what is required there. Step 3 – Click the Preview button to view the document before printing. Step 4 – Click the Print button to print the report. Description Cards (Only available to users with Easy Cars 2000) Description Cards are used to generate web pages that you can use when creating a web site. For Multiple Vehicles Step 1 – From the Reports menu, select Description Cards The Print “Description Cards” screen is displayed and the Vehicles tab is ready for selections to be made. As a default all Unsold vehicles will be selected. If you want to change this click on the Clear All button then select the vehicles required with the mouse. Enter the Name and phone number of a contact person if required. Step 2 – Select the Options 1 tab to determine what you want printed on the report and web page. Use the mouse to select or deselect the fields you want included in the report. Any field that contains a tick or a dot will be included. Step 3 – Select the Options 2 tab to determine what header you want printed on the report. Using standard word processing skills you can enter a heading for your report in the Custom Heading area. This heading will not be displayed on a web page. The details from your registration screen will be used. If you would like have additional text on the report it can be entered in the Vendors Comments area. This text will not appear as part of a web page. Must be selected for your custom heading to be printed on the report. Must be ticked for Vendor’s Comment to be printed on the report. 77 U S I N G E A S Y C A R S 2 0 0 0 Step 4 – Click the Preview button to view the document before printing. Step 5 – Click the Print button to print the report. Step 6 – Click on the Web Pages tab. Leave all defaults as they are unless you are experienced in this area. Step 7 – Click on the Web button. If any web pages have been created before, a message will be displayed telling you that the files currently in the directory will be deleted and replaced with this. Click Yes to continue. Once finished a message will be displayed informing you of how many files were created. Click Ok. Step 8 – View the file in a web browser. Use Explore to open the file that was created. The path for this unless you have changed it is: C:\Program Files\EasyCars\Web\ For a Single Vehicle Step 1 – Search for the vehicle – see Chapter 4 – “Searching” section. Step 2 – When the correct vehicle is displayed, click on the Cards button. The Print “Description Cards” screen is displayed and the Vehicles tab is ready for selections to be made. Select Description Card from the box now displayed. The vehicle you were working with will now be highlighted in the list. Step 3 – Select the Options 1 tab to determine what you want printed on the report and web page. Use the mouse to select or deselect the fields you want included in the report. Any field that contains a tick or a dot will be included. Step 4 – Select the Options 2 tab to determine what header you want printed on the report. Using standard word processing skills you can enter a heading for your report in the Custom Heading area. This heading will not be displayed on a web page. The details from your registration screen will be used. If you would like have additional text on the report it can be entered in the Vendors Comments area. This text will not appear as part of a web page. Step 5 – Click the Preview button to view the document before printing. Step 6 – Click the Print button to print the report. Step 7 – Click on the Web Pages tab. Leave all defaults as they are unless you are experienced in this area. Step 8 – Click on the Web button. If any web pages have been created before, a message will be displayed telling you that the files currently in the directory will be deleted and replaced with this. Click Yes to continue. Once finished a message will be displayed informing you of how many files were created. Click Ok. Step 9 – View the file in a web browser. 78 Use Explore to open the file that was created. The path for this unless you have changed it is: U S I N G E A S Y C A R S 2 0 0 0 C:\Program Files\EasyCars\Web\ 79 U S I N G E A S Y C A R S 2 0 0 0 MailingLists Step 1 – From the Data Entry menu, select Look Up Lists then select the Mailing List menu. The “Mailing List Edit” screen will be displayed. To view the entries in your mailing list you can do so by several options. To view all listed in your Mailing List select Browse. To view only one listing at a time select either Find, Previous or Next. To filter out particular purchases or vehicles select Query. For more information regarding this, see Chapter 4 – “Searching” section. Once you have located a contact you can either edit or delete the entry by selecting the Edit or Delete button. All entries in this list are created automatically whilst selling vehicles, provided the option ‘Automatically add purchaser details to mailing list’ is ticked. This is located in Setup and Options tab. Vehicles sold to other dealers are not added to this list. IMPORTANT NOTE: Update. If entries are missing from the mailing list, click on A Message may be displayed. Click Yes to continue updating the mailing list. To Print Mailing Lists / Labels Step 1 – From the Mailing List Edit screen, select the Print button. The Print Mailing List will be displayed. Step 2 – Check all relevant information boxes for your desired result for printing labels. Step 3 – Click the Preview list or the Preview labels button to view the labels and or list before printing. Step 4 – Click the Print list or the Print labels button to print the report and or labels. To Export the Mailing List Step 1 – From the Print Mailing List screen select Preview List or Preview Labels. Step 2 – Click on the File menu and then select the desired output format, e.g. TEXT, PDF, RTF or EXCEL. Enter the path and file name for your export. Important Note: Always remember the folder that you saved this export to. 80 U S I N G E A S Y C A R S 2 0 0 0 TollForms The toll form feature needs to be activated before a user can access it. Activating must be done by a JCS staff on their client software. Step 1 – Search the vehicle you want to print the toll form for. See Chapter 4 – “Searching” section. Step 2 – If the correct vehicle is displayed and all details are correct, click on the Toll Forms button. The button is located on the top right hand side of the screen. Screen Shot: Step 3 – The Toll Forms box will then be displayed with the details of the current vehicle selected in stock. Note: Generated data will depend on the status of the vehicle. Figure 1.1 - Buttons Clear Form – Clear every field except for company details. This information will always be the same. Repopulate Form – Click this button to refill all fields with the details of the selected vehicle. Preview – Click this to view the form before printing. Print – Print the form. Print blank form – tick this box if you want to print a clean form. 81 U S I N G E A S Y C A R S 2 0 0 0 Figure 1.2 - Fields When you are doing a Toll Form, you should have received a Toll Notice letter from RTA. Those details are entered in this section. The company details registered in EasyCars will then populate this section. Note: Auto-fill section. Important! This section will be generated automatically depending on the status of a vehicle. Previous Owner selected. Acquisition details are displayed on the fields. New Owner selected. Disposal details are displayed on the fields. Select “Clear and let me type details” – if the details are not in EasyCars. 82 U S I N G E A S Y C A R S 2 0 0 0 Chapter 8 Chapter 8 : Bulk Sale and Purchase Options (Only available to users with Easy Cars 2000) Pickups (Quick Acquisitions) Step 1 – From the Data Entry menu, select Bulk Data Entry then select Pickups (Quick Acquisition), then Enter Pickups. The “Pickups” screen will be displayed with the Data Entry screen ready for input. Step 2 – Enter the relevant data to bring this vehicle into stock The cursor will default into Last/Company field. If the vehicle was brought from a dealer simply start typing their name. Strike the <Tab> key when the correct dealer is highlighted. If purchased from private person, hold the <shift> key and the <Tab> key at the same time. The cursor will move back to First Name field. Complete the name and address details. Note: If the ABN number is not valid an error message will be displayed. Click Cancel to ignore or Retry to correct. If vehicles are consignments from other dealers and you have the tick box marked GST Registered – agreement, the vehicle will be treated like a purchase when calculating GST records. Note: If How Acquired is P for purchase Tax invoice provided will become available for selection. If Commission basis is selected and Non-Registered, the buyer of this vehicle will not receive a tax invoice therefore cannot claim an input credit until they sell the vehicle, ie: “Notional input credit” Private-accounting will also be treated like a purchase for GST calculations. Acquisition date will default to today’s date. If this is not correct type in the correct date. Enter How Acquired as either C for consignments or P for purchases Enter a unique Reference Number for each pickup (batch number) Enter Number of Vehicles to be brought into stock from this supplier. 83 U S I N G E A S Y C A R S Enter the Acquisition Salesman who brought these vehicles. Enter the Group to which this vehicle belongs to if needed. If vehicles need to be transferred (RTA acquisition forms printed) leave the tick box ticked. Enter any Default Expenses to be added automatically to each vehicle. If a Tax Inv is provided check the tick box. Enter the Amount inc GST of the expense The GST rate should be 10%. This will cause the GST Amount to be calculated. 2 0 0 0 Step 3 – Click the Enter vehicles button. The “Vehicle Details” screen will be displayed Enter all vehicle details Acquisition price may be left blank, eg: If vehicle is a real consignment (Commission basis). At time of sale you will be able to enter that amount, which is called net to vendor. See sales. Default expenses can be changed for each individual vehicle. If more vehicles are to be added click Next. When final vehicle has been entered click Add to stock. All vehicles entered in that pick up will automatically be added to the police book. Sales/Invoicing Step 1 – From the Data Entry menu, select Bulk Data Entry then select Sales/Invoicing The “Bulk Sales” screen will be displayed with the Sale screen ready for input. The cursor will default itself to First Name field. Enter the first name here if selling to a private person. If the vehicle is being sold to a Dealer strike the <Tab> key once. Start typing their name in the Last/Company field. Strike the Tab Key once the correct dealer is highlighted. Enter the private purchaser’s Last Name and Address details. Note: If the ABN number is not valid an error message will be displayed. Click cancel to ignore or Retry to correct. Step 2 – After entering the buyer’s details strike the <Page down> key, the cursor will move to Stock No. field. 84 Select either the Stock No. or the Registration number from the lists provided. Enter the Sell Price inc GST. Note: If this vehicle was sold to a charity or disabled person who qualifies under the Act (Section 38-510) a zero tax rate must be entered U S I N G E A S Y C A R S 2 0 0 0 in the GST rate field. You will not be entitled to an input credit for the purchase of that vehicle (If purchased from an unregistered person). Otherwise leave it as 10%. If the vehicle was bought in on a Purchase you can enter or change Net to Vendor if needed. (This is the creditors amount or amount to be paid to the consignor). For this amount to be transferred to creditors screen the tick box must be ticked. Current expenses will be displayed. Extra expenses can be entered at this time if needed. In the extra’s field enter an administration fee or extra charge to the buyer. If the field is not available when selling to dealers, click the Options tab and make sure the tick box is ticked. Date sold will default to today’s date, you can change this if required. How disposed will automatically default to A for auction. Change this if it is needed Salesman will default to the last salesman’s code used. If left blank no name will be printed on the form 7. Tip: Consider entering the employee who is completing the sale as a salesman (set too not active) for commission purposes. This will then allow the name to be printed on forms. Enter Inspection Rpt number and Report date if needed. Odometer now will default to acquisition odometer reading. This can be changed if needed. Step 3 – Click on the Save button or tab to that button and strike the enter key. That vehicle is now held in the pending sales list waiting to be printed. Once printed the sale is finalised. The data entry screen is reset and ready to enter the next vehicle. Step 4 – Click on the Invoice tab to print Invoices and Forms. Selecting the Print all button will print all outstanding invoices and forms. If only certain vehicles need to be printed, use the mouse to select that vehicle then select Print. You may also click back on Sale and enter more vehicles to the pending sales list. Bulk Receipts Step 1 – From the Data Entry menu, select Bulk Data Entry then select Enter receipts from Debtor. The “Receipts from Debtors” screen is displayed. Select an Invoice for payment and/or select a previous receipt for re-allocation or choose a debtor name from the drop down box provided. If entering a receipt, adjust receipt date if necessary. Add the Type of payment. If a cheque then enter the Cheque number. Enter the total amount. The <F2> key will insert total debtors amount automatically. 85 U S I N G E A S Y C A R S 2 0 0 0 If required you can enter the date that it was Banked. Tick Auto allocate then click allocate button or <Tab> to the button then strike the <Enter> key. If you do not tick the option to auto allocate you will need to manually enter each amount on individual cars. This may be needed when the debtor is not paying for all cars purchased. Remember to click Save button once amounts have been typed in. NOTE: By ticking the auto allocate box, once you have selected the receipt number you want, it will then automatically allocate that amount to the Bulk Receipts Audit Trail where you can print the receipts. Viewing Receipts Audit Trail Step 1 – From the Data Entry menu, select Bulk Data Entry then select Bulk Receipts Audit Trail. The “Receipts Audit Trail” is displayed. All receipts that have been generated can be viewed from here. You can also print receipts from that screen by highlighting the car you want a receipt for and clicking on Print. The receipts print out individually not in bulk. Tip. Once you highlight the receipt you wish to print off, just underneath that it tells you what vehicles are included in that invoice number so you can work out if that’s the one you want. Bulk Payments to Creditors Step 1 – From the Data Entry menu, select Bulk Data Entry then select Enter Payments to Creditors The “Payments to Creditors” screen is displayed. Select a pickup number for payment and/or select a previous receipt for re-allocation or choose a creditor name from the drop down box provided. Enter or select Date of the payment. Enter Cheque No. used to make this payment. The <F2> function key will automatically transfer total creditor amount as the Total Amount of this cheque. Selecting the Auto Allocate box will automatically allocate as much of the payment as possible. If you do not tick the option to auto allocate you will need to manually enter each amount on individual cars. Remember to click Save button once amounts have been typed in. Bulk Payment/Receipts Audit trail Step 1 – From the Data Entry menu, select Bulk Data Entry then select Bulk Payments Audit Trail. The “Bulk Payments Audit” screen will be displayed. 86 All payments/receipts will be listed with corresponding allocations to each vehicle and or unallocated amounts. To preview or print selected receipts/payments, highlight the record by clicking with mouse or use the arrow keys to select. All corresponding records on that date will be grouped together for preview or print. U S I N G E A S Y C A R S 2 0 0 0 Click Preview to see if the information is correct and presented appropriately and when satisfied click on the Print button. Old records may be deleted by highlighting the payment then clicking the Delete button. Corresponding receipts/payments attached to each vehicle will not be removed although the ability to reallocate that amount will be lost. If there is any chance those vehicle purchases or sales could be cancelled do not delete the record. Unallocated amounts, due to sale or purchase cancellation are used to calculate debtors or creditors. Therefore deleting those records would give incorrect figures. Only old records should be deleted, eg: sales and purchases which will not be altered. 87 U S I N G E A S Y C A R S 2 0 0 0 Chapter 9 Chapter 9 : General Information and Hints Backing Up Your Data Within the File menu there is an option to Make a Local Backup. It copies the data to another location on your hard disk drive or another hard disk drive on your network (if you have one). A Local Backup is very fast and convenient, and allows for very fast recovery. It is so fast that busy yards should use it each day. It is not used for copying your data to a floppy drive because this routine cannot span across disks, and your database will almost certainly be too large for a single disk. Making a backup to another location on your hard disk drive may be fast and convenient but it offers limited security in the event of stolen computers, viruses or lightning damage. A backup should be made onto some form of external disk, at the very least, once a week. Making a backup onto a “zip” disk is fine, provided a second copy of it is kept off the premises. You can make backups as frequently as you wish. Ask yourself this… when the big day arrives and you lose all your data (data is the information that you have been gradually accumulating day by day), how much data are you prepared to re-enter or type back into your computer? If you don’t mind re-entering one day’s work, then you must backup every day. If you don’t mind re-entering one week of work then you only need to backup once each week. But think about it… when the big day arrives, you may be in a hurry, much more of a hurry than you are today. You should also check the Department of Fair Trading regulations in regards to the frequency of the backups and their storage. IMPORTANT: DO NOT BACKUP OVER THE LAST (MOST RECENT) BACKUP. IN FACT ALWAYS PRESERVE AT LEAST THE LAST SEVEN BACKUPS IN CASE YOU ARE UNKNOWINGLY BACKING UP CORRUPT DATA OVER THE TOP OF GOOD DATA. Finally, EasyCars makes a “daily” backup once every day, another “weekly” backup once each week and finally a “monthly” backup once each month if you have this option turned on in your setup options. Don’t depend upon these backups – remember that they are only local backups on your hard disk and could be destroyed by the same “accident” that caused you to look for a backup copy of your data. For making permanent external backups you must refer to your Windows Help System and use the facilities provided there. To make a local backup copy onto another disk drive on your network: - 88 U S I N G E A S Y C A R S 2 0 0 0 Step 1 – Click on the File menu. Step 2 – Click on ‘Make a local backup copy’. The save local backup copy window will be displayed. Step 3 – The “Save as” dialogue box will automatically default to, Safety and Backup of xxxxxxxxxxx.mdb (x being the name of your database), Click on Save. Telephone Support and Program Maintenance The importance of “Telephone Support and Program Maintenance” cannot be stressed enough. IT IS VITALLY IMPORTANT TO YOU AND YOUR BUSINESS. What it covers Firstly, telephone support is to provide you with upgrades. Upgrades will be made available whenever EasyCars is modified, enhanced or it has corrections or “bug fixes”. Some major upgrades may incur a charge. To avoid time wasting problems, it is critical that you obtain every upgrade as soon as it is released. Upgrades may be produced as often as once a month. The upgrades are placed on the Internet where they can only be accessed by those dealers who have a current support plan with us. Secondly, telephone support is to guide you through problems and help you to get the most out of EasyCars 2000. We will guide you through any procedures that you have not yet become familiar with. We will also answer questions about any facet of EasyCars. We will take serious notice of any suggestions that you put forward – and quite possibly modify or enhance EasyCars 2000 as a result. We will also take urgent calls at any time of the day, night, weekends and holidays. Any problem that prevents you from continuing to do your work is considered urgent. However, telephone support does not provide any other services - such as tuition in the use of Windows, making backups (other than “local” backups from within EasyCars 2000), or diagnosing faulty hardware. The people who supplied your computer provide these services. Problems, like repairing damaged data, are usually caused by turning the computer off when EasyCars is still “active”. This kind of problem is “self inflicted” and therefore chargeable. Repairing damaged data can be a tedious & time-consuming job. It requires the expertise of a programmer and is therefore expensive and cannot be covered by telephone support. *** IMPORTANT *** It is essential that the person calling for support is able to sit at the keyboard whilst speaking on the telephone. Service calls are usually impossible; often time consuming and even annoying when a telephone is not available at the keyboard. Please DO NOT call for telephone support until this basic requirement is satisfied. A “Client Code” is displayed above the main menu. It will be helpful to quote your client code when placing service calls. During the free period If you make the effort to read this manual and the help screens, you will find us most grateful and helpful. You will also find the program simpler to use. However, if you cannot find the answer to your problem in this manual, or you simply do not understand the manual, we will be more than happy to assist you. 89 U S I N G E A S Y C A R S 2 0 0 0 The cost of Pre-Paid Support JCS strongly encourages you to take up a pre-paid support arrangement for your own benefit. The cost is advertised on the Jeal Computer Services web site at www.jeal.com.au/easycars. It is invoiced half yearly or yearly in advance. The cost is adjusted periodically in line with C.P.I. adjustments. The benefits include: 24-hrs 7-days telephone support and after hours emergency support. All program updates and enhancements are made available to you via the Internet. Your suggestions for improvements to EasyCars are given priority. Additional special features of EasyCars. If you subscribe to pre-paid support, you may call for support whenever necessary without incurring further charges. You may also download upgrades from the Internet at any time. We are continuously on call - 24 hours / 7 days, in case you have a problem. Pay as you go support If you choose to pay for support calls as each one is required (a credit card is essential) you will find that the cost of each call will very quickly add up to a great deal more than the “up front” subscription. If you choose, you can pay for support calls with a credit card at the time of calling. If you don’t have a subscription, support is only available during business hours. The price for a call in business hours is $75 (Inc GST for up to 30 minutes). These charges reflect the costs of continuously developing and upgrading the software as well as maintaining our specialist telephone support staff. If this method of payment satisfies you, please have your credit card details ready when you call, then allow 5 minutes for us to verify your card before you call back. The Telephone Support Numbers During our office hours (02) 9623 6403 To call for urgent support outside normal hours use these numbers (in this order): Our mobile number (try a couple of times) 0412 281 158 If still no answer try 0403 551 559 We are happy to receive calls after hours as long as they are necessary to sort out an urgent problem. If you have questions of a non-urgent nature, it would be more appropriate to call us during business hours. We will drop some hints (and probably the phone too) if you call at 11.00 pm to order a printer ribbon. Don’t laugh - it has happened! If you call our office after hours with a serious problem - our answering machine will suggest that you call the mobile number first - please call it. Software Problems If you have recently installed any new software, ask yourself: has EasyCars 2000 worked correctly since the new software was installed? Hardware Problems Before calling us, please do some preliminary checks: 90 U S I N G E A S Y C A R S 2 0 0 0 If you have just moved your computer from one office to another, and it no longer works, it will almost certainly be one of the cables are not plugged in correctly (unless you dropped the computer on the way!). If you have just moved your computer from one yard to another by car, truck or bicycle and it no longer works, it may be that one of the internal cards has come loose from the main board. This type of service call should be directed to the supplier of the computer. If you have recently changed the location of the printer, ask yourself; has it worked correctly since it was moved? Have the cables been reconnected properly? If the number keys on the right hand side of your keyboard are not printing numbers on the screen, check that the <num lock> light is on (see the indicator lights in the top right corner of your keyboard). Telephone Support via Internet Alert us before attempting to activate telephone support. We must prepare a computer in our office before you can connect to it. Using Remote Admin A JCS technician can connect to your computer through two methods, Logmein Rescue and Remote Client. Logmein Rescue: On your internet browser visit the www.logmein123.com website. You will then be asked to enter a 6-digit pin code. This will be given to you by the JCS technician. When the code is entered, hit connect to technician. A prompt will appear asking if you want to download this file. If the download does not show up, it may be because pop-ups are blocked on your web browsing program. You will need to allow this site to temporarily show pop-ups. Once the prompt appears, if possible Run the file, otherwise Save it to your desktop. If asked to run again, answer with Run. It will connect to the Logmein Rescue Gateway. The JCS technician will begin and will require you to give permission to remotely access your computer. When the prompt asks for your permission, say Ok. Remote Client: To use remote client to log into your computer, go to the website, www.jeal.com.au and click on the tab which says Get Help Now. A prompt will appear asking if you want to download this file. If possible Run the file, otherwise Save it to your desktop. If asked to run again, answer with Run. The JCS technician will advise you to which technician you will be connecting to. Select that technician and then press the start button. Causes of Modem Problems Lock Ups On occasions modems and/or computers can become “electronically confused”, for want of better words. In this condition they simply refuse to work at all. Switching them both OFF from the power and then back on again after 5 - 10 seconds will usually reset them back to normal working condition. If this happens frequently, it may mean that the mains power supply is jumping up and down or maybe your electronic wizard is really faulty! Modem Cable Connections Make sure that the cable that connects the modem to the telephone socket in the wall is connected properly. Some modems have two sockets in the back of them - one that goes to the wall socket and is 91 U S I N G E A S Y C A R S 2 0 0 0 marked LINE, and the other that is used to connect a handset and is marked TELEPHONE. Do not plug the lead from your wall outlet into the wrong socket in the back of the modem! 92