1
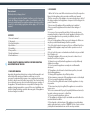
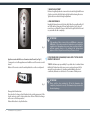
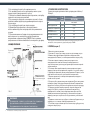
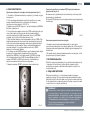
Instruction manual
Electric
stand
fan
/Model
TEF F16 FH2
71
17
Outlook of devices, aslo colour scores can be revised without any special advance notices.
2. SAFEGUARDS
Dear customer!
We thank you for your happy choice!
You've bought an electric fan Timberk. It will serve you for a long time.
Electric fan Timberk is designed for creation of comfortable coolness. The
fan may be installed upright on a rigid base in places, where it is possible to
connect it to electric wiring (single-phase electric supply ~230 V, 50 Hz is
required)
CONTENTS
1. Fan user's manual......................................................................................................2
2. Safeguards....................................................................................................................2
3. General description...................................................................................................3
4.Specification................................................................................................................ 3
5. Assembling...................................................................................................................3
6. Fan operation...............................................................................................................3
7. Height adjustment.....................................................................................................4
8. Fan maintenance........................................................................................................4
PLEASE, READ THIS MANUAL CAREFULLY BEFORE MOUNTING
AND OPERATIING OF THE FAN
1. FAN USER'S MANUAL
Important safeguards and instructions contained in this manual do not
include all possible modes and situations, which may occur. It is
necessary to understand that common sense, caution and accuracy are
the factors, which cannot be 'built in' any product. These factors should
be considered by a person, who is interested in the proper operation of
the appliance. The manufacturer is nor responsible for damage of the
appliance during transportation, as a result of incorrect installation, as a
result of voltage fluctuations, as well as when any part of the appliance
has been changed or modified.
2
1. Before the first use read all the instructions and study the respective
figures. Use the appliance only in accordance with the user's manual.
2. Before connection of the appliance to power network, please, check if
the voltage indicated on the appliance corresponds to the voltage in the
point of connection.
3. Never connect the appliance if its assembling is not completed.
4. Never operate the appliance with cracks and other damages of
propeller.
5. For reasons of your own safety and safety of other people, please,
remember that entry of water in the electric appliance is dangerous! Do
not use the appliance in close proximity to a bathtub, shower or
swimming pool.
6. Do not use the appliance if the power cord is damaged or if there are
any other possible internal damages/faults in operation.
7. Use of electrical contacts not approved for use or different from those
supplied with the appliance may cause faults in operation or a short
circuit.
8 .Do not touch the power cord and make sure that it is not pressed with
bits of furniture, etc.
9. Unplug the appliance if it is necessary to move it or when it is not
intended to use it for a long time.
10. Always be very careful, when the appliance is used by children by
children or near them.
11. Do not operate the appliance near explosive or inflammable
substances.
12. The appliance should never be located bear open fire, stoves and
other heating appliances.
13. Always put the appliance only on flat dry surface.
14. Never immerse components of the appliance in water or other liquid.
15. Do not operate the appliance without grilles.
16. Do not touch the grilles with a view to turn the appliance or to stop
its operation.
17. Never insert any objects in grilles, if the appliance is connected to a
power source.
18. It is not recommended for people (especially children and seniors) to
be under continuous exposure to cold air flow.
19. Do not operate the appliance outdoors.
20. This appliance is designed only for residential use and should not be
used in industrial conditions.
21. If mechanical or electrical repair of the appliance is needed, always
apply to authorized service centers of TIMBERK. The list of service centers
you may find at www.timberk.com or ask from a shop assistant.
ENGLISH
3. GENERAL DESCRIPTION
Handle
Beck grille
Locking screw
Plastic rim
Assambled
electric motor
A button for change
of air flow direction
Fan body
Screw A
Front grille
Propeller screw
Propeller
Back grille
screw
Height adjustment
screw
Telescopic tube
Rack
Support strap
Support
Cross-piece
Fig. 1
ATTENTION!
The manufacturer reserves the right to introduce structural
alterations not deteriorating the fan quality and reliability without
any special notification.
4. SPECIFICATIONS
Specifications of the fan are shown in Table 1.
Table 1.
Name
Type
Propeller diameter
Nominal voltage
Nominal power
Maximum height
Net weight
Unit
inch/cm
V
V
Article
TEF F16 FH2
floor
16/40,6
~230
55
mm
1400
kg
4,4
For more detailed description of specifications visit www.timberk.com or ask official dealers of
TIMBERK
5. ASSEMBLY (see Fig. 1)
Take all the components from the package.
Mount 4 supports in a cross-piece by passing them through a support strap.
Remove a back grille screw and propeller screw from the electric motor.
Remember that the propeller screw has a left-hand thread.
Mount the back grille on the front of the electric motor and match a dowel
on the electric motor with an aperture in the grille, while the handle should
be located in upper part of the fan.
Using the back grille screw, fix the back grille to the electric motor
tightening it clockwise.
Fix the propeller on the motor shaft. Make sure that the shaft pin entered
the propeller aperture.
Fix the propeller with the use of the propeller screw, turning it
counterclockwise.
Check the propeller work by revolving it. At that there should not be any
friction of the back grille screw. If the propeller does not revolve freely,
dismantle the structure and repeat the procedure.
Connect the front grille with the back one and attach them to each other.
For that, put a plastic rim on the grilles after releasing of the mounting
screw in a way that the back grille enters the first groove. Then insert the
front grille in the second groove of the rim and tighten the mounting
screw.
Extend the telescopic tube from the rack to a required height and fix it
with a height adjustment screw.
Mount the fan body on the telescopic tube and tighten the body screw.
6. FAN OPERATION
Appliance control with the use of control panel
Install the assembled fan on a flat, stable and dry surface.
After voltage check connect the appliance to a power source. Your electric
network should provide a single-phase power supply 230 W, 50 Hz
Press the button ON/OFF once the indicator «POWER» will flash on. The
fan will switch on.
In a successive order press the button «SPEED» and select operation speed
of the fan. At that, the following indicators will flash on the control panel:
«LOW» (low speed), «MEDIUM» (medium speed) or «HIGH» (high speed).
To set the disconnecting timer, press the button «TIMER». Each pressing
will increase the disconnection time and the number of flashing indicators
on the control panel will show the timer setting. If the maximum of the
timer is reached, the next pressing on the «TIMER» button will result in its
cutoff.
Using the button «MODE», select a required mode for blow-off. At that, the
following indicators will flash on the control panel: «NORMAL» («normal
mode»), «NATURAL» («Natural blow-off» mode) or «SLEEP» («Blow-off for
sleep» mode). In «NATURAL» and «SLEEP» modes operation speed of the
fan will change automatically.
Press the button «ON/OFF» to switch the fan off.
www.timberk.com floor-type electric fan 3
7. HEIGHT ADJUSTMENT
Release a height adjustment screw and set a desired height with the use
of a telescopic tube. Hold the fan body tight while releasing the screw.
Tighten the screw after the height adjustment.
8. FAN MAINTENANCE
Unplug the fan and remove the front grille. Wipe the propeller with soft
wet cloth without changing of the propeller position. Let it dry up. If
needed, use a soft brush to remove dust from the grille. Before the next
use, assemble the fan completely.
Fig. 2
Appliance control with the use of remote control board (see Fig. 2)
You may also control the appliance work with the use of the remote control
board.
Buttons of the remote control board duplicate those on the control panel.
Fig. 3
Change of air flow direction
Press a button for change of air flow direction located in upper part of the
electric motor in order to start up a function of blow-off direction change
in the course of the fan operation.
Release the button to stop this function.
4
www.timberk.com floor-type electric fan
ATTENTION!
If the appliance failure is caused by non-fulfillment or improper
fulfillment of the above-mentioned instructions and operation
regulations for this appliance by a user, it may result in a refusal to
perform warranty service or to exchange the broken-down
appliance. Before the purchase ask for a performance check.
IF THE POWER CORD IS DAMAGED, PLEASE APPLY TO THE SERVICE
CENTER TO REPLACE IT
TIMBERK disclaims any responsibility for possible direct or indirect harm
inflicted by Timberk products upon persons, pets and property if it is
caused by nonobservance of operating and installation rules and
conditions, deliberate or reckless acts of consumer of third persons
ATTENTION!
Please, ask the shop assistant to fill in the Guarantee slip
completely, clearly and correctly. The Guarantee slip is inserted in
the article package.
!
2.
1.
!
.
Timberk.
Timberk
.
.
,
(
~230 V, 50 Hz)
,
.
3.
5.
..................................................5
.................................................................5
.......................................................................................................6
.............................................................................6
...........................................................................................................................6
............................................................................................................................7
...............................................................................................7
...........................................................................................7
............................................................................8
.
,
.
,
!
,
.
6.
/
7.
.
,
,
8.
,
.
10.
,
11.
,
,
,
.
,
,
.
,
,
,
.
,
12.
,
13.
14.
.
.
,
,
,
.
,
. .
9.
1.
,
,
,
4.
1.
2.
3.
4.
5.
6.
7.
8.
9.
.
2.
.
,
.
.
-
www.timberk.com
5
15.
16.
.
4.
.
17.
.
18.
E .
(
)
.
19.
20.
1.
1.
,
.
TEF F16 FH2
/
.
16/40,6
~230
55
.
21.
1400
,
TIMBERK.
www.timberk.com
4,4
.
www.timberk.com
3.
5.
(
1.
2.
3.
TIMBERK
.
. 1)
.
4
,
.
.
,
.
4.
.
,
5. C
,
,
6.
,
7.
.
.
,
9.
.
.
,
.
.
10.
,
11.
.
www.timberk.com
.
.
.1
!
,
,
8.
6
.
.
.
.
,
6.
(
1.
.
)
«POWER».
«SPEED»
: «LOW» (
«HIGH» (
).
), «MEDIUM»
.3
«TIMER».
,
,
1.
.
,
7.
.
ON/OFF
.
4.
«
,
~230 , 50
3.
6.
(
. 2)
.
,
.
(
5.
.
,
.
2.
)(
. 2)
.
«ON/OFF»
,
.
«MODE»
: «NORMAL» («
»)
«SLEEP» (
«NATURAL» «SLEEP»
,
«TIMER»
2.
»), «NATURAL» (
«
»).
,
.
7.
.
.
.
.
.
8.
.
.
.
,
,
.
.
,
!
.2
.
www.timberk.com
7
9.
,
EEC 89/336,
TIMBERK
,
,
,
TIMBERK
,
,
,
.
,
.
.
Timberk
,
Timberk
,
,
.
.
,
,
:
325;
28,
«
4,
.
RU.0001.11MP18
«
».
: 123308, .
, .
, . 3,
: 115162, .
,
. +7 495 6044266,
+7 495 6044266
.
,
,
/
:
»
88000
+972-8-637-88-311
»
: .
,
.
.
, 10,
,
(499) 638-26-77
+ 7 (495) 6275285
. 1,
.,
:
P 52161.2.80-2008
P 51318.14.1-2006 .4
P 51318.14.2-2006 p.5,7
P 51317.3.3-2008
P 51317.3.2-2006 p.6,7
: RU C-IL.MP18.B.00013
.
,
: 08.02.2012 07.02.2015
:
«
606
/
www.timberk.com
,
,
!
,
8
,
:
1,
.1,
Timberk
.
Timberk,
,
RU
KG
:
1.
2.
3.
BY
KZ
(
)
:
OS
1.
2.
3.
c
4.
,
UA
10%,
.
AK
TJ
(
)
.
CIS
www.timberk.com
9
10
www.timberk.com
www.timberk.com
11
www.timberk.com
71
17