1
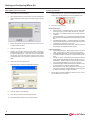
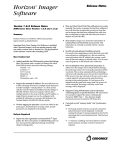
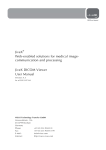
WWW. .COM Version 3.0 Instructions for Use and Tutorial STANDARD IMAGING, INC. 7601 Murphy Drive Middleton, WI 53562-2532 Nov / 2006 ©2006 Standard Imaging, Inc. DOC #80518-01 TEL 800.261.4446 TEL 608.831.0025 FAX 608.831.2202 www.standardimaging.com General Precautions Warnings and Cautions alert users to dangerous conditions that can occur if instructions in the manual are not obeyed. Warnings are conditions that can cause injury to the operator, while Cautions can cause damage to the equipment. WARNING: Federal law in the U.S.A., and Canadian law, restricts the sale distribution, or use of this product to, by, or on the order of a licensed medical practitioner. This product should be used under the guidance of a medical physicist. CAUTION: To minimize the potential for computer issues, do not run IMSure QA concurrently with other software programs. CAUTION: Install IMSure QA software only on approved Operating Systems. The current version of IMSure QA is designed for use only on NT, Windows 2000 and Windows XP Operating Systems. WARNING: Should IMSure QA results differ from the treatment planning results, further review of each is needed to determine which results are most appropriate. CAUTION: Active plans are deleted when Preferences are modified. When any Preference is modified in the User Preferences Module, all existing plan data is cleared out and reset to default. Users are cautioned not to change Preferences when plans are in progress. WARNING: Enter complete and correct data. Ensure that complete and correct data has been entered by viewing the data on the screen before proceeding. WARNING: Poor quality Imported Fluence Maps and/or Maps with an incorrect resolution may reduce correlation of the Difference Map and increase the Maximum Difference. It is the responsibility of the user to visually verify Imported Fluence Maps, and to ensure that Fluence Map resolutions are correctly defined in User Preferences. WARNING: Conduct Acceptance and routine QA Testing. It is the responsibility of the user to conduct Acceptance Testing on the machine specified for treatment, and to conduct routine QA Testing at appropriate intervals. Algorithm information is provided in this IMSure QA User Manual. WARNING: Verify file selection before import, and verify imported data. It is the user’s responsibility to select the correct Plan and Fluence Map Files for import. Patient name and selected plan data is displayed prior to Plan import to assist in this process. After import, verify plan data before proceeding. WARNING: Machines must be commissioned before use. Verify physics data prior to commissioning. Only machines commissioned prior to the initiation of a treatment plan may be used to complete that plan. If a machine is recommissioned while a plan is in progress, the new data will be used starting with the next new plan. WARNING: Verify all printed data. Verify that printed data matches the screen display. All pages need to be accounted for and correctly collated. Correct paper size and printer conditions need to be verified for all print jobs. WARNING: Verify exported reports. After exporting a report for electronic storage, users are advised to verify the file before closing the plan. WARNING: Verify all physics data. Ensure that physics data is complete and correct after entering or importing data by viewing the data screens in the Physics Data Module. CAUTION: Assign unique names to each machine. Do not attempt to assign the same name to more than one machine. CAUTION: Verify precision levels when importing tables. Precision levels on imported tables may affect calculations, due to rounding. CAUTION: Only one user may access the Physics Data Module concurrently. On networked machines with a shared Physics Data file, only one user may access the Physics Data Module at any one time. CAUTION: Machine changes are effective when the next plan is initiated. The machine that is commissioned at the initiation of a plan is used to complete that plan. If machine parameters are changed while a plan is in progress, the change does not take effect until the current plan is closed. CAUTION: Back up data files. Data files should be backed up on a regular basis. CAUTION: Protect the CD-ROM surface from fingerprints, scratches and other damage. Do not store the CD-ROM in direct sunlight or warm and humid places. WARNING: The use of IMSure QA does not preclude the need for routine machine QA. Table of Contents PAGE 2 3 4 6 7 General Precautions System Requirements Installing and Registering IMSure QA Starting and Configuring IMSure QA Importing Data and Calculating IMRT Dose and Maps 7601 MURPHY DRIVE MIDDLETON, WI 53562-2532 USA WWW.STANDARDIMAGING.COM System Requirements System Requirements Operating System Processor Memory Hard Drive Screen Resolution CD-ROM Drive Microsoft® Windows® NT4 SP6 / Windows® 2000 SP4 / Windows® XP SP1 Intel® or AMD® 600 MHz or greater 256 MB or greater 50 MB or greater 1024 x 768 or higher recommended 2X speed or greater Windows is a registered trademark of Microsoft Corporation. Product Standards: Designed to meet IEC 60601-1-4 Installing and Registering IMSure QA Installing IMSure QA 1. 2. Insert the Installation CD into your CD-ROM drive. If the installation program does not start automatically, click the Start button and select Run. Then, type E:\Setup.exe where “E” is the drive letter of the CD-ROM drive. 3. Select which installation you want to install: IMSure QA or DICOM Router. 4. Accept the default Destination Folder or choose another folder, and then click Next. NOTE: The default folder is C:\Program Files\Standard Imaging\IMSure 3.0. If you have a previous version of IMSure QA installed, the new version will install in a separate folder. 5. The installation program will install the necessary files. Click Finish when complete. Internet Registration If the software is loaded onto a computer that has Internet access, you can register the software from the host computer. Phone Registration If the software has been loaded onto a computer that does NOT have Internet access, you must use the Phone registration method. How to Perform an Internet Registration To register your Standard Imaging software via the Internet, please complete the Internet Registration form. The installation of IMSure QA Software includes a choice for installing PDF Creator. PDF Creator is an ‘Open Source’ utility program that allows users to export any printable document to a PDF file. IMSure QA requires a program of this type in order to export calculation reports as a PDF. If you already have a PDF creation utility program present on your computer you do not need to install this option. Registering IMSure QA An automated software-licensing algorithm is embedded into each Standard Imaging software application. Its intended use is to prevent piracy and unauthorized use of Standard Imaging software products. Standard Imaging utilizes a multi-layered encryption algorithm to ensure that only legally licensed end-users may access the protected software applications based on electronic security keys. Through an automated key creation and distribution process, Standard Imaging is able to provide a quick and completely automated means of licensing a software product. Software Keys Each Standard Imaging software application is issued a software key. The key is an eight-digit number attached to the CD-ROM packaging. There are two types of keys: Demo and Perpetual. Demo – This type of key allows the user to use the software application for a period of 60 days. Once this period has expired and the user has not purchased the perpetual key, the registration software will not allow the user to use the software. *CD Key – This information is attached to the CD-ROM packaging. Once you have completed the form and selected “Register”, the information is forwarded to Standard Imaging for validation. If successful, you can begin using IMSure QA. How to Perform a Phone Registration To register your Standard Imaging software via the telephone, call Standard Imaging at the telephone number displayed on the form and provide us with the following information: · CD Key (jewel case) · Product ID (see form) · Host ID (see form) Perpetual – This type of key will allow the user to use the software indefinately. The processes described below are identical for both types of software keys. Initial Software Installation After you have installed the Standard Imaging software application and attempt to run it for the first time, you will be greeted with the following software Registration Options form. After the SI representative has confirmed your customer status, he or she will provide you an Activation Code for you to enter in the appropriate fields. Once the Activation Code has been entered, select “Activate” to complete the registration process and begin using IMSure QA. Installing and Registering IMSure QA Continued Upgrading from your current version of IMSure QA The first time you open IMSure QA 3.0 after installation the migration module will automatically launch. The migration module will automatically search the Program files for earlier installations of the software. Choose the installation you would like to copy from and then decide which information you would like to migrate by checking the appropriate boxes. The migration module will check the preferences file of the previous installation you have chosen to determine where to copy the data from. If you choose to migrate your physics data, plan files, and/or users data, these will be copied to the default locations in the IMSure QA 3.0 directory to prevent overwriting. If you plan on using a network folder for your physics data, plan files, and/or users data this information will need to be manually copied to these locations. If you choose not to migrate your data at this time the migration module can be accessed at anytime by going to Modules/Migrate Data. Uninstalling IMSure QA To uninstall IMSure QA follow the instructions below. 1. 2. 3. 4. 5. 6. 7. Go the Control Panel. Double click on Add/Remove Programs Highlight IMSure QA DICOM Router. Click on Remove Click Yes to confirm. IMSure QA uninstallation will complete. Click Ok. If you have added files or directories to the IMSure QA main directory, these will remain, and you will need to manually delete the IMSure QA directory from Windows® Explorer. Starting and Configuring IMSure QA Starting IMSure QA for the First Time 1. Select IMSure from the Start Menu. 2. When starting IMSure for the first time, the User Management dialog is displayed and the system warns that no users currently exist. 3. IMSure automatically creates a Superuser account. This account is used to create new users. 4. Select the ‘Add User’ button. 5. Create a new account for each user. Only those at ‘Superuser’ level may add new users. ‘Physicist’ level may access any module except User Management. ‘User’ level may only access IMRT QA, MU Calc, and Import Tool modules. The user name must be 12 characters or less. The password is optional and may be left blank. 6. Select ‘OK’ to exit and save the user. 7. Select ‘OK’ again to exit the User Management dialog. Configuring Preferences 1. Select Preferences by clicking the Preferences button on the toolbar or by choosing Preferences from the Modules menu. 2. From here you may modify: General Preferences a. Machine Folder - The default location of the machine folder where the physics (machine) data, ‘Physics.dat,’ is stored. b. Plan Folder - The default location of the plan files for import to IMSure. c. Fluence Map Folder - If your map files are separate from plan files, this provides a default directory location for fluence map files. d. User Management Folder – The default location of the folder where the users file that stores the users information including usernames and passwords can be found. e. Facility Name and Plan Summary Footer – Used to customize the hardcopy and exported Summary reports. Physics Preferences a. Imported Map Resolution - Default import resolution of fluence maps. The resolution may also be changed during import. b. Calculated Map Resolution - Used during calculations; make the resolution smaller for greater accuracy (but slower calculations). c. Auto flip on import - Used during import of plans and fluence maps when the data file does not specify orientation (i.e. nonDICOM files). Either or both of the leaf and map orientations can be automatically flipped in the x and/or y direction. d. Preferred Map Type, specific to Eclipse maps, allows the user to choose Optimal or Total Actual Maps for import. e. Error thresholds - Used during calculations to warn the user when the error range is exceeded. Warnings may be adjusted for IMRT, Gamma Map, and MU calculations. 3. 8. The Login dialog is then displayed. 9. Login with your new account name and password. 10. The DICOM Router module does not require a login. These values may be left at default by selecting ‘Cancel’, or they may be edited to suit your needs. Importing Data and Calculating IMRT Dose and Maps Importing Plan Data 1. From the IMRT QA screen, select ‘Import Plan’. 2. Select a plan from the plan list. You may also browse for plans in other subfolders or across a network. 3. Other selections at this point: a. Details - Display more detailed information about the selected plan. b. Anonymize - Create a new plan file with a new patient name, machine and/ or energy. c. Accept plan - Continue importing the plan. 4. Select ‘Next’. 5. If you selected an IMRT plan containing fluence maps (such as a DICOM file) you will go immediately to the Plan Edit page. Otherwise, you will be shown the Map Import page. On the Map page, selecting the corresponding map file(s), and select ‘Next.’ 6. Verify the leaf positions are correct. You may have to modify the Options to get the correct orientation or map resolution. Calculating IMRT Dose and Maps 1. Before calculating dose, make sure all the data fields are completed: a. SSD - Fill in SSD values for each field if neccessary. b. Depth - Fill in the depth for each field or select ‘Auto Calculate Depths’. c. PSSD and Eff Depth - Fill in the PSSD and Eff Depth for each d. Fill in the Calculation Point location and TPS Dose: F. IMSure Patient, BEV, Calc Point and Machine Coordinate System field if neccessary. Geometry Patient Geometry Map Resolution The map resolution of some ASCII map formats does not include in- IMSure conforms to the IEC standard Fixed Coordinate System patient or formation about the map pixel resolution. The user may interactively adjust this pixel size by editing the desired value in the “Map Resolu- geometric descriptions of the patient or phantom. In the IEC Fixed Coordinate S tion” box. The default setting for Map Resolution is set in the User Preferences module under the Physics section, but may be modified for a patient lying headfirst and supine on the treatment table, the positive x-axi here for import of the selected file. patient’s left hand, the positive y-axis is towards the patients head, and the p RTP-sequence leaf orientation correction Some TPS plans are saved with RTP leaf sequence information that towards the patient’s anterior, as shown in figure F.1 The patient geometry in the are not available to IMSure via special Machine Files. Plans from these systems must be carefully reviewed for correct leaf orientation. planning system may differ from the IEC coordinate system. The origin of the pa If the Leaf orientation is incorrect, the leaves may be swapped on the The is following illustrates coordinate IMSure coordinat horizontal axis or the vertical axis or both by checking the “Flip Leaves system always diagram set to the same asthe isocenter, thesystem origin used of thefor machine calculation points: X” and “Flip Leaves Y” boxes. This flips the leaves for all fields in the plan. The default setting for these check boxes is set in the User Preferences module under the Physics section, but may be modified here for import of the selected file. Map Orientation Correction Some maps are saved with orientation information that is not available to IMSure. Maps from these systems must be carefully reviewed for orientation. If the orientation is incorrect, the maps may be flipped on the horizontal axis or the vertical axis or both by checking the “Flip Maps X” and “Flip Maps Y” boxes. This flips all maps in the plan. The default setting for these check boxes may be found in the User Preferences menu option of the IMRT QA window under the Physics section. 7. Select ‘Finish’ to import plan into IMRT QA. 8. The MU Calc ‘Import’ function uses the same plan selection screen. Select the desired plan. On the same screen, click ‘Finish’ to import the plan into the MU Calc module. e. Enter optional fields for PSSD and Effective Depth, if de sired. f. Select ‘Calculate Map’ to calculate the fluence maps. Verify the results by selecting ‘Calculated,’ ‘Difference,’ and ‘Gamma’ BEV Coordinate Systems from the Display Options. In IMSure, The Portal Image Display, or Beams-eye-View, is fixed relative to the g. Select ‘Calculate Dose’ to calculate the dose to the specified source, regardless gantry or collimator Depending on collimator calcofpoint. Verify results by angle. checking the ‘Calculated Dose’ angle, and ‘% Difference’ fields. displayed. The first axes pair is will always be for no collimator rotation, where of the disp always point towards the gantry, and the +X-axis will point to the right a combination of the X and Z ordinates of Fixed Coordinate System, and dep rotation. The second axes pair will be fixed with respect to rotation of the collima