1
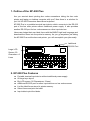
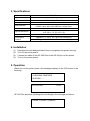
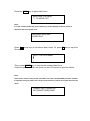
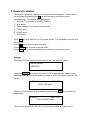
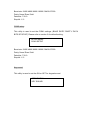
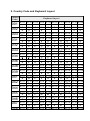
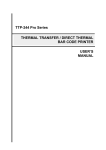
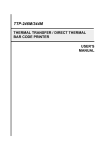
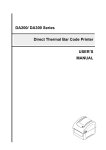
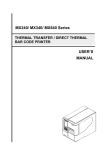
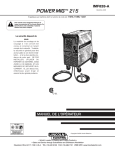
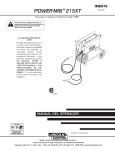
KP-200 Plus Stand-alone Keyboard Display Unit USER’S MANUAL Contents 1. OUTLINE OF THE KP-200 PLUS ............................................................... 3 2. KP-200 PLUS FEATURES.......................................................................... 3 3. SPECIFICATIONS ...................................................................................... 4 4. INSTALLATION ........................................................................................... 4 5. OPERATION ............................................................................................... 4 6. FUNCTION KEYS FOR KP-200 PLUS ....................................................... 6 7. POWER-ON UTILITIES .............................................................................. 7 8. RS-232 INTERFACE AND COMMUNICATION PARAMETERS ............... 10 9. COUNTRY CODE AND KEYBOARD LAYOUT ......................................... 11 1. Outline of the KP-200 Plus Are you worried about printing bar codes somewhere taking the bar code printer and laptop or desktop computer with you? Now there is a solution for you! It’s KP-200 Plus series stand-alone keyboard. KP-200 Plus is a portable terminal input device which connects to the RS-232 port of the bar code printer without additional power supply. It also provides another RS-232 port for bar code scanners or other input devices. Users can design their own label forms with the BASIC high level language and download the forms into the printer’s memory. As you go anywhere just taking the KP-200 Plus and the bar code printer, you will accomplish your jobs easily. Additional RS-232 Port Large LCD Screen, 20 Characters 2 Lines 2. KP-200 Plus Features Portable terminal input device without additional power supply 68 large keys layout Big LCD screen (20 Characters x 2 lines) Additional RS-232 port for other input devices ex: bar code scanner List the label forms stored in printer memory Select forms and print the label Input data to print the labels 3. Specifications Keyboard model KP-200 Plus Keyboard 68 keys, large keypad layout LCD Memory Serial interface Power Physical dimension Weight Environment condition 20 characters x 2 lines N/A COM1: 9 pins, baud rate 9600 bps, male Dsub with cable COM2: 9 pins, baud rate 4800 bps, female Dsub Input: DC 5V, 250mA 261 mm (W) x 31 mm (H) x 142 mm (D) 10.2“ (W) x 1.2” (H) x 5.6” (D) 0.6 kg (1.32 lbs) Operation: 5 ~ 40°C, 20 ~ 80% non-condensing Storage: -20 ~ 60°C, 10~ 90% non-condensing 4. Installation (1) (2) (3) (4) Download the well-designed label forms or programs into printer memory. Turn off the printer power. Connect the cable of the KP-200 Plus to the RS-232 port of the printer Turn on the printer power. 5. Operation When turn on the printer power, the messages display on the LCD screen is as following: CHECKING PRINTERS WAITING…… KP-200 Plus Vx.xx KP-200 Plus performs self diagnosis and displays the message as follows: “FORM” = SELECT LABELS Press the FORM key to select label form. XXXXXXXX (File name) TO MOVE LIST Note: If no file is downloaded into printer memory, LCD will display as below, please to download the file to printer first. NO LABEL EXISTING! PRESS EXIT Press arrow keys to list stored label forms. Or press F1 key to input the file name. INPUT THE FILE NAME: ▌ Then, press ENTER key to execute the selected label form. Follow the prompts which are shown on the LCD screen to print the labels. Note: Label forms stored on the printer should be in the 8.3 (xxxxxxxx.BAS) filename formats. If input the wrong file name, the LCD will show as below, please must input the exact file name. FORMAT NOT FOUND OR NO PROMPT RESPONSE. 6. Function Keys for KP-200 Plus There are 68 keys on KP-200 Plus. Most of the keys are the same as normal keyboard of desktop computer. The followings are the descriptions of the special function keys: FORM key List the label forms downloaded in the printer memory CLEAR key Clear characters of the line on the LCD screen where cursor locates. ALT key Hold down “ALT” and press the 0~9 keys to get special characters. F1 key Search the file and enter the setup menu. (Please refer section 5 & section 7) F2 key The one function key is reserved. 7. Power-On Utilities There are six power-on utilities to set up and test the keyboard. These utilities are activated by pressing the F1 key and turning on the printer power simultaneously. The utilities are listed below: 1. Self test (This function is used for factory.) 2. Auto detect 3. Model change (This function is reserved.) 4. COM1 setup 5. COM2 setup 6. Key sound Press F1 key and then turn on the printer power. The keyboard will enter the setup menu. Press arrow keys to select the utility. Press ENTER key to enter or set the utility. Press EXIT key to cancel the setting and return to the previous menu. Self test After enter the setup menu, the first item is self test utility as below: SETUP MENU: SELFTEST Press the ENTER key to enter this utility, LCD screen will auto display some checking patterns. The check pattern is used to check the performance of LCD screen. KP200P SELFTEST TEST LCD NOW When the LCD screen test is completed, please press EXIT key to enter the keypad test. KP200P SELFTEST TEST KEYPAD NOW There are 68 keys on KP-200 Plus. You should to press all of the keys to complete this test, if you miss the key that you did not press, the keyboard will show you on the LCD screen as below: MISS PRESS: < x > TEST KEYPAD NOW When the keypad test is completed, please press the EXIT to next test. The next test need the test cable if you do not have it, please double press the EXIT to leave this self test utility. Auto detect This utility is used to set ON or OFF for auto detect. If setting is ON the keyboard will auto detect the printer using TSPL or EPL. This utility default is ON. After enter the setup menu, please use key to select this utility. SETUP MENU: AUTO DETECT Press ENTER key to enter this utility. And use keys to select ON or OFF. Press ENTER key to set the setting. Press EXIT key to return to the previous menu. COM1 setup This utility is used to set the COM1 settings. (BAUD RATE/ PARITY/ DATA BITS/ STOP BIT) Please refer to section 8 for default setting. SETUP MENU: COM1 SETUP Baud rate: 2400/ 4800/ 9600/ 19200/ 38400/ 57600 Parity: None/ Even/ Odd Data bits: 7/ 8/ 9 Stop bit: 1/ 2 COM2 setup This utility is used to set the COM1 settings. (BAUD RATE/ PARITY/ DATA BITS/ STOP BIT) Please refer to section 8 for default setting. SETUP MENU: COM1 SETUP Baud rate: 2400/ 4800/ 9600/ 19200/ 38400/ 57600 Parity: None/ Even/ Odd Data bits: 7/ 8/ 9 Stop bit: 1/ 2 Key sound This utility is used to set the ON or OFF for keypad sound. SETUP MENU: KEY SOUND 8. RS-232 Interface and Communication Parameters (1) The keyboard COM1 port should be connected to the bar code printer. Keyboard power is drawn from printer serial port. The communication parameters of the keyboard COM1 port is set as following: Baud Rate : 9600 bps Parity : None Data Bits :8 Stop Bit :1 (2) The keyboard COM2 port can be connected to the bar code scanner. The communication parameters are listed as below. Baud Rate : 4800 bps Parity : None Data Bits :8 Stop Bit :1 (3) Keyboard COM1 and COM2 pin assignment KEYBOARD COM1 Pin Configuration KEYBOARD COM2 Pin Configuration 1 Power input 5 volts, 250mA 1 Power input 5 volts, 250mA 2 RxD 2 TxD 3 TxD 3 RxD 4 Not used 4 Not used 5 Ground 5 Ground 6 Not used 6 Not used 7 Not used 7 Not used 8 Not used 8 Not used 9 Connect with Pin1 internally 9 Connect with Pin1 internally Note: (1) Be sure to connect well the scanner and keyboard before turn on the printer power (2) Please disable the CTS/RTS and Xon/Xoff handshaking of the scanner. (3) The postfix 0Dh and 0Ah should be set in scanner. 9. Country Code and Keyboard Layout Country Code Keyboard Layout 001 ALT+1 ALT+2 ALT+3 ALT+4 ALT+5 ALT+6 ALT+7 ALT+8 ALT+9 ALT+0 002 ALT+1 ALT+2 ALT+3 ALT+4 ALT+5 ALT+6 ALT+7 ALT+8 ALT+9 ALT+0 003 ALT+1 ALT+2 ALT+3 ALT+4 ALT+5 ALT+6 ALT+7 ALT+8 ALT+9 ALT+0 031 ALT+1 ALT+2 ALT+3 ALT+4 ALT+5 ALT+6 ALT+7 ALT+8 ALT+9 ALT+0 032 ALT+1 ALT+2 ALT+3 ALT+4 ALT+5 ALT+6 ALT+7 ALT+8 ALT+9 ALT+0 033 ALT+1 ALT+2 ALT+3 ALT+4 ALT+5 ALT+6 ALT+7 ALT+8 ALT+9 ALT+0 034 ALT+1 ALT+2 ALT+3 ALT+4 ALT+5 ALT+6 ALT+7 ALT+8 ALT+9 ALT+0 036 ALT+1 ALT+2 ALT+3 ALT+4 ALT+5 ALT+6 ALT+7 ALT+8 ALT+9 ALT+0 038 ALT+1 ALT+2 ALT+3 ALT+4 ALT+5 ALT+6 ALT+7 ALT+8 ALT+9 ALT+0 039 ALT+1 ALT+2 ALT+3 ALT+4 ALT+5 ALT+6 ALT+7 ALT+8 ALT+9 ALT+0 041 ALT+1 ALT+2 ALT+3 ALT+4 ALT+5 ALT+6 ALT+7 ALT+8 ALT+9 ALT+0 042 ALT+1 ALT+2 ALT+3 ALT+4 ALT+5 ALT+6 ALT+7 ALT+8 ALT+9 ALT+0 044 ALT+1 ALT+2 ALT+3 ALT+4 ALT+5 ALT+6 ALT+7 ALT+8 ALT+9 ALT+0 045 ALT+1 ALT+2 ALT+3 ALT+4 ALT+5 ALT+6 ALT+7 ALT+8 ALT+9 ALT+0 046 047 ALT+1 ALT+2 ALT+3 ALT+4 ALT+5 ALT+6 ALT+7 ALT+8 ALT+9 ALT+0 048 ALT+1 ALT+2 ALT+3 ALT+4 ALT+5 ALT+6 ALT+7 ALT+8 ALT+9 ALT+0 É Ñ Ä é à a ä ä à à ä µ £ ¢ ½ ñ ä è é o ß ß ù ä ß ½ £ £ £ Ñ é é £ £ é ë Ç è Ç ú ú é ¢ ú µ µ µ ç ó ó è è ó Ö à ù ö ù Ü â ½ ê ¼ ¼ ¼ í Ç ñ Ü Ü ò é Ü ü ü Ö Ö ö ö Ç ü ü Ö Ö Ç ö £ Å Å å å £ £ Æ Ä æ ä ø Ö Ø ö ½ ½ ¼ ¼ ALT+1 ALT+2 ALT+3 ALT+4 ALT+5 ALT+6 ALT+7 ALT+8 ALT+9 ALT+0 Å å £ Æ æ ø Ø ½ ¼ ä ß é ú ó Ü ü Ö ö 049 ALT+1 ALT+2 ALT+3 ALT+4 ALT+5 ALT+6 ALT+7 ALT+8 ALT+9 ALT+0 055 ALT+1 ALT+2 ALT+3 ALT+4 ALT+5 ALT+6 ALT+7 ALT+8 ALT+9 ALT+0 061 ALT+1 ALT+2 ALT+3 ALT+4 ALT+5 ALT+6 ALT+7 ALT+8 ALT+9 ALT+0 351 ALT+1 ALT+2 ALT+3 ALT+4 ALT+5 ALT+6 ALT+7 ALT+8 ALT+9 ALT+0 358 ALT+1 ALT+2 ALT+3 ALT+4 ALT+5 ALT+6 ALT+7 ALT+8 ALT+9 ALT+0 Ä a a Å ä o o å Ü £ £ £ ü Ç Ç Ä Ö ö ß µ ç ç ä Ö ö ½ ¼ TSC Auto ID Technology Co., Ltd. Corporate Headquarters 9F., No.95, Minquan Rd., Xindian Dist., New Taipei City 23141, Taiwan (R.O.C.) TEL: +886-2-2218-6789 FAX: +886-2-2218-5678 Web site: www.tscprinters.com E-mail: [email protected] [email protected] Li Ze Plant No.35, Sec. 2, Ligong 1st Rd., Wujie Township, Yilan County 26841, Taiwan (R.O.C.) TEL: +886-3-990-6677 FAX: +886-3-990-5577