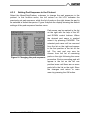
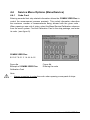
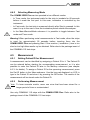
1
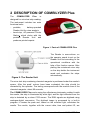
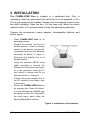
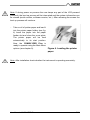
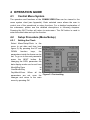
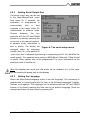
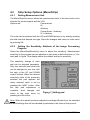
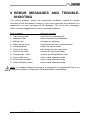
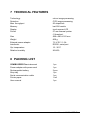
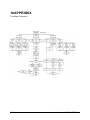
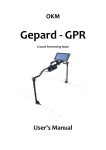
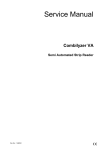
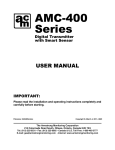
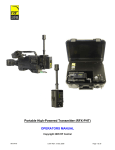
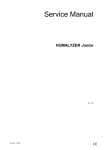
User Manual
!"#$%&'()*+,-./
Human
Gesellschaft für Biochemica
und Diagnostica mbH
Max-Planck-Ring 21 ! D-65205 Wiesbaden
Germany
Telefon:
+49 6122 9988 0
Telefax:
+49 6122 9988 100
eMail:
Internet:
02/2005-05
[email protected]
http://www.human.de
Cat.-No.: 17601P
!
CONTENTS
1
INTRODUCTION
1.1
Methodology of Urine Testing
1.2
Test Strips
2 DESCRIPTION OF COMBILYZER PLUS
3 INSTALLATION
4 OPERATION GUIDE
4.1
Control Menu System
4.2
Setup Procedure (Menu/Setup)
4.2.1 Setting the Clock
4.2.2 Setting Serial Output Port
4.2.3 Setting the Language
4.3
Strip Setup Options (Menu/Strip)
4.3.1 Setting Measurement Unit
4.3.2 Setting the Sensitivity Attribute of the Image Processing
Program
4.3.3 Setting Pad Sequence in the Printout
4.4
Service Menu Options (Menu/Service)
4.4.1 Code Card
4.4.2 Selecting Measuring Mode
4.5
Measurement
4.5.1 Setting Patient ID for Measurement
4.5.2 Performing Measurement
4.6
Memory/Data Management
4.6.1 Result Printout
4.6.2 Sending data to Host Computer
4.6.3 Enter Patient ID for Memory Record
4.6.4 Clearing Test Data from Memory
4.7
Printer Station
4.8
Serial Port
5 MAINTENANCE
6 ERROR MESSAGES AND TROUBLESHOOTING
7 TECHNICAL FEATURES
8 PACKING LIST
9 SYMBOLS
10 APPENDIX
3
3
3
4
6
8
8
8
8
9
9
10
10
10
11
12
12
13
13
13
13
15
15
16
16
16
17
17
18
19
20
20
21
22
This page left blank
2/22
User Manual COMBILYZER Plus
1 INTRODUCTION
1.1
Methodology of Urine Testing
Urinalysis is one of the medical diagnosis methods frequently used by medical
doctors in laboratories in order to reveal diseases.
This micro-chemistry system has been available for many years and allows
qualitative and semi-quantitative analysis within one minute by simple but careful
observation. The colour change occurring on each segment of the strip is
compared to a colour chart to obtain the result. However, misreading or
misinterpreting of results may happen, caused by individual handling habits of
different users or different light conditions.
1.2
Test Strips
The COMBILYZER Plus works with COMBINA 11S urine test strips:
Tested parameters are as follows:
Bilirubin
Urobilinogen
Ketones
Ascorbic Acid
Glucose
Protein
Blood
pH
Nitrite
Leucocytes
Specific Gravity
User Manual COMBILYZER Plus
3/22
2 DESCRIPTION OF COMBILYZER Plus
The
COMBILYZER
Plus
is
designed for urine test strip reading.
The instrument includes two main
functional units:
- portable,
battery-operated
Reader Unit for urine analysis
- bench-top, AC-powered Printer
Station, which docks with the
portable Reader Unit and
produces printed reports.
Figure 1. Parts of COMBILYZER Plus
Figure 2. The Reader Unit
The Reader is menu-driven, so
the operator needs to set up the
Reader Unit first according to the
operational conditions with the
help of the function menus. After
placing the moistened urine strip
on the strip holder the instrument
reads and evaluates the strips
automatically.
The urine test strip containing chemical reagents is positioned under the reader's
sensor. After the pads' colours have been evaluated, the strip should be
discarded by the operator. The testing corresponds with the reaction time of the
chemical reagents - about 60 seconds.
The COMBILYZER Plus works using the reflectance photometry method: inside
the reader, the strip is illuminated by white light, and the light reflected from the
strip is detected by a colour CCD sensor. The RGB signals are digitised using
analogue-digital conversion. The digitised image is processed by a built-in
program: it locates the pads and, based on the reflected light, calculates the
results. The results, together with the current date, time and patient ID, are
4/22
User Manual COMBILYZER Plus
stored and can be printed out by connecting the reader to the Printer Station.
The instrument is designed specifically for in vitro diagnostic professional use
and to meet the requirements of medical professionals. The measurement
capacity is up to 80 test strip evaluations per hour.
User Manual COMBILYZER Plus
5/22
3 INSTALLATION
The COMBILYZER Plus is shipped in a cardboard box. Prior to
unpacking, clear the area where the instrument is to be operated: a 30 x
50 cm size space will be needed. Please note the shipping marks on the
box while handling. Open the box. Cut the tape only, leave the carton
material intact. (It is recommended to keep the packaging materials)
Prepare the accessories: power adapter, rechargeable batteries and
printer paper.
- Place COMBILYZER Plus in its
operating position.
- Remove the Reader Unit from its
docked position, locate its battery
holder on the bottom, remove the
cover-plate and load the batteries
(included) as shown in figure 3.
Reconnect the Reader Unit in its
docked position.
- Using the standard RS232 serial
cable (included) to connect the
Reader Unit's serial port (see figure
2) to the computer's serial port if
you intend to upload data to an
external device i.e. Computer
- Connect the power adapter first to
the DC socket on the reader, then
to the mains.
- Switch the COMBILYZER Plus on
by pressing the Power-On button.
In a few seconds the HUMAN logo
will appear on the LCD, followed by
the main menu, which offers the
Memory/Meas/Menu options.
Figure 3. Installation of the batteries
6/22
User Manual COMBILYZER Plus
Note: If during power on process the user keeps any part of the LCD pressed
(touched), the boot up process will be interrupted and the system information can
be viewed (serial number, software version, etc.). After releasing the screen the
boot up process will continue.
- Take a roll of printer paper and load it
into the printer paper holder (see fig.
4) Insert the paper into the paper
feeder slot and close the cover plate.
The printer paper will be feed
automatically to its start position.
Now, the COMBILYZER Plus is
ready to operate using the Main Menu
options (see chapter 9).
Figure 4. Loading the printer
paper
Note: After installation check whether the instrument is operating accurately.
User Manual COMBILYZER Plus
7/22
4 OPERATION GUIDE
4.1
Control Menu System
The operation and functions of the COMBILYZER Plus can be viewed in the
menu system chart (see Appendix). Each selected menu allows the user to
control one of the operational or setup functions. For a detailed explanation of
the submenus, please see the detailed descriptions in following chapters.
Pressing the QUIT button will return to main-menu. The OK button is used to
enter the edited data and quit the function.
4.2
Setup Procedure (Menu/Setup)
4.2.1
Setting the Clock
Select Menu/Setup/Clock in the
menu to set date and time (see
figure 5). By pressing the UP and
DOWN
function
keys,
the
parameters inside the frame can be
set. To go on to the next parameter
press the NEXT button. By
changing the SEQ. parameter the
date display mode can be set from
Month/Day/Year
to
Year/Month/Day
or
Day/Month/Year. When all the
Figure 5. Clock setting
parameters are set, save the
changes and return to the main
menu by pressing OK.
8/22
User Manual COMBILYZER Plus
4.2.2
Setting Serial Output Port
The serial output port can be set
in the Menu/Setup/Serial menu
(see figure 6). If enabled, the
instrument is programmed to
communicate
with
a
host
computer in two ways: either PC
unidirectional or network mode.
Choose
between
the
two
protocols with the UP and DOWN
buttons or by directly selecting the
circle next to the desired protocol.
In network mode, information is
sent in blocks. The blocks are Figure 6. The serial setup menu
arranged either by sequence
number (Seq. Nr.) or by patient ID.
(set by the user in advance by selecting or unselecting the B1. ID.) identifies the
result reports. The standard mode setting is 9600 Baud, 8 bits with 1 Stop bit and
no parity. Other options can not be programmed. For more information on the
serial port refer to section 4.8.
Note: By disabling the serial port, the printer will be disabled, too. In this case,
the test results will appear only on the display.
4.2.3
Setting the Language
Select the Menu/Setup/Language menu to set the language. The instrument is
programmed to communicate with the user in the following languages: English,
German or Hungarian. The language can be selected with the UP and DOWN
buttons or by directly marking the field next to the desired language. Store the
changes and return to main menu by pressing OK.
User Manual COMBILYZER Plus
9/22
4.3
Strip Setup Options (Menu/Strip)
4.3.1
Setting Measurement Unit
The Menu/Strip/Unit menu allows the measurement units of the test results to be
selected for printed reports and the LCD.
Options are:
Conventional
SI
Arbitrary
Conventional + Arbitrary
SI + Arbitrary
The units can be selected with the UP and DOWN buttons or by directly marking
the field near the desired unit type. Store the changes and return to main menu
by pressing OK.
4.3.2
Setting the Sensitivity Attribute of the Image Processing
Program
Select the Menu/Strip/Sensitivity menu to adjust the sensitivity. Measurement
sensitivity in the program can be adjusted on two levels in both directions (+/-) for
each pad. In figure 7 the display shows the default setting for sensitivity.
The sensitivity change of each
pad can be adjusted separately.
Only one selected pad sensitivity
can be changed at one time with
the help of the UP and DOWN
control buttons. When the desired
sensitivity value of the previously
selected test pad appears the
newly selected value is set by
pressing the NEXT button. After
the last pad adjustment is
complete, store changes and
return to the main menu by
pressing the OK button.
Figure 7. Setting pad
sensitivity
Note: When the reader has been adjusted to settings different from the standard
HUMAN settings this will be indicated by asterisks in the footer of the printout.
10/22
User Manual COMBILYZER Plus
4.3.3
Setting Pad Sequence in the Printout
Select the Menu/Strip/Padseq. submenu to change the pad sequence in the
printout. In this function menu, the left column on the LCD indicates the
previously set pad sequence, while the list of pads on the right shows the pad to
be selected in default sequence. Figure 8 depicts the display showing the default
settings of the pad sequence function menu.
Figure 8. Changing the pad sequence
User Manual COMBILYZER Plus
Pad names can be marked in the list
on the right with the help of the UP
and DOWN control buttons. When
the desired pad name is marked
select it by pressing CHOOSE. The
selected pad name will be removed
from the list on the right and appear
in the first position in the list on the
left. The next pad can now be
chosen from the list of remaining
pads on the right following the same
procedure. Each succeeding pad will
appear in the list on the left one
position lower until there are no more
pads left in the list on the right. Store
the changes and return to main
menu by pressing the OK button.
11/22
4.4
Service Menu Options (Menu/Service)
4.4.1
Code Card
Entering encoded test strip related information allows the COMBILYZER Plus to
control the measurement process precisely. This coded information describes
the maximum number of measurements being allowed with the given code .
When opening a new vial of strips, select the Menu/Service/Calibration submenu
from the menu system. Find the Calibration Card in the strip package, and enter
its code . (see figure 9).
COMBILYZER Plus
0002760131444446
Figure 9a.
Example of COMBILYZER Plus
Calibration Card
Figure 9b.
Entering the code
Note:
- Always remember to enter the code when opening a new pack of strips.
12/22
User Manual COMBILYZER Plus
4.4.2
Selecting Measuring Mode
The COMBILYZER Plus can be operated in two different modes:
- In Timer mode, the instrument waits for the strip to incubate for 60 seconds
before it reads the first pad. In this case, incubation is controlled by the
instrument.
- In Fast mode, the test strip is measured directly after Start is pressed. In this
case it is up to the user to time the incubation period outside the analyzer.
- In the Menu/Service/Mode submenu it is possible to toggle between Fast
mode and Timer mode.
Warning! When performing serial measurements in Fast mode, allow the strips
to react for approximately 55 seconds before inserting them into the
COMBILYZER Plus and pressing Start. If the reaction ( incubation ) time is too
short or too high false results my be obtained. Refer also to the package insert of
the COMBINA 11S test strips.
4.5
Measurement
4.5.1
Setting Patient ID for Measurement
A measurement can be identified by assigning a Patient ID to it. The Patient ID
can be entered before starting the corresponding measurement, or it is also
possible to enter the Patient ID later in the Memory submenus (see chapter
4.6.3. for details). To assign a Patient ID for the upcoming measurement, press
the Set ID button in the Meas submenu. Use the key pad displayed on LCD to
type in the Patient ID and store it by pressing the OK button. The results of the
measurement will be stored under the Patient ID.
4.5.2
Performing Measurement
Note: To have accurate results, never use urine that has been stored for a
longer period of time or contaminated.
Use only COMBINA 11S strips with the COMBILYZER Plus. Refer also to the
package insert of the COMBINA 11S test strips
User Manual COMBILYZER Plus
13/22
If your COMBILYZER Plus has already been set up for normal operation,
please, follow the instructions listed below (no 1-9), if not, follow the instructions
in chapters 4.1through 4.4.
1.
2.
3.
4.
5.
6.
7.
8.
9.
Prepare the urine test sample tubes.
Enter the Patient ID by using the Meas/SetID.
Press the Start button on the LCD. The strip holder tray opens automatically.
Dip a test strip into the urine sample for 2 sec. and remove the excess urine
from strip by drawing its edge across the rim of the test or blotting it on a
paper towel.
Place the moistened test strip with the pads facing up on the strip holder.
Make sure that the leading edge of the strip is pushed against the stop.
Press the Start button on the LCD again. The strip holder will close
automatically. The device will check if there is a strip on the strip holder and if
so, the strip holder case will open half-way to allow the strip to evaporate
freely. When the incubation time is over, the strip holder will close again and
the measuring cycle will start.
From this step on, the test process is controlled automatically by the
COMBILYZER Plus, if the Timer measuring mode has been previously
selected (see chapter 4.4.2). Results are stored and will be printed out by
default. In Timer measuring mode (default) a measuring cycle lasts around
60 seconds from pressing the Start button. To get the results in printed report
form, the printer has to be enabled in advance (see chapter 4.8). The Reader
Unit should be docked or be short distance from Printer Station.
To start a new measuring cycle, place a new strip on the strip holder and
touch the Start button. Quit operation is accepted in such case only if there is
no strip left in the strip holder, otherwise the device will continue to display a
warning message until the used strip has been removed.
When you are finished working with the COMBILYZER Plus press the Quit
button in main menu. After asking for confirmation of your request, the
instrument will shut down automatically. If the instrument is left without input,
it will shut down automatically, after 2.5 minutes if operated on batteries and
after 5 minutes if connected to mains.
14/22
User Manual COMBILYZER Plus
4.6
Memory/Data Management
4.6.1
Result Printout
Enter the Memory/Print submenu to
print out records stored in the
memory. A range of stored records
can be selected for printing. The limits
of the selected range are displayed in
the top-right corner (see figure 10).
They can be selected simply tapping
them. The selected limit can be
adjusted with the help of the UP and
DOWN arrows. The lower limit can
not be higher than the upper limit,
therefore increasing the low limit will
increase the high limit and decreasing
the high limit will decrease the low Figure 9. Selecting a memory range
limit if the value was the same. The for printing
selected range can be printed out by
pressing PRINT.
For example on figure 10. the low limit is 39 and 41 is the high limit of the range
to be printed. Pressing the PRINT button will therefore print three records, 39-4041.
User Manual COMBILYZER Plus
15/22
4.6.2
Sending data to Host Computer
In the Memory/Send submenu it is possible to send records from the memory to
a host computer. The selected range of measurement data (located in the
selected range of memory addresses) will be sent to the receiver serial port at
the pre-programmed speed. Refer to section 4.6.1. for details about setting the
memory range to be sent. For setting the parameters of the serial port see
section 4.2.2.
Note: Entering a new patient ID or modifying an existing one for a selected
memory record is possible both in the Memory/Print and Memory/Send
submenus with the Set-ID function button.
4.6.3
Enter Patient ID for Memory Record
New patient IDs can be entered or a existing IDs modified. Enter the
Memory/Print or the Memory/Send submenu and choose a data record by
adjusting the low limit of the memory range (see figure 10). After pressing the Set
ID button, a new patient ID for the selected record can be set or an existing ID
can be modified. Use the key pad to enter the patient ID and store it by pressing
the OK button.
4.6.4
Clearing Test Data from Memory
All data in the memory, or only a specific record, can be deleted in the
Memory/Clear submenu. The maximum number of stored records is 200. The
lower and upper limits of the memory address can be set by using the UP and
DOWN arrows in top-right corner of the LCD (refer section 4.6.1. for details about
setting the memory range to be cleared). After setting the limits of the memory
range that should be erased, press the CLEAR button. The address pointer
returns to the next lower address field after execution of the memory clear
function. By pressing CLR.ALL button all, existing records in the memory will be
cleared.
16/22
User Manual COMBILYZER Plus
4.7
Printer Station
The Printer Station connects the instrument to the mains voltage and also
provides power for the Reader Unit if it is docked (???). Sending measurement
data either to the printer or to a computer via serial port can be done the
following way: first, make sure the Reader Unit is connected to the Printer
Station. Data communication is executed through the infrared (IR) transmission
line: either docking the Reader Unit or placing it in a direct sight line with the
Printer Station. Test data of the previously selected memory range will be printed
out on the built in thermo-paper printer at a speed of 2 lines per sec.
Note: The printer will operate only if it is connected to mains.
4.8
Serial Port
The COMBILYZER Plus serial communication protocol offers two options:
either the PC Unidirectional protocol, when upon a Start signal the selected data
of the test (measurement) is sent to the receiver computer, or Network protocol
can be used. the communication protocol can be selected in the
Menu/Setup/Serial submenu. By checking the Bl. ID field it can determined
whether the uploaded serial data should be identified by patient ID or by
sequence ID. In this submenu all serial data flow and the printer itself can be
disabled.
Note:
- Use only the serial port on the Reader Unit for uploading data to the host PC.
The serial port on the Printer Station is an input only for manufacturer
calibration.
- If the Enable field is unchecked, no test result will be printed out or sent
through serial port. In this case test results can only be viewed on the LCD.
- The PC unidirectional protocol does not apply control sum checking.
- When sending/uploading result data to a computer, the COMBILYZER Plus
needs to be connected to the host computer (PC) via the interface cable
(included) and the serial output line needs to be enabled.
User Manual COMBILYZER Plus
17/22
5 MAINTENANCE
Cleaning: To keep your COMBILYZER Plus in perfect condition never leave
used strips in the strip holding tray. The COMBILYZER Plus checks the tray
before switching off and opens it to remind the user when there is a strip left
inside. The only required maintenance activity is to rinse and wipe out the strip
holder with a dry cotton cloth each day before switching off the instrument.
Warning! Since urine is a fluid of human origin, biological risks cannot be ruled
out. Handle used strips and urine contaminants with care!
Battery recharge: The COMBILYZER Plus's portable Reader Unit is powered by
3 AA size rechargeable batteries. Their fully charged capacity is sufficient for
about 300 test measurements, sufficient for about a half-year of operation.
The Portable Reader Unit operates on batteries only in stand-alone mode.
Docking it with the Printer Station, will recharge the batteries. The Reader Unit
can also be powered by connecting the power adapter directly to its socket. If
batteries are discharged, the instrument cannot be switched on. When batteries
are low a „Battery low” message appears on the LCD.
In case the screen hasn't been touched for a while, the COMBILYZER Plus will
shut down to save energy; after 2,5 minutes if operated on batteries and after 5
minutes if connected to mains.
18/22
User Manual COMBILYZER Plus
6 ERROR MESSAGES AND TROUBLESHOOTING
The control program checks the operational conditions needed for proper
execution of the instrument’s functions. If the check ends with the indication of a
malfunction, an error message will be displayed. The list of error messages,
below, includes suggestions on how to eliminate problems.
Error message
Action to be done
1. Tray moving error!
2. Memory is full!
3. Battery low!
4. Netw. comm. error!
5. Serial disabled!
6. There is no strip!
7. Remove the strip!
8. Wrong calibr. code!
9. Expiry date error!
10. Is not meas. number!
11. Need calibration code!
check the tray opening path
clear some memory addresses
recharge the batteries
check the serial com. synchronisation
enable the serial output
load a strip into the strip holder
remove the strip from holder
re-enter a valid calibration code
enter a valid calibration code
enter a valid calibration code
enter a valid calibration code
Note: If a problem cannot be solved or a malfunction is experienced that is not
listed above, please, contact your HUMAN distributor immediately.
User Manual COMBILYZER Plus
19/22
7 TECHNICAL FEATURES
Technology
Detection
Max. throughput
Memory
Display
Printer
Size
Weight
External power-adapter
Interfaces:
Op. temperature
Relative humidity
colour image processing
CCD image processing
50 strips/hour
last 200 results
touch screen LCD
57 mm thermal printer
(2 lines/sec)
480 x 290 x 165 mm
850 g
7,5 V DC / 1.5A
RS232, serial port
15...30°C
20-80%
8 PACKING LIST
COMBILYZER Plus instrument
Power adapter with power cord
Rechargeable battery
Strip tray
Serial communication cable
Printer paper
User manual
20/22
1 pc
1 pc
3 pcs
1 pc
1 pc
1 roll
1 pc
User Manual COMBILYZER Plus
9 SYMBOLS
according to EN 980
In vitro diagnostic medical device
Warning
Information inside
SN
Serial number
Manufacturer
User Manual COMBILYZER Plus
21/22
10APPENDIX
The Menu Structure
22/22
User Manual COMBILYZER Plus
User Manual
!"#$%&'()*+,-./
Human
Gesellschaft für Biochemica
und Diagnostica mbH
Max-Planck-Ring 21 ! D-65205 Wiesbaden
Germany
Telefon:
+49 6122 9988 0
Telefax:
+49 6122 9988 100
eMail:
Internet:
02/2005-05
[email protected]
http://www.human.de
Cat.-No.: 17601P
!