1
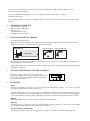
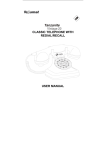
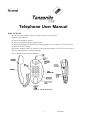
Telephone User Manual
PRECAUTIONS
Do not expose the telephone to direct sunlight or moisture. Do not use the
telephone in the bathroom.
Do not use the telephone outdoors.
Do not use the telephone during a lightning storm.
Do not install the telephone near open fires, heating appliances, air conditions, etc. Do not drop the
telephone or handle it roughly.
Do not allow magnetic objects to come into contact with the telephone receiver. Do not use strong or
abrasive cleaning agents to clean the telephone.
Use a soft damp cloth to clean the telephone.
Figure 1: Phone Front View
-1-
862-02753
The Tanzanite 110 telephone with its high-tech design and modular handset and cord, offers a range of
advanced technological features.
The Last Number Redial memory can store and display the last number (up to 32 digits)
dialled via the keypad.
The telephone handset is hearing aid compatible. Refer to your hearing aid user manual for the operation of this
facility.
1.
EQUIPMENT SUPPLIED
One Tanzanite 110 Phone
One Tanzanite 110 Handset
One Line cord
One Handset Curly Cord
Comprehensive User Guide
2.
INSTALLING THE TELEPHONE
To connect the telephone line
Plug one end of the line cord into the LINE jack on the base of the telephone and the other end into the wall
socket (you will hear a click when the plug is inserted correctly).
Telephone Plug
Lift the handset
Listen for dial tone
Wall Socket
You will hear dial tone if the telephone is connected correctly. If you do not hear dial tone, check that the
telephone plug is inserted correctly.
Depress and release the cradle switch a few times and press any keypad button between 0 and 9 and check that
the dial tone disappears.
3.
SETTING THE RINGER VOLUME CONTROL
The ringer volume control has three settings Low,
Medium and High and can be set using the slider switch
on the right side of the telephone base. Set the switch to
the volume level required.
4.
FEATURES
MUTE
Pressing the MUTE key during a call will disconnect the microphone, allowing you to have a private
conversation without the other party hearing you.
Pressing MUTE again (or any other button on the keypad) reconnects the microphone allowing you to
resume your telephone conversation. Replacing the handset also cancels the mute function. If the telephone
is connected behind a PABX, pressing RECALL when Mute is activated will place the other party on hold.
REDIAL
Pressing the REDIAL key will automatically redial the last number dialed.
RECALL
The RECALL key is used with voice services and PABX systems to transfer, or place calls on hold. Refer
to your PABX system manual for the operation of this facility.
VISUAL RINGING INDICATOR
The Ringing indicator lamp will light up when the phone is ringing to indicate an incoming call.
-2-
HANDSET VOLUME CONTROL
The handset volume may be adjusted by using the NORM/HIGH switch on the side of the handset. You can set
the volume louder by sliding the switch to the HIGH position or softer by sliding the switch to the NORM
position.
5.
MAKING AND ANSWERING CALLS
Lift the handset
Listen for dial tone
Dial the number
1
4
7
*
2
5
8
0
Listen for ringing tone
3
6
9
#
If the number you have dialed is busy or does not exist, you will hear a repeated tone
(engaged) or a long continuous tone (number unobtainable). To make calls from a telephone connected to a
PABX, consult your system manual. (See Section 10)
6.
RECALL BUTTON
The RECALL button is used with Voice Services (e.g. TalkPlus) and PABX systems to transfer, place calls
on Hold etc. It is also referred to as “R” or FLASH and functions as Time Break Recall (TBR). Refer to your
PABX system manual or your TalkPlus manual for the operation of this facility.
7.
REDIAL BUTTON
Press the REDIAL button in normal mode will automatically redial he last number dialed via the keypad
(up to 32 digits).
Lift the handset
Listen for dial tone
Press REDIAL
REDIAL
8.
PARALLEL WORKING
If the telephone is connected in parallel (two or more telephones on the same PABX/exchange line) and
one of the other telephones is used simultaneously, correct operation cannot be guaranteed. It is,
therefore, recommended that only one telephone be used at a time.
-3-
9.
WALL MOUNTING
The key-slots on the underside of the telephone base can be used to mount the telephone directly onto a wall.
The telephone base has a reversible handset retaining clip ( s e e F i g u r e 1 o n p a g e 2 ) for wall
mounting.
a.
b.
c.
d.
e.
To mount the phone against a wall, you need two screws (not supplied) with heads that fit into the
keyhole slots in the bottom of the phone and wedge.
On the base, pull out the handset retainer clip (see Figure 1 on page 2), turn it around and place in
the opposite direction, so that the clip allows the handset to hang onto the base unit.
Drill two holes in the wall 83 mm apart and fit raw plugs if necessary.
Thread a screw into each hole, letting the heads extend about 5 mm from the wall. Place the base on
the 2 screws and slide downwards to engage the screws in the narrow portions of the slots.
Connect phone to handset and telephone jack on wall as described in Installing the Telephone on
page 3.
10. TROUBLESHOOTING CHECKLIST
After following the procedures in this manual, if you experience problems with the operation of your
telephone, refer to the checklist below.
Problem
No Dial tone
The telephone rings
too loudly/softly
Noise on the phone
Action
Check that the telephone line cord is
connected to the line jack on the phone and
the wall socket
Set the ringer volume
Refer to
Section 2
Section 3
Check for source of noise (e.g. cellphone,
cordless phone, PC, etc…). Move phone or
source of noise
11. CLEANING THE TELEPHONE
Use a soft damp cloth to lightly wipe the telephone. If the telephone is dirty use a mild detergent on the
cloth. Do not use abrasive materials or solvents as these can damage the telephone surface and printing.
12. TECHNICAL SPECIFICATION
The telephone complies with ICASA Regulatory Requirements.
Recall: 100ms (typical)
Line Cord Plug:
RJ11
Dialing Mode: DTMF
NOTE: We reserve the right to make modification to the product to enhance features and functionality. User
manual will change accordingly without notification.
13. SERVICE ENQUIRIES
For any service or product information queries relating to this telephone, please call our ShareCall number
08602HELPU (0860243578) or visit our website on www.phones4telkom.co.za.
-4-