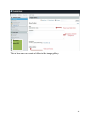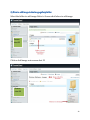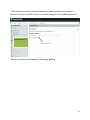
1
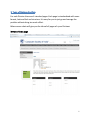
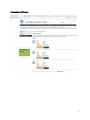
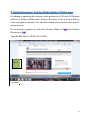
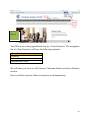
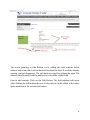
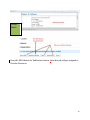
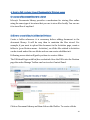
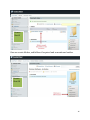
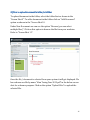
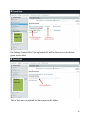
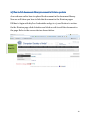
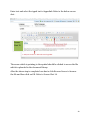
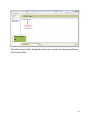
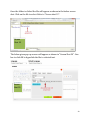
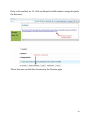
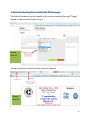
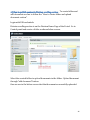
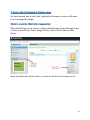
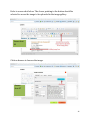
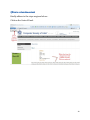
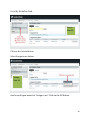
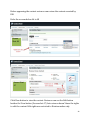
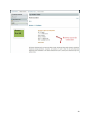
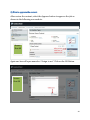
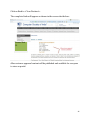
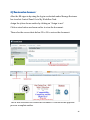
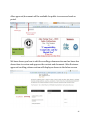
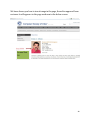
Content Management of Division/Region/SIG Portlets on CSI Knowledge Portal User Guidelines v1.1 Computer Society of India Index Sr No. 1. 2. 3. 4. 4.1 4.2 4.3 4.4 4.5 4.6 5. 5.1 5.2 5.3 6. 6.1 6.2 6.3 7. 8. Contents Introduction Tour of Division Portlets Content Management – how to add/edit content of division pages How to link various type of documents in division pages Concept of document library in (Liferay) How to create folder/subfolder for division How to upload document in folder/subfolder How to link document library documents in division pages Option for showing the document in the division pages How to publish content in scrolling section How to add/edit image in division pages How to create folder in Image Gallery How to upload image in folder/subfolder How to insert image in the division pages How to review and approve How to review the content How to approve the content /document How to review document Screens of before and after editing of Division pages How to get started 2 1. INTRODUCTION We have created a Division/Region/SIG portlet for each Division/Region/SIG of CSI on CSI Knowledge portal. For each Division/Region/SIG there are 4 standard pages. Each page is standardized with same format, look and feel and structure. These pages and there use is briefly described below: The Division/Region/SIG Home page or landing page – Introduction of Division /Region/SIG chairman and Division/Region/SIG Activities- information about activities, any type of files can be uploaded. National Events- details about the national event and at the same time one can also register for the upcoming event. International Events- details about the international event and at the same time one can also register for the upcoming event. In the Tour of Division portlets, will give you actual look and feel of Division/Region/SIG portlets. These portlets have been deployed in such a way that each Division/Region/SIG portlet can be managed independently by the concerned Division/Region/SIG. Here will be no need to send content to CSI HQ and request the web manager to upload content on the CSI portal. This User Manual will guide you on how you can manage Division/Region/SIG portlet content on CSI knowledge portal. Currently it is under UAT Stage and the url is – http://188.92.91.221:8585 Who can manage the content. The content can be managed by a team of two or more persons from the Division/Region/SIG. 3 For each division we have two roles – 1) Division/Region/SIG Maker 2) Division/Region/SIG Reviewer Division/Region/SIG Maker – He has rights to edit content, upload documents/images. Division/Region/SIG Reviewer - He has rights to review and approve the contents/documents/images which are uploaded by Division/Region/SIG maker. Unless ‘Approved’ by Division/Region/SIG reviewer, content or document or images cannot be accessed or viewed by public. Each Division/Region/SIG can decide who will perform the role of Maker and Reviewer. A Division/Region/SIG can decide to have more than one maker and reviewer. The portal will maintain a complete audit trail of all actions taken by the maker and reviewer. The privileges enjoyed by the maker or reviewer are limited to only the portlet of concerned Division/Region/SIG. That is, a maker or reviewer of one Division/Region/SIG cannot edit / approve content of another Division/Region/SIG. Please note : We have used Software Division for reference / demonstration purpose. Same rules are applicable to other Divisions/Regions/SIGs. 4 2. Tour of Division Portlets For each Division there are 4 standard pages. Each page is standardized with same format, look and feel and structure. It is easy for you to just go and manage the portlets without doing too much effort. Below screen shots will give you the idea of all pages of <your Division> Division Home page Home page 5 Activities Activities National Events National Events 6 International Events International Events 7 3. Content Management - How to add/edit content of Division pages For adding or updating the contents on the web portal of CSI each CSI Division will have a Division Maker and a Division Reviewer. Each of them will have their own login credentials. Care should be taken not to disclose the log-in ID and password. For convenience purpose we will refer Division Maker as “DM” and Division Reviewer as “DR”. Type the URL http://188.92.91.221:8585 screen Shot 1 URL SCREEN. 8 Click on the Sign In button on the top with the credentials provided. screen Shot 2 SIGN IN SCREEN Once the DM logs-in the log-in screen will have the date of the log-in and the name of the Division. Refer to the screen Shot 3. One can see in the drop down menu of Go To options, they are: My Public Pages <Your Division> The DM will click on <Your Division> option. <Your Division> indicates the name of the respective Division. 9 Screen Shot 3 The DM is now on the page allotted only for <Your Division>. The navigation bar of <Your Division> will have the following contents:<Your Division > Activities National Events International Events We will show you how to edit Division Chairman details and about Division section. How to edit the contents- Below screen shot is self explanatory. 10 Screen Shot 4 The arrow pointing to Edit Button is for editing the web content. Select content button and Add content button should not be used. If used the already existing content disappears. The edit button is used for editing the page. The address should match with the address as in the Who’s Who Book. How to add content- Click on the Edit Button. The Edit window will open. After clicking the Edit button the text or the content can be edited in the white space as shown in the screen shot below:- 11 Screen Shot 5 Once the required information is typed then click on the “Submit for publication” button. There are other 4 buttons i.e Save as draft Expire Delete Version Cancel. Do not use these buttons. Refer to the Screen Shot as shown below:- 12 Screen Shot 6 Once the DM Submits for Publication button, then that job will get assigned to Division Reviewer. 13 4. How to link various type of documents in Division pages i) Concept of document library in Liferay Liferay’s Documents library provides a mechanism for storing files online using the same type of structure that you use to store files locally. You can use it to store files of any kind. ii) How to create folder/subfolder for Divisions Create a folder whenever it is necessary before adding document in the document library. It will be easy then to maintain the files stored. For example, if you want to upload the document in the Activities page, create a folder to (your Division name – Activities), so all the files related to Activities can be stored under this one folder and one can create subfolder in it. Following screen shots will guide you how to create a folder. The DM should login with his/her credentials. Once the DM is into the Division page the under Manage Toolbar one has to select Control Panel. Screen Shot 7 Click on Document Library and then click on Add Folder- To create a folder 14 Refer to the below screen i.e Screen Shot 8. One can see the 2 options pertaining to folder. One is the Name for naming the folder and in Description column one can describe about the folder. Once the folder is named click on the Save Button. Screen Shot 8 After clicking on Save the created folder appears as can be seen under Folders. For reference you can see in the below screen shot the folder highlighted in Blue colour i.e Software Division –Activities. 15 Screen Shot 9 One can create folders, sub folders if required and as mentioned earlier. Screen Shot 10 16 iii)How to upload document in folder/subfolder To upload document in the folder, select the folder first as shown in the “Screen Shot 9”. To add a document in the folder click on “Add Document” option as shown in the “Screen Shot 10. Under New Document one can see the option “Browse (you can select multiple files)”. Click on this option to browse the file from your machine. Refer to “Screen Shot 11”. Screen Shot 11 Once the file / document is selected from your system it will get displayed. We have shown one file by name “Alan Turing Year 2012.pdf” in the below screen shot for reference purpose. Click on the option “Upload Files” to upload the selected file. 17 Screen Shot 12 On clicking “Upload Files” the uploaded file will be shown as in the below given screen shot. Screen Shot 13 This is how one can upload the document in the folder. 18 iv) How to link documents library document in Division portlets As we shown earlier how to upload the document in the document library. Now we will show you how to link that document in the Division pages. DM has to login with his/her Credentials and go to <your Division> section. On the Division page click Activities and click on edit to add the document in the page. Refer to the screen shot as shown below. Screen Shot 14 19 Enter text and select the typed text to hyperlink. Refer to the below screen shot . Screen Shot 15 The arrow which is pointing to the symbol should be clicked to access the file which is uploaded in the document library. After the above step is completed one has to click Browse Server to browse the file and then click on OK. Refer to Screen Shot 16. 20 Screen Shot 16 Select the Resource type as document. In the screen shot one can see 2 folders. The first folder is created by default. Neglect this folder. Click on the second folder. Screen Shot 17 Refer to the Screen Shot 18 as shown below:21 Screen Shot 18 The folder name will be displayed which was created in the document library. Click on the folder. 22 Once the folder is clicked the file will appear as shown in the below screen shot. Click on the file to select. Refer to “Screen shot 19”. Screen Shot 19 The below given pop up screen will appear as shown in “Screen Shot 20”. One has to click OK to hyperlink the file to selected text. Screen Shot 20 23 Refer to Screen Shot no. 21. Click on Submit for Publication to assign the job to the Reviewer. Screen Shot 21 This is how one can link the document in the Division page. 24 v) Option for showing the document in the Division pages The linked document can be opened in the various window through “Target” option as shown in the below screen. Screen Shot 22 Below document is opened in the different window. Screen Shot 23 25 vi).How to publish content in Division scrolling section: - To create folder and add document one has to follow the “How to create folder and upload document section”. Login with DM credentials. Division scrolling section is on the Division Home Page of the Portal. Go to Control panel and create a folder as shown below screen. Screen Shot 24 Select the created folder to upload documents in the folder. Upload document through “add document” button. One can see in the below screen shot that documents successfully uploaded. 26 Screen Shot 25 Go to Division Home page. Click column 1 ‘edit button’ to edit the details. Screen Shot 26 27 Screen Shot 27 Select Document as Resource Type. Select the folder which is created in the document library to access the file. Refer to Screen Shot below. Screen Shot 28 One can see in the below screen, the column 1 is renamed as “Chairman Discusses…” This is how you can change the name of column and add details under that column. 28 Screen Shot 29 Click on Submit for Publication and assign the job to the Reviewer. Same process should be followed for publishing content in other columns. 29 5. How to add/edit images in Division pages We have learned how to add /edit /upload the document, now we will learn how to manage the images. i)How to create the folder in the image gallery. When the DM signs In he can see on the toolbar Manage. Under Manage he has to select Control Panel. Select Image Gallery. Click on Add Folder to add a folder. Screen Shot 30 Name the folder and click on Save to create the folder as in Screen shot 31. 30 Screen shot 31 This is how one can create a folder in the image gallery. 31 ii) How to add image in the image gallery folder Select the folder to add image. Refer to Screen shot below to add image. Screen shot 32 Click on Add image as in screen shot 33 Screen shot 33 32 Click on Browse button and then upload as shown earlier for document library. One can see in the below screen the image is successfully uploaded. Screen shot 34 This is how one can add image in the image gallery. 33 iii) How to insert image in the Division pages We have learned how to upload image in the Image Gallery. Now we will show you how to insert image in the page. Login with DM credentials. Division Chairman Photograph is on Division home page of the portal. Click on edit to add image. Screen shot 35 34 Refer to screen shot below. The Arrow pointing to the button should be selected to access the image to be uploaded in the image gallery. Screen shot 36 Click on browse to browse the image. Screen shot 37 35 Then select the folder which is created in the image gallery. Select the resource type will be Image. Select a folder which is created in the image gallery as shown in the below screen shot. Screen shot 38 Then select the image. Preview of the image will display as shown in the below screen. Define the width and height of the image as shown in the below screen Screen shot 39 36 Click on Submit for Publication to submit the job. Screen shot 40 This is how one can manage the images in the image gallery and Division pages 37 6. How to Review and Approve Initially we had shown you how DM can edit contents / upload documents / images. Now we will show you how Division reviewer role works. Unless ‘Approved’ by Division Reviewer, content /document /images cannot be accessed or viewed by public One can now refer to the Role of Division Reviewer (referred to as “DR”) - The DR has to enter his Division Reviewer’s credentials in the same manner as that of the Division Maker. The URL will be the same. Refer to the below screen shot. Screen Shot 41 In <Your Division> section, on the left hand side of the Toolbar one can find the menu “Manage”. Click on the Manage menu and the Control Panel appears. 38 i)How to review the content Kindly adhere to the steps as given below:Click on the Control Panel. Screen Shot 42 39 Go to My Workflow Task. Screen Shot 43 Click on the Action Button. Select Assign to me button. Screen Shot 44 One box will open named as “Assign to me”. Click on the OK Button. 40 Screen Shot 45 After the OK button is clicked, click on the Action Button. One popup will be displayed showing 4 options i.e. Approve. – to approve and publish on website Reject. – if any further changes are required Assign to. – to some other authorized person Update Due date- Set the date and time to update the job 41 Before approving the content reviewer can review the content creeated by DM. Refer the screens below 46 to 48 Screen Shot 46 Screen Shot 47 Click View button to view the content. Reviewer can see the Edit button besides the View button (Screen shot 47) but reviewer doesn’t have the rights to edit the content. Edit rights are restricted to Division maker only. 42 Screen Shot 48 43 ii) How to approve the content After review the content, select the Approve button to approve the job as shown in the following screen shots. Screen Shot 49 Again one box will open named as “Assign to me”. Click on the OK Button. Screen Shot 50 44 Click on Back to <Your Division>. The completed task will appear as shown in the screen shot below:- Screen Shot 51 After reviewer approval content will be published and available for everyone to view on portal. 45 iii) How to review document After the DR signs in by using the log-in credentials under Manage Reviewer has to select Control Panel. Go to My Workflow Task. Assign the job as shown earlier by clicking on “Assign to me”. Click on view button as shown earlier to view the document. Then refer the screen shots below 52 to 54 to review the document. Screen Shot 52 Screen Shot 53 This is how reviewer can review the document. Then follow the approval process as explain earlier. 46 After approval, document will be available for public to access and read on portal. Screen Shot 54 We have shown you how to edit the scrolling column section and we have also shown how to review and approve the content and document. After Reviewer approval scrolling column section will display as shown in the below screen. Screen Shot 55 47 We have shown you how to insert image in the page, then after approval from reviewer it will appears in the page as shown in the below screen Screen Shot 56 48 7.Screens of before and after editing of Division pages Below we have shown you screen shots of Division portlets. It will give you a look and feel of before and after editng of Division pages. National Events before editing process- National Events after editing process- 49 International Events before editing process- International Events after editing process- 50 Column 2 & 3 before editing process- Column 2 & 3 after editing process- 51 8. How to get started. 1. Identify one or more person to play the role of Division /Region /SIG Maker from your Area. 2. Identify Division/Region/SIG one or more person to play the role of Division/Region/SIG Reviewer from your Area. 3. Division/Region/SIG Head should communicate authorized person’s name, Membership No., Email id, Mobile No. to Web Manager at HQ ([email protected]). 4. Head Quarter will provide credentials to only authorized persons for security purpose. 5. After that, those people can start managing the content of your Division/Region/SIG 52