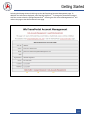
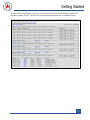
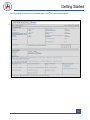
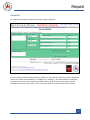
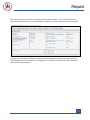
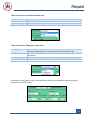
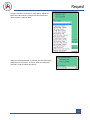
1
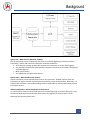
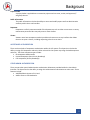
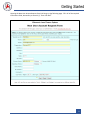
Lane Closure System User Manual Table of Contents Background Overview ……..………………………………………………………………………………………………………………… 1 User Types ……..……..………………..…………………………………………………….……..…………………….… 4 User Regions ….……..……………………………………………………………………………………………………..… 4 User Roles ……..………………………………………………………………………………………………………………. 4 Acceptance Authorization ……..……………………………………………………………………………………… 5 Other Admin Authorization ……..…………………………………………………………………………………… 5 User Permission Summary ……..…………………………………………………………………………………… 6 Getting Started Requesting an Account ……..………………………………………………………..………………………………… 7 Logging In.…………….…………………………..……………………………………………………………..……………. 10 Forgot User I.D./Password ……………………………………………………………………………………………. 11 Managing Your WisTransPortal Account ………………………………………………………………………. 12 Home Screen ….……..………………………………………………………………………………………………………. 14 Request Request Interface ……..…………………………………………………………………………………………………… 19 Request a Closure ……..…………………………………………………………………………………………………… 20 Construction ……..……………………………………………………………………………………………… 21 Maintenance ……..……………………………………………………………………………………………… 22 Permit …………..…………………………………………………………………………………………………… 23 Special Event ……..……………………………………………………………………………………………… 24 Emergency ……..………………………………………………………………………………………………… 25 Closure Acceptance Overview ……………………………………………………………………………………… 26 Facilities and Duration Overview……….…………….……………………………..………………..…………… 29 Schedule Overrides …….……..………………………………..……………………….…………….…………………. 31 Delay Information ……….……..…………………………………..……………………….………….………………… 33 Accept Accept Interface ……..…………………………………………………………………………………………………….. 34 Edit ……………………………………………………………………..……………….………….………………… 36 Recommend Acceptance……………………………………...…………………..…….………………… 37 Reject …………………………….………….………………………………………………………………….…… 37 Accept …………………………….……………………………………………………………….………………… 37 Delete All – Delete Facility .………………………………………….……….………….…..…………… 38 2 Table of Contents Modify Modify Interface ……..…………………………………………………………………………………………………….. 39 Edit ……..………………………………………………………………………………………..…………………… 40 Cancel – Cancel All……………………………………………………………………………………………… 41 Complete – Complete All………………………………………………………………………………… 42 Date/Time Pending …………………………………………………………..….………….…………..…… 43 When Do Closures “Fall Off”? …………………………………………..….………….…………..…… 43 Search Search Interface ……..……………………………………………………………………………………………………… 44 Comma Separated Value (CSV) ……..……………………………………………………………………….……… 47 Reports Reports Interface ……..……………………………………………………………………………………………………. 49 511 Local 511 Local …………………………………………………..………………………………..………………………….……… 52 Calendar Event Calendar Interface ……………………………………………………………………………………….……… 55 E-mail E-mail Interface ……..………………………………………………………………………………………………………. 56 Preferences Preferences Interface ……..…………………………………………………….………………………………….…… 57 Admin Admin Interface …………………………………………………………….……………………..………….…………… 58 Users.……..……………………………………………………………………………………………..……….……………… 58 Messages.……..…………………………………….…………………………………………………………….…………… 59 E-mail.……..……………………………………….…………………………………..………………………….……………. 59 Priority Roadways.……..……………………………………………..………………………………………….………. 60 STN Landmarks.…………..……..…………..…………………………………………………….………….....…...…. 60 Resources Documentation …………………………………………………………….……………………..………….………..…… 61 Help ……………………………………..……………………………………….……………………..………….………..…… 61 Contacts …………………………….………………………………………….……………………..………….………..…… 61 Notifications ………………………………………………………………….……………………..………….………..…… 62 Training Site …………………………….…………………………………….……………………..………….………..…… 62 3 Background OVERVIEW The Wisconsin Lane Closure System (LCS) is a web-based system for tracking closures and restrictions on Wisconsin Interstate, US, and State highways. The purpose of the LCS is to: • Provide a standard interface for lane closure operations, closure tracking, and data retrieval for WisDOT regional offices statewide • Facilitate data sharing with WisDOT applications that require lane closure data such as 511 Traveler Information, the STOC Incident Management System (IMS), Inconvenience Map production, and Oversize/Overweight (OSOW) permitting • Improve the completeness, reliability, and timeliness of lane closure data on state highways • Archive LCS data in the WisTransPortal system for future analysis and integration with other WisDOT / TOPS Lab traffic engineering applications and research • Integrate historical traffic flow data and capacity information to calculate available closure thresholds LCS was designed as a hierarchical system with users having different roles and privileges. The main goals of Wisconsin LCS are: • • • • Create, approve, and track lane closures, restrictions, and special events Provide accurate and current decision making data (capacity charts) Distribute closure reports to subscribed persons and systems (511, etc.) Accessibility to current closure information anytime, anywhere.” Benefits The LCS was developed for the purpose of streamlining and enhancing the ability to track closures on Wisconsin highways. The benefits this system provides include: • Coordinates activities to reduce back-ups and potential conflicts Multiple activities can utilize the same closure Avoid lane closures during a special event Avoid right lane closure near a left lane closure on the same roadway • Eliminates duplications and inefficiencies by streamlining information into one system • Provides link to historical data that can be used to make informed decisions System Data Sharing The LCS shares data with a number of internal and external mediums. Below are a few examples along with a diagram depicting the process. • Wisconsin 511 system • WisDOT website • Statewide Traffic Operations Center (STOC) • Daily/weekly e-mail reports • FHWA Real-Time System Management Information Program (Section 1201) • Third-party (vehicle navigation systems, phone/tablet apps. Websites. Social media, and news reports) 1 Background System Use – What Closures Should be Tracked? The LCS is the single source of Wisconsin Interstate, US, and State highway lane and ramp closure information. Closure and restriction information should be entered for: • All let projects or design projects with impacts to an Interstate, US, and/or State highway • Any planned maintenance or permit/utility restrictions of closures on interstates, US highways, and State highways • Major special events • Any unplanned, emergency lane closures System Users – Who Should Use the System? Closure information can be entered into the LCS by any system user. WisDOT staff can enter the information or request that the consultant/contractor/county enter the information. Either way, it is essential that staff have a clear understanding of who is responsible for entering and keeping closure information current. Advance Notification – When should closures be entered? It is important for closures to be entered into the LCS several days prior to the lane closure occurring. Provide the following minimum advance notification to the engineer for incorporation into the Wisconsin Lane Closure System (LCS). 2 Background Closure Type/Impact Lane closures* Full roadway closures System and service ramp closures* Full system and service ramp closures Project start Construction stage changes Detours Lane closures** System and service ramp closures** Revising all closure types Advance Notice Required 14 calendar days 14 calendar days 14 calendar days 14 calendar days 14 calendar days 14 calendar days 14 calendar days 3 business days 3 business days 3 business days *With height, weight, or width restrictions (available width, all lanes in one direction ≤16’) ** Without height, weight, or width restrictions (available width, all lanes in one direction >16’) Discuss LCS completion dates at weekly project meetings in order to manage closures nearing their completion date prior to the completion date. Enter changes in the schedule or completion date into LCS after the weekly project update meetings. For unexpected closures or closure extension required due to weather, equipment malfunction, or other emergency situation, contact the regional work zone engineer in the region where the work will occur for additional guidance. Enter the range of the project duration and utilize overrides when the closure is not in place for long term projects with sporadic restricted nighttime or daytime closures. Enter a note into the Internal Comment section explaining that this approach is being utilized, so if a load needs to get through, permitting can double check to determine whether the closure is in place. If OSOW loads can be accommodated through work zones with lane closures incurred by moving operations, such lane closures can be entered as a lane closure with restrictions and enter a note into the Internal Comment section explaining that there is a moving operation causing the lane closure. Closure Acceptance Process Depending on the type of closure and the user entering the closure, the closure will either be automatically accepted or sent through the acceptance process. If a user has acceptance authority, the system allows, but does not require, the user to immediately accept the entered closure information into the system. Once accepted, the information is live and therefore published as an active closure. However, it is intended that closures on Priority Roadways follow the system acceptance process due to potential impact of the closures. Regional Traffic Supervisors will assign the appropriate role and authority to staff. The system acceptance process is depicted below. ENTER ACCEPT MODIFY COMPLETE PENDING DATE/TIME 3 Background USER TYPES A user may only enter and act upon a closure of the same type as the user's type. For example, if a user is entered in the system as ‘Maintenance’, then they can only request Maintenance closures. The user type options in LCS include: • Maintenance • Permit • Construction • All Types USER REGIONS A user may only enter and act upon a closure that is located within the same region as the user's region. The region options in LCS include: • SE (Southeast) • SW (Southwest) • NE (Northeast) • NC (North Central) • NW (Northwest) • ALL (All Regions) USER ROLES Supervisor Supervisors have the ability to assign acceptance authorization to users and perform other administrative functions. The Supervisor role has system administrative privileges. Regional Traffic Engineer (RTE) RTE’s act as regional coordinators of closures and are typically responsible for accepting closures for the region on Priority Roadways. STOC (Statewide Traffic Operations Center) The STOC personnel may utilize LCS to enter emergency closure information or to find closure contact information in the event of an incident. Project Manager A project manager is applicable to construction projects and may review and/or approve closure entered by a project leader or inspector. Permit Coordinator A permit coordinator can enter, review, and approve closures that are related to utility or other permits. Maintenance Coordinator A maintenance coordinator may only enter, review, and approve maintenance type closures. 4 Background Project Leader A project leader is applicable to construction projects and can enter, review, and approve (if assigned) closures. Public Information The public information role has the ability to access and modify reports and has administrative authority within the e-mail interface. Requestor Requestors are likely someone outside of the Department, such as either a contractor or county maintenance personnel who may only enter or view closures. Viewer Viewers never have acceptance authority and do not have access to any interface that allows them to act upon a closure, including requesting, other than to view it. ACCEPTANCE AUTHORIZATION There are three levels of acceptance authorization within the LCS system. The Supervisor role has the ability to assign Full Acceptance authority. Other roles within the system may assign Limited Acceptance authority. The three acceptance types include: • No Acceptance Authorization • Limited Acceptance (Non-Priority Roadways) • Full Acceptance (Priority Roadways) OTHER ADMIN AUTHORIZATION There are two other special administrative authorization allowances provided within the User Admin Interface. The Supervisor has the ability to assign this administrative authorization to other users. These features include: • Add/Edit/Admin Access to 511 Local • Admin Access to STN Landmarks 5 Background USER PERMISSION SUMMARY Full No Acceptance Authority Limited User Region ALL All Types Construction Permit User Roles Maintenance User Type One The table below summarizes the User Type, User Region, and Acceptance Authority which is typically associated with each individual user role. For example, an RTE is generally associated with one specific region, has the ability to enter all types of closures, and has either full or limited acceptance authority. A Viewer will generally be able to view closures statewide (all regions), for all types of closures, but will have no acceptance authority. Supervisor*** Regional Traffic Engineer (RTE) Statewide Traffic Operations Center (STOC) Project Manager Project Leader Permit Coordinator Maintenance Coordinator Requestor Viewer Public Information ***Can assign acceptance authority and administrative privileges 6 Getting Started REQUESTING AN ACCOUNT A WisTransPortal account is needed to access the Wisconsin Lane Closure System (WisLCS). To create an account, begin by going to the home page cited below: http://transportal.cee.wisc.edu/closures/ There are several links to various operations related to the WisLCS. The Wisconsin Lane Closure System (WisLCS) link1 will direct to the live site where you can access the WisLCS. This user manual as well as supplementary materials can be found by selecting link3. To access the WisLCS training website select link4. To find WisDOT regional contacts and tech support select link5. To request an account online select the New User – WisLCS Account Request Form link2. 1 2 3 4 5 7 Getting Started Opening the New User Account Request Form link brings up the following page. Fill in all of the required information fields, denoted by an asterisk (*). Then click Next6. 6 8 Getting Started This page provides one last opportunity to check the request form for errors. To complete the account creation, select Finish7 to submit the request form for review. An e-mail response wth your log-in details should be sent to you within 1-2 business days. 7 If you already have an account, contact the regional contact person for steps to prepare your account for LCS use. 9 Getting Started LOGGING IN To enter the WisLCS (https://transportal.cee.wisc.edu/closures/) first log in to the WisTransPortal system. The screen below will appear automatically for users that are not already logged in. Fill in the required fields and select Login8. 8 9 10 Getting Started FORGOT USER ID/PASSWORD To request misplaced or forgotten account credentials, select Forgot User ID or Password?9. The link will lead you to the following page. Fill in the required fields related to the desired information and select either Get User ID10 or Reset Password11. The desired information will be sent to the e-mail entered in the corresponding field. 10 11 11 Getting Started MANAGING YOUR WisTransPortal ACCOUNT Once inside the WisTransPortal System, the Manage Account link12 will bring up the general WisTransPortal account management page to add/alter profile information and/or change the account’s password. 12 12 Getting Started Selecting the Manage Account link brings up the WisTransPortal Account Management page. To add/alter the information displayed, select the Edit Profile link13. To change the password associated with this account select the Change Password link14. Selecting the Exit Account Management link15 will redirect the page to the WisTransPortal home page. 13 14 15 13 Getting Started HOME SCREEN Before reaching the home screen, there is an intermediate page that requests you select a region for which you would like to enter the LCS system. Once the required field is filled in, select Enter The WisLCS16. 16 14 Getting Started Each user will have a different home screen based on the user role (e.g. requestor, RTE, supervisor, etc.). The functions within the Menu bar17 tabs and Home Page Sections,18 are two examples of items that may change from user to user. You can view the settings you entered the site as and your actual credentials22 at the bottom of the screen. 17 18 19 20 21 22 The Home Page Sections Overview18 is where you can get an overview of the three main home page sections. By selecting the Priority Roadway Closures That Need Action link19, the My Closures link20, or the Near Region Boundary Closures link21, you will be shown the number of closure results for each section. A description of these three sections is below. • Priority Roadway Closures That Need Action o PR closures needing initial acceptance, pending date/time acceptance, and completion viewable for Supervisor, STOC, and RTE roles only • My Closures o Any closure where the user is part of the closure history (e.g. entered, accepted, modified, etc…) • Near Region Boundary Closures o Closures where the region is checked in the General Section and viewable by Supervisor, STOC, and RTE roles within those affected regions 15 Getting Started By opening these links, you will be led to a Show Results link23 that will direct you to the appropriate closure results. 23 16 Getting Started Once the results are displayed, you can view further details of the closure by selecting the Expand link24. The Open In Modify Tab link25 will direct you to the Modify tab explained later in the Modify section. 24 25 17 Getting Started Once expanded, the closure can be collapsed again via link26 for a more condensed view. 26 18 Request REQUEST INTERFACE The Request Interface is used initially to enter a closure into the system. A closure can be one of five types: • • • • • Maintenance – A closure required by WisDOT or County maintenance personnel Permit – A closure requiring a permit such as utility or development related work Construction – Closures associated with a Let project Special Event – A closure related to a planned event such as a parade Emergency – Any closures related to an unplanned occurrence such as flooding If the user is authorized to enter more than one of these types of closures, the user will be prompted from a dropdown list1 to select the type of closure they wish to enter. If a user is matched to construction, maintenance, or permit, however, the user will be brought right into the general section of the closure request. Each closure consists of two parts: the General Section and a Facility Section. The General Section includes attributes that pertain to the entire closure and once entered into the database cannot be changed (with limited exception). The Facilities Section is a way to group closure-specific attributes within the same closure. Facilities come in three types: Mainline, Ramp, and System Interchanges. 1 19 Request REQUESTING A CLOSURE The user’s role and type will determine if they can request a closure or what type of closure they can enter. A user with a Viewer role will not be able to enter a closure into the system and likewise a user with a Project Leader type will only be able to enter a construction closure. There are a few exceptions to this rule, such as Supervisor, RTE and STOC role types, which can enter more than one closure type. Most users will be limited by their role. All closures have a slight variation to the General Section of the closure, but every closure will share the same facility section. For instance, for a construction closure, the user will have to select a Project I.D. from a drop down list. A maintenance closure will only need the general description of the work entered, and a permit will need the permit number entered. The emergency and special event closures are entered in the same fashion as the previous three. Emergency closures will not need to go through the acceptance phase. Once entered, the emergency closure automatically becomes a live closure. These closures are the result of an unexpected incident, such as bridge hit or flooding, that results in the roadway being closed for an extended period of time. Any planned closure will fall somewhere in the other closure types. Requesting a closure takes place in the Request Interface. From the menu bar, select the Request link2 to reach the Request Interface. 2 Once at the Request Interface, select from the Closure Type drop down bar link3. Based on the user’s role and type, select the closure type and select Continue4. 3 4 20 Request CONSTRUCTION For selecting a Construction Request, the following page is displayed. Fill in the required fields denoted by an asterisk (*). When the user selects the Award Year and Project ID, the location will auto-populate with the project information. The user will have to select the appropriate highway from the Hwy field, which is always entered by direction. When selecting the Primary Contact, the contacts phone number will auto-populate. Once the user has filled in the required fields, select Submit. NOTE: The County and Highway fields are not editable after the initial closure request is created. 21 Request MAINTENANCE For selecting a Maintenance Request, the following page is displayed. Fill in the required fields denoted by an asterisk (*). Here, the user will have to enter a description of the type of work to be completed (i.e., “guardrail” or “pothole” repair). When selecting the primary and secondary contacts, the contacts phone numbers will auto-populate. For maintenance closures, the primary contact list will be comprised of all the maintenance coordinators in the user’s region and the secondary contacts are the maitenance coordinators and Regional Traffic Engineers (RTE) in that region. Once the user has filled in the required fields, select Submit. 22 Request PERMIT For selecting a Permit Request, the following page is displayed. Fill in the required fields in the above denoted by an asterisk (*). Here the user will have to enter a permit number and description of the type of work to be completed (i.e., “installing power lines” or “overlay work”). As with the construction request, the phone number for the primary contact will autopopulate. For permit closures, the primary contact list consists of all the permit coordinators in the users region. Once the user has filled in the required fields, select Submit. 23 Request SPECIAL EVENT For selecting a Special Event Request, the following page is displayed. Fill in the required fields above denoted by an asterisk (*). Here the user will enter a description of the type of work to be completed (i.e. “Thanksgiving Day parade” or “street festival”). Here, the primary contact is a text entry and not a dropdown bar and there is no secondary contact. Once the user has filled in the required fields, select Submit. 24 Request EMERGENCY For selecting an Emergency Request, the following page is displayed. Fill in the required fields above denoted by an asterisk (*). Here the user will have to enter a description of the type of work to be completed (i.e. “bridge hit” or “flooding”). As mentioned earlier, emergency closures will not need to go through the acceptance phase. Once entered, the emergency closure automatically becomes a live closure. Once the user has filled in the required fields, select Submit. 25 Request CLOSURE ACCEPTANCE OVERVIEW Each of the five closure types has different General Section5, but all of them share the same Facilities Section6. 5 7 6 The General Section is where the user will enter the attributes that pertain to the entire closure. This section differs from each closure type. All required fields are denoted by an asterisk (*) throughout the LCS, giving the user clear direction as to what information to input into the system. The Internal Comments text box7 is where closure information not intended for public view can be entered. Only users of the system will see this information. A user can select an adjacent region when a closure is close to a regional boundary line. When done, the users in the adjacent region will be able to see this closure and can plan accordingly in order to avoid any potential conflict. The system will not allow a user to select the region in which they reside, unless the user’s role is such that it allows the user to access more than one region. Once all required fields in the General Section are filled, selecting the Add Facility section6 leads to the following page. The user cannot advance to Add Facility without first correctly filling out the General Section. 26 Request Now is the time to check to make sure all the data was filled in properly. If not, the General Closure Information bar8 allows the user to select the Edit or Delete links to the information previously entered. 8 The user can also check the Calendar and Static Priority Roadways links to make sure that the closure will be feasible at the time requested. The Capacity link is currently not available but was created fpr a potential future enhancement. 27 Request FACILITIES AND DURATION OVERVIEW The Facility Section will look the same regardless of the type9 of closure selected. This section is a way to group closure-specific attributes within the same closure. 9 28 Request There are three types of Facilities to choose from: Mainline Ramp System Interchange Lane(s) of a highway Service interchange entrance or exit ramp A ramp from one freeway leading to another freeway There are four types of Duration to choose from: Daily/Nightly Weekly Continuous Long Term The time of operation occurs on a daily or nightly basis as specified by the starting and ending times per each day within the start and end range The time of operation occurs on a weekly basis as specified by the day of week dropdowns 24-hour work zone lasting less than 2 weeks Work zone lasting longer than 2 weeks An example of a Daily/Nightly closure, pictured below, would be cones dropped at 8 AM and picked up at 3 PM each day for two weeks. 29 Request An example of a Weekly closure, pictured below, would be cones dropped at 8 AM on Monday and picked up at 3 PM on Friday for two weeks. An example of a Continuous closure, pictured below, would be cones dropped at 8 AM on Monday, January 5 and picked up at 3 PM on Friday, January 16. An example of a Long Term closure, pictured below, would be cones dropped on January 5 and picked up on January 23. The end date is typically modified, as the end date gets closer. Long Term closures also need to be completed in the Modify interface when the work is complete. 30 Request SCHEDULE OVERRIDES Schedule Overrides are modifications to an existing closure when work is not being performed. Schedule Overrides are not to be used to extend existing closures. If the user chooses not to perform work on a day within their closure, they can do so by entering that date and time into the override section. This excludes the selected date and time from information reported to 511 for public viewing. For example, using the Daily/Nightly closure, if the user is not performing work on Wednesday, January 7, they would enter their information in as pictured below. This is a way to avoid having two separate closures for the same work operation, or to manage cancellations of work without canceling the entire closure request. Any additional feedback can go in the Schedule Override Comment. Multiple Schedule Overrides may be included from the original request by selecting the Attach button. 31 Request A closure is either a restriction or a full closure. When the Restriction radio button is selected, the Lane Detail drop down becomes a required field. When the Full Closure button is selected, the Lane Detail autopopulates with Full Closure. A detour route will now also be required in order to submit the closure. 32 Request DELAY INFORMATION Users have an option to Add Delay Info10 for any Priority Roadways, which then allows LCS to search for closures with those delay parameters. 10 33 Accept ACCEPT INTERFACE The Accept Interface is used to edit or accept closures that have been initially entered into the system but have not yet been accepted. Only users with a role providing authorization can accept closures. If the requestor would like to edit the closure prior to it being accepted, they may perform this action from the Accept interface. Furthermore, the user’s type and region settings will filter out any closures to which they are not allowed to take action upon. 2 1 Fill out the required region and then select Search1 to display results. Searching by Region/County and Highway will narrow the return to match only the closures desired. A user can only accept closures of the same user type. If the user knows the Closure ID (CID)2, they can enter into the CID box. 34 Accept There are three Closure Statuses on any entered closure3. 3 4 As with the Modify interface, a closure can be edited in the Accept interface. The user can View, Edit, Recommend Acceptance, Reject, Accept, or Delete4 a closure, based on the user’s role. 35 Accept EDIT In the Edit page, a user can Edit Date/Time5 of the general request (which will apply to all facilities). The date/time for one facility can also be modified within the Edit Facility8 option. In this view, a user can also edit the general request6, add a facility7, or edit any of the facilities associated with the general request. 5 6 7 8 36 Accept RECOMMEND ACCEPTANCE Depending on your user capability, you can recommend that a closure be accepted “as is”. It is assumed you reviewed the closure and recommend it. The user can also add optional comments if necessary. REJECT Depending on your user capability, you can recommend that a closure be rejected “as is”. It is assumed you reviewed the closure and will it to be deleted or edited. The user can also add optional comments if necessary. ACCEPT Clicking Accept8, will automatically accept the closure request, and change the request from “Entered” to “Accepted”9. 8 9 37 Accept DELETE ALL – DELETE FACILITY A user should only delete closures that were entered in error and never took place. The user can also add optional comments if necessary. Red closures that have taken place, should be accepted then cancelled or completed via the Accept interface. Delete ALL10 deletes the general closure along with all of its facilities. Delete Facility11 only deletes that selected facility. 10 11 For individual facilities, the user may Delete Facility, Add Schedule Override, or Add Delay Info (for Priority Roadways). 38 Modify MODIFY INTERFACE The Modify interface is where a user can edit or reschedule a closure that has been accepted. This interface also allows users to cancel individual facilities as well as the complete closure. Completing a closure effectively removes it from an active state so that it will become view only. Fill out the required fields denoted by an asterisk (*) and select Search1 to display results. 1 Much like in the Accept phase, users will be able to Edit, Cancel, or Complete2 a closure request. 2 39 Modify EDIT In the Edit page, a user can edit the Date/Time3 of the general request (which will apply to all facilities). The Date/Time for one facility can also be modified within the Edit Facility option. In this view, a user can also edit the general request4, add a facility5, or edit any of the facilities6 associated with the general request. 3 4 5 6 40 Modify CANCEL – CANCEL ALL If a facility closure will not be taking place as scheduled, the facility must be canceled before it’s removed from the list of active closures. If work has already been performed, “complete” the facility instead. The user can also add optional comments if necessary. Cancel ALL7 deletes the general closure along with all of its facilities. Cancel8 only deletes that selected facility. 7 8 41 Modify COMPLETE – COMPLETE ALL To remove facilities with a duration of 2 weeks or longer from the list of active closures, a user must “complete” the facility. You may also revise the closure end date at this time. Keeping in mind clicking Complete All will change all of the facilities under the general closure. Complete ALL9 completes the general closure along with all of its facilities. Complete10 only completes that selected facility. 9 10 42 Modify DATE/TIME PENDING If a user edits the Date/Time from the Modify interface (after the closure has been accepted), then the closure will have a date/time pending until the closure is accepted again. A user with acceptance authorization will be able to Accept, Reject, Recommend Accept, or Recommend Reject for the pending date/time. Unlike the initial acceptance that occurs from the Accept Interface, the acceptance process for date/time pending occurs within the Modify Interface. WHEN DO CLOSURE “FALL OFF”? Any closure not considered a long-term closure (less than 14 days in duration) will automatically become an inactive closure when its end date is greater than yesterday. Therefore the closure will “fall off” from the Modify interface and will become an inactive closure. The closure will be able to be found in the Search interface but can no longer be modified. All long-term closures (14 days or greater) must be manually completed in the system for the closure to “fall off”. 43 Search SEARCH INTERFACE The Search interface is a view to access all closures within the system. It also provides links to save individually displayed closures or all the displayed closures. 1 2 Fill in the required fields and select Search2 to display results. Note that the Date Range From field1 will automatically fill in the date you are searching. 44 Search Once the results are displayed, there is an additional MakeLike link3 that allows users to utilize a displayed closure’s general section as a template for a new closure. 3 45 Search Selecting the MakeLike link allows the user to add another closure with those same attributes carried over. 46 Search COMMA SEPARATED VALUE (CSV) The LCS gives users the ability to save closures outside of the LCS in a Microsoft Excel format. The user has the ability to do so in multiple areas of the LCS, such as Accept, Modify, Search, and Reports Interfaces. Clicking the CSV button4 will return a file with only the closure listed. Clicking on the CSV ALL dropdown bar5, will give the user the option to view a summary, expanded, contact information and delay reports. Once the desired field has been chosen, select Generate6. 5 4 6 47 Search The example below displays a Summary CVS report for all the closures listed. 48 Reports REPORTS INTERFACE The Reports interface is especially valuable to the Public Information role as they are allowed to modify closure details. All users can use the reports interface as an easy way to save and print closures that are “active” within the system, meaning that the closure has been or is currently accepted. 1 Fill in the required fields and select Search1 to display results. 49 Reports Once the results are displayed, there are additional links where a user can manually adjust data. The QA/QC General link2 is where the user can change data in the general section, much like editing a closure in the Modify interface. The QA/QC Facility link3 is where the user has the ability to change the begin and end locations, detour route, and facility external comments. 2 3 50 Reports QA/QC General Section: QA/QC Facility Section: 51 511 Local 511 LOCAL 511 Local is used to report construction closures on local streets ONLY. This information is reported out on the Closures portion of the 511 Construction Projects website (http://projects.511wi.gov/). This information is used primarily for public information. Depending on a user’s accessibility, they will see the following choices when they click on the 511 Local header. There is no acceptance process with this interface, therefore additions and modifications will automatically be accepted. The Search Local Road Closures interface is where a user can search for local road closures that have already been entered into the system. The Modify Local Road Closures interface is where a user can edit an existing local road closure. 52 511 Local The Add New Local Road Closure interface is where a user can actually add the local road closure. Be sure the appropriate Project ID1 and 511 Project2 is selected and all of the required field denoted by an asterisk (*) are filled out. Click Save to enter the closure into the system. Note that the Roadway Name field is a text box only, not a dropdown menu. Any closures on an Interstate, US, or State highway shall still be entered from the LCS Accept interface. 1 2 The 511 Project List interface lists projects that are entered into 511 Local. You may edit, add, and delete projects from this interface. These projects are what you use for the 511 Project dropdown2. 53 511 Local 54 Calendar EVENT CALENDAR INTERFACE The Calendar interface is for viewing special events (not event closures) that have been entered into the system. The purpose of the Calendar interface it to provide a repository of special events throughout the state to inform personnel requesting or accepting closures of potential events. Dependent on the user’s role, they can Edit and Delete events1. Also role dependent, is the ability to Add or Delete event attributes2. All required fields denoted by an asterisk (*) should be filled out, as well as supplementary information when available. Examples of event users would add are festivals, professional athletic events, large-attendance conventions and others. 2 1 55 E-mail EMAIL INTERFACE Users can sign up to receive daily or weekly e-mail reports by region or county from the Email interface. This interface should be used to manage a user’s own e-mail reports and/or other (external) e-mail addresses to receive reports. Daily e-mails are sent at 3:00 PM, provided a change has been made to the database (cancellations and additions constitute a change). Weekly e-mails are sent out every Friday at 3:00 PM for Saturday through the following Sunday’s work. Administrators have an additional control to manually send a daily e-mail report in the event a change was made after the daily report has been sent. 1 To add a new e-mail, select the Add New link1. An example of an e-mail preference is pictured below. 56 Preferences PREFERENCES INTERFACE The Preference Interface allows users to do the following: Edit Your Account Profile or Password1: Here users can change their name, e-mail address, title, organization, and contact information. View Only Access of User Information2: This interface lists all users (alphabetized by last name), displaying first name, last name, user ID, role, user type, region, and their acceptance authorization. Clicking a user’s User ID, will result in a pop up that provides contact information. View Only Access of Priority Roadways3: This interface lists all the priority roadways and corridors within those priority roadways. 1 2 3 57 Admin ADMIN INTERFACE The Admin interface has five links and is only available to those roles that have administrative authorization. 1 2 3 4 5 USERS The Users link1 allows a user to add, edit, or delete users including altering the role, type, region, and access authorization. This interface also allows for adding new LCS accounts, activating pending account requests, and adding new profiles to a user. 58 Admin MESSAGES The Messages link2 allows a user to add, edit, or delete messages within the system. E-MAIL The Email link3 is similar to the e-mail interface, but with access to all e-mail preference entries within the system. This is where users should add e-mail addresses of non-DOT personnel as all users can access and or change addresses here. 59 Admin PRIORITY ROADWAYS The Priority Roadways link4 allows the user to delete or edit priority roadways, and corridors within those priority roadways, that have been entered into the system. Users can also add new priority roadways within this interface. Priority Roadways are generally Interstate, freeway, or expressway, which will require Full Acceptance authorization to accept a closure. STN LANDMARKS The STN Landmarks link5 allows users with specific STN admin access to View, Edit, Delete, Add landmarks. Landmarks are the lane closure begin/end points that users select from a dropdown menu when they enter a closure. If a certain landmark is missing, needs to be revised, or no longer exists, it can be changed from this interface. 60 Resources DOCUMENTATION Various help tools are available at the link below at assist users with navigating the system. This link is available without logging into the LCS. Documents available include: • • • • User manual Quick reference guides Presentations Frequently asked questions http://transportal.cee.wisc.edu/closures/manual.html HELP Additional help tools are available via the HELP link within the LCS on the toolbar in the upper right of the screen. CONTACTS Contact information for the WisDOT regional work zone engineers and for the LCS system management is available at the CONTACT link within the LCS on the toolbar in the upper right of the screen (see above). Questions related to the LCS system may be sent to: [email protected] 61 Resources NOTIFICATIONS The LCS will send personalized, automated e-mails to users to notify the users of certain conditions. A summary of those e-mail notifications is below. 1. Pending/Past Start-Date Notice: E-mail sent to the primary and secondary contacts listed in the general section of the closure when the closure is less than two days or past the schedule start date and has not been accepted. 2. Pending Date/Time E-mail: E-mail sent to the requestor and acceptor of the closure once a pending date/time has been submitted. 3. Long-Term Closure E-mail: E-mail sent to the primary and secondary contacts listed in the general section of the closure when the long-term closure (greater than 14 days) is within two weeks of the end date and is required to be manually completed. 4. Friday Long-Term Closure E-mail: E-mail sent to the five regional work zone contacts on a weekly basis to flag closures that are past their end date. TRAINING SITE The LCS has a Training Site available for users to learn, practice, and test closures. The Training Site is like a sandbox for users to play with closures. However, others may modify previously submitted closures by other users. The Training Site also allows users to enter the system with different authorization, regions, roles, and types as shown in the screenshot below. http://transportal.cee.wisc.edu/training/WisLCS/Logon.do 62