1
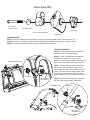
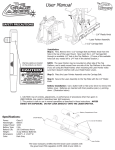
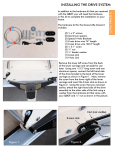
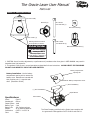
The Gracie Laser User Manual
Parts List
SAFETY PRECAUTIONS
(on reverse side)
M6 Knob (2)
M6 x 60mm
Hex Head bolt (1)
Hex Swivel Head (1)
Laser Pointer (1)
M6 x 45mm
Hex Head bolt (1)
Warning Labels are located
on the product, as shown:
LASER RADIATIONDO NOT STARE INTO BEAM
LASER DIODE
Wavelength: 650nM
Max Output Power: <1mW
This device complies with
21 CFR. Chapter I, Subchapter J
CLASS II LASER PRODUCT
ZHONGSHAN CITY NEWWISH METAL & ELECTRONICAL
GUANGDONG PROVINCE, CHINA
Manufactured date: JANUARY 2006
CAUTION
Main Swivel Attatchment (1)
ACTUAL SIZE
1. CAUTION: Use of controls, adjustments, or performance of procedures other than given in USER MANUAL may result in
hazardous laser light exposure.
2. This product is safe to use in normal operations as described in these instructions. AVOID DIRECT EYE EXPOSURE.
DO NOT LOOK DIRECTLY INTO THE LASER EMITTER.
Battery Compartment
Opening Tab
Battery Installation: Use the battery
compartment opening tab to remove the
battery cover. Batteries are inserted with
their possitive pole (+) opposite each
other. (Illustration shown)
Battery Compartment Cover
(+) End of AA Battery
(+) End of AA Battery
On/Off Button
Specifications:
Power:
Wavelength:
Output Power:
Battery Type:
Battery Life:
Weight:
Dimensions:
Color:
Class II
650nm
1mW
2 AA
150 Continuous hours
31.2g Without Batteries
6.929” L X 1.533” W
Blue
Laser Emitter
The Grace Company certifies that the Gracie Laser complies with
the government FDA regulation 21CFR 1040.10 and 1040.11.
Laser Assembly
M6 x 60mm
Hex Head bolt
Hex Swivel Head
M6 Knob
Main Swivel Attatchment
Laser Pointer
Assembly Steps:
Step 1: Insert the M6x60mm Hex Head Bolt through the Hex Swivel Head with the rounded portion up.
Step 2: Continue by pushing the bolt through the Main Swivel Attachment and through the Laser Pointer.
Step 3: Tighten the M6 Knob onto the of of the M6x60mm Hex Head Bolt.
Carriage Installation:
Step 1: Insert the M6x45mm Hex Head Bolt
through the Laser Pointer Assembly.
Step 2: Insert the M6x45mm Hex Head Bolt
through an available 1/4” hole in the Top
Platform. (If none of the available holes suit your
needs, drill a 1/4” hole in the desired location.)
Little Gracie II/GMQ-Pro
M6 Knob
NOTE: The Laser Pointer may be mounted on
either side of the Top Platform, and is easily
moved from one side of the Top Platform to the
other. If you are using the Pedal Pusher, when
mounting the Laser Pointer, make sure that it
doesn’t interfere with your Pedal Pusher Levers.
M6 x 45mm
Hex Head bolt
Step 3: Secure the Laser Assembly and bolt to
the Top Platform with the M6 Plastic Knob.
Pinnacle/Mini-Pinni
M6 Knob
M6 x 45mm
Hex Head bolt