1
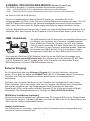
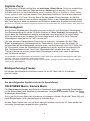
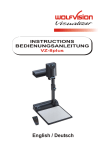
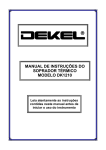
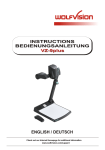
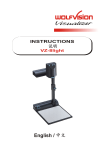
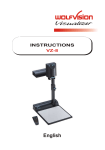
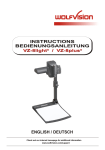
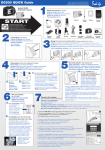
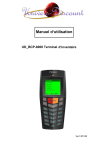
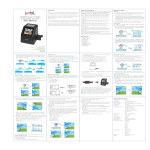
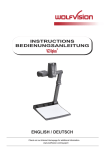
R
INSTRUCTIONS
BEDIENUNGSANLEITUNG
VZ-8light
English / Deutsch
PRECAUTIONS
WARNING!
RISK OF ELECTRIC SHOCK
DANGEROUS VOLTAGE INSIDE
Caution:
To reduce the risk of electric shock, do not open the
unit. No user serviceable parts inside. Refer servicing
to qualified service personal only!
Warning:
To reduce the risk of electric shock or fire, do not
expose this unit to rain, moisture or extreme heat!
Warning:
The external Power Supply has to be approved by
CSA or UL in accordance to CSA 22.2-60950 or
UL1310. The outputs have to be rated NEC power
class II and SELV.
This product is built according to Directive EMC and to Directive electrical equipment.
Proofments according to UL 60950. CSA 22.2-60950
FCC
"This device complies with Part 15 of the FCC Rules. Operation is subject to the following two
conditions: (1) this device may not cause harmful interference, and (2) this device must accept
any interference received, including interference that may cause undesired operation."
Manufacturer:
WolfVision GmbH, Vlbg. Wirtschaftspark, A-6840 Götzis, Austria
Tel. ++43-(0)5523-52250-0, Fax ++43-(0)5523-52249
E-Mail: [email protected], Internet Homepage: www.wolfvision.com
Made in: Austria (EU)
Printed in Austria
1
February 2004
9
ENGLISH
10
1
2
1
#1
#2
#3
#4
#5
#6
7
8
5
6
#7
#8
#9
3
#10
4
Connectors (3):
Camera head
Light
Connectors (on the back)
Working surface
Power on/off key
Light key (also works as White
Balance key if pressed for 3
seconds - see page 5)
Close up lens for camera
Pull ring
Auto focus on/off key
(a light above this key shows
that the auto focus is on)
Zoom keys (if the Zoom keys
are pressed simultaneously with
the Auto fucus key (9) they work
as manual FOCUS keys.
EXTERN IN
XGA
USB
RS 232
11
12
13
14
POWER
LB
15 16
#11 External input for Computers (see page 3) #12 RGBHV output (switchable)
#13 USB-port (see page 3)
#14 Serial control input RS232 (see page 6)
#15 Power connection 12V
#16 DC-output for lightbox (see page 3)
Setting up
1. Pull the arm upwards using the special pull ring (#8)
2. Turn the camera head (#1) and point it at the working surface
3. Connect the power adaptor to the DC-input (#15).
4. Connect your output unit (projector, monitor, video conferencing
unit etc.) to the appropriate output of the Visualier (#12 or #13).
IMPORTANT:
For choosing the right output mode please read the detailled
description on page 3!
5. Switch on the Visualizer with the power switch (#5)
Power-on preset:
The power-on preset is automatically activated when switching on the unit. The settings are:
Zoom size approx. 20 x 15 cm (A5), Autofocus on, Autoiris on, top light on.
2
Choosing the right output mode (XGA at 75Hz or 60Hz)
The RGBHV-output (#12) can output signals in the following formats:
- XGA (1024x768 pixel) at 75Hz
- XGA (1024x768 pixel) at 60Hz
.
The default setting is XGA (1024x768) at 60 Hz.
If you output the Visualizer image on a CRT-monitor or CRT-projector, use an output mode
with 75Hz, because 60Hz may show a slight image flickering. For LCD/DLP projectors or
monitors and video conferencing units 60Hz is the best choice. If you are unsure what is the
best mode read the user manual of the connected units.
You can change the output mode in the on-screen-menu of the Visulizer (see page 5).
USB-PORT
The USB output of the VZ-8light can be used to transfer
Visualizer images onto a computer in just 2 seconds. No
additional computer hardware (like a grabber card) is required. In
this way the Visualizer can be used as a 3-D scanner for your
computer. Just connect the USB port (#13) of the Visualizer and
the USB port of your computer, using the supplied USB cable.
A dedicated WolfVision USB-software can be downloaded from WolfVision's Internet
homepage at: www.wolfvision.com/wolf/techinfo.html. The software works under Windows
98, ME, 2000 and XP. Windows 95 and NT will not work, because they do not support USB.
EXTERNAL INPUT
A Computer can be connected to the External RGBHV input (#11) of the Visualizer.
Press the Power-key (#5) for 2 seconds to switch between the Visualizer and
Computer image to be displayed to the audience.
The signal from the computer is just looped through the Visualizer and is not processed
in any way. In order to avoid that your projector or monitor adjusts itself when switching,
it is recommended that you set the output of the computer to the same signal format
(XGA) and vertical frequency (75 or 60Hz) as the Visualizer. The default
output settings of the Visualizer is: XGA (1024x768) at 60Hz.
WolfVision lightboxes (optional)
Connect the power cord to the light box connector (#16) on the back side of the Visualizer.
The light switch (#6) of the Visualizer can now be used to switch between the light of the
Visualizer and the light of the lightbox.
Other lightboxes:
In order to prevent reflections the light of the Visualizer always has to be switched off when
working with lightboxes.
3
Shooting area on the working surface:
Eliminating reflections
In order to eliminate reflections (on high gloss photographs etc.)
just turn the light backwards slightly.
Please note that reflections can also be caused by the room light.
Shooting area outside of the working surface:
to infinity
Turning the light backwards
In order to enable recordings with
illumination outside of the working
surface, the light of the Visualizer
can be horizontally turned an
angle of up to 250 degrees.
Close-up adaptor lens
For shooting an object outside the working surface, in a further distance to the unit, the close up
lens (#7) has to be removed.
In this case just pull the lens away from the main optic Of the camera until it reaches the locked
position. It is impossible to remove the lens completely from the unit, therefore it can not get
lost. Before turning back the camera into the standard working position push the close up lens
back in.
Autofocus:
When switching on the unit the autofocus is automatically switched on too. The correct focus is
continuously adjusted. The green light beside the autofocus on/off switch (#9) is illuminated if
the autofocus is on.
.
Please note that objects with a very low contrast (like a blank sheet of paper) are difficult to
focus. If the autofocus does not work just move the object slightly.
.
For special applications the autofocus can also be switched off using the AF on/off switch (#9).
The autofocus is also switched off when the manual Focus are used (see manual focusing).
Manual focusing
For manual focusing press AF-key (#9) (hold it down) and focus with the zoom keys (#10).
4
Digital Zoom
Please note that the VZ-8light has an optical 12x zoom, which is digitally increased to a 24x
zoom. The smallest pickup size on the working surface without (!) digital zoom is 33 x 25mm
(1.3" x 1"). When you zoom in further the digital zoom is automatically activated and the
smallest pickup size is 17 x 13mm (0.7" x 0.5”). However please be aware that when the
digital zoom is used the resolution of the picture is not as good as before. The default setting
is that the zoom stops and a message appears on-screen when the digital zoom mode is
reached.
You can change the behaviour of the Visualizer in the digital zoom mode in the on-screen menu (see below).
White balance:
Correct white balance adjustment is important for true colors! The default white balance
setting when the VZ-8light is shipped is "Auto Tracking". This means that the white balance
is continuously adjusted. If the colors appear to be wrong try to move any object in the
picture. However an "Auto Tracking" white balance can never be 100% correct.
.
For a more precise white balance adjustment use the "One Push" white balance. This can
be done by completely zooming in a white paper on the working surface and pressing the
LIGHT-key (#6) for 3 seconds. When the white balance is stored an on-screen message
appears. Setting a "One Push" white balance switches off the "Auto Tracking" mode and the
current white balance setting remains in the memory even when the unit is switched off.
When the lighting conditions change (e.g. different room light or sunlight) the white balance
should be readjusted!
For specialists: The VZ-8light can be switched between "Auto Tracking", "One Push" and "Manual" white balance
mode in the on-screen menu (see below).
If you work with negative transparencies and an external light box, use a blank (dark) piece of the negative film for
white balance adjustment!
Image Freeze Function
You can freeze the current image by just pressing the AF-key (#9) for 2 seconds.
The following chapters are for experienced users only:
ON-SCREEN MENU
For standard use of the WolfVision Visualizer it is not necessary to go into the Visualizer's
menu and change settings. Inexperienced users should not make any adjustments there.
To enter the on-screen menu press the AF-key (#9) and both ZOOM-keys (#10)
simultaneous for one second.
Settings of the Visualizer's basic functions and the built-in camera can be made here. Use
the AF-key (#9) to select and the ZOOM-keys (#10) to navigate in the menu
5
SWITCHING TO NEGATIVE, NEGATIVE/BLUE and
BLACK/WHITE
The output image of the Visualizers can be switched from positive to negative in the
on-screen menu. In addition the background of a negative image can be switched to
blue for better readability of text. You can also switch between color and black and white
in the on-screen menu.
Auto Power off
In the "Power-On Settings” settings of the on-screen menu you can select that the
Visualizer will be automatically switched off, if it is not used for a certain time.
Changing the standard contrast (color) settings
If the picture or the colors on your screen appear to be too dark, you can lower the
overall contrast of the picture in the "Color settings" menu of the on-screen menu.
RESET OF ON-SCREEN MENU SETTINGS
All settings in the on-screen menu can be set back to the factory defaults.
“Reset Complete Menu" is one item in the on-screen menu.
Firmware Upgrades
The firmware (software) of your Visualizer can be
upgraded to the latest version. This can be done by
connecting a computer or a modem to the RS232 port of
your Visualizer.
Please consult your WolfVision dealer or check the
WolfVision homepage at:
http://www.wolfvision.com/wolf/fware.html
Serial control input, RS 232
1 2 3 4 5
9-pin D-Sub connector on unit
male, front side
6 7 8 9
Pins:
2: RX, 3: TX, 5: GND, 7: RTS, 8: CTS
Baud rate: 19200 or 9600, databits: 8, stopbit: 1, parity: no
Please note that DecimaI-Codes (=ASCII-Codes or Hex-Codes)
must be sent as one single byte (e.g. 199 and not: 1 + 1 + 9) !
Function: Decimal-Code :
Image on
192
Iris open
193
Focus far
194
Zoom wide
195
Image off
196
Iris close
197
Focus near
198
Zoom tele
199
Preset 1
202
Preset 2
203
Save Preset 1
216
Save Preset 2
217
Preset max. wide 229
Preset A5
231
Preset A6
232
Preset max. tele
235
A detailed description of the serial protocol can be found on our internet homepage:
www.wolfvision.com/wolf/techinfo.html
6
Technical Data
VZ-8light
Camera
Output signals
Pictures per second (as picked up by the camera)
Horizontal resolution (Progressive Scan)
Vertical resolution (Progressive Scan)
Effective pixel
(=pixels which are actually used for the image information)
Total pixels of CCD
Color reproduction
Vertical image-frequency
Horizontal image-frequency
Signal format
Iris
White balance adjustment
Fokus
On screen menu with menu-reset function
Upgradeable firmware
Lens / zoom
Max object height on working surface
Max. pick-up area on working surface
Min. pick-up area on working surface (without digital Zoom)
Min. pick-up area on working surface (with digital Zoom)
Max object height outside of the working surface
Depth of focus (Depth of field) small Objects (42 x 33mm)
Depth of focus (Depth of field) large Objects (360 x 270mm)
Disturbing stray light
Blinding of audience or speaker
Reflection free area
Light source
1/3" 1-CCD progressive Scan
XGA (1024x768 Pixel), USB
20
640 lines
640 lines
USB-Software
Time for still image capture through USB software
Quick recordings outside of the working surface possible
Intelligent folding system
User programmable presets
Special working plate for transparencies
Image memory
Alternative image display
Inputs
Progressive scan outputs
USB-Port
RS232-Port
(serial protocol with position setting and status report)
Weight / Portability
Power (external power supply)
Supplied accessories
Optional accessories
Made in
810.000
840.000
very good colors
progressive Scan: 75 Hz or 60 Hz (switch able)
progressive Scan: 60,2 - 80 kHz
Non-Interlaced (progressive Scan)
automatic or manual
automatic or manual
automatic or manual
yes
yes (updates downloadable from www.wolfvision.com)
24 x Zoom (12x optical + 2x digital)
150mm in Tele position and 370mm in Wide position
length: 276mm, width: 370mm
33mm x 25mm
17mm x 13mm
unlimited
10mm
260mm
Almost none
none
284 x 230mm
high frequency fluorescent lamp (9W)
included on CD-ROM (for Windows 98/ME/2000/XP,
Updates available on www.wolfvision.com)
2 seconds
yes
yes - pneumatic arm
3 (plus 8 fixed) presets trough RS232
yes
1 image (Freeze-function)
negative, negative/blue, black/white
RGBHV (15-pin D-Sub-plug) for PCs
(the computer signal looped through)
RGBHV (15-pin D-Sub-plug)
yes (USB1.1)
9-pin D-Sub plug
(for external control and software updates)
4,5 kg, portable
Multi Range 100-240 V, Weight: 0.3kg
power cord, power supply, Instructions, XGA-cable,
carrying case
lightbox LB-7K, lightbox LB-38
Austria (EC)
Specifications and availability subject to change !
150mm (5.9")
405 mm (15.9")
7
310 mm (12.2")
113 mm (4.5")
405 mm (15.9")
260 mm (10.2")
485 mm (19")
580 mm (22.9")
121 mm
(4.8")
150 mm
(5.9")
235mm (9.2")
Changing the lamp of the
Visualizer:
1. Remove the power cord of
the Visualizer.
2. Remove lamp housing glass.
(1 Screw)
3. Remove the safety clip
4. Change the lamp.
CAUTION: Hot when used!
Lamp type: Osram Dulux S/E
9W/21 or equivalent
VORSICHTSMASSNAHMEN
WARNUNG!
ELEKTROSCHOCKRISIKO - Gefährliche
Spannung im Geräteinneren
Achtung:
Das verwendete Netzteil benötigt eine europäische Zertifizierung
nach EN 60950 oder von CSA/UL nach UL60950 oder UL1310.
Die Ausgänge müssen SELV mit begrenzter Leistung einhalten.
This product is built according to Directive EMC and to Directive electrical equipment.
Proofments according to UL 60950. CSA 22.2-60950
FCC
"This device complies with Part 15 of the FCC Rules. Operation is subject to the following two
conditions: (1) this device may not cause harmful interference, and (2) this device must accept
any interference received, including interference that may cause undesired operation."
Herstellerr:
WolfVision GmbH, Vlbg. Wirtschaftspark, A-6840 Götzis, Austria
Tel. ++43-(0)5523-52250-0, Fax ++43-(0)5523-52249
E-Mail: [email protected], Internet Homepage: www.wolfvision.com
Hergestellt in: Austria (EU)
Gedruckt in Österreich
1
February 2004
DEUTSCH
9
10
2
1
#1
#2
#3
#4
#5
#6
7
8
5
6
#7
#8
#9
3
#10
4
Anschlüsse (3)
Kamera-Kopf
Licht
Anschlüsse (rückwärts, siehe unten)
Arbeitsfläche
Power-Taste
Licht-Taste (arbeitet auch als Weissabgleich-Taste wenn 3 Sekunden lang
gedrückt - siehe Seite 5)
Nahlinse für Kamera
Ziehvorrichtung
Autofokus Ein/Aus Schalter
(grünes Licht leuchtet, wenn der
Autofokus eingeschalten ist)
Zoom-Tasten (wenn die Zoom-Tasten
zusammen mit der Autofokus-Taste
gedrückt werden, dann werden sie
zu FOKUS-Tasten
EXTERN IN
XGA
USB
RS 232
11
12
13
14
#11 Externer Eingang für Computer (Seite 3)
#13 USB-Anschluß (Seite 3)
#15 DC-Eingang 12V
POWER
LB
15 16
#12 RGBHV Ausgang (schaltbar)
#14 Serielle Schnittstelle RS-232 (Seite 6)
#16 DC-Ausgang für Lichtbox (Seite 3)
Aufstellung des Visualizers
1. Arm mit der speziellen Ziehvorrichtung (#8) nach oben ziehen
2. Kamerakopf (#1) in Richtung Arbeitsfläche drehen
3. Netzgerät am DC-Eingang (#18) anschliessen
4. Ihr Ausgabegerät (Projektor, Monitor, Videokonferenzanlage etc.)
an den passenden Ausgang (#12 oder #13) des
Visualizers anschliessen
Wichtig:
Lesen Sie bitte unbedingt die Hinweise zur Auswahl des
richtigen Ausganges auf Seite 3!
5. Mit dem Netzschalter (#5) das Gerät einschalten
Power-on Preset
Mit Einschalten des Visualizers werden automatisch folgende Einstellungen hergestellt:
Aufnahmefläche ca. 20x15 cm (A5), Autofokus an, Autoiris an, Oberlicht an.
2
AUSWAHL DES AUSGANGS-MODUS (XGA bei 75 oder 60 Hz)
Der RGBHV-Ausgang (12) können folgende Signalformate ausgeben:
- XGA
- XGA
(1024x768 Pixel) bei 75Hz (Standardwert nach Reset der Einstellungen)
(1024x768 Pixel) bei 60Hz (Standardwert wenn Auto Resolution nicht funktioniert)
.
.
Ab Werk ist XGA bei 60Hz aktiviert.
Wenn Ihr Ausgabegerät ein Röhren-Monitor/Projektor ist, verwenden Sie einen
Ausgangsmodus mit 75Hz, da bei 60Hz ein leichtes Bildflimmern sichtbar sein kann. Für LCD
oder DLP Monitore/Projektoren und Videokonferenzgeräte sind jedoch 60Hz die bessere
Wahl. Lesen Sie hierzu auch die Bedienungsanleitungen der angeschlossenen Geräte.
Falls der angeschlossene Monitor oder Projektor die eingestellte Bildwiederholfrequenz nicht
darstellen kann, dann können Sie die Frequenz im On-Screen-Menü ändern (siehe Seite 5)
USB - Anschluss
Der USB-Anschluß des VZ-8plus kann zur schnellen Übertragung
von Bildern vom Visualizer zum Computer verwendet werden.
Keine zusätzliche Computer-Hardware (wie z.B. eine GrabberCard) ist hierfür notwendig. Auf diese Weise kann der Visualizer
als 3-D Scanner für den Computer verwendet werden. Verbinden
Sie einfach den USB-Anschluß (#13) des Visualizers mittels
beiliegendem USB-Kabel mit dem USB-Anschluß Ihres PCs.
Eine spezielle WolfVision USB-Software finden Sie auf der WolfVision Homepage unter
www.wolfvision.com/wolf/techinfo.html. Die Software läuft unter Windows 98, ME, 2000
und XP. Windows 95 und NT werden jedoch nicht unterstützt, da diese beiden älteren
Betriebssysteme noch keine USB-Schnittstellen kennen.
Externer Eingang
Ein Computer kann über den Externen Eingang (#11) mit dem Visualizer verbunden
werden. Durch gedrückt halten der POWER-Taste (#5) für 2 Sekunden können Sie zwischen
Visualizer und Computer wechseln um Bilder abwechselnd von beiden Medien zu
präsentieren.
Die Daten vom Computer werden durch den Visualizer nur durchgeschleift und in keiner
Weise verändert. Um zu verhindern, dass sich Ihr Projektor oder Monitor beim Umschalten
neu einstellt, empfehlen wir, das Ausgangssignal Ihres Computers auf das selbe
Signalformat (XGA) und die selbe vertikale Frequenz (75 od. 60Hz) wie die des VZ-8light
einzustellen. Die Werkseinstellung beim VZ-8light ist: XGA (1024x768) bei 60Hz.
WolfVision Lichtboxen (optional):
Schliessen Sie das Stromkabel der Lichtbox an den DC-Ausgang (#16) auf der Rückseite des
Visualizers an. Mit dem Lichttaster (#6) kann nun zwischen dem Licht für die Arbeitsfläche und
dem Licht der Lichtbox umgeschaltet werden.
Andere Lichtboxen:
Um Reflektionen zu vermeiden, muss das Licht des Visualizers immer ausgeschaltet sein,
wenn eine Lichtbox verwendet wird.
3
Aufnahmen auf der Arbeitsfläche
Vermeidung von Reflektionen
Um Reflektionen (auf glänzendem Material wie z.B. Photos)
zu vermeiden, muss oft nur das Licht des Visualizers leicht
nach hinten geschwenkt werden. Bitte beachten Sie, dass
auch das normale Raumlicht Reflektionen bewirken kann.
Aufnahmen ausserhalb der Arbeitsfläche
to infinity
Das Licht nach hinten schwenken um
Aufnahmen mit Beleuchtung ausserhalb der
Arbeitsfläche zu ermöglichen, kann das Licht
des Visualizers horizontal bis zu 250 Grad
geschwenkt werden.
Nahlinse
Um Objekte außerhalb der Arbeitsfläche in einer grösseren Entfernung aufzunehmen muss
die Nahlinse (#7) entfernt werden. In diesem Fall ziehen Sie die Nahlinse aus dem Kamerakopf.
Es ist nicht möglich die Linse komplett zu entfernen. (Damit sie nicht verloren gehen kann).
Um wieder Aufnahmen auf der Arbeitsfläche machen zu können, schieben Sie die Nahlinse
wieder in die ursprüngliche Position (vor der Kameraoptik).
Autofokus
Der Autofokus ist nach Einschalten des Gerätes automatisch in Betrieb und stellt die optimale
Schärfe ein. Wenn der Autofokus eingeschaltet ist, leuchtet das grüne Licht über der
Autofokus-Ein/Aus-Taste (#9). Bitte beachten Sie, dass kontrast-schwache Objekte (z.B. ein
leeres Blatt Papier) einem Autofokus immer Probleme bereiten kann. In einem solchen Fall
bewegen Sie das Objekt leicht. Für spezielle Anwendungen kann der Autofokus mit dem
Ein/Aus-Taster (#9) abgeschaltet werden. Der Autofokus wird ebenfalls ausgeschaltet, sobald
manuell fokusiert wird.
Manueller Fokus
Die AF-Taste (#9) gedrückt halten und mit den ZOOM-Tasten (#10) fokusieren.
4
Digitales Zoom
Der Wolfvision VZ-8light verfügt über ein optisches 12-fach Zoom. Durch ein zusätzliches
Digitalzoom (2-fach) kann der Zoombereich auf 24-fach erhöht werden. Der kleinste
Aufnahmebereich auf der Arbeitsfläche ohne(!) digitales Zoom ist 33x25mm. Wenn weiter
hinein gezoomt wird, wird das digitale Zoom automatisch aktiviert. Der kleinste Aufnahmebereich ist dann 17x13mm. Wichtig: Wenn Sie das digitale Zoom einsetzen, ist die BildAuflösung nicht mehr so hoch wie beim optischen Zoom. In der Standardeinstellung stoppt
das Zoom und eine Meldung erscheint am Bildschirm sobald das Digitalzoom erreicht wird.
Sie können das Verhalten des Gerätes im digitalen Zoombereich im On-Screen-Menü des Visualizers ändern (siehe Seite unten)
Weissabgleich
Eine korrekte Weissabgleich-Einstellung ist sehr wichtig für eine Echtfarben-Wiedergabe.
Die Werkseinstellung bei neuen VZ-8light Geräten ist "Auto Tracking" Weissabgleich. Das
heisst, dass der Weissabgleich ständig automatisch nachjustiert wird. Falls die Farben
nicht korrekt erscheinen, bewegen Sie einen Gegenstand im Bild. Ein "Auto Tracking"
Weissabgleich kann jedoch nie 100% korrekt sein.
Um eine präzisere Weissabgleich-Einstellung zu erreichen, verwenden Sie den "One
Push" Weissabgleich (=Weissabgleich auf Tastendruck). Hierfür legen Sie einfach ein
weisses Blatt auf die Arbeitsfläche, zoomen es ein und drücken dann die LICHT-Taste (#6)
für 2 Sekunden. Wenn der Weissabgleich gespeichert wurde, erscheint eine Meldung im
Bild. Das Abspeichern eines "One Push" Weissabgleiches schaltet auch den "Auto
Tracking" Modus ab und der gespeicherte Weissabgleich bleibt auch nach Ausschalten
des Visualizers erhalten.
Für Spezialisten: Im On-Screen Menü des Visualizers (siehe unten) kann zwischen den Weissabgleich-Arten "Auto
Tracking", "One Push" und "Manual" umgeschalten werden.
Wenn Sie mit negativen Filmen auf einer externen Lichtbox arbeiten, benutzen sie einen leeren (dunklen) Teil des
Filmes für den Weissabgleich.
Bildspeicherung (Freeze)
Sie können das aktuelle Bild einfrieren indem Sie die AF-Taste (#9) für 2 Sekunden
gedrückt halten.
Die nachfolgenden Kapitel sind nur für Spezialisten!
ON-SCREEN Menü / Kamera Menü
Für Standardanwendungen des WolfVision Visualizers ist es nicht notwendig Einstellungen
im On-Screen-Menü des Visualizers vorzunehmen. Unerfahrene Anwender sollten hier keine
Änderungen durchführen.
Um in das On-Screen Menü des Visualizers zu gelangen, drücken Sie die AF-Taste (#9) und
beide Zoom-Tasten (#10) gleichzeitig eine Sekunde lang.
Mit den Zoom-Tasten kann nun im Menü navigiert werden und mit der AF-Taste werden die
einzelnen Einstellungen angewählt bzw. geändert.
5
NEGATIV, NEGATIV BLAU und SCHWARZ/WEISS Modus:
Das vom Visualizer ausgegebene Bild kann im On-Screen-Menü von Positiv auf Negativ
umgeschaltet werden. Zusätzlich kann der Hintergrund einer negativen Vorlage zur besseren
Lesbarkeit Blau dargestellt werden. Auch Schwarz/Weiss Darstellungen sind über das OnScreen Menü möglich.
Ändern der Standard Kontrast (Farb) Einstellungen
Falls Ihnen das Bild auf Ihrem Bildschirm zu kontrastarm erscheint, können sie den
grundlegenden Kontrast des Bildes in den "Color settings" des On-screen-Menüs verändern.
Auto Power off
In den "Power-On Settings” Einstellungen des On-Screen Menüs können Sie einstellen, dass
der Visualizer sich nach einen gewissen Zeit selbst abschaltet, wenn er nicht verwendet wird.
Zurücksetzen von ON-SCREEN Menü-Einstellungen
Alle Einstellungen im On-Screen Menü können auf die Werkseinstellungen zurückgesetzt
werden. "Reset" ist ein Punkt im On-Screen Menü.
Firmware updates
Die Firmware (=Gerätesoftware) Ihres Visualizers kann
auf die neueste Version aktualisiert werden. Dies erfolgt
durch Anschluss eines Computers oder eines Modems an
die RS-232-Schnittstelle des Visualizers.
Bitte konsultieren Sie hierfür ihren WolfVision Händler
oder die WolfVision Homepage, unter:
www.wolfvision.com/wolf/techinfo.html
Serielle Schnittstelle, RS 232
Die serielle Schnittstelle kann verwendet werden um den
Visualizer durch ein externes Gerät zu steuern (z.B. eine Fernbedienung für einen gesamten Konferenzraum).
1 2 3 4 5
9-Pol D-Sub Stecker am Gerät
männlich, Vorderseite
6 7 8 9
Funktion: Dezimal-Code :
Image on
192
Iris open
193
Focus far
194
Zoom wide
195
Image off
196
Iris close
197
Focus near
198
Zoom tele
199
Preset 1
202
Preset 2
203
Save Preset 1
216
Save Preset 2
217
Preset max. wide
229
Preset A5
231
Preset A6
232
Preset max. tele
235
Kontakte: 2: RX, 3: TX, 5: GND, 7: RTS, 8: CTS
Baud Rate: 19200 or 9600, databits: 8, stopbit: 1, parity: no
Bitte beachten Sie, dass Dezimal-Codes (=ASCII-Codes oder Hex-Codes)
immer als ein einziges Byte gesendet werden müssen (z.B. 199 und nicht: 1 + 1 + 9)!
Eine detaillierte Beschreibung finden Sie in unserer Homepage:
www.wolfvision.com/wolf/techinfo.html
6
Technische Daten
VZ-8light
Kamera
Ausgangs-Signale
Bilder pro Sekunde (von der Kamera aufgenommen)
Horizontale Auflösung (Progressiv Scan)
Vertikale Auflösung (Progressiv Scan)
Effektive Pixel (=Pixel die tatsächlich für die Bildinformation
verwendet werden)
Pixel der CCD (gesamt)
Farben
Vertikale Bildfrequenz
Horizontale Bildfrequenz
Signal-Format
Iris (Blende)
Weißabgleich
Fokus
On Screen Menü mit Menü-Rückstellungsfunktion
1/3" 1-CCD Progressiv Scan
XGA (1024x768 Pixel), USB
20
640 Linien
640 Linien
810.000
Upgratebare Firmware (Geräte-Software)
Optik / Zoom
Max. Objekthöhe auf der Arbeitsfläche
Max. Abtastbereich auf der Arbeitsfläche
Min. Abtastbereich auf Arbeitsfläche (ohne digital Zoom)
Min. Abtastbereich auf Arbeitsfläche (mit digital Zoom)
Max. Objekthöhe außerhalb der Arbeitsfläche
Tiefenschärfe bei kleinen Objekten (42 x 33mm)
Tiefenschärfe bei großen Objekten (360 x 270mm)
Störendes Streulicht
Blenden von Vortragendem oder Publikum
Reflektionsfreier Bereich
Lichtquelle
USB-Software
Zeit des Einlesens eines Bildes durch die USB software
Schnelle Aufnahmen außerhalb der Arbeitsfläche möglich
Intelligentes Faltsystem
Anwenderprogrammierbare Presets
Spezielle Arbeitsplatte für Folien
Bildspeicher
Alternative Bildwiedergabe
Eingänge
Progressiv Scan Ausgänge
USB-Anschluss
RS232-Anschluß
(Protokoll mit Positionierung und Rückmeldung)
Gewicht / Tragbarkeit
Netzanschluss (Externes Netzteil)
Mitgeliefertes Zubehör
Optionales Zubehör
Made in
840.000
sehr gute Farben
Progressiv Scan: 75 Hz oder 60 Hz (umschaltbar)
Progressiv Scan: 60,2 - 80 kHz
Non-Interlaced (Progressiv Scan)
automatisch und manuell
automatisch und manuell
automatisch und manuell
ja
ja (Updates können von www.wolfvision.com
heruntergeladen werden)
24 x Zoom (12x optisch + 2x digital)
150mm in Tele und 370mm in Wide-Stellung
Länge: 276mm, Breite: 370mm
33mm x 25mm
17mm x 13mm
unlimitiert
10mm
260mm
Nahezu keines
keines
284 x 230mm
Hochfrequenz-Neonlicht (9W)
inkludiert auf CD-ROM (für Windows 98/ME/2000/XP,
Updates erhältlich unter www.wolfvision.com)
2 Sekunden
ja
Ja – pneumatischer Arm
3 (plus 8 fixe Presets) über RS232
ja
1 Bild (Freeze-Funktion)
Negativ, Negativ/Blau, Schwarz/Weiß
RGBHV (15-Pol D-Sub-Buchse) für PCs
(Das Computersignal kann durchgeschlauft werden)
RGBHV (15-Pol D-Sub-Buchse)
Ja (USB1.1)
9-pol D-Sub Stecker (für externe Ansteuerung und
Firmware Updates)
4,5 kg, tragbar
Multi Range 100-240 V, Gewicht: 0.3kg
Netzkabel, Netzteil, Bedienungsanleitung, XGA-Kabel,
Tragekoffer
Lichtbox LB-7K, Lichtbox LB-38
Austria (EC)
Technische Änderungen und Lieferbarkeit vorbehalten !
150mm (5.9")
405 mm (15.9")
7
310 mm (12.2")
113 mm (4.5")
405 mm (15.9")
260 mm (10.2")
485 mm (19")
580 mm (22.9")
121 mm
(4.8")
150 mm
(5.9")
235mm (9.2")
Wechseln der Lampe des Visualizers
1. Entfernen Sie das Netzkabel vom
Visualizer
2. Entfernen Sie die Plexiglas-Abdeckung
des Lampengehäuses (eine Schraube)
3. Lösen Sie denSicherungsbügel
4. Wechseln Sie die Lampe
ACHTUNG: Nach Gebrauch heiss
Lampentype: Osram Dulux S/E
9W/21 oder baugleiche
R
CODES:
9
10
2
1
7
8
5 6
3
4
ENGLISH:
Freezing Images:
Press the AF-key (#9) for 2 sec.
Activating the on-screen menu:
Press the AF-key (#9) and both ZOOM-keys (#10) simultaneous for 1 sec.
Manual Focus:
Focus near: Simultaneously press the AF-key (#9) and the ZOOM-tele-key (#10) on the camera head
Focus far: Simultaneously press the AF-key (#9) and the ZOOM-wide-key (#10) on the camera head
Extern / Intern signal:
Press the Power-key (#5) for 2 sec to to loop through the computer signal.
DEUTSCH:
Bild einfrieren:
Drücken Sie eine AF-Taste (#9) 2 Sekunden lang
.
Aktivieren des On-Screen Menüs:
Drücken Sie die AF-Taste (#9) und beide ZOOM-Tasten (#10) 1 Sekunde lang
..
Manueller Fokus:
Fokus nah: Drücken Sie gleichzeitig die AF-Taste (#9) und die ZOOM-tele-Taste (#10) am Kamerakopf
Fokus fern: Drücken Sie gleichzeitig die AF-Taste (#9) und die ZOOM-wide-Taste (#10) am Kamerakopf
Extern / Intern Signal:
Drücken Sie die POWER-Taste (#5) 2 Sekunden lang um das Computerbild durch zu schlaufen
Printed in Austria - February 2004