1
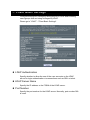
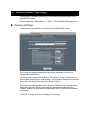
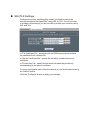
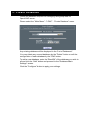
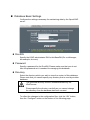
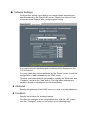
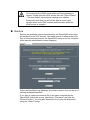
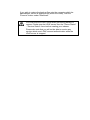
LDAP Manual 2 HDE Controller X LDAP Manual Please note that this user manual may be subjected to change due to product upgrades without any prior notice. HDE and HDE Controller is a registered trademark of HDE, Inc. All group names and product names listed in this manual are registered trademarks to each of the groups and products respectively. This manual may only be copied by printing in PDF format. Any other forms of copying, transferring, loaning, adapting, translating, or public distribution of this manual is not allowed. Reprinting or reproducing this manual without HDE's permission is strictly forbidden. © 2011 HDE, Inc. LDAP 3 How to Read this Manual About this Manual The “HDE Controller Installation Manual” provides users with instructions to installing OS and the HDE Controller (this Product) as well as steps for configuring the initial settings of the Product. Annotations are provided for any matters requiring special attention and phrase supplements. Any matters which require special attention are marked with this "Alert" icon in bold frame. Contents which provide useful reference for using HDE Controller are marked with this "Hint" icon. 4 HDE Controller X LDAP Manual HDE Controller X LDAP LDAP Summary Please be sure to specify the domain administrator name and password as they are required when adding the domain member machine to the Windows machine. LDAP (Lightweight Directory Access Protocol) is a service that manages and searches data associated with a network user's environment such as E-mail address and account information. Incorporating LDAP for account management is useful when you are using multiple computers. By registering your account information (LDAP account) on LDAP, you will be able to login with one username and password on every computer you are working on without having the need to create a new user account on each computer. HDE Controller provides an easy tool for users to register and authenticate (LDAP authentication) using LDAP accounts. Encrypting LDAP Communication Port number 389 will be used for the communication between the LDAP server and the client. Since the data transferred by LDAP contains confidential contents such as account information and passwords, users may choose to set an encryption to the transfers to prevent wire tapping from any unauthorized third-party. For encrypting the communication, you may choose between using SSL which uses the encryptionexclusive port (ldaps: 636) or STARTTLS which check the encryption support status of the client before applying encryption and uses the normal port (ldap: 389) regardless of whether encryption is applied or not. Services which allow LDAP Authentication A list of common services which allow authentication by LDAP: z HDE Controller Administrator Screen z login z telnet z ssh z ftp (vsftpd) z pop3 z imap (dovecot)1 z pop before smtp (sendmail,postfix) z smtp auth (postfix)2 z smb 1 HDE Controller 6.1 Professional / Virtual / LG Edition do not support cyrus-imapd. 2 You may only set SMTP auth on postfix for HDE Controller 6.1 Professional Edition. LDAP authentication may be disabled due to defect in the packages included in distribution media such as CD-ROMs. Please be sure that the packages provided by your distributor are updated to the newest version before configuring LDAP authentication. Setting up LDAP Authentication General procedures for setting up LDAP authentication is as follows: z (1) Construct/Configure the LDAP Server To enabled LDAP authentication, first you will require a LDAP server that is setup on an environment supported by HDE Controller. If such server is does not exist, please install the OpenLDAP Server Package from the distribution media (CD-ROM, etc.) on the computer which you wish to setup the LDAP server. After acquiring the OpenLDAP server package, go to the "LDAP" - "Server Basic Settings" menu and the "Create Database" menu to configure the settings for your OpenLDAP server. Please refer to the "Server Basic Settings" and "Create Database" sections of this manual for detailed explanation on these menus. z (2) Enable LDAP Authentication Once the LDAP server is setup, proceed to the LDAP authentication setting screen from the "LDAP" - "Basic Client Settings" and configure the LDAP server name and the LDAP database (BaseDN) to be connected to. This configuration procedure must be performed on the HDE Controller administrator screens of all of the computers with HDE Controller 5 Professional/LG Edition installed. Please refer to the "Client Basic Settings" section of this manual for detailed explanation on these menus. z (3) Register a LDAP Account Register a LDAP account from the "LDAP Accounts" - "Add User" menu on a computer which enables LDAP authentication. This operation can be performed from the administrator screen of any computer which enables LDAP authentication. Please refer to the "LDAP Account" manual for details. Please be aware that the use of Naming Service Caching Daemon (nscd) will cause LDAP data updates and deletions to be reflected on the system incorrectly and lead to unexpected errors. Please stop and disable nscd daemon if it is operating on your system. Please note that if you attempt to execute the "authconfig" command provided by your distribution after setting up LDAP via HDE Controller, the following issues may rise due to changes and deletions of a part of data configured by HDE Controller. z Unable to authenticate local accounts if ldap server is stopped. z Home directories will not be created automatically z Encryption transfer mode is altered. If you have executed the "authconfig" command, please go back to the "LDAP" - "Basic Client Settings" and reconfigure your settings. Difference between an LDAP account and a local account Users registered on the LDAP server (LDAP account) and on individual computers (local account) differ in the following ways: z LDAP accounts cannot be authenticated if the LDAP server is not running or if communication is blocked. z LDAP accounts must authorize the use of ftp at all times. z LDAP accounts cannot use APOP. z Home directory may not exist for a LDAP account. A home directory will only be created at the time of LDAP registration on the computer which the registration process was performed, but not on any other LDAP client machines. However, home directories on these machines can be automatically created when the SSH service is used on such machines (Note that HDE Controller 6.1 / 5.1 / 5.0 Professional/LG Edition must also be installed on these machines). Auto Create Home Directory If the "Creates the home directory when the user logged in" in the "LDAP" - "Basic Client Settings" menu is checked, a home directory will be created automatically if it does not exist at the time when the user logs in from the administrator screen on the LDAP client computer or via SSH or Telnet. Sharing Home Directory These settings is limited to users with knowledge on auto-mount and are able to self-resolve, if any, errors or problems regarding auto-mount. This feature will allow users to set a pre-existing directory as the home directory of their LDAP account instead of creating a new home directory. To enable this feature, go to "LDAP Accounts" - "Template Settings" "Home Directory Prefix" and set the prefix to a file system different from the home directory of the local account and auto-mount this file system on all of the computers used by the LDAP account. Please note that we do not offer support to inquiries regarding auto-mount. Please do not perform this setting unless you have advanced knowledge on auto-mount and are able to resolve any problems that may rise. LDAP server environment supported by HDE Controller Below are lists of LDAP server environments that are supported by HDE Controller. Please refer to the lists when switching from any pre-existing LDAP servers. z (1)Schema Files /etc/openldap/schema/core.schema /etc/openldap/schema/cosine.schema /etc/openldap/schema/inetorgperson.schema /etc/openldap/schema/nis.schema /etc/openldap/schema/samba.schema z (2)Object Trees BaseDN: dc=example, dc=com User Info: ou=Users, dc=example, dc=com Group Info: ou=Groups, dc=example, dc=com Computer Info: ou=Computers, dc=example, dc=com z (3) LDIF # example.com dn: dc=example,dc=com objectClass: dcObject objectClass: organization dc: example o: example # Users, example.com dn: ou=Users,dc=example,dc=com objectClass: organizationalUnit ou: Users # Groups, example.com dn: ou=Groups,dc=example,dc=com objectClass: organizationalUnit ou: Groups # Computers, example.com dn: ou=Computers,dc=example,dc=com objectClass: organizationalUnit ou: Computers # foo, Groups, example.com dn: cn=foo,ou=Groups,dc=example,dc=com objectClass: posixGroup objectClass: sambaGroupMapping cn: foo gidNumber: 10001 sambaSID: S-1-5-21-3330201069-3057011054-2046070042-21003 sambaGroupType: 2 displayName: foo # foo, Users, example.com dn: uid=foo,ou=Users,dc=example,dc=com objectClass: top objectClass: inetOrgPerson objectClass: posixAccount objectClass: shadowAccount objectClass: sambaSamAccount cn: foo sn: foo uid: foo uidNumber: 10001 gidNumber: 10001 homeDirectory: /home/foo loginShell: /bin/bash shadowLastChange: 12971 shadowMin: 0 shadowMax: 99999 shadowWarning: 7 sambaLogoffTime: 2147483647 sambaKickoffTime: 2147483647 sambaPwdMustChange: 2147483647 displayName: foo sambaAcctFlags: [U ] sambaSID: S-1-5-21-3330201069-3057011054-2046070042-21002 sambaPrimaryGroupSID: S-1-5-21-3330201069-30570110542046070042-21003 sambaHomeDrive: C: sambaLogonScript: foo.cmd sambaProfilePath: \\_PDCNAME_\profiles\foo sambaHomePath: \\_PDCNAME_\homes sambaPwdCanChange: 1120715335 sambaLMPassword: A108796B6ACB1E3A25AD3B83FA6627C7 sambaNTPassword: 7CCBE21EA6FF186378FAFB095F5DFAD8 sambaPasswordHistory: 00000000000000000000000000000000000000000000000000000000 00000000 sambaPwdLastSet: 1120715335 1. Client Basic Settings Configure settings for managing users/groups on LDAP and browsing users/groups that are being managed by LDAP. Please go to "LDAP" - "Client Basic Settings". z LDAP Authentication Specify whether to allow the use of the user accounts on the LDAP server for login authentication via connections such as SSH or telnet. z LDAP Server Name Specify the IP address or the FQDN of the LDAP server. z Port Number Specify the port number for the LDAP server. Normally, port number 389 is used. z BaseDN Search Search and display BaseDNs managed by the specified LDAP server by clicking the "Search" button after entering "LDAP Server Name" and "Port Number". You may click the button on the left side of each BaseDN found by the search to add the BaseDN into the BaseDN textbox. Here are some possible causes if you failed to find any BaseDN using BaseDN Search: z Incorrect LDAP Server Name z Incorrect LDAP Server Port Number z The LDAP server is not running z BaseDN is not setup on the LDAP server Please reconfigure your LDAP server settings as LDAP authentication cannot be enabled under these conditions. z BaseDN Specify the BaseDN configured on this LDAP server. You may use the BaseDN Search function to enter this item. z RootDN Specify the RootDN configured on this LDAP server. If you are using OpenLDAP on this LDAP server, please enter the value specified in rootdn of the LDAP server configuration file (slapd.conf). Please be aware that incorrect configuration of the RootDN will disable the proper retrieval of user account information from the LDAP client. z Password Check this box if you wish to change the password for the RootDN. z Password (Retype) Confirm RootDN password. z Auto Create Home Directories Specify whether or not to create a user home directory automatically if it does not exist at the time of user login via SSH, telnet, etc. z LDAP Management for Samba Account You will be able to manage Samba user account data via LDAP if you specify this server as a Samba server. Check the box "Manages the Samba accounts by LDAP" if you wish to manage Samba user accounts via LDAP. Please note that this menu will not appear if samba is not installed. z Samba System SID Search You must specify a SambaSID if you wish to manage Samba accounts via LDAP. Click the "Search" button to show any pre-existing SambaSID if you have already registered a SambaSID on the LDAP database. By clicking the button of the left side of each SambaSID search result will automatically fill the "Samba System SID" with the selected SambaSID. If the search does not yield any result, no SambaSID is currently registered. Please register a new SambaSID according to the initial value that is already set in the "Samba System SID" textbox as it is. Please note that this menu will not appear if samba is not installed. z Samba System SID Enter the SambaSID necessary for managing Samba accounts via LDAP. Please note that this menu will not appear if samba is not installed. Click the “Configure” button to complete your configuration. 2. Server Basic Settings Configure the necessary settings for managing user/group data using OpenLDAP server. Please select the "Main Menu" - "LDAP" - "Server Basic Settings" menu. Schema Settings Configure the schema file to be read by the OpenLDAP server. Any currently registered schema files will be displayed in the list of registered schema files. To add a new schema file, enter the "File Name" of the schema file you wish to add and click the "Add" button. You may also browse the schema file in your file directories using the "Select" button. To delete an existing schema file, click the "Delete" button beside each listed schema files. Please note that any schema files that lack the "Delete" button are files that are required by HDE Controller and cannot be deleted. Click the "Configure" button to apply your settings. SSL/TLS Settings Configure the server certificate files used if you wish to protect the content transferred via OpenLDAP using SSL or TLS. You do not have to configure this setting if you do not wish to protect your contents using SSL and TLS. In "CA Certificate File", specify the file (in PEM format) which contains the certificate from a trusted CA. In "Server Certificate File", specify the file which contains the server certificate. In "Private Key File", specify the file which contains the private key corresponding to the server certificate. You may also browse each of the files above in your file directories using the "Select" button. Click the "Configure" button to apply your settings. 3. Create Database Create the database required for managing user/group data via OpenLDAP server. Please select the "Main Menu" - "LDAP" - "Create Database" menu. Any existing database will be displayed in the "List of Databases". You may delete any unused database by the "Delete" button or edit the configuration of each database by the "Edit" button. To add a new database, enter the "BaseDN" of the database you wish to all and click the "Add" button and proceed to the "Database Basic Settings" screen. Click the "Configure" button to apply your settings. Database Basic Settings Configure the settings necessary for maintaining data by the OpenLDAP server. z RootDN Specify the LDAP administrator DN for this BaseDN (Ex. cn=Manager, dc=example, dc=com). z Password Specify a password for the RootDN. Please make sure that you do not lose this password as it is needed for managing this database. z Directory Select the directory which you wish to store the content of this database. Please note that you cannot specify any directory that is used by another database. The specified directory must be readable/writable by the LDAP server. Please specify the directory carefully as you cannot change the directory once the database has been created. To reflect the changes to the configuration files, click the “OK” button, then the “Configure” button on the bottom of the following page. Indexes Settings Configure this setting if you wish to use indexes when accessing the data maintained by the OpenLDAP server. Please note that you must create the actual indexes after configuring this setting. Any registered index attributes and conditions will be displayed in the "List of Indexes". You may delete any unused database by the "Delete" button or edit the configuration of each database by the "Edit" button. To add a new index attribute and condition, specify the "Attributes" and "Condition" and click the "Add" button. The new index attribute and condition should be displayed in the list immediately. z Attributes Specify the attributes of the LDAP server you wish to create indexes on. z Condition Specify the condition for creating indexes. To reflect the changes to the configuration files, click the “OK” button, then the “Configure” button on the bottom of the following page. 4. Create Index Create the actual indexes specified in the "Indexes Settings" to allow users to access the data maintained by the OpenLDAP server using indexes. The BaseDNs of the existing databases will be displayed. Click the "Execute" button after selecting the BaseDN of the database which you wish to create the indexes on. You must stop the LDAP server when creating indexes. Please stop the LDAP server from the "Server Status" "Service Status" menu before creating your indexes. Please also note that you will not be able to receive any service which uses LDAP account authentication while the LDAP server is stopped. 5. Backup/Restore Backup Backup the database entries maintained by the OpenLDAP server in LDIF format files. You make choose to either backup the files on the same computer as the OpenLDAP server or on the computer which has the administrator screen displayed. Select the BaseDN of the database you wish to create backup for from the list of existing database BaseDNs. If you wish to create the backup file on the same computer as the OpenLDAP (within the server), specify the "File Name" and click the "Execute" button. You may also browse the file in your file directories using the "Select" button. If you wish to download the backup file onto the computer which the administrator screen is displayed on (within the client), click the "Execute" button under "Download". You must stop the LDAP server while performing backup or restore. Please stop the LDAP server from the "Server Status" - "Service Status" menu before creating your indexes. Please also note that you will not be able to receive any service which uses LDAP account authentication while the LDAP server is stopped. Restore Restore the database entries maintained by the OpenLDAP server from the backup files (in LDIF format). You make choose to either restore the files on the same computer as the OpenLDAP server or on the computer which has the administrator screen displayed. Select the BaseDN of the database you wish to restore for from the list of existing database BaseDNs. If you wish to restore the backup file on the same computer as the OpenLDAP (within the server), specify the "File Name" and click the "Execute" button. You may also browse the file in your file directories using the "Select" button. If you wish to restore the backup files onto the computer which the administrator screen is displayed on (within the client), click the "Execute" button under "Download". You must stop the LDAP server while performing backup or restore. Please stop the LDAP server from the "Server Status" - "Service Status" menu before creating your indexes. Please also note that you will not be able to receive any service which uses LDAP account authentication while the LDAP server is stopped. HDE Controller PRO / LG User Manual April 30, 2011 1st Ed. 10.0-001 HDE, Inc. 16-28, Nanpeidaicho, Shibuya, TOKYO, 150-0036 JAPAN