1
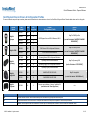
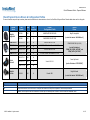
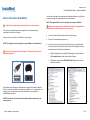
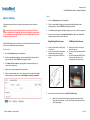
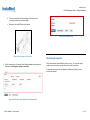
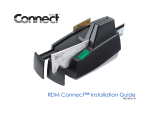
CONFIDENTIAL Quick Reference Guide – Payment Devices Topics InstaMed Payment Devices Overview Click a link below for more information: InstaMed’s payment solutions work with a wide range of payment devices that read information from payment cards, checks or both. This quick reference guide is designed to provide information on device selection, setup and basic troubleshooting. • Select a Device: Choose the best possible device to capture payment for your particular situation • Set Up a Device: Make sure that your device is ready to accurately process payments and record them in the payment product • Troubleshoot a Device: Follow these steps to deal with the most likely issues that may happen during payment processing • Appendix: More information on troubleshooting and specific device setup © 2015 InstaMed. All rights reserved. For more information about how to use the devices, please refer to the InstaMed Online User Guide or your vendor’s documentation as appropriate. Select the right device Different devices have different payment type and security configurations and should be carefully studied before purchase and deployment. Consider the following questions and use the chart on the next page to find the device that meets your specific needs. Questions to Consider: 1. 2. Do you need to read payment cards? a. Do you need a mobile solution? b. Do you need end-to-end encryption? Do you need to read checks? a. Do you need to read payment cards on the same machine? b. Do you need a batch reader? Device Consideration: The MagTek ImageSafe reads both payment cards and checks v20150428 1 of 15 CONFIDENTIAL Quick Reference Guide – Payment Devices Card Payment Device Selection Table Use the table below to select the right device for the payment type accepted, the security level required, etc. Contact InstaMed if you do not see the capabilities or configurations that meet your business needs. NOTE: Some device part numbers cover a range of configurable options. Specify which configuration meets your particular needs when ordering devices. Device Name MagTek Dynapro Part Number Mode P2PE Card Scan Manually Key Card 30056001 HID 30056003 HID 30056013 HID 30056028 HID 30050202 KE 30050200 HID 21073062 KE 21073075 HID 21073062 KE 21073075 HID 22370001 HID Check Scan Notes w/ signature capture w/ signature capture MagTek IPAD MagTek Dynamag MagTek ImageSafe MagTek uDynamo 21073092 M Not recommended due to PCI scope impacts Card swipe encryption is optional Designed for use with the iOS app InstaMed Go. Can also be used with other mobile computing options – smartphones, tablets (e.g., Microsoft’s Surface Pro) or with any device able to connect to the uDynamo micro USB port. Mode Description HID Description Human Interface Device: device interacts directly with humans and is typically used with USB ports KE Keyboard Emulation: device connects to a computer and imitates the computer’s keyboard in function and performance M Mobile Device Peripheral: device connected to the audio port of a mobile phone or tablet in order to interact with InstaMed Online P2PE Point to Point Encryption © 2015 InstaMed. All rights reserved. 2 of 15 CONFIDENTIAL Quick Reference Guide – Payment Devices Check Payment Device Selection Table Please contact InstaMed if you do not see the capabilities or configurations that meet your business needs. Device Name Part Number Mode P2PE Card Scan MagTek ImageSafe 22370001 HID RDM EC6011f RDM EC6011f HID RDM EC6111f RDM EC6111f HID RDM EC7011f RDM EC7011f HID RDM EC7111f RDM EC7111f HID VX50-1-FF-IJ HID VX75-1-FF-IJ Panini VisionX MagTek Excella Batch Check Check Scan Notes Card swipe encryption is optional No longer recommended No longer recommended If P2P (point-to-point) CC (credit card) swipe is required, then use this RDM unit in conjunction with a CC swipe device that enables P2P encryption (e.g., MagTek Dynamag) If CC swipe is required, but P2P encryption is NOT required, then use this RDM unit for both check and card payment processing 50 checks/minute, ink jet printer attached HID 75 checks/minute, ink jet printer attached VX100-1-FF-IJ HID 100 checks/minute, ink jet printer attached 22310102 HID 20-50 checks/minute Mode Description HID Description Human Interface Device: device interacts directly with humans and is typically used with USB ports KE Keyboard Emulation: device connects to a computer and imitates the computer’s keyboard in function and performance M Mobile Device Peripheral: device connected to the audio port of a mobile phone or tablet in order to interact with InstaMed Online P2PE Point to Point Encryption © 2015 InstaMed. All rights reserved. 3 of 15 CONFIDENTIAL Quick Reference Guide – Payment Devices Set Up a Device Device Driver Selection & Installation Software installation must be done by a user with administrator rights. There are four basic steps to setting up a device properly. Details on each step follow the list below: 1. Device Driver Selection & Installation Most devices need a specific software driver installed on the computer that the device will be connected to. The driver can be downloaded from the device manufacturer or from InstaMed’s website. Follow the instructions later in this guide to make sure installation is done properly. 2. See the “Card/Check Payment Device Drivers & Configuration Profiles” table on the following pages for a list of which driver to install for a specific device. 1. Point your web browser to the following address and click the Download link for your device. http://www.instamed.com/contact/device-drivers/ Device Connection & Validation After the device driver has been installed the device must be connected to the computer. Once it is connected and powered on, confirm that the computer recognizes the device correctly. 3. Device Configuration Most devices used with InstaMed Online need to be configured so payment information can be captured correctly. Each device has a specific configuration profile that must be selected. Follow the instructions later in this guide to determine the proper configuration profile. 4. Device Testing Once the device has been correctly set up it should be tested to see that payment information is accurately captured and transmitted to the InstaMed portal. These steps should ensure that a device is working correctly and is ready to use. If there are issues with the machine after these steps have been accomplished, consult the troubleshooting section of this guide. © 2015 InstaMed. All rights reserved. 2. Click Save when prompted. Select a location for the file and allow the download to complete. 3. Locate the saved file on your computer. Right-click the file and select Extract All. 4. Complete the Extraction Wizard to unzip the file. 5. When extraction is complete, open the unzipped folder and run the set up file with the name shown in the table labeled Card/Check Payment Device Drivers & Configuration Profiles. 4 of 15 CONFIDENTIAL Quick Reference Guide – Payment Devices Card Payment Device Drivers & Configuration Profiles For more information on specific part numbers, please see the manufacturer’s documentation or refer to the Card/Check Payment Device Selection table shown earlier in this guide. Device Name MagTek Dynapro Part Number Mode P2P Encryption Device Configuration Profile 30056001 HID Y 30056003 HID Y 30056013 HID Y 30056028 HID Y 30050202 KE Y IPAD Secure USB w/ Keyboard Emulation MagTek IPAD/DynaPro 30050200 HID Y IPAD Secure USB All Browsers [run the file labeled: “MAGTEK DYNAPRO DRIVER.EXE”] 21073062 KE Y Dynamag Secure USB w/ Keyboard Emulation 21073075 HID Y Dynamag Secure USB All Browsers MagTek Dynamag USB 21073062 KE N Dynamag Legacy USB w/ Keyboard Emulation [run the file labeled: “SETUP.EXE”] 21073075 HID N Dynamag Legacy USB All Browsers 22370001 HID Y IMAGESAFE SECURE USB MagTek ImageSafe 22370001 HID N IMAGESAFE LEGACY USB [run the file labeled: “99500006.exe”] 21073092 M Y Requires an installation of the app “InstaMed Go” (available on the iTunes App Store) n/a MagTek IPAD/DynaPro IPAD/Dynapro Secure USB All Browsers 108.01 MagTek IPAD MagTek Dynamag MagTek ImageSafe MagTek uDynamo Device Driver [run the file labeled: “MAGTEK DYNAPRO DRIVER.EXE”] Mode Description HID Description Human Interface Device: device interacts directly with humans and is typically used with USB ports KE Keyboard Emulation: device connects to a computer and imitates the computer’s keyboard in function and performance M Mobile Device Peripheral: device connected to the audio port of a mobile phone or tablet in order to interact with InstaMed Online © 2015 InstaMed. All rights reserved. 5 of 15 CONFIDENTIAL Quick Reference Guide – Payment Devices Check Payment Device Drivers & Configuration Profiles For more information on specific part numbers, please see the manufacturer’s documentation or refer to the Card/Check Payment Device Selection table shown earlier in this guide. Device Name Mode P2P Encryption Device Configuration Profile Device Driver 22370001 HID Y IMAGESAFE SECURE USB MagTek ImageSafe 22370001 HID N IMAGESAFE LEGACY USB [run the file labeled: “99500006.exe”] RDM EC6011f RDM EC6011f HID N EC6000i USB V6.6.5.20 RDM EC6111f RDM EC6111f HID N EC6000i USB w/ Card Reader V6.6.5.20 RDM EC7011f RDM EC7011f HID N EC7000i USB V6.6.5.20 RDM EC7111f RDM EC7111f HID N EC7000i USB w/ Card Reader V6.6.5.20 VX50-1-FF-IJ HID N VX75-1-FF-IJ HID N VX100-1-FF-IJ HID N 22310102 HID N MagTek ImageSafe Panini VisionX MagTek Excella Part Number RDM EC6000/7000 (6.6.5.20) [run the files labeled: “RDM_USB_DRVR_INST.EXE” and “RDM_CNTRL_INST.EXE”] Panini MyVisionX Vision X V3.3.0.1 [run the file labeled: “SETUP.EXE”] MagTek Excella Excella USB [run the file labeled: “99500006.exe”] Mode Description HID Description Human Interface Device: device interacts directly with humans and is typically used with USB ports KE Keyboard Emulation: device connects to a computer and imitates the computer’s keyboard in function and performance M Mobile Device Peripheral: device connected to the audio port of a mobile phone or tablet in order to interact with InstaMed Online © 2015 InstaMed. All rights reserved. 6 of 15 CONFIDENTIAL Quick Reference Guide – Payment Devices Device Connection & Validation Confirm that the computer has recognized and validated the device by verifying that the device manager has registered the device on the computer. NOTE: This applies ONLY to devices that plug into a computer USB port. Install the device driver before connecting the device to the computer. Make sure the device driver is installed and the device is plugged into the computer before validating the device on the computer. If the device has a separate power cable, plug that into the wall socket before connecting the device to the computer. 1. Go to the Control Panel and System and Security tab or page 2. Select the Device Manager and open it up 3. Locate the device in the list of devices and verify that it is correctly identified. Some devices will be listed directly under the main Device Manager file listing while others may be listed under nested entries: Connect your device directly to the USB port on your computer. NOTE: The uDynamo uses the audio jack or micro USB port of a mobile device. Do not connect through a hub or an adapter. This may prevent the device from working properly. USB Audio Jack • MagTek MiniMag devices and MagTek Dynamag devices will be listed as ‘HID-compliant device’ under Human Interface Devices • RDM devices will be listed as ‘RDM USB Class Device’ under Universal Serial Bus controllers Consult the device manufacturer’s documentation for specific information on what the LED color and status should be to indicate proper installation. If the indicator lights are displaying an error status please consult the manufacturer’s documentation for troubleshooting information. NOTE: Some devices will not activate their indicator lights even when they are correctly set up. © 2015 InstaMed. All rights reserved. 7 of 15 CONFIDENTIAL Quick Reference Guide – Payment Devices Thermal Receipt Printers Epson TM-T88V is the supported thermal printer. Software Installation [FOR ETHERNET CONNECTED PRINTERS] Software Installation [FOR USB CONNECTED PRINTERS] 1. Make sure the printer is NOT connected to the computer and powered down 2. Insert the Epson TM-T88V Software and Documents disc 1. Connect the Ethernet cable to the printer and Ethernet jack 3. Click Install Now 2. Press and hold the Push button on the back of the printer to output the IP address 4. Select I accept the terms in the license agreement, and click Next 3. Insert the Epson TM-T88V Software and Documents disc 5. On the Select Installation Type page, select Easy Install 4. Click Install Now 6. 5. Select I accept the terms in the license agreement, and click Next When the Connect Printer page appears, connect the printer to the USB port and the power cable, and make sure the printer is powered on 6. On the Select Installation Type page, select Easy Install 7. On the Commnunication Port Settings page, click the USB button and then click Next 7. When the Connect Printer page appears, ensure the printer is connected to the Ehternet jack and the power cable, and the printer is on 8. On the Start Installation page, click Install 8. On the Communication Port Settings page: 9. When the Installation Finished page appears, perform a test print or click Finish 9. a. Select the Ethernet tab b. Input the IP Address for the printer (see step 2) c. Click Search, the new IP Address will populate into the dropdown list d. Select the new IP Address e. Click Next On the Start Installation page, click Install 10. When the Installation Finished page appears, perform a test print or click Finish © 2015 InstaMed. All rights reserved. 8 of 15 CONFIDENTIAL Quick Reference Guide – Payment Devices InstaMed Online Device Configuration The following applies only to users of InstaMed Online. If you process payments in a different application, please refer to your vendor’s documentation to configure your device. Make sure the device has already been connected and recognized by the computer it is plugged into. The Super User assigned to your account configures a default device profile that applies to all users. Please contact InstaMed Customer Service to confirm who the Super User is for your account. Super User 1. Log in to InstaMed Online 2. Click Configure in the Main Menu 3. Click the Devices tab 4. Select [DEFAULT] from the Users menu 5. Select the desired Card Reader and Check Reader items 6. Click Save Use the Device Driver and Configuration Profile table earlier in this guide to select the correct profile for the type of device you are using. All users may modify their own device profiles to override the default settings. All Other Users 1. Card Reader and Check Reader are set to Use Default 2. To override the default setting for any computer, change the settings as desired and click Save 3. To override the default setting for the current computer only, select the Save configuration for this computer only checkbox before saving 4. To restore the default setting, click Use Default and then Save © 2015 InstaMed. All rights reserved. Franker: The RDM check scanning devices (shown above selected as the EC7000I USB V6.6.5.20) has an additional feature – the Franker – that can be turned on and off from this configuration page. When turned on the Franker will stamp the checks to prevent duplicate scanning. Receipt Printer: The payment product uses the default printer connected to the computer for receipt printing. Alternatively, specific peripherals – such as a thermal paper printers – can be selected here. Signature Capture Device: InstaMed supports signature capture devices. If one is to be used, select the specific model here. Contact InstaMed Customer Support for more information. 9 of 15 CONFIDENTIAL Quick Reference Guide – Payment Devices Check Device Testing 1. Go to the Payments page on the application Complete setting up a device by testing the card swiping or check scanning function. 2. Select or input patient information, input payment/billing information and a payment amount. Select CHECK as the payment method. In order to properly test the device make sure that the device driver has been installed on the computer, the device is plugged in and powered on, the computer has recognized the device, and the application has been configured to use the device. 3. Click Scan (a popup graphic will appear asking you to scan a check for payment) 4. Insert a check into the device (Single Check Device). Make sure all folds and staples or paper clips have been removed MagTek Single Check Scanner With InstaMed Online open in a browser, run the following tests to determine that the device is installed and registered properly: a. Payment Card b. 1. Go to the Payments page on the application 2. Select or input patient information, input payment/billing information and a payment amount. Select CARD as the payment method. 3. Click Swipe or Tap or Insert (a popup graphic will appear asking you to swipe a card for payment) 4. Swipe, tap, or insert a payment card on the device 5. With a successful swipe, tap, or insert, the payment form fields will populate with the payment card information: if this happens, testing is successful c. 5. Insert the check flush to the left side of the device Insert the check with the information side facing the machine’s center Insert the check with the MICR line down a. b. c. Insert the check flush to the right side of the device Insert the check with the information side up Insert the check with the MICR line (shown by the red arrow in the image below) to the inside right Insert a batch of checks into the device (Batch Check Device) a. © 2015 InstaMed. All rights reserved. RDM Single Check Scanner Make sure to stack the batch of checks together so that they are all facing the same direction. Fan the checks before placing them into the device feed hopper. 10 of 15 CONFIDENTIAL Quick Reference Guide – Payment Devices b. Place the check batch into the feed hopper of the device in the orientation as shown on the device hopper c. Make sure that the MICR line is on the bottom Batch Check Payment Page Check Feed for a Batch Check Device 6. With a successful scan, the payment form fields will populate with the payment information: if this happens, testing is successful Device Setup Complete With a successful test accomplished the device is set up. You may now use this guide to set up other devices or train others to set up their own devices. If testing was unsuccessful use the following Troubleshooting Steps to identify and solve the problem. Single Check Payment Page (Fields Shown Unpopulated) © 2015 InstaMed. All rights reserved. 11 of 15 CONFIDENTIAL Quick Reference Guide – Payment Devices Troubleshooting Steps 1. 2. 3. 7. Card/Check processing: Test the device’s ability to swipe a card or scan a check within InstaMed Online. See the Device Testing section earlier in this guide to confirm whether the portal is accurately reading the card swiped or check scanned. 8. Java Update [SEE APPENDIX FOR MORE INFORMATION]: Make sure that the latest version of Java is running on the computer that the device is connected to. 9. Device Manufacturer Documentation: Please contact the manufacturer directly for specific information about operating status and troubleshooting issues not addressed in this guide. Device Power Supply: If the device requires a dedicated power supply connection, make sure that the power cord is properly plugged into the device and the wall socket. Computer Connection: Make sure that the device is securely plugged into the correct port on the computer that will be used to access the payment transaction pages. Device Indicator (LED) Status: Make sure that after the device is plugged in and connected to the computer the indicator light or lights on the device are displaying the correct status according to the manufacturer’s documentation Manufacturer Website MagTek 4. 5. 6. Device Driver Installation: Make sure that the correct device driver has been installed on the computer connected to the device. See the device driver installation section earlier in this guide for more information. Web Browser Configuration [SEE APPENDIX FOR MORE INFORMATION]: Any modern web browser will work for payment transactions, but it must be a 32bit version. InstaMed recommends using Microsoft Internet Explorer web browser and for the sake of this guide assumes that is the browser being used. The browser must be correctly configured with respect to Java, Security, and Active X controls in order to properly communicate with the payment devices. Following the detailed troubleshooting steps in the Appendix for more specific information. Device Configuration: Make sure that the device has been properly configured on InstaMed Online. See the section on configuration earlier in this guide. If you are not using InstaMed Online, contact your payment product provider’s customer support to confirm that the device is able to accurately send information to the payment product. © 2015 InstaMed. All rights reserved. DYNAMAG IPAD/DYNAPRO uDYNAMO Excella ImageSafe http://www.magtek.com/ RDM RDM EC6000 series RDM EC7000 series Panini Vision X http://www.rdmcorp.com/ http://www.panini.com/ 10. Contact Customer Service: For more help on troubleshooting your device, please contact Customer Service through the contact information provided in the Help section of your provider portal. 12 of 15 CONFIDENTIAL Quick Reference Guide – Payment Devices Appendix 3. Web Browser Configuration Your internet browser must be properly configured in order to allow payment to be accurately captured by InstaMed Online through the payment device. Follow the steps below and test the unit after each step to determine whether that step solved the current device problem. 1. Browser Type & Version: InstaMed recommends that you are using Microsoft’s Internet Explorer as your web browser for the purposes of this guide. Make sure that the following is also true: a. b. 2. Browser Type: You must be running a 32-bit browser in order to properly process payments with these devices. In the main browser window click on the HELP menu and select ABOUT INTERNET EXPLORER. If the dialog box says that it is a 64-bit browser, you must download or open a 32-bit version to continue. Contact microsoft.com for more information on downloading the latest 32-bit web browser. Browser Version: Internet Explorer 10 is the recommended browser for payment processing. You must be running Internet Explorer version 8 or higher. In the main browser window click on the HELP menu and select ABOUT INTERNET EXPLORER. If the dialog box displays a version number lower than 8 you must update to a newer version to continue. Contact microsoft.com for more information on downloading the latest version of Internet Explorer for your Operating System. Popup Blocker Settings: Make sure that the browser settings keeping popup windows from automatically loading is correctly configured to InstaMed Online to function properly. a. b. 4. 5. Java Settings: Make sure that Java is able to run on the browser – some settings may disable Java and not allow the payment product to run properly. a. Click the Tools menu and select Internet Options b. Click the Advanced tab and scroll to the Java (Sun) section c. Select the Use JRE checkbox d. Click Apply and then OK e. Close all browser windows Disable Script Debugging: Allowing the debugging function to operate could result in unwanted error messages and possibly impair the way that the payment product should work. a. Click the Tools menu and select Internet Options b. Click the Advanced tab and scroll to the Browsing section c. Select the checkboxes for Disable Script Debugging (Internet Explorer and Other) d. Click Apply and then OK e. Close all browser windows Clear Temporary Internet Files: This will ensure that the browser is using the latest files from the payment product. a. Click the Tools menu and select Internet Options Click the Tools menu and select Popup Blocker Settings from the Popup Blocker submenu b. From the General tab, delete Temporary Internet Files Type https://online.instamed.com in the address field and click Add c. Close all browser windows © 2015 InstaMed. All rights reserved. 13 of 15 CONFIDENTIAL Quick Reference Guide – Payment Devices d. 6. Clear Browser Cookies: a. Click the Tools menu and select Internet Options b. From the General tab, delete Cookies c. Close all browser windows In the Security Settings – Trusted Sites Zone window, scroll to the ActiveX controls and plug-ins section and verify the following settings i. (Enable) Allow previously unused ActiveX controls to run without prompting ii. (Disable) Automatic prompting for ActiveX controls iii. (Enable) Download signed ActiveX controls 7. Remove Unnecessary Third-Party Toolbars: Certain toolbars may conflict with other toolbars and cause browser stability issues. It is recommended that all third-party toolbars are removed from the browser. a. Close all instances of Internet Explorer, click Start, point to Settings, and then click Control Panel b. Double-click Internet Options c. Click the Advanced tab. d. e. 8. Under Browsing, click to clear the Enable third-party browser extensions (requires restart) check box iv. (Enable) Download unsigned ActiveX controls v. (Enable) Initialize and script ActiveX controls not marked as safe for scripting vi. (Enable) Run ActiveX controls and plug-ins e. Click OK f. In the Internet Options window, click Apply and then OK g. NOTE: If you are using Internet Explorer 11, also do the following: i. Click on the Tools button View settings , and then click Compatibility Restart Internet Explorer ii. Under Add this website, enter the URL of the payment product you are using and then click Add Browser Security Settings – Active X Settings: USB devices require the use of ActiveX controls, which are add-ons that allow your web browser to interact with the devices. Your browser security settings may block the installation or use of ActiveX controls. In order to avoid constant messages from the browser concerning these security settings, follow the steps below: iii. Click the F12 button on your keyboard. This will open the developer panel on the bottom of the browser. iv. Press Ctrl+8 or click on the Emulation Icon on the left side of the panel a. Click the Tools menu (or button b. Select the Security tab and the Trusted Sites zone c. In the Security Level for this zone section, click Custom Level… © 2015 InstaMed. All rights reserved. ) and select Internet Options v. Click the User Agent String dropdown menu and select Internet Explorer 10 vi. Press F12 on the keyboard to exit the developer panel 14 of 15 CONFIDENTIAL Quick Reference Guide – Payment Devices Verify Device Driver Status Java Version Update Installing the driver for your device is explained earlier in this guide, but it may be necessary to verify that you have the correct driver installed. For those devices – and device modes – that require Java, it is necessary to have an up to date version of Java. It is recommended that you update the computer’s Java version to the highest one available. 1. For the RDM devices, follow the table below to make sure that the latest driver is installed. To confirm the file version, right-click the file and select Properties. The file version will be listed on the Details tab: Determine which version you are running: Windows 8 Filename RDMSIM.sys RDMCO.dll RDMSO.dll 2. Location C:\Windows\System32\Drivers C:\Windows\System32 (32-bit Operating System) C:\Windows\SysWOW64 (64-bit Operating System) C:\Windows\System32 (32-bit Operating System) C:\Windows\SysWOW64 (64-bit Operating System) Driver Package File Version 1. v6.6.3.10 v6.6.5.20 3.4.1.20 3.4.1.20 2. 3. Right-click on the screen at bottom-left corner and choose the Control Panel from the pop-up menu When the Control Panel appears, select Programs Click Programs and Features v6.6.3.10 v6.6.5.20 1.6.8.304 1.6.8.514 4. The installed Java version(s) are listed v6.6.3.10 v6.6.5.20 1.6.8.304 1.6.8.514 For the MagTek devices, it is recommended that you simply re-install the latest drivers to ensure that the correct driver is installed on the computer interfacing with the device. See the section earlier in this guide for device driver installation. Convert MagTek Device From HID to KE Mode MagTek devices in keyboard emulation mode do not require use ActiveX controls. To convert a MagTek device to keyboard emulation mode make sure that the device is in a non-encrypted mode and then go to the MagTek website and use the automatic conversion process they have set up there: http://www.magtek.com/support/mode/ © 2015 InstaMed. All rights reserved. Windows 7 and Vista 1. Click Start 2. 3. 4. Select Control Panel Select Programs Click Programs and Features 5. The installed Java version(s) are listed Windows XP 1. Click Start 2. 3. Select Control Panel Click the Add/Remove Programs control panel icon 4. The Add/Remove control panel displays a list of software on your system, including any Java versions that are on your computer If the version number listed in the About dialog box is less than Java 7 Update 51, visit Java’s website and follow the instructions to update Java on the computer connected to the payment device. https://www.java.com/ 15 of 15