1
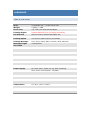
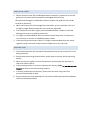
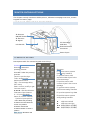
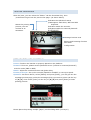
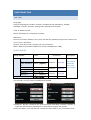
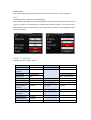
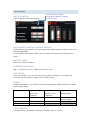
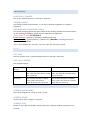
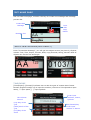
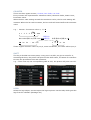
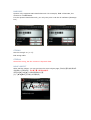
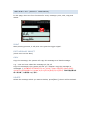
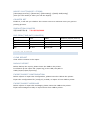
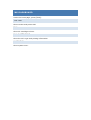
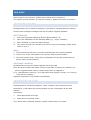
U2PRO USER MANUAL By ANSER CODING INC. www.anser-u2.com First edition: 2014.10.1 Revision: 2014.10.8 ANSER CODING INC. CONTENTS Notes ............................................................................ 錯 誤 ! 尚 未 定 義 書 籤 。 Installation ........................................................................................... 3 Operation................................................................. 錯 誤 ! 尚 未 定 義 書 籤 。 U2Pro introduction .......................................................... 錯 誤 ! 尚 未 定 義 書 籤 。 Structure Description ................................................. 錯 誤 ! 尚 未 定 義 書 籤 。 IR-Remote Keypad .................................................... 錯 誤 ! 尚 未 定 義 書 籤 。 U2Pro Home Page ..................................................... 錯 誤 ! 尚 未 定 義 書 籤 。 Preparation for printing .............................................. 錯 誤 ! 尚 未 定 義 書 籤 。 Menu Tree................................................................ 錯 誤 ! 尚 未 定 義 書 籤 。 Configration ................................................................... 錯 誤 ! 尚 未 定 義 書 籤 。 System .................................................................... 錯 誤 ! 尚 未 定 義 書 籤 。 Printhead ................................................................. 錯 誤 ! 尚 未 定 義 書 籤 。 Photocell .................................................................. 錯 誤 ! 尚 未 定 義 書 籤 。 System clock ............................................................ 錯 誤 ! 尚 未 定 義 書 籤 。 Screen ..................................................................... 錯 誤 ! 尚 未 定 義 書 籤 。 Sound ..................................................................... 錯 誤 ! 尚 未 定 義 書 籤 。 Editing Message ............................................................. 錯 誤 ! 尚 未 定 義 書 籤 。 Edit New Message(Add Object) ............................................................. 15 Preveiw List(Select Message) ................................................................ 18 Modify Object ........................................................... 錯 誤 ! 尚 未 定 義 書 籤 。 Shortcut ........................................................................ 錯 誤 ! 尚 未 定 義 書 籤 。 Message Delay.......................................................... 錯 誤 ! 尚 未 定 義 書 籤 。 Clean Printhead ........................................................ 錯 誤 ! 尚 未 定 義 書 籤 。 Edit Setting .............................................................. 錯 誤 ! 尚 未 定 義 書 籤 。 Message Report ........................................................ 錯 誤 ! 尚 未 定 義 書 籤 。 Ink dashboard ................................................................ 錯 誤 ! 尚 未 定 義 書 籤 。 System .................................................................... 錯 誤 ! 尚 未 定 義 書 籤 。 Ink .......................................................................... 錯 誤 ! 尚 未 定 義 書 籤 。 Ink Cartridge ............................................................ 錯 誤 ! 尚 未 定 義 書 籤 。 Warning ................................................................... 錯 誤 ! 尚 未 定 義 書 籤 。 USB Synchronizing Function ....................................................................... 24 U2Pro Message Pro .................................................... 錯 誤 ! 尚 未 定 義 書 籤 。 U2Pro Inksaving Pro .................................................. 錯 誤 ! 尚 未 定 義 書 籤 。 Ink Tuning ............................................................................................... 25 HARDWARE SPECIFICATION Shell 114x76x60 mm3 / 4.5x3.0x2.4 inch3 Weight 0.49kg / 1.08lb Front View 3.5” color LCD with LED backlight Printing Engine Hewlett-Packard TIJ 2.5 printing technology Ink Solution U2Pro Exclusive 420ml Bulk/Black Ink Printing Speed 120 m/min (394 feet/min) at 300DPI Printing Message Text, Time, Expiry date, Counter, Shift, Barcode Message height 12cmx540cm and width Power Supply AC 100V-240V, 50/60 Hz, 2A, auto-switching Max. power consumption: 75 Watts Temperature 5℃-40℃ (41F℉-104F℉) INSTALLATION 1. Please note that once the PrintHead has been installed it is necessary to use the guide bar to protect the PrintHead from damaged while printing. (Any external damaged, included box collision without the guide bar will not be covered by warranty) 2. When you extract the ink cartridge from the holder, press it and take it out at a 15 degree angle. Please ensure ALL the screws are tightened. 3. The installation of a UPS is highly recommended because it helps to avoid the damage that may be caused by power loss. 4. It is highly recommended for users to correctly earth the printer. Furthermore, it’s necessary to connect to a dedicate power socket. 5. If the working environment is dusty, it is highly recommended clean the nozzle regularly using a low level compressed air supply that is dry and clean. OPERATION 1. The remote controller will turned off automatically after three minutes if it is not being operated. 2. Please keep the printing throw distance within 6mm to ensure the best printing quality.. 3. When the lay-‐out appears to have ink excessive, please apply the wet wipe to clean the nozzle surface.. 4. If the printing position is incorrect, please press the key [Tab|→ ] on the rem ote keypad to reset to the best printing position. 5. In a dusty production environment, please clear the dust using clean low pressure compressed air daily. 6. Please contact your local distributor if the printer malfunctions and the problems cannot be solved personally. PRINTER INTRODUCTIONS This chapter mainly introduces U2Pro printer, software homepage overview, remote keypad and menu page. HARDWARE STRUCTURE DESCRIPTION IR-Remote ON/OFF Button IR Receiver IR Signal Ink Cartridge USB Slot External Device Connector LCD Backlit Power Input IR-REMOTE KEYPAD Description table for remote keypad control keys. Printing button Print On: starts the printing process Print Off: halts the printing process Function: preview logo Tools: access to the dashboard function. Tab|→: Set message delay ESC: return Enter: confirm, modify or get into next screen. ▲▼◄ ►: directional button Shortcuts F2: quick access to system time setting interface F3: quick access to edit expiration date object in the current message F4: quick access to edit counter object in the current message F5: quick access to system shift format setting interface Characters input buttons F6: preview system logo data 0 ~ 9: input alphabetic letters or numeric number .Symbols: input symbols. ←BS: delete the preceding character and shift back the cursor one position. X Delete: discard the character ahead of cursor’s position ABC.Select: Numbers and F8: quick access to system string setting interface ◄: ►: ◄◄: ►►: object moves left object moves right 快速左移物件/左移視框 快速右移物件/右移視框 PRINTER HOMEPAGE After the boot, you can select the “Editor” via the directional key, then press”Enter”to get into the preview list page. (as shown below) Starts the printing process, the red roulette is an animation. Indicates the USB slot’s status (USB support: flash drive, WIFI and HID keyboard. Indicates enable the encoder. Indicates enable the external photocell. 墨水匣狀態良好. Message Preview area Editing and browsing function Shortcuts Configuration PREPARATION FOR PRINTING Printer: Fixed on the bracket or properly placed on the platform. Photocell: First use, please set the photocell source (internal or external photocell) and the mode (PNP or NPN). Nozzle: Adjust the nozzle direction and globe delay. Encoder/Conveyor: Set up the encoder(300DPI or 400DPI) or conveyor speed. Operation: As shown above, select [Editor] and press [Enter], you will get into the message preview page, select the message which you want to printer via the key of [▲][▼], then select [Print] via the key of [◄][►] and press [Enter] to start printing process. Please place the printing sample (paper) on the sliding table (conveyor). Once the photocell triggered by the slide table or printing sample, you will see the message has been printed on it. MENU TREE Below is the printer’s menu tree. Home page Dashboar d System Ink Editor home page Create new Ink cartridge Alarm Preview list Syste Printe Photoc Time Screen Sound m ad ell Printi Edit Copy Delet ng e Add Language Measurem ent Password Modif Shift Rem y ove Print Mode Print Resolution Global delay WIFI Text Time Expire Counter Shift table Shift Logo Barcode String table String Stream Configuration Shortcuts Format Parameter s Message delay Clean nozzle Edit setting Message Report Clear record Backup record Export setting Import setting Export messages Import Messages Photocell Source Photocell Mode Encoder Switch Conveyor Speed Reset to default Measurem ent Customer year Shift String Rollover hour Counter Auto Productio n Counter Pre-Zero Brightnes s Screen saver Seconds set Screen detection System clock Daylight saving Mode Single/Du al channel Automatic nozzle Left/Right channel Nozzle check Printing Direction Pre-purge Pre-purge Humity Repeat Time Date Counter Time refresh Refresh interval Trigger Setting Infinite Print Repeat count Delay Gap Counter alarm Key tone Printing beep CONFIGRATION SYSTEM Language: Support languages includes: Chinese (Traditional and Simplified), English, Japanese, Korean, German, Portuguese, Spanish and Russian. Units of Measurement: Metric (millimeters) vs Imperial (inches). Password: Once the function enabled, every time will ask for password to get into system and record every operation. System just can set up 5 groups the user password. Notes: Admin all-powerful password: anser+%SN(printer’s SN) PRINT MODES PRINT MODES Fonts Basic Arial (Bold) High-Definition 1 High-Definition Gothic (lighter) Resolution Notes: 300x300 400x300 DPI setting should be same with 2 Standard 1 Arial (Bold) Standard 2 Gothic (lighter) Saving 1 Arial (Bold) Saving 2 Gothic (lighter) Customize Description C ustomize 300x150 400x150 150x150 200x150 ???x??? ???x??? the encoder. User can select the print modes according their requirement. (Total seven modes) The encoder we only support 300DPI and 400DPI. Customize: We can customize the new font mode according customer request, it needs the PC software (Message Pro) and USB to import into printer. Select this Mode, you will find the customized font mode in the “Customer Font”. Global Delay Set up the printing global delay, this value will function for every message. WIFI [Configuration]→[System]→Wifi[Setting] After starting up system, it will automatically restore the previous connection, if you want to create a new connection, please press [Access point], it will scan all the connections, when it finished you can select the connection in the [ESSID], then press [Connect]. RESET TO DEFAULT Following is the factory value. Language English Photocell Souce Internal Measurement Metric Global Delay 0 mm Password Disable Encoder/Conveyor Encoder:Disable Option Print Mode Standard#1 Conveyor:76m/min Dots/inch 300 Box Length:100cm Resolution 150*300 Daylight Saving Disable Screen Brightness Maximum Channel Dual channel Screen Saver Disable Auto nozzle Disable Key tone Disable Nozzle Switch Disable Printing Beep Disable Printing ABC→ Switch direction Repeat Print Disable Time Refresh Disable PRINTHEAD Channel Mode: Single Auto Nozzle Switch: Disable Channel: Left NOZZLE SWITCH U2Pro supports dual channel print. AUTO NOZZLE SWITCH/ NOZZLE SWITCH Once enable single channel, you can select auto nozzle switch to make sure the ink has best utilization. If you disable auto nozzle switch, you can select the channel by manual( left or right). NOZZLE CHECK Check the nozzle condition. PRINTING DIRECTION ABC→: print from A to C, ←ABC: print from C to A. PRE-PURGE Once you enable it, you can set up the Pre-purge humidity (1~5), higher the environment temperature, higher the humidity value. REPEAT Enable this function, you need to set up the Initial delay (Initial delay) and repeat printing gap (Gap). Setting\Condition Trigger Repeat several Repeat print all Repeat print times once the time once automatically. triggered. triggered. Enable Enable Disable(no need for the trigger) Repeat finite Finite Infinite 無限次 Repeat times Enable (Value) 0 0 TIME REFRESH [Configuration]→[Printhead]→[Refresh interval], range:1~9 min. If the printing message has a precise time requirement, please set to minimum interval (1minute). PHOTOCELL PHOTOCELL SOURCE Set up the photocell source, internal or external. TRIGGER MODE According photocell specification, it can set to Positive triggered or negative triggered. ENCODER AND CONVEYOR SPEED The printer printing speed should be same as the printing sample movement speed, Or the printing message’s length will be reduced or lengthened. 同步的方式有下列 2 種: 看不懂什麼意思 Enable Encoder: [System]→[Encoder: Enable][Set DPI] Conveyor Speed: [Configuration]→[Photocell]→[Encoder: Disable][Conveyor]: Input the actual speed. Notes: Only disable the encoder, you can input the conveyor speed. TIME SET TIME Set the system clock. (Year/Month/Day Hours: Minutes: Seconds) DAYLIGHT SAVING Set daylight saving. Spec.\Daylight Start End The last Sunday in March every The last Sunday in October every year, the time at 1:59:59 jump year, the time at 1:59:59 jump into 03:00:00. into 01:00:00. The second Sunday in March The second Sunday in October every year, the time at every year, the time at 1:59:59 1:59:59 jump into 03:00:00. jump into 01:00:00.0 saving European American SCREEN SCREEN BRIGHTNESS Set screen brightness, range is 10%~100%. SCREEN SAVER Screen saver time, range is 1~60min. SCREEN TEST Enable it, the LCD will display sequence R(red) G(green) B(blue) W(white) for a second. SOUND Set the counter alarm, remote keypad tone, printing beep. EDIT HOME PAGE Get into edit home page, includes: the key for create new message and message preview list. Create New Message Print Edit Copy Delete Message List CREATE NEW MESSAGE(ADD OBJECT) Press “Create New Message”, you will get into objects screen (As picture), Objects include: Text, Time, Expire, Counter, Shift, Logo, Barcode, String, Stream. Most of objects can set the size and angle. TIME/EXPIRE [Time/Expire]→[Format]: It allows user to edit 20 types of custom time format. Remote keypad: Press[0~9] to input the number (convert to T9 keyboard to input letter),└┘ input space, [.] input symbols. Hour Minute Second [JJJ]:Day of the year [W52]:Week of the year [D7]:Day of the week It can input numbers, letters, symbols. Year/Month/Day It can input number or letters. COUNTER There are three types counter, Counter, Box Code, Lot Code Every counter has 4 parameters: Maximum Value, Minimum Value, Start Count, Increment value. When the box code setting exceeds the maximum value, the lot code setting will increase. When the lot code increases, the box code will reset itself to the minimum value. e.g. : Counter: Increment value=1, :5→6 0 1 2 3 4 5 6 … 999 箱號溢位 Box code:遞增=10,回歸:100→10棧板進位 棧板:遞增=2,跳動:4→6 10 2 20 30 … 99 100 4 6 8 … 20 These 3 types counter’s vale is 5,100,4, count increased 1, the value will be 6,10,6. SHIFT The day is divided into some parts, every part is a shift ,we give a name for it, according the time, the printer will print out the shift name, it’s better for customer to trace the production time and operators. e.g. : Time is 09:14, the corresponding shift is CCC, the printer will print out CCC. LOGO Select the logo object, we can import the logo to printer via the USB, which gets the logo from PC software (Message Pro) BARCODE System only supports static data’s barcode. For example, EAN-13 barcode, the content is 12345678900. For the dynamic data’s barcode, you only can print it via the PC software (Message Pro). STRING Set the string’s no. (1~5). Edit string table STREAM Same like string, but the content is dynamic data. MOVE OBJECT After add the object, you can get into the move object page,初始的位置則為對齊該訊 息的最後方(即最右邊). 完全看不懂上面這句的意思. 使用[▲][▼][◄][►]方向鍵來移動物件位置. (註: [◄◄][►►]可快速左右移動物件) PREVIEW LIST (SELECT MESSAGE) In this page, there are four functions for every message: print, edit, copy and delete. PRINT Start printing process, it will print once gets the trigger signal. EDIT MESSAGE OBJECT (Much more on this later) COPY Copy the message, the system will copy this message to a blank message. e.g. : now we have edited the message1,2,3,8,15. Copy the message2, the system will ask you “whether copy the message to message4 ?”,系統會詢問”是否複製至訊息 4?”,此時按下[ESC:放棄返回]/[Enter:確認]. 完成後,訊息目錄就會變成 1,2,3,4,8,15,其中[訊息 4]是由[訊息 2]而來的. 確定是這麼操作的 嗎? 都放棄了,怎麼還能 copy 過去? DELETE Select the message which you want to delete, press[Enter], then it will be deleted. EDIT MESSAGE OBJECT Select [Homepage Preview]→[Edit]→[Select Message], there are four function on this page: add, modify, move object, delete. ADD OBJECT Set the parameters of the object which added or selected, after add new object, it will get into move object page,初始的位置則為對齊該訊息的最後方(即最右邊). 這句話真 糾結,看不懂所表達的意思. SELECT OBJECT Get into [select object],[move object],[delete object] these 3 functions, you will find the select page.(as shown below). Press [▲][▼] keys, you can change object, then press [Enter], you can get into it. (Notes: Press[◄][►] keys, you can scroll around the screen.) Edit object Select object Select function, Then select object. MODIFY OBJECT Please refer to the previous page (ADD OBJECT). MOVE OBJECT: After add new object, get into move object preview page, you can move the object via the keys [▲][▼][◄][►]. DELETE OBJECT Select the object and press [Enter], it will be deleted. SHORTCUTS PRINT DALAY There are three types delay in the system, include: repeat print delay, global delay, message delay (can not be used at the same time). If a conflict occurred among them, the priority order is : repeat print delay >global delay>message delay. Global delay [Configuration]→[System]→[ Print delay] Set global delay.(Apply to all messages) Repeat print [Configuration]→[Printhead]→[Repeat print] Message Delay (Default parameter) [Shortcuts]→[Message delay] The delay is only for this message. Mode: Infinite print/repeat times. Mode, repeat times, delay and gap Delay Global delay Gap YES YES YES YES Repeat 3 Sample YES times YES YES YES YES YES Sample Message delay Infinite print Actual print Triggered CLEAN NOZZLE 當噴印發生墨水沾黏或堵塞現象時使用. 不理解何謂沾黏 EDIT SETTING CUSTOMER YEAR Set customer year. (e.g. : It is 2014, but set this value to 103, when you print the year it will print out 2013,not 2014.) ROLLOVER HOUR Set a date every day carry point in time, it will not affect the system clock, just has the effect on the date which you print out. e.g. : Set the value to 23:50, now the time is 2014/10/08 23:52:00, the actual print time is 2014/10/09 23:52:00.(the data 10 minutes early). MODIFY SHIFT/MODIFY STRING [Homepage preview]→[Shortcuts]→[Edit setting]→[Modify shift/string] (Also you can modify it when you edit the object). COUNTER RET Enable it, it will ask you whether the counter return to minimum once you get into printing process. PRODUCTION COUNTER 設置系統噴印累加值. 不明白你們怎麼定義的 PRE-ZERO(TIME,DATE,COUNTER) Time Date Counter (digit:6,value:8) 空位補零 12:08:05- 2014/02/08- 000008 置左 12:8:5 - 2014/2 /8 – 8 置右 12: 8: 5- 2014/ 2/ 8- 壓密 12:8:5- 2014/2/8- 8 8 MESSAGE REPORT CLEAR REPORT Clear all the content in the report. BACKUP REPORT Before backup the report, please insert the USB to the printer. It will back up the report file (report.log) to the USB, the path is USB://auprn/u2pro/report.log. EXPORT/IMPORT CONFIGURATION Before export or import the configuration, please insert the USB to the printer. Export the configuration file (config.ini) to USB, or import it from USB to printer. EXPORT/IMPORT MESSSAGE Before export or import the messages, please insert the USB to the printer. Export all messages to USB, or import them from USB to printer. INK DASHBOARD Under the home page, press [Tools]. SYSTEM Show version and printer SN. INK Show ink cartridge volume. INK CARTRIDGE Show the ink’s type and printing information. WARNING Show system error. USB SYNC When used for the first time, please insert USB to PC and format it. The system will ask whether you want to format it, please click enter to format it. ABOUT MESSAGE PRO Message PRO is tie-in U2Pro PC software, it provides a complete powerful editing function and exchange messages with PC via USB or upgrade software. EDIT MESSAGE 1. Insert the formated USB to PC 將格式化過後的 USB 插入 PC. 2. Open the USB folder via the Message PRO (e.g. :u2pro-1234567). 3. After modified it, insert the USB to printer. 4. The printer will ask you whether you want to sync the message, please press enter to sync it. Notes: 1. The font and logo will sync to printer automatically when synchronization. 2. It will cover all the information in the printer when synchronization. 3. The time format/ shift / string from configuration file will be synchronized to printer when synchronization. SOFTWARE UPGRADE Message PRO will sync the latest upgrade file to the USB. Once the printer detect the latest version in the USB, it will ask you whether you want to upgrade latest version, please press enter to upgrade it. (e.g. :USB software version is 1.0.01.48, higher than printer’s version 1.0.01.29,so it will ask for upgrade.) Upgrade completed, it will restart automatically. ABOUT INKSAVING PRO Inksaving PRO is a software platform, which customer can customize font by themselves, it will make the printing quality and ink consumption at the best balance. It provides : 1. More appropriate font style. 2. More save ink printing mode. The custom font is optional software, please contact with your dealer. 進階墨水調校 This function is only for engineering test. INK PARAMETER UPGRADE Edit the ink.ini and copy to USB:/auprn/firmware/ink.ini (in the same folder with upgrade file .ans). Then insert the USB to printer to synchronize it. MODIFY INK PARAMETER [Home page preview]→[Remote keypad: Function] ([ESC]:Esc)