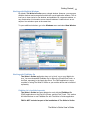
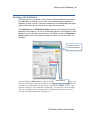
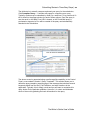
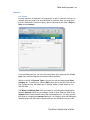
1
The Writer’s Scribe User’s Guide version 5.1 For the PC The Writer’s Scribe User’s Guide © 2010-2015 Swatski Enterprises. All Rights Reserved. Swatski Enterprises. 45 White Birch Lane, North Andover, Massachusetts 01845 FileMaker, the file folder logo, Bento and the Bento logo are trademarks of FileMaker, Inc. in the U.S. and other countries. Mac and the Mac logo are the property of Apple Inc. registered in the U.S. and other countries. All third party trademarks are the property of their respective owners. Sonar3 is the copyright of Spacejock Software. The Writer’s Scribe documentation is copyrighted. You are not authorized to make additional copies or distribute this documentation without written permission from Swatski Enterprises. You may use this documentation solely with a valid licensed copy of The Writer’s Scribe software. All persons, companies, email addresses, and URLs listed in the examples are purely fictitious and any resemblance to existing persons, companies, email addresses or URLs is purely coincidental. Mention of third-party products and URLs are for informational purposes only and constitutes neither an endorsement nor a recommendation. Swatski Enterprises assumes no responsibility with regard to the performance of these products. For more information, visit our website at www.thewritersscribe.com. The Writer’s Scribe User’s Guide Table of Contents Table of Contents Welcome ..................................................................................................................... 1 Getting Started ............................................................................................................ 1 Welcome ......................................................................................................................................................................... 2 Language Support ...................................................................................................................................................... 2 Activate License .......................................................................................................................................................... 3 Home Tab ....................................................................................................................................................................... 3 Summary View ............................................................................................................................................................ 3 Details View .................................................................................................................................................................. 4 Bookmarks View ........................................................................................................................................................ 4 Calendar View ............................................................................................................................................................ 5 Navigating Application Tabs ................................................................................................................................. 6 Navigating Records ................................................................................................................................................... 6 Search for Records ..................................................................................................................................................... 7 Quick Find ...................................................................................................................................................................... 8 Sort Records ................................................................................................................................................................. 8 New Record ................................................................................................................................................................... 9 Delete Record ............................................................................................................................................................... 9 Working with Multiple Windows ..................................................................................................................... 11 Working with FileMaker Go ................................................................................................................................ 11 FileMaker Go is Available Separately ............................................................................................................ 11 Local versus Remote Access .............................................................................................................................. 12 Installing The Writer’s Scribe onto the Mobile Device to Run Locally ......................................... 12 Running The Writer’s Scribe on a Remote Computer .......................................................................... 14 Navigating the FileMaker Go Interface ........................................................................................................ 14 Software Limitations when Using FileMaker Go ..................................................................................... 16 Moving the Local Data File from the Mobile Device back to the Computer ............................... 16 Viewing Files Stored within FileMaker Go .................................................................................................... 17 Working with Stories .................................................................................................. 19 Sent to subtab ........................................................................................................................................................... 20 Contributors subtab ............................................................................................................................................... 20 Rights subtab ............................................................................................................................................................ 20 Notes subtab .............................................................................................................................................................. 20 Source subtab ........................................................................................................................................................... 21 Picture subtab ........................................................................................................................................................... 23 Sales subtab ............................................................................................................................................................... 23 Docs subtab ................................................................................................................................................................ 23 Alerts subtab ............................................................................................................................................................. 23 Alternate View Control ......................................................................................................................................... 23 Work-‐In-‐Progress, Trunk and Published Fields ....................................................................................... 24 Action Buttons .......................................................................................................................................................... 25 Drag-‐and-‐Drop File for New Story ................................................................................................................... 25 Working with Publishers ............................................................................................ 27 The Writer’s Scribe User’s Guide Table of Contents Locking Publishers for Import/Export ........................................................................................................ 28 Info subtab ................................................................................................................................................................. 29 Sent subtab ............................................................................................................................................................... 29 Notes subtab .............................................................................................................................................................. 29 Sales subtab ............................................................................................................................................................... 29 Docs subtab ................................................................................................................................................................ 29 Alerts subtab ............................................................................................................................................................. 29 Action Buttons .......................................................................................................................................................... 29 Global Publishers .................................................................................................................................................... 29 Pack & Send button ................................................................................................................................................ 30 Drag-‐and-‐Drop File for Attaching a Document ......................................................................................... 31 Working with Submissions ......................................................................................... 33 Handling Simultaneous Submissions ............................................................................................................. 34 Create a Sale from a Submission ....................................................................................................................... 34 Post to Facebook ...................................................................................................................................................... 35 Tweet ............................................................................................................................................................................ 36 Submitting Stories in Three Easy Steps ....................................................................... 37 Using Alerts ............................................................................................................... 41 Active Alerts .............................................................................................................................................................. 41 Showing Active Alerts, Alerts Not Completed, or All Alerts ................................................................. 43 Alert Hyperlinks ...................................................................................................................................................... 43 Action Buttons .......................................................................................................................................................... 43 Send Email .................................................................................................................................................................. 43 Pack & Send ............................................................................................................................................................... 44 Go to Home Calendar View ................................................................................................................................. 44 Sales and Expenses .................................................................................................... 45 Sales .............................................................................................................................................................................. 45 Info Subtab ................................................................................................................................................................. 45 Rights subtab ............................................................................................................................................................. 46 Notes subtab .............................................................................................................................................................. 46 Picture subtab ........................................................................................................................................................... 46 Vendors subtab ......................................................................................................................................................... 46 Docs subtab ................................................................................................................................................................ 46 Expenses ..................................................................................................................................................................... 47 Info Subtab ................................................................................................................................................................. 47 Notes subtab .............................................................................................................................................................. 48 Picture subtab ........................................................................................................................................................... 48 Docs subtab ................................................................................................................................................................ 48 Managing Rights ........................................................................................................ 49 Defining Rights ......................................................................................................................................................... 49 Defining Rights from the Story tab .................................................................................................................. 50 Specifying Rights for a Story .............................................................................................................................. 50 Connecting Rights to a Sale from a Story ...................................................................................................... 51 Connecting Rights from the Sale ....................................................................................................................... 51 Disconnecting/Removing Rights ...................................................................................................................... 52 Managing Documents ................................................................................................ 53 The Writer’s Scribe User’s Guide Table of Contents Adding a Document ................................................................................................................................................ 54 Viewing a Document .............................................................................................................................................. 55 Reports ...................................................................................................................... 56 Overview ..................................................................................................................................................................... 56 Viewing Report Pages ............................................................................................................................................ 56 Constraining a Report ........................................................................................................................................... 57 Summary of Story Submissions ........................................................................................................................ 57 Active Alerts .............................................................................................................................................................. 57 Alerts Listing ............................................................................................................................................................. 57 Alerts by Type ........................................................................................................................................................... 57 Stories Listing ........................................................................................................................................................... 57 Stories Listing by Format ..................................................................................................................................... 58 Publication Résumé ................................................................................................................................................ 58 Publishers Listing .................................................................................................................................................... 58 Available Publishers .............................................................................................................................................. 58 Submissions History .............................................................................................................................................. 58 Sales by month ......................................................................................................................................................... 59 Specifying a Date Range ....................................................................................................................................... 59 Sales by story ............................................................................................................................................................ 59 Sales by story with Rights ................................................................................................................................... 59 Sales by publisher ................................................................................................................................................... 59 Expenses by month ................................................................................................................................................ 60 Expenses by story ................................................................................................................................................... 60 Expenses by expense category .......................................................................................................................... 60 Profit/Loss by story ............................................................................................................................................... 60 Submissions Pending ............................................................................................................................................. 60 Documents ................................................................................................................................................................. 60 Calendar Timeline ................................................................................................................................................... 60 Page Visit Counters ................................................................................................................................................. 60 Preferences ................................................................................................................ 61 User Name .................................................................................................................................................................. 61 Control Panel ............................................................................................................. 62 Utilities subtab ......................................................................................................................................................... 62 Backup Now ............................................................................................................................................................... 62 Restore from Backup or Prior Version ........................................................................................................... 63 Activation .................................................................................................................................................................... 63 About ............................................................................................................................................................................. 63 View License ............................................................................................................................................................... 63 Check for Updates .................................................................................................................................................... 63 View Upgrade Instructions .................................................................................................................................. 63 Delete All Data .......................................................................................................................................................... 63 Send Support an Email .......................................................................................................................................... 64 www.thewritersscribe.com .................................................................................................................................. 64 View Log ...................................................................................................................................................................... 64 Diagnostics ................................................................................................................................................................. 64 Maintenance .............................................................................................................................................................. 65 The Writer’s Scribe User’s Guide Table of Contents Reset Page Visit Counters ..................................................................................................................................... 65 Rebuild Calendar Events ....................................................................................................................................... 65 Exit Application ........................................................................................................................................................ 65 Preferences subtab ................................................................................................................................................. 66 General ......................................................................................................................................................................... 66 Banner Picture .......................................................................................................................................................... 66 Email ............................................................................................................................................................................. 67 User Email ................................................................................................................................................................... 67 Login ............................................................................................................................................................................. 67 Alerts/Notifications ............................................................................................................................................... 67 Default Alert Offset ................................................................................................................................................. 67 Default Filters ............................................................................................................................................................ 68 Hide Work-‐In-‐Progress Stories .......................................................................................................................... 68 Hide Trunked Stories .............................................................................................................................................. 68 Hide Publishers Closed to Submissions ........................................................................................................... 68 Administration ......................................................................................................................................................... 68 Disable Log ................................................................................................................................................................. 68 Force Write to Disk on Saves .............................................................................................................................. 69 Source Analysis ......................................................................................................................................................... 69 Tables subtab ............................................................................................................................................................ 70 Edit Genres .................................................................................................................................................................. 70 Edit Formats .............................................................................................................................................................. 70 Edit Attachments ..................................................................................................................................................... 70 Edit Submission Results ........................................................................................................................................ 70 Edit Sales Types ........................................................................................................................................................ 70 Edit Expense Categories ........................................................................................................................................ 70 Edit Expense Mileage Rates ................................................................................................................................. 70 Market Research ...................................................................................................................................................... 71 Edit Alert Types ........................................................................................................................................................ 71 Edit Rights Categories ........................................................................................................................................... 71 Edit Rights .................................................................................................................................................................. 71 Edit Documents ........................................................................................................................................................ 71 Edit Document Instances ...................................................................................................................................... 71 Edit Story Status ...................................................................................................................................................... 71 Localization subtab ................................................................................................................................................ 71 Language ..................................................................................................................................................................... 71 Industry Terminology ............................................................................................................................................ 72 Templates Variables subtab ............................................................................................................................... 72 Twitter Template .................................................................................................................................................... 73 Export / Import subtab ........................................................................................................................................ 73 Export ........................................................................................................................................................................... 73 Export Stories Spreadsheet File ......................................................................................................................... 73 Export Publishers Spreadsheet File ................................................................................................................. 73 Export Doc Files ........................................................................................................................................................ 74 Export Alerts Spreadsheet File ........................................................................................................................... 74 Import .......................................................................................................................................................................... 75 Import Global Publishers ...................................................................................................................................... 75 Import Stories Spreadsheet File ........................................................................................................................ 75 Import Publishers Spreadsheet File ................................................................................................................. 75 The Writer’s Scribe User’s Guide Table of Contents Import Stories derived from Files ..................................................................................................................... 77 Import Alerts Spreadsheet File .......................................................................................................................... 79 Load Data from .sonar3 File ............................................................................................................................... 79 Index .......................................................................................................................... 81 The Writer’s Scribe User’s Guide Getting Started | 1 Welcome Thank you for selecting The Writer’s Scribe software for your professional submission tracking software needs. Our philosophy is that writers write. Our software handles the business side of sending out your submissions, allowing you to focus on the creative side of your work. With The Writer’s Scribe, your submissions are under control. Getting Started The Writer’s Scribe uses a simple notebook metaphor, displaying tabs for the key areas of submission tracking. Toolbar Scorecard View Selector Filters Banner Content Tabs Toolbar Navigate, create and delete records; find and sort records; view records in the format of a single form, a repeating form, or a spreadsheet-like grid. Scorecard A summary of all submissions Accepted, Pending, or Rejected. View Selector Switch between a Summary, Details, and Calendar view of the Home tab. The Writer’s Scribe User’s Guide 2 | Getting Started Tabs Switch between the different screens in the application. Filters Hide records that do not require your immediate attention. Banner Display a picture of your choosing and your name. Content The records stored by the application. These may be simple pages showing a single record, or more complex summary pages, showing information pulled together from multiple records, so you can see everything you need at a glance. Welcome When you start The Writer’s Scribe application for the first time, you will be presented with a Welcome screen. The trial version is the full working copy of the software that will function for 20 days. After the trial period elapses, the software will become read-only. We highly recommend that you watch the Video Tutorial, available on the Website, to gain a full appreciation of the application’s capabilities. The application will automatically detect the language set by default and select the pre-defined custom labels used in the application. These may be later changed using the Control Panel tab (rightmost tab), and the Localization subtab. Language Support The application is installed with language packs for the following languages: The application is installed with language packs for the following languages: English, French, Italian, German, Swedish, Spanish, Dutch, Chinese simplified, Chinese traditional, Arabic, Russian, Hebrew, Portuguese, and Japanese. This allows you to view the menus and other interface elements in your preferred language. To change the language settings, use the steps listed below. 1. 2. 3. 4. 5. 6. Open the application, The Writer’s Scribe. Click on the Edit menu, and then the Preferences menu item. Set the language in the dropdown control to the preferred language. Quit the application, The Writer’s Scribe. Open the application, The Writer’s Scribe. Click on the rightmost tab at the top of the page for the Control Panel tab. 7. Click on the Localization subtab. 8. Select the preferred language, by clicking the desired language button. 9. Enable the Reset Supporting Tables checkbox to change the default values used in the supporting tables to the specified language. This will not erase existing data in a different language, but previously entered da- The Writer’s Scribe User’s Guide Getting Started | 3 ta may not be displayed if it does not correspond to the new default values. 10. Enable the Use System Formats checkbox to use the System specified formats for dates and numbers. Disclaimer: It is not our intent to offend any of our users due to a poor translation. Please notify us at our support email, [email protected], with the offending text and correct translation, if possible, if you discover an error. You may also override any strings used in the application, and if appropriate, send these overrides to our support group for incorporation into future versions of the application. This capability is described in the Control Panel chapter at the end of this User’s Guide. Activate License The Activation screen is available under the Control Panel tab, and then under the Utilities subtab, then the Activation button. This screen only applies once you have purchased the software and would like to activate all of the functionality for the Full version. Please enter the exact Registration Name that you provided at the time of purchase, along with the Registration Key that you were emailed. Both fields will change from red to green to indicate that the key has been accepted. Note: the application only needs to be activated ONCE! Upon installing a later version, you may import your data from your backup file. This will load your registration name and key and automatically activate the new version. Security measures built into the software prevent the sharing of your license information with others (which would be in violation of the license agreement.) Home Tab The Home tab collects all the key information on your submissions into a single screen. It lists your stories, along with the submissions for each story. Summary View Listed below is the Summary view of the Home page, providing an overview of all of your submissions. This view shows only your most recent submission of each story. The individual Story names, Publisher names, and submissions via the Days Out column are hyperlinked to the other Tabs that show more detailed information on each item. The Writer’s Scribe User’s Guide 4 | Getting Started At the top of the page is a Scorecard of your submission results. This box is color-coded: green for accepted, yellow for pending, and red for rejected. Next to the title of “Submissions Overview”, is a group of checkboxes that allow you to hide or show records that may not be of immediate interest. This includes works that are currently work-in-progress, trunked works, and works that have already been published (and hence only available as reprints). The screen is immediately updated when a filter is modified. The Story, Publisher, Date Sent, and Date Received columns may also be used to sort the records displayed. Clicking on the column header for each of these 4 columns will cycle the sort through ascending, descending, and unsorted. Details View The Details view displays up to 3 submissions for each story. All of the Pending and Accepted submission results are highlighted. Rejected results are highlighted only if you do not have other submissions on that work pending. This allows you to see what is available to be sent out at a glance. Submissions may also be updated directly on the Home Tab. Click on the Received date and the Result field to update the submission information. Filtering and Sorting may also be performed on the Home Details view in the same manner as the Home Summary view. Often you will define Alerts for submissions that you have sent out. If the Result is changed to Rejected or Accepted, a dialog will be displayed asking if you would like to mark those alerts as Completed. This is done as a convenience as most alerts connected to a Submission are for the purpose of providing a reminder and once a submission is resolved, that reminder is no longer needed. Bookmarks View The Bookmarks view lists out bookmarks, or shortcuts, that allow you to jump directly to the listed record. Bookmarks may be set for each of the key type of record managed by the application. Bookmarks may be added or removed to records by clicking the Bookmark icon in the top right corner of the banner for that record. When selected, a bright blue bookmark symbol will be displayed. To remove a bookmark, click it again to disable it. Bookmarks may also be removed from the Home tab Bookmarks view. The Writer’s Scribe User’s Guide Getting Started | 5 Calendar View The Calendar view of the Home page places all of your Alerts, Submissions, Expenses, and Sales into a grid for a month. The items displayed on the Calendar can be customized under the Control Panel tab and the Utilities subtab. The block for the current day is shaded with the color blue. By default, items are color-coded based upon the state of the item. For Submissions, the color used is as defined in the Submission Results. Typically, this is green for accepted, yellow for pending, and red for rejected. The values for Submission Results along with the color for each may be customized. The colors for Alerts vary based upon whether the item has been completed, green if completed, and whether the due date has passed, red when overdue. The color for each Alert may also be specified, overriding the default values. For Sales, the color purple is used, and for Expenses the color grey is used. Each item listed also serves as a hyperlink to that item under its corresponding tab. All colors are immediately updated based upon the date and the values of the underlying items. The Writer’s Scribe User’s Guide 6 | Getting Started Up to 5 items are listed in each block. If more than 5 items apply for a given date, a “More…” link will be displayed. All of the items for a day may be displayed in a popup window by clicking on the day header or day number. Navigating Application Tabs The application contains 9 tabs that are always displayed across the top of the screen. Within most of these tabs, alternate views are also supported. For the Stories, Publishers, Submissions, Alerts, Sales, and Expenses tabs the following views are supported: • Read-only Easy to read without needing to switch between subtabs. • Edit For editing or creating new records. All information is available. • Tabular Listing View multiple records at once with sorting on the column headers. Clicking on the currently selected tab will switch the view to the next successive view. The three circles under the tab label indicate the currently selected view. Navigating Records The Toolbar provides the ability to move from one record to the next. The arrows will move to the next or previous record, the record slider under the input box allows you to advance through many records, and the indicators show which record is currently displayed. For a listing view, a solid vertical bar on the left border indicates the currently active record. You may also type a record number directly into the box and press Return to jump to a particular record. The mouse scroll wheel may be used to advance through the records. The Writer’s Scribe User’s Guide Getting Started | 7 Search for Records A listing of records, over time, may grow quite large. The Writer’s Scribe allows you to search for a subset of the records using the Find button in the toolbar. By clicking the Find button, the Content area is transformed to allow you to enter in criteria for your search. After clicking the Perform Find button, 145 of the 204 submission records were found to meet the criteria of Date Sent before January 1, 2011. Perform Find button The count of records found that match the criteria You may click on the green circle to toggle between the records that matched your criteria and those that did not. To clear out the search, click the Show All button. The Writer’s Scribe User’s Guide 8 | Getting Started Upon completing a find, you may also Save the find with a name so that you can use it again in the future. Go to the application’s Records menu, select Saved Finds, and then from the pull-right menu select Save Current Find... Quick Find You may also search through all of the fields in a tab using the Quick Find control in the toolbar. Enter a search value and press Enter to search across all fields on the page. Quick Find Sort Records The Sort button in the toolbar allows you to control the order of the display. Move fields from the listbox on the left to the listbox on the right by selecting one or more fields and clicking the Move button. The Move button will transform into a Clear button by selecting one or more fields in the right listbox. To complete your sort, click the Sort button at the bottom right corner of this dialog. To clear your sort criteria, display this dialog again and click the Unsort button. The Writer’s Scribe User’s Guide Getting Started | 9 New Record The New Record button in the toolbar allows you to enter a new record. Upon clicking the button, the page will be cleared of values, and default values, if applicable, will be displayed. Required fields are shown with a label in a red color. Fields that do not have an input box or other control are for display purposes only. New Record Button Required Field Edit list of values available The new record is automatically saved when you switch to a different record or page, or if you click off to the side of the form. Fields that display a pre-defined list of values may often be customized. An edit button is shown adjacent to the field label so you may edit these values immediately in a popup window and apply them to the current record. Delete Record If you decide you do not want the new record, click Delete Record in the toolbar and confirm the deletion in the popup dialog box that is presented. You will then be returned to the last record you were viewing. The Writer’s Scribe User’s Guide 10 | Getting Started Warning: The Writer’s Scribe uses ID values throughout the application to link together related records. As a result, it is possible to delete a record that is related to other records. For example, if you delete a Story record, and then go to an Alert record that referenced the Story record you just deleted, the hyperlink on the related Alert will no longer function. If you want that alert linked to a different Story, you will need to set that manually on the Alert record. It is NOT possible to perform cascade deletes that remove all related records in The Writer’s Scribe application. There may be situations where you want to delete a given record and retain all of the other related records. Many also consider a delete operation, though useful, to be a dangerous operation, and a cascade delete even more so. Therefore only simple deletes are supported. The Control Panel tab, under the Utilities subtab, contains a button for Diagnostics. Use this function to generate a comprehensive report on your data. This function will trace out nearly all of the relationships in the application to confirm the referential integrity of the data. It will then report each error or warning, along with instructions on how to address that issue. The Writer’s Scribe User’s Guide Getting Started | 11 Working with Multiple Windows By default, The Writer’s Scribe opens a single window. However, you can open multiple windows and arrange them within the overall application window. This allows you to view stories in one window, and publishers in a separate window, or any combination of information across several windows. Listed below is an example of two windows open at the same time. To open additional windows, go to the Windows menu and select New Window. Working with FileMaker Go The Writer’s Scribe application does not, by itself, run on your Mobile device. You must download FileMaker Go for either the iPhone/iPod Touch, or the iPad, separately in the Apple App Store. The FMG application is a prerequisite for using The Writer’s Scribe on your mobile device and is installed separately. FileMaker Go is Available Separately The Writer’s Scribe has been updated to work with the FileMaker Go (FMG) application on the iPad, the iPhone, and the iPod Touch. This section will describe how to use FileMaker Go with The Writer’s Scribe application. FMG is NOT included as part of the installation of The Writer’s Scribe. The Writer’s Scribe User’s Guide 12 | Getting Started Local versus Remote Access FMG can access either a remote copy of The Writer’s Scribe shared on another computer running FileMaker Pro or a running FileMaker Server, or from a local copy. The advantage of running it on a remote computer is that you are updating only a single copy of your information. Each of the remote solutions involves an additional cost as they require upgraded versions of the FileMaker product, also sold separately. If you run the FMG as a local file, you will need to either use the FMG copy as a read-only version of your information, or stay aware of which copy contains your latest edits and move the file accordingly. Installing The Writer’s Scribe onto the Mobile Device to Run Locally Within the install directory of The Writer’s Scribe are a number of files. You will need to copy the file “TheWritersScribe.USR” to the mobile device. Several methods are available to do this. The most commonly used approach is to use iTunes. This allows you to move the file onto the mobile device as shown below. The Writer’s Scribe User’s Guide Getting Started | 13 Just open iTunes, connect your mobile device to your computer and allow it to connect to iTunes. Then select the device, then select the Apps tab. Next, click on the FileMaker Go icon. Use the “Add…” button at the bottom of the screen to move the following 2 files to the FileMaker Go Documents area of your mobile device. You may need to scroll your screen to see this button. • • TheWritersScribe.USR TheWritersScribeUsersGuide_en.pdf Mounted iOS Device Files on iOS Device FMG 12 Selected for File Sharing Click “Add…” to place files on the Mobile device To use the files, open FMG. Then use the FMG File Browser to open the file: TheWritersScribe.USR. To access the FMG File Browser, you may need to go to the Switch Windows screen and then click on the “Open File Browser…” button in the bottom left corner of the screen. Then select the “Files on Device” option and select the file. Copying the User’s Guide to the mobile device will allow you to access the manual via the Control Panel tab and the “User’s Guide” button. This will dis- The Writer’s Scribe User’s Guide 14 | Getting Started play the PDF file for the User’s Manual with the native PDF viewer. You may also use other third party software to load and view the manual. Running The Writer’s Scribe on a Remote Computer The procedure for viewing The Writer’s Scribe application as served up from a remote computer is nearly identical to the above procedure for viewing it via a local file. Instead of using the FileMaker File Browser to view the “Files on the Device”, select the option to view the “Local Network Hosts”. Navigating the FileMaker Go Interface The menus in the standard interface have been replaced with the pre-defined menus shown below. These streamlined menus optimize the use of the screen so you have as much display area to work with as possible. Switch between windows Switch View Mode/Settings Switch between layouts Search/Show/Sort Records Add/Delete Records Switch between records The Writer’s Scribe User’s Guide Getting Started | 15 Links, tabs, and buttons all operate as they do on the full version of the product. However, instead of a cursor, you need to point and click with your fingertip on the device’s touch screen. The application interface has been adapted for this form factor to the extent possible by making buttons and other items you click on larger. Nevertheless, some items are too small to click on when originally displayed. Please use the following techniques to navigate the screen. Action Zoom In/Zoom Out Click Button or Hyperlink Select a Field Move between Fields Technique Lightly double tap on the screen at the desired location. The zoom action will be centered at the spot you touch. FMG uses the boundaries of the particular container to automatically size the screen. Or, use the 2-finger pinch to shrink or 2-finger spread to zoom. Tap the button or hyperlink with your finger. You may need to tap and hold your finger on the object for a second or two to “click” as the interface needs to distinguish between a tap and a click. The button will highlight when clicked to show that it is selected. It is possible to tap a button and have it highlight and yet not actually click. Hold your tap on the object for a slightly longer time to have it recognized as a click. Tap the field with your finger to select it. The keyboard will automatically display as needed. For dropdown lists, the bottom of the screen will display the list of values in a full-sized control. Likewise, date fields are displayed with a full-sized rolling calendar control. Use the Next and Previous buttons on the popup edit control to move between fields. This replaces the Tab key used in the standard interface. The Writer’s Scribe User’s Guide 16 | Getting Started Software Limitations when Using FileMaker Go Some limitations apply to using the application with FileMaker Go. Where applicable, the portions of the application that do not work on the mobile device have been grayed out. The limitations are listed in the table below: Unsupported Feature Export Alert to iCal Preview mode for Reports Growl Notifications Menus and all functions specifically accessed through menus Printing Loading Files for Document Export/Import to a Spreadsheet File Read Aloud File Dialog functions Import Global Publishers Description FMG does not support the use of Apple events needed for the iCal integration used in the application. FMG does not support displaying a form in Preview mode. All reports are shown in Form mode. FMG does not support the use of Applescript events, which are needed for the Growl integration FMG does not support the use of Custom Menus. Limited pre-defined menus are supported. FMG currently does not support printing. Files used in Documents must be loaded on the Desktop computer. Binary files may still be viewed, attached to emails, and exported. Export/Import to an xlsx format file from the Control Panel tab, Utilities subtab, for Stories and Publishers, is not supported. FMG does not support speech from the Stories tab and the Source subtab. Most operations that display a file or directory selection dialog require the use of a plugin and Java. These are not available for FMG. Alternate data entry using the keyboard is supported wherever possible. Imports of Global Publishers allows the user to review What’s New, but updates must be applied in the desktop version. Moving the Local Data File from the Mobile Device back to the Computer You may want to use The Writer’s Scribe only on your mobile device and never return to using it on your desktop or laptop computer. Unfortunately, the mobile device lacks the access to the file system at this time to update the software directly to the mobile device. Therefore, you will need to move your data back to the main computer, update it, and again load it onto the mobile device. To move the local file, you need to simply reverse the steps used to originally place it on the mobile device. Using iTunes, select the FMG application, select the file “TheWritersScribe.USR” in the list of documents, then select the “Save to…” button at the bottom of the screen. You may need to scroll your screen to see this button. The Writer’s Scribe User’s Guide Getting Started | 17 Warning: If you modify a copy of the data file, the file named TheWritersScribe.USR, on both your desktop computer and on the mobile device, there is currently no automatic way to reconcile these copies into a single file. Please be aware of this limitation and make your edits accordingly. Viewing Files Stored within FileMaker Go The Writer’s Scribe application supports storing original documents in container fields throughout the application. This includes query letters, manuscripts, media files, and electronic receipts, to name a few. Some of these files can be viewed directly in The Writer’s Scribe application. Other files may be in formats not supported within the application or on the page that holds the container field. The application provides an export button to View, Save, or Email these files on the mobile platform. The Writer’s Scribe User’s Guide Working with Stories | 19 Working with Stories The Writer’s Scribe application tracks Story submissions. After you write a story, you submit it to a publisher. A submission is tied to both a story and a publisher. Therefore, the first step in using The Writer’s Scribe is to enter your stories. Click the Stories tab and then the New Record button in the toolbar to enter a new record. Required fields are shown with dark magenta label, which in this case includes the Name field. All other fields are optional and may be entered at a later time. Upon updating the Name field for either a Story, a validation check runs. Currently, it checks that a value is entered for the name, making this a required field. In addition, the application will also check if the Name is unique. This is to prevent the creation of “soft” duplicates accidentally. The user may still enter duplicates as a Validation Error message will be displayed that allows the user to override this uniqueness check if necessary. Fields on the form allow you to enter information about the Story. The Format field allows you to specify the overall format such as Short Story, Novel, or other descriptive information. This field may be customized, as indicated by the pencil button next to the field. Also note, some of these fields may also be customized via the Control Panel/Custom Labels, so you may use them for the purpose that best fits your needs. The Writer’s Scribe User’s Guide 20 | Working with Stories Other fields include a Status field for describing the status of the Story itself. Another is a Fiction field to describe whether the field is fiction or non-fiction. Many publishers handle fictional stories different from non-fiction. With fiction, an author may query the publisher and get a conditional acceptance prior to completing a full manuscript. And then finally, fields for Work-in-Progress, Trunked (no longer worthwhile sending out for consideration), and Published. Each of these fields may be used on the Home tab to filter out submissions shown on the Home tab page. Sent to subtab The Sent to subtab is for viewing submissions associated with the story. This list will automatically be updated when you enter submissions for this story. Contributors subtab The Contributors subtab allows you to enter a listing of all of the contributors to the story or work. You can also include their title, what their contribution was, or other information. Rights subtab The Rights subtab allows you to enter Rights assigned to a story or work. You can also include which Sale the right has been sold with and the expiration or reversion date for the right. See the chapter on Managing Rights for more information on using the Rights subtabs on the Stories and Sales screens. The Edit button next to the Right column header and “+” button allows you to edit the list of rights that you may select from. The Edit Rights screen is also available from the Control Panel tab, Tables subtab. Notes subtab The Notes subtab allows you to enter any additional notes you need to keep with the story. This may include copyright information, legal notes, other contact information…or anything else. The Writer’s Scribe User’s Guide Working with Stories | 21 Source subtab The Source subtab allows you to extract information from your story or article and generate a profile or signature of your work. To use the Source subtab, follow these steps: 1. Open the Story with your Word Processing Application Open your editing application and select the entire contents of your story or work. 2. Copy the Original Story to your Clipboard Copy the selection to the clipboard. 3. Paste into the Source Field Click in the Source field shown above and Paste the entire work into it. You may paste an entire novel into this field for analysis. 4. Enter Stop Words (Optional) Enter the Stop Words you would like to use. Stop Words are words that are commonly used and do not make the work unique. If this a new record, a typical set of Stop Words is entered by default. You may customize the Stop Words used in a separate dialog. 5. Enter Character Names (Optional) Enter the names of your characters into the Characters field. Typically they are used frequently, but are not useful in characterizing your work 6. Mark Checkbox for Characters (Optional) Mark the checkbox Use Character Names as Stop Words to have the application consider the names as Stop Words. 7. Click the Analyze Source button The application will now analyze your work and generate your keywords and a concordance. The analysis may take a matter of seconds for short works of less than 5,000 words, to perhaps over 20 minutes for a work that is 70,000 words long. You will be warned if the application detects previously entered keywords, allowing you to either replace or append to the current keywords. When finished, a dialog will be displayed summarizing the results: The Source subtab will then be updated with the new keywords derived from the analysis. Keywords are useful for searching the document. For large fields, the indexes generated by the database use approximately the first 120 characters of the field. Therefore, it is useful to have a keywords field to quickly locate a story record. It will also the Adult Content and Target Audience fields based upon the content. This is a simple keyword analysis so you may still override these values as appropriate. The Writer’s Scribe User’s Guide 22 | Working with Stories The other output generated by the Analyze Source function is a concordance. Click the Save button to save the concordance out to a text file. Click the View button to instantly view the concordance as output to a temporary file. Click the Email button to create and attach the concordance to an email. The Concordance contains every unique word used in your document. Words are sorted first by their frequency of use, the most commonly used listed first. They are then sorted alphabetically. A Concordance is useful for: • Understanding how you use vocabulary in your document • Analyzing the variety of words used • Determining how frequently certain words are used • Spotting errors that otherwise are easily missed Today, spell checking functions provide the user with immediate feedback and correction on words that are in the dictionary. For technical terms and proper names that are not within the spell checker’s dictionary, words may be flagged but not as easily corrected. Reviewing the concordance allows you to spot errors that otherwise may be missed. Analytics subtab When a Source Analysis is performed, statistics are calculated for the document. This includes Readability statistics using standard formulas. Syllables are calculated via an algorithm and not via a dictionary lookup. Please use your word processing application for a precise value on the readability statistics. Each paragraph is analyzed on whether it contains any dialog, or in this case, whether it contains any quoted phrases or sentences. In addition, the non-dialog text passages are analyzed for proper names that are either pre-dominantly male or female to determine the gender of that paragraph. Word Cloud subtab When a Source Analysis is performed, a concordance of the words in the story is generated. The Word Cloud subtab uses the concordance to generate a Word Cloud, with the most frequently used word in the center in the largest font size, and then spiraling outwards for less frequently used words. The Writer’s Scribe User’s Guide Working with Stories | 23 Picture subtab The picture subtab supports a capturing a picture. This may be used for cover artwork or other purposes. It is intended to store smaller images for browsing. Multiple larger images may be stored as a document under the Docs subtab. The picture may be cover art, an illustration, or other inspiration for your muse that you would like to browse when skimming through your stories. Sales subtab This section allows you to track information on Sales, and then Units Sold for each vendor on your sales. You may update the Units Sold directly on this screen. Add new sales or new vendors using the main Sales tab at the top of the screen. Docs subtab See the section for “Managing Documents” for detailed information on associating binary documents with a story. Alerts subtab The last section on the Story page is the Alerts section. Technically, this is not part of the Story record; rather this section contains Alerts that link back to this particular story. Alerts may be created at any time. By creating Alerts from the Story page, the newly created Alert automatically picks up the context and links back to the Story record. Alerts will be covered in greater detail later in this guide. Alternate View Control Once you have created a few story records, you may want to browse through them. Use the arrow buttons in the toolbar to step between the records. The tabs on the page are smart, retaining the selected tab as you page through each record. You may also switch to a different mode for the page to view more records at a time. Use the toolbar to switch between the Form view, the List view, and the Table view buttons. Form view button List view button Table view button The Writer’s Scribe User’s Guide 24 | Working with Stories In the List view, the same form will be displayed; except that multiple records will be stacked vertically on the form. This view will display all of the available records. The Table view (rightmost button) displays the records like a spreadsheet. This format is compact, allowing you to quickly browse to the record you need. Table view button Here is the same page in Table view. The page retains the formatting to the extent possible, including conditional formatting as shown with the green cell for a published story. Clicking on a column header will change the page’s sort order based upon the column selected. You may also define which columns are shown by right-clicking on a column header and selecting Modify Table View… The following dialog will be displayed. Work-‐In-‐Progress, Trunk and Published Fields Finally, there are 3 additional fields worth mentioning, “Work-In-Progress,” “Trunk” and “Published.” For stories that you do not want to actively track submissions on, you may designate them as a Work-in-Progress or a Trunk story. Work-In-Progress applies when you are not yet done with a story, or you have decided to do some addi- The Writer’s Scribe User’s Guide Working with Stories | 25 tional work on it. A Trunk story is one that, though obviously of personal value, is somehow flawed in the eyes of publishers and not worth pursuing. These fields allow you to hide them on the Home Page tabular summaries per a setting in the Control Panel. The other value to note is the Published field. This field turns green when enabled. Action Buttons A group of buttons in the top right corner enables actions using the context of the current story. This includes “Suggest a Publisher”, which is detailed in the chapter, “Submitting Stories in Three Easy Steps.” The “Create Alert” button is described in the chapter, “Using Alerts.” The third button is specific to the Stories tab: “Drag-‐and-‐Drop File for New Story,” described below. Drag-‐and-‐Drop File for New Story This button allows the user to select a story using a file dialog, OR to simply drag a file from their desktop onto this button. The title of the file will be used for the Story and the file will automatically be attached as a Document. Note: this feature is not supported on iOS for Mobile. Also, if multiple files are dragged and dropped, only the first file will be used for the story and at-‐ tached as a document. The Writer’s Scribe User’s Guide Working with Publishers | 27 Working with Publishers Finding a home for your article or story means finding a publisher that believes their publication is a match for your work. After reading through a publisher’s magazine, journal, or books, you have invested time in understanding their publication and whether they are someone you may find success with. The Publishers tab in The Writer’s Scribe captures vital information about the publishers you submit to. It is not an all-inclusive repository of information on that publisher; you can find that on the Internet. A Publisher record, for The Writer’s Scribe, captures the key information needed to submit your work for their consideration. Scorecard for this particular publisher Action Buttons Upon updating the Name field for either a Publisher, a validation check runs. Cur this a required field. rently, it checks that a value is entered for the name, making In addition, the application will also check if the Name is unique. This is to prevent the creation of “soft” duplicates accidentally. The user may still enter duplicates as a Validation Error message will be displayed that allows the user to override this uniqueness check if necessary. The Writer’s Scribe User’s Guide 28 | Working with Publishers The magnifying glass button following the Publisher Name field will display a popup window with a Market Research listing. Market Research entries are bookmarks and descriptions of useful index sites that list new or existing markets for your work. You may switch between a summary and a detailed view of this window. The Allows Simultaneous Submissions field allows you to note whether the Publisher will accept submissions of your story that you have sent to multiple publishers. The POC Email field is for your point of contact person at that publisher. The Genre Org. field is to note whether the organization in your favorite genre will accept that publisher as a prerequisite to becoming a member. For example, the Science Fiction Writer’s of America (SFWA) organization lists those publications that qualify towards having 4 works published as science fiction. This field may be customized on the Control Panel tab, Custom Labels subtab, for other uses. For example, musicians may use it to note ASCAP acceptance. The Alert Offset field allows you to enter a default value for any Alerts you create that are associated with a particular publisher. The Alert will take today’s date and add the number of days from today for the default date for the Alert. You may always change the Alert date; this is simply an initial value. If you do not enter a value for the Publisher’s offset, the Default Offset value set in the Control Panel will be used. The Address for the Publisher may be viewed using Google Maps. Click the View on Google Maps button to display a popup Web browser window that automatically loads the specified address. Locking Publishers for Import/Export Records may be locked for the purpose of imports and/or exports. Lock for Import Updates With this option selected, when Publishers are imported using a spreadsheet, duplicate records will NOT update Publisher records that are locked. This allows you to ensure that personal notes, phone numbers, and other information are not overwritten by the import update. Lock from Exports With this option selected, when you use Pack & Send, or export Publishers via a spreadsheet, this Publisher record will NOT be exported. This allows you to exchange Publisher information with others without exposing your personal, private information, or otherwise share confidential information. The Writer’s Scribe User’s Guide Working with Publishers | 29 The subtabs under the Publisher tab include the items listed below. Info subtab The Info subtab contains information on the publisher, as described above. Sent subtab The Sent subtab allows you to quickly browse every story or article that you have sent to that particular publisher. Notes subtab The Notes subtab allows you to enter miscellaneous notes about the publisher. Sales subtab Stores information on Sales to this publisher, and units sold by each vendor associated with these sales. Docs subtab See the chapter for “Managing Documents” for detailed information on associating binary documents with a publisher. Alerts subtab There is also an Alerts section for tracking information about a Publisher. For example, a publisher may be closed for submissions for a two-month period. You an capture this in the Notes field, and set an Alert for yourself that will be listed when they are once again open for submissions. Action Buttons A group of buttons in the top right corner enables actions using the context of the current publisher. This includes “Create a Submission”, which is detailed in the chapter, “Submitting Stories in Three Easy Steps.” The “Create Alert” button is described in the chapter, “Using Alerts.” The third button is specific to the Publishers tab: “Pack & Send.” Global Publishers Publishers designated as Global Publishers may be synchronized with updates available from The Writer’s Scribe website. These updates may be downloaded and applied via the Control Panel tab, Import subtab, and the dialog for Import Global Publishers. Updating Publishers from The Writer’s Scribe website can save a tremendous amount of time, freeing you from needing to check whether a Publisher is currently Open to submissions and making other updates to the Publisher records. The Writer’s Scribe User’s Guide 30 | Working with Publishers When a publisher is designated as a Global Publisher, the following apply: • Updates to the Publisher information are applied from the update file. • Publisher records available as a Global Publisher have the Synchronize to Global checkbox control enabled and may be synchronized if the checkbox is marked. • Publishers enabled as a Global Publisher are shown with the Info subtab as blue. • Updates from the update file only affect information on the Info subtab. Information on the remaining subtabs is unaffected by updates, allowing you to retain your custom information on each publisher. • Publishers marked as Private are unaffected by a Global Publisher update. • Publishers marked for Synchronize to Global may not also be marked as Private. Pack & Send button The Pack & Send button allows you to export a single Publisher, a set of Publisher records, or all Publisher records, to a spreadsheet file. This spreadsheet file is automatically attached to an email. This allows you to easily share information about a market with a fellow writer. Upon clicking the Send button at the top right corner of the popup dialog, the file is attached to an email and opened in your email client application. Fill out your email message and send this to your fellow writer. The Writer’s Scribe User’s Guide Working with Publishers | 31 Upon receiving the email, your fellow writer will need to import the spreadsheet file. Please perform the following steps: 1. Save the spreadsheet to the install directory for The Writer’s Scribe application from the email. 2. Navigate to the Control Panel tab and the Import subtab. 3. Click the Publishers Spreadsheet File (.xlsx) under the Import heading. 4. Enter the name of the spreadsheet file in the popup dialog, shown below. 5. Select the appropriate option, as described under the Instructions tab in the dialog 6. Click Import. This completes the import process. Drag-‐and-‐Drop File for Attaching a Document This button allows the user to use a file dialog, OR to simply drag a file from their desktop onto this button. The file is automatically attached as a document for the currently selected object, and the name of the file is used for the Title of the document. Note: this feature is not supported on iOS for Mobile. Also, if multiple files are dragged and dropped, only the first file will be attached. The Writer’s Scribe User’s Guide Working with Submissions | 33 Working with Submissions A tremendous amount of work goes into writing a story. Therefore, you want to give it the best chance of being accepted for publication. The objective of The Writer’s Scribe is to give you the tools to manage your submissions. You want to avoid submitting: a story to the same publisher twice, or submitting to a publisher and not realizing that you never received a reply, or even worse, hearing from a publisher and failing to follow-up on a request. Action buttons Hyperlink to the Publisher Pre-defined filters Hyperlink to the Story The Submissions tab allows you to keep a complete record of your submission: what story was sent to whom, when it was sent, what was sent, when you heard back, how you sent it, and what was the result. You may also capture the query letter you sent with the submission. You may later learn the name of a favorable editor and want to note this on record for any future submissions to that publisher. Once a story is accepted, you may also keep a copy of the contract so you know whether you can sell the story again or need to retire it from any future submissions. The Writer’s Scribe User’s Guide 34 | Working with Submissions You may also edit the list of Result values using the Edit… button next to the field. This will display a popup window that allows you to change, delete, or add values for use with this field. Handling Simultaneous Submissions Some publishers, actually most, request that you not make multiple submissions of a work. One reason is to minimize the impact on the publication in terms of reading time should another publication accept your work and you need to pull the submission. Some authors choose to overlook this stipulation, while other authors want to make sure they maintain good relations with a favored publisher. The Writer’s Scribe notifies you if a given submission would violate a publisher’s request to not make multiple submissions. It is up to the author to decide whether to proceed with the submission or change whom a given submission is sent to. Listed below is the warning message displayed when a conflict is detected. The Submissions tab also contains several subtabs. These include the following: Info Notes Picture Docs Alerts For general information on the submission For general notes To store a single picture to associate with the submission. This may be the cover art for the particular publication of this submission. A series of files to associate with the submission. This may include the manuscript submitted, the contract, and other correspondence. A listing of alerts connected to this submission. Create a Sale from a Submission Once a Submission has been “Accepted”, the “Create Sale…” button will be enabled. Clicking this button will navigate to the Sales tab and automatically create a Sale using the information from the Submissions page. It will also check if there is already a Sale recorded for this submission and display a warning if a Sale already exists. This warning will still allow you to create the sale if you want, or cancel creating the record. The Writer’s Scribe User’s Guide Working with Submissions | 35 Post to Facebook The Post to Facebook button opens a popup window and connects to Facebook, allowing you to enter a message that will be posted to your wall. If you are not already logged in, you will be asked to log in. If you are already logged in, you will not be asked to log in again. Please see the Control Panel chapter for additional information on defining the Social Template. You may always edit this message further before you Publish it to your wall. Or, you may Skip posting this message. After posting, you will see a message posted note and you may close the window. The Writer’s Scribe uses a simple Facebook app to post your message to your Wall. The app does not require any personal information or access to your account in order to use it. The Writer’s Scribe User’s Guide 36 | Working with Submissions Tweet The Tweet button opens a popup window and connects to Twitter, allowing you to enter a Tweet. If you are not already logged in, you will be asked to log in. If you are already logged in, you will not be asked to log in again. The message uses the template defined in the Control Panel tab for the Social Template to fill in the default message. Please see the Control Panel chapter for additional information on defining the Social Template. You may always edit this message further before you Tweet. Or, you may close the window to cancel this Tweet. After posting, you will see a Tweet posted note and you may close the window. The Writer’s Scribe application uses a web browser based interface to send your Tweet. The Writer’s Scribe User’s Guide Submitting Stories in Three Easy Steps | 37 Submitting Stories in Three Easy Steps Another feature of The Writer’s Scribe is a smart story submission capability. After you have entered your stories and publishers, this feature makes it a snap to send your work out to other publishers. The first step is to select a story you would like to send out from the Stories tab. To start, click the 1 – Suggest a Publisher… button. The application will remember which story you were last looking at and move to the listing of Publishers. Click to find a Publisher The Writer’s Scribe User’s Guide 38 | Submitting Stories in Three Easy Steps The listing of Publishers is automatically filtered. Only publishers that: • Are open to receiving submissions • Do not currently have any pending submissions from you • Accept one or more genres that match your story • Checks that the Story is less than or equal to the maximum accepted word count if specified • Checks that the Story is greater than or equal to the minimum accepted word count if specified • If the story has already been published, it checks whether the publisher accepts reprints • Publishers are sorted with Professional paying markets listed first, and non-paying markets last. Page through the list of Publishers, and then click to create a Submission using the Story/Publisher combo The second step is to step through the list of publishers and find the publisher you would like to send your story to. Once you find the publisher for the submission, click 2 – Create a Submission… The application will move to the Submissions tab and will create a new Submission using the previously selected Story and Publisher, then finish filling out the Submission screen. Typically, you need to specify which attachments will be submitted with your work. The Writer’s Scribe User’s Guide Submitting Stories in Three Easy Steps | 39 The third step is to actually compose and send your query for the submission., Click Compose Query…. A window will popup for composing your query. Typically, queries may be submitted by email, by a web form, or by postal mail. A tab is shown in the popup window for each of these options. Once the query is sent via email, or the Web Form URL is viewed, or the Postal Mail query is previewed or exported, a Doc will be created of the query and automatically attached to the Submission. Click to select an attachment The above screen is generated using a mail-merge like capability. In the Control Panel, a new subtab is listed of “Query Templates.” This section allows you to define the query template, supplying tags in the message that subsitute several keywords pulled from the Story, the Publisher, and other locations in the application. Typically, this is simply a draft and you will want to customize this query further for the particular publisher. However, it is a start and eliminates much of the work in gathering the basic information for the query. The Writer’s Scribe User’s Guide 40 | Submitting Stories in Three Easy Steps Also note, the bottom section of the Compose Query popup allows you to select a single attachment. If you loaded your file into the application for the story, you may select that file and it will automatically be attached to the email when you send it. Listed below is the email message generated from the popup above. The box next to the attachment document will show as green when that document, or file, is selected. The other tabs on the Compose Query popup allow the user to collect information to copy and paste into a web form in a browser window. Listed below is the web form tab with the information filled in using the Compose Templates. In addition, the button at the bottom right corner will open a web browser and navigate to the web site entered for the publisher specified for this submission. Though the file may be shown in the Attachments list, it cannot be dragged and dropped into the publisher’s form in you web browser. However, you can easily save a copy of the file to your file system and upload it to the publisher’s website. Click on name of the attachment to display the document popup, then click the “Save …” option to save it to your file system. The third option is to send a query letter via postal mail. This screen is listed below. Two buttons are shown in the bottom right corner of the Postal Mail tab. The first, is a Print Preview button. This will take the information shown, place it on a full page suitable for printing, and display it in print preview mode. It may then be printed. Also note, you may format the text of the query with different fonts, font sizes, bold, underline, and text alignment. The second option is to export the text to a text file. You may then use the word processing software of your choice to continue editing it and printing it. The Writer’s Scribe User’s Guide Using Alerts | 41 Using Alerts Alerts act as a tickler file or To Do list. They provide a reminder of when to followup on something. They are very flexible and may be applied to a story, a publisher, a submission, or even standalone. Active Alerts An alert is considered Active if it is not yet completed, and it falls within the specified time frame from the current day. Alerts are color coded to indicate their urgency. Listed below are the default colors assigned to alerts. Color Active Green No White No Yellow No Blue Yes Red Yes Time Interval Completed. Due more than 7 days into the future. Not completed AND due within 7 days of today. Not completed AND due today. Not completed AND past due. Description Alerts that are marked as completed. Alerts that are NOT active Alerts that are active though not yet due. Alerts that are active and due today. Alerts that were due prior to today and are not yet completed. The user may also specify a specific color to an Alert using the Color field. If the user sets the color to Default, the above colors will be used. These colors will also be used on the Home Calendar view. The Writer’s Scribe User’s Guide 42 | Using Alerts A count is kept of active alerts, just like a count of unread emails you may have. This is shown via a small red number in superscript on the Alerts tab. Pre-defined filters Alerts may be created while on the Alerts tab; however, it is more common to create them while viewing the Story, Publisher, or Submission record. This approach has the advantage of pulling information from the record to which it will be linked. For example, if you are viewing a Submission record and click the Create Alert button at the bottom of the page, a dialog will pop up for entering the alert information. An alert created in this manner will default to a future date based on the date of the submission and the setting in the Default Alert Offset. It will pick up the Story, the Publisher, and the ID directly from the Submission record. If the user clicks Cancel, the Alert will not be created. If the user clicks Done, the alert is created and the user will remain on the Submission page. The list of Alerts at the bottom of the Submissions page will automatically be updated with the new alert. The Default Alert Offset, covered later in this User Guide under the Control Panel section, specifies the number of days to add to the current day for the default due date on an alert. Typically, this may be 60 to 90 days, and is only a default value. The user may change the date to whatever offset is most appropriate. In addition, a default alert offset may also be defined for each Publisher. The Publisher offset will take precedence over the general offset value set in the Control Panel. The Writer’s Scribe User’s Guide Using Alerts | 43 Many alerts may be easily categorized for quick reference later. Typical values include: Deadline, Follow-up, and Submit after. This value is also used to describe an Alert when exported. Like all other forms, the user has an option of switching into a Table view of the Alerts page. This is particularly useful if many of the alerts have been acted upon or are no longer relevant. The user may click on the Complete checkbox for one record after the next, quickly and easily. Once a record has been marked as having been completed, it will no longer be included in the count of active alerts. Showing Active Alerts, Alerts Not Completed, or All Alerts Three buttons are located at the top of the Alert page: Only Active, Note Completed and All. These buttons allow you to easily switch between 3 pre-defined filters. The button is shaded green if the particular filter has been applied. In addition, the date of the alert is colored per the color-coding in the table listed above. Alert Hyperlinks Throughout The Writer’s Scribe are hyperlink buttons that allow you to jump to the detailed record for the referenced item. Normally, the last record viewed under a tab is remembered by the application, so you can easily switch back and forth between the related records. The Alerts tab also contains a few subtabs. These include the following: Info Notes Picture For general information on the alert For general notes To store a single picture to associate with the alert. Action Buttons Send Email The Send Email… button is particularly useful. Using the value set in Customize for User Email, you can generate an email to send to yourself and others. See User Email for information on setting a custom value for the default email address. This setting is covered in greater detail in the Control Panel section of this guide. The email generated by The Writer’s Scribe contains references to the records in the application. It also picks up on the dates from the Alert record. This allows you to easily add an Alert to your calendar. You may edit your email message, adding additional note if you like, before sending it to yourself and/or to others. The Writer’s Scribe User’s Guide 44 | Using Alerts The email generated looks similar to the following. Pack & Send The Pack & Send… button provides a quick and simple method to send alerts to another user. These alerts may then be imported by that user and will also appear under their Home Calendar view. Go to Home Calendar View This button jumps to the Home Calendar view, displaying the month that applies for the currently displayed alerts The Writer’s Scribe User’s Guide Sales and Expenses | 45 Sales and Expenses Sales The equation: Sales minus Expenses equals’ income. While The Writer’s Scribe is not an accounting program, it can provide a full accounting of your income as a writer by tracking your sales and expenses. The top right corner of the Sales tab also displays the running total for your yearto-date sales. Info Subtab The Sales screen will trace your expenses in writing your stories, submitting them, and finally promoting them, back to your individual stories. Hyperlink to the Story Hyperlink to the Publisher Hyperlink to the Submission The Writer’s Scribe records Sales information on a cash basis, or in other words, as it is actually received. Sales are related to a Publisher and a Story. In addition, you will need a date for the sale. Typically, this will be the date the money is received. The Writer’s Scribe User’s Guide 46 | Sales and Expenses The Type field records information about the sale, including whether it is a Flat Rate, Royalty, or an Advance. You may also edit the list of Sales Types using the Edit… button next to the field. This will display a popup window that allows you to change, delete, or add values for use with this field. Rights subtab The Rights subtab allows you to connect Rights on a Story to the current Sale. You can also specify the expiration or reversion date for the right. See the chapter on Managing Rights for more information on using the Rights subtabs on the Stories and Sales screens. Notes subtab Use Notes to enter miscellaneous notes about the sale. Picture subtab Stores a single picture to associate with the sale. Vendors subtab Tracks information about individual vendors for each sale. This information is also shown in the Stories tab under the Sales subtab. Add a Vendor: Click the “+” button and a row will be added to the list of vendors. The new row will be given the Name of “New Vendor”. Edit a Vendor: Edit the information directly in the row by clicking on the field and entering the information. Delete a Vendor: Click on the “-“ button above the rightmost column to enter “Delete” mode. A red button will appear in each row. Click the red button for the row you would like to delete. Click the “-“ button again to leave “Delete” mode. Docs subtab See the chapter for “Managing Documents” for detailed information on associating binary documents with a sale. The Writer’s Scribe User’s Guide Sales and Expenses | 47 Expenses Info Subtab In many respects, an expense is the opposite of a sale. In contrast, however, an expense does not need to be associated with a particular story; you may leave the story field blank if it does not apply. We do require that you enter a Payee, a Date, and an Amount. For accounting purposes, you may also associate a given expense with a Category. Here are the categories as included with the product. Similar to the list of Expense Types, you can also edit and expand the Sales Category list. To edit the list, click the Edit button next to the field. This will display a popup window that allows you to change, delete, or add values for use with this field. The Miles and Mileage Rate fields are useful for recording and calculating the expense Amount based on your mileage. If both of these fields are filled in, the Amount field will automatically record the calculated amount. You may override this value by changing the Amount field itself. If a Category other than Mileage is selected, these two fields will be dimmed and are not included in the tab order. The Writer’s Scribe User’s Guide 48 | Sales and Expenses You may also edit the list of Expense Mileage Rates… using the Edit… button next to the field. This will display a popup window that allows you to change, delete, or add values for use with this field. Notes subtab You may enter miscellaneous notes about the expense. Picture subtab Stores a single picture to associate with the expense. Docs subtab The Docs subtab allows you to enter a picture or PDF file of your receipt. A report, Expenses by month with receipt images, is also available for printing a copy of all of your receipts. The Writer’s Scribe User’s Guide Managing Rights | 49 Managing Rights Selling or assigning Rights is an important aspect of the business of writing. Where a work is distributed, who is allowed to distribute it, how long a right applies until it reverts to you, and exactly what right you are the distributing, are all part of rights management. You may think of a right as a single slice out of the total value derived from a work. The diagram below illustrates how Rights Management is implemented in The Writer’s Scribe. Rights are normally set forth in the contract that an author signs with a publisher. Each contract may have different wording, with slight variations in the scope of a particular right. However, for the purposes of managing rights, a single set of categories and right definitions are defined. In addition, right definitions are organized by categories for easy reference. The Writer’s Scribe allows you to define a set of categories, and then you may define a right and assign it to a category. Once you have this predefined set of rights, you may create an instance of a right and assign it to a story and then connect that same right instance to a particular sale. Defining Rights Use the Control Panel screen, and then the Tables subtab, to create your Rights Categories and then your Rights. This structure will ensure consistency across your works in how you reference these rights. To create a new record, click the New Record button at the top of the popup window. You may always return to these screens at a later time to add or edit the categories and rights. Once your rights are defined, you are ready to apply them to your works or stories. The Writer’s Scribe User’s Guide 50 Managing Rights Defining Rights from the Story tab Go to the Stories tab and navigate to any Story, then click on the Rights subtab. Then click on the pencil button to display a popup window to define a right. Alternatively, go to the Control Panel tab, and then the Tables subtab. Then click on the Rights button. From this popup, you may use the toolbar, clicking on the New Record button to create a right. You may also edit an existing right. Specifying Rights for a Story Go to the Stories tab and navigate to the Story you would like to define rights for. Next, click on the Rights subtab, and then the “+” button above the leftmost column. An empty row will be added as shown below. Yellow combo box controls indicate information required to complete entering the right instance. In the top of the new row, specify the right you would like to add using the combo box. In the bottom of the new row, use the combo box to specify the sale this right is connected to. You may define a right and at some point in the future later connect it to a particular sale. Finally you may specify a start and expiration date for each right instance. The Writer’s Scribe User’s Guide Managing Rights | 51 Connecting Rights to a Sale from a Story Next, connect the right for the Story to a Sale. Note: each Sale is associated with a particular Publisher. By connecting a right instance defined for a Story to a Sale, you are also associating the right to a publisher. Click on the “+” button next to the Sold to Publisher column header label to associate a right to a sale. A Connect Rights screen will be displayed which is a 2step wizard. The first step displays a listing of rights you defined for the story. You may select 1 or more of these rights to connect to a sale. Again, use the checkboxes in the first column to select rights to connect. The checkbox in the column header for the first column may be used to easily select all or none of the rights. Click the Next button to proceed to step 2, shown below. Use the radio button in the first column, above, to select a particular sale. If you have made more than one sale to a particular publisher, you may distinguish between them by noting the Sale Amount, the Sale Date, or even the Sale ID for the sale record. Then click the Finish button at the top of the Connect Rights screen. Again, the Rights subtab for the story will be updated with the new information as shown below. Finally, you may edit the Expiration Date, also referred to as the Reversion Date, by clicking on the field for that rights instance. Leave this field blank if this does not apply. To clear the date if accidentally entered, just select the field and press the Delete key. Connecting Rights from the Sale Rights may also be connected to a Sale, from the Sale record itself. This is done in much the same way as they are connected via the Story record. In this case, however, you are connecting rights defined for a story that have not been connected to any other sales. In this example, we will use the same sale that was shown in the prior section. Click on the “+” button next to the Right column header label to display the Connect Rights to Sale popup screen. In this case, the user has also selected all of the unassigned rights to connect. After selecting which rights to assign to the Sale, click the Done button at the top of the screen. Again, the first column has a checkbox in the header to allow you to select all or none of the items displayed. The Sale screen and Rights subtab will be updated with the rights you selected as shown below. Finally, you may edit the Expiration Date, also referred to as the Reversion Date, by clicking on the field for that rights instance. Leave this field blank if this does not apply. To clear the date if accidentally entered, just select the field and press the Delete key. The Writer’s Scribe User’s Guide 52 Managing Rights Disconnecting/Removing Rights Mistakes are made, contracts change or fall through, and the rights you recorded for a given Sale or against a given Story may no longer apply. How do you disconnect a right instance from a Sale, or remove a rights instance from a Story? Fortunately, this is easy. The “-“ button at the rightmost side of the Rights subtab on both a Story and a Sale allows you to perform this task. To disconnect a rights instance on a Sale from a Story, click the “-“ button. Red disconnect buttons will appear on each row, as shown below. Click the red button on each row you would like to disconnect. The screen will immediately be updated. When you are done, click the “-“ button again and the red disconnect buttons will disappear. This mechanism ensures that you do not accidentally edit a right, and yet makes it simple to disconnect them. To remove a rights instance from a Story, click the “-“ button. Red disconnect buttons will appear on each row, as shown below. Click the red button on each row you would like to remove. The screen will immediately be updated. When you are done, click the “-“ button again and the red disconnect buttons will disappear. This mechanism ensures that you do not accidentally remove a right, and yet makes it simple to delete them. The Writer’s Scribe User’s Guide Preferences, Backups, Import, and Activation | 53 Managing Documents Documents provide a means to store all of your files within the application, making it convenient to locate all of your information. This includes the ability to store your manuscript or artwork with your story, your query letter or contract with your submission, or your receipt with your expense record. This gives you flexibility, allowing you to store any number of files with a record, limited only by your storage and the capacity of the database system. In addition, a single file may be loaded and shared between multiple items. For example, you may create a Query Letter template and share that with each of your Submissions. The template file is stored only once. Each item then may then reference the file via a Document Instance. The diagram below illustrates how Document Management is implemented in The Writer’s Scribe. A file is stored as a document. A Document is then associated with an item such as a Story or Sale. This association is called a Document Instance. A document instance can be given a name and color. The Writer’s Scribe provides a subtab for all documents with the name of Docs. By default, the Docs subtab is shown in a View mode. The Writer’s Scribe User’s Guide 54 | Preferences, Backups, Import, and Activation Adding a Document Click or tap on the Docs subtab on a Story, Publisher, Submission, Sale, or Expense screen. By default, you this screen will open in View mode. Documents may be added while in either the View or Edit modes. Click the “+” button to add a document. The file open dialog will automatically open, allowing you to select a file to add. Select a file and then click the Open button. The file will be loaded and shown in the Docs tab at the bottom of the list as below. If the file is loaded in this manner, the default name defined for the document is the name of the file. The file in the document may also be changed using the right-click menu on the icon at the beginning of the row for a menu. Next, you may edit the document listing. Click the Edit button to switch to the edit mode. From this point, you may do the following: • • • • • Click on the Name field and edit the name for this document instance Click on a row with a document instance shown, and then click on a color to highlight that row with the selected color Click on a row, and then the Copy command. Then move to another page and Docs subtab and enter the Edit mode to place a reference to the document into that file. If a document is already in the clipboard, a new copy command will replace it. The name of the document will be shown immediately below the Copy and Paste buttons. The Paste command will place a new document instance or reference into the docs listing. Click the View button to hide the edit controls when you are done. To delete the document instances for an item, click the “-” button located above the last column. The button will show as an activated color and red buttons, one for each row, will appear below it. Click on the red button for the desired row to delete that document instance. The application will automatically manage all references. If you delete the only document instance that references the document, which includes the actual file, then both the document instance and the file will be deleted from the system. If The Writer’s Scribe User’s Guide Preferences, Backups, Import, and Activation | 55 other document instances remain that reference that file, only the document instance will be removed. Viewing a Document When the Docs subtab is in View mode, click on the Name of the document to display a popup window. This popup window will allow you to View, Email, or Save the file associated with the document. • The View button will open the file with the default editor for that file with a single click. • The Save button allows you to save the file to your computer’s file system. To clear a previously entered document, right-click on the document icon and select Cut from the right-click menu. • The Email button will open a new email message screen and attach the selected object to the email with a single click. The behavior is similar on all supported operating systems. In the case of the iPad/iPhone, the Preview capability will be used to display the document. Often, if another application is installed that also uses that file type; the Preview application will also allow you to open the document in that application. The only difference is that if you click Done while in Preview, you will immediately be returned to The Writer’s Scribe application. If you proceed and open the file in the other application, may need to re-start FileMaker Go to continue using it. The Writer’s Scribe User’s Guide 56 | Preferences, Backups, Import, and Activation Reports Overview Reports in The Writer’s Scribe refer to tabular or summary listing page layouts that are designed for printing. Often, information is grouped by one or more categories of information or by month/year. The steps to run a report are: 1. Select the Reports tab. 2. Click the report you want. It will be opened in a separate window that is automatically sized to fit the report. Note: Saving a Report directly to a PDF file from the application toolbar is NOT SUPPORTED by the application. However, other solutions, such as printing to a PDF driver, may be used. Viewing Report Pages The first page of the report is initially displayed in the Preview mode. Use the arrow keys in the top toolbar to move between pages. The Writer’s Scribe User’s Guide Preferences, Backups, Import, and Activation | 57 Constraining a Report After you display the report, you may limit the report to a subset of records by following these steps: 1. Click Exit Preview in the toolbar immediately above the Content area. 2. Click Find in the top toolbar. 3. Click on a field on the form. Many fields will not display an outline since they have been formatted for display on a printed report. Nevertheless, the fields are there and you may use these to enter criteria for constraining the set of records. 4. Click the Perform Find button in the top toolbar. 5. Click the Preview button in the top toolbar (otherwise all of the found records may not be displayed correctly using the grouping defined for that page. Summary of Story Submissions This report mimics the information presented on the Home tab, showing each story, the number of submissions, the status of the most recent submission, along with other information. Active Alerts Active Alerts is a report that lists those alerts that have not yet been completed and mature either today or in the past. See the description of Active Alerts for more information. Alerts Listing The Alerts Listing report displays all alerts entered into The Writer’s Scribe. Alerts by Type The Alerts Listing report displays all alerts entered into The Writer’s Scribe grouped by Alert Type. Stories Listing This report is a summary listing of all your stories with each story’s genre, word count, and synopsis. It also notes whether a story has been trunked or published. The Writer’s Scribe User’s Guide 58 | Preferences, Backups, Import, and Activation Stories Listing by Format This report lists all stories grouped by the format of the story. Publication Résumé This report lists all of your published stories. Publishers Listing This report lists all the publishers stored in the database. It includes a link to the publisher’s website, if available, along with notes and the genres the publisher accepts. Available Publishers This report lists all the publishers along with the status of the most recent submission to that publisher. Submissions History The Submissions History report is a chronological listing of all your submissions along with the notes you recorded on each submission. It also lists the attachments sent with each submission, along with how it was sent. Finally, it lists the inclusive dates the submission was outstanding. The Writer’s Scribe User’s Guide Preferences, Backups, Import, and Activation | 59 Sales by month This report is a chronological listing of sales by month and year. The date of each sale is listed, along with the publisher and type of sale (flat-rate, royalty, etc.). A Grand Total is shown at the end of the report. Specifying a Date Range After you display the report, you may limit the report to a specific time period by following these steps: 1. Click Exit Preview in the toolbar immediately above the Content area. 2. Click Find in the top toolbar. 3. Next to the magnifying glass in the date field, enter the period of time you would like to cover with the report. For example, enter the following: • “1/1/2009…12/31/2009” for the year 2009 • “1/2009…12/2009” for the year 2009 • 11/2009 for the month of November in 2009 • Note that the text of “…” is used to indicate a date range. 4. Click the Perform Find button in the top toolbar. 5. Click the Preview button in the top toolbar (otherwise all of the found records may not be displayed correctly using the grouping defined for that page. Sales by story Since a story may be sold multiple times, depending on the rights you sell it with, or you may receive multiple payments on a single submission, it is possible to have multiple sales on a story. Listed below is a sample Sales report that is grouped by the story. Stories are listed in alphabetical order. Sales by story with Rights Since a story may be sold multiple times, depending on the rights you sell it with, or you may receive multiple payments on a single submission, it is possible to have multiple sales on a story. Listed below is a sample Sales report that is grouped by the story that includes the rights included with each sale. Stories are listed in alphabetical order. Sales by publisher This report lists sales for each publisher in chronological order. The Writer’s Scribe User’s Guide 60 | Preferences, Backups, Import, and Activation Expenses by month This report summarizes expenses for each year/month. This report, like all others, may be further constrained by entering search criteria that limit the records displayed. This allows you to specify a time range over which to run the report, similar to the Sales reports described above. Expenses by story This report groups the expenses records by story. Expenses that are not associated with a story are listed at the end of the report. Expenses by expense category This report groups expenses by category. For example, all “Lodging” expenses would be grouped together. Again, using a search, you may constrain this listing with a date range. Profit/Loss by story This report combines the aggregate sales for each story with its corresponding expenses. Submissions Pending This report provides a listing of all currently pending submissions. Documents This report provides a listing of all currently pending submissions. Calendar Timeline This report provides a listing of all currently pending submissions. Page Visit Counters This report provides a listing of number of times each screen in the application is visited. The Writer’s Scribe User’s Guide Preferences | 61 Preferences User Name The user name displayed in the banner area at the top of the screen may be customized using the Preferences screen. This is found under the Edit menu. Simply edit the value entered for User Name to change the name displayed. The Writer’s Scribe User’s Guide 62 | Control Panel Control Panel Click on the tab to access the Control Panel screen for The Writer’s Scribe. Control Panel tab User’s Guide This User’s Guide is always available via the Control Panel tab. Click on the User’s Guide button to display the PDF file with this guide. Utilities subtab Several utility functions are available under the Utilities subtab. Backup Now Automatic Backups of the application file will be performed every fifth time that you close the application. This is important since it is possible to corrupt the file if your computer crashes while performing a save, or if for some unforeseen reason, the application crashes while using this file. We believe such an occurrence to be extremely rare, but not unheard of. This backup is done automatically; no user action is required. In addition to the Automatic Backup, the user may force the application to make a backup copy. Click the Backup Now button to initiate the backup. When done, a confirmation dialog will be displayed. A timestamp of the last backup is shown at the bottom of the screen. This is important because some backup software will not make a copy of an open file. If you leave the application open all of the time, it is not backed up. However, the backup file is normally closed. This means that the backup software can back up your information using this file. By placing the backup timestamp at the bottom of most screens, the user can easily refer to this to determine if they need to manually perform a backup of the file. This timestamp will also turn red if more than 3 days have elapsed since the last backup. Clicking on the backup timestamp will also initiate an immediate backup of the application. The Writer’s Scribe User’s Guide Control Panel | 63 Restore from Backup or Prior Version This button automates the loading of data from a backup file. Activation This button allows you to enter the Registration Name and the Registration Key that were provided when you purchased the application. About The Writer’s Scribe application is built with the FileMaker product. The About screen lists all stipulations set forth in the FileMaker licensing for a runtime application. View License The View License button displays the license agreement for the application. Click on a tab at the top of the page to return to exit this screen. Check for Updates The application will periodically check for updates on startup if the option is enabled on the Preferences subtab. This function will cause the upgrade check to be performed. If an update is available, the dialog listed below will be displayed. Clicking the Upgrade button will initiate the upgrade. It will automatically perform a backup of your data, record the location of the current install, initiate the download, and quit the application after displaying a dialog. After installing the upgrade, the application will automatically detect that it is running for the first time and search for a prior version so it can complete the upgrade. View Upgrade Instructions Upgrade instructions may very slightly from one version to the next. Every effort is made to automate this process, but it is difficult to foresee some issues. This button will open the browser page that provides instructions for the most current upgrade. Delete All Data The application comes pre-loaded with a set of demonstration data. This is useful for exploring the full capabilities of the application, but ultimately, it becomes time to clear out the demo data, leaving it ready to use for tracking your own submissions. The following dialog is displayed when you initiate this function. The dialog gives you one last chance to cancel the delete. If you find that you have accidentally deleted your own data, DO NOT exit the application, as that may initiate an automatic backup. Instead, perform an Import, described below, providing the full path and name of the most recent backup file to reload your data. The Writer’s Scribe User’s Guide 64 | Control Panel Send Support an Email Click the Send Support an Email button under the Utilities subtab to generate an email. This will open an email message and automatically enter in information that is useful to the support request. In addition, a dialog is presented that asks whether to attach a copy of the Diagnostics report for a comprehensive analysis of the data in the application. www.thewritersscribe.com The www.thewritersscribe.com button will open a browser window or open a new browser tab to view The Writer’s Scribe website. View Log Click the View Log button under the Utilities subtab to display a popup window that shows all log file entries. The log primarily captures notes on any errors generated by the application. In some cases, the errors are benign in that they do not affect the values or the program function. Some events are captured because they provide key information about the operation of the program. This includes performing a startup, deleting all demo data, or performing an upgrade. If the error field is zero, then an error was not recorded and the field is highlighted in green. If an error occurs, it is highlighted in red so you can easily scan the file for problem areas. At the top of the screen are 2 filter buttons, allowing you to see all of the log entries, or only those with errors. There is also a button for Saving the log records to an external file with a variety of formats. There is also an Email button. This allows you to generate an email with the log file attached to it. This is useful for diagnosing problems with support. Finally, the Purge Log… will clear out the log file of all entries currently displayed. Diagnostics Normally, you should never have records in your application with duplicate ID numbers within the same table. In other words, you should not be able to enter two different stories that have the same Story ID. However, by importing external files into the application, it may be possible to encounter this problem. This function gives you the ability to locate this type of error, and many more. If errors are found, a dialog is presented to generate a report that lists all of the errors, or in some cases, warnings about the data. The Writer’s Scribe User’s Guide Control Panel | 65 The following will be listed in the Diagnostics report: • Duplicate records • Number of records in each table • Referential Integrity Errors – causes broken links or “Record Not Found” errors • Logical Use – warns when tables are empty that should have values • Empty Required Fields • Log entries for errors only • General system and license information • Page Visit counts Maintenance Earlier versions of this software may have introduced errors in how new records are created and how serial numbers were automatically assigned. This will automatically be corrected upon performing an upgrade. However, it is also possible to cause this problem by importing improperly formatted external files. The following dialog will be presented when you run this function. Since this function does not change any existing data, it is always safe to run this function. Reset Page Visit Counters All page visit counters will be reset to zero by this function. Page Visit counters are used to provide feedback on the application regarding the usage of different elements of the application. Rebuild Calendar Events The Calendar view of the Home page displays calendar events. Calendar events are derived from the underlying information on Alerts, Submissions, Sales, and Expenses. The preferences screen allows the user to control which events are placed on the Calendar view and whether they need to be updated. For example, some users may want to only view Alerts on the Calendar, or perhaps just Alerts and Submissions Received. Upon clicking the Rebuild Calendar Events… button, the calendar events used for the Calendar view will be rebuilt. This is a time consuming process and may take a few minutes to complete, depending on the number of records the application needs to process. Once updated, the application will keep the selected items up to date on the Calendar with all other changes to the data. Exit Application This exits the application. This is useful when the application is used under iOS with FileMaker Go (FMG) and a password is enabled for login. You may leave the application and when you re-enter FMG, the application will open to the location you last left. In effect, you would never fully exit the application and you will never be prompted for the password. This function allows you to exit the applica- The Writer’s Scribe User’s Guide 66 | Control Panel tion so that you will be prompted for the password, if that feature is enabled, the next time you open the application. Preferences subtab From the Control Panel screen, click on the Preferences subtab to display the general customization information. General Banner Picture A banner area above the tabs displays a picture in the background. Throughout this manual, different banner pictures were used for the screen captures. Some are available with the application, while others may be downloaded from the website: www.thewritersscribe.com. You may also insert your own photo to customize The Writer’s Scribe for your enjoyment. A wide variety of picture formats are supported. From the Control Panel page, you may change the picture used at any time and it will immediately be reflected in banner. Click the Set Picture… button to select a different picture. For best results, use a picture that has the dimensions of 900 pixels wide by 50 pixels high. If you use a higher resolution picture with different dimensions, the picture will be cropped. In addition, using a very high-resolution image may affect the performance of the application, since this banner is used on most of the pages in the application. An alternate method of changing the banner picture is to right-click on the banner from ANY page and select the Insert Picture… menu item. Ignore Field Formatting When enabled, this removes all text formatting from fields such as Name, Address, and other fields. Other fields such as Source or Description will always retain their formatting. This is intended to improve the readability of the records. Updates to remove the formatting will be done whenever the record is updated. This option appears in the Control Panel tab under the Preferences subtab. Backup on Nth Quit This option allows the user to specify when an Auto-Backup occurs. By default, a value of every third time the user quits is used. If a value of “0” to save on every quit, and “99” to never perform an Auto-Backup. This option appears in the Control Panel tab under the Preferences subtab, then under the Administration section. The Writer’s Scribe User’s Guide Control Panel | 67 Email User Email When you click Send Email on the Alerts page, the value entered in this field will be inserted in the email message’s To: field. This makes it convenient to add events to your appointment calendar by generating an email with all of the pertinent information in it and sending it to your own email account or to another appropriate email address so that it can be automatically processed. You may, for example, set up a rule in your email application to look for “The Writer’s Scribe” in the email’s Subject line and move it to a special folder. Kindle Email When you click Share on a document or other file, a dialog is displayed allowing you to View, Email, My Kindle, or Save that document. This setting controls the My Kindle function, allowing you to specify your Kindle email account for Kindle device. If you have multiple Kindle devices and have separate email accounts for each, you may edit the value on the My Kindle button as needed prior to sending the document. Documents sent via this function will be Converted to the Kindle format for easy viewing. Warning: a fee may be charged by Amazon for performing this conversion and transferring it wirelessly to your Kindle device. Login Login Password This option allows you to set a password. This password is required upon starting the application before you are given access to the application. This password protection should be considered as a layer of protection from a casual user as the database itself is not encrypted and would not protect the database from a higher skill level attack. Alerts/Notifications Default Alert Offset This is the number of days used as the default value for the Alert date. For example, if you are viewing a submission, the application will take the date of the submission, add 60 days to it per the screen above, and use that as the default date for that Alert. You may, of course, change that date, particularly if it falls on a non-working day. Many users find a date from 60 to 90 days in the future works well, but it may vary based on how quickly a publisher can respond, or upon the circumstances of the Alert. The Writer’s Scribe User’s Guide 68 | Control Panel Default Filters The filters that apply to the Home tab for the summary and details views are also available at the top of those pages. Clicking on the Hide checkboxes for each filter causes the filter to be applied and immediately refreshes the screen. Hide Work-‐In-‐Progress Stories A Work-In-Progress story is one that the writer is still working on and has not submitted, or has pulled it back for rework. Checking the Hide Work-In-Progress Stories option will affect the Home Tab, hiding WIP stories from the summary listing. Hide Trunked Stories A trunked story is one that the writer is withdrawing from future submissions. This may be a story that has been published and all rights have been sold, or a story that, after numerous attempts, has not found a home with a publisher and it is time to abandon it. Checking the Hide Trunked Stories option will affect the Home Tab, hiding trunked stories from the summary listing. When creating a new submission, the dropdown list for specifying the story will show only stories that are not trunked if this option is selected. Hide Publishers Closed to Submissions Periodically, some publishers decide to close their publication to new submissions. Also, publishers go out of business or are purchased by other publishers. It is useful to keep these publishers in your database since they contain information on prior submissions. However, when creating a new submission, you no longer want to select that publisher. Checking this option will hide publishers in the dropdown list for specifying the publisher and will show only publishers that are currently open for submissions. Checking this option also hides these publishers from the Available Publishers report. Hide Published Stories Checking the Hide Published Stories option will affect the Home Tab, hiding already published stories from the summary listing. Administration Disable Log A log capability is included in the application. This is covered in greater detail under the Utilities subtab on the Control Panel. This checkbox allows you to The Writer’s Scribe User’s Guide Control Panel | 69 turn off the logging of error messages. It is recommended that you enable this function so problems are more easily diagnosed when support is needed. The application will also automatically offer to truncate the log table on startup when it reaches 5000 records to ensure it does not grow too large. Log records are truncated by removing the oldest records from the database. Force Write to Disk on Saves If this option is enabled, all save will immediately be committed to the disk AND a backup will silently be performed to the file “TWS_SpecialBackup.fmp12”. Enabling this option WILL degrade performance and should only be used if your system has stability problems. This operation will not interfere with the normal backup operations. If your system crashes, you may import data into your system from the file: “TWS_SpecialBackup.fmp12”. Source Analysis Default Stop Words for Analyzing the Source Work The list of words used by default for a new Story or work when defining the Stop Words under the Analyze tab. In other words, these are the words that, by default, will be excluded from the keywords generated for a Story when the Analyze button is clicked. The Writer’s Scribe User’s Guide 70 | Control Panel Tables subtab Typically, you would update the supporting tables used throughout the application directly from the page that uses that table. However, they are collected on this page to make it easy to reach all of the supporting tables in one location. Edit Genres The list of items shown for Genre on the Stories page and the Publishers page may be edited in a popup window. Changes to the list are immediately displayed on these two pages. Edit Formats The list of items shown for Formats on the Stories page may be edited in a popup window. Changes to the list are immediately displayed on the page. Edit Attachments The list of items shown for Attachments on the Submissions page may be edited in a popup window. Changes to the list are immediately displayed on the page. Edit Submission Results The list of items shown for Submission Results on a Submission may be edited in a popup window. This also affects how Submissions are counted on the Scorecards shown on the Home tab, the Stories tab, and the Publishers tab. The Submission Results provides flexibility by allowing you to designate the names and colors for all submission results. For example, you may use the term “Pass” instead of “Rejected” with a color of “Red” and it will be correctly reflected in the Scorecards on the Home tab, the Stories tab, and the Publishers tab, along with all of the corresponding reports. In addition, multiple submission results may be defined for each of the 3 colors. Edit Sales Types The list of items shown for Sales Types on the Sales page may be edited in a popup window. Changes to the list are immediately displayed on the page. Edit Expense Categories The list of expense categories, in accounting terms, is also referred to as the chart of accounts. This will list will vary for different professions and by personal preferences on how this information is tracked. This table provides flexibility in how this information is recorded. Edit Expense Mileage Rates This is a list of applicable mileage rates for recording mileage expenses. The IRS, in the United States, will publish the currently accepted rate or rates. One rate may apply to one portion of the year, and a different rate for the succeeding time period. This page allows you to adjust for these changes as needed. The Writer’s Scribe User’s Guide Control Panel | 71 Market Research Market Research is a listing of websites where you may find markets for your work. The summary listing displays the site names. You may click on the name to open a Web browser window for that site. The detailed listing provides additional information on the website. Edit Alert Types This is the list of items shown for categorizing Alerts. Edit Rights Categories This is the list of items shown for categorizing Rights. Edit Rights This is the list of items shown for Rights. Edit Documents This is the list of items shown for documents. Edit Document Instances This is the list of items shown for document instances. Edit Story Status This is the list of items shown for Story Status. Localization subtab Language The application supports the display of text in any of 14 different languages. Selecting a language does not affect the text that you enter as data, only the text strings used by the application, with one exception. An option is provided to reset the default values for several tables with values in the selected language. In addition, the system may use your System Formats for entering data. This may affect number, currency, and date entries. Edit Translation Strings Given the breadth of languages supported, and the difficulty of providing good translations, some of the translation strings may be inaccurate. We can assure you, it is not our intent to offend or in any way disparage our end users by way of inaccurate translations. We also provide the ability to override the strings provided, and if desired, submit select overrides to our support for improvement of the product in the future. Simply open the Edit Translation Strings dialog, search for the string you would like to override, and enter the new value in the Override field. A button is provided to send these overrides to our Support group. The Writer’s Scribe User’s Guide 72 | Control Panel Industry Terminology The labels for 30 different values may be customized. These changes are applied throughout the application and do not affect any of the user entered data. These customizations are intended to allow the application to adapt to the terminology of writers in a number of different industries. The user may change these labels at any time. These labels affect some tabs, field labels, and reports. To customize the labels from the Customize screen, select an Industry Terminology set from the choices: Writer (default), Poet, Screenwriter, Songwriter, and Academic. The values will be updated for each of the values below. You may then also change the individual values for each of the labels. Listed below are the default terms for a songwriter. The label customizations are applied instantly. There is no need to restart the application. Listed below is the application with custom labels applied. Templates Variables subtab The templates listed below are used in the Compose Query popup window. This is displayed from the Submissions tab, then by clicking the 3 – Compose Query button. You may also apply formatting to the above templates, such as font, font size, bold, underline, and text alignment. This formatting will carry over to the Compose Query The Writer’s Scribe User’s Guide Control Panel | 73 popup dialog. Note, the email generated by the Compose Query popup is a plain text email and will lose any formatting applied. The tags are detailed below, describing the source of the information for each tag. Tag Description Source <<SubmissionID>> Submissions tab | ID <<POC>> <<POCEmail>> <<Title>> <<Synopsis>> <<Words>> <<Source>> <<UserName>> <<UserEmail>> Unique ID for the submission. Point of Contact. Point of Contact Email. Title of the Story. Synopsis of the Story. Word Count of the Story. Source text for the Story. Name of the user. Email for the user. <<CurrentDate>> <<ReturnAddress>> Today’s date. The user’s return address. <<PublisherName>> <<PublisherAddress>> <<BIO>> Publisher’s Name. Publisher’s Address. The Author’s mini Bio. Publishers tab | POC Publishers tab | POC Email Stories tab | Name Stories tab | Synopsis Stories tab | Length Stories tab | Analyze subtab | Source Preferences | User Name Control Panel tab| General subtab | User Email System Control Panel tab | Query Templates subtab | Return Address Publishers tab | Name Publisher’s tab | Address Control Panel tab | Query Templates subtab | BIO Twitter Template The templates listed below are used the Submissions tab, and then by clicking the the Tweet button. Export / Import subtab Export The following import functions are designed to make it easy to export your existing story and publisher information to a spreadsheet file (xlsx files). You may also easily exchange a spreadsheet file of publisher listings with others. Export Stories Spreadsheet File Click this button and a File Selection dialog will be displayed. Enter the name of the file and a list of all of your Stories will be exported. Export Publishers Spreadsheet File Click this button and a File Selection dialog will be displayed. Enter the name of the file and a list of all of your Publishers will be exported. The Writer’s Scribe User’s Guide 74 | Control Panel Export Doc Files To start the process, go to the Control Panel tab and the Utilities subtab click on the Export Doc Files button. The Export Doc Files dialog will be displayed as shown below. Use this dialog to select all or only some of the files to be exported. Since space is often a limitation, the dialog gives you immediate feedback on the storage requirements needed for the exported files. Click the Export button to export the files. All files will retain the original file name with the addition of a prefix to uniquely identify them to the application. Upon completion of the export, a success message will be displayed. Export Alerts Spreadsheet File Click this button and a File Selection dialog will be displayed. Enter the name of the file and a list of all of your Alerts will be exported. The Writer’s Scribe User’s Guide Control Panel | 75 Import The following import functions are designed to make it easy to load your existing story and publisher information from a spreadsheet file (xlsx files). You may also easily exchange a spreadsheet file of publisher listings with others. Finally, you may download and apply updates from The Writer’s Scribe website and selectively apply them to your records. Import Global Publishers The Import Global Publishers dialog allows you to update your publishers with the latest information available from The Writer’s Scribe. Full instructions on the use of this dialog are available as a tab in this dialog screen. The Info subtab displays the most recent summary information available from the website, listing out the number of Publishers available for each market and an alphabetical listing of the Publishers along with whether they are Open or Closed for submissions. The What’s New subtab is a comparison of what is currently loaded in the most recent update applied and the one available from the website. Color-coded markup highlights the differences between what is installed and what is available. The Profile subtab gives you control over how updates are applied. Many users will select the first option, to Synchronize all Global Publishers. This overrides all individual record settings regarding Private and applies the updates, including adding any publishers not already loaded into the application. The other settings provide more granular control over the synchronization process. If you only publish Romance and Fantasy genres, you may control the import to only use Publishers that meet those criteria. Likewise, if you are a poet and only want to update and add Publishers that accept poetry, select the filter for Include Poetry Only. The Update button at the top of the dialog initiates the actual download and applies the update per the settings in the Profile subtab. Once a profile has been applied you may later change your profile and click Update again. Each update will always download the latest Global Publishers data from the website. Import Stories Spreadsheet File Enter the name of the file to import or click “Open...” to select a file. When importing a spreadsheet file, mark the Exclude duplicates on import checkbox to skip over records that would duplicate already loaded records. The application will also automatically add any formats, status, or genres specified in the stories to the supporting tables. Import Publishers Spreadsheet File Enter the name of the file to import or click “Open...” to select a file. The Writer’s Scribe User’s Guide 76 | Control Panel When the publishers are loaded, the application will also check for possible duplicates in the event a story was previously loaded. It will also automatically add any genres specified for the publishers to the supporting tables. The scope, or in other words, the fields that will be updated, may be specified with the Scope tab on the dialog below. The Writer’s Scribe User’s Guide Control Panel | 77 Import Stories derived from Files This function is designed to automate the loading of stories into the application. Often, the original stories are kept in directories in your file system. This function uses this organization to create a story record and attach one or multiple files to the story. In addition, the first file listed under the story name is used to capture the source, or the actual text of the story. This allows the story to be analyzed, creating a concordance, a synopsis, a word, and other information. Alternatively, if the first file is a picture, it will load it into the picture field and attach it to the story as an associated document. Two tabs are provided to load stories. The first is “All Files in a Directory”. This option is useful when you have a directory that contains a series of directories, each being a separate story. The second tab, “Single File,” applies when you have a single story to add with a single file. In addition, the “Instructions” tab provides information on loading stories that you may easily reference while using the application. Click the button, “Stories derived from Files…,” in the Import section of the “Utilities” subtab. The following dialog will be displayed: All Files in a Directory Click “Choose…,” shown above, to open a file dialog that allows you to select an import directory. The Writer’s Scribe User’s Guide 78 | Control Panel Select a directory and then select the “Choose” button in the popup file dialog. The “Files to Import” field will be filled in with the information for the import. In this case, all options were selected. At this point, you may edit the “Files to Import” input area further if necessary. Simply delete lines that show files you do not want to import. You may also edit the name of each Story. The application uses the original filename to provide a default Story name. In addition, you may insert additional lines with the prefix “NAME:” to create separate stories. You may also reorder the lines shown so that Text or HTML files directly follow the “NAME:” line. These files may automatically be loaded into the Source field and analyzed. Click the “Refresh” button next to the story and file count values if you would like to see updated information on the size or count of stories and files. Finally, before initiating the Import, click the “Set Default Story Values…” button. This will display another popup dialog that allows you to set values for all stories that the application creates. This is useful for defining Genres and other information with each story. Also note, this dialog allows you to define additional formats, genres, status, and other values. Then click “Set Default Values.” The Writer’s Scribe User’s Guide Control Panel | 79 The final step is to click the “Import” button. This will start the import operation. The screen will switch to numerous screens as it imports the files and attaches them to Stories. In addition, if you selected “Analyze Imported Stories,” it will perform the analysis function available under the Source subtab for a story. This analyze operation may be done later on each story, which is necessary if you need to copy and paste the Source information into the field manually. If each story is under 10,000 words, this operation can be done in a timely manner. For stories analyzed above this threshold, the analysis may take considerably long, perhaps 20 minutes to half an hour for a 300 page novel. Single File Listed below is the tab for import a “Single File.” Click “Open…,” shown above, to open a file dialog that allows you to select a file. After selecting a file, the “File” field will be updated. If possible, it will also display a preview of the document to be imported. Click the “Import” button at the top of the screen to complete the process. A story will be created, and analyzed if this option was chosen. This will also close this window and take you to the newly created Story record so you may specify the genres for the story, along with other information about the story. Import Alerts Spreadsheet File Enter the name of the file to import or click “Open...” to select a file. When the alerts are loaded, the application will also check for possible duplicates in the event a story was previously loaded. The scope, or in other words, the fields that will be updated, may be specified with the Scope tab on the dialog below. Alerts may be loaded into the application from external sources. This may include an Editorial Calendar. Use the Label field and Alert Color field to set this type of Alert apart from other alerts. In addition, an Alert Type of “Editorial Calendar” may be specified for an alert. Any additional Alert Types not already listed in the database will automatically be added to the list of valid Alert Types. Load Data from .sonar3 File The application also supports loading a Sonar3 © Copyright Spacejock Software file. These files must have a suffix of “sonar3”. The Writer’s Scribe User’s Guide Control Panel | 81 Index Create Sale from Submission, 34 1 1 – Suggest a Publisher…, 37 2 2 – Create a Submission…, 38 3 3 – Compose Query…, 39 A About, 63 Action Buttons, 25, 29 Activation, 3, 63 Active Alerts, 41, 57 Adding a Document, 54 Alert Hyperlinks, 43 Alerts, 23, 29, 41 Alerts Listing, 57 Alerts subtab, 29 Alternate View Control, 23 Analytics subtab, 22 Automatic Backups, 62 Available Publishers, 58 Available Publishers report, 68 B Backup Now, 62 Backup on Nth Quit, 66 Banner, 2 Banner Picture, 66 Blue, 41 Bookmarks View, 4 C Calendar Timeline, 60 Calendar View, 5 cascade deletes, 10 Check for Updates, 63 Complete checkbox, 43 Concordance, 22 Connect Rights, 51 Connecting Rights to a Sale from a Story, 51 Connecting Rights to a Sale from the Sale, 51 Content, 2 Contributors subtab, 20 Contributors tab, 20 Create Alert button, 42 D Default Alert Offset, 67 Default Stop Words, 69 Defining Rights, 49 Defining Rights from the Story tab, 50 Delete All Data, 63 Delete Record, 9 Diagnostics, 64 Disable Log, 68 Disconnecting/Removing Rights, 52 Docs subtab, 23, 29, 46, 48 Documents Report, 60 E Edit Alert Types, 71 Edit Attachments, 70 Edit Document Instances, 71 Edit Documents, 71 Edit Expense Categories, 70 Edit Expense Mileage Rates, 70 Edit Formats, 70 Edit Genres, 70 Edit Rights, 71 Edit Rights Categories, 71 Edit Sales Types, 70 Edit Story Status, 71 Edit Submission Results, 70 Editorial Calendar, 79 email, 44 Exit Application, 65 Expense Types, 47 Expenses, 47 Expenses by expense category, 60 Expenses by month, 60 Expenses by month with receipt images, 48 Expenses by story, 60 Expiration Date, 51 Export, 73 Export Alerts Spreadsheet File, 74 Export Publishers Spreadsheet File, 73 Export Stories Spreadsheet File, 73 Export/Import subtab, 73 Exporting Doc Files, 74 F Fiction field, 20 FileMaker Go, 11 FileMaker Go Software Limitations, 16 Filters, 2 Find, 7 The Writer’s Scribe User’s Guide 82 | Index Find button, 7 Force Write to Disk on Saves, 69 Format field, 19 G Global Publishers, 29 Go to Home Calendar View, 44 Google Maps, 28 H Handling Simultaneous Submissions, 34 Hide Closed to Submissions, 68 Hide Published Stories, 68 Hide Trunked Stories, 68 Hide Work-‐In-‐Progress Stories, 68 Home Tab, 3, 68 I iCal, 16 ID values, 10 Ignore Field Formatting, 66 Import, 75 Import Alerts Spreadsheet File, 79 Import Global Publishers, 75 Import Publishers Spreadsheet File, 75 Import Stories derived from Files, 77 Import Stories Spreadsheet File, 75 Info subtab, 29, 45, 47 iPad, 11 iPhone, 11 K Kindle Email, 67 L Language Support, 2 List view, 23 Load Data from .sonar3 File, 79 Localization, 71 Lock for Import Updates, 28 Lock from Exports, 28 Login Password, 67 M Maintenance, 65 Managing Documents, 53 Managing Rights, 49 Market Research, 71 Mileage Rate, 47 Miles, 47 Modify Table View, 24 multiple windows, 11 The Writer’s Scribe User’s Guide N Navigating Application Tabs, 6 Navigating Records, 6 Navigating the FileMaker Go Interface, 14 New Record, 9 Notes subtab, 20, 29, 46, 48 P Pack & Send, 30 Pack & Send Alert, 44 Page Visit Counters, 60 Payee, 47 Perform Find button, 7 philosophy, 1 Picture subtab, 23, 46, 48 Poet, 72 Post to Facebook, 35 Preferences, 66 Profit/Loss by story, 60 Publication Resume, 58 Published, 24, 25 Published field, 20 Publishers Listing, 58 Publishers tab, 27 Q query letter, 33 R Rebuild Calendar Events, 65 Red, 41 Registration Key, 3, 63 Registration Name, 3, 63 Reports, 56 Reset Page Visit Counters, 65 Restore from Backup or Prior Version, 63 Reversion Date, 51 Rights, 49 Rights Categories, 49 Rights subtab, 20, 46 S Sales, 45 Sales by month, 59 Sales by publisher, 59 Sales by story, 59 Sales by story with Rights, 59 Sales Category list, 47 Sales subtab, 23, 29 Saved Finds, 8 Screenwriter, 72 Search for Records, 7 Send Email, 43 Send subtab, 29 Control Panel | 83 Send Support an Email, 64 Sent to subtab, 20 Show All button, 7 Showing Active, Not Completed, or All Alerts, 43 solid vertical bar, 6 Sonar3 © Copyright Spacejock Software, 79 Songwriter, 72 Sort Records, 8 Source Analysis, 69 Source tab, 21 Specifying a Date Range, 57, 59 Specifying Rights for a Story, 50 Status field, 20 Stories Listing, 57 Stories Listing by Format, 58 Stories tab, 19 Submissions History, 58 Submissions Pending Report, 60 Submissions tab, 33 Submitting Stories in Three Easy Steps, 37 Summary of Story Submissions, 57 T Table view, 24, 43 Tables, 70 Tabs, 2 Templates Variables subtab, 72 tickler file, 41 To Do list, 41 Toolbar, 1, 6 Trunk, 24 Trunked field, 20 trunked story, 68 Tweet, 36 Twitter Template, 73 Type field, 46 U User Email, 67 User Name, 61 Utilities, 62 V Vendors subtab, 46 View License, 63 View Log, 64 View Upgrade Instructions, 63 Viewing a Document, 55 Viewing Files with FileMaker Go, 17 Viewing Report Pages, 56 W White, 41 Word Cloud subtab, 22 Working with Multiple Windows, 11 Work-‐in-‐Progress, 24 Work-‐in-‐Progress field, 20 Work-‐In-‐Progress story, 68 www.thewritersscribe.com, 64 Y Yellow, 41 The Writer’s Scribe User’s Guide