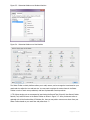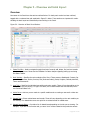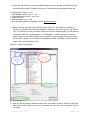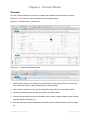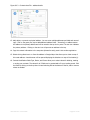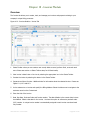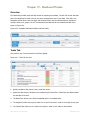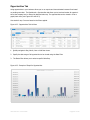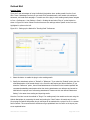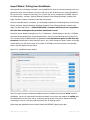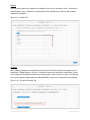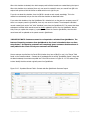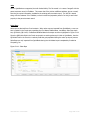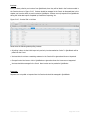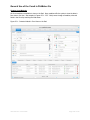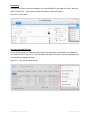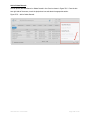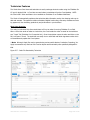
1
User Manual
Revised May 22, 2014
950 Boardwalk, Suite 205, San Marcos, CA 92078 • (760) 510-1200 • www.productivecomputing.com
© Copyright 2014 Productive Computing, Inc.
END USER LICENSE AGREEMENT (EULA)
This software product is protected by copyright laws and international copyright treaties, as well as other intellectual property laws
and treaties. This software product is licensed, not sold.
LICENSE AGREEMENT AND DISCLAIMER:
PLEASE READ ALL TERMS AND CONDITIONS OF THE LICENSE AGREEMENT BEFORE CONTINUING. USING OUR SOFTWARE INDICATES YOUR ACCEPTANCE OF THIS AGREEMENT. IF YOU DO NOT AGREE TO THE TERMS AND CONDITIONS, YOU MAY NOT INSTALL OR USE THE SOFTWARE PRODUCT. PRODUCTIVE COMPUTING, INC. MAKES NO OTHER WARRANTY, EXPRESS OR IMPLIED,
INCLUDING WITHOUT LIMITATION, ANY IMPLIED WARRANTIES OF MERCHANTABILITY OR FITNESS FOR A PARTICULAR PURPOSE.
Disclaimer of Damages:
Productive Computing, Inc. has made every effort possible to ensure that the Core4 CRM is free of any bugs or errors, however in
no way is the Core4 CRM to be considered error or bug free. You assume all responsibility for any damages or lost data that may
result from any errors or bugs in the Core4 CRM. IN NO EVENT WILL PRODUCTIVE COMPUTING BE LIABLE TO YOU FOR ANY GENERAL, SPECIAL, INDIRECT, CONSEQUENTIAL, INCIDENTAL OR OTHER DAMAGES ARISING OUT OF THIS LICENSE. In no case shall
Productive Computing’s liability exceed the purchase price for the software or services.
Data Loss/Backup Responsibility/Release of Liability:
It is understood that during the normal course of software usage, computer systems can crash, remote connections can be disconnected, data/database systems can be corrupted and data loss can occur. It is also understood that the best way to fully or partially
recover from such a data loss event is to setup and maintain regular backups of all data/database systems. As the user of the Core4
CRM, you are responsible for setting up and maintaining regular backups of your data/database systems. Should you experience a
data loss, you shall in no way hold Productive Computing, Inc. monetarily or otherwise liable for lost data, the cost of any data recovery services or for the future losses in revenue the data loss event may cause you. We advise that, at a minimum, you perform
daily backups and conduct weekly monitoring of your data backups. It is your responsibility to ensure that the consistency and quality of the backups is being maintained throughout the life history of the data/database system.
Trademark Notices:
FileMaker is a registered trademark of FileMaker, Inc., registered in the U.S. and other countries. The file folder logo is a trademark
of FileMaker, Inc. Mac and the Mac logo are trademarks of Apple Inc., registered in the U.S. and other countries. Microsoft, Windows, and the Windows Vista logo are registered trademarks of the Microsoft Group of Companies in the U.S. and other countries.
All other trademarks are the property of their respective owners.
Description of Other Rights and Limitations:
- Restrictions: You may not reverse engineer, decompile, modify or disassemble this software product. This software product is licensed as a single product. Its component parts may not be separated for use. You may not sell, distribute, rent, lease or lend this
software product to any other party.
- Software Transfer: You may permanently transfer all of your rights under this EULA, as long as you no longer have any copies,
transfer all of this software product, components, media, documentation (printed or otherwise) and the recipient agrees to all
terms of this EULA.
User Manual – Core4 CRM
Page 2 of 153
Table of Contents
CHAPTER 1 - OVERVIEW!...................................................................................................................7
About This Guide....................................................................................................................................7
Key Features ..........................................................................................................................................7
Requirements.........................................................................................................................................8
CHAPTER 2 - HOSTING!.....................................................................................................................9
Hosting for Software as a Service (SaaS)..............................................................................................9
Hosting Options for On Premise (Site License)....................................................................................10
Internal Hosting....................................................................................................................................10
External Hosting...................................................................................................................................11
Peer to Peer Sharing............................................................................................................................12
CHAPTER 3 - FILEMAKER PRO BASICS !............................................................................................13
Using FileMaker Pro.............................................................................................................................13
Modes ...........................................................................................................................................13
Status Toolbar Setup.....................................................................................................................14
Finding...........................................................................................................................................16
Deleting Records in Core4.............................................................................................................17
Duplicating Records in Core4........................................................................................................17
CHAPTER 4 - SETUP CORE4 PREFERENCES!.....................................................................................18
Global Settings ....................................................................................................................................18
General Tab....................................................................................................................................18
Templates Tab................................................................................................................................19
Phone Formats Tab........................................................................................................................20
Activity Categories Tab..................................................................................................................21
Calendar Settings Tab...................................................................................................................22
Lists Tab.........................................................................................................................................23
Stages Tab.....................................................................................................................................24
Plug-ins Tab...................................................................................................................................25
Modules Tab..................................................................................................................................26
User Settings.......................................................................................................................................27
How to Create a New User............................................................................................................27
General Tab....................................................................................................................................29
Email Tab.......................................................................................................................................30
Calendar / Tasks Tab.....................................................................................................................31
Address Book Manipulator Tab.....................................................................................................31
CHAPTER 5 - OVERVIEW AND INITIAL IMPORT!....................................................................................32
Overview..............................................................................................................................................32
Initial Batch Import...............................................................................................................................33
CHAPTER 6 - CONTACTS MODULE !...................................................................................................35
Overview..............................................................................................................................................35
More Info Tab.......................................................................................................................................39
User Manual – Core4 CRM
Page 3 of 153
Merge Duplicates.................................................................................................................................40
CHAPTER 7 - OPPORTUNITIES MODULE !...........................................................................................42
Overview..............................................................................................................................................42
More Info Tab.......................................................................................................................................44
CHAPTER 8 - ESTIMATES MODULE !...................................................................................................45
Overview..............................................................................................................................................45
More Info Tab.......................................................................................................................................47
CHAPTER 9 - ORDERS MODULE !......................................................................................................48
Overview..............................................................................................................................................48
More Info Tab.......................................................................................................................................51
CHAPTER 10 - INVOICES MODULE !...................................................................................................52
Overview..............................................................................................................................................52
Payments Tab.......................................................................................................................................55
More Info Tab.......................................................................................................................................58
CHAPTER 11 - PURCHASE ORDERS (P.O.S) MODULE!........................................................................59
Overview..............................................................................................................................................59
Receiving Items....................................................................................................................................62
Receipts Tab.........................................................................................................................................63
More Info Tab.......................................................................................................................................64
CHAPTER 12 - ITEMS MODULE !........................................................................................................65
Overview..............................................................................................................................................65
Inventory Items ....................................................................................................................................65
More Info Tab.......................................................................................................................................67
Inventory Assembly Items....................................................................................................................68
CHAPTER 13 - PROJECTS MODULE!.................................................................................................72
Overview..............................................................................................................................................72
More Info Tab.......................................................................................................................................75
CHAPTER 14 - CALENDAR MODULE !.................................................................................................76
Overview..............................................................................................................................................76
CHAPTER 15 - ACTIVITIES MODULE !.................................................................................................78
Overview..............................................................................................................................................78
Emails............................................................................................................................................79
Notes.............................................................................................................................................83
Tasks..............................................................................................................................................84
Calls...............................................................................................................................................85
Events............................................................................................................................................86
Groups, Mailing Lists, and Campaigns................................................................................................89
CHAPTER 16 - TIMERS MODULE !......................................................................................................90
Overview..............................................................................................................................................90
User Manual – Core4 CRM
Page 4 of 153
Timers Detail View................................................................................................................................92
CHAPTER 17 - DOCUMENTS MODULE!..............................................................................................93
Overview..............................................................................................................................................93
CHAPTER 18 - REPORTS AND PRINTING!...........................................................................................95
Overview..............................................................................................................................................95
Reports................................................................................................................................................95
Printing.................................................................................................................................................96
Envelopes and Labels..........................................................................................................................97
CHAPTER 19 - DASHBOARD MODULE !..............................................................................................98
Overview..............................................................................................................................................98
Tasks Tab..............................................................................................................................................98
Opportunities Tab.................................................................................................................................99
CHAPTER 20 - OUTLOOK INTEGRATION !..........................................................................................103
Overview.............................................................................................................................................103
Outlook Manipulator Plug-in Installation and Registration.................................................................103
Outlook Mail.......................................................................................................................................105
Sending Email..............................................................................................................................105
Importing Email............................................................................................................................106
Pulling Contacts...........................................................................................................................109
Pushing Contacts........................................................................................................................111
Viewing Contacts .........................................................................................................................112
Pulling Events ..............................................................................................................................112
Pushing Events............................................................................................................................113
Viewing Events ............................................................................................................................114
Pulling Tasks ................................................................................................................................114
Pushing Tasks..............................................................................................................................115
Viewing Tasks ..............................................................................................................................116
CHAPTER 21 - QUICKBOOKS PLUG-IN INTEGRATION !.......................................................................117
Overview.............................................................................................................................................117
FM Books Connector Installation and Registration...........................................................................118
First Time Connection to the QuickBooks File...................................................................................118
Data Transfer......................................................................................................................................119
Import Wizard / Pulling from QuickBooks..........................................................................................120
Accounts......................................................................................................................................121
Payment Terms............................................................................................................................122
Shipping Methods .......................................................................................................................123
Customer Messages....................................................................................................................124
Items ............................................................................................................................................125
Taxes ...........................................................................................................................................125
Classes........................................................................................................................................126
Contacts ......................................................................................................................................126
Jobs .............................................................................................................................................128
User Manual – Core4 CRM
Page 5 of 153
Sales Reps...................................................................................................................................128
Invoices .......................................................................................................................................129
Payments.....................................................................................................................................129
Push and View Contacts....................................................................................................................130
Push and View Items .........................................................................................................................131
Push and View Invoices .....................................................................................................................132
CHAPTER 22 - APPLE ADDRESS BOOK PLUG-IN INTEGRATION !.........................................................133
Overview.............................................................................................................................................133
Address Book Manipulator Installation and Registration...................................................................133
Push Contacts ....................................................................................................................................135
CHAPTER 23 - ICAL PLUG-IN INTEGRATION !....................................................................................137
Overview.............................................................................................................................................137
iCal Manipulator Installation and Registration....................................................................................137
CHAPTER 24 - FM CREDIT CARD PLUG-IN INTEGRATION !.................................................................140
Overview.............................................................................................................................................140
FM Credit Card Installation and Registration.....................................................................................140
FM Credit Card Setup........................................................................................................................141
FM Credit Card Processing................................................................................................................142
CHAPTER 25 - FILEMAKER GO !......................................................................................................144
Overview.............................................................................................................................................144
Connecting Core4 to FileMaker Go....................................................................................................144
General Use of the Core4 in FileMaker Go........................................................................................145
Viewing Core4 Modules ...............................................................................................................145
Action Items .................................................................................................................................147
Find, Sort and Omit Records .......................................................................................................147
Add or Delete Records ................................................................................................................148
Technician Features ...........................................................................................................................149
Work Order Overview...................................................................................................................149
CHAPTER 26 - FILEMAKER WEBDIRECT!........................................................................................152
Overview.............................................................................................................................................152
Connecting Core4 to FileMaker WebDirect........................................................................................152
CHAPTER 27 - TROUBLESHOOTING AND SUPPORT!..........................................................................153
Troubleshooting Tips..........................................................................................................................153
Re-open the Current Window......................................................................................................153
Restart FileMaker and Re-open the Core4..................................................................................153
Restart your Computer................................................................................................................153
Additional Support Resources ...........................................................................................................153
User Manual – Core4 CRM
Page 6 of 153
Chapter 1 - Overview
Welcome to the Core4, Customer Relationship Management (CRM) software at its best: end-to-end management of all customer touch-points and commitments, from external interactions with your customers
to internal project management and task and time tracking, including work orders and invoicing. Robust
reporting and an interactive dashboard help to easily view and track what's most important to you.
The Core4 is a multi-user, cross platform system that enables organizations to intuitively manage all their
company and individual contacts from virtually anywhere. Core4 was built with a “your data anywhere”
philosophy by providing users with access into the Core4 system through the use of a FileMaker Pro client, FileMaker Go on the iPad, or from a web browser.
Not only can you track all correspondence history, opportunities and sales, but you can also manage projects, invoices, payments, orders, calendars, documents, and more. Other features include dashboards,
reports, and integration with Outlook, QuickBooks, Address Book, iCal, PayPal, and Authorize.net.
About This Guide
The sole purpose of the User Manual is to provide users with detailed information of how to setup and
use the Core4 CRM. This manual will explain the Core4 features and functionality for each available area
and is specifically designed for a Core4 user.
Key Features
The Core4 CRM offers the following modules and features:
• Dashboard: Lists, key performance indicators and graphs viewed at-a-glance for tasks, opportunities, estimates, orders, and invoices.
• Contacts: Specifically designed to handle both individuals and organizations and their relationship
to each other. This cross-linking functionality allows you to see everyone that is associated with an
organization and their roles. Easily view the associated Opportunities, Estimates, Orders, Invoices,
Projects, Activities, Timers, and Documents associated with any contact or organization.
• Opportunities: Track your sales process from initial contact through to invoiced customer. Sales
opportunities can be linked to individuals, companies or both. Quickly generate multiple related
opportunities, estimates, orders and invoices from a single opportunity.
• Estimates: Create, manage and send estimates relating to your company’s quoting process.
• Orders: Create work orders and dispatch them to field technicians’ iPads; completed work is
signed off electronically on-site.
• Invoicing: Generate and send invoices; receive and track payments, including multiple payments
across multiple invoices. Optionally interface invoice and payment data with QuickBooks using FM
Books Connector.
• Purchase Orders: Track all data for your P.O. process (vendor, customer, items, status, etc.).
• Items: Create and track inventory, including items, sub-items, reorder levels, quantity on hand,
etc. Supports kits and inventory assemblies.
• Projects: Easily define projects, tasks, and roles; assign tasks to individuals or groups.
User Manual – Core4 CRM
Page 7 of 153
• Calendars: Individual and overlapped group calendars provide insight into one-off and repeating
events or meetings.
• Activities: Easily assign activities to individuals or groups, with at-a-glance status views and
automated reminders to keep everyone on track.
• Timers: Track time against projects for internal reporting or client invoicing.
• Documents: Secure document storage and checkout management means everyone has access to
the information they need and no one can overwrite another user’s updates.
Additional Core4 CRM features include:
• Web Access and iPad Optimized: Conveniently access Core4 from any computer with a web
browser with FileMaker WebDirect™. This solution has been optimized to run on the free FileMaker® Go app for iPad with additional functionality added for technicians who fulfill work orders in the
field.
• Reporting: Copy the dashboard charts and graphs for a presentation or choose from preformatted reports to communicate information to your teams.
• Communication History and Campaign Management: Track every contact with your prospects, customers, and employees: phone calls, emails, and meeting notes. Easily send email marketing campaigns and HTML e-communications using Outlook Manipulator.
• WAN Optimized: Access your data more efficiently with increased speed across your Wide Area
Network.
• Multi-Platform Support: Whether you need PC or Mac CRM software, Core4 works seamlessly
in all platforms, including iPads for technicians and project teams or sales reps at remote locations.
• Data Exchange: Depending on your needs, the Core4 CRM seamlessly exchanges information
with Microsoft® Outlook for Windows and Macintosh, Intuit® QuickBooks desktop for Windows,
Apple® iCal, and Apple Address Book. Credit Card Processing through Authorize.net and/or PayPal
utilize our FM Credit Card plug-in to process credit card payments right in FileMaker.
Requirements
The Core4 CRM is engineered in FileMaker Pro the #1 selling database software for Mac or Windows.
Therefore, FileMaker Pro 13 will be installed on each user’s machine in order to run the Core4.
The minimum Mac and Windows machine requirements for running FileMaker 13 can be found here:
http://www.filemaker.com/products/filemaker-pro/pro-13-specifications.html
User Manual – Core4 CRM
Page 8 of 153
Chapter 2 - Hosting
Hosting for Software as a Service (SaaS)
Core4 is a full-featured FileMaker Pro CRM solution offered under Productive Computing’s Software as a
Service (SaaS) subscription model and is fully hosted on our dedicated servers.
FileMaker Pro 13 WebDirect™ and FileMaker Go® 13 connections are available for each SaaS user account.
The SaaS hosting offers:
•
FileMaker Hosting on dedicated servers with SSD solid state drives for fast booting and maximum
performance.
•
Upload speeds of up to 100 Mb/s and unlimited bandwidth.
•
Twice daily and weekly backups to ensure your data is secure.
Our staff is dedicated to personally walking each customer through their Core4 setup process so that it is
easy and pleasant for even the most novice computer user. Not only do we care about your Core4 solution, but we care about the server you are running your business on.
User Manual – Core4 CRM
Page 9 of 153
Hosting Options for On Premise (Site License)
FileMaker offers three options to provide simultaneous access to the Core4 CRM. You can either setup
internal hosting within your company, external hosting with a third party company, or use peer-to-peer
sharing.
Internal Hosting
If you decide to host the Core4 database within your company, then you will need to obtain a license for
FileMaker Server (if you do not currently own one). Installing FileMaker Server can be done in as little as
20 minutes and provides 24/7 access anytime to the Core4. You will first need to designate a machine
that will run FileMaker Server.
The minimum Mac and Windows machine requirements for running FileMaker Server 13 can be found
here: http://www.filemaker.com/products/filemaker-server/server-13-specifications.html
After you install FileMaker Server, then you will need to follow the setup instructions provided by FileMaker to properly upload and host your Core4 database files within FileMaker Server.
Here is a direct link to all supporting FileMaker Server documentation:
http://www.filemaker.com/support/product/documentation.html
Uploading your Core4 database files goes beyond the scope of this document. Productive Computing may
be hired to assist with this setup if needed.
There are many benefits when you host your own database. Primarily internal hosting gives you complete
control and responsibility of your solution. If you are not ready to take on this responsibility, then please
explore the external hosting option. FileMaker Server has a sleek Admin Console that also offers you the
ability to:
• Manage databases remotely
• Schedule automatic backups
• Automate administrative tasks
• Receive email notifications of maintenance activities
• Publish data to the web using PHP or XSLT
• Manage users through external authentication via Active Directory/Open Directory
• Secure data transfers with SSL encryption
User Manual – Core4 CRM
Page 10 of 153
External Hosting
Core4 is a full-featured FileMaker Pro CRM solution offered under Productive Computing’s Software as a
Service (SaaS) subscription model. Please explore the following links for more information:
http://www.productivecomputing.com/FileMakerHosting.php
http://www.core4crm.com
If you decide to host the Core4 database files with a third party hosting company, then this will alleviate
the cost and maintenance required to internally maintain FileMaker Server. There are many outside FileMaker hosting companies available. The monthly hosting cost typically varies between $20 and $80 depending on the hosting company. A simple Google search should provide you with various FileMaker hosting companies or please contact us for our preferred hosting vendors. Your hosting company will provide
you with the credentials to open your files remotely as shown in Figure 2.0.
The primary benefit of hosting your Core4 files with a hosting company is that you are not responsible for
maintaining FileMaker Server. This can also be viewed as a disadvantage as you do not have complete
control of the FileMaker Server. This really depends on your IT infrastructure and preference.
Figure 2.0 - Open Remote File
User Manual – Core4 CRM
Page 11 of 153
Peer to Peer Sharing
The third option is peer-to-peer sharing, which we do not recommend or support in a multi user environment. Since FileMaker does have this option available, we find it appropriate to mention this option
should you decide to choose this sharing option.
Peer-to-peer sharing means that you have opened the Core4 within FileMaker Pro on a “host” computer.
You then run FileMaker Pro on additional computers and log into the Core4 (using “Open Remote ..”) on
the additional computers. All computers must be on the same network and the Core4 must always be
open on the “host” computer.
For further information on FileMaker Pro peer-to-peer sharing, please see this link:
http://help.filemaker.com/app/answers/detail/a_id/6097
User Manual – Core4 CRM
Page 12 of 153
Chapter 3 - FileMaker Pro Basics
Before we start using the Core4, let’s first go over some basic functionality of FileMaker Pro. Since FileMaker is the application on which the Core4 is built, it is helpful to understand some basic FileMaker Pro
functionality to allow you to work more efficiently. You may also want to come back and reference this
chapter after you have the Core4 open.
Using FileMaker Pro
Modes
FileMaker Pro has four different modes which are Browse mode, Find mode, Layout mode, and Preview
mode. As a Core4 user, you will primarily stay in Browse mode for your typical workflow: entering and
viewing data, creating estimates and invoices, managing your calendar, etc. Find mode allows you to
search in any field on the screen. You may switch modes from the View option at the top, from the pop
up menu in the lower left corner, or by using keyboard shortcuts as shown in Figure 3.0 below.
Figure 3.0 - FileMaker Modes
Browse Mode = Most of your work will be done here (i.e. data entry, add, edit, delete, sort, omit, etc.)
Find Mode = Search for ANY records that match your criteria known as the found set of records.
Layout Mode = Not available for users. This is a mode developers use to design and edit layouts.
Preview Mode = View data before you print or save to PDF.
**IMPORTANT NOTE: Layout Mode and Preview Mode are not available with FileMaker Go
and FileMaker WebDirect.
User Manual – Core4 CRM
Page 13 of 153
Status Toolbar Setup
The Status Toolbar plays a vital role in using the Core4. In order to optimize your Core4 experience we
recommend customizing your Status Toolbar. In order to customize the Status Toolbar please select View
> Customize Status Toolbar... from the menu bar at the top as shown in Figure 3.1, or you may right-click
on the actual Status Toolbar and select the “Customize...” or “Customize Toolbar...” depending on your
operating system as shown in Figure 3.2.
Figure 3.1 - Accessing Status Toolbar from Menu Bar at the Top
Figure 3.2 - Accessing the Status Toolbar by right-clicking on a Windows or Mac Machine
This will open up the customize window to provide you with various options to add a command to your
Status Toolbar. Although the Status Toolbar and the customize window look a little bit different on a Windows and Mac machine, the functionality of simply dragging what you want from the customize window
onto the Status Toolbar or what you do not want off the Status Toolbar is similar on both platforms. The
customize window on both platforms is shown in Figure 3.3 and in Figure 3.4.
User Manual – Core4 CRM
Page 14 of 153
Figure 3.3 - Customize Window on a Windows Machine
Figure 3.4 - Customize Window on a Mac Machine
The Status Toolbar on both platforms allows you to add, remove, and re-arrange the items based on your
needs and also adjust the icon and text size. You may want to explore the various items in the Status
Toolbar in order to work more productively and have a pleasurable Core4 experience.
**TIP: When starting out we recommend at least having the Record Total, Show All, New Record, Delete
Record, Find, and Sort items on the Status Toolbar as shown in Figure 3.2. After you become more acquainted with all the functionalities of FileMaker Pro, then you may add or remove more items from your
Status Toolbar based on your work flow and preferences. **
User Manual – Core4 CRM
Page 15 of 153
Finding
As outlined above in Figure 3.0 there are various ways to enter into find mode. Once in find mode, you
may perform a find based off of ANY search criteria. The result of a find is known as the found set of records. This makes FileMaker’s find mode a useful and powerful tool. There are many finds available and
we would like to show you some of them. For a complete list please reference FileMaker’s help menu or
visit www.filemaker.com
1. For searching text fields FileMaker looks for any word that begins with or matches the word entered.
For example, a find on the name "Chris" would also find the name "Christopher."
For searching exact text, use an equals sign (=) followed by the text.
Example: =Chris would only return those with the name "Chris"; it would not return "Christopher."
For searching text fields if you enter more than one word, FileMaker finds both words in any order.
2. Search for all records that have an empty field by entering = (an equals sign) in the appropriate field.
This is one of my favorites especially for clean up!
3. To specify a range, type in three periods. Example: to find all records created between 12/1/2012 and
12/15/2012, type in "12/1/2012...12/15/2012" in the creation date field. In addition to find all records
where the last name begins with the letters A through C, type in "A...C" in the last name field.
4. To find items greater than or less than a certain value, use the "<" and ">" signs.
5. Omitting records: You can omit single or multiple records from the found set by selecting the “Omit
Record” or “Omit Multiple...” from the “Record” menu bar at the top or from your Status Toolbar. For
example, you may want to omit a single record or multiple records to restrict your found set. Alternatively you may also want to perform a find request and omit certain records based off of a specific
criteria. For example, you want to find all contact records belonging to those not living in Rhode Island. Simply enter find mode, click "Omit" in the status toolbar area, enter "RI" in the state field and
then click "Perform Find" or enter.
FileMaker finds can be quite detailed and elaborate as you can typically find anything you desire. The
time will come when you will want to expand and learn more about the secret life of find mode. There
are many great tutorials available online and we hope this just gets you started with the possibilities.
TIP: The found set of records can be identified in the upper left hand corner of the Status Toolbar as
shown in Figure 3.5.
Figure 3.5 - Navigating Through Found Records in Status Toolbar
1. Go to the next or previous record.
2. Type a number to go to a different record.
3. Slide forward or backward to go to a different record.
4. Displays the total number in the found set. In the example above there are 11 records in the found
set out of a total of 29 records.
5. Select to show only those records that are not in the current found set.
User Manual – Core4 CRM
Page 16 of 153
Deleting Records in Core4
Each record you wish to delete from the Core4 must be deleted manually using the “Delete Record” button. There is no option to delete "Core users" as this could damage the system. Furthermore, there is no
“Delete Found Set” option, and this was purposely left out as a safety measure. Users who are new to
FileMaker can easily fall into a one-way trap of deleting multiple records for which there is no “undo.”
Duplicating Records in Core4
There is no option to duplicate a record in the Core4. This was removed from the Core custom menus
due to the fact that when a record is "truly duplicated" you would technically want all the related elements of that record duplicated as well.
User Manual – Core4 CRM
Page 17 of 153
Chapter 4 - Setup Core4 Preferences
There are two types of settings in the Core4 which are Global Settings and User Settings. Both settings
may be found by selecting Core > Preferences from the drop-down menu bar at the top. Global settings
apply to the Core4 as a whole and are not user specific. User settings apply to a specific user and must
be set up for each user. We will explore the options for both setting types in this chapter.
Please note before you begin working in the Core4 CRM you should set up all Global Settings
and User Settings.
Global Settings
General Tab
This tab provides you with the area to specify your specific company information.
Figure 4.0 - Global Settings > General Tab
1. Enter your company information (name, address, phone numbers, etc.) The details entered here will
appear on your reports, estimates, orders, invoices and purchase orders.
2. Upload your company logo. This logo will appear in the upper left hand header on reports, estimates,
orders, invoices and purchase orders. Logos should be approximately 260 pixels wide by 70 pixels
tall.
3. Enter the Contact ID for the Default Opening Record ID. This becomes a “home” record that will
appear when users first open the Core4.
User Manual – Core4 CRM
Page 18 of 153
Templates Tab
Create and manage all your email templates and applicable merge fields.
Figure 4.1 - Global Settings > Templates Tab
1. Select the blue New Template button to add a new email template.
2. Select the blue arrow to view and modify a template.
3. Navigate to the “Merge Fields” tab to add a new merge field. Please note this requires knowledge of
the field expression and may require assistance from a developer.
4. Select the red X button to permanently delete a template.
User Manual – Core4 CRM
Page 19 of 153
Phone Formats Tab
The phone format tab provides support for international phone formats. Enter your country and corresponding phone format here.
Figure 4.2 - Global Settings > Phone Formats Tab
1. Select the blue New Phone Format button to add a new phone format. Enter new countries from the
editable drop down list rather than manually typing each new entry.
2. Enter the phone format and select the default phone format to be used when a country is not assigned to a contact.
As shown in Figure 4.3 once you specify the country in the address field for each contact on the Contacts
> Contact tab, then each phone number entered thereafter for that contact will apply the specific phone
format. Please note that only one country per contact is supported.
Figure 4.3 - Example of the Phone Format for the United States
User Manual – Core4 CRM
Page 20 of 153
Activity Categories Tab
All categories can be customized and setup to meet your company’s specific needs. Categories can be set
up for Events, Tasks, Notes and Project Items as shown on the corresponding tabs in Figure 4.4. If a
category is no longer in use, then please make the category inactive rather than permanently deleting the
category in order to preserve the integrity of the category history for your activities.
Figure 4.4 - Global Settings > Activity Categories Tab
User Manual – Core4 CRM
Page 21 of 153
Calendar Settings Tab
Here you will create and manage all individual and group calendars. Calendar names must be unique. A
courtesy individual calendar is automatically created for Core users upon initial setup. Calendars are NOT
linked to a Core user. In other words if you change the Core user name, then you must manually change
the corresponding individual calendar. The Core4 CRM manages users independent of calendars so that
calendars can be created for others who may not already be a user. For example, calendars may be created for meeting rooms, delivery trucks, or people outside the organization who are not necessarily Core4
users.
Group calendars can also be created. Group calendars will be automatically changed to upper case. You
can apply specific individual calendars to a group calendar by selecting the group calendar and selecting
all associated individual calendars as shown in Figure 4.5.
Figure 4.5 - Global Settings > Calendar Settings Tab
User Manual – Core4 CRM
Page 22 of 153
Lists Tab
The “Lists” tab is where you will maintain and manage various lists for the entire system. List items are
Accounts, Payment Methods, Terms, Shipping Methods, Customer Messages, Taxes and Classes. If using
QuickBooks and the FM Books Connector, then you should manage and maintain all lists in QuickBooks
rather than the Core4.
Figure 4.6 - Global Settings > Lists Tab
Here is a brief overview of each list item.
Accounts: Accounts are read only and apply only if integrating with QuickBooks.
Payment Methods: Enter the forms of payments you accept. Generally you would list various credit card
payment types as well as check or cash.
Terms: Define the terms of payment on the invoice such as Due on receipt, Net 15, or Net 30.
Shipping Methods: Define the forms of shipment you have and/or the shipping companies you use.
Customer Messages: Enter a customer message to appear on the lower left hand corner of invoices.
Taxes: Define your tax rates for each state, county, district, etc. It may be required to collect sales tax
depending on where you do business.
Classes: Define classes as a way to further classify your transactions.
User Manual – Core4 CRM
Page 23 of 153
Stages Tab
All stages may be customized and setup to meet your company’s specific needs. Stages can be set up for
Opportunities, Estimates, Orders, Invoices and Projects as shown on the corresponding tabs in Figure 4.7.
In addition, stage bar graphs for each appropriate module may be viewed via sub-tabs on the Dashboard.
Please ensure that you have setup your stages BEFORE you begin creating new records. The
stages specified here are applied to a new record at the time the new record is created.
Figure 4.7 - Global Settings > Stages Tab
Please be aware that stages are different for each module. You may also reorder the stages using the
blue up and down arrows on the right.
User Manual – Core4 CRM
Page 24 of 153
Plug-ins Tab
This tab is only required if you are using the Address Book Manipulator, FM Books Connector, FM Credit
Card, iCal Manipulator, or Outlook Manipulator plug-ins. The settings and functionality of this tab are further explained in subsequent chapters pertaining to the specific plug-in use.
Figure 4.8 - Global Settings > Plug-ins Tab
User Manual – Core4 CRM
Page 25 of 153
Modules Tab
The Global Settings > Modules tab is not discussed in detail in the User Manual since it is used to
customize the Core4 modules used in your system. The module tabs should only be modified with
assistance from Productive Computing. It is not recommended for general users to make module
changes.
A module tab will not work if the module’s default layout name is not typed exactly as originally
programmed in the Core4.
Productive Computing may be hired to assist you with modification of the name or location of the Core4
modules.
Figure 4.9 - Module Modification Interface
User Manual – Core4 CRM
Page 26 of 153
User Settings
How to Create a New User
In order to create a new Core user navigate to Core > Preferences > User Settings and select the New
Account button on the lower left hand corner as shown in Figure 4.10.
Figure 4.10 - New User Account Button
Then enter the user account name, password, and password confirmation as shown in Figure 4.11.
Figure 4.11 - New Account & Password
User Manual – Core4 CRM
Page 27 of 153
Once you create a new account, then a new contact record is also created in Contacts. The new contact
record will be identified in Contacts with a Core User label on the More Info area tab as shown in Figure
4.12. This means that you will have a contact record for each Core user.
A unique calendar is also created for each Core user as a courtesy. This calendar is not officially linked to
the Core user account meaning that if you change the Core user name, then you must also manually update the corresponding individual calendar.
Figure 4.12 - Core User Label
User Manual – Core4 CRM
Page 28 of 153
General Tab
After your new Core user has been created, then you can fill in all the general user account details as
shown in Figure 4.13.
Figure 4.13 - User Settings > General Tab
1. If you change the account name here, then you will be required to re-assign the password. The account name for the admin cannot be changed. The account name does not necessarily have to be the
same as the user name. The account name and password are needed to log into the Core4.
2. Select the “Remember Window Position” check box to preserve each user’s window position upon reopening the Core4.
3. Add a closing signature to be used in emails.
4. Displays the currently logged in user and privilege set.
5. Tech Checkbox: Specify if the user is a technician. Technicians may be linked to work orders via the
Orders tab > More Info.
Inactive Checkbox: Specify if the user account is inactive. Inactive accounts will not be able to login.
User Manual – Core4 CRM
Page 29 of 153
Email Tab
Here is where you specify the email options for each user. Users can send emails specific to their needs
allowing the Core4 to fit each user’s preference. If using Windows and the Outlook Manipulator, then you
have the option to import emails from Outlook into the Core4. Please see the “Outlook Plug-in Integration” chapter.
Figure 4.14 - User Settings > Email Tab
1. Select the “Sending” tab to specify the method that each user will use to send email. Please choose
from the following three options:
FileMaker (via mail client): Send email through your default email client. HTML formatted emails and
multiple attachments are not supported using this method.
FileMaker (via SMTP): Send email directly through an SMTP server. No email client is needed, but you
must enter your SMTP settings. HTML formatted emails and multiple attachments are not supported
using this method.
Plug-in: Option that uses the Outlook Manipulator to send email. Please see the “Outlook Plug-in Integration” chapter for additional available functionality such as sending HTML formatted emails with
multiple attachments.
2. Select the “Importing” tab to specify the Outlook watch folders to import mail from. This requires the
Outlook Manipulator and the functionality is explained in the “Outlook Plug-in Integration” chapter.
3. Option to embed (outgoing and incoming) attachments directly into the Core4 for safe keeping or
option to store all attachments as a reference. We recommend using the “embed” method.
4. Select the “Test Settings” button to send a test email to ensure that your settings are functioning.
User Manual – Core4 CRM
Page 30 of 153
Calendar / Tasks Tab
This tab simply allows you to specify your user calendar and task preferences. Please note that the “Default Calendar” and “Default User for Tasks” specified are extremely important when pushing and pulling
events and tasks using the Outlook Manipulator or iCal Manipulator and are discussed in the “Outlook
Plug-in Integration” and “iCal Manipulator Integration” chapters. The iCal Title field specifies the title of
your calendar in iCal and is discussed in the “iCal Manipulator Integration” chapter.
Figure 4.15 - User Settings > Calendar / Tasks Tab
Address Book Manipulator Tab
This tab simply allows you to specify the title of the group to communicate within Apple’s Address Book.
This tab is further discussed in the “Address Book Manipulator Integration” chapter.
Figure 4.16 - User Settings > Address Book Manipulator Tab
User Manual – Core4 CRM
Page 31 of 153
Chapter 5 - Overview and Initial Import
Overview
Most areas in the Core4 have the sections outlined below. For clarity each section has been outlined,
tagged with a numbered star and explained in Figure 5.0 below. These sections are important for understanding the basic layout and functionality when working in the Core4.
Figure 5.0 - Overview of Basic Core4 Sections
1. Status Tool Bar = Used to navigate through found set of records, add, delete, find, and sort records
plus much much more. Please see the FileMaker Pro Basics chapter regarding setting up and using
the Status ToolBar.
2. Main Modules = Specifies the main modules of the Core4. These areas are Dashboard, Contacts, Opportunities, Estimates, Orders, Invoices, POs (Purchase Orders), Items, Projects, Calendar, Activities,
Timers and Documents.
3. Area Tabs = Specifies the individual area within each main module. These will vary depending on the
main module you are viewing. In Figure 5.0 above, the Contacts module has two area tabs, which
are Contact and More Info.
4. Action Items = Actions you can make in a specific module such as creating a new email or letter etc.
5. Related Tabs = Shows related areas and records. These will vary depending on the main module you
are viewing. The related tabs serve as a quick link to related records in related areas.
6. Related Records Button = Provides a list of related items depending on the tab you are viewing. For
example, if you are on the Invoices tab, you see a list of invoices related to that particular contact.
User Manual – Core4 CRM
Page 32 of 153
Initial Batch Import
The Core4 is built using a multi-table relational database structure. This essentially means that each major piece of data regarding your contact is stored in its own area or "table." Storing data like this in multiple tables give you great flexibility and expandability whereby you can have a single contact with multiple addresses, phone numbers and internet addresses. Because of this structure, it is not possible to use
the traditional FileMaker "Import Records" script step to import your data unless you are familiar with
relationships, scripts and the act of importing into multiple related tables. Fortunately, the Core4 comes
with a special "Batch Import" process that allows you to import your basic data by matching your fields
with select fields in the Core4.
The "Batch Import" process will move your data into all the necessary tables and properly link them. This
basic “out of box” import process provides you with a starting point, however; your data may be formatted in a more complex structure not supported by this process. Productive Computing may be hired to
assist you with your data import process if you need additional assistance.
Please note that multiple batch imports are not supported with this process and should be done at your
own risk. We recommend performing the “Batch Import” prior to using the Core4 as this import should be
your starting point. If you have additional data files that need to be imported, then consolidate these
data files into one master file. Afterwards you may perform a “Batch Import” using your single master
file. This is often the best method for basic users. If you are an advanced user or you work with a developer then you may prefer to use the “Batch Import” for more advanced data imports. All imports outside
the standard use are supported under our paid support program. If importing data from a third party
program such as Outlook, Address Book, or QuickBooks using one of our plug-ins, then please see the
section regarding the specific plug-in integration.
The “Batch Import” steps are as follows:
1. Start with a clean copy of the Core4.
2. Select “Batch Import” from the Core menu in the Contacts tab as shown in Figure 5.1.
Figure 5.1 - Batch Import
User Manual – Core4 CRM
Page 33 of 153
3. Select your data file. Any file type that FileMaker supports may be imported. A complete list of supported file types is listed in FileMaker’s help area. For a quick reference supported data files are:
•
•
•
•
•
•
FileMaker Files *.fmp12 or *.fp7
Tab-Separated Text Files *.tab or *.txt
Comma Separated Text Files *.csv or *.txt
Merge Files *.mer
Excel Workbooks *.xls or *.xlsx
Other file types supported by FileMaker found at www.filemaker.com
4. Match your fields with fields in the Core4 as shown in Figure 5.2. The fields from your data file
(shown on the left side below) should be matched to the fields in the Core4 (shown on the right below). The “Arrange By” option in the lower corner can assist with arranging fields. The most common
“Arrange By” selection is “Matching Names” or “Field Names.” In order to select the “Matching
Names” option you may need to select the “Don’t import first record (contains field names)” check
box as shown in Figure 5.2 (this checkbox is automatically marked in FileMaker). Please choose the
import option most appropriate for you.
Figure 5.2 - Import Field Mapping
5. After you have appropriately aligned the field names, then select the “Import” button to import your
data into the Core4. Fields are one to one. For example, one work phone and one email for one contact record.
User Manual – Core4 CRM
Page 34 of 153
Chapter 6 - Contacts Module
Overview
The main Contacts module is where all your company and individual contact information is stored.
Figures 6.0 - 6.0.5 outlines the basic functionality of the Contacts module.
Figure 6.0 - Contacts Module > Contacts Tab
Figure 6.0.1 - Contacts Module Status Toolbar
1. Status Toolbar where you can create a new record, delete a record, perform finds, sorts and much
more. Please see section on Status Toolbar setup for full functionality.
2. View Contacts in detail view or list view by selecting the appropriate icon in the Status Toolbar.
3. Preview the contact record by selecting this button in the Status Toolbar.
4. Contact area tab contains key contact information such as name, company, address, phone numbers,
email and website information, etc.
5. More Info area tab provided for additional information about the selected contact record. See Figure
6.1.
User Manual – Core4 CRM
Page 35 of 153
Figure 6.0.2 - Contacts Area Tab - name, phone and internet details
6. Enter Company Name, Individual Name and Title in this area.
7. Check box indicating if the contact record is a company record. Uncheck for individual records.
8. Unique Contact ID number assigned to each company or individual contact record. This number is
automated and read only.
9. Picture field for company and/or individual records. To insert a picture simply click on the picture and
navigate to the desired image file to insert for that specific contact record.
10. Add, delete, or promote a phone number. You can enter multiple phone numbers and label each accordingly. Click on the green plus sign to add additional phone number fields. "Promoting" a number
means the number is the primary number and will be moved to the top slot in portal. The star icon
indicates the primary number. Clicking on the star icon will promote a phone number to the top.
11. Add, delete, or promote a internet related address such as an email address, web address, etc. You
can enter multiple internet addresses and label each accordingly. Click on the green plus sign to add
additional internet address fields. "Promoting" an address means the address is the primary address
and will be moved to the top slot in portal. The star icon indicates the primary address. Clicking on
the star icon will move or “promote” an item to the top.
12. Select the email icon to send an email to this address or select the arrow to open a new browser
window to be routed to the specific web address. The email will be sent out based on your user email
settings specified in the Preferences > User Settings > Email tab.
User Manual – Core4 CRM
Page 36 of 153
Figure 6.0.3 - Contacts Area Tab - address details
13. Add, delete, or promote a physical address. You can enter multiple addresses and label each accordingly. Click on the green plus sign to add additional address fields. "Promoting" an address means
the address is the primary address and will be moved to the top slot in portal. The star icon indicates
the primary address. Clicking on the star icon will promote an address to the top.
14. Copy this contact information to the computer clipboard to easily paste it into another application.
15. Obtain driving directions to or from this address in Google Maps. Also allows you to obtain a map of
this exact address. A web browser will be opened displaying the directions or map of the location(s).
16. Contact identification fields Type, Status, and Source allow you to select values for labeling, tracking
or sorting your contacts. The values for all 3 fields can be customized to fit your tracking needs. Edit
the fields by clicking on the drop down list and selecting Edit at the bottom of the list, add or remove
values as needed.
User Manual – Core4 CRM
Page 37 of 153
Figure 6.0.4 - Contacts Area Tab - related tabs and links
17. Related tabs showing all related information linked to the contact record. This allows you to quickly
find information or documents related to the contact such as Opportunities, Estimates, Invoices, etc.
18. Link contacts to various company or individual records. Once contacts have been linked, then you can
easily navigate between records and associate contacts with various companies and/or individuals.
19. Select the blue arrow button to conveniently navigate to the linked contact record.
20. Sort column is helpful for sorting your linked contacts in that particular contact record. Contact with
sort “1” will appear at the top of the list. You can easily adjust the number to prioritize how each
contact will appear in the sort.
21. Select the red X button to unlink a contact from the current record. This does not delete the contact
record.
Figure 6.0.5 - Contacts Module Action Tab
22. Action item links allow you to create a new activity for the contact such as a
note, event, task, email, call or timer. Once created, all activities can be found on
the Activities tab. See the Activities section for additional details.
• Select the New Note button to create a new note. The note will be linked to the
contact.
• Select the New Event button to create a new event. The event will be linked to
the contact.
• Select the New Task button to create a new task. The task will be linked to the
contact.
•
Select the New Email button to create a new email. The email will be linked to the contact.
•
Select the New Call button to create a new call. The call will be linked to the contact.
•
Select the New Timer button to create a new timer. The timer will be linked to the contact.
User Manual – Core4 CRM
Page 38 of 153
More Info Tab
The More Info tab displays additional information about the contact as shown in Figure 6.1.
Figure 6.1 - Contacts Module > More Info Tab
1. Enter Other Details related to contact such as Nickname, Department, Industry, Sales Rep, QB Initials
(read only information populated during QuickBooks data exchange), Referred By link, Birth Date,
count of days until next Birthday, Spouse, and Children.
2. The “Private” field allows you to secure a contact record. You can assign a contact record to one or
multiple Core users in this “Private” field. This makes the contact record visible to only those core
users specified in the “Private” field. These specified users are the only people who can add or remove users from the “Private” field. Core user contact records cannot be marked as private.
3. The Groups area is used to manage groups, assign contacts to a group, and remove contacts from a
group. Click the pencil for the “Edit Groups” window to display. You can then select Manage, Add Multiple of Remove Multiple.
•
Click the “Manage” button to open another window displaying the list of groups and subscriber
count. Here you can add and remove groups.
•
Click the “Add Multiple” button to add multiple contacts in a found set of records to a group.
•
Click the “Remove Multiple” button to remove contacts in a found set of records from a group.
4. QuickBooks List ID captured only when using the QuickBooks data exchange feature. This is a read
only field that is read from QuickBooks.
5. Created and Modified Date/Time stamp. This tracks when a contact was created and last modified
and by whom.
6. A free form notes field.
7. Enter keywords for a contact record that may help with categorizing and searches.
8. Core User label only appears on contact records of your Core users.
User Manual – Core4 CRM
Page 39 of 153
Merge Duplicates
Creating and importing contacts from several different sources can lead to unintentional duplicate contact
records. This feature makes the task of finding and merging duplicates easier. To merge duplicates navigate to the Contacts tab and select Core > Merge Duplicates from the drop-down menu at the top as
shown in Figure 6.2.
Figure 6.2 - Contacts > Core > Merge Duplicates
A “Duplicate Search” window will appear as shown in Figure 6.3. Simply select the criteria you want to
use to identify duplicates. Currently you may search for duplicates based off of the Name, Phone, Email
and Address. If searching by name, then the First and Last Name must be an exact match for each contact.
Figure 6.3 - Duplicate Search Window
As shown in Figure 6.3 once duplicate contacts are found, then simply select the name on the left of the
desired duplicate to merge and a list of found duplicate contacts will appear in the list on the right. Please
User Manual – Core4 CRM
Page 40 of 153
note that you can only merge two contacts at a time, and Core User contacts cannot be merged. Select
the two duplicate contacts to merge by checking the box to the right of each contact and select the
“Combine” button.
Then a “Merge Duplicate Contacts” window will appear as shown in Figure 6.4 allowing you to see the
details from each record side by side.
Figure 6.4 - Merge Duplicate Contacts Window
The record on the right will merge into the record on the left. In other words, the record on the left will
be kept and the one on the right will be deleted. All phones, internet, and addresses will be merged.
Names will be replaced (the record on the left will win). The company name on the left will also win. If
you need to swap the records from left to right, then select the “Swap” button on the bottom. Once ready
to merge duplicates, then select the “Combine” button.
If the records have linked contacts, then you will get prompted to copy these linked contacts to the “master” record (or the record on the left). This can be very handy when you have two duplicated individual
records each with their own set of related contact records. The linked contacts from the duplicated record (on the right side) will be moved and related to the “master” record on the left side. This option to
copy linked contacts only apples to linked contacts and not other linked records such as a linked order or
invoice. When merging two records the other linked records such as opportunities, estimates, orders, invoices, projects, activities, timers and documents from both records will always be combined into the
“master” record.
User Manual – Core4 CRM
Page 41 of 153
Chapter 7 - Opportunities Module
Overview
Opportunities allow you to create, track and manage your opportunity related data unique to your company’s lead tracking process.
Figure 7.0 - Opportunities Module > Opportunity Tab
1. Status Toolbar where you can create a new record, delete a record, perform finds, sorts and much
more. Please see section on Status Toolbar setup for full functionality.
2. View opportunities in detail view or list view by selecting the appropriate icon in the Status Toolbar.
3. Preview the opportunity record by selecting this button in the Status Toolbar.
4. More info tab: Additional tab for information about the selected record. Please see Figure 7.1.
5. Title of opportunity and unique opportunity number. The unique number assigned to each opportunity
record. This number is automated and read only.
6. Associate a company and/or individual to an opportunity. You are given the flexibility to associate a
different company and individual to an opportunity.
7. Quick references to the individual’s phone and internet information. These values are read only and
are pulled from the individual’s contact record.
8. Additional fields such as Category, Department, and Sales Rep. Available Sales Reps values come
from the contact records with the “Sales Rep” box checked on the Contacts > More Info tab.
User Manual – Core4 CRM
Page 42 of 153
9. Priority field allows to assign a High, Normal, Low priority to each opportunity.
10. Free form description field to elaborate about the opportunity.
11. Opportunity Date, Estimate Close Date, and Actual Close Date are editable fields. The Opportunity
Date is used in the Dashboard. Please see Dashboard section for further clarification.
12. Specify the phase or Stage of the opportunity in the Stage drop down menu. To set up or modify the
stages in the drop down menu go to Core > Preferences > Global Settings > Stages > Opportunities
tab. Probability and Value fields are used to measure the opportunity’s worth. The Weighed field is
calculated based on the Probability and Value field. The Days Open field is a count of the number of
days since the opportunity was created based on the Created date on the Opportunities > More Info
tab.
13. Related tabs showing all related information linked to the opportunity record.
14. Select the blue New Estimate button to create a new estimate based off of the current opportunity.
This will link the estimate and opportunity together, and will also copy relevant information to the
newly created estimate.
15. Select the blue arrow button to conveniently navigate to a linked estimate. Selecting the red X button
will unlink the estimate and the opportunity. The Orders, Invoices, Activities, and Documents related
sub-tabs have similar functionality.
16. Action item links allow you to create a new activity for the contact such as a note, event, task, email,
or call. Once created, all activities can be found on the Activities tab.
User Manual – Core4 CRM
Page 43 of 153
More Info Tab
The More Info tab displays additional information about the opportunity and leaves you with room for
expansion to add additional fields and information as shown in Figure 7.1.
Figure 7.1 - Opportunities Module > More Info Tab
1. Title of opportunity and unique opportunity number. The number assigned to each opportunity record
is an automated and read only number.
2. Created and Modified Date/Time stamp. This tracks when the opportunity was created and last modified and by whom.
User Manual – Core4 CRM
Page 44 of 153
Chapter 8 - Estimates Module
Overview
Estimates allow you to create, track, and manage your estimates relating to your company’s unique quoting process.
Figure 8.0 - Estimates Module > Estimate Tab
1. Status Toolbar where you can create a new record, delete a record, perform finds, sorts and much
more. Please see section on Status Toolbar setup for full functionality.
2. View estimates in detail view or list view by selecting the appropriate icon here in the Status Toolbar.
3. Preview the estimate record by selecting this button in the Status Toolbar.
4. More info tab: Additional tab for information about the selected record. Please see Figure 8.1
5. Assign and link a contact and billing address to the estimate.
6. Title of the estimate.
7. Date and unique estimate number. The date defaults to the current date, but can be modified. A
unique estimate number is automatically assigned to each estimate record and read only number.
8. Assign a shipping address. This address may be different than the billing address.
9. Assign an identifier, phase or tracking information to an estimate with Stage, Class, and Sales Rep
fields:
User Manual – Core4 CRM
Page 45 of 153
•
Stages for Estimates can be selected in the drop down menu. To set up or modify the stages in
the drop down menu go to Core > Preferences > Global Settings > Stages > Estimates tab.
•
Class is a way to further customize and identify an estimate. Classes can be selected in the drop
down menu. To set up or modify the Classes in the drop down menu go to Core > Preferences >
Global Settings > List > Classes tab.
•
Sales Reps can be assigned to Estimates by clicking on the arrow in the Sales Rep field. A new
window “Link Sales Rep” window will appear. To select a sales rep click the Link button next to
the appropriate sales rep name. To remove a sales rep, click the Clear button and click Done.
The Sales Reps values come from contact records with the Sales Rep box checked on the Contacts > More Info tab.
10. Add estimate line items.
•
Estimate line items can be added by simply typing in the Item field and selecting the appropriate
Item. The description, quantity, unit price, markup, total and taxable fields can be edited directly
on the estimate.
•
If you need to add additional line items to the estimate, select the blue New Line Item button.
•
Once you have added an item, you can select the blue arrow button to conveniently navigate to
the selected item to view additional details or make system wide edits. Please see section on
Items for information on adding or modifying your list of items to the Core4.
•
The markup field can take the value of a dollar amount (XXX.XX) or percentage (XX%). The mark
up amount does not appear on the printed estimate. The total can also change and the values
will calculate backwards to adjust the markup accordingly.
•
Taxable items can be checked or unchecked directly on the estimate. Only items with the Taxable check box marked will have tax applied to them.
•
The Sort column allows you to assign a sort number to move line items up and down.
11. Memo is a free form field that allows you to type an optional message that will print on the estimate.
12. Tax Rates are set up in Core > Preferences > Global Settings > List > Taxes tab. An unlimited number of tax rates may be set up, but two separate tax rates are not permitted on one estimate. If you
need two separate tax rates, then you will need to create two estimates.
13. Subtotal, tax, and total values calculated for the entire estimate.
14. Action item links allow you to Duplicate an Estimate, Create an Order, Create an Invoice or Send the
estimate via email.
•
Select the Duplicate icon to create a duplicate estimate containing all customer information and
items related to the current estimate. You are given the option to select “new series” or “revision”
when creating the duplicate. Selecting “new series” will create an entirely new estimate record
number. Selecting “revision” of the current estimate will add decimal digit after the current esti-
User Manual – Core4 CRM
Page 46 of 153
mate number (for example, if the original estimate is 1003, the revision will be 1003.1). The
original estimate and revision will be linked in the Revision History on the More Info tab.
•
Select the Create Order icon to create an order from the estimate. All relevant information will
be copied over to the new order. The estimate and order will also be automatically linked.
•
Select Create Invoice icon to create an invoice from this estimate. All relevant information will be
copied over to the new invoice. The estimate and invoice will also be automatically linked.
•
Select Send as Email icon to send the estimate as a PDF attachment in an email. Once the email
is sent, a link to the email can be found on the Activities tab. WebDirect does not generate PDFs
and you are not able to send the PDF attachment in an email.
More Info Tab
The More Info tab displays additional information about the estimate and leaves you with room for expansion to add additional fields and information as shown in Figure 8.1.
Figure 8.1 - Estimates Module > More Info Tab
1. Title of estimate and unique estimate number. The number assigned to each estimate record is an
automated and read only number.
2. Link an estimate to an opportunity here. Once an estimate has been linked, then select the blue arrow to conveniently navigate to that specific opportunity.
3. Created and Modified Date/Time stamp. This tracks when the estimate was created and last modified
and by whom.
4. Related tabs allowing you to see the revision history and related orders of an estimate.
User Manual – Core4 CRM
Page 47 of 153
Chapter 9 - Orders Module
Overview
Orders allow you to create, track, and manage your orders relating to your company’s unique ordering
processes. An order is a generic record that can be used to provide a quote to a customer or can be used
as a work order for a customer request (or appointment). Orders in Core4 are automatically updated
when modified by technicians’ iPads. This section outlines the basic functionality of the Orders tab.
Figure 9.0 - Orders Module > Order Tab
1. Status Toolbar where you can create a new record, delete a record, perform finds, sorts and much
more. Please see section on Status Toolbar setup for full functionality.
2. View orders in detail view or list view by selecting the appropriate icon in the Status Toolbar.
3. Preview the order by selecting this button in the Status Toolbar.
4. More info tab: Additional tab for information about the selected order. Please see Figure 9.1.
5. Link a customer to an order and specify the Billing Address. Select the blue arrow to navigate to the
customer record in the Contacts tab.
6. Enter the title of the order.
7. Description of Work is a free form field that allows you to make notes related to the order. This area
could be used by dispatchers to enter notes intended for a technician in the field.
User Manual – Core4 CRM
Page 48 of 153
8. Date, Purchase Order and Order number. The date defaults to the current date, but can be modified.
You have the option to reference a purchase order (P.O.) number. A unique order number is automatically assigned to each order record and read only number.
9. Assign a shipping address. This address may be different than the billing address.
10. Assign an identifier, phase or tracking information to an order with Stage, Class, Status and Sales Rep
fields:
•
Stages for Orders can be selected in the drop down menu. To set up or modify the stages in the
drop down menu go to Core > Preferences > Global Settings > Stages > Orders tab.
•
Class is a way to further customize and identify an order. Classes can be selected in the drop
down menu. To set up or modify the Classes in the drop down menu go to Core > Preferences >
Global Settings > List > Classes tab.
•
Status of the order will reflect either “Pending” or “Signed” depending on signature input from
the technician/customer. This is a read only field and cannot be modified.
•
Sales Reps can be assigned to Orders by clicking on the arrow in the Sales Rep field. A new window “Link Sales Rep” window will appear. To select a sales rep click the Link button next to the
appropriate sales rep name. To remove a sales rep, click the Clear button and click Done. The
Sales Reps values come from contact records with the Sales Rep box checked on the Contacts >
More Info tab.
11. Add order line items.
•
Order line items can be added by simply typing in the Item field and selecting the appropriate
Item. The description, quantity, unit price, total and taxable fields can be edited directly on the
order. Please note that item inventory amounts are not affected through orders.
•
If you need to add additional line items to the order, select the blue New Line Item button.
•
Once you have added an item, you can select the blue arrow button to conveniently navigate to
the selected item to view additional details or make system wide edits. Please see section on
Items for information on adding or modifying your list of items to the Core4.
•
Taxable items can be checked or unchecked directly on the order. Only items with the Taxable
check box marked will have tax applied to them.
•
The Sort column allows you to assign a sort number to move line items up and down.
12. Technician and Customer signatures are read only in the desktop system. The signatures are
obtained via iPad by a technician. The technician taps in the appropriate signature area, captures the
signature by signing directly on the iPad and it saves automatically to the signature field. The signature Date/time stamps reflect when the order was signed. All edits and signature captures made to
an order by a technician on an iPad will simultaneously update the Core4 system.
User Manual – Core4 CRM
Page 49 of 153
13. Tax Rates are set up in Core > Preferences > Global Settings > List > Taxes tab. An unlimited number of tax rates may be set up, but two separate tax rates are not permitted on one order. If you
need two separate tax rates, then you will need to create two orders.
14. Memo is a free form field that allows you to type an optional message that will print on the order.
15. Subtotal, Tax, and Totals calculated based on line item amounts and if items are taxed.
16. Action item links allow you to Duplicate an order, Create an Invoice, Send as Email or Send to Technician:
•
Select the Duplicate icon to create a duplicate order containing all customer information and
items related to the current order. An entirely new estimate record number will be created.
•
Select Create Invoice icon to create an invoice from this order. All relevant information will be
copied over to the new invoice. The invoice will be automatically linked and can be viewed in the
More Info tab.
•
Select Send as Email icon to send the order as a PDF attachment in an email. Once the email is
sent, a link to the email can be found on the Activities tab. The WebDirect system does not generate PDFs and cannot send the PDF attachment in an email.
•
Select the Send to Technician button to email the order to the technician. Technicians may open
the file with the FileMaker Go app on iPad. The technician will have the ability to view, edit and
capture signatures for order via the iPad.
User Manual – Core4 CRM
Page 50 of 153
More Info Tab
The More Info tab displays additional information about the order and leaves you with room for expansion to add additional fields and information as shown in Figure 9.1.
Figure 9.1 - Orders Module > More Info Tab
1. Title of the order and unique order number. The number assigned to each order record is an automated and read only number.
2. Link the order to an Opportunity or an Estimate. Select the blue arrow button to conveniently navigate to the specific record.
3. Created and Modified date/time stamp. This tracks when the order was created and last modified by
whom.
4. Select the technician for the work order. The technician phone number will be pre-filled based on the
contact information.
5. Specify a start and end date/time for an appointment.
6. Notes is a free form field that allows you to enter notes about the order. A technician can easily add
notes about the order via iPad.
7. Invoices Tab allows you to view and easily link to all invoices related to the order.
User Manual – Core4 CRM
Page 51 of 153
Chapter 10 - Invoices Module
Overview
The Invoice tab allows you to create, track, and manage your invoices and payments relating to your
company’s unique billing processes.
Figure 10.0 - Invoices Module > Invoice Tab
1. Status Toolbar where you can create a new record, delete a record, perform finds, sorts and much
more. Please see section on Status Toolbar setup for full functionality.
2. View invoice in detail view or list view by selecting the appropriate icon in the Status Toolbar.
3. Preview the invoice by selecting this button in the Status Toolbar.
4. Payments and More info tabs: Additional tabs for information about the selected invoice. Please see
Figure 10.1, 10.2 and 10.3.
5. Link a customer to an invoice and specify the Billing Address. Select the blue arrow to navigate to the
customer record on the Contacts tab.
6. Enter the title of the invoice.
7. Date, Due Date, Purchase Order and Invoice number. The date defaults to the current date, but can
be modified. Select a due date for the invoice. You have the option to reference a purchase order
(P.O.) number. A unique invoice number is automatically assigned to each invoice record and read
only number.
User Manual – Core4 CRM
Page 52 of 153
8. Assign a shipping address. This address may be different than the billing address.
9. Assign terms, identifiers, phase or tracking information to an invoice with Terms, Ship Date, Ship Via,
Tracking #, Stage, Class and Sales Rep fields:
•
Terms, also known as Payment Terms, is where you can define the terms of payment for the invoice. To set up or modify the terms in the drop down menu go to Core > Preferences > Global
Settings > Lists > Terms tab.
•
Shipment date can be entered.
•
Ship Via or Shipping Method is where you define the type of shipping method or shipping company to be used. To set up or modify the Ship Via options in the drop down menu go to Core >
Preferences > Global Settings > Lists > Shipping Methods tab.
•
Enter tracking number. Select the globe icon to navigate to the shipping provider’s website in a
web window to track the shipment status. This feature currently works with Fed Ex, UPS, DHL
and USPS.
•
Stages for Invoices can be selected in the drop down menu. This can be used to identify invoices
that have been sent, paid, on hold, etc. To set up or modify the stages in the drop down menu
go to Core > Preferences > Global Settings > Stages > Invoices tab.
•
Class is a way to further customize and identify an invoice. Classes can be selected in the drop
down menu. To set up or modify the Classes in the drop down menu go to Core > Preferences >
Global Settings > List > Classes tab.
•
Sales Reps can be assigned to Invoices by clicking on the arrow in the Sales Rep field. A new
window “Link Sales Rep” window will appear. To select a sales rep click the Link button next to
the appropriate sales rep name. To remove a sales rep, click the Clear button and click Done.
The Sales Reps values come from contact records with the Sales Rep box checked on the Contacts > More Info tab.
10. Add invoice line items:
•
Order line items can be added by simply typing in the Item field and selecting the appropriate
Item. The description, quantity, unit price, total and taxable fields can be edited directly on the
order. The inventory for each item in the Core4 is subtracted by the quantity reflected on these
line items.
•
If you need to add additional line items to the order, select the blue New Line Item button.
•
Once you have added an item, you can select the blue arrow button to conveniently navigate to
the selected item to view additional details or make system wide edits. Please see section on
Items for information on adding or modifying your list of items to the Core4.
•
Taxable items can be checked or unchecked directly on the invoice. Only items with the Taxable
check box marked will have tax applied to them.
•
The Sort column allows you to assign a sort number to move line items up and down.
User Manual – Core4 CRM
Page 53 of 153
11. Customer Message can be selected from the drop down list and will appear on a printed invoice.
Select a customer message from the drop down menu. To set up or modify the Customer Messages
in the drop down menu go to Core > Preferences > Global Settings > List > Customer Messages tab.
12. Memo is a free form field that allows you to type an optional message or reference meant for internal
use. This memo field will not print on the invoice.
13. Indicates if this invoice is to be printed or emailed.
14. Tax Rates are set up in Core > Preferences > Global Settings > List > Taxes tab. An unlimited number of tax rates may be set up, but two separate tax rates are not permitted on one invoice. If you
need two separate tax rates, then you will need to create two invoices.
15. Subtotal, Tax, and Totals are calculated based on line item amounts and if items are taxed. Payments
Applied and Balance Due are calculated based in the amount of payments applied to the invoice.
16. Action item links allow you to Duplicate an invoice, Void an Invoice, Send as Email or apply a Payment:
•
Select the Duplicate icon to create a duplicate invoice containing all customer information and
items related to the current invoice. An entirely new invoice record number will be created. The
List ID and QB Inv # on the More Info tab will also be cleared in the duplicate.
•
Select Void to cancel an invoice but still keep a historical record of the invoice in Core4. When an
invoice is voided all item quantities are set to zero on the invoice and “VOID” is added in the
Memo field. All voided item quantities are added back to the items inventory. An invoice record
can also be deleted with the Delete Record button, but you would no longer have the historical
information.
•
Select Send as Email icon to send the invoice as a PDF attachment in an email. Once the email is
sent, a link to the email can be found on the Activities tab. The WebDirect system does not generate PDFs and cannot send the PDF attachment in an email.
•
Select Payment to enter a payment for the invoice. Please see Figure 10.1 and 10.2 for further
details.
User Manual – Core4 CRM
Page 54 of 153
Payments Tab
Payments allow you to create and manage all payments received. You can access payments through the
Invoices > Payments tab (as shown in Figure 10.1) or through the Contacts > Invoices > Payments tab.
Figure 10.1 - Invoices Module > Payments Tab
1. Title of the invoice and unique invoice number. The number assigned to each invoice record is an
automated and read only number.
2. Select Payment to enter a payment for the invoice. Please see 10.2 for further details.
3. This Payments sub-tab shows a history of all related payments to the specific invoice. Click on the
blue arrow to open specific payment record details.
User Manual – Core4 CRM
Page 55 of 153
Figure 10.2 - Payment Window
1. Customer you received the payment from, the amount of the payment, the payment method (such as
credit card type, cash, check, etc.), as well as a field to add a payment memo.
2. The current customer balance is calculated based on the payment amount received. This will add all
outstanding balances for all invoices for this customer.
3. The payment date defaults to the current date, but can be modified.
4. Payment information will change depending on which payment method is selected. Figure 10.2 has a
payment method of “Check” and the payment information provides an area to type the Check #. If a
payment method of “Visa” was selected, the payment information will change to provide fields for the
credit card number, expiration date, etc.
NOTE: Core4 allows you to automatically process credit cards using the FM Credit Card plug-in
through PayPal or Authorize.net accounts. You must have the plug-in installed and registered and
have a valid PayPal or Authorize.net account deployed. If you are using a different credit card processing method, then you also have the option to select the “Process Credit Card” button to manually
mark as processed.
User Manual – Core4 CRM
Page 56 of 153
5. Select the desired invoice(s) to apply the payment via the check box(es). Information related to the
invoice are also displayed such as Date, Title, Invoice #, QB Inv # (if applicable), Original Amount of
invoice, and remaining Amount Due of invoice.
6. The Amount field provides the opportunity to specify the dollar amount applied to each invoice selected. If there are multiple invoices, you can specify the dollar amounts applied to each invoice. In
Figure 10.2 we received a partial payment of $10,000 and applied the entire payment amount to Invoice # 1236.
7. Amount Due represents the total amount due, but only for the invoice(s) currently selected. In Figure
10.2 we received a partial payment for Invoice # 1236 and we have a remaining amount due of
$10,219.30 for the invoice.
8. Applied is the total payment amount applied to the invoices selected. The applied amount changes as
you select and deselect invoices during steps 5 and 6 above.
9. In Balance is the payment amount applied or unapplied during the payment process. If a customer
over paid an invoice, the In Balance field would show the remaining balance as “unapplied amount”.
10. Once the “Save & Close” button is selected, the payment is validated and posted.
11. The Clear button will clear all fields to allow you to start the payment process again.
12. The Cancel button will close the screen without applying any changes.
User Manual – Core4 CRM
Page 57 of 153
More Info Tab
The More Info tab displays additional information about the invoice and leaves you with room for expansion to add additional fields and information as shown in Figure 10.3.
Figure 10.3 - Invoices Module > More Info Tab
1. Title of invoice and unique invoice number. The number assigned to each invoice record is an automated and read only number.
2. List ID, QB Inv# and Refresh check box are used only when integrating with QuickBooks using the
FM Books Connector plug-in. The List ID and QB Inv# are captured from QuickBooks. The Refresh
check box indicates that QuickBooks needs to be refreshed.
3. Link an invoice to an opportunity, estimate, and/or order. Once an invoice has been linked, select the
blue arrow button to conveniently navigate to that specific opportunity, estimate, or order.
4. Created and Modified Date/Time stamp. This tracks when the invoice was created and last modified
and by whom.
User Manual – Core4 CRM
Page 58 of 153
Chapter 11 - Purchase Orders (P.O.s) Module
Overview
The POs tab allows you to create, track, and manage your company’s purchase orders, related receipts,
documents, and received item history.
Figure 11.0 - POs Module > Purchase Orders Tab
1. Status Toolbar where you can create a new record, delete a record, perform finds, sorts and much
more. Please see section on Status Toolbar setup for full functionality.
2. View purchase order in detail view or list view by selecting the appropriate icon in the Status Toolbar.
3. Preview the purchase order by selecting this button in the Status Toolbar.
4. Purchase Order, Receipts, and More info tabs: Additional tabs for information about the selected PO.
Please see Figure 11.1 and 11.2 for further details.
5. Link a vendor to the purchase order from your list of contacts. The vendor address will be automatically populated. Select the blue arrow button to navigate to the vendor’s record on the Contacts tab.
6. Link a customer to the purchase order. Select the blue arrow to navigate to the customer record on
the Contacts tab.
7. Select the shipping address for the customer.
8. Enter the title of the purchase order..
9. Purchase order approval information:
User Manual – Core4 CRM
Page 59 of 153
•
Select the Approval Status of the purchase order from the options: approval needed, approve or
disapproved.
•
The Approval Date is automatically entered when the purchase order is marked as “approved” or
“disapproved”. This is a read only field.
•
The Approval By is automatically entered when the purchase order is marked as approved. The
Core4 user that changes the Approval Status to “approved” will be listed in this field. This is a
read only field.
10. Purchase Order Number, Date Created, and Request By information:
•
A unique purchase order number is automatically assigned to each PO record and is a read only
number.
•
The date created field is automated and is read only.
•
Enter a name in the Requested By field to specify who requested the PO.
11. Purchase order status information:
•
Select the Status of the purchase order as “open” or “closed”.
Note: After all items are received, you’ll see a message that the PO has been received in full and
prompted if you want to close the PO. If you select yes, the status will change to “closed” and
the purchase order will be stamped with “Received.”
•
Select Upon Receipt options “adjust inventory” or “do not adjust inventory” to specify whether
the inventory is automatically adjusted upon receiving a receipt. See Figure 11.1
12. Shipping information:
•
Enter the date of shipment here.
•
Ship Via or Shipping Method is where you define the type of shipping method or shipping company to be used. To set up or modify the Ship Via options in the drop down menu go to Core >
Preferences > Global Settings > Lists > Shipping Methods tab.
•
Enter a tracking number in the appropriate field. Select the globe icon to navigate to the shipping
provider’s website in a web window to track the shipment status. This feature currently works
with Fed Ex, UPS, DHL and USPS.
13. Add purchase order line items:
•
Purchase order line items can be added by simply typing in the Item field and selecting the appropriate Item. The description, quantity, cost, amount, quantity received (see item 14) and taxable fields can be edited directly on the purchase order. The inventory is not adjusted at the line
item level of a purchase order, please see Figure 11.1 for receiving inventory.
•
If you need to add additional line items to the order, select the blue New Line Item button.
User Manual – Core4 CRM
Page 60 of 153
•
Once you have added an item, you can select the blue arrow button to conveniently navigate to
the selected item to view additional details or make system wide edits. Please see section on
Items for information on adding or modifying your list of items to the Core4.
•
Taxable items can be checked or unchecked directly on the invoice. Only items with the Taxable
check box marked will have tax applied to them.
•
The Sort column allows you to assign a sort number to move line items up and down.
14. Qty Received: Reflects the quantity of items received for that product. Select the blue arrow button
to navigate to that item’s receipt history. If the quantity is “0”, there will be no receipt history.
15. Select the New Attachment blue button to add a new attachment (document, photo, etc.) to the purchase order. All attachments added to a PO create corresponding records in the Documents tab. You
may select the blue arrow button to conveniently navigate to the selected record in Documents tab.
Select the Insert, Open, or Export buttons to perform specified actions with the attached document.
Select the red X button to delete an attachment from the PO.
16. Notes is a free form field that allows you to type an optional message that will print on the purchase
order.
17. Select the Taxable checkbox and appropriate tax rate to apply to the purchase order. Only one tax
rate can be applied per purchase order. Tax rates are set up in Core > Preferences > Global Settings
> Lists > Taxes tab.
18. Subtotal, Tax, and Totals are calculated based on line item amounts and if items are taxed. These
numbers are automated and read only.
19. Action item links allow you to Duplicate a purchase order, Void, Send as Email or Receive Items:
•
Select the Duplicate icon to duplicate the PO. The PO number will not be duplicated as this is a
unique number. Attachments and receipts also will not be duplicated.
•
Select the Void icon to void the PO. When a PO is voided all quantities are set to zero on the PO
and the status is changed to “Void.” All voided item quantities are added back to the items inventory.
•
Select Send as Email icon to send the PO as a PDF attachment in an email. Once the email is
sent, a link to the email can be found on the Activities tab. The WebDirect system does not generate PDFs and cannot send the PDF attachment in an email.
•
Select the Receive Items icon to receive or log of a quantity items into the inventory. Please see
Figure 11.1 for further details.
User Manual – Core4 CRM
Page 61 of 153
Receiving Items
The Receipts screen displays all open purchase orders and line items for a vendor.
Figure 11.1 - Receiving Items in the New Receipt Window
1. Received From is the vendor name listed on the purchase order. This is a read only field.
2. All purchase order line items related to the vendor will be listed. If multiple POs are open for the
vendor, all POs and line items will be listed on the screen. In Figure 11.1, the vendor has two POs
open.
3. Quantity Received allows you to enter the actual quantity received for each item. You can enter full
or partial quantities. In Figure 11.1, a partial shipment of 50 items was entered for PO # 1003.
4. Total Quantity Received will adjust and track the total quantity received for each item. This number
will automatically calculate after an amount is entered into the “Qty Received” field. In the receipt
shown in Figure 11.1, 50 items were added and the total quantity received is now 150. Figure 11.2
will show the receipt history which references two receipts for this item. The current receipt of 50
items and previous receipt of 100 items now brings the Total Quantity Received to 150 for PO# 1003.
5. Once the “Save & Close” button is selected, then everything is validated and posted.
6. The Clear button will clear all values to allow you to re-enter quantities received.
7. The Cancel button will close the screen without applying any changes.
User Manual – Core4 CRM
Page 62 of 153
Receipts Tab
The Receipts tab displays the entire history of received items for that specific purchase order.
Figure 11.2 - POs Module > Receipts Tab
1. Title of purchase order and unique PO number. You may edit the PO title from this tab. The PO number assigned to each record is an automated and read only number.
2. Receipt Items displays the receipt history for each item on the PO. Each line reflects item Quantity
Received, Quantity Received to Date, and Total Quantity Received as indicated via the Receive Items
button (Figure 11.1). Select the blue arrow button to navigate to the specific receipt record. Select
the red X button to delete the receipt line item and adjust quantities back to zero. In Figure 11.2 two
receipts were processed for one item (a quantity of 50 items on receipt# 1015 and a quantity of 100
items on receipt # 1005.)
User Manual – Core4 CRM
Page 63 of 153
More Info Tab
The More Info tab displays additional information about the PO and leaves you with room for expansion
to add additional fields and information as shown in Figure 11.3.
Figure 11.3 - POs Module > More Info Tab
1. Title of PO and unique PO number. The PO number assigned to each record is an automated and
read only number.
2. Created and Modified Date/Time stamp. This tracks when the PO was created and last modified and
by whom.
User Manual – Core4 CRM
Page 64 of 153
Chapter 12 - Items Module
Overview
Items allow you to create, track, and manage your items including Inventory, Non-Inventory, Inventory
Assembly, Service, and Subtotal items.
Inventory Items
Figure 12.0 - Items Module > Item Tab - Inventory Items
1. Status Toolbar where you can create a new record, delete a record, perform finds, sorts and much
more. Please see section on Status Toolbar setup for full functionality.
2. View items in detail view or list view by selecting the appropriate icon in the Status Toolbar.
3. The Preview functionality is not available for the Items Module.
4. More info tab: Additional tab for information about the selected record. Please see Figure 12.2
5. Item related fields such as Name, SKU, Type, Category, Cost, Unit Price, Taxable, Quantity, Reorder
Quantity, Description and Notes. Some field are discussed in more detail below.
6. Select an item Type or Category from drop down lists.
•
Type allows you to identify the item as Inventory, Inventory Assembly, NonInventory, Service and
Subtotal. This is a pre-defined list in the Core4.
User Manual – Core4 CRM
Page 65 of 153
•
Category allows you to select values for categorizing or identifying your items. The values can be
customized to fit your needs. Edit the field by clicking on the drop down list and selecting Edit at
the bottom of the list, add or remove values as needed.
7. The Quantity, Adjust Qty and Reorder Qty fields allow you to manage your inventory:
•
The Quantity field displays the current inventory level and is read only.
•
The Adjust Inventory button allows you to adjust the inventory quantity in a negative or positive
amount and enter adjustment information or note.
•
Reorder Quantity allows you to set a reorder level for each item. If the inventory Quantity falls
below the reorder level, the Quantity field will display as red on the items screen as well as any
estimate, orders, and invoices where the item is listed.
8. Notes is a free form field that allows you to type information for internal use.
9. Item Picture allows you to Insert, Export or Clear an image associated with an item.
10. Related tabs allowing you to see all items connected to an Estimate, Order, Invoice, Inventory Log
and Inventory Assemblies. See Figures 12.1 - 12.6 for other tabs.
11. Select the duplicate icon to duplicate the item in a new record.
Figure 12.1 - Items Module > Inventory Log
The Inventory Log tab allows you to view basic inventory history such as Date, Time, User, Adjustment
Info, Previous Quantity, Quantity Adjusted, and Final Quantity.
1. Filter options allowing you to view the inventory history by the selected Adjustment Types.
2. Click on the blue arrow to view linked purchase orders.
User Manual – Core4 CRM
Page 66 of 153
More Info Tab
The More Info tab displays additional information about the item and leaves you with room for expansion
to add additional fields and information as shown in Figure 12.2.
Figure 12.2 - Items Module > More Info Tab
1. The item name, SKU number and item number are listed and can be edited. An item can be deactivated by checking the Inactive box.
2. Created and Modified Date/Time stamp. This tracks when an item was created or last modified and
by whom.
3. The List ID, Type, Sales/Purchase, Asset Account, Expense/COGS Account and Income Account are all
fields used only when integrating with QuickBooks.
4. Check box indicating that QuickBooks needs to be refreshed. Applicable only if using QuickBooks integration.
User Manual – Core4 CRM
Page 67 of 153
Inventory Assembly Items
An Inventory Assembly record is a type of item that is a result of assembling individual item components
or inventory parts. For instance in Figure 12.3 below, an interior door (inventory assembly item) is built
using door frame/door knobs (inventory parts). Please note inventory assembly item builds are
currently not supported via iPad at this time.
Figure 12.3 - Items Module > Item Tab - Inventory Assembly Items
1. Items listed with a Type of “Inventory Assembly” will have additional related sub-tabs including Related Assemblies, Bill of Materials and Builds. For assembled items, the quantity displays the current
inventory level of assembled (built) item.
2. The Bill of Materials sub-tab allows you to link the necessary items and quantities needed from your
inventory to build the final assembled product.
3. Select the blue Build Assemblies button to build or restock your assembled item. See Figure 12.4 for
details.
4. Click in the Name field to select an item from your inventory list to the Bill of Materials. The SKU,
Type, Description, Quantity on Hand, and Cost are filled based on that item’s information.
5. The Qty On Hand shows the current inventory level for that specific item and is read only.
6. The Qty Required allows you to specify the quantity needed to build the final inventory assembly
product.
User Manual – Core4 CRM
Page 68 of 153
Figure 12.4 - Items Module > Item Tab > Build Assemblies
The Build Assembly window opens once the blue Build Assemblies button has been selected on the Items
module.
1. Assembly Item is the item name as shown on the Items Module and is read only.
2. Quantity on Hand displays the current inventory level of assembled (built) item. This is read only.
3. The list of items is pulled from the Bill of Materials sub-tab. The information for the item Name and
Quantity on Hand are automatically populated from the system and are read only. If you need to add
an item to the list, click cancel and add the item in the Bill of Material sub-tab (see Figure 12.3).
4. Quantity on Hand shows the inventory level for each item in your build. This allows you to confirm
there is enough inventory available to build the assembled item.
5. Quantity Required shows the number of items required to complete your build for the assembled
item. This references the Quantity Required from the Bill of Materials sub-tab (see #6 on Figure
12.3) and is calculated based on the Quantity to Build listed in step #7.
6. Maximum Number You Can Assemble calculates the maximum quantity of assembled items you may
build with all your current Quantity on Hand. This is read only.
7. Quantity to Build allows you to specify the number of items to assemble and thus add to the assembly item’s inventory level. As you add numbers to the Quantity to Build field, the numbers in Quantity
Required will be adjusted.
8. Created by date/time stamp. This tracks when a build assembly was created and by whom.
9. The Cancel button will close the window without applying changes.
10. Select the Save button to validate the build and update the inventory to the items.
User Manual – Core4 CRM
Page 69 of 153
Figure 12.5 - Items Module > Item Tab > Builds Tab
1. The Builds sub-tab displays the history of builds for an item.
2. Select the blue arrow button next to the line item date to open that specific Build Assembly record.
3. Previous Quantity displays the quantity on hand before the build.
4. Qty Built displays the quantity built and thus added to inventory.
5. Build Assembly window reflects the Assembly Item name and Quantity on Hand to Date (prior to the
build) at the top. See Figure 12.4 for further details on line items.
6. Quantity Built reflects the number of items built and added to inventory.
User Manual – Core4 CRM
Page 70 of 153
Figure 12.6 - Items Module > Item Tab > Related Assemblies Tab
1. The Related Assemblies sub-tab displays all related assembly records. In the example above, door
frames (current record) were used to build two different items: Complete Interior Door and Door interior pre-fab (assembled items).
2. Select the blue arrow button to open the assembled item’s specific record. The SKU, Type, Description, and Quantity on Hand are all filled based on the record’s information.
User Manual – Core4 CRM
Page 71 of 153
Chapter 13 - Projects Module
Overview
Projects allow you to create, track, and manage your projects relating to your company’s unique project
management process.
Figure 13.0 - Projects Module > Project Tab
1. Status Toolbar where you can create a new record, delete a record, perform finds, sorts and much
more. Please see section on Status Toolbar setup for full functionality.
2. View projects in detail view or list view by selecting the appropriate icon in the Status Toolbar.
3. The Preview functionality is not available for the Projects Module.
4. More Info Tab: Additional tab for information about the selected order. Please see Figure 13.1.
5. Link a Company or an Individual to a project. Once linked, select the blue arrow button to conveniently navigate to the record in the Contacts tab.
6. Title, Description and Category fields allowing you to enter additional project information. Each field
is an editable drop down list and unique to each project. The Priority field provides a pre-defined list
of options: High, Normal and Low.
7. Contacts and Roles can be specified on each project. Select a Contact from the full list of contacts in
the Core4. Assign a Role for each contact by selecting an option from the drop down list. The list
can be customized to fit your needs. Edit the field by clicking on the drop down list and selecting Edit
at the bottom of the list, add or remove values as needed.
User Manual – Core4 CRM
Page 72 of 153
8. The Department field is an editable drop down list.
9. Select the stage of the project from the drop down list. Project stages may be set up in Core > Preferences > Global Settings > Stages > Projects tab.
10. Manage the time spent on the project:
•
Select a Start Date and End Date for the project.
•
The Total Time is auto-calculated from the related timers in hours, minutes and seconds.
•
The % Complete is a weighted calculation based off of each project line item’s Start Date, End
Date, and % Done values. The Start Date, End Date and % Done values for each line item must
have a value in order for the % Complete value to be calculated as the % Complete field is used
to track the percentage complete for the entire project.
11. Add project line items:
•
Project line items can be added by simply typing in the Item field and selecting the appropriate
Item. The project line items have Order, Name, Description, Assigned To, Start, End, Category,
% Done, and Time columns available.
•
If you need to add additional line items to the project list, select the blue New Line Item button.
•
The Order column allows you to assign an order/sort number to move line items up and down.
Project line items with Order “1” will appear at the top of the list and so forth.
•
The Name and Description columns allow you to assign further details to the project line items.
•
The Assigned To column provides you with a pre-populated drop down list to choose from your
list of Core Users.
•
Select a Start Date and End Date for each project line item.
•
The Category column provides you with a drop down list of categories created in Core > Preferences > Global Settings > Activity Categories > Project Items tab.
•
% Done allows you to track a specific percentage of completion for each project line item.
12. The Time column allows you to create, view, and display timers against a project line item.
•
Select the blue arrow button to conveniently navigate to all related timer entries.
•
Select the green plus button to add a timer to a project line item.
•
The red X button permanently deletes the project line item. Please use with caution as all timers
associated and linked to the project line will also be deleted.
13. Related tabs showing all related Activities, Timers, and Documents linked to the project record.
14. Filter options allowing you to filter the activities displayed in the related Activities tab.
User Manual – Core4 CRM
Page 73 of 153
15. Action item links allow you to Duplicate a project, create a new activity for the project such as a note,
event, task, email or call. Once created, all activities can be found on the Activities tab.
•
Select the Duplicate button to duplicate the project and all relevant fields.
•
Select the New Note button to create a new note. The note will be linked to the project and contact.
•
Select the New Event button to create a new event. The event will be linked to the project and
contact.
•
Select the New Task button to create a new task. The task will be linked to the project and contact.
•
Select the New Email button to create a new email. The email will be linked to the project and
contact.
•
Select the New Call button to create a new call. The call will be linked to the project and contact.
User Manual – Core4 CRM
Page 74 of 153
More Info Tab
The More Info tab displays additional information about the project and leaves you with room for expansion to add additional fields and information as shown in Figure 13.1.
Figure 13.1 - Projects Module > More Info Tab
1. Title of project and unique project number. The number assigned to each project record is an automated and read only number.
2. Created and Modified Date/Time stamp. This tracks when a project was created and last modified
and by whom.
3. Related tabs showing all related Activities, Timers, and Documents linked to the project record.
4. Filter options allowing you to filter the types documents displayed in the related Documents tab.
User Manual – Core4 CRM
Page 75 of 153
Chapter 14 - Calendar Module
Overview
The Core4 comes complete with a calendar specifically designed to handle individual and group calendars. You can manage calendars for employees, meeting rooms, equipment, and just about anything. You
may overlap individual or group calendars and show availability or event density. The Core4 offers various
calendar views to meet all your needs as shown in Figures 14.0, 14.1, and 14.2.
Figure 14.0 - Sample Calendar Month View
1. Change the calendar view to either Month, Week, or Day view. Use the blue arrows to navigate forward or backwards to the next month, week, or day depending on the view.
2. Navigate to a specific month or a specific year.
3. Select the “Today” icon to navigate to the current day relative to the system clock of your machine.
4. Select specific individual or group calendar to display all events for the selected calendars. You can
select one or multiple calendars at one time. Group calendars are in upper case. If you select a
group, then all group members will be selected and vice versa if you unselect a group. Calendars are
managed in Core > Preferences > Global Settings > Calendar Settings tab.
5. The Select Calendar/Groups button allows you to quickly choose Default, All or None. The Default
button resets the calendar display to current user. The All and None buttons to conveniently select all
calendars or no calendars.
6. Add a new event by selecting the corresponding number of the day or edit an existing event by selecting the event. For example, click on the number 5 to create a calendar event for the 5th.
7. The current day (according to your machine clock) will be highlighted blue with a red number.
User Manual – Core4 CRM
Page 76 of 153
Figure 14.1 - Sample Calendar Week View
Figure 14.2 - Sample Calendar Day View
User Manual – Core4 CRM
Page 77 of 153
Chapter 15 - Activities Module
Overview
The activities area provides you with an area to track, manage, and maintain all correspondence history
and activities. Activities include the history of all Emails, Calls, Notes, Tasks, Events and Project Items.
Figure 15.0 - Activities Module in List View
1. Use the Find button to search for specific records. See Figure 15.0.1
2. Select the blue arrow button to navigate to the specific activity record.
3. Select the blue arrow button to navigate to the specific contact record(s).
Figure 15.1 - Activities Find View
1. Once you click the Find button, you can enter search criteria in any field. In this example, we have
entered “email” in the type field.
2. Additional search criteria can be added to further narrow down the results. In this example, we have
also entered “Portia” in the contact field as second search criteria. We would then see all emails with
Portia as the contact once the search is committed.
3. Select the Perform Find button to commit the search.
User Manual – Core4 CRM
Page 78 of 153
Emails
Emails can be created via templates with merge fields or written on the fly.
Figure 15.2 - Sample Email from Template with Merge Fields
1. Select the From, To, CC, or BCC buttons to add email addresses accordingly.
•
The From field is automatically set to the currently logged in Core user, however; once the email
is in your mail client (Outlook, Mac Mail, etc.) then the email will be sent based off of your mail
client permissions and settings. Modifying the From field is only supported with SMTP or Outlook
Manipulator sending options (set up in Core > Preferences > User Settings > Email > Sending).
•
When setting the To, CC, or BCC fields, please see Figure 15.3 and 15.4 for details on the Simple
and Advanced options.
2. Choose an email template (optional) from the drop down list and select the Apply button to apply
that template. If no template is selected, you may type a free form email message (see #6).
3. Select this box to send an email campaign. This will send separate mail-merged emails to each “To”
recipient.
4. Select this box to send HTML formatted emails. Use of this feature requires the Outlook Manipulator
and is currently only supported when using Outlook as your mail application.
5. Click the green plus button to add an attachment to the email. FileMaker only supports sending only
a single email attachment per email. If you would like to send emails with two or more attachments,
then the Outlook Manipulator plug-in is required.
User Manual – Core4 CRM
Page 79 of 153
6. The email text can be typed in this area in a free form format. If an email template is chosen, then
the body of the email template (including any merge fields) will display. You may edit the text of
template prior to clicking Send.
7. The closing signature set up in Core > Preferences > User Settings > General tab is displayed here.
8. Link any Contact to the email. If a contact is entered in the To, CC, or BCC fields, they will automatically be linked to the email. Unlink a contact by clicking the red “x” button.
9. Link a Project to the email.
10. Link an Opportunity to the email.
11. Select the Print icon to view and print the email(s).
12. Select the ABC icon to perform a spell check on the body of the email.
13. Select the Send button to send the email.
14. Select Cancel to permanently delete/cancel the email or Done to finish and close the window.
User Manual – Core4 CRM
Page 80 of 153
Figure 15.3 - Add Emails using Simple Search
1. Manually search for a contact using the search box and select the To, CC or BCC button to add that
email to the selected To, CC or BCC field.
2. Displays a list of recipients currently set in the To, CC and BCC fields.
3. Select the Done button once finished.
User Manual – Core4 CRM
Page 81 of 153
Figure 15.4 - Add Emails using Advanced Search
1. Select the desired Group from the drop down list and click on the To, CC or BCC button to add the list
of contact emails associated with that group. Groups are managed on the Contacts > More Info tab.
If a member of the group does not have an email address in the system, they will not be added to
the list.
2. If you have done a search of contacts and created a Found Set, you can send an email to everyone in
the found set. Select the To, CC, or BCC button to add the found set of contact emails to the selected To, CC or BCC field. If a member of the found set does not have an email address in the system, they will not be added to the list.
3. Displays a list of recipients currently set in the To, CC, and BCC fields.
4. Select the Done button once finished.
User Manual – Core4 CRM
Page 82 of 153
Notes
Notes can be created to track various info, notes, or any other miscellaneous activity records.
Figure 15.5 - Sample Note
1. Select a Category from the drop down list. Categories are set up in Core > Preferences > Global Settings > Activity Categories > Notes tab.
2. Select the date and time for the note.
3. The Created By field is read only. The Core User name who created the note will be placed in this
field.
4. Enter the subject and body of the note.
5. Link a Contact to the note. Unlink a contact by clicking the red “x” button.
6. Link a Project to the note.
7. Link an Opportunity to the note.
8. Select the ABC icon to perform a spell check on the body of the note.
9. Select Cancel to permanently delete the note, or Done to finish and close the window.
User Manual – Core4 CRM
Page 83 of 153
Tasks
Manage and maintain a complete task correspondence history for each contact and/or each Core User.
Figure 15.6 - Sample Task
1. Enter the subject and body of the task.
2. Priority drop down list with High, Normal, and Low options.
3. Enter the Start Date and Due Date of the task.
4. Select a Category from the drop down list. Categories are set up in Core > Preferences > Global Settings > Activity Categories > Tasks tab.
5. Set the Assigned To field from a drop down list of Core Users.
6. Set the Assigned By field from a drop down list of Core Users.
7. Set the Reminder Date and Reminder Time.
8. Mark the task as Complete by checking the box.
9. Link a Contact to the task.
10. Link a Project to the task.
11. Link an Opportunity to the task.
12. Select Cancel to permanently delete the task, or Done to finish and close the window.
User Manual – Core4 CRM
Page 84 of 153
Calls
Calls can be created to track phone call correspondence history.
Figure 15.7 - Sample Call
1. Enter the From, Subject, and call details in the body. The From field is a drop down list of all Core
users.
2. Enter the call Start Time, End Time, and Date. The Duration is an auto calculation based on times.
3. Enter the Result of the call. Choose from the drop down list: Call Attempted, Call Completed, Call Left
Message, or Call Received.
4. The Created By field is auto populated with the Core user name who created the record. This field is
read only.
5. Link a Contact to the call.
6. Link a Project to the call.
7. Link an Opportunity to the call.
8. Select the Follow Up button to create a new task allowing you to easily follow up on the call.
9. Select Cancel button to permanently delete the call. Select the Done button to finish and close the
window.
User Manual – Core4 CRM
Page 85 of 153
Events
Manage and maintain a complete event correspondence history for each contact and/or Core User.
Figure 15.8 - Sample Event
1. Link the event to a Core User’s calendar or group calendar.
2. Enter the event name.
3. Select a Category from the drop down list. Categories are set up in Core > Preferences > Global Settings > Activity Categories > Events tab.
4. Enter additional event details or notes.
5. Select the Start and End dates/times.
6. Click the Reminders button to set a pop up reminder for the event. Please see Figure 15.9. This
window allows you to set reminders for each user. A pop up reminder in FileMaker for each user selected will appear based off of the reminder time specified.
7. Select the Repeat box to add event recurrences. Please see Figure 15.10.
8. Select this box to mark the event as an all day event. Please note that the Start/End dates and times
will be adjusted accordingly.
9. Select this check box to mark the event as complete.
10. Link a Contact to the event.
11. Link a Project to the event.
12. Link an Opportunity to the event.
13. Select Cancel to permanently delete the event, or Done to finish and close the window.
User Manual – Core4 CRM
Page 86 of 153
You may set reminders options for each event. Once you select the Reminders button in the event details
screen (see Figure 15.8) then you will see the Reminders window as shown in Figure 15.9.
Figure 15.9 - Event Reminders Window
1. Select the Core User(s) to receive a pop up reminder in FileMaker for the event.
2. Specify the Reminder Time from a drop down list. The drop down list includes minutes, hours, days
and week options.
3. The All or None buttons allow you to conveniently select all Core Users or none.
4. Select the Done button when finished to close the Reminders window.
User Manual – Core4 CRM
Page 87 of 153
You may set Recurrence options for each event. Once you select the Repeat checkbox in the event details
screen (see Figure 15.8) to add event recurrences, then you will see the recurrences window as shown in
Figure 15.10. Here you can set the repeat options for the event.
Figure 15.10 - Event Recurrences
1. Option to conveniently change the Start time, End time, and Duration.
2. Select the appropriate tab to set a daily, weekly, monthly, or yearly recurrence rule.
3. Specify the Recurrence pattern (ie. repeating weekly on Friday as shown above).
4. Specify the Range of the recurrence to not have an end date, end after a specific number of occurrences, or end by a specific date.
5. Select the OK button to close the window and save all changes.
6. Select the Cancel button to close the window without saving changes.
7. Select the Remove Recurrence button to completely remove the recurrence from the event.
User Manual – Core4 CRM
Page 88 of 153
Groups, Mailing Lists, and Campaigns
Groups in the Contacts module allows you to manage and create mailing lists to be used for mass mail
campaigns among many other uses.
Figure 15.12 - Group Management
1. The Groups area is used to manage groups, assign contacts to a group, and remove contacts from a
group. Click the pencil for the “Edit Groups” window to display.
2. To edit the Groups, select Manage, Add Multiple of Remove Multiple.
•
Click the “Manage” button to open another window displaying the list of groups and subscriber
count. Here you can add (create) and remove groups.
•
Click the “Add Multiple” button to add multiple contacts in a found set of records to a group.
•
Click the “Remove Multiple” button to remove contacts in a found set of records from a group.
3. To add or remove groups, select the Manage button. The Group Management window displays all
existing groups with the current subscriber count. You may add new groups by selecting the green
plus button. You may remove groups by selecting the red X button.
4. Select the Add Multiple button to add a found set of contact records to the group(s) selected in the
pop up window.
5. Select the Remove Multiple button to remove the found set of contact records from the group (s) selected in the pop up window.
6. The check box indicates the group(s) to which the contact belongs. The image above shows that the
contact belongs to the Happy Hour Networking, Monthly Flyer and Staff Newsletter groups.
User Manual – Core4 CRM
Page 89 of 153
Chapter 16 - Timers Module
Overview
Timers provide an area to keep track of Core user’s timers allowing you to create, track, and manage
valuable user time spent. When a user clicks on the Timers module, he/she will be directed to a list view
of all timer records.
Figure 16.0 - Timers in List View
1. Status Toolbar where you can create a new record, delete a record, perform finds, sorts and much
more. Please see section on Status Toolbar setup for full functionality.
2. View timers in detail view or list view by selecting the appropriate icon in the Status Toolbar.
3. Preview the timers by selecting this button in the Status Toolbar.
4. Specifies the Core User for the timer entry. Select the blue arrow button to navigate to the specific
Core user’s contact record.
5. Specifies the timer Start time down to the second.
6. Specifies the timer End time down to the second.
7. Total hours calculated based off of the Start and End time.
8. Description of timer entry, which could also serve as an audit trail of all work performed during a specific time.
9. Link a timer to a specific contact. Select the blue arrow button to navigate to the specific contact.
10. Link a timer to a specific project. Select the blue arrow button to navigate to the specific project.
11. Link a timer to a specific project item. Project items are a drop down list relating to the available project items for the specific project.
User Manual – Core4 CRM
Page 90 of 153
Figure 16.1 - Timers Find View
You can use the Find button to search for specific timer records.
1. Once you click the Find button, you can enter search criteria in any field. In this example, we have
entered “john” in the user field.
2. Additional search criteria can be added to further narrow down the results. In this example, we have
also entered “call” in the description field as second search criteria. We would then see all timer entries for calls made by John.
3. Select the Perform Find button to commit the search.
User Manual – Core4 CRM
Page 91 of 153
Timers Detail View
The option to view timers in a detail view can be quite useful if it is desired to browse through a found
set of timers or view more information as shown in Figure 16.2 and 16.3.
Figure 16.2 - Timers in Detail View
1. Timer details in detail view displaying the Core User, Start, End, Total Hours and Description fields.
Please see Figure 16.0 for more details about these fields.
2. Links to a related Contact, Project or Project Items
Figure 16.3 - Timers > More Info Tab
1. Description of timer and unique timer number. The number assigned to each timer record is an
automated and read only number.
2. Created and Modified Date/Time stamp. This tracks when a timer was created and last modified and
by whom.
User Manual – Core4 CRM
Page 92 of 153
Chapter 17 - Documents Module
Overview
Documents allow you to create, track, and manage your documents. Here you may safely store and reference all document types for a complete document storage and management system.
Figure 17.0 - Documents Module > Document Tab
1. Status Toolbar where you can create a new record, delete a record, perform finds, sorts and much
more. Please see section on Status Toolbar setup for full functionality.
2. View documents in detail view or list view by selecting the appropriate icon in the Status Toolbar.
3. The Preview functionality is not available for the Documents Module. See item #10.
4. More info tab for additional information about the selected order. Please see Figure 17.1.
5. Link a document to a Client, Project, Opportunity, Estimate, Order, and/or Purchase Order. Once
linked, select the blue arrow to navigate to that specific linked record.
6. Add a document name for better reference and organization.
7. Select the Insert button to add a file. Inserting a file embeds and stores the actual file into the Core4.
8. Select the Export button to export the file to a specified location. Please note that if the file has already been checked out you will be given a warning before exporting.
User Manual – Core4 CRM
Page 93 of 153
9. Select the Clear button to remove the inserted file. Please note that if the file has already been
checked out you will be given a warning before clearing the file.
10. Select the View button for a quick view of the file. Since the file is embedded in the Core4, any
changes made to the file will not be saved.
11. This area displays the inserted file.
12. Add a description to add details about the document inserted.
13. Categorize the document. This field is an editable drop down list. Additional fields such as Document
Type, Reference Number, Version, Physical Location, Author, Pages, and Keywords are also editable
fields. The Filename is not an editable field as this is an automated field displaying the actual name of
the inserted file.
14. The lock icon indicates if the file has been checked out. If the file has been checked out, then the
Core user and the date/time stamp are indicated as a tracking method to show who has reviewed the
document and when.
Figure 17.1 - Documents Module > More Info Tab
1. Title of document and unique document number. The number assigned to each document record is
an automated and read only number.
2. Created and Modified Date/Time stamp. This tracks when a document was created and last modified
and by whom.
User Manual – Core4 CRM
Page 94 of 153
Chapter 18 - Reports and Printing
Overview
Reports and various print options are available throughout the Core4. This section will discuss these different options and explain how to access them.
**IMPORTANT NOTE: Reports and print options are not available with FileMaker Go and
FileMaker WebDirect.
Reports
Most modules have reporting options and different reports available depending on the module (or main
tab) you are viewing. In order to access the reports available for each module, you must first navigate to
that module (main tab), then select Core > Reports. See Figure 18.0. All available reports will be listed
under the Core > Reports menu option. In the example in Figure 18.0, the Activities Report is the only
available report on the Contacts main tab.
Figure 18.0 - Reports Drop Down List
Currently the following reports are available and can be found in the locations outlined below.
1. Contacts > Core > Reports > Activities Report
Note: The Activities report will display each contact in the found set and display the first 50 activities.
The report will omit contacts that do not have any activities even if the contact is in your found set.
2. Opportunities > Core > Reports > Opportunities by Stage
Note: The Opportunities Report summarizes by stage, then lists opportunities within each stage.
3. Invoices offers 3 reports:
•
Invoice > Core > Reports > A/R Aging Summary
User Manual – Core4 CRM
Page 95 of 153
•
Invoices > Core > Reports > A/R Aging Detail
•
Invoices > Core > Reports > Customer Balance Detail
4. Items > Core > Reports > Items Reorder Report
5. Projects > Core > Reports > Gantt Chart
Note: We do not support printing Gantt charts. This chart is meant to view projects on the fly. This
chart will present information based on start and end times within a project’s line items.
6. Timers > Core > Reports > Timers by Project Report
Printing
In addition to reports there are also many other views and printing options available to provide you with
options to obtain the desired data print outs. Each module (main tab) has the option in the Status Toolbar
to view records in detail form view or list view as show in Figure 18.1.
**IMPORTANT NOTE: The preview and print options are not available with FileMaker Go and
FileMaker WebDirect.
Figure 18.1 - Preview Options
1. Select this icon to view the record(s) in form view. Currently form views are not available for the
Dashboard, Calendar or Activities tabs.
2. Select this icon to view the record(s) in list view. Currently list views are not available for the Dashboard or Calendar tabs. The list view is the default view for the Activities tab.
3. Once you have selected your view (either form view or list view as shown above), then select this
Preview button to preview the records in the selected view. You can then select “Print” in the Status
Toolbar at the top to print to a desired printer, or select the “Save as PDF” option. Click “Continue” to
exit and close the print preview. Currently the preview button does not work for the Dashboard,
Items, Projects, Calendar and Documents tabs.
User Manual – Core4 CRM
Page 96 of 153
Envelopes and Labels
In addition to printing reports the Core4 also provides you with the option to print labels and envelopes
for the found set records.
Simply navigate to Contacts tab, then select the Core menu at the top and select “Print Envelopes” or
“Print Labels” as shown in Figure 18.2.
Envelopes are compatible with Envelope #10 format and Labels are compatible with Avery 5160 formats.
Figure 18.2 - Print Envelopes and Print Labels Menu
User Manual – Core4 CRM
Page 97 of 153
Chapter 19 - Dashboard Module
Overview
The Dashboard provides quick and easy access for analyzing all vital data. We will look at each tab available in the dashboard to clarify how you can get a comprehensive view of your data. Each tab in the
Dashboard contain filters. After you apply the necessary filters, then the desired data can typically be
viewed in either a list, graph or chart. The Dashboard provides data for the modules and date views
shown in Figure 19.0.
Figure 19.0 - Available Dashboard Modules and Date Views
Tasks Tab
View tasks for any Core user based on the filters applied.
Figure 19.1 - Tasks Tab List View
1. Quickly navigate to Day, Month, Year or Multi-Year views.
2. Specify the date range of all tasks to be viewed using the Date Filter. Dates filters are determined by
the due date of the task.
3. The Status filter allows you to select Completed tasks or Incomplete tasks.
4. The Assigned To filter allows you to select one or more Core users in order to view tasks for any user.
5. The Contact filter allows you to a select one contact in order to view tasks for that contact.
User Manual – Core4 CRM
Page 98 of 153
Opportunities Tab
Using opportunities in your business allows you to run reports and view estimated revenue flows based
on pending new sales. The Dashboard > Opportunities tab allows you to track and review all opportunities at the company level or filtered by date and sales rep. The opportunities can be viewed in a list or
graph/chart views (see Figure 19.2 and 19.3).
View tasks for any Core user based on the filters applied.
Figure 19.2 - Opportunities Tab List View
1. Quickly navigate to Day, Month, Year or Multi-Year views.
2. Specify the date range of all opportunities to be viewed using the Date Filter.
3. The Status filter allows you to select a specific Sales Rep.
Figure 19.3 - Example of Graph for Opportunities
User Manual – Core4 CRM
Page 99 of 153
Estimate Tab
Most sales are preceded by estimates. The Dashboard > Estimates tab allows you to manage and track
all estimates that meet the specific criteria. The estimates can be viewed in a list or graph/chart views
(see Figure 19.4 and 19.5).
Figure 19.4 - Estimates Tab List View
1. Quickly navigate to Day, Month, Year or Multi-Year views.
2. Specify the date range of all estimates to be viewed using the Date Filter.
3. The Status filter allows you to select a specific Sales Rep.
Figure 19.5 - Example of Stage Graph for Estimates
User Manual – Core4 CRM
Page 100 of 153
Orders Tab
Orders are created to record a potential sales. Having the ability to view any orders on the Dashboard >
Orders Tab allows you to easily manage and track all orders during the sales process. The orders can be
viewed in a list or graph/chart views (see Figure 19.6 and 19.7).
Figure 19.6 - Orders Tab List View
1. Quickly navigate to Day, Month, Year or Multi-Year views.
2. Specify the date range of all orders to be viewed using the Date Filter.
3. The Status filter allows you to select a specific Sales Rep.
Figure 19.7 - Example of Class Graph for Orders
User Manual – Core4 CRM
Page 101 of 153
Invoices Tab
Once your estimates or orders have been finalized, invoices are typically generated and sent to the
customers. Having the ability to view any of the invoices on the Dashboard > Invoices Tab allows you to
easily manage and track all invoices. The invoices can be viewed in a list or graph/chart views (see Figure
19.8 and 19.9).
Figure 19.8 - Invoices Tab List View
1. Quickly navigate to Day, Month, Year or Multi-Year views.
2. Specify the date range of all invoices to be viewed using the Date Filter.
3. The Status filter allows you to select a specific Sales Rep.
Figure 19.9 - Example of Class Bar for Invoices
User Manual – Core4 CRM
Page 102 of 153
Chapter 20 - Outlook Integration
Overview
If using Microsoft® Outlook as your mail client, then you may want to strongly consider using the Outlook
integration features. Integration with Outlook can be extremely powerful as one of the primary goals is to
avoid double entry and increase accuracy between FileMaker and Outlook. Increasing accuracy and efficiency by avoiding double data entry is what most organizations strive for and is the purpose for creating
the Outlook integration. Outlook integration requires purchasing, installing and registering the Outlook
Manipulator plug-in, which is sold separately. The plug-in is licensed, installed and registered on each
client machine. You do not need to learn how to “program” in order to use the “out of box” features discussed in this chapter.
**IMPORTANT NOTE: plug-ins do not work with FileMaker Go and FileMaker WebDirect.
Please read this entire chapter for a detailed description of the exact functionality pertaining to each Outlook area. The Core4 has the following “out of box” Outlook integration functionality:
•
Send HTML formatted emails with multiple attachments and suppress the Outlook security dialog.
•
Send an email campaign as a separate mail-merged message to each recipient rather than 1
message to all.
•
Import emails with attachments from Outlook into the Core4 allowing a complete correspondence
history of all emails sent and received across the entire organization.
•
Push and pull Contacts, Events, and Tasks to and from Outlook and the Core4.
Outlook Manipulator Plug-in Installation and Registration
After purchasing your Outlook Manipulator license(s), then follow these installation and registration steps.
1. Close FileMaker Pro.
2. Download the plug-in bundle from our site.
Windows: www.OutlookManipulator.com
Mac: www.OutlookManipulatorForMac.com
3. Unzip the contents of the bundle. Install the plug-in by copying and pasting the actual plug-in into
your FileMaker Extensions folder.
Windows: C:\Program Files\FileMaker\FileMaker Pro XX\Extensions
Mac: Volume/Applications/FileMaker Pro XX/Extensions (Volume is the name of the
mounted volume)
User Manual – Core4 CRM
Page 103 of 153
4. Open the Core4 and navigate to Core > Preferences > Global Settings > Plug-ins > Register Plug-ins
tab. Enter your License ID, which is provided by Productive Computing, in the License ID field and
select the “Register” button.
Once successfully registered you should be running in LIVE mode as shown in Figure 20.0.
Figure 20.0 - Outlook Manipulator Plug-in Registration
User Manual – Core4 CRM
Page 104 of 153
Outlook Mail
Sending Email
There are 3 main advantages of using the Outlook Manipulator when sending emails from the Core4
CRM. These 3 advantages are that you can send HTML formatted emails, send emails with multiple attachments, and send email campaigns. To enable use of the plug-in when sending emails please navigate
to Core > Preferences > User Settings > Email > Sending tab and select “Plug-in” as the Method as
shown in Figure 20.1 below. Please note that these are user settings and are specific to the Core user
highlighted in yellow on the left.
Figure 20.1 - Setting up the Method for “Sending Email” Preferences
1. Select this button to enable the plug-in when sending emails
2. Specify the attachment options to “Embed” or “Reference.” If you select the “Embed” option, then the
email attachments will be stored directly in the Core4 for safe keeping and future reference. If you
select the “Reference” option, then all email attachments will be stored in the location specified. We
recommend embedding attachments rather than storing attachments as a reference and cannot be
held liable for improper use of referencing attachments. Please note this user defined “Attachment
Setting” is the same when sending and importing emails.
Once the Core User has set the method to “Plug-in” for sending email, then emails can be sent using the
Outlook Manipulator by composing the email and pushing the “Send” button. All emails sent from the
Core4 using the Outlook Manipulator plug-in technique will be marked with a unique Core ID in a custom
field in Outlook. This ensures that the email does not get pulled back into the Core4 on the import process as explained below.
User Manual – Core4 CRM
Page 105 of 153
Please note that modifying the “From” field in composing a new email is only supported when the Send
Method is set as “FileMaker (via SMTP)” or “Plug-in.” To enable use of the plug-in when sending emails
please navigate to Core > Preferences > User Settings > Email > Sending tab, and select “Plug-in” as
shown in Figure 20.1. Although the “From” field in the Core4 is set to the currently logged in Core user,
the email in Outlook will be sent based off of your Outlook permissions and settings.
Importing Email
Using the Outlook Manipulator you can import emails from Outlook into the Core4. This feature allows a
user to pull their emails from selected folders in Outlook into the Core4. This can be beneficial for people
who want to associate a given email with a Core4 contact. It also allows multiple emails to be centralized
under a single contact in the Core4 even though that email came from one or more individual’s Outlook
clients. Using this feature will allow you to find a contact in the Core4 and have a complete correspondence history of all emails sent and received across the entire organization.
To enable use of the plug-in to import emails please navigate to the Core > Preferences > User Settings
> Email > Importing tab and specify the Source and Archive folders as shown in Figure 20.2. Please note
that these are user settings and are specific to the Core user highlighted in yellow on the left. The folders
specified here must also exist in Outlook. When specifying these folders in the Core4 a “/” indicates a
subfolder in Outlook, so please do not use “/” in your Outlook folder names.
Figure 20.2 - “Import Email” Preferences Setup
1. Specify the Source Folders in Outlook. Typically you will have two source folders for incoming and
outgoing emails. All emails in these Outlook source folders will be imported in to the Core4.
2. Specify the Archive Folders in Outlook. Typically you will have two archive folders for incoming and
outgoing emails. After emails are successfully imported, then the emails in Outlook will be moved to
this archive folder in Outlook.
3. Specify the attachment options to “Embed” or “Reference.” If you select the “Embed” option, then the
email attachments will be stored directly in the Core4 for safe keeping and future reference. If you
select the “Reference” option, then all email attachments will be stored in the location specified. We
User Manual – Core4 CRM
Page 106 of 153
recommend embedding attachments as improper use of storing attachments as a reference can be
dangerous. Please note this user defined “Attachment Setting” is the same for sending and importing
emails.
**Please note that if using the “Reference” option, then file paths take the full FileMaker file path reference such as file:directoryName, filewin:/driveletter:/directoryName,
filewin://computerName/shareName/DirectoryName/, filemac:directoryName/ or
filemac:/volumeName/directoryName/ etc. Please see FileMaker’s help for further assistance.**
After you have set up your folders, then select the Import Mail option from Core > Outlook Integration >
Import Mail drop-down menu from the Activities module. Please note that this option is only available
from the Activities module as shown in Figure 20.3.
Figure 20.3 - Import Mail Option Found in the Activities Module
The “Import Mail” routine will import emails that do not already have an unique Core ID. Unique Core
IDs are assigned to a custom field in Outlook behind the scenes. This prevents the same email to be imported more than once into the Core4. Keep in mind that the Core4 will never import the same email
twice (regardless if the emails are matched to a Core contact or not). The first time emails are imported
from Outlook into the Core4 a custom field in Outlook is set with a unique Core ID. This custom field is
not visible to the Outlook user and is set behind the scenes. Any emails in your watch folder with a Core
ID will not be re-imported into the Core4, but rather simply moved to the archive folder. This is true even
if you delete the email record in Core, reset the Core etc.
If you need to reset the Core IDs for mail items, then please place all emails to be reset into the watch
folders and run the “ACTVT_OM_Mail_Clear_Core_IDs” script as shown in Figure 20.3.1 below. Running
this script requires administrator rights and can be found in the “Manage Scripts” area in FileMaker, which
is a developer area or contact Productive Computing for assistance. This script will simply clear the Core
IDs for all emails in the Outlook watch folders. This script will NOT delete any records in FileMaker.
User Manual – Core4 CRM
Page 107 of 153
Figure 20.3.1 - ACTVT_OM_Mail_Clear_Core_IDs Script
Once the emails are imported from Outlook into the Core, then the imported emails are parsed into the
Core4 and matched up to the corresponding contact based on the From, To, and CC email addresses. An
email is considered matched if the "From” address matches a contact’s email in the Core4 along with at
least one recipient (To, CC, BCC). If emails are not successfully matched, then the emails are still imported into the Core4, but are put into a “holding area.” This holding area contains all unmatched emails
and is not openly visible to the user. You can resolve all unmatched emails by simply selecting the “Resolve Unmatched Emails” option found on the Core > Resolve Unmatched Mail as shown in Figure 20.4.
Please note that this option is only available from the Activities tab.
Figure 20.4 - Resolve Unmatched Email Option - Activities Tab
When the routine to resolve unmatched emails runs, all unmatched emails will attempt to be matched. If
the email could not be successfully matched (i.e. the From, To, CC or BCC field are not matched), then
the emails will remain unmatched. A dialogue will pop up and list all email addresses that could not be
matched, thus allowing you to add the emails to the appropriate contact records.
User Manual – Core4 CRM
Page 108 of 153
Contacts
Pulling Contacts
The intention of pulling your contacts from Outlook into the Core4 is to perform a one-time import to
gather all contacts from Outlook and populate those contacts in the Core4. After the initial import, the
Core4 will be used as the master repository for contacts from that point forward and any new or edited
contacts will be pushed to Outlook rather than the other way around. This recommendation allows the
Core4 to be the anchor by which all contacts are added, edited and deleted where they are centralized,
validated and secure. Outlook on the other hand may have an individual’s personal contacts, little or no
security, no validation and not provide a mechanism to enter all the important specifics required by the
organization.
With that said, there may be compelling reasons why organizations may want the option to continuously
update and modify contacts via Outlook. Use this with caution as there is no conflict resolution of any
kind. It is a one-way pull. An individual’s Outlook contacts will override anything in the Core4 when
matching contact is found, even if that contact was last modified in the Core4. Matching contacts are determined by the unique Core ID assigned to each Core contact. The Core ID is managed in the Core and
populated in a custom Outlook field.
In order to import all your contacts from Outlook to the Core4 navigate to the Core > Preferences >
Global Settings > Plug-ins > Outlook Manipulator and select the “Contact Import” button. All contacts
from your user’s contacts folder will be imported. Before you import your contacts please confirm that the
Contact field mapping for Phone, Address and Internet fields is setup properly as shown in Figure 20.5.
Figure 20.5 - Importing Contacts from Outlook and Field Mapping
User Manual – Core4 CRM
Page 109 of 153
Field mapping between Outlook and the Core4 is handled using a logical approach. For fields that are
more subjective as to how they should be mapped, you can specify that mapping directly in the preferences area of the Core4 as shown in Figure 20.5 above.
The “Contact Import” routine only pulls from the user’s default Outlook contact folder. The routine will
always pull all Outlook contacts so long as they are not marked as “private” in Outlook. Contacts that are
marked as “private” in Outlook are always completely ignored even if they were original created by way
of the push process and have a valid matching Core ID. During the pull process, the routine will assign a
unique Core ID to each contact imported by setting a custom field in Outlook with the unique Core ID.
When performing subsequent pulls or as discussed later when pushing a contact, this allows the Core4 to
understand whether to create a new Core4 contact or update an existing contact with data from Outlook.
Records in Outlook that do not already exist in the Core4 (in other words records that do not have a Core
ID) will be added. Please also note that the Outlook picture field is not yet supported by the Outlook Manipulator, so the picture field will not be populated.
The pull process pulls the contacts from the user’s default Outlook contacts folder as shown in Figure
20.6. In Figure 20.6 only the contacts in the primary “Contacts” Outlook folder will be imported. All contacts in any other subsequent folders such as “Group A,” “Group B,” “Sales Contacts” and “Support Contacts” will be ignored.
Figure 20.6 - Default Outlook Contacts Folder
Please also note that records that are deleted in Outlook are NOT deleted in the Core4 during the pull
process. If you delete an Outlook contact record that has a matching record in Core4, then you will need
to delete that Core4 contact record manually.
User Manual – Core4 CRM
Page 110 of 153
Pushing Contacts
Using the plug-in you have the ability to push a single contact or a found set of contacts from the Core4
to Outlook. The intention of this feature is to allow the user to perform specific “finds” of contacts in the
Core4 and have those contacts pushed to Outlook. After insertion into Outlook, you have great flexibility
in how you can use those contacts since there are numerous third party tools that allow you to connect
Outlook in a variety of ways such as for use on a mobile device. This is especially useful for sales oriented users who may not always be at a place to conveniently access the organization’s list of contacts in
the Core4 directly using FileMaker.
New contacts will be added and existing records will be updated. On subsequent pushes, records that
were previously pushed to Outlook will be updated and new records will be added. We set a custom field
in Outlook to keep track of a unique Core ID to allow for this functionality. Simply navigate to the Contacts module and perform a find for the contacts you want to push to Outlook, then select Core > Outlook Integration > Push Contacts as shown in Figure 20.7 and either the single contact or all contacts in
your found set will be pushed to your user’s default Outlook contacts folder.
Figure 20.7 - Outlook Integration Menu Options Relating to Contacts
Please note that Core4 contacts are always pushed to the users default Outlook contacts folder and that
contacts marked as “private” in Outlook are completely ignored even if they have a valid matching Core
ID. Please also note that the Outlook picture field is not yet supported by the Outlook Manipulator, so the
picture field will not be populated.
Basing the push on the user’s found set in the Core4 allows the user to virtually find any combination of
contacts under any criteria for maximum flexibility. For example, you may want to only push contacts
that are marked with a type of “lead” and located in the city of Nashville. If there is a matching contact
found in Outlook (meaning a contact record in Outlook already exists with the same Core ID) during the
push process, then this contact will be overridden with information in the Core4 even if that contact’s
data in Outlook is newer.
Field mapping between Outlook and the Core4 is handled using a logical approach. For fields that are
more subjective as to how they should be mapped, you can specify that mapping directly in the preferences area of the Core4 as shown in Figure 20.5.
User Manual – Core4 CRM
Page 111 of 153
Matching records that are deleted in FileMaker are NOT deleted in Outlook during the push process. If
you delete a Core4 contact that has a matching record in Outlook, you need to delete that Outlook contact record manually.
Viewing Contacts
In order to conveniently view the corresponding Outlook contact (assuming you have pushed or pulled
the Core4 contact to or from Outlook), then simply select the “View in Outlook” option from the Contacts
Module as shown in Figure 20.7. This will open the corresponding Core4 contact in Outlook, which saves
you the hassle of having to locate the contact in Outlook.
Events
Pulling Events
Using the plug-in you have the ability to pull events from Outlook into the Core4. The intention of this
feature is to allow a user to pull their calendar data from Outlook into the Core4. This can be beneficial
for people who create or edit appointments via Outlook while away from the Core4.
Before pulling events the Core User must have a default calendar set up and specified in the Core4. The
user must specify a single Core4 calendar where they will store their Outlook events. The default calendar
is assigned to each user on Core > Preferences > User Settings > Calendar/Tasks tab of the Core4. Once
you assigned a default calendar to the specific Core user, then this user can now pull events. As shown in
Figure 20.8 the “Pull Events” routine can be found under the “Core” menu at the top of the screen by
selecting Core > Outlook Integration > Pull Events when you are in the Activities module.
Figure 20.8 - View, Pull and Push Outlook Event Options
This routine pulls events from the user’s default Outlook calendar via a specific dynamic date range. The
date range rule is to pull all non-private events that have been created 30 days from the current date
through 2 years into the future. Events that are marked as “private” in Outlook are completely ignored.
The routine includes recurring events and any exceptions to a recurring event series. With recurring
User Manual – Core4 CRM
Page 112 of 153
events, if any part of the recurring range falls within the range specified above, the entire event comes in
including all recursions.
Please note that handling recurring events in the Core4 is not yet supported by the Outlook Manipulator
for Mac.
During the event pull process, the routine will assign a unique Core ID to each event imported and will
set the Core ID to a custom field in Outlook. When performing subsequent pulls or as discussed later
when pushing events, this allows the Core4 to either create a new event or update an existing event with
data from Outlook. Records in Outlook that do not already exist in the Core4 (or records that do not have
a Core ID) will be added. The assignee field will never populate unless the record pulled is a new record
(new record = record without a Core ID). In that case the assignee field of new records will populate
with the default calendar assigned to the currently logged in Core user.
Please also note that records that are deleted in Outlook are NOT deleted in the Core4 during the pull
process. If you delete an Outlook event record that has a matching record in Core4, then you will need to
manually delete that event record in the Core4.
Pushing Events
Alternatively you can also push events from the Core4 into Outlook. The intention of this feature is to
allow the user to perform specific “finds” of events in the Core4 and have those events pushed to Outlook. All events in the found set will be pushed including events that do not belong to the user’s default
calendar. After insertion into Outlook, you have great flexibility in how you can use those events since
there are numerous third party tools that allow you to connect Outlook in a variety of ways such as for
use on a mobile device. This is especially useful for sales oriented users who may not always be at a
place to conveniently access their calendar in the Core4 directly using FileMaker.
As shown in Figure 20.8 the “Push Events” routine can be found under the “Core” menu at the top of the
screen by selecting Core > Outlook Integration > Push Events when you are in the Activities tab of the
Core4. Events are pushed based on the user’s found set in the Core4. This allows the user to virtually find
any combination of events under any criteria for maximum flexibility. For example, you may want to only
push events that occur this week or this month or you may want to push events from 2 calendars such as
events from you and your boss’s calendar.
When an event is pushed from the Core4 to Outlook, a unique Core ID is assigned to the event. A custom
field in Outlook is set with this unique Core ID. If there is a matching event found in Outlook during the
push process (meaning the Core4 event and Outlook event have the same Core ID), then the Core4 will
override the Outlook event with information in the Core4 even if the event data in Outlook is newer.
In addition matching records that are deleted in the Core4 are NOT deleted in Outlook during the push
process. If you delete a Core4 event that has a matching record in Outlook, you need to delete that Outlook event record manually. Events marked as “private” in Outlook are completely ignored even if they
were original created by way of the push process and have a valid matching Core ID.
User Manual – Core4 CRM
Page 113 of 153
**IMPORTANT NOTE: The Category field of events are populated in Core4 during the pull,
however; if the Outlook event category does NOT exist in the Core4 or the Outlook event has
multiple categories (which is not supported in the Core4), then the category field is NOT
populated in the Core4 during the pull and is left blank. Please consider this when repushing the event back to Outlook as you could permanently delete the Outlook category.
Viewing Events
In order to conveniently view the corresponding Outlook event (assuming you have pushed or pulled the
Core4 event to or from Outlook), then simply select the “View in Outlook” option as shown in Figure 20.8.
This will open the corresponding Core4 event in Outlook, which saves you the hassle of having to locate
the event in Outlook.
Tasks
Pulling Tasks
Using the plug-in you have the ability to pull tasks from Outlook into the Core4 CRM. The intention of this
feature is to allow a user to pull their task data from Outlook into the Core4. This can be beneficial for
people who create or edit tasks via Outlook while away from the Core4.
As shown in Figure 20.9 the “Pull Tasks” routine can be found when you are in the Activities module under the “Core” menu at the top of the screen by selecting Core > Outlook Integration >Pull Tasks.
Figure 20.9 - View, Pull, and Push Outlook Task Options
The routine pulls all tasks from the user’s default Outlook tasks that are not marked as private. Tasks that
are marked as private in Outlook are completely ignored. The routine does not pull any tasks that are
recurring.
User Manual – Core4 CRM
Page 114 of 153
During the pull process, the routine will assign a unique Core ID to each task imported and sets the Core
ID to a custom field in Outlook. When performing subsequent pulls or as discussed later when pushing
tasks, this allows the Core4 to understand whether to create a new task or update an existing task with
data from Outlook. Records in Outlook that do not already exist in the Core4 (or in other words records
that do not have a Core ID) will be added. The assignee field will never populate unless the record pulled
is a new record (new record = record without a Core ID). In that case the assignee field of new records
will populate with the default user’s task assigned to the currently logged in Core user.
Please also note that records that are deleted in Outlook are NOT deleted in the Core4 during the pull
process. If you delete an Outlook event record that has a matching record in Core4, then you will need to
delete that task record manually in the Core4.
Pushing Tasks
Using the plug-in you have the ability to push tasks from the Core4 CRM into Outlook. The intention of
this feature is to allow the user to perform a specific “find” of tasks in the Core4 and have those tasks
pushed to Outlook. All tasks in the found set will be pushed including tasks that do not belong to the
Core user. After insertion into Outlook, you have great flexibility in how you can use those tasks since
there are numerous third party tools that allow you to connect Outlook in a variety of ways such as for
use on a mobile device. This is especially useful for sales oriented users who may not always be at a
place to conveniently access their tasks in the Core4 directly using FileMaker.
As shown in Figure 20.9 the “Push Tasks” routine can be found when you are in the Activities tab of the
Core4 under the “Core” menu at the top of the screen by selecting Core > Outlook Integration >Push
Tasks. Tasks in the Core4 are pushed to the users default Outlook tasks folder. Tasks are pushed based on
the user’s found set in the Core4. This allows the user to virtually find any combination of tasks under
any criteria for maximum flexibility. For example, you may want to only push tasks that have a due date
of this week or this month.
When a task is pushed from the Core4 Outlook, a unique Core ID is assigned to the task. A custom field
in Outlook is set with this unique Core ID. If there is a matching task found in Outlook during the push
process (meaning the Core4 task and Outlook task have the same Core ID), FileMaker will override this
task with information in the Core4 even if the task data in Outlook is newer.
In addition matching records that are deleted in the Core4 are NOT deleted in Outlook during the push
process. If you delete a Core4 task that has a matching record in Outlook, you need to delete that Outlook task record manually. Tasks marked as “private” in Outlook are completely ignored even if they were
originally created by way of the push process and have a valid matching Core ID.
User Manual – Core4 CRM
Page 115 of 153
*IMPORTANT NOTE: The Category field of tasks are populated in Core4 during the pull, however; if the Outlook task category does NOT exists in the Core4 or the Outlook task has multiple categories (which is not supported in the Core4), then the category field is NOT populated in the Core4 during the pull and is left blank. Please consider this when re-pushing the
task back to Outlook as you could permanently delete the Outlook category.
Viewing Tasks
In order to conveniently view the corresponding Outlook task (assuming you have pushed or pulled the
Core4 task to or from Outlook), then simply select the “View in Outlook” option as shown in Figure 20.9.
This will open the corresponding Core4 task in Outlook, which saves you the hassle of having to manually
locate the task in Outlook.
User Manual – Core4 CRM
Page 116 of 153
Chapter 21 - QuickBooks Plug-in Integration
Overview
If using Intuit® QuickBooks for Windows, then you may want to strongly consider using the QuickBooks
integration features. Integration with QuickBooks can be extremely powerful as one of the primary goals
is to avoid double entry and increase accuracy between FileMaker and QuickBooks. Increasing accuracy
and efficiency by avoiding double data entry is what most organizations strive for and is the purpose for
creating the QuickBooks integration. QuickBooks integration requires purchasing, installing and registering of the FM Books Connector plug-in, which is sold separately. The plug-in is licensed, installed and
registered on each client machine. You do not need to learn how to program in order to use the “out of
box” features discussed in this chapter; rather you just need to purchase, install and register the FM
Books Connector.
“Out of the box” the Core4 communicates with the following QuickBooks areas: Customers, Invoices,
Items, Accounts, Sales Reps, Payment Terms, Shipping Methods, Customer Messages, Tax Rates and
Classes. Detailed descriptions of the exact “out of box” functionality pertaining to each QuickBooks area is
described throughout this chapter.
While FM Books Connector allows you to exchange data with QuickBooks, Productive Computing, Inc.
recommends managing some tasks or items in Core4 and others in QuickBooks.
MANAGE IN CORE4
MANAGE IN QUICKBOOKS
Contacts
Accounts
Invoices
Payments and Payment Terms
Items
Taxes
Classes
Shipping Methods
Customer Messages
**IMPORTANT NOTES:
•
Please read through the entire chapter prior to importing any QuickBooks data.
•
The FM Books Connector plug-in connects to QuickBooks desktop editions 20102014.
•
Plug-ins do not work with FileMaker Go and FileMaker WebDirect.
User Manual – Core4 CRM
Page 117 of 153
FM Books Connector Installation and Registration
After purchasing your FM Books Connector license(s), then follow these installation and registration steps.
1. Close FileMaker.
2. Download the plug-in bundle from our site: www.fmbooksconnector.com
3. Unzip the contents of the bundle. Copy and paste the actual plug-in into your FileMaker Extensions
folder located here: C:\Program Files\FileMaker\FileMaker Pro XX\Extensions.
4. Open the Core4 and navigate to Core > Preferences > Global Settings > Plug-ins > Register Plug-ins
tab. Enter your license ID, which is provided by Productive Computing, in the license ID field and select the “Register” button.
Once successfully registered you should be running in LIVE mode as shown in Figure 21.0.
Figure 21.0 - FM Books Connector Registration - Live Mode
First Time Connection to the QuickBooks File
After you have installed and registered the plug-in, you will then need to install the QBXMLRP2 and
MSXML installers that are found in the plug-in bundle. Simply click the two installers and run them on
your machine. Next we are ready to make an initial connection to the QuickBooks file. This connection
only needs to be made one time per QuickBooks file and can be made by following these steps.
1. Open your QuickBooks file in single user mode as the ADMIN user. After you successfully make this
first time connection, then you can re-open the QuickBooks file in multi user mode as any desired
QuickBooks user.
2. Navigate to the Core > Preferences > Global Settings > Plug-ins > FM Books Connector tab and select the “Initial QuickBooks Connection” button.
3. QuickBooks will then be flashing with a screen shown in Figure 21.1. Please select the fourth radio
button down to always allow access even if QuickBooks is not running and select the admin user if a
drop down list appears with user names. Then select the check box below to allow the plug-in full
access and select the “Continue” button.
User Manual – Core4 CRM
Page 118 of 153
Figure 21.1 - QuickBooks Application Certificate
4. Select “Yes” and/or “Done” (if prompted) to allow and finish the access confirmation.
Please note that while this screen appears, if you should click on FileMaker, FileMaker may stop responding. This is caused when the plug-in is waiting for user input from the QuickBooks connection dialog box.
This isolated situation is due to a FileMaker limitation when a plug-in waits for user input from a 3rd party
application. If this occurs, force quit FileMaker and repeat the steps above.
This connection and access authentication must be done one time per QuickBooks file. In QuickBooks you
can always navigate to Edit > Preferences > Integrated Applications > Company Preferences to change
the plug-in access properties or check to see if the connection has already been established.
Data Transfer
Through the FM Books Connector, Core4 users will be able to exchange data with QuickBooks through
“pull” and “push” actions that will be explained in further detail.
During the initial data exchange the following data can be imported (pulled) from QuickBooks into Core4:
Accounts, Payment Methods, Sales Reps, Payment Terms, Shipping Methods, Customer Messages, Tax
Rates and Classes. We do not support pushing these items. The main reason is that there are several
other fields in QuickBooks that need to be populated in order to add many of these items. In addition
these items are typically 10 items or less (except for Accounts), so the argument to have them pushed is
not strong. Lastly these QuickBooks items are a sensitive area where users should not necessarily have
jurisdiction over manipulating them from the Core4 as this is typically an accounting only area for most
organizations and should be managed in QuickBooks.
User Manual – Core4 CRM
Page 119 of 153
Import Wizard / Pulling from QuickBooks
Since typically you will already have data in your QuickBooks file, then we will need a starting point. As a
general rule when you first setup the Core4 you will want to pull all data from your existing QuickBooks
file into the Core4. Productive Computing, Inc. will work with you to complete the initial data import of
the following items: Accounts, Payment Methods, Payment Terms, Shipping Methods, Customer Messages, Tax Rates, Classes, Customers, Sales Reps and Invoices.
Once the initial data import is complete, you will be able to update the the following items via the Import
Wizard: Accounts, Payment Methods, Sales Reps, Payment Terms, Shipping Methods, Customer Messages, Tax Rates and Classes. **IMPORTANT NOTE: Customers and Invoices are only pulled in
the initial data exchange as they should be maintained in Core4.
Access the Import Wizard by navigating to Core > Preferences > Global Settings > Plug-ins > FM Books
Connector tab and selecting the “Import Wizard” button. You will see the following screen (Figure 21.3).
This is where you import data directly from QuickBooks. It is important to import in order from top
to bottom (complete part 1 before moving to part 2, etc.). Upon clicking the “Import” button to the right
of each section, you will see the result of the import. It will display how many records were imported,
when it was last imported, and by whom.
Figure 21.3 - QuickBooks Import Wizard
Note: The import process only adds and modifies records in FileMaker and only pulls active records in
QuickBooks. We do not create specific and obvious buttons in any of the main modules for pulling data
from QuickBooks into the Core4; rather, we place all pulling options in the Import Wizard area further
encouraging its use as a one time preference rather than an ongoing routine.
Please read each QuickBooks area in further detail below BEFORE importing your data.
User Manual – Core4 CRM
Page 120 of 153
Accounts
Once you have pulled in your accounts from QuickBooks, then they will be listed on Core > Preferences >
Global Settings > Lists > Accounts tab. Accounts are read only and should be managed in QuickBooks.
Figure 21.4 - Accounts Tab
User Manual – Core4 CRM
Page 121 of 153
Payment Terms
Once you have pulled in your terms from QuickBooks, then they will be listed on Core > Preferences >
Global Settings > Lists > Terms tab. Terms pulled in from QuickBooks are read only and should be managed in QuickBooks. You may receive a “date driven terms” error when importing terms. If the QuickBooks file does not have any date driven terms, then you will receive an error indicating a query request
did not find a matching object in QuickBooks in the area of Date Driven Terms. There are two types of
payment terms in QuickBooks, Standard and Date Driven. Date driven terms are typically not used in
QuickBooks and this error message can be closed and ignored.
Figure 21.6 - Terms Tab
User Manual – Core4 CRM
Page 122 of 153
Shipping Methods
Once you have pulled in your shipping methods from QuickBooks, then they will be listed on Core > Preferences > Global Settings > Lists > Shipping Methods tab. Shipping methods pulled in from QuickBooks
are read only and should be managed in QuickBooks.
Figure 21.7 - Shipping Methods Tab
User Manual – Core4 CRM
Page 123 of 153
Customer Messages
Once you have pulled in your customer messages from QuickBooks, then they will be listed on Core >
Preferences > Global Settings > Lists > Customer Messages tab. Customer messages pulled in from
QuickBooks are read only and should be managed in QuickBooks.
Figure 21.8 - Customer Messages Tab
User Manual – Core4 CRM
Page 124 of 153
Items
Once you have pulled in your items from QuickBooks, then they will be listed in the Items module in the
Core4 as shown in Figure 21.9. As discussed later in this chapter you have the ability to push new items
to QuickBooks. Items should be managed in the Core4. Please note that Inventory Assembly items are
currently not supported and may not be pushed to QuickBooks at this time.
Figure 21.9 - Items Module in List View
Taxes
Once you have pulled in your taxes from QuickBooks, then they will be listed on Core > Preferences >
Global Settings > Lists > Taxes tab. Taxes pulled in from QuickBooks are read only and must be managed
in QuickBooks.
Figure 21.10 - Taxes Tab
User Manual – Core4 CRM
Page 125 of 153
Classes
Once you have pulled in your classes from QuickBooks, then they will be listed on Core > Preferences >
Global Settings > Lists > Classes tab. Classes pulled in from QuickBooks are read only and should be
managed in QuickBooks.
Figure 21.11 - Classes Tab
Contacts
When importing customers from QuickBooks into the Core4 CRM, please ensure you navigate to Core >
Preferences > Global Settings > Plug-ins > FM Books Connector tab, and check or uncheck the “Create
both Company and Individual records during Customer import” option as shown in Figure 21.12 depending on your preference. Please adjust this setting BEFORE you import your customers from QuickBooks.
Figure 21.12 - FM Books Connector Tab
User Manual – Core4 CRM
Page 126 of 153
When this checkbox is selected, then both company and individual records are created during the import.
When this checkbox is not selected, then only one record is created for every one record from QB. Let’s
explore both options a little bit further to decide which one is right for you.
If you do not select this checkbox, then the QB ID is stored on each record accordingly. This is the
method we recommend, but you can also select the checkbox as described below.
If you select this checkbox, then the QuickBooks ID is included only on the parent or company record. If
there is no company name in QuickBooks, then only one record is created. The subsequent individual
records created (such as the 2nd “child” individual) never have the QuickBooks ID. This means that these
subsequent individual child records cannot be directly updated from the Core4 to QuicKBooks. Alternatively when you update the company (or parent) record from the Core4 to QuickBooks, then the child
record name will be updated on the parent record in QuickBooks.
*IMPORTANT NOTE: Customers cannot be re-imported or refreshed from QuickBooks. The
feature of importing customers from QuickBooks to the Core4 is intended to be a one-time
setup feature. Re-importing customers will completely ignore customers that have been already added to the Core4 and only new customers will be added.
Once a customer is pulled into the Core4 CRM (whether they have a QBs ID or not), the “Source” field
found on the Contacts module > Contact tab is populated with the words “QuickBooks Import” along with
the date timestamp the contact was pulled into Core4 CRM as shown in Figure 21.13. This makes it easy
to later identify that the contact originally came from QuickBooks.
Figure 21.13 - Populated Source Field in Contacts tab after QuickBooks Customer Import
User Manual – Core4 CRM
Page 127 of 153
Jobs
Jobs in QuickBooks are supported, but with limited ability. The Job record is in a sense "merged" with the
parent customer record in FileMaker. This means that if the job has a different address, phone or email,
then the job contact information is added to the existing parent contact record. The Job ID is stored
along with the Customer ID in FileMaker, so that invoices and payments pulled in for this job are linked
properly to the parent contact record.
Sales Reps
Sales reps are derived from Core4 contacts. When sales reps are imported from QuickBooks, a new contact is created in the Core4 auto populating the First Name, Middle Name, Last Name, Sales Rep checkbox, QB Initials, QB List ID, Created and Modified date time stamps as shown highlighted in Figure 21.14.
Since the QB Initials field in the Core4 must match an existing sales rep's initials in QuickBooks, then the
QB Initials field in the Core4 is a read only field that gets populated during the sales rep import process.
Sales Reps are only imported from QuickBooks during the initial data import completed by Productive
Computing, Inc.
Figure 21.14 - Sales Reps
User Manual – Core4 CRM
Page 128 of 153
Invoices
Once you have pulled in your invoices from QuickBooks, then they will be listed in the Invoices module in
the Core4 as shown in Figure 21.15. Invoices should be managed in the Core4. As discussed later in this
chapter you have the ability to push invoices to QuickBooks. Invoices are only imported from QuickBooks
during the initial data import completed by Productive Computing, Inc.
Figure 21.15 - Invoices Tab in List View
Please note the following about pulling invoices:
• All pulling is done via the initial import only and only invoices marked as “active” in QuickBooks will be
pulled into the Core4.
• Invoices that do not have a matching customer in the Core4 will be ignored and thus not imported.
• Grouped invoice line items or kits in QuickBooks are ignored as these line items are not supported.
• Invoices should be managed in the Core4. New invoices can be pushed to QuickBooks.
Payments
Payments are not pulled or imported into the Core4 and should be managed in QuickBooks.
User Manual – Core4 CRM
Page 129 of 153
Push and View Contacts
You have the option to push either a single contact or to push the found set of records from the Core4 to
QuickBooks. Simply navigate to the Contacts module and select QuickBooks Integration > Push Customer (Single) or QuickBooks Integration > Push Customers (Found Set) from the Core menu at the top
as shown in Figure 21.16. In addition, you may select the “View in QuickBooks” option to conveniently
open the customer in QuickBooks from the Core4. We recommend managing your Contact records in the
Core4.
Figure 21.16 - QuickBooks Customer Push and View options
Please note the following when pushing and viewing contacts from the Core4 to QuickBooks.
• Contacts without a QB List ID in the Core4 will be added as a new contact in QuickBooks. The exception to this rule is child records as you cannot push individual records that were at one time a "child"
record from an original QuickBooks pull. Child records exist if you elect to pull in separate company and
individual records as discussed on the Contacts pull area of this document.
• If you are pushing a Core4 company record, then the individual added to QuickBooks is the first one
listed in the Core4 (via the individual's sort number).
• If you push an existing customer that matches a customer in QuickBooks (identified by the QB List ID),
then that customer will be updated.
• When you delete a contact in the Core4, then you will be asked if you would like to delete the contact
in QuickBooks. Contacts in QuickBooks are never deleted if they have associated "job" records in
QuickBooks.
User Manual – Core4 CRM
Page 130 of 153
Push and View Items
You have the option to push either a single item or to push the found set of items from the Core4 to
QuickBooks. Simply navigate to the Items module and select QuickBooks Integration > Push Item (Single) or QuickBooks Integration > Push Items (Found Set) from the Core menu at the top as shown in
Figure 21.17. In addition, you may select the “View in QuickBooks” option to conveniently open the item
in QuickBooks from the Core4.
Figure 21.17 - QuickBooks Items Push and View Options
Please note the following when pushing and viewing items from the Core4 to QuickBooks.
• Items without a QB List ID in the Core4 will be added as a new item in QuickBooks.
• If you push an existing item that matches an item in QuickBooks (identified by the List ID), then that
item will be updated.
• When you delete an item in the Core4, then you will be asked if you would like to delete the item in
QuickBooks.
• In order to push an item in QuickBooks, then the Type must be specified and the corresponding Accounts must also be specified.
• Inventory Assembly items are currently not supported and may not be pushed to QuickBooks at this
time.
• If an item is changed in the Core4, then the “Refresh QB” checkbox will be checked indicating that the
item needs to be refreshed or updated in QuickBooks. The “Refresh QB” checkbox can be found on the
Items > More Info tab.
User Manual – Core4 CRM
Page 131 of 153
Push and View Invoices
You have the option to push either a single invoice or to push the found set of invoices from the Core4 to
QuickBooks. Simply navigate to the Invoices module and select QuickBooks Integration > Push Invoice
(Single) or QuickBooks Integration > Push Invoices (Found Set) from the Core menu at the top as shown
in Figure 21.18. In addition, you may select the “View in QuickBooks” option to conveniently open the
invoice in QuickBooks from the Core4.
Figure 21.18 - QuickBooks Invoice Push and View options
Please note the following when pushing and viewing invoices from the Core4 to QuickBooks.
• Invoices without a List ID in the Core4 will be added as a new invoice in QuickBooks.
• If you push an existing invoice that matches an invoice in QuickBooks (identified by the List ID), then
that invoice will be updated.
• When you delete an invoice in the Core4, then you will be asked if you would like to delete the invoice
in QuickBooks. Invoices in QuickBooks are never deleted if they have associated payments. Also when
you void an invoice in the Core4, then you will be asked if you would like to void the invoice in QuickBooks.
• If an invoice is changed in the Core4, then the “Refresh” checkbox will be checked indicating that the
invoice needs to be refreshed or updated in QuickBooks. The “Refresh” checkbox can be found on the
Invoice > More Info tab.
• When a child QuickBooks record in the Core4 is used on an invoice, we will associate that invoice with
the parent QuickBooks contact when pushing.
• The list item marked as the default in the Core4 will be used on new invoices created when pushing
invoices or payments that require a valid list.
User Manual – Core4 CRM
Page 132 of 153
Chapter 22 - Apple Address Book Plug-in Integration
Overview
If using Apple® Address Book, then you may want to strongly consider using the Address Book integration features. Integration with Apple’s Address Book can be extremely powerful as one of the primary
goals is to avoid double entry and increase accuracy between FileMaker and Apple’s Address Book. Increasing accuracy and efficiency by avoiding double data entry is what most organizations strive for and
is the purpose for creating the Address Book integration. Address Book integration requires purchasing,
installing and registering the Address Book Manipulator plug-in, which is sold separately. The plug-in is
licensed, installed and registered on each client machine. You do not need to learn how to “program” in
order to use the “out of box” features discussed in this chapter; rather you simply just need to purchase,
install and register the Address Book Manipulator plug-in.
**IMPORTANT NOTE: plug-ins do not work with FileMaker Go and FileMaker WebDirect.
Please read this entire chapter for a detailed description of the exact integration functionality. The Core4
has the following “out of box” Address Book integration functionality:
• Pull all contacts from a specified group in Address Book.
• Push a single contact or a found set of contacts to a specified group in Address Book.
Address Book Manipulator Installation and Registration
After purchasing your Address Book Manipulator license(s), then follow these installation and registration
steps.
1. Close FileMaker.
2. Download the plug-in bundle from our site: www.addressbookmanipulator.com
3. Unzip the contents of the bundle. Copy and paste the actual plug-in into your FileMaker Extensions
folder located here: Volume/Applications/FileMaker X/Extensions (Volume is the name of the mounted
volume)
4. Open the Core4 CRM and navigate to Core > Preferences > Global Settings > Plug-ins > Register
Plug-ins tab. Enter your license ID, which is provided by Productive Computing, in the License ID field
and select the “Register” button.
Once successfully registered you should be running in LIVE mode as shown in Figure 22.0.
User Manual – Core4 CRM
Page 133 of 153
Figure 22.0 - Address Book Manipulator Registration
Pull Contacts
The intention of pulling your contacts from Apple’s Address Book into the Core4 is to perform a one-time
import to gather all contacts from Apple’s Address Book and populate those contacts in the Core4. After
the initial import, the Core4 will be used as the master repository for contacts from that point forward
and any new or edited contacts will be pushed to Address Book rather than the other way around. This
recommendation allows the Core4 to be the anchor by which all contacts are added, edited and deleted
where they are centralized, validated and secure. Address Book on the other hand may have an individual’s personal contacts, little or no security, no validation and may not provide a mechanism to enter all
the important specifics required by the organization.
With that said, there may be compelling reasons why organizations want the option to continuously update and modify contacts via Address Book. Use this with caution as there is no conflict resolution of any
kind. It is a one-way pull. An individual’s Address Book contacts will override anything in the Core4 when
a matching contact is found, even if that contact was last modified in the Core4. Matching contacts are
determined by the unique Core ID assigned to each Core contact. The Core ID is managed in the Core
and populated in a custom Address Book field.
In order to import all your contacts from Address Book to the Core4, navigate to Core > Preferences >
User Settings > Address Book Manipulator tab. Here you will specify the group name in Address Book
that you would like to import all contacts from. This group may or may not already exist and is unique to
each Core user. All contacts from ONLY this specific group will be imported. This keeps your Core4 contacts in a separate group in Address Book for simple organization. If this group does exist, then simply
move all contacts to be imported into this group. If the group does not exist, then please first create the
group in Address Book and then move all contacts to be imported into this group. Next select the “Contact Import” button as shown in Figure 22.1. All contacts from this group will be imported into the Core4
and will be assigned a unique Core ID, which is populated in a hidden custom field in Address Book.
Figure 22.1 - Importing Contacts from Address Book
User Manual – Core4 CRM
Page 134 of 153
Push Contacts
Using the plug-in you have the ability to push a single contact or your found set of contacts from the
Core4 to Apple’s Address Book. The intention of this feature is to allow the user to perform specific
“finds” of contacts in the Core4 and have those contacts pushed to Apple’s Address Book.
After insertion into Apple’s Address Book, you have great flexibility in how you can use those contacts
since there are numerous third party tools that allow you to connect Apple’s Address Book in a variety of
ways such as for use on a mobile device. This is especially useful for sales oriented users who may not
always be at a place to conveniently access the organization’s list of contacts in the Core4 directly using
FileMaker.
New contacts will be added and existing records will be updated ONLY in the group specified in Core >
Preferences > User Settings > Address Book Manipulator tab. If this group does not exist, then the group
will be created in Apple’s Address Book.
On subsequent pushes, records that were previously pushed to Apple’s Address Book will be updated and
new records will be added. We set a custom field in Apple’s Address Book to keep track of a unique Core
ID to allow for this functionality. Simply navigate to the Contacts module, and perform a find for the contacts you wish to push to Address Book. Next select Core > Push Contact to Address Book (Single) or
(Found Set) as shown in Figure 22.2 and either the single contact or all contacts in your found set will be
pushed to your specified group in Apple’s Address Book.
Figure 22.2 - Address Book Contacts Push Menu
Please note that the picture field is supported and will be populated
Basing the push on the user’s found set in the Core4 allows the user to virtually find any combination of
contacts under any criteria for maximum flexibility. For example, you may want to only push contacts
that are marked with a type of “lead” and located in New York.
If there is a matching contact found in Address Book (meaning a contact record in Address Book already
exists with the same Core ID) during the push process, then this contact will be overridden with information in the Core4 even if that contact’s data in Address Book is newer.
User Manual – Core4 CRM
Page 135 of 153
If for any reason, you need to clear the Core IDs in the custom field in Apple’s Address Book, then please
run the CNTCT__AB__Contacts_Clear_Core_IDs script, which may be found in the “Manage Scripts” area
in FileMaker Pro. This is a developer area and requires admin access, so please use with caution or contact your FileMaker developer. This script will simply clear the Core IDs for all contacts in Apple’s Address
Book. This script will NOT delete any records in FileMaker.
User Manual – Core4 CRM
Page 136 of 153
Chapter 23 - iCal Plug-in Integration
Overview
If using Apple® iCal, then you may want to strongly consider using the iCal integration features. Integration with Apple’s iCal can be extremely powerful as one of the primary goals is to avoid double entry and
increase accuracy between FileMaker and Apple’s iCal. Increasing accuracy and efficiency by avoiding
double data entry is what most organizations strive for and is the purpose for creating the iCal integration. iCal integration requires purchasing, installing and registering the iCal Manipulator plug-in, which is
sold separately. The plug-in is licensed, installed and registered on each client machine. You do not need
to learn how to “program” in order to use the “out of box” features discussed in this chapter, rather you
just simply need to purchase, install and register the iCal Manipulator plug-in.
**IMPORTANT NOTE: plug-ins do not work with FileMaker Go and FileMaker WebDirect.
Please read this entire chapter for a detailed description of the exact integration functionality. The Core4
has the following “out of box” iCal integration functionality:
• One way push all Core user events and tasks to a specified calendar in iCal.
iCal Manipulator Installation and Registration
After purchasing your iCal Manipulator license(s), then follow these installation and registration steps.
1. Close FileMaker.
2. Download the plug-in bundle from our site here: www.icalmanipulator.com
3. Unzip the contents of the bundle. Copy and paste the actual plug-in into your FileMaker Extensions
folder located here: Volume/Applications/FileMaker X/Extensions (Volume is the name of the mounted
volume)
4. Open the Core4 CRM and navigate to Core > Preferences > Global Settings > Plug-ins > Register
Plug-ins tab. Enter your license ID, which is provided by Productive Computing, in the License ID field
and select the “Register” button.
Once successfully registered you should be running in LIVE mode as shown in Figure 23.0.
User Manual – Core4 CRM
Page 137 of 153
Figure 23.0 - iCal Manipulator Registration
Push to iCal
Using the plug-in you have the ability to push all your events and tasks to a specified calendar in iCal.
The intention of this feature is to populate iCal with the Core user’s events and tasks. After insertion into
iCal, you have great flexibility in how you can use your calendar since there are numerous third party
tools that allow you to connect iCal in a variety of ways such as for use on a mobile device. This is especially useful for sales oriented users who may not always be at a place to conveniently access their calendar in the Core4 directly using FileMaker Pro.
First please ensure that you have User preferences setup. These settings are user specific and may be
setup in Core > Preferences > User Settings > Calendar / Tasks tab as shown in Figure 23.1 below. The
currently logged in user’s default calendar events and default tasks will be populated into the iCal calendar specified.
Figure 23.1 - iCal Setup in Core > Preferences > User Settings > Calendar / Tasks Tab
Simply navigate to the Calendar module and select the “Push Calendar to iCal” menu option as shown in
Figure 23.2 below. This will create a new iCal calendar with the iCal title you have specified in the preferences setup and will populate with the Core user’s default calendar events and tasks specified in the
preferences setup.
User Manual – Core4 CRM
Page 138 of 153
Figure 23.2 - iCal Push Menu
Please note that this is a ONE WAY purge and push. Each time you push to iCal, the iCal calendar is completely deleted and re-populated with the user’s Core4 events and tasks. Currently, event recurrences are
not supported. A bidirectional data exchange and support for recurring events are available by customization requests under Productive Computing’s paid support services.
User Manual – Core4 CRM
Page 139 of 153
Chapter 24 - FM Credit Card Plug-in Integration
Overview
If processing credit cards in the Core4, then you may want to strongly consider using the FM Credit Card
integration features. Credit card integration allows you to easily automate credit card processing. This
ensures accuracy and eliminates the need for double entry, which is what most organizations strive for
and is the purpose for creating the FM Credit Card integration. FM Credit Card integration requires purchasing, installing and registering the FM Credit Card plug-in, which is sold separately and requires that
you have a gateway account setup with PayPal or Authorize.net. The plug-in is licensed, installed and registered on each client machine. You do not need to learn how to program in order to use the “out of box”
features discussed in this chapter; rather you just simply need to purchase, install and register the FM
Credit Card plug-in.
**IMPORTANT NOTE: plug-ins do not work with FileMaker Go and FileMaker WebDirect.
Please read this entire chapter for a detailed description of the exact integration functionality. The Core4
has the following “out of box” FM Credit Card integration functionality:
• Automatically process a credit card payment through PayPal or Authorize.net
FM Credit Card Installation and Registration
After purchasing your FM Credit Card license(s), then follow these installation and registration steps.
1. Close FileMaker.
2. Download the plug-in bundle from our site here: www.fm-creditcard.com
3. Unzip the contents of the bundle. Copy and paste the actual plug-in into your FileMaker Extensions
folder located here: Volume/Applications/FileMaker X/Extensions (Volume is the name of the mounted
volume)
4. Open the Core4 CRM and navigate to the Core > Preferences > Global Settings > Plug-ins > Register
Plug-ins tab. Enter your license ID, which is provided by Productive Computing, in the License ID field
and select the “Register” button.
Once successfully registered you should be running in LIVE mode as shown in Figure 24.0.
User Manual – Core4 CRM
Page 140 of 153
Figure 24.0 - FM Credit Card Plug-in Registration
FM Credit Card Setup
Before you can begin automatically processing credit cards you will need to setup your FM Credit Card
preferences in Core > Preferences > Global Settings > Plug-ins > FMCredit Card tab as shown in Figure
24.1 below.
Figure 24.1 - FM Credit Card Tab to Setup Gateway Information
1. Select the Gateway you will be using. Currently PayPal and Authorize.net gateways are supported.
2. Select the Process Mode. “Test” mode will allow you to test your charges with a test gateway account. “Live” mode will allow you to process charges with your gateway in a live environment.
3. Enter the Gateway access information here. These credentials are provided by PayPal or
Authorize.net.
User Manual – Core4 CRM
Page 141 of 153
FM Credit Card Processing
Now you are ready to automatically process credit cards. Once you enter your payment and change the
payment method to a credit card type, then you will be prompted to enter the credit card number and
expiration date. Then select the “Process Credit Card” button as shown in Figure 24.2.
Figure 24.2 - Process Credit Cards in the Invoices > Payments Tab
Next you will receive a dialog asking you if you would like to “Manually mark credit card as processed” or
to “Process credit card through gateway.” Select the second option as shown in Figure 24.3.
Figure 24.3 - Process Credit Card Through Gateway
User Manual – Core4 CRM
Page 142 of 153
Once your payment has been processed, then the Payment Status will be updated to “Processed” and will
be marked with a date/time stamp of when the payment was processed as shown in Figure 24.4. If for
any reason an error occurs during the credit card processing, then you will receive an error dialog with a
detailed description of the error.
Figure 24.4 - Payment Status of Processed Transaction
User Manual – Core4 CRM
Page 143 of 153
Chapter 25 - FileMaker Go
Overview
The Core4 has been optimized to run on the free ‘FileMaker Go 13’ app for Apple® iPad. This allows you
to have your information at your fingertips at all times. Sales reps or field technicians can easily access
Contacts, Opportunities, Work Orders, etc. Many Core4 subscription packages come with access to FileMaker Go, please contact Productive Computing, Inc. if you need access to the FileMaker Go added to
your subscription.
Please note the following Core4 features are not available on FileMaker Go:
•
Printing and converting records to PDF
•
Core4 custom menu features such as Preferences, Exporting, Reports, etc.
•
Sending Orders to Technicians from the Orders module
•
Plug-ins functionality
•
Layout Mode and Preview Mode
The minimum iPad requirements for running FileMaker Go can be found here:
http://www.filemaker.com/products/filemaker-go/specifications.html
Connecting Core4 to FileMaker Go
Productive Computing, Inc. will provide each user a link to access the Core4 on the iPad. Users will need
to download and install the free ‘FileMaker Go 13’ app on the Apple® iPad.
Follow the following steps to connect to your Core4 file:
1. From your iPad click on the Core4 link provided by Productive Computing, Inc. via email.
2. Core4 will automatically open and request the user to sign in. The user will need to enter the same
login credentials set up in the Core4 desktop edition.
When opening ‘FileMaker Go 13’ app on the iPad after the initial connection, select the Core4.fmp12 file
and enter the login credentials.
User Manual – Core4 CRM
Page 144 of 153
General Use of the Core4 in FileMaker Go
Viewing Core4 Modules
All Core4 modules are available to view on the iPad. Many modules offer the option to view the data in
form view or list view. See samples in Figures 25.1 - 25.3. Easily move through all modules, tabs and
fields in the Core4 by touching the iPad screen.
Figure 25.1 - Contacts Module in Form View on the iPad
User Manual – Core4 CRM
Page 145 of 153
Figure 25.2 - Contacts Module in List View on the iPad
You can easily change the view by with Select Layout in the Core4 as shown in Figure 25.3. From the
bottom left side of the screen, touch the form icon and select Form or List.
Figure 25.3 - Change Views
User Manual – Core4 CRM
Page 146 of 153
Action Items
The quick links to Action Items are available in the Core4 FileMaker Go app under the “Action” button as
shown in Figure 25.4. Touch the Action button and select the appropriate action.
Figure 25.4 - Action Items
Find, Sort and Omit Records
You can quickly search for records with Quick Find or Enter Find Mode, Sort Records or Omit Records in
the Core4 as shown in Figure 25.5. From the bottom right side of the screen, touch the magnifying glass
icon and select the appropriate action.
Figure 25.5 - Find, Sort and Omit Records
User Manual – Core4 CRM
Page 147 of 153
Add or Delete Records
You can quickly Add New Record or Delete Record in the Core4 as shown in Figure 25.6. From the bottom right side of the screen, touch the plus/minus icon and select the appropriate action.
Figure 25.6 - Add or Delete Records
User Manual – Core4 CRM
Page 148 of 153
Technician Features
The Core4 allows Core Users and technicians to easily exchange electronic orders using the ‘FileMaker Go
13’ app for Apple® iPad. A Core User can send orders to technicians from the Core4 desktop. NOTE:
the “send order” action and feature is not available on FileMaker Go or FileMaker WebDirect.
The Core4 will automatically update as the technician adds information onsite, thus keeping orders up to
date and accurate. This paperless solution eliminates illegible hand writing, data entry mistakes and missing paperwork, thus increasing productivity and performance in your business!
Work Order Overview
The order (or technician file) allows technicians to fill out an order form using FileMaker Go on iPad.
When a Core User sends an order to a technician, the Core4 sends the order via email to the technician
as a “.fmpsl” file (FileMaker Pro 13 snapshot link). Once the technician opens the order and clicks on the
file it will open in Core4. The technician can easily view or edit fields and obtain signatures onsite which
will simultaneously update the Core4 system.
**Note: Although .fmpsl files may be opened using various mobile devices, Productive Computing, Inc.
highly recommends only iPad use with Core4 as layouts and functionality were specifically designed for
iPad.
Figure 25.7 - Order File Received by Technician
User Manual – Core4 CRM
Page 149 of 153
1. Displays the customer linked to the order. Touch the drop down arrow to modify.
2. View or edit the Title of the order.
3. View or edit the Date of the order.
4. You have the option to reference a purchase order (P.O.) number.
5. Displays the Order number created with the original order in Core4.
6. Displays the Appointment Date.
7. Displays the Appointment Time
8. Displays the Customer Billing Address linked to the order. Touch the drop down arrow to modify.
9. Displays the Customer Shipping Address linked to the order. Touch the drop down arrow to modify.
10. Description of Work is a free form field that allows a Core User to provide instructions or details about
the order to technicians in the field.
11. Technician Notes allows technicians to write notes via the iPad about the order that can immediately
be viewed by any Core User in the Orders > More Info tab.
12. Stages for Orders can be selected in the drop down menu.
13. Class is a way to further customize and identify an order. Classes can be selected in the drop down
menu.
14. Status of the order will reflect either “Pending” or “Signed” depending on signature input from the
technician/customer. Once a signature is captured, the status will change to “Signed”. This is a read
only field and cannot be modified.
15. Displays the technician assigned to the work order. The technician phone number will be pre-filled
based on the contact information in the Core4.
16. View or edit order line items.
•
Order line items can be added by simply typing in the Item field and selecting the appropriate
Item. The description, quantity, unit price, total and taxable fields can be edited directly on the
order. Please note that item inventory amounts are not affected through orders.
•
If you need to add additional line items to the order, select the blue New Line Item button.
•
Taxable items can be checked or unchecked directly on the order. Only items with the Taxable
check box marked will have tax applied to them.
•
The Sort column allows you to assign a sort number to move line items up and down.
17. Technician signatures can be captured electronically directly on the iPad. The technician taps in the
appropriate signature area, captures the signature by signing directly on iPad and it saves automatically to the signature field. The signature Date/time stamps reflect when the order was signed. All
User Manual – Core4 CRM
Page 150 of 153
edits and signature captures made to an order by a technician on an iPad will simultaneously update
the Core4 system.
18. Customer signatures can be captured electronically directly on the iPad using the same process in
Item 17.
19. Get Map will link to the Shipping Address displayed on the order.
20. Email the signed work order to the customer directly from the iPad.
User Manual – Core4 CRM
Page 151 of 153
Chapter 26 - FileMaker WebDirect
Overview
The Core4 has been optimized to run on most web browser via FileMaker WebDirect. This allows any
Core User to have access to your important business information at all times. Many Core4 subscription
packages come with access to FileMaker WebDirect, please contact Productive Computing, Inc. if you
need access to the FileMaker WebDirect added to your subscription.
Core4 WebDirect is intended for light use and has some limitations compared to the full functionality of
the Core4 desktop version. Please note the following Core4 features are not available on FileMaker WebDirect:
•
Printing and converting records to PDF
•
Emails can only be sent through a SMTP email method. This can be enabled through the Core4
preferences User Settings. Email attachments are not supported.
•
Core4 custom menu features such as Preferences, Exporting, Reports, etc.
•
Sending Orders to Technicians from the Orders module
•
Plug-in functionality
•
Layout Mode and Preview Mode
Supported web browsers:
•
Safari 6.1 or above
•
Internet Explorer 10 or above
•
Chrome 27 or above
For added security, WebDirect has a session timeout feature that will log out Core Users after the system
has been idle for approximately 30 minutes.
Connecting Core4 to FileMaker WebDirect
Productive Computing, Inc. will provide each user a link to access the Core4 through WebDirect.
Follow the following steps to connect to your Core4 file:
1. Click on the Core4 WebDirect link provided by Productive Computing, Inc. via email.
2. Core4 will automatically open and request the user to sign in. The user will need to enter the same
login credentials set up in the Core4 desktop edition.
User Manual – Core4 CRM
Page 152 of 153
Chapter 27 - Troubleshooting and Support
Troubleshooting Tips
There may be situations where the Core4, FileMaker Pro, or your computer experience a disruption in
normal operation. If Core4 does not appear to be functioning normally (especially if you are performing
an operation that has previously succeeded), then you can try the following steps to resolve the problem.
Re-open the Current Window
1. If the window in which the problem occurred is other than the main window, then close that window,
and re-open it. There may be occasions when the window has not refreshed properly and is not displaying the up-to-date data.
If the problem persists, or you cannot close the window, then continue with the following procedures.
Restart FileMaker and Re-open the Core4
1. Close Core4 and FileMaker Pro completely.
2. Re-open Core4 the way you normally do on your computer, and login normally. This will automatically
re-start the FileMaker Pro application.
If the problem persists, or you cannot re-open Core4, then try the next procedure.
Restart your Computer
1. Close all applications and restart your computer.
2. Re-open Core4 the way you normally do on your computer, and login normally. This will automatically
re-start the FileMaker Pro application.
If the problem persists, and Core4 is not operating normally, then please contact Productive Computing,
Inc. If we can determine that you have encountered a bug in the program, then you will not be charged
for the technical support contact. We are interested in maintaining the highest possible quality and reliability for Core4, and therefore we encourage you to let us know when you encounter unexplained problems.
Additional Support Resources
There are several other resources available for additional information about the Core4 CRM. It would be
very beneficial to review the training videos on our site at www.productivecomputing.com/video as these
videos visually explore the Core4 features.
If you need additional support please contact Productive Computing, Inc. via the avenues listed below.
Website: www.productivecomputing.com
Forum: www.productivecomputing.com/forum
Email: [email protected]
Phone: (760) 510-1200
User Manual – Core4 CRM
Page 153 of 153