1
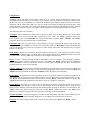
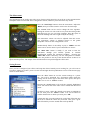
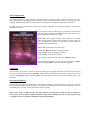
StompBox is a program that turns your Pocket PC into a personal practice amp and effects unit, ideal for
acoustic guitar players seeking a greater variety of sound. StompBox allows you to chain up to 9 effects in
any order and then save your settings as patches files that can be recalled at a later date.
Before You Start
StompBox uses either the internal microphone or external microphone/line input (where applicable) as a
sound source. If you are using the internal microphone as a sound source you must be listening via a set of
headphones otherwise you will hear feedback from the Pocket PC's internal speaker.
If you are connecting your instrument directly via an external microphone/line input, then you can use
external amplification as it should eliminate any feedback problems. This allows you to place StompBox
between instrument and amplification just as you would with hardware effects pedals.
Many popular makes of Pocket PC's have a multi-function 3.5mm headset jack
which has both microphone and headphones in a single socket. To use this
jack you will most likely require a headset adaptor allowing you simultaneous
both input and output.
The Dell Axim x50v, x51v and HP-4700 are just a few examples of Pocket PC
that support this type of adapter. Please check your Pocket PC user manual for
details on whether a headset is supported. Please note that the 3.5mm headset
jack has 4 connections.
Program Configuration
When you launch StompBox you will see the configuration screen. By default StompBox will select the
High Quality 44Khz mode which should work fine in most cases. If your Pocket PC has a 200Mhz processor
and you are suffering from a breakup of sound then you may want to consider dropping to 22Khz mode.
In order for the program to work efficiently then it is important
you find the correct Latency setting to work with your model of
Pocket PC. Latency is defined as the time taken for the input
signal to be processed and finally passed to the output device.
Setting a low latency value will decrease the delay but can often
result in sound breakups. A high latency value will increase
stability but result in a longer delay. The best latency setting is
that which gives the shortest delay with stable sound. This will
vary from one Pocket PC to another. You can obtain a better
latency using 22Khz mode, at the expense of sound quality.
Power On
To start the program, press the big ‘Red Rocker’ button on the
configuration screen. If you hear feedback then this is because
you haven't plugged in a set of headphones or headset adapter.
Effects Chains
The configuration screen shows a list of all effects available and whether they are currently on or off. The
effects are routed in the order that they appear in the list. You can move any effect up or down in the chain
which can result in a very different sound. For instance, placing a Phaser before the overdrive will sound
totally different to placing the Phaser after the distortion.
You can move an effect by highlighting an effect in the list then pressing the ‘Move Up’ or ‘Move Down’
buttons. Pressing the ‘Default’ button will undo any effect ordering you may have made.
Pressing the ‘Edit Effect’ Button allows you to change the effect parameters. Pressing the ‘On/Off’ button
or double clicking an effect toggles it's status between on and off.
Navigating the Effects
The direction pad on your Pocket PC can be used to quickly move between the various StompBox screens.
Pressing the ‘left’ and ‘right’ arrows scroll between the following areas of the program.
Configuration <> Effects Pedals <> Load/Save Presets <> Metronome <> Loop Recorder
So from the configuration screen pressing the ‘right’ arrow will display the effects pedals screen. Pressing
‘right’ a second time displays the Load/Save Presets and so on.
Program Areas
Pressing the ‘up’ and ‘down’ buttons whilst an effects pedal is on display will allow you to move up and
down the all 9 effects in the chain. The order they appear is the order the sound is being processed.
The following diagram represents the order of navigation using the direction pad. Pressing ‘left’ and ‘right’
move between program modes whilst ‘up’ and ‘down‘ to navigate the effects chain.
Previous Effect
Configuration
Effects Pedals
Next Effect
Load Presets
Metronome
Loop Recorder
Using Effects
StompBox passes the audio input though a chain of up to 9 effects before outputting the sound to your
headphones. Each effect has it’s own unique set of controls, but one parameter is common to them all, the
input level. This is very important as it controls the amount of input signal to be processed. If you can hear
distortion, and an effects Peak LED is lit, then you need to turn down the input signal on that effect. Most
effects also have a Mix knob. This controls the amount of effected signal to pass though the effect. Turning
the Mix knob to the left will pass a dry signal, whilst turning the mix to the right will pass a wet signal.
The following effects are available:Overdrive: Adds a distortion or crunch effect to the input sound. This is widely used by rock / heavy metal
guitar players, but can also used on other instruments or even vocals. The ‘Drive’ parameter controls the
level of input signal, and ‘Saturation’ the amount of distortion. Separate ‘Bass’, ‘Middle’ and ‘Treble’
parameters allow you to control the tone of the distortion.
Parametric EQ: This is used to boost a certain frequency giving a nasal filtered quality to the sound. The
‘Frequency’ knob and ‘Boost’ are used to boost a frequency whilst the ‘Resonance’ controls the bandwidth
of the boosted frequencies. This type of equalizer is often used in conjunction with Overdrive to give greater
control over the tone.
Pitch Shifter: Allows you to transpose the input signal up or down by a given number of semitones. Please
note that the pitch shifter imposes a 100ms delay into the signal path. Use the ‘Semitones’ knob to select the
amount of shift. Turn the ‘Mix’ fully clockwise to hear only the shifted sound.
Phaser: Creates a swirling spiraling sound by attenuating a series of ‘notches’ in the frequency spectrum.
The position of these notches is modulated over time. The ‘Rate’ and ‘Depth’ knobs control the modulation
whilst ‘Feedback’ is used to control the amount of output signal fed back into the input. Increasing the
feedback makes the effect more noticeable.
Chorus / Flanger: Used to expand or thicken the sound by playing multiple versions of the input signal with
slightly different delays and changes in pitch simulating an ensemble of the input sound. The ‘Speed’ and
‘Depth’ control the modulation whilst the ‘Feedback’ makes the effect more noticeable.
Digital Delay: An effect that is used to add depth or space to an audio signal by repeating the input one or
more times after a brief pause of a few milliseconds to a few seconds. Delay is also often referred to as echo.
The ‘Delay’ knob controls the distance between echoes and the ‘Decay’ controls the number of repeats. The
‘Cutoff’ knob controls the brightness of the delays, acting as a frequency cutoff filter.
Digital Reverb: This effect uses is similar to echo, but instead of discrete, long delay repeats, it is a series of
very short delays that add up to create a sense of spaciousness in the tone. When sound is produced in an
enclosed space multiple reflections build up and blend together creating an ambience or reverberation. The
‘Delay’ controls the distance between reflections and the ‘Decay’ controls the repeats. The ‘Filter’ knob
allows you to cut/boost the high and low frequencies, depending on the LP/HP button.
Graphic Equalizer: This effect simply cuts of boosts certain frequencies within the signal. It can be used to
prevent feedback by cutting offending frequencies or for adding extra bass and treble to the mix.
Tremolo: This effect simply modulates the volume at a given rate using ‘Speed’ and ‘Depth’ controls.
The Metronome
The metronome can be used to provide a sense of tempo whilst practicing. In order to use the metronome the
StompBox must be turned ON in the configuration screen, otherwise you will not hear any sound.
Press the ‘Start/Stop’ button to hear the metronome. Adjust the
‘BPM’ (beats per minute) knob to achieve the desired tempo.
The ‘Accent’ knob can be used to change the time signature.
Setting the accent to 4 will result in every forth beat being louder
and effectively give you a 4/4 time signature. Place the stylus on
the knob and drag from left to right to adjust the setting.
The metronome volume can also be adjusted from this screen.
The metronome volume is adjusted relative to the global
StompBox volume on the configuration screen.
Another handy feature is the ability to play a ‘440Hz’ test tone
which can be used to check if your instruments are in tune.
The ‘Mute Mic’ button is handy if you want to hear the
metronome through your internal speaker or external
amplification without the unwanted feedback. Pressing the
‘Mute Mic’ button effectively cuts the microphone or headset
input. When this option is selected it is therefore not possible to use any of the internal effects as there is no
input sound to process. The output of the metronome does not pass through the effects unit.
Saving Presets
Once you have configured your effects and setup the desired sound you are looking for, you will want to
save these settings as a patch / preset. Use the left and right direction pad buttons to move to the Presets page
which is shown below.
Press the ‘Save’ button to save the current settings to a .preset
file. You will be prompted for a description under which the
settings will be saved. Type in the name of the preset, then press
‘OK’ save to save or ‘Cancel’ to abort.
Pressing the ‘Load’ button will recall the currently highlighted
preset. All effects and effect order will be loaded from the saved
preset.
To delete a preset, ensure the desired preset name is highlight in
the list then press the ‘Delete’ button. You will be asked to
confirm the deletion to which you must press ‘OK’
A patch not only saves the settings for each of the effects but also
the order in which the effects are processed. This gives a great
deal of flexibility over the sounds that can be produced.
The Loop Recorder
The Loop Recorder is a great practice tool which allows you can use this to capture a few bars or even a
whole song (memory permitting). This can then be used as a backing track for you to play along with. For
example, a guitarist may want to record a few bars of rhythm over which he can practice a lead solo.
In order to use the loop recorder you must first ensure StompBox is turned ON using the switch on the
configuration screen.
If you decide to record a whole song, it is possible to select which
part of the song is played in a continuous loop. This allows you to
practice different sections of the song.
Please Note: The sample recorder stores sound in raw format
which means samples occupy large amounts of storage space. If
you are wishing to record very large loops please install the
software on an expansion card.
Follow these instructions to record a loop:1) Press the ‘Record’ button to begin recording.
2) Press ‘Stop’ when recording is complete.
3) Press ‘Play’ to listen to the sample.
If you wish to repeat the sample, press the ‘Repeat’ button.
You can suspend playback at any time by pressing the ‘Pause’
button. Pressing ‘Pause’ again will continue playback.
Loop Points
If you wish to repeat only a section of your recording, move the playback slider to the start of the section
you wish to repeat and press the ‘Loop Start’ button. Move the slider to the end of the section to repeat and
press the ‘Loop End’ button. Pressing ‘Play’ will now only play the section of the recording you’ve just
specified.
Recording With Effects
If you enable any of the effects then these will also be recorded. If you are sampling a section of a CD then
you will need to disable the effects before you make the recording. If however you are recording a few bars
of rhythm guitar you may wish to add effects to the recording.
Please Note: Loop recordings occupy very large amounts of storage space. Only one loop recording can
exist at any one time, and you will be prompted to delete the recording when you exit the program. Loop
recordings cannot be exported or loaded into external applications.
Troubleshooting
The following are a set of questions and answers which should help you solve any problems you might be
having with Pocket StompBox.
Q) When I turn StompBox on all I hear is a loud squealing noise, why is this?
A) This is something called feedback, which is caused when the sound from a speaker is being passed back
through a microphone. This created an infinite loop and results in a loud squealing sound. To resolve this
issue you need to connect a set of headphones or a headset adapter to your Pocket PC.
Q) I can’t hear anything through my headphones, what am I doing wrong?
A) Have you turned StompBox on using the ‘On/Off’ switch in the configuration screen? You should also
check that the master volume is turned up and that your Pocket PC’s audio device isn’t muted.
Q) The sound is breaking up and I can hear loud clicks through the headphones.
A) You probably need to adjust the ‘Latency’ setting in the configuration screen. Increasing the latency
makes the program more stable but increases the delay between sound coming into your Pocket PC and that
coming out of the headphones.
Q) There is a lengthy delay between me playing my guitar and what comes out of the headphones.
A) You need to adjust the latency setting in the configuration screen. Decreasing the latency will help solve
the problem, but using excessively low values may cause instability and breakup of sound. In some cases
setting a very low latency may result in an ever increasing delay of sound. This is because your Pocket PC
can’t keep up with the latency value you have selected. To resolve this issue try setting a larger latency
value.
Q) I’m setting the Latency very low but it doesn’t seem to make any difference.
A) Your Pocket PC will have an internal overhead which will vary from one model of Pocket PC to another.
Setting below a certain threshold will have no effect on the overall speed of audio processing. You Pocket
PC receives blocks of audio samples from the microphone. These blocks are then passed through several
effects before finally being passed on to the audio output device. This all takes time, hence the delay.
Reducing the Latency setting will reduce the size of the block of data being processed, but the operating
system may impose it’s own physical limits in terms of how smaller blocks it can handle. This can either
result in a breakout of sound or an ever increasing delay. If you wish to achieve lower latencies you could
try reducing the sample rate to 22Khz.
Q) Why can’t I hear any output from the metronome or the 440Hz test tone?
A) You must turn on Pocket StompBox before you start the metronome, otherwise you won’t hear anything
through your headphones.
Q) I can hear distortion being introduced when I enable certain effects.
A) Each effect has a peak LED which lights if you exceed the maximum input. To avoid signal clipping turn
down the input level for the effect who’s peak indicator is lit.
Q) There seems to be excessive noise when I’m not playing, why is this?
A) Your Pocket PC has an automatic gain control (AGC) which amplifies quiet sounds rather like an audio
compressor. This is useful for the voice recorder application but it does tend to amplify unwanted noise..
You can turn off this feature from your Pocket PC’s settings screen.
Q) Can I load the loop recording into an external program.
A) No, the loop recording is not stored in a standard file format.
Q) The loop recorder doesn’t appear to be working correctly. When I press Play nothing happens?
A) The loop recorder will only function if StompBox is turned on in the configuration page.
Technical Support
If you have and problems or questions not covered by this manual, you can contact us as follows:
Web Site: www.4Pockets.com
Support Email: [email protected]