1
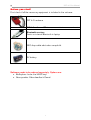
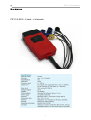
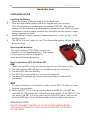
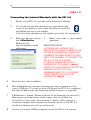
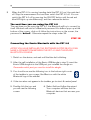
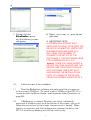
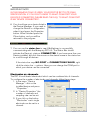
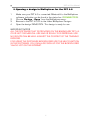
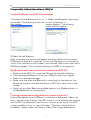
PET 4.0 + BioExplorer
Installation Manual
PET 4.0 User Manual
J
Index
What
Page
For your safety
3
Before you start
4
Hardware
5
Recommendations
6
Hardware notes
7
Software notes
9
Step 1
9
BioExplorer installation
Step 2A Internal Bluetooth installation
9
Step 2B Ezurio installation
10
Step 3A Connecting the Int.Bluetooth with the PET 4.0
11
Step 3B Connecting the Ezurio with the PET 4.0
12
Step 4
15
Connecting PET 4.0 and BioExplorer
Working with BioExplorer
17
BioExplorer best practices
19
Electrode use
20
FAQ
23
Support & Warranty
26
2
PET 4.0 User Manual
J
For your safety
Read these simple guidelines. Not following them may be dangerous or illegal.
Read the complete user guide for further information.
SWITCH ON SAFELY
Do not switch the PET 4.0 on when bluetooth use is prohibited or when it may
cause interference or danger.
INTERFERENCE
PET 4.0 may be susceptible to interference, which could affect performance.
SWITCH OFF IN AIRCRAFT
Follow any restrictions. Wireless devices can cause interference in aircrafts.
SWITCH OFF NEAR BLASTING
Follow any restrictions. Do not use the PET 4.0 where blasting is in progress.
USE SENSIBLY
Use only in the normal position as explained in the product documentation.
QUALIFIED SERVICE
Only qualified personnel may install or repair this product.
ENHANCEMENTS AND BATTERIES
Use only approved enhancements and batteries. Do not connect incompatible
products.
WATER-RESISTANCE
Your PET 4.0 is sweat-resistant NOT water-resistant. Keep it dry.
CONNECTING TO OTHER DEVICES
When connecting to any other device, read this user guide for detailed safety
instructions. Do not connect incompatible products.
Enhancements
A few practical rules about accessories and enhancements.
• Keep all accessories and enhancements out of the reach of small children.
• When you disconnect the power cord of any accessory or enhancement, grasp
and pull the plug, not the cord.
• Installation of any complex enhancements must be made by Brainquiry personnel
only. Otherwise there will be no support.
3
PET 4.0 User Manual
J
Before you start!
First check if all the necessary equipment is included in the suitcase:
PET 4.0 hardware
PET 4.0 software CD (licenses not included to activate software)
Bluetooth receiver:
Ezurio or internal Bluetooth in laptop
EEG disposable electrodes sample kit
3V battery
Software needs to be ordered separately. Options are:
• BioExplorer (order the HASP key)
• Neuropuzzles (Neurofeedback Game)
4
PET 4.0 User Manual
J
Hardware
PET 4.0 EEG - 6 lead – 4 channels
5
PET 4.0 User Manual
J
Recommendations
System requirements
Recommended Computer Configuration:
• Windows XP- Service Pack 2
• Microsoft’s DirectX version 9.0b or later
• 2 GHz Pentium 4 or faster
• 512 MB RAM or more
• SoundBlaster or compatible sound card
• A graphics card with 3D and DVD video acceleration and 64MB or more
dedicated video RAM.
INTEGRATED VIDEO SYSTEMS THAT SHARE MEMORY WITH THE
PROCESSOR ARE NOT RECOMMENDED.
Assuming your PC meets the other requirements, a fast video card will give
you the best results. Cards targeted at the gaming or multimedia market
with newer chipsets from ATI or NVIDIA should work well. Two cards or a
single card with dual independent video outputs are required for dual monitor
display.
• DVD compatible drive
• WinDVD 6 or PowerDVD 6 for DVD playback
Download software updates from www.brainclinics-products.com under
downloads.
6
PET 4.0 User Manual
J
Read this first
HARDWARE NOTES
1
2
Installing the Battery
Open the battery holder by pulling off the black cap
Take the disposable battery that was shipped with your product.
This 3-Volt battery is marked with the number CR123A. This type of
battery can be ordered at www.brainclinics-products.com. Often this type
of battery is used in photo cameras and therefore can be found in shops
where cameras are sold.
3
4
Install battery in correct position. Never place the ‘+ pole’ on the ‘- pole’
and vice versa.
The PET 4.0 is now ready for use. The disposable battery will last for about
8 hours of use.
Rechargeable batteries
This type of battery (CR 123A) can also be
ordered as a rechargeable battery. The charger
for this type can also be ordered at
www.brainclinics-products.com.
How to switch the PET 4.0 ON or OFF
ON
1 Switch on the PET 4.0 by shortly pressing the on/off button on top.
2 The red and blue LED will light up simultaneously for some time.
3 The blue LED will start blinking.
4 The PET 4.0 is now ready to connect with bluetooth.
5 The blue LED will light up continuously when there is a bluetooth
connection.
OFF
1 To save the battery it is advised to switch off the PET 4.0 after you have
finished your activities.
2 When the PET 4.0 is running (sending data) the PET 4.0 can NOT be
switched off. Shut down the software and then switch off the PET 4.0. You
can switch the PET 4.0 off by pressing the ON/OFF button until the red
and blue LED lights lit up simultaneously, and then release the button.
IMPORTANT NOTE
NEVER CONNECT THE PET 4.0 TO AC POWER LINES USING A
VOLTAGE CONVERTER. THIS COULD ENDANGER THE SAFETY
OF THE USER.
7
PET 4.0 User Manual
J
Only for advanced users
The DLL can be used for implementation of the PET 4.0 or PET in other
software. On demand the DLL /Source code can be provided by Brainquiry.
Please contact us for information on [email protected].
Other software provided on the CD
Freeware
• Neuropuzzles (license can be bought at www.brainclinicsproducts.com)
• JAVA 1.4.2_07
License required
• BioExplorer software
• BioEra (for purchase, installation and support visit
http://www.proatech.com/products/)
Games
• Neuropuzzles Lite (as freeware)
For information about buying the license of the software,
please contact Brainclinics.
8
PET 4.0 User Manual
J
Software notes
IMPORTANT NOTE
ALL THE SOFTWARE THAT IS PROVIDED ON THE BRAINQUIRY PET 4.0
CD IS NOT FOR MEDICAL USE AND IS SOLELY FOR PERSONAL USE.
Please follow the steps that are indicated in this installation manual
STEP 1 Install the BioExplorer software
A Use the Bluetooth receiver in your own laptop
STEP 2
B Install the Ezurio Bluetooth receiver
A Connect the internal Bluetooth with PET 4.0
STEP 3
B Connect the Ezurio with PET 4.0
STEP 4 Connect the PET 4.0 with the BioExplorer software
Page 9
Page 9
Page 10
Page 13
Page 15
Page 17
STEP 1
BioExplorer Software installation
HASP = USB key with
BioExplorer license
BioExplorer installation
1 Put the PET 4.0 CD in your computer.
2 Browse to the CD ROM and go to the directory
\BioExplorer
3 Double click the installation file
BE1.5.1.510Setup.exe.
4 Follow the installation steps until the installation is finished.
5 After installation of BioExplorer a screen will appear asking you to install
he HASP-driver. Please also finish this installation.
This is essential!
STEP 2A
Internal Bluetooth
To check if you have Bluetooth available on your laptop you need to consult
the manual of your own laptop. Any Bluetooth receiver will be able to
connect with the PET 4.0. Follow the instructions to find Bluetooth devices in
the area of your laptop.
To connect the Bluetooth with the PET 4.0 read more on page 11.
9
PET 4.0 User Manual
J
STEP 2B
Ezurio USB-bluetooth dongle installation
FOR EZURIO BLUETOOTH INSTALLATION WINDOWS XP SERVICEPACK
2 HAS TO BE INSTALLED.
1. The Ezurio dongle will install the software automatically when the dongle
is put into the USB port.
2. Click through all windows that appear and install what is necessary.
3. If the installation is successful, Windows will not find new hardware
anymore and the Ezurio is installed correctly.
IMPORTANT NOTE
IF AFTER THIS INSTALLATION WINDOWS AGAIN FINDS NEW
HARDWARE, JUST PUT IN THE EZURIO DONGLE INTO THE USB PORT
AGAIN AND CONTINUE OR REPEAT THE PROCESS.
10
PET 4.0 User Manual
J
STEP 3 A
Connecting the internal Bluetooth with the PET 4.0
1
Switch on the PET 4.0, and wait until the blue led is blinking.
2
You should now see the following icon in the bottom right
corner of the taskbar in your screen (the Blue icon with the
white Bluetooth logo in the middle):
If the icon does not appear in the taskbar, go to start Æ control panel
3
Search for devices until you
find a BlueRadios
Bluetooth chip,
and the following screen
will appear:
4
Select ‘use no key’ or ‘geen sleutel
gebruiken’
IMPORTANT NOTE
A SCREEN WILL APPEAR THAT
INDICATES TO WHICH COMPORT THE
DEVICE IS CONNECTED. WRITE THIS
NUMBER DOWN BECAUSE YOU WILL
NEED THIS NUMBER TO CONNECT THE
PET 4.0 TO THE SOFTWARE.
IF THE SOFTWARE ASKS FOR A
PASSWORD IT IS ALWAYS ‘default’.
ONCE YOU HAVE ADDED A DEVICE THE
INTERNAL BLUETOOTH WILL
REMEMBER AND TRY TO CONNECT
ITSELF, ASKING YOU FOR THE
PASSWORD ‘default’.
5
Finish the rest of the installation.
6
Start the BioExplorer software and make sure that you measure on the
correct COM-port. (To check to which COM-port the PET 4.0 is connected
with the Aircable dongle, see Frequently Asked Questions on page 25).
7
If BioExplorer is started, Windows will ask for the bluetooth password (if a
balloon pops up at the bottom of the screen, click on it) follow the
instructions on the screen, the password is ‘default’. When there is a
connection between the hardware and software, the led on the PET 4.0
should stop blinking and is lid up continuously.
8
To point out another COM-port please consult the FAQ in this manual.
11
PET 4.0 User Manual
J
9
When the PET 4.0 is running (sending data) the PET 4.0 can’t be switched
off. Stop the measurement first and then switch the PET 4.0 off. You can
switch the PET 4.0 off by pressing the ON/OFF button until the red and
blue LED lights up simultaneously, and then release the button.
The next time you are using the PET 4.0
The next time you are using the PET 4.0, the Bluetooth will try to connect by
itself. Windows will ask for a Bluetooth password (if a balloon pops up at the
bottom of the screen, click on it) follow the instructions on the screen, the
password is ‘default’. Otherwise repeat the steps under 3A.
STEP 3B
Connecting the Ezurio Bluetooth with the PET 4.0
AFTER YOU HAVE INSTALLED THE SOFTWARE IN STEP 2B YOU CAN
MAKE A CONNECTION BETWEEN THE PET 4.0 AND THE EZURIO
BLUETOOTH DONGLE.
1. Switch on the device, and wait until the blue led is blinking.
2. After the self installation of the Ezurio USB-dongle in step 2, insert the
Ezurio USB-dongle into the USB-port you installed the dongle on.
Remember which port you used to install the dongle.
3. You should now see the following icon in the bottom right corner
of the taskbar in your screen (the Blue icon with the white
Bluetooth logo in the middle):
4. If the icon does not appear in the taskbar, go to start Æ control panel
5. Double click the icon and
you will see the following
screen:
6. Select Add and follow the wizard.
Your computer will then find the
Bluetooth devices that are near your
computer.
12
PET 4.0 User Manual
J
7. Double click the
BlueRadios device,
and the following screen
will appear:
10.
8. Select ‘use no key’ or ‘geen sleutel
gebruiken’
9. IMPORTANT NOTE
A SCREEN WILL APPEAR THAT
INDICATES TO WHAT COM-PORT THE
DEVICE IS CONNECTED. WRITE THIS
NUMBER DOWN BECAUSE YOU
WILL NEED THIS NUMBER TO
CONNECT THE PET 4.0 TO THE
SOFTWARE. IF THE SOFTWARE ASKS
FOR A PASSWORD FILL OUT
‘default’. ONCE YOU HAVE ADDED A
DEVICE YOU CAN ALWAYS USE THE
DEVICE (USE THE EZURIO DONGLE
INTO THE SAME USB-PORT AS IT
WAS DURING THE INSTALLATION)
UNTIL YOU REMOVE THE DEVICE
FROM THE SCREEN UNDER POINT 4.
Follow the rest of the installation.
11.
Start the BioExplorer software and make sure that you measure
on the correct COM-port. (To check to which COM-port the PET 4.0 is
connected with the Ezurio dongle, see Frequently Asked Questions on
page 25).
12.
If BioExplorer is started, Windows can ask for a bluetooth
password (if a balloon pops up at the bottom of the screen, click on it)
follow the instructions on the screen, the password is ‘default’. When
there is a connection with the hardware and software, the led on the
PET 4.0 should stop blinking and is lid up continuously.
13
PET 4.0 User Manual
J
13.
To point out another COM-port please consult the FAQ
on page 22 in this manual.
14.
When the PET 4.0 is running (sending data) the PET 4.0 can not
be switched off. Stop the measurement first and then switch the PET
4.0 off. You can switch the PET 4.0 off by pressing the ON/OFF
button until the red and blue LED lights lit up simultaneously, and then
release the button.
IMPORTANT NOTE
WHEN YOU REMOVE THE EZURIO FROM THE USB-PORT, MAKE SURE
THAT THE NEXT TIME YOU USE IT, IT WILL BE INSERTED IN THE SAME
USB-PORT AS IT WAS DURING THE INSTALLATION.
The next time you are using the PET 4.0
The next time you are using the PET 4.0 with the Ezurio Bluetooth dongle the
PET 4.0 will try to connect by itself. Windows will ask for a bluetooth
password (if a balloon pops up at the bottom of the screen, click on it) follow
the instructions on the screen, the password is ‘default’. A Otherwise repeat
the steps under 3A.
14
PET 4.0 User Manual
J
STEP 4
Connecting the Brainquiry PET 4.0 to the BioExplorer
software
First time use
If you are using the PET 4.0 for the first time you will have to install the
Brainquiry driver into the software.
Install drivers per device:
PET 4.0 use the QPET driver
(PET EEG = Brainquiry driver / PET GSR = Brainquiry PET driver)
Where can I change or add the driver for my PET 4.0?
You can change the driver by following the points 1 to 8.
1
2
3
4
5
6
Run the software BioExplorer by
double clicking the icon on your desktop.
Make sure the connection between the
PET 4.0 and the bluetooth dongle is made
described in step 3.
Choose ‘Devices’ from the BioExplorer
menu. This will display the Device
Manager dialog. The Device Manager
allows you to add and remove devices
and set device properties.
Press the ‘Add’ button on the Device Manager
dialog, displaying
the New Device dialog.
For PET 4.0 Choose QPET in the
drop down box, and press OK.
At this point the Device Properties dialog will be
displayed. This is where you specify how the PET
4.0 is connected to your computer. Please only
set the
COM-port for your device. Press Ok
15
PET 4.0 User Manual
J
IMPORTANT NOTE
IN THE EXAMPLE COM1 IS USED. YOUR PORT IS SET TO ITS OWN
SPECIFICATION. IF YOU DON’T KNOW TO WHAT COM PORT YOUR
DEVICE IS CONNECTED PLEASE READ THE FAQ; TO WHAT COM PORT
IS MY DEVICE CONNECTED?.
6 You should see your device listed in
the Device Manager. If you need to
change the Device’s configuration,
select it and press the Properties
button. When finished press the
Close button, and you will be
returned to the program.
7 You can use the status bar to see if BioExplorer is successfully
communicating with the Brainquiry PET 4.0. The Status Bar should
indicate the Device’s state as CONNECTED. If you have more than one
Device installed, left click the mouse on the device name in the status bar
to scroll through all devices.
If the status bar says NO PORT or CONNECTION FAILED, right
click the status bar -> options. Here you can change the COM port to
which your device can be connected.
Electrodes vs channels
The PET 4 has 6 leads (electrodes) which can be combined into 4 channels.
To configure the number of electrodes and channels follow these steps:
1. In the menu “Device
Manager” click on the
installed device and press
“Properties”.
2. In “Device Properties” the
number of channels and
sampling rate can be set.
3. If you click on the button
“Electrodes” each single
electrode can be set to a
channel.
16
PET 4.0 User Manual
J
4. Opening a design in BioExplorer for the PET 4.0
1
2
3
4
Make sure your PET 4.0 is connected (Bluetooth) to the BioExplorer
software, indication can be found in the status bar (CONNECTED)
Choose ‘Design - Open’ from the BioExplorer menu.
Browse to the PET 4.0 CD to the folder BioExplorer Designs.
Open the design DEMO PET4. This design is ready for use.
IMPORTANT NOTES
ALL THE SOFTWARE THAT IS PROVIDED ON THE BRAINQUIRY PET 4.0
CD IS NOT FOR MEDICAL USE AND IS SOLELY FOR PERSONAL USE.
NO RIGHTS CAN BE HELD AGAINST THE CONTENT OF THE TRAINING
DESIGNS.
FOR USING THE SOFTWARE BIOEXPLORER USE THE HELP FUNCTION
IN THE SOFTWARE. YOU CAN ALSO SIGN UP FOR THE BIOEXPLORER
YAHOO LIST ON THE INTERNET.
17
PET 4.0 User Manual
J
What is BioExplorer?
BioExplorer is a Windows program for real-time biophysical data acquisition,
processing, and display. It is intended for personal use in entertainment,
education, and experimentation.
BioExplorer allows you to process and display data from your devices any
way you want. You can work with data received from one or more devices in
real time, or play back and analyze a previously recorded session.
BioExplorer uses a ´Design´ to tell it what to do with data from your device.
A design consists of a Signal Diagram and a set of Instruments.
You graphically create a Design by
adding objects to the Signal Diagram and
wiring them together by simply pulling an
arrow between two objects..
Then configure your Design by double
clicking objects to set their properties.
Here’s an example of the Band pass
Filter property page:
If any of the objects added to the
Signal Diagram have user interfaces, or
Instruments, they are automatically
added to the Instruments window. You
can position these however you want.
When you have the Instruments positioned, just press play to process and
display data from your device in real time!
For more information about the use of BioExplorer, please consult the Help
function in the software module itself.
18
PET 4.0 User Manual
J
BioExplorer ‘best practices’
1. The signal from the PET 4.0 source is a raw signal, it has to be filtered
before it goes into the oscilloscope. Use a High Pass (2Hz,
th
Butterworth, 6 order) and a Low Pass (42Hz, FIR, 60 length) for this.
With these you know for certain that the slow DC components will be
adequately filtered out. The low pass will further eliminate 50 Hz noise,
EMG and other high frequency activity. For visualizing EMG or ECG
one can adjust the high pass and low pass filter setting accordingly.
2. It is recommended for an EMG filter or an EMG inhibit to optimally use
the full bandwidth of the PET EEG by using a High Pass of 55 Hz (EU)
or 65 Hz (US) (FIR, order 100). Connect this to the expression
evaluator (In1*In1*100000) to get RMS EMG (square the signal to get
a positive value). Using this implementation ensures you only get
EMG, not 50Hz, gamma or high-beta!
3. As a real-time impedance filter it is recommended to use a Band pass
th
filter of 48-52 Hz (EU) or 58-62 Hz (US) (Butterworth, 16 order) as
impedance filter. You connect the Amplitude (NOT signal) of this filter
to a threshold object. This value normally has to be under the 20-50
microvolt, if not re-apply the electrodes again and try to get a better
contact between the electrodes and the skin.
4. In case you use the PET EEG 2 channel for example for Coherence
training, this impedance filter ALSO has to be present and controlled
for, for this second channel. Both channels have to have a clean and
noise free signal. The same is true for visualizing both EEG, then the
High-pass and Low-pass filters need to be in place (as in 1).
5. In general: the amplitude of the band pass filter is usually connected to
a bar graph or threshold object and the signal to an oscilloscope!
6. Never link two or more filters serially (behind each other) except in the
case of a high-pass and low-pass filters, otherwise the delays of these
filters will add up and will lead to less efficient neurofeedback learning
curves.
It is better to use an IIR filter for the filter settings for the slower bands,
When you go higher in frequency a FIR is better. Always look closely to the
frequency course and look for the optimum between a specific filter and an
adequate delay (0.25s max).
19
PET 4.0 User Manual
J
Electrode Use
Tips and tricks for using the active electrodes
IMPORTANT NOTES
1
DO NOT USE THE ACTIVE ELECTRODE DIRECTLY ON THE SKIN
OR SCALP. ALWAYS USE A DISPOSABLE OR REUSABLE
ELECTRODE AS INTERFACE.
2
DON’T EVER PUT CONDUCTIVE PASTE DIRECTLY ON THE ACTIVE
ELECTRODE. EXCESSIVE PASTE CAN BE REMOVED FROM THE
ACTIVE ELECTRODE BY WASHING OFF WITH A MOIST COTTON
CLOTH.
3
PLEASE FOLLOW THESE INSTRUCTIONS TO AVOID CORROSION
OF THE ELECTRODES.
Electrode type:
For use on the skin
1. For usage on the mastoids (ground and reference) it is
advisable to use the disposable electrodes
2. First clean the skin with an alcohol swipe
3. Snap the disposable electrode on the active electrode
4. Peel off the plastic cover and place the electrode on the skin
5. Make sure the pre-gelled parts make full contact with the
skin
6. The electrode is ready for measurement
For use in the hairy parts
1. You can also use the disposable electrodes with
conductive paste added for good connection.
2. Snap the disposable electrode on the active electrode
3. Peel off the plastic cover and add conductive paste (Ten20
paste) to the electrode
4. Place the electrode on the scalp and make sure the paste
makes full contact with the measuring spot and the
disposable electrode.
5. The electrode is ready for measurement
IMPORTANT NOTE
WE DO NOT ADVISE TO USE THE REUSABLE ELECTRODES. AFTER THE SILVER
CHLORIDE LAYER HAS (PARTLY) COME OFF, SEVERE NOISE WILL INTERFERE WITH
THE SIGNAL.
20
PET 4.0 User Manual
J
Conditions for good electrode contact
It is very important that the electrodes are placed correctly.
• The skin should be clean, free of cosmetics, grease, dirt or sweat.
• You can prep the skin with an alcohol swipe and/or Nuprep abrasive
paste.
• The disposable and/or re-usable electrodes are correctly snapped on the
active electrodes.
• The removable plug (male sub-D) should be firmly connected
on the PET 4.0.
• Make sure excess hair is out of the way of the head electrode site.
• Make sure the wires are not tangled too much.
10-20 system
Electrode placement
The International 10-20 System of Electrode Placement is the most widely
used method to describe the location of scalp electrodes. The 10-20 system
is based on the relationship between the location of an electrode and the
underlying area of cerebral cortex. Each site has a letter (to identify the lobe)
and a number or another letter to identify the hemisphere location.
The letters used are:
‘F’ - Frontal lobe
‘T’ - Temporal lobe
‘C’ - Central
‘P’ - Parietal lobe
‘O’ - Occipital lobe
(Note: There is no central lobe in the cerebral cortex. ‘C’ is just used for
identification purposes only.)
21
PET 4.0 User Manual
J
The even numbers (2, 4, 6, 8) refer to the right hemisphere and odd
numbers (1, 3, 5, 7) refer to the left hemisphere. ‘Z’ refers to an electrode
placed on the mid line.
The smaller the number, the closer the position to the mid line. ‘Fp’ stands
for Front polar.
‘Nasion’ is the point between the forehead and nose.
‘Inion’ is the bump at the back of the skull.
The ‘10’ and ‘’20’ (10-20 system) refer to the 10% and 20% inter electrode
distance.
Where should I place the electrodes?
The black electrode serves as the ground electrode. The blue one is - and
the yellow one is +. Basically you use the + and the - to tap into that part of
the brain you want to get EEG from and you use the black one (the ground)
to eliminate noise.
If you would like to measure:
Cz - 1-channel - 1 black on mastoid (behind right or left ear), 1 blue on
mastoid (right or left, if ground is behind the right ear, yellow should be
behind the left), 1 yellow on Cz.
The black electrode should be attached to an area
where no brain activity is present. The preferred
configuration is to attach the black and the blue
electrode to the right and left mastoids (bony area
behind the ear) and the yellow electrode on the
area of interest, e.g. Fz, Cz, C3, C4 etc.
Mastoid placement
Make sure wires are not in front of the face; they can be guided over the
ears. Also make sure wires do not jerk when moving around or when the
head is turned.
IMPORTANT NOTES
IF NOT THE FULL SET OF ELECTRODES IS USED DURING A SESSION,
IT IS IMPORTANT TO PUT THE LOOSE ELECTRODES ON THE ARMBAND
USING THE VELCRO. LOOSE ELECTRODES COULD CAUSE NOISE TO
THE OTHER CHANNEL.
22
PET 4.0 User Manual
J
Frequently Asked Questions (FAQ’s)
To what COM-port is my PET 4.0 connected?
1 Double-click the Bluetooth-icon on 2 Select the Blueradios device and
the taskbar. The following screen will choose ‘properties’ or
then appear:
‘eigenschappen’. The following
screen will then appear:
3 Select the tab Services.
After some time the services will appear and there will be shown at which
COM-port the device is connected. In this case the device is connected on
com4. If the checkbox in the screen is not checked, select it and wait until a
COM-port appears. This is the port where your QPET is connected to.
My Bluetooth can’t seem to find and connect to my PET 4.0?
• Make sure the PET 4.0 is switched ON and the blue led is blinking.
• Take the external Bluetooth from your USB port and insert it again.
• Search for new devices again.
• Make sure that when the Bluetooth is searching for new devices, the
Bluetooth dongle is inserted and that your PET 4.0 is very close to the
dongle.
• Switch of any other Bluetooth enabled devices, e.g. Mobile phones, or
disable Bluetooth on those devices.
•
I’m using a laptop and my Bluetooth can’t detect the device?
Quite often laptops have a USB port on the back of the laptop. Make sure
that, if you are using a laptop, the LCD screen is not in between the receiver
and the PET 4.0 otherwise it can block or not pick up the signal. The LCD
screen probably acts as a ‘cage of Faraday’. Therefore, during the first
installation, always make sure there is a direct line of sight between the
23
PET 4.0 User Manual
J
receiver and the PET 4.0. If the USB ports are on the back of your laptop
and you have trouble finding the bluetooth, try a USB extension cable.
If after the installation of the Bluetooth dongle, windows shows ‘New
hardware found’ what should i do?
Repeat installation again. Wait until the whole installation is finished and take
out the USB dongle again. When you remove the dongle from the USB-port,
make sure that the next time you use it, it will be inserted in the the same
USB-port as it was during the installation. If this is ignored the driver has to
be installed all over again.
My PET 4.0 is connected to COM 31, how can I change my COM port to a
lower value?
1. Go to Control panel -> System -> Hardware.
2. Go to Device Manager, right click the USB serial port (COM & LPT)
and go to properties.
3. Go to port settings and advanced.
4. Select a lower COM port in the drop down menu, preferably COM 4.
5. When it shows ‘(in use)’ you can still select it and force it on that
COM port,
6. unless you are aware of other applications who need that specific
COM port.
7. Press OK and close the screens. Now your COM port is set to a
lower COM port.
8. Change the COM port settings in BioExplorer accordingly.
When I put in my bluetooth dongle, it wants to start installing software but
I allready installed the software!
You should always use the same USB-port as the one you used when you
installed the software. Please use this port or otherwise install the driver
again on the port you want to use.
How can I change the USB-port for my bluetooth dongle?
Just put in the dongle in to another USB-port and wait if ‘New hardware
found’ screen appears. If this happens, please install the software again. If
this doesn’t happen, the dongle can be used also in this USB-port.
A few things that could interfere with the installation of Bluetooth.
• A virus scanner or wireless LAN could interfere during the installation of
Bluetooth.
• Other Bluetooth applications, drivers or hardware that are installed on
your system could also interfere.
24
PET 4.0 User Manual
J
• When you insert the dongle before installing the software this will also
interfere with the installation of Bluetooth, therefore before installing the
Bluetooth software make sure you have NOT plugged in the Bluetooth
dongle.
Poor electrode contact can be caused by?
• Poorly attached electrodes (e.g. hair interfering the contact area)
• High skin impedance (due to skin that is oily, dirty, greasy, sweaty or that
has a lot of dead skin cells)
• Dirty or oxidised electrodes
Which lead is the ground (black, yellow or blue)? Can any lead serve as
ground?
The black electrode serves as the ground electrode. The coloured
electrodes (yellow and blue) can be configured to measure as pairs.
Should I turn off the PET 4.0 when I’m not using it?
When you are not using the PET 4.0 it is better to turn it off. This way the
batteries will last longer (about 10 hrs. for a disposable CR123).
The led is blinking on a different frequency than normal, what is wrong?
This frequency indicates that the battery is low.
I can’t switch OFF my device?
The PET 4.0 can be switched off when the blue led blinks by pressing the
on/off button until the led stops blinking. When the led is lighting
continuously break the bluetooth connection with the PET 4.0 by unplugging
the Aircable or Ezurio from the USB-port, then after some time the status of
the led on the PET 4.0 should change to blinking and the PET 4.0 can be
turned off with the on/off button. Alternatively the software can be closed
and the connection will be disabled.
25
PET 4.0 User Manual
J
Support
Contacting support
In case of problems please send an e-mail with your (technical related)
question specified to [email protected] or visit the website
www.brainclinics-products.com
Support for customers in EU
Tel 0031 24 750 35 05
Fax 0031 84 224 55 79
We appreciate your suggestions about our products or FAQ’s!
Warranty
Warranty period on PET 4.0 Hardware: 1 year
Warranty terms
1. This warranty only goes into effect if the end-user is a paying customer
known by an official Brainquiry B.V. reseller or distributor.
2. Brainquiry B.V. warrants to you the end-user customer, that hardware and
accessories, will be free from defects in materials and workmanship after
the date of purchase, for a period of one year. If Brainquiry B.V. receives
notice of such defects during the warranty period, Brainquiry B.V. will, at
its’ option, either repair or replace products which prove to be defective.
Return shipment of the hardware is at customers’ cost and risk.
3. Brainquiry B.V. does not warrant that the operation of Brainquiry B.V.
products will be uninterrupted or error free.
4. Brainquiry B.V. products are neither intended nor approved for the
diagnosis or treatment of any medical condition.
5. Warranty does not apply to defects resulting from:
a. improper or inadequate maintenance or calibration,
b. software, interfacing, parts or supplies not supplied by Brainquiry B.V.,
c. unauthorized modification or misuse,
d. operation outside of the published environmental specifications for the
product, or improper site preparation or maintenance.
6. The remedies in this warranty statement are your sole and exclusive
remedies, accept as indicated above, in no event will Brainquiry B.V. be
liable for loss of data or for direct, special, incidental, consequential
(including lost profits), or other damage, whether based in contract, or
otherwise.
7. Some states or provinces do not allow the exclusion or limitation of
incidental or consequential damages, so the above limitation or exclusion
may not apply to you.
26
PET 4.0 User Manual
J
27