1
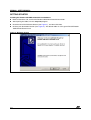
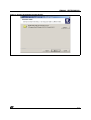
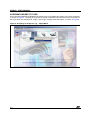
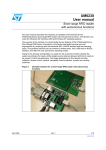
UM0080
USER MANUAL
Reader USB CRX14 (V4.0) Demonstration Software
This document describes the hardware and software of the STMicroelectronics Reader USB CRX14
Demokit V4.0 working under the Windows 98/2000/XP operating systems.
Figure 1. Reader USB CRX14 Demokit V4.0 Hardware
USB Cable
I2C Cable
CRX14
Board and
Antenna
USB Tranceiver
AI08718b
The Reader USB CRX14 Demokit V4.0 tools are designed to demonstrate the STMicroelectronics short
range product portfolio that includes the SR176/SRIX512/SRIX4K/CTS products.
Each SR176/SRIX512/SRIX4K/CTS device is a contactless memory, powered by a transmitted carrier radio wave at 13.56MHz. It contains a 176-bit (SR176), 512-bit (SRIX512), 4096-bit (SRIX4K) or 256-bit
(CTS) EEPROM, with memory mapping organized as blocks of 16 or 32 bits. It conforms to the ISO 14443B recommendation for the transfer of power and signals via radio transmission. The Reader USB CRX14
Demokit V4.0 reader circuitry amplitude modulates (10% modulation) the data on the carrier using amplitude shift keying (ASK). The SR176/SRIX512/SRIX4K/CTS replies by load modulating the data on the carrier using the BPSK (Bit Phase Shift Keying) coding using the 847kHz sub-carrier. The data transfer rate
in each direction is 106 Kbit/second.
The purpose of the Reader USB CRX14 Demokit V4.0 program is to give an example of how the interfacing can be achieved. It does not allow the user to evaluate all of the different ISO14443 modes.
The Reader USB CRX14 Demokit V4.0 gives access to the full memory mapping. It is possible to read
and write into the selected SR176/SRIX512/SRIX4K/CTS device. This release of the demonstration software, differentiated for each SR176/SRIX512/SRIX4K/CTS, allows all of the product features to be exercised. The kit consists of:
– One CD-ROM
– One CRX14 board with I2C connector
– One USB Transceiver with USB cable
– Some SR176 and SRIX4K Samples
– Documentation.
November 2004
1/14
UM0080 - USER MANUAL
TABLE OF CONTENTS
Figure 1. Reader USB CRX14 Demokit V4.0 Hardware. . . . . . . . . . . . . . . . . . . . . . . . . . . . . . . . . . 1
Application Features . . . . . . . . . . . . . . . . . . . . . . . . . . . . . . . . . . . . . . . . . . . . . . . . . . . . . . . . . . . . 3
GETTING STARTED . . . . . . . . . . . . . . . . . . . . . . . . . . . . . . . . . . . . . . . . . . . . . . . . . . . . . . . . . . . . . . . . 4
Installing the Reader USB CRX14 Demokit V4.0 Software . . . . . . . . . . . . . . . . . . . . . . . . . . . . . 4
Figure 2. Welcome Screen . . . . . . . . . . . . . . . . . . . . . . . . . . . . . . . . . . . . . . . . . . . . . . . . . . . . . . . . 4
Figure 3. Choose Destination Location Screen . . . . . . . . . . . . . . . . . . . . . . . . . . . . . . . . . . . . . . . . 5
Launching the Reader USB CRX14 Demokit V4.0 DemoKit Software . . . . . . . . . . . . . . . . . . . . 6
Figure 4. Standard Mode Main Screen . . . . . . . . . . . . . . . . . . . . . . . . . . . . . . . . . . . . . . . . . . . . . . . 6
USER INTERFACE . . . . . . . . . . . . . . . . . . . . . . . . . . . . . . . . . . . . . . . . . . . . . . . . . . . . . . . . . . . . . . . . . 7
Figure 5. Main Menus . . . . . . . . . . . . . . . . . . . . . . . . . . . . . . . . . . . . . . . . . . . . . . . . . . . . . . . . . . . . 7
Exit Menu . . . . . . . . . . . . . . . . . . . . . . . . . . . . . . . . . . . . . . . . . . . . . . . . . . . . . . . . . . . . . . . . . . . . . 7
SuperUser Mode Menu . . . . . . . . . . . . . . . . . . . . . . . . . . . . . . . . . . . . . . . . . . . . . . . . . . . . . . . . . . 7
Standard Mode Menu . . . . . . . . . . . . . . . . . . . . . . . . . . . . . . . . . . . . . . . . . . . . . . . . . . . . . . . . . . . 7
File Menu . . . . . . . . . . . . . . . . . . . . . . . . . . . . . . . . . . . . . . . . . . . . . . . . . . . . . . . . . . . . . . . . . . . . . 7
ASSIGNING IMAGES TO TAGS. . . . . . . . . . . . . . . . . . . . . . . . . . . . . . . . . . . . . . . . . . . . . . . . . . . . . . . 8
Figure 6. Assigning an Image to a Tag – Popup Menu. . . . . . . . . . . . . . . . . . . . . . . . . . . . . . . . . . . 8
Figure 7. Assigning an Image to a Tag – Visual Selection . . . . . . . . . . . . . . . . . . . . . . . . . . . . . . . . 9
READING THE TAGS . . . . . . . . . . . . . . . . . . . . . . . . . . . . . . . . . . . . . . . . . . . . . . . . . . . . . . . . . . . . . . 10
Figure 8. Tag Information Dialog Box . . . . . . . . . . . . . . . . . . . . . . . . . . . . . . . . . . . . . . . . . . . . . . . 10
SUPERUSER MODE . . . . . . . . . . . . . . . . . . . . . . . . . . . . . . . . . . . . . . . . . . . . . . . . . . . . . . . . . . . . . . . 11
Figure 9. SuperUser Screen . . . . . . . . . . . . . . . . . . . . . . . . . . . . . . . . . . . . . . . . . . . . . . . . . . . . . . 11
RF Off/On . . . . . . . . . . . . . . . . . . . . . . . . . . . . . . . . . . . . . . . . . . . . . . . . . . . . . . . . . . . . . . . . . . . . 11
Initiate . . . . . . . . . . . . . . . . . . . . . . . . . . . . . . . . . . . . . . . . . . . . . . . . . . . . . . . . . . . . . . . . . . . . . . . 11
Inventory . . . . . . . . . . . . . . . . . . . . . . . . . . . . . . . . . . . . . . . . . . . . . . . . . . . . . . . . . . . . . . . . . . . . . 11
Reset Inventory . . . . . . . . . . . . . . . . . . . . . . . . . . . . . . . . . . . . . . . . . . . . . . . . . . . . . . . . . . . . . . . . 11
Select. . . . . . . . . . . . . . . . . . . . . . . . . . . . . . . . . . . . . . . . . . . . . . . . . . . . . . . . . . . . . . . . . . . . . . . . 11
Get UID . . . . . . . . . . . . . . . . . . . . . . . . . . . . . . . . . . . . . . . . . . . . . . . . . . . . . . . . . . . . . . . . . . . . . . 12
Authenticate. . . . . . . . . . . . . . . . . . . . . . . . . . . . . . . . . . . . . . . . . . . . . . . . . . . . . . . . . . . . . . . . . . . 12
Read All . . . . . . . . . . . . . . . . . . . . . . . . . . . . . . . . . . . . . . . . . . . . . . . . . . . . . . . . . . . . . . . . . . . . . . 12
Reset Tag . . . . . . . . . . . . . . . . . . . . . . . . . . . . . . . . . . . . . . . . . . . . . . . . . . . . . . . . . . . . . . . . . . . . 12
Read . . . . . . . . . . . . . . . . . . . . . . . . . . . . . . . . . . . . . . . . . . . . . . . . . . . . . . . . . . . . . . . . . . . . . . . . 12
Write . . . . . . . . . . . . . . . . . . . . . . . . . . . . . . . . . . . . . . . . . . . . . . . . . . . . . . . . . . . . . . . . . . . . . . . . 12
Erase . . . . . . . . . . . . . . . . . . . . . . . . . . . . . . . . . . . . . . . . . . . . . . . . . . . . . . . . . . . . . . . . . . . . . . . . 12
Program . . . . . . . . . . . . . . . . . . . . . . . . . . . . . . . . . . . . . . . . . . . . . . . . . . . . . . . . . . . . . . . . . . . . . . 12
Auto Find New Hardware . . . . . . . . . . . . . . . . . . . . . . . . . . . . . . . . . . . . . . . . . . . . . . . . . . . . . . . . 12
REVISION HISTORY . . . . . . . . . . . . . . . . . . . . . . . . . . . . . . . . . . . . . . . . . . . . . . . . . . . . . . . . . . . . . . . 13
Table 1. Document Revision History . . . . . . . . . . . . . . . . . . . . . . . . . . . . . . . . . . . . . . . . . . . . . . . 13
2/14
UM0080 - USER MANUAL
With Reader USB CRX14 Demokit V4.0, you can:
■
Choose your images by selecting the appropriate folder (or keep the default folder)
■
Change the background image of the main window
■
Assign images to tags
■
Perform an inventory of the tags, and see their image assignment
■
Read and write in tags in ASCII
■
Use the SuperUser mode to access all of the SR176/SRIX512/SRIX4K/CTS features
Application Features
■
RAM: 16MByte
■
Free space on the hard disk drive: 4MByte
■
USB version 1.1
■
Run on the Windows98 SE Platform, Windows2000, Windows XP
3/14
UM0080 - USER MANUAL
GETTING STARTED
Installing the Reader USB CRX14 Demokit V4.0 Software
■
Browse around the CD, and find the Reader USB CRX14 Demokit V4.0 folder.
■
After opening the folder, run the setup.exe program.
■
Read the text of the Welcome Screen (see Figure 2.), and then click Next.
■
Choose your destination location (see Figure 3.). The default folder is C:\Program Files\ST\Reader
USB CRX14 Demokit V4.0
Figure 2. Welcome Screen
4/14
UM0080 - USER MANUAL
Figure 3. Choose Destination Location Screen
5/14
UM0080 - USER MANUAL
Launching the Reader USB CRX14 Demokit V4.0 DemoKit Software
Connect the reader(s) to your PC. Run the Reader USB CRX14 Version4.0.exe to launch the program.
The program will detect all the readers automatically, and the main window appears at once (Figure 4.).
The various areas of this screen are described in detail in the remaining sections of this document.
Figure 4. Standard Mode Main Screen
6/14
UM0080 - USER MANUAL
USER INTERFACE
The User Interface is based on the Main Menus (Figure 5.). For the user, the most important entries are
Standard Mode and SuperUser Mode.
Figure 5. Main Menus
Exit Menu
The Exit menu is used for stopping the demonstration software, and returning to the operating system.
SuperUser Mode Menu
The SuperUser gives you access to all of the commands of the SR176/SRIX512/SRIX4K/CTS.
Standard Mode Menu
In the Standard Mode you can
–
access all the SR176/SRIX512/SRIX4K/CTS tags, in the field of the connected readers, along with the
memory content of each tag.
–
assign an image to each SR176/SRIX512/SRIX4K/CTS tag.
File Menu
In the File menu (Figure 5.) you can change the tag image folder, or change the background of the main
window. The background image should be a JPEG image file, and the recommended resolution for this is
approximately 788 x 495 pixels.
For clarity, and convenience, it is recommended that the files in the image directory, or folder, should be
named systematically, for example numbered continuously from 00.BMP upwards. The content of each
file must be in .BMP format, with a recommended resolution of about 120 x 120 pixels.
The tag assignments are written in the TagData.ini file, which is held in the Tag directory. Tags that are
not listed in TagData.ini are considered as unassigned. Tags that have an image number assigned to
them, but this number is greater than the number of files in the directory, are also treated as being unassigned. The tags with an image index equal to zero are also treated as unassigned.
If you wish to edit this file by hand, each line must contain the hexadecimal serial number of one tag, and
the decimal number of the image that is assigned to it, separated by a equal sign “=”. For example:
[ImgIdx]
D0020CB3E3C74D04=4
D00208C5E804B690=2
D002102758774494=5
D0020CB3E3C755DE=4
D00208C5E8037F1F=1
D0020CB3E3C755DF=6
Erasing the contents of the TagData.ini file effectively removes all assignments.
7/14
UM0080 - USER MANUAL
ASSIGNING IMAGES TO TAGS
Place some SR176/SRIX512/SRIX4K/CTS memory tags in the field of the reader. The screen will appear
as shown in Figure 4., showing the tags that have been inventoried. Click with the left mouse button on
the tag to which you would like to assign a new image. A popup menu will appear, as shown in Figure 6.
Figure 6. Assigning an Image to a Tag – Popup Menu
8/14
UM0080 - USER MANUAL
Here you can select the Assign Picture Index entry, to allow you to enter the number that corresponds to
the image file in the selected folder. Alternatively, you can select the Assign Picture Visually entry, to allow
you to assign a new image to the tag from those that are displayed graphically, in a window like that in
Figure 7.. As another alternative, you can select the Clear entry, to clear the assigned image.
Figure 7. Assigning an Image to a Tag – Visual Selection
9/14
UM0080 - USER MANUAL
READING THE TAGS
Place some SR176/SRIX512/SRIX4K/CTS memory tags in the reader field. The screen will appear as
shown in Figure 4., showing the tags that have been inventoried, along with their corresponding images.
Double-click on a tag, to access its memory. A dialog box appears, as shown in Figure 8. In this dialog
box, the serial number and any previously saved text are displayed.
Figure 8. Tag Information Dialog Box
To modify the memory content, type your text in the text field, and click on the OK button. The tag’s memory will be updated.
10/14
UM0080 - USER MANUAL
SUPERUSER MODE
Choosing the SuperUser mode, in Main Menu, the screen will appear as shown in Figure 9. This gives you
access to all the commands that are available for the SR176/SRIX512/SRIX4K/CTS tags.
Figure 9. SuperUser Screen
First, you need to select, via the first combo-box, the physical CRX14 reader with which you want to work.
After this, you can choose whether you want to work with tags from Short Range (SR) family or with CTS
tags. Then, you can start using the particular CRX14 functions and features. Depending on the precise
state of the reader at any particular moment, and the responses that it has received from the tags, the user
interface interactively offers the user relevant commands from the following list:
RF Off/On. By writing appropriate values in the Parameter register, of the selected CRX14 reader, the
transmitted carrier radio wave is switched momentarily off and back on again.
Initiate. This button launches the anti-collision sequence of the Short Range contactless memory. This
command is useful for speeding up the search for the Chip_ID, when there is only one tag in the reader
field range.
Inventory. By writing into the Slot Marker Register, an automated anti-collision sequence is triggered between the selected CRX14 reader and the Short Range contactless memory that is presently accessible
in the electromagnetic field. All the valid Chip_IDs that are received, as a result, are listed in the combobox, next to the Select button.
Reset Inventory. This command puts the Short Range contactless memory, that is presently in SELECTED state, back in to the INVENTORY state.
Select. The active reader sends a SELECT() command, with the chosen Chip_ID. The Short Range contactless memory with the corresponding Chip_ID enters the SELECTED state, and each of the tags that
do not match the Chip_ID are automatically put in the DESELECTED state.
11/14
UM0080 - USER MANUAL
Get UID. When receiving the GET_UID() command, the Short Range contactless memory sends back its
UID bytes in response.
Authenticate. By writing to the Authenticate Register, the complete authentication exchange is triggered
between the active CRX14 reader and the STMicroelectronics secure Short Range contactless memory.
Read All. This command reads the whole memory content of the selected tag.
Reset Tag. This command brings the content of the user memory of the selected tag into the zero point
state.
Read. This command reads the contents of one memory block of the selected tag. The memory block that
is to be read is determined by the Address value.
Write. This command writes the new data, as supplied in the Data Edit box, into the selected tag’s memory, at specified address.
Erase. When receiving the ERASE() command, the CTS device fully erases the 16 bits of the addressed
block, if available and not write/erase-protected.
Program. This command programs the data, as supplied in the Data Edit box, into the specified memory
block of the selected CTS contactless memory.
Auto Find New Hardware. This button enables, or disables, the background routine. This routine monitors the plugging in and unplugging of USB devices. You should turn this feature OFF if you do not want
to be disturbed for a while by irrelevant reader resets.
12/14
UM0080 - USER MANUAL
REVISION HISTORY
Table 1. Document Revision History
Date
Version
Revision Details
16-Jul-2003
1.0
First Issue.
24-Nov-2003
1.1
Support of Windows XP added. Illustrations updated from screen captures of current
software.
05-Nov-2004
2.0
Document revised to refer to v4.0 of the demonstration software
13/14
UM0080 - USER MANUAL
If you have any questions or suggestions concerning the matters raised in this document, please refer to the MPG
request support web page:
http://www.st.com/askmemory
Information furnished is believed to be accurate and reliable. However, STMicroelectronics assumes no responsibility for the consequences
of use of such information nor for any infringement of patents or other rights of third parties which may result from its use. No license is granted
by implication or otherwise under any patent or patent rights of STMicroelectronics. Specifications mentioned in this publication are subject
to change without notice. This publication supersedes and replaces all information previously supplied. STMicroelectronics products are not
authorized for use as critical components in life support devices or systems without express written approval of STMicroelectronics.
The ST logo is a registered trademark of STMicroelectronics.
All other names are the property of their respective owners
© 2004 STMicroelectronics - All rights reserved
STMicroelectronics group of companies
Australia - Belgium - Brazil - Canada - China - Czech Republic - Finland - France - Germany - Hong Kong - India - Israel - Italy - Japan Malaysia - Malta - Morocco - Singapore - Spain - Sweden - Switzerland - United Kingdom - United States of America
www.st.com
14/14


![Lite Reader Getting Started Guide [In Progress]](http://vs1.manualzilla.com/store/data/005692633_1-050fc996995aae18a2c8846f796d5b4a-150x150.png)