1
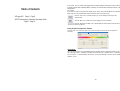
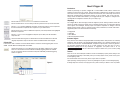
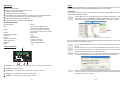
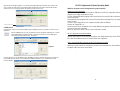
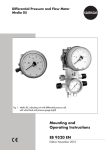
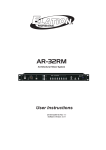
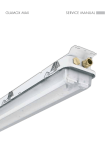
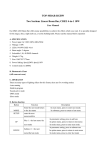
X-Trigger-8R
USB cable
User Instructions
All Rights Reserved! Improvements and specifications in the design of this unit and
this manual are subject to change without any prior written notice.
Table of Contents
X-Trigger-8R
Page1~Page3
AR32 Configuration Software Operating Guide
Page6~Page12
In this option, user can activate Time Trigger Mode for desired SHOW by editing show events to AR-32C,
including Calendar Mode and Weekly Mode. Commonly, the Calendar Mode will take precedence of the
Weekly Mode.
For example,
If you have set up two events(A1and A2) within one day, and A1 in the Calendar Mode, A2 in the Weekly
Mode. Only A1 in the Calendar Mode will be performed, however A2 will be void.
Click the "Save" icon to confirm and save your current settings in memory for the
selected show.
Click the "DEL" icon to delete your current setting if you're not satisfied.
Click the "DownLoad To AR32" icon to download those shows which events have been edited
well to your AR-32.
Exiting the AR-32 Configuration Software
Click the "Exit" icon at the top-right c orner of the Tool Bar to exit the AR-32 Configuration
Software.
1
Special Note:
Up to 32 shows allows to be programmed through operating AR-32 configuration software, but the user
can only trigger Show1~Show8 by switching on/off external 8 dy contacts(Contact1~Contact8). When
any of Contact1~ Contact8 disables, Show 32 is running automatically and others shows disables
whatever you do.
-12-
About X-Trigger-8R
Introduction:
Thanks for purchasing our product, X-Trigger-8R is a newest DMX recorder, features 8 built-in shows by
switching on/off 8 external dry contacts. And the fixed built-in 128M memory chip allows to represent 128
scene files. The user can program 128 scene files and edit 8 shows, then conveniently record into X-Trigger8R through operating AR-32 configuration software on the PC platform. Easy to play and plug. Please
simply connect the USB-cable between your X-Trigger-8R and your computer to configure the unit by
operating AR-32 Configuration software, then you're ready to go!
Click the "DEL Scene File" icon to delete the undesired scene flash files.
Click the "Format Device" icon to format your AR-32 system and clear up all scene flash files.
Click the ">" icon to add a highlighted component (Scene flash) from the source components
list into the destination components list in sequence for your desired Show.
Click the "Insert" icon to insert an additional component (scene flash) between two highlighted
destination components.
Click the "<" icon to cancel a highlighted component (Scene flash) from the destination
components list
Click the "DownLoad to Keypad" icon download the selected and edited show to AR-32C
(keypad). Repeat above steps to edit more shows and download them to the Keypad.
5.Events Edit
In this function, built-in real-time clock and calendar allows to edit events and set triggering time for each
SHOW. Calendar Mode and Weekly Mode are available.
Click the "Event Edit" icon, a new dialog box(screen) will appear, indicating you to edit its
events in a selected show. And the Calendar and Weekly triggering modes are available.
You can set its Event Start time and its Event Stop time individually in different triggering
modes. See figure-5.
Figure 5
-11-
Unpacking:
The X-Trigger-8R has been thoroughly tested and shipped in perfect working condition. Please take a few
minutes to carefully inspect the system carton for damage that may have occurred during shipping. If the
carton appears to be damaged, carefully inspect each system component for damage, in the case that
damage is found, please contact our customer support center, listed below, for further instructions. The XTrigger-8R system carton should includes the following:
1 X-Trigger-8R
1 USB-cable
1 User's Manual
1 AR-32 Configuration Software
Customer Support:
Every effort has been made to design dependable and reliable products. New products are constantly being
designed to meet the needs of the entertainment lighting industry. Your comments regarding our products
and services are welcome. ACCLAIM LIGHTING will provide set up help and to answer any question should
you encounter problems during you set up or initial operation. You may also visit us on the web at
www.acclaim lighting.com for any comments or suggestions. And please send us an e-mail to
info@acclaim lighting .com and let us know how to improve to better serve you. It is both a privilege and
pleasure serving you.
Caution!
There are no user serviceable parts inside this unit. Do not attempt any repairs yourself, doing so will void
your manufactures warranty. In the unlikely event your unit may require service, please contact your nearest
Acclaim lighting dealer.
Do not discard this carton in the trash, please recycle when ever possible.
Upon unpacking, carefully inspect your unit for any damage that any have occurred during shipping.
If damage may have occurred, do not plug the unit in, please contact your dealer as soon as possible.
-1-
Main Features
Record function available
It features 8 dry contacts to trigger 8 built-in Shows
USB Port to communicate with PC
128M memory represent 128 scene files
Scene DMX files format and Show editing can match with AR-32 configuration software.
Allows up to 8 programmable Shows by AR-32 configuration software.
Build-in 24V/6.5A switching power supply unit
Output voltage 24VDC, maximum 6A with DMX signal
*NOTE:
Please make sure all DMX Setups are connected properly and correctly before DMX recording. If or not, DMX
record would fail and the warning hint with "NO DMX Input" will show on the screen.
4. Edit Show
In the function, allows up to 32 Shows can be created and assigned by customizing flash scenes with DMX
address setting and fadetime selection.
Click the "Edit Show" icon, a new dialog box(screen) will appear, indicating you to edit some
scene flashes, set their separate DMX addresses and fade times. Before editing a show,
please firstly select the desired show, set its DMX address and fade time. See figure-4.
1
Technical Specification:
Power Requirement
Input
DC24V
4-pin terminal socket(DC Power)
2-pin terminal socket(contact ports)
4-pin terminal socket( power through)
5-pin terminal socket, max 6A of 24VDC
PolyCaronate
IP 20
Terminal
CE certificated
-10deg c to+50 degC
-20 degC TO +70 degC
195(L)X100(W)X25(H)mm
Output
Housing
Ingress Protection Rating
Connection
Listing
Operation Temperature
Storage Temperature
Dimension
Weight
200g
Controls & Functions
1
CONTACT
1
3
2
5
4
+24V
+24V
+24V
+24V
6
GND
GND
POWER OUT
Max 6A
Destination components list for your desired SHOW
User can set up DMX initial address for show triggering and Fade Time in the blank bar. (For further information,
please refer to AR-32C accompanying manual.)
Click the "Read Current AR-32 Scenes" icon to look through the list of AR-32 current Scene
flash files.
Click the "Save Scene To PC" icon to save pointed individual scene flash file in your PC.
Click the "Load Scene To Ar32" icon to load pointed scene flash file to your AR-32. And loading
desired scenes flash file will be listed in AR Scene File List.
Click the "Save All Scenes To PC" icon to save all scenes flash files in destination path in your
PC. And a new dialog box(screen) will appear, press "OK" icon to confirm and save.
OUTPUT: 24VDC 6A / CH, Total 6A Max.
OUTPUT
USB
4
5
GND
Data Data +
GND
+24V
1 2 3 4 5
8
AR-32 Scene File List
X-Trigger-8R
GND
GND
POWER IN
7
Figure-4
Made in PRC
2 3
1
Contacts 1~8 : To trigger the relative Show(Show1~Show8) which you desired.
2
Power In : DC24V power input
3
Power Out : To feed DC24V, 6A max. Of power supply to the next unit
4
Output : To feed DMX signal and DC24V power supply
5
USB Port : To communicate with PC through this por t
-2-
Click the "Load All Scenes To AR32" icon to load all scenes flash files in destination path in
your PC to your AR-32. And a new dialog box(screen) will appear, select your desired, then
press "OK" icon to confirm and save.
-10-
When the above dialog box appears, you can input flash playing speed (Flash Frame), then click the "OK"
icon to confirm its value and the current playing flash with extension.swf will be converted into file with
extension.scn. The converting progress rate will show on the screen for you.
1
Converting Progress Rate
4. DMX Record
In this function, allows to record external DMX signal from DMX generator or controller as a new scene for
application.
Click the "DMX Record" icon, the new dialog box(screen) will appear, indicating you to record
external DMX signal from DMX controller to your AR-32 system as a scene (DMX signal
converting to file with extension.scn). See figure-3.
1
AR-32 Configuration Software Operating Guide
USB Drive Program & AR-32 Configuration Program Installation
USB Drive Program Installation
If you first use the system, you must install the USB Driver and AR-32 Configuration Software
program as the simply following these steps;
1.Before installing USB Drive program, please ensure all tension and USB cable connections are
connected properly.
2.Download the main program folder, copy and save them in the pointed path of your computer
which you wish.
3.Connect your X-Trigger-8R to your computer with USB cable via USB port.
4.Power the X-Trigger-8R on.
5.And a promote screen will indicate you to install USB Driver program by following the installation
process till it has been completed.
NOTE: You must select "Driver" directory in the main folder to install.
AR-32 Configuration Program Installation
Open the main folder file, and select AR-32 program, then simple double-click on the "SETUP.EXE"
file, follow the installation process to install till it has been completed.
How to uninstall USB Drive program and AR-32 Configuration software
Figure-3
USB Drive program and AR-32 Configuration software can be uninstalled via "Add or Remove
Programs" utility found in the Control Panel.
Click the "Record" icon to start DMX recoding, and DMX recording is valid until pressing the "Stop Record"
to stop DMX recording. And the screen will show the DMX record time for you. And at this time, other
functions disable.
1
-9-
-3-
Getting started AR-32 Configuration Software(Ver3.01)
1
In Windows, click the Start icon and go to the "Programs" then "AR-32". Move the pointer to the AR-32 icon
and click it. After a few seconds, the AR-32 screen appears.
Menu Bar
1
Tool Bar
Preview Screen Area
Auto Bar
Figure-1
Exited File
Exited File
Using the Menu Bar
In Menu Bar, there are File, Edit and Help options.
Two submenus including File Covert, DMX Record are in the File option;
Two submenus including Show Edit and Event Edit are in the Edit option;
Two submenus including AR32_Help and About AR-32 are in the Help option.
To key a valid number(1~170) as your selected RGB LED lighting points.
2. Preview
In this function, a temporary flash scene is available by directly playing current flash .And it allows to learn
about the flash effect showing on the LED fixtures before recording. Click the "Preview" icon to preview the
current flash and the second tapping this icon to close.
Using the Auto Bar
3. File Convert
Due to only flash files with extension.scn can be accepted and downloaded to AR-32 system, so some flash
files which are with extension.swf must be primarily converted into ones with extension.scn.
The Auto Bar is a quick and rapid way to choose many of the most useful commands and shortcut keys for
PC Flash Control, features Play, Pause and Stop. To choose a desired command, only simply click its shortcut
key in Auto Bar area you want.
Click the "FileConvert" icon, a new dialog box(screen) will appear, indicating you to set flash
frames. The flash frame can be set up at the range of 1~35 frames/S. See figure-2.
1
To start your selected flash
To pause temporarily running flash
To close running flash
Using the Tool Bar
1.Open flash
To open the currently selected flash file, a new dialog box(screen) will appear, indicating you to
select your desired flash files in a flash file selection, then move the pointer to the "open" icon
to open. See figure-1.
-7-
Figure-2
-8-