1
User’s Guide
QLIB
(Quancom Library)
Industrial Measurement and Automation
Copyright © QUANCOM Informationssysteme GmbH
All specification in this manual was arranged after careful check, and it is not considered as any warranty of product properties. QUANCOM shall not be responsible for any errors or omissions contained
in this user’s manual, and reserves the right to make changes without notice. Passing on and duplication of this manual and the utilisation of its contents as well as the software belonging to the product
are permitted only with written permission by QUANCOM.
Wesseling, May 2002
Table of contents
1
Overview....................................................................................5
1.1
Introduction .................................................................................................. 5
1.2
Our experience is your profit ........................................................................ 5
1.3
Customer Communication............................................................................ 5
1.4
Changes in this manual and software updates ............................................ 6
1.5
Scope of supply............................................................................................ 6
2
Softwareprogramming with the QLIB......................................7
2.1
QLIB ( QUANCOM Driver Library ) .............................................................. 7
2.2
Installation and general programming with the QLIB ................................... 8
2.2.1 Installing the QLIB and drivers for your QUANCOM PCI board (Windows Me/98/95) .......... 9
2.2.2 Installing the QLIB and drivers for your QUANCOM ISA board (Windows Me/98/95) ........ 10
2.2.3 Installing the QLIB and drivers for your QUANCOM PCI board (Windows XP/2000/NT) ... 12
2.2.4 Installing the QLIB and drivers for your QUANCOM ISA board (Windows XP/2000/NT) ... 13
2.3
3
Filestructure after the installation of the QLIB ............................................ 14
Configuration of the boards to be consulted........................15
3.1
Configuration of ISA-cards ......................................................................... 15
3.2
Configuration of PCI-cards......................................................................... 18
3.3
Setting of a projekt with the QLIB under Microsoft Visual C++ 4.x............. 19
3.3.1 Building of a project ............................................................................................................. 20
3.3.2 Settings of the Compiler-options.......................................................................................... 21
3.3.3 Building of a small QLIB-application .................................................................................... 22
3.3.4 Compile and start a program example................................................................................. 22
3.4
Setting of a project with the QLIB under Borland Delphi 2.x ...................... 23
3.5
Setting of a project with the QLIB under Borland C++ 5.0x (US-Version) .. 24
3.5.1 Building of the project .......................................................................................................... 24
3.5.2 Settings the compiler-options .............................................................................................. 26
3.5.3 Building of a small QLIB-Application.................................................................................... 27
3.5.4 Compile and start a program example................................................................................. 27
3.6
Project building with the QLIB under Borland C++ 5.0x (german version) . 28
3.6.1 Build a project ...................................................................................................................... 29
3.6.2 Adjustment of the compiler option ....................................................................................... 31
3.6.3 Building of a little QLIB application ...................................................................................... 32
3.6.4 Programing example of compiling and start ........................................................................ 32
4
QLIB Commands.....................................................................33
4.1
General functions....................................................................................... 33
4.2
Watchdog functions.................................................................................... 34
4.3
Digital write functions ................................................................................. 35
4.4
Digital read functions.................................................................................. 36
4.5
A/D and D/A functions................................................................................ 37
4.6
8255/8253 PIA functions ............................................................................ 39
4.7
Special functions........................................................................................ 41
5
Annex.......................................................................................43
5.1
Frequently asked questions (FAQ) ............................................................ 43
5.1.1 Genaral informations............................................................................................................ 43
5.1.2 What kind of problems may occur if the board is running under DOS ................................ 44
5.1.3 Problems with boards running under Windows 98/95 and Windows XP/2000/NT.............. 44
5.2
Customer Communication and Help .......................................................... 47
5.3
Technical support form............................................................................... 50
5.4
Hardware and software configuration form ................................................ 51
5.5
Documentation comment form ................................................................... 52
Overview
1 Overview
1.1 Introduction
Congratulations! You’ve bought a QUANCOM high quality measurement and automation board, which shows the newest update of technology and whose attributes
and functions are able to compete with every other instrument and even beats them.
The following special attributes are included:
Features of the board
•
Easy programming
•
Various sample applications in different programming languages
•
Driver support by Windows XP, 2000, NT and Me/98/95 with the QLIB (QUANCOM Driver Library)
1.2 Our experience is your profit
We from QUANCOM are specialists for the development of hard- and software.
QUANCOM has grown to become one of the leading suppliers of measuring and
automation technology to industry. At its design centres QUANCOM has developed
an impressive range of products.
1.3 Customer Communication
QUANCOM wants to receive your comments on our products and manuals. We
are interested in the applications you develop with our products, and we want to help
if you have problems with them. To make it easy for you to contact us, this manual
contains comment and configuration forms for you to complete. These forms are in
chapter 6.2 “Customer Communication and Help” at the end of this manual.
QLIB (Quancom Library)
Seite 5
Overview
1.4 Changes in this manual and software updates
QUANCOM - products are marked out by their constant further development. You
can watch all the actual information of the changes in the README-file on the installation disk or CD. You can always get more information and free software updates
on our internet website.
(WWW.QUANCOM.DE)
1.5 Scope of supply
•
Measuring and automation board
•
User‘s manual
•
QUANCOM CD
If a component is missing please contact your dealer. QUANCOM reserves the right
to change the extent of delivery without a preliminary announcement.
Seite 6
Produktbeschreibung
Softwareprogramming with the QLIB
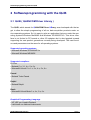
2 Softwareprogramming with the QLIB
2.1 QLIB ( QUANCOM Driver Library )
The QLIB, which stands for QUANCOM Driver LIBrary, was developed with the target to allow the simple programming of all our data acquisition products under various operating systems. So it is easy to write an application that runs under the operating systems Windows Me/98/95 and Windows XP/2000/NT4.0. This driver interface is not limited to PC boards or other I/O adapters but is also targeted towards
supporting the next product generations currently being developed. The used functions and parameters are the same for all operating systems.
Supported operating systems:
• Microsoft Windows XP/2000/NT4.x
• Microsoft Windows ME/98/95
Supported compilers:
C / C++
• Borland C++ 3.1, 4.x, 5.x, 6.x
• Microsoft® Visual C++ 1.x, 2.x, 4.x, 5.x, 6.x
Pascal
• Borland Turbo Pascal
Delphi
• Borland Delphi
Basic
• Microsoft® Visual Basic 3.x, 4.x, 5.x; 6.x
Graphical Programming Language
• HP VEE von Hewlett-Packard
• LabView® von National Instruments
QLIB (Quancom Library)
Seite 7
Softwareprogramming with the QLIB
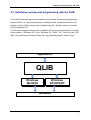
2.2 Installation and general programming with the QLIB
For further information about the installation process and the general programming
with the QLIB ( i.e. setting up the system, linking libraries, adding header files, etc.)
please see the „QLIB“ manual or the windows help file ( qlib.hlp ) which is included
on the installation CD.
The following chapters describe the installation of the drivers depending on the operating system ( Windows 95 / 98 or Windows XP / 2000 / NT ) and bus type (PCI,
ISA). The installation procedure differs for every operating system and bus type.
Applikation
QLIB
Windows
Me/98/95
Windows
XP/2000/NT
Hardware
Seite 8
Produktbeschreibung
Softwareprogramming with the QLIB
2.2.1
Installing the QLIB and drivers for your QUANCOM PCI
board (Windows Me/98/95)
If you have downloaded the QLIB Software from our website please read the note
below before installing any drivers.
Step1: Driver installation for PCI boards:
After you installed the QUANCOM PCI board in your system the board will be recognised automatically by Windows 95/98 during system restart. If you are restarting
the system the system detects the new board and opens a dialog box „New hardware
detected“. Press the button „Have disk“ and insert the QLIB installation Disk 1 in
drive „A“. To properly recognise the board you have to select the file
A:\WIN95\QUANCOM.INF or A:\WIN98\QUANCOM.INF depending of the operating
system you are using. After the file was loaded a list of the PCI boards is shown.
Please select the right board from the list.
Step 2: Software installation for PCI boards:
Put the QLIB installation Disk 1 in drive A: and click on Start | Run. Select the program a:\setup.exe and click on OK to continue. The installation program will be
started now and will guide you through the rest of the installation process. SETUP.EXE will install the QLIB software library.
NOTE: This section tells you what to do if you downloaded the QLIB from the web ( QUANCOM Library )
If you have downloaded the QLIB from our website „http://www.quancom.de/QLIBENG“ you received a program like „qlib32_v160.exe“. Create a directory „i.e. C:\QLIBINST“ on you harddrive.
Copy the program to this directory. Change on the DOS commandline to this directory and run the
program. „qlib32_v160.exe“. This will extract the archived files to your harddisk. If you are asked in
the following steps to select the i.e. A:\WIN95\QUANCOM.INF or A:\SETUP.EXE don’t switch to drive
„A:“ but rather to „i.e. C:\QLIBINST\DISK1\WIN95\QUANCOM.INF“ or
„C:\QLIBINST\DISK1\SETUP.EXE“.
QLIB (Quancom Library)
Seite 9
Softwareprogramming with the QLIB
2.2.2
Installing the QLIB and drivers for your QUANCOM ISA
board (Windows Me/98/95)
If you have downloaded the QLIB Software from our website please read the note
below before installing any drivers.
Step 1: Software installation for ISA boards:
Put the QLIB installation Disk 1 in drive A: and click on Start | Run. Select the program a:\setup.exe and click on OK to continue. The installation program will be
started now and will guide you through the rest of the installation process. SETUP.EXE will install the first part of QLIB.
Step2: Driver installation for ISA boards:
Step 2 installs the generic driver for the QUANCOM ISA boards. The driver must be
installed with the „Control panel“. To open the „Control panel“ click on Start | Settings | Control panel.
• Double click on the „Hardware“ icon.
• Click on “continue”
• Choose “no” (“Should the new hardware be searched ?“) and click on “continue”
• Click on “other components” and then on “continue”
Click on “disk” and choose the file “A:\WIN95\QUANCOM.INF” on QLIB-disk 1.
Choose the item QUANCOM ISA-Karten or QUANCOM ISA board in the list of
available boards and the click on “continue”
The driver for all ISA boards will be installed now.
Seite 10
Produktbeschreibung
Softwareprogramming with the QLIB
Step3: Select your board in the QLIB Control panel:
Step 3 is to let QLIB know which type of boards are installed. For step 3 please open
the „Control panel“ again. To open the „Control panel“ click on Start | Settings |
Control panel.
• Double click on the QLIB icon
• Click on „Add“ and select the QUANCOM board you want to install.
• Select the QUANCOM board from the list of installed boards and click on the button „Properties“. Check that the selected I/O address is the same as the one configured with the jumpers on the board (see chapter ”Jumpers”).
The board will be installed now. QLIB supports multiple boards in the same system. If
you have more than one board Step 3 has to be repeated for every board.
NOTE: This section tells you what to do if you downloaded the QLIB from the web ( QUANCOM Library )
If you have downloaded the QLIB from our website „http://www.quancom.de/QLIBENG“ you received a program like „qlib32_v160.exe“. Create a directory „i.e. C:\QLIBINST“ on you harddrive.
Copy the program to this directory. Change on the DOS commandline to this directory and run the
program. „qlib32_v160.exe“. This will extract the archived files to your harddisk. If you are asked in
the following steps to select the i.e. A:\WIN95\QUANCOM.INF or A:\SETUP.EXE don’t switch to drive
„A:“ but rather to „i.e. C:\QLIBINST\DISK1\WIN95\QUANCOM.INF“ or
„C:\QLIBINST\DISK1\SETUP.EXE“.
QLIB (Quancom Library)
Seite 11
Softwareprogramming with the QLIB
2.2.3
Installing the QLIB and drivers for your QUANCOM PCI
board (Windows XP/2000/NT)
If you have downloaded the QLIB Software from our website please read the note
below before installing any drivers.
NOTE: Windows 2000 Plug & Play
If Windows 2000 shows the dialog box „New hardware found“ on system start press
the button „CANCEL“. Don’t use „Have disk“ button. The required drivers will be installed with the QLIB in Step 1.
Step1: Software and Driver installation for PCI boards:
Put the QLIB installation Disk 1 in drive A: and click on Start | Run. Select the program a:\setup.exe and click on OK to continue. The installation program will be
started now and will guide you through the rest of the installation process. SETUP.EXE will install the QLIB and the needed drivers.
NOTE: This section tells you what to do if you downloaded the QLIB from the web ( QUANCOM Library )
If you have downloaded the QLIB from our website „http://www.quancom.de/QLIBENG“ you received a program like „qlib32_v160.exe“. Create a directory „i.e. C:\QLIBINST“ on you harddrive.
Copy the program to this directory. Change on the DOS commandline to this directory and run the
program. „qlib32_v160.exe“. This will extract the archived files to your harddisk. If you are asked in
the following steps to select the i.e. A:\WIN95\QUANCOM.INF or A:\SETUP.EXE don’t switch to drive
„A:“
but
rather
to
„i.e.
C:\QLIBINST\DISK1\WIN95\QUANCOM.INF“
or
„C:\QLIBINST\DISK1\SETUP.EXE“.
Seite 12
Produktbeschreibung
Softwareprogramming with the QLIB
2.2.4
Installing the QLIB and drivers for your QUANCOM ISA
board (Windows XP/2000/NT)
If you have downloaded the QLIB Software from our website please read the note
below before installing any drivers.
Step1: Software and Driver installation for ISA boards:
Put the QLIB installation Disk 1 in drive A: and click on Start | Run. Select the program a:\setup.exe and click on OK to continue. The installation program will be
started now and will guide you through the rest of the installation process. SETUP.EXE will install the QLIB and the needed drivers.
Step 2: Select your board in the QLIB Control panel
Step 2 is to let QLIB know which type of boards are installed. For step 2 please open
the „Control panel“ again. To open the „Control panel“ click on Start | Settings |
Control panel.
• Double click on the QLIB icon
• Click on „Add“ and select the QUANCOM board you want to install.
• Select the QUANCOM board from the list of installed boards and click on the button „Properties“. Check that the selected I/O address is the same as the one configured wit the jumpers on the board (see chapter „Jumpers“).
The board will be installed now. QLIB supports multiple boards in the same system. If
have more than one board Step 3 has to be repeated for every board.
NOTE: This section tells you what to do if you downloaded the QLIB from the web ( QUANCOM Library )
If you have downloaded the QLIB from our website „http://www.quancom.de/QLIBENG“ you received a program like „qlib32_v160.exe“. Create a directory „i.e. C:\QLIBINST“ on you harddrive.
Copy the program to this directory. Change on the DOS commandline to this directory and run the
program. „qlib32_v160.exe“. This will extract the archived files to your harddisk. If you are asked in
the following steps to select the i.e. A:\WIN95\QUANCOM.INF or A:\SETUP.EXE don’t switch to drive
„A:“
but
rather
to
„i.e.
C:\QLIBINST\DISK1\WIN95\QUANCOM.INF“
or
„C:\QLIBINST\DISK1\SETUP.EXE“.
QLIB (Quancom Library)
Seite 13
Softwareprogramming with the QLIB
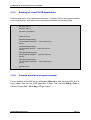
2.3 Filestructure after the installation of the QLIB
Config
Configurationtool QLIBCNFG for ISA Cards
+----DLL
+----BCPP
DLL’s for Compiler Borland / Inprise
+----MSDEV
DLL’s for Compiler Microsoft
+----Driver
NT Driver
+----Help
API Documentation
+----Include
Include files for C, Delpi and Visual Basic
+----Lib
+----BCPP
Libraries for Compiler Borland / Inprise
+----MSDEV
Libraries for Compiler Microsoft
+----Samples
+----C
+----ADI12
Example for AD1 and AD2
+----POPTOLCA Example for POPTOLCA
+----PTTL24IO
Example for PTTL24IO
+----PWDOG_B
Example for PWDOG1 and PWDOG2 unter C++
+----REL8UM
Example for Rel8UM
+----WDOGTEST Example for ISA- and PCI Watchdogcard
+----Delphi
+----WATCHDOG Example for ISA- and PCI Watchdogcard
+----HPVEE
Example for PAD12
+----MSOffice
+----Excel
Example for PAD12
+----Pwrpoint Example for 220V switching board
+-----VB
+-----SDK
Example for Installation of QLIB
Components with InstallShield
+-----Tools
Useful tools for our boards
( e.g. PCIINFO for MS-DOS and Windows )
Seite 14
Produktbeschreibung
Configuration of the boards to be consulted
3 Configuration of the boards to be consulted
For the configuration of cards you have to distinguish between ISA- and PCI-cards.
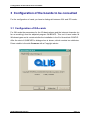
3.1 Configuration of ISA-cards
For ISA-cards the parameters for the I/O-basis adress and the interrupt channels (so
far as excisting) must be adjusted program QLIBCNFG. This tool is used under all
Windows-types and is contained after the installation in the file Verzeichnis CONFIG.
After the start of QLIBCNFG a dialogue-box is shown, which consists two attributes.
Direct vsisible is the side Common with a Copyright-advice.
QLIB (Quancom Library)
Seite 15
Configuration of the boards to be consulted
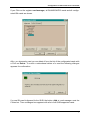
If you Click on the register card-manager, all QUANCOM-PCI-cards and all configurated ISA-cards are shown.
Aftre you choosed a card you can delete it from the list of the configurated cards with
a Click on Delete. To avoid a unintentional delete of a card the following dialogue
appears for confirmation.
If a new ISA-card is diposed for the QLIB, the button Add at card-manager must be
Clicked on. Then a dialogue-box appears with a list of all QLIB supported cards.
Seite 16
Produktbeschreibung
Configuration of the boards to be consulted
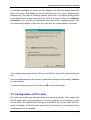
After the card was choosen the dialogue will be closed with Ok. Now the card is
available for the QLIB. At the same time the feature dialogue will be opened and the
cardparameter will be declared.
In the column resource types the types of cardparameters is shown. In the column
settings befinden the values of the card parameters are contained. With a double
Click on one of the resourcetypes a window will be opened, with which the value can
be changed.
QLIB (Quancom Library)
Seite 17
Configuration of the boards to be consulted
The following dialogue box serves for the settings of the I/O-base adress (short E/Abase) of the card. After Value you can choose the value from a list of possible base
adresses the. This value is setted by jumpers on the card. If an adress setting should
cause conflikt with another card inside the QLIB it is shown in the field conflikt informations. Ther you will get information about with which card/gearnumber (Device) this setting collides. In this case you must take an unused adress on the card.
The cardparameters gearnumber (Device) and IRQ are setted with a similar dialogue
box.
Now the cardparameters can always be called and changed with the button Features
in card-manager.
To safe the settings now you must Click on Ok in the card-manager.
3.2 Configuration of PCI-cards
PCI-cards are cinfigurated automaticallyby the operating system. That means, that
the I/O-adress and interrupt channels (so far as excisting) are automatically known
for the QLIB. This causes that the program QLIBCNFG can only be used with PCIcards to establish, if the PCI-card is detected by the computer. A configuration of the
cardparameters is not possible.
Seite 18
Produktbeschreibung
Configuration of the boards to be consulted
3.3 Setting of a projekt with the QLIB under Microsoft Visual C++ 4.x
With a small example we can now show you, how you
1. can invent a project
2. the neccesary QLIB-files can be integrated into the project
3. the neccesary compiler-settings can be taken
4. can provide a small QLIB-application
5. can compile the project and how to start the application
As an example you can see the connection to the PCI-Watchdog-Karte PWDOG1.
Here the testapplication has the name PWDOG and should be a 32-Bit consoleprogram.
QLIB (Quancom Library)
Seite 19
Configuration of the boards to be consulted
3.3.1
Building of a project
The building of the project happens in the following steps:
-
Start the compiler
-
Click on File | New. Now you can see the dialogue New.
Choose Project Workspace and Click on OK. Now you can see the dialogue
New Project Workspace.
Choose under type the item Console Application. Under Plat- forms before
Win32
there
must
be
a
hooklet.
Behind
Location
c:\programme\quancom\qlib32\beispiel and under Name the file-name pdwdog
must be declared.
-
Finish the dialogue with Create.
After this settings the compiler now creates the project. Therewith the compiler can
find the components of the QLIB during the later compilating- and Link-proceedings
the following steps must be performed:
Choose menupoint File | New and Click in the dialogue New on the item Text
File and finish the dialogue with OK. Now an empty quell-code-window will be built.
Now this quell-code must be safed by File | Save as under filename
c:\programme\quancom\ qlib32\ beispiel\pdwog.c.
-
Choose in the projekt-window the registertype FileView.
Seite 20
Produktbeschreibung
Configuration of the boards to be consulted
Click on the menupoint Insert | Files into Project. Now you can see the dialogue Insert Files into Project. Now choose the file c:\programme\ quancom\qlib32\beispiel\pdwog.c and finish the dialogue with Add. Now the file will be
added to the project.
Click on menupoint Insert | Files into Project. Now you can see the dialogue
Insert Files into Project. Now choose the file c:\programme\ quancom\qlib32\lib\msdev\qlib32.lib und and finish the dialogue with Add. Now the file
will be added to the project.
Therewith , after the compile process, all necessary DLLs can be founded by the
programm example, the following files, for example with the Explorer, must be copied
into the project register c:\programme\quancom\qlib32\beispiel:
c:\programme\quancom\qlib32\dll\msdev\qlib32.dll
c:\programme\quancom\qlib32\dll\msdev\qmulti32.dll
3.3.2
Settings of the Compiler-options
The options must be setted in the following way:
Click on the menupoint Tools | Options. Now you can see the dialogue Options.
Click on register type Directories, add the new
c:\programme\quancom\qlib32 and finnish the dialogue with OK.
QLIB (Quancom Library)
Include-register
Seite 21
Configuration of the boards to be consulted
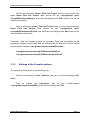
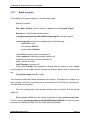
3.3.3
Building of a small QLIB-application
Now the application of the quellcode can begin. Therefore Click in the project-window
on the line pwdog.c and write down in the opened window the following lines:
#include "windows.h"
#include "conio.h"
#include "stdio.h"
#include "include\qlib.h"
void main (void)
{
QAPIWatchdogDisable();
printf("PWDOG deaktiviert ... Taste druecken\n");
getch();
QAPIWatchdogEnable();
printf("PWDOG aktiviert ... Taste druecken\n");
getch();
QAPIWatchdogRetrigger();
printf("PWDOG retriggert ... Taste druecken\n");
getch();
QAPIWatchdogDisable();
printf("PWDOG deaktiviert ... Taste druecken\n");
getch();
printf("Ende\n");
}
3.3.4
Compile and start a program example
To built the EXE-file now the compiler about Build | Build pwdog.exe. If everything
is setted correct, the first own QLIB-Applikation will be built after asfew seconds. This
can now be started with Build | Execute pwdog.exe.
Seite 22
Produktbeschreibung
Configuration of the boards to be consulted
3.4 Setting of a project with the QLIB under Borland Delphi
2.x
Not like in the other programming languages C/C++ we only show you in this example, what is important for the QLIB-integration:
Choose the menupoint Project | Options .... Now you can see the dialogue
Project Options.
Click on the register type Directories/Conditionals. Behind Search b Path
now add the path c:\programme\quancom\qlib32\include. Tehen finish the dialogue with OK.
In evrey unit, which is adressed in the QLIB, the line {$INCLUDE QLIB.pas}
must be added. This line should be before the first procedure/function in the Unit.
QLIB (Quancom Library)
Seite 23
Configuration of the boards to be consulted
3.5 Setting of a project with the QLIB under Borland C++
5.0x (US-Version)
With a small example we can now show you, how you
1. can invent a project
2. the neccesary QLIB-files can be integrated into the project
3. the neccesary compiler-settings can be taken
4. can provide a small QLIB-application
5. can compile the project and how to start the application
As an example you can see the connection to the PCI-Watchdog-Karte PWDOG1.
Here the testapplication has the name PWDOG and should be a 32-Bit consoleprogram.
3.5.1
Building of the project
The building of the project happens in the following steps:
-
Start the compiler
-
Click on File | New | Project.... Now you can see the dialogue NewTarget.
Click
on
Browse
and
open
c:\programme\quancom\qlib32\beispiel\pwdog.ide
with Target Type now do the following settings:
the
project
Application [.exe]
Platform: Win32
Target Model: Console
- dechoose everything with Frameworks
-
dechoose everything with Controls
-
dechoose evrything with Libraries
-
choose Static
dechoose Multithread
Seite 24
Produktbeschreibung
Configuration of the boards to be consulted
Click on button Advanced then choose in the following dialogue the option .c
Node and cancel the options .rc and .def . Thenfinish the dialogue with OK.
-
Finish the dialogue New Target with OK
Now after this settings the compiler builts the project. Terewith the compiler
can find the components of the QLIB during the later compiling- and linkproceedings, you now have to add the following file to the project
click on the first line (pwdog.exe) in the project window. Now the line will become
conspicious.
Push button Insert resp. Einf. Now you can see the dialogue
Add to Project
List. Give in c:\programme\quancom\qlib32\lib\bcpp\qlib32.lib with the filename
and finish the dialogue with OK. This file will now be added to the project.
Therewith , after the compile process, all necessary DLLs can be founded by
the programm example, the following files, for example with the Explorer, must be
copied into the project register c:\programme\quancom\qlib32\lib\bcpp\qlib32.lib:
:
c:\programme\quancom\qlib32\dll\bcpp\qlib32.dll
c:\programme\quancom\qlib32\dll\bcpp\qmulti32.dll
QLIB (Quancom Library)
Seite 25
Configuration of the boards to be consulted
3.5.2
Settings the compiler-options
The options must be stted in the following way:
Click on menupoint Options | Project. Now you can see the dialogue
Project Options.
Click on point 32-bit Compiler under Topics. Now other compiler- topics are
shown. Choose point Calling Convention. Now you can see the options for the calling conventions on the right side of the dialogue.
-
Click on Standard call. Therewith the settings for the compiler are finished.
Click on point Directories under Topics. On the right side you can see the
settings of the register. Add the path c:\programme\ quancom\ qlib32 behind Include under Source Directories with a placed in front semicolon.
Finish the dialogue Project Options with OK. All necessary options are setted
now.
Seite 26
Produktbeschreibung
Configuration of the boards to be consulted
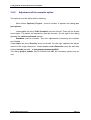
3.5.3
Building of a small QLIB-Application
Now the application of the quellcode can begin. Therefore Click in the project-window
on the line pwdog.c and write down in the opened window the following lines:
#include "windows.h"
#include "conio.h"
#include "stdio.h"
#include "include\qlib.h"
void main (void)
{
QAPIWatchdogDisable();
printf("PWDOG deaktiviert ... Taste druecken\n");
getch();
QAPIWatchdogEnable();
printf("PWDOG aktiviert ... Taste druecken\n");
getch();
QAPIWatchdogRetrigger();
printf("PWDOG retriggert ... Taste druecken\n");
getch();
QAPIWatchdogDisable();
printf("PWDOG deaktiviert ... Taste druecken\n");
getch();
printf("Ende\n");
}
3.5.4
Compile and start a program example
For the building of the EXE-file go to Project | Make all or with the button F9. If all is
exact adjust, then the first QLIB application is build. This can with Debug | Run or
with the buttons Ctrl + F9 or Strg + F9 get startet.
QLIB (Quancom Library)
Seite 27
Configuration of the boards to be consulted
3.6 Project building with the QLIB under Borland C++ 5.0x
(german version)
The following example shows how to
1. build a project
2. get the necessary QLIB files into the project
3. get the necessary compile adjustments
4. build a little QLIB application
5. compile a project and run the application
As an example should be the communication of the PCI watchdog card PWDOG1.
The test application has the name PWDOG and should be a 32-Bit Console program.
Seite 28
Produktbeschreibung
Configuration of the boards to be consulted
3.6.1
Build a project
The building of a project happens in the following steps :
-
Start the compiler
-
File | New | Project must be clicked. It appears the dialog New Target.
-
Search has to be clicked and the project
c:\programme\quancom\qlib32\beispiel\pwdog.ide must be opened
-
Under target type must be the adjustments as the following :
application [.exe]
environment: Win32
target model: Konsole
Under Plot everything must be choosen off
Under elements everything must be choosen off
Under libary everything must be choosen off
static must be choosen
Multi-Thread be choosen off
Click button Further and it appears a Dialog with the option to click .c knot
and the options .rc and .def must be choosen off and the dialog could be closed with
ok.
Dialog New target with ok to close
The compiler builds after these adjustments the project. Therewith the compiler at a
later compile- and Link proceeding find to components of the QLIB, the following file
must be taken in the project :
First Line (pwdog.exe) in the project window must be clicked. The line will be
stand out.
Button Insert or Einf muct be clicked. It appears a Dialog add to project list.
The file name c:\programme\quancom\qlib32\lib\bcpp\qlib32.lib must be choosen
and close the dialog with OK. The file will be add to the project.
QLIB (Quancom Library)
Seite 29
Configuration of the boards to be consulted
Therewith after the compiled proceeding all necessary DLLs of the example program
are found, the following files must be copied into the project directory:
c:\programme\quancom\qlib32\beispiel
c:\programme\quancom\qlib32\dll\bcpp\qlib32.dll
c:\programme\quancom\qlib32\dll\bcpp\qmulti32.dll
Seite 30
Produktbeschreibung
Configuration of the boards to be consulted
3.6.2
Adjustment of the compiler option
The options must be adjust as the following:
Menu button Options | Project... must be clicked. It appears the dialog project options.
Under topic the point 32-bit Compiler must be clicked. There will be shown
more topics. The option call konvention must be choosen. On the right in the dialog
appears the call konventionen options.
Standard must be choosen. Then the adjustments concerning the compiler
are finished.
Under topic the point directory must be clicked. On the right appears the adjustments of the single directories. Under source code directories must be add after
clicked Include the path ; ;c:\programme\quancom\qlib32
The dialog project options can be finished with OK. All necessary options are saved.
QLIB (Quancom Library)
Seite 31
Configuration of the boards to be consulted
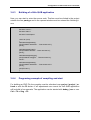
3.6.3
Building of a little QLIB application
Now, you can start to enter the source code. Therfore must be clicked in the project
window the line pwdog.c and in the opened window must be entered the following lines:
#include "windows.h"
#include "conio.h"
#include "stdio.h"
#include "include\qlib.h"
void main (void)
{
QAPIWatchdogDisable();
printf("PWDOG deaktiviert ... Taste druecken\n");
getch();
QAPIWatchdogEnable();
printf("PWDOG aktiviert ... Taste druecken\n");
getch();
QAPIWatchdogRetrigger();
printf("PWDOG retriggert ... Taste druecken\n");
getch();
QAPIWatchdogDisable();
printf("PWDOG deaktiviert ... Taste druecken\n");
getch();
printf("Ende\n");
}
3.6.4
Programing example of compiling and start
For building an EXE File the compiler must be refreshed over project | project | refresh or with the F9 button. If all adjustments are correct the first QLIB application
will be build in few seconds. The application can be started with debug | run or over
Ctrl + F9 or Strg + F9.
Seite 32
Produktbeschreibung
QLIB Commands
4 QLIB Commands
Make sure that the QLIB (QUANCOM Driver Library) is properly installed. For programming the UNITIMER board you need at minimum the QLIB release v1.70. For
further information about the installation and how to include the necessary files in
your application see the „QLIB“ documentation. This chapter describes the special
commands that are required to use the UNITIMER board with the QLIB. These
samples assume that the board is installed and properly set-up for use with the QLIB
(QUANCOM Driver Library).
4.1 General functions
QAPIExtOpenCard
ULONG QAPIExtOpenCard ( ULONG cardid, ULONG devnum );
Use the function QAPIExtOpenCard to open a board and retrieve the board handle
QAPIExtCloseCard
void QAPIExtCloseCard( ULONG cardhandle );
With the function QAPIExtCloseCard the board is closed
QAPINumOfCards
ULONG QAPINumOfCards (void);
With the function QAPINumOfCards it is possible to ask , which used cards are supported by the QLIB
QAPIExtNumOfCards
ULONG QAPIExtNumOfCards (void);
With the function QAPIExtNumOfCards it is possible to ask , which used cards are supported by the
QLIB
QLIB (Quancom Library)
Seite 33
QLIB Commands
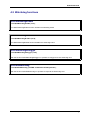
4.2 Watchdog functions
QAPIWatchdogEnable
void QAPIWatchdogEnable (void);
The QAPIWatchdogEnable function enables the watchdog board
QAPIWatchdogDisable
void QAPIWatchdogDisable (void);
The QAPIWatchdogDisable function disables the watchdog board
QAPIWatchdogRetrigger
void QAPIWatchdogRetrigger (void);
With the function QAPIWatchdogRetrigger it is possible to retigger an active watchdog card
QAPIExtWatchdog
void QAPIExtWatchdog ( ULONG cardhandle ULONG jobcode );
With the function QAPIExtWatchdog it is possible to respond the Watchdog card
Seite 34
Produktbeschreibung
QLIB Commands
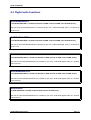
4.3 Digital write functions
QAPIExtWriteDO1
void QAPIExtWriteDO1 ( ULONG cardhandle ULONG channel ULONG value ULONG mode );
With the function QAPIExtWriteDO1 it is possible to give out a 1 Bit width digital value on a channel of
the DO card
QAPIExtWriteDO8
void QAPIExtWriteDO8 ( ULONG cardhandle ULONG channel ULONG value ULONG mode );
With the function QAPIExtWriteDO8 it is possible to give out a 8 Bit width digital value on a channel of
the DO card
QAPIExtWriteDO16
void QAPIExtWriteDO16 ( ULONG cardhandle ULONG channel ULONG value ULONG mode );
With the function QAPIExtWriteDO16 it is possible to give out a 16 Bit width digital value on a channel
of the DO card
QAPIExtWriteDO32
void QAPIExtWriteDO32 ( ULONG cardhandle ULONG channel ULONG value ULONG mode );
With the function QAPIExtWriteDO32 it is possible to give out a 32 Bit width digital value on a channel
of the DO card
QAPIPutDO
ULONG QAPIGetDI ( ULONG cardid ULONG channel ULONG value );
With the function QAPIExtWriteDO32 it is possible to give out a 32 Bit width digital value on a channel
of the DO card
QLIB (Quancom Library)
Seite 35
QLIB Commands
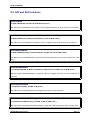
4.4 Digital read functions
QAPIExtReadDI1
ULONG QAPIExtReadDI1 ( ULONG cardhandle ULONG channel ULONG mode );
With the function QAPIExtReadDI1 the condition of a 1 Bit width digital channel could be read by a DI
card
QAPIExtReadDI8
ULONG QAPIExtReadDI8 ( ULONG cardhandle ULONG channel ULONG mode );
With the function QAPIExtReadDI8 the condition of a 8 Bit width digital channel could be read by a DI
card
QAPIExtReadDI16
ULONG QAPIExtReadDI16 ( ULONG cardhandle ULONG channel ULONG mode );
With the function QAPIExtReadDI16 the condition of a 16 Bit width digital channel could be read by a
DI card
QAPIExtReadDI32
ULONG QAPIExtReadDI32 ( ULONG cardhandle ULONG channel ULONG mode );
With the function QAPIExtReadDI32 the condition of a 32 Bit width digital channel could be read by a
DI card
QAPIGetDI
ULONG QAPIGetDI ( ULONG cardid ULONG channel );
With the function QAPIGetDI the condition of a 32 Bit width digital channel could be read by a DI card
Seite 36
Produktbeschreibung
QLIB Commands
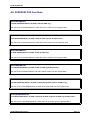
4.5 A/D and D/A functions
QAPIGetAD
ULONG QAPIGetAD ( ULONG cardid ULONG channel );
With the function QAPIGetAD it is possible to read a digital value from an input channel of a A/D card
QAPIPutDA
ULONG QAPIPutDA ( ULONG cardid ULONG channel ULONG value );
With the function QAPIPutDA it is possible to give out a digital value on the channel of an A/D card
QAPIExtReadAD
ULONG QAPIExtReadAD( ULONG cardhandle ULONG channel ULONG mode );
With the function QAPIExtReadAD it is possible to read a digital value from an input channel of an A/D
card
QAPIExtWriteDA
void QAPIExtWriteDA( ULONG cardhandle ULONG channel ULONG value ULONG mode );
With the function QAPIExtReadAD it is possible to give out a digital value from an input channel of an
A/D card
QAPIExtLatchDA
void QAPIExtLatchDA ( ULONG cardhandle );
With the function QAPIExtLatchDA are all digital values put out of the channels
QAPIConvertDWToVoltage
float QAPIConvertDWToVoltage ( ULONG cardid ULONG value );
With the function QAPIExtConvertDWToVoltage a digital value will be calculated into an analog value
QLIB (Quancom Library)
Seite 37
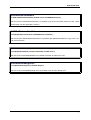
QLIB Commands
QAPIExtConvertDWToVoltage
float QAPIExtConvertDWToVoltage ( ULONG cardhandle ULONG value ULONG mode );
With the function QAPIConvertDWToVoltage a digital value will be calculated into an analog value
Seite 38
Produktbeschreibung
QLIB Commands
4.6 8255/8253 PIA functions
QAPIRead8253
ULONG QAPIExtRead8253 ( ULONG cardid ULONG reg );
With the function QAPIRead8253 the 8 Bit value will be read from the Register 8253
QAPIWrite8253
void QAPIExtWrite8253 ( ULONG cardid ULONG chipnum ULONG value );
With the function QAPIWrite8253 the 8 Bit value will be written from the Register 8253
QAPIRead8255
ULONG QAPIRead8255 ( ULONG cardid ULONG reg );
With the function QAPIRead8255 the 8 Bit value will be read from the Register 8255
QAPIWrite8255
void QAPIExtRead8255 ( ULONG cardid ULONG reg ULONG value );
With the function QAPIWrite8255 a 8 Bit value will be written from the register 8255
QAPIExtRead8253
ULONG QAPIExtRead8253 ( ULONG cardhandle ULONG chipnum ULONG reg );
With the function QAPIExtRead8253 the 8 Bit value will be read from the Register 8253
QAPIExtWrite8253
void QAPIExtWrite8253 ( ULONG cardhandle ULONG chipnum ULONG reg ULONG value );
With the function QAPIExtWrite8253 the 8 Bit value will be written from the Register 8253
QLIB (Quancom Library)
Seite 39
QLIB Commands
QAPIExtRead8255
ULONG QAPIExtRead8255 ( ULONG cardhandle ULONG chipnum ULONG reg );
With the function QAPIExtRead8255 the 8 Bit value will be read from the Register 8255
QAPIExtWrite8255
void QAPIExtWrite8255 ( ULONG cardhandle ULONG chipnum ULONG reg ULONG value );
With the function QAPIExtWrite8255 the 8 Bit value will be written from the Register 8255
Seite 40
Produktbeschreibung
QLIB Commands
4.7 Special functions
QAPIGetCardInfo
LPCARDDATAS QAPIGetCardInfo ( ULONG cardid );
With the function QAPIGetCardInfo it is possible to get some information about the card
QAPIGetCardInfoEx
ULONG QAPIGetCardInfoEx( ULONG cardid LPCARDDATAS lpcd );
With the function QAPIGetCardInfoEx it is possible to get some information about the card. These will
be written into the applications memory
QAPISpecial
ULONG QAPISpecial ( ULONG cardid ULONG jobcode ULONG para1 ULONG para2 );
With this function QAPISpecial it is possible to run card specific functions
QAPIExtSpecial
ULONG QAPIExtSpecial ( ULONG cardhandle ULONG jobcode ULONG para1 ULONG para2 );
With this function QAPIExtSpecial it is possible to run card specific functions
QAPIExtGetCardInfo
LPCARDDATAS QAPIExtGetCardInfo( ULONG cardid );
With the function QAPIExtGetCardInfo it is possible to get some information about the card
QLIB (Quancom Library)
Seite 41
QLIB Commands
QAPIExtGetCardInfoEx
ULONG QAPIExtGetCardInfoEx( ULONG cardid LPCARDDATAS lpcd );
With the function QAPIExtGetCardInfoEx it is possible to get some information about the card. These
will be written into the applications memory
QAPIExtReleaseCardInfo
void QAPIExtReleaseCardInfo( LPCARDDATAS carddatas );
With the function QAPIExtReleaseCardInfo it is possible with QAPIExtGetCardInfo to get out the asked card information
QAPIExtEnableIRQ
void QAPIExtEnableIRQ ( ULONG cardhandle ULONG mode );
With the function QAPIExtEnableIRQ it is possible to activate an IRQ an the card
QAPIExtSetDebugLevel
void QAPIExtSetDebugLevel( ULONG dbgval );
With the function QAPIExtSetDebugLevel it is possible to set an intern debug level
Seite 42
Produktbeschreibung
Annex
5 Annex
5.1 Frequently asked questions (FAQ)
5.1.1
Genaral informations
Can I have any problems with network boards, sound cards, system components or other expansion boards?
Yes, according to how you have set the I/O address of your QUANCOM and the
other component. You may encounter a resource conflict if the QUANCOM board
and another component are using the same I/O address. Either change the I/O
address of the QUANCOM or the I/O address of the other component.
What is the purpose of the PCIInfo program ?
The program PCIINFO dumps the I/O addresses of all QUANCOM PCI-cards used in
the system.
What is the program PCISETIO for?
The program PCISETIO allows the manual change of the base I/O address of a
QUANCOM PCI-card.
What is the program PCIGETIO for?
The program PCIGETIO reads the base IO address from the
QUANCOM PCI board.
QLIB (Quancom Library)
PNP-Bios for the
Seite 43
Annex
5.1.2
What kind of problems may occur if the board is running
under DOS
Can I use the card with a memory manager? (QEMM 386,EMM386)
Yes, but the use of a memory manager can make your computer or the software running slower.
PCIINFO does not correctly identify the PCI-card, is that right?
The message "PCI-card unknown" shows that the device is no QUANCOM board.
PCIINFO has been developed only for QUANCOM boards. Other components are listed as "unknown" (i.e. graphic cards, disk controllers, PCI bridges or other components).
5.1.3
Problems with boards running under Windows 98/95 and
Windows XP/2000/NT
Why is the “Control Panel” board configuration dialog “QLIB” empty?
• There is no QUANCOM PCI board in the system.
• There are no drivers installed for a QUANCOM ISA board.
After installation I get the message “QLIBNDRV.SYS not found“ or
“QLIBNDRV.VXD not found“ . What can I do?
• Check that the QLIB is installed properly. For further information about the installation process and the general programming with the QLIB please see the „QLIB“ manual which is included on the installation CD.
• If you use a QUANCOM ISA board check if the drivers for the QUANCOM board
are installed.
What is the program PCISETIO for?
The program PCISETIO allows the manual change of the base I/O address of a
QUANCOM PCI-card.
What is the program PCIGETIO for?
The program PCIGETIO reads the base IO address from the
QUANCOM PCI board.
Seite 44
PNP-Bios for the
Produktbeschreibung
Annex
Why do I get the message "Driver QLIBNDRV.SYS” or “Driver QLIBNDRV.VXD”
could not be load?
• Check that the QLIB is installed properly. For further information about the installation process and the general programming with the QLIB please see the „QLIB“ manual which is included on the installation CD.
• The driver for the QUANCOM board was not loaded. (Control Panel => System )
Windows XP/2000/NT: Must the QLIB be installed with Administrator-right?
• Yes, always install the QLIB with administration rights.
Windows XP/2000/NT: Why do I get the message “Driver could not be installed”
during the installation?
• Installation was made without administration rights.
Windows XP/2000/NT: Why do I get the message "Driver QLIBNDRV.SYS could
not be loaded“?
• Installation of drivers has failed, because the QLIB was not installed with administration-rights.
• QLIB-Software was installed on a network drive. Always install the QLIB on your local drive.
Windows XP/2000/NT: How can I install the driver QLIBNDRV.SYS manually?
If the QLIBNDRV.SYS failed to install it may be necessary to install the driver manually.
Please take the following steps to manually install the driver:
• Search on the installation CD in the directory “Tools” for the tool instdrv.exe. With
this tool you can install and de-install the driver manually.
• Please call this tool with the following command line parameters:
instdrv
qlibndrv
d:\directory\qlibndrv.sys .
Replace d:\directory\ with the drive and the file, where the driver qlibndrv.sys is located.
QLIB (Quancom Library)
Seite 45
Annex
• Go to “Start -> Settings ->Control panel ->(Administrative Tools / Windows 2000
only) -> Drivers” change the start type to “automatic”, then click on the “start” button.
For the changes to become active please restart the system.
Why must I restart the driver after every reboot of the computer?
The starting type of the driver is set to “Manual”. If you want you can change this setting on „Automatic“ to start the driver on every reboot of the system.
Seite 46
Produktbeschreibung
Annex
5.2 Customer Communication and Help
You need help?
If you don’t know how to
go on during the installation or operation of
your QUANCOM board please first consult
this user’s guide.
! Tip !
In the chapter „Frequently asked question“ a
lot of answers to questions for known problems. They may help you to solve the problems. On the QUANCOM installation CD
you can find a ASCII – Text – file README.TXT, which include changes made after
printing of this user’s manual.
! Important !
QLIB (Quancom Library)
If you have further questions please contact
our support team. For this case please prepare the following information:
•
Exact type of the board.
•
Version of the driver
•
Version of the QLIB
•
Operating system, Hardware equipment
and Bus - System
•
Name and Version of the program, which
reports the failure
•
A detailed failure description. To make
sure, please try to reproduce the failure,
and describe exactly, which steps led to
this failure.
Seite 47
Annex
Who can you contact?
The QUANCOM internet website
http://www.quancom.de/
Per Fax
+49 22 36 / 89 92 - 49
Per E-Mail:
[email protected]
Address:
QUANCOM INFORMATIONSSYSTEME
GmbH
In der Flecht 14
50389 Wesseling
If you need urgent help call:
QUANCOM Hotline Germany
0 22 36 / 89 92 - 20
Monday-Thursday
from 9:00 to 18:00
Friday
from 9:00 to 17:00
Actual drivers
You can find the newest Version of QUANCOM software on our internet website
http://www.quancom.de. You can also find a
lot of information and „Frequently asked questions (FAQ’s)”. Before you contact the
QUANCOM support, please check if you are
using the newest software version of the
QUANCOM software.
Seite 48
Produktbeschreibung
Annex
Repair
If you are not sure whether your QUANCOM
board is defective please call the QUANCOM
Hotline:
Tel.: +49 22 36 / 89 92 – 20
Before you send us the QUANCOM board to
be repaired call:
Tel.: +49 22 36 / 89 92 – 20
If you send us your QUANCOM board, please use original package or any other suitable
package, to protect the contents against
transport damage. You also need to send us
a copy of the original bill and the RMA number.
You can shorten the repair time by sending
us an exact failure description, so that a
faster failure search is possible. Send your
QUANCOM board directly to the service department of QUANCOM Informationssysteme GmbH.
QLIB (Quancom Library)
Seite 49
Annex
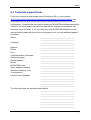
5.3 Technical support form
If you have internet access please enter the following URL in your browser:
http://www.quancom.de/quancom/qshop.nsf/techniksupport?OpenForm&eng else
photocopy this form and use the copy of this form as a reference for your current
configuration. Complete this form before contacting QUANCOM Informationssysteme
GmbH for technical support help and our applications engineers may answer your
questions more efficiently. If you are using any other QUANCOM hardware or software products please add them to this configuration form. Include additional pages if
necessary.
Name
_________________________________
_________________________________
Company
_________________________________
_________________________________
Address
_________________________________
Phone
_________________________________
Fax
_________________________________
Computer brand / Processor:
_________________________________
Operating system
_________________________________
Display adapter
_________________________________
Mouse
_________________________________
QUANCOM board
_________________________________
Other adapters installed
_________________________________
Hard disk (capacity, free)
_________________________________
The problem is
_________________________________
List any error messages
_________________________________
_________________________________
_________________________________
_________________________________
_________________________________
The following steps will reproduce the problem
_________________________________
_________________________________
_________________________________
_________________________________
_________________________________
_________________________________
_________________________________
Seite 50
Produktbeschreibung
Annex
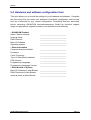
5.4 Hardware and software configuration form
This form allows you to record the settings of your hardware and software. Complete
this form each time you revise your software or hardware configuration, and use this
form as a reference for your current configuration. Completing this form accurately
before contacting QUANCOM Informationssysteme GmbH for technical support
helps our applications engineers answer your questions more efficiently.
• QUANCOM Product
Name / Name of board:
__________________________
Interrupt Level:
__________________________
DMA Channel:
__________________________
Base I/O Address:
__________________________
Operating system:
__________________________
• Other information
Computer brand and Model:
__________________________
Processor:
__________________________
Clock Frequency:
__________________________
Type of Video Board Installed:
__________________________
DOS Version:
__________________________
Programming Language:
__________________________
Programming Language Version:
__________________________
• Other Boards in System
Base I/O Address of other Boards: __________________________
DMA Channels of other Boards:
__________________________
Interrupt Level of other Boards:
__________________________
QLIB (Quancom Library)
Seite 51
Annex
5.5 Documentation comment form
QUANCOM Informationsysteme GmbH would like you to comment on the documentation supplied with our products. This information helps us to provide you with quality products to meet your needs. Include additional pages if necessary.
Title:
QLIB (Quancom Library)
Edition date:
10.08.04 16:42
Name:
Company:
Address:
Phone:
Fax:
Comment:
________________________________________________
________________________________________________
________________________________________________
________________________________________________
________________________________________________
________________________________________________
________________________________________________
________________________________________________
________________________________________________
________________________________________________
________________________________________________
________________________________________________
________________________________________________
________________________________________________
________________________________________________
________________________________________________
________________________________________________
Mail to:
[email protected]
Fax to:
+49 2236 89 92 49
Address:
QUANCOM Informationssysteme GmbH
In der Flecht 14,
50389 Wesseling
Germany
Seite 52
Produktbeschreibung
Annex
registered trade-mark:
Windows/386 is trade-mark of Microsoft
XT and PS/2 are trade-marks and IBM, OS/2 and AT are registered of the International Business Machines Corporation.
National Instruments, LabVIEW are registered trade-mark of National Instruments Corporation
MS, MS-DOS, Microsoft, Visual Basic, Windows, Windows NT are registered trade-mark
of Microsoft Corporation
On other product- and company names, that are mentioned in this manual, it could bargain for marks
of the respective owner.
QLIB (Quancom Library)
Seite 53