1
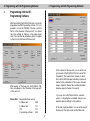
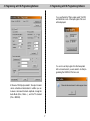
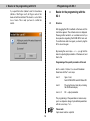
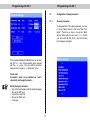
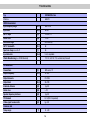
X-DVB-S / PAL twin
Operating instructions
Picture
Content
Content
. . . . . . . . . . . . . . . . . . . . . . . . . . . . . . . . Page 3
Description . . . . . . . . . . . . . . . . . . . . . . . . . . . . . . . . Page 4
Installation of X-DVB-S / PAL twin card . . . . . . . . . Page 4
2.1
Installation in X-5 twin . . . . . . . . . . . . . . . . . . . . Page 4
2.2
Cabling of X-DVB-S/PAL twin . . . . . . . . . . . . . . Page 5
2.3
Changing the Audio channels (left / right) . . . . Page 5
Programming with the HE-Programming software Page 6
Basics for programming with the KC 3 . . . . . . . . . . Page 10
4.1
Structure . . . . . . . . . . . . . . . . . . . . . . . . . . . . . . Page 10
4.2
Order of Programming . . . . . . . . . . . . . . . . . . . Page 11
4.3
Store . . . . . . . . . . . . . . . . . . . . . . . . . . . . . . . . Page 11
Programming with the KC 3 . . . . . . . . . . . . . . . . . . . Page 11
5.1
Choosing parameters of the
base unit / slot . . . . . . . . . . . . . . . . . . . . . . . . . Page 11
5.1.1 Adjusting the bus address
of the base unit . . . . . . . . . . . . . . . . . . . Page 11
5.1.2 Choosing the slot . . . . . . . . . . . . . . . . . . Page 11
5.2
Adjusting the RF-output parameters . . . . . . . . . Page 11
5.2.1 Adjusting RF-output frequency . . . . . . . . Page 11
5.2.2 Switching off the output signal . . . . . . . . Page 12
5.2.3 Error messages . . . . . . . . . . . . . . . . . . . Page 12
5.2.4 Level adjustment of X-DVB-S / PAL twin . . Page 12
5.3
Configuration of input parameters . . . . . . . . . . Page 12
5.4
Configuration of output parameters . . . . . . . . . Page 13
5.4.1 Choosing a program . . . . . . . . . . . . . . . . Page 13
5.4.2 Audio options . . . . . . . . . . . . . . . . . . . . . Page 14
5.4.3 Manual program choise . . . . . . . . . . . . . Page 14
5.4.4 Video options / test signals . . . . . . . . . . . Page 15
Short overview of programming steps . . . . . . . . Page 17
Technical Data . . . . . . . . . . . . . . . . . . . . . . . . . . . . . . Page 18
Notes
. . . . . . . . . . . . . . . . . . . . . . . . . . . . . . . . Page 19
Pictographs
1
2
3
4
5
X-DVB-S / PAL twin - Card
6
7
2
Pictographs
Pictographs
Italiano:
Gli apparecchi elettronici non vanno smaltiti nei rifi uti urbani,
bensi smaltiti in maniera appropriate conformemente alla
direttiva 2002/96/CE DEL PARLAMENTO E CONSIGLIO
EUROPEO del 27 gennaio 2003 su apparecchiature elettriche ed elettroniche. Quando l`apparecchio non serve piú, si
raccomanda di recarlo ad un centro di raccolta pubblico previsto per lo smaltimento.
Pictographs and safety information
Pictographs are icons with specific meanings. The following pictographs are used in the installation and operating instructions:
Warns about situations in which there is danger of lethal
injury due to hazardous electrical voltage and non-compliance with these instructions.
Español:
Los equipos electrónicos no son basura especial, según la
directive 2002/96/CE DEL PARLAMENTO EUROPEO y
DEL CONSEJO del 27 de enero de 2003 deberán eliminarse correctamente los equipos eléctricos y electrónicos
antiguos. Entregue este equipo al final de su utilización,
para su eliminación a los centros públicos derecogida.
Recycling: All of our packaging materials (packaging,
identification sheet, plastic foil and bag) are fully recyclable.
English:
Electronic equipment is not household waste – in accordance with directive 2002/96/EC OF THE EUROPEAN
PARLIAMENT AND THE COUNCIL of 27th January 2003 on
used electrical and electronic equipment, it must be disposed of properly. At the end of its service life, take this unit for
disposal at a relevant official collection point.
Česky:
Elektronické přístroje nepatří do domovního odpadu, ale
musí se – dle směrnice 2002/96/EG EVROPSKĒHO
PARLAMENTU A RADY z 27.ledna 2003 o elektrickych a
elektronickych starych přístrojích odborně likvidovat. Odevzdejte tento příostoj na konci na jeho používání k likvidaci
v komunálních sběrnych místech určenych k tomu účelu.
Francaise:
Les appareils électroniques doivent pas être mis dans la
poubelle de la maison, mais doivent être recycles correctement selon la directive 2002/96/EG DU PARLAMENT ET
DU CONSEIL EUROPEEN du 27 janvier 2003 concernant
les appareils électroniques et électriques usages. Nous
vous prions de metre cet appareil á la fin de son utilisation
dans un emlacement prévu pour son recyclage.
Türkće:
Elektronik/ elektrikli cihazlar ev ćöpüne atűlmaz. Bu cihazlar
AVRUPAPARLAMENTO VEKONSEYięNiN 27. Ocak 2003
tarihli 2002/96/AT Yönetmeligi uyarűnca, elektrik ve elektronik cihazlarű imha yerlerinde usulüne uygun olarak imha
edilmelidir. Lütfen bu cihazű kullandűktan sonra imha edilmesi ićin öngörülen belediyeye ait toplama yerlerine teslim
ediniz.
Nederlands:
Elektronische apparaten horen - volgens richtlijn 200296EG
van het Europese Parlement d.d. 27 januari 2003 - niet thuis
bij het gewone huisvuil maar moeten gescheiden ingezameld worden. Lever gebruikte elektrische en elektronische
apparatuur aan het eind van hun levensduur in bij de daarvoor bedoelde verzamelpunten.
3
1 Description
1
2 Pre-configuration
Description
The X-DVB-S / PAL twin card is designed for the
transcoding of two digital satellite TV-programmes into standard PAL-signals within the
frequency range 47 – 862 MHz. It contains two
independent input demodulators and one
shared output converter. This means any two
satellite programmes can be converted in two
adjacent channels. Data Services as VPS or
Teletext can be switched on and off as well as
the generation of test signals. Each board has a
level control for level matching of the individual
plug-in boards to the same output level via KC 3
or HE-programming software.
2
Installation of X-DVB-S / PAL twin card
2.1
Installation in X-5 twin
The allowed loss power of the power supply can be
exceeded, if the base unit X-5 is operated with 5 cards
X-DVB-S / PAL twin and the LNB remote supply is
activated at the same time. To make this operation
impossible, the remote supply for the LNC has to be
deactivated permanently. To operate the X-DVB-S /
PAL twin in the X-5 base unit, an upgrade of the X-5
main processor is necessary. Base units with this upgrade will switch off the remote supply for the LNC automatically, depending on the assembled plug-in cards.
From HE programming software version 4.90,
Please note:
the remote supply is also switched off depending on the
Authorized and qualified personnel only, is allowed to change the plug-in modules. Before this,
the operating instructions, and especially the
security advises, of the V16 base unit have to be
read and followed. All works have to be done
according to the security standards DIN VDE
0701, part 1 and 200.
assembled plug-in cards.
The LNC remote supply has to be realized via SSW 22
(order no.: 310 100)
4
2 Pre-configuration
2.2
Cabling of X-DVB-S/PAL twin
2 Pre-configuration
2.2
Changing the Audio Channels
The X-DVB-S/PAL twin can be operated with a bridge
for the input SAT-signal. This means that the SAT-IF
from the loop-through output of Tuner A is bridged to
the SAT-IF input of Tuner B.
STANDARD
Video-Jumper, don´t change!
SAT-IF bridged from Tuner A to Tuner B
CHANNEL A
CHANGED
CHANNEL B
CHANGED
CHANNEL A+B
CHANGED
Tuner A and B connected separately with SAT-IF
Audio Jumper
3 Programming with HE-Programming Software
3
3 Programming with HE-Programming Software
Programming with the HEProgramming Software
After the installing, the X-DVB-S / PAL twin card can be
programmed via HE-Programming software. If it is not
possible to choose the X-DVB-S / PAL twin card from
the list in the „Overview of the base unit“, you should
check the settings at “Options” à “Favoured plug-in
cards. The card must be activated as below, to appear
on the list in the „Overview of the base unit“.
In the overview of the base-unit, you can set the output channels of the X-DVB-S / PAL twin card at “RFParameters”. This means those channels, in which
the, from the DVB-S bouquet selected, programs are
inserted to the cable network. The chosen channel is
always channel A. Channel B is automatically determined as adjacent channel of channel A.
After reading out the base unit, the X-DVB-S / PAL
twin card appears in the “Overview of the base unit“
on the used slot.
If you now click on the “Details” button, a window
opens for configuring the card details. Here you can
make the relevant settings for the operation.
Please Note:: Required Software version:
X-5 Basis twin:
4.00
X-8 Basis twin:
1.21
V16:
1.21
Programming software
4.90
At the area „Input parameters“ you can set the input of
the base unit, the symbol rate and the Viterbi rate.
6
3 Programming with HE-Programming Software
3 Programming with HE-Programming Software
If you use the button “Check signal quality”, the C/N
and the Bit error ratio of the input signal of the card
will be displayed.
You can choose the program from the transponder
after a channel search, you are asked to do after programming the X-DVB-S / PAL twin card.
At the area “HF-Output parameter”, the output channel
can be activated and deactivated. In addition you can
increase or decrease the Audio amplitude, change the
Audio-Mode (Mono, Stereo…), and the TV standard
(PAL or SECAM).
7
3 Programming with HE-Programming Software
3 Programming with HE-Programming Software
Following to the channel search, the list with the included
programs is displayed automatically. Now you can
choose the program to be inserted to the cable network.
gramming the card again. If you choose a multilingual
program, there is the possibility to select from different Audio-PIDs.
If you click on “Options” in the window of the “Parameters of the Plug-in card”, the following window appears:
The program is chosen by clicking on it, without pro8
3 Programming with HE-Programming Software
3 Programming with HE-Programming Software
Changes are only written and stored into the Plug-in
card after clicking the button “Write Options“.
The level adjustment of the X-DVB-S/PAL twin card
can also be done via HE-programming software. For
this you just have to click on “Level control“ in the window “Parameters of the Plug-in card”.
With “Read Options”, the parameters programmed into
the card will be read out and displayed. These parameters are Data Services, Test lines or manual program selection.
Here you can (de-) activate data services as VPS or
Teletext if provided by the transmitter and fix the CNI
code hexa-decimal. Further on, there is the possibility to
switch on or off test lines, and to type in the line in which
the test line should be keyed in. The valid range for keying in test lines is between 17–28 and 330 and 341.
If you activate the manual program selection, and
you type in invalid PIDs, there is no error message
in the HE-programming software!
But on the television screen you can see the error message for example „NO INPUT DATA“. This is why the
manual program search must be tested in the output of
the head end with TV-Set or measurement equipment.
But it is possible to switch off those OSD-messages by clicking on “No OSD messages”
First of all you should push the button „Parameter
read“, to read out the already programmed state of
attenuation.
The next step is the correction of the attenuation in
0,5 dB – steps. To store the changed values press
„Parameter write“.
9
4 Basics for the programming with KC 3
5 Programming with KC 3
If you push the button „Restart cards“ in the window
„Details of the Plug-in card“, all Plug-in cards of the
base-unit will be restarted. This leads to a short-term
loss of vision. This is why you have to confirm the
restart.
4
Basics for the programming with the
KC 3
4.1
Structure
After plugging the KC 3 handheld on the base unit, the
start menu appears. The software version is displayed.
Please give this number to our customer service if you
have questions regarding the X-DVB-S/PAL twin card.
To see this menu later once again, you have to plug the
KC 3 out and in again.
By pressing the cursor keys ← or → you get into the
menu for adjusting the parameters of the base unit, and
then to the
Programming of the specific parameters of the card
which consists of 4 lines. You can switch between
these lines with the ↑ and ↓ keys.
Line 1:
type of card,
here X-DVB-S/PAL twin A/B Status OK
Line 2:
Choosing the input and (de-) activating
the ON-Screen-display
Line 3 / 4:
RF – output parameters
The programming of the parameters is made via keypad or as stepwise change of pre-defined parameters
with the cursor keys ↑ or ↓.
☞
10
Please note:
Input values must be complete!
5 Programming with KC 3
4.2
Order of programming
1.
2.
3.
4.
5.
6.
4.3
5 Programming with KC 3
5.1.2
•
•
Choose the Plug-in card (line 1)
Type in the output parameters of the
Plug-in card (line 3/4)
Adjust the connected TV-measurement device
on the programmed output frequency
Turn on the on-screen-display (line 2)
Type in the input parameters in the
on-screen-display
Switch off the on-screen-display (line 2)
5.2
Store
5.2.1
☞
After choosing the slot (chapter 4), the programming of
the Plug-in card can begin.
Choosing parameters of the base unit / slot
5.1.1
Adjusting the bus address of the base unit
•
Adjusting RF- output frequency
Please note:
The adjusting of the output frequency should always
be done by choosing the channel in line 4. This
makes sure that the picture carrier has a frequency
according to the corresponding channel grid.
Therefore the frequency in line 3 is changed automatically with the changed output channel.
The output channel can be changed with the cursor
keys ← or →.
If you connect several base units with the ASTRO bus
system, you have to make sure, that the connected
base units are adjusted on different bus addresses
(delivery state 241).
•
•
Adjusting the RF-output parameters
The RF-output frequency can be adjusted in line three
with the input of the frequency value by keypad or in
line
four
with
the
stepwise
change
by
cursor keys ← or → (100-kHz-steps).
Programming with the KC 3
5.1
Select line 1 with the cursor keys ↑ or ↓
Choose the required slot with
the cursor keys ← or →
By pushing the cursor keys ↑ or ↓ you get into the third
or fourth line. Here you can insert the required RF-output parameters.
After finishing the data input, the new parameters have
to be stored by pushing the “OK/Store” button. After
pushing this button, the parameters are saved.
5
Choosing the slot
The input will not be checked, this means that a
wrong input is stored after pushing the
“OK/Store” button without warning!
Select line 3 with the cursor keys ↑ or ↓
Adjust the bus address with the cursor keys
← or → in a range between 001 – 020, 241
Store changed addresses with „OK / Store“
11
5 Programming with KC 3
5.2.2
5 Programming with KC 3
☞
Switching off the output signal
By pushing the „Menü / Read“ – button in the third line,
you get to the option “Output signal On/Off”.
The output signal is switched on or off with the cursor
keys ← or →.
Important note:
You should never compensate outgoing cable attenuation by different level adjustment of the plug-in card!
To do this, use the output coupler U-901
(order no.: 380 190) or VZN 8 (order no.: 380 191).
To activate the changes push the „OK / Store“ button.
5.3
5.2.3
Error messages
Configuration of input parameters
To configure the input parameters, you have to activate
the on-screen-menu first. By pushing the “Menü / Read”
– button in line 2, the following picture appears on the
TV set or measurement device.
By pushing the „Menü / Read“ – button in the third line,
you get to the display of error messages. The operational state of the plug-in card is displayed.
The error message 00000010 for example stands for a
missing input signal. If any other error message
appears, please contact our customer service.
5.2.4
To start the configuration, select the
Level adjustment of X-DVB-S/PAL twin
Menu „Channel Settings“
By pushing the „Menü / Read“ – button in the third line,
you get to the level adjustment of the X-DVB-S/PAL
twin plug-in card. The level can be adjusted via cursor
keys ← or → in a range from 0 dB up to 15,5 dB (0,5
dB – steps). All changes must be stored by pushing the
“OK / Store” button.
by choosing the menu „Channel Settings“ with the „OK
/ Store“ – button. Then you get to the main parameters
of the plug-in card.
12
5 Programming with KC 3
5 Programming with KC 3
5.4
Configuration of output parameters
5.4.1
Choosing a program
To change details of the output parameters, you have
to choose “Select Service” in the menu “Main Parameter”. Therefore you have to choose the “Select
Service” button with the cursor keys ↑ or ↓. Confirm
your choice with the “OK / Store – key. The following
picture appears (example):
The movement between the different lines can be done
with the ↑ or ↓ – keys. The parameters can be changed
with the ← or → keys, or the input with the numerical
keypad in the “Frequency” or “Symbolrate” option.
Please note:
Parameters, which are pre-defined on “auto”,
should only be changed by experts.
☞
Setting the input parameters:
• Type in the input frequency with the numerical keypad
• Choose the SAT input
• Type in the symbol rate
• Choose the Viterbi ratio
• Tune again
13
5 Programming with KC 3
5.4.2
5 Programming with KC 3
Audio – Options
5.4.3
Manual Program Choice
If you now choose a program of the chosen bouquet,
the following menu appears:
If the requested station / program does not appear in
the list “Select Service” you have to choose the last
point “Manual PID”. Here you can choose a program
manually:
Here you have the possibility to change the audio language, the volume, the audio mode and the configuration of the subtitle. Any changes have to be
confirmed by pressing the “OK / Store” – button.
In this sub-menu, the video PID, audio PID and
Teletext PID have to be entered four-digit decimal.
The hexadecimal PID will be converted by the card
software and displayed next to the decimal PID. If
you choose a program like this and you type in
wrong PIDs, there will be no error message on the
OSD!
This error message will be displayed in the TV-Set,
for example „NO INPUT DATA“. These error messages can be faded out. For doing this, please read
chapter 5.4.4.
14
5 Programming with KC 3
5.4.4
5 Programming with KC 3
Video – Options / Test signals
Please choose „Options“ in the start menu. The now
opened window offers the following configuration possibilities:
Activating or deactivating of Teletext (if transmitted),
VPS (if transmitted) and OSD error messages as well
as choosing the video standard (PAL or SECAM).
If you now choose the submenu „Test Pictures“ you
can activate different test signals.
15
5 Programming with KC 3
5 Programming with KC 3
Several different test lines can be activated and deactivated. If you activate a test line you can choose the
line for keying it in. The valid range for keying in the
test line is between 17 – 28 and 330 – 341. Any changes have to be stored by choosing the “Store” button.
There are two different test signals to choose:
1. black picture (choose „Black“) or
2. vertical colored beams (choose „BAR 75“)
By choosing „OFF“, you see the normal program in
the TV set after deactivating the OSD.
☞
The X-DVB-S/PAL twin – card offers the possibility to
key in test lines. For the configuration of those test
lines please choose “Test Lines” in the submenu
“Options”.
16
Important note:
If Teletext and test line are keyed in the same line, the
test line has priority. Then the Teletext will not be fed
in the network.
6 Short-overviev of programming steps
Startmenü (appears only once after plugging in the KC3):
ASTRO V16
Version 2,01
1 = deutsch
(next < >)
“ Menu / Read”
→
V16 Setup
VMS 616
yes
Power
A+B
Password
off
Choose Line 4
Password on
→
then “OK/Store”
V16 Serie
Password
0000
Password OK Menu
New PW
xxxx
with Cursorbuttons ← or → to Menu 1
Menu 1 — Choosing the slot / channel:
Choose line 1 with
Cursorkeys ↑ or ↓
With Cursorkeys
← or →
choose the channel
V16 Parameters
VMS-Input 11-14
Adress
241
Temperature 22°C
01:
Slot
no or unknown
Plug-in Card!
04: TDVBS/P A OK
Input
11
RF out 311,2 MHz
Channel
S 22
Menu 2 — Output parameters:
Choose line 3 with
Cursorkeys ↑ or ↓
04: TDVBS/P A OK
Input
11
RF out
311,2 MHz
Channel
S22
04: TDVBS/P A OK
Input
11
RF out
on
with “Menu / Read” -key switch between the submenus
17
04: TDVBS/P A OK
Input
11
Error
00000010
04: TDVBS/P A OK
Input
11
Attenuat. -3,5 dB
7 Technical data
Typ
X-DVB-S/PAL twin
Order no.
330 676
QPSK-Demodulator:
Input Freqency range
[MHz]
950–2150
Input level
[dBµV]
40–80
SAT IF input
[Ω]
F-Jacks, 75
Return loss
[dB]
> =10
AFC-catch range
SAT IF bandwidth
Spectrum shape cos-roll-off
Input data rate
automatically
[MHz]
[%]
[mBaud]
Viterbi-Decodierung (acc. DVB-Standard)
36
35
2–35, adjustable
1/2; 2/3; 3/4; 5/6; 7/8, automatically/manuell
HF-Modulatore
Connections
Output frequency
[Ω]
[MHz]
Output channels
Output level
IEC-Jacks, 75
47–862
C2–C69
[dBµV]
90–100
Intermod.-distance
[dB]
typ. 60
Return loss
[dB]
> 10
Spurios frequency distance
[dB]
typ. 60
[dB]
typ. 60
[° C]
0... +50
TV-Standard
Video-signal to noise ratio
B, G (D/K if requested)
Common data
Temp.-range
18
Notes
Notes
19
82 272 452 10 / 05
ASTRO Strobel
Kommunikationssysteme GmbH
Olefant 1–3
D-51427 Bergisch Gladbach (Bensberg)
Tel. +49 (0) 22 04 / 405-0
Fax +49 (0) 22 04 / 405 10
http://www.astro-kom.de