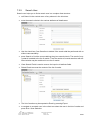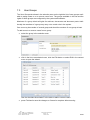
1
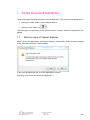
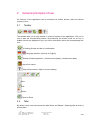
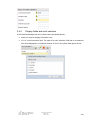
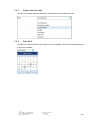
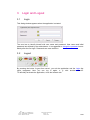
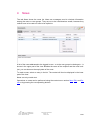
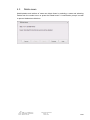
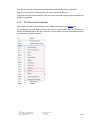
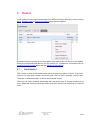
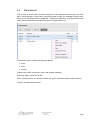
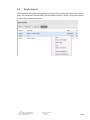
User Manual TypMaster/DD 3.1 PDC ECM&CRM&BI Version Last Revised Status Author 1.2 2012-08-20 Final Frank Merath / Ingrid Restle Privacy note: Internal Imprint Copyright © 2012 by T-Systems T-Systems International GmbH, Frankfurt am Main, Germany All rights reserved, including those relating to partial reprinting, photomechanical reproduction (including micro copy) and analysis using databases or other equipment. Issued by T-Systems International GmbH Industry Line/Service Line: go to document properties Fasanenweg 5, D-70771 Leinfelden-Echterdingen File name TMDD_3.1_UserManu al_en.doc Document number Document name TypMaster/DD 3.1 User Manual Version 1.2 Last revised 2012-08-20 Status Final Author Frank Merath / Ingrid Restle Content checked by Released by Ingrid Restle Munich, 2012-08-20 Contacts Jochen Ruoff (Product Management) Frank Merath (Architecture) Telephone +49 711 999 9940 E-Mail [email protected] [email protected] Brief details User Manual for TypMaster/DD, Release 3.1 File name: TMDD_3 1_UserManual_en Author: Frank Merath / Ingrid Restle Source: SE Book 3.5.3-en Last revised: 2012-08-20 Version: 1.2 Status: Final 2/60 Table of Contents 1 1.1 Online Document Distribution ............................................................................. 5 Note for users of Internet Explorer: ..................................................................... 5 2 2.1 2.2 2.3 2.4 2.4.1 2.4.2 2.4.3 2.4.4 2.5 2.6 2.7 2.8 2.9 General principles of use .................................................................................... 6 Toolbar ............................................................................................................... 6 Tabs ................................................................................................................... 6 Context menus ................................................................................................... 7 Fields ................................................................................................................. 7 Mandatory fields ................................................................................................. 7 Display fields and multi selection ........................................................................ 8 Single selection field ........................................................................................... 9 Date field ............................................................................................................ 9 Wizards ............................................................................................................ 10 Common functions for tables ............................................................................ 11 Column preferences ......................................................................................... 12 Page split preferences ...................................................................................... 13 Export to Excel ................................................................................................. 13 3 3.1 3.2 3.3 Login and Logout.............................................................................................. 14 Login ................................................................................................................ 14 Logout .............................................................................................................. 14 Change password ............................................................................................ 15 4 4.1 4.2 4.3 News ................................................................................................................ 16 Create news ..................................................................................................... 17 Edit news.......................................................................................................... 18 Delete news ..................................................................................................... 19 5 5.1 5.2 5.2.1 5.2.2 5.3 5.4 5.5 5.6 5.7 5.8 5.9 5.10 5.11 5.12 5.13 5.14 5.15 Archives ........................................................................................................... 20 Searching ......................................................................................................... 20 Create document .............................................................................................. 22 Create a new document from scratch: .............................................................. 22 Copy an existing document .............................................................................. 25 Edit document .................................................................................................. 28 Delete document .............................................................................................. 29 Save document ................................................................................................ 30 Checkout document ......................................................................................... 30 Checkin document ............................................................................................ 31 Copy/move document....................................................................................... 33 Change document rights .................................................................................. 35 Add document part ........................................................................................... 37 Delete document part ....................................................................................... 38 Show document part ........................................................................................ 39 Save document part ......................................................................................... 39 Change document part rights ........................................................................... 40 Put document to basket .................................................................................... 42 6 6.1 6.2 6.3 6.4 6.5 Basket .............................................................................................................. 43 Send basket ..................................................................................................... 43 Store basket ..................................................................................................... 45 Create CD archive from basket ........................................................................ 46 Remove document from basket ........................................................................ 46 Empty basket ................................................................................................... 47 File name: TMDD_3 1_UserManual_en Author: Frank Merath / Ingrid Restle Source: SE Book 3.5.3-en Last revised: 2012-08-20 Version: 1.2 Status: Final 3/60 7 7.1 7.2 7.2.1 7.2.2 7.2.3 7.2.4 7.2.5 7.3 Client Administration ........................................................................................ 48 Invoking TypMaster/DD Adminsitration ............................................................. 48 User/Client ....................................................................................................... 49 Client Tree........................................................................................................ 49 Department ...................................................................................................... 51 Team ................................................................................................................ 52 User ................................................................................................................. 53 Search User ..................................................................................................... 58 User Groups ..................................................................................................... 59 A Further applicable documents .......................................................................... 60 Change History / Release Notes ....................................................................................... 60 File name: TMDD_3 1_UserManual_en Author: Frank Merath / Ingrid Restle Source: SE Book 3.5.3-en Last revised: 2012-08-20 Version: 1.2 Status: Final 4/60 1 Online Document Distribution These help pages describe the features of the application. Help sites can be displayed by clicking the "Help" button in the dialog window or clicking on the "Help" icon The help page corresponding to the present feature (context sensitive help) will be displayed. 1.1 Note for users of Internet Explorer: While running the application, the Internet Explorer occasionally shows a warning dialog to the effect that a script is causing delays. In this case please press ‚No‘ to let the application continue. (Pressing ‘Yes’ would shut down the application.) File name: TMDD_3 1_UserManual_en Author: Frank Merath / Ingrid Restle Source: SE Book 3.5.3-en Last revised: 2012-08-20 Version: 1.2 Status: Final 5/60 2 General principles of use All functions of the application can be accessed via toolbar buttons, tabs and context (popup) menus. 2.1 Toolbar The toolbars offer you a quick access to common features of the application. Click on an icon to start the corresponding feature. By positioning the mouse cursor on an icon, a bubble field will be displayed to give you some information about the corresponding feature. UI setting (Simple and fast vs comfortable) Language selection (German or English) Refresh (Reload application / reload current display / reload current data) Logout from server Help (Help contents / help for current display) New Edit Delete Export to Excel 2.2 Tabs By default, every user may access the tabs ‘News’ and ‘Basket’. Switching tabs is done by clicking them. File name: TMDD_3 1_UserManual_en Author: Frank Merath / Ingrid Restle Source: SE Book 3.5.3-en Last revised: 2012-08-20 Version: 1.2 Status: Final 6/60 Archives that the user can see (a ‘Read‘ right is needed for this) are shown as tabs, too. 2.3 Context menus When you click the right mouse button on a list, tree or table a context menu pops up that contains menu items corresponding to the current display and the current selection. All menus and features available in this application are explained in the following help sites. 2.4 2.4.1 Fields Mandatory fields When creating or editing documents or other data mandatory fields must be filled. Mandatory fields are identified by an exclamation mark on yellow background directly next to the field: File name: TMDD_3 1_UserManual_en Author: Frank Merath / Ingrid Restle Source: SE Book 3.5.3-en Last revised: 2012-08-20 Version: 1.2 Status: Final 7/60 2.4.2 Display fields and multi selection A field with the background color yellow cannot be edited directly: either it is used to display information only or it is a multi selection field. The data of a multi selection field has to be selected from a list displayed in a separate window. A click in the yellow field opens the list File name: TMDD_3 1_UserManual_en Author: Frank Merath / Ingrid Restle Source: SE Book 3.5.3-en Last revised: 2012-08-20 Version: 1.2 Status: Final 8/60 2.4.3 Single selection field The data for a single selection field has to be selected from the drop down list. 2.4.4 Date field The date for a data field has to be chosen from the calendar. Click on the calendar symbol to open the calendar. File name: TMDD_3 1_UserManual_en Author: Frank Merath / Ingrid Restle Source: SE Book 3.5.3-en Last revised: 2012-08-20 Version: 1.2 Status: Final 9/60 2.5 Wizards Many functions of the application (e.g. for creating a document) are carried out using wizards. When the function is called up, the corresponding wizard dialog opens and guides the user through the function’s actions.. Depending on the function this may take one or several steps. For each step, actions like entering data or selecting values. Pressing Next causes the wizard to switch to the next step. This can only be done if the data for the current step is complete and correct. Pressing Back switches to the previous step. Finish saves all changes and closes the wizard. Cancel closes the wizard without saving. File name: TMDD_3 1_UserManual_en Author: Frank Merath / Ingrid Restle Source: SE Book 3.5.3-en Last revised: 2012-08-20 Version: 1.2 Status: Final 10/60 2.6 Common functions for tables Clicking on a row using the left mouse button selects (marks) this row. Ctrl + click can be used to select several rows, Ctrl + click on a selected row deselects that row. Shift + click is used to select a block of rows. Clicking the right mouse button opens the context menu for the selected row(s). Clicking a row header sorts the table rows according to the contents of that column. Clicking the same column header againg reverses the sort order. The table that is currently displayed can be saved locally using Export to Excel. File name: TMDD_3 1_UserManual_en Author: Frank Merath / Ingrid Restle Source: SE Book 3.5.3-en Last revised: 2012-08-20 Version: 1.2 Status: Final 11/60 2.7 Column preferences Using this dialog the layout of the current table can be changed. The settings are saved for each user and each table and remain active when the user next logs in. Column visibility: Select or deselect the check box ‚visible‘ for the column.. Column width: By double clicking the width value of a column, this value may be edited. Clicking the button ‘Optimize column widths‘ changes the widths of all columns so that the longest content in each column can be displayed. Column order: The buttons ‚Up‘ and ‚Down‘ can be used to change the column order. Select a column and move it by pressing one of the buttons. Reset to Defaults This button resets column visibility, width and order to the application’s default values for the current table. By pressing ‚OK‘, the changes will be applied (the table will be reformatted); pressing ‚Cancel‘ will close the dialog and discard the changes. File name: TMDD_3 1_UserManual_en Author: Frank Merath / Ingrid Restle Source: SE Book 3.5.3-en Last revised: 2012-08-20 Version: 1.2 Status: Final 12/60 2.8 Page split preferences Using this dialog the view parts’ sizes for the current view can be changed. The settings are saved for each user and each view (e.g. News, each archive, Basket) and remain active when the user next logs in. Height of results view changes the position of the horizontal divider Width of selection view changes the position of the vertical divider Reset to defaults sets the divider positions to the application’s default values for the current view. By pressing ‚OK‘, the changes will be applied (the table will be reformatted); pressing ‚Cancel‘ will close the dialog and discard the changes. 2.9 Export to Excel To transfer the result list of an archive to Excel, press the button Export to Excel. A browser dialog will open that allows you to store or open the Excel file that was generated by the application. The exact behavior depends on your local browser settings. All data from the result list will be transferred to the Excel file. File name: TMDD_3 1_UserManual_en Author: Frank Merath / Ingrid Restle Source: SE Book 3.5.3-en Last revised: 2012-08-20 Version: 1.2 Status: Final 13/60 3 3.1 Login and Logout Login This dialog window appears when the application is started: The user has to identify himself with user name and password. User name and initial password are defined by the administrator. It is suggested to change the password immediately after the first login. Passwords are case sensitive. 3.2 Logout By pressing the button ‘Logout from server’, you exit the application and the Login dialogue reappears. Now you can log in again, e. g. with another User-ID. To definitely terminate the application, close the browser tab. File name: TMDD_3 1_UserManual_en Author: Frank Merath / Ingrid Restle Source: SE Book 3.5.3-en Last revised: 2012-08-20 Version: 1.2 Status: Final 14/60 3.3 Change password Press the Cange button in the login dialog to change your password: Enter your current password and your new password. Repeat the entry of your new password and click the OK button. Your new password is active now. The new password must conform to the password guidelines defined for the system. File name: TMDD_3 1_UserManual_en Author: Frank Merath / Ingrid Restle Source: SE Book 3.5.3-en Last revised: 2012-08-20 Version: 1.2 Status: Final 15/60 4 News The tab News shows the news list. News are messages used to circulate information among the users or user groups. They are not to be considered as emails, because they neither have to be read nor have to be replied to. A list of the news addressed to the logged-in user - or to the user groups he belongs to - is shown in the upper part of the view. Besides the name of the recipient and the news' subject, you can also see the expiry date of the news To read a news, select an entry in the list. The content will then be displayed in the lower part of the view. News can only contain text. Operations on news can be performed using the context menu entries New, Edit, and Delete or by pressing the corresponding buttons. File name: TMDD_3 1_UserManual_en Author: Frank Merath / Ingrid Restle Source: SE Book 3.5.3-en Last revised: 2012-08-20 Version: 1.2 Status: Final 16/60 4.1 Create news This feature helps you to create new news. Select New from the context menu or press the New button. The Create News wizard opens: In the first wizard page, you can enter title, text and the expiry date of the news. (Title and expiry date are mandatory fields.) After the expiry date, the news will not be displayed anymore. In the second wizard page, the recipients for the news are entered. Press the button Add user or Add group to open the list of all possible recipients for the News. Choose one or more recipients (users or groups). Press Finish to save the news. File name: TMDD_3 1_UserManual_en Author: Frank Merath / Ingrid Restle Source: SE Book 3.5.3-en Last revised: 2012-08-20 Version: 1.2 Status: Final 17/60 4.2 Edit news To change the data of existing news, select Edit from the context menu or press the Edit button. Now you can change the news' data in the Edit News wizard. In the first wizard page, you can edit title, text and the expiry date of the news. (Title and expiry date are mandatory fields.) After the expiry date, the news will not be displayed anymore. In the second wizard page, the recipients for the news can be changed. Press the button Add user or Add group to open the list of all possible recipients for the News. Choose one or more recipients (users or groups). By selecting a news recipient and pressing Remove you can remove this recipient from the list. The feature Edit is only active when a news is selected in the news list. File name: TMDD_3 1_UserManual_en Author: Frank Merath / Ingrid Restle Source: SE Book 3.5.3-en Last revised: 2012-08-20 Version: 1.2 Status: Final 18/60 4.3 Delete news Administrators and authors of news can delete these by selecting a news and selecting Delete from the context menu or press the Delete button. A confirmation prompt is made to prevent inadvertent deletions. File name: TMDD_3 1_UserManual_en Author: Frank Merath / Ingrid Restle Source: SE Book 3.5.3-en Last revised: 2012-08-20 Version: 1.2 Status: Final 19/60 5 Archives The available archives are shown as tabs: Select an archive by clicking on one of the tabs. The archive view will be displayed. Archives the user is not allowed to see are not displayed at all. 5.1 Searching In an archive, the user can search for all visible documents (the user must have at least ‚Read‘ rights on such a document). Search expressions can be entered in the search form fields in the left window area. Fields that are colored yellow are selection fields. Clicking on the field will open a dialog where the attribute values can be selected from a list. File name: TMDD_3 1_UserManual_en Author: Frank Merath / Ingrid Restle Source: SE Book 3.5.3-en Last revised: 2012-08-20 Version: 1.2 Status: Final 20/60 The search is started by pressing the ‚Search‘ button or by pressing the ‚Return‘ key. All documents matching the search criteria will be shown in the results table. If no documents can be found that match the search criteria, a message ‚No documents found‘ will be shown. The button Clear Search attribute fields removes all data that the user has entered into the search fields. Pressing the button Reset search result clears the displayed result list. Using the ‚Search settings‘ menu button, the search can be configured: Option ‚Delete result on Search‘: Checking this option results in the search result table being cleared before a new search is done. If this option is not checked, the results of a new search will be added to the results that are already displayed. Option ‚Ignore Case‘: Checking this option means that for every text search attribute, the search will operate case insensitive, i.e. ‘abc’ will be considered as equal to ‘AbC’. This setting can be overridden for individual text search attributes using the ‘a=A’ button or the menu item ‘a=A’ in the attribute label. Option ‚Use wildcard‘: Checking this option means that for every text search attribute, the search will add wild cards to the search text that was entered, e.g. ‘haus’ will be considered as matching a value of ‘Exhaust’. If this option is not checked, the search text that was entered must be exactly the same as the document’s attribute value. This setting can be overridden for individual text search attributes using the ‘*’ button or the menu item ‘*abc’ in the attribute label. File name: TMDD_3 1_UserManual_en Author: Frank Merath / Ingrid Restle Source: SE Book 3.5.3-en Last revised: 2012-08-20 Version: 1.2 Status: Final 21/60 5.2 Create document There are two ways to create a new document: 5.2.1 Create a new document from scratch: Press the New button or select A New Document wizard will open: New document from the context menu. Step 1: Define part roles For each category that is displayed, the concrete part role for the new document must be defined. (E.g. if the ‚Technical Service 2‘ is to be used as the technical service for the application, ‚TechnicalService2‘ must be selected for the category ‚Technical Service‘.) If multi selection is possible for a category than more than one concrete part role of this category can be selected via click, shift+click and ctrl+click. (E.g. if the document is relevant for ‘Vehicle Type R’ and ‘Vehicle Type X’, both vehicle types have to be selected in the category ‘Vehicle responsible’) If no or exactly one set of part roles is defined in the system configuration, this step will not be shown. File name: TMDD_3 1_UserManual_en Author: Frank Merath / Ingrid Restle Source: SE Book 3.5.3-en Last revised: 2012-08-20 Version: 1.2 Status: Final 22/60 Step 2: Define attributes The attributes for the document can be entered in this step. Mandatory attributes must be filled, optional attributes may be left blank. Step 3: Administer document rights The rights that have been defined for the selected set of part roles are already shown here as a default. Normally, it will not be necessary to change these rights. If there is no such default, the rights defined for the current archive will be used. Use the buttons ‘Add’, ‘Edit’ and ‘Remove’ to change rights for selected user groups. Rights that have been defined as fixed cannot be changed or removed. If all rights that have been defined for the document are fixed, this step will not be shown. File name: TMDD_3 1_UserManual_en Author: Frank Merath / Ingrid Restle Source: SE Book 3.5.3-en Last revised: 2012-08-20 Version: 1.2 Status: Final 23/60 Step 4: Administer document parts Add document parts: enter a unique name for the document part press search and select the file to be uploaded as document part. Following the content of fields ‘File to upload’ and ‘Filename’ is updated automatically. to add an additional file press new. An extra line will be displayed where the data for another file upload can be entered. if one of these uploads should not be executed, the corresponding line can be deleted by pressing the delete button for this line. the rights of a document part can be edited by pressing the Rights button in the corresponding line (see Change document part rights). Save the document by pressing the ‘Finished’ button. The new document with its attributes, rights and document parts is created. The files for the document parts are uploaded and the data is stored in the database File name: TMDD_3 1_UserManual_en Author: Frank Merath / Ingrid Restle Source: SE Book 3.5.3-en Last revised: 2012-08-20 Version: 1.2 Status: Final 24/60 5.2.2 Copy an existing document This is done by selecting an existing document in the results table and selecting ‘Copy/Move’ from the context menu. Step 1: Define the target archive Make sure that ‘Copy document’ is checked and select the target archive from the drop down list. File name: TMDD_3 1_UserManual_en Author: Frank Merath / Ingrid Restle Source: SE Book 3.5.3-en Last revised: 2012-08-20 Version: 1.2 Status: Final 25/60 Step 2: Edit attributes if needed Mandatory attributes must be filled. Step 3: Administer document rights This step is not available if only fixed rights are defined for the document. File name: TMDD_3 1_UserManual_en Author: Frank Merath / Ingrid Restle Source: SE Book 3.5.3-en Last revised: 2012-08-20 Version: 1.2 Status: Final 26/60 Step 4: Administer document parts By default all document parts are transferred to the new archive as well. In this step new document parts can be added to the document and existing document parts can be deleted. The rights for the document parts can be edited by pressing the rights button in the corresponding line. File name: TMDD_3 1_UserManual_en Author: Frank Merath / Ingrid Restle Source: SE Book 3.5.3-en Last revised: 2012-08-20 Version: 1.2 Status: Final 27/60 5.3 Edit document To edit an existing document, select it in the result table and select Edit from the context menu or press the Edit button. Step 1: Edit attributes All attribute values can be edited. Mandatory attributes must be filled. Step 2: Administer document rights The rights that are currently defined for the document are shown here. Use the buttons ‘Add’ ‘Remove’ to add or remove user groups in the table. To change the rights for a group use the check boxes in the table. Rights that have been defined as fixed cannot be changed or removed. If all rights that have been defined for the document are fixed, this step will not be shown. File name: TMDD_3 1_UserManual_en Author: Frank Merath / Ingrid Restle Source: SE Book 3.5.3-en Last revised: 2012-08-20 Version: 1.2 Status: Final 28/60 5.4 Delete document To delete an existing document, select it in the result table and select Delete from the context menu or press the Delete button. A confirmation prompt is opened to prevent inadvertent deletions. File name: TMDD_3 1_UserManual_en Author: Frank Merath / Ingrid Restle Source: SE Book 3.5.3-en Last revised: 2012-08-20 Version: 1.2 Status: Final 29/60 To delete a document the user must have update rights for the document and its parts. 5.5 Save document This function is used to save the document parts of the selected document(s) to a local storage. If there are no document part to save, the message ‚Cannot save, there are no document parts‘ is displayed. The data is supplied as a Zip file with the document parts in directories that take the name of the document’s id. The browser opens a dialog showing the options Open Save Cancel (Options may differ according to your local browser settings.) Selecting ‚Open‘ opens the zip file. When selecting ‚Save‘, the directory where the zip file should be stored must be chosen. ‘Cancel’ cancels the save action. 5.6 Checkout document The Checkout function is used to save a document to a local storage and to lock the document so that it cannot be edited. As long as a document is checked out, it cannot be checked out once more. No changes to the document’s attributes, rights or parts can be performed and the document itself and its parts cannot be deleted. Documents that are checked out contain the name of the user that has performed the check out in the column Checked out by are shown in the search result table in a bold and italics type File name: TMDD_3 1_UserManual_en Author: Frank Merath / Ingrid Restle Source: SE Book 3.5.3-en Last revised: 2012-08-20 Version: 1.2 Status: Final 30/60 Check Out operation: Select one (or several) document(s) in the result table. Choose Check Out from the context menu. This causes the Check Out wizard dialog to open: You can enter a comment that tells other users why the document(s) have been checked out. This comment is optional. If you already have a local copy of the document or if you only plan to add new document parts, you can remove the check mark for Store document parts. Then the document will only be locked but will not be saved locally. 5.7 Checkin document The Checkin function is used to move local changes to document parts back to the archive. This function is permitted only if the document is checked out. Documents that are checked out contain the name of the user that has performed the check out in the column Checked out by are shown in the search result table in a bold and italics type File name: TMDD_3 1_UserManual_en Author: Frank Merath / Ingrid Restle Source: SE Book 3.5.3-en Last revised: 2012-08-20 Version: 1.2 Status: Final 31/60 Check In operation: Select a document in the result table. Choose Check In from the context menu. This causes the Check In wizard dialog to open: You can enter a comment that tells other users what changes have been made to the document (step 1). This comment is optional. In step 2, the document parts can be administrated using the Search, Rights, and Delete actions that are described in detail in the section on document parts. File name: TMDD_3 1_UserManual_en Author: Frank Merath / Ingrid Restle Source: SE Book 3.5.3-en Last revised: 2012-08-20 Version: 1.2 Status: Final 32/60 5.8 Copy/move document Using this function you can make a copy of a document in the current or another archive or move the document to another archive. In the first step, you must decide whether you want to copy or move the document and select the target archive. The second step is used to complete or edit the document’s attributes. File name: TMDD_3 1_UserManual_en Author: Frank Merath / Ingrid Restle Source: SE Book 3.5.3-en Last revised: 2012-08-20 Version: 1.2 Status: Final 33/60 Attributes that the source and the target archive have in common are filled with the source document’s values automatically. The document rights for selected user groups can be managed (added, changed or removed) in the third step. This is done using the buttons Add, Edit and Remove. Rights that have been defined as fixed cannot be changed or removed. If all rights that have been defined for the document are fixed, this step will not be shown. Step four is used for managing the document parts By default all document parts are copied to the new document as well. In this step new document parts can be added to the document and existing document parts can be deleted. The rights for the document parts can be edited by pressing the rights button in the corresponding line. File name: TMDD_3 1_UserManual_en Author: Frank Merath / Ingrid Restle Source: SE Book 3.5.3-en Last revised: 2012-08-20 Version: 1.2 Status: Final 34/60 5.9 Change document rights This function is used to change the rights that are defined for the current document: Rights can only be assigned to user groups, not to individual users. If a user is a member of a user group which has been assigned a certain right, the wording ‘a user has the right’ is also used. In this dialog window all user groups are shown that have been assigned rights to the current document. The following rights can be assigned: Right Meaning READ The document can be found by a search, its attributes are displayed in the result table. It may not be changed or deleted, no new document parts may be created. CREATE New document parts may be created for the document, but existing document parts may not be changed or deleted. UPDATE All operations are allowed. A user who has none of the rights listed here will never see the document in question. Each document part can be assigned its own set of rights which may differ from the document rights. Thus the situation may occur that a user may see the document itself but has no rights for some of the document parts. In this case, those document parts will not be visible for the user. Rights for additional groups are assigned by pressing the button New. A dialog opens where the user groups may be selected. File name: TMDD_3 1_UserManual_en Author: Frank Merath / Ingrid Restle Source: SE Book 3.5.3-en Last revised: 2012-08-20 Version: 1.2 Status: Final 35/60 Pressing OK closes the dialog and adds the selected groups with the right read to the table. The right for a group is changed by activating the adequate checkbox in the table. Removing the rights for selected groups is done by pressing Remove. If all rights that have been defined for the document are fixed, changing the document rights is not possible. File name: TMDD_3 1_UserManual_en Author: Frank Merath / Ingrid Restle Source: SE Book 3.5.3-en Last revised: 2012-08-20 Version: 1.2 Status: Final 36/60 5.10 Add document part Using this function new document parts (files) can be added to a document that already exists in an archive. For a selected document, clicking the New button or choosing New document part from the context menu will open the Create document part wizard. enter a unique name for the document part press search and select the file to be uploaded as document part. Following the content of fields ‘File to upload’ and ‘Filename’ is updated automatically. to add an additional file press new. An extra line will be displayed where the data for another file upload can be entered. if one of these uploads should not be executed, the corresponding line can be deleted by pressing the delete button for this line. Each document part can be assigned different rights. This is done by clicking the Rights button in the corresponding line. File name: TMDD_3 1_UserManual_en Author: Frank Merath / Ingrid Restle Source: SE Book 3.5.3-en Last revised: 2012-08-20 Version: 1.2 Status: Final 37/60 Rights can be added, changed or deleted. By assigning different rights for different document parts it can be accomplished that all necessary document parts are included in a document but the users can see or edit only those document parts that are meant for them. Click Finish to confirm the operation. 5.11 Delete document part To delete a document part, in the result table, select the document that you want to delete a document part from, in the lower part of the view, select the document part to be deleted, click the Delete button or choose Delete from the document part’s context menu, click Finish in the confirmation prompt that opens and the document part will be deleted. (Cancel will bring you back to where you started.) File name: TMDD_3 1_UserManual_en Author: Frank Merath / Ingrid Restle Source: SE Book 3.5.3-en Last revised: 2012-08-20 Version: 1.2 Status: Final 38/60 5.12 Show document part Choose Open from the context menu of a selected document part to open the document part’s file. The browser’s functionality for opening a file is used for this. What precisely happens next depends on the browser, the browser settings (especially security settings) and the type of the file that is to be shown. 5.13 Save document part Choose Save from the context menu of a selected document part to store the document part’s file locally. The browser’s functionality for downloading and storing a file is used for this. What precisely happens next depends on the browser, the browser settings (especially security settings) and the type of the file that is to be shown. File name: TMDD_3 1_UserManual_en Author: Frank Merath / Ingrid Restle Source: SE Book 3.5.3-en Last revised: 2012-08-20 Version: 1.2 Status: Final 39/60 5.14 Change document part rights This function is used to change the rights that are defined for the current document part. Rights can only be assigned to user groups, not to individual users. If a user is a member of a user group which has been assigned a certain right, the wording ‘a user has the right’ is also used. In this dialog window all user groups are shown that have been assigned rights to the current document. The following rights can be assigned: Right Meaning READ The document part may be shown and read. It may not be changed or deleted. CREATE No meaning for document parts. UPDATE All operations are allowed. A document part will not be shown to a user who has none of the rights listed here. The document parts of a selected document are shown in the lower part of the view. To change the rights of a document part, select it and choose Rights from its context menu. File name: TMDD_3 1_UserManual_en Author: Frank Merath / Ingrid Restle Source: SE Book 3.5.3-en Last revised: 2012-08-20 Version: 1.2 Status: Final 40/60 Rights for additional groups are assigned by pressing the button New. A dialog opens where the user groups may be selected. Pressing OK closes the dialog and adds the selected groups with the right read to the table. File name: TMDD_3 1_UserManual_en Author: Frank Merath / Ingrid Restle Source: SE Book 3.5.3-en Last revised: 2012-08-20 Version: 1.2 Status: Final 41/60 The right for a group is changed by activating the adequate checkbox in the table. Removing the rights for selected groups is done by pressing Remove. If all rights that have been defined for the document are fixed, changing the document part rights is not possible. 5.15 Put document to basket This function is used to put documents from different archives to the Basket tab. It is invoked by choosing Basket from the document’s context menu. Now the document is listed in the Basket tab as well as in its archive’s result table. Several selected documents can be put to the basket together. File name: TMDD_3 1_UserManual_en Author: Frank Merath / Ingrid Restle Source: SE Book 3.5.3-en Last revised: 2012-08-20 Version: 1.2 Status: Final 42/60 6 Basket In the basket you can collect documents from different archives and carry out the actions Store, Send by email or Create CD archive on all of them together. Documents that are shown in the result table of an archive tab, can be put to the basket, where the aforementioned actions can be carried out. Furthermore, documents can be removed from the basket again and the basket can be emptied. 6.1 Send basket This function is used to send documents with their document parts via email. If the documents to be sent don’t contain document parts, then an error message ‚Cannot save. There are no document parts.’ is shown and no email is sent. The user can send individual documents with document parts or several documents at once. Select the documents that are meant to be sent and choose Send from the context menu. File name: TMDD_3 1_UserManual_en Author: Frank Merath / Ingrid Restle Source: SE Book 3.5.3-en Last revised: 2012-08-20 Version: 1.2 Status: Final 43/60 This will open the Send dialog window where the email subject must be entered and the email recipients must be selected from a list. Clicking OK confirms sending the email(s). The email(s) contain the document attributes. To avoid unnecessarily large emails, each document is sent in a separate email the document parts are attached to the email in a zip file Please note: Send basket is only fully available if this function has been activated in the configuration of the system. File name: TMDD_3 1_UserManual_en Author: Frank Merath / Ingrid Restle Source: SE Book 3.5.3-en Last revised: 2012-08-20 Version: 1.2 Status: Final 44/60 6.2 Store basket This function is used to save the document parts of the selected document(s) in the basket to a local storage. If there are no document parts to save, the message ‚Cannot save, there are no document parts‘ is displayed. The data is supplied as a Zip file with the document parts in directories that take the name of the document’s id. The browser opens a dialog showing the options Open Save Cancel (Options may differ according to your local browser settings.) Selecting ‚Open‘ opens the zip file. When selecting ‚Save‘, the directory where the zip file should be stored must be chosen. ‘Cancel’ cancels the save action. File name: TMDD_3 1_UserManual_en Author: Frank Merath / Ingrid Restle Source: SE Book 3.5.3-en Last revised: 2012-08-20 Version: 1.2 Status: Final 45/60 6.3 Create CD archive from basket This feature stores all the data and documents to a local file that are necessary to create a CD with an offline version of the Document Distribution Application. Step 1 All documents that are to be stored on CD must be put to the basket. Documents from any number of archives can be put to the basket. Step 2 Now change to the archive tab, select all documents to be exported and choose Create CD-archive from the context menu. A zip archive is created that contains all files for the CD archive. This may take some time, as the files from all the document parts must be read from the archives and stored locally. Step 3 All files from the zip file created in step 2 must be copied to a CD (using a CD writer program) or another medium. This concludes the CD archive creation. 6.4 Remove document from basket This removes the selected documents from the archive tab when Remove from basket is chosen from the basket context menu. Please note: This function removes a document from the basket, the document will no longer appear in the basket tab. However, the document is not deleted from its archive. File name: TMDD_3 1_UserManual_en Author: Frank Merath / Ingrid Restle Source: SE Book 3.5.3-en Last revised: 2012-08-20 Version: 1.2 Status: Final 46/60 6.5 Empty basket The basket can be emptied completely by choosing Clear basket from the basket context menu. All documents are removed from the basket, leaving it empty, but the documents remain in their respective archives. File name: TMDD_3 1_UserManual_en Author: Frank Merath / Ingrid Restle Source: SE Book 3.5.3-en Last revised: 2012-08-20 Version: 1.2 Status: Final 47/60 7 Client Administration The system administrator for TypMaster/DD may divide the users into several clients and delegate the maintenance of the clients organizational structure and its users to a client administrator. Furthermore the client administrator is in charge of associating the users of his client to certain user groups. The functionality described in this chapter is only available for client administrators. 7.1 Invoking TypMaster/DD Adminsitration Client administrators can alternate to the administration area by pressing the + button at the bottom right. To go back to the documents area press the + button at the top right. File name: TMDD_3 1_UserManual_en Author: Frank Merath / Ingrid Restle Source: SE Book 3.5.3-en Last revised: 2012-08-20 Version: 1.2 Status: Final 48/60 The administration area for client administrators shows to tabs: User/Client for the maintenance of the client structure and the users of the client. User groups to add or remove members to or from the various user groups. 7.2 User/Client 7.2.1 Client Tree A hierarchical tree in the selection view on the left shows the organizational structure of the client. The tree has 4 levels 1st level: client 2nd level: department 3rd level: team 4th level: user This inherent structure cannot be changed. Thus a user always has to be assigned to a team,. a team relates to a department and a department relates to the client. Click on the triangle to the left of an element ore double-click an element in the tree to expand or collapse its child element(s). Remark: User can be marked as invalid users. By default the client tree does not show the invalid users. To display the invalid users as well, deactivate the option hide invalid users. File name: TMDD_3 1_UserManual_en Author: Frank Merath / Ingrid Restle Source: SE Book 3.5.3-en Last revised: 2012-08-20 Version: 1.2 Status: Final 49/60 The details area on the right always shows the data of the element that is selected in the tree. Most attributes can be edited in the details area. Remark: The changes entered in the details area must be saved by pressing the button Save, selecting Save in the context menu or typing ctrl+s. Right click on an element opens the context menu showing all functions available for the element. Some of these functions may be started by pressing one of the default-buttons on the top right. Remark: New always creates a new child element of the selected element. E.g. selecting a team and calling New will create an new user in this team. File name: TMDD_3 1_UserManual_en Author: Frank Merath / Ingrid Restle Source: SE Book 3.5.3-en Last revised: 2012-08-20 Version: 1.2 Status: Final 50/60 7.2.2 Department Create a department: select the client in the tree call New by pressing the default button or opening the context menu enter the data for the department in the popup window press Finished the new department is shown in the client tree Edit a department: select the department in the tree edit the department’s name or select a new manager from the list press Save, enter ctrl+s or select Save in the context menu to save the changes Delete a department: A department can only be deleted as long as no teams exist for the department. select the department in the tree press Delete or select Delete in the context menu a confirmation prompt is made to prevent inadvertent deletions File name: TMDD_3 1_UserManual_en Author: Frank Merath / Ingrid Restle Source: SE Book 3.5.3-en Last revised: 2012-08-20 Version: 1.2 Status: Final 51/60 press Finished to delete the department or Cancel to cancel the function 7.2.3 Team Create a team: select a department in the tree to add new team to this department call New by pressing the default button or opening the context menu enter the data for the team in the popup window press Finished the new team is shown in the client tree Edit a team: select the team in the tree edit the team’s name or select a new manager from the list press Save, enter ctrl+s or select Save in the context menu to save the changes File name: TMDD_3 1_UserManual_en Author: Frank Merath / Ingrid Restle Source: SE Book 3.5.3-en Last revised: 2012-08-20 Version: 1.2 Status: Final 52/60 Delete a team: A team can only be deleted as long as no user exist for the team. select the team in the tree press Delete or select Delete in the context menu a confirmation prompt is made to prevent inadvertent deletions press Finished to delete the team or Cancel to cancel the function 7.2.4 User Create user select a team in the tree to add new user to this department call New by pressing the default button or opening the context menu enter the user data in the popup window Step 1 provides several attributes: User account Name of the user account. The user has to enter this name in the logindialogue Password File name: TMDD_3 1_UserManual_en Author: Frank Merath / Ingrid Restle Source: SE Book 3.5.3-en Last revised: 2012-08-20 Version: 1.2 Status: Final 53/60 Every password has to meet the password policies of the system. The password policies depend on the configuration of the system, please refer to system administrator for detailed information. Last name, First Name The user’s last name and first name. Email The user’s email address. This address is used for sending a basket. Remark Any text can be entered here Expiry date The user is only able to logon to the system as long as the expiry date is empty or at later date as today. If not so, the user is an invalid user. Password change each Period of time in days that may elapse until the user is forced change his or her password. Selected language Language selected automatically for the user subsequent to the login. Step 2 provides the user groups the new user may associated to. Use the checkboxes in the list to associate the user to the group(s) members of a group inherit all rights for archives, documents, document parts and part roles of from the group the groups available in this list and the rights of these groups are configured by the system administrator. File name: TMDD_3 1_UserManual_en Author: Frank Merath / Ingrid Restle Source: SE Book 3.5.3-en Last revised: 2012-08-20 Version: 1.2 Status: Final 54/60 Edit user select the user in the tree edit the user’s attributes in the details area Important specific features of some attributes are: Password: the client administrator may reset the password for a user, if needed. Expiry date: An expiry date before today invokes the user. To revoke the user the expiry date can removed or set to a date in the future. Login failures: The system logs the failed login attempts for every user a. After a certain number of login failures the access to the system is disabled for the user. Enter ‘0’ to enable the access again. Last Password change: The date of the last password change is logged by the system. Assigned groups A click in the list of assigned groups opens the wizard for the group assignment of the user. File name: TMDD_3 1_UserManual_en Author: Frank Merath / Ingrid Restle Source: SE Book 3.5.3-en Last revised: 2012-08-20 Version: 1.2 Status: Final 55/60 press Save, enter ctrl+s or select Save in the context menu to save the changes Delete User select the user in the tree press Delete or select Delete in the context menu a confirmation prompt is made to prevent inadvertent deletions As soon as a user is owner of documents it is not recommended to delete the user. Otherwise there would exist documents in the archives without an owner, there would be no possibility to determine the primal owner. In this case the confirmation messages informs about the fact that the user is owner of documents and recommends to set the user to invalid instead of deleting the user: Use the checkbox to decide if user should be set to invalid or deleted. press Finished to delete respective to invalidate the user or Cancel to cancel the function File name: TMDD_3 1_UserManual_en Author: Frank Merath / Ingrid Restle Source: SE Book 3.5.3-en Last revised: 2012-08-20 Version: 1.2 Status: Final 56/60 Duplicate User The function creates a new user based on the data of an existing user. Select a user in the client tree call Duplicate in the context menu Step 1 and 2 of wizard for the user creation is initialized with the data of the selected user, except of user account and password. change the data as desired press Finished to create the new user Move User With this function users can be moved from one team to another. select user(s) in the client tree call Move in the context menu in the popup window select the target team for the selected user(s) press Finished to move the user(s) to the selected team File name: TMDD_3 1_UserManual_en Author: Frank Merath / Ingrid Restle Source: SE Book 3.5.3-en Last revised: 2012-08-20 Version: 1.2 Status: Final 57/60 7.2.5 Search User Search user helps you to find a certain user in a complex client structure. call Search in the context menu of any element in the client tree enter the search criteria in the various attributes of details area. Use the check box Case Sensitive to decide if the search shall be performed with or without case sensibility. press Search to find the users matching the given search criteria. The result of every search is added to the list of results. Thus the results of several searches with different criteria may be combined in one list of results. Clear Search Fields is used to remove the input in all attribute fields. Delete Result removes the content of the list of results. The list of results may be exported to Excel by pressing Export to navigate to a certain user in the client tree select the user in the list of results and press Goto / User Selection File name: TMDD_3 1_UserManual_en Author: Frank Merath / Ingrid Restle Source: SE Book 3.5.3-en Last revised: 2012-08-20 Version: 1.2 Status: Final 58/60 7.3 User Groups The User Groups tab shows in the selection area on the right the list of user groups available to assign users to or to remove users from. The groups available in this list and the rights of these groups are configured by the system administrator. Members of a group inherit all rights for archives, documents and document parts. Additionally the members of a group may carry out a certain role in the system. One user may be member of several group and should be member of one group at least. To add users to or remove users from a group: select the group in the selection area click in the list or associated users, click the Edit button or select Edit in the context menu to open the wizard: Use the checkbox Associated? in the table to add or remove users. press Finished to save the changes or Cancel to complete without saving File name: TMDD_3 1_UserManual_en Author: Frank Merath / Ingrid Restle Source: SE Book 3.5.3-en Last revised: 2012-08-20 Version: 1.2 Status: Final 59/60 A Further applicable documents Manual for System Administrators: “TypMaster/DD 3.1 Handbuch Administration” Change History / Release Notes Version Last revised Author/Editor 1.0 2012-03-23 Ingrid Restle New Document derived from the online help document. Chapter 7 added. 1.1 2012-04-23 Ingrid Restle New screenshot for part role selection in section 5.2.1 1.2 2012-08-20 Ingrid Restle Changes according to KBA review (Sections 3.3, 4, 5.2.1, 6.1, 6.3) File name: TMDD_3 1_UserManual_en Author: Frank Merath / Ingrid Restle Source: SE Book 3.5.3-en Reason Last revised: 2012-08-20 Version: 1.2 Status: Final Changes/Comments 60/60