1
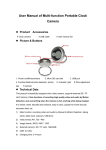
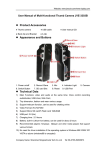
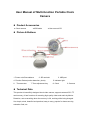
User Manual of Multi-function Portable Clock Camera Product Accessories ● Clock camera ● USB cable ● User manual CD Picture & Buttons 1. Power on/off/record/save 2. SD card slot 3. USB port 4. Function Button(motion detection, photo) 5. Indicator light 6. 8. Clock Thermometer 7. Time adjustment key 9. Camera Technical Data This product is beautifully designed clock video camera, supports external SD / TF card memory; it has functions of recording high quality video and audio by Motion Detection, auto overwriting when the memory is full, working while being charged. It is simple, sleek, beautiful and practical, easy to carry, popular for home security, education field, etc. 1) Main function: recording video and audio by Manual & Motion Detection, taking photo, table clock, webcam, Thermometer, USB drive 2) Video format: AVI, 1280*960 3) Image format: JPEG, 2560*1920 4) External memory: SD / TF card, 1GB-8GB 5) USB: 2.0 (Hs) 6) Charging time :2-3 hours 7) Battery: built-in high-capacity polymer lithium battery, can work for 1-2 hours 8) Operating System: Windows ME/2000/XP/Vista or more versions of the operating system without installing driver (Windows98 system needs to install the driver) Operation Insert card Before switching on the camera, please insert Micro SD card by pushing it towards the dial direction. Switch on Under power off mode, press power on/off / record/ save button for some seconds, the camera system begins initialization, red light and blue light keep on at the same time, then red light is off and blue light keeps on, indicating the camera comes into standby mode. Note: The camera will be shut down automatically within 1 minute under standby mode without any operation. Recording video and audio by Manual Under standby mode, press the power on / off / record / save / button once, it comes to recording mode. In order to save power, the blue light flashes 6 times then turns off, indicating it is still recording. Press any button, the blue light flashes, recording status shows. Shortly press the power on / off / video / save button once, the blue light keeps on, indicating one video file is saved and the camera back to the standby mode. To be safety, every video file will be saved every 5 minutes, and continuous works. Note: When the memory is full, the device will overwrite the first file automatically. Recording video and audio by Motion Detection Under standby mode, long press function button, red light and blue light flash 6 times at the same time then off, the camera comes into motion detection mode; press any button, the blue light and red light flashes, recording status shows. Shortly press the power on / off / video / save button once, the blue light keeps on, indicating video file is saved and the camera is stop motion detection recording and back to the standby mode. Note: Under motion detection mode, if people and objects move in front of the camera, the camera starts recording, the camera will automatically save a video file every 5 minutes. If there is no moving after 30 seconds, in order to save power, the camera stops motion detection and comes into motion detection standby mode. If there is something moving again, the camera red light and blue light flashes 6 times then off, means motion detection recording. Taking Photo Under standby mode, press function button once, blue light flashes once, indicating one photo is taken and saved, and then the camera back to standby mode. For another photo, just repeat the above operation. Switch off Under any mode, press the power on / off / camera / Save button for a long time, the red light flashes 3 times then turns off, shows that the equipment has been shut down; It can also be shut down by pressing the power on / off / video / save button and function button at the same time. Note: under video and motion detection mode, press the power on / off / video / save button longly, the system will firstly save the video file then power off, to shut down by reset button, video files will not be saved. Reset When the product can’t work because of incorrect operation or other unknown cause, you need to reset the product. When reset, press the power on / off / video / Save button and the function button at the same time to complete the reset, at this time the machine power off, and can be used after reboot. Please maintain a moderate strength, not too hard, or it will damage ther components. Working while being charged The camera has the function of working while being charged. Under power off mode, connecting the camera with computer or charger, red light and blue light keeps on, 2 seconds later, blue light keeps on while red light flashes, at this time, long press function button, red light and blue light flash and the camera comes into motion detection mode. Under motion detection mode, if you need to take video by manual or take photo, press the Power on/off button one time firstly to save video file. At this time, the blue light keeps on and enters into standby mode. The camera can record for long time without worry about insufficient power supply that leads to power off. Video files will be saved automatically every 5 minutes; it has overwriting function with recycling recoding. Charging Under any mode, connect the camera with computer or charger, blue light keeps on but red keep flashing while being charged, when fully charged, red light and blue light turns off. Playback Under power off mode, connect the camera to computer via USB cable and play back video on computer. Please make sure there is playback software in the computer before connecting. Setting time When playback the video file, the device will show the recording time on the right corner of video. Please set time as follows: 1) Connect the camera with computer 2) Create a file named "Time.txt" text document 3) Edit the file as format "2010.12.12 12:12:12" 4) Copy the file to the disk's root directory of the camera 5) Pull the camera from computer, when record next time, the time will be set successfully. If you need to change the recording time, as long as you change time of computer. Use as a Web Camera The camera can be use as web camera. Before using it please install the driver.exe which is included in the user manual CD. Under power off mode, keep press the function button then connect the camera to computer; you will see standard equipment appears in the computer screen then loose your hand .After this it can be used as a web camera. Note: as this web camera driver has no automatic uninstalling function, when installing this driver for even times, the system will default to uninstall the driver, then the device will remove some driver files, so that web camera can not be used, when this happens, please reinstall the driver, it will work again. Attention 1) When recording, if power is low, the red light flashes quickly three times, the system will save the video firstly, then turn off automatically. 2) When memory is full, the device will automatically delete the first files with time to circular recording. 3) For continuous recording, the system will automatically generate a new video file with every operation 4) Please keep the camera in brighter environment, to maintain the camera vertical and stable, and keep the review within a certain distance to obtain better effect. 5) Connected to the computer: the time for computer with different system or configuration to identify the hardware is slightly different. During this period, please wait for a moment. If computer can’t identify, please make sure your operating system, drivers and USB interface cable in good work order, then connect again. 6) In the video process, in order to save the video file more carefully, the system will automatically save a video file every 5 minutes, then record again after saving. 7) As the device can work while being charged. But we advise in the first 5 times of usage, charge the battery fully after the battery is out of use, so that the battery can work with its max working hours perfectly.