1
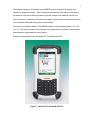
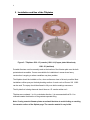
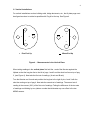
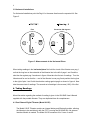
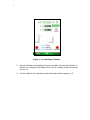
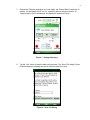
Instruction Manual Model 6101D MEMS Portable Tiltmeter No part of this instruction manual may be reproduced, by any means, without the written consent of Geokon, Inc. The information contained herein is believed to be accurate and reliable. However, Geokon, Inc. assumes no responsibility for errors, omissions or misinterpretation. The information herein is subject to change without notification. Copyright © 2015 by Geokon, Inc. (Doc REV C 9/15) Warranty Statement Geokon, Inc. warrants its products to be free of defects in materials and workmanship, under normal use and service for a period of 13 months from date of purchase. If the unit should malfunction, it must be returned to the factory for evaluation, freight prepaid. Upon examination by Geokon, if the unit is found to be defective, it will be repaired or replaced at no charge. However, the WARRANTY is VOID if the unit shows evidence of having been tampered with or shows evidence of being damaged as a result of excessive corrosion or current, heat, moisture or vibration, improper specification, misapplication, misuse or other operating conditions outside of Geokon's control. Components which wear or which are damaged by misuse are not warranted. This includes fuses and batteries. Geokon manufactures scientific instruments whose misuse is potentially dangerous. The instruments are intended to be installed and used only by qualified personnel. There are no warranties except as stated herein. There are no other warranties, expressed or implied, including but not limited to the implied warranties of merchantability and of fitness for a particular purpose. Geokon, Inc. is not responsible for any damages or losses caused to other equipment, whether direct, indirect, incidental, special or consequential which the purchaser may experience as a result of the installation or use of the product. The buyer's sole remedy for any breach of this agreement by Geokon, Inc. or any breach of any warranty by Geokon, Inc. shall not exceed the purchase price paid by the purchaser to Geokon, Inc. for the unit or units, or equipment directly affected by such breach. Under no circumstances will Geokon reimburse the claimant for loss incurred in removing and/or reinstalling equipment. Every precaution for accuracy has been taken in the preparation of manuals and/or software, however, Geokon, Inc. neither assumes responsibility for any omissions or errors that may appear nor assumes liability for any damages or losses that result from the use of the products in accordance with the information contained in the manual or software. TABLE of CONTENTS 1. INTRODUCTION ........................................................................................................................................... 1 2. DESCRIPTION ................................................................................................................................................. 1 3 INSTALLATION AND USE OF THE TILTPLATES ................................................................................ 3 3.1 VERTICAL INSTALLATIONS. .............................................................................................................................. 4 3.2 HORIZONTAL INSTALLATIONS. ......................................................................................................................... 5 4. TAKING READINGS ......................................................................................................................................... 5 4.1 DUAL CHANNEL DIGITAL TILTMETER (MODEL 6101D) ................................................................................... 5 4.2. DUAL-AXIS TILTMETER DATA FORMAT .......................................................................................................... 9 5. DATA RECORDING AND REDUCTION ..................................................................................................... 10 5.2 EXAMPLE OF READINGS TAKEN FROM A HORIZONTAL TILTPLATE .................................................................. 10 6. TROUBLESHOOTING .................................................................................................................................... 13 7. SPECIFICATIONS MODEL 6101 MEMS PORTABLE TILTMETER ......................................................... 13 TABLE of FIGURES Figure 1 - Model 6101D MEMS Portable Tiltmeter ................................................................. 1 Figure 2 - Model FPC-1 Handheld Field PC. .......................................................................... 2 Figure 3 - Tiltplates: 6201-1C (ceramic), 6201-1A (Copper plated Aluminum), ........................ 3 Figure 4 - Measurements in the Vertical Plane ...................................................................... 4 Figure 5 - Measurements in the Horizontal Plane .................................................................... 5 Figure 6 - Live Readings (Tiltmeter) ........................................................................................ 7 Figure 7 - Saving data query ................................................................................................... 8 Figure 8 - Save File Dialog ...................................................................................................... 8 Figure 9 - File Exists Dialog..................................................................................................... 9 Figure 10 - A Typical Tiltmeter Calibration Sheet .................................................................. 12 1 1. Introduction The Geokon Model 6101D MEMS Portable Tiltmeter is a precise, portable instrument designed to make rapid determinations of tilting in the monitoring of structures and soil and rock masses. It has applications in landslide monitoring, movements adjacent to excavations, tilting in buildings, retaining walls, bridge abutments, dams, etc. Figure 1 - Model 6101D MEMS Portable Tiltmeter When connected by Bluetooth wireless the Model 6101 Tiltmeter, (see Figure 1), can be read with the Model FPC-1 Handheld Field PC, (see Figure 2. The lack of an interconnecting cable greatly facilitates the readout procedure. 2. Description The MEMS tiltmeter system usually consists of three main components. They are the tiltmeter, the Handheld Field PC and the tilt plates. Tilt plates, (examples are shown in figure 3), are designed to be permanently attached to the structure, either by epoxy bonding (ceramic plates) or by bolting, (stainless steel plates), (copper-coated aluminum plates). 2 The sensing elements in the tiltmeter are two MEMS sensor oriented at 90 degrees and sealed in a waterproof housing. Axis A is aligned with the body of the tiltmeter, and tilting in the direction of the end marked + produces a positive change in the readings of the A axis. At the same time, a reading on the B axis will be taken, and the positive direction of the B axis is at 90 degrees clockwise looking down on the tiltmeter. The output of the Geokon Model 6101D MEMS tiltmeter is equal to approximately +/- 4 volts at +/- 15°.The sensor is aligned on the tiltplate using alignment bars so that the same position and orientation is guaranteed for every reading. Readout is accomplished using the Model FPC-1 Handheld Field PC. Figure 2 - Model FPC-1 Handheld Field PC. 3 3 Installation and Use of the Tiltplates Figure 3 - Tiltplates: 6201-1C (ceramic), 6201-1A (Copper plated Aluminum), 6201-1S (stainless) Portable tiltmeters must be manually read so the location of the tiltmeter plate must be both protected and accessible. Covers are available for installations in areas where heavy construction is ongoing or where vandalism may be a problem. The tiltplates should be installed on firm, clean surfaces as close to flat as is possible. Most installations utilize epoxy as the body-bonding medium. A resin such as Devcon VW 11800 can be used. The epoxy should be allowed to fully cure before readings commence. The tilt plate that is being observed should have an I.D. number written on it. Tiltplates are numbered 1 to 4 in a clockwise direction. It is recommended that Pin 1 be oriented towards the direction of the greatest expected tilting. Note: If using ceramic tiltmeter plates care should be taken to avoid nicking or cracking the ceramic surface of the tiltplate pegs. The ceramic material is very brittle. 4 3.1 Vertical installations. For vertical installations such as building walls, bridge abutments, etc., the tilt plate pegs must be aligned as close to vertical as possible with Peg #1 at the top. See Figure 4 1 1 2 4 2 4 3 3 + Plus End Up Minus End Up Figure 4 - Measurements in the Vertical Plane When taking readings in the vertical plane first hold the + end of the tiltmeter against the tiltplate so that the long bar lies to the left of pegs 1 and 3 and the short bar lies on top of peg 2, (see Figure 4). Now take the first set of readings, (A axis and B axis) Turn the tiltmeter end for end and position the long bar to the right of pins 1 and 3 with the short bar resting on top of peg 4. Now take the second set of readings. The second set of reading is the reverse (180) of the first set of readings. Taking the difference of the two sets of readings and dividing by two yields a number that eliminates any zero offset in the two MEMS sensors. 5 3.2 Horizontal installations. For Horizontal installations point the Peg #1 in the same direction as the expected tilt. See Figure 5 First Second at 180 degrees 2 4 4 2 Figure 5 - Measurements in the Horizontal Plane When taking readings in the horizontal plane first hold the + end of the tiltmeter over peg 1, so that the long bar on the underside of the tiltmeter lies to the left of pegs 1 and 3 and the short bar lies against peg 2 as shown in figure 4 Now take the first set of readings. Turn the tiltmeter end for end so that the + end of the tiltmeter is over peg 3 and position the long bar to the right of pins 1 and 3 with the short bar resting against peg 4 as shown in figure 4. Now take the second set of readings. The second set of readings is the reverse (180) of the first 4. Taking Readings More information regarding the method of reading is given in the GK-604D User’s Manual supplied with the portable tiltmeter. They are duplicated here for completeness. 4.1 Dual Channel Digital Tiltmeter (Model 6101D) The Model 6101D Tiltmeter contains an integral battery and Bluetooth module, allowing the tiltmeter to be read directly with the FPC-1 running the GK-604D IRA. No external Interface Module is needed. The Model 6101D measures tilt in 2 axes: A and B. 6 It is assumed that a valid Bluetooth pairing exists between the 6101D and the FPC-1 (see section 2.2 of the GK-604 D User’s Manual for more information about establishing Bluetooth pairings). The recommended steps for connecting to and taking a reading with the Model 6101D Tiltmeter are as follows: 1. Create an initial “hole” configuration corresponding to the unique location of the tilt plate where tilt is to be measured: Using the Context Menu (see section 3.2.1 of the GK-604D Manual), after highlighting the Project element, select the “Add Hole” menu item to create a new configuration. Since the “hole” corresponds to a physical location, be sure to name it appropriately, such as, “Location1”. Additional information may be entered in the “Description” field. For the first location (hole) created, select “UNKNOWN” for “Probe name:”. The hole parameters such as “Starting Level”, “Interval”, “Top Elevation” and “Azimuth Angle” are not applicable for Tiltmeter operation and can be left blank. Tap “Save Settings” to save the new location (hole) configuration. See section 4.1of the GK4-604D manual for more information about hole configuration. 2. Make sure that the “hole” corresponding to the location to be measured is selected in the Project Explorer. 3. Press the “ON/OFF” button on the 6101D Tiltmeter and ensure that the blue indicator is blinking. 4. Tap the “Live Readings” menu item from the “Application” menu to start the reading process. If a valid Bluetooth connection can be established, a dual axis, tiltmeter specific, Live Readings screen will be displayed (see Figure 6). Note the drop-down control in Figure 6, located just to the right of the “A” value display. This allows the “A” and “B” values to be displayed in 3 different units, described below: Digits Digit values are read directly from the 6101D Tiltmeter and are internally calculated as follows: R1 = internal MEMS module voltage, (volts) R0 = Zero Shift A [from internal probe configuration] GF = Gage Factor A [from internal probe configuration] GO = Gage Offset A [from internal probe configuration – usually zero] DIGITS = (((R1 – R0) * GF) + GO) * 2500 Volts PV = DIGITS / 2500 [for Geokon probes: +4V ≈ +30 degrees] Degrees DEGREES = arcsin( DIGITS / 20000 )* 180/Pi From this Menu select “Degrees” 7 Figure 6 - Live Readings (Tiltmeter) 5. Align the Tiltmeter on the tiltplate in the A+ orientation, then tap “Record Data” to take the “A+” reading For the Model 6101D, the “B+” reading is taken at the same time as “A+”. 6. Tap the “Dataset” icon and observe that the dataset number changes to “2”. 8 7. Reverse the Tiltmeter orientation to A- and, again, tap “Record Data” to take the “A-“ reading. For the Model 6101D, the “B-” reading is taken at the same time as “A-”. Tapping “Menu-›Exit Live Readings” will display the window in Figure 7. Figure 7 - Saving data query 8. Tap the “Yes” button to start the data saving process. The “Save File” dialog (Figure 8) will be displayed, allowing the user to name the data file to save. Figure 8 - Save File Dialog 9 9. After tapping “Save” the GK-604 IRA will determine if the file exists. If this is a new file then the data will be written to it in a format similar to the standard Inclinometer format. If a file of the same name already exists then the dialog shown in Figure 9 will be displayed. Figure 9 - File Exists Dialog 10. Tapping “Yes” on the “File exists” dialog allows multiple reads for this location to be stored in a single data file. See section G.4 for an example of Dual Axis Tiltmeter data format. 11. Tapping “No” at the “File exists” dialog will again call up the “Save File” dialog (see Figure 8) and another opportunity will be given to select a new file. 4.2. Dual-Axis Tiltmeter Data Format *** GK 604E(v1.3.0.0,02/15);2.0;FORMAT II PROJECT :Site 1 LOCATION :Loc1 DATE :02/19/15 TIME :14:54:17 PROBE NO.:tiltMeter UNITS :DEGREES FILE NAME:Loc1_Tiltmeter.gkn A+, A-, B+, B-, Date/Time -0.031, +0.028, +0.002, -0..002, 2/19/15 14:50:25 -0.033, +0.030, +0.002, -0..002, 2/17/15 13:54:40 -0.037, +0.036, +0.002, -0..002, 2/14/15 13.45.20 -0.038, +0.035, +0.002, -0..002, 2/10/15 11:23:30 10 5. Data Recording and Reduction 5.1 The change in tilt and deflection Can be calculated by comparing the values of the A+ and A - and the B+ and B - readings on subsequent days, i.e., Change of Tilt in the A axis = Δ (A+ - A-)/2 Change of Tilt in the B axis = Δ (B+ - B-)/2 and, on subsequent days. The change of tilt can be converted into a deflection using the conversion factor: 1 arc second = 0.0048mm/meter or 1 arc second = 0.000058inches/ft 5.2 Example of readings taken from a horizontal tiltplate Four readings are taken; two each for Pin 1 and 3 and two each from Pins 2 and 4, following the instructions of Section 4. Reading Peg 1 to 3, (A+) +0.0447 Degrees Reading Peg 3 to 1, (A-), –0.0581 Degrees Reading Peg 2 to 4, (B+), –0.0469 Degrees Reading Peg 4 to 2, (B-), +0.0342 Degrees Peg 1 and 3. Tilt in the A axis direction is given by the difference, (A+ - A-) = +0.0447 – (–0.0581) = + 0.1028 Degrees Peg 2 and 4. Tilt in the B axis direction is given by the difference, (B+ - B-) = – 0.0469 – (+0.0342) = – 0.0811 Degrees Note that the tilt is towards Peg 1 (positive) and towards Peg 4. (negative). (A positive figure for both A and B axes means that the tilt is towards Pin 1 and towards Pin 2.) 11 These two tilts can be combined, to give the maximum resultant tilt and its direction. This is done by first calculating the deflections, in the A axis and the B axis), using the relationships 1 arc second = 0.0048mm/m or 1 arc second = 0.00062 inches/ft In the above example Deflection in the A axis direction (DA) = +0.1028 x 3600 x 0.0048 = + 1.78mm/m Deflection in the B axis direction (DB) = - 0.0811 x 3600 x 0.0048 = - 1.4 mm/m The maximum deflection, Dmax, is given by the equation Dmax = √ [(1.78) 2 ] + (-1.4) 2 = 2.26 mm/m And the angle θ, the angle between the direction of Peg 1 and the direction of the maximum tilt, is given by the formula θ = Tan-1 [(DB)/(DA) θ = Tan-1 [(1.4)/(1.78) And the direction of the maximum defection is 38 degrees from the direction of Peg 1 in the direction of Peg 4 For further information refer to the GK604D manual 12 5.3 Calibration The calibration sheet shown in figure 10 shows the calibration factor, G, which is entered into the tiltmeter at the factory so that the tiltmeter output can be shown directly in degrees. Figure 10 - A Typical Tiltmeter Calibration Sheet 13 6. Troubleshooting The main concerns of tiltmeter surveys are the measurement of change in magnitude and direction of rotational movement. The zero offset of the sensor is not critical because the algebraic difference of the two readings eliminates the effect. A tiltplate tilted at an angle and located on a stable surface can be read periodically to check the calibration of the instrument. The sensor itself should not be opened in the field and if the unit fails to work it should be returned to Geokon for repair. 7. Specifications Model 6101 MEMS Portable Tiltmeter Range ±15° Output at +/- 15º tilt4 +/- 4 Volts DC (Nominal) Input Supply Voltage3 9 to18 Volts DC Input Supply Current 25 mA Resolution1 ± 4 arc seconds (+/- 0.02mm/m) Accuracy2 ± 10 arc seconds. (+/- 0.05mm/m) Thermal zero shift 0.0003volts/ºC rise Temperature Range, Operating -0 to+ 50°C Temperature Range, Storage –20 to +80°C Shock Survival 2000g Dimensions Sensor: 172x 102 x 166mm Weight 6.5Kg(including case) Connector Bluetooth ® Notes: 1 2 3 4 Depends on readout equipment. For best results requires a 4 ½ digit digital voltmeter. Averaging will yield resolution on the order of 2 arc seconds Based upon the use of a second order polynomial Voltages in excess of 18V will damage the circuitry and are to be avoided. The output is digital.