1
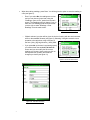
GK-604 Inclinometer Readout User’s Manual No part of this instruction manual may be reproduced, by any means, without the written consent of Geokon, Inc. The information contained herein is believed to be accurate and reliable. However, Geokon, Inc. assumes no responsibility for errors, omissions or misinterpretation. The information herein is subject to change without notification. Copyright © 2012 by Geokon, Inc. (Doc Rev Initial, 1/2012) Warranty Statement Geokon, Inc. warrants its products to be free of defects in materials and workmanship, under normal use and service for a period of 13 months from date of purchase. If the unit should malfunction, it must be returned to the factory for evaluation, freight prepaid. Upon examination by Geokon, if the unit is found to be defective, it will be repaired or replaced at no charge. However, the WARRANTY is VOID if the unit shows evidence of having been tampered with or shows evidence of being damaged as a result of excessive corrosion or current, heat, moisture or vibration, improper specification, misapplication, misuse or other operating conditions outside of Geokon's control. Components which wear or which are damaged by misuse are not warranted. This includes fuses and batteries. Geokon manufactures scientific instruments whose misuse is potentially dangerous. The instruments are intended to be installed and used only by qualified personnel. There are no warranties except as stated herein. There are no other warranties, expressed or implied, including but not limited to the implied warranties of merchantability and of fitness for a particular purpose. Geokon, Inc. is not responsible for any damages or losses caused to other equipment, whether direct, indirect, incidental, special or consequential which the purchaser may experience as a result of the installation or use of the product. The buyer's sole remedy for any breach of this agreement by Geokon, Inc. or any breach of any warranty by Geokon, Inc. shall not exceed the purchase price paid by the purchaser to Geokon, Inc. for the unit or units, or equipment directly affected by such breach. Under no circumstances will Geokon reimburse the claimant for loss incurred in removing and/or reinstalling equipment. Every precaution for accuracy has been taken in the preparation of manuals and/or software, however, Geokon, Inc. neither assumes responsibility for any omissions or errors that may appear nor assumes liability for any damages or losses that result from the use of the products in accordance with the information contained in the manual or software. 3 Table of Contents: 1. Introduction .............................................................................................. 1 1.1 Features ...................................................................................................................................... 1 1.2 Before using the GK‐604 Readout software ............................................................................... 2 2. Operation ................................................................................................. 3 2.1 Establishing contact with the remote. ........................................................................................ 3 2.2 Using the GK‐604 Readout Software .......................................................................................... 5 2.3 Exiting the Program..................................................................................................................... 8 3. Configuring Holes, Probes, and Projects.................................................... 9 3.1 Hole Configuration ...................................................................................................................... 9 3.2 Probe Configuration.................................................................................................................. 10 3.3 Project Configuration ................................................................................................................ 10 3.4 Compass Probe.......................................................................................................................... 11 4. Files, Folders, Transferring Data, Software Updates.................................12 4.1 File Transfer............................................................................................................................... 12 4.2 Updating Firmware ................................................................................................................... 13 4.3 Installing updated GK‐604 Readout Software........................................................................... 13 5 Table of Figures: Figure 1 ‐ Remote Module (mounted in reel) and Archer Field PC ........................................................ 1 Figure 2 ‐ Main screen ............................................................................................................................ 5 Figure 3 ‐ Connection Error .................................................................................................................... 5 Figure 4 ‐ System Menu.......................................................................................................................... 5 Figure 5 ‐ Probe Connected.................................................................................................................... 6 Figure 6 ‐ Readings Menu....................................................................................................................... 6 Figure 7 ‐ Live Readings Screen .............................................................................................................. 6 Figure 8 ‐ Save data confirm................................................................................................................... 7 Figure 9 ‐ Auto‐increment save .............................................................................................................. 7 Figure 10 ‐ File Save As Screen ............................................................................................................... 7 Figure 11 ‐ Hole Configuration ............................................................................................................... 9 Figure 12‐ Hole Configuration File Selection .......................................................................................... 9 Figure 13 ‐ Probe Configuration ...........................................................................................................10 Figure 14 ‐ Project Configuration .........................................................................................................10 Figure 15 ‐ Compass Probe Confirm .....................................................................................................11 Figure 16 ‐ Compass Probe selected ....................................................................................................11 Figure 17 ‐ Live Compass Readings.......................................................................................................11 1 1. Introduction The GK-604 is made up of two components: the readout which is composed of an Archer Field PC running the GK-604 Inclinometer Readout software the GK-604 remote module which is directly connected to the inclinometer probe and is housed in a weather proof enclosure Figure 1 ‐ Remote Module (mounted in reel), Archer Field PC and Carrying Case The two components communicate wirelessly using Bluetooth ®, a reliable digital communications solution. This simplifies the handling of the system in the field as well as simplifying the transfer of data to your PC workstation for final analysis. 1.1 Features Rugged, general purpose, reliable readout based on an Archer Field PC: all the benefits of a Windows compatible device (Windows file system, RS-232, USB and wireless connectivity) long battery life ease of use Lightweight and simple remote unit: Lithium battery (8 + hours of continuous use) one button operation; automatic power down when Bluetooth connection is dropped or after several minutes of inactivity rugged reliable connection to standard inclinometer probes firmware upgradeable in the field 1 2 1.2 Before using the GK-604 Readout software The readout software runs as an application under Windows Mobile 5 or 6 operating system installed on an Archer Field PC. Please familiarize yourself with the Field PC (see the included CD Reference Manual) and the Windows Mobile OS. It is assumed in the instructions below that you can launch applications from the Start button including File Explorer and the Bluetooth Settings manager. It is assumed that you can tap the keyboard icon as needed and use the on-screen keyboard to enter text and numbers. 3 2. Operation 2.1 Establishing contact with the remote. This only has to be done once and is typically done before it leaves the factory. Follow the steps below to ensure the ‘partnership’ with the remote is established before using the readout software: 1. Use the Bluetooth Settings Manager on the Archer Field PC to set up the link to the remote. Read about setting up a Bluetooth “partnership” in Chapter 9 of the Field PC’s Reference Guide. Several ways to start the Bluetooth Manager. 2. Once in the Bluetooth Settings Manager, click on the “Mode” tab and then make sure that the box next to “Turn on Bluetooth” is checked. 3. Click on the “Devices” tab. If it shows a “Geokon” device (name will start with “GK” and contain the remote’s serial number), go to the next step. Otherwise turn on the remote module (should see a flashing blue indicator on the remote) and select “Add new device…”. 3 4 4. When a suitable remote is discovered, highlight the device and click Next. 5. A prompt will be displayed for a password; enter “default” and press Next again. If a partnership with the device is successfully established the screen will momentarily display the prompt to the right and then return to the Bluetooth Devices screen. 6. Click on the COM Ports tab. If the “Geokon” device is already assigned to a COM Port, the partnership process is finished. If not, select “New Outgoing Port” and select an available COM port (COM5 is the default). Be sure to remember the number of the COM port as you may have to select it later in the readout software (see section 2.2). 5 2.2 Using the GK-604 Readout Software The readout software can be launched by tapping the Start button and selecting it from the drop down list or clicking on Programs and then clicking the G icon. After launch the main (opening) screen is displayed (see figure 2): Figure 2 ‐ Main screen If at launch, the application displays the error shown in figure 3, then the following options should be considered: Make sure the remote is turned on (blue light blinking). Select the “System” option and “Connect to Remote” again (if no previous connection, assumes COM5 has been set up as an outgoing port in the Bluetooth Settings Manager) or select the “Alternate Connect” option (see figure 4) and pick the COM port previously established in section 2.1. 5 Figure 3 ‐ Connection Error Figure 4 ‐ System Menu 6 A successful connection is reflected in the Main Screen status as in figure 5. At this point readings can be taken by clicking “Readings→Live Readings” (see figure 6). After an initial connection, subsequent connections should happen automatically provided the remote is powered on before launching the GK-604 Inclinometer Readout application. Figure 5 ‐ Probe Connected Figure 6 ‐ Readings Menu The “Live Readings” screen appears as in figure 7: Readings are continuously updated from the remote. The ‘Data Set’ always starts with ‘Set 1’ but can be switched at any time to ‘Set 2’ (usually after rotating the probe 180 degrees). At the start of a survey, the ‘level’ is set to the “Starting Level” configured for a particular hole. Pressing the “Record” button (with a finger or tap of the stylus) records that set of A&B values and automatically changes the ‘level’ (on screen) by the an amount based on the hole configuration (see section 3.1). The ‘Record” option can also be activated by pressing the “Enter” key on the keypad. Be sure to move the probe to the new level and wait for the readings to stabilize before recording the next reading. A “beep” sound should be heard, confirming that the reading has been stored. If no beep is heard, tap the “volume” control at the top of the screen and adjust the volume. At any point you can scroll the ‘level’ using the Up/Down buttons on the screen and view data stored and checksums (lower half of the screen). Figure 7 ‐ Live Readings Screen 7 When done taking readings, press Done. You will be given the option to save the reading to a file (see figure 8). o o o Even if you select No, the readings are not lost and you can choose to save later using the “Readings→Save to File” option from the main screen. The Readings will only change if you go back into Live Readings (and record new ones over the old) or select “Readings→Clear Readings” from the main screen. Figure 8 ‐ Save data confirm If Yes is selected, you then will be given the choice of saving with the auto-increment suffix on the standard filename (see figure 9). Selecting Yes again causes the save operation to be carried out using a filename of the form: [Hole_ID][3 digit AutoIncr_Suffix].GKN If you select No (to the auto incrementing option) you will be shown the standard File Save As screen and you can modify the file name to anything you choose. Use the stylus to click on the keyboard icon (bottom) and make the changes you desire (see figure 10). Figure 9 ‐ Auto‐increment save Figure 10 ‐ File Save As Screen 7 8 2.3 Exiting the Program The 'Close Window' [X] in the upper left corner of the display screen does not stop the program, it only pauses the operation and hides the program. This can be a problem as it leaves the Bluetooth connection active (eventually the remote will time out and shut off). This option retains any readings that haven’t been saved to a file (simply re-activate the GK-604 program and pick up where you left off). Selecting the “Readings→Exit” option from the main screen forces everything off and ensures a clean start the next time. This option will cause readings to be lost if they have not been saved to a file (see section 2.2, figures 8 and 9 for information regarding saving data). 9 3. Configuring Holes, Probes, and Projects Parameters such as English/metric units, initial level of hole, and gage factors can be adjusted to meet user’s needs and the specifications of the probe. The software currently supports 2 different probe types, up to 12 different probe configurations and as many hole configurations as the Field PC can store in memory. All these can be adjusted using 3 options on the System menu. 3.1 Hole Configuration Select System→Hole Configuration and the screen depicted in figure 11 will be displayed: - Hole ID Tap on the keyboard icon (bottom of the screen) to bring up the on-screen keyboard. Use it to edit the Hole ID (name). - Probe Number Select the Probe Number (or name) from the drop down list. This associates a hole with a particular probe. Pressing “Options” takes you directly to the Probe Configuration screen (see section 3.2) - Starting Level Using the on-screen keyboard, enter a value for the initial level of the survey for this hole. - Interval Tap the radio button corresponding to the interval that will be used for the survey - Save The configuration should be saved (A file will be created using the Hole ID name). - Open Press “Open” to view and select any previously saved hole configurations (see figure 12). 9 Figure 11 ‐ Hole Configuration Figure 12‐ Hole Configuration File Selection 10 3.2 Probe Configuration Select System→Probe Configuration and the screen depicted in figure 13 will be displayed: - Probe Number Use the drop-down list to select 1 of 12 probes - Edit probe name Use the on-screen keyboard to enter a friendly name - A and B Channel Gage Factors Using the on-screen keyboard, enter appropriate numbers for the 2 gage factors (see the Inclinometer Probe manual and Calibration sheet for more information) - A and B Channel Zero Shift To compensate for any offset at zero enter appropriate values for the Zero Shift values (see the Inclinometer Probe manual and Calibration sheet for more information) - Update Tapping “Update” causes the information to be Figure 13 ‐ Probe Configuration temporarily used for the current set of readings (you’ll see the effect when you go to “Live Readings” and the readings which are saved in this session”). - OK Tapping “OK” updates the current session and saves the information to the probe configuration file (so it can be used in future sessions). 3.3 Project Configuration Select System→Project Configuration and the screen depicted in figure 14 will be displayed: - Project Name can be changed and is stored in the data file. - Auto Increment File The 3 digit value in this entry is added as a suffix to data file names automatically if the Auto Incr. Enabled box is checked. The 3 digit value is automatically adjusted after every file is saved and the value shown is the current value to be used. You can lower this value to force overwrites of previously saved files, or raise the value to skip file names. - OK Tapping “OK” updates the current values and saves the information to the auto configuration file. Figure 14 ‐ Project Configuration 11 3.4 Compass Probe Select System→Compass Probe and the dialog box depicted in figure 15 will be displayed: Figure 15 ‐ Compass Probe Confirm o Selecting Yes will rescale the software to properly display 0-360 degrees on the Live Readings screen. The “type” on the Main Screen will reflect that a Compass Probe has been selected (see figure 16). o The software is designed to work only with the Geokon 6005-3 Spiral Indicator Probe. Only one channel (A) is read and displayed on the Live Readings screen (see figure 17). Only the A1 readings are stored in the data file. To discontinue the use of Compass Probes, you must exit the Live Readings screen, select System→Compass Probe again, and answer No at the prompt (see figure 15). Figure 16 ‐ Compass Probe selected Figure 17 ‐ Live Compass Readings 11 12 4. Files, Folders, Transferring Data, Software Updates There are several types of files in use with this software: hole configuration files, probe configuration files, GTilt data files, firmware update, and setup files. The software assumes the following: Purpose Assumed Folder Filename File Extension Hole Configuration \My Documents\GK604_Holes\ User specified in the Hole Configuration window. .TXT Probe Configuration \My Documents\GK604_Probes\ GK604PROB .TXT Initialization File \My Documents\ GK604INIT .TXT Auto Increment Parameters \My Documents\ GK604AUTO .TXT GTilt Data files (saved readings) \My Documents\ User specified when the Save Readings option is selected. .GKN Firmware Update (for remote unit) \My Documents\ GK604_RFW .S19 Installation File (for the GK-604 readout software) \ GK604_Setup .CAB (root folder) Table 1 – Folder paths and File Names 4.1 File Transfer In general, the only files that will have to be transferred are the GTilt data files, although archiving the others on a “master” PC is recommended. In either case this is easily accomplished several different ways. Connecting the Field PC to a desktop or laptop PC using the supplied USB cable (Type A to mini B) is straight forward and allows the user to view the Field PC’s storage as a flash drive on the desktop/laptop; you can then simply drag the files around to any folder on the desktop/laptop. If you are using Windows XP you will need to download and install the program, “ActiveSync”. This application is available for free from the Microsoft site (www.microsoft.com and search for “Active Sync download”). Once installed (generally requires a reboot), simply connect the USB cable from the Field PC and then open “My Computer” on the XP machine and see a “PDA” entry under drives. Just double click on it to see the folders in the Field PC. If you are using Windows Vista or Windows 7, they include software called Windows Mobile Device Center and you should be able to immediately connect the Field PC and see it in the “Computer” window. 13 It is not necessary to set up any ‘syncing’ options although it can easily be accomplished. Another Bluetooth partnership can also be set up from your desktop/laptop (assuming they have Bluetooth modules) to the Field PC and transfer files that way. All of these options (and more) are described in the Field PC’s Reference Guide. 4.2 Updating Firmware This section describes how to download new firmware revisions to the GK-604 Remote Module. If a firmware update is needed, new update files (GK604_RFW.S19) are typically available from Geokon via email or by downloading from the Geokon web-site. The steps below describe the firmware update procedure: This file needs to be transferred to the \My Documents folder of the Field PC (using any strategy described above). Turn on the remote and make sure its battery is charged (or it is powered externally). A power supply interruption during a firmware update will make it more difficult to complete the update in the field and may require sending the unit back to Geokon. With the GK-604 readout software running, select System→Update Firmware and follow the on-screen instructions. It takes several minutes to complete the update, so don’t turn off the Field PC or the remote unit. 4.3 Installing updated GK-604 Readout Software As new versions of the GK-604 Inclinometer Readout software become available they will be posted to Geokon’s web-site. The installation will overwrite the old program, but will not destroy any of your saved data or configuration files. If in doubt, and as a matter of good computer technique, take the time to back up critical data and configuration files BEFORE installing the new software. This file needs to be transferred to the root (\) folder or the \My Documents folder of the Field PC (using any strategy described in section 4.1). On the Field PC, tap the Start button and then select File Explorer. Navigate to the location of the setup file and tap it. Confirm that you want to install the new program and follow any on-screen instructions. After the installation is complete you should be able to simply launch the GK-604 software from the start menu. 13